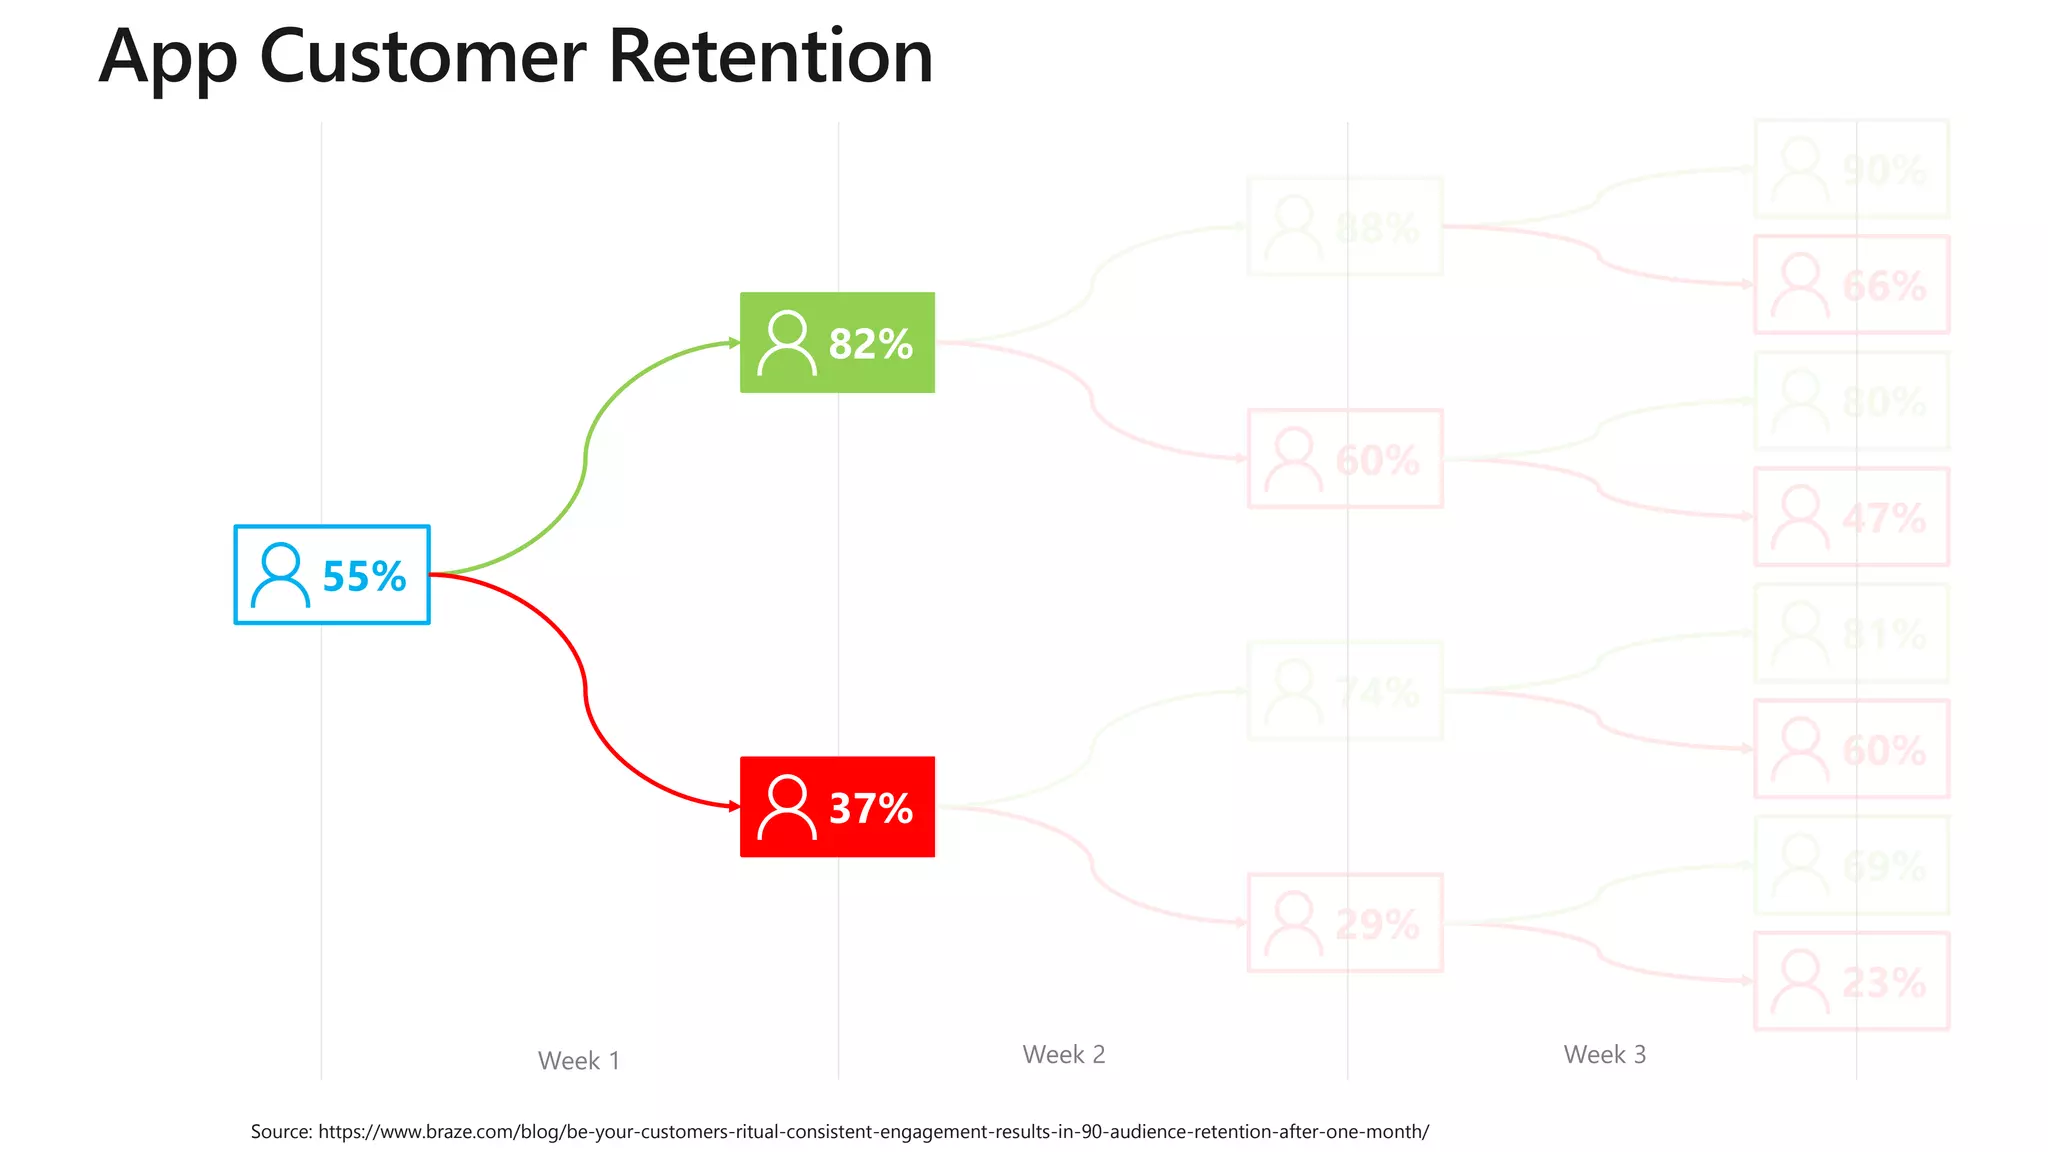
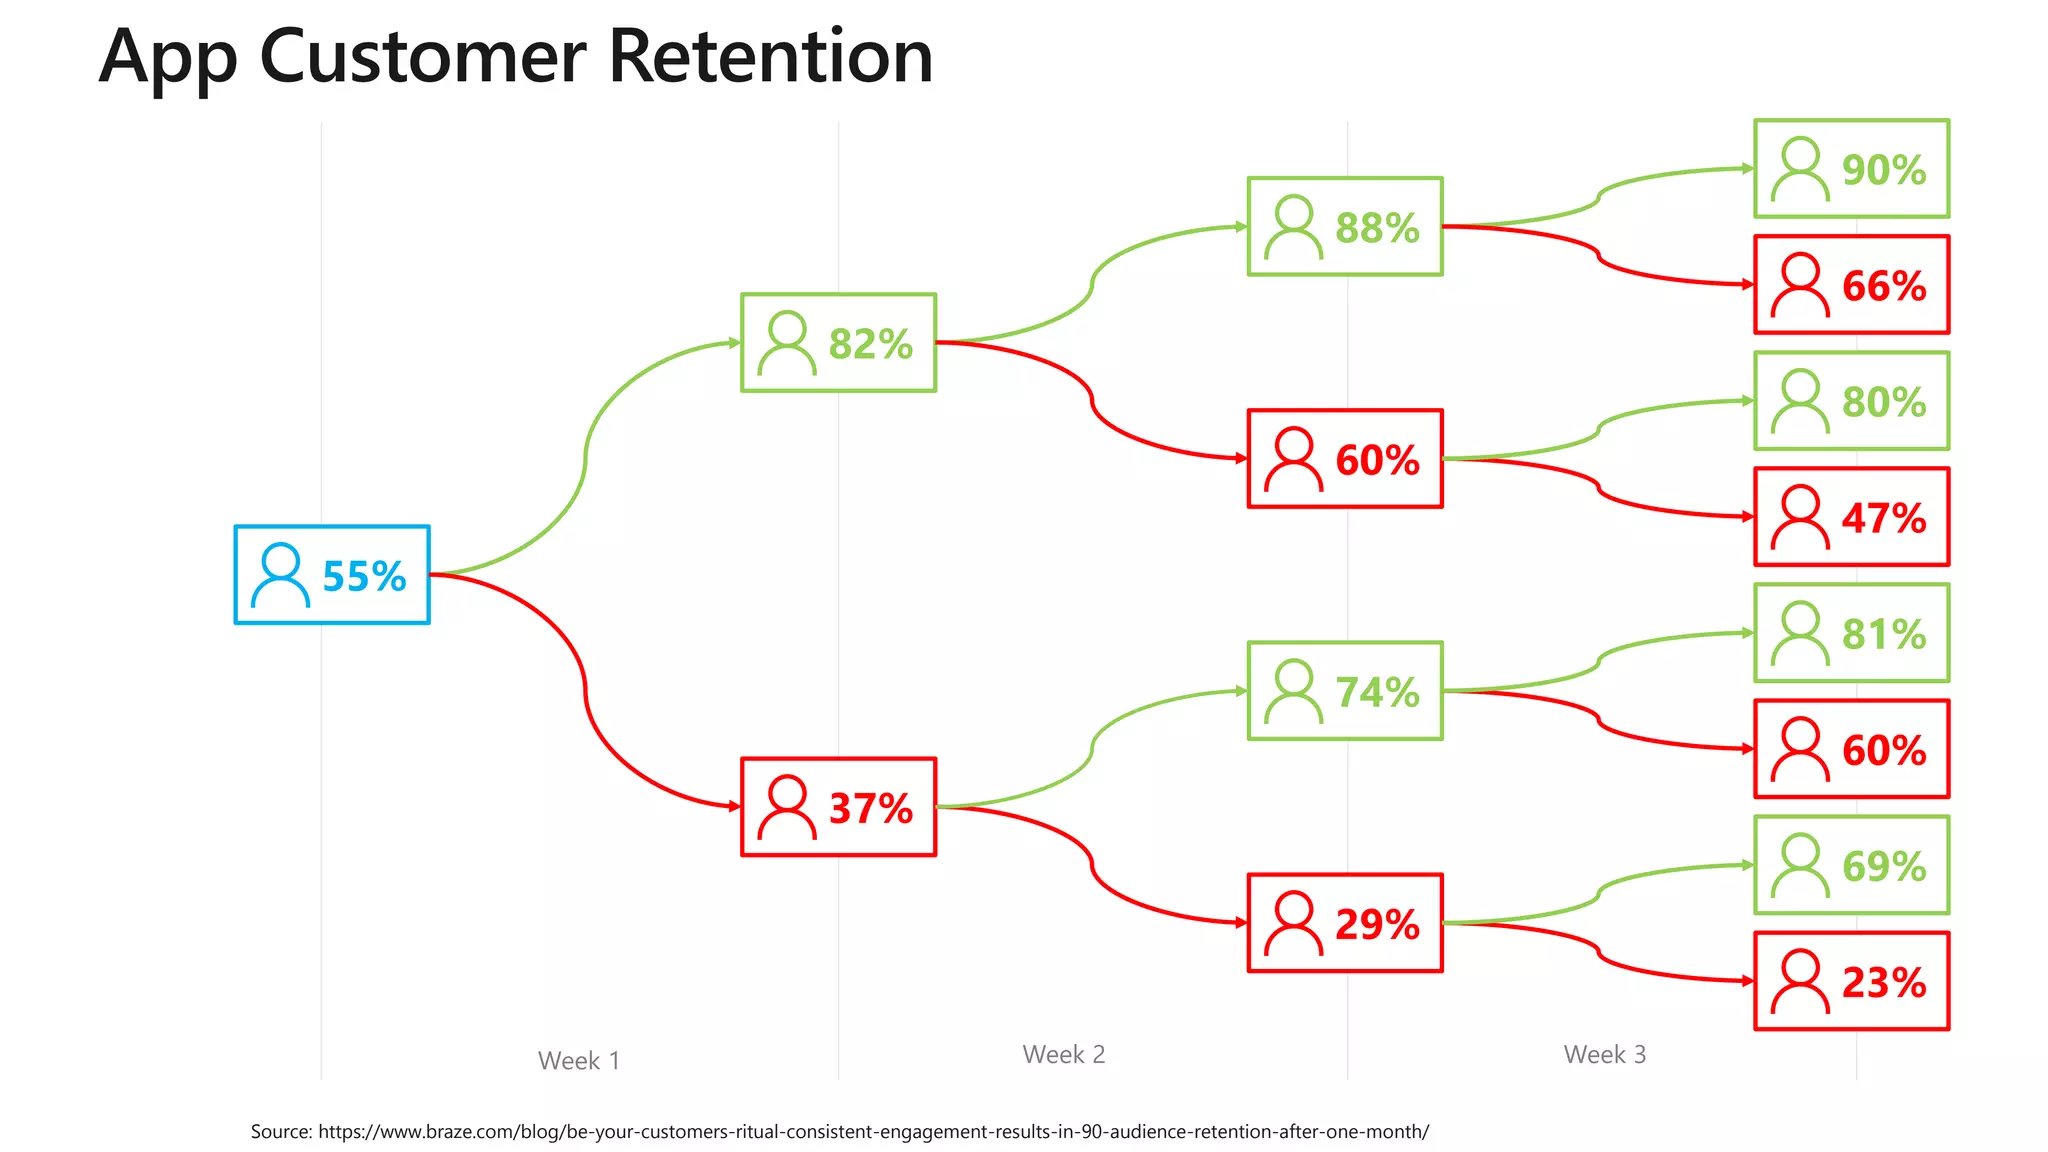
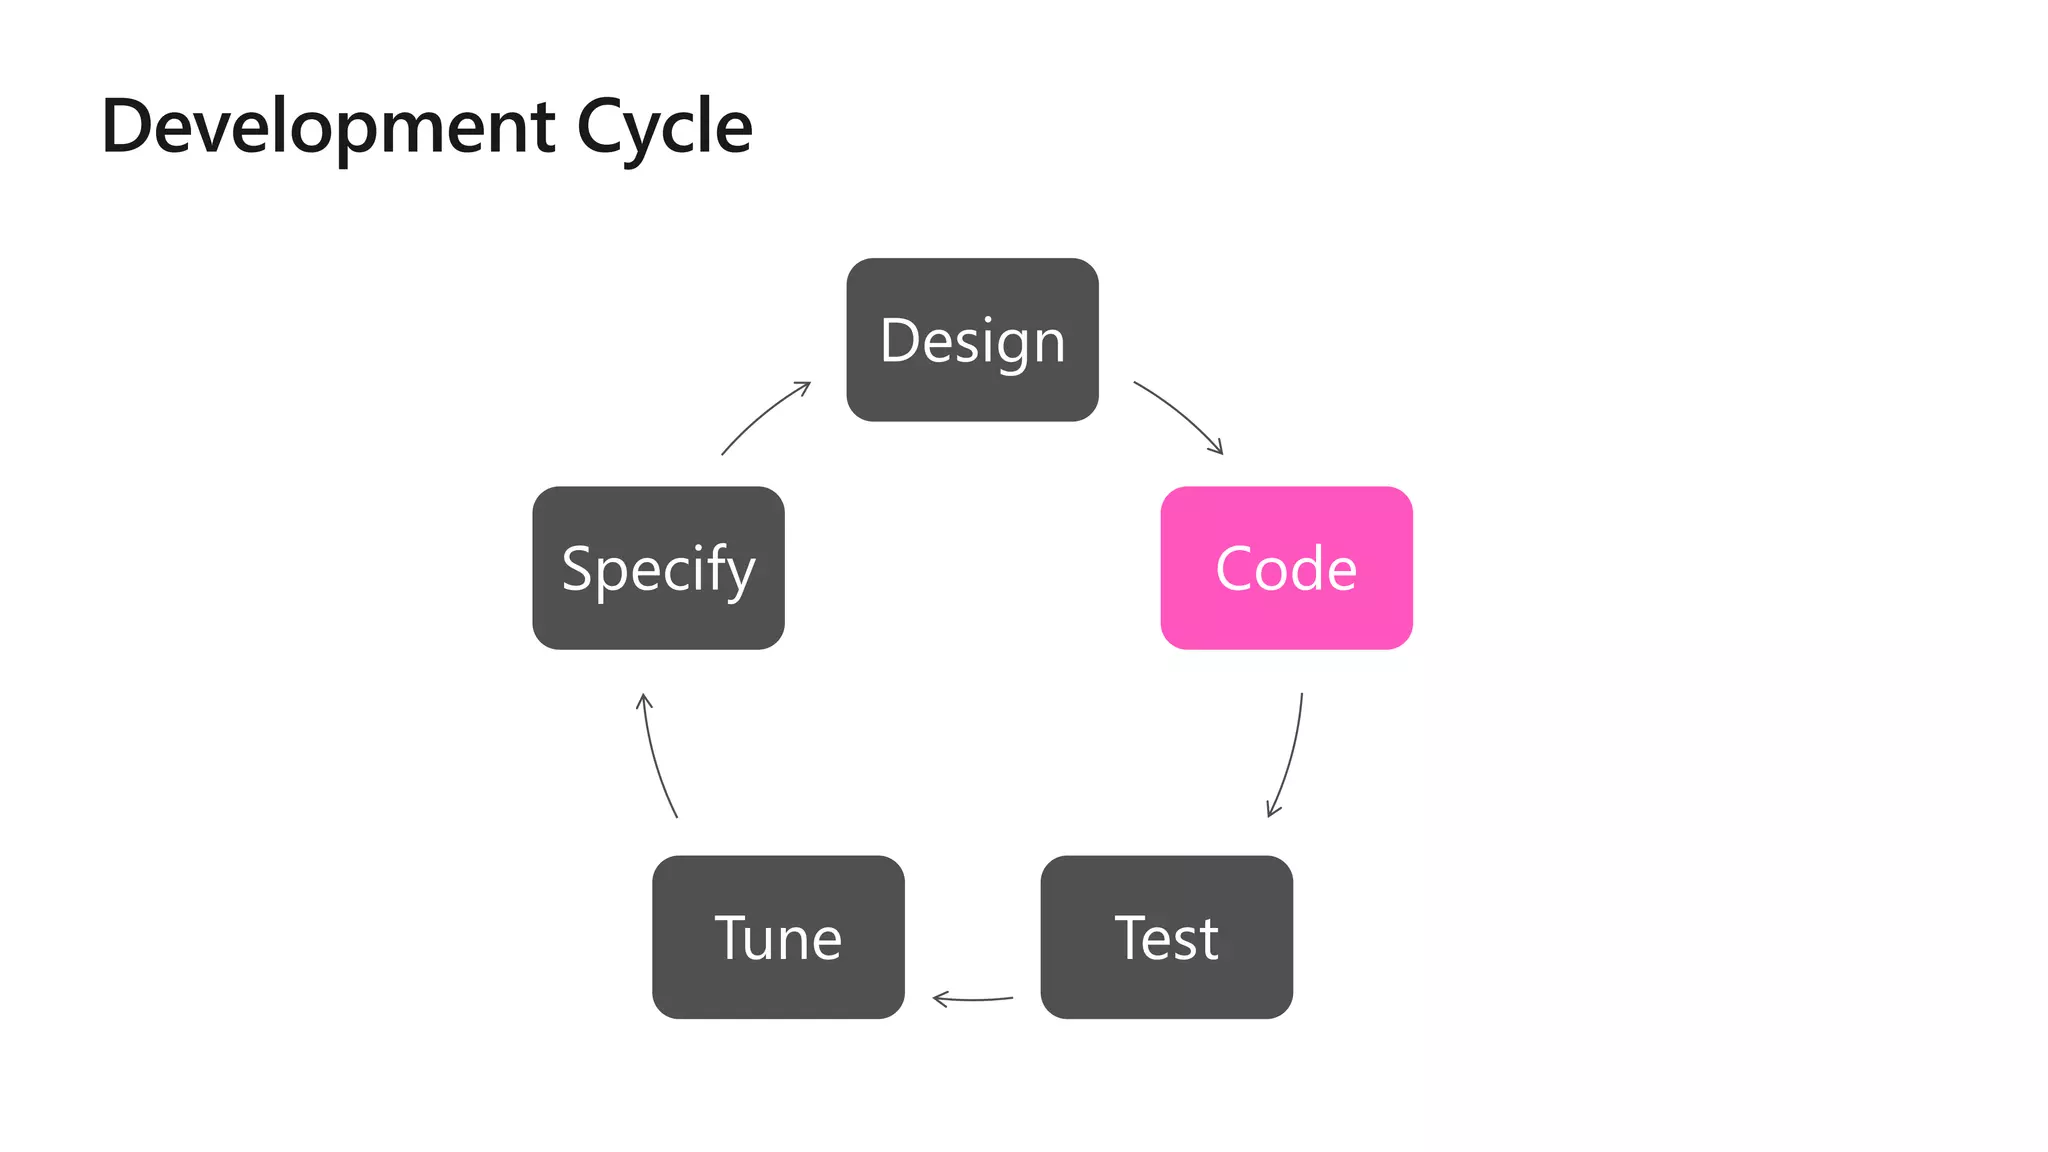
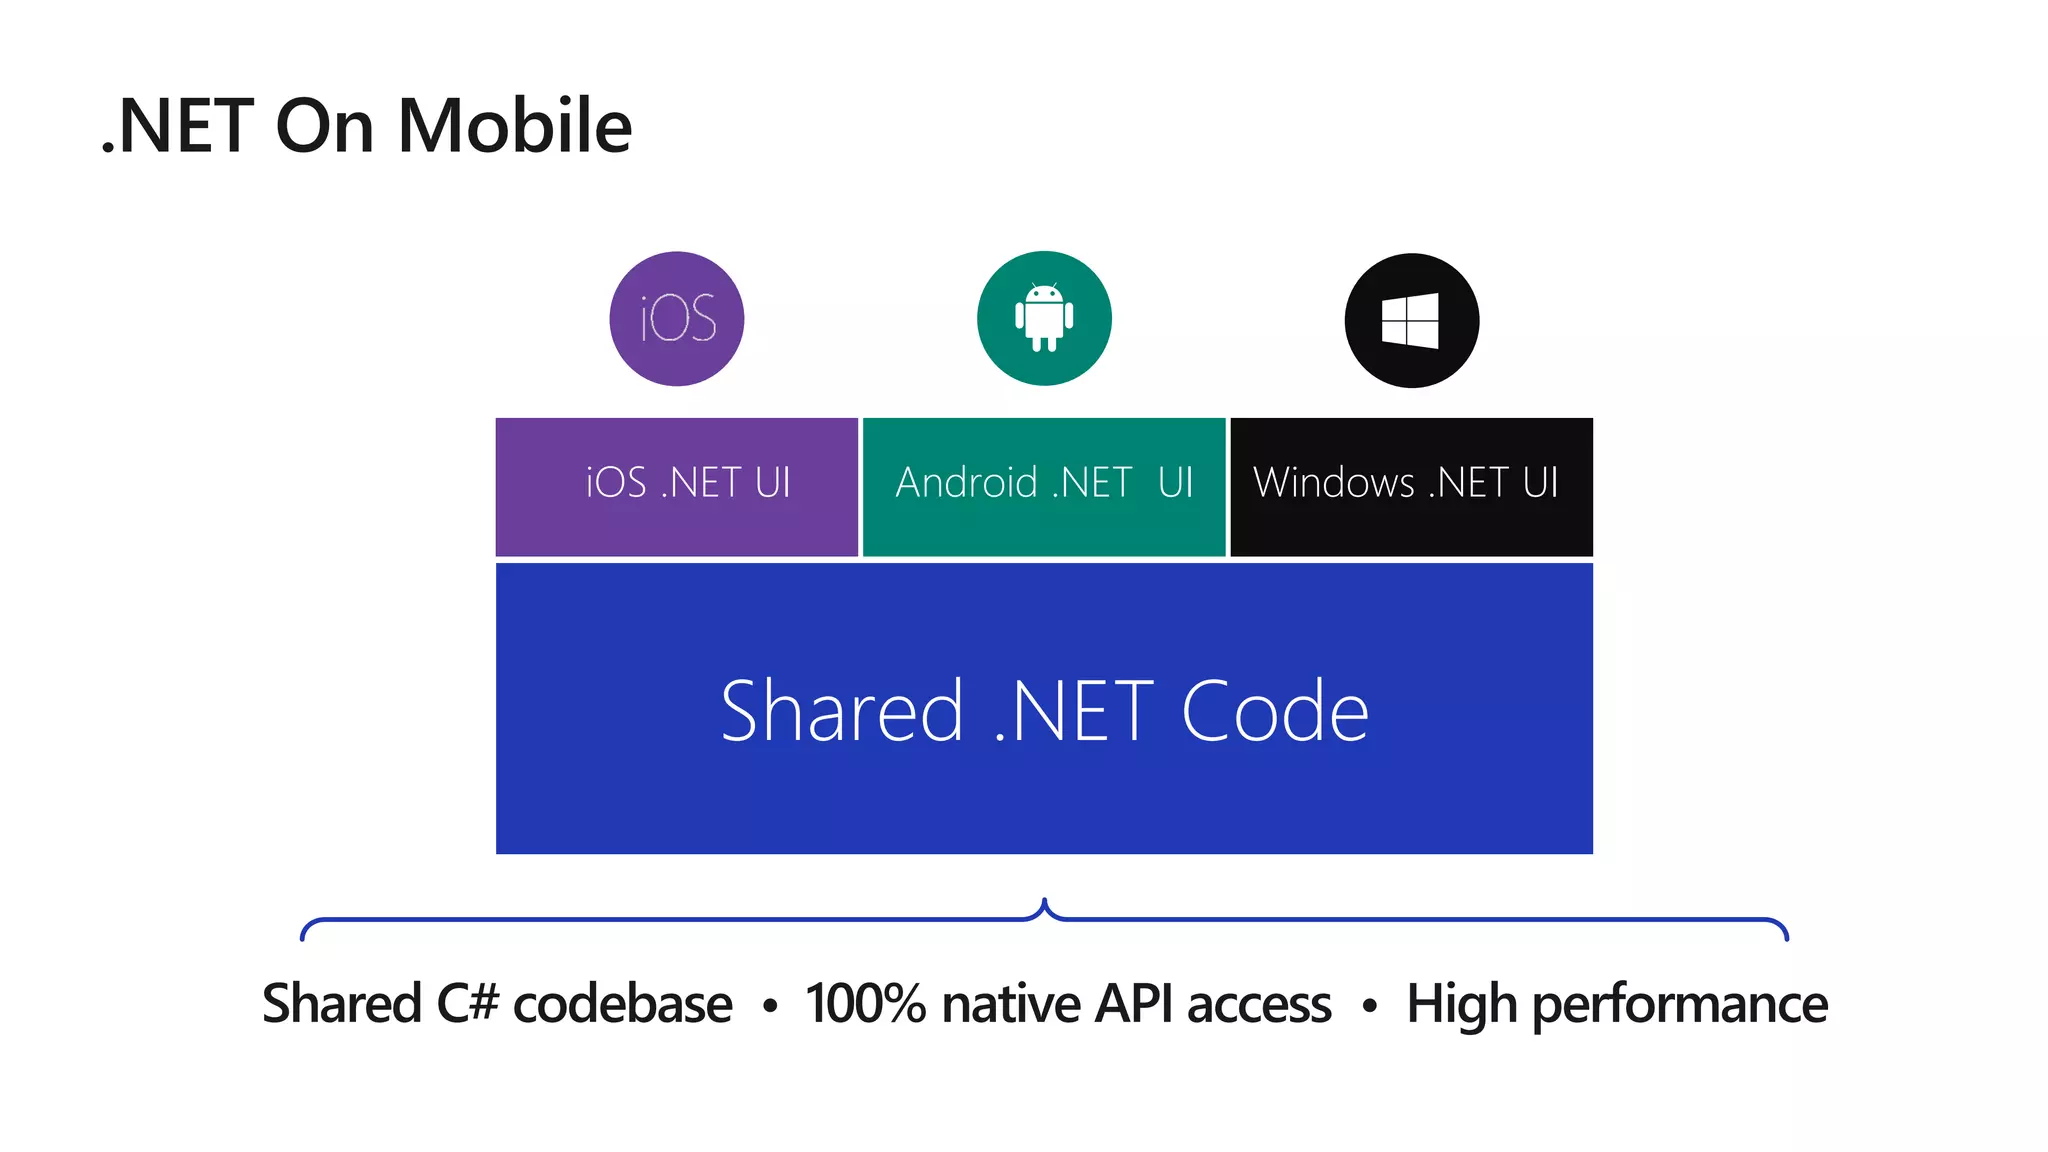
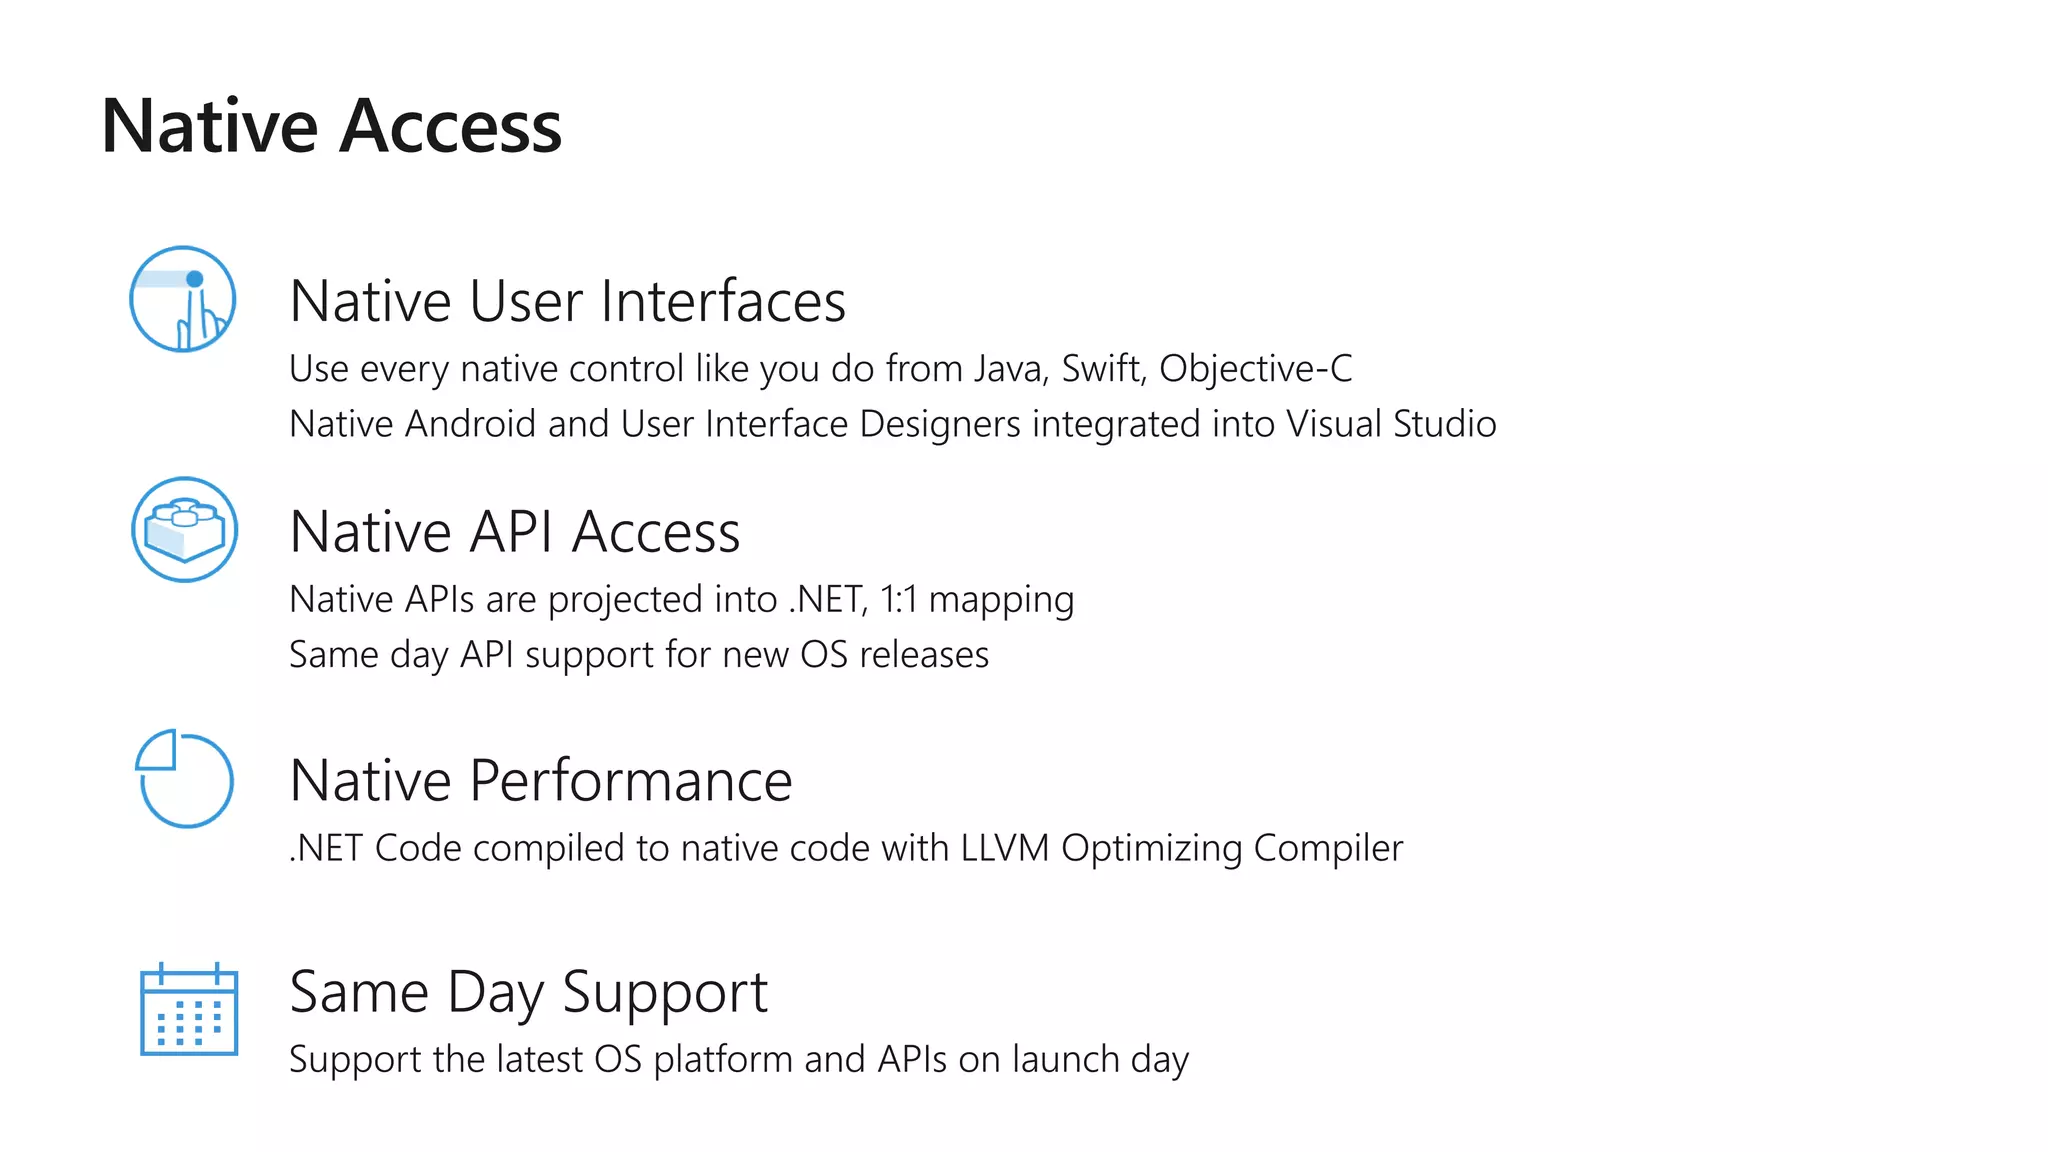
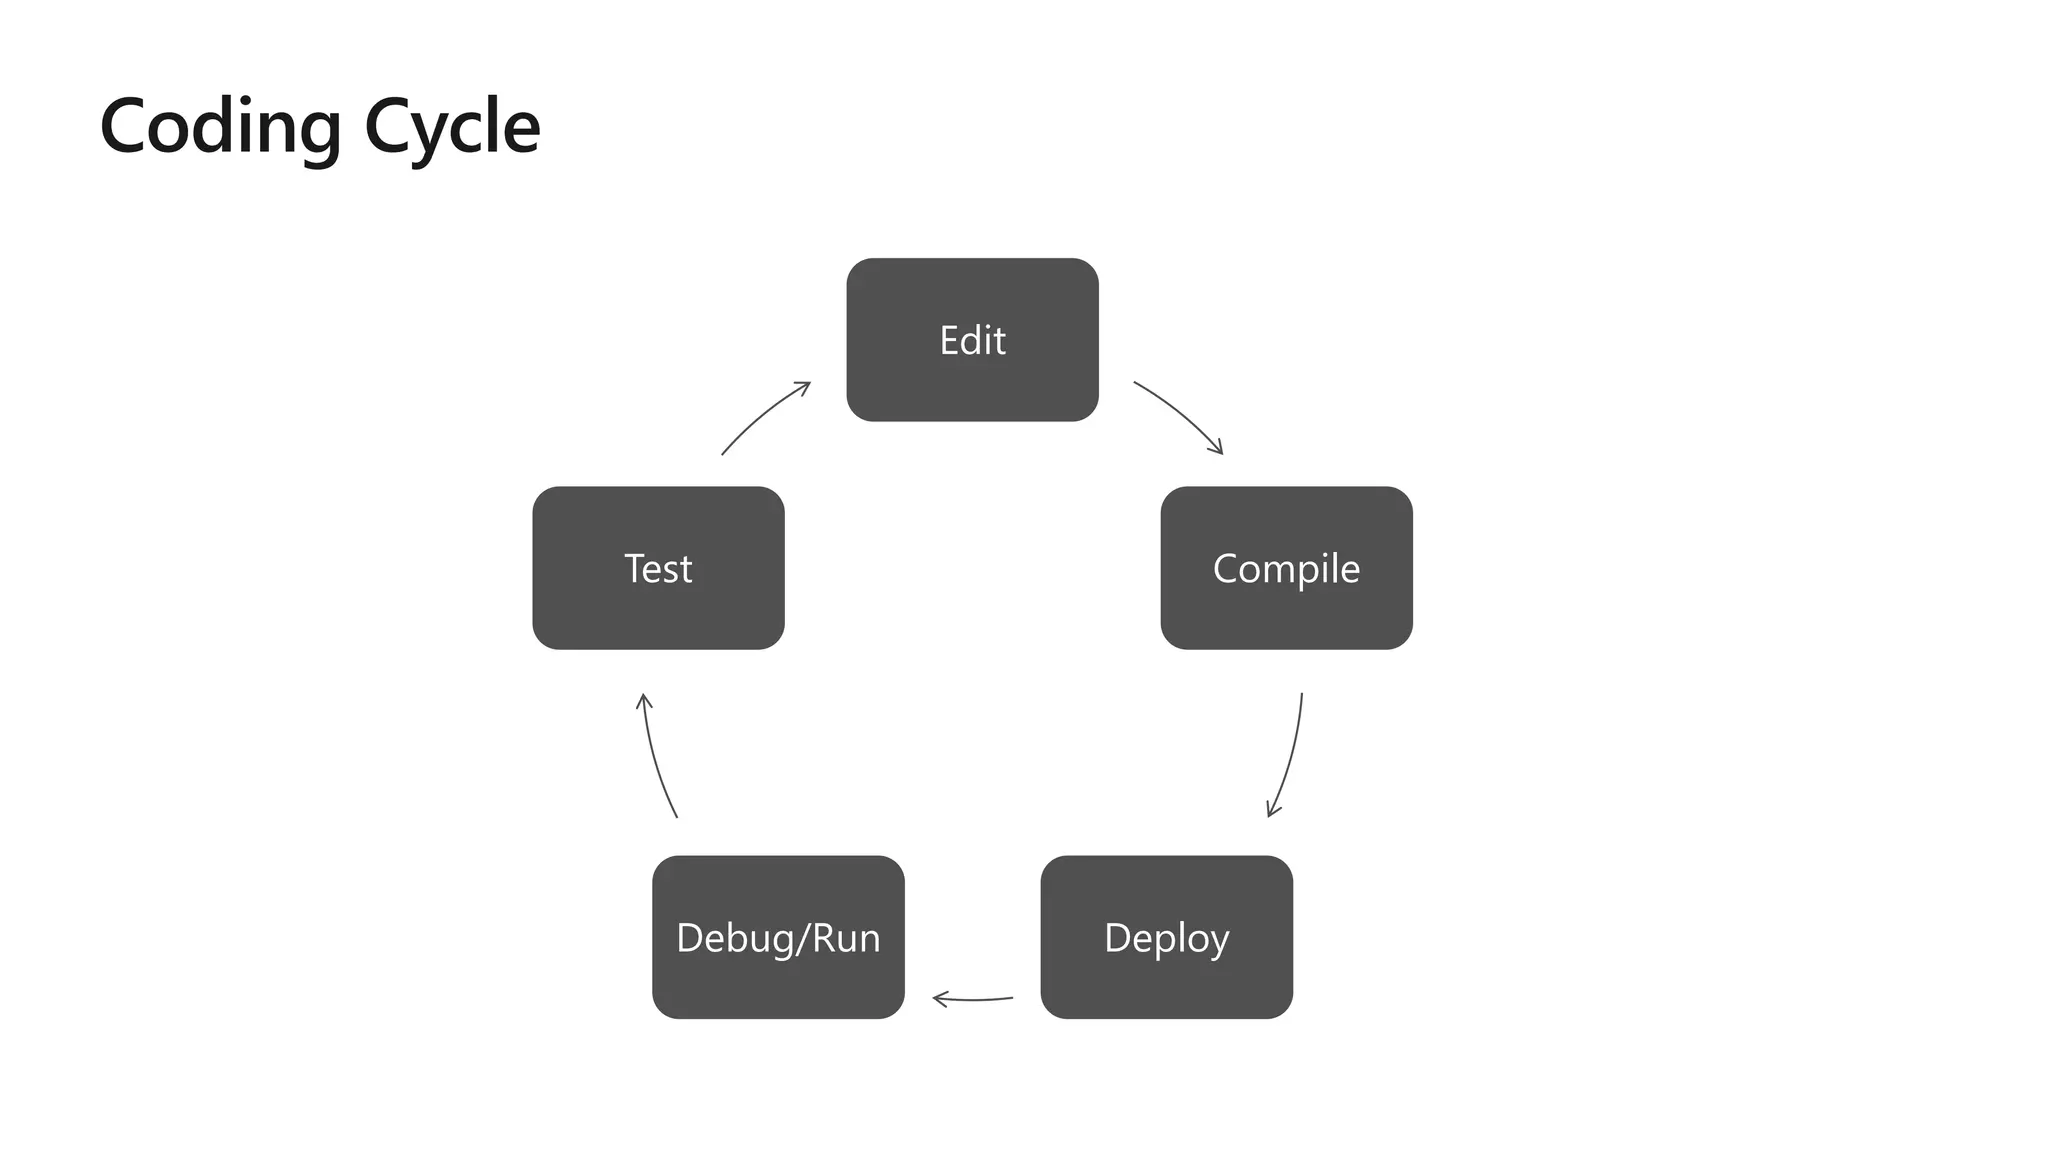
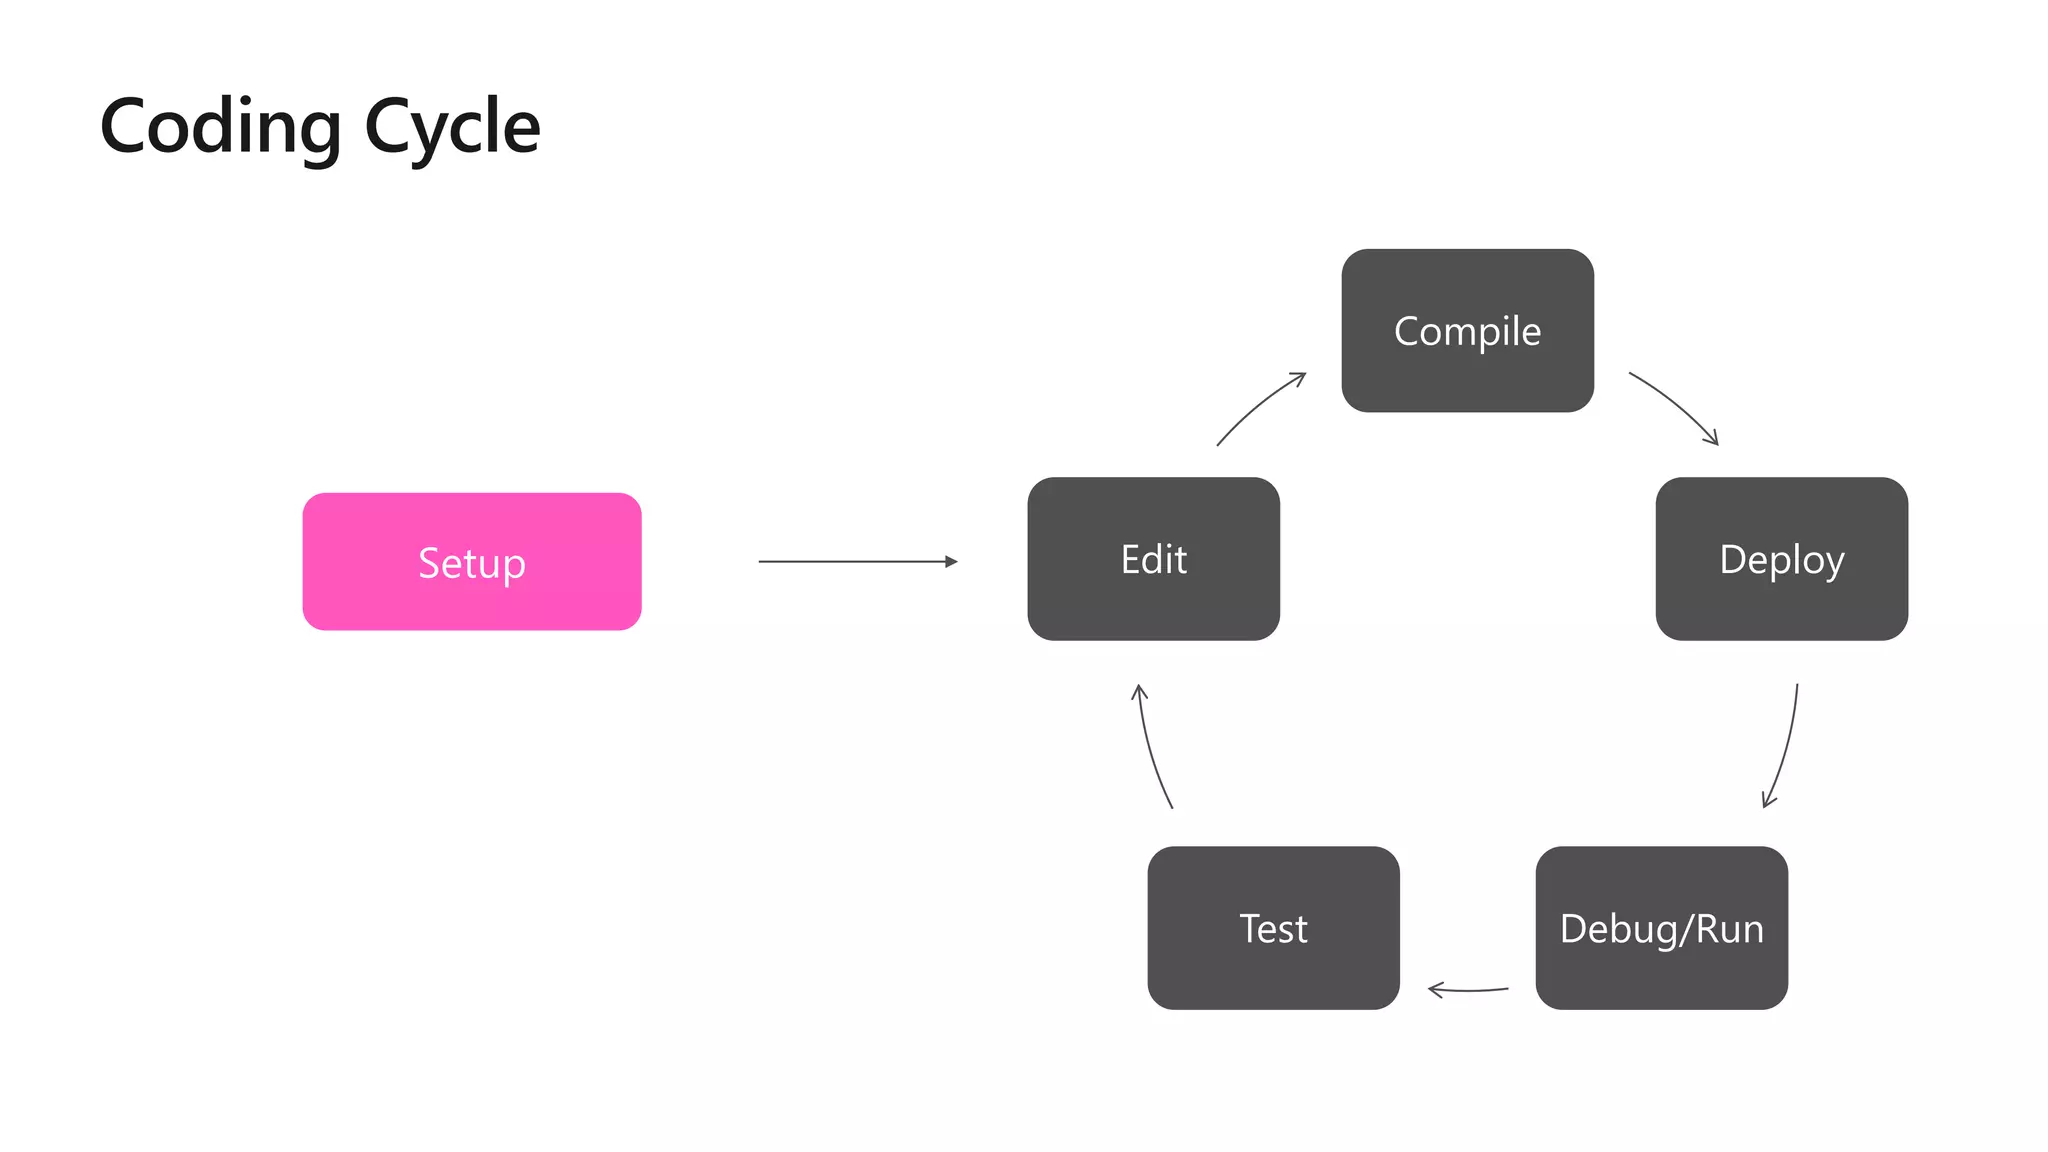
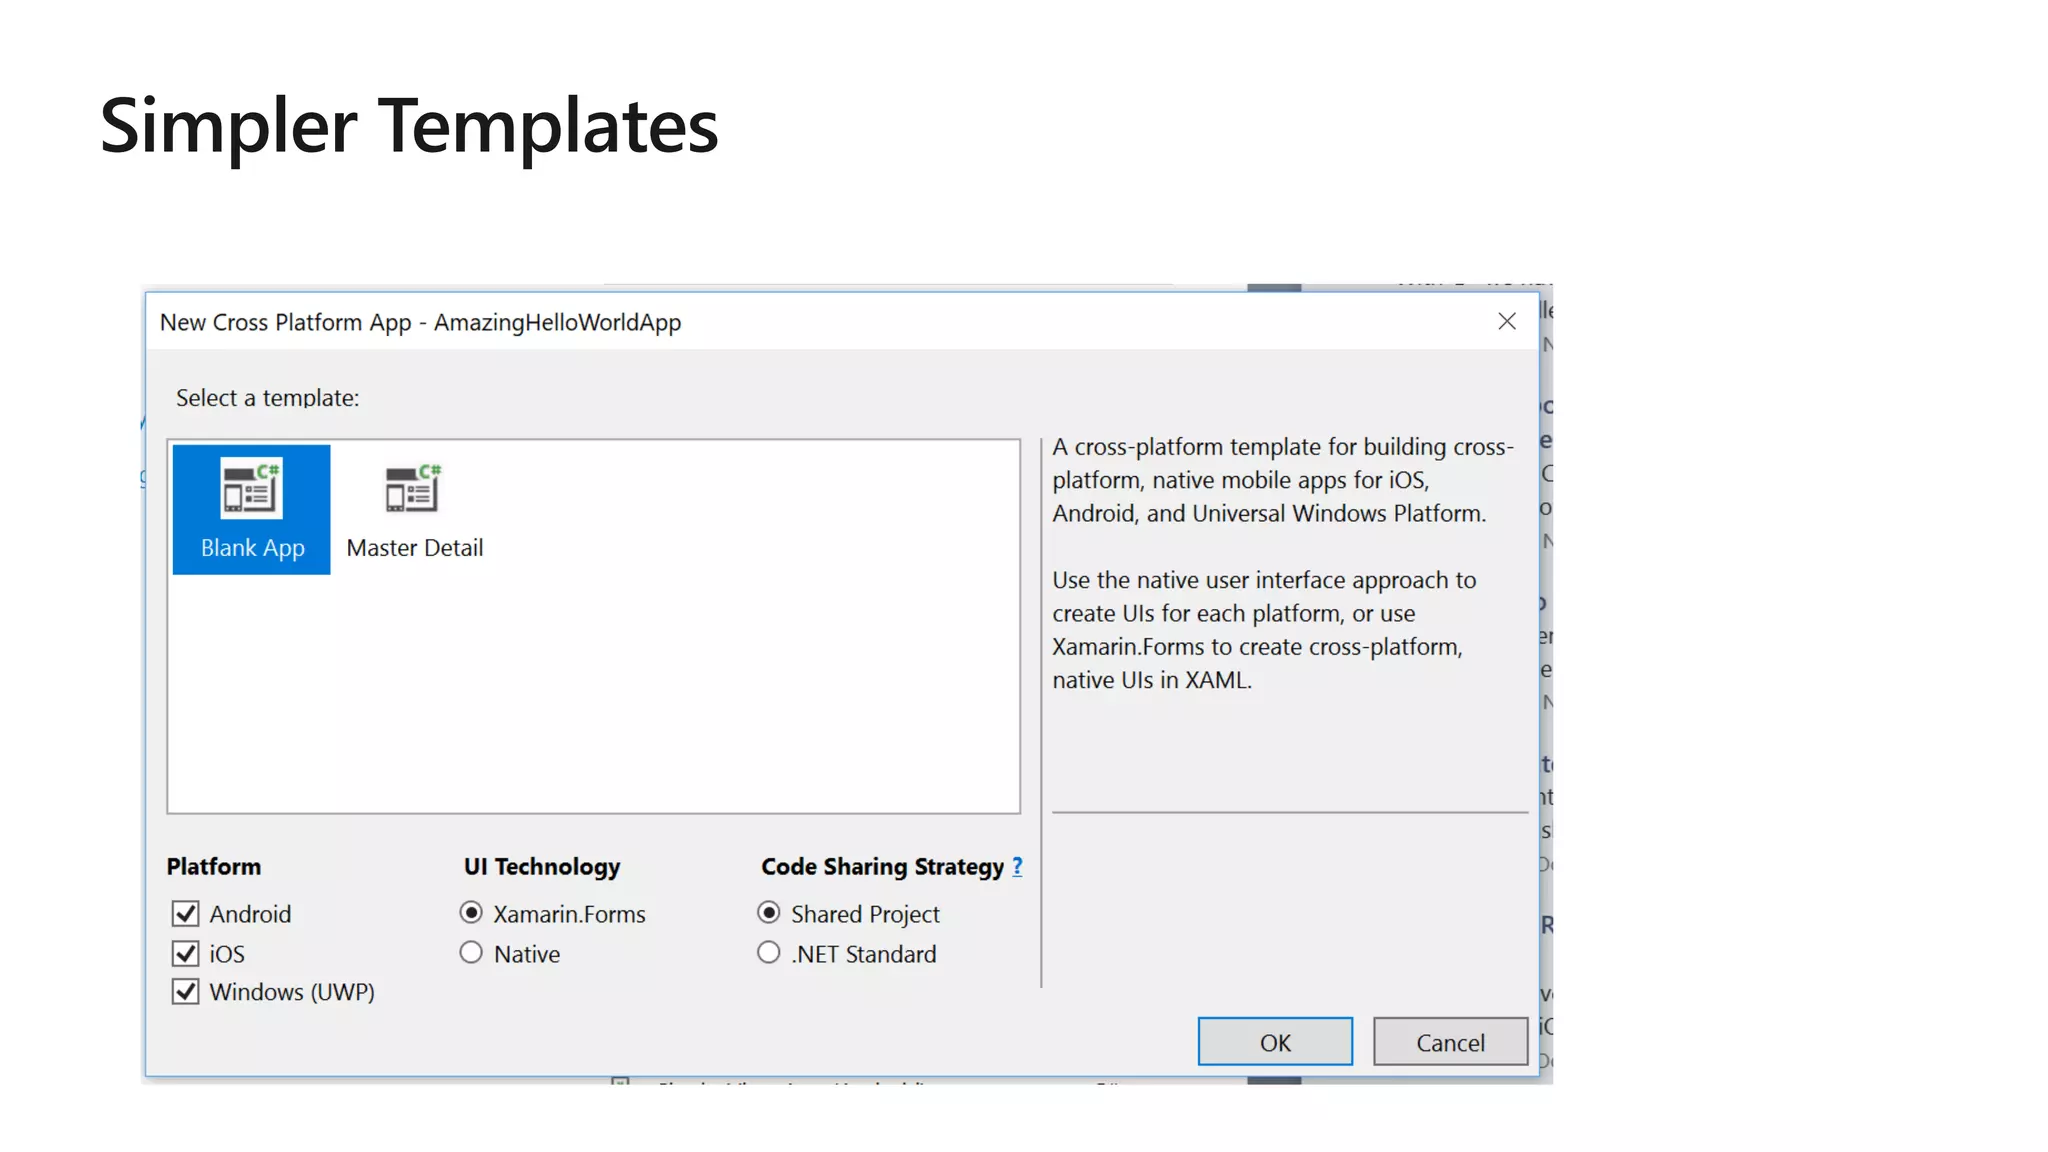
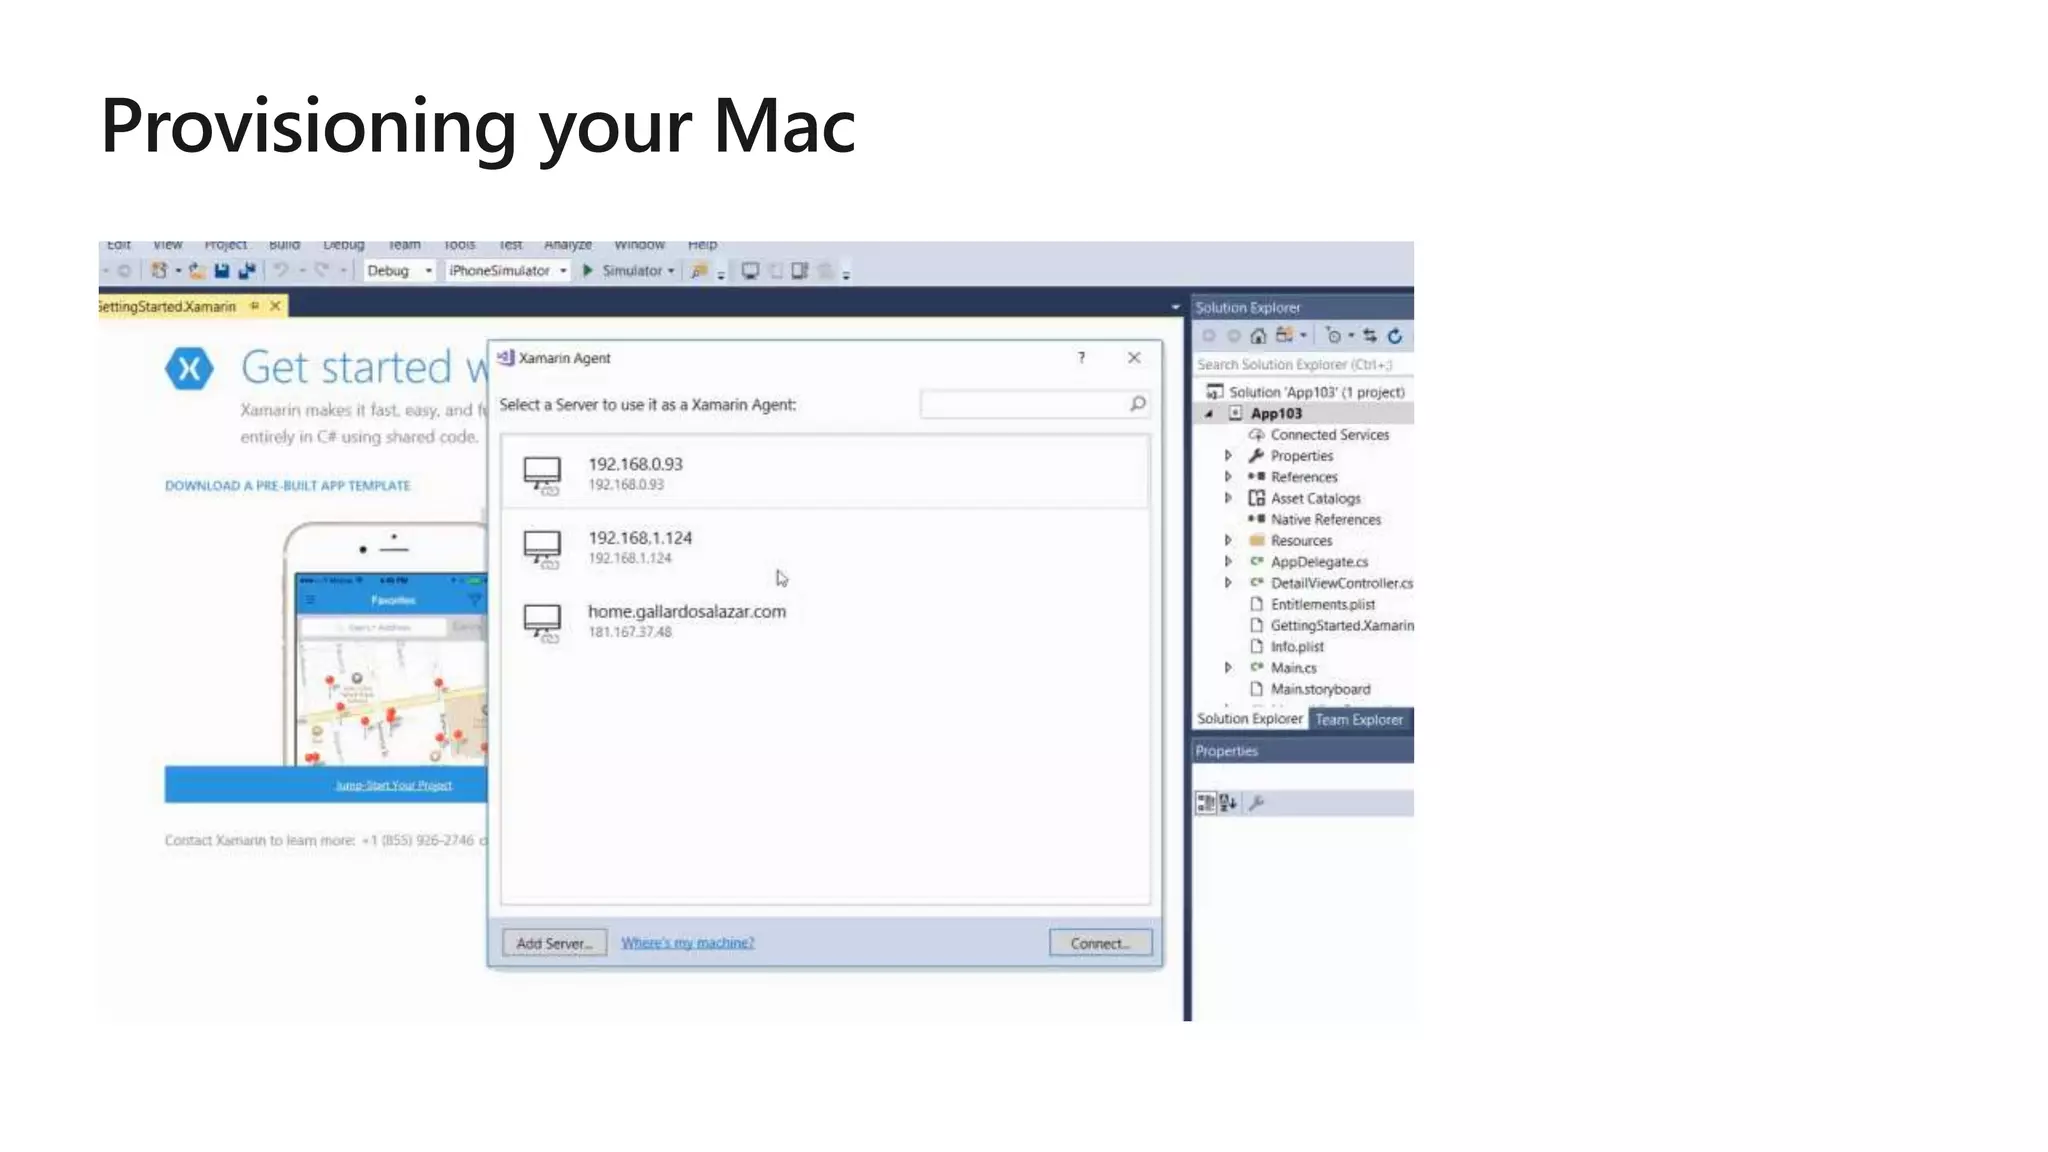
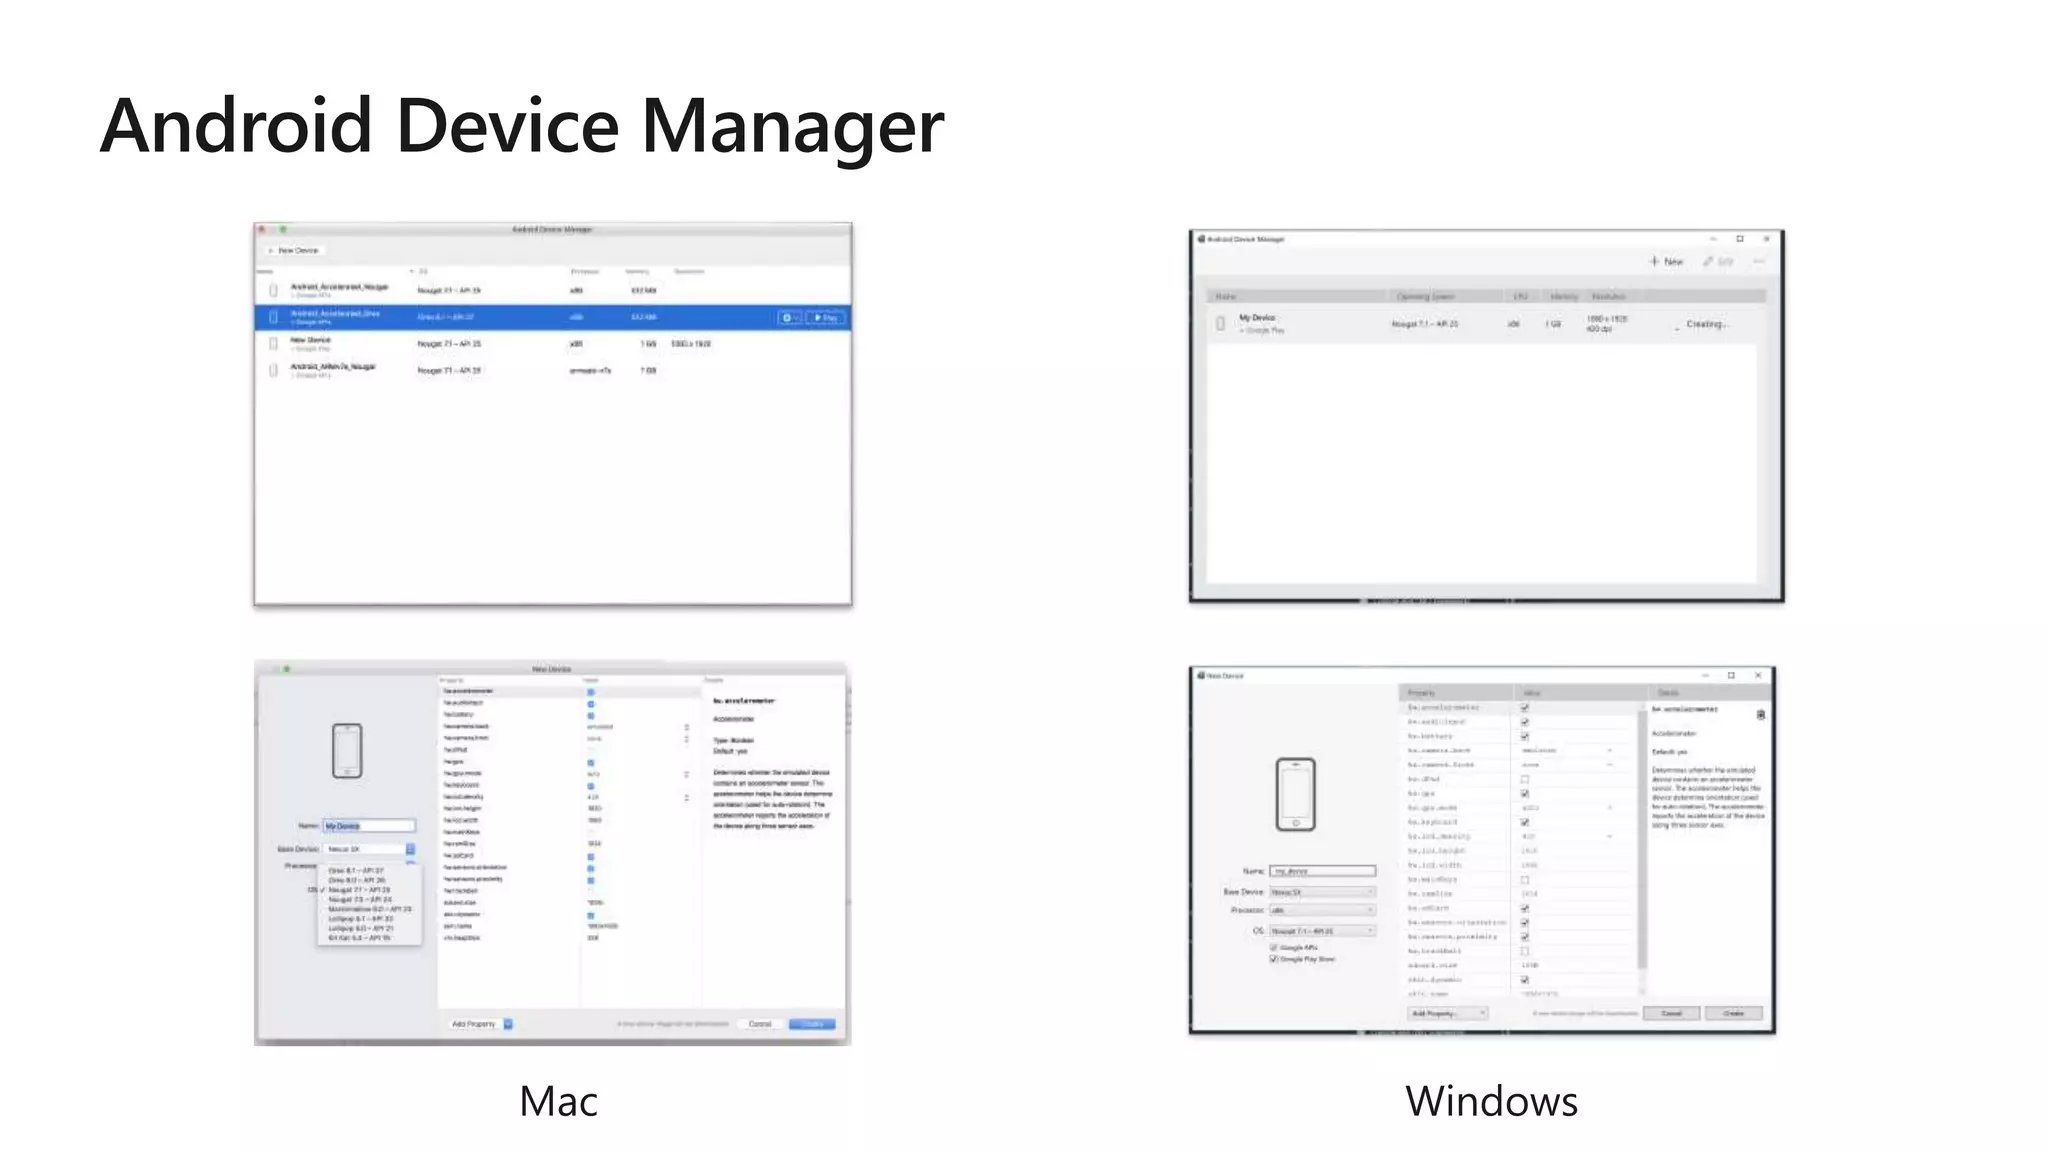
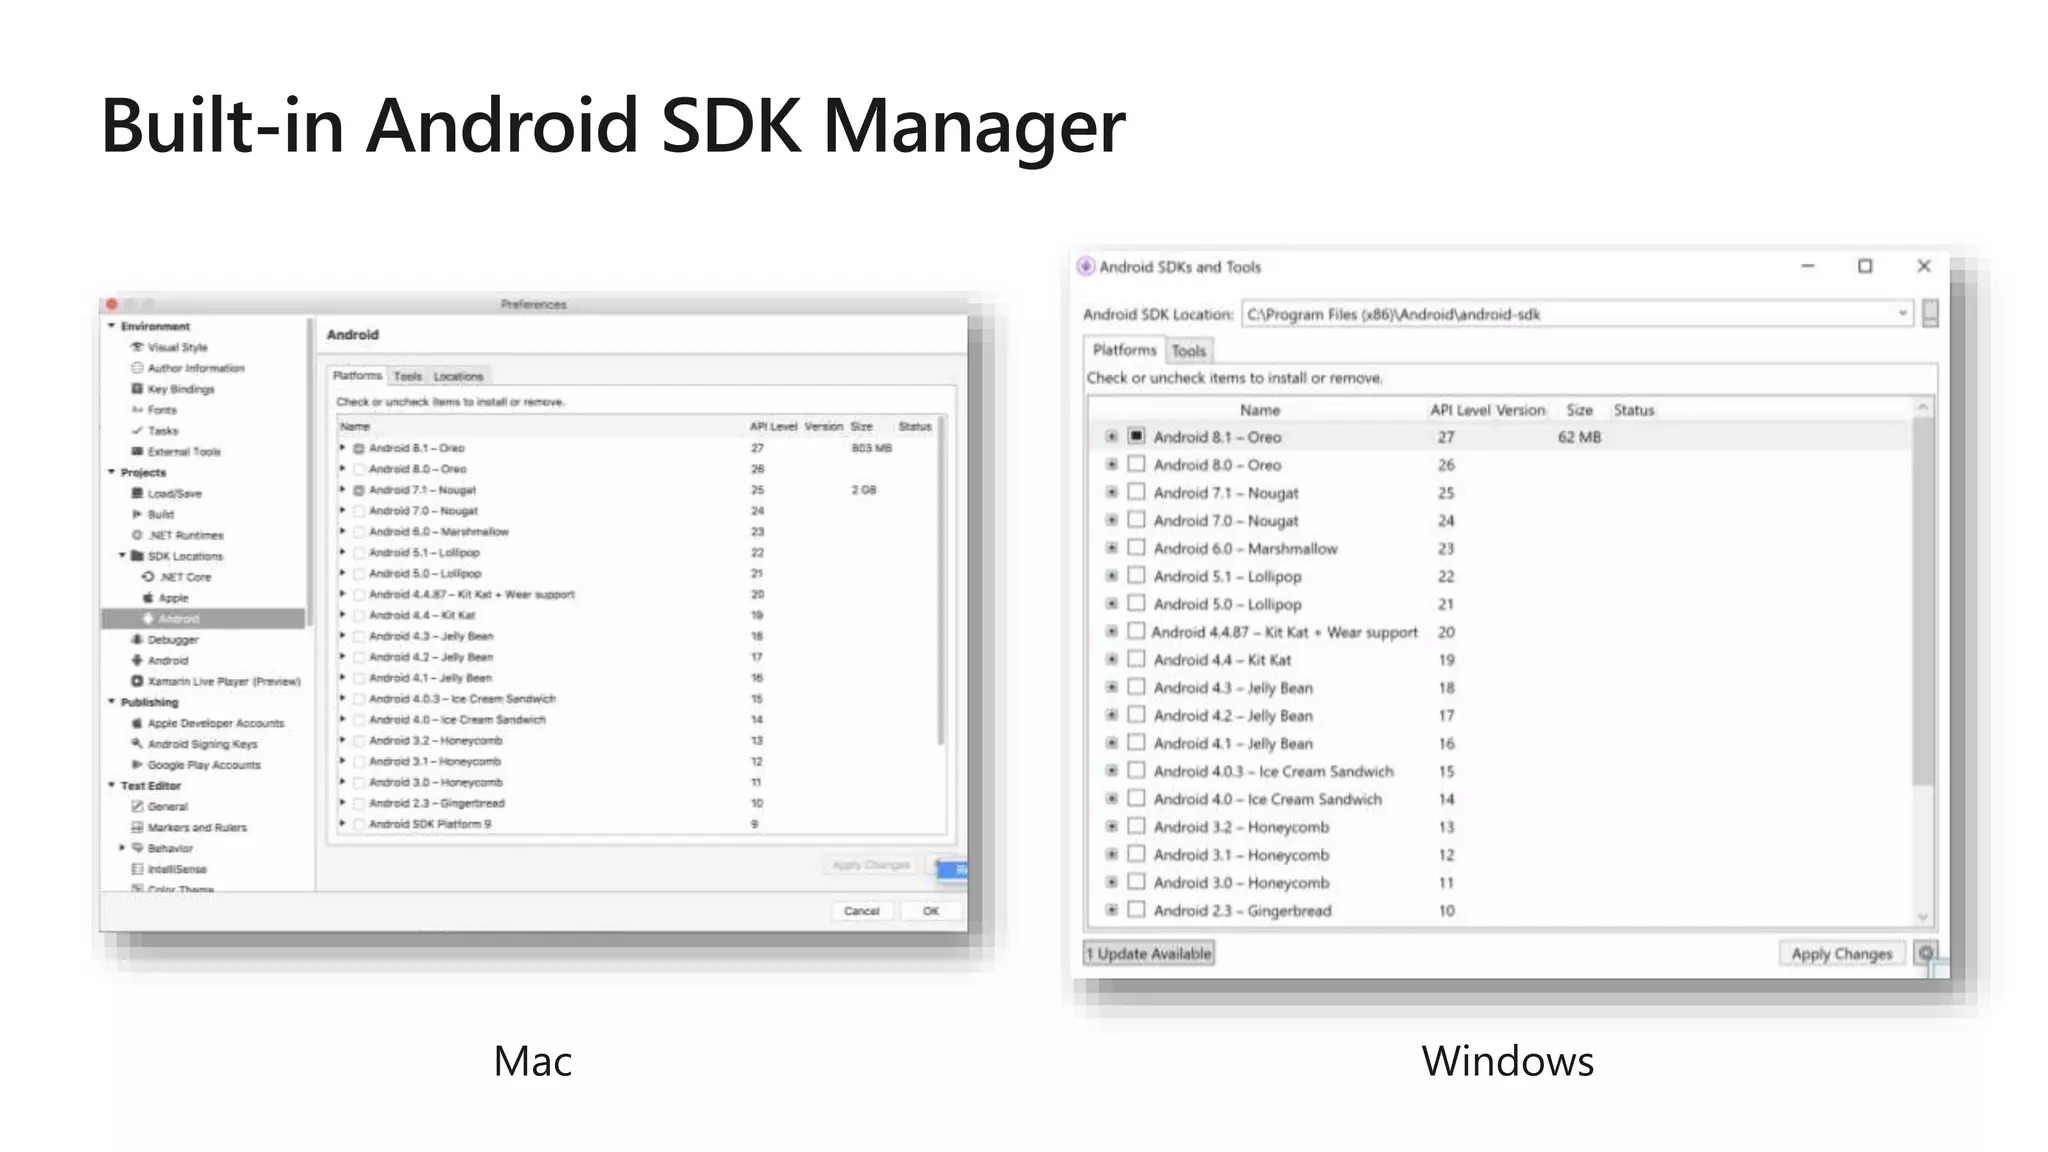
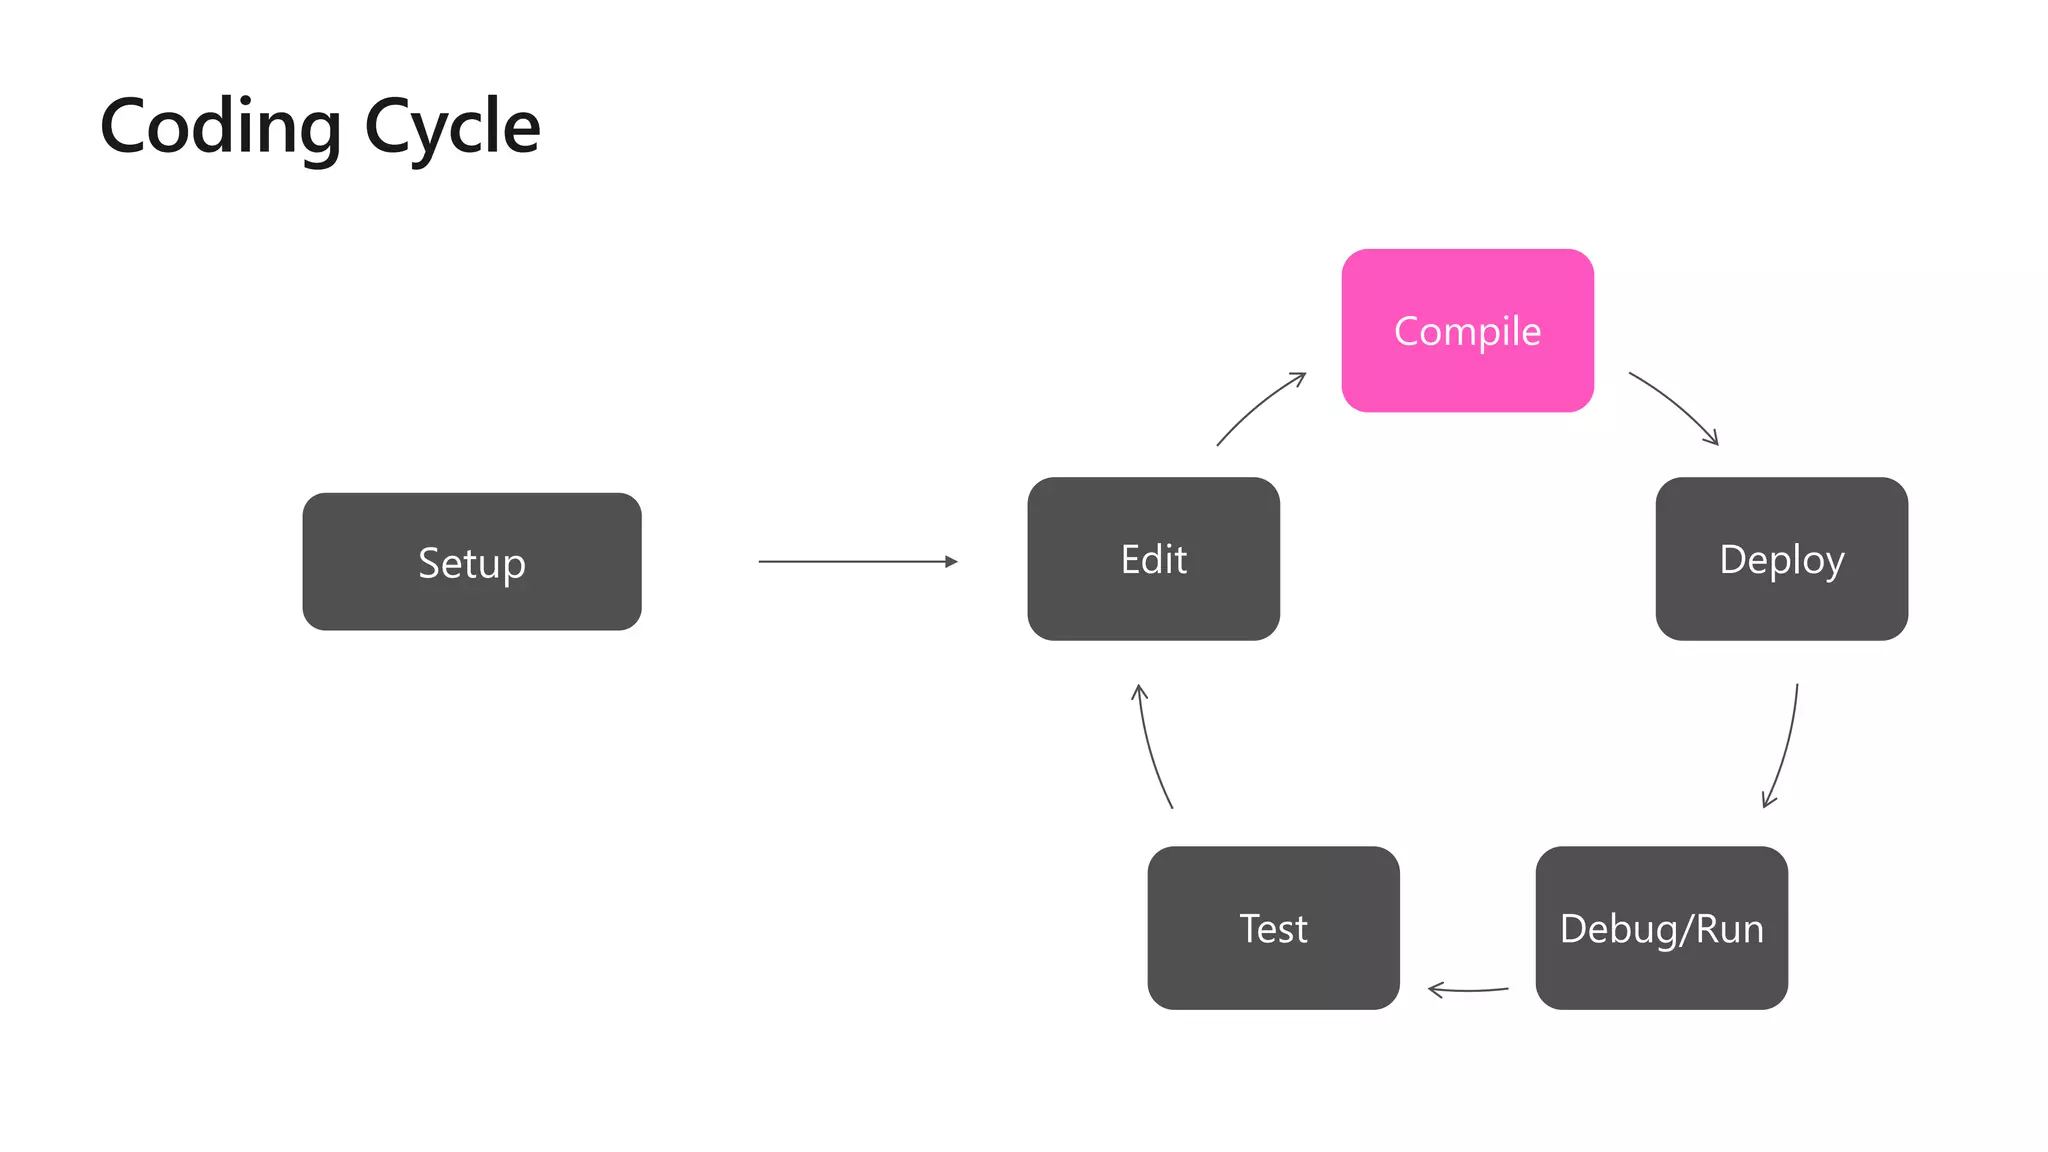
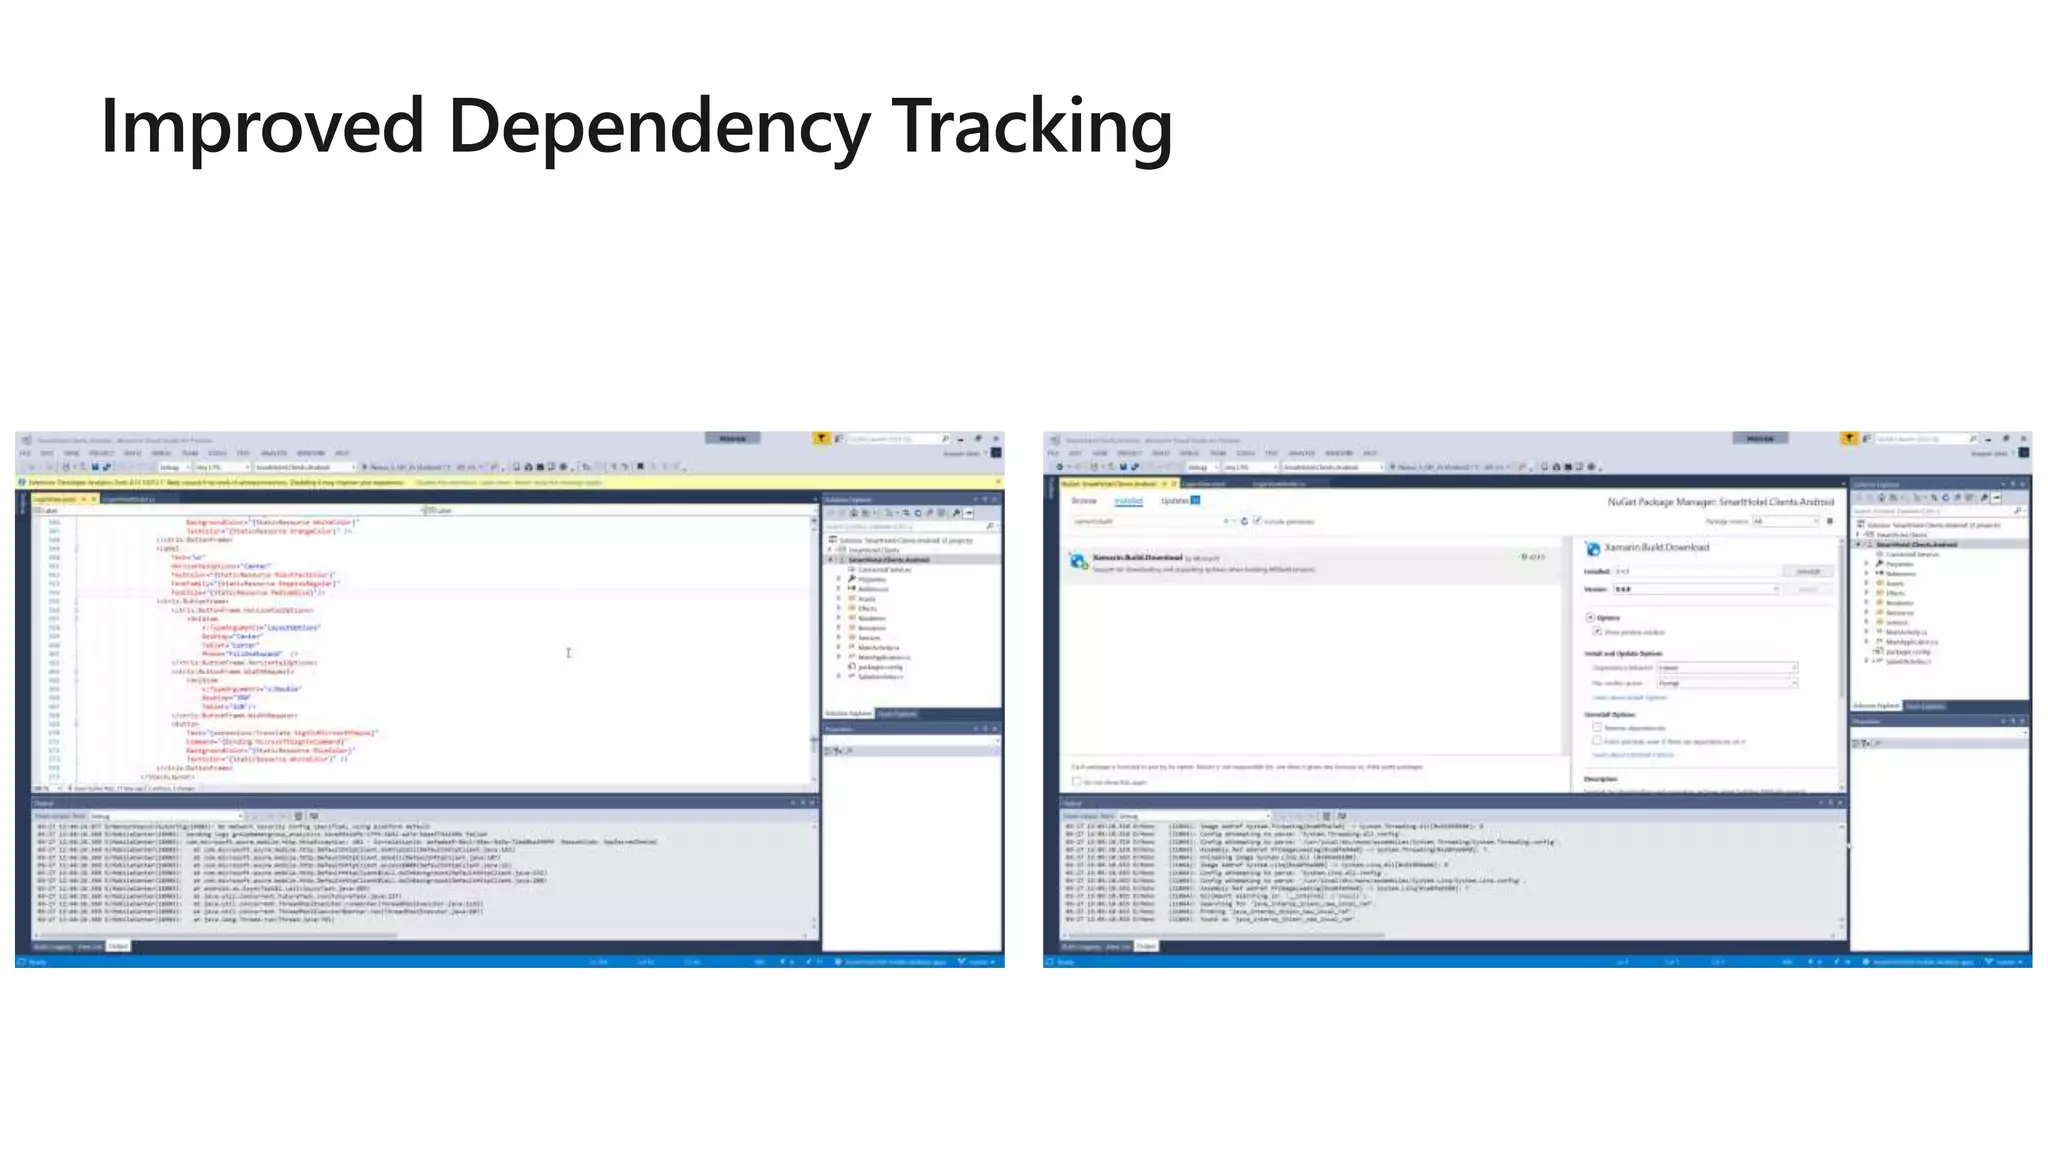
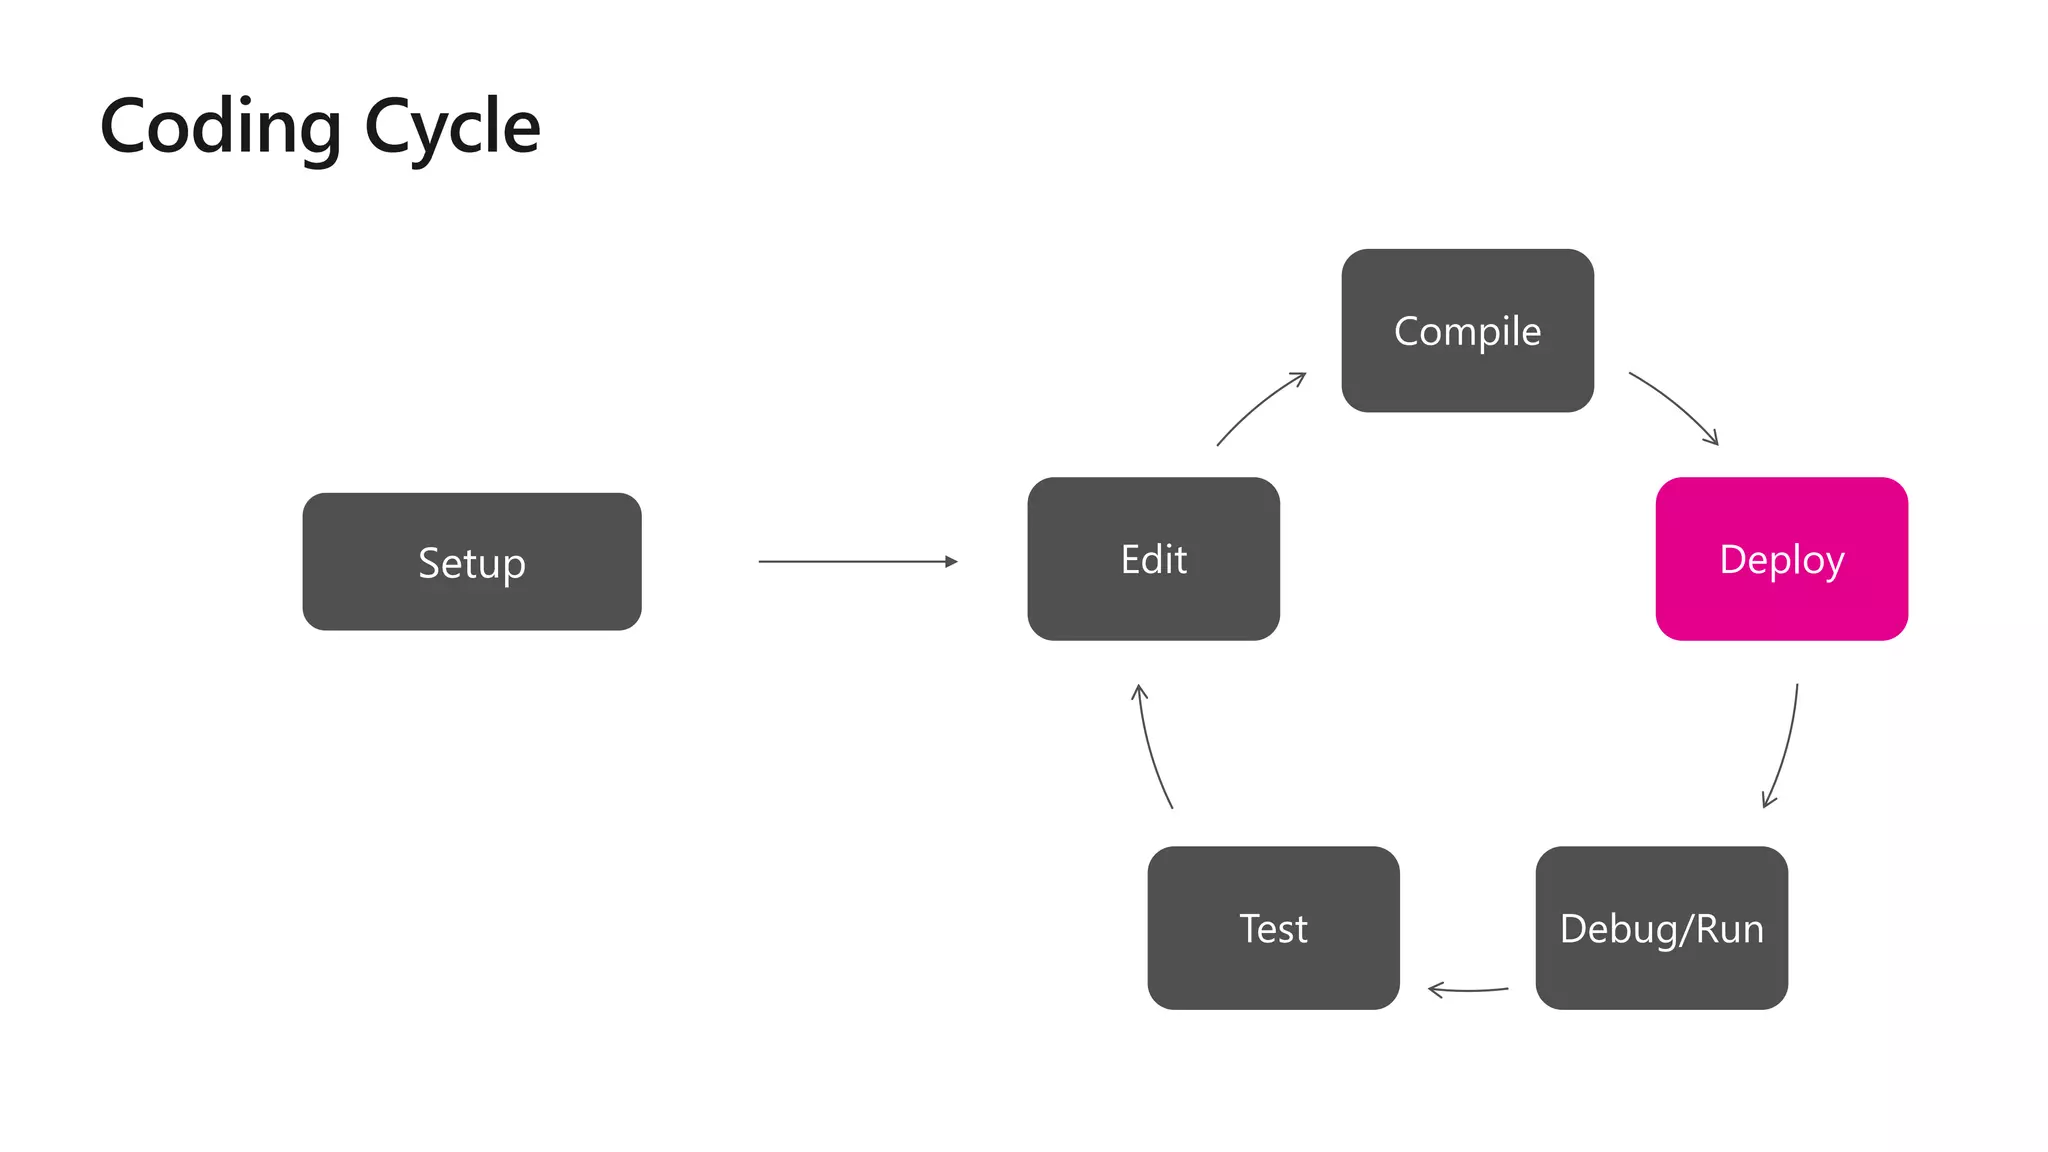
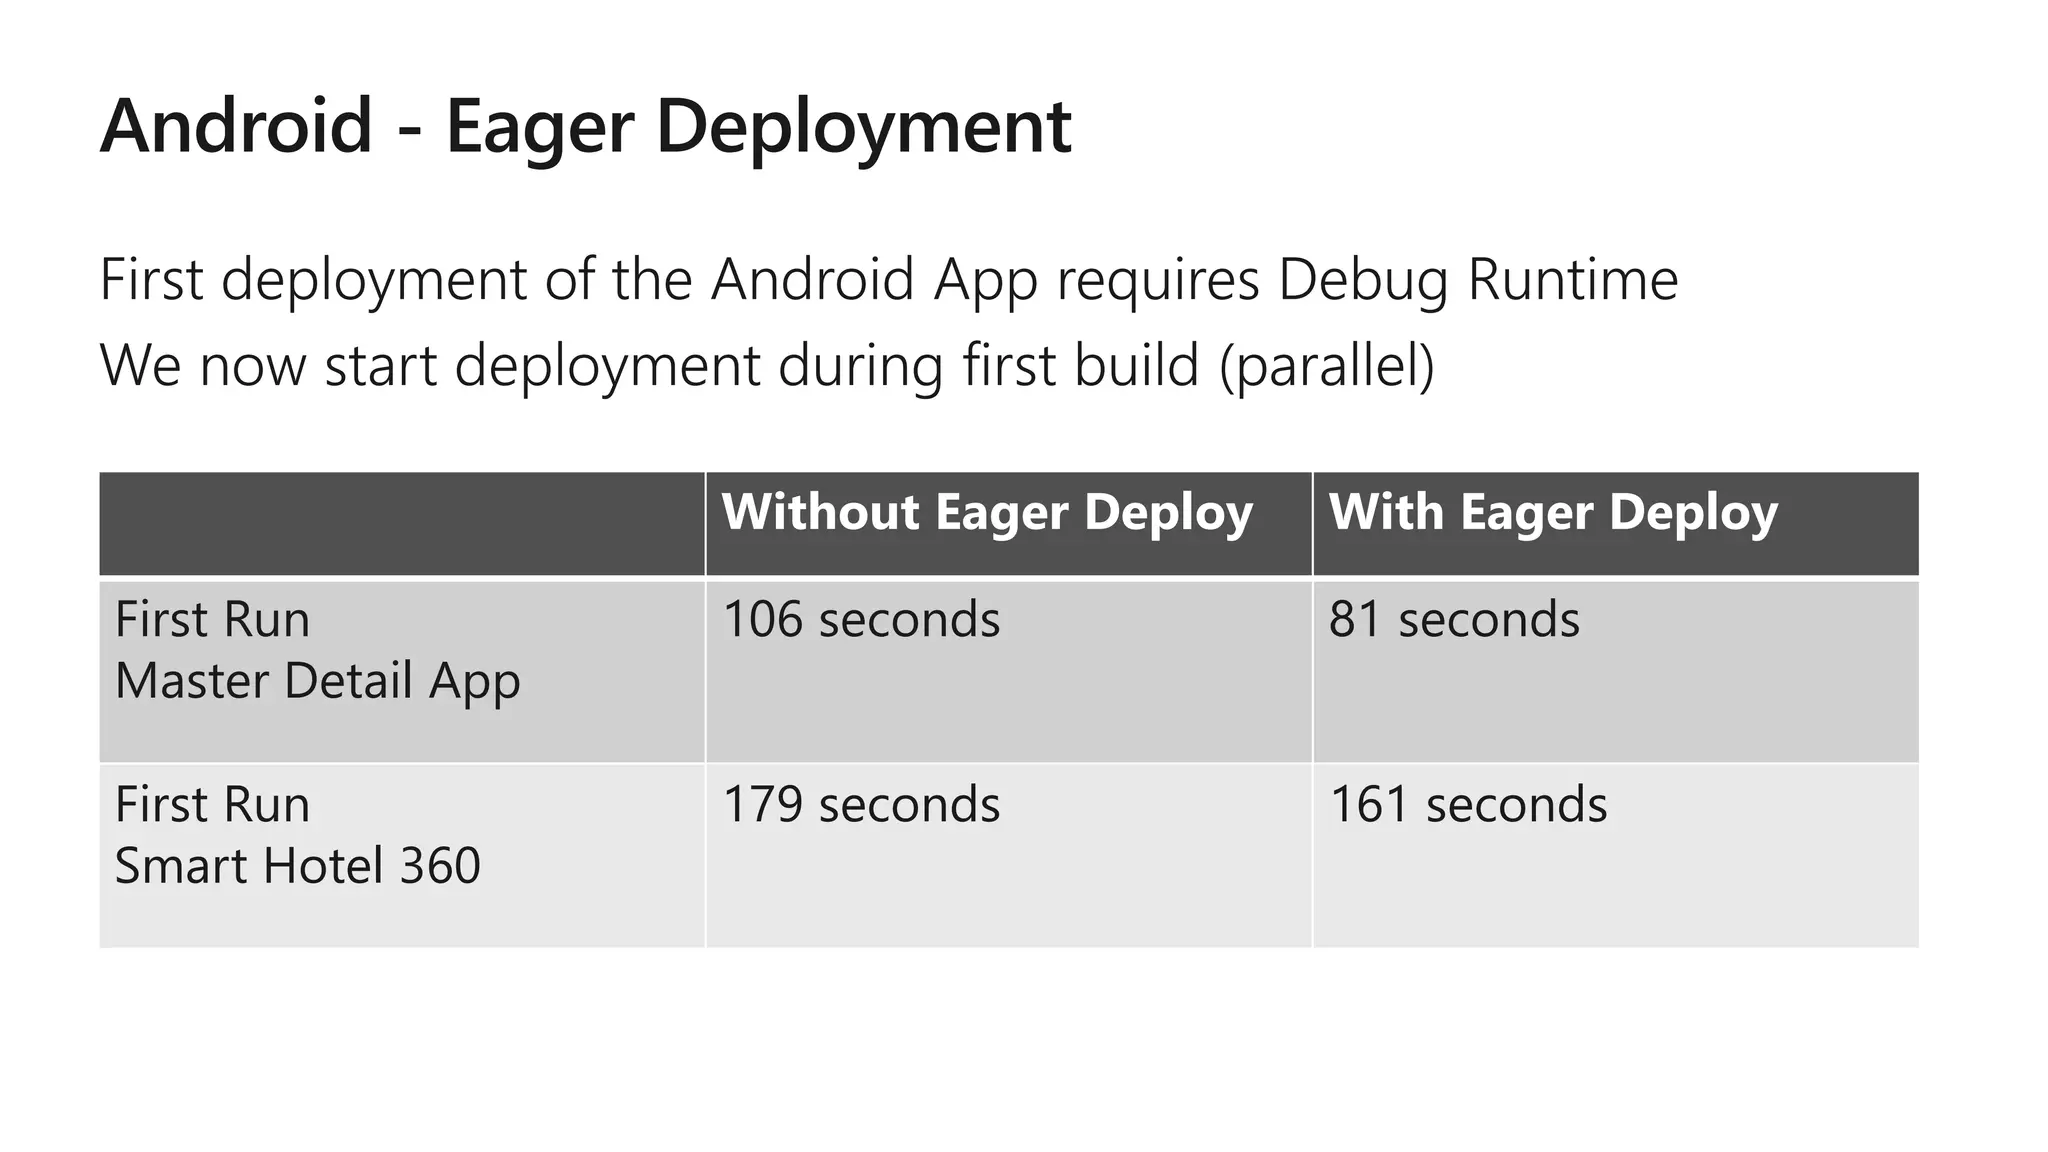
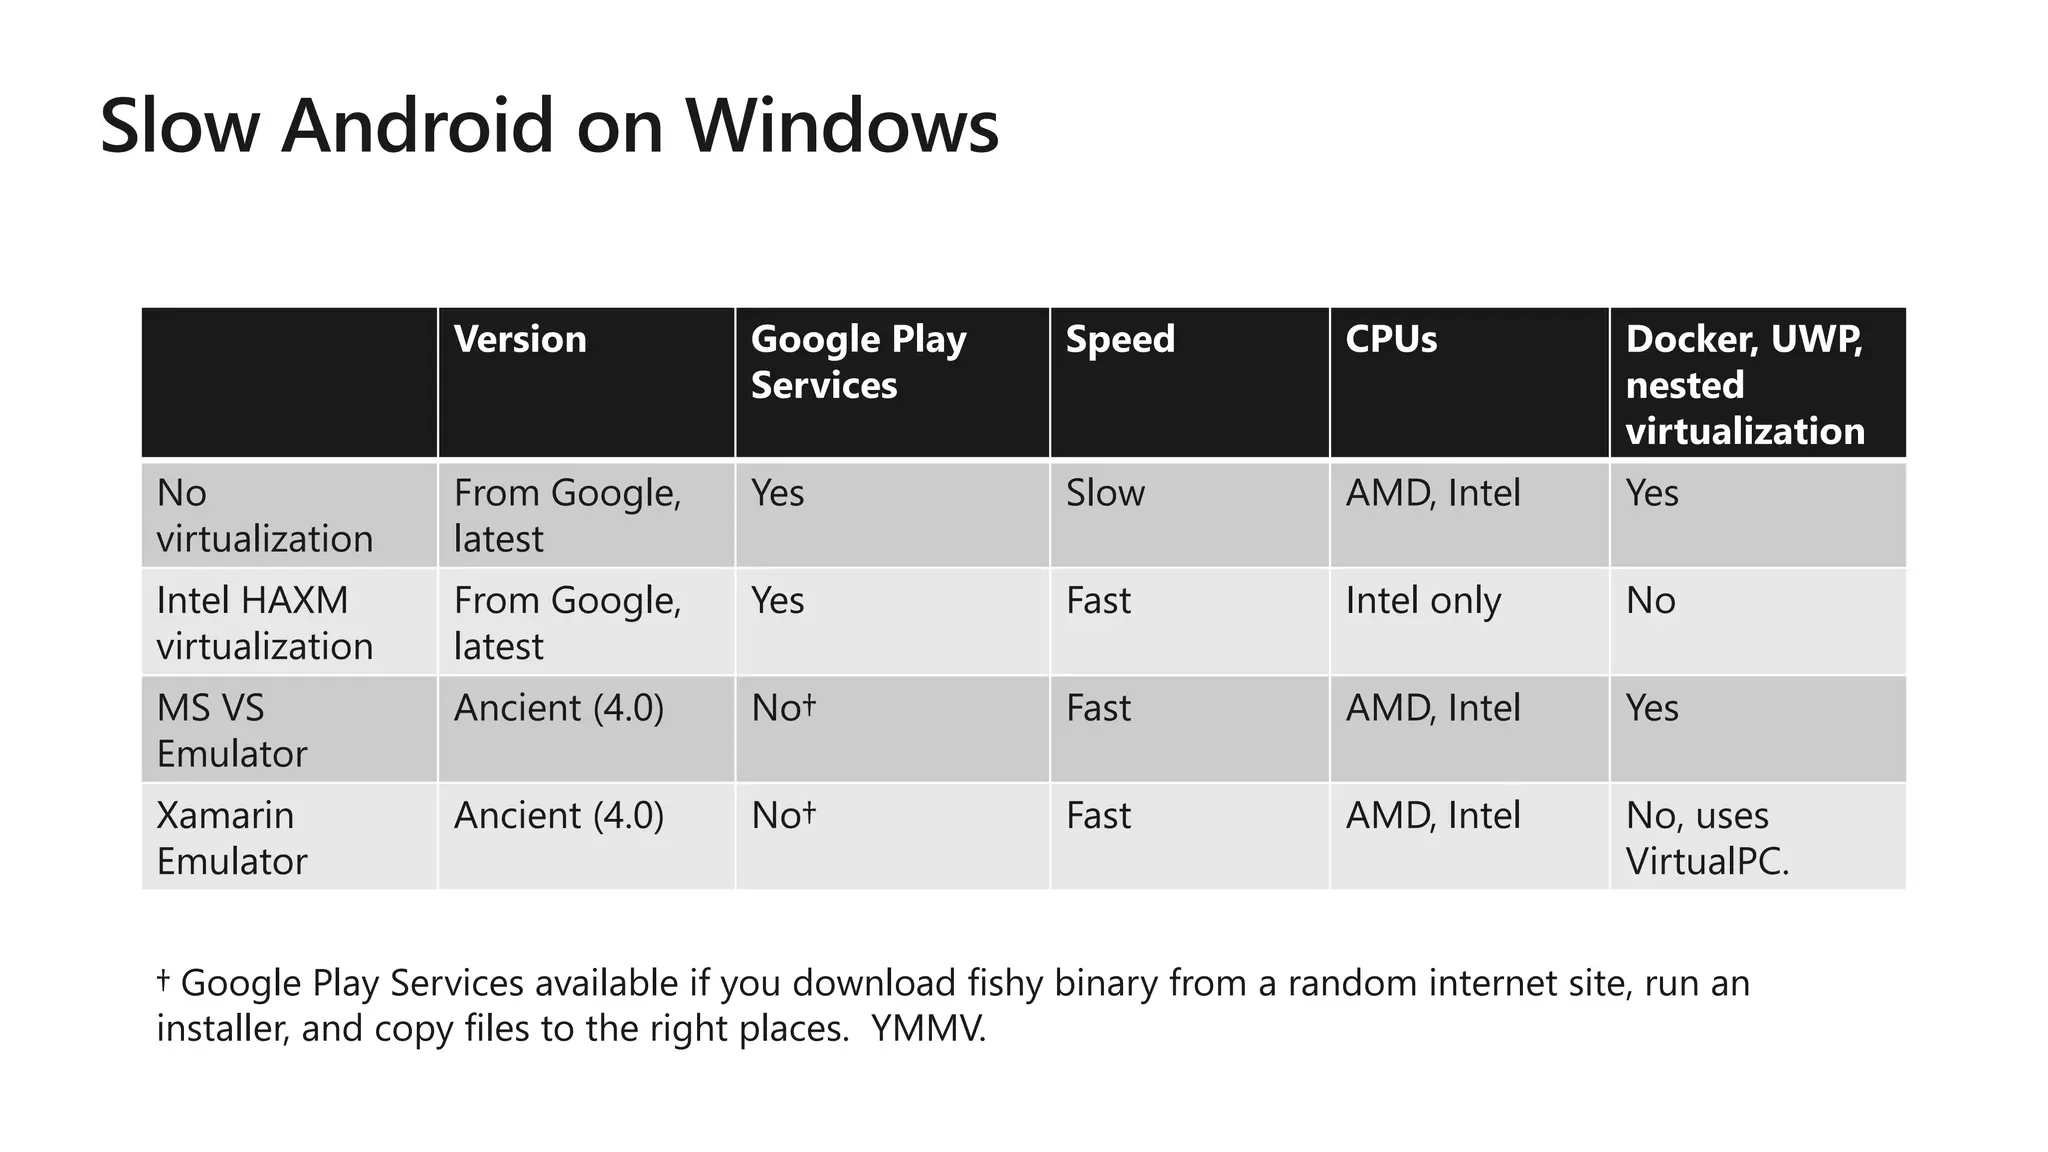
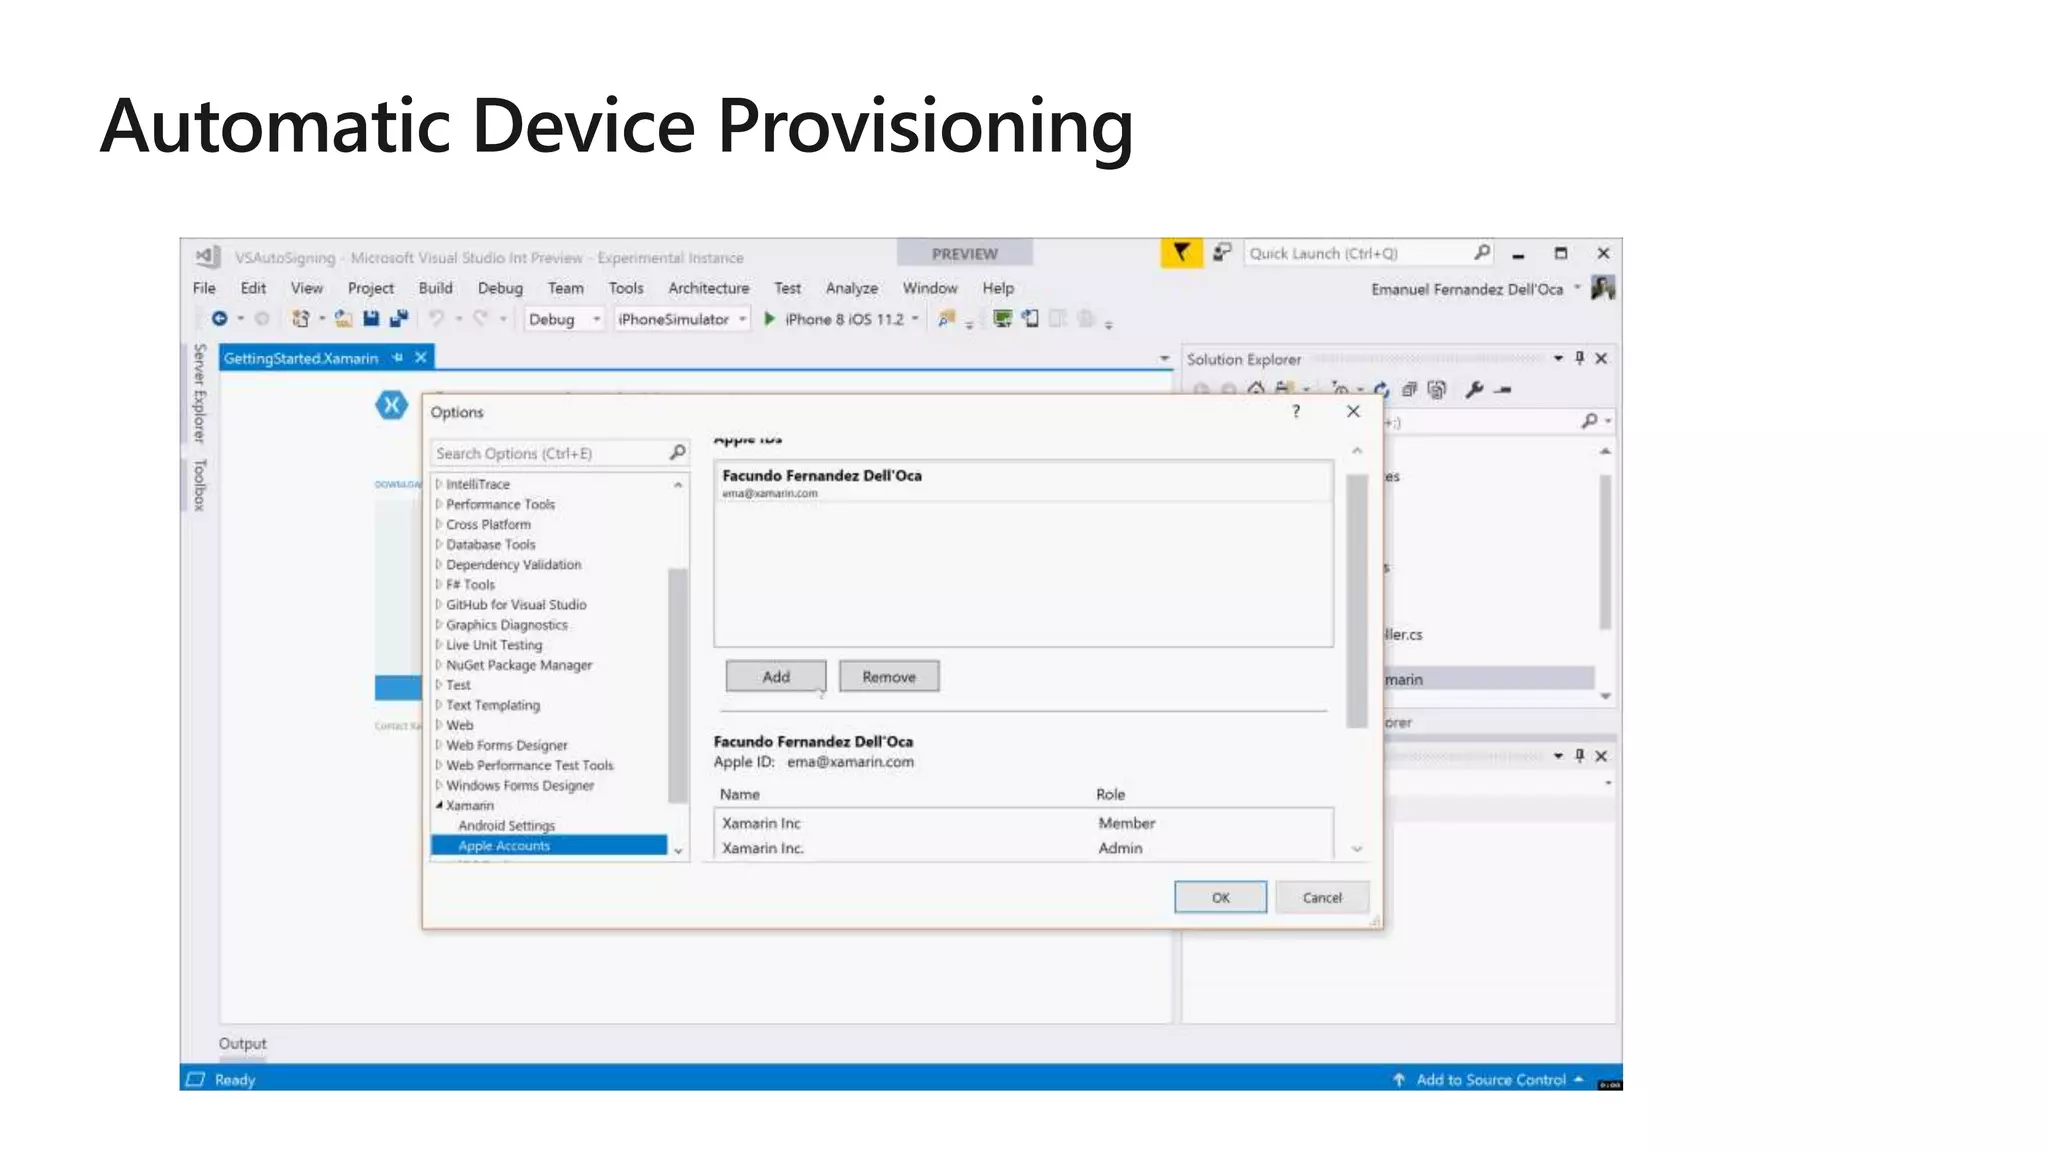
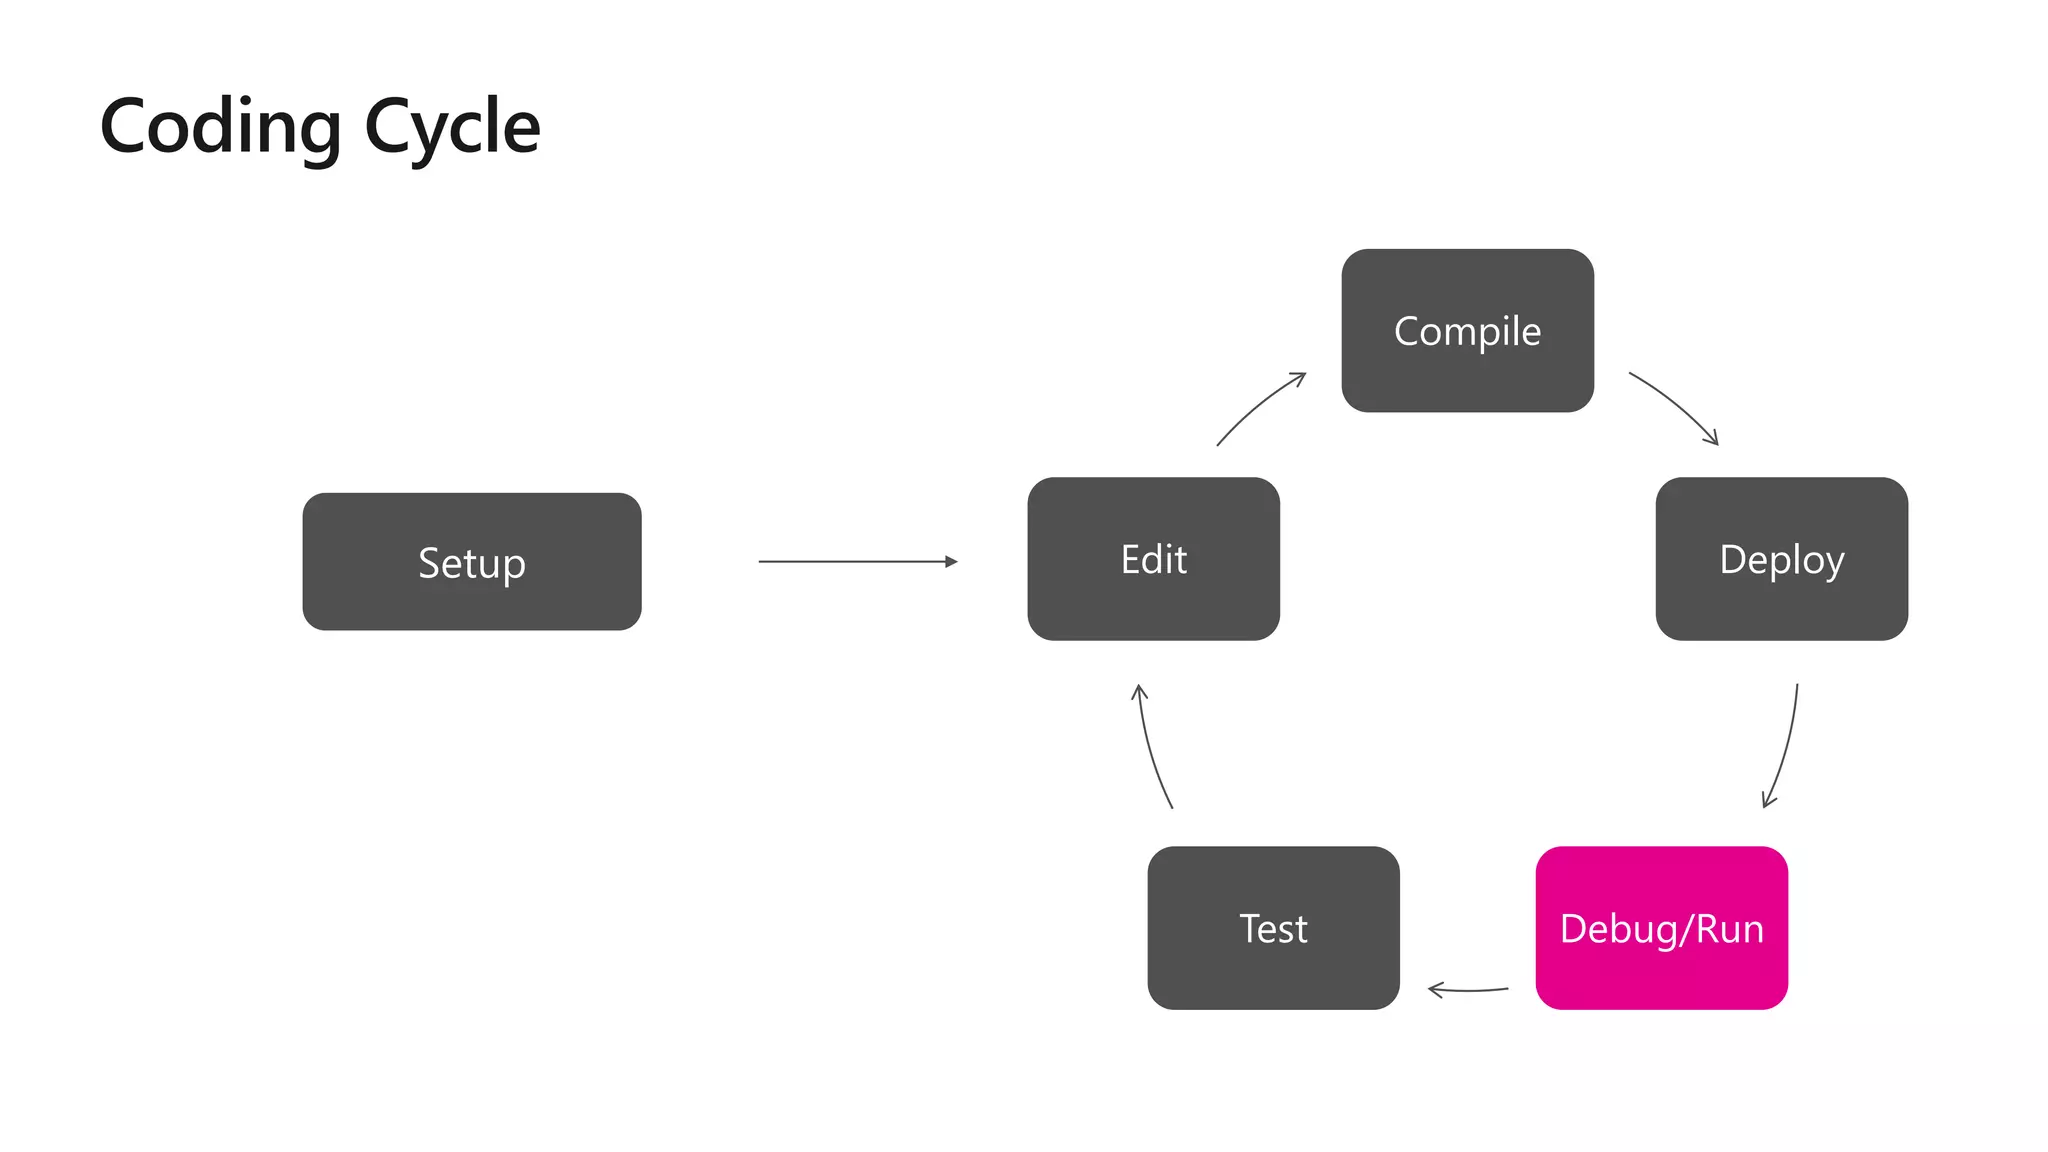
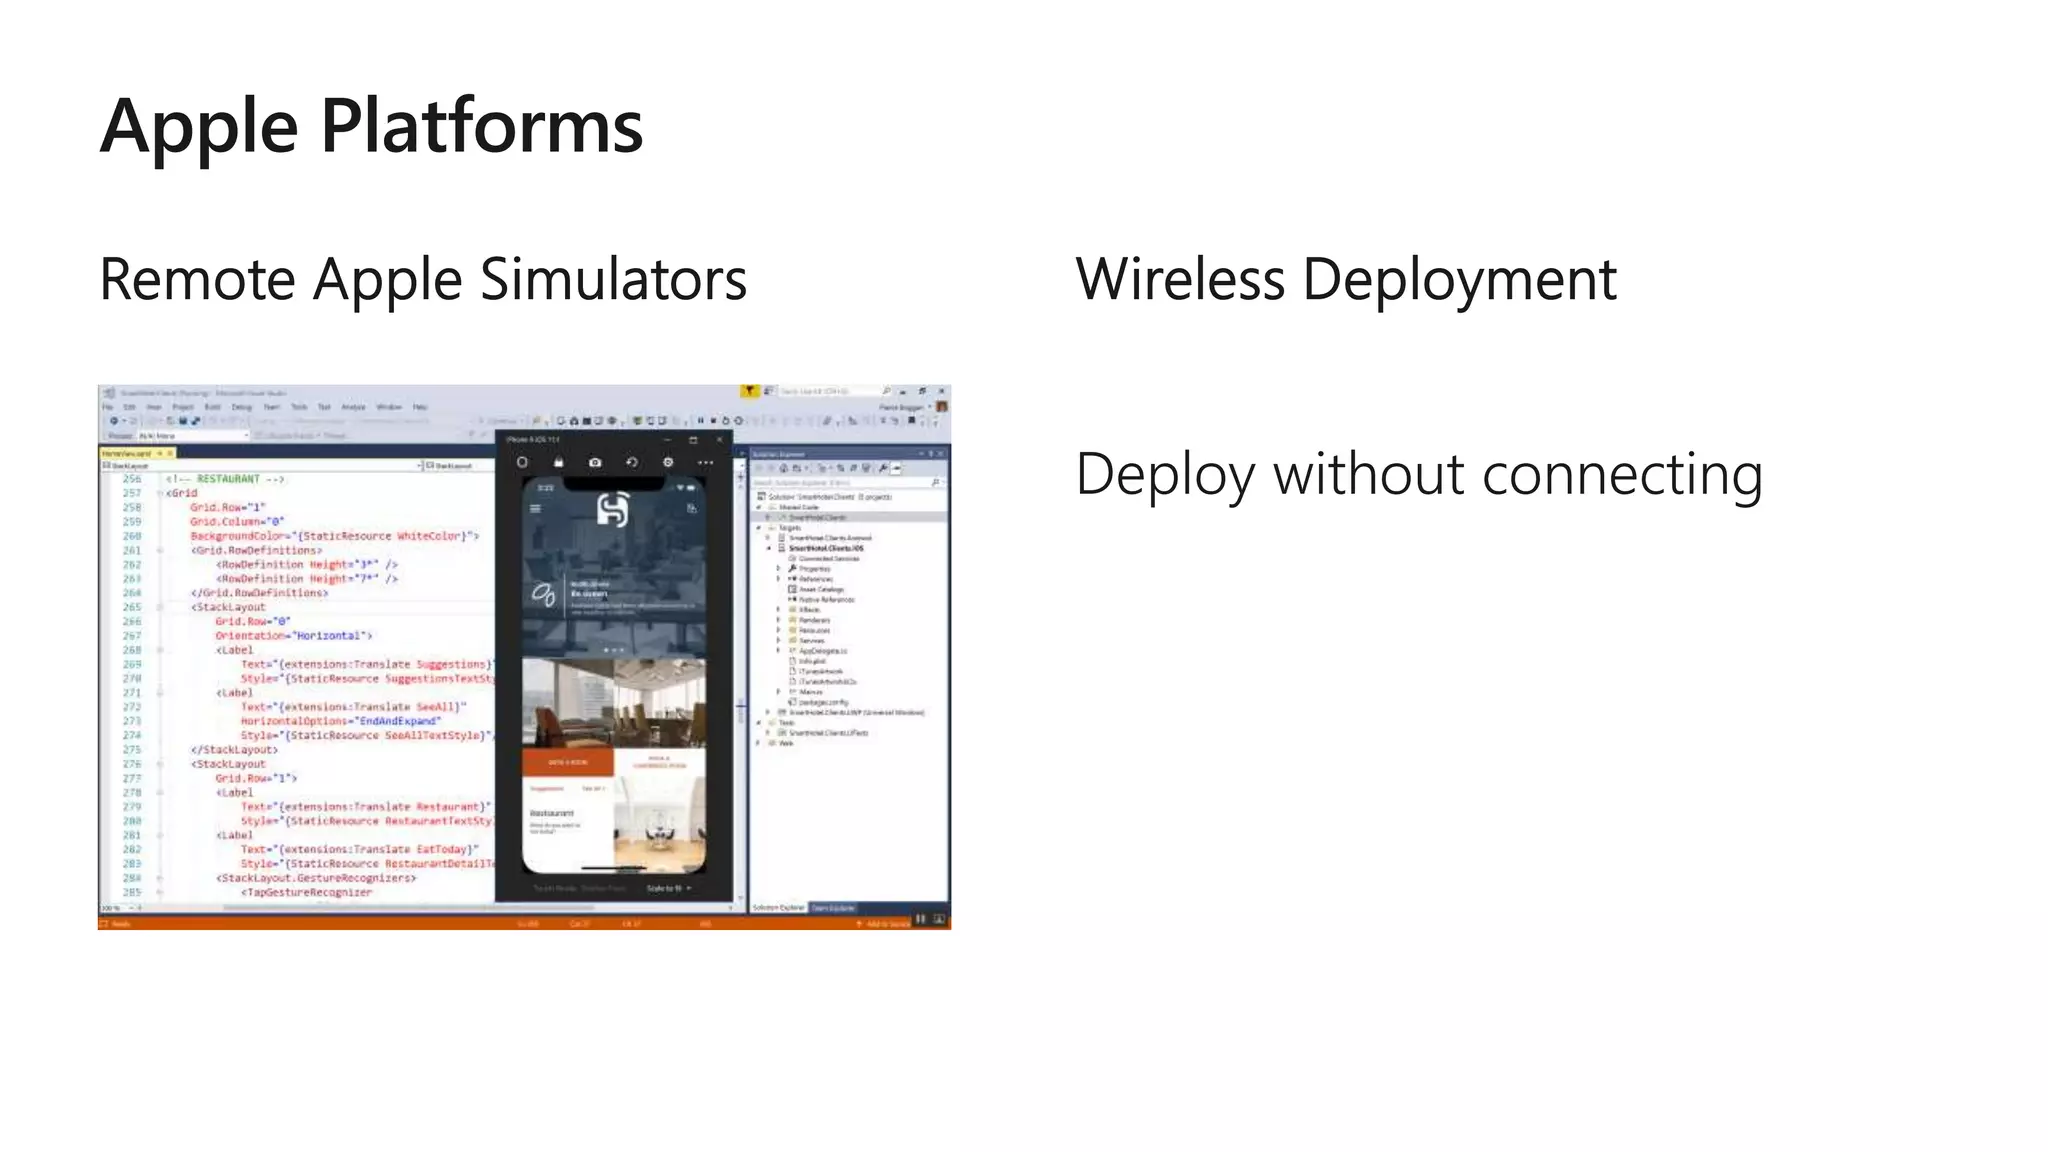
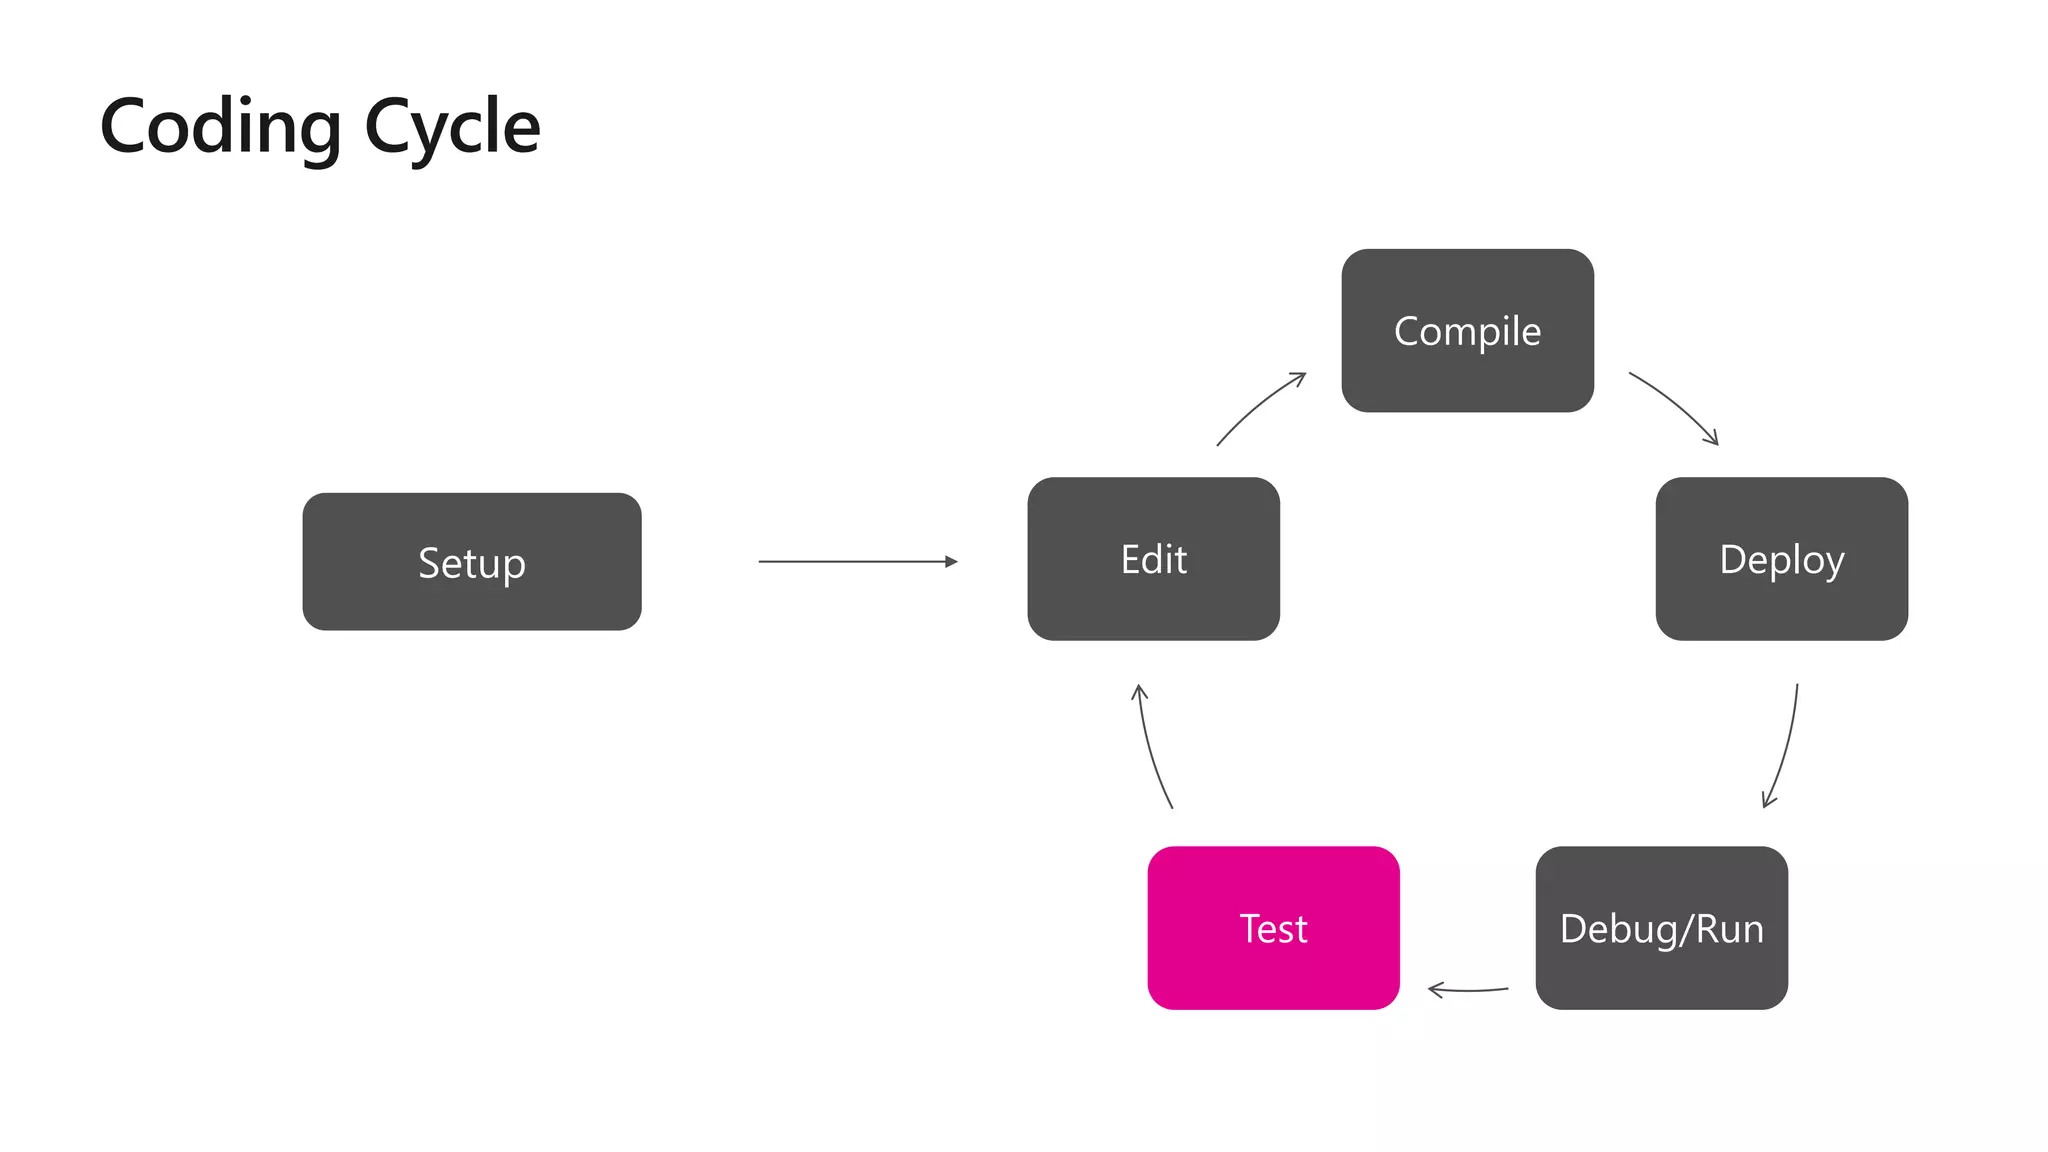
55%
90%
80%
47%
81%
60%
69%
23%
66%
60%
74%
29%
88%
37%
82%
Source: https://www.braze.com/blog/be-your-customers-ritual-consistent-engagement-results-in-90-audience-retention-after-one-month/
Week 1 Week 2 Week 3
55%
90%
80%
47%
81%
60%
69%
23%
66%
60%
74%
29%
88%
37%
82%
Source: https://www.braze.com/blog/be-your-customers-ritual-consistent-engagement-results-in-90-audience-retention-after-one-month/
Week 1 Week 2 Week 3
Design
Code
TestTune
Specify
Design
Code
TestTune
Specify
Design
Code
TestTune
Specify
iOS .NET UI Android .NET UI
Shared .NET Code
Windows .NET UI
Edit
Compile
DeployDebug/Run
Test
Compile
Deploy
Debug/RunTest
Edit
Compile
Deploy
Debug/RunTest
Edit
Compile
Deploy
Debug/RunTest
Edit
Compile
Deploy
Debug/RunTest
Edit
Without Eager Deploy With Eager Deploy
First Run
Master Detail App
106 seconds 81 seconds
First Run
Smart Hotel 360
179 seconds 161 seconds
Version Google Play
Services
Speed CPUs Docker, UWP,
nested
virtualization
No
virtualization
From Google,
latest
Yes Slow AMD, Intel Yes
Intel HAXM
virtualization
From Google,
latest
Yes Fast Intel only No
MS VS
Emulator
Ancient (4.0) No† Fast AMD, Intel Yes
Xamarin
Emulator
Ancient (4.0) No† Fast AMD, Intel No, uses
VirtualPC.
† Google Play Services available if you download fishy binary from a random internet site, run an
installer, and copy files to the right places. YMMV.
5/6/2018 Working with Entitlements - Xamarin | Microsoft Docs
https://docs.microsoft.com/en-us/xamarin/ios/deploy-test/provisioning/entitlements?tabs=vsmac 4/10
5. Select and configure any entitlements required for the Xamarin.iOS
application so that they match the setup that was defined when the App
ID was created.
6. Save the changes to the Entitlements.plist file.
Adding a new Entitlements.plist file
Entitlements are added to an app via the Entitlements.plist file. This file is
included in Xamarin.iOSprojects by default but may be missing from older
projects.
To add an Entitlements.plist file to your Xamarin.iOSdo the following:
1. Right-click on the project file and browse to Add > New File…:
Add Files context menu
2. In the New File dialog select iOS > Property List and name it Entitlements:
5/6/2018 Working with Capabilities - Xamarin | Microsoft Docs
https://docs.microsoft.com/en-us/xamarin/ios/deploy-test/provisioning/capabilities/index?tabs=vsmac 5/14
Developer Center
Using the developer center is a two step process that requires creating an App
ID and then using that App ID to create a provisioning profile. These steps are
detailed below.
Creating an App ID with an app service
1. Browse to the Apple Developer Center on a Mac (the build host mac if using
a windows machine) and log in.
2. Select Certificates, Identifiers, and Profiles:
Apple Developer Center
3. Under Identifiers, select App IDs:
4. Press the + button in the top right corner to create a new App ID.
5/6/2018 Working with Capabilities - Xamarin | Microsoft Docs
https://docs.microsoft.com/en-us/xamarin/ios/deploy-test/provisioning/capabilities/index?tabs=vsmac 6/14
5. Enter an App ID description, select Explicit App ID, and enter a bundle ID in
the format com.domain.appname . This bundle ID should match the bundle ID
in your project:
Adding App ID details
6. Under App Services select the service or services that are required in your
app:
7. Press Continue.
5/6/2018 Working with Capabilities - Xamarin | Microsoft Docs
https://docs.microsoft.com/en-us/xamarin/ios/deploy-test/provisioning/capabilities/index?tabs=vsmac 9/14
Creating a Provisioning Profile
Now create a provisioning profile that contains this App ID. Follow the steps
below:
1. In the Apple Developer Center, browse to Provisioning Profiles > All:
Provisioning Profile section
2. Press the + button in the top right corner to create a new provisioning
profile.
3. Select the type of provisioning profile that you need, and click Continue:
5/6/2018 Working with Capabilities - Xamarin | Microsoft Docs
https://docs.microsoft.com/en-us/xamarin/ios/deploy-test/provisioning/capabilities/index?tabs=vsmac 10/14
4. From the dropdown list, select the App ID that was created in the steps
above and press Continue:
App ID selection
5/6/2018 Working with Capabilities - Xamarin | Microsoft Docs
https://docs.microsoft.com/en-us/xamarin/ios/deploy-test/provisioning/capabilities/index?tabs=vsmac 11/14
5. Select the certificates used to sign the app and press Continue:
6. Select the devices to be included in this profile and press Continue:
Select devices for Provisioning Profile
7. Give the profile a name so that it can be identified and press Continue to
generate the profile:
Name provisioning Profile
Compile
Deploy
Debug/RunTest
Edit
Compile
Deploy
Debug/RunTest
Edit
Baseline Executable
Sizes
Release 15.6 Release 15.7 Improvement
.NET iOS App 7.52 4.98 (2.54 MB)
(34%)
.NET iOS Extension 5.40 4.14 (1.26 MB)
(23%)
Swift 4.14
Objective-C 3.30
Strong native reference to user type
UIKit
UserList
UserListDelegate
GC Root (Reference)
Xamarin
Runtime
Toggle Reference
Weak Reference
Reference
UIKit
UserList
UserListDelegate
GC Root (Reference)
Xamarin
Runtime
Toggle Reference
Weak Reference
Reference
macOS
https://github.com/fsprojects/Elmish.XamarinForms
/// The messages dispatched by the view
type Msg = |
/// The model from which the view is generated
type Model = { : }
/// Returns the initial state
let init() = { =false }
/// The funtion to update the view
let update msg Msg model Model =
match with | -> { with = true }
/// The view function giving updated content for the page
let view model Model dispatch =
if then
="I was pressed!"
else
="Press Me!" = fun ->
type App () =
inherit ()
let runner =
|>
|>
|>
https://github.com/praeclarum/Ooui
http://ooui.mecha.parts/
MaterialShell
Shell
DataTemplate
Grid
Label Text "{x:Bind HeaderText}"
Grid
DataTemplate
Shell
ShellItem Title "My music" ItemsSource "{x:Bind MyMusicModels}"
ShellItem
local:MyMusicItemTemplateSelection
ShellItem
ShellItem
ShellItem Title "Home" Icon "home.png" GroupBehavior "ShowTabs"
ShellTabItem Title "My Friends"
local:FriendsPage
ShellTabItem
local:FeedPage
local:ProfilePage
ShellItem
local:SettingsPage
MenuItem Text "Log Out" Command "{x:Bind LogOutCommand}"
MaterialShell
<?xml version="1.0" encoding="UTF-8" ?>
<Shell xmlns="http://xamarin.com/schemas/2014/forms"
xmlns:x="http://schemas.microsoft.com/winfx/2009/xaml"
xmlns:local="clr-namespace:Xamarin.Store"
x:Class="Xamarin.StoreDemoApp"
Route="s">
<Shell.FlyoutHeader>
<local:HeaderView />
</Shell.FlyoutHeader>
<Shell.MenuItems>
<MenuItem x:Name="preferencesMenuItem" Text="Preferences" Icon="prefs.png" />
<MenuItem x:Name="logOutMenuItem" Text="Logout" Icon="logout.png" />
</Shell.MenuItems>
<ShellItem Route="home" Title="Home" Icon="home.png" GroupBehavior="ShowTabs">
<ShellTabItem Route="updates" Title="Home" Icon="home.png"
ContentTemplate="{DataTemplate local:HomePage}" />
<ShellTabItem Route="games" Title="Games" Icon="games.png"
ContentTemplate="{DataTemplate local:GamesPage}" />
<ShellTabItem Route="settings" Title="Settings" Icon="games.png"
ContentTemplate="{DataTemplate local:SettingsPage}" />
</ShellItem>
<ShellItem Route="apps" Title="Media" Icon="media.png">
<ShellTabItem Route="books" Title="Books" Icon="books.png"
ContentTemplate="{DataTemplate local:BooksPage}" />
<ShellTabItem Route="music" Title="Music" Icon="music.png"
ContentTemplate="{DataTemplate local:MusicPage}" />
<ShellTabItem Route="movies" Title="Movies" Icon="movies.png"
ContentTemplate="{DataTemplate local:MoviesPage}" />
</ShellItem>
</Shell>
Visual Studio and Xamarin: The future of app development

Visual Studio and Xamarin: The future of app development

  • 4.
  • 5.
  • 13.
  • 14.
  • 29.
  • 31.
    iOS .NET UIAndroid .NET UI Shared .NET Code Windows .NET UI
  • 33.
  • 35.
  • 42.
  • 46.
  • 48.
  • 49.
    Without Eager DeployWith Eager Deploy First Run Master Detail App 106 seconds 81 seconds First Run Smart Hotel 360 179 seconds 161 seconds
  • 50.
    Version Google Play Services SpeedCPUs Docker, UWP, nested virtualization No virtualization From Google, latest Yes Slow AMD, Intel Yes Intel HAXM virtualization From Google, latest Yes Fast Intel only No MS VS Emulator Ancient (4.0) No† Fast AMD, Intel Yes Xamarin Emulator Ancient (4.0) No† Fast AMD, Intel No, uses VirtualPC. † Google Play Services available if you download fishy binary from a random internet site, run an installer, and copy files to the right places. YMMV.
  • 63.
    5/6/2018 Working withEntitlements - Xamarin | Microsoft Docs https://docs.microsoft.com/en-us/xamarin/ios/deploy-test/provisioning/entitlements?tabs=vsmac 4/10 5. Select and configure any entitlements required for the Xamarin.iOS application so that they match the setup that was defined when the App ID was created. 6. Save the changes to the Entitlements.plist file. Adding a new Entitlements.plist file Entitlements are added to an app via the Entitlements.plist file. This file is included in Xamarin.iOSprojects by default but may be missing from older projects. To add an Entitlements.plist file to your Xamarin.iOSdo the following: 1. Right-click on the project file and browse to Add > New File…: Add Files context menu 2. In the New File dialog select iOS > Property List and name it Entitlements: 5/6/2018 Working with Capabilities - Xamarin | Microsoft Docs https://docs.microsoft.com/en-us/xamarin/ios/deploy-test/provisioning/capabilities/index?tabs=vsmac 5/14 Developer Center Using the developer center is a two step process that requires creating an App ID and then using that App ID to create a provisioning profile. These steps are detailed below. Creating an App ID with an app service 1. Browse to the Apple Developer Center on a Mac (the build host mac if using a windows machine) and log in. 2. Select Certificates, Identifiers, and Profiles: Apple Developer Center 3. Under Identifiers, select App IDs: 4. Press the + button in the top right corner to create a new App ID. 5/6/2018 Working with Capabilities - Xamarin | Microsoft Docs https://docs.microsoft.com/en-us/xamarin/ios/deploy-test/provisioning/capabilities/index?tabs=vsmac 6/14 5. Enter an App ID description, select Explicit App ID, and enter a bundle ID in the format com.domain.appname . This bundle ID should match the bundle ID in your project: Adding App ID details 6. Under App Services select the service or services that are required in your app: 7. Press Continue. 5/6/2018 Working with Capabilities - Xamarin | Microsoft Docs https://docs.microsoft.com/en-us/xamarin/ios/deploy-test/provisioning/capabilities/index?tabs=vsmac 6/14 5. Enter an App ID description, select Explicit App ID, and enter a bundle ID in the format com.domain.appname . This bundle ID should match the bundle ID in your project: Adding App ID details 6. Under App Services select the service or services that are required in your app: 7. Press Continue. 5/6/2018 Working with Capabilities - Xamarin | Microsoft Docs https://docs.microsoft.com/en-us/xamarin/ios/deploy-test/provisioning/capabilities/index?tabs=vsmac 9/14 Creating a Provisioning Profile Now create a provisioning profile that contains this App ID. Follow the steps below: 1. In the Apple Developer Center, browse to Provisioning Profiles > All: Provisioning Profile section 2. Press the + button in the top right corner to create a new provisioning profile. 3. Select the type of provisioning profile that you need, and click Continue: 5/6/2018 Working with Capabilities - Xamarin | Microsoft Docs https://docs.microsoft.com/en-us/xamarin/ios/deploy-test/provisioning/capabilities/index?tabs=vsmac 10/14 4. From the dropdown list, select the App ID that was created in the steps above and press Continue: App ID selection 5/6/2018 Working with Capabilities - Xamarin | Microsoft Docs https://docs.microsoft.com/en-us/xamarin/ios/deploy-test/provisioning/capabilities/index?tabs=vsmac 11/14 5. Select the certificates used to sign the app and press Continue: 6. Select the devices to be included in this profile and press Continue: Select devices for Provisioning Profile 7. Give the profile a name so that it can be identified and press Continue to generate the profile: Name provisioning Profile
  • 65.
  • 67.
  • 79.
    Baseline Executable Sizes Release 15.6Release 15.7 Improvement .NET iOS App 7.52 4.98 (2.54 MB) (34%) .NET iOS Extension 5.40 4.14 (1.26 MB) (23%) Swift 4.14 Objective-C 3.30
  • 81.
  • 82.
  • 83.
  • 86.
  • 91.
    https://github.com/fsprojects/Elmish.XamarinForms /// The messagesdispatched by the view type Msg = | /// The model from which the view is generated type Model = { : } /// Returns the initial state let init() = { =false } /// The funtion to update the view let update msg Msg model Model = match with | -> { with = true } /// The view function giving updated content for the page let view model Model dispatch = if then ="I was pressed!" else ="Press Me!" = fun -> type App () = inherit () let runner = |> |> |>
  • 92.
  • 94.
    MaterialShell Shell DataTemplate Grid Label Text "{x:BindHeaderText}" Grid DataTemplate Shell ShellItem Title "My music" ItemsSource "{x:Bind MyMusicModels}" ShellItem local:MyMusicItemTemplateSelection ShellItem ShellItem ShellItem Title "Home" Icon "home.png" GroupBehavior "ShowTabs" ShellTabItem Title "My Friends" local:FriendsPage ShellTabItem local:FeedPage local:ProfilePage ShellItem local:SettingsPage MenuItem Text "Log Out" Command "{x:Bind LogOutCommand}" MaterialShell
  • 96.
    <?xml version="1.0" encoding="UTF-8"?> <Shell xmlns="http://xamarin.com/schemas/2014/forms" xmlns:x="http://schemas.microsoft.com/winfx/2009/xaml" xmlns:local="clr-namespace:Xamarin.Store" x:Class="Xamarin.StoreDemoApp" Route="s"> <Shell.FlyoutHeader> <local:HeaderView /> </Shell.FlyoutHeader> <Shell.MenuItems> <MenuItem x:Name="preferencesMenuItem" Text="Preferences" Icon="prefs.png" /> <MenuItem x:Name="logOutMenuItem" Text="Logout" Icon="logout.png" /> </Shell.MenuItems> <ShellItem Route="home" Title="Home" Icon="home.png" GroupBehavior="ShowTabs"> <ShellTabItem Route="updates" Title="Home" Icon="home.png" ContentTemplate="{DataTemplate local:HomePage}" /> <ShellTabItem Route="games" Title="Games" Icon="games.png" ContentTemplate="{DataTemplate local:GamesPage}" /> <ShellTabItem Route="settings" Title="Settings" Icon="games.png" ContentTemplate="{DataTemplate local:SettingsPage}" /> </ShellItem> <ShellItem Route="apps" Title="Media" Icon="media.png"> <ShellTabItem Route="books" Title="Books" Icon="books.png" ContentTemplate="{DataTemplate local:BooksPage}" /> <ShellTabItem Route="music" Title="Music" Icon="music.png" ContentTemplate="{DataTemplate local:MusicPage}" /> <ShellTabItem Route="movies" Title="Movies" Icon="movies.png" ContentTemplate="{DataTemplate local:MoviesPage}" /> </ShellItem> </Shell>

Editor's Notes