
Recommended
Recommended
More Related Content
What's hot
What's hot (20)
Similar to Using webblocks for popups in Outsystems Mobile
Similar to Using webblocks for popups in Outsystems Mobile (20)
Recently uploaded
Recently uploaded (9)
Using webblocks for popups in Outsystems Mobile
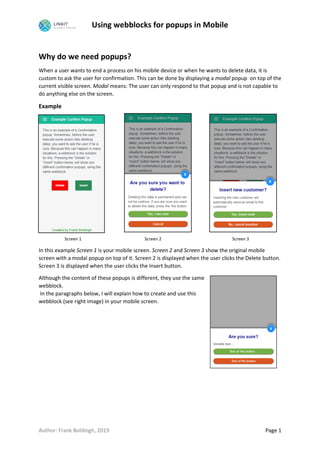
- 1. Using webblocks for popups in Mobile Author: Frank Boldingh, 2019 Page 1 Why do we need popups? When a user wants to end a process on his mobile device or when he wants to delete data, it is custom to ask the user for confirmation. This can be done by displaying a modal popup on top of the current visible screen. Modal means: The user can only respond to that popup and is not capable to do anything else on the screen. Example Screen 1 Screen 2 Screen 3 In this example Screen 1 is your mobile screen. Screen 2 and Screen 3 show the original mobile screen with a modal popup on top of it. Screen 2 is displayed when the user clicks the Delete button. Screen 3 is displayed when the user clicks the Insert button. Although the content of these popups is different, they use the same webblock. In the paragraphs below, I will explain how to create and use this webblock (see right image) in your mobile screen.
- 2. Using webblocks for popups in Mobile Author: Frank Boldingh, 2019 Page 2 Define your popup webblock We are going to create webblock “wbConfirm”. This webblock contains 2 buttons (a Yes button and a Cancel button), some texts and a alternative way to cancel and close the popup (the white cross in blue background in the upper right) It is advisable to store all your webblocks in a separate UI-flow. For webblocks that you will reuse very often (also in other apps) it is even better to store them in a separate module (like a library module). Here I stored the webblock in the same app, in the UI-Flow “MyWebBlocks”. Because you want to reuse this webblock with different texts and button texts, add the four input parameters you see on the left (all text datatypes). Create a client action for each button. Leave these client actions empty for now. Also create two events (No and Yes event). A webblock use events to tell the screen (or webblock) where this webblock is used, what to do. Create all the visible elements of the webblock and style them On the left you see all the visible elements of this webblock. On the right you see the widget tree that shows some of containers, expressions, buttons and text. Some of these elements have specific classes. Notice the grey background on the left image, that is also a visible element, it is the main element with a semi-transparent grey background-color. In the next paragraphs I will explain each element from top to bottom and I will provide the CSS I used.
- 3. Using webblocks for popups in Mobile Author: Frank Boldingh, 2019 Page 3 wbConfirm-Modal This is a container which uses Style Class “wbConfirm-Modal”. This container must cover the complete mobile screen and must lay on top of all other elements of the mobile screen where this webblock is used. The z-index of the header and bottom of a typical webscreen is 50. So for being on top of the webscreen, this container must have a z-index higher than 50. The background-color of this container must be semi-transparent. For this container I used the following CSS: wbConfirm-ModalContent This container uses Style Class “wbConfirm-ModalContent”. It has a flexible height, if the text in this webblock is more than 1 line, the height of this container will expand. The bottom of this container is fixed to the bottom of the screen. The CSS of this container is: wbConfirm-Content This container takes care of the padding of the content. It has a width of Fill (100%) The CSS is:
- 4. Using webblocks for popups in Mobile Author: Frank Boldingh, 2019 Page 4 wbConfirm-Cross This container needs a negative margin-top. The complete CSS is: h2 bold wbConfirm-MainText This container contains an expression. This main text (the expression) is provided via the input parameter MainText. This container is center aligned and uses three Style Classes. The classes h2 and bold are already included in the Outsystems theme. For class wbConfirm-MainText I used the following CSS: wbConfirm-SubText This container contains an expression, the subtext is provided via the input parameter SubText. The CSS for this container is: myButton To give all your buttons the same look and feel, you have to place the CSS for the buttons in the App- CSS instead of the CSS for each webscreen. I used this CSS for myButton:
- 5. Using webblocks for popups in Mobile Author: Frank Boldingh, 2019 Page 5 myButton-secondary Because the only difference between this class and the previous defined class myButton is the background-color, the CSS of this class is: Always use this style-class in combination with style-class myButton (myButton myButton- secondary). myButton first! Client actions If you followed all the instructions above, you have created the two following empty client-actions for this webblock. If not, create them (without any content yet): • OnClick_Yes • OnClick_Cancel Now, bind the OnClick_Yes action to the click-event of the Yes button. Bind the OnClick_Cancel action to the click event of the No button and to the onClick event of the wbConfirm-Crosss container. Because webblocks can be re-used in many screens, you cannot exactly specify in these client- actions what to do. What you can do is: • Do changes (like changing variables) in the webblock itself, and/or; • Tell the mobile screen where this webblock is used what to do. This is done by triggering an event. An event can have input parameters (e.g. you fill them with values of webblock variables). For the wbConfirm webblock the OnClick_Yes and On-Click_Cancel client actions only triggers an event. OnClick_Yes This event only triggers the Yes event. OnClick_Cancel This event only triggers the No event.
- 6. Using webblocks for popups in Mobile Author: Frank Boldingh, 2019 Page 6 Add the webblock to your mobile screen In my mobile screen I want to display the confirm popup when I click the Delete button and also when clicking the insert button. You can add 1 wbConfirm webblock to your screen for that and use different parameters, depending whether you click the Delete or the Insert button. I chose for adding the webblock twice to my screen, each with its own input parameters and event handlers. On the right you see the content of my screen in the widget-tree. Notice that I added the webblock twice to my screen, one for the Delete button and one for the Insert button. I named them wbConfirmDelete and wbConfirmInsert. Because you want the popup only to be visible when you press the delete- or insert button, I enclosed each webblock in an IF-widget, each using a boolean condition-variable (showConfirm_Delete and showConfirm_Insert). On the lower half of the image, you see the values for the input parameters I used for the Delete popup. For the Insert popup I used other values. Notice the Event handlers. Each time you add this webblock to your screen, you have to create event handlers in that screen, meaning screen actions that are be executed when the webblock triggers an event (e.g. when you click the Yes button). The webblock for the Insert button will have its own event handlers. Using the webblock in your mobile screen Clicking the Delete button The only thing you need to do here is to display the webblock for the delete button. You do that by setting the screen variable ShowConfirm_Delete to True. So create a client action that is bound to the onclick event of the Delete button. In that client action, place an assignment ShowConfirm_Delete = True.
- 7. Using webblocks for popups in Mobile Author: Frank Boldingh, 2019 Page 7 Clicking the Insert button The only thing you need to do here is to display the webblock for the insert button. You do that by setting the screen variable ShowConfirm_Insert to True. So create a client action that is bound to the onclick event of the Insert button. In that client action, place an assignment ShowConfirm_Insert = True. Event handler: wbConfirmDeleteNo On the previous page you saw that this action is executed when the user clicks the NO button. What you want to do here is to hide the confirm popup. You can do that by setting the screen variable ShowConfirm_Delete to False. Event handler: wbConformDeleteYes Do here things like Deleting a record. When you finished that, you want the popup to hide. Set the screen variable ShowConfirm_Delete to False for that. For wbConfirmInsertNo and wbConfirmInsertYes, you can do similar things, but use its own screen variable (ShowConfirm_Insert) to hide the popup. Tip 1: hide popup during design-time When adding a webblock to your screen, you see the content of that webblock during design time. Because this webblock has a high z-index, all other elements of your screen are blocked from view. To prevent this you can tell the IF-widget that encloses the webblock only to display the False branch during design time: Tip 2: class naming convention for webblocks When two different webblock are used in the same screen and both webblocks have in their CSS a style-class with the same name, they can adversely affect each other, causing strange unexpected effects. You can prevent that e.g. by using unique class-names. For the wbConfirm webblock I used prefix “wbConfirm” for each class I made in the CSS. Advanced features When clicking a button twice with a very small interval (like a double-click), this can result in doing a certain action twice. Sometimes this is not an issue (like setting a variable twice to True or False). But sometimes you don’t want that. In that case, the first thing you have to do is make the button disabled (e.g. by setting a variable that makes this button disabled). This can also be done for buttons in webblocks.