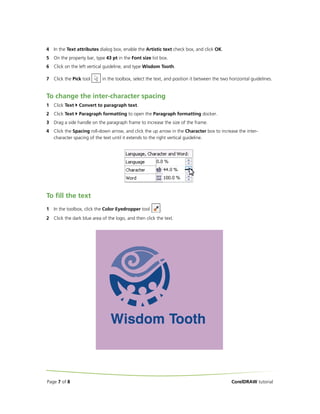
Vectorizing images
In this CorelDRAW tutorial, you will learn how to vectorize a bitmap logo image by tracing it, converting it from pixels to editable vector objects. Specifically, you will import and crop the bitmap logo, then use PowerTRACE to convert it to a vector graphic while adjusting settings for optimum results. You will also identify and install the font used in the logo text, replace the text in the vector image, and modify properties like character spacing to match the original bitmap logo. The tutorial covers important vectorization techniques like tracing, ungrouping objects, and filling objects with color that are useful for graphics editing.
This document is a tutorial that teaches how to vectorize a bitmap image in CorelDRAW. It discusses importing a bitmap logo, tracing it to convert it to a vector image using PowerTRACE, and then replacing the text within the logo by ungrouping objects, deleting the text and background, and creating new text along a curved path within the logo. The overall goal is to learn how to convert a bitmap image to editable vector objects while modifying elements like text.
This tutorial teaches how to create personalized business cards using CorelDRAW's print merge feature. It shows how to set up a business card document, import a logo graphic, add text, create contact records in a text file, insert merge fields into the business card template, perform the print merge to create individual cards, and print multiple cards per sheet. The print merge allows applying variable text to the same design, which is useful for creating items like business cards, labels, and invitations.
This tutorial introduces layout tools in CorelDRAW like guidelines, frames, and alignment options. It guides the user through creating an advertisement for "The Coffee Shop" including importing images, adding artistic and paragraph text, and arranging elements. Guidelines, snapping, and PowerClip are used to precisely position graphics and text. Formatting is applied to headings and body text.
This document provides a tutorial for creating a logo for a coffee shop in CorelDRAW. The tutorial instructs the user to:
1. Create triangular shapes to form the background using tools like the Smart drawing tool, Rotate, Mirror, and Group.
2. Add color to the triangles and add decorative circles.
3. Create overlapping squares and rotate them to form a diamond shape for the coffee cup.
4. Import a coffee cup image and add a drop shadow.
5. Import a banner image and add curved text using the 3 Point curve and Text tools.
This tutorial provides instructions for creating vector graphics in Corel Draw and Adobe Illustrator. It covers topics such as drawing simple lines, creating empty spaces, working with text, and ensuring thin points and lines meet thickness requirements. The document is organized into sections that provide step-by-step explanations of the tools and techniques needed to design graphics that meet criteria for print processes. Readers will learn how to use various shape and text tools, convert objects, add outlines, and test designs using 1.5mm circles to ensure all elements have the necessary thickness.
LO4 – Be able to edit materials to produce a final print media productmdelmar97
The document outlines the post-production skills used to create a magazine in Adobe Photoshop CS5. It lists the various tools used such as the crop tool, clone stamp tool, and pen tool along with their purposes. It also discusses following safe working practices like maintaining color consistency and font styles. The front cover and double page spread are compared from first to final drafts. A witness statement is included to verify the completion of the work. In conclusion, the importance of documenting the post-production process and tools used to edit materials into a final print product is emphasized.
The document discusses Microsoft Publisher 2013 and provides an overview of its capabilities and how to get started using the program. It covers topics like understanding Publisher's support for commercial printing, applying design concepts, starting a new publication from a template or blank file, and exploring the Publisher interface. The document also provides instructions for basic formatting tasks in Publisher like inserting text boxes, changing font colors and styles, and using master pages.
This document provides an introduction to Adobe PageMaker, including definitions, features, advantages, disadvantages, and how to use it. PageMaker is a desktop publishing program that allows users to design documents like books, brochures, and newsletters. It includes tools for placing images, data merging, improved PDF support, and updated filters. The document also explains how to create a new PageMaker document and utilize various palettes that control objects, text, styles, layers, master pages, and hyperlinks.
This document is a tutorial that teaches how to vectorize a bitmap image in CorelDRAW. It explains how to import a bitmap logo, trace it to convert it to a vector image using PowerTRACE, and then replace the text within the logo by ungrouping objects, deleting the text and background, and creating new text along a curved path within the logo. The tutorial also previews the tracing results and allows adjustments to tracing settings. It aims to teach how to import, trace, draw shapes, ungroup objects, delete objects, type text on a path, and use various drawing tools.
In this CorelDRAW tutorial, the learner will create an advertisement layout for "The Coffee Shop" to learn layout and organization tools. They will create a colored background, import and position images, add artistic and paragraph text, apply drop shadows and alignments. The tutorial covers creating frames, snapping guides, and importing assets to design the multi-element advertisement layout.
This document provides a tutorial on the CorelDRAW workspace. It introduces the various tools in the toolbar, toolbox, property bar, and dockers. It then walks through creating a simple drawing using these tools, such as drawing rectangles and curved lines, adding text, and modifying object properties. The tutorial concludes by customizing the workspace layout and toolbars.
This document provides a tutorial on the CorelDRAW workspace. It introduces the various tools in the toolbar, toolbox, property bar, and dockers. It guides the user through creating a simple drawing using these tools, such as drawing rectangles and curved lines, adding text, and modifying object properties. It also covers customizing the workspace by creating new toolbars and saving workspace configurations.
This tutorial introduces layout tools in CorelDRAW like guidelines, frames, and alignment options. It guides the user through creating an advertisement for "The Coffee Shop" including importing images, adding artistic and paragraph text, and arranging elements. Guidelines, snapping, and PowerClip are used to precisely position graphics and text. Formatting is applied to headings and body text.
The document provides a tutorial on the CorelDRAW workspace. It introduces the various tools in the toolbar, toolbox, property bar, flyouts, and Docker windows/palettes. It demonstrates how to use these tools to create a simple drawing with text, shapes, lines, and effects. The tutorial also covers customizing the workspace by creating new toolbars and settings.
This tutorial introduces the CorelDRAW workspace and tools. It teaches how to use the toolbar, toolbox, property bar, flyouts, Docker windows, mouse commands, and Help to create a simple drawing with text, shapes, lines, and a colored background. The last section explains how to customize the workspace by configuring toolbars and other settings.
The document provides instructions for creating posters using Adobe Illustrator CS5 and the HP DesignJet 5500 plotter at Middlebury College. It details how to set up the file, insert and format text and images, and print the poster. Key points include using landscape orientation at 64x41 inches, consulting staff for help, and treating the plotter kindly to avoid issues. Design tips emphasize keeping the poster simple, legible, and well-organized with an effective use of graphics, fonts, colors and layout.
The document provides a tutorial for creating a logo for a coffee shop in CorelDRAW. It includes instructions on how to draw shapes, add color, duplicate and rotate objects, import images, and use tools like the smart drawing, ellipse, rectangle, and text tools. Specifically, it describes how to create triangles to form the background, add decorative circles, create overlapping squares to form a diamond shape for the coffee cup image, and add a drop shadow to make the coffee cup stand out. The goal is to learn key skills in CorelDRAW by building this multi-step logo design.
This document discusses using Axure to represent visual design in prototypes. It provides tips for defining colors and styles, using images effectively, and promoting reuse through masters, libraries and templates. The document recommends using Axure's color palette and style editor to define colors and formatting. It also suggests techniques like image maps, slicing, preserving corners and styles to make images more interactive. Further, it advocates applying a grid during design through masters but hiding it before generating prototypes to avoid clutter. The goal is to test visual design effectively while prototyping without compromising usability.
This 12-page CorelDRAW tutorial teaches the user how to create a logo for a fictional coffee shop. It provides step-by-step instructions on how to draw shapes, add color, duplicate objects, rotate objects, import images, add text to a path, and use various drawing tools. The user learns how to create the background triangles, decorative circles, a diamond shape overlay, and add a coffee cup graphic, banner, and text. Finally, the user saves the completed coffee shop logo file.
This document provides instructions for creating a layout template in CorelDRAW for a barrel-fold brochure with three panels. The steps include setting the page size to A4 landscape, adding guidelines to divide the page into three equal sections, creating master layers for bleed areas and printing margins, setting up 3mm bleeds and 12mm print margins using rectangles, and saving the finished layout as a template for a tri-fold barrel brochure.
The document discusses productivity tools and advanced application techniques. It defines productivity tools as those used to organize, manipulate, shape and present ideas efficiently. Key productivity tools identified are Microsoft Word, Excel and PowerPoint. Advanced techniques covered include mail merge and label generation in Word, custom animations and timing in PowerPoint, hyperlinking across documents, integrating images and external material into documents, and embedding files and data. Examples and step-by-step instructions are provided for how to implement many of these techniques using Microsoft Office applications.
This tutorial teaches how to create a logo for a coffee shop in CorelDRAW. It demonstrates how to draw shapes, add color, rotate and mirror objects, import images, add text to a path, and use tools like the smart drawing tool, ellipse tool and drop shadow tool. The final logo brings together various graphic elements like triangles, circles, squares and imported images of a coffee cup and banner to create a cohesive design representing the coffee shop.
This tutorial teaches how to create a logo for a coffee shop in CorelDRAW. It includes steps to draw shapes, add color, duplicate and arrange objects, import images, add text to a path, and use tools like the smart drawing tool, ellipse tool and drop shadow tool. The final logo combines graphical elements like triangles, circles, squares and imported images of a coffee cup and banner with text along a curved path.
This document provides a tutorial for using Adobe InDesign CS6. It begins with an introduction to InDesign and its capabilities. The tutorial then covers getting started, setting up a document, using the toolbox and its tools, organizing a document with columns, rulers and guides, inserting and formatting text, and other InDesign features like saving, exporting to PDF and new features in CS6. It aims to take beginners through the software from start to finish.
This document provides instructions on how to perform various tasks in Microsoft Word, including inserting and formatting pictures, clip art, shapes, SmartArt, charts, and screen clippings. It also discusses the mail merge feature, which allows creating multiple documents linked to a single data source. Specifically, it outlines how to create a main document, link it to a data source, and perform the mail merge to generate individual documents. Formatting techniques for various inserted objects are also described.
This document provides instructions for creating a layout template for a barrel-fold brochure in CorelDRAW. The tutorial explains how to set up the page properties, add guidelines to divide the pages, create master layers for bleed areas and printing margins, and save the finished layout as a template. Key steps include changing the page orientation and size, adding rectangles to represent folds and margins, and using mathematical operators to precisely position and size elements.
Practical eLearning Makeovers for EveryoneBianca Woods
Welcome to Practical eLearning Makeovers for Everyone. In this presentation, we’ll take a look at a bunch of easy-to-use visual design tips and tricks. And we’ll do this by using them to spruce up some eLearning screens that are in dire need of a new look.
Connect Conference 2022: Passive House - Economic and Environmental Solution...TE Studio
Passive House: The Economic and Environmental Solution for Sustainable Real Estate. Lecture by Tim Eian of TE Studio Passive House Design in November 2022 in Minneapolis.
- The Built Environment
- Let's imagine the perfect building
- The Passive House standard
- Why Passive House targets
- Clean Energy Plans?!
- How does Passive House compare and fit in?
- The business case for Passive House real estate
- Tools to quantify the value of Passive House
- What can I do?
- Resources
EASY TUTORIAL OF HOW TO USE CAPCUT BY: FEBLESS HERNANEFebless Hernane
CapCut is an easy-to-use video editing app perfect for beginners. To start, download and open CapCut on your phone. Tap "New Project" and select the videos or photos you want to edit. You can trim clips by dragging the edges, add text by tapping "Text," and include music by selecting "Audio." Enhance your video with filters and effects from the "Effects" menu. When you're happy with your video, tap the export button to save and share it. CapCut makes video editing simple and fun for everyone!
ARENA - Young adults in the workplace (Knight Moves).pdfKnight Moves
Presentations of Bavo Raeymaekers (Project lead youth unemployment at the City of Antwerp), Suzan Martens (Service designer at Knight Moves) and Adriaan De Keersmaeker (Community manager at Talk to C)
during the 'Arena • Young adults in the workplace' conference hosted by Knight Moves.
International Upcycling Research Network advisory board meeting 4Kyungeun Sung
Slides used for the International Upcycling Research Network advisory board 4 (last one). The project is based at De Montfort University in Leicester, UK, and funded by the Arts and Humanities Research Council.
Fonts play a crucial role in both User Interface (UI) and User Experience (UX) design. They affect readability, accessibility, aesthetics, and overall user perception.
Architectural and constructions management experience since 2003 including 18 years located in UAE.
Coordinate and oversee all technical activities relating to architectural and construction projects,
including directing the design team, reviewing drafts and computer models, and approving design
changes.
Organize and typically develop, and review building plans, ensuring that a project meets all safety and
environmental standards.
Prepare feasibility studies, construction contracts, and tender documents with specifications and
tender analyses.
Consulting with clients, work on formulating equipment and labor cost estimates, ensuring a project
meets environmental, safety, structural, zoning, and aesthetic standards.
Monitoring the progress of a project to assess whether or not it is in compliance with building plans
and project deadlines.
Attention to detail, exceptional time management, and strong problem-solving and communication
skills are required for this role.
Visual Style and Aesthetics: Basics of Visual Design
Visual Design for Enterprise Applications
Range of Visual Styles.
Mobile Interfaces:
Challenges and Opportunities of Mobile Design
Approach to Mobile Design
Patterns
1. Vectorizing images
Welcome to CorelDRAW®, a comprehensive vector-based drawing and graphic-design program for the graphics
professional.
In this tutorial, you will trace a bitmap image of a company logo and convert it to a vector image destined for
commercial printing as a spot color print job. Bitmaps are composed of pixels; they are useful if you want to
achieve a photographic quality image with complex color gradients or bitmap effects. Vector images, on the other
hand, are composed of lines and curves, which are easy to manipulate as individual objects. In this project, you will
vectorize a logo, converting it from a bitmap to a vector image, and then you will replace the text of the logo
without affecting the rest of the image.
What you will learn
In this tutorial, you will learn
•
to import images
•
to add guidelines
•
to crop bitmaps
•
to trace bitmaps
•
to ungroup objects
•
to identify fonts
•
to add and modify text
•
to use the Attributes Eyedropper tool
Page 1 of 8
CorelDRAW tutorial
2. Tracing the bitmap
First, you will import the bitmap into CorelDRAW. Then, you will trace the bitmap using the
Corel® PowerTRACE™ feature.
When you use the PowerTRACE feature to trace a bitmap, you can preview and adjust the results. The
PowerTRACE feature offers several preset styles for different tracing methods. Each preset style is a collection of
settings that are appropriate for the specific type of bitmap you want to trace (for example, line art, technical
illustration, high- or low-quality photo images, or logos of varying detail). In this case, you will use the Outline
tracing method, which converts colors in the bitmap to editable curve objects with no outlines. The Outline tracing
method has a variety of presets. You will use the Logo preset style, which lets you trace simple logos with little
detail and few colors. You will also make some adjustments to the preset style to achieve optimum results.
You will first import and crop the bitmap. Then, you will identify and install the text in the bitmap, so that you can
recreate it in the vector graphic.
To import the bitmap
1
Click File
New and then click OK in the Create a New Document dialog box.
2
Click File
Import.
3
Choose the folder Program filesCorelCorelDRAW Graphics Suite X5Tutorial files.
4
Choose the filename logo.tif.
5
Click Import.
6
Press Enter to center the graphic on the page.
To add guidelines
1
Click the vertical ruler, and drag two guidelines, aligning one to the left of the “W” in Wisdom Tooth and
one to the right of the “h”.
You will replace the text, using the guidelines to help you position it.
If the rulers are not visible, click View
enabled.
2
Rulers. A check mark next to Rulers indicates that the rulers are
Click the horizontal ruler, and drag two guidelines, aligning one to the top edge of Wisdom Tooth and one
to the bottom edge.
Page 2 of 8
CorelDRAW tutorial
3. To crop the bitmap
1
Click the Pick tool
in the toolbox, and click the bitmap.
2
Click the Crop tool
.
3
Drag around the logo, and double-click in the crop area to remove the text and background.
This is what the bitmap should look like:
To trace the bitmap
1
Click the Pick tool
2
Click Bitmaps
3
In the PowerTRACE dialog box, choose Wireframe Overlay from the Preview list box.
4
Move the Transparency slider to 48.
5
Move the Smoothing slider to 38.
6
Move the Corner smoothness slider to 1.
Page 3 of 8
in the toolbox, and click the bitmap.
Outline Trace
Logo.
CorelDRAW tutorial
4. 7
To make the elements of the resulting vector image easier to edit, disable the Remove object overlap check
box.
8
To keep the purple background, disable the Remove background check box.
9
Ensure that the Delete original image check box is disabled.
10 Click the Colors tab, and choose PANTONE® Goe™ coated from the Color mode list box.
11 Click the PANTONE 84-2-4 C color swatch, and click the Edit button.
12 In the Select color dialog box, click the Palettes tab.
13 Choose PANTONE 74-1-6 C from the Name list box.
14 Move the Tint slider to 63, and click OK.
15 When you are done adjusting the settings, click OK.
Editing the vector image
The traced logo is a group of individual objects. To edit them separately, you will first ungroup the objects that
make up the logo. Then, you will expand the purple background.
To ungroup the individual vector objects
1
Open the Object manager docker.
If the Object manager docker is open but hidden behind another docker, click the Object manager tab to
display it. If the Object manager docker is not open, click Window
2
Click Arrange
Object manager.
Make sure the vector image is selected.
3
Dockers
Ungroup to ungroup the objects.
The individual, ungrouped objects are displayed in the Object manager docker. All the objects are selected.
To expand the background
1
Click outside the image to deselect all the objects.
Page 4 of 8
CorelDRAW tutorial
5. 2
Click the Pick tool in the toolbox, and click the purple background.
3
Drag the bottom-right handle to expand the purple background to the right vertical guideline.
Identifying and installing fonts
You can quickly identify the font used in the bitmap by capturing a sample containing text and sending it to
WhatTheFont.com™, the online font identification service from Bitstream®. You will analyze the original bitmap,
and identify the font.
Then, you will use Bitstream® Font Navigator® to find the font on your computer and install it.
To identify the font
1
Click File
Import.
2
Choose the folder Program filesCorelCorelDRAW Graphics Suite X5Tutorial files.
3
Choose the filename logo.tif.
4
Click Import.
5
Press Enter to center the graphic on the page.
6
Click the Zoom tool
7
Click Text
8
Drag the cursor to create a marquee around Wisdom Tooth, and press Enter to complete the capture.
in the toolbox, and zoom in on Wisdom Tooth in the bitmap.
WhatTheFont?!
A sample of the graphic is automatically uploaded it to www.whatthefont.com for identification.
9
Follow the directions on the WhatTheFont?! Web site to complete the font identification.
10 The font is identified as Swiss721 Bold.
Page 5 of 8
CorelDRAW tutorial
6. To check if that font is installed
1
In the toolbox, click the Text tool
2
On the property bar, choose Swiss721 Bold from the Font list list box.
.
If you can’t find Swiss721 Bold in the Font list list box, perform the next procedure.
To install the font
1
Click Start
All programs
CorelDRAW Graphics Suite X5
Bitstream Font Navigator.
The first time you start Bitstream Font Navigator, you must follow the steps in the setup wizard.
2
Insert the CorelDRAW Graphics Suite X5 disc into your DVD drive.
3
In the Font Navigator, choose your DVD drive from the Go to a different folder list box.
4
Navigate to the fonts folder, and drag Swiss721 Bold from the Contents of Font Catalog list to the
Installed fonts list.
Adding the text
Now that you have identified the font used in the original bitmap, you will add text to the vector graphic. You will
modify the inter-character spacing to replicate the text. You will also fill it with the color used in part of the logo
graphic.
To create the text
1
In the toolbox, click the Pick tool, select the second bitmap you imported, and press Delete.
2
In the toolbox, click the Text tool
3
Choose Swiss721 Bold from the Font list list box.
Page 6 of 8
.
CorelDRAW tutorial
7. 4
In the Text attributes dialog box, enable the Artistic text check box, and click OK.
5
On the property bar, type 43 pt in the Font size list box.
6
Click on the left vertical guideline, and type Wisdom Tooth.
7
Click the Pick tool
in the toolbox, select the text, and position it between the two horizontal guidelines.
To change the inter-character spacing
1
Click Text
Convert to paragraph text.
2
Click Text
Paragraph formatting to open the Paragraph formatting docker.
3
Drag a side handle on the paragraph frame to increase the size of the frame.
4
Click the Spacing roll-down arrow, and click the up arrow in the Character box to increase the intercharacter spacing of the text until it extends to the right vertical guideline.
To fill the text
1
In the toolbox, click the Color Eyedropper tool
2
Click the dark blue area of the logo, and then click the text.
Page 7 of 8
.
CorelDRAW tutorial