Custom Settings
Custom settingsare similar to custom objects and enable application developers to create custom sets of data, as well as create and associate custom data for an
organization, profile, or specific user. All custom settings data is exposed in the application cache, which enables efficient access without the cost of repeated queries
to the database. This data can then be used by formula fields, validation rules, flows, Apex, and the SOAP API.
There are two types of custom setting:
List Custom Settings
Hierarchical Custom Settings.
To Know more,Please look here: https://help.salesforce.com/apex/HTViewHelpDoc?id=cs_about.htm
Use of Custom Settings:
Hard-coding and good code are a match made in hell. RecordTypeIds are most vulnerable to this abuse, and we’re are all familiar with the frustration of finding that
code that worked in environment A, suddenly stops working when it is promoted to say test. Why? Because possibly RecordTypeIds are different across the two
environments.
Why hard-code when you can use Custom Setting for stuff like this ? Custom Settings are a SOQL inexpensive way of storing your configurable parameters in the
safe confines of the Salesforce database, with all the conveniences of a custom object – create / edit via point and click – standard salesforce !
Under the hood Custom Settings are much like a Custom Salesforce Object, save for you cant have triggers on them. Most obvious difference, amongst others.
One of the best example of using custom setting in code is here: http://www.sfdc99.com/2014/03/02/change-your-code-on-the-fly-using-custom-settings/
3.
Custom Metadata
Custom metadatatype in salesforce is customizable, deployable, packageable, and upgradeable application metadata. Custom metadata types are mainly used for app
configuration. Custom Metadata Types are similar to Custom Settings in Salesforce, except that they are deployable and packagable. First, you create a custom
metadata type, which defines the form of the application metadata. Then you build reusable functionality that determines the behavior based on metadata of that type.
After you create a public custom metadata type, you or others can declaratively create custom metadata records that are defined by that type. When you package a
public custom metadata type, customers who install the package can add their own records to the metadata type. Your reusable functionality reads your custom
metadata and uses it to produce customized application behavior. For example, you can use custom metadata types for the following.
● Mappings—Create associations between different objects, such as a custom metadata type that assigns cities, states, or provinces to particular regions in a
country.
● Business rules—Combine configuration records with custom functionality. Use custom metadata types along with some Apex code to route payments to the
correct endpoint.
● Master data—Let’s say that your org uses a standard accounting app. Create a custom metadata type that defines custom charges, like duties and VAT rates.
If you include this type as part of an extension package, subscriber orgs can reference the master data.
● Whitelists—Manage lists, such as approved donors and pre-approved vendors.
● Secrets—Store information, like API keys, in your protected custom metadata types within a package.
Custom metadata rows resemble custom object rows in structure. You create, edit, and delete custom metadata rows in Metadata API or in Setup. Because the records
are metadata, you can migrate them using packages or Metadata API tools.
4.
Diff b/w Customsetting and Custom Metadata
Main difference between custom metadata and custom setting is that custom metadata records are deployable and packagable. But we can not deploy custom setting
data. Here is list of Difference Between Custom Settings and Custom Metadata Types
● Custom settings enable you to create custom sets of data, as well as create and associate custom data for an organization, profile, or specific user. All custom
settings data is exposed in the application cache, which enables efficient access without the cost of repeated queries to the database. Custom metadata are
like custom setting but records in custom metadata type considered as metadata rather than data. These are typically used to define application configurations
that need to be migrated from one environment to another, or packaged and installed.
● There are 2 types of custom setting List and Hierarchy Custom setting. There are no such types in custom metadata. Custom metadata does not support
Hierarchy type of data based on user profile or specific user.
● You can control the visibility of custom setting by specifying it as public or protected. If custom setting is marked as protected, the subscriber organization
will not be able to access the custom setting. If it is marked as public, then subscriber org can also access it. You can control the visibility of Custom
Metadata Types by specifying it as public or protected. If it is marked as public type, then anyone can see it. If it is marked as protected type, in the installed
managed package subscriber organization, only Apex code in that managed package can use it.
● Custom settings do not support relationship fields. You can create lookups between Custom Metadata objects.
● You can access custom setting data using instance methods and can avoid SOQL queries to database. With custom metadata types, you can issue unlimited
Salesforce Object Query Language (SOQL) queries for each Apex transaction.
● Custom metadata type are visible in test class without “SeeAllData” annotation but custom setting data is not visible.
● Custom metadata records are deployable but custom setting data is not.
5.
Assignment Rule
Assignment rulesin salesforce are used to automatically assign lead or Case to owner(User Or Queue). Assignment rule is used to automate owner assignment
on Case and Lead based on conditions on Case or Lead. For example, there could on lead assignment rule for web-generated leads and one case assignment rule
for the holiday use.
Types of assignment rules
There are two type of assignment rules
● Lead Assignment Rules
● Case Assignment Rules
Lead Assignment Rules
Specify how leads are assigned to users or queues as they are created manually, captured from the web, or imported via the Data Import Wizard.
Case Assignment Rules
Determine how cases are assigned to users or put into queues as they are created manually, using Web-to-Case, Email-to-Case, On-Demand Email-to-Case, the
Self-Service portal, the Customer Portal, Outlook, or Lotus Notes.
6.
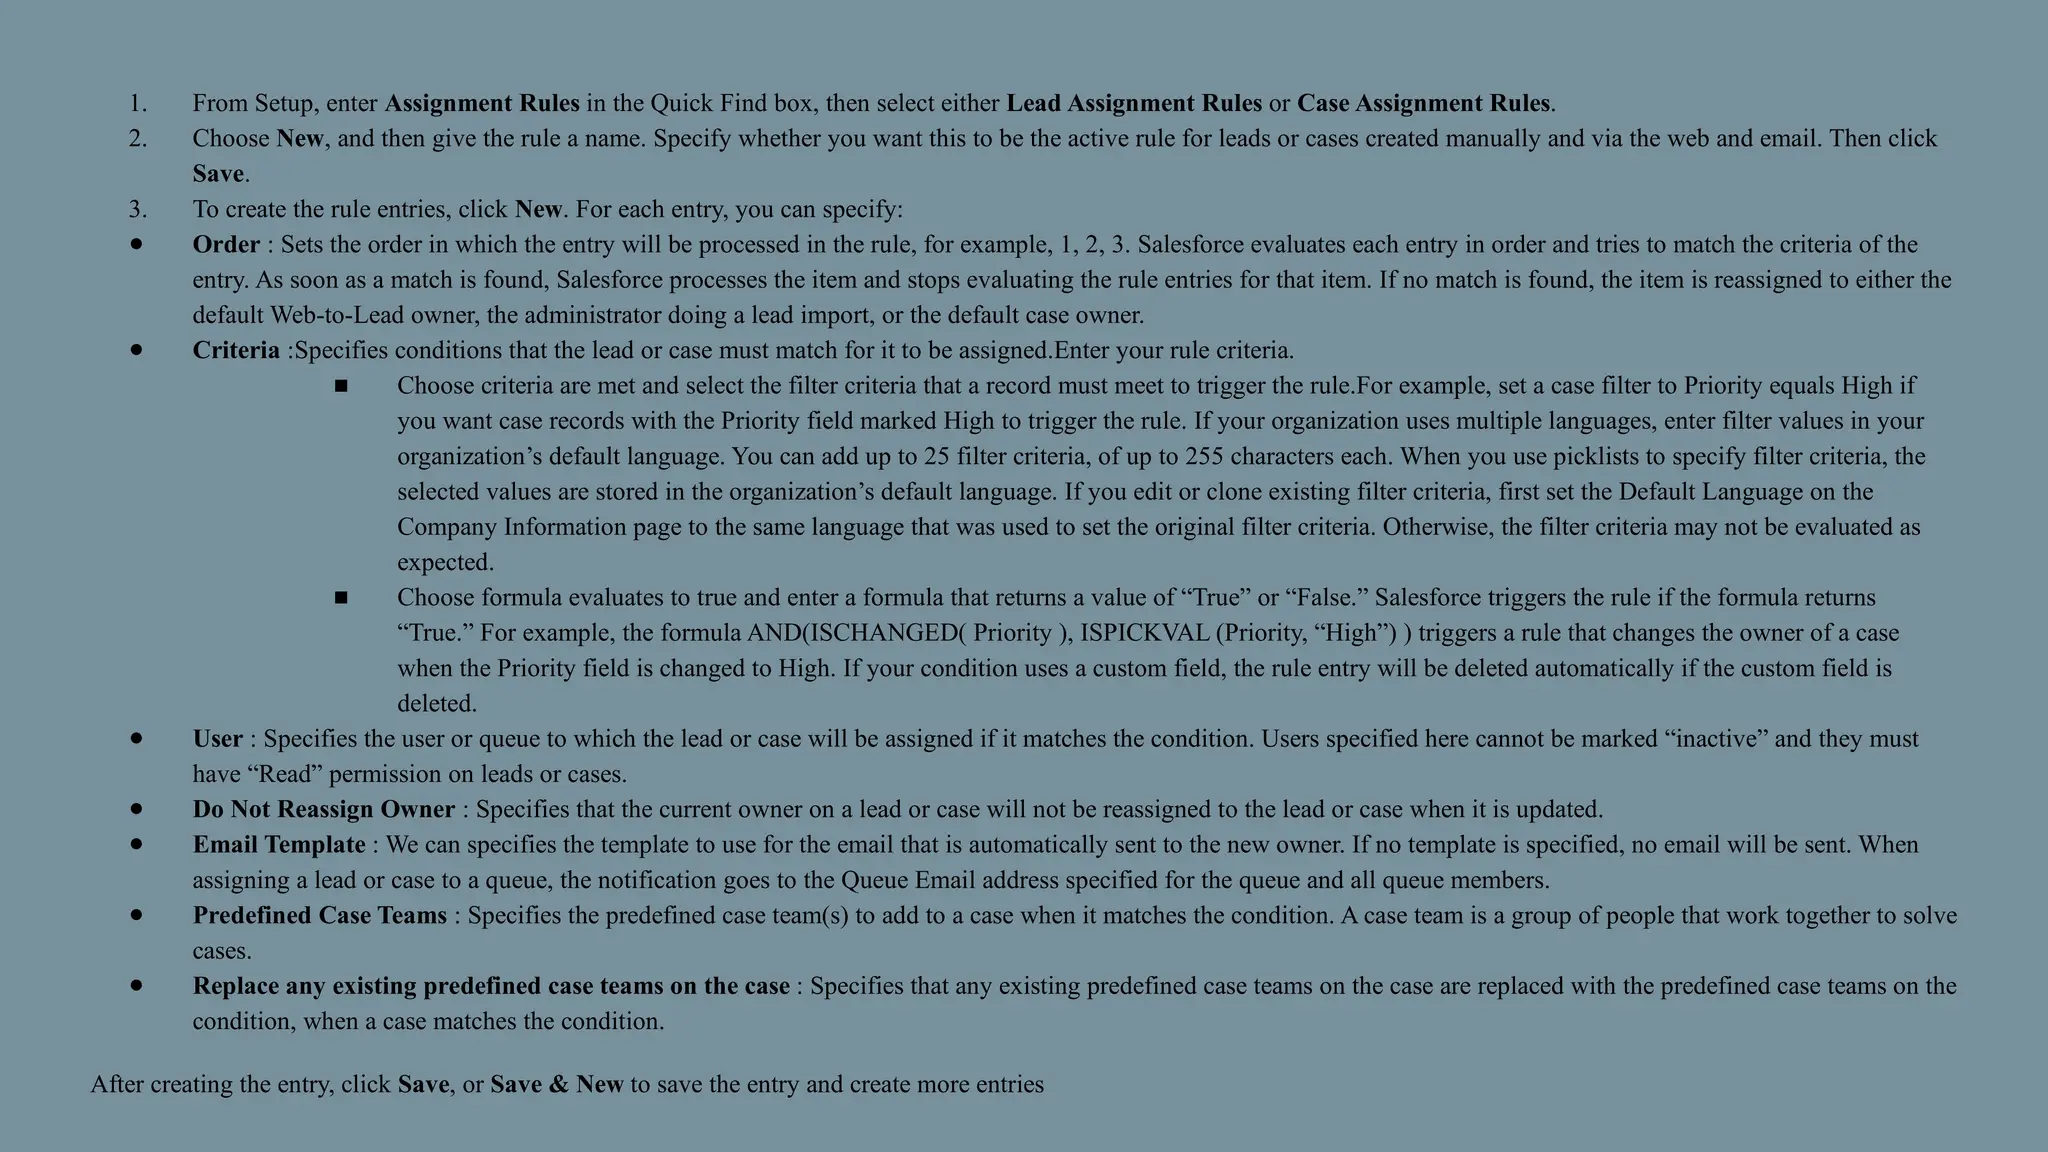
1. From Setup,enter Assignment Rules in the Quick Find box, then select either Lead Assignment Rules or Case Assignment Rules.
2. Choose New, and then give the rule a name. Specify whether you want this to be the active rule for leads or cases created manually and via the web and email. Then click
Save.
3. To create the rule entries, click New. For each entry, you can specify:
● Order : Sets the order in which the entry will be processed in the rule, for example, 1, 2, 3. Salesforce evaluates each entry in order and tries to match the criteria of the
entry. As soon as a match is found, Salesforce processes the item and stops evaluating the rule entries for that item. If no match is found, the item is reassigned to either the
default Web-to-Lead owner, the administrator doing a lead import, or the default case owner.
● Criteria :Specifies conditions that the lead or case must match for it to be assigned.Enter your rule criteria.
■ Choose criteria are met and select the filter criteria that a record must meet to trigger the rule.For example, set a case filter to Priority equals High if
you want case records with the Priority field marked High to trigger the rule. If your organization uses multiple languages, enter filter values in your
organization’s default language. You can add up to 25 filter criteria, of up to 255 characters each. When you use picklists to specify filter criteria, the
selected values are stored in the organization’s default language. If you edit or clone existing filter criteria, first set the Default Language on the
Company Information page to the same language that was used to set the original filter criteria. Otherwise, the filter criteria may not be evaluated as
expected.
■ Choose formula evaluates to true and enter a formula that returns a value of “True” or “False.” Salesforce triggers the rule if the formula returns
“True.” For example, the formula AND(ISCHANGED( Priority ), ISPICKVAL (Priority, “High”) ) triggers a rule that changes the owner of a case
when the Priority field is changed to High. If your condition uses a custom field, the rule entry will be deleted automatically if the custom field is
deleted.
● User : Specifies the user or queue to which the lead or case will be assigned if it matches the condition. Users specified here cannot be marked “inactive” and they must
have “Read” permission on leads or cases.
● Do Not Reassign Owner : Specifies that the current owner on a lead or case will not be reassigned to the lead or case when it is updated.
● Email Template : We can specifies the template to use for the email that is automatically sent to the new owner. If no template is specified, no email will be sent. When
assigning a lead or case to a queue, the notification goes to the Queue Email address specified for the queue and all queue members.
● Predefined Case Teams : Specifies the predefined case team(s) to add to a case when it matches the condition. A case team is a group of people that work together to solve
cases.
● Replace any existing predefined case teams on the case : Specifies that any existing predefined case teams on the case are replaced with the predefined case teams on the
condition, when a case matches the condition.
After creating the entry, click Save, or Save & New to save the entry and create more entries
7.
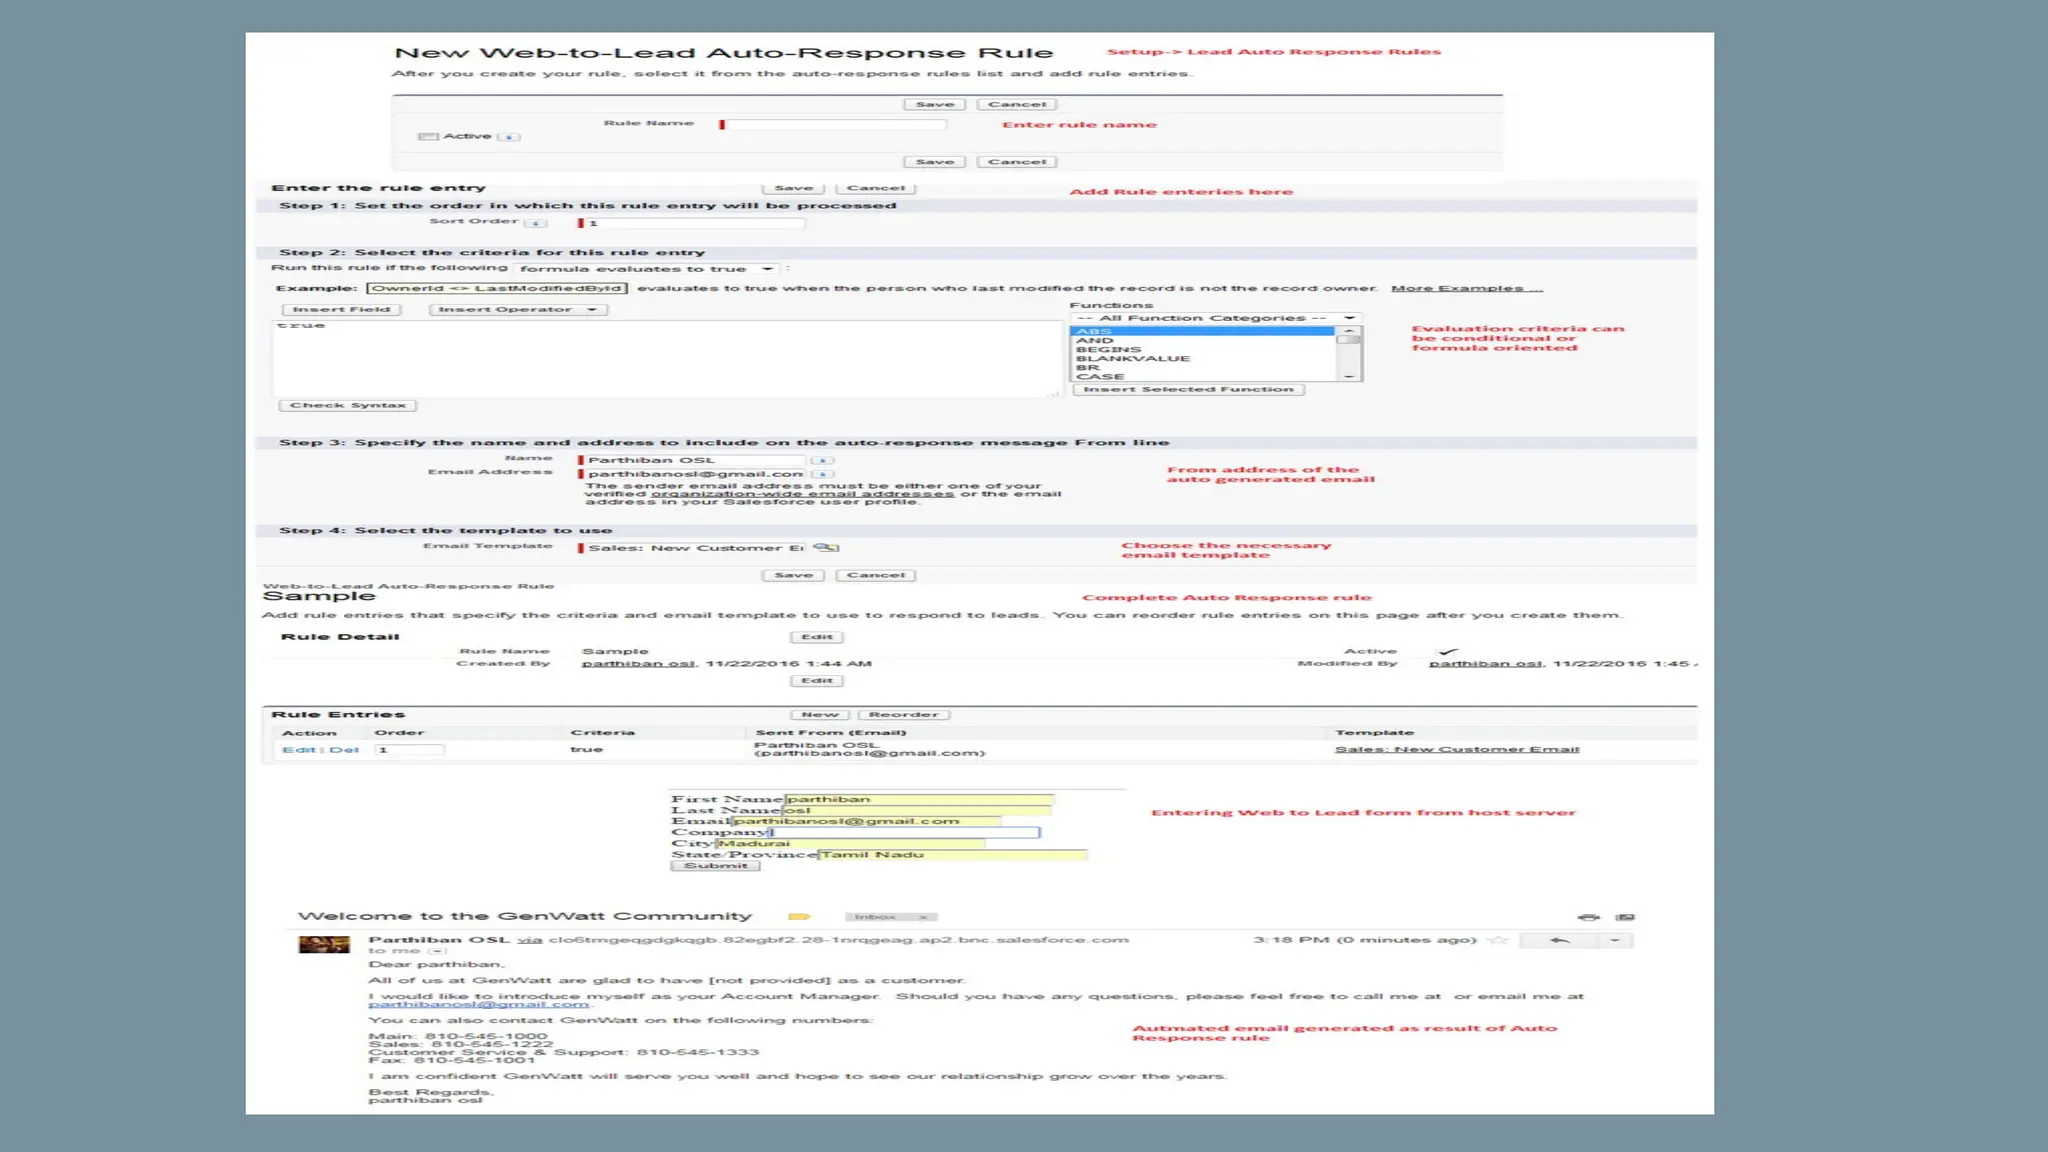
Auto Response Rule
AnAuto Response rule is a set of conditions for sending automatic email responses to lead or case submissions based on the attributes of the submitted record.
Applicable leads include those captured through a Web-to-Lead form. Auto Response rules can be created for the following,
● Self-Service portal
● Customer Portal
● Web-to-Case form
● Email-to-Case message
● On-Demand Email-to-Case message
You can create as many response rules as you like based on any attribute of the incoming lead or case, but only one rule for leads and one for cases can be active at
a time
Go Setup –> Build –> Customize –> Leads –> Auto-Response Rules
9.
Escalation Rule
Escalation guidelinesconsequently raise cases when the case meets the criteria characterized in the rule entry section. You can make rule entry sections, which
characterize criteria for raising a case and heightening activities, which characterize what happens when a case heightens Here is a table containing the required
editions and user permissions
Orgs commonly utilize one escalation rule that comprises various lead passages. For instance, your standard case escalation control could have two passages: cases
with Type set to Gold are escalated within a two hours’ time frame, and cases with Type set to Silver are escalated within an eight hours’ time frame.
Feature Available in: Salesforce Classic and Lightning Experience.
Edition Available in:
Essentials, Professional, Enterprise, Performance,
Unlimited, and Developer Editions
10.
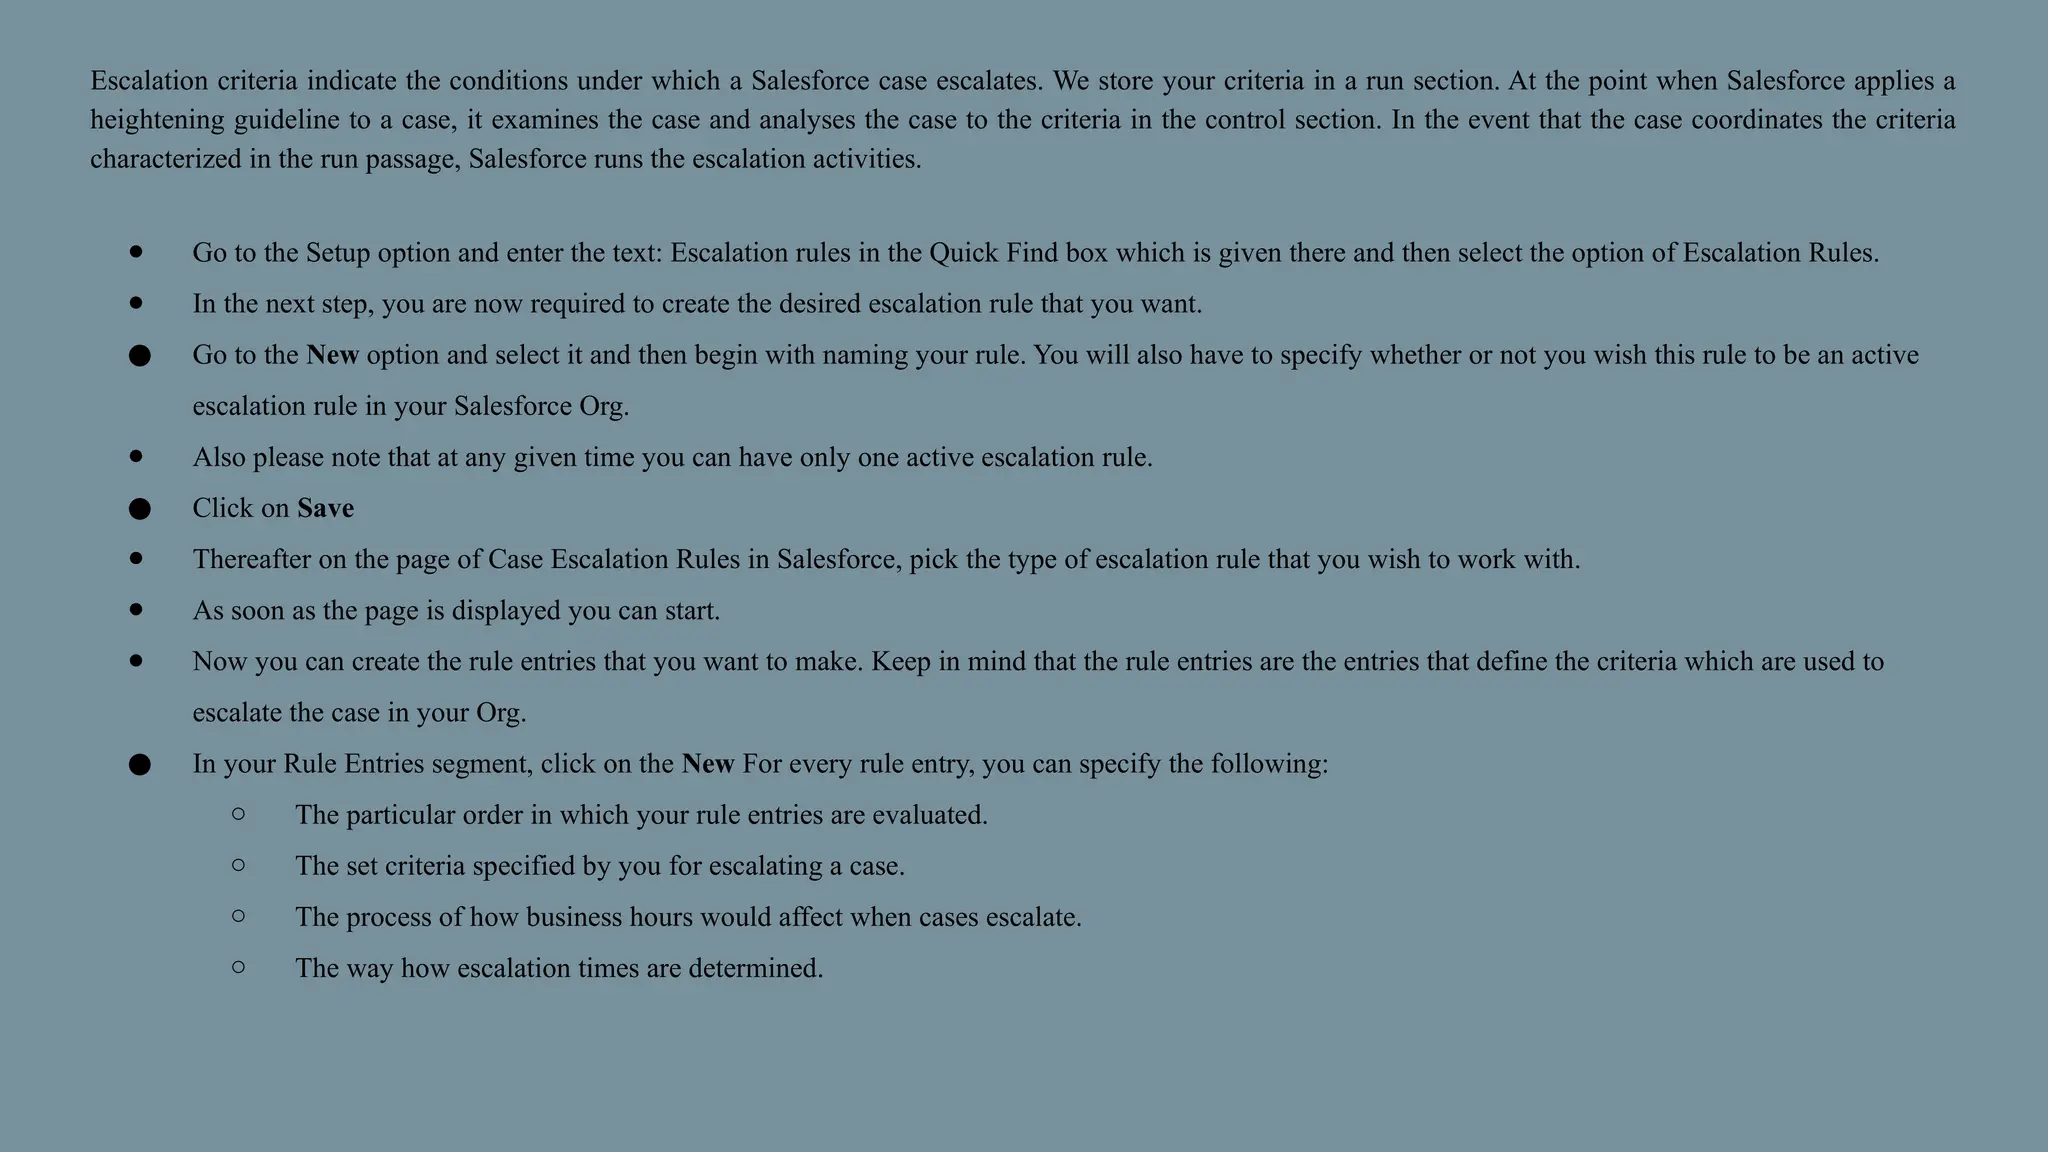
Escalation criteria indicatethe conditions under which a Salesforce case escalates. We store your criteria in a run section. At the point when Salesforce applies a
heightening guideline to a case, it examines the case and analyses the case to the criteria in the control section. In the event that the case coordinates the criteria
characterized in the run passage, Salesforce runs the escalation activities.
● Go to the Setup option and enter the text: Escalation rules in the Quick Find box which is given there and then select the option of Escalation Rules.
● In the next step, you are now required to create the desired escalation rule that you want.
● Go to the New option and select it and then begin with naming your rule. You will also have to specify whether or not you wish this rule to be an active
escalation rule in your Salesforce Org.
● Also please note that at any given time you can have only one active escalation rule.
● Click on Save
● Thereafter on the page of Case Escalation Rules in Salesforce, pick the type of escalation rule that you wish to work with.
● As soon as the page is displayed you can start.
● Now you can create the rule entries that you want to make. Keep in mind that the rule entries are the entries that define the criteria which are used to
escalate the case in your Org.
● In your Rule Entries segment, click on the New For every rule entry, you can specify the following:
○ The particular order in which your rule entries are evaluated.
○ The set criteria specified by you for escalating a case.
○ The process of how business hours would affect when cases escalate.
○ The way how escalation times are determined.
11.
● Click onSave
● As soon as you do this your Escalation Actions page is displayed.
● The next step that you have to do is to define escalation activities. Escalation activities determine when your case escalates and what happens when the
case rises. You can indicate five activities for each manage section to escalate the case over expanding timeframes.
● In the Escalation Actions section, click New. For each escalation action, you can:
● In the Escalation Actions area, click on the New option. For every escalating activity, you can:
○ Specify when the case escalates: In the Age Over field, enter the number of hours after which a case escalates on the off chance that it hasn't been
shut. You can enter the number of hours and either 0 minutes or 30 minutes. For instance, 1 hour and 0 minutes or 1 hour and 30 minutes.
○ Reassign the case to another client or line, and select an email layout that sends the new chosen one (the new case proprietor) a notification
email.
○ Send notice messages to different clients, the present case proprietor, or different beneficiaries.
● Again do not forget to click on Save
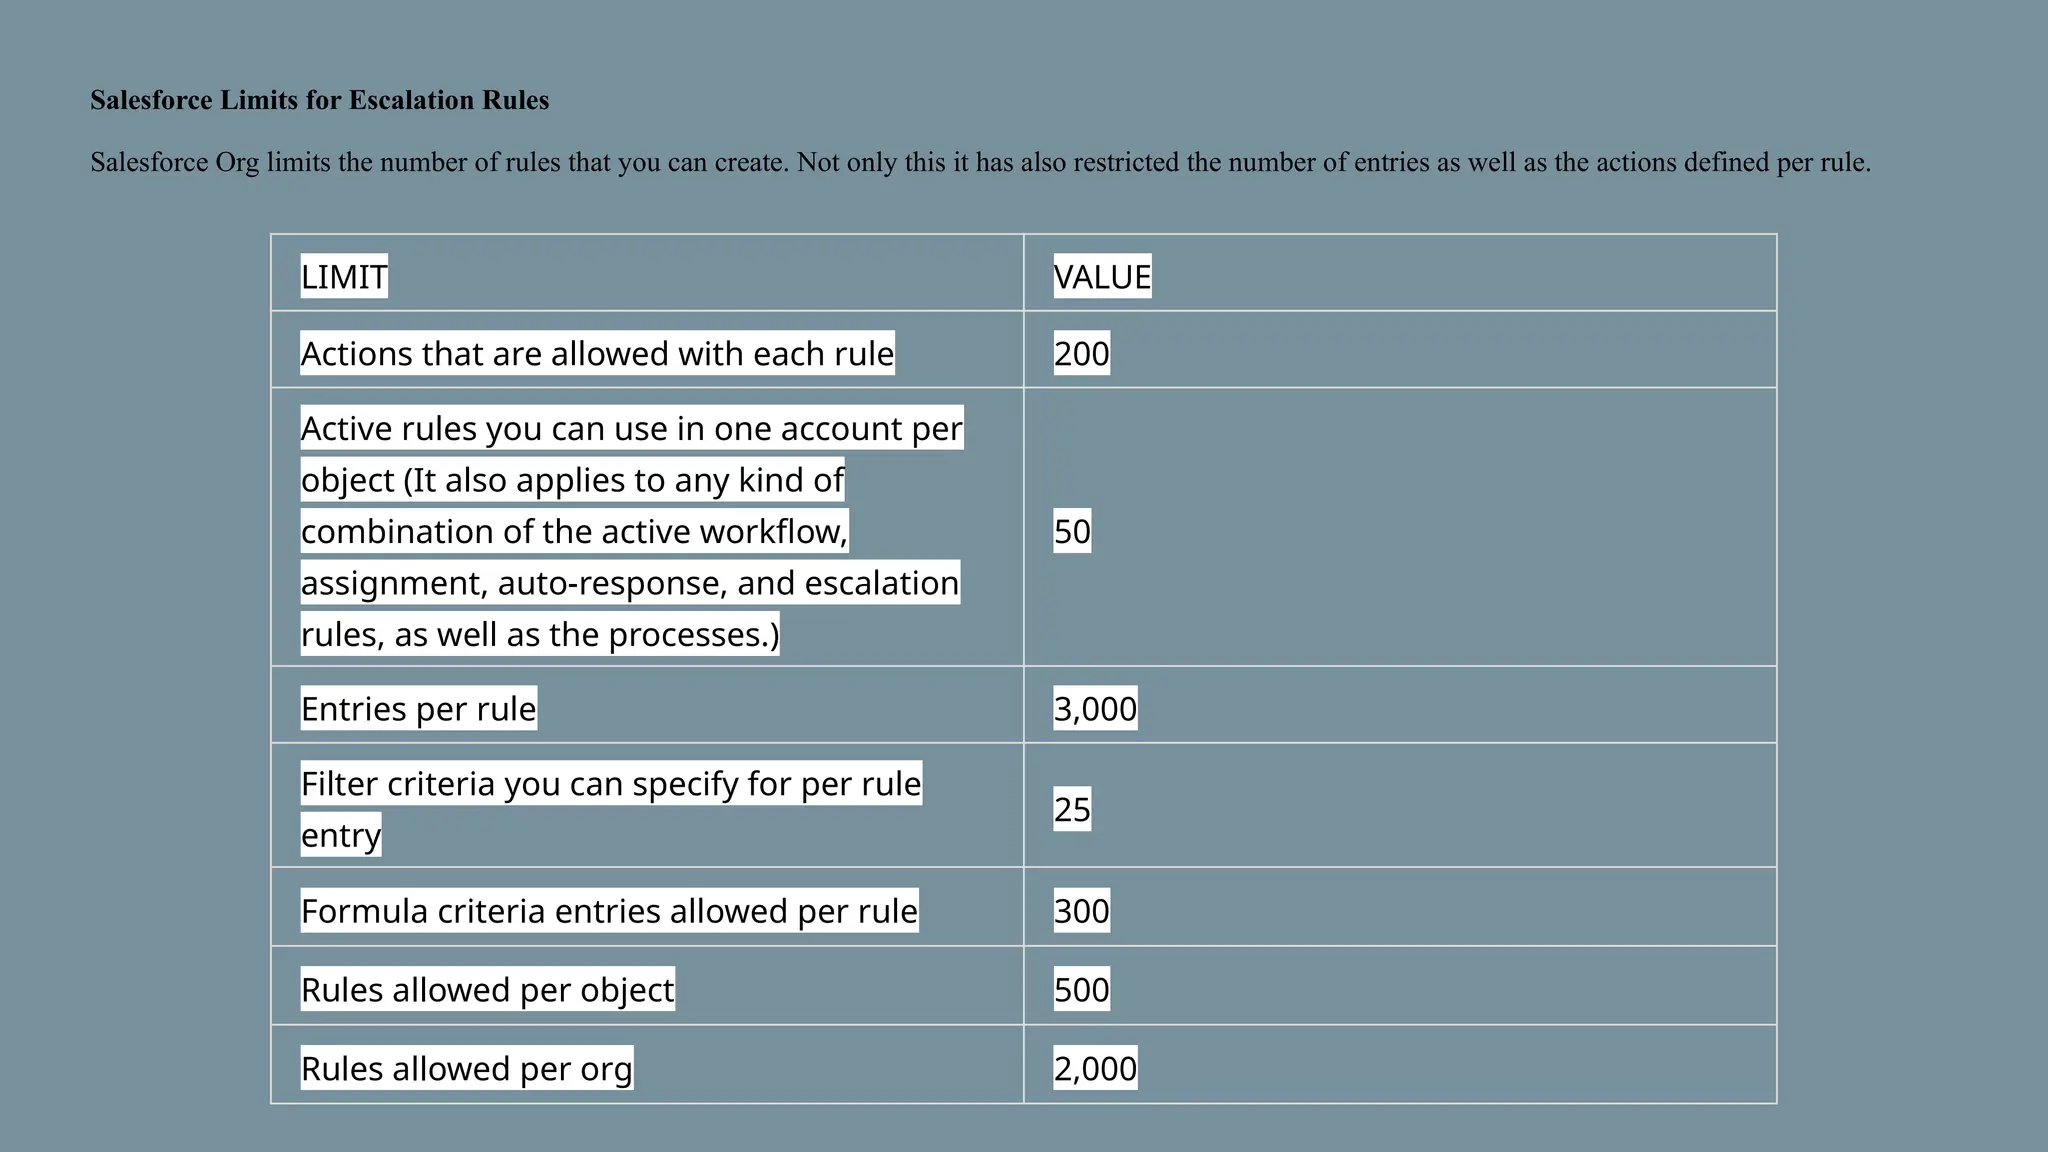
Salesforce Limits for Escalation Rules
Salesforce Org limits the number of rules that you can create. Not only this it has also restricted the number of entries as well as the actions defined per rule.
12.
Salesforce Limits forEscalation Rules
Salesforce Org limits the number of rules that you can create. Not only this it has also restricted the number of entries as well as the actions defined per rule.
LIMIT VALUE
Actions that are allowed with each rule 200
Active rules you can use in one account per
object (It also applies to any kind of
combination of the active workflow,
assignment, auto-response, and escalation
rules, as well as the processes.)
50
Entries per rule 3,000
Filter criteria you can specify for per rule
entry
25
Formula criteria entries allowed per rule 300
Rules allowed per object 500
Rules allowed per org 2,000
13.
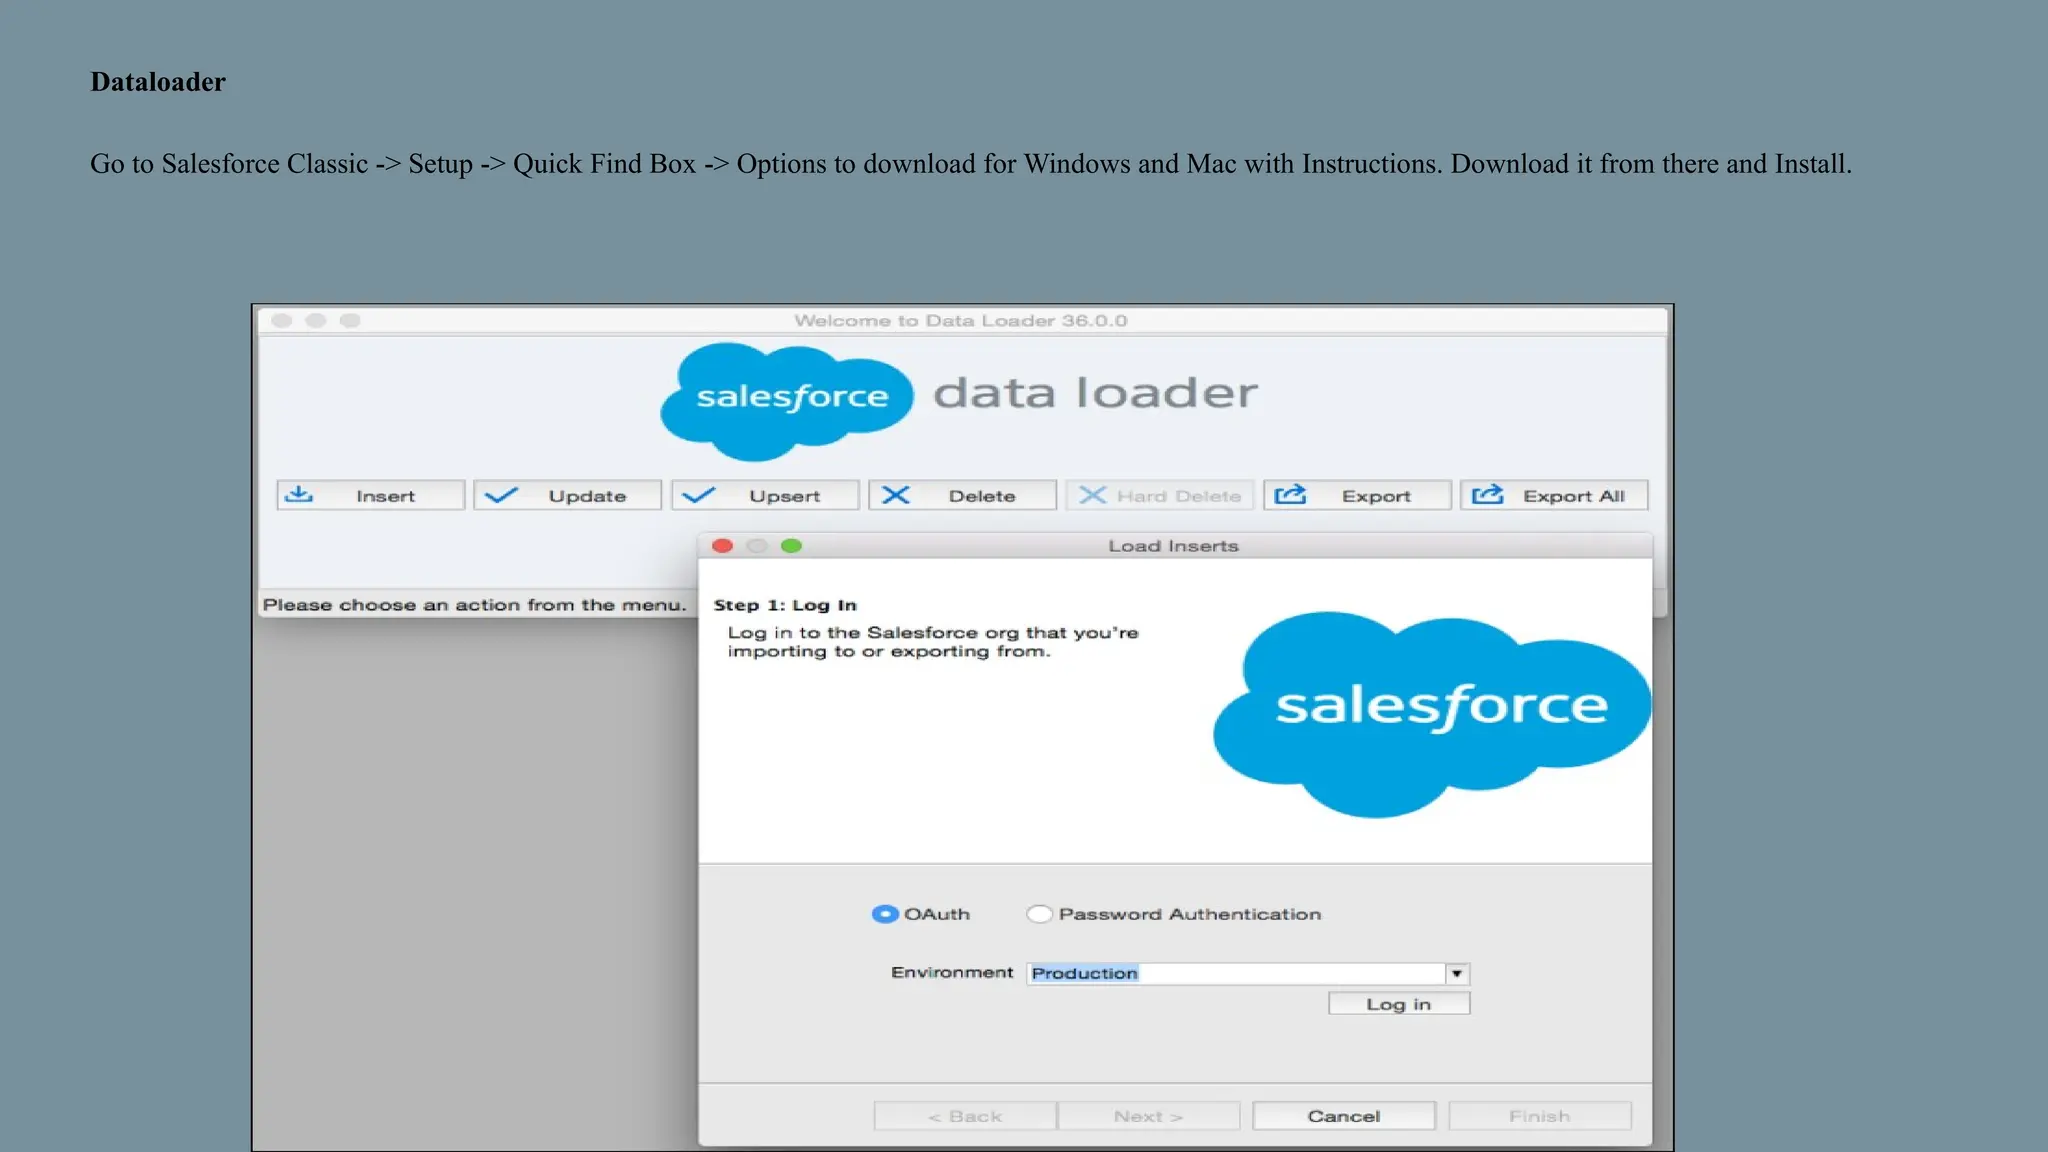
Dataloader
Go to SalesforceClassic -> Setup -> Quick Find Box -> Options to download for Windows and Mac with Instructions. Download it from there and Install.
14.
Data Loader
● DataLoader is a client application for the bulk import or export of data. Use it to insert, update, delete, or export Salesforce records. When
importing data, Data Loader reads, extracts, and loads data from comma-separated values (CSV) files or from a database connection. When
exporting data, it outputs CSV files.
● For complex imports of any size, it can upload more than 50000 records.
● Can import and export data.
● Can import data of any object except User.
● We need to install a data loader first, then only we can export and import data.
● It does not support schedule export.
● While importing, duplicates cannot be ignored.
15.
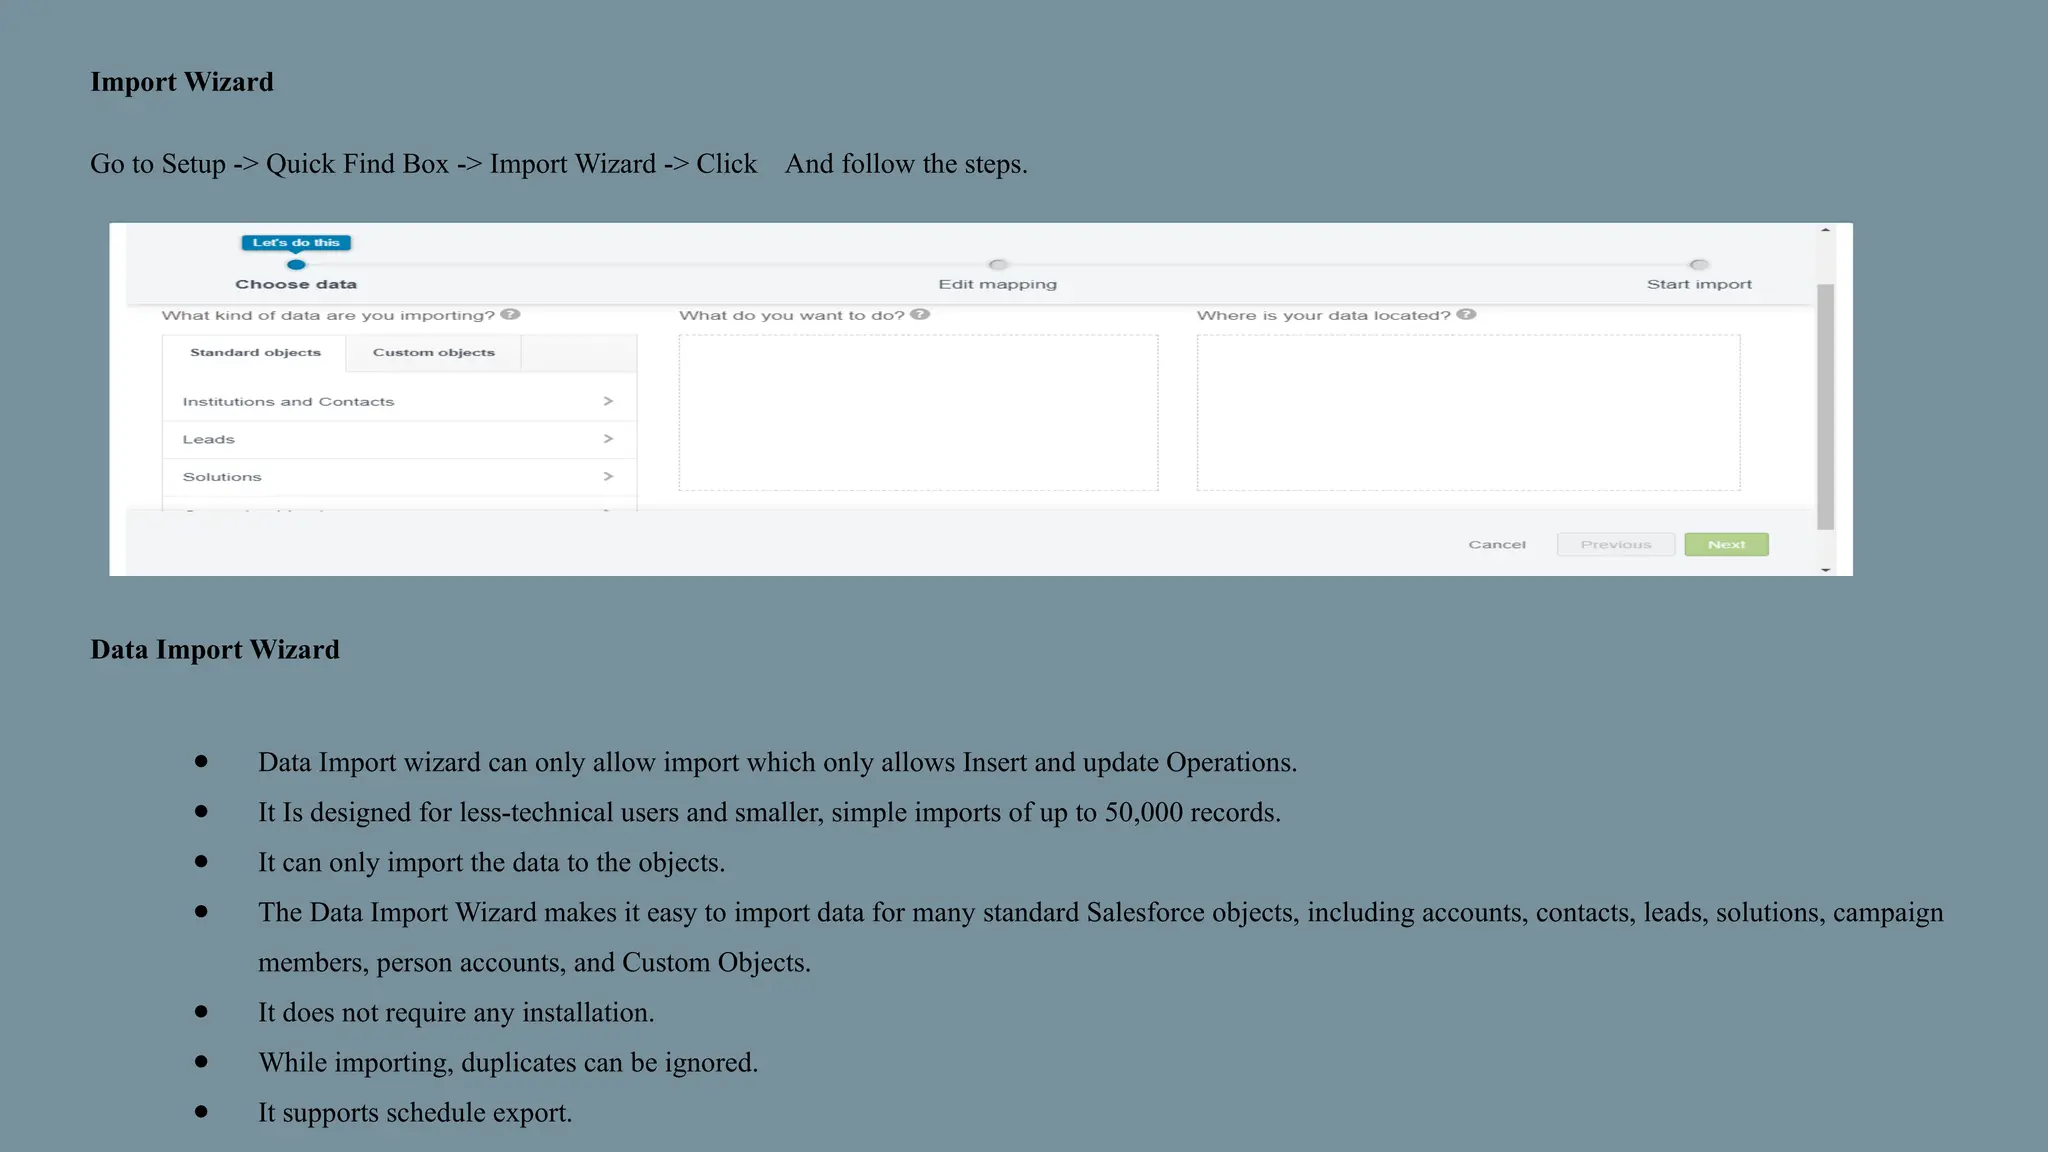
Import Wizard
Go toSetup -> Quick Find Box -> Import Wizard -> Click And follow the steps.
Data Import Wizard
● Data Import wizard can only allow import which only allows Insert and update Operations.
● It Is designed for less-technical users and smaller, simple imports of up to 50,000 records.
● It can only import the data to the objects.
● The Data Import Wizard makes it easy to import data for many standard Salesforce objects, including accounts, contacts, leads, solutions, campaign
members, person accounts, and Custom Objects.
● It does not require any installation.
● While importing, duplicates can be ignored.
● It supports schedule export.