2. 2
Contents
History
Role of Orthodontist
Indications of Orthognathic Surgery
Diagnosis and Treatment Planning
Clinical evaluation
Cephalometric evaluation
Growth Modification for Skeletal changes in
Adolescents :- What works?
3. 3
Contents
Limitations of Growth Modification
Pre-surgical orthodontics
Compensation
Decompensation
Model Surgery
Surgical Procedures
Involving Maxilla
Involving Mandible
Soft tissue changes following surgical procedures
Conclusion
4. 4
HISTORY
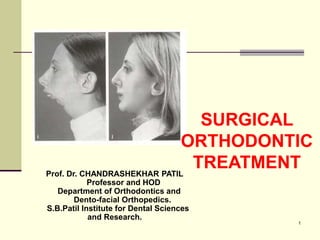
SURGICAL TREATMENT FOR
MANDIBULAR PROGNATHISM STARTED
IN EARLY 19th CENTURY.
In 1959, Trauner and Obwegeser introduced
sagittal split osteotomy as the beginning of a
new era of orthognathic surgery.
5. 5
1960
American surgeons modify the technique for
maxillary surgery that has been developed in
europe
Epker, bell and Wolford developed Lefort-1
maxillary downward fracture ,so that we can
keep the maxilla stable in all 3 planes of
spaces
6. 6
1980 - 1990
By 1980 progress has reached such an
extent with the ability to reposition either or
both the jaws and to move the chin in all 3
planes of spaces.
Rigid internal fixation made it possible for
comfort and better immobilization was
achieved.
7. 7
DIFFERENT APPROACHES IN
ORTHODONTICS
Envelope of discrepancy shows how much
change can be produced by various
treatment modalities.
3 5 25
2
5
15
5
10
1
2
4
6
10
7 12 15
2
5
15
2
5
10
4
6
10
8. 8
INDICATIONS
Severe skeletal class II &class III cases
Skeletal open bite and deep bite cases
Deep over bite in non growing individuals
Extreme vertical excess or deficiency in
maxilla or mandible
Severe dentoalveolar problem
Extemely compromised periodontal situation
Skeletal asymmetry
9. 9
ROLE OF ORTHODONTIST
Orthodontists have the most extensive knowledge
about growth & development than any other
professionals
As orthognathic surgery has become more refined &
less traumatic procedure , it rapidly became a
reasonable treatment option
10. 10
THE ESTHETIC & FUNTIONAL GOALS FOR
GROWING Pts SHOULD BE THE SAME AS
THEY ARE FOR OUR ADULT Pts
IN CONTEMPORARY ORTHODONTIC
PRACTICE THE DIFFERENCE IN
ESTHETIC PLANNING IN ADOLECENT &
ADULT Pt IS FAIRLY SIMPLE
11. 11
IF SKELETAL CHANGES ARE DESIRED
THE GROWING Pt RECEIVES GROWTH
MODIFICATION
IN ADULT BECAUSE THE GROWTH IS NO
LONGER AVAILABLE , SURGICAL
MODIFICATION OF JAWS IS MORE
STRONGLY CONSIDERED
12. 12
GROWTH MODIFICATIONS FOR SKELETAL
CHANGES IN THE ADOLESCENT : WHAT WORKS ?
MANDIBULAR DEFECIENCY CAN BE
TREATED BY
A. REDIRECTION OF SKETAL GROWTH
VECTORS WITH HEAD GEAR
B. FUNTIONAL APPLIANCES
C. COMBINATION OF ABOVE
14. 14
VERTICAL MAXILLARY EXCESS
HIGH PULL HEAD GEAR
BITE BLOCKS OF FUNCTIONAL
APPLIANCES AND VERTICALLY
DIRECTED CHIN CUPS HAVE A
DIMINISHING EFFECT ON VERTICAL
MAXILLARY EXCESS
17. 17
1.MANDIBULAR PROGNATHISM
IN PAST ATTEMPS WERE MADE TO RETARD THE
EXCESS GROWTH OF THE MANDIBLE THROUGH
EXTRA ORAL FORCES APPLIED VIA CHIN CUP.
BECAUSE THE MANDIBLE GROWS BY APPOSITION
OF BONE AT THE CONDYLE & ALONG ITS FREE
POSTERIOR BORDER THIS METHOD IS NOT
SUCCESSFUL AS THE USE OF EXTRA ORAL FORCE
TO THE MAXILLA
18. 18
THE CHIN CUP TREATMENT IS
FAVOURABLE IN SHORT LAFH , BECAUSE
ITS APPLICATION CAN RESULT IN
DOWNWARD & BACKWARD ROTATION OF
THE MANDIBLE
THIS CUP IS CONTRA INDICATED IN
LONG FACE CL-III Pts.
21. 21
DIAGNOSIS AND TREATMENT PLANNING
APPROACHES FOR PATIENTS WITH
DENTOFACIAL DEFORMITY ARE
BASICALLY THE SAME AS FOR PATIENTS
WITH LESS SEVERE DISTORTIONS OF
DENTAL AND FACIAL PROPORTIONS
22. 22
THERE IS NO USE OF USING A SINGLE
DIAGNOSTIC TOOL TO IMPLICATE
APPROPRIATE TREATMENT AS EDWARD
ANGLE ONCE HOPED
UNTILL RECENTLY HARD TISSUES OF THE
FACIAL SKELETON WERE THE FOCUS OF
DIAGNOSIS AND TREATMENT PLANNING
23. 23
IT IS NOW CLEAR
THAT THE SOFT
TISSUES ARE THE
LIMITING FACTOR IN
THE CHANGES THAT
CAN BE PRODUCED
IN TREATMENT AND
OBTAINING
APPROPRIATE SOFT
TISSUE
PROPORTIONS IS
THE PRIMARY GOAL
OF TREATMENT
25. 25
LIPS
THE Ht OF CENTER PART OF
UPPER LIP TRAILS BEHIND THE
VERTICAL Ht OF THE LOWER
FACE IN CHILDHOOD & THEN
CATCHES UP DURING & AFTER
ADOLESCENCE.
WHAT LOOKS LIKE
INCOMPETENT LIPS IN
CHILDHOOD OR EARLY
ADOLESCENCE IS MERELY A
REFLECTION OF INCOMPLETE
SOFT TISSUE GROWTH
26. 26
FEMALES : UPPER LIP TILL 14
LOWER LIP CONTINUES TO
GROW UP TO THE AGE OF 16
MALES : GROWTH OF BOTH UPPER &
LOWER LIP CONTINUES INTO LATE
TEENS
LIP HIEGHT
27. 27
LIP THICKNESS IS MAXIMUM DURING THE
CONCLUSION OF ADOLESCENT GROWTH
SPURT & THEN DECREASES DURING
LATE TEENS.
28. 28
NOSE
BOTH MALES & FEMALES
SHOW MORE GROWTH IN
VERTICAL ht THAN
ANTEROPOSTERIOR
PROJECTION OF NOSE
BUT DOWNWARD
GROWTH IS GREATER IN
MALES
BOYS HAVE AN
ADOLESCENT GROWTH
SPURT IN NOSE LENGTH
WHERE AS OFTEN GIRLS
DO NOT
29. 29
A DORSAL HUMP IN THE NOSE
DEVELOPS WHEN CI-II MALOCCLUSION
IS PRESENT & IS MORE PRONOUNCED
IN BOYS
AMJ ORTHD 56:403-414,1969
30. 30
CHIN
BOTH SEXES HAVE SIMILAR (13.3mm)
SOFT TISSUE THICKNESS AT AGE 17
THE SIZE OF CORPUS & THICKNESS OF
BONY SYMPHYSIS ARE SAME AT 7
YEARS . GROWTH CURVES FOR BOTH
THE SEXES ARE PARALLEL TO EACH
OTHER UNTILL AGE 15 AFTER WHICH
MALES HAVE LARGER CHANGES
31. 31
THE INCRESED CHIN PROJECTION SEEN IN
MALES DURING GROWTH IS DUE TO THE
UNDERLYING SKELETAL CHANGES IN LATE
ADOLESCENCE THAN SOFT TISSUE CHANGES
PERHAPS THERE IS NO REASON TO EXPECT
THAT THE AMOUNT OF SOFT TISSUE THAT
COVERS THE BONY CHIN WILL CHANGE
SIGNIFICANTLY DURING GROWTH
32. 32
Methods for evaluation of smile
The major goals of
orthodontics
and/orthognathic
surgery is to enhance
anterior tooth display
during speech and
smiling.
33. 33
A balanced smile is
achieved by appropriate
positioning the teeth
and gingiva in the area
that is displayed by lip
animation during
smiling (the dynamic
display zone)
34. 34
Appropriate positioning entails not only the
three planes of space (vertical, lateral, and
anteroposterior) but also the orientation of the
occlusal plane transversely and sagittally.
35. 35
Types of the smile
Posed smile :
also called as social
smile,
36. 36
Spontaneous
smile :has been
referred to as the
enjoyment smile.
The difference between social and
enjoyment smile is not the activity of orbicularis
oris musculature but of orbicularis oculi.
37. 37
In the enjoyment smile,
there is a crinkling
around the eyes that
cannot be duplicated
with a social smile.
38. 38
An unposed smile is
involuntary and is
induced by joy or mirth.
Where as posed smile
are of two types
Strained
Unstrained.
40. 40
1. THE AMOUNT OF INCISOR AND
GINGIVAL DISPLAY
As a general guideline,
the elevation of the lip
for the posed smile
should stop at or near
the gingival margins of
the maxillary incisors.
Some gingival display is
certainly acceptable,
and in many cases,
even esthetic and
youthful appearing.
41. 41
Conversely, lip
elevation that does not
reach the gingival
margin (i.e., less than
100% incisor show on
smile) is not as
attractive as complete
tooth display or even
some gingival display.
42. 42
Males show less of the
upper incisors and more
of the lower incisors
than females, at rest
and on smile. It is also a
characteristic of aging
to show less of the
upper incisors at rest
and on smile, so that, to
a degree, more tooth
display gives a more
feminine and youthful
smile.
43. 43
THE TRANSVERSE DIMENSION OF
SMILE
This characteristic is
referred to in terms of
“broadness the smile"
and the presence and
amount of "buccal
corridor” also referred to
by some orthodontists
as "negative space," to
be eliminated by
transverse expansion of
the maxilla.
45. 45
This smile feature has been thought of
primarily in terms of maxillary width, there is
evidence that the corridors are also heavily
influenced by the anteroposterior position of
the maxilla relative to the lip drape. This
means that moving the maxilla forward also
reduces the size of the buccal corridors and
decreases negative space.
47. 47
THE SMILE ARC
The ideal smile arc has
the curvature of the
maxillary incisal edges
parallel to the curvature
of the lower lip upon
smile, and the term
consonant is used to
describe this parallel
relationship.
48. 48
A nonconsonant, or flat,
smile arc is
characterized by the
maxillary incisal
curvature being flatter
than the curvature of
the lower lip on smile.
50. 50
VERTICAL FACIAL PROPORTIONS
The ideal face in both
males and females is
vertically divided into
equal thirds by
horizontal lines at the
hairline, the nasal base,
and the menton
51. 51
In the middle third, philtrum height is
important, especially in its relationships with
the upper incisor and commissures of the
mouth. Commissure height is normally is no
more than 2 to 3 mm greater than the
philtrum height in adults, but in adolescents
the philtrum height may be several
millimeters shorter.
52. 52
A short philtrum in
adults results in an
unaesthetic maxillary lip
line, which makes
resting posture
resemble a frown.
53. 53
The base of the nose
has a "gull in flight"
contour. The nares
should be barely visible
when the head is in
natural head position,
and the columella
should be slight lower
than and parallel to the
alae when viewed in
any direction.
54. 54
The contour of the alae
from the base of the
nose to its tip should be
well defined to form a
"scroll".
55. 55
In the ideal lower third
of the face, the upper lip
comprises the upper
one third and the lower
lip and chin make up
the lower two thirds.
56. 56
Excessive lower face height can be due
to
Excessive vertical
development of
maxilla, which causes
the mandible to rotate
down and back
Excessive vertical
development at the
chin.
57. 57
Tooth-lip relationships
In adolescents 3 to 4
mm of the maxillary
incisor should be
displayed at rest, and
the entire clinical crown
(with some gingiva)
should be seen on
smiling.
58. 58
EXCESSIVE TOOTH DISPLAYS
Excessive incisor
display is judged better
at rest than on smile,
simply because lip
elevation on smiling is
so variable.
59. 59
If the exposure at rest is normal, even if
considerable amount of gingival display occurs on
smiling, this should be considered normal for that
individual.
60. 60
Excessive tooth display
maybe result of both hard
tissue and soft tissue
factors, such as
Short philtrum height
Vertical maxillary
excess
Excessive crown height
Lingually tipped
maxillary incisors.
62. 62
Transverse facial and dental
proportions
The “rule of fifths"
describes the ideal
transverse relationships
of the face; the face is
divided sagittally into
five symmetric and
equal parts, and each of
the segments should be
the width of one eye.
63. 63
The middle fifth of the
face is delineated by
the inner canthus of the
eyes.
A line from the inner
canthus should be
coincident with the ala
of the base of the nose;
that is, the width of the
alar base of the nose
should equal the inner
canthal distance
64. 64
If the inner canthal
distance is smaller than
an eye width, the nose
should be slightly wider.
65. 65
For ideal transverse
proportionality of the
face, the width of the
mouth and the
interpupillary distance
should be the same.
66. 66
A line from the outer
canthus of the eyes
should be coincident
with the gonial angles of
the mandible; that is,
the bigonial width
should equal the outer
canthal distance.
67. 67
The outer fifths of the
face are measured from
the outer canthus of the
eye and gonial angles
to the helix of the ear.
This dimension is
largely composed of the
width of the ear.
68. 68
SOFT TISSUE PROPORTIONS:
profile view
The prominent part of the
forehead (glabella) should
be approximately the same
as the base of the nose, and
the forehead should slope
gently posteriorly.
The radix (the depth of the
concavity at the base of the
forehead) should be
prominent to obscure the
eyelash on the opposite
side.
69. 69
The bridge of the nose
(nasal dorsum) should then
be a straight line from the
base of the radix to the nasal
tip cartilage, and there
should be a slight
prominence of the tip relative
to the bridge.
The lips should be slightly
everted relative to their base,
with several millimeters of
vermilion border displayed,
and the upper lip should be
slightly anterior to the lower
lip.
70. 70
The labiomental sulcus
should form a shallow S
curve, with the upper and
lower portions similarly
shaped. The prominence of
the chin should be slightly
less than the prominence of
the lower lip, and the angle
between the lower lip, chin,
and deepest point along the
chin-neck contour should be
approximately 90 degrees
71. 71
Ideal male profile
An ideal male profile
differs from the female
in several ways: greater
forehead prominence,
deeper radix, more
projection of the nasal
dorsum and lower nasal
tip, flatter lips with less
vermilion display, upper
lip even with lower lip,
and greater chin
prominence.
73. 73
Purpose
To be able to analyse variation in facial bone
as well as the dentition in relation to the jaws.
Analysis for patients requiring orthognathic
surgery
74. 74
Planes
Uses constructed true horizontal as a reference
plane.
Occlusal plane is drawn form the buccal groove of
both permanent molars through a point 1mm apical to
the central incisors of each respective jaw base.
Mandibular plane is drawn from Go-Gn.
The nasal floor plane is the palatal plane.
Burstone article J oral surg 1978
83. 83
Purpose
A soft tissue cephalometric analysis designed
for the patient who requires surgical
orthodontic care was developed to
complement a previously reported
dentoskeletal measurement.
Burstone article J oral Surg. 1980
84. 84
Planes
The SN plane is the plane of reference when
converted to the true horizontal.
91. 91
Purpose
To find any frontal skeletal assymetry.
To study the frontal VTO
To evaluate tooth eruption with segmental
TMJ splint therapy.
To evaluate improvements in facial or dental
proportions.
92. 92
Planes
Plane of reference is drawn from Crista Galli
to the ANS to the chin and will be
perpendicular to the Z plane.
Selected because it closely follows the visual
plane formed between subnasale and
midpoints between the eyes and eyebrows.
Grummons article JCO 1987
93. 93
The first horizontal plane connects the medial
aspects of the zygomaticofrontal sutures.
The second horizontal plane connects the center of
the zygomatic arches.
The third horizontal plane connects the jugal
processes.
A fourth horizontal plane runs through the menton
and is parallel to the first plane.
Grummons article JCO 1987
98. 98
Frontal Vertical Proportion Analysis
Upper facial ratio
Lower facial ratio
Maxillary ratio
Total Maxillary ratio
Mandibular ratio
Total Mandibular ratio
Maxillomandibular ratio
100. 100
Compensation
In cases of severe jaw imbalances, the teeth
are inclined in such a way as to partially
offset the discrepancies.
101. 101
For e.g., the lower
anteriors may be
upright or retroclined in
a case of mandibular
prognathism and
proclined in mandibular
retrognathism.
102. 102
This is nature’s mechanism to compensate
for the jaw imbalance by proclining or
retroclining the teeth i.e., as a compensation
for the jaw discrepancy.
104. 104
In mandibular prognathism for e.g., the
retroclined incisors should be brought into
the ideal axial inclination by proclining them.
In mandibular retrognathism, the proclined
teeth are brought back.
Often, teeth are extracted for
decompensation.
105. 105
Decompensation makes the maxillo-
mandibular dental relation temporarily
worse. Hence it is sometimes called
“Reverse Orthodontics”.
106. 106
Extraction Pattern
The extraction pattern for decompensation
is different from what we do normally in
camouflage treatment.
In camouflage, extraction spaces are
closed for dental compensation but in
orthognathic case, extraction spaces are
used to align the teeth on their respective
jaw bases.
107. 107
Often the extraction
pattern for Class II case
is, 5|5 and 4T4. Lower
extraction space is used
to retract the
compensated flared
incisors.
108. 108
Whereas in a skeletal
class III case
extraction of 4|4 and
5T5 is required for
correction of proclined
upper incisors which
is usually present.
109. 109
The common belief that Class II elastics are
used in class II skeletal pattern, is no more a
valid approach if mandibular advancement is
planned.
Instead Class III elastics should be used.
111. 111
Root Divergence in Segmental
Osteotomy
When extractions are indicated, the teeth to
be moved should help both, in eliminating
the crowding and providing an osteotomy
site.
112. 112
Analysis of the size, shape and angulation
of the roots of the teeth adjacent to potential
osteotomy cuts is a key step in the selection
of the sites, particularly if no extractions are
to be performed
113. 113
Vertical Plane
Before surgery, the orthodontist must
establish not only the ideal anteroposterior
and transverse positions but also the
vertical position of the teeth.
For instance, in a patient who will have only
a mandibular ramus osteotomy, the vertical
position of the incisor teeth determine the
post surgical facial height.
114. 114
This in turn will determine whether leveling
of an excessive curve of Spee should be
done either by intrusion of the incisors or
elongation of the posterior teeth.
115. 115
Segmental Osteotomy
It is neither necessary nor desirable to level
the entire arch in a patient with vertical
discrepancy (e.g. open-bite or deep-bite),
that is being prepared for a segmental
osteotomy.
116. 116
In these cases the leveling is done only
within each segment, either using
segmental NiTi wire or bond the anterior
and posterior brackets at different heights.
117. 117
Why is Presurgical
Decompensation So Important ?
To position the teeth in an ideal axial
inclination with respect to their respective
jaws.
To optimize the magnitude of the surgical
advancement or setback.
For better esthetics, stability and function.
If malpositioned anterior teeth are not
corrected they hinder the repositioning of the
jaws at the time of surgery.
118. 118
MODEL SURGERY
Model surgery is the
dental cast version of
cephalometric
prediction of surgical
results indicated in
double as well as single
jaw surgery.
119. 119
Purpose of Model surgery
1. To determine the magnitude and direction
of skeletal movements
2. To determine the size and shape of the
osteotomies especially interdentally
3. To provide a splint for surgical splint
correction
120. 120
MODEL SURGERY
Cast should be
mounted on a semi -
adjustable articulator if
maxillary surgery is
planned.
121. 121
Advantages of Model surgery
The simulation of the patients facial
structures, functionally and spatially in three
dimensions.
The surgeon can correlate the relavant
information and arrive at the surgical
predictions in three dimensions
Model surgery gives an accurate 1:1 replica
of the patients dentition allowing an increased
accuracy in prediction when compared to the
10% discrepancy seen in cephalometric
prediction
125. 125
LeFort I Osteotomy :
Surgical Technique :
.1
when vertical changes are planned, it
is critical to place an external reference
pin and measure to a reproducible
point on the maxillary incisors. This is
accomplished by placing a Kirschner
wire through the skin and into the
bone of the nasal bridge.
126. 126
The oral incision is
placed high in the
mucobuccal fold of the
upper lip, and it extends
from the
zygomaticomaxillary
buttress region
anteriorly across the
midline. As the incision
proceeds along the
lateral wall of the
maxilla, it descends
slightly anteriorly.
127. 127
When the incision is
completed bilaterally,
the lateral walls of the
maxilla are exposed
superior to the incision.
Most often, the incision
is made with a scalpel
blade or a calibrated
thermal knife.
128. 128
The use of electrocautery for the incision is
discouraged, since adverse wound healing by
excessive scarring beneath the upper lip and
nasal base may affect the length of the lip
and the amount of exposed vermilion of the
upper lip.
129. 129
The anterior nasal spine and piriform rim are
identified and the septopremaxillary ligament
is removed from the anterior nasal spine.
130. 130
The direction of the
posterior dissection is
inferior and posterior to
the zygomaticomaxillary
buttress to the pterygoid
plate.
131. 131
vertical reference
points are placed at the
piriform aperture region
and at the
zygomaticomaxillary
buttress area.
Horizontal score marks
are not placed on the
maxilla since the teeth
serve as the reference
in the sagittal plane
132. 132
The design of the lateral maxillary osteotomy
is tailored to the patient’s aesthetic needs.
For instance, if the patient requires greater
augmentation of the cheek or infra-orbital
region, the osteotomy incorporates the
zygomaticomaxillary buttress as well as the
higher aspect of the lateral maxillary wall.
133. 133
The osteotomy should always be designed so
that it terminates inferiorly in the piriform
aperture region (under the inferior turbinate).
This minimizes the risk to the nasolacrimal
system.
134. 134
Normally, a retractor is placed at the junction of the
maxilla with the pterygoid plate, and this provides
adequate exposure to ensure safety. The posterior
osteotomy is directed inferiorly as it proceeds
posteriorly from the zygomaticomaxillary buttress to
the junction of the maxilla and the pterygoid plate.
This minimizes the risk of damaging the maxillary
artery or any of its terminal branches as they
descend from the pterygopalative fossa.
135. 135
The posterior osteotomy should be 5 mm
superior to the second molar (approximately
25 mm from the occlusal plane) to minimize
the risk of devitalizing teeth.
136. 136
After the posterior wall
is cut, the saw is
reversed so that the
blade is placed into the
maxillary sinus and the
osteotomy is completed
from the sinus to the
outside.
137. 137
With care to preserve
the nasal mucosa, a
septal osteotome is
malleted posteriorly,
freeing the cartilage and
bone of the nasal
septum and vomer from
the maxilla.
138. 138
Attention is then
directed to the lateral
nasal walls. A periosteal
elevator is placed
subperiosteally on the
medial aspect of the
lateral wall of the nose.
This protects the nasal
mucosa during
sectioning
139. 139
The osteotome should
be placed at the piriform
rim and directed
posteriorly and inferiorly
along the lateral nasal
wall toward the
perpendicular plate of
the palatine bone. The
lateral nasal wall is thin
and offers little
resistance to sectioning
until the palatine bone
is reached.
140. 140
Resistance to the advancing osteotome as
well as an audible change when malleting the
osteotome indicates that the palatine bone is
encountered. Complete sectioning of the
palatine bone should be accomplished, even
if it results in damage to the descending
palatine vessel.
141. 141
When the descending palatine vessel is
damaged during this maneuver, hemorrhage
may be encountered; it can be controlled with
packing and further injection with a
vasoconstrictor.
142. 142
The final step in the LeFort I osteotomy is
separation of the maxilla from the pterygoid
plates. This is done with a curved osteotome,
which is directed medially and anteriorly at
the lowest part of the junction of the maxilla
and the pterygoid plate.
144. 144
The maxilla is now ready for
downfracturing. With hand
pressure, the anterior aspect
of the maxilla is gently
depressed. If significant
resistance is encountered, it
is likely that the lateral nasal
wall (perpendicular part of
the palatine bone) has been
incompletely sectioned. If
this occurs, the spatula
osteotome should be placed
and malleted to complete the
osteotomy.
145. 145
A rongeur is used to
remove any remaining
vomer or nasal crest of
the maxilla, particularly
if superior repositioning
of the maxilla is
planned. Similarly, the
lateral nasal walls are
also reduced when
necessary.
146. 146
The anterior nasal spine should not be
removed unless necessary to facilitate
superior repositioning of the maxilla since this
is important for nasal tip support.
147. 147
The descending palatine neurovascular
bundle is commonly visualized in the
posterior and medial aspect of the maxillary
sinuses. Bone should be removed carefully
from the posterior maxilla and from around
the descending palatine vessels with a
rongeur, osteotome, or bur
148. 148
If superior or posterior repositioning is
planned, it is critical to remove sufficient
quantities of bone at the posterior and medial
parts of the maxilla. Bony interference is
common in this area and may prevent the
planned repositioning of the maxilla.
149. 149
If the maxilla is repositioned superiorly, bone
from the nasal crest of the maxilla and
cartilage from the nasal septum should be
resected sufficiently to allow the maxilla to be
elevated.
150. 150
The sequence of performing these
osteotomies (lateral maxillary walls, nasal
septum, lateral nasal walls, and
pterygomaxillary junction) permits quick
mobilization of the maxilla if hemorrhage is
encountered during the procedure.
151. 151
Once the maxilla is positioned, the distances
between the vertical reference holes, external
nasal pin, and oral reference mark are
measured to ensure the correct vertical
repositioning
153. 153
Osteotomy
The basic osteotomy pattern includes cuts just
through the cortical bone: on the medial side of the
ramus above the lingula, down the anterior ramus
onto the superior aspect of the body of the mandible,
and then curving inferiorly through the lateral cortical
plate, including the inferior border.
154. 154
Before making the medial bony cut, the bone
on the medial anterior ramus and temporal
crest can be reduced with a rotary instrument
to improve access
155. 155
The horizontal osteotomy in the ramus
should extend posteriorly one half to two
thirds the anteroposterior dimension of the
ramus.
156. 156
The vertical component of the osteotomy in
the body of the mandible should include the
inferior border.
157. 157
The position of the inferior alveolar
neurovascular bundle just under the lateral
cortical plate of the body of the mandible
dictates that the vertical osteotomy be just
through the cortical plate.
158. 158
The bone over the neurovascular bundle is
greatest over the area of the second molar,
and the vertical cut should be made here
159. 159
Following the
completion of the
osteotomy pattern
through cortical bone, a
thin spatula osteotome
malleted into the
osteotomy sites better
defines the cuts,
beginning in the medial
cut, working down the
ramus, continuing on
the body, and finishing
at the vertical cut
160. 160
Care is taken to keep
the spatula osteotome
directed just beneath
the cortical plate to
prevent damage to the
neurovascular bundle.
161. 161
As the mandible splits, care is taken to
identify the course of the neurovascular
bundle, making certain that portions of it are
not contained in the proximal condylar
segment.
162. 162
If the bundle is found to be attached to the
proximal segment in some area, the covering
bone should be removed and the nerve free
with an instrument
163. 163
The osteotomy is repeated on the opposite
side of the patient’s the distal mandible is
repositioned. The teeth are secured to the
maxilla with MMF (25-gauge wire) and with
the aid of an occlusal wafer splint.
164. 164
The distal tooth-bearing
segment should move
easily to the new
position.
165. 165
If the mandible is advanced, the medial
pterygoid muscle should be released at the
inferior aspect of the distal segment with a
periosteal elevator
166. 166
If the mandible is set back, release of the
medial pterygoid muscle and the masseter
muscle at the posteroinferior border may be
necessary to prevent displacement of the
condylar segment posteriorly.
167. 167
With a mandibular setback, sufficient bone
must be trimmed from the anterior aspect of
the proximal condylar segment to allow it to
rest passively against the tooth bearing
segment with the condyle in proper position.
168. 168
Four methods of
interosseous fixation
will be discussed: upper
border wiring, lower
border wiring,
circumramus-body
wiring, and the option
most effective to day,
RIF with lag screws,
position screws, or
small bone plates.
169. 169
SAGITTAL SPLIT OSTEOTOMY
ADVANTAGES:
GREAT FLEXIBILITY IN REPOSITIONING THE
DISTAL TOOTH BEARING SEGMENT
BROAD BONY OVERLAP OF THE SEGMENTS
AFTER REPOSITIONING OF JAWS
MINIMAL ALTERATIONS IN POSITION OF
MUSCLES OF MASTICATION & TMJ
171. 171
Better visibility and additional access for
bony cuts are needed or if there is to be more
than a few millimeters of mandibular
repositioning, the coronoid process should be
released.
172. 172
With a small reciprocating saw, a cut to
release the coronoid is made from the
sigmoid notch at the base of the coronoid
process extending through the anterior
ramus.
175. 175
The coronoid fragment is removed after
dissecting free the attached temporalis
muscle.
176. 176
A slight bony elevation mid-ramus
corresponds to the position of the medial
entrance of the neurovascular bundle,
directing the line of the osteotomy through
both medial and lateral cortical plates of bone
from an area in front of the condyle to a point
at or near the angle of the mandible.
177. 177
The osteotomy cut begins at the superior
aspect of the ramus, where visibility is usually
excellent, particularly after releasing the
coronoid process. The cut is carried through
the mandible, continuing down to a point at or
near the angle.
178. 178
verify the direction of the osteotomy before
completion because it is easy to become
disoriented and make the cut too close to the
posterior border or too far anteriorly.
179. 179
If the osteotomy is directed too far posteriorly,
a subcondylar-type osteotomy can occur.
180. 180
If the osteotomy is directed too far anteriorly,
increased danger of injury to the inferior
neurovascular bundle exists.
181. 181
A number of reciprocating saw blade designs
exist, and the resulting oblique bone cut
allows for greater bony contact of the
overlapped segments.
182. 182
When the osteotomy has been completed,
the proximal condylar fragement may tend to
displace medially.
183. 183
Often it is necessary to strip some of the
remaining periosteal and muscle attachments
from the inferior medial aspect of the
proximal condylar fragment, as well as along
the posterior border, to allow the fragment to
remain in a lateral position.
184. 184
The wire or suture is passed beneath the
periosteum on the medial aspect of the
mandible, picked up at the posterior aspect of
the ramus, and carried around and lateral to
the proximal segment.
191. 191
Maxillary Advancement
Frontal Changes
Increases fullness of upper lip
Increases visibility of upper lip vermilion
Increases alar base width
Increases paranasal fullness
192. 192
Maxillary Advancement
Profile Changes
Increases paranasal
area fullness
Deceases the
prominence of chin
and nose relatively
Elevates the nasal tip
Increases the upper lip
fullness
196. 196
Profile Changes
Increases upper
lip prominence
Makes
nasolabial angle
obtuse
Makes mandible
less prominent
antero-posteriorl
Maxillary Inferior Repositioning
197. 197
POST OPERATIVE INSTRUCTIONS
It has been of experience that the more
information and preparation patients have
prior to their surgery, the more easily they are
able to manage their postoperative
care.
1. SWELLING : Nasal swelling and stuffiness
can also be a problem after upper jaw
surgery. This will tend to be worse 48 hours
after surgery and will then begin to decrease
198. 198
POST OPERATIVE INSTRUCTIONS
2. DRINKING: Following jaw surgery there is
frequently some numbness in the upper or
lower lip, or both. When this is combined with
facial swelling and soreness due to incisions
inside the mouth, a task as basic as drinking
may present difficulties
REMEMBER: TAKING ADEQUATE
AMOUNTS OF FLUIDS IS ESSENTIAL
FOLLOWING SURGERY
199. 199
3. MEDICATIONS: Several medications will be
used around the time of the surgery
4. PLASTIC SPLINT: This will help balance your
bite and train your muscles to function in the
new jaw position. It should be worn full-time
except eating or cleaning mouth for up to 8
weeks.
5. JAW JOINT PAIN: This may feel somewhat
like an earache. The new position of the jaw is
the cause of pressure in the jaw joint area.
POST OPERATIVE INSTRUCTIONS
200. 200
6. JAW OPENING : Since jaw surgery causes
soreness in the muscles and bones of your
face, you will find some difficulty in moving
your jaw normally after surgery.
7. BLEEDING: It is normal to experience some
bleeding from the mouth for the first 7-10
days after jaw surgery. With upper jaw
surgery you may experience some old blood
from the nose for the first week after surgery
POST OPERATIVE INSTRUCTIONS
202. 202
References
Contemporary Orthodontics – William Proffit
Essentials of Orthognathic Surgery –
Reyneke
Esthetic Orthodontics & Orthognathic Surgery
– Sarver
Orthodontics: Current Principles &
Techniques – Graber, Vanarsdall
Mandibular Growth Anomalies – H. L.
Obwegeser
203. 203
References
Contemporary Treatment of Dentofacial
Deformity – Proffit & Sarver
A Frontal Assymetry Analysis – JCO (1987);
Grummons & Kappeyne.
Surgical Orthodontic Treatment Planning:
Profile Analysis and Mandibular Surgery – AO
(1976); Worms, Isaacson, Speidel.
Cephalometric Prediction for Orthodontic
Surgery – AO (1972); McNeill, Proffit, White.
204. 204
References
Projecting the soft-tissue outcome of surgical
and orthodontic manipulation of the
maxillofacial skeleton – AJODO (1983);
Kinnebrew, Hoffman, Carlton.
220. 220
The use of electrocautery for the incision is
discouraged, since adverse wound healing by
excessive scarring beneath the upper lip and
nasal base may affect the length of the lip
and the amount of exposed vermilion of the
upper lip.