The welded steel frame of the forklift truck has a bolt-on cast iron counterweight. The counterweight weighs 900 kgs and is secured to the frame by 3 bolts that should be torqued to 710 Nm. The removable rear counterweight can be removed by removing these 3 bolts.
Hadj Ounis's most notable work is his sculpture titled "Metamorphosis." This piece showcases Ounis's mastery of form and texture, as he seamlessly combines metal and wood to create a dynamic and visually striking composition. The juxtaposition of the two materials creates a sense of tension and harmony, inviting viewers to contemplate the relationship between nature and industry.
Explore the multifaceted world of Muntadher Saleh, an Iraqi polymath renowned for his expertise in visual art, writing, design, and pharmacy. This SlideShare delves into his innovative contributions across various disciplines, showcasing his unique ability to blend traditional themes with modern aesthetics. Learn about his impactful artworks, thought-provoking literary pieces, and his vision as a Neo-Pop artist dedicated to raising awareness about Iraq's cultural heritage. Discover why Muntadher Saleh is celebrated as "The Last Polymath" and how his multidisciplinary talents continue to inspire and influence.
2137ad - Characters that live in Merindol and are at the center of main storiesluforfor
Kurgan is a russian expatriate that is secretly in love with Sonia Contado. Henry is a british soldier that took refuge in Merindol Colony in 2137ad. He is the lover of Sonia Contado.
2137ad Merindol Colony Interiors where refugee try to build a seemengly norm...luforfor
This are the interiors of the Merindol Colony in 2137ad after the Climate Change Collapse and the Apocalipse Wars. Merindol is a small Colony in the Italian Alps where there are around 4000 humans. The Colony values mainly around meritocracy and selection by effort.
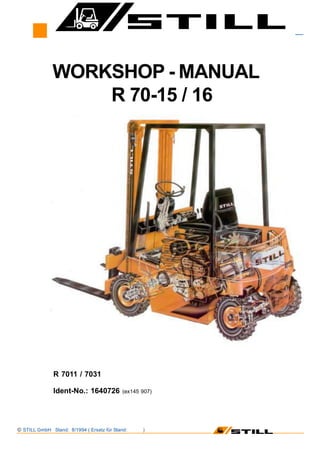
Still forklift r70 15 series service repair manual
1. STILL GmbH Stand: 8/1994 ( Ersatz für Stand: )
WORKSHOP - MANUAL
R 70-15 / 16
R 7011 / 7031
Ident-No.: 1640726 (ex145 907)
2. 01Workshop Manual R 7011(R 7031, R 7001)
Frame and Counterweight
01STILL GmbH Stand: 8/2004 ( Ersatz für Stand: 1986 )
Frame
The welded steel frame is of unit construction and
has a bolt-on cast iron counterweight.
The hydraulic oil tank serves as a frame crossmember
between the leg and engine compartments.
The front cowl is bolted to the frame.
Counterweight
The removable rear counterweight is secured to the
frame by 3 bolts. (See sketch).
All the counterweight bolts should be torqued to 710
Nm.
1 = Hex hd bolt M 24 x 85 DIN 933
2 = Ball cup DIN 6319 D 28
3 = Spherical washer DIN 6319 C 25
4 = Hex hd bolt M 24 x 60 DIN 933
5 = Spring washer DIN 127 A24
Weight of the counterweight: 900 kgs
3. 02
Technical Data for Maintenance Service
01STILL GmbH Stand: 8/2004 ( Ersatz für Stand: 1986 )
Workshop Manual R 7011(R 7031, R 7001)
Trail Axle
Trail axle mounting bolts MA = 195 Nm
Wheel hub bolts MA = 22.6 Nm
Axial play of wheel hub 0.15 - 0.25 mm
Wheel lock angles 80 - 820 the complementary angle to 180° is measured
Press force for steer max. 68 kN
cylinder mounting pin
Press force for bellcrank max. 42 kN
mounting pin
4. 02
Trail/Steer Axle
02STILL GmbH Stand: 8/2004 ( Ersatz für Stand: 1986 )
Workshop Manual R 7011(R 7031, R 7001)
Description
The articulating steer axle suspended from the coun-
terweight is mounted in neoprene blocks. King pins
are mounted in needle bearings for easy steering.
Steering is limited by stop screws on the axle. Ar-
ticulation is limited by stops on the counterweight.
Steering axle removal
For steering axle removal, disconnect the power steer
cylinder pipes and remove the cap screws (3) hold-
ing the fixing plates in position.
To install the steering axle, reverse the removal pro-
cedure.
Torque loading: MA = 195 Nm.
Note:
Do not interchange hyd. connections left and right!
Wheel hubs
The wheel hubs are mounted on taper roller bear-
ings. The wheel hub and the end of the axle are pre-
cision engineered, to eliminate the need for adjusting
the bearing clearance by adding for removing shims.
Axial play = 0. 15 - 0.25 mm.
Wheel hub removal
Pull hub cap (4) from wheel. Remove locking bolts
(1) securing thrust washer (5). Next, remove thrust
washer (5) together with roll pin (6). Remove the in-
ner race (2) of outer taper roller bearing from the end
of the axle and withdraw the wheel hub (7).
Wheel hub installation.
When installing the wheel hub (7) tighten the hex
head locking bolt (1) while rotating the wheel hub.
Torque loading: MA = 22.6 Nm.
Secure locking bolt (1) with Loctite 242.
Prior to assembly, apply grease between inner race
and cage of taper roller bearing.
Only inner and outer races (2) of same make should
be used.
When installing the wheel bearings, the correspond-
ing bearings spaces must be repacked with grease,
as shown in figure (3).
Before re-assembling the hub, carefully grease the
sealing lip of the sealing ring (8).
Grade of lubricant to be used: Lithium soap based
grease.
5. 02
Trail/Steer Axle
03STILL GmbH Stand: 8/2004 ( Ersatz für Stand: 1986 )
Workshop Manual R 7011(R 7031, R 7001)
Setting both steering angles
The wheel lock is limited by the stop screw (1).
Note:
Ensure that the wheel lock is limited by the stop screw
and not by the cylinder stroke, and that there is suf-
ficient clearance between the piston rod and the stub
axle.
Checking the steering angles
The steering angle á must amount to 80° -82°, see
figure.
To facilitate the measurement use the com-
plementary angle ß for the setting. It should amount
to 98° - 100°.
Greasing the stub axle bearings
Operate the linkage during greasing.
Note:
In order to ensure that the bearings are sufficiently
greased, the axle must not be off load, i. e. the truck
should not be chocked up.
Right-hand bend
Left-hand bend
á = 80° - 82° steering lock
6. 02
Trail/Steer Axle
04STILL GmbH Stand: 8/2004 ( Ersatz für Stand: 1986 )
Workshop Manual R 7011(R 7031, R 7001)
Stub axle king pin bearings
Removal:
Remove grub screw (1).
Using a chisel (or similar tool) open needle bearing
at the top of the king pin.
Drive king pin down, forcing out bearing at the
bottom of the king pin.
Then drive out king pin in the opposite direction.
Installation:
Pack lower bearing (6) with grease, sparingly apply
loctite grade 270 to the outside, and press it into
its bore until flush.
Install oil seal (2).
The sealing lip must point away from the bearing.
Install stub axle with thrust bearing (3) into axle
beam.
Compensate for any play by adding shims (4).
Max. permissible axial play = 0.1 mm.
Grease shims and machined surfaces.
Install oil seal (5).
The sealing lip must point away from the bearing.
Install stub axle king pin and lock with grub .screw
(1 ).
Install grub screw (1), with thin coating of loctite
grade 242.
Pack upper bearing (7) with grease, sparingly apply
loctite grade 270 to the outside, and press it in.
7. 02
Trail/Steer Axle
05STILL GmbH Stand: 8/2004 ( Ersatz für Stand: 1986 )
Workshop Manual R 7011(R 7031, R 7001)
Track rod and steer cylinder bearing at stub
axle
1 = mounting/steer cylinder
2 = grease nipple
3 = oil seal
4 = stub axle
5 = track rod
6 = bearing
7 = washer
8 = circlip
Track rod bearing on steering bell crank
1 = bearing inserted with Loctite 270
2 = pin
3 = grease nipple
4 = track rod
5 = oil seal
6 = steering bell crank
8. 02
Trail /Steer Axle
06STILL GmbH Stand: 8/2004 ( Ersatz für Stand: 1986 )
Workshop Manual R 7011(R 7031, R 7001)
Detail ‘W’
Steer cylinder mounting at axle beam
1 = snap ring
2 = roll pin
3 = fillister head cap screw
(secured with Loctite)
4 = washer
5 = oil seal
6 = ball joint
7 = oil seal
8 = pin
Press force: 68 kN at the maximum
Detail “Y”
Bellcrank mounting
1 = locking ring
2 = washer
3 = needle bearing
4 = pin
5 = oil seal
6 = shim (quantity as required)
7 = washer (must always be fitted)
8 = grease nipple
9 = snap ring
Press- force: 42 kN at the maximum
9. 03
01STILL GmbH Stand: 8/2004 ( Ersatz für Stand: 1986 )
Technical Data for Maintenance Service
Workshop Manual R 7011(R 7031, R 7001)
Power Axle
Torque loading Power axle mounting bolts 195 Nm
Torque loading Axle housing mounting bolts 120 Nm
Axial clearance Hollow shaft: 0.05 mm at the maximum
Axial clearance Wheel hub: 0.07 mm pre-load -
Axial clearance Wheel hub: 0.21 mm slackness
Grade of grease lithium soap based grease
Torque loading Wheel hub/Slotted nut 180+20 Nm
Gearbox oil Capacity: approx. 2 litres
Grade SAE - 80
MIL - L - 2105
API - GL 4
9
10. 03
Power Axle
02STILL GmbH Stand: 8/2004 ( Ersatz für Stand: 1986 )
Workshop Manual R 7011(R 7031, R 7001)
Description
The power axle consists of a double reduction
spur-type gearbox (1) comprising differential assem-
bly with two-bearing driving pinion, to which a D. C.
electric motor (2) is flange mounted, as well as of a
long axle housing (3) and an axle housing which is
an integral part of the gear case (1).
The long axle housing (3) with the double
reduction spur-type gearbox (1) are rigidly bolted to
the frame as a complete unit.
11. 03
Power Axle
04STILL GmbH Stand: 8/2004 ( Ersatz für Stand: 1986 )
Double reduction gear and differential
Workshop Manual R 7011(R 7031, R 7001)
12. 03
Power Axle
05STILL GmbH Stand: 8/2004 ( Ersatz für Stand: 1986 )
Workshop Manual R 7011(R 7031, R 7001)
1-2= gear case with integral axle housing
3 = cylindrical pin
4 = Allen head screw
5 = sealing ring
6 = screw plug (oil drain plug)
7 = grooved ball bearing
8 = differential
9 = gear
10 = hex hd screw
11 = roll pin
12 = taper roller bearing
13 = gear shaft
14 = shim 0.1, 0.3, 0.5, 1 mm
15 = circlip
16 = cover
17 = driving dog
18 = shaft sealing ring
19 = taper roller bearing
20 = toothed hollow shaft
21 = ‘0’ ring seal
22 = shim 0.1, 0.3, 0.5, 1 mm
23 = ring
24 = ‘0’ ring seal
25 = shaft sealing ring
26 = cover
27 = Allen head screw
28 = Allen head screw
13. 03
Power Axle
06STILL GmbH Stand: 8/2004 ( Ersatz für Stand: 1986 )
Workshop Manual R 7011(R 7031, R 7001)
Axle housing installation
Clean contact areas of gear case and axle housing.
Provide ‘O’ ring seal (2) with a smear of grease and
place it on the recess of the axle housing (3). Next,
assemble the axle housing with the gear case.
Apply loctite grade 270 to the 12 screws (4) and torque
to 120 Nm.
14. 03
07STILL GmbH Stand: 8/2004 ( Ersatz für Stand: 1986 )
Power Axle
Workshop Manual R 7011(R 7031, R 7001)
Half -shaft removal
- Jack up truck securely from one side, otherwise
drain gearbox oil
- Remove wheel nuts
- Remove drive wheel
- Remove screws (10) securing shaft (7) to hub. Us-
ing two of the screws drive out the half shaft (7).
Two appropriate tapholes exist in the shaft flange
- Remove shaft (7)
Note:
When carrying out repairs or maintenance operations
on the half-shafts remove only one at a time.
Reason:
Should both half-shafts (long and short shafts) be
removed at the same time, the position of the half-shaft
location inside the differential
will be modified, making half-shaft installation impos-
sible.
Half -shaft installation
- Clean sealing surface of half-shaft (7) and apply
loctite grade 573 to sealing surface
- Install shaft (7)
- Torque shaft mounting screws to MA = 35 Nm
- Replace drive wheel. Watch for correct align-
ment of holes for wheel brake adjustment
- Torque wheel nuts to 195 Nm
- Jack down the truck
- Check half -shaft for leaks
15. 03
08STILL GmbH Stand: 8/2004 ( Ersatz für Stand: 1986 )
Power Axle
Workshop Manual R 7011(R 7031, R 7001)
Wheel hub removal
- Jack up truck securely from one side (otherwise
drain gearbox)
- Remove half-shaft as described in section ‘Half
-shaft removal’, page 9
- Remove brake drum (5)
- Remove slotted nut (1)
- Remove washer (2)
Important:
Note the position of the washer which is may be
turned off at one side.
- Place fitting tool (self-made tool - see figure) into
axle housing, and using a puller, pull wheel hub
from axle housing.
- Inner race (9) of bearing can now be withdrawn from
axle housing using puller.
16. 03
09STILL GmbH Stand: 8/2004 ( Ersatz für Stand: 1986 )
Power Axle
Workshop Manual R 7011(R 7031, R 7001)
Wheel hub installation
- Thouroughly clean wheel hub
- Press both taper roller bearings complete only
into wheel hub.
In the event of repairs of maintenance work on the
wheel hub the taper roller bearings must always be
replaced with new ones comprising a sealing ring
(8).
Note:
The taper roller bearings are provided with sealing
rings which are installed at the factory with a special
device. The taper roller bearings should therefore never
be disassembled.
- Check grease filling of bearings, repack with grease
if necessary. Grade of lubricant to be used: lithium
soap based grease
- Position wheel hub on axle housing
- Place fitting tool (self-made tool - see figure) on
outer bearing, and using a twoarmed claw puller or
extractor slide hub with taper roller bearings on axle
housing (puller claws behind brake anchor plate)
Note:
Do not hit or apply blows with a hammer, otherwise
the sealing rings could fall off their locations
- Fit washer (2) to axle housing (watch for correct
fitting position)
- Install new slotted nut and torque to 180+20 Nrn
- Install brake drum (hole for wheel brake adjustment
should align_with opening in wheel hub)
- Axial clearance betw een 0.07 mm preloaded and
0.21 mm slackness
- Install half -shaft (seepage 9)
17. 03
09STILL GmbH Stand: 8/2004 ( Ersatz für Stand: 1986 )
Power Axle
Workshop Manual R 7011(R 7031, R 7001)
Replacing the shaft sealing ring
Remove the wheel nuts of the LH front wheel and pull
wheel from the lift truck.
By passing an Allen key through a hole in the frame
loosen and remove screws securing tachogenerator
to axle gearbox.
Remove tachogenerator together with driving dog.
Using a drawing point or similar tool remove shaft
sealing ring (1) by pulling it in your direction.
Apply grease to new shaft sealing ring (1) -see sketch.
Lightly lubricate the borehole with oil.
Install shaft sealing ring (1) into the borehole provided
to this end, and using a guide tube (see tool assem-
bly drawing below) bring it into its correct position.
Note:
Check driving dog (2) in hollow shaft (3) for correct
press -in depth (15 mm) and truth.
Refit driving dog and tachogenerator. Refer to Func-
tional Group 08 ‘Tachogenerator’.
Install the front wheel in reverse order of removal.
Torque wheel nuts to 195 Nm.
18. 04
Wheels and Tyres
01STILL GmbH Stand: 8/2004 ( Ersatz für Stand: 1986 )
Synoptical Table on Tyres
Pneumatic tyres
Size Track/mm Mast O.L.H.* mm
front 18x7-8 IC 11 16PR STD. 897 Tele ...2730
rear 16x6-8 10PR STD. 882 Hi-Lo ...2530
Triple ...1930
front 18x7-8 IC 11 16PR 997 Tele 2731 ... 3230
rear 16x6-8 10PR 882 Triple 1931 ... 3230
Superelastic (puncture- proof) tyres
front 18x7-8 DIN 897 Tele ...2730
rear 16x6-8 DIN 882 Hi-Lo ...2530
Triple ...1930
front 18x7-8 DIN 997 Tele 2731 ... 3230
rear 16x6-8 DIN 882 Triple 1931 ... 3230
front 18x7-8 SIT 897 Tele ...2730
rear 16x6-8 SIT 882 Hi-Lo ...2530
Triple ...1930
front 18x7-8 SIT 997 Tele 2731 ... 3230
rear 16x6-8 SIT 882 Triple 1931 ... 3230
* Overall lowered height
Ball seat nut: Torque loading = 195 or 210 Nm
Workshop Manual R 7011(R 7031, R 7001)
19. 04
02STILL GmbH Stand: 8/2004 ( Ersatz für Stand: 1986 )
Wheels and Tyres
Workshop Manual R 7011(R 7031, R 7001)
Pneumatic tyred wheel
1-6= Tyres frontAB
1-3= Tyre, COMPL. 18x7-8 16PR
2 = Tube 180-8 VTL
3 = Flap
4 = Disk wheel without rings
5 = Side ring
6 = Lock ring
7 = Ball seat nut
8 = Spacer B
9 = Ball seat bolt B
11 - 16 = Tyres rear AB
11 - 13 = Tyre, COMPL. 16x6-8 10PR
12 = Tube
13 = Flap
14 = Disk wheel without rings
15 = Side ring
16 = Lock ring
Note:
Where the axle is fitted with spacers, ball seat type
wheel nuts on spacer must be checked for correct
torque at regular intervals to which end it is necessary
to remove the wheels.
Torque loadings
Ball seat type wheel nuts front and rear
M14 x 1.5
MA: 195 Nm
Ball seat type wheel bolts (for increased track
width) M 14 x 24 Grade 10.9
MA: 195 Nm
Important:
Torque loadings for ball seat type wheel nuts/bolts:
1) without aftertreatment (black nuts/bolts)
210 Nm
2) galvanically aftertreated (bright nuts/bolts)
195 Nm
20. Thank you very much for
your reading. Please Click
Here. Then Get COMPLETE
MANUAL. NO WAITING
NOTE:
If there is no response to
click on the link above,
please download the PDF
document first and then
click on it.
21. 04
03STILL GmbH Stand: 8/2004 ( Ersatz für Stand: 1986 )
Wheels and Tyres
Workshop Manual R 7011(R 7031, R 7001)
Superelastic tyred wheel with lock rings
1--4= Tyres front AB
1 = Superelastic tyre 18x7-8
2 = Disk wheel without rings
3 = Side ring
4 = Lock ring
5 = Ball seat nut
6 = Spacer B
7 = Ball seat bolt B
10- 13 = Tyres rear AB
10 = Superelastic tyre 16x6-8
11 = Disk wheel without rings
12 = Side ring
13 = Lock ring
Note:
Where the axle is fitted with spacers, ball seat type
wheel nuts on spacer must be checked for correct
torque at regular intervals to which end it is neces-
sary to remove the wheels!
Torque loadings
Ball seat nuts front and rear
M 14x 1,5
MA: 195 Nm
Ball seat bolts (for increased track width)
M 14 x 24 Grade 10.9
MA: 195 Nm
Important:
Torque loadings for ball seat nuts/bolts:
1) without aftertreatment (black nuts/bolts)
210 Nm
2) galvanically aftertreated (bright nuts/bolts)
195 Nm
22. 04
04STILL GmbH Stand: 8/2004 ( Ersatz für Stand: 1986 )
Wheels and Tyres
Workshop Manual R 7011(R 7031, R 7001)
Superelastic tyred wheel without lock rings
1-2= Tyres front AB
1 = Superelastic tyre 18x7-8
2 = Disk wheel without rings
3 = Ball seat nut
4 = Spacer
5 = Ball seat bolt
10- 11 = Tyres rear AB
10 = Superelastic tyre 16x6-8
11 = Disk wheel without rings
Note:
Where the axle is fitted with spacers, ball seat
type wheel nuts on spacer must be checked for
correct torque at regular intervals to which end it is
necessary to remove the wheels!
Torque loadings
Ball seat nuts front and rear
M 14x 115
MA: 195 Nm
Ball seat bolts (for increased track width)
M 14 x 24 Grade 10.9
MA: 195 Nm
Important:
Torque loadings for ball seat nuts/bolts:
1) without aftertreatment (black nuts/bolts)
210 Nm
2) galvanically aftertreated (bright nuts/bolts)
195 Nm