Agenda
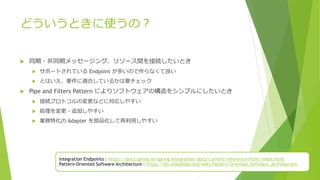
Spring Integrationとは
簡単なアプリケーションの作成
STS3 の integration-graph を利用
Spring Integration の Java DSL を利用
4.
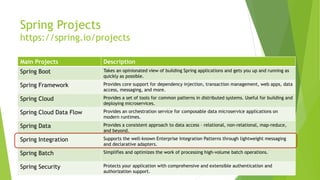
Main Projects Description
SpringBoot Takes an opinionated view of building Spring applications and gets you up and running as
quickly as possible.
Spring Framework Provides core support for dependency injection, transaction management, web apps, data
access, messaging, and more.
Spring Cloud Provides a set of tools for common patterns in distributed systems. Useful for building and
deploying microservices.
Spring Cloud Data Flow Provides an orchestration service for composable data microservice applications on
modern runtimes.
Spring Data Provides a consistent approach to data access – relational, non-relational, map-reduce,
and beyond.
Spring Integration Supports the well-known Enterprise Integration Patterns through lightweight messaging
and declarative adapters.
Spring Batch Simplifies and optimizes the work of processing high-volume batch operations.
Spring Security Protects your application with comprehensive and extensible authentication and
authorization support.
Spring Projects
https://spring.io/projects


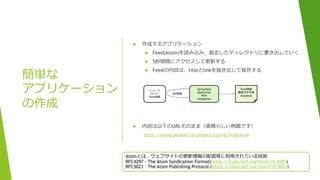

![ [ファイル] → [新規] → [その他] → [Spring Boot] → [Spring スターター・プロジェクト]
Spring スターター・プロジェクト
名前:integration-demo
グループ:com.example.integ
成果物:integration-demo
パッケージ:com.example.integ.demo
Spring スターター・プロジェクト依存関係
Spring Boot バージョン:2.4.5
Spring Integration を選択
プロジェクトの作成
動作確認済み Spring Boot バージョン
2.4.5, 2.3.10.RELEASE, 2.2.13.RELEASE, 2.2.4.RELEASE](https://image.slidesharecdn.com/20210523springintegrationforbeginners-210522203644/85/Spring-Integration-10-320.jpg)
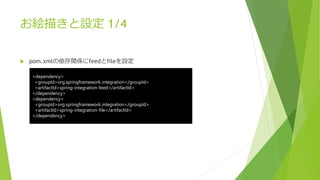
![お絵描きと設定 2/4
設定ファイルの作成
[ファイル] → [新規] → [その他] → [Spring] → [Spring Bean 構成ファイル]
src/main/resources/integration.xml を作成
Integration.xml ファイルを開く
[名前空間] を3つ選択して保存
Int
Int-feed
Int-file](https://image.slidesharecdn.com/20210523springintegrationforbeginners-210522203644/85/Spring-Integration-12-320.jpg)
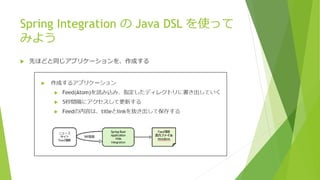
![お絵描きと設定 3/4
[integration-graph] で絵を描く(integration.xmlファイルを開く)1/2
コンポーネントを配置
feed から “inbound-channel-adapter”
ファイル から “outbound-channel-adapter”
変換 から “transformer”
コンポーネント間をつなぐ
“接続” を選択してコンポーネントを繋げる(channelは自動的に配置される)
feed transformer file](https://image.slidesharecdn.com/20210523springintegrationforbeginners-210522203644/85/Spring-Integration-13-320.jpg)
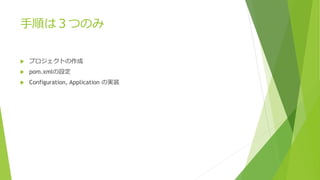
![ [integration-graph] で絵を描く(integration.xmlファイルを開く)2/2
コンポーネント毎の設定(コンポーネントをダブルクリックして、プロパティウィンドウを開く)
1. feed - inbound-channel-adapter
id:news
url:https://www.j-cast.com/atom.xml
2. ファイル – outbound-channel-adapter
id:file
charset:UTF-8
directory:C:temp
filename-generator-expression:’jcast-news’
mode:APPEND
3. 変換 – transformer
expression:payload.title + ‘@’ + payload.link + ‘#{systemProperties[‘line.separator’]}’
お絵描きと設定 4/4
1.feed 2.ファイル
3.変換](https://image.slidesharecdn.com/20210523springintegrationforbeginners-210522203644/85/Spring-Integration-14-320.jpg)
![数行の実装
Integration.xml に poller 設定追加
IntegrationDemoApplication.java の書き換え
<int-feed:inbound-channel-adapter
id="news" channel="channel1" url="https://www.j-cast.com/atom.xml">
<int:poller fixed-rate="5000" />
</int-feed:inbound-channel-adapter>
@SpringBootApplication
@ImportResource("/integration.xml")
public class IntegrationDemoApplication {
public static void main(String[] args) throws Exception {
ConfigurableApplicationContext context =
new SpringApplication(IntegrationDemoApplication.class).run(args);
System.out.println(“Hit enter to terminate.”); // main を終了しないようにする
System.in.read();
context.close();
}
}](https://image.slidesharecdn.com/20210523springintegrationforbeginners-210522203644/85/Spring-Integration-15-320.jpg)
![完成したので実行する
実行
IntegrationDemoApplication.java を選択して右クリック
[実行] → [Spring Boot アプリケーション]
“C:tempjcast-news” ファイルが出力され、5秒間隔で Feed 情報の取得が繰り返される
※コンソールウィンドウ内でリターンをするとアプリケーションが終了する](https://image.slidesharecdn.com/20210523springintegrationforbeginners-210522203644/85/Spring-Integration-16-320.jpg)
![XML定義は、もう少し簡素に書ける
Channelを経由しなくてもシンプルに書けるが、integration-graphでは書けない
<int-feed:inbound-channel-adapter
id="news" channel="channel1" url="https://www.j-cast.com/atom.xml">
<int:poller fixed-rate="5000" />
</int-feed:inbound-channel-adapter>
<int-file:outbound-channel-adapter channel="channel2" id="file" charset="UTF-8“
directory="C:temp" mode="APPEND“ filename-generator-expression="'jcast-news'">
</int-file:outbound-channel-adapter>
<int:transformer input-channel="channel1"
output-channel="channel2"
expression="payload.title + '@' + payload.link + '#{systemProperties['line.separator']}'">
</int:transformer>
<int:channel id="channel1"></int:channel>
<int:channel id="channel2"></int:channel>
<int-feed:inbound-channel-adapter id="news" url="https://www.j-cast.com/atom.xml">
<int:poller fixed-rate="5000" />
</int-feed:inbound-channel-adapter>
<int:transformer input-channel="news"
expression="payload.title + '@' + payload.link + '#{systemProperties['line.separator']}'"
output-channel="file" />
<int-file:outbound-channel-adapter id="file" mode="APPEND" charset="UTF-8"
directory="C:temp" filename-generator-expression="'jcast-news'" />
XMLタグ数:6
XMLタグ数:4](https://image.slidesharecdn.com/20210523springintegrationforbeginners-210522203644/85/Spring-Integration-17-320.jpg)
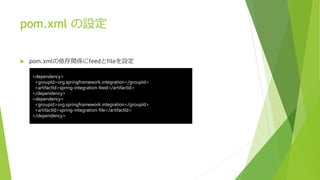
![ [ファイル] → [新規] → [その他] → [Spring Boot] → [Spring スターター・プロジェクト]
Spring スターター・プロジェクト
名前:integration-demo2
グループ:com.example.integ
成果物:integration-demo2
パッケージ:com.example.integ.demo2
Spring スターター・プロジェクト依存関係
Spring Boot バージョン:2.4.5
Spring Integration を選択
プロジェクトの作成](https://image.slidesharecdn.com/20210523springintegrationforbeginners-210522203644/85/Spring-Integration-20-320.jpg)
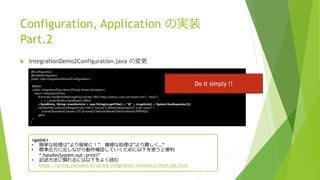
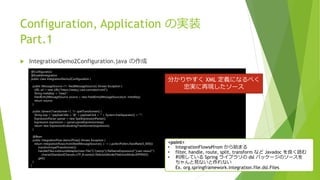
![Configuration, Application の実装
IntegrationDemo2Application.java の書き換え
@SpringBootApplication
public class IntegrationDemo2Application {
public static void main(String[] args) throws Exception {
ConfigurableApplicationContext context =
new SpringApplication(IntegrationDemo2Application.class).run(args);
System.out.println(“Hit enter to terminate.”); // main を終了しないようにする
System.in.read();
context.close();
}
}
<point>
XMLとは異なり、”@ImportResource” が必要ない](https://image.slidesharecdn.com/20210523springintegrationforbeginners-210522203644/85/Spring-Integration-22-320.jpg)
![完成したので実行する
実行
IntegrationDemo2Application.java を選択して右クリック
[実行] → [Spring Boot アプリケーション]
“C:tempjcast-news2” ファイルが出力され、5秒間隔で Feed 情報の取得が繰り返される
※コンソールウィンドウ内でリターンをするとアプリケーションが終了する](https://image.slidesharecdn.com/20210523springintegrationforbeginners-210522203644/85/Spring-Integration-24-320.jpg)