Solution Manual forChemistry, 9th Edition
download
http://testbankbell.com/product/solution-manual-for-
chemistry-9th-edition/
Download more testbank from https://testbankbell.com
2.
We believe theseproducts will be a great fit for you. Click
the link to download now, or visit testbankbell.com
to discover even more!
Solution Manual for Chemistry 9th Edition by Zumdahl
https://testbankbell.com/product/solution-manual-for-
chemistry-9th-edition-by-zumdahl/
Solution Manual for Introductory Chemistry A Foundation
9th by Zumdahl
https://testbankbell.com/product/solution-manual-for-
introductory-chemistry-a-foundation-9th-by-zumdahl/
Test Bank for Chemistry, 9th Edition
https://testbankbell.com/product/test-bank-for-chemistry-9th-
edition/
Solution Manual for Basic Chemistry, 8th Edition
https://testbankbell.com/product/solution-manual-for-basic-
chemistry-8th-edition/
3.
Solution Manual forChemistry: The Molecular Nature of
Matter and Change, 9th Edition, Martin Silberberg
Patricia Amateis
https://testbankbell.com/product/solution-manual-for-chemistry-
the-molecular-nature-of-matter-and-change-9th-edition-martin-
silberberg-patricia-amateis/
Biophysical Chemistry 1st Klostermeier Solution Manual
https://testbankbell.com/product/biophysical-chemistry-1st-
klostermeier-solution-manual/
Environmental Chemistry 10th Manahan Solution Manual
https://testbankbell.com/product/environmental-chemistry-10th-
manahan-solution-manual/
Solution Manual for Chemistry 10th by Zumdahl
https://testbankbell.com/product/solution-manual-for-
chemistry-10th-by-zumdahl/
Chemistry for Today General Organic and Biochemistry
9th Edition Seager Solutions Manual
https://testbankbell.com/product/chemistry-for-today-general-
organic-and-biochemistry-9th-edition-seager-solutions-manual/
4.
Solution Manual forChemistry, 9th Edition
Full download link at: https://testbankbell.com/product/solution-manual-for-
chemistry-9th-edition/
CHAPTER 2
ATOMS, MOLECULES, AND IONS
Questions
16. Some elements exist as molecular substances. That is, hydrogen normally exists as H2
molecules, not single hydrogen atoms. The same is true for N2, O2, F2, Cl2, etc.
17. A compound will always contain the same numbers (and types) of atoms. A given amount of
hydrogen will react only with a specific amount of oxygen. Any excess oxygen will remain
unreacted.
18. The halogens have a high affinity for electrons, and one important way they react is to form
anions of the type X−
. The alkali metals tend to give up electrons easily and in most of their
compounds exist as M+
cations. Note: These two very reactive groups are only one electron
away (in the periodic table) from the least reactive family of elements, the noble gases.
19. Law of conservation of mass: Mass is neither created nor destroyed. The total mass before a
chemical reaction always equals the total mass after a chemical reaction.
Law of definite proportion: A given compound always contains exactly the same proportion
of elements by mass. For example, water is always 1 g H for every 8 g oxygen.
Law of multiple proportions: When two elements form a series of compounds, the ratios of
the mass of the second element that combine with 1 g of the first element always can be reduced
to small whole numbers: For CO2 and CO discussed in Section 2.2, the mass ratios of oxygen
that react with 1 g carbon in each compound are in a 2 : 1 ratio.
20. a. The smaller parts are electrons and the nucleus. The nucleus is broken down into protons
and neutrons, which can be broken down into quarks. For our purpose, electrons,
neutrons, and protons are the key smaller parts of an atom.
b. All atoms of hydrogen have 1 proton in the nucleus. Different isotopes of hydrogen have
0, 1, or 2 neutrons in the nucleus. Because we are talking about atoms, this implies a
neutral charge, which dictates 1 electron present for all hydrogen atoms. If charged ions
were included, then different ions/atoms of H could have different numbers of electrons.
c. Hydrogen atoms always have 1 proton in the nucleus, and helium atoms always have 2
protons in the nucleus. The number of neutrons can be the same for a hydrogen atom and
a helium atom. Tritium (3
H) and 4
He both have 2 neutrons. Assuming neutral atoms, then
the number of electrons will be 1 for hydrogen and 2 for helium.
5.
d. Water (H2O)is always 1 g hydrogen for every 8 g of O present, whereas H2O2 is always 1
g hydrogen for every 16 g of O present. These are distinctly different compounds, each
with its own unique relative number and types of atoms present.
25
6.
26 CHAPTER 2ATOMS, MOLECULES, AND IONS
CHAPTER 2 ATOMS, MOLECULES, AND IONS 26
e. A chemical equation involves a reorganization of the atoms. Bonds are broken between
atoms in the reactants, and new bonds are formed in the products. The number and types
of atoms between reactants and products do not change. Because atoms are conserved in
a chemical reaction, mass is also conserved.
21. J. J. Thomson’s study of cathode-ray tubes led him to postulate the existence of negatively
charged particles that we now call electrons. Thomson also postulated that atoms must
contain positive charge in order for the atom to be electrically neutral. Ernest Rutherford and
his alpha bombardment of metal foil experiments led him to postulate the nuclear atom−an
atom with a tiny dense center of positive charge (the nucleus) with electrons moving about
the nucleus at relatively large distances away; the distance is so large that an atom is mostly
empty space.
22. The atom is composed of a tiny dense nucleus containing most of the mass of the atom. The
nucleus itself is composed of neutrons and protons. Neutrons have a mass slightly larger than
that of a proton and have no charge. Protons, on the other hand, have a 1+ relative charge as
compared to the 1– charged electrons; the electrons move about the nucleus at relatively large
distances. The volume of space that the electrons move about is so large, as compared to the
nucleus, that we say an atom is mostly empty space.
23. The number and arrangement of electrons in an atom determine how the atom will react with
other atoms, i.e., the electrons determine the chemical properties of an atom. The number of
neutrons present determines the isotope identity and the mass number.
24. Density = mass/volume; if the volumes are assumed equal, then the much more massive
proton would have a much larger density than the relatively light electron.
25. For lighter, stable isotopes, the number of protons in the nucleus is about equal to the number
of neutrons. When the number of protons and neutrons is equal to each other, the mass
number (protons + neutrons) will be twice the atomic number (protons). Therefore, for
lighter isotopes, the ratio of the mass number to the atomic number is close to 2. For
example, consider 28
Si, which has 14 protons and (28 – 14 =) 14 neutrons. Here, the mass
number to atomic number ratio is 28/14 = 2.0. For heavier isotopes, there are more neutrons
than protons in the nucleus. Therefore, the ratio of the mass number to the atomic number
increases steadily upward from 2 as the isotopes get heavier and heavier. For example, 238
U
has 92 protons and (238 – 92 =) 146 neutrons. The ratio of the mass number to the atomic
number for 238
U is 238/92 = 2.6.
26. Some properties of metals are
(1) conduct heat and electricity;
(2) malleable (can be hammered into sheets);
(3) ductile (can be pulled into wires);
(4) lustrous appearance;
(5) form cations when they form ionic compounds.
Nonmetals generally do not have these properties, and when they form ionic compounds,
nonmetals always form anions.
7.
27 CHAPTER 2ATOMS, MOLECULES, AND IONS
CHAPTER 2 ATOMS, MOLECULES, AND IONS 27
27. Carbon is a nonmetal. Silicon and germanium are called metalloids because they exhibit both
metallic and nonmetallic properties. Tin and lead are metals. Thus metallic character
increases as one goes down a family in the periodic table. The metallic character decreases
from left to right across the periodic table.
28. a. A molecule has no overall charge (an equal number of electrons and protons are present).
Ions, on the other hand, have extra electrons added or removed to form anions (negatively
charged ions) or cations (positively charged ions).
b. The sharing of electrons between atoms is a covalent bond. An ionic bond is the force of
attraction between two oppositely charged ions.
c. A molecule is a collection of atoms held together by covalent bonds. A compound is
composed of two or more different elements having constant composition. Covalent
and/or ionic bonds can hold the atoms together in a compound. Another difference is that
molecules do not necessarily have to be compounds. H2 is two hydrogen atoms held
together by a covalent bond. H2 is a molecule, but it is not a compound; H2 is a diatomic
element.
d. An anion is a negatively charged ion; e.g., Cl−
, O2−
, and SO4
2−
are all anions. A cation is a
positively charged ion, e.g., Na+
, Fe3+
, and NH4
+
are all cations.
29. a. This represents ionic bonding. Ionic bonding is the electrostatic attraction between
anions and cations.
b. This represents covalent bonding where electrons are shared between two atoms. This
could be the space-filling model for H2O or SF2 or NO2, etc.
30. Natural niacin and commercially produced niacin have the exact same formula of C6H5NO2.
Therefore, both sources produce niacin having an identical nutritional value. There may be
other compounds present in natural niacin that would increase the nutritional value, but the
nutritional value due to just niacin is identical to the commercially produced niacin.
31. Statements a and b are true. Counting over in the periodic table, element 118 will be the next
noble gas (a nonmetal). For statement c, hydrogen has mostly nonmetallic properties. For
statement d, a family of elements is also known as a group of elements. For statement e, two
items are incorrect. When a metal reacts with a nonmetal, an ionic compound is produced,
and the formula of the compound would be AX2 (alkaline earth metals form 2+ ions and halo-
gens form 1– ions in ionic compounds). The correct statement would be: When an alkaline earth
metal, A, reacts with a halogen, X, the formula of the ionic compound formed should be AX2.
32. a. Dinitrogen monoxide is correct. N and O are both nonmetals, resulting in a covalent
compound. We need to use the covalent rules of nomenclature. The other two names are
for ionic compounds.
b. Copper(I) oxide is correct. With a metal in a compound, we have an ionic compound.
Because copper, like most transition metals, forms at least a couple of different stable
charged ions in compounds, we must indicate the charge on copper in the name. Copper
oxide could be CuO or Cu2O, hence why we must give the charge of most transition
8.
28 CHAPTER 2ATOMS, MOLECULES, AND IONS
CHAPTER 2 ATOMS, MOLECULES, AND IONS 28
metal compounds. Dicopper monoxide is the name if this were a covalent compound, which
it is not.
c. Lithium oxide is correct. Lithium forms 1+ charged ions in stable ionic compounds.
Because lithium is assumed to form 1+ ions in compounds, we do not need to indicate the
charge of the metal ion in the compound. Dilithium monoxide would be the name if Li2O
were a covalent compound (a compound composed of only nonmetals).
Exercises
Development of the Atomic Theory
33. a. The composition of a substance depends on the numbers of atoms of each element
making up the compound (depends on the formula of the compound) and not on the
composition of the mixture from which it was formed.
b. Avogadro’s hypothesis (law) implies that volume ratios are proportional to molecule
ratios at constant temperature and pressure. H2(g) + Cl2(g) → 2 HCl(g). From the
balanced equation, the volume of HCl produced will be twice the volume of H2 (or Cl2)
reacted.
34. Avogadro’s hypothesis (law) implies that volume ratios are equal to molecule ratios at
constant temperature and pressure. Here, 1 volume of N2 reacts with 3 volumes of H2 to
produce 2 volumes of the gaseous product or in terms of molecule ratios:
1 N2 + 3 H2 → 2 product
In order for the equation to be balanced, the product must be NH3.
35. From the law of definite proportions, a given compound always contains exactly the same
proportion of elements by mass. The first sample of chloroform has a total mass of 12.0 g C
+ 106.4 g Cl + 1.01 g H = 119.41 g (carrying extra significant figures). The mass percent of
carbon in this sample of chloroform is:
12.0 g C
119.41g total
× 100 = 10.05% C by mass
From the law of definite proportions, the second sample of chloroform must also contain
10.05% C by mass. Let x = mass of chloroform in the second sample:
30.0 g C
x
× 100 = 10.05, x = 299 g chloroform
36. A compound will always have a constant composition by mass. From the initial data given,
the mass ratio of H : S : O in sulfuric acid (H2SO4) is:
2.02
:
2.02
32.07
:
2.02
64.00
= 1 : 15.9 : 31.7
2.02
If we have 7.27 g H, then we will have 7.27 × 15.9 = 116 g S and 7.27 × 31.7 = 230. g O in
the second sample of H2SO4.
9.
29 CHAPTER 2ATOMS, MOLECULES, AND IONS
CHAPTER 2 ATOMS, MOLECULES, AND IONS 29
37. Hydrazine: 1.44 × 10⁻¹
g H/g N; ammonia: 2.16 × 10⁻¹
g H/g N; hydrogen azide:
2.40 × 10⁻²
g H/g N. Let's try all of the ratios:
0.144
= 6.00;
0.0240
0.216
= 9.00;
0.0240
0.0240
= 1.00;
0.0240
0.216
= 1.50 =
3
0.144 2
All the masses of hydrogen in these three compounds can be expressed as simple whole-
number ratios. The g H/g N in hydrazine, ammonia, and hydrogen azide are in the ratios
6 : 9 : 1.
38. The law of multiple proportions does not involve looking at the ratio of the mass of one
element with the total mass of the compounds. To illustrate the law of multiple proportions,
we compare the mass of carbon that combines with 1.0 g of oxygen in each compound:
compound 1: 27.2 g C and 72.8 g O (100.0 − 27.2 = mass O)
compound 2: 42.9 g C and 57.1 g O (100.0 − 42.9 = mass O)
The mass of carbon that combines with 1.0 g of oxygen is:
compound 1:
compound 2:
27.2 g C
72.8 g O
42.9 g C
57.1g O
= 0.374 g C/g O
= 0.751 g C/g O
0.751
=
0.374
number.
2
; this supports the law of multiple proportions because this carbon ratio is a whole
1
39. For CO and CO2, it is easiest to concentrate on the mass of oxygen that combines with 1 g of
carbon. From the formulas (two oxygen atoms per carbon atom in CO2 versus one oxygen
atom per carbon atom in CO), CO2 will have twice the mass of oxygen that combines per
gram of carbon as compared to CO. For CO2 and C3O2, it is easiest to concentrate on the
mass of carbon that combines with 1 g of oxygen. From the formulas (three carbon atoms per
two oxygen atoms in C3O2 versus one carbon atom per two oxygen atoms in CO2), C3O2 will
have three times the mass of carbon that combines per gram of oxygen as compared to CO2.
As expected, the mass ratios are whole numbers as predicted by the law of multiple proportions.
40. Compound I:
14.0g R
3.00g Q
=
4.67g R
; compound II:
1.00g Q
7.00 g R
4.50 g Q
=
1.56 g R
1.00 g Q
The ratio of the masses of R that combine with 1.00 g Q is:
4.67
= 2.99 3
1.56
As expected from the law of multiple proportions, this ratio is a small whole number.
Because compound I contains three times the mass of R per gram of Q as compared with
compound II (RQ), the formula of compound I should be R3Q.
10.
30 CHAPTER 2ATOMS, MOLECULES, AND IONS
CHAPTER 2 ATOMS, MOLECULES, AND IONS 30
41. Mass is conserved in a chemical reaction because atoms are conserved. Chemical reactions
involve the reorganization of atoms, so formulas change in a chemical reaction, but the
number and types of atoms do not change. Because the atoms do not change in a chemical
reaction, mass must not change. In this equation we have two oxygen atoms and four hydrogen
atoms both before and after the reaction occurs.
42. Mass is conserved in a chemical reaction.
ethanol + oxygen → water + carbon dioxide
Mass: 46.0 g 96.0 g 54.0 g ?
Mass of reactants = 46.0 + 96.0 = 142.0 g = mass of products
142.0 g = 54.0 g + mass of CO2, mass of CO2 = 142.0 – 54.0 = 88.0 g
43. To get the atomic mass of H to be 1.00, we divide the mass of hydrogen that reacts with 1.00
g of oxygen by 0.126; that is,
the same division.
0.126
= 1.00. To get Na, Mg, and O on the same scale, we do
0.126
Na:
2.875
= 22.8; Mg:
0.126
1.500
= 11.9; O:
0.126
1.00
= 7.94
0.126
H O Na Mg
Relative value 1.00 7.94 22.8 11.9
Accepted value 1.008 16.00 22.99 24.31
For your information, the atomic masses of O and Mg are incorrect. The atomic masses of H
and Na are close to the values given in the periodic table. Something must be wrong about
the assumed formulas of the compounds. It turns out the correct formulas are H2O, Na2O,
and MgO. The smaller discrepancies result from the error in the assumed atomic mass of H.
44. If the formula is InO, then one atomic mass of In would combine with one atomic mass of O,
or:
A
=
16.00
4.784g In
, A = atomic mass of In = 76.54
1.000g O
If the formula is In2O3, then two times the atomic mass of In will combine with three times
the atomic mass of O, or:
2A
=
(3)16.00
4.784g In
, A = atomic mass of In = 114.8
1.000g O
The latter number is the atomic mass of In used in the modern periodic table.
The Nature of the Atom
45. From section 2.5, the nucleus has “a diameter of about 10−13
cm” and the electrons “move
11.
31 CHAPTER 2ATOMS, MOLECULES, AND IONS
CHAPTER 2 ATOMS, MOLECULES, AND IONS 31
about the nucleus at an average distance of about 10−8
cm from it.” We will use these
12.
32 CHAPTER 2ATOMS, MOLECULES, AND IONS
CHAPTER 2 ATOMS, MOLECULES, AND IONS 32
−13
statements to help determine the densities. Density of hydrogen nucleus (contains one proton
only):
4 4 − −
Vnucleus = r3
3
= (3.14)(5 10 14
cm)3
= 5 10 40
cm3
3
−24
d = density =
1.67 10 g
5 10−40
cm3
= 3 1015
g/cm3
Density of H atom (contains one proton and one electron):
4 − −
Vatom = (3.14)(1 10 8
cm)3
= 4 10 24
cm3
3
−24 −28
d =
1.67 10 g +9 10 g
4 10−24
cm3 = 0.4g/cm3
46. Because electrons move about the nucleus at an average distance of about 1 × 10⁻⁸
cm, the
diameter of an atom will be about 2 × 10⁻⁸
cm. Let's set up a ratio:
diameterof nucleus
=
1mm
=
1 10 cm
; solving:
diameterof atom diameterof model 2 10−8
cm
diameter of model = 2 × 10⁵
mm = 200 m
47. 5.93 10−18
C
1electroncharge
1.602 10−19
C
= 37 negative (electron) charges on the oil drop
48. First, divide all charges by the smallest quantity, 6.40 × 10⁻¹³
.
2.56 10−12
6.40 10−13
= 4.00;
7.68
0.640
= 12.0;
3.84
0.640
= 6.00
Because all charges are whole-number multiples of 6.40 × 10⁻¹³
zirkombs, the charge on one
electron could be 6.40 × 10⁻¹³
zirkombs. However, 6.40 × 10⁻¹³
zirkombs could be the
charge of two electrons (or three electrons, etc.). All one can conclude is that the charge of
an electron is 6.40 × 10⁻¹³
zirkombs or an integer fraction of 6.40 × 10⁻¹³
zirkombs.
49. sodium−Na; radium−Ra; iron−Fe; gold−Au; manganese−Mn; lead−Pb
50. fluorine−F; chlorine−Cl; bromine−Br; sulfur−S; oxygen−O; phosphorus−P
51. Sn−tin; Pt−platinum; Hg−mercury; Mg−magnesium; K−potassium; Ag−silver
52. As−arsenic; I−iodine; Xe−xenon; He−helium; C−carbon; Si−silicon
53. a. Metals: Mg, Ti, Au, Bi, Ge, Eu, and Am. Nonmetals: Si, B, At, Rn, and Br.
13.
33 CHAPTER 2ATOMS, MOLECULES, AND IONS
CHAPTER 2 ATOMS, MOLECULES, AND IONS 33
3
Na F O
23 19 16
b. Si, Ge, B, and At. The elements at the boundary between the metals and the nonmetals
are B, Si, Ge, As, Sb, Te, Po, and At. Aluminum has mostly properties of metals, so it is
generally not classified as a metalloid.
54. a. The noble gases are He, Ne, Ar, Kr, Xe, and Rn (helium, neon, argon, krypton, xenon,
and radon). Radon has only radioactive isotopes. In the periodic table, the whole number
enclosed in parentheses is the mass number of the longest-lived isotope of the element.
b. Promethium (Pm) has only radioactive isotopes.
55. a. transition metals b. alkaline earth metals c. alkali metals
d. noble gases e. halogens
56. Use the periodic table to identify the elements.
a. Cl; halogen b. Be; alkaline earth metal
c. Eu; lanthanide metal d. Hf; transition metal
e. He; noble gas f. U; actinide metal
g. Cs; alkali metal
17
57. a. Element 8 is oxygen. A = mass number = 9 + 8 = 17; 8 O
b. Chlorine is element 17.
37
17 Cl c. Cobalt is element 27.
60
27 Co
d. Z = 26; A = 26 + 31 = 57;
57
Fe e. Iodine is element 53.
131
26
f. Lithium is element 3.
7
Li
58. a. Cobalt is element 27. A = mass number = 27 + 31 = 58;
58
27 Co
53 I
10
b. 5 B c.
23
12 Mg d.
132
53 I e.
47
20 Ca f.
65
29Cu
59. Z is the atomic number and is equal to the number of protons in the nucleus. A is the mass
number and is equal to the number of protons plus neutrons in the nucleus. X is the symbol
of the element. See the front cover of the text which has a listing of the symbols for the
various elements and corresponding atomic number or see the periodic table on the cover to
determine the identity of the various atoms. Because all of the atoms have equal numbers of
protons and electrons, each atom is neutral in charge.
a. 11 b. 9 c. 8
60. The atomic number for carbon is 6. 14
C has 6 protons, 14 − 6 = 8 neutrons, and 6 electrons in
the neutral atom. 12
C has 6 protons, 12 – 6 = 6 neutrons, and 6 electrons in the neutral atom.
The only difference between an atom of 14
C and an atom of 12
C is that 14
C has two additional
neutrons.
14.
34 CHAPTER 2ATOMS, MOLECULES, AND IONS
CHAPTER 2 ATOMS, MOLECULES, AND IONS 34
c.
50
61. a.
79
35 Br: 35 protons, 79 – 35 = 44 neutrons. Because the charge of the atom is neutral,
the number of protons = the number of electrons = 35.
81
b. 35 Br: 35 protons, 46 neutrons, 35 electrons
239
94 Pu: 94 protons, 145 neutrons, 94 electrons
133
d. 55 Cs: 55 protons, 78 neutrons, 55 electrons
3
e. 1 H: 1 proton, 2 neutrons, 1 electron
56
f. 26 Fe: 26 protons, 30 neutrons, 26 electrons
62. a.
235
92U: 92 p, 143 n, 92 e b.
27
13 Al: 13 p, 14 n, 13 e c.
57
26 Fe: 26 p, 31 n, 26 e
208
d. 82Pb: 82 p, 126 n, 82 e e.
86
37 Rb: 37 p, 49 n, 37 e f.
41
20 Ca: 20 p, 21 n, 20 e
63. a. Ba is element 56. Ba2+
has 56 protons, so Ba2+
must have 54 electrons in order to have a
net charge of 2+.
b.
c.
d.
e.
f.
g.
Zn is element 30. Zn2+
has 30 protons and 28 electrons.
N is element 7. N3−
has 7 protons and 10 electrons.
Rb is element 37, Rb+
has 37 protons and 36 electrons.
Co is element 27. Co3+
has 27 protons and 24 electrons.
Te is element 52. Te2−
has 52 protons and 54 electrons.
Br is element 35. Br−
has 35 protons and 36 electrons.
64. a. 24
Mg: 12 protons, 12 neutrons, 12 electrons
12
b. 24
Mg2+
: 12 p, 12 n, 10 e c. 59
Co2+
: 27 p, 32 n, 25 e
12 27
d. 59
Co3+
: 27 p, 32 n, 24 e e. 59
Co: 27 p, 32 n, 27 e
27 27
f. 79
Se: 34 p, 45 n, 34 e g. 79
Se2−
: 34 p, 45 n, 36 e
34 34
h. 63
Ni: 28 p, 35 n, 28 e i. 59
Ni2+
: 28 p, 31 n, 26 e
28 28
65. Atomic number = 63 (Eu); net charge = +63 − 60 = 3+; mass number = 63 + 88 = 151;
151
symbol: 63Eu3+
Atomic number = 50 (Sn); mass number = 50 + 68 = 118; net charge = +50 − 48 = 2+;
symbol:
118
Sn2+
15.
35 CHAPTER 2ATOMS, MOLECULES, AND IONS
CHAPTER 2 ATOMS, MOLECULES, AND IONS 35
Symbol
Number of protons in
nucleus
Number of neutrons in
nucleus
Number of
electrons
Net
charge
53
Fe2+
26
26 27 24 2+
59 3+
26 Fe 26 33 23 3+
210 −
85 At 85 125 86 1–
27 3+
13 Al 13 14 10 3+
128 2−
52 Te 52 76 54
2–
66. Atomic number = 16 (S); net charge = +16 − 18 = 2−; mass number = 16 + 18 = 34;
34
symbol: 16 S2−
Atomic number = 16 (S); net charge = +16 − 18 = 2−; mass number = 16 + 16 = 32;
32
symbol: 16 S2−
67.
Symbol
Number of protons in
nucleus
Number of neutrons in
nucleus
Number of
electrons
Net
charge
238
92 U
92 146 92 0
40
20 Ca2+ 20 20 18 2+
51
23 V3+ 23 28 20 3+
89
39 Y
39 50 39 0
79
Br−
35
35 44 36 1−
31
P3−
15
15 16 18 3−
68.
16.
CHAPTER 2 ATOMS,MOLECULES, AND IONS 35
35 CHAPTER 2 ATOMS, MOLECULES, AND IONS
69. In ionic compounds, metals lose electrons to form cations, and nonmetals gain electrons to
form anions. Group 1A, 2A, and 3A metals form stable 1+, 2+, and 3+ charged cations,
respectively. Group 5A, 6A, and 7A nonmetals form 3−, 2−, and 1− charged anions,
respectively.
a. Lose 2 e−
to form Ra2+
. b. Lose 3 e−
to form In3+
. c. Gain 3 e−
to form P3−
.
d. Gain 2 e−
to form Te2−
. e. Gain 1 e−
to form Br−
. f. Lose 1 e−
to form Rb+
.
70. See Exercise 69 for a discussion of charges various elements form when in ionic compounds.
a. Element 13 is Al. Al forms 3+ charged ions in ionic compounds. Al3+
b. Se2−
c. Ba2+
d. N3−
e. Fr+
f. Br−
Nomenclature
71. a.
c.
e.
sodium bromide
calcium sulfide
SrF2
b.
d.
f.
rubidium oxide
aluminum iodide
Al2Se3
g. K3N h. Mg3P2
72. a. mercury(I) oxide b. iron(III) bromide
c. cobalt(II) sulfide d. titanium(IV) chloride
e.
g.
Sn3N2
HgO
f.
h.
CoI3
CrS3
73. a. cesium fluoride b. lithium nitride
c. silver sulfide (Silver only forms stable 1+ ions in compounds, so no Roman numerals are
needed.)
d. manganese(IV) oxide e. titanium(IV) oxide f. strontium phosphide
74. a.
b.
ZnCl2 (Zn only forms stable +2 ions in compounds, so no Roman numerals are needed.)
SnF4 c. Ca3N2 d. Al2S3
e. Hg2Se f. AgI (Ag only forms stable +1 ions in compounds.)
75. a. barium sulfite b. sodium nitrite
c. potassium permanganate d. potassium dichromate
76. a.
c.
Cr(OH)3
Pb(CO3)2
b.
d.
Mg(CN)2
NH4C2H3O2
77. a. dinitrogen tetroxide b. iodine trichloride
c. sulfur dioxide d. diphosphorus pentasulfide
17.
CHAPTER 2 ATOMS,MOLECULES, AND IONS 36
36 CHAPTER 2 ATOMS, MOLECULES, AND IONS
4 3
3
4
2
78. a.
c.
B2O3
N2O
b.
d.
AsF5
SCl6
79. a. copper(I) iodide b. copper(II) iodide c. cobalt(II) iodide
d. sodium carbonate e. sodium hydrogen carbonate or sodium bicarbonate
f.
i.
tetrasulfur tetranitride
barium chromate
g.
j.
selenium tetrachloride
ammonium nitrate
h. sodium hypochlorite
80. a. acetic acid b. ammonium nitrite c. cobalt(III) sulfide
d. iodine monochloride e. lead(II) phosphate f. potassium chlorate
g. sulfuric acid h. strontium nitride i. aluminum sulfite
j. tin(IV) oxide k. sodium chromate l. hypochlorous acid
Note: For the compounds named as acids, we assume these are dissolved in water.
81. In the case of sulfur, SO4
2−
is sulfate, and SO3
2−
is sulfite. By analogy:
SeO4
2−
: selenate; SeO3
2−
: selenite; TeO 2−
: tellurate; TeO 2−
: tellurite
82. From the anion names of hypochlorite (ClO−
), chlorite (ClO2
−
), chlorate (ClO −
), and
perchlorate (ClO4
−
), the oxyanion names for similar iodine ions would be hypoiodite (IO−
),
iodite (IO2
−
), iodate (IO3
−
), and periodate (IO −
). The corresponding acids would be
hypoiodous acid (HIO), iodous acid (HIO2), iodic acid (HIO3), and periodic acid (HIO4).
83. a. SF2 b. SF6 c. NaH2PO4
d. Li3N e. Cr2(CO3)3 f. SnF2
g. NH4C2H3O2 h. NH4HSO4 i. Co(NO3)3
j. Hg2Cl2; mercury(I) exists as Hg 2+
ions. k. KClO3 l. NaH
84. a. CrO3 b. S2Cl2 c. NiF2
d. K2HPO4 e. AlN
f. NH3 (Nitrogen trihydride is the systematic name.) g. MnS2
h. Na2Cr2O7 i. (NH4)2SO3 j. CI4
85. a. Na2O b. Na2O2 c. KCN
d.
g.
Cu(NO3)2
PbS2
e.
h.
SeBr4
CuCl
f. HIO2
i. GaAs (We would predict the stable ions to be Ga3+
and As3−
.)
j. CdSe (Cadmium only forms 2+ charged ions in compounds.)
k. ZnS (Zinc only forms 2+ charged ions in compounds.)
l. HNO2 m. P2O5
18.
CHAPTER 2 ATOMS,MOLECULES, AND IONS 37
37 CHAPTER 2 ATOMS, MOLECULES, AND IONS
2
86. a. (NH4)2HPO4 b. Hg2S c. SiO2
d. Na2SO3 e. Al(HSO4)3 f. NCl3
g. HBr h. HBrO2 i. HBrO4
j. KHS k. CaI2 l. CsClO4
87. a. nitric acid, HNO3 b. perchloric acid, HClO4 c. acetic acid, HC2H3O2
d. sulfuric acid, H2SO4 e. phosphoric acid, H3PO4
88. a. Iron forms 2+ and 3+ charged ions; we need to include a Roman numeral for iron.
Iron(III) chloride is correct.
b. This is a covalent compound, so use the covalent rules. Nitrogen dioxide is correct.
c. This is an ionic compound, so use the ionic rules. Calcium oxide is correct. Calcium only
forms stable 2+ ions when in ionic compounds, so no Roman numeral is needed.
d. This is an ionic compound, so use the ionic rules. Aluminum sulfide is correct.
e. This is an ionic compound, so use the ionic rules. Mg is magnesium. Magnesium acetate
is correct.
f. Phosphide is P3−
, while phosphate is PO4
3−
. Because phosphate has a 3− charge, the
charge on iron is 3+. Iron(III) phosphate is correct.
g. This is a covalent compound, so use the covalent rules. Diphosphorus pentasulfide is
correct.
h. Because each sodium is 1+ charged, we have the O 2−
(peroxide) ion present. Sodium
peroxide is correct. Note that sodium oxide would be Na2O.
i. HNO3 is nitric acid, not nitrate acid. Nitrate acid does not exist.
j. H2S is hydrosulfuric acid or dihydrogen sulfide or just hydrogen sulfide (common name).
H2SO4 is sulfuric acid.
Additional Exercises
89. Yes, 1.0 g H would react with 37.0 g 37
Cl, and 1.0 g H would react with 35.0 g 35
Cl.
No, the mass ratio of H/Cl would always be 1 g H/37 g Cl for 37
Cl and 1 g H/35 g Cl for 35
Cl.
As long as we had pure 37
Cl or pure 35
Cl, the ratios will always hold. If we have a mixture
(such as the natural abundance of chlorine), the ratio will also be constant as long as the
composition of the mixture of the two isotopes does not change.
90. Carbon (C); hydrogen (H); oxygen (O); nitrogen (N); phosphorus (P); sulfur (S)
19.
CHAPTER 2 ATOMS,MOLECULES, AND IONS 38
38 CHAPTER 2 ATOMS, MOLECULES, AND IONS
26
For lighter elements, stable isotopes usually have equal numbers of protons and neutrons in
the nucleus; these stable isotopes are usually the most abundant isotope for each element.
Therefore, a predicted stable isotope for each element is 12
C, 2
H, 16
O, 14
N, 30
P, and 32
S. These
are stable isotopes except for 30
P, which is radioactive. The most stable (and most abundant)
isotope of phosphorus is 31
P. There are exceptions. Also, the most abundant isotope for
hydrogen is 1
H; this has just a proton in the nucleus. 2
H (deuterium) is stable (not radioactive),
but 1
H is also stable as well as most abundant.
91. 53
Fe2+
has 26 protons, 53 – 26 = 27 neutrons, and two fewer electrons than protons (24
electrons) in order to have a net charge of 2+.
92. a.
b.
False. Neutrons have no charge; therefore, all particles in a nucleus are not charged.
False. The atom is best described as having a tiny dense nucleus containing most of the
mass of the atom with the electrons moving about the nucleus at relatively large distances
away; so much so that an atom is mostly empty space.
c. False. The mass of the nucleus makes up most of the mass of the entire atom.
d. True.
e. False. The number of protons in a neutral atom must equal the number of electrons.
93. From the Na2X formula, X has a 2− charge. Because 36 electrons are present, X has 34
protons and 79 − 34 = 45 neutrons, and is selenium.
a.
b.
c.
True. Nonmetals bond together using covalent bonds and are called covalent compounds.
False. The isotope has 34 protons.
False. The isotope has 45 neutrons.
d. False. The identity is selenium, Se.
94. a. Fe2+
: 26 protons (Fe is element 26.); protons − electrons = net charge, 26 − 2 = 24
electrons; FeO is the formula since the oxide ion has a 2− charge, and the name is
iron(II) oxide.
b. Fe3+
: 26 protons; 23 electrons; Fe2O3; iron(III) oxide
c. Ba2+
: 56 protons; 54 electrons; BaO; barium oxide
d. Cs+
: 55 protons; 54 electrons; Cs2O; cesium oxide
e. S2−
: 16 protons; 18 electrons; Al2S3; aluminum sulfide
f. P3−
: 15 protons; 18 electrons; AlP; aluminum phosphide
g. Br−
: 35 protons; 36 electrons; AlBr3; aluminum bromide
h. N3−
: 7 protons; 10 electrons; AlN; aluminum nitride
20.
CHAPTER 2 ATOMS,MOLECULES, AND IONS 39
39 CHAPTER 2 ATOMS, MOLECULES, AND IONS
4
4
95. a. Pb(C2H3O2)2: lead(II) acetate b. CuSO4: copper(II) sulfate
c. CaO: calcium oxide d. MgSO4: magnesium sulfate
e. Mg(OH)2: magnesium hydroxide f. CaSO4: calcium sulfate
g. N2O: dinitrogen monoxide or nitrous oxide (common name)
96. a. This is element 52, tellurium. Te forms stable 2 charged ions in ionic compounds (like
other oxygen family members).
b. Rubidium. Rb, element 37, forms stable 1+ charged ions.
c. Argon. Ar is element 18. d. Astatine. At is element 85.
97. From the XBr2 formula, the charge on element X is 2+. Therefore, the element has 88
protons, which identifies it as radium, Ra. 230 − 88 = 142 neutrons.
98. Because this is a relatively small number of neutrons, the number of protons will be very
close to the number of neutrons present. The heavier elements have significantly more
neutrons than protons in their nuclei. Because this element forms anions, it is a nonmetal and
will be a halogen because halogens form stable 1− charged ions in ionic compounds. From
the halogens listed, chlorine, with an average atomic mass of 35.45, fits the data. The two
isotopes are 35
Cl and 37
Cl, and the number of electrons in the 1− ion is 18. Note that because
the atomic mass of chlorine listed in the periodic table is closer to 35 than 37, we can assume
that 35
Cl is the more abundant isotope. This is discussed in Chapter 3.
99. a. Ca2+
and N3−
: Ca3N2, calcium nitride b. K+
and O2−
: K2O, potassium oxide
c. Rb+
and F−
: RbF, rubidium fluoride d. Mg2+
and S2−
: MgS, magnesium sulfide
e. Ba2+
and I−
: BaI2, barium iodide
f. Al3+
and Se2−
: Al2Se3, aluminum selenide
g. Cs+
and P3−
: Cs3P, cesium phosphide
h. In3+
and Br−
: InBr3, indium(III) bromide. In also forms In+
ions, but one would predict
In3+
ions from its position in the periodic table.
100. These compounds are similar to phosphate (PO 3-−
) compounds. Na3AsO4 contains Na+
ions
and AsO4
3−
ions. The name would be sodium arsenate. H3AsO4 is analogous to phosphoric
acid, H3PO4. H3AsO4 would be arsenic acid. Mg3(SbO4)2 contains Mg2+
ions and SbO 3−
ions, and the name would be magnesium antimonate.
101. a. Element 15 is phosphorus, P. This atom has 15 protons and 31 − 15 = 16 neutrons.
b. Element 53 is iodine, I. 53 protons; 74 neutrons
21.
CHAPTER 2 ATOMS,MOLECULES, AND IONS 40
40 CHAPTER 2 ATOMS, MOLECULES, AND IONS
c. Element 19 is potassium, K. 19 protons; 20 neutrons
d. Element 70 is ytterbium, Yb. 70 protons; 103 neutrons
102. Mass is conserved in a chemical reaction.
chromium(III) oxide + aluminum → chromium + aluminum oxide
Mass: 34.0 g 12.1 g 23.3 g ?
Mass aluminum oxide produced = (34.0 + 12.1) − 23.3 = 22.8 g
ChemWork Problems
The answers to the problems 103-108 (or a variation to these problems) are found in OWL. These
problems are also assignable in OWL.
Challenge Problems
109. Copper (Cu), silver (Ag), and gold (Au) make up the coinage metals.
110. Because the gases are at the same temperature and pressure, the volumes are directly proportional
to the number of molecules present. Let’s assume hydrogen and oxygen to be monatomic gases
and that water has the simplest possible formula (HO). We have the equation:
H + O → HO
But the volume ratios are also equal to the molecule ratios, which correspond to the
coefficients in the equation:
2 H + O → 2 HO
Because atoms cannot be created nor destroyed in a chemical reaction, this is not possible. To
correct this, we can make oxygen a diatomic molecule:
2 H + O2 → 2 HO
This does not require hydrogen to be diatomic. Of course, if we know water has the formula
H2O, we get:
2 H + O2 → 2 H2O
The only way to balance this is to make hydrogen diatomic:
2 H2 + O2 → 2 H2O
111. Avogadro proposed that equal volumes of gases (at constant temperature and pressure)
contain equal numbers of molecules. In terms of balanced equations, Avogadro’s hypothesis
(law) implies that volume ratios will be identical to molecule ratios. Assuming one molecule
of octane reacting, then 1 molecule of CxHy produces 8 molecules of CO2 and 9 molecules of
H2O. CxHy + n O2 → 8 CO2 + 9 H2O. Because all the carbon in octane ends up as carbon in
22.
CHAPTER 2 ATOMS,MOLECULES, AND IONS 41
41 CHAPTER 2 ATOMS, MOLECULES, AND IONS
CO2, octane must contain 8 atoms of C. Similarly, all hydrogen in octane ends up as
hydrogen in H2O, so one molecule of octane must contain 9 × 2 = 18 atoms of H. Octane
formula = C8H18, and the ratio of C : H = 8 : 18 or 4 : 9.
112. From Section 2.5 of the text, the average diameter of the nucleus is about 10−13
cm, and the
electrons move about the nucleus at an average distance of about 10−8
cm . From this, the
diameter of an atom is about 2 10−8
cm .
2 10−8
cm
1 10−13
cm
= 2 105
;
1mi
=
1grape
5280ft
=
1grape
63,360in
1grape
Because the grape needs to be 2 105
times smaller than a mile, the diameter of the grape
would need to be 63,360/(2 × 105
) 0.3 in. This is a reasonable size for a small grape.
113. The alchemists were incorrect. The solid residue must have come from the flask.
114. The equation for the reaction would be 2 Na(s) + Cl2(g) → 2 NaCl(s). The sodium reactant
exists as singular sodium atoms packed together very tightly and in a very organized fashion.
This type of packing of atoms represents the solid phase. The chlorine reactant exists as Cl2
molecules. In the picture of chlorine, there is a lot of empty space present. This only occurs
in the gaseous phase. When sodium and chlorine react, the ionic compound NaCl forms.
NaCl exists as separate Na+
and Cl−
ions. Because the ions are packed very closely together
and are packed in a very organized fashion, NaCl is depicted in the solid phase.
115. a. Both compounds have C2H6O as the formula. Because they have the same formula, their
mass percent composition will be identical. However, these are different compounds
with different properties because the atoms are bonded together differently. These
compounds are called isomers of each other.
b. When wood burns, most of the solid material in wood is converted to gases, which
escape. The gases produced are most likely CO2 and H2O.
c. The atom is not an indivisible particle but is instead composed of other smaller particles,
called electrons, neutrons, and protons.
d. The two hydride samples contain different isotopes of either hydrogen and/or lithium.
Although the compounds are composed of different isotopes, their properties are similar
because different isotopes of the same element have similar properties (except, of course,
their mass).
116. Let Xa be the formula for the atom/molecule X, Yb be the formula for the atom/molecule Y,
XcYd be the formula of compound I between X and Y, and XeYf be the formula of compound
II between X and Y. Using the volume data, the following would be the balanced equations for
the production of the two compounds.
Xa + 2 Yb → 2 XcYd; 2 Xa + Yb → 2 XeYf
From the balanced equations, a = 2c = e and b = d = 2f.
Substituting into the balanced equations:
23.
CHAPTER 2 ATOMS,MOLECULES, AND IONS 42
42 CHAPTER 2 ATOMS, MOLECULES, AND IONS
X2c + 2 Y2f → 2 XcY2f ; 2 X2c + Y2f → 2 X2cYf
For simplest formulas, assume that c = f = 1. Thus:
X2 + 2 Y2 → 2 XY2 and 2 X2 + Y2 → 2 X2Y
Compound I = XY2: If X has relative mass of 1.00,
Compound II = X2Y: If X has relative mass of 1.00,
1.00
1.00 + 2y
2.00
2.00 + y
= 0.3043, y = 1.14.
= 0.6364, y = 1.14.
The relative mass of Y is 1.14 times that of X. Thus, if X has an atomic mass of 100, then Y
will have an atomic mass of 114.
117. Most of the mass of the atom is due to the protons and the neutrons in the nucleus, and
protons and neutrons have about the same mass (1.67 10−24
g). The ratio of the mass of the
molecule to the mass of a nuclear particle will give a good approximation of the number of
nuclear particles (protons and neutrons) present.
7.31 10−23
g
1.67 10−24
g
= 43.8 44 nuclear particles
Thus there are 44 protons and neutrons present. If the number of protons equals the number
of neutrons, we have 22 protons in the molecule. One possibility would be the molecule CO2
[6 + 2(8) = 22 protons].
118. For each experiment, divide the larger number by the smaller. In doing so, we get:
experiment 1 X = 1.0 Y = 10.5
experiment 2 Y = 1.4 Z = 1.0
experiment 3 X = 1.0 Y = 3.5
Our assumption about formulas dictates the rest of the solution. For example, if we assume
that the formula of the compound in experiment 1 is XY and that of experiment 2 is YZ, we
get relative masses of:
X = 2.0; Y = 21; Z = 15 (= 21/1.4)
and a formula of X3Y for experiment 3 [three times as much X must be present in experiment
3 as compared to experiment 1 (10.5/3.5 = 3)].
However, if we assume the formula for experiment 2 is YZ and that of experiment 3 is XZ,
then we get:
X = 2.0; Y = 7.0; Z = 5.0 (= 7.0/1.4)
and a formula of XY3 for experiment 1. Any answer that is consistent with your initial
assumptions is correct.
24.
CHAPTER 2 ATOMS,MOLECULES, AND IONS 43
43 CHAPTER 2 ATOMS, MOLECULES, AND IONS
The answer to part d depends on which (if any) of experiments 1 and 3 have a formula of XY
in the compound. If the compound in experiment 1 has a formula of XY, then:
21 g XY ×
4.2 g Y
(4.2 + 0.4) gXY
= 19.2 g Y (and 1.8 g X)
If the compound in experiment 3 has the XY formula, then:
21 g XY
7.0 g Y
(7.0 + 2.0) g XY
= 16.3 g Y (and 4.7 g X)
Note that it could be that neither experiment 1 nor experiment 3 has XY as the formula.
Therefore, there is no way of knowing an absolute answer here.
Integrated Problems
119. The systematic name of Ta2O5 is tantalum(V) oxide. Tantalum is a transition metal and
requires a Roman numeral. Sulfur is in the same group as oxygen, and its most common ion
is S2–
. There-fore, the formula of the sulfur analogue would be Ta2S5.
Total number of protons in Ta2O5:
Ta, Z = 73, so 73 protons 2 = 146 protons; O, Z = 8, so 8 protons 5 = 40 protons
Total protons = 186 protons
Total number of protons in Ta2S5:
Ta, Z = 73, so 73 protons 2 = 146 protons; S, Z = 16, so 16 protons 5 = 80 protons
Total protons = 226 protons
Proton difference between Ta2S5 and Ta2O5: 226 protons – 186 protons = 40 protons
120. The cation has 51 protons and 48 electrons. The number of protons corresponds to the atomic
number. Thus this is element 51, antimony. There are 3 fewer electrons than protons. Therefore,
the charge on the cation is 3+. The anion has one-third the number of protons of the cation,
which corresponds to 17 protons; this is element 17, chlorine. The number of electrons in this
anion of chlorine is 17 + 1 = 18 electrons. The anion must have a charge of
1−.
The formula of the compound formed between Sb3+
and Cl–
is SbCl3. The name of the
compound is antimony(III) chloride. The Roman numeral is used to indicate the charge on Sb
because the predicted charge is not obvious from the periodic table.
121. Number of electrons in the unknown ion:
2.55 × 10−26
g ×
1kg
1electron
= 28 electrons
1000g 9.1110−31
kg
Number of protons in the unknown ion:
25.
CHAPTER 2 ATOMS,MOLECULES, AND IONS 44
44 CHAPTER 2 ATOMS, MOLECULES, AND IONS
5.34 × 10−23
g ×
1kg
1proton
= 32 protons
1000g 1.6710−27
kg
Therefore, this ion has 32 protons and 28 electrons. This is element number 32, germanium
(Ge). The net charge is 4+ because four electrons have been lost from a neutral germanium
atom.
The number of electrons in the unknown atom:
3.92 × 10−26
g ×
1kg
1electron
= 43 electrons
1000g 9.11 0−31
kg
In a neutral atom, the number of protons and electrons is the same. Therefore, this is element
43, technetium (Tc).
The number of neutrons in the technetium atom:
9.35 × 10−23
g ×
1kg
1proton
= 56 neutrons
1000g 1.6710−27
kg
The mass number is the sum of the protons and neutrons. In this atom, the mass number is 43
protons + 56 neutrons = 99. Thus this atom and its mass number is 99
Tc.
Marathon Problem
122. a. For each set of data, divide the larger number by the smaller number to determine
relative masses.
0.602
= 2.04; A = 2.04 when B = 1.00
0.295
0.401
= 2.33; C = 2.33 when B = 1.00
0.172
0.374
= 1.17; C = 1.17 when A = 1.00
0.320
To have whole numbers, multiply the results by 3.
Data set 1: A = 6.1 and B = 3.0
Data set 2: C = 7.0 and B = 3.0
Data set 3: C = 3.5 and A = 3.0 or C = 7.0 and A = 6.0
Assuming 6.0 for the relative mass of A, the relative masses would be A = 6.0, B = 3.0,
and C = 7.0 (if simplest formulas are assumed).
26.
CHAPTER 2 ATOMS,MOLECULES, AND IONS 45
45 CHAPTER 2 ATOMS, MOLECULES, AND IONS
2
3
2
b. Gas volumes are proportional to the number of molecules present. There are many
possible correct answers for the balanced equations. One such solution that fits the gas
volume data is:
6 A2 + B4 → 4 A3B
B4 + 4 C3 → 4 BC3
3 A2 + 2 C3 → 6 AC
In any correct set of reactions, the calculated mass data must match the mass data given
initially in the problem. Here, the new table of relative masses would be:
6 (mass A2 )
=
0.602
; mass A = 0.340(mass B4)
mass B4
4 (mass C3 )
=
0.295
0.401
; mass C = 0.583(mass B4)
mass B4
2 (mass C3 )
0.172
=
0.374
; mass A = 0.570(mass C3)
3 (mass A2 ) 0.320
Assume some relative mass number for any of the masses. We will assume that mass B =
3.0, so mass B4 = 4(3.0) = 12.
Mass C3 = 0.583(12) = 7.0, mass C = 7.0/3
Mass A2 = 0.570(7.0) = 4.0, mass A = 4.0/2 = 2.0
When we assume a relative mass for B = 3.0, then A = 2.0 and C = 7.0/3. The relative
masses having all whole numbers would be A = 6.0, B = 9.0, and C = 7.0.
Note that any set of balanced reactions that confirms the initial mass data is correct. This
is just one possibility.
attacked, something mighthave been done, anyhow with the enemy
to the south-west of the Quadrilateral; but with only one, the
barrage, arranged with gaps for three, became ineffective, and a
concentrated fire on the one Tank soon put it out of action—it also
drew attention to the infantry attack. Briefly, the 6th Division failed.
There was still a chance that the Guards would advance and render
the position of the Bavarians impossible. But this chance was not
realised. The Quadrilateral was a mass of machine guns, and, taking
the Guards Division in flank, inflicted fearful casualties. The first
objective was taken and held—on the left the second objective was
reached—but already the assaulting troops were being shot in the
back by the Bavarians, and no further progress was made. Tanks do
not seem to have helped in that direction either.
With this state of affairs on the left of the 56th Division, the
attacking brigades were not likely to progress very far in the building
up of a flank facing Combles. Until the Quadrilateral was taken the
167th Brigade could not possibly move. The 7th Middlesex had lost a
lot of men from machine guns firing into their left rear as they
advanced behind the assault of the 1st London Regt. And finally
their Tank had broken down and was being attacked by the enemy.
By 11 a.m. the two reserve battalions of the 169th Brigade were
moved forward to be used as reinforcements before the 168th
Brigade was sent into action. Gen. Hull was determined to clear
Bouleaux Wood, which had resisted so long. But at 1.30 p.m. the
Corps Commander, Lord Cavan, telephoned him that the Guards had
not made as much progress as he had thought, and that the
operation against Bouleaux Wood would not be practicable. But
before this order could reach them the 8th Middlesex made a further
attempt to get into the wood and failed. All attention was then
centred on the Quadrilateral, which was holding up the advance of
no less than three divisions.
The division was ordered to consolidate where it stood, but during
the night bombing attacks were carried out by the 169th Brigade on
29.
the sunken roadand end of Loop Trench, and by the 167th Brigade
on the trench in Bouleaux Wood—neither met with success.
On the 16th the 6th Division again attacked the Quadrilateral and
failed, but they were now well up to the stronghold. The Guards
Division had also crept in from the north.
The 17th September was devoted to preparations for attacking on
the 18th. The 169th Brigade made a trench parallel to the sunken
road to Combles, and also managed to occupy some 200 yards more
frontage along the road. Many dead Germans of the 26th Regiment
were found.
The attack on the 18th was in conjunction with the 6th Division. The
task of the 56th Division was to capture the trench on the north of
the sunken road to Combles, and the south-west face of Bouleaux
Wood, to a point beyond Beef Trench, and from there through the
wood to Middle Copse, where touch would be obtained with the 6th
Division, who were making another effort to clear the Quadrilateral.
The attacking brigades of the latter division declined the aid of Tanks
on this occasion.
The weather was appalling. The state of the ground was rather
worse than what is so frequently called a quagmire—troops could
not get along.
The 167th Brigade had lost heavily, and was not in sufficient
strength to attack, so the London Scottish were attached to that
brigade. But the battalion was unable to reach the assaulting line.
Zero hour was 5.50 a.m., and on the right the 169th Brigade, with
the Queen’s Westminster Rifles and the London Rifle Brigade
attacking, failed to cross the fatal sunken road, which was not
surprising, as the mud by itself was an almost perfect obstacle from
the German point of view. While on the left the London Scottish
failure to reach the assembly trench caused the attack to be
abandoned.
30.
But the 6thDivision was successful, and the Quadrilateral, which
gave such strong support to the enemy troops holding Bouleaux
Wood, was captured. The news was received by everyone with a
sigh of relief.
Of the fighting as a whole on the 15th September and subsequent
days Sir Douglas Haig reported:
“The advance met with immediate success on almost the
whole of the front attacked. At 8.40 a.m. our Tanks were seen
entering Flers, followed by a large number of troops. Fighting
continued in Flers for some time, but by 10 a.m. our troops
had reached the north of the village, and by midday had
occupied the enemy’s trenches for some distance beyond. On
our right our line was advanced to within assaulting distance
of the strong line of defence running before Morval, Les
Bœufs, and Gueudecourt, and on our left High Wood was at
last carried after many hours of very severe fighting,
reflecting great credit on the attacking battalions. Our success
made it possible to carry out during the afternoon that part of
the plan which provided for the capture of Martinpuich and
Courcelette, and by the end of the day both these villages
were in our hands. On the 18th September the work of this
day was completed by the capture of the Quadrilateral, an
enemy stronghold which had hitherto blocked our progress
towards Morval.
The result of the fighting on the 15th September and the
following days was a gain more considerable than any which
had attended our arms in the course of a single operation
since the commencement of the offensive. In the course of
one day’s fighting we had broken through two of the enemy’s
main defensive systems, and had advanced on a front of over
six miles to an average depth of a mile. In the course of this
advance we had taken three villages, each powerfully
organised for prolonged resistance.... The total number of
31.
prisoners taken byus in these operations amounted to over
4,000, including 127 officers.”
The 168th Brigade, on the left of the divisional front, was
responsible for holding Middle Copse. On the two nights of the 19th
and 20th September the London Scottish provided covering parties
for the 5th Cheshire Regt., who connected Beef Trench with Middle
Copse, and carried on two lines of trench in a north-easterly
direction as far as the rail or tram line; companies of these pioneers
also connected the Copse with the south-east side of the
Quadrilateral. This work resulted in a firm line some 900 yards in
length facing Bouleaux Wood, and gradually working round Combles.
Prisoners captured by the London Scottish while covering the digging
parties were from the 2nd Battalion, 235th Regiment, Reserve 51st
Division.
The right wing of the British Army had not yet reached the line
desired by Sir Douglas Haig. Morval, Les Bœufs, and Gueudecourt
were still in the hands of the enemy, and on the right Combles still
held out at the junction of the Allied Armies. An Allied attack from
the Somme to Martinpuich was arranged for the 23rd September, but
the weather was so bad that it had to be postponed until the 25th.
[The battle of Morval.]
32.
2. Ginchy &Morval.
The Battles on the 9th
, 15th
, & 25th
, Sep
r
.
The 168th Brigade were relieved by the 167th, and obtained a little
rest from the night of the 22nd to the night of the 24th. The battle
front of the division was then the 169th Brigade on the right
between Leuze Wood and Combles, the 167th Brigade in Beef and
Bully Trenches, and the 168th Brigade in the new trenches ready to
attack Bouleaux Wood from the north-west, or rather to envelop it,
as the wood was not to be entered.
The main task of the 56th Division was to continue building up the
flank, to neutralise the German detachments in Bouleaux Wood, and
to get touch with the 5th Division on the left. The actual objectives
of the 168th Brigade were some trenches between the north-east of
the wood and the tram-line, also the bank and cutting of the tram-
line. The 167th Brigade were to help by directing machine-gun and
trench-mortar fire on the wood, and the 169th Brigade by firing on
the north and north-east exits of Combles.
33.
The whole Corpsattacked at 12.35 p.m., and the German resistance
crumbled away.
The 4th London Regt. on the right and the London Scottish on the
left advanced under “a most efficient enfilade artillery barrage.” All
objectives were reached. The 4th London Regt. killed a large number
of Huns in shell-holes round the north end of the wood, and suffered
themselves somewhat from enemy snipers in the southern part of
the wood. The London Scottish had some trouble and quite a stiff
fight to clear the railway embankment, during which the left
company suffered severely. But four machine guns were captured
there and eighty prisoners. These two battalions overran their
objectives and curled round the end of Bouleaux Wood.
The 5th, 6th, and Guards Divisions on the left swept through all their
objectives—Morval and Les Bœufs were captured.
For some time the London Scottish were out of touch with the 5th
Division, which had swerved too far to the right, but the complete
success of the operations enabled the 56th Division to improve the
position round Combles. By three o’clock in the afternoon the 4th
London Regt. had two companies in the north end of Bouleaux
Wood, and both the attacking battalions of the 168th Brigade had
pushed out patrols towards Combles. Artillery observation officers
reported to Gen. Hull that the enemy could be seen hurrying, in
small parties, from Combles in an easterly direction.
A steady pressure was kept on the Germans in Bouleaux Wood. The
centre of resistance here was round the derelict Tank on the left
edge of the wood. The 1st London Regt. was on one side of the
Tank and the enemy on the other. On the right the London Rifle
Brigade and the Queen Victoria’s Rifles gave the enemy no rest in
the sunken road and the trench leading to Combles.
By midnight the 168th Brigade had posts east of Combles, the 167th
Brigade had cleared the lower end of Bouleaux Wood and got behind
the Tank, and the 169th Brigade had captured all of the sunken road
34.
trench and theCombles trench. And at dawn an officer’s patrol of
the 168th Brigade had met a French patrol on the east of Combles.
The London Rifle Brigade had already entered the town at 3.30 a.m.
and secured touch with the French there.
The line desired by Sir Douglas Haig had been captured and there
was a momentary pause. The line held by the 56th Division at
midday on the 26th was some 1,500 yards to the east of Combles.
The 167th Brigade were in the front line and in touch with the 5th
Division and the French; the 168th Brigade were a short distance in
rear, round about the railway cuttings; and the 169th Brigade were
half in Combles and half to the west of it. The Germans were some
distance away, holding what was known as Mutton Trench in force,
and it was arranged that the 168th Brigade should attack with the
assistance of five Tanks. But the Tanks failed to put in an
appearance, and after waiting twenty-four hours, the Rangers were
told that the attack was cancelled.
Meanwhile our Allies on the right had captured Frigicourt and had
the hard nut of Sailly-Saillisel to crack. To assist them in securing this
very important position, Sir Douglas Haig agreed to hand over the
line as far as Morval, so on the 28th the division was relieved and
marched for a few days’ rest to the neighbourhood of Ville-sur-Ancre
and Meaulte.
* * * * * * *
The battle, however, still raged. Sir Douglas Haig was pushing the
enemy hard:
“The success of the Fourth Army had now brought our
advance to a stage at which I judged it advisable that
Thiepval should be taken, in order to bring our left flank into
line and establish it on the main ridge above that village, the
possession of which would be of considerable value in future
operations.
35.
Accordingly, at 12.25p.m. on the 26th September, before the
enemy had been given time to recover from the blow struck
by the Fourth Army, a general attack was launched against
Thiepval and the Thiepval Ridge.... The attack was a brilliant
success. On the right our troops reached the system of
enemy trenches which formed their objective without great
difficulty. In Thiepval and the strong works to the north of it
the enemy’s resistance was more desperate.... On the left of
the attack fierce fighting, in which Tanks again gave valuable
assistance to our troops, continued in Thiepval during the day
and the following night, but by 8.30 a.m. on the 27th
September the whole of the village of Thiepval was in our
hands.”
The rest for the division, however, was not for very long. Reinforced,
though hardly refreshed, the brigades began to move back to the
line. On the 29th September the 167th Brigade was in Trones Wood,
west of Guillemont, and the 169th in a camp near by. On the last
night of September the latter brigade took over the line from the 6th
Division, with the right in touch with the French, while the 167th
relieved the 2nd Guards Brigade on the left.
The position taken over was outside Les Bœufs, in the trenches
called Foggy and Windy. Battalions in line from the right were the
Queen’s Westminsters, Queen Victoria’s, 1st Londons, and the 7th
Middlesex. The orders were that they should send out patrols and
occupy a line of posts over the crest of the ridge—the 169th Brigade
posts A, B, C, D, and the 167th Brigade E, F, G, H, and K.
On October 2nd the 167th Brigade reported having joined up a line
of posts, but we cannot make the map-readings given agree with
what is known of positions in subsequent events. The country was
more than ever devoid of landmarks—it was just a wide expanse of
shell-holes in a dark brown, almost black, kind of earth—and no one
knew either their own position or those of the enemy within a few
hundred yards; and the few hundred yards were a matter of
importance. Anyhow, the line was not the line of posts, but probably
36.
near the linewe have sketched on the left of 34. Touch was
obtained with the 20th Division on the left.
Gen. Hull was now instructed that the Fourth Army would renew the
attack on the 5th October, and that the XIV Corps would establish
itself on a line from which the main Transloy defences could be
attacked at a later date. The 56th Division would capture Hazy,
Dewdrop, Spectrum, and part of Rainbow, and establish a line along
the west crest of the ridge; the Division would then, as a second
phase of the attack, establish a line on the forward slope of the ridge
from which Le Transloy could be seen. The General ordered that the
169th Brigade should attack on the right, and the 167th Brigade on
the left. [The battle of the Transloy Ridges, 1st-18th October.]
The weather became steadily worse and, though water is supposed
to run downhill and the division was on the slope of a hill, the troops
might just as well have been in the middle of a pond. No one could
move, and the operations were postponed for forty-eight hours.
Assembly trenches were dug; and patrols reported the enemy some
200 yards on the farther side of the ridge. The objectives for the
attack were well beyond the line of posts it had been hoped to
occupy with patrols, and the 2/1st London and 1/1st Edinburgh Field
Companies R.E., with two companies of the 5th Cheshire Regt., were
given to the two brigades to consolidate what was gained.
The assault took place at 1.45 p.m. on the 7th October, and on the
left was fairly successful. The 7th Middlesex, on the extreme left,
and the left company of the 1st London Regt. drove the enemy out
of the northern half of Spectrum and part of Rainbow, where they
joined with the 20th Division. The right company of the 1st Londons,
however, was held up by machine-gun fire from Dewdrop and failed
to reach that end of Spectrum.
The 168th Brigade fared badly on the right. Three battalions
attacked in line—the London Scottish, the 4th London Regt., and the
Rangers. Two machine guns were in the front line, for covering fire,
37.
and four otherswest of Les Bœufs, for indirect covering fire; there
were also six Stokes mortars in Burnaby to put a barrage on
Dewdrop. In some respects the attack was peculiar. As was so often
the case, the direction of the attack was at an angle to our front,
and the London Scottish, starting the assault from the right at 1.45
p.m., were followed by the 4th London Regt. at 1.47 and the
Rangers at 1.49 p.m.; this was calculated to bring the three
battalions into line by the time Dewdrop and the gun-pits were
reached.
The leading company of the Rangers, on the left, was knocked out,
before it had gone fifty yards, by machine guns in the northern end
of Dewdrop, and the reserve companies of the battalion came under
a very heavy barrage and did not succeed in carrying forward the
attack. The remnants of this battalion lay out in shell-holes until
dusk, when they returned to the original line.
The 4th London Regt., in the centre, met with much the same fate.
The left company was annihilated, and the right company, managing
to reach a patch of dead ground, lay down unable to move. The rear
waves were met with intense artillery fire, but advanced most
gallantly to the line of the leading troops. From the dead ground
attempts were made to outflank the gun-pits, from which the hostile
machine-gun fire was directed, and small parties managed to work
well round to the south.
The London Scottish advanced well for about 400 yards, and
occupied the south gun-pits and the southern end of Hazy. The
enemy at once attempted a counter-attack from the northern end,
but this was driven off. But it was found that a wide gap existed
between the right of the battalion and the French, who had attacked
east instead of north-east, and small parties of the London Scottish
were successively pushed out to fill the gap and get touch. At six
o’clock they had succeeded in establishing a thin but continuous line
in touch with our Allies. But the situation was a very difficult one.
The enemy had received reinforcements in Hazy and the north gun-
pits—from all appearances fresh troops—and both flanks of the
38.
London Scottish werein the air and exposed to the immediate
presence of the enemy.
At 8.30 p.m. the German counter-attack developed, and, though
heavy casualties were inflicted on the enemy, he succeeded in
forcing the London Scottish and the right of the 4th London Regt.,
which was creeping round the gun-pits, to retire to our original line.
The division, at nightfall, was left with a net gain of part of Spectrum
and Rainbow. Gen. Hull then ordered a renewal of the attack on the
next day, and sent up the London Rifle Brigade and the Queen
Victoria’s Rifles to the 168th Brigade, and the Queen’s Westminster
Rifles to the 167th Brigade.
The assault took place at 3.30 p.m. on the 8th October, and almost
at once Brig.-Gen. Freeth reported that the barrage was very feeble.
On the 168th Brigade front the attack was arranged this time so that
it started simultaneously all along the line. The London Rifle Brigade
on the right advanced steadily for about 500 yards, and again gained
a foothold in Hazy. But the experience of the previous day was
repeated. The northern gun-pits, with their garrison of machine-
gunners, was held by the enemy, who poured a devastating fire into
the left flank of the four advancing waves, and on this occasion
there was fire from the right flank as well; the attack was in the
main held up about fifty yards from Hazy, where a shell-hole line was
established. The reserve company was sent forward to fill the gap
which existed, as on the first attack, between us and the French.
The Queen Victoria’s Rifles and the 3rd London Regt., on the 167th
Brigade front, failed to make any appreciable advance. Both
Dewdrop and the south of Spectrum resting on the sunken road
were strongly garrisoned, and the machine-gun fire was withering.
At 10.30 p.m. all troops were withdrawn to the original line.
The position on the morning of the 9th was that we held Spectrum
to the bend in the trench just south of the sunken road, and had a
39.
strong party ofthe Queen’s Westminsters in the sunken road. On the
remainder of the front there had been no advance.
41.
3. The TransloyRidge.
On these two days 84 prisoners of the 31st and 84th Reserve
Infantry Regts., 18th Division, and two machine guns were captured.
The great difficulty experienced was to know where troops were
situated. The weather was bad, and the effort of attacking was in
itself a gigantic one, but that effort had been made, and seemed to
hang on the brink of success, and if the artillery could have helped a
little more would have been entirely satisfactory. The artillery,
however, were greatly handicapped. Maps could not tell them where
the new enemy trenches were, and aeroplanes were unable to take
photographs. As to being helped by roads, though these were clearly
marked on the map, they had been almost completely blown away
by shell fire on the ground and were by no means easy to
distinguish. It was a vile country.
The latter days of the Somme battle were even worse for the
R.A.M.C. Wounded men had to be carried to Ginchy and frequently
from there to Montauban. The medical branch of the division never
experienced a harder time than that on the Somme.
On the night of the 9th October the 56th Division was relieved by
the 4th Division. The battles of the Somme were practically over. Sir
Douglas Haig wanted to push on in the direction of Le Transloy:
“On our eastern flank ... it was important to gain ground.
Here the enemy still possessed a strong system of trenches
covering the villages of Transloy and Beaulencourt and the
town of Bapaume; but although he was digging with feverish
haste, he had not been able to create any very formidable
defences behind this line. In this direction, in fact, we had at
last reached a stage at which a successful attack might
reasonably be expected to yield much greater results than
anything we had yet attained. The resistance of the troops
opposed to us had seriously weakened in the course of our
42.
recent operations, andthere was no reason to suppose that
the effort required would not be within our powers.
This last completed system of defence, before Le Transloy,
was flanked to the south by the enemy’s position at Sailly-
Saillisel and screened to the west by the spur lying between
Le Transloy and Les Bœufs. A necessary preliminary,
therefore, to an assault upon it was to secure the spur and
the Sailly-Saillisel heights. Possession of the high ground at
this latter village would at once give us far better command
over the ground to the north and the north-west, secure the
flank of our operations towards Transloy, and deprive the
enemy of observation over the Allied communications in the
Combles valley. In view of the enemy’s efforts to construct
new systems of defence behind the Le Transloy line, it was
desirable to lose no time in dealing with the situation.
Unfortunately, at this juncture very unfavourable weather set
in, and continued with scarcely a break during the remainder
of October and the early part of November. Poor visibility
seriously interfered with the work of our artillery, and
constant rain turned the mass of hastily-dug trenches for
which we were fighting into channels of deep mud. The
country roads, broken by countless shell craters, that cross
the deep stretch of ground we had lately won, rapidly became
almost impassable, making the supply of food, stores, and
ammunition a serious problem. These conditions multiplied
the difficulties of attack to such an extent that it was found
impossible to exploit the situation with the rapidity necessary
to enable us to reap the full benefits of the advantages we
had gained.”
Two attacks were, indeed, made to assist the French in their
operations against the important village of Sailly-Saillisel, which fell
to them on the 18th of the month, but by that time the weather had
become so bad, and the delay had been so long, that the decisive
moment had passed. [The short and successful battle of the Ancre
43.
was fought onthe 13-18th November, bringing the total number of
1916 Somme battles up to twelve.]
* * * * * * *
Lieut.-Col. A. D. Bayliffe, who commanded the 168th Brigade
through this great battle, wrote at the time an interesting paper
which he heads: “Lessons to be deducted from the Operations on
the Somme.” Written with the incidents and conditions fresh on his
mind, and for future guidance, it is not a criticism of the actions
fought, but from his recommendations we may gather something of
the difficulties which had to be faced and overcome. We give only
some striking extracts:
“The results of the operations carried out by this brigade bear
out more than ever the necessity for an assault being made
direct at the objective. Failures, or partial failures, are
attributable to present-day troops being asked to perform a
complicated manœuvre such as a wheel or change of
direction during an assault.
The objectives allotted should be as far as possible definite,
and should be chosen on the ground so that well-defined
landmarks may be included. With the heavy casualties which
occur among the officers, and considering the partially-trained
state of N.C.O.s and men, it is seldom any use leaving the
site of the objective to the judgment of the assaulting troops.
In order to comply with this suggestion, it is essential that a
proper scheme of assembly trenches should be thought out,
and proper time given for their construction even in the rapid
advances which have been taking place.
In this connection it should be remembered that troops
engaged in holding the line cannot be expected to do much
digging work. Also that, without further training,
reinforcement officers are incapable of finding their way over
unknown ground, even with good maps, and that they cannot
44.
tape out trenchesand extend working parties. It is therefore
necessary to use pioneers very largely for the digging of
assembly trenches if this essential work is to be well done.
Attacks delivered on too broad a front with too little weight
fail even against what appears to be inferior hostile defences.
The reason is that assaulting troops edge away from the
source of hostile fire, and when the lines of men are too thin,
they move forward through the gaps in the hostile defences
without dealing with them.
It appears that assaults, to be successful, should never be
delivered with less than four waves even against near
objectives. One hostile machine gun may completely break up
the first wave or two; if there are two or more waves in rear
they may successfully carry on the assault.
It is desirable to have Battalion Headquarters as far forward
as possible, right up in the front assembly trenches if
possible, before an attack. But it is no good placing them
there unless there is some suitable shelter (however small),
and unless time is available to lay communication lines
forward. Brigade Headquarters should also be right forward,
provided there is some accommodation. This facilitates
personal reconnaissance and liaison.
If the efficiency of a brigade is to be maintained as a fighting
unit through a period of several weeks of active operations, a
far larger proportion of officers and men should be left back
than is customary. The average reinforcement officer is quite
useless when his first appearance on service is in the middle
of a modern battle. I would suggest that a battalion should
go into action with from 12 to 16 officers only, and that 4 to 8
more should be kept about the line of Brigade Headquarters,
and the remainder to be at the transport lines. N.C.O.s should
be dealt with in the same proportion.
45.
It is wellborne out through these operations that, if the
artillery barrage is good and the infantry advance close to it,
they will probably reach their objective without heavy loss.
Usually the standing barrage was put up behind the objective,
and it is thought that the standing barrage should be on the
objective until the creeping barrage coincides with it and then
both move together to their next standing line.
On one occasion (7th October) the three battalions of infantry
on this brigade front had to advance at different times; the
consequence was that the last to move had to face a very
heavy barrage in addition to machine-gun fire. It is thought
that the infantry should always move at zero, even if they are
not in line with each other, and that the barrage line should
be made to conform with the line of the assaulting infantry.
As usual there was a complete lack of touch throughout the
operations with the heavy artillery. It is thought that the
artillery group system should be extended so as to include
some heavy artillery.
It is suggested that a large supply of signboards, painted
white or luminous, should be prepared for active operations,
and also a supply of trench bridges ... reliefs were often much
complicated and delayed by the lack of good tracks.
The value of the Stokes mortars in the more open fighting we
have been having is very doubtful. The results achieved have
never been commensurate with the great labour involved in
getting the guns and ammunition forward. The trench mortar,
from an administrative point of view, is more trouble than any
other unit when frequent moves and reliefs occur, as it is not
self-contained, and much work and trouble is involved at very
busy moments in devising how its stores are to be moved.
The Tanks allotted to co-operate with this brigade were not
found to be of any use at all. It is thought that Tanks require
46.
select crews ofgreat determination, and officers in charge
who have more experience and knowledge of the methods of
infantry and artillery in war. If the speed of the Tanks could
be increased, it would add very greatly to their value.”
The difficulties indicated in this paper were those which faced the
actual fighting men. We have already mentioned the zigzag line, and
the reader will readily appreciate how the attempt to form a front,
moving in a given direction after the men had left the trenches,
frequently led to confusion and loss of direction. Col. Bayliffe’s
statement that men will edge away from the source of fire does not
necessarily contravert our assertion that they are drawn towards the
sound of fire, which must be read in conjunction with the admitted
uncertainty of the exact position of an objective. During an attack no
officer or N.C.O. can control more than half a dozen men, and the
more usual number is two. On this basis the proportion of officers
and N.C.O.s is totally inadequate, and it follows that success
depends largely on the men themselves. The assaulting troops will
fall naturally under two heads: leaders and followers. The leaders
are the men of greater initiative, and in moments of uncertainty,
when doubt of their direction seizes them, when no trench is visible,
they turn towards the sound of the enemy—the place where the
firing comes from. It is one of the factors to be dealt with in keeping
direction. A line which has become thin through casualties will, no
doubt, swerve from a strongly-held post.
And what a lot is covered by the paragraph on digging! The physical
effort required to go through a battle like the Somme was colossal.
Relief meant only relief from the actual front line, not relief from
open trenches, from wet, from mud, from cold, or even from severe
casualties; it was merely a case of moving a short way back to other
trenches. After days of this sort of life an assault was a most
exhausting experience and, if successful, was not finished with the
written message, “We are on our objective.” Exhausted men were
called upon to dig new trenches at once, under fierce fire, and the
trenches dug, they waited for the counter-attack which, on the
47.
Somme, inevitably followed.Perhaps the counter-attack succeeded
and the men were driven back to their original line—and still there
was no rest.
Imagine the condition of mind of the surviving officers and men of a
company when they were reinforced by troops straight from home,
with no experience of modern or indeed any other form of fighting.
The reinforcements came almost as an added anxiety to the old
men. And how could the new arrivals be expected to appreciate the
advantage of following close on our own barrage, in itself a doubt-
provoking thing? There was nothing easy for the regimental officer
or for his men; they fought the enemy, the earth, and the sky.
We give the gallant colonel’s remarks on Tanks as an interesting light
on the early proceedings of the new engines of war. We are well
aware that they will provoke a smile from some readers, but they
are none the less justifiable. Tanks accomplished very little on this
part of the battle front. To the infantry they seemed only to attract
the attention of the enemy with the appalling noise they made and
the very definite target they afforded, and then they broke down!
Col. Bayliffe’s opinion, which does not absolutely condemn the use of
Tanks, was shared by two Brigadier-Generals of the 16th Division,
and most of the infantry in less exalted positions. That they
afterwards accomplished the object of their inventors is beside the
point.
Heaven forbid that we should appear to offer excuses for the 56th
Division—none are needed. But we find it impossible to give a true
picture of the conditions under which men fought, and by placing a
few of the difficulties before the reader, hope to enable him to
appreciate the truly great fighting qualities of these London men.
Success conjures up to the mind a picture of swift movement, and
such successes were gained during the war—but not on the Somme.
The enemy was strong and determined, and fought to the last. Gen.
Falkenhayn, who was the instigator of the Verdun offensive, seems
to rather pooh-pooh the battle of the Somme, and give the
impression that it had little effect on the Central Powers; but as he
48.
was dismissed atthe end of August, one might deduce that other
people did not share his views. Hindenburg and Ludendorff, on the
other hand, wag their heads gravely over the whole business. The
Germans were being badly battered, and were fighting most
desperately to arrest disaster. And so, in recording the exploits of the
56th Division, we have to repeat somewhat monotonously the
account of attacks being continually delivered on the same trench or
point.
The trouble in a battle of this sort is to reconcile the two points of
view: that of the Higher Command and that of the infantry. For the
infantry there was no break in the fighting—if they did not assault
“over the top,” they were bombing the enemy out of a trench or
being bombed out themselves. And it is not too easy to decide what
particular trenches were held at any one moment. The position in
Loop Trench, for instance, was continually changing. Combles
Trench, the sunken road, and the southern end of Bouleaux Wood
were points of continual struggle. The enemy exerted his full
pressure on the 56th Division. But for the Higher Command this
month of fighting divides itself into five attacks!
The plan on this part of the front was to surround Combles by
joining the French on the far side. The junction of two armies of
different nationalities might always be considered a point of
weakness, and the movement itself was one of which the enemy
could take advantage. Lord Cavan explains the position very clearly
with a small rough sketch:
“The plan to take Combles was like this:
49.
Therefore during theadvance the protection of my flank from
a possible counter-stroke down the arrow was most
important. This protection from Leuze Wood to Morval was
splendidly and gloriously afforded. Further, in the actual
attack on Morval and Les Bœufs this protecting flank had to
be advanced to keep pace with the attack. The key of this
was the capture of a trench about X-X. This was captured and
held, and the complete success of the battle was assured. I
had every confidence in Hull and his men, tired though they
were, and this confidence was more than justified.”
This grim, determined, and desperate struggle reveals qualities in
the London troops which, though they existed, would not in a more
spectacular success have been so clearly demonstrated. It requires
good men to attack again and again until their object is gained, and
when these attacks are launched against such splendidly trained
soldiers as the Germans, one can only marvel that the thing was
ever done, and applaud the steadfast courage, the endurance of
body and spirit, which enabled the men to do it.
True, the battles of the Somme ended with both sides being stuck in
the mud—an inglorious ending to so much heroism—and the final,
and perhaps fatal, stroke was snatched from our grasp by the
weather; but those who came through the battle may now consider
dispassionately what it was they had accomplished.


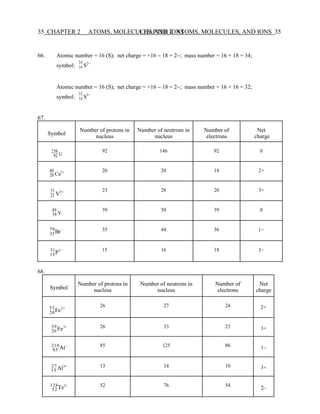
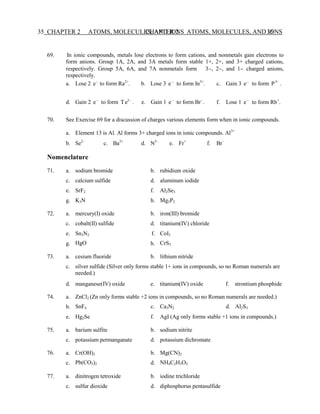
![CHAPTER 2 ATOMS, MOLECULES, AND IONS 42
42 CHAPTER 2 ATOMS, MOLECULES, AND IONS
X2c + 2 Y2f → 2 XcY2f ; 2 X2c + Y2f → 2 X2cYf
For simplest formulas, assume that c = f = 1. Thus:
X2 + 2 Y2 → 2 XY2 and 2 X2 + Y2 → 2 X2Y
Compound I = XY2: If X has relative mass of 1.00,
Compound II = X2Y: If X has relative mass of 1.00,
1.00
1.00 + 2y
2.00
2.00 + y
= 0.3043, y = 1.14.
= 0.6364, y = 1.14.
The relative mass of Y is 1.14 times that of X. Thus, if X has an atomic mass of 100, then Y
will have an atomic mass of 114.
117. Most of the mass of the atom is due to the protons and the neutrons in the nucleus, and
protons and neutrons have about the same mass (1.67 10−24
g). The ratio of the mass of the
molecule to the mass of a nuclear particle will give a good approximation of the number of
nuclear particles (protons and neutrons) present.
7.31 10−23
g
1.67 10−24
g
= 43.8 44 nuclear particles
Thus there are 44 protons and neutrons present. If the number of protons equals the number
of neutrons, we have 22 protons in the molecule. One possibility would be the molecule CO2
[6 + 2(8) = 22 protons].
118. For each experiment, divide the larger number by the smaller. In doing so, we get:
experiment 1 X = 1.0 Y = 10.5
experiment 2 Y = 1.4 Z = 1.0
experiment 3 X = 1.0 Y = 3.5
Our assumption about formulas dictates the rest of the solution. For example, if we assume
that the formula of the compound in experiment 1 is XY and that of experiment 2 is YZ, we
get relative masses of:
X = 2.0; Y = 21; Z = 15 (= 21/1.4)
and a formula of X3Y for experiment 3 [three times as much X must be present in experiment
3 as compared to experiment 1 (10.5/3.5 = 3)].
However, if we assume the formula for experiment 2 is YZ and that of experiment 3 is XZ,
then we get:
X = 2.0; Y = 7.0; Z = 5.0 (= 7.0/1.4)
and a formula of XY3 for experiment 1. Any answer that is consistent with your initial
assumptions is correct.](https://image.slidesharecdn.com/4129-250418043524-5418cf3b/85/Solution-Manual-for-Chemistry-9th-Edition-23-320.jpg)


![prisoners taken by us in these operations amounted to over
4,000, including 127 officers.”
The 168th Brigade, on the left of the divisional front, was
responsible for holding Middle Copse. On the two nights of the 19th
and 20th September the London Scottish provided covering parties
for the 5th Cheshire Regt., who connected Beef Trench with Middle
Copse, and carried on two lines of trench in a north-easterly
direction as far as the rail or tram line; companies of these pioneers
also connected the Copse with the south-east side of the
Quadrilateral. This work resulted in a firm line some 900 yards in
length facing Bouleaux Wood, and gradually working round Combles.
Prisoners captured by the London Scottish while covering the digging
parties were from the 2nd Battalion, 235th Regiment, Reserve 51st
Division.
The right wing of the British Army had not yet reached the line
desired by Sir Douglas Haig. Morval, Les Bœufs, and Gueudecourt
were still in the hands of the enemy, and on the right Combles still
held out at the junction of the Allied Armies. An Allied attack from
the Somme to Martinpuich was arranged for the 23rd September, but
the weather was so bad that it had to be postponed until the 25th.
[The battle of Morval.]](https://image.slidesharecdn.com/4129-250418043524-5418cf3b/85/Solution-Manual-for-Chemistry-9th-Edition-31-320.jpg)
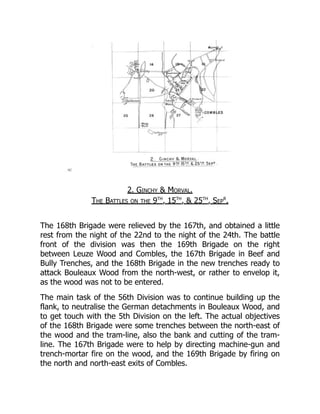
![near the line we have sketched on the left of 34. Touch was
obtained with the 20th Division on the left.
Gen. Hull was now instructed that the Fourth Army would renew the
attack on the 5th October, and that the XIV Corps would establish
itself on a line from which the main Transloy defences could be
attacked at a later date. The 56th Division would capture Hazy,
Dewdrop, Spectrum, and part of Rainbow, and establish a line along
the west crest of the ridge; the Division would then, as a second
phase of the attack, establish a line on the forward slope of the ridge
from which Le Transloy could be seen. The General ordered that the
169th Brigade should attack on the right, and the 167th Brigade on
the left. [The battle of the Transloy Ridges, 1st-18th October.]
The weather became steadily worse and, though water is supposed
to run downhill and the division was on the slope of a hill, the troops
might just as well have been in the middle of a pond. No one could
move, and the operations were postponed for forty-eight hours.
Assembly trenches were dug; and patrols reported the enemy some
200 yards on the farther side of the ridge. The objectives for the
attack were well beyond the line of posts it had been hoped to
occupy with patrols, and the 2/1st London and 1/1st Edinburgh Field
Companies R.E., with two companies of the 5th Cheshire Regt., were
given to the two brigades to consolidate what was gained.
The assault took place at 1.45 p.m. on the 7th October, and on the
left was fairly successful. The 7th Middlesex, on the extreme left,
and the left company of the 1st London Regt. drove the enemy out
of the northern half of Spectrum and part of Rainbow, where they
joined with the 20th Division. The right company of the 1st Londons,
however, was held up by machine-gun fire from Dewdrop and failed
to reach that end of Spectrum.
The 168th Brigade fared badly on the right. Three battalions
attacked in line—the London Scottish, the 4th London Regt., and the
Rangers. Two machine guns were in the front line, for covering fire,](https://image.slidesharecdn.com/4129-250418043524-5418cf3b/85/Solution-Manual-for-Chemistry-9th-Edition-36-320.jpg)

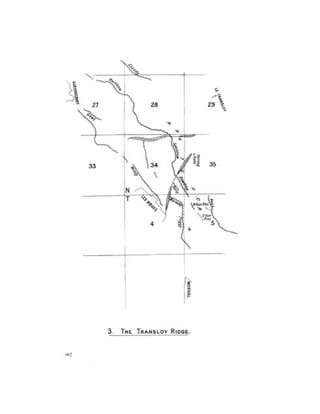
![was fought on the 13-18th November, bringing the total number of
1916 Somme battles up to twelve.]
* * * * * * *
Lieut.-Col. A. D. Bayliffe, who commanded the 168th Brigade
through this great battle, wrote at the time an interesting paper
which he heads: “Lessons to be deducted from the Operations on
the Somme.” Written with the incidents and conditions fresh on his
mind, and for future guidance, it is not a criticism of the actions
fought, but from his recommendations we may gather something of
the difficulties which had to be faced and overcome. We give only
some striking extracts:
“The results of the operations carried out by this brigade bear
out more than ever the necessity for an assault being made
direct at the objective. Failures, or partial failures, are
attributable to present-day troops being asked to perform a
complicated manœuvre such as a wheel or change of
direction during an assault.
The objectives allotted should be as far as possible definite,
and should be chosen on the ground so that well-defined
landmarks may be included. With the heavy casualties which
occur among the officers, and considering the partially-trained
state of N.C.O.s and men, it is seldom any use leaving the
site of the objective to the judgment of the assaulting troops.
In order to comply with this suggestion, it is essential that a
proper scheme of assembly trenches should be thought out,
and proper time given for their construction even in the rapid
advances which have been taking place.
In this connection it should be remembered that troops
engaged in holding the line cannot be expected to do much
digging work. Also that, without further training,
reinforcement officers are incapable of finding their way over
unknown ground, even with good maps, and that they cannot](https://image.slidesharecdn.com/4129-250418043524-5418cf3b/85/Solution-Manual-for-Chemistry-9th-Edition-43-320.jpg)