Downloaded 65 times


![References
1. Illinois Solar Energy Association. 2002. Solar Greenhouse. ISEA Fact Sheet #9. Accessed at:
www.illinoissolar.org/
2. Alward, Ron, and Andy Shapiro. 1981. Low-Cost Passive Solar Greenhouses.
National Center for Appropriate Technology, Butte, MT. 173 p.
3. White, Joe. 1991. Growing it in a Sunpit. The Natural Farmer. Winter. p. 14.
4. Thomas, Stephen G., John R. McBride, James E. Masker, and Keith Kemble. 1984. Solar Greenhouses and
Sunspaces: Lessons Learned.
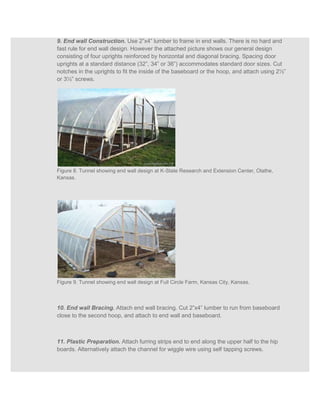
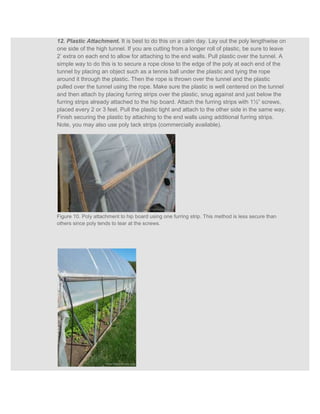
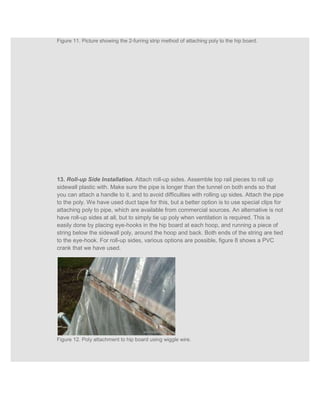
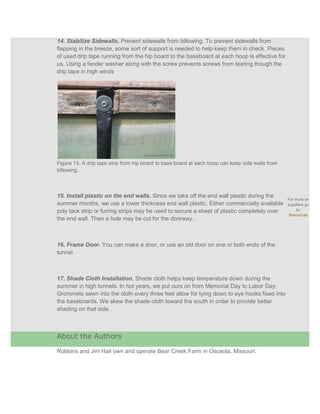
National Center for Appropriate Technology. Butte, MT. 36 p.
5. Bartok, Jr., John W. 2000. Greenhouses for Homeowners and Gardeners. NRAES-137. Cornell University,
Ithaca, NY. 214 p.
6. Giacomelli, Gene A. 1999. Greenhouse coversing systems—User considerations. Cook College. Rutgers
University. Accessed at: http://AESOP.RUTGERS.EDU/~ccea/publications.html
7. Giacomelli, Gene A. 1999. Greenhouse glazings: Alternatives under the sun. Department of Bioresource
Engineering. Cook College. Rutgers University. Accessed at:
http://AESOP.RUTGERS.EDU/~ccea/publications.html
8. Bartok, Jr., John W. 2001. Energy Conservation for Commercial Greenhouses. NRAES-3. Cornell University,
Ithaca, NY. 84 p.
9. BTS. 2001. Passive Solar Design. Technology Fact Sheet. U.S. Department of Energy. Office of Building
Technology, State and Community Programs. Accessed at:
apps1.eere.energy.gov/buildings/publications/pdfs/building_america/29236.pdf
[PDF/232K]
10. Luce, Ben. 2001. Passive Solar Design Guidelines for Northern New Mexico. New Mexico Solar Energy
Association. Accessed at:
www.nmsea.org/Curriculum/Courses/Passive_Solar_Design/Guidelines/Guidelines.htm
11. NREL. 2001. Passive Solar Design for the Home. Energy Efficiency and Renewable Energy Clearinghouse.
National Renewable Energy Laboratory. U.S. Department of Energy. Accessed at:
www.nrel.gov/docs/fy01osti/27954.pdf [PDF/216K]
12. BTS. 2001. Passive Solar Design. Technology Fact Sheet. U.S. Department of Energy. Office of Building
Technology, State and Community Programs. Accessed at: www.nrel.gov/docs/fy01osti/29236.pdf
[PDF/232K]](https://image.slidesharecdn.com/solarheetgreenhuouse-120210040011-phpapp01/85/Solar-heet-greenhuouse-19-320.jpg)
![13. Smith, Shane. 2000. Greenhouse Gardener's Companion: Growing Food and Flowers in Your Greenhouse or
Sunspace. Fulcrum Publishers. 2nd edition. 544 pages. Excerpts accessed at:
www.greenhousegarden.com/energy.htm
14. Nuess, Mike. 1997. Designing and building a solar greenhouse or sunspace. Washington State University
Energy Program.
15. Williams, Sue E., Kenneth P. Larson, and Mildred K. Autrey. 1999. Sunspaces and Solar Porches. The Energy
Event. Oklahoma State Cooperative Extension Service. A hard copy can be purchased via the following
website www.osuums.com/ASPFiles/inventfind.asp?s=.
16. Anon. n.d. Solar Greenhouse Plans and Information. Sun Country Greenhouse Company. Accessed at:
www.hobby-greenhouse.com/FreeSolar.html
17. North Carolina Solar Center. 2000. Do It Yourself Solar Applications: For Water and Space Heating. North
Carolina Solar Center. Energy Division North Carolina Department of Commerce. Accessed at:
www.ncsc.ncsu.edu/information_resources/factsheets/23lowcst.pdf [PDF/713K]
18. NREL. 1999. Building a Better Trombe Wall. National Renewable Energy Laboratory.
19. Edey, Anna. 1998. Solviva: How to Grow $500,000 on One Acre and Peace on Earth. Trailblazer Press,
Vineyard Haven, MA. 225 p.
20. Pin, Nick. 1995. Solar closets in a nutshell. Listserv message. Archived at:
www.ibiblio.org/london/renewable-energy/solar/Nick.Pine/msg00026.html
21. Solar Technologies. Accessed at: www.alaskasun.org/pdf/SolarTechnologies.pdf
(PDF/328K]
22. Gates, Jonathan. 2000. Phase Change Material Research. Accessed at:
http://freespace.virgin.net/m.eckert/index.htm
23. Baird, Stuart, and Douglas Hayhoe. 1983. Passive Solar Energy. Energy Fact Sheet.
24. Korin, E., A. Roy, D. Wolf, D. Pasternak, and E. Rappaport. 1987. A novel passive solar greenhouse based
on phase-change materials. International Journal of Solar Energy. Volume 5. p. 201-212.
25. PCM Thermal Solutions. Underfloor heating. Accessed at: www.pcm-solutions.com/under_app.html
26. TEAP Energy. 2002. PCM Energy Efficiency.
27. EREC. n. d. Phase Change Drywall. EREC Reference Briefs. U.S. Department of Energy. Office of Energy
Efficiency and Renewable Energy. (document no longer available on web)](https://image.slidesharecdn.com/solarheetgreenhuouse-120210040011-phpapp01/85/Solar-heet-greenhuouse-20-320.jpg)
![28. Butler, Nancy J. 1985. A Home Greenhouse—Dream or Nightmare? Weed 'Em and Reap; Feb.-March. MSU
Cooperative Extension Service. Accessed at: www.hobby-greenhouse.com/UMreport.htm
29. Monk, G.J., D.H. Thomas, J.M. Molnar, and L.M. Staley. 1987. Solar Greenhouses for Commercial Growers.
Publication 1816. Agriculture Canada. Ottawa, Canada.
30. Puri, V.M., and C.A. Suritz. 1985. Feasibility of subsurface latent heat storage for plant root zone and
greenhouse heating. American Society of Agricultural Engineers (Microfiche collection) 20 p.
31. NREL. 1994. Sunspace Basics. Energy Efficiency and Renewable Energy Clearinghouse. National Renewable
Energy Laboratory. U.S. Department of Energy. Accessed at:
www1.eere.energy.gov/office_eere/pdfs/solar_fs.pdf [PDF/220K]
32. Thomas, Andrew L., and Richard J. Crawford, Jr. 2001. Performance of an Energy-efficient, Solar-heated
Greenhouse in Southwest Missouri. Missiouri Agricultural Experiment Station. Missouri University College of
Agriculture, Food, and Natural Resources.
33. Nelson, Richard. Sola Roof Garden. Accessed at: http://solaroof.org/wiki/SolaRoof/SolaRoofGarden/
34. Cruickshank, John. 2002. Solar Heated Greenhouses with SHCS. Growing Concerns. Accessed at:
www.sunnyjohn.com/indexpages/shcs_greenhouses.htm
35. Geery, Daniel. 1982. Solar Greenhouses: Underground. TAB Books, Inc.
Blue Ridge Summit, PA. 400 p.
36. Benson Institute. n.d.. The Pankar-huyu and Building a Pankar-huyu. Accessed at:
http://benson.byu.edu/Publication/BI/Lessons/volume22/pankar.html and
http://benson.byu.edu/Publication/BI/Lessons/volume22/building.html
37. Anon. 2002. Greenhouse Glazing. Horticultural Engineering, Rutgers Cooperative Extension, Volume 17, No.
1. Accessed at: www.rosesinc.org/ICFG/Join_ICFG/2002-03/Greenhouse_Glazing.asp
38. Aldrich, Robert A., and John W. Bartok, Jr. 1989. Greenhouse Engineering. NRAES-33. Northeast Regional
Agricultural Engineering Service, Cornell University. 203 p.
39. Hunt, John N. 1988. Saving energy—North Carolina style. Greenhouse Grower. March.
40. Gilman, Steve. 1991. Solar ventilation at Ruckytucks Farm. The Natural Farmer. Winter. p. 15.
Back to top
Resources](https://image.slidesharecdn.com/solarheetgreenhuouse-120210040011-phpapp01/85/Solar-heet-greenhuouse-21-320.jpg)
![Kansas State University Recommended High Tunnel Resources. Ted Carey. 2008.
K State Plans for 4-season hoophouses
www.hightunnels.org
Note: www.hightunnels.org has links to suppliers and multiple sources of information-including the high tunnels
listserv, Penn State Web site, and construction designs. The hightunnel listserv allows participants to ask questions of
all members of the list. Complete archives are stored on-line.
Blomgren, T., and T. Frisch. 2007. High Tunnels: Using low-cost technology to increase yields, improve quality and
extend the season. University of Vermont Center for Sustainable Agriculture.
www.uvm.edu/sustainableagriculture/hightunnels.html
Coleman, Eliot. 1998. The Winter Harvest Manual.
Order from: Four Season Farm, 609 Weir Cover Road, Harborside, ME. $15.00.
Growing for Market. [n.d.] Hoophouse handbook. Fairplain Publications, Lawrence, KS.
Order from: Fairplain, P.O. Box 3747, Lawrence, KS 66046.
www.growingformarket.com; 800-307-8949. Much of the content reprinted from Growing for Market.
Heidenreich, C. et al. 2007. High Tunnel Raspberries and Blackberries. Cornell University.
www.fruit.cornell.edu/Berries/bramblepdf/hightunnelsrasp.pdf
Jett, Lewis. High Tunnel Tomato Production. University of Missouri Extension. Pub. MI70.
Jett, L. High Tunnels Melon and Watermelon Production. University of Missouri Extension. Pub. M173.
Lamont et al. 2004. Production of Vegetables, Strawberries and Cut Flowers Using Plasticulture. NRAES-133. Ithaca,
NY.
Penn State High Tunnel Production Manual. 2004.
www.plasticulture.org/publications/tunnel.pdf. $31.00.
Wiediger, Paul and Alison. [n.d.] Walking to Spring.
Order from: Au Naturel Farm, 3298 Fairview Church Road, Smiths Grove, KY 42171. $18.50.
Books
Solar Greenhouses
Energy Conservation in Greenhouses
Passive Solar Home Design
Note: Many of the books listed below are out of print. You may be able to locate these books at a public library or in
a good used bookstore. Bibliofind is an excellent, searchable Web site where many used and out-of-print books can
be located.
Solar Greenhouses
Anon. 1980. A Solar Adapted Greenhouse Manual and Design. Miller-Solsearch, Charlottetown, PEI, Canada.
Anon. 1979. The Canadian Solar Home Design Manual. Overview,
Wolfville, Nova Scotia. 71 p.
Babcock, Joan, et al. 1981. A Place in the Sun: A Guide to Building an Affordable Solar Greenhouse. R.J.K. Solar,
Gillette, NJ. 28 p.](https://image.slidesharecdn.com/solarheetgreenhuouse-120210040011-phpapp01/85/Solar-heet-greenhuouse-22-320.jpg)
![Manchester, NH 03103
603-668-8186
Sundance Supply
Provides information on greenhouse design and installation. Sells materials needed for constructing and maintaining
greenhouses.
Sunglo Solar Greenhouses
214 21st Street SE
Auburn, WA 98002
800-647-0606
Free catalog of greenhouse kits available.
Greenhouse Glazing
Giacomelli, Gene A. 1999. Greenhouse coversing systems - User considerations. Greenhouse glazings: Alternatives
under the sun. Cook College. Rutgers University.
http://AESOP.RUTGERS.EDU/~ccea/publications.html
Giacomelli, G.A., and W.J. Roberts. 1993. Greenhouse covering systems. HortTechnology. Volume 3, no. 1. p. 50-58.
Roberts, W.J. 1989. Greenhouse glazing. In: K.V. Garzoli (ed.) Energy Conservation and Solar Energy Utilization in
Horticultural Engineering. Acta horticulturae. Volume 257. p. 161-168. Ordering information at:
www.actahort.org/books/257/index.htm
Meyer, J. 1985. Greenhouse Construction and Covering Materials. ISHS Acta Horticulturae 170. Ordering information
at: www.actahort.org/books/170/
Efficient Windows Collaborative
National Festration Council. 2002
Greenhouse Curtains
National Greenhouse Manufactures Association. Helpful Hints: Internal and External Greenhouse Curtain Systems
[PDF/125K]
Agri-tech. Energy Curtain
FAQs—Internal & External Greenhouse Curtain Systems. Griffin Greenhouse and Nursery Supply
National Greenhouse Manufacturers Association](https://image.slidesharecdn.com/solarheetgreenhuouse-120210040011-phpapp01/85/Solar-heet-greenhuouse-28-320.jpg)


This document provides information on solar greenhouses, including basic design principles, common designs, heat absorption, and glazing material options. It discusses the key factors in solar greenhouse design such as orientation, slope of glazing, and types of glazing materials. The document also provides a table comparing characteristics of different glazing materials and their advantages and disadvantages. Resources for further information on solar greenhouse design are listed, including books, articles, websites and software.


