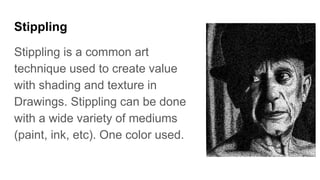
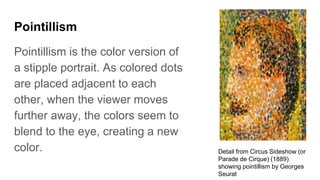
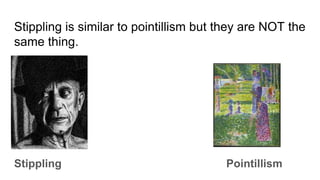
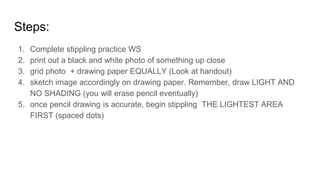
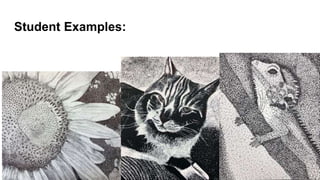
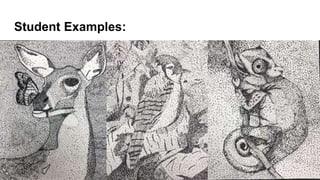
Sharpie Stippling Drawing
Drawing I
Stippling
Stippling is a common art
technique used to create value
with shading and texture in
Drawings. Stippling can be done
with a wide variety of mediums
(paint, ink, etc). One color used.
Pointillism
Pointillism is the color version of
a stipple portrait. As colored dots
are placed adjacent to each
other, when the viewer moves
further away, the colors seem to
blend to the eye, creating a new
color. Detail from Circus Sideshow (or
Parade de Cirque) (1889)
showing pointillism by Georges
Seurat
Stippling is similar to pointillism but they are NOT the
same thing.
Stippling Pointillism
Why Study Stippling?
A stippling will help us STUDY VALUE TO
BEGIN WITH and will also familiarize you with
controlled movement. After we study color theory
in Painting I, we will move into paintings with
color.
The Function of Stippling
The closer the dots, the darker the subject will be.
This is handy for shading. To create a look of gradual shading,
the artist only has to make the dots closer and closer as the
lighting fades to get a shaded look.
Stippling can also create the look of texture.
If the dots are irregular in shape, this can make the object look
rough.
The End Result: the Effects of Stippling
This form of shading creates an optical illusion when done
correctly.
To the viewer, the shading will almost look like one smooth
application from far away and the dots will only be obvious when
viewed very closely.
From far away no dots will be apparent. We will also use
gridding to help you achieve proportions and to find the value
more easily.
Time Lapse Video of Stippling
Student Examples:
Learning Objectives:
Students will-
Use close observation to understand objective reality
Learn and produce the art of stippling
Strengthen drawing skills
Apply new vocabulary to their art
Vocab
Stippling (verb): (in drawing and painting) marking a surface with numerous small
dots or specks.
Gridding: laying a gridded pattern to ease the study of replication
Value: the degree of lightness or darkness in a color
Observational Drawing: develops parts of the brain that helps us see better
*builds confidence
*requires intense concentration
Steps:
1. Complete stippling practice WS
2. print out a black and white photo of something up close
3. grid photo + drawing paper EQUALLY (Look at handout)
4. sketch image accordingly on drawing paper. Remember, draw LIGHT AND
NO SHADING (you will erase pencil eventually)
5. once pencil drawing is accurate, begin stippling THE LIGHTEST AREA
FIRST (spaced dots)
Stippling Worksheet:
Student Examples:
Student Examples:
Reminder!
Just remember: Make sure that the picture you
choose has a lot of areas of value for you to
demonstrate with your stippling. You will do a
great job!

Sharpie Stippling Drawing.pptx

  • 1.
  • 2.
    Stippling Stippling is acommon art technique used to create value with shading and texture in Drawings. Stippling can be done with a wide variety of mediums (paint, ink, etc). One color used.
  • 3.
    Pointillism Pointillism is thecolor version of a stipple portrait. As colored dots are placed adjacent to each other, when the viewer moves further away, the colors seem to blend to the eye, creating a new color. Detail from Circus Sideshow (or Parade de Cirque) (1889) showing pointillism by Georges Seurat
  • 4.
    Stippling is similarto pointillism but they are NOT the same thing. Stippling Pointillism
  • 5.
    Why Study Stippling? Astippling will help us STUDY VALUE TO BEGIN WITH and will also familiarize you with controlled movement. After we study color theory in Painting I, we will move into paintings with color.
  • 6.
    The Function ofStippling The closer the dots, the darker the subject will be. This is handy for shading. To create a look of gradual shading, the artist only has to make the dots closer and closer as the lighting fades to get a shaded look. Stippling can also create the look of texture. If the dots are irregular in shape, this can make the object look rough.
  • 7.
    The End Result:the Effects of Stippling This form of shading creates an optical illusion when done correctly. To the viewer, the shading will almost look like one smooth application from far away and the dots will only be obvious when viewed very closely. From far away no dots will be apparent. We will also use gridding to help you achieve proportions and to find the value more easily.
  • 8.
    Time Lapse Videoof Stippling
  • 9.
  • 10.
    Learning Objectives: Students will- Useclose observation to understand objective reality Learn and produce the art of stippling Strengthen drawing skills Apply new vocabulary to their art
  • 11.
    Vocab Stippling (verb): (indrawing and painting) marking a surface with numerous small dots or specks. Gridding: laying a gridded pattern to ease the study of replication Value: the degree of lightness or darkness in a color Observational Drawing: develops parts of the brain that helps us see better *builds confidence *requires intense concentration
  • 12.
    Steps: 1. Complete stipplingpractice WS 2. print out a black and white photo of something up close 3. grid photo + drawing paper EQUALLY (Look at handout) 4. sketch image accordingly on drawing paper. Remember, draw LIGHT AND NO SHADING (you will erase pencil eventually) 5. once pencil drawing is accurate, begin stippling THE LIGHTEST AREA FIRST (spaced dots)
  • 13.
  • 14.
  • 15.
  • 16.
    Reminder! Just remember: Makesure that the picture you choose has a lot of areas of value for you to demonstrate with your stippling. You will do a great job!