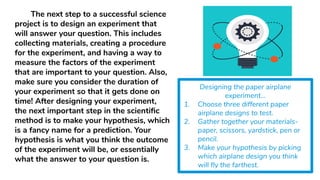
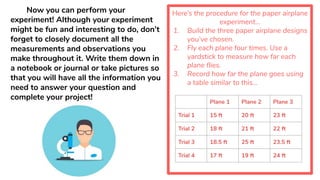
A Parent’s Guide to
Science Fair Projects
How to Help Your Child Make an Easy and
Successful Science Fair Project
Science fair projects are a big and stressful
undertaking for any student, and they often require
the assistance of a parent at one or multiple stages
of the project. However, unlike their children,
parents don’t get to receive the classroom lesson on
the methods and requirements needed for a
successful science fair project. So here’s a quick
lesson on the key to a science fair project- the
scientific method- alongside an example of a simple
science fair project.
Ask A Question!
Step 1
Every great scientific endeavor
starts with a question, including
scientific fair projects. Without the
process of asking a question it’s pretty
much impossible to do a successful
project since the whole point of the
scientific method is to answer a
question! A project that just builds or
demonstrates an event without asking
a question, such as creating a volcano,
making a potato battery, or growing
crystals, is not a science fair project.
However, these demonstration projects
can be adapted into projects that
follow the scientific method. For
example, if you wanted to build a
volcano, you could ask what would
Inside the box on each slide there will
be steps from an example science project
that follows the scientific method while still
being easy and inexpensive to do. The
question that this project will be asking is,
“Which design of paper airplane flies the
farthest?”
happen if you changed the ratio of
baking powder to vinegar.
Design an Experiment!
Step 2
The next step to a successful science
project is to design an experiment that
will answer your question. This includes
collecting materials, creating a procedure
for the experiment, and having a way to
measure the factors of the experiment
that are important to your question. Also,
make sure you consider the duration of
your experiment so that it gets done on
time! After designing your experiment,
the next important step in the scientific
method is to make your hypothesis, which
is a fancy name for a prediction. Your
hypothesis is what you think the outcome
of the experiment will be, or essentially
what the answer to your question is.
Designing the paper airplane
experiment...
1. Choose three different paper
airplane designs to test.
2. Gather together your materials-
paper, scissors, yardstick, pen or
pencil.
3. Make your hypothesis by picking
which airplane design you think
will fly the farthest.
Perform the Experiment!
Step 3
Now you can perform your
experiment! Although your experiment
might be fun and interesting to do, don’t
forget to closely document all the
measurements and observations you
make throughout it. Write them down in
a notebook or journal or take pictures so
that you will have all the information you
need to answer your question and
complete your project!
Here’s the procedure for the paper airplane
experiment…
1. Build the three paper airplane designs
you’ve chosen.
2. Fly each plane four times. Use a
yardstick to measure how far each
plane flies.
3. Record how far the plane goes using
a table similar to this...
Plane 1 Plane 2 Plane 3
Trial 1 15 ft 20 ft 23 ft
Trial 2 18 ft 21 ft 22 ft
Trial 3 18.5 ft 25 ft 23.5 ft
Trial 4 17 ft 19 ft 24 ft
Answer the Question!
Step 4
To analyze the results of the airplane
experiment….
1. Find the average distance of each
plane across the trials.
2. Use a program like Google Sheets or
Excel to make a graph that compares
the average values like the one below.
3. According to the results, Plane 3 flies
the farthest. See if that matches your
hypothesis!
Once you’ve completed your experiment
and collected all of your measurements and
observations, it’s time to answer your
question! First, you have to analyze your
results. Ask yourself questions like, “Do
these results make sense?”, “What do
these results mean?”, “How do these
results answer my question?”, and “Do
these results follow my hypothesis or
contradict it?”. Create some charts, tables,
or graphs that will creatively display the
results you’ve collected. Then, make your
final conclusion. Your conclusion should be
the answer to your initial question and a
statement on whether or not your
hypothesis was correct. Now you can share
your findings with the world!

science fair guide

  • 1.
    A Parent’s Guideto Science Fair Projects How to Help Your Child Make an Easy and Successful Science Fair Project
  • 2.
    Science fair projectsare a big and stressful undertaking for any student, and they often require the assistance of a parent at one or multiple stages of the project. However, unlike their children, parents don’t get to receive the classroom lesson on the methods and requirements needed for a successful science fair project. So here’s a quick lesson on the key to a science fair project- the scientific method- alongside an example of a simple science fair project.
  • 3.
  • 4.
    Every great scientificendeavor starts with a question, including scientific fair projects. Without the process of asking a question it’s pretty much impossible to do a successful project since the whole point of the scientific method is to answer a question! A project that just builds or demonstrates an event without asking a question, such as creating a volcano, making a potato battery, or growing crystals, is not a science fair project. However, these demonstration projects can be adapted into projects that follow the scientific method. For example, if you wanted to build a volcano, you could ask what would Inside the box on each slide there will be steps from an example science project that follows the scientific method while still being easy and inexpensive to do. The question that this project will be asking is, “Which design of paper airplane flies the farthest?” happen if you changed the ratio of baking powder to vinegar.
  • 5.
  • 6.
    The next stepto a successful science project is to design an experiment that will answer your question. This includes collecting materials, creating a procedure for the experiment, and having a way to measure the factors of the experiment that are important to your question. Also, make sure you consider the duration of your experiment so that it gets done on time! After designing your experiment, the next important step in the scientific method is to make your hypothesis, which is a fancy name for a prediction. Your hypothesis is what you think the outcome of the experiment will be, or essentially what the answer to your question is. Designing the paper airplane experiment... 1. Choose three different paper airplane designs to test. 2. Gather together your materials- paper, scissors, yardstick, pen or pencil. 3. Make your hypothesis by picking which airplane design you think will fly the farthest.
  • 7.
  • 8.
    Now you canperform your experiment! Although your experiment might be fun and interesting to do, don’t forget to closely document all the measurements and observations you make throughout it. Write them down in a notebook or journal or take pictures so that you will have all the information you need to answer your question and complete your project! Here’s the procedure for the paper airplane experiment… 1. Build the three paper airplane designs you’ve chosen. 2. Fly each plane four times. Use a yardstick to measure how far each plane flies. 3. Record how far the plane goes using a table similar to this... Plane 1 Plane 2 Plane 3 Trial 1 15 ft 20 ft 23 ft Trial 2 18 ft 21 ft 22 ft Trial 3 18.5 ft 25 ft 23.5 ft Trial 4 17 ft 19 ft 24 ft
  • 9.
  • 10.
    To analyze theresults of the airplane experiment…. 1. Find the average distance of each plane across the trials. 2. Use a program like Google Sheets or Excel to make a graph that compares the average values like the one below. 3. According to the results, Plane 3 flies the farthest. See if that matches your hypothesis! Once you’ve completed your experiment and collected all of your measurements and observations, it’s time to answer your question! First, you have to analyze your results. Ask yourself questions like, “Do these results make sense?”, “What do these results mean?”, “How do these results answer my question?”, and “Do these results follow my hypothesis or contradict it?”. Create some charts, tables, or graphs that will creatively display the results you’ve collected. Then, make your final conclusion. Your conclusion should be the answer to your initial question and a statement on whether or not your hypothesis was correct. Now you can share your findings with the world!