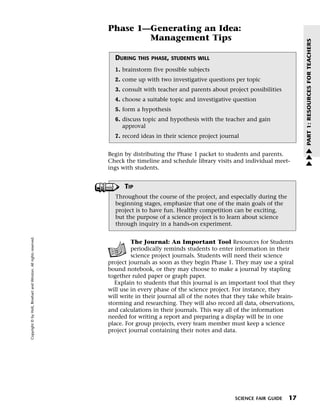
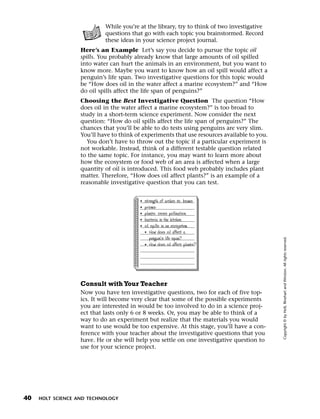
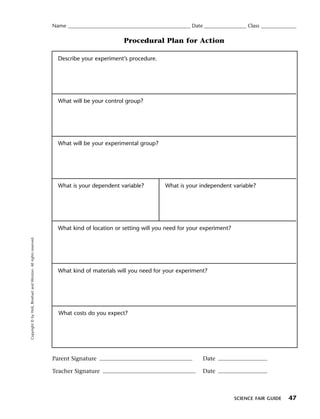
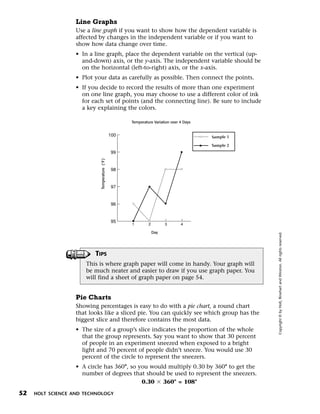
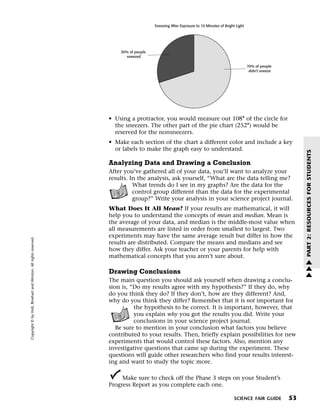
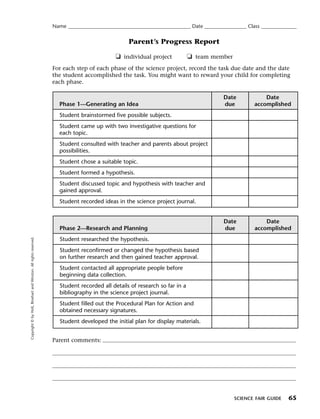
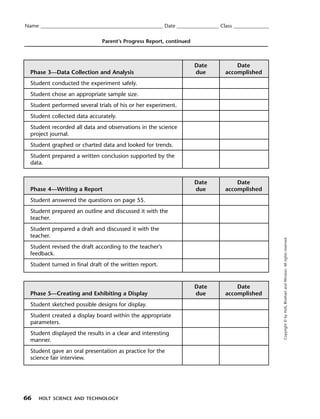
Menu    Print


                   Science Fair Guide
       To jump to a location in this book

         1. Click a bookmark on the left.


       To print a part of the book

         1. Click the Print button.

         2. When the Print window opens, type in a range of
         pages to print.

           The page numbers are displayed in the bar at the
           bottom of the document. In the example below,
           “1 of 151” means that the current page is page 1 in a
           file of 151 pages.
Menu

                     Copyright © by Holt, Rinehart and Winston. All rights reserved.
                                                                                                                                                Print


                                                                                       PART 1: RESOURCES
                                                                                        FOR
                                                                                       TEACHERS


SCIENCE FAIR GUIDE
1
                                                                                                               PART 1: RESOURCES FOR TEACHERS
                                                                                                           w
                                                                                                           w
                                                                                                           w
Menu         Print
                      Hands-on Science
                      The most obvious goal of a science project is to extend a student’s
                      understanding of science. Science is hands-on by nature, and there is
                      no doubt that hands-on experiences facilitate the learning process.
                      The scientific method allows scientists to collect and analyze data in
                      a strategic and unified manner. When students use the scientific
                      method to design and execute a project, they use the same steps
                      professional researchers use to gather new information.
                      Building Scientific Confidence More importantly, science proj-
                      ects make science more fun and relevant to the student. Every student,
                      regardless of aptitude, can benefit from planning and executing an
                      inquiry-based science project. A science project can be a great way to
                      spark a student’s interest in science or to help a student develop a
                      broader interest in research.


                      Philosophy of Science Fairs
                      Science fairs range in scale from a single class of students sharing
                      their projects to an international event offering scholarship money
                      as prizes. From the largest science fair to the smallest, science fairs
                      generally share a common philosophy and similar values:
                        • emphasis on using the scientific method
                        • investigation by experimentation (inquiry-based learning)
                        • development of critical thinking skills
                        • opportunity for a positive learning experience
                        • extension of formal science education

                      How to Use This Guide


                                                                                                Copyright © by Holt, Rinehart and Winston. All rights reserved.
                      While a science project is entirely the product of a student’s ingenu-
                      ity and work, motivation from teachers and parents is invaluable.
                      The Science Fair Guide leads teachers, parents, and students through
                      the process of developing a science project.
                      What’s in This Guide Using the scientific method, this guide
                      divides the science project into five phases:
                        • Phase 1: Generating an Idea
                        • Phase 2: Research and Planning
                        • Phase 3: Data Collection and Analysis
                        • Phase 4: Writing a Report
                        • Phase 5: Creating and Exhibiting a Display

                      For each phase, you will find a set of management tips for teachers,
                      an instruction worksheet for students, and a handout encouraging
                      parental involvement. This guide also provides three progress
                      reports, allowing each participant—the teacher, the student, and the


  2    HOLT SCIENCE AND TECHNOLOGY
Menu                                                                 Print
                                                                             parents—to monitor the student’s work. Also included are sample
                                                                             timelines, rubrics, and safety guidelines. For additional resources on
                                                                             ideas and equipment, see pp. 28–29.


                                                                                                                                                          PART 1: RESOURCES FOR TEACHERS
                                                                             Rules, Rules, Rules Often a school will conduct its own science
                                                                             fair. The winners of the school science fair may enter a citywide sci-
                                                                             ence fair, and the winners of a citywide science fair may enter a
                                                                             regional science fair. Before assigning the project, consider whether
                                                                             your students should prepare their science project to meet the
                                                                             requirements of subsequent science fairs.
                                                                                Regulations vary from science fair to science fair and even from
                                                                             year to year, so it is essential to contact the science fair sponsors for
                                                                             current listing of rules and regulations. Some science fairs have regis-
                                                                             tration fees and cutoff dates, lists of materials that students are not
                                                                             permitted to use, and requirements for reports and displays. It is
                                                                             extremely important to be prepared with the necessary information
                                                                             before assigning a science project.

                                                                             Getting Started                                                              w
                                                                             Before you begin Phase 1, complete these steps using the strategies          w
                                                                             that follow.                                                                 w
                                                                             1. create a timeline
                                                                             2. send home a parent letter with a safety guide, a safety contract,
                                                                                and a copy of the timeline
                                                                             3. hand out Resources for Students and get students excited about
                                                                                the science fair
                                                                             4. send home Resources for Parents and explain how parents should
                                                                                use the progress reports

                                                                             1. Timelines Your first step is to create a timeline that will allow
   Copyright © by Holt, Rinehart and Winston. All rights reserved.


                                                                                plenty of time for students to develop a project that is suitable for
                                                                                entering the chosen science fair. If students are participating in a
                                                                                national science fair, their projects will be more involved, requir-
                                                                                ing more teacher and parental guidance. On the next few pages,
                                                                                you will find sample timelines for a 4-week schedule (page 5), an
                                                                                8-week schedule (pp. 6–7), and a blank timeline (page 8) that
                                                                                allows you to create a schedule tailored to your students’ needs.
                                                                                Distribute this timeline to both parents and students, letting
                                                                                them know in advance what their responsibilities will be.

                                                                                   SCHEDULING TIP
                                                                               On the timeline, having Monday as a completion date for each
                                                                               assignment will allow parents to help their child over the week-
                                                                               end with library trips, data collection, and other parts of the
                                                                               project.

                                                                             2. Prepping Parents After you have notified the students of the
                                                                                upcoming activity, you are ready to prepare the parents. You may
                                                                                choose to send them a notice 1 or 2 weeks before you make the
                                                                                first assignment. Include the timeline, which identifies the date


                                                                                                                                SCIENCE FAIR GUIDE    3
Menu        Print
                       of the science fair and describes when assignments are due. Also
                       include the Safety Guide (page 33) and Safety Contract (page 34)
                       for parents to read with their child in preparation for the experi-
                       ment. Below is a sample letter.

                              You can find this letter on the One-Stop Planner CD-ROM.


                         Dear Parent or Guardian,
                            In the next few weeks, your son or daughter will begin a
                         science project in our science class. The science project’s
                         objective is to give every child hands-on experience using the
                         scientific method. In addition, each student will have the
                         opportunity to independently research a topic of his or her
                         interest. You can help motivate your son or daughter by
                         taking an interest in the project.
                            Your child will have an opportunity to enter his or her
                         science project in the science fair, which takes place on
                                          . The emphasis of our project is not on win-
                         ning, but on having positive learning experiences and having
                         fun.
                            I am including with this letter a copy of a timeline for our
                         class projects, a safety guide, and a safety contract. Please go
                         over the safety guide with your child, and have him or her
                         return the signed contract. An information packet for parents
                         will be arriving shortly to keep you informed about how you
                         can best assist your child with his or her project. Thank you
                         for your help.
                            Sincerely,


                                                                                             Copyright © by Holt, Rinehart and Winston. All rights reserved.
                     3. Motivating Students Next, you will want to discuss with stu-
                        dents what a science fair is and get them excited about the event.
                        When you introduce the science fair, give the students their
                        instruction worksheets (Part 2: Resources for Students). You can
                        either hand out Resources for Students in its entirety or as indi-
                        vidual worksheets as the class begins each phase. Either way,
                        make sure students are aware of the due dates for their assign-
                        ments. Also, be certain that they clearly understand the safety
                        guidelines they are expected to uphold. Distribute the Student’s
                        Progress Reports (pp. 35–36), and explain how they will be used.
                     4. Request Back-up Finally, send home the parent information
                        packet (Part 3 of this guide) so that the parents are prepared to
                        help with each phase of the student’s work. Be sure to explain how
                        they can use the Parent’s Progress Report (pp. 65–66) to guide
                        their children. You will find more about how to use the progress
                        reports in the Evaluation section of this guide (page 9–11).


 4   HOLT SCIENCE AND TECHNOLOGY
Menu

                                     Copyright © by Holt, Rinehart and Winston. All rights reserved.


                                                                               Timeline for a 4-Week Science Project
                                                                                                                                                                                          Print


                                   Sunday                   Monday                         Tuesday             Wednesday            Thursday                  Friday           Saturday


                     Week                                                                                                                                    Phase 1
                     project                                                                                                                            Brainstorm ideas in
                     is assigned                                                                                                                       school and at home
                                                                                                                                                          over weekend


                                                          Library                         Develop investigative question         Check progress              Phase 2
                                                       research day                                                              report—end of         Library research day
                     Week 1                                                       Student-teacher meetings to confirm topic         Phase 1
                                                                                                                                                       Reconfirm hypothesis
                                                                                                 Develop hypothesis                                        with teacher


                                                                                     Check progress              Phase 3          In-class data
                     Week 2                                                          report—end of             Brief safety         collection
                                                                                        Phase 2                 reminder


                                                       In-class data                 Check progress           Outline due                               In-class draft check
                                                      collection and                 report—end of
                     Week 3                               analysis                      Phase 3               Begin written
                                                                                                                 report
                                                                                        Phase 4
                                                                                      Begin outline

                                                      Written report                 Check progress              Phase 5          Display due
                                                           due                       report—end of             Reminder of
                                                                                        Phase 4                  display       Oral presentation,
                     Week 4                                                                                   requirements    practice for interview       Science Fair!
                                                                                                                                 Check progress
                                                                                                                                 report—end of
                                                                                                                                     Phase 5


SCIENCE FAIR GUIDE
5
                                                                                                                               w
                                                                                                                               w
                                                                                                                               w


                                                                                                                                         PART 1: RESOURCES FOR TEACHERS
6
                                                                                                                                                                                            Menu


                                                                                       Timeline for an 8-Week Science Project

                                            Sunday                   Monday                         Tuesday       Wednesday              Thursday                Friday          Saturday
                                                                                                                                                                                            Print


                              Week                                                                                                                              Phase 1
                              project                                                                                                                      Brainstorm ideas in
                              is assigned                                                                                                                 school and at home
                                                                                                                                                             over weekend


HOLT SCIENCE AND TECHNOLOGY
                                                                      Library                                                            Develop investigative question
                                                                   research day
                              Week 1                                                                                                Student-teacher meetings to confirm topic

                                                                                                                                               Develop hypothesis


                                                                 Check progress                   Phase 2          Reconfirm
                                                                 report—end of                Library research   hypothesis with
                              Week 2
                                                                    Phase 1                         day             teacher


                                                                                                                 Library research
                                                                                                                       day
                              Week 3


                                                                                               Check progress        Phase 3                                  In-class data
                                                                                               report—end of       Brief safety                                 collection
                              Week 4                                                              Phase 2           reminder


                                              Copyright © by Holt, Rinehart and Winston. All rights reserved.
Menu

                                Copyright © by Holt, Rinehart and Winston. All rights reserved.


                                                             Timeline for an 8-Week Science Project, continued
                                                                                                                                                                         Print


                              Sunday                   Monday                         Tuesday      Wednesday            Thursday                Friday        Saturday


                                                                                   In-class data                                               In-class
                                                                                     collection                                             data collection
                     Week 5                                                                                                                  and analysis


                                                                                  Check progress     Phase 4                                 Outline due
                                                                                  report—end of    Begin outline
                                                                                     Phase 3                                                Begin written
                     Week 6                                                                                                                    report


                                                                                      In-class                                              Writen report
                     Week 7                                                         draft check                                                  due


                                                   Check progress                     Phase 5                          Display due
                                                    report—end                      Reminder of
                     Week 8                          of Phase 4                       display                       Oral presentation,
                                                                                   requirements                    practice for interview    Science Fair!

                                                                                                                      Check progress
                                                                                                                       report—end
                                                                                                                        of Phase 5


SCIENCE FAIR GUIDE
7
                                                                                                                              PART 1: RESOURCES FOR TEACHERS
                                                                                                                   w
                                                                                                                   w
                                                                                                                   w
Menu         Print
                                    Create Your Own Timeline

                 Sunday    Monday     Tuesday   Wednesday   Thursday   Friday   Saturday


      Week


      Week


      Week


      Week


      Week


                                                                                           Copyright © by Holt, Rinehart and Winston. All rights reserved.
      Week


      Week


      Week


      Week


  8    HOLT SCIENCE AND TECHNOLOGY
Menu                                                                 Print
                                                                             Evaluation
                                                                             The science projects will likely be evaluated twice: first by you for a


                                                                                                                                                         PART 1: RESOURCES FOR TEACHERS
                                                                             grade and second by the judges at the science fair. Setting your evalu-
                                                                             ative criteria to reflect the criteria the judges hold for a competitive
                                                                             project will be helpful for students who are entering the science fair.
                                                                             Students can then use your evaluation to improve the project before
                                                                             presenting it to the judges.

                                                                             What the Judges Are Looking For
                                                                             Because science fairs vary widely, it is of the utmost importance that
                                                                             you familiarize yourself with the specific judging criteria of a particu-
                                                                             lar science fair. Many science fairs judge entries using the following
                                                                             criteria:
                                                                               use of scientific thought                               30%
                                                                               creativity of approach                                  30%
                                                                               thoroughness of investigation and research              15%               w
                                                                                                                                                         w
                                                                               skill of experimental technique                         15%
                                                                                                                                                         w
                                                                               clarity of expression in presentation and report        10%


                                                                                   OTHER CONSIDERATIONS
                                                                                The following are suggestions for evaluating a student project or
                                                                                predicting how a judge will evaluate a project:
                                                                                • Besides assessing the five categories that appear above, some
                                                                                  science fairs reward memorable presentations or displays.
                                                                                • A science project should have a clear hypothesis, research
                                                                                  plan, and conclusion.
   Copyright © by Holt, Rinehart and Winston. All rights reserved.


                                                                                • Many science fairs will not accept models or demonstrations,
                                                                                  only experiments that follow the scientific method.
                                                                                • Simple library research or an unplanned experiment is not
                                                                                  acceptable.
                                                                                • The student should design a controlled experiment.
                                                                                • Judges typically evaluate projects using a rubric.
                                                                                • Projects should be assessed against the other projects in the
                                                                                  science fair or competition, as opposed to being judged
                                                                                  against an ideal.
                                                                                • Judges at most science fairs will be asking themselves how
                                                                                  they would approach the investigative question and whether
                                                                                  they would draw the same conclusions the student did.
                                                                                • Creative use of materials should be considered.

                                                                             Student Understanding The student’s work should be evident in
                                                                             the project. The scientific process and the manner in which the
                                                                             research was conducted tend to outweigh the actual display of infor-
                                                                             mation. The judges will be looking carefully to see that the student

                                                                                                                               SCIENCE FAIR GUIDE   9
Menu       Print
                     has an understanding of his or her project and is responsible for the
                     final product. In a group project, the judges will be looking for evi-
                     dence that each group member completed specified tasks that fur-
                     thered the progress of the group.
                     Tailoring Evaluation to Criteria of a Particular Fair Each
                     science fair differs in the types of science projects that qualify for
                     entry. Some strictly require that students perform experiments that
                     follow the scientific method rather than perform demonstrations of
                     scientific principles. Other science fairs accept inventions, scientific
                     models, engineering projects, and informative exhibits. For instance,
                     Invent America, a nonprofit K–8 educational program, holds a
                     national contest in which students can enter inventions that solve
                     everyday problems. The resources in this guide are tailored for experi-
                     mental science projects. If you choose to broaden the scope of the
                     projects that you accept, be sure to inform your students and their
                     parents.

                     Display Regulations
                     Although the display may not be an important part of your evalua-
                     tion, the judges will evaluate it. Rules regarding acceptable display
                     materials vary. Most science fairs have a long list of items that are
                     unacceptable for display. Restricted items can include everything
                     from living organisms to any chemical, including water. It is also
                     important to verify the parameters for displays. For example, some
                     science fairs limit the size of displays to 76 cm deep, 122 cm wide,
                     and 274 cm high, including the height of the table supporting the
                     display. Be sure students have the list of unacceptable display items
                     and the required display parameters at the time the projects are
                     assigned.
                     The Poster Session Preliminary judging sometimes includes a


                                                                                                Copyright © by Holt, Rinehart and Winston. All rights reserved.
                     “poster session” in which no electrical power is provided for the dis-
                     plays. The purpose of this session is to maintain the focus on the
                     creative and scientific aspects of the project and to decrease the
                     impact of a fancy display.

                     What to Look For
                     Positive Learning Many students do not feel like they can win
                     and therefore become discouraged about participating. Emphasize
                     healthy competition and a positive learning experience over simply
                     winning. Participating in a science fair allows a student the opportu-
                     nity to take charge of his or her own learning experience and to
                     explore something that interests him or her. To emphasize positive
                     learning, your evaluation can focus on the student’s use of the scien-
                     tific method and the amount of effort he or she put into the project
                     rather than the student’s ability to win a science fair.
                     Rubrics You may find that some students excel at developing a sci-
                     entifically sound experiment yet are not as talented at expressing
                     what they have learned. Others have good oral and written skills but
                     do not have a firm grasp of the scientific method. Since both the
                     development process and the clear expression of ideas are important
                     aspects of a competitive science project, it may be best to focus on

  10   HOLT SCIENCE AND TECHNOLOGY
Menu                                                                 Print
                                                                             these skills in separate evaluations. For this reason, you will find
                                                                             included in this guide one rubric that emphasizes the development


                                                                                                                                                        PART 1: RESOURCES FOR TEACHERS
                                                                             process and another that emphasizes the final report and display.
                                                                             You can use these together, or you may choose to develop your own
                                                                             rubric using the Create Your Own Rubric found on page 14.

                                                                                    Additional checklists and rubrics can be found on the One-
                                                                                    Stop Planner CD-ROM.

                                                                             Progress Reports
                                                                             Many students find it difficult to keep track of all of the tasks
                                                                             required in a project that lasts several weeks. To help you monitor
                                                                             student progress, you will find a Teacher’s Progress Report on
                                                                             pp. 15–16. You may choose to use this as a checklist to determine
                                                                             whether or not a student performed each assigned task on time.
                                                                             Student’s Progress Report Maintaining the Student’s Progress
                                                                             Report (pp. 35–36) may help your students better understand their          w
                                                                             responsibilities. The Student’s Progress Report lists the tasks required   w
                                                                             in each phase of the science project, giving students a better under-      w
                                                                             standing of what the judges may be looking for as well as what you
                                                                             expect of them. The Student’s Progress Report also can serve as a
                                                                             handy checklist to remind students what to do next.
                                                                             Parent’s Progress Report A Parent’s Progress Report is also
                                                                             included in Resources for Parents on pp. 65–66. Parents may find the
                                                                             progress reports useful if their child requires help with long-term
                                                                             organization and keeping track of responsibilities.
                                                                             Progress Reports and Evaluation You may wish to include the
                                                                             results of all three progress reports in the final evaluation. This
                                                                             approach will reward students who carefully planned their science
   Copyright © by Holt, Rinehart and Winston. All rights reserved.


                                                                             project and spent time developing each phase. Including the
                                                                             progress reports in your evaluation will discourage students from
                                                                             waiting until the weekend before the science fair to prepare the
                                                                             entire science project. However you choose to incorporate the
                                                                             progress reports into your evaluation, be sure to make both students
                                                                             and parents aware of the intended use of the progress reports.

                                                                             Group Projects
                                                                             You may choose to let your students work in groups. If this is the
                                                                             case, assign the groups before beginning Phase 1. For progress
                                                                             reports, you may still want to evaluate students on an individual
                                                                             basis. Making this clear at the beginning of the project may encour-
                                                                             age participation from students who tend to let the others do the
                                                                             work. Consult Holt Science & Technology Assessment Checklists &
                                                                             Rubrics for a sample teacher evaluation of a cooperative group
                                                                             activity.


                                                                                                                              SCIENCE FAIR GUIDE   11
Menu           Print
                         Science Project Development Rubric
  This rubric focuses on the development process (planning, research, and data collection)
  of a science project.

       Possible                             Use of Scientific Method
        points                                (40 points possible)

        40–31      Student designed an experiment with clear control and experimental
                   groups that effectively tested a hypothesis.

        30–21      Student designed an experiment with control and experimental groups that
                   adequately tested a hypothesis.

        20–11      Student designed an experiment with control and experimental groups that
                   were related indirectly to the hypothesis.

        10–1       Student designed an experiment that did not effectively test a hypothesis
                   and had inadequate control and experimental groups.

                               Thoroughness of Research and Data Collection
                                          (40 points possible)

        40–31      Student thoroughly researched topic, collected data with care and preci-
                   sion, recorded all observations and sources in a science project journal, and
                   achieved a high level of detail.

        30–21      Student researched topic well, collected data with care but lack of preci-
                   sion, recorded most observations and sources in a science project journal,
                   and achieved moderate detail.

        20–11      Student adequately researched topic, collected data imprecisely, made a


                                                                                                   Copyright © by Holt, Rinehart and Winston. All rights reserved.
                   fair attempt to record observations and sources in a science project journal,
                   and achieved average detail.

        10–1       Student poorly researched topic, collected data inappropriately, and made
                   a poor attempt to record observations and sources in a science project jour-
                   nal; research lacked detail.

                                Originality of Approach and Use of Equipment
                                              (20 points possible)

        20–16      Student adopted an original, resourceful, and novel approach and had
                   creative design and use of equipment.

        15–11      Student extended standard approach and use of equipment and exercised
                   moderate creativity.

        10–6       Student employed standard approach and use of equipment and exercised
                   little creativity.

         5–1       Student used equipment and topic in an ineffective and unimaginative way.


  12    HOLT SCIENCE AND TECHNOLOGY
Menu                                                                 Print
                                                                                             Science Project Presentation Rubric
                                                                     This rubric focuses on the final written report and display of a science project.


                                                                                                                                                                            PART 1: RESOURCES FOR TEACHERS
                                                                        Possible                        Understanding and Scientific Thought
                                                                         points                                 (40 points possible)

                                                                         40–31        Student completely understands the topic and uses scientific terminology
                                                                                      properly and effectively.

                                                                         30–21        Student demonstrates solid understanding of the topic and adequate use of
                                                                                      scientific terminology.

                                                                         20–11        Student displays insufficient understanding of the topic and uses very little
                                                                                      scientific terminology.

                                                                          10–1        Student lacks understanding of the topic and incorrectly uses scientific
                                                                                      terminology.
                                                                                                                                                                            w
                                                                                                         Quality of Oral/Written Presentation                               w
                                                                                                                 (32 points possible)                                       w
                                                                         32–25        Student exhibits an original, resourceful, and novel approach to presenta-
                                                                                      tion of topic; paper is creatively and clearly written.

                                                                         24–17        Student presents topic with standard approach; writing is unimaginative
                                                                                      but effectively gets point across.

                                                                          16–9        Student’s presentation of topic is incomplete and unimaginative; writing
                                                                                      lacks clarity.

                                                                           8–1        Student’s presentation of topic is ineffective and lacks cohesion; paper lacks
   Copyright © by Holt, Rinehart and Winston. All rights reserved.


                                                                                      clarity and is poorly written.

                                                                                                           Effectiveness of Exhibit or Display
                                                                                                                   (28 points possible)

                                                                         28–22        Layout is logical and imaginative and can be followed easily; student dis-
                                                                                      plays creative use of materials.

                                                                         21–15        Layout of exhibit is acceptable; student demonstrates proper use of materials.

                                                                          14–8        Layout lacks organization; student exhibits poor but effective use of materials.

                                                                           7–1        Layout is difficult to understand; student uses materials poorly and
                                                                                      ineffectively.


                                                                                                                                              SCIENCE FAIR GUIDE       13
Menu          Print
                              Create Your Own Rubric

       Possible
        points                             Criteria


                                                       Copyright © by Holt, Rinehart and Winston. All rights reserved.


  14    HOLT SCIENCE AND TECHNOLOGY
Menu                                                                 Print
                                                                     Name ____________________________________________________ Date __________________ Class _______________


                                                                                                    Teacher’s Progress Report
                                                                                              ❑ individual project            ❑ team member
                                                                     For each step of each phase of the science project, record the task due date and the date
                                                                     the student accomplished the task.

                                                                                                                                            Date              Date
                                                                       Phase 1—Generating an Idea                                           due           accomplished
                                                                       Student brainstormed five possible subjects.
                                                                       Student came up with two investigative questions for each
                                                                       topic.
                                                                       Student consulted with teacher and parents about project
                                                                       possibilities.
                                                                       Student chose a suitable topic.
                                                                       Student formed a hypothesis.
                                                                       Student discussed topic and hypothesis with teacher and
                                                                       gained approval.
                                                                       Student recorded ideas in science project journal.


                                                                                                                                            Date              Date
                                                                       Phase 2—Research and Planning                                        due           accomplished
                                                                       Student researched the hypothesis.
   Copyright © by Holt, Rinehart and Winston. All rights reserved.


                                                                       Student reconfirmed or changed the hypothesis based
                                                                       on further research and then gained teacher approval.
                                                                       Student contacted all appropriate people before
                                                                       beginning data collection.
                                                                       Student recorded all details of research so far in a
                                                                       bibliography in the science project journal.
                                                                       Student filled out the Procedural Plan for Action and
                                                                       obtained necessary signatures.
                                                                       Student developed the initial plan for display materials.

                                                                     Teacher comments:


                                                                                                                                                 SCIENCE FAIR GUIDE     15
Menu          Print
  Name ____________________________________________________ Date __________________ Class _______________


                                  Teacher’s Progress Report, continued


                                                                          Date             Date
    Phase 3—Data Collection and Analysis                                  due          accomplished
    Student conducted the experiment safely.
    Student chose an appropriate sample size.
    Student performed several trials of his or her experiment.
    Student collected data accurately.
    Student recorded all data and observations in the science
    project journal.
    Student graphed or charted data and looked for trends.
    Student prepared a written conclusion supported by the
    data.


                                                                          Date             Date
    Phase 4—Writing a Report                                              due          accomplished
    Student answered the questions on page 55.
    Student prepared an outline and discussed it with the
    teacher.
    Student prepared a draft and discussed it with the teacher.


                                                                                                            Copyright © by Holt, Rinehart and Winston. All rights reserved.
    Student revised the draft according to the teacher’s
    feedback.
    Student turned in the final draft of the written report.


                                                                          Date             Date
    Phase 5—Creating and Exhibiting a Display                             due          accomplished
    Student sketched possible designs for display.
    Student created a display board within the appropriate
    parameters.
    Student displayed the results in a clear and interesting
    manner.
    Student gave an oral presentation as practice for the
    science fair interview.


  16   HOLT SCIENCE AND TECHNOLOGY
Menu                                                                 Print
                                                                             Phase 1—Generating an Idea:
                                                                                     Management Tips


                                                                                                                                                        PART 1: RESOURCES FOR TEACHERS
                                                                               DURING    THIS PHASE, STUDENTS WILL

                                                                               1. brainstorm five possible subjects
                                                                               2. come up with two investigative questions per topic
                                                                               3. consult with teacher and parents about project possibilities
                                                                               4. choose a suitable topic and investigative question
                                                                               5. form a hypothesis
                                                                               6. discuss topic and hypothesis with the teacher and gain
                                                                                  approval
                                                                               7. record ideas in their science project journal
                                                                                                                                                        w
                                                                             Begin by distributing the Phase 1 packet to students and parents.          w
                                                                             Check the timeline and schedule library visits and individual meet-        w
                                                                             ings with students.


                                                                                   TIP
                                                                               Throughout the course of the project, and especially during the
                                                                               beginning stages, emphasize that one of the main goals of the
                                                                               project is to have fun. Healthy competition can be exciting,
                                                                               but the purpose of a science project is to learn about science
                                                                               through inquiry in a hands-on experiment.
   Copyright © by Holt, Rinehart and Winston. All rights reserved.


                                                                                      The Journal: An Important Tool Resources for Students
                                                                                      periodically reminds students to enter information in their
                                                                                      science project journals. Students will need their science
                                                                             project journals as soon as they begin Phase 1. They may use a spiral
                                                                             bound notebook, or they may choose to make a journal by stapling
                                                                             together ruled paper or graph paper.
                                                                                Explain to students that this journal is an important tool that they
                                                                             will use in every phase of the science project. For instance, they
                                                                             will write in their journal all of the notes that they take while brain-
                                                                             storming and researching. They will also record all data, observations,
                                                                             and calculations in their journals. This way all of the information
                                                                             needed for writing a report and preparing a display will be in one
                                                                             place. For group projects, every team member must keep a science
                                                                             project journal containing their notes and data.


                                                                                                                             SCIENCE FAIR GUIDE   17
Menu        Print
                    Brainstorming for Topics
                    Students often find that coming up with a suitable idea is the most
                    challenging part of a project. Encourage students to brainstorm and
                    to be creative. Trying to come up with new ideas can be difficult
                    and sometimes embarrassing for sensitive students. Make sure they
                    feel free to record any idea, no matter how odd it seems at first.
                    Familiarize yourself with the students’ packets to help them. If you
                    know of a subject that a student is particularly interested in, offer
                    ideas related to that topic.
                       Caution: Be careful not to take over the brainstorming process for stu-
                    dents. Avoid assigning topics. Unless a student finds something that
                    interests him or her, he or she may have a difficult time putting
                    forth the effort necessary to complete a project.
                    Suggesting Ideas For students who have trouble coming up with
                    science project topics, try the following:
                      • Provide your students with a list of projects that previous stu-
                        dents have successfully completed.
                      • You may also decide to list some projects that did not work out
                        as planned. Explain why the projects were unsuccessful (too
                        involved, too expensive, not enough time, etc.).
                      • Holt Science & Technology Long-Term Projects & Research Ideas con-
                        tains several ideas that may be developed into science projects.
                      • Resources for Students mentions several topics for science
                        projects.
                      • The Additional Resources section of this booklet also provides a
                        list of books with ideas for science projects (see pp. 28–29).

                    Forming Investigative Questions


                                                                                                 Copyright © by Holt, Rinehart and Winston. All rights reserved.
                    Require that all students generate at least two investigative questions
                    for each of five topics. If they have 10 investigative questions to
                    choose from, chances are good that they will be able to settle on a
                    viable investigative question.


                         TIP
                      The timelines and Resources for Students suggest a library trip
                      early in Phase 1, after a student has brainstormed for topics.
                      Before or during the scheduled library trips, brief students on
                      how to use library resources.

                    Strengthening Research Skills For students who require addi-
                    tional help with researching topics, use the following worksheets
                    from Holt Science & Technology Science Skills Worksheets:
                      • Worksheet 17: Organizing Your Research
                      • Worksheet 18: Finding Useful Sources
                      • Worksheet 19: Researching on the Web


 18   HOLT SCIENCE AND TECHNOLOGY
Menu                                                                 Print
                                                                             The Teacher-Student Meetings
                                                                             This is the best time to meet with students individually to ensure


                                                                                                                                                       PART 1: RESOURCES FOR TEACHERS
                                                                             that they are on the right track. Discuss their project options, and
                                                                             help them decide which investigative question they will choose.
                                                                             Steer them away from projects that would exceed a reasonable
                                                                             budget or projects that may risk disqualification. During the meet-
                                                                             ings, it would be helpful for you to have a copy of the science fair
                                                                             rules handy to point out problems that may make a particular proj-
                                                                             ect difficult. For example, many science fairs prohibit the display of
                                                                             chemicals. A student may be allowed to perform a supervised proce-
                                                                             dure with chemicals during the data collection phase of the project,
                                                                             but the rules prohibiting chemicals would limit the display.

                                                                             Forming a Hypothesis
                                                                             When students have chosen their topics, it is time for them to form
                                                                             a hypothesis. Having researched their topic thoroughly, students are
                                                                             now able to make an educated guess that answers their investigative
                                                                             question. Make sure students understand the scientific method.            w
                                                                             Emphasize that they will not design an experiment in order to yield       w
                                                                             results that support the hypothesis they have formed. Instead, they       w
                                                                             will design an experiment to test the hypothesis. There is often great
                                                                             pressure to be right about the hypothesis, but that is not the point of
                                                                             a science project. The purpose is to discover whether the hypothesis
                                                                             is supported or disproved by the experimental results. The quality of
                                                                             the project is independent of the accuracy of the hypothesis.

                                                                                  At the end of Phase 1, make sure you are still following the
                                                                             timeline. Check students’ progress on their Student’s Progress Report
                                                                             and Parent’s Progress Report.
   Copyright © by Holt, Rinehart and Winston. All rights reserved.


                                                                                                                            SCIENCE FAIR GUIDE   19
Menu       Print
                     Phase 2—Research and Planning:
                             Management Tips

                       DURING   THIS PHASE, STUDENTS WILL

                       1. research the hypothesis
                       2. change or reconfirm the hypothesis with the teacher
                       3. contact all appropriate people
                       4. record all research sources in their science project journal
                       5. fill out the Procedural Plan for Action and obtain signatures
                       6. develop the initial plan for display materials


                     Research
                     You may feel it is necessary to give students a further lesson on
                     Internet research or library research. The library may have a list of
                     useful sources that students can refer to while planning their experi-
                     ments. You may wish to meet with the librarian to discuss what the
                     students will be researching so that he or she can prepare for the
                     class visit. Also, Additional Resources (page 29) provides a list that
                     includes books about developing science projects. Remind students
                     to record all research in their science project journals.
                        Students may wish to obtain information using other methods,
                     such as seeking an interview with a scientist or writing a letter to a
                     company. Encourage students to contact all sources early in Phase 2
                     in order to allow plenty of time for a response. The student packet
                     includes a sample letter for students who wish to contact someone
                     about information needed for their science project.


                                                                                              Copyright © by Holt, Rinehart and Winston. All rights reserved.
                     Bibliography Make sure students are familiar with the style of
                     bibliography that you require. Resources for Students encourages stu-
                     dents to record all sources used, including interviews, in their sci-
                     ence project journals. Recording all sources during the research
                     phase will give students a head start on the bibliographies that they
                     will need for the written report and the display.

                     Procedural Plan
                     Students will plan how they are going to test their investigative
                     questions. Their packets include a brief discussion of control groups
                     versus experimental groups and dependent variables versus inde-
                     pendent variables. You may want to discuss these terms further in
                     class. Once each student has an idea of how to scientifically test
                     his or her hypothesis, you may require students to fill out the
                     Procedural Plan for Action (page 47) and the Task List (page 48).
                        Caution: Watch for projects that will require too much time, money,
                     or effort. Now is the time for the student to determine whether the
                     procedural plan for an experiment exceeds budget or time limits. At
                     this point, it would not be too late for a student to choose a differ-
                     ent topic. However, changing a project any later than this stage may
                     pose a problem in meeting the deadlines on the timeline.

  20   HOLT SCIENCE AND TECHNOLOGY
Menu                                                                 Print
                                                                                         Obtaining Equipment and Materials
                                                                                         Cutting Costs Remind students to keep cost and availability of


                                                                                                                                                                      PART 1: RESOURCES FOR TEACHERS
                                                                                         materials in mind when planning a project. Some ideas require more
                                                                                         resources than are available within a limited budget. Not all expen-
                                                                                         sive ideas need to be discarded. Encourage students to come up with
                                                                                         less expensive ways to conduct their experiment or ways to perform
                                                                                         a similar yet less costly experiment within the chosen topic. For
                                                                                         prices and availability of materials, provide students with a list of
                                                                                         local businesses that carry scientific and laboratory supplies (see
                                                                                         page 28).
                                                                                            After students have chosen a hypothesis and planned their proj-
                                                                                         ect, it is important to anticipate costs. When preparing a budget, a
                                                                                         student should consider the following expenses:
                                                                                           • Science fair entry fee
                                                                                           • Science fair travel expenses
                                                                                           • Library trips
                                                                                           • Book purchases                                                           w
                                                                                                                                                                      w
                                                                                           • Journal purchase                                                         w
                                                                                           • Materials necessary for experimentation
                                                                                           • Materials necessary for display
                                                                                         Creativity Counts Judges often take creative use of materials into
                                                                                         account when judging a science fair; a student who has built a
                                                                                         barometer will likely be recognized as more motivated than a stu-
                                                                                         dent who purchased one. In other words, high-dollar projects will
                                                                                         not be recognized as better just because they employ fancier equip-
                                                                                         ment. The library and Internet may provide resources with sugges-
                                                                                         tions on how to make equipment using inexpensive materials.
   Copyright © by Holt, Rinehart and Winston. All rights reserved.


                                                                                         Outside Sponsors Also, many businesses and institutions will lend
                                                                                         equipment to young scientists. Encourage your students to write
                                                                                         to such businesses for help in obtaining expensive equipment or
                                                                                         materials for their science projects. Be sure that the schedule allows
                                                                                         enough time for students to receive a response. (This approach to
                                                                                         procuring equipment works best with an 8-week timeline.)


                                                                                                        MONEY-RAISING IDEAS
                                                                      The following are a few ideas for raising funds to help defray science project expenses:
                                                                      • A local business may be willing to act as a monetary sponsor in exchange for an
                                                                        advertisement at the event or in the event program.
                                                                      • Schools participating in science fairs may hold raffles to raise money for projects.
                                                                      • Parents may be willing to donate materials (or time) to support the science fair.


                                                                                              At the end of Phase 2, make sure you are still following the
                                                                                         timeline. Check students’ progress on their Student’s Progress Report
                                                                                         and Parent’s Progress Report.


                                                                                                                                          SCIENCE FAIR GUIDE     21
Menu       Print
                     Phase 3—Data Collection and Analysis:
                             Management Tips

                       DURING   THIS PHASE, STUDENTS WILL

                       1. conduct experiments safely
                       2. choose an appropriate sample size
                       3. perform several trials of the experiment
                       4. collect data accurately
                       5. record all data and observations in their science project
                          journal
                       6. graph or chart the data and look for trends
                       7. prepare a written conclusion supported by the data


                     Safety First! Safety is of particular concern during the data collec-
                     tion phase. The timelines allow one class period for a brief review of
                     safety before students begin collecting data. The in-class data collec-
                     tion days give you a chance to supervise safety. Remind students to
                     have an adult supervise all data collection at home.

                     In-Class Data Collection
                     The following tips may be helpful during in-class data collection:
                       • Take a moment in class to review the difference between quali-
                         tative data and quantitative data. Go over with your students
                         the kinds of projects that call for each type of data.
                       • Make sure that students understand the importance of using an


                                                                                               Copyright © by Holt, Rinehart and Winston. All rights reserved.
                         adequate sample size, as discussed in Resources for Students on
                         page 50.
                       • Explain that in order for data to be valid, a researcher must per-
                         form several trials of an experiment.
                       • Watch to see that students measure accurately. (You may choose
                         to distribute the SI Unit Conversion Chart on page 30.)
                       • Check students’ science project journals to make sure that they
                         keep a neat record of all aspects of the project.
                       • If a student’s project does not lend itself to collecting data in
                         class, ask the student to bring in a book he or she is reading for
                         continued research so that class time will be used effectively.
                       • Students who have collected all the data they need can use the
                         in-class data collection days to work on analyzing the data.


  22   HOLT SCIENCE AND TECHNOLOGY
Menu                                                                 Print
                                                                             Strengthening Data Collection Skills For students who require
                                                                             additional help with data collection, use the following worksheets
                                                                             from Holt Science & Technology Science Skills Worksheets:


                                                                                                                                                        PART 1: RESOURCES FOR TEACHERS
                                                                               • Worksheet 14: Using the International System of Units (SI)
                                                                               • Worksheet 15: Measuring
                                                                               • Worksheet 23: Science Drawing

                                                                             Analysis and Conclusions
                                                                             Analysis When students have finished collecting data and making
                                                                             observations, they can begin the analysis. As part of the analysis, stu-
                                                                             dents will make charts and graphs in their science project journals.
                                                                             Page 54 includes a sheet of graph paper that can be used for graph-
                                                                             ing purposes. Resources for Students discusses graphing, which you
                                                                             may want to review in class, along with a brief lesson on useful
                                                                             mathematical terms, such as median and mean. Instruct students to
                                                                             examine the charts and graphs for trends and record these trends
                                                                             and all calculations in their journal.                                     w
                                                                                                                                                        w
                                                                             Strengthening Graphing and Analysis Skills For students                    w
                                                                             who require additional help with graphing and analysis, use the fol-
                                                                             lowing worksheets from Holt Science & Technology Science Skills
                                                                             Worksheets:
                                                                               • Worksheet 25: Introduction to Graphs
                                                                               • Worksheet 26: Grasping Graphing
                                                                               • Worksheet 27: Interpreting Your Data
                                                                               • Worksheet 28: Recognizing Bias in Graphs
                                                                               • Worksheet 29: Making Data Meaningful
   Copyright © by Holt, Rinehart and Winston. All rights reserved.


                                                                             Conclusions In the conclusion, students will determine whether
                                                                             the results support or disprove the hypothesis. Discourage students
                                                                             from simply writing opinions in the conclusion. Instead have stu-
                                                                             dents discuss factors that contributed to the results and explain how
                                                                             they would control these factors if the experiment were performed
                                                                             again.

                                                                                  At the end of Phase 3, make sure you are still following the
                                                                             timeline. Check students’ progress on their Student’s Progress Report
                                                                             and Parent’s Progress Report.


                                                                                                                             SCIENCE FAIR GUIDE   23
Menu       Print
                     Phase 4—Writing a Report: Management
                             Tips

                        DURING   THIS PHASE, STUDENTS WILL

                        1. answer the questions on page 55
                        2. prepare an outline and discuss it with the teacher
                        3. prepare a draft and discuss it with the teacher
                        4. revise the draft according to the teacher’s feedback
                        5. turn in a completed draft


                     Assigning a Written Report If the science fair you are entering
                     requires a written report, you will need to share the particulars (how
                     long it should be, whether it must be typed, etc.) with your students
                     and their parents. Not all science fairs require a written report, but a
                     paper gives students the chance to express what about the project
                     meant the most to them and to organize their thoughts for an oral
                     presentation. It is also a very important part of any scientific
                     endeavor.
                     Having Fun Have your students use the italicized questions on
                     page 55 of Resources for Students as a guideline for writing their
                     reports. By asking students to answer questions about their personal
                     experiences with the emphasis on what they enjoyed about doing a
                     science project, you can reinforce that the science fair can be fun.
                     The more fun they have writing the report, the easier it will be to
                     complete and the more interesting it will be to read.

                     Writing Tips


                                                                                                Copyright © by Holt, Rinehart and Winston. All rights reserved.
                     Use the following tips to help students with writing:
                       • Require students to first write an outline for the written report.
                         You may need to review the outlining process in class.
                       • Explain how index cards that are grouped together by subject
                         can be helpful in writing a paper.
                       • Written reports can greatly improve when students write
                         more than one draft. You may wish to add more drafts to
                         the timeline.

                     Strengthening Writing Skills For students who require addi-
                     tional help with science writing, use Worksheet 22: Science Writing
                     from Holt Science & Technology Science Skills Worksheets.


  24   HOLT SCIENCE AND TECHNOLOGY
Menu                                                                 Print
                                                                             Feedback and Assessment
                                                                             Giving feedback to a student need not be difficult. The following tips


                                                                                                                                                      PART 1: RESOURCES FOR TEACHERS
                                                                             may help:
                                                                               • Try to mention both the strong and weak points of a draft.
                                                                               • Encourage students to do several drafts, if needed, and to ask an
                                                                                 adult to read each one.
                                                                               • Peer editing may be helpful and will give students a chance to
                                                                                 see how their friends are handling similar problems.
                                                                               • When assessing a written report, be aware that students’ differ-
                                                                                 ent writing abilities can affect the overall quality of presenta-
                                                                                 tion. Try not to let that overshadow the quality of the scientific
                                                                                 content.

                                                                                  At the end of Phase 4, make sure you are still following the
                                                                             timeline. Check students’ progress on their Student’s Progress Report
                                                                             and Parent’s Progress Report.                                            w
                                                                                                                                                      w
                                                                                                                                                      w
   Copyright © by Holt, Rinehart and Winston. All rights reserved.


                                                                                                                            SCIENCE FAIR GUIDE   25
Menu       Print
                     Phase 5—Creating and Exhibiting a
                             Display: Management Tips

                       DURING   THIS PHASE, STUDENTS WILL

                       1. sketch possible designs for the display
                       2. create a display board within the appropriate parameters
                       3. display results in a clear and interesting manner
                       4. give an oral presentation as practice for the science fair
                          interview


                     The Display Board
                     A typical display is a trifold board made from corrugated cardboard,
                     foam core, or corkboard. Impress upon students the importance of
                     measuring the display board more than once to ensure that it fits the
                     size constraints of the science fair. Many science fairs require that
                     the display be no more than 274 cm tall, 122 cm wide, and 76 cm
                     deep. Having an oversized display can disqualify the entire project,
                     no matter the quality of the work. Be aware that certain materials are
                     often prohibited in the display area.
                     A Sample Display You may want to set up a successful sample dis-
                     play in your classroom. Students can study the sample display up
                     close, noticing the neatness of the lettering, the layout of the dis-
                     play, and the type of information contained in each section. Show
                     students how a display board can have a large middle section and
                     two smaller “wings” on the left and right that can fold up, making a
                     display more portable.


                                                                                              Copyright © by Holt, Rinehart and Winston. All rights reserved.
                     Is the Data Clearly Presented and Relevant?
                     You may decide to have conferences with students about the data
                     that they plan to present. Check charts and graphs for accuracy and
                     readability. Make sure that the information shown in the figures is
                     relevant to the purpose, hypothesis, and conclusion. The purpose of
                     a display is to present the information in the clearest manner possi-
                     ble so that the judges will be able to recognize quickly that the stu-
                     dent performed a successful science project.
                     Display Design Although the display introduces the project, the
                     design should not distract from the content. Encourage students to
                     be creative with borders, font, and layout but not to the point that a
                     judge would find it difficult to read the information contained in
                     the display. Illustrations should be informative, not just decorative.
                     A sleek, mature, and professional style can impress the judges, but
                     they prefer presentations which are unique and are clearly a product
                     of the student who created it.


  26   HOLT SCIENCE AND TECHNOLOGY
Menu                                                                 Print
                                                                             Preparing for the Interview
                                                                             Many science fairs require that a student give a presentation about


                                                                                                                                                        PART 1: RESOURCES FOR TEACHERS
                                                                             his or her project to the judges. The presentation summarizes each
                                                                             step of the science project: why the student chose his or her subject,
                                                                             a statement of the hypothesis, what kind of data was collected, a
                                                                             brief summary of the data, and the conclusions that the student
                                                                             came to when he or she analyzed the data. Students can also discuss
                                                                             how they would do the experiment differently if they were to start
                                                                             over again or what other questions arose during their research.
                                                                             A Captive Audience If the science fair your students are entering
                                                                             requires an interview, it is in your students’ best interest to practice
                                                                             the presentations at least once before the science fair. Requiring an
                                                                             oral presentation in front of the class can be beneficial to all stu-
                                                                             dents. It will give them an opportunity to practice speaking in front
                                                                             of a group and to determine the most effective presentation styles by
                                                                             watching each other. An oral presentation will give you an opportu-
                                                                             nity to evaluate what students have done, as well as give personal
                                                                             feedback that will be very helpful during the interview with the           w
                                                                             judges.                                                                    w
                                                                                During the interview, the judges will likely ask students a few         w
                                                                             questions. To prepare your students for this, ask questions during
                                                                             their oral presentation to the class. Encourage other students to ask
                                                                             questions as well. Also, suggest that they make a list of possible ques-
                                                                             tions the judges could ask and possible answers to those questions.
                                                                             Practice, and Practice Again Some students dread the interview
                                                                             part of the science fair. The more practice a student gets for the
                                                                             interview, the more comfortable he or she will be speaking to the
                                                                             judges. Encourage students to practice as often as possible and in
                                                                             front of as many people as possible. For instance, students may want
                                                                             to practice by giving their presentation to family members at home.
   Copyright © by Holt, Rinehart and Winston. All rights reserved.


                                                                             Remind them to relax and have fun.

                                                                                  At the end of Phase 5, make sure you are still following the
                                                                             timeline. Check students’ progress on their Student’s Progress Report
                                                                             and Parent’s Progress Report.

                                                                             Additional Resources
                                                                             On the next few pages, you will find resources that may be helpful
                                                                             in the science fair process. Included are:
                                                                               • a list of suppliers of scientific laboratory equipment
                                                                               • the address and phone number of Science Service, a company
                                                                                 that supports and regulates science fair administration
                                                                               • a bibliography of books that can help students choose, design,
                                                                                 and complete a science project
                                                                               • a standard SI unit conversion chart to help students learn to
                                                                                 work in the SI system


                                                                                                                             SCIENCE FAIR GUIDE   27
Menu        Print
                    Additional Resources
                    The following list is a compilation of resources for students and
                    teachers.

                    Equipment Suppliers
                    The following is a list of a few scientific supply companies that spe-
                    cialize in laboratory equipment:
                    Carolina Biological Supply Co.
                    2600 York Road
                    Burlington, NC 27215
                    (800) 334-5551
                    www.carolina.com
                    Science Kit and Boreal Labs
                    777 East Park Drive
                    Tonawanda, NY 14150
                    (800) 828-7777
                    www.sciencekit.com
                    WARD’s Natural Science Establishment, Inc.
                    5100 W. Henrietta Rd.
                    Rochester, NY 14586
                    (800) 962-2660
                    www.wardsci.com

                    Science Fair Administration
                    Science Service, Inc.
                    1719 N Street, NW
                    Washington, DC 20036
                    (202) 785-2255


                                                                                             Copyright © by Holt, Rinehart and Winston. All rights reserved.
                    www.sciserv.org


 28   HOLT SCIENCE AND TECHNOLOGY
Menu                                                                 Print
                                                                             Books
                                                                             Beller, Joel. So You Want to Do a Science Project! Paramus, N.J.: Prentice


                                                                                                                                                          PART 1: RESOURCES FOR TEACHERS
                                                                               Hall, 1984.
                                                                             Bochinski, Julianne. The Complete Handbook of Science Fair Projects.
                                                                               New York: John Wiley & Sons, 1996.
                                                                             Bombaugh, Ruth. Science Fair Success. Berkeley Heights, N.J.: Enslow
                                                                               Publishers, 1990.
                                                                             Bonnet, Robert and Daniel Keen. Botany: 49 Science Fair Projects. New
                                                                               York: McGraw-Hill, 1989.
                                                                             Bonnet, Robert and Daniel Keen. Earth Science: 49 Science Fair Projects.
                                                                               New York: McGraw-Hill, 1990.
                                                                             Brisk, Marion. 1001 Ideas for Science Projects. New York: Macmillan,
                                                                               1992.
                                                                             Cook, James. The Thomas Edison Book of Easy and Incredible
                                                                               Experiments. New York: John Wiley & Sons, 1988.
                                                                                                                                                          w
                                                                             Iritz, Maxine. Science Fair: Developing a Successful and Fun Project. New    w
                                                                                York: McGraw-Hill, 1987.                                                  w
                                                                             Mandell, Muriel. Simple Science Experiments with Everyday Materials.
                                                                              New York: Sterling Publishing, 1989.
                                                                             Tant, Carl. Projects: Making Hands-On Science Easy. Angleton, Texas:
                                                                               Biotech Publishing, 1992.
                                                                             Tocci, Salvatore. How to Do a Science Fair Project. Danbury, Conn.:
                                                                               Franklin Watts, 1989.
                                                                             Wolfe, Connie. Search: A Research Guide for Science Fairs and
                                                                              Independent Study. Tucson, Ariz.: Zephyr Press, 1988.
                                                                             Wood, Robert. Physics for Kids: 49 Easy Experiments with Heat. Blue
   Copyright © by Holt, Rinehart and Winston. All rights reserved.


                                                                              Ridge Summit, Penn.: TAB Books, 1990.


                                                                                                                               SCIENCE FAIR GUIDE   29
30
                                                                                                   SI Unit Conversion Chart
                                                                                                                                                                              Menu


                              Length                                              1   inch                  =   2.54 centimeters    1   centimeter   =   0.39   inch
                                                                                  1   foot                  =   30.48 centimeters   1   centimeter   =   0.03   foot
                                                                                  1   foot                  =   0.30 meter          1   meter        =   3.28   feet
                                                                                  1   yard                  =   0.91 meter          1   meter        =   1.09   yards
                                                                                  1   mile                  =   1.61 kilometers     1   kilometer    =   0.62   mile
                                                                                                                                                                              Print


                              Mass                                                1 ounce                   =   28.35 grams         1 gram           =   0.35 ounce
                                                                                  1 pound                   =   0.45 kilogram       1 kilogram       =   2.20 pounds


                              Volume                                              1   teaspoon              =   4.93 milliliters    1   milliliter   =   0.20   teaspoon


HOLT SCIENCE AND TECHNOLOGY
                                                                                  1   tablespoon            =   14.79 millilters    1   milliliter   =   0.07   tablespoon
                                                                                  1   fluid ounce           =   29.57 milliliters   1   milliliter   =   0.03   fluid ounce
                                                                                  1   cup                   =   0.24 liter          1   liter        =   4.23   cups
                                                                                  1   pint                  =   0.47 liter          1   liter        =   2.11   pints
                                                                                  1   quart                 =   0.95 liter          1   liter        =   1.06   quarts
                                                                                  1   gallon                =   3.79 liters         1   liter        =   0.26   gallon


                              Freezing point of water                             32°F                      =   0°C


                              Boiling point of water                              212°F                     =   100°C

                                                                                                    5
                              To convert °F to °C                                                   ᎏᎏ
                                                                                  (°F – 32) ϫ       9


                                                                                          9
                              To convert °C to °F                                         ᎏᎏ
                                                                                  °C ϫ    5    ϩ 32


                                              Copyright © by Holt, Rinehart and Winston. All rights reserved.
Menu

                     Copyright © by Holt, Rinehart and Winston. All rights reserved.
                                                                                                           Print


                                                                                       PART 2: RESOURCES
                                                                                        FOR
                                                                                       STUDENTS


SCIENCE FAIR GUIDE
31
                                                                       PART 2: RESOURCES FOR STUDENTS
                                                          w
                                                          w
                                                          w
Menu         Print
                     What Is a Science Project?
                     Scientists all over the world make new discoveries by using the scien-
                     tific method. Now, you can join their ranks! A science project is your
                     chance to choose a subject of interest to you and study it in the
                     exact same way that a professional scientific researcher would.
                        You may choose to study a topic such as how lighting affects
                     plants or how much of the air is oxygen. Whatever you choose to
                     do, the worksheets on pp. 35–60 will lead you through each step of
                     the scientific method and through each phase of the project. The
                     worksheets will even help you choose your subject if you can’t
                     decide what to do. So, don’t worry! The project is entirely yours.
                     Your parents and teachers will be around to help you if you need it.
                     You’ll also have plenty of tools such as timelines and progress
                     reports to help keep you on track.
                     Explore Your World The whole point of a science fair is to give
                     you a chance to explore on your own. Exploration can be a lot of
                     fun. Instead of reading about composting in a book, you can do
                     experiments comparing store-bought fertilizer to compost that you
                     have made. You may try to figure out what weather patterns would
                     be like if the Earth were square. Or, you can discover what types of
                     plants attract butterflies. Maybe you’ll build a machine to test the
                     difference between old golf balls and new golf balls. The fact is that
                     your science project presents your creative solution to a question or
                     problem. So good luck, and have a blast!


                                       THE SCIENTIFIC METHOD
                                       The steps of the scientific method that you’ll be
                                       using appear below. Each step is explained in
                                       Phases 1–5 of this packet.*


                                                                                              Copyright © by Holt, Rinehart and Winston. All rights reserved.
                       Purpose:        developing an investigative question
                       Hypothesis: making an educated guess about the answer to
                                   the investigative question based on research
                       Experiment: testing the hypothesis, collecting data, and
                                   making observations
                       Analysis:       organizing data from the research and experi-
                                       mentation and looking for patterns
                       Conclusion: determining if the hypothesis is supported or
                                   disproved by the experimental results
                       Communicating the Results: sharing the conclusion with
                                                  others
                       *In Chapter 1 of your textbook, these steps are called Ask a
                       Question, Form a Hypothesis, Test the Hypothesis, Analyze the
                       Results, Draw Conclusions, and Communicate Results.


 32    HOLT SCIENCE AND TECHNOLOGY
Menu                                                                Print
                                                                            Safety Guide
                                                                            Science is a lot of fun, and you’ll have the most fun if you avoid
                                                                            accidents. Some simple precautions can go a long way to ensure the
                                                                            safe and successful completion of your project.
                                                                               The major causes of laboratory accidents are carelessness, lack of
                                                                            attention, and inappropriate behavior. Following the safety guide-
                                                                            lines below will greatly reduce your chances of having an accident.
                                                                            While you are working on a science experiment at home, even a
                                                                            minor accident can cause serious injuries, so be very careful.
                                                                              • Know the locations of the fire extinguisher, telephone, and first-
                                                                                aid kit in the event of an emergency.
                                                                              • Always have an adult (parent or teacher) supervising the data
                                                                                collection phase of your science experiment.
                                                                              • Wear safety goggles and tie back loose hair and clothing when
                                                                                working with any chemical, flame, or heating device.
                                                                              • Wear an apron and gloves when using acids
                                                                                and bases.


                                                                                                                                                      PART 2: RESOURCES FOR STUDENTS
                                                                              • Never smell or taste a chemical unless instructed to do so by
                                                                                your teacher.
                                                                              • Never use an electrical device with a frayed cord. Never use an
                                                                                electrical appliance with wet hands or with water nearby.
                                                                              • Never eat any part of a plant used in an experiment.
                                                                              • Whenever possible, use plastic test tubes, beakers, and flasks.
                                                                                Check all glassware for chips and cracks. Glass containers used
                                                                                for heating should be made of heat-resistant glass.
                                                                              • Whenever possible, use a hot plate rather than an open flame or
                                                                                burner. Make sure to turn off and unplug a heating device when
  Copyright © by Holt, Rinehart and Winston. All rights reserved.


                                                                                you are through with it.
                                                                              • Check with your state board of education before experimenting
                                                                                with and exhibiting animals. Permits and/or veterinarian super-
                                                                                                                                                      w
                                                                                vision may be required. Also, wash your hands with hot water          w
                                                                                and soap after touching any animal.                                   w
                                                                              • Always exercise extreme caution when using a sharp object in
                                                                                the lab. Never cut an object while holding it in your hand—
                                                                                always use an appropriate work surface.
                                                                              • Students and adults should wear ultraviolet safety goggles dur-
                                                                                ing operation of UV light.
                                                                              • Do not use cultures from any warm-blooded animal.
                                                                              • If you are planning on using X rays, cathode ray tubes, or radioac-
                                                                                tive substances, you must get information on federal guidelines
                                                                                for their use. Consult the Consumer Affairs Office of the Center
                                                                                for Devices and Radiological Health, a division of the Department
                                                                                of Health and Human Services.
                                                                              • Many states require registration of lasers. Check with the state
                                                                                board of education for tips on how to register.
                                                                              • Discuss the safety of your materials with your teacher or another
                                                                                scientist.

                                                                                                                           SCIENCE FAIR GUIDE   33
Menu       Print
                                    Safety Contract

        I, ___________________________, hereby certify that on this day of

        _____________________, I have successfully completed a review of

        safety procedures for a science project. I agree to follow the

        safety guidelines listed below, and I will take every necessary

        precaution to operate safely throughout my experiment.

        • I will follow the safety guidelines of my teacher and my school.

        • I will keep my work area neat and free of unnecessary papers, books, and
          materials. I will keep my clothing and hair neat and out of the way, and I
          will wear a safety apron and/or gloves if necessary.

        • I know the location of all safety equipment (such as the fire extinguisher
          and first-aid kit) and the nearest telephone.

        • I will wear safety goggles when handling chemicals, working with a flame,
          or performing any other activity that may cause harm to my eyes.

        • I will not use chemicals, heat, electricity, or sharp objects until my teacher
          or parent instructs me to do so, and I will follow the adult’s instructions
          carefully.

        • I will be especially careful when using glassware. Before heating glassware,
          I will make sure that it is made of heat-resistant material, and I will never
          use cracked or chipped glassware.


                                                                                           Copyright © by Holt, Rinehart and Winston. All rights reserved.
        • I will wash my hands immediately after handling hazardous materials.
          I will clean up all work areas before I leave the laboratory, put away all
          equipment and supplies, and turn off all water faucets, gas outlets, burn-
          ers, and electric hot plates.


        I understand and agree to the above and all other safety
        precautions presented to me in class. I am hereby ready to
        undertake my science project with safety from this day
        forward.


                                       Student’s signature


              Teacher’s signature                        Parent’s/guardian’s signature


  34   HOLT SCIENCE AND TECHNOLOGY
Menu                                                                 Print
                                                                     Name ____________________________________________________ Date __________________ Class _______________

                                                                                                    Student’s Progress Report
                                                                     For each step of each phase of the science project, mark the date it is due and the date
                                                                     you completed your work. Reward yourself for your hard work!

                                                                                                                                             Date             Date
                                                                        Phase 1—Generating an Idea                                           due          accomplished
                                                                        I brainstormed five possible topics.
                                                                        I came up with two investigative questions for each topic.
                                                                        I consulted with my teacher and parents about project
                                                                        possibilities.
                                                                        I chose a suitable topic.
                                                                        I formed a hypothesis.
                                                                        I discussed topic and hypothesis with my teacher and
                                                                        gained approval.
                                                                        I recorded ideas in my science project journal.


                                                                     HOORAY! You’ve completed Phase 1—now you’re on your way!

                                                                                                                                             Date             Date
                                                                       Phase 2—Researching and Planning                                      due          accomplished
                                                                       I researched my hypothesis.
                                                                       I reconfirmed or changed my hypothesis based on further
                                                                       research and then gained teacher approval.
   Copyright © by Holt, Rinehart and Winston. All rights reserved.


                                                                       I contacted all appropriate people before beginning data
                                                                       collection.
                                                                       I recorded all details of research so far in a bibliography in
                                                                       my science project journal.
                                                                       I filled out the Procedural Plan for Action and obtained
                                                                       necessary signatures.
                                                                       I developed the initial plan for display materials.


                                                                     WAY TO GO! You’ve completed Phase 2—give yourself a pat on the back!
                                                                     Comments:


                                                                                                                                                 SCIENCE FAIR GUIDE     35
Menu         Print
  Name ____________________________________________________ Date __________________ Class _______________


                                   Student’s Progress Report, continued


                                                                          Date            Date
    Phase 3—Data Collection and Analysis                                  due         accomplished
    I conducted the experiment safely.
    I chose an appropriate sample size.
    I performed several trials of my experiment.
    I collected data accurately.
    I recorded all data and observations in my science
    project journal.
    I graphed or charted data and looked for trends.
    I prepared a written conclusion supported by the data.


  ALL RIGHT! You’ve completed Phase 3—you’re halfway there!

                                                                          Date            Date
    Phase 4—Writing a Report                                              due         accomplished
    I answered the questions on page 55.
    I prepared an outline and discussed it with my teacher.
    I prepared a draft and discussed it with my teacher.


                                                                                                            Copyright © by Holt, Rinehart and Winston. All rights reserved.
    I revised the draft according to my teacher’s feedback.
    I turned in the final draft of my written report.


  FANTASTIC! You’ve completed Phase 4—you’re almost done!

                                                                          Date            Date
    Phase 5—Creating and Exhibiting a Display                             due         accomplished
    I sketched possible designs for my display.
    I created a display board within the appropriate
    parameters.
    I displayed the results in a clear and interesting manner.
    I gave an oral presentation as practice for the science
    fair interview.


  CONGRATULATIONS! You’ve completed your science project!


  36    HOLT SCIENCE AND TECHNOLOGY
Menu                                                                 Print
                                                                             Phase 1—Generating an Idea: Science
                                                                                     Fair Success

                                                                               DURING   THIS PHASE, YOU WILL

                                                                               1. brainstorm five possible subjects
                                                                               2. come up with two investigative questions per topic
                                                                               3. consult with your teacher and parents about project
                                                                                  possibilities
                                                                               4. choose a suitable topic and investigative question
                                                                               5. form a hypothesis
                                                                               6. discuss topic and hypothesis with your teacher and gain
                                                                                  approval
                                                                               7. record ideas in your science project journal


                                                                                                                                                        PART 2: RESOURCES FOR STUDENTS
                                                                             Remember to update your Student’s Progress Report as you go along.
                                                                             You will have until               to finish Phase 1.
                                                                                       Your Journal: The Most Important Tool You’ll Use
                                                                                       The first thing you’ll need to do is sit down with your sci-
                                                                                       ence project journal and brainstorm a list of possible science
                                                                             project topics. Keep all notes that you take and data that you collect
                                                                             in this journal. The point of having a science project journal is sim-
                                                                             ple: if you write everything down in one place, you’ll know where
                                                                             all of your information is during the entire project. It will also be
                                                                             much easier for you to show your progress to your teacher and par-
                                                                             ents. Because all of your project information will be in your journal,
                                                                             be sure to keep it in a safe place.
   Copyright © by Holt, Rinehart and Winston. All rights reserved.


                                                                             Brainstorming for Topics
                                                                                                                                                        w
                                                                             Here’s where it all begins. By following the steps outlined in this sec-
                                                                                                                                                        w
                                                                             tion, you will take a general idea and narrow it down into a working       w
                                                                             science project. You will start with a general topic, choose a specific
                                                                             research question, and then develop the hypothesis that your experi-
                                                                             ment will test.


                                                                                                                             SCIENCE FAIR GUIDE   37
Menu       Print
                     Ideas Galore! Brainstorming means coming up with as many inter-
                     esting ideas as possible and writing them down in a list. Don’t worry
                     about how your ideas sound or whether you will actually pursue
                     each topic. The important thing at this stage is to come up with a lot
                     of ideas to choose from. The more ideas you have, the more likely it
                     is that you will find one that is interesting and one that you’ll enjoy
                     working on for the entire length of the project.
                     Make It Fun Since you’ll be spending weeks or months preparing
                     for the science fair, you really want to be sure that you have a true
                     interest in finding out about your topic. Even though all of what
                     you learn in school is worthwhile, most of the topics have been cho-
                     sen by someone else. Take full advantage of the chance to choose
                     something you’re really interested in for your science project.

                     Getting Started
                     Find Out More To begin the brainstorming process, think about
                     scientific topics you’ve always wanted to know more about. Maybe
                     you’ve always been interested in the way mirrors work or the way
                     light waves travel. Have you been on a field trip recently that
                     sparked your interest or brought up some interesting questions? Now
                     is your chance to find out more about your favorite science topics.

                                             •   strength of arches vs. beams
                                             •   prisms
                                             •   plants: cross pollination
                                             •   bacteria in the kitchen
                                             •   oil spills in an ecosystem


                                                                                               Copyright © by Holt, Rinehart and Winston. All rights reserved.
                     Solve a Mystery Another way to begin is to make a list of things
                     that have mystified you. What makes a microwave oven cook some
                     foods more quickly than a conventional oven? How do ants know to
                     travel in a single line? Why are some bicycles faster than others? If
                     the idea involves a mystery, chances are good that it would make an
                     excellent topic for a science project.


  38   HOLT SCIENCE AND TECHNOLOGY
Menu                                                                 Print
                                                                             The Library: Where the Topics Are Many kids get ideas from
                                                                             library books or even from the Internet. If you start researching early
                                                                             on in the process, you can get an idea of how much information has
                                                                             been written about your topic. Even though your goal is to design
                                                                             your own experiment, you’re still going to have to research the
                                                                             topic. You will want to get some background information and deter-
                                                                             mine how to go about testing your hypothesis. So don’t be afraid of
                                                                             research. In the long run, it will actually make your project much
                                                                             easier for you.


                                                                                   TIP
                                                                               An adult can help you think of an idea, but it is very important
                                                                               that your science project is clearly your own. At the science fair,
                                                                               your work will be compared only with that of other students
                                                                               close to your age.

                                                                                       From the list of topics that you brainstormed, choose five


                                                                                                                                                          PART 2: RESOURCES FOR STUDENTS
                                                                                       subjects that interest you most. Not all of these subjects
                                                                                       have to be developed into an experiment; this is just a list
                                                                             of ideas of things that you may like to learn more about.

                                                                             Investigative Question
                                                                             When you’ve chosen five possible topics, you’ll want to figure out
                                                                             what you want to know about each topic. Your investigative ques-
                                                                             tion is what you intend to find out during the course of your experi-
                                                                             ment. Using the topics you brainstormed earlier, you will choose a
                                                                             related question that your experiment will answer.
                                                                             The Search Continues At the library, start by searching through
                                                                             the card catalog. (If you need help, ask your teacher or librarian. The
   Copyright © by Holt, Rinehart and Winston. All rights reserved.


                                                                             faster you understand how to use the library’s resources, the easier
                                                                             your research will be.) Look up key words from the subject that you
                                                                             are interested in. Looking up “oil spills” in the card catalog or            w
                                                                             Reader’s Guide to Periodical Literature will lead you to a number of arti-   w
                                                                             cles. If you have Internet access, you could try a search on “oil            w
                                                                             spills.” You may include the word “penguin” in your search to find
                                                                             articles about how oil spills have affected penguins.


                                                                                                                              SCIENCE FAIR GUIDE    39
Menu       Print
                              While you’re at the library, try to think of two investigative
                              questions that go with each topic you brainstormed. Record
                              these ideas in your science project journal.
                     Here’s an Example Let’s say you decide to pursue the topic oil
                     spills. You probably already know that large amounts of oil spilled
                     into water can hurt the animals in an environment, but you want to
                     know more. Maybe you want to know how an oil spill would affect a
                     penguin’s life span. Two investigative questions for this topic would
                     be “How does oil in the water affect a marine ecosystem?” and “How
                     do oil spills affect the life span of penguins?”
                     Choosing the Best Investigative Question The question “How
                     does oil in the water affect a marine ecosystem?” is too broad to
                     study in a short-term science experiment. Now consider the next
                     question: “How do oil spills affect the life span of penguins?” The
                     chances that you’ll be able to do tests using penguins are very slim.
                     You’ll have to think of experiments that use resources available to you.
                        You don’t have to throw out the topic if a particular experiment is
                     not workable. Instead, think of a different testable question related
                     to the same topic. For instance, you may want to learn more about
                     how the ecosystem or food web of an area is affected when a large
                     quantity of oil is introduced. This food web probably includes plant
                     matter. Therefore, “How does oil affect plants?” is an example of a
                     reasonable investigative question that you can test.


                                           •   strength of arches vs. beams
                                           •   prisms
                                           •   plants: cross pollination
                                           •   bacteria in the kitchen
                                           •   oil spills in an ecosystem
                                               • How does oil affect a
                                                  penguin's life span?


                                                                                                Copyright © by Holt, Rinehart and Winston. All rights reserved.
                                               • How does oil affect plants?


                     Consult with Your Teacher
                     Now you have ten investigative questions, two for each of five top-
                     ics. It will become very clear that some of the possible experiments
                     you are interested in would be too involved to do in a science proj-
                     ect that lasts only 6 or 8 weeks. Or, you may be able to think of a
                     way to do an experiment but realize that the materials you would
                     want to use would be too expensive. At this stage, you’ll have a con-
                     ference with your teacher about the investigative questions that you
                     have. He or she will help you settle on one investigative question to
                     use for your science project.


  40   HOLT SCIENCE AND TECHNOLOGY
Menu                                                                 Print

                                                                             Avoiding Problems
                                                                             Keep in mind the limitations of the science project. Ask yourself the
                                                                             following questions about your topic:

                                                                             • Are the materials you need affordable?
                                                                             • Are the materials you need available?

                                                                               Consider the expense and availability of materials that you need
                                                                             for your project. For instance, unless you have access to an X-ray
                                                                             machine, you don’t want to study how different materials affect the
                                                                             path of X rays.

                                                                             • Does the science fair you are entering prohibit materials or
                                                                               specimens that you will need for your experiment?

                                                                               Find out the limitations of the science fair itself. Ask your teacher


                                                                                                                                                       PART 2: RESOURCES FOR STUDENTS
                                                                             about any restrictions on qualified science projects.

                                                                             • How long will it take you to gather the necessary data?
                                                                             • How much time do you have for data collection?

                                                                                Be careful not to choose a topic that will take more time to inves-
                                                                             tigate than you have to carry out the science project. For instance,
                                                                             you don’t want to study the growth of a plant that grows only 2 cm
                                                                             a month.
   Copyright © by Holt, Rinehart and Winston. All rights reserved.


                                                                                                                                                       w
                                                                                                                                                       w
                                                                                                                                                       w


                                                                             Creativity Is the Key There are many ways to develop a workable
                                                                             project that is within your budget and still study a topic that inter-
                                                                             ests you; it will just take a lot of creativity—and that’s the key to a
                                                                             winning science project.
                                                                                                                             SCIENCE FAIR GUIDE   41
Menu       Print
                     Forming a Hypothesis
                     What Do You Think the Answer Is? Before you begin an experi-
                     ment about oil spills, you would read about oil spills and guess that
                     oil affects the health of plants in a negative way. It’s typical scientific
                     procedure to have an idea of the answer to your investigative ques-
                     tion before you begin. In fact, the scientific method requires that
                     you state a possible answer to the investigative question before you
                     begin. This statement is called the hypothesis.
                     Some possible hypotheses for the investigative question “How does
                     oil affect plants?” are
                       • “Oil does not affect the health of plants.”
                       • “Oil negatively affects the health of plants.”
                       • “Oil improves the health of plants.”
                     What if the Hypothesis Is Inaccurate? It doesn’t actually mat-
                     ter whether your hypothesis is accurate. The objective of a science
                     project is to develop a hypothesis and then design a way to test it. In
                     fact, few people will be concerned if the results of your experiment
                     do not support your hypothesis. It is just as acceptable to have an
                     inaccurate hypothesis as it is to have an accurate hypothesis—the
                     challenge is in designing an effective experiment.
                              So take the plunge, and write down what you think will
                              happen. After researching the example that we are using,
                              you may come up with the following hypothesis:

                                           Topic: Oil Spills in Ecosystems

                                           Investigative Question: How does
                                           oil affect plants?


                                                                                                   Copyright © by Holt, Rinehart and Winston. All rights reserved.
                                           Hypothesis: Introducing oil into
                                           the soil of a house plant will
                                           shorten its life span.


                          Make sure to check off the Phase 1 steps on your Student’s
                     Progress Report as you complete each one.


  42   HOLT SCIENCE AND TECHNOLOGY
Menu                                                                 Print
                                                                             Phase 2—Research and Planning: Science
                                                                                     Fair Success

                                                                               DURING   THIS PHASE, YOU WILL

                                                                               1. research the hypothesis
                                                                               2. change or reconfirm the hypothesis with the teacher
                                                                               3. contact all appropriate people
                                                                               4. record all research sources in the science project journal
                                                                               5. fill out the Procedural Plan for Action and obtain signatures
                                                                               6. develop the initial plan for display materials


                                                                             Remember to update your Student’s Progress Report as you go along.
                                                                             You will have until               to finish Phase 2.


                                                                                                                                                       PART 2: RESOURCES FOR STUDENTS
                                                                             Researching and Planning
                                                                                      Doing further research will help you decide what your
                                                                                      experiment will be. Remember to write all of your research
                                                                                      notes in your science project journal.
                                                                               Imagine for a moment that your hypothesis is “Bridges with
                                                                             arches provide more support than simple beam bridges.” For your
                                                                             project, you want to build two models: one testing the forces that
                                                                             bridges with beams can withstand and another testing the forces
                                                                             that bridges with beams and arches can withstand. Before you can
                                                                             really do this, you will have to read about the design of bridges.
   Copyright © by Holt, Rinehart and Winston. All rights reserved.


                                                                                                                                                       w
                                                                                                                                                       w
                                                                                                                                                       w


                                                                             Ensuring Success By thinking ahead, you can prevent problems
                                                                             from popping up later. So start planning now, and you’ll be much
                                                                             more likely to end up with a successful project. Now’s the time to
                                                                               • make sure you have enough time to complete your experiment.
                                                                               • make sure you can cover the costs involved.
                                                                               • start thinking about the science fair display.
                                                                               • ask others for any information or help you may need.

                                                                                                                             SCIENCE FAIR GUIDE   43
Menu       Print
                     Is This the Project for You?
                     After additional library research, you’ll check in with your teacher to
                     reconfirm your hypothesis. By now, you probably have a good feel
                     for how much information has been written on your topic. You may
                     also have some good ideas about what you can do to test your
                     hypothesis. If you need to change your topic at this point, you can
                     still do so. If you feel that you won’t have enough time or money to
                     complete your experiment, speak to your teacher. Remember, this is
                     your last chance to change topics! After this point you will be too far
                     along in the timeline to safely change your plan of action.

                     Further Research
                     You have already begun researching your topic by the usual means,
                     such as reading books and checking out the Internet. Perhaps you
                     haven’t thought about the following ways of gathering information:
                               Interview an Expert You might want to interview an
                               expert in the field you’re studying. If you are interested in
                               studying sedimentary rocks, for example, you could talk to
                     a geologist. A geologist could probably give you some good tips on
                     where to find the materials you need. Remember to record the
                     details of the interview in the bibliography section of your journal.
                     You’ll need to give the expert credit for the information that he or
                     she has given you.
                     Let the Letter Ask Writing a letter is one of the best ways to get
                     information. It sometimes takes a while to receive a response,
                     though, so write as early as possible. Let’s say you were interested in
                     finding out how to dispose of paint and other chemical wastes with-
                     out hurting the environment. You might write to someone at a paint
                     company. You can ask for information in a letter like this one:


                                                                                               Copyright © by Holt, Rinehart and Winston. All rights reserved.
                       Green Paint Company
                       4500 East South Street
                       Detroit, Michigan 70555
                       Dear Sir or Madam:
                       I am a seventh grader preparing for the Springfield School
                       District Annual Seventh-Grade Science Fair. The purpose of
                       my experiment is to see how proper disposal of leftover
                       paint can prevent heavy metals from contaminating drink-
                       ing water supplies.
                       Could your company provide me with a list of chemical
                       ingredients contained in your product? I would also appreci-
                       ate some guidelines on how to safely dispose of leftover
                       paint.
                       I hope you will be able to help. Thank you for your time
                       and effort.
                       Sincerely,
                       Meredith Phillips


  44   HOLT SCIENCE AND TECHNOLOGY
Menu                                                                 Print
                                                                             Thank Others for Their Help When you receive a response
                                                                             from a company, transfer any useful information into your science
                                                                             project journal. It’s also a good idea to keep the actual letter in a safe
                                                                             place so that you can refer to it again later. Remember to thank any-
                                                                             one who helps you by supplying information or materials.

                                                                             Citing All Your Sources
                                                                             Your sources may include books, magazines, newspapers, Web sites,
                                                                             television programs, videos, or even interviews with live people. You
                                                                             will need to include all of these sources in the bibliography for your
                                                                             research paper. Your science project journal is the perfect place to
                                                                             keep track of this information.
                                                                                      How to Cite a Reference In your science project jour-
                                                                                      nal, record the title, author, publisher, and copyright date of
                                                                                      each source that you use. If you perform an interview,
                                                                             record who you spoke to, what you discussed, and when and where
                                                                             the interview took place. You can keep all this information organized
                                                                             by devoting a few journal pages to your notes on information


                                                                                                                                                          PART 2: RESOURCES FOR STUDENTS
                                                                             sources.

                                                                             Preparing to Conduct the Experiment
                                                                             You have a hypothesis that you are happy with, and you are learning
                                                                             more about your topic. Now it’s time to consider a procedural plan
                                                                             for your experiment. Most scientific experiments follow the same
                                                                             basic rules, which are explained below.
                                                                             Being in Control When testing your hypothesis, you’ll want to
                                                                             establish a control group and one or more experimental groups. The
                                                                             control group and the experimental groups are exactly the same
                                                                             except for one factor, which varies in the experimental groups. The
                                                                             factor that differs is called the variable. Because the variable is the
   Copyright © by Holt, Rinehart and Winston. All rights reserved.


                                                                             only factor that differs between the control group and the experi-
                                                                             mental group, scientists know that this factor is responsible for the
                                                                             results of the experiment.                                                   w
                                                                                If you were planning to test the effects of an arch on the strength       w
                                                                             of a bridge made of beams, you must test the strength of a bridge            w
                                                                             that doesn’t have an arch and the strength of the same bridge with
                                                                             an arch. Bridges that have no arch (beam bridges) are in the control
                                                                             group. Bridges that have beams and arches are the experimental
                                                                             group. The variable is whether the bridge has an arch.
                                                                                Then if you wanted to test the effects of suspension cables on the
                                                                             strength of a bridge, you’d use the same control group as before—
                                                                             beam bridges. Your experimental group would include beam bridges
                                                                             with suspension cables. The new variable is whether the bridge has
                                                                             suspension cables.
                                                                             It Depends The physical structure of a bridge—whether it has an
                                                                             arch—can differ from one bridge to the next. Since the bridge’s phys-
                                                                             ical structure does not depend on any other characteristic, it is called
                                                                             the independent variable. The independent variable can be changed by
                                                                             the researcher.


                                                                                                                              SCIENCE FAIR GUIDE    45
Menu       Print
                       The strength of the bridge depends on whether the bridge has an
                     arch, so the strength of the bridge is the dependent variable. When
                     you measure the dependent variable you are measuring the result
                     that occurs when the researcher changes the independent variable.
                     The dependent variable is what the experiment is actually measuring.
                     There Can Be Only One It is very important that you have only
                     one variable. Otherwise you are not effectively testing your hypothe-
                     sis. For instance, your test of the bridges’ strengths would be influ-
                     enced by the materials from which the bridges were made, so all
                     bridges in your experiment must be made of the same materials. All
                     factors of the control group and the experimental group(s) must be exactly
                     the same except for one variable.


                      Experiments Versus Demonstrations When you don’t
                      know what you want to do for an experiment, it can be tempt-
                      ing to demonstrate a concept that scientists have already fig-
                      ured out. As a researcher, you will focus on performing an
                      experiment instead of a demonstration. Though modeling a
                      volcano’s eruption is an interesting demonstration, it is not an
                      experiment. Figuring out how altitude affects the boiling point
                      of water is an experiment. Ask your teacher if you need help
                      developing an experiment that tests your hypothesis.


                     The Procedural Plan
                     Look on the next page to find a blank form for your Procedural Plan
                     for Action. You can use this worksheet to write down your ideas for
                     your experiment. It can help you think through the details of your
                     science fair project.
                        When completing the procedural plan, it is important to begin


                                                                                                  Copyright © by Holt, Rinehart and Winston. All rights reserved.
                     planning for the display. Your teacher will provide you with a list
                     of rules for the science fair you are going to enter. The rules will
                     include important information about display sizes and materials.
                     You will also need to begin gathering the materials that you will
                     need for the experiment and the science fair.
                     Put Your Ducks in a Row Some students find it helpful to use a
                     schedule or a list to organize all the work that they need to do. You
                     can use the Task List (page 48) to create your own personal schedule.
                     Fill out your task list however you like. You can use it as a personal
                     to-do list or as a place to write down which days you want to go to
                     the library or meet with your teacher.

                          Make sure to check off the Phase 2 steps on your Student’s
                     Progress Report as you complete each one.


  46   HOLT SCIENCE AND TECHNOLOGY
Menu                                                                 Print
                                                                     Name ____________________________________________________ Date __________________ Class _______________

                                                                                                   Procedural Plan for Action

                                                                       Describe your experiment’s procedure.


                                                                       What will be your control group?


                                                                       What will be your experimental group?


                                                                       What is your dependent variable?             What is your independent variable?


                                                                       What kind of location or setting will you need for your experiment?
   Copyright © by Holt, Rinehart and Winston. All rights reserved.


                                                                       What kind of materials will you need for your experiment?


                                                                       What costs do you expect?


                                                                     Parent Signature                                               Date

                                                                     Teacher Signature                                              Date


                                                                                                                                                 SCIENCE FAIR GUIDE     47
Menu         Print
  Name ____________________________________________________ Date __________________ Class _______________

                                              Task List

                                                                         Goal             Date
    Task to be accomplished                                              date         accomplished


                                                                                                            Copyright © by Holt, Rinehart and Winston. All rights reserved.


  48    HOLT SCIENCE AND TECHNOLOGY
Menu                                                                 Print
                                                                             Phase 3—Data Collection and Analysis:
                                                                                     Science Fair Success

                                                                               DURING   THIS PHASE, YOU WILL

                                                                               1. conduct the experiment safely
                                                                               2. choose an appropriate sample size
                                                                               3. perform several trials of the experiment
                                                                               4. collect data accurately
                                                                               5. record all data and observations in your science project journal
                                                                               6. graph or chart the data and look for trends
                                                                               7. prepare a written conclusion supported by the data


                                                                             Before You Begin


                                                                                                                                                          PART 2: RESOURCES FOR STUDENTS
                                                                               • Have your teacher or parent approve your experiment.
                                                                               • Read over your Safety Contract.
                                                                               • During the data collection, make sure that there is an
                                                                                 adult present.

                                                                             Your teacher will schedule some in-class data collection days, so
                                                                             remember to take the necessary materials to class. Don’t forget to
                                                                             update your Student’s Progress Report as you go along. You will have
                                                                             until                  to complete Phase 3.

                                                                             Types of Data
   Copyright © by Holt, Rinehart and Winston. All rights reserved.


                                                                             Data can take two different forms: data can be quantitative (a value
                                                                             that can be measured or counted) or qualitative (a value that can be
                                                                             described but cannot be measured or counted). Some projects may              w
                                                                             combine both forms of data.                                                  w
                                                                                                                                                          w
                                                                             Quantitative Data: Count It Up Quantity and quantitative have
                                                                             the same word root. Just remember that quantitative data have to do
                                                                             with numbers or quantities that you can measure. Examples of quan-
                                                                             titative data are the number of bird chirps that you hear on a cold
                                                                             day or the width of a layer of rock in a cliff wall.
                                                                             Qualitative Data: Spell It Out The word quality is related to the
                                                                             word qualitative. Taking qualitative data means that you will be
                                                                             describing your observations with adjectives instead of numbers.
                                                                             Examples of qualitative data are descriptions of the color and shape
                                                                             of the rock in each layer of a cliff wall. Drawings and photographs
                                                                             are also qualitative data.
                                                                             Whichever kind of data you have decided to collect, remember to
                                                                             write it down. Be certain to record all results of your tests in your sci-
                                                                                        ence project journal. Recording everything as it happens
                                                                                        not only will help you keep your information in one place
                                                                                        but also will make it easier for you to avoid errors.

                                                                                                                               SCIENCE FAIR GUIDE    49
Menu       Print
                     Sample Size and Multiple Trials
                     Test More Than One Subject Sample size is the number of sub-
                     jects you test. Your sample size must be large enough to allow you to
                     draw accurate conclusions from your data.
                        For example, if you were comparing the differences in hand-eye
                     coordination between 20-year-old and 40-year-old women, the data
                     taken from just one woman in her 20s may not give you accurate
                     results. She could be the fastest woman in the world! Testing only
                     her, you would conclude—possibly incorrectly—that all women in
                     their 20s are faster than all women
                     in their 40s. If you tested several
                     other women in their 20s and
                     compared this data to the data
                     taken from several 40-year-old
                     women, you would have a more
                     realistic picture of the actual
                     trends among 40-year-olds and
                     20-year-olds.
                               Record in your journal
                               the number of subjects
                               that you tested. Also
                     record any details that might affect
                     your results. For instance, in the example
                     above, you would record each subject’s
                     age, sex, height, weight, the time of day
                     the subject was tested, the number of
                     times you tested each subject, etc.
                     Play It Again, Sam! When you are con-
                     ducting an experiment, it is necessary to do
                     multiple trials. This means you should perform
                     each test several times. For instance, if you are going to compare your


                                                                                               Copyright © by Holt, Rinehart and Winston. All rights reserved.
                     body temperature in the morning with your body temperature in the
                     evening as part of your project, make sure that you test your tempera-
                     ture on several days before you try to draw any conclusions. And if
                     one day’s temperature differs wildly from the rest, you might consider
                     that there was an error and try to figure out what went wrong.

                     Taking Accurate Measurements
                     Scientists need to be as exact as possible in taking measurements. It’s
                     almost impossible to measure something exactly, so scientists usually
                     measure something more than once and then use the average of the
                     results. This approach helps to account for the uncertainty of each
                     individual measurement.
                        Always double-check the measurements you take before you
                     record them in your journal. Measure carefully and make each
                     measurement level. For instance, if your experiment requires the use
                     of measuring spoons or cups, be consistent: don’t fill some of them
                     so that they are heaping and others so that they are not quite full.


  50   HOLT SCIENCE AND TECHNOLOGY
Menu                                                                 Print
                                                                                                      Go Global Most scientists use the International System of Units (SI)
                                                                                                      in all their work. The International System of Units is a global meas-
                                                                                                      urement system that helps scientists share and compare their obser-
                                                                                                      vations and results. It is usually best to use this system, and some
                                                                                                      science fairs require that all measurements be expressed in SI units.
                                                                                                      Your teacher has a unit conversion chart for common measurements
                                                                                                      of length, mass, volume, and temperature that may be useful.

                                                                                                      Creating Charts and Graphs
                                                                                                                As you are collecting your data, you may want to keep in
                                                                                                                mind that you will be required to display your results and
                                                                                                                conclusions at the science fair. You can make it easy for peo-
                                                                                                      ple to understand the relationship between your variables by display-
                                                                                                      ing your data in a chart or graph. It may be useful for you to make
                                                                                                      the first drafts of your graphs in your journal. This will let you
                                                                                                      decide the best way to illustrate your data before you make the final
                                                                                                      graphs for your display.


                                                                                                                                                                                                      PART 2: RESOURCES FOR STUDENTS
                                                                                                              TIP
                                                                                                         When you create a graph, make sure that you leave equal spaces
                                                                                                         between the numbers on the axes and that you number the
                                                                                                         axes consistently. For instance, if you start with the number 0
                                                                                                         and the next values are 5 and 10, you can’t skip to 20. The next
                                                                                                         number would have to be 15.


                                                                                                      Bar Graphs
                                                                                                      Use a bar graph if you want to compare different types of data. In the
                                                                                                      case of a bar graph, each bar represents a group of data.
   Copyright © by Holt, Rinehart and Winston. All rights reserved.


                                                                                                      • It is important to make it easy to identify each bar. For example,
                                                                                                        you could choose to use polka-dotted bars for one group of data
                                                                                                        and striped bars for another.
                                                                                                                                                                                                      w
                                                                                                      • Every graph always needs a key so that people can easily tell what                            w
                                                                                                        each color or pattern represents.                                                             w
                                                                                                      • Make each key the same so that graphs are easy to compare. That
                                                                                                        way, if you had measured data on three different days, a person
                                                                                                        could quickly distinguish between the groups of data.

                                                                                           Tomato Plant Height: Week 1                      Tomato Plant Height: Week 2
                                                                                                                                                                                Full light

                                                                                      15                                               15                                       Light deprived
                                                                        Centimeters


                                                                                                                         Centimeters


                                                                                      10                                               10


                                                                                      5                                                5


                                                                                       0                                                0


                                                                                                                                                                          SCIENCE FAIR GUIDE     51
Menu         Print
                     Line Graphs
                     Use a line graph if you want to show how the dependent variable is
                     affected by changes in the independent variable or if you want to
                     show how data change over time.
                     • In a line graph, place the dependent variable on the vertical (up-
                       and-down) axis, or the y-axis. The independent variable should be
                       on the horizontal (left-to-right) axis, or the x-axis.
                     • Plot your data as carefully as possible. Then connect the points.
                     • If you decide to record the results of more than one experiment
                       on one line graph, you may choose to use a different color of ink
                       for each set of points (and the connecting line). Be sure to include
                       a key explaining the colors.

                                                        Temperature Variation over 4 Days


                                                  100                                       Sample 1

                                                                                            Sample 2
                                                   99
                              Temperature (°F )


                                                   98


                                                   97


                                                   96


                                                   95
                                                        1        2         3       4

                                                                     Day


                                                                                                       Copyright © by Holt, Rinehart and Winston. All rights reserved.
                            TIPS
                        This is where graph paper will come in handy. Your graph will
                        be much neater and easier to draw if you use graph paper. You
                        will find a sheet of graph paper on page 54.


                     Pie Charts
                     Showing percentages is easy to do with a pie chart, a round chart
                     that looks like a sliced pie. You can quickly see which group has the
                     biggest slice and therefore contains the most data.
                     • The size of a group’s slice indicates the proportion of the whole
                       that the group represents. Say you want to show that 30 percent
                       of people in an experiment sneezed when exposed to a bright
                       light and 70 percent of people didn’t sneeze. You would use 30
                       percent of the circle to represent the sneezers.
                     • A circle has 360°, so you would multiply 0.30 by 360° to get the
                       number of degrees that should be used to represent the sneezers.
                                              0.30 ϫ 360° = 108°
 52    HOLT SCIENCE AND TECHNOLOGY
Menu                                                                 Print
                                                                                                 Sneezing After Exposure to 10 Minutes of Bright Light


                                                                                 30% of people
                                                                                    sneezed

                                                                                                                                                         70% of people
                                                                                                                                                          didn't sneeze


                                                                             • Using a protractor, you would measure out 108° of the circle for
                                                                               the sneezers. The other part of the pie chart (252°) would be
                                                                               reserved for the nonsneezers.
                                                                             • Make each section of the chart a different color and include a key
                                                                               or labels to make the graph easy to understand.


                                                                                                                                                                               PART 2: RESOURCES FOR STUDENTS
                                                                             Analyzing Data and Drawing a Conclusion
                                                                             After you’ve gathered all of your data, you’ll want to analyze your
                                                                             results. In the analysis, ask yourself, “What are the data telling me?
                                                                                       What trends do I see in my graphs? Are the data for the
                                                                                       control group different than the data for the experimental
                                                                                       group?” Write your analysis in your science project journal.
                                                                             What Does It All Mean? If your results are mathematical, it will
                                                                             help you to understand the concepts of mean and median. Mean is
                                                                             the average of your data, and median is the middle-most value when
                                                                             all measurements are listed in order from smallest to largest. Two
                                                                             experiments may have the same average result but differ in how the
   Copyright © by Holt, Rinehart and Winston. All rights reserved.


                                                                             results are distributed. Compare the means and medians and see
                                                                             how they differ. Ask your teacher or your parents for help with
                                                                             mathematical concepts that you aren’t sure about.                                                 w
                                                                                                                                                                               w
                                                                             Drawing Conclusions                                                                               w
                                                                             The main question you should ask yourself when drawing a conclu-
                                                                             sion is, “Do my results agree with my hypothesis?” If they do, why
                                                                             do you think they do? If they don’t, how are they different? And,
                                                                             why do you think they differ? Remember that it is not important for
                                                                                       the hypothesis to be correct. It is important, however, that
                                                                                       you explain why you got the results you did. Write your
                                                                                       conclusions in your science project journal.
                                                                                Be sure to mention in your conclusion what factors you believe
                                                                             contributed to your results. Then, briefly explain possibilities for new
                                                                             experiments that would control these factors. Also, mention any
                                                                             investigative questions that came up during the experiment. These
                                                                             questions will guide other researchers who find your results interest-
                                                                             ing and want to study the topic more.

                                                                                  Make sure to check off the Phase 3 steps on your Student’s
                                                                             Progress Report as you complete each one.

                                                                                                                                                SCIENCE FAIR GUIDE        53
Menu         Print
  Name ____________________________________________________ Date __________________ Class _______________


                                                                                                            Copyright © by Holt, Rinehart and Winston. All rights reserved.


  54    HOLT SCIENCE AND TECHNOLOGY
Menu                                                                 Print
                                                                             Phase 4—Writing a Report: Science Fair
                                                                                     Success

                                                                               DURING    THIS PHASE, YOU WILL

                                                                               1. answer the questions on this page
                                                                               2. prepare an outline and discuss it with your teacher
                                                                               3. prepare a draft and discuss it with your teacher
                                                                               4. revise the draft according to your teacher’s feedback
                                                                               5. turn in a completed draft


                                                                             All of the time you’ve spent recording every little detail in your sci-
                                                                             ence project journal is about to pay off. Your written report will rep-
                                                                             resent your ideas and conclusions about your project, so you’ll want
                                                                             to make sure that it is well thought out and neatly prepared. Don’t


                                                                                                                                                        PART 2: RESOURCES FOR STUDENTS
                                                                             forget to update your Student’s Progress Report as you go along. You
                                                                             will have until                  to complete Phase 4.

                                                                             Putting Your Ideas on Paper
                                                                                      Before you begin, answer the following questions in your
                                                                                      science project journal. When you are through, you may
                                                                                      have a better idea of how to start on your written report.
                                                                             1. How did you first decide on your idea?
                                                                             2. What was your favorite aspect of the experiment?
                                                                             3. What was something new that you learned?
                                                                             4. What was something unexpected that happened?
   Copyright © by Holt, Rinehart and Winston. All rights reserved.


                                                                             5. What were the ups and downs of the whole process?
                                                                             6. What did your data show?                                                w
                                                                             7. What would you do differently next time?                                w
                                                                                                                                                        w

                                                                                   TIP
                                                                                Have fun with your report. You’ve already done most of the
                                                                                work. Now, just carefully describe what you did in each phase,
                                                                                and explain every detail of your experience.


                                                                             Creating an Outline
                                                                             Now that you’ve answered the questions on this page, you are ready
                                                                             to make an outline of your report. An outline is a framework of what
                                                                             is going to go inside a report. Most scientific reports follow the same
                                                                             order as the steps of the scientific method, explaining the entire
                                                                             process from beginning to end. Using index cards for each idea will
                                                                             allow you to make sure that all the information makes sense in the
                                                                             order that you are going to tell it.


                                                                                                                             SCIENCE FAIR GUIDE    55
Menu       Print
                     Making a List Include at the beginning of the report any back-
                     ground information that a reader would need to understand your
                     project. Then you will state the purpose and hypothesis of your proj-
                     ect. Briefly describe your procedure and the data that you acquired.
                     Finally, you’ll want to illustrate your conclusion using charts, graphs,
                     or photographs of your data. You may want to include your answers
                     to the questions on page 55.


                           TIP
                       You may choose to use some of your charts or graphs in your
                       report. The best figures to use are those that clearly show
                       the trends you found in your data. Always title and label your
                       figures, and, if possible, write a sentence telling what they
                       illustrate.

                     Checking It Twice When you are done, have your teacher check
                     your outline. Your teacher will make some suggestions about how to
                     improve your report. Pretend the report is not your own, and try
                     to see how your teacher’s suggestions could make it even better.
                     Professional scientists and writers get constructive criticism about
                     everything they do before they show their results to the world. It is an
                     important part of the writing process, and it will help you improve
                     your report so that it is ready to impress the science fair judges.

                     Writing the Draft
                     After you’ve thought about your teacher’s suggestions, you may
                     want to change your outline. When you are happy with your out-
                     line, you can start a draft of the written report.


                                                                                                Copyright © by Holt, Rinehart and Winston. All rights reserved.
                           TIPS
                        The following are some helpful writing tips:

                        • Before you begin, make sure that you know how many pages
                          your report should be.
                        • As you write, you may ask your parents to read sections to
                          make sure that you are on the right track.
                        • Show your finished draft to your teacher. Your teacher will
                          make comments to help you create the best project that you
                          possibly can.
                        • Don’t forget about neatness and spelling! Judges will notice if
                          you have not been careful in your work.
                        • Finally, remember to complete a bibliography of the sources you
                          used. Be sure to give credit to the people who helped you in
                          your project—your teacher, your parents, professional scientists,
                          or others.


                          Make sure to check off the Phase 4 steps on your Student’s
                     Progress Report as you complete each one.

  56   HOLT SCIENCE AND TECHNOLOGY
Menu                                                                 Print
                                                                             Phase 5—Creating and Exhibiting a
                                                                                     Display: Science Fair Success

                                                                               DURING   THIS PHASE, YOU WILL

                                                                               1. sketch possible designs for the display
                                                                               2. create a display board within the appropriate parameters
                                                                               3. display results in a clear and interesting manner
                                                                               4. give an oral presentation as practice for the science fair
                                                                                  interview


                                                                             After this phase, you can tell everyone that you know what it is like
                                                                             to be a real scientific researcher—and mean it! Don’t forget to update
                                                                             your Student’s Progress Report as you go along. You will have until
                                                                                                to complete Phase 5.


                                                                                                                                                       PART 2: RESOURCES FOR STUDENTS
                                                                             Before You Begin
                                                                             Before you begin your display, review the science fair display and
                                                                             interview guidelines. Some science fairs have a list of items and
                                                                             materials that you are not allowed to use in a display. Double-check
                                                                             to be sure you have followed these guidelines. You wouldn’t want to
                                                                             be disqualified after all of the hard work you’ve already done.
   Copyright © by Holt, Rinehart and Winston. All rights reserved.


                                                                                                                                                       w
                                                                                                                                                       w
                                                                                                                                                       w


                                                                             The Layout of Your Display
                                                                             Displays are usually divided into three sections. You can bend a card-
                                                                             board box so that it has a large middle section and two smaller
                                                                             “wings” that fold inward across the center. This design allows your
                                                                             display to fold flat, making it easier to transport and store. You can
                                                                             purchase hinges at an art supply or hardware store if you prefer to
                                                                             attach the “wings” that way.

                                                                                                                             SCIENCE FAIR GUIDE   57
Menu       Print
                     An Example The illustration below is one example of how infor-
                     mation can be laid out on the display. You can do it differently, but
                     remember to place the information from left to right in the general
                     order that you performed each item. It is also common to place
                     models, samples, demonstration props, or small pieces of equipment
                     in front of the display board.


                     Here’s how the information is organized on the display shown
                     above:
                       • Top Left This section provides basic background information
                         and introduces the purpose and hypothesis of the project.


                                                                                                 Copyright © by Holt, Rinehart and Winston. All rights reserved.
                       • Bottom Left This section briefly explains the procedure that
                         was followed (review your Procedural Plan for Action).
                       • Right-hand Panel Brief written summaries of the data and
                         the conclusions are located on this panel. The research is dis-
                         played so that it is obvious that the data support the conclu-
                         sions.
                       • Center The middle panel contains the title of the project and
                         the name, grade, and school of the researcher. Charts, graphs,
                         photographs, and other illustrations are displayed here.
                       • Keep It Simple The display touches on all aspects of the proj-
                         ect, but keeps the information general. The details of the project
                         belong in the written report.

                     Designing Your Display
                     Back to the Drawing Board Before you construct a display,
                     sketch some ideas of how you want your display to look. Sketching
                     it out on paper lets you easily choose colors, borders, sizes, lettering,
                     and even arrangement of items in your display.


  58   HOLT SCIENCE AND TECHNOLOGY
Menu                                                                 Print
                                                                             Materials Most students will use corrugated cardboard, cork board,
                                                                             or foam core to construct their display. You can recycle by calling a
                                                                             local appliance store to get a large, corrugated box from a refrigera-
                                                                             tor, washing machine, or TV. Observe appropriate safety precautions
                                                                             and make sure that an adult helps you cut the cardboard to regula-
                                                                             tion size.
                                                                             Remember—Neatness Counts! There may be requirements about
                                                                             the lettering for the display. If you write the information for your
                                                                             display by hand, make sure the writing is neat and easy to read. Your
                                                                             main title and major subtitles should be readable from a distance,
                                                                             and any other information can be smaller. If you use paper or plastic
                                                                             lettering or stencils, use a ruler to apply them in a straight line.
                                                                             Creative, Yet Clear While you want your display to be as interest-
                                                                             ing as possible, the design should not distract from the content. Be
                                                                             creative with borders, font, and layout, but make sure that a judge
                                                                             would find it easy to read the information contained in the display.
                                                                             Illustrations should be informative, not just decorative. In your dis-
                                                                             play, you want to impress the judges with the project’s seriousness


                                                                                                                                                       PART 2: RESOURCES FOR STUDENTS
                                                                             yet be unique and have some fun.


                                                                                   TIP
                                                                               A simple display is best if it clearly shows what you have
                                                                               learned. An expensive computer display or a flashy presentation
                                                                               is useful only if it relates to your results and helps make your
                                                                               conclusions more clear.


                                                                             The Interview
                                                                             If you are going to make a presentation to the judges, it’s in your
   Copyright © by Holt, Rinehart and Winston. All rights reserved.


                                                                             best interest to practice at least once. Practice explaining your proj-
                                                                             ect to someone who knows nothing about it. Your family and your
                                                                             classmates are good audiences. It may be difficult at first, but once
                                                                             you run through it a few times, you’ll have a great advantage over        w
                                                                             students who haven’t bothered to practice. If you’re part of a group      w
                                                                             project, each person in the group should be responsible for present-      w
                                                                             ing a certain aspect of the project, such as the purpose, hypothesis,
                                                                             or conclusion.
                                                                             Summarize It! You’ll want to prepare a summary of what you did.
                                                                             You can do this by following the steps below.
                                                                               • Explain why your subject interested you.
                                                                               • Define the hypothesis you developed.
                                                                               • Describe how you decided what type of data to collect.
                                                                               • Outline your Procedural Plan for Action.
                                                                               • Summarize the data you actually collected.
                                                                               • Explain the conclusions you drew after you analyzed the data.
                                                                               • Describe to the judges what you would do differently if you had
                                                                                 another chance, and tell them why.


                                                                                                                             SCIENCE FAIR GUIDE   59
Menu       Print


                     Tricks of the Trade Here are more suggestions that may help you
                     during the interview:
                       • Carry an index card with an outline of what you want to say,
                         and refer to it if you forget something during your interview.
                       • Don’t read to the judges from your report or from notes—they
                         would rather hear you speak naturally.
                       • Have copies of the written report near your display so that inter-
                         ested people can learn more about your project.
                       • Offer a copy of your report to the judges so that they can read
                         about what you have done.
                       • If a judge asks you a question that you are unable to answer,
                         stay calm. Explain that you aren’t sure about the answer to that


                                                                                              Copyright © by Holt, Rinehart and Winston. All rights reserved.
                         question, and offer to explain a part of the project that you’re
                         more comfortable with.
                       • If the judge offers you suggestions or says that he or she might
                         have done something differently, try not to react angrily. The
                         judge is only trying to help you be a better scientist.
                       • It is perfectly natural to be nervous—even seasoned scientists
                         get the jitters. Just remember that this is your project and you
                         are the best person to explain it to others!

                          Make sure to check off the Phase 5 steps on your Student’s
                     Progress Report as you complete each one.


  60   HOLT SCIENCE AND TECHNOLOGY
Menu

                                 Copyright © by Holt, Rinehart and Winston. All rights reserved.
                                                                                                                       Print


                                                                                                   PART 3: RESOURCES
                                                                                                    FOR
                                                                                                   PARENTS


SCIENCE FAIR GUIDE
61
                         PART 3: RESOURCES FOR PARENTS


                     w
                     w
                     w
Menu       Print
                     Welcome to the World of Science Fairs!
                     The Science Fair Guide is designed to direct teachers, students, and
                     parents through all phases of a science project, preparing a student
                     to participate in a science fair. A science project serves more than
                     one purpose. The most obvious goal is to extend a student’s under-
                     standing of science. Science is hands-on by nature, and there is no
                     doubt that hands-on experiences facilitate the learning process.
                     The purpose of Resources for Parents is to help you guide your stu-
                     dent through a science project using the following five phases,
                     which mirror the scientific method:
                       • Phase 1: Generating an Idea
                       • Phase 2: Research and Planning
                       • Phase 3: Data Collection and Analysis
                       • Phase 4: Writing a Report
                       • Phase 5: Creating and Exhibiting a Display
                     The Scientific Method The scientific method allows scientists to
                     further the advancement of knowledge in a strategic and unified
                     manner. When students use the scientific method to design and exe-
                     cute a project they use the same steps that professional researchers
                     use to glean new information about the world.


                                      THE SCIENTIFIC METHOD
                                      The steps of the scientific method that your child
                                      will be using appear below. Each step is explained
                                      in greater detail in Phases 1–5 of Resources for
                                      Students.*


                                                                                            Copyright © by Holt, Rinehart and Winston. All rights reserved.
                      Purpose:        developing an investigative question
                      Hypothesis: making an educated guess about the answer to the
                                  investigative question based on research
                      Experiment: testing the hypothesis, collecting data, and mak-
                                  ing observations
                      Analysis:       organizing data from the research and experimen-
                                      tation and looking for patterns
                      Conclusion: determining if the hypothesis is supported or
                                  disproved by the experimental results
                      Communicating the Results: sharing the conclusion with
                                                 others
                      *In Chapter 1 of your child’s textbook, these steps are called Ask
                      a Question, Form a Hypothesis, Test the Hypothesis, Analyze the
                      Results, Draw Conclusions, and Communicate Results.


  62   HOLT SCIENCE AND TECHNOLOGY
Menu                                                                 Print
                                                                             Building Scientific Confidence Most importantly, science proj-
                                                                             ects make science more fun and relevant to the student. Every stu-
                                                                             dent, regardless of aptitude, can benefit from planning and execut-
                                                                             ing a science project. A science project can be a great way to spark a
                                                                             student’s interest in science or to help a student develop a broader
                                                                             interest in research.

                                                                             Philosophy of Science Fairs
                                                                             Science fairs range in scale from a single class of students showing
                                                                             one another their projects to an international event offering scholar-
                                                                             ship money as prizes. From the largest science fair to the smallest, sci-
                                                                             ence fairs generally share a common philosophy and similar values:
                                                                               • emphasis on using the scientific method
                                                                               • investigation by experimentation (inquiry-based learning)
                                                                               • development of critical thinking skills
                                                                               • opportunity for a positive learning experience
                                                                               • extension of formal science education

                                                                             How to Help as a Parent
                                                                             It is up to the student to decide what to study. You can help by
                                                                             motivating your child and listening to his or her ideas. However, it is
                                                                             crucial to remember that it is up to your child to design and execute
                                                                             the entire project. Judges at a science fair take particular care to note
                                                                             that the work is the student’s and that the student understands the
                                                                             topic, the research, the experiments, the analysis of data, and the
                                                                             conclusion. The judges expect that the student has received some
                                                                             help from another person, such as a parent or teacher, and that such
                                                                             help will be credited in the display.
   Copyright © by Holt, Rinehart and Winston. All rights reserved.


                                                                             Support the Troops Your child may need more attention than a
                                                                             teacher can give to each student in a large class. Some class time will
                                                                             be devoted to researching at the library; however, your child may
                                                                             find it helpful to do more library research outside of school. Expect


                                                                                                                                                         PART 3: RESOURCES FOR PARENTS
                                                                             your child to spend time brainstorming, researching, planning,
                                                                             experimenting, analyzing data, writing a report, and constructing a
                                                                             display. You may offer to spend time with your child at the library.
                                                                             You can also help by encouraging your child to record everything in
                                                                             his or her science project journal, such as notes from brainstorming,
                                                                             sources used during research, and observations made during data
                                                                             collection.
                                                                                Your child has been told that an adult must be present during all
                                                                             data collection. Please supervise the experimental phase for safety
                                                                             purposes. You may refer to the Safety Guide to help avoid accidents
                                                                             during data collection.


                                                                                                                                                         w
                                                                                                                                                         w
                                                                                                                                                         w

                                                                                                                              SCIENCE FAIR GUIDE   63
Menu       Print
                     When You Should Help It is very easy to take control of a stu-
                     dent’s project, especially if you think it should be done differently.
                     Remember that this project is a learning experience for your child,
                     and he or she will not benefit from a project performed by you. If
                     your child is performing all the necessary tasks to an acceptable stan-
                     dard and is not requesting assistance, your job is to supervise. If your
                     child asks for help, appears to be struggling, or is performing below
                     acceptable standards or with disregard for safety measures, then you
                     may wish to offer assistance.

                     Judging
                     The criteria on which a science fair is judged can vary, and most
                     judges evaluate projects using the following criteria:
                       • use of scientific thought
                       • creativity of approach
                       • thoroughness of investigation and research
                       • skill of experimental technique
                       • clarity of expression in presentation and report

                     Besides assessing the five categories that appear above, some science
                     fairs reward memorable presentations or displays.
                     Student Understanding It is very important that the student’s
                     work be evident in the project. The scientific process and the man-
                     ner in which the research was conducted tend to outweigh the actu-
                     al display of information. The judges will be looking carefully to see
                     that the student has an understanding of his or her project and is
                     responsible for the final product. In a group project, the judges will
                     be looking for evidence that each group member completed specified
                     tasks that furthered the progress of the group.


                                                                                                Copyright © by Holt, Rinehart and Winston. All rights reserved.
                     Enclosed Materials
                     The handouts for each of the five phases will help you guide your
                     son or daughter through each phase of the project. In preparing for
                     the science fair, please understand that this project is a fun opportu-
                     nity for independent learning rather than for competition to identify
                     winners and losers. Coming away with a new interest in a particular
                     subject or a new understanding of a scientific principle can be more
                     rewarding than a prize.
                       A Parent’s Progress Report is included in Resources for Parents on
                     pp. 65–66. Please refer to this sheet throughout the project to make
                     sure that your child is on track according to the timeline enclosed in
                     the parent letter. The teacher may use the Parent’s Progress Report
                     for grading purposes.


  64   HOLT SCIENCE AND TECHNOLOGY
Menu                                                                 Print
                                                                     Name ____________________________________________________ Date __________________ Class _______________


                                                                                                     Parent’s Progress Report

                                                                                               ❏ individual project            ❏ team member
                                                                     For each step of each phase of the science project, record the task due date and the date
                                                                     the student accomplished the task. You might want to reward your child for completing
                                                                     each phase.

                                                                                                                                             Date             Date
                                                                       Phase 1—Generating an Idea                                            due          accomplished
                                                                       Student brainstormed five possible subjects.
                                                                       Student came up with two investigative questions for
                                                                       each topic.
                                                                       Student consulted with teacher and parents about project
                                                                       possibilities.
                                                                       Student chose a suitable topic.
                                                                       Student formed a hypothesis.
                                                                       Student discussed topic and hypothesis with teacher and
                                                                       gained approval.
                                                                       Student recorded ideas in the science project journal.


                                                                                                                                             Date             Date
                                                                        Phase 2—Research and Planning                                        due          accomplished
   Copyright © by Holt, Rinehart and Winston. All rights reserved.


                                                                        Student researched the hypothesis.
                                                                        Student reconfirmed or changed the hypothesis based
                                                                        on further research and then gained teacher approval.
                                                                        Student contacted all appropriate people before
                                                                        beginning data collection.
                                                                        Student recorded all details of research so far in a
                                                                        bibliography in the science project journal.
                                                                        Student filled out the Procedural Plan for Action and
                                                                        obtained necessary signatures.
                                                                        Student developed the initial plan for display materials.


                                                                     Parent comments:


                                                                                                                                                 SCIENCE FAIR GUIDE     65
Menu         Print
  Name ____________________________________________________ Date __________________ Class _______________

                                  Parent’s Progress Report, continued


                                                                         Date             Date
    Phase 3—Data Collection and Analysis                                 due          accomplished
    Student conducted the experiment safely.
    Student chose an appropriate sample size.
    Student performed several trials of his or her experiment.
    Student collected data accurately.
    Student recorded all data and observations in the science
    project journal.
    Student graphed or charted data and looked for trends.
    Student prepared a written conclusion supported by the
    data.


                                                                         Date             Date
    Phase 4—Writing a Report                                             due          accomplished
    Student answered the questions on page 55.
    Student prepared an outline and discussed it with the
    teacher.
    Student prepared a draft and discussed it with the
    teacher.


                                                                                                            Copyright © by Holt, Rinehart and Winston. All rights reserved.
    Student revised the draft according to the teacher’s
    feedback.
    Student turned in final draft of the written report.


                                                                         Date             Date
    Phase 5—Creating and Exhibiting a Display                            due          accomplished
    Student sketched possible designs for display.
    Student created a display board within the appropriate
    parameters.
    Student displayed the results in a clear and interesting
    manner.
    Student gave an oral presentation as practice for the
    science fair interview.


  66   HOLT SCIENCE AND TECHNOLOGY
Menu                                                                 Print
                                                                        Phase 1—Generating an Idea: Getting Involved

                                                                                  DURING   THIS PHASE, STUDENTS WILL:

                                                                                  1. brainstorm five possible subjects
                                                                                  2. come up with two investigative questions per topic
                                                                                  3. consult with teacher and parents about project possibilities
                                                                                  4. choose a suitable topic and investigative question
                                                                                  5. form a hypothesis
                                                                                  6. discuss topic and hypothesis with the teacher and gain
                                                                                     approval
                                                                                  7. record ideas in their science project journal


                                                                                At the beginning of the project, you may wish to consult the time-
                                                                                line that was included in the packet of information that was sent to
                                                                                you. Also, you may want to contact the teacher to find out the spe-
                                                                                cific judging criteria and display requirements for the particular sci-
                                                                                ence fair that your child will be entering.
                                                                                This is fun! Throughout the course of the project, especially during
                                                                                the beginning stages, you may remind your child that one of the
                                                                                main goals of the project is to have fun. While healthy competition
                                                                                can be exciting, the purpose of a science project is to learn science
                                                                                through inquiry in a hands-on experiment.
                                                                                The Journal: Your Child’s Most Important Tool Your child
                                                                                will record everything he or she does in his or her science project
                                                                                journal. This includes all brainstorming lists, research notes, data,
                                                                                and observations. Your child will need the journal for all phases of
   Copyright © by Holt, Rinehart and Winston. All rights reserved.


                                                                                the science project, so it is important that he or she keep careful
                                                                                track of it. Also, you may want to check the journal periodically as a
                                                                                way of keeping up with your child’s progress.


                                                                                                                                                          PART 3: RESOURCES FOR PARENTS
                                                                                Brainstorming for Topics
                                                                                During Phase 1, students will be brainstorming for scientific subjects
                                                                                that interest them. Subjects can be as simple as how light affects
                                                                                plant growth or as complex as how carotenes affect cancer growth.
                                                                                Students often find the pressure of coming up with a suitable idea
                                                                                the most challenging part of a project. You can help by acting as a
                                                                                sounding board for ideas or reminding your child of things that he
                                                                                or she has been curious about around the house. Students will need
                                                                                to brainstorm five possible topics and eventually develop two inves-
                                                                                tigative questions for each topic.

                                                                                The Investigative Question
                                                                                The investigative question is what the experiment is intended to
                                                                                find out. This question should narrow down the topics to specific
                                                                                areas of interest. For example, if a student chooses biological clocks    w
                                                                                                                                                          w
                                                                                                                                                          w

                                                                                                                                SCIENCE FAIR GUIDE   67
Menu       Print
                     as a topic, he or she might ask, “Does the length of time for which a
                     hamster is exposed to daylight affect how much it eats?”
                     Ten Questions After every student has selected five topics, the
                     class will visit the library to research the subjects that students have
                     chosen. Students will create 2 investigative questions for each topic,
                     a total of 10. It is likely that one of these questions will develop into
                     a successful project. However, brainstorming more than one topic
                     will allow students to change topics with little difficulty if they
                     choose a topic that doesn’t prove fruitful.
                     Choosing the Best Investigative Question As it turns out,
                     “Does the length of time for which a hamster is exposed to daylight
                     affect how much he eats?” may be a problematic investigative ques-
                     tion because many science fairs prohibit the use of vertebrates in any
                     experiment. The teacher will be familiar with the specific rules of the
                     science fair and will steer students away from experiments that
                     would lead to disqualification. There are many testable investigative
                     questions within a topic, and one of them will probably fit the
                     requirements of the science fair. Another investigative question for
                     the subject “biological clocks” that may be more appropriate for a
                     science project is “Does the length of time for which a flowering
                     plant is exposed to daylight affect the rate at which it produces
                     flowers?”

                     The Hypothesis
                     Once a student has selected an investigative question, the next step is
                     for him or her to develop a hypothesis. A hypothesis is an educated
                     guess that answers the investigative question. After reading about
                     flowering plants and their growth patterns, the student will be able
                     to guess whether flowering plants have biological clocks. Two appro-
                     priate hypotheses for that investigative question would be as follows:


                                                                                                 Copyright © by Holt, Rinehart and Winston. All rights reserved.
                     • The length of time for which a flowering plant is exposed to
                       daylight affects the rate at which it produces flowers.


                     • The length of time for which a flowering plant is exposed to
                       daylight does not affect the rate at which it produces flowers.

                     Have your child list all the possible answers to the investigative
                     question and choose the one that is most likely to be correct accord-
                     ing to the research he or she has done. The chosen answer will serve
                     as your child’s hypothesis.
                     What If the Hypothesis Is Inaccurate? Often students feel
                     great pressure to be right about things. If you find that your child is
                     discouraged because the results of his or her experiment disprove the
                     hypothesis, remind him or her that the quality of the project is inde-
                     pendent of the accuracy of the hypothesis.

                          If your child is involved in a group project, try to monitor his
                     or her individual participation in the project. Consult the timeline,
                     and check your child’s progress at the end of Phase 1.


  68   HOLT SCIENCE AND TECHNOLOGY
Menu                                                                 Print
                                                                             Phase 2—Research and Planning:
                                                                                     Getting Involved

                                                                                DURING   THIS PHASE, STUDENTS WILL

                                                                                1. research the hypothesis
                                                                                2. change or reconfirm the hypothesis with the teacher
                                                                                3. contact all appropriate people
                                                                                4. record all research sources in the science project journal
                                                                                5. fill out the Procedural Plan for Action and obtain signatures
                                                                                6. develop the initial plan for display materials


                                                                             Research
                                                                             By now your child has settled on an investigative question and a
                                                                             hypothesis, and it is time to do further research. Your child may
                                                                             need help with basic researching techniques both at the library and
                                                                             on the Internet. Further library research trips may be necessary for
                                                                             your child to confirm his or her hypothesis and determine how to
                                                                             test the hypothesis effectively. If your child has access to the Internet
                                                                             at home, you may want to help him or her find appropriate sites for
                                                                             science project research. Please continue to encourage your child by
                                                                             discussing the project with him or her.
                                                                                Your child may wish to obtain information using other methods,
                                                                             such as seeking an interview with a scientist or writing a letter to a
                                                                             company. Encourage your child to contact all sources early in Phase 2
                                                                             in order to allow plenty of time for a response.
                                                                             Bibliography Students will need to prepare bibliographies for both
   Copyright © by Holt, Rinehart and Winston. All rights reserved.


                                                                             the research project and the display, so remind your child to keep
                                                                             careful note of all sources. These include documentaries, interviews,
                                                                             Web sites, television programs, books, newspapers, and magazines.
                                                                             Your child is expected to record this information in his or her journal.


                                                                                                                                                              PART 3: RESOURCES FOR PARENTS
                                                                             Procedural Plans
                                                                             After a few trips to the library and some interviews or Internet
                                                                             research, your child will know whether he or she is comfortable with
                                                                             the chosen investigative question. Then, your child will consider
                                                                             how he or she is going to test the investigative question. Students’
                                                                             packets include discussions of control groups versus experimental
                                                                             groups and dependent variables versus independent variables. The
                                                                             teacher will most likely discuss these concepts in class.
                                                                             Voice Your Concerns The teacher has required that your child fill
                                                                             out the Procedural Plan for Action on page 47 of Resources for
                                                                             Students. Students are also encouraged to use the Task List (page 48).
                                                                             The teacher will be watching for projects that require too much time
                                                                             or money. If, for some reason, you think that the project is unreasonable
                                                                                                                                                              w
                                                                             (because of cost, workload, or lack of interest on your child’s part), now is
                                                                                                                                                              w
                                                                             the time to contact the teacher. Soon it will be very difficult for your child   w
                                                                             to switch topics.
                                                                                                                                 SCIENCE FAIR GUIDE     69
Menu         Print
                     The Price is Right In most cases, there will be minor costs
                     involved in your child’s science project. As your child formulates a
                     science project, he or she will be asked to evaluate the costs involved
                     with performing each experiment. You can assist your child with this
                     process and help create an informative project that stays within your
                     family’s budget. In certain cases, a science fair entry fee or travel
                     expenses may be required. In general, here are a few items you can
                     expect your child to need:
                       • journal
                       • materials necessary for experimentation
                       • materials necessary for display (posterboard, markers, etc.)
                       • books (using the library can help avoid these costs)
                     Less Is More Judges often take creative use of materials into
                     account when judging a science fair, and expensive projects probably
                     will not be recognized as better just because they employ fancier
                     equipment. The library and Internet provide resources with sugges-
                     tions on how to make equipment using materials that are inexpen-
                     sive or can be found around the house. Also, many businesses and
                     institutions will lend equipment to young scientists. Encourage your
                     child to write to local businesses for help in obtaining materials if
                     the schedule allows enough time for him or her to receive a
                     response. You may wish to consult a scientific supply company, such
                     as those listed in the box below, in order to determine how much
                     materials will cost.

                           TIP
                       The following is a list of a few scientific supply companies that
                       specialize in laboratory equipment. These companies require
                       that biological and chemical supplies be purchased by your


                                                                                               Copyright © by Holt, Rinehart and Winston. All rights reserved.
                       child’s school and shipped to his or her teacher.
                                 Carolina Biological Supply Co.
                                 2600 York Road
                                 Burlington, NC 27215
                                 (800) 334-5551
                                 www.carolina.com
                                 Science Kit and Boreal Labs
                                 777 East Park Drive
                                 Tonawanda, NY 14150
                                 (800) 828-7777
                                 www.sciencekit.com
                                 WARD’s Natural Science Establishment, Inc.
                                 5100 West Henrietta Road
                                 Rochester, NY 14586
                                 (800) 962-2660
                                 www.wardsci.com


                          If your child is involved in a group project, try to monitor his
                     or her individual participation in the project. Consult the timeline,
                     and check your child’s progress at the end of Phase 2.
 70    HOLT SCIENCE AND TECHNOLOGY
Menu                                                                 Print
                                                                             Phase 3—Data Collection and Analysis:
                                                                                     Getting Involved

                                                                               DURING   THIS PHASE, STUDENTS WILL

                                                                               1. conduct experiments safely
                                                                               2. choose an appropriate sample size
                                                                               3. perform several trials of the experiment
                                                                               4. collect data accurately
                                                                               5. record all data and observations in their science project journal
                                                                               6. graph or chart the data and look for trends
                                                                               7. prepare a written conclusion supported by the data


                                                                             Although your child’s science teacher will plan for some in-class data
                                                                             collection, much of the data collection phase of the project may be
                                                                             done at home. Your child has been told that an adult must be pres-
                                                                             ent during all data collection. For your child’s safety, please supervise
                                                                             the data collection phase. You may refer to the Safety Guide in the
                                                                             student resource packet to help avoid accidents during data collec-
                                                                             tion. This is a good time to review the Safety Contract with your
                                                                             child.
                                                                                Over the next few weeks, you may want to help your child in the
                                                                             following ways:
                                                                               • Familiarize yourself with the Phase 3 student instruction
                                                                                 sheets, and help your child understand the importance of
                                                                                 each technique, such as using an adequate sample size, collect-
                                                                                 ing the right type of data, and performing several trials of
   Copyright © by Holt, Rinehart and Winston. All rights reserved.


                                                                                 an experiment.
                                                                               • Make sure that your child is measuring accurately.
                                                                               • The International System of Units (SI) is a global measurement


                                                                                                                                                         PART 3: RESOURCES FOR PARENTS
                                                                                 system that helps scientists share and compare their observa-
                                                                                 tions and results. If there is a requirement that your child
                                                                                 express data measurements using SI, make sure that he or she
                                                                                 understands this requirement.
                                                                               • Check your child’s science project journal to make sure that he
                                                                                 or she is keeping a neat record of all aspects of the project.
                                                                               • Assist in explaining charts, graphs, or basic concepts of analysis
                                                                                 when necessary.
                                                                               • Motivate your child by showing interest and asking questions,
                                                                                 and allow him or her to decide how to conduct the experiment.

                                                                                  If your child is involved in a group project, try to monitor his
                                                                             or her individual participation in the project. Consult the timeline,
                                                                             and check your child’s progress at the end of Phase 3.                      w
                                                                                                                                                         w
                                                                                                                                                         w

                                                                                                                              SCIENCE FAIR GUIDE   71
Menu       Print
                     Phase 4—Writing a Report: Getting
                             Involved

                       DURING   THIS PHASE, STUDENTS WILL

                       1. answer the questions on page 55 of Resources for Students
                       2. prepare an outline and discuss it with the teacher
                       3. prepare a draft and discuss it with the teacher
                       4. revise the draft according to the teacher’s feedback
                       5. turn in a completed draft


                     When your child’s teacher assigns the written report, you may want
                     to be sure that your child understands what is expected. He or she
                     needs to follow the rules for how long the report should be, whether
                     it must be typed, etc., especially if a written report is required for the
                     science fair. You may want to contact the science teacher for report
                     guidelines. The written report will represent your child’s ideas and
                     conclusions about the project, so it should be well thought out and
                     neat.

                     The Process
                     Students will be asked to answer the questions on page 55 of
                     Resources for Students. The questions are designed to get students
                     thinking about what they learned and what they enjoyed the most
                     about the science project. After answering the questions, students
                     will create an outline of the information to include in their written
                     reports. Using index cards may help with the organization part of
                     the assignment. Once students have completed their outline, the


                                                                                                  Copyright © by Holt, Rinehart and Winston. All rights reserved.
                     teacher will meet with them to offer constructive criticism. From
                     there, students will create at least one rough draft.
                     Positive Feedback If you help your child with an outline or draft
                     of his or her report, remember that giving and receiving feedback
                     can be difficult for parent and child. Here are some tips to aid the
                     process:
                       • You may want to mention both the strong and weak points of
                         an outline or a draft.
                       • You can certainly help your child with neatness, spelling, and
                         grammar, but the ideas and writing should be his or her own.
                       • Remind your child to cite all sources he or she used. In the bib-
                         liography, your child should also acknowledge the help he or
                         she received from parents, teachers, and other people.
                       • Be aware that your child’s writing ability can affect the overall
                         presentation of information. Imperfections in writing style may
                         overshadow the scientific content. You may wish to check your
                         child’s report to ensure that it is factual and organized.


  72   HOLT SCIENCE AND TECHNOLOGY
Menu                                                                 Print
                                                                             What to Include in the Written Report
                                                                             Most scientific reports follow the same order as the steps of the sci-
                                                                             entific method, explaining the entire experimental process from
                                                                             beginning to end. Student reports should be ordered as follows:
                                                                               • Your child may include some background information about the
                                                                                 topic before stating the purpose and hypothesis of the project.
                                                                               • A description of the procedure comes next, followed by the data
                                                                                 acquired during the experimentation.
                                                                               • Your child may choose to include charts, graphs, or photo-
                                                                                 graphs, but it is best to save most figures for the display.
                                                                               • Last, your child will describe the conclusions that resulted from
                                                                                 the data analysis. The conclusion is also the place to address
                                                                                 some of the questions asked on page 55 of Resources for
                                                                                 Students.
                                                                               • You might also encourage your child to include suggestions for
                                                                                 further study or a brief description of how he or she would do
                                                                                 the project differently next time.
                                                                               • Invite your child to have fun with the written part of the
                                                                                 project.

                                                                                  If your child is involved in a group project, try to monitor his
                                                                             or her individual participation in the project. Consult the timeline,
                                                                             and check your child’s progress at the end of Phase 4.
   Copyright © by Holt, Rinehart and Winston. All rights reserved.


                                                                                                                                                       PART 3: RESOURCES FOR PARENTS


                                                                                                                                                       w
                                                                                                                                                       w
                                                                                                                                                       w

                                                                                                                             SCIENCE FAIR GUIDE   73
Menu       Print
                     Phase 5—Creating and Exhibiting a
                             Display: Getting Involved

                       DURING   THIS PHASE, STUDENTS WILL

                       1. sketch possible designs for the display
                       2. create a display board within the appropriate parameters
                       3. display results in a clear and interesting manner
                       4. give an oral presentation as practice for the science fair
                          interview


                     The Display Board
                     The purpose of a display is to present the information in the clearest
                     manner possible so that the judges will be able to recognize quickly
                     that the student performed a successful science project. You may
                     want to encourage your child to be creative with borders, fonts, and
                     layout, but have them make sure that a judge would find it easy to
                     read the information contained in the display. Illustrations should
                     be informative, not just decorative. A sleek, mature, and professional
                     style can impress the judges, but they prefer presentations which are
                     unique and clearly a product of the student.
                     Portable A display board can have a large middle section and two
                     smaller “wings” on the left and right. This design allows the display
                     to fold up, making it more portable. If the science fair is located far
                     away, you might ask other parents to share the expense of renting a
                     moving truck or trailer in order to save many families the worry of
                     transporting displays that don’t fit comfortably into cars.


                                                                                               Copyright © by Holt, Rinehart and Winston. All rights reserved.
                       HOW CAN I HELP?
                       • Encourage your child to sketch out a design before he or she
                         begins making the display.
                       • Check charts and graphs for accuracy and readability.
                       • Make sure that the information shown is relevant to the pur-
                         pose, hypothesis, and conclusion.
                       • Remember that judges are looking for conclusions based on
                         experimental evidence, not on opinions.
                       • Give your child a pep talk before the interview.
                       • Tell your child some tricks that you use to remain calm and
                         focused.


  74   HOLT SCIENCE AND TECHNOLOGY
Menu                                                                 Print
                                                                             Preparing for the Interview
                                                                             Find out if your child needs to make a presentation to the judges at
                                                                             the science fair. The presentation summarizes each step of the sci-
                                                                             ence project: why students chose their subject, a statement of the
                                                                             hypothesis, what type of data was collected, a brief summary of the
                                                                             data, and the conclusions that students came to when they analyzed
                                                                             the data. Your child may also discuss how he or she would do the
                                                                             experiment differently if he or she were to start over again or what
                                                                             other questions arose during his or her research.
                                                                             Practice Makes Perfect If your child practices a few times he or
                                                                             she will have a great advantage over students who haven’t rehearsed.
                                                                             Your child could practice by explaining the project to your family
                                                                             and friends. During the interview, the judges will likely ask the stu-
                                                                             dent a few questions. If you ask a few questions during your child’s
                                                                             practice presentations, he or she may feel more comfortable answer-
                                                                             ing the judge’s questions.

                                                                                  If your child is involved in a group project, try to monitor his
                                                                             or her individual participation in the project. Consult the timeline,
                                                                             and check your child’s progress at the end of Phase 5.

                                                                             Be Supportive
                                                                             Hopefully, every student will be recognized for his or her effort at
                                                                             the science fair. To show your support for your child, try to attend
                                                                             the science fair if possible and be proud of his or her individual
                                                                             effort and the part you played in his or her growth as a student.
   Copyright © by Holt, Rinehart and Winston. All rights reserved.


                                                                                                                                                         PART 3: RESOURCES FOR PARENTS


                                                                                                                                                         w
                                                                                                                                                         w
                                                                                                                                                         w

                                                                                                                            SCIENCE FAIR GUIDE      75

Sci fair

  • 1.
    Menu Print Science Fair Guide To jump to a location in this book 1. Click a bookmark on the left. To print a part of the book 1. Click the Print button. 2. When the Print window opens, type in a range of pages to print. The page numbers are displayed in the bar at the bottom of the document. In the example below, “1 of 151” means that the current page is page 1 in a file of 151 pages.
  • 2.
    Menu Copyright © by Holt, Rinehart and Winston. All rights reserved. Print PART 1: RESOURCES FOR TEACHERS SCIENCE FAIR GUIDE 1 PART 1: RESOURCES FOR TEACHERS w w w
  • 3.
    Menu Print Hands-on Science The most obvious goal of a science project is to extend a student’s understanding of science. Science is hands-on by nature, and there is no doubt that hands-on experiences facilitate the learning process. The scientific method allows scientists to collect and analyze data in a strategic and unified manner. When students use the scientific method to design and execute a project, they use the same steps professional researchers use to gather new information. Building Scientific Confidence More importantly, science proj- ects make science more fun and relevant to the student. Every student, regardless of aptitude, can benefit from planning and executing an inquiry-based science project. A science project can be a great way to spark a student’s interest in science or to help a student develop a broader interest in research. Philosophy of Science Fairs Science fairs range in scale from a single class of students sharing their projects to an international event offering scholarship money as prizes. From the largest science fair to the smallest, science fairs generally share a common philosophy and similar values: • emphasis on using the scientific method • investigation by experimentation (inquiry-based learning) • development of critical thinking skills • opportunity for a positive learning experience • extension of formal science education How to Use This Guide Copyright © by Holt, Rinehart and Winston. All rights reserved. While a science project is entirely the product of a student’s ingenu- ity and work, motivation from teachers and parents is invaluable. The Science Fair Guide leads teachers, parents, and students through the process of developing a science project. What’s in This Guide Using the scientific method, this guide divides the science project into five phases: • Phase 1: Generating an Idea • Phase 2: Research and Planning • Phase 3: Data Collection and Analysis • Phase 4: Writing a Report • Phase 5: Creating and Exhibiting a Display For each phase, you will find a set of management tips for teachers, an instruction worksheet for students, and a handout encouraging parental involvement. This guide also provides three progress reports, allowing each participant—the teacher, the student, and the 2 HOLT SCIENCE AND TECHNOLOGY
  • 4.
    Menu Print parents—to monitor the student’s work. Also included are sample timelines, rubrics, and safety guidelines. For additional resources on ideas and equipment, see pp. 28–29. PART 1: RESOURCES FOR TEACHERS Rules, Rules, Rules Often a school will conduct its own science fair. The winners of the school science fair may enter a citywide sci- ence fair, and the winners of a citywide science fair may enter a regional science fair. Before assigning the project, consider whether your students should prepare their science project to meet the requirements of subsequent science fairs. Regulations vary from science fair to science fair and even from year to year, so it is essential to contact the science fair sponsors for current listing of rules and regulations. Some science fairs have regis- tration fees and cutoff dates, lists of materials that students are not permitted to use, and requirements for reports and displays. It is extremely important to be prepared with the necessary information before assigning a science project. Getting Started w Before you begin Phase 1, complete these steps using the strategies w that follow. w 1. create a timeline 2. send home a parent letter with a safety guide, a safety contract, and a copy of the timeline 3. hand out Resources for Students and get students excited about the science fair 4. send home Resources for Parents and explain how parents should use the progress reports 1. Timelines Your first step is to create a timeline that will allow Copyright © by Holt, Rinehart and Winston. All rights reserved. plenty of time for students to develop a project that is suitable for entering the chosen science fair. If students are participating in a national science fair, their projects will be more involved, requir- ing more teacher and parental guidance. On the next few pages, you will find sample timelines for a 4-week schedule (page 5), an 8-week schedule (pp. 6–7), and a blank timeline (page 8) that allows you to create a schedule tailored to your students’ needs. Distribute this timeline to both parents and students, letting them know in advance what their responsibilities will be. SCHEDULING TIP On the timeline, having Monday as a completion date for each assignment will allow parents to help their child over the week- end with library trips, data collection, and other parts of the project. 2. Prepping Parents After you have notified the students of the upcoming activity, you are ready to prepare the parents. You may choose to send them a notice 1 or 2 weeks before you make the first assignment. Include the timeline, which identifies the date SCIENCE FAIR GUIDE 3
  • 5.
    Menu Print of the science fair and describes when assignments are due. Also include the Safety Guide (page 33) and Safety Contract (page 34) for parents to read with their child in preparation for the experi- ment. Below is a sample letter. You can find this letter on the One-Stop Planner CD-ROM. Dear Parent or Guardian, In the next few weeks, your son or daughter will begin a science project in our science class. The science project’s objective is to give every child hands-on experience using the scientific method. In addition, each student will have the opportunity to independently research a topic of his or her interest. You can help motivate your son or daughter by taking an interest in the project. Your child will have an opportunity to enter his or her science project in the science fair, which takes place on . The emphasis of our project is not on win- ning, but on having positive learning experiences and having fun. I am including with this letter a copy of a timeline for our class projects, a safety guide, and a safety contract. Please go over the safety guide with your child, and have him or her return the signed contract. An information packet for parents will be arriving shortly to keep you informed about how you can best assist your child with his or her project. Thank you for your help. Sincerely, Copyright © by Holt, Rinehart and Winston. All rights reserved. 3. Motivating Students Next, you will want to discuss with stu- dents what a science fair is and get them excited about the event. When you introduce the science fair, give the students their instruction worksheets (Part 2: Resources for Students). You can either hand out Resources for Students in its entirety or as indi- vidual worksheets as the class begins each phase. Either way, make sure students are aware of the due dates for their assign- ments. Also, be certain that they clearly understand the safety guidelines they are expected to uphold. Distribute the Student’s Progress Reports (pp. 35–36), and explain how they will be used. 4. Request Back-up Finally, send home the parent information packet (Part 3 of this guide) so that the parents are prepared to help with each phase of the student’s work. Be sure to explain how they can use the Parent’s Progress Report (pp. 65–66) to guide their children. You will find more about how to use the progress reports in the Evaluation section of this guide (page 9–11). 4 HOLT SCIENCE AND TECHNOLOGY
  • 6.
    Menu Copyright © by Holt, Rinehart and Winston. All rights reserved. Timeline for a 4-Week Science Project Print Sunday Monday Tuesday Wednesday Thursday Friday Saturday Week Phase 1 project Brainstorm ideas in is assigned school and at home over weekend Library Develop investigative question Check progress Phase 2 research day report—end of Library research day Week 1 Student-teacher meetings to confirm topic Phase 1 Reconfirm hypothesis Develop hypothesis with teacher Check progress Phase 3 In-class data Week 2 report—end of Brief safety collection Phase 2 reminder In-class data Check progress Outline due In-class draft check collection and report—end of Week 3 analysis Phase 3 Begin written report Phase 4 Begin outline Written report Check progress Phase 5 Display due due report—end of Reminder of Phase 4 display Oral presentation, Week 4 requirements practice for interview Science Fair! Check progress report—end of Phase 5 SCIENCE FAIR GUIDE 5 w w w PART 1: RESOURCES FOR TEACHERS
  • 7.
    6 Menu Timeline for an 8-Week Science Project Sunday Monday Tuesday Wednesday Thursday Friday Saturday Print Week Phase 1 project Brainstorm ideas in is assigned school and at home over weekend HOLT SCIENCE AND TECHNOLOGY Library Develop investigative question research day Week 1 Student-teacher meetings to confirm topic Develop hypothesis Check progress Phase 2 Reconfirm report—end of Library research hypothesis with Week 2 Phase 1 day teacher Library research day Week 3 Check progress Phase 3 In-class data report—end of Brief safety collection Week 4 Phase 2 reminder Copyright © by Holt, Rinehart and Winston. All rights reserved.
  • 8.
    Menu Copyright © by Holt, Rinehart and Winston. All rights reserved. Timeline for an 8-Week Science Project, continued Print Sunday Monday Tuesday Wednesday Thursday Friday Saturday In-class data In-class collection data collection Week 5 and analysis Check progress Phase 4 Outline due report—end of Begin outline Phase 3 Begin written Week 6 report In-class Writen report Week 7 draft check due Check progress Phase 5 Display due report—end Reminder of Week 8 of Phase 4 display Oral presentation, requirements practice for interview Science Fair! Check progress report—end of Phase 5 SCIENCE FAIR GUIDE 7 PART 1: RESOURCES FOR TEACHERS w w w
  • 9.
    Menu Print Create Your Own Timeline Sunday Monday Tuesday Wednesday Thursday Friday Saturday Week Week Week Week Week Copyright © by Holt, Rinehart and Winston. All rights reserved. Week Week Week Week 8 HOLT SCIENCE AND TECHNOLOGY
  • 10.
    Menu Print Evaluation The science projects will likely be evaluated twice: first by you for a PART 1: RESOURCES FOR TEACHERS grade and second by the judges at the science fair. Setting your evalu- ative criteria to reflect the criteria the judges hold for a competitive project will be helpful for students who are entering the science fair. Students can then use your evaluation to improve the project before presenting it to the judges. What the Judges Are Looking For Because science fairs vary widely, it is of the utmost importance that you familiarize yourself with the specific judging criteria of a particu- lar science fair. Many science fairs judge entries using the following criteria: use of scientific thought 30% creativity of approach 30% thoroughness of investigation and research 15% w w skill of experimental technique 15% w clarity of expression in presentation and report 10% OTHER CONSIDERATIONS The following are suggestions for evaluating a student project or predicting how a judge will evaluate a project: • Besides assessing the five categories that appear above, some science fairs reward memorable presentations or displays. • A science project should have a clear hypothesis, research plan, and conclusion. Copyright © by Holt, Rinehart and Winston. All rights reserved. • Many science fairs will not accept models or demonstrations, only experiments that follow the scientific method. • Simple library research or an unplanned experiment is not acceptable. • The student should design a controlled experiment. • Judges typically evaluate projects using a rubric. • Projects should be assessed against the other projects in the science fair or competition, as opposed to being judged against an ideal. • Judges at most science fairs will be asking themselves how they would approach the investigative question and whether they would draw the same conclusions the student did. • Creative use of materials should be considered. Student Understanding The student’s work should be evident in the project. The scientific process and the manner in which the research was conducted tend to outweigh the actual display of infor- mation. The judges will be looking carefully to see that the student SCIENCE FAIR GUIDE 9
  • 11.
    Menu Print has an understanding of his or her project and is responsible for the final product. In a group project, the judges will be looking for evi- dence that each group member completed specified tasks that fur- thered the progress of the group. Tailoring Evaluation to Criteria of a Particular Fair Each science fair differs in the types of science projects that qualify for entry. Some strictly require that students perform experiments that follow the scientific method rather than perform demonstrations of scientific principles. Other science fairs accept inventions, scientific models, engineering projects, and informative exhibits. For instance, Invent America, a nonprofit K–8 educational program, holds a national contest in which students can enter inventions that solve everyday problems. The resources in this guide are tailored for experi- mental science projects. If you choose to broaden the scope of the projects that you accept, be sure to inform your students and their parents. Display Regulations Although the display may not be an important part of your evalua- tion, the judges will evaluate it. Rules regarding acceptable display materials vary. Most science fairs have a long list of items that are unacceptable for display. Restricted items can include everything from living organisms to any chemical, including water. It is also important to verify the parameters for displays. For example, some science fairs limit the size of displays to 76 cm deep, 122 cm wide, and 274 cm high, including the height of the table supporting the display. Be sure students have the list of unacceptable display items and the required display parameters at the time the projects are assigned. The Poster Session Preliminary judging sometimes includes a Copyright © by Holt, Rinehart and Winston. All rights reserved. “poster session” in which no electrical power is provided for the dis- plays. The purpose of this session is to maintain the focus on the creative and scientific aspects of the project and to decrease the impact of a fancy display. What to Look For Positive Learning Many students do not feel like they can win and therefore become discouraged about participating. Emphasize healthy competition and a positive learning experience over simply winning. Participating in a science fair allows a student the opportu- nity to take charge of his or her own learning experience and to explore something that interests him or her. To emphasize positive learning, your evaluation can focus on the student’s use of the scien- tific method and the amount of effort he or she put into the project rather than the student’s ability to win a science fair. Rubrics You may find that some students excel at developing a sci- entifically sound experiment yet are not as talented at expressing what they have learned. Others have good oral and written skills but do not have a firm grasp of the scientific method. Since both the development process and the clear expression of ideas are important aspects of a competitive science project, it may be best to focus on 10 HOLT SCIENCE AND TECHNOLOGY
  • 12.
    Menu Print these skills in separate evaluations. For this reason, you will find included in this guide one rubric that emphasizes the development PART 1: RESOURCES FOR TEACHERS process and another that emphasizes the final report and display. You can use these together, or you may choose to develop your own rubric using the Create Your Own Rubric found on page 14. Additional checklists and rubrics can be found on the One- Stop Planner CD-ROM. Progress Reports Many students find it difficult to keep track of all of the tasks required in a project that lasts several weeks. To help you monitor student progress, you will find a Teacher’s Progress Report on pp. 15–16. You may choose to use this as a checklist to determine whether or not a student performed each assigned task on time. Student’s Progress Report Maintaining the Student’s Progress Report (pp. 35–36) may help your students better understand their w responsibilities. The Student’s Progress Report lists the tasks required w in each phase of the science project, giving students a better under- w standing of what the judges may be looking for as well as what you expect of them. The Student’s Progress Report also can serve as a handy checklist to remind students what to do next. Parent’s Progress Report A Parent’s Progress Report is also included in Resources for Parents on pp. 65–66. Parents may find the progress reports useful if their child requires help with long-term organization and keeping track of responsibilities. Progress Reports and Evaluation You may wish to include the results of all three progress reports in the final evaluation. This approach will reward students who carefully planned their science Copyright © by Holt, Rinehart and Winston. All rights reserved. project and spent time developing each phase. Including the progress reports in your evaluation will discourage students from waiting until the weekend before the science fair to prepare the entire science project. However you choose to incorporate the progress reports into your evaluation, be sure to make both students and parents aware of the intended use of the progress reports. Group Projects You may choose to let your students work in groups. If this is the case, assign the groups before beginning Phase 1. For progress reports, you may still want to evaluate students on an individual basis. Making this clear at the beginning of the project may encour- age participation from students who tend to let the others do the work. Consult Holt Science & Technology Assessment Checklists & Rubrics for a sample teacher evaluation of a cooperative group activity. SCIENCE FAIR GUIDE 11
  • 13.
    Menu Print Science Project Development Rubric This rubric focuses on the development process (planning, research, and data collection) of a science project. Possible Use of Scientific Method points (40 points possible) 40–31 Student designed an experiment with clear control and experimental groups that effectively tested a hypothesis. 30–21 Student designed an experiment with control and experimental groups that adequately tested a hypothesis. 20–11 Student designed an experiment with control and experimental groups that were related indirectly to the hypothesis. 10–1 Student designed an experiment that did not effectively test a hypothesis and had inadequate control and experimental groups. Thoroughness of Research and Data Collection (40 points possible) 40–31 Student thoroughly researched topic, collected data with care and preci- sion, recorded all observations and sources in a science project journal, and achieved a high level of detail. 30–21 Student researched topic well, collected data with care but lack of preci- sion, recorded most observations and sources in a science project journal, and achieved moderate detail. 20–11 Student adequately researched topic, collected data imprecisely, made a Copyright © by Holt, Rinehart and Winston. All rights reserved. fair attempt to record observations and sources in a science project journal, and achieved average detail. 10–1 Student poorly researched topic, collected data inappropriately, and made a poor attempt to record observations and sources in a science project jour- nal; research lacked detail. Originality of Approach and Use of Equipment (20 points possible) 20–16 Student adopted an original, resourceful, and novel approach and had creative design and use of equipment. 15–11 Student extended standard approach and use of equipment and exercised moderate creativity. 10–6 Student employed standard approach and use of equipment and exercised little creativity. 5–1 Student used equipment and topic in an ineffective and unimaginative way. 12 HOLT SCIENCE AND TECHNOLOGY
  • 14.
    Menu Print Science Project Presentation Rubric This rubric focuses on the final written report and display of a science project. PART 1: RESOURCES FOR TEACHERS Possible Understanding and Scientific Thought points (40 points possible) 40–31 Student completely understands the topic and uses scientific terminology properly and effectively. 30–21 Student demonstrates solid understanding of the topic and adequate use of scientific terminology. 20–11 Student displays insufficient understanding of the topic and uses very little scientific terminology. 10–1 Student lacks understanding of the topic and incorrectly uses scientific terminology. w Quality of Oral/Written Presentation w (32 points possible) w 32–25 Student exhibits an original, resourceful, and novel approach to presenta- tion of topic; paper is creatively and clearly written. 24–17 Student presents topic with standard approach; writing is unimaginative but effectively gets point across. 16–9 Student’s presentation of topic is incomplete and unimaginative; writing lacks clarity. 8–1 Student’s presentation of topic is ineffective and lacks cohesion; paper lacks Copyright © by Holt, Rinehart and Winston. All rights reserved. clarity and is poorly written. Effectiveness of Exhibit or Display (28 points possible) 28–22 Layout is logical and imaginative and can be followed easily; student dis- plays creative use of materials. 21–15 Layout of exhibit is acceptable; student demonstrates proper use of materials. 14–8 Layout lacks organization; student exhibits poor but effective use of materials. 7–1 Layout is difficult to understand; student uses materials poorly and ineffectively. SCIENCE FAIR GUIDE 13
  • 15.
    Menu Print Create Your Own Rubric Possible points Criteria Copyright © by Holt, Rinehart and Winston. All rights reserved. 14 HOLT SCIENCE AND TECHNOLOGY
  • 16.
    Menu Print Name ____________________________________________________ Date __________________ Class _______________ Teacher’s Progress Report ❑ individual project ❑ team member For each step of each phase of the science project, record the task due date and the date the student accomplished the task. Date Date Phase 1—Generating an Idea due accomplished Student brainstormed five possible subjects. Student came up with two investigative questions for each topic. Student consulted with teacher and parents about project possibilities. Student chose a suitable topic. Student formed a hypothesis. Student discussed topic and hypothesis with teacher and gained approval. Student recorded ideas in science project journal. Date Date Phase 2—Research and Planning due accomplished Student researched the hypothesis. Copyright © by Holt, Rinehart and Winston. All rights reserved. Student reconfirmed or changed the hypothesis based on further research and then gained teacher approval. Student contacted all appropriate people before beginning data collection. Student recorded all details of research so far in a bibliography in the science project journal. Student filled out the Procedural Plan for Action and obtained necessary signatures. Student developed the initial plan for display materials. Teacher comments: SCIENCE FAIR GUIDE 15
  • 17.
    Menu Print Name ____________________________________________________ Date __________________ Class _______________ Teacher’s Progress Report, continued Date Date Phase 3—Data Collection and Analysis due accomplished Student conducted the experiment safely. Student chose an appropriate sample size. Student performed several trials of his or her experiment. Student collected data accurately. Student recorded all data and observations in the science project journal. Student graphed or charted data and looked for trends. Student prepared a written conclusion supported by the data. Date Date Phase 4—Writing a Report due accomplished Student answered the questions on page 55. Student prepared an outline and discussed it with the teacher. Student prepared a draft and discussed it with the teacher. Copyright © by Holt, Rinehart and Winston. All rights reserved. Student revised the draft according to the teacher’s feedback. Student turned in the final draft of the written report. Date Date Phase 5—Creating and Exhibiting a Display due accomplished Student sketched possible designs for display. Student created a display board within the appropriate parameters. Student displayed the results in a clear and interesting manner. Student gave an oral presentation as practice for the science fair interview. 16 HOLT SCIENCE AND TECHNOLOGY
  • 18.
    Menu Print Phase 1—Generating an Idea: Management Tips PART 1: RESOURCES FOR TEACHERS DURING THIS PHASE, STUDENTS WILL 1. brainstorm five possible subjects 2. come up with two investigative questions per topic 3. consult with teacher and parents about project possibilities 4. choose a suitable topic and investigative question 5. form a hypothesis 6. discuss topic and hypothesis with the teacher and gain approval 7. record ideas in their science project journal w Begin by distributing the Phase 1 packet to students and parents. w Check the timeline and schedule library visits and individual meet- w ings with students. TIP Throughout the course of the project, and especially during the beginning stages, emphasize that one of the main goals of the project is to have fun. Healthy competition can be exciting, but the purpose of a science project is to learn about science through inquiry in a hands-on experiment. Copyright © by Holt, Rinehart and Winston. All rights reserved. The Journal: An Important Tool Resources for Students periodically reminds students to enter information in their science project journals. Students will need their science project journals as soon as they begin Phase 1. They may use a spiral bound notebook, or they may choose to make a journal by stapling together ruled paper or graph paper. Explain to students that this journal is an important tool that they will use in every phase of the science project. For instance, they will write in their journal all of the notes that they take while brain- storming and researching. They will also record all data, observations, and calculations in their journals. This way all of the information needed for writing a report and preparing a display will be in one place. For group projects, every team member must keep a science project journal containing their notes and data. SCIENCE FAIR GUIDE 17
  • 19.
    Menu Print Brainstorming for Topics Students often find that coming up with a suitable idea is the most challenging part of a project. Encourage students to brainstorm and to be creative. Trying to come up with new ideas can be difficult and sometimes embarrassing for sensitive students. Make sure they feel free to record any idea, no matter how odd it seems at first. Familiarize yourself with the students’ packets to help them. If you know of a subject that a student is particularly interested in, offer ideas related to that topic. Caution: Be careful not to take over the brainstorming process for stu- dents. Avoid assigning topics. Unless a student finds something that interests him or her, he or she may have a difficult time putting forth the effort necessary to complete a project. Suggesting Ideas For students who have trouble coming up with science project topics, try the following: • Provide your students with a list of projects that previous stu- dents have successfully completed. • You may also decide to list some projects that did not work out as planned. Explain why the projects were unsuccessful (too involved, too expensive, not enough time, etc.). • Holt Science & Technology Long-Term Projects & Research Ideas con- tains several ideas that may be developed into science projects. • Resources for Students mentions several topics for science projects. • The Additional Resources section of this booklet also provides a list of books with ideas for science projects (see pp. 28–29). Forming Investigative Questions Copyright © by Holt, Rinehart and Winston. All rights reserved. Require that all students generate at least two investigative questions for each of five topics. If they have 10 investigative questions to choose from, chances are good that they will be able to settle on a viable investigative question. TIP The timelines and Resources for Students suggest a library trip early in Phase 1, after a student has brainstormed for topics. Before or during the scheduled library trips, brief students on how to use library resources. Strengthening Research Skills For students who require addi- tional help with researching topics, use the following worksheets from Holt Science & Technology Science Skills Worksheets: • Worksheet 17: Organizing Your Research • Worksheet 18: Finding Useful Sources • Worksheet 19: Researching on the Web 18 HOLT SCIENCE AND TECHNOLOGY
  • 20.
    Menu Print The Teacher-Student Meetings This is the best time to meet with students individually to ensure PART 1: RESOURCES FOR TEACHERS that they are on the right track. Discuss their project options, and help them decide which investigative question they will choose. Steer them away from projects that would exceed a reasonable budget or projects that may risk disqualification. During the meet- ings, it would be helpful for you to have a copy of the science fair rules handy to point out problems that may make a particular proj- ect difficult. For example, many science fairs prohibit the display of chemicals. A student may be allowed to perform a supervised proce- dure with chemicals during the data collection phase of the project, but the rules prohibiting chemicals would limit the display. Forming a Hypothesis When students have chosen their topics, it is time for them to form a hypothesis. Having researched their topic thoroughly, students are now able to make an educated guess that answers their investigative question. Make sure students understand the scientific method. w Emphasize that they will not design an experiment in order to yield w results that support the hypothesis they have formed. Instead, they w will design an experiment to test the hypothesis. There is often great pressure to be right about the hypothesis, but that is not the point of a science project. The purpose is to discover whether the hypothesis is supported or disproved by the experimental results. The quality of the project is independent of the accuracy of the hypothesis. At the end of Phase 1, make sure you are still following the timeline. Check students’ progress on their Student’s Progress Report and Parent’s Progress Report. Copyright © by Holt, Rinehart and Winston. All rights reserved. SCIENCE FAIR GUIDE 19
  • 21.
    Menu Print Phase 2—Research and Planning: Management Tips DURING THIS PHASE, STUDENTS WILL 1. research the hypothesis 2. change or reconfirm the hypothesis with the teacher 3. contact all appropriate people 4. record all research sources in their science project journal 5. fill out the Procedural Plan for Action and obtain signatures 6. develop the initial plan for display materials Research You may feel it is necessary to give students a further lesson on Internet research or library research. The library may have a list of useful sources that students can refer to while planning their experi- ments. You may wish to meet with the librarian to discuss what the students will be researching so that he or she can prepare for the class visit. Also, Additional Resources (page 29) provides a list that includes books about developing science projects. Remind students to record all research in their science project journals. Students may wish to obtain information using other methods, such as seeking an interview with a scientist or writing a letter to a company. Encourage students to contact all sources early in Phase 2 in order to allow plenty of time for a response. The student packet includes a sample letter for students who wish to contact someone about information needed for their science project. Copyright © by Holt, Rinehart and Winston. All rights reserved. Bibliography Make sure students are familiar with the style of bibliography that you require. Resources for Students encourages stu- dents to record all sources used, including interviews, in their sci- ence project journals. Recording all sources during the research phase will give students a head start on the bibliographies that they will need for the written report and the display. Procedural Plan Students will plan how they are going to test their investigative questions. Their packets include a brief discussion of control groups versus experimental groups and dependent variables versus inde- pendent variables. You may want to discuss these terms further in class. Once each student has an idea of how to scientifically test his or her hypothesis, you may require students to fill out the Procedural Plan for Action (page 47) and the Task List (page 48). Caution: Watch for projects that will require too much time, money, or effort. Now is the time for the student to determine whether the procedural plan for an experiment exceeds budget or time limits. At this point, it would not be too late for a student to choose a differ- ent topic. However, changing a project any later than this stage may pose a problem in meeting the deadlines on the timeline. 20 HOLT SCIENCE AND TECHNOLOGY
  • 22.
    Menu Print Obtaining Equipment and Materials Cutting Costs Remind students to keep cost and availability of PART 1: RESOURCES FOR TEACHERS materials in mind when planning a project. Some ideas require more resources than are available within a limited budget. Not all expen- sive ideas need to be discarded. Encourage students to come up with less expensive ways to conduct their experiment or ways to perform a similar yet less costly experiment within the chosen topic. For prices and availability of materials, provide students with a list of local businesses that carry scientific and laboratory supplies (see page 28). After students have chosen a hypothesis and planned their proj- ect, it is important to anticipate costs. When preparing a budget, a student should consider the following expenses: • Science fair entry fee • Science fair travel expenses • Library trips • Book purchases w w • Journal purchase w • Materials necessary for experimentation • Materials necessary for display Creativity Counts Judges often take creative use of materials into account when judging a science fair; a student who has built a barometer will likely be recognized as more motivated than a stu- dent who purchased one. In other words, high-dollar projects will not be recognized as better just because they employ fancier equip- ment. The library and Internet may provide resources with sugges- tions on how to make equipment using inexpensive materials. Copyright © by Holt, Rinehart and Winston. All rights reserved. Outside Sponsors Also, many businesses and institutions will lend equipment to young scientists. Encourage your students to write to such businesses for help in obtaining expensive equipment or materials for their science projects. Be sure that the schedule allows enough time for students to receive a response. (This approach to procuring equipment works best with an 8-week timeline.) MONEY-RAISING IDEAS The following are a few ideas for raising funds to help defray science project expenses: • A local business may be willing to act as a monetary sponsor in exchange for an advertisement at the event or in the event program. • Schools participating in science fairs may hold raffles to raise money for projects. • Parents may be willing to donate materials (or time) to support the science fair. At the end of Phase 2, make sure you are still following the timeline. Check students’ progress on their Student’s Progress Report and Parent’s Progress Report. SCIENCE FAIR GUIDE 21
  • 23.
    Menu Print Phase 3—Data Collection and Analysis: Management Tips DURING THIS PHASE, STUDENTS WILL 1. conduct experiments safely 2. choose an appropriate sample size 3. perform several trials of the experiment 4. collect data accurately 5. record all data and observations in their science project journal 6. graph or chart the data and look for trends 7. prepare a written conclusion supported by the data Safety First! Safety is of particular concern during the data collec- tion phase. The timelines allow one class period for a brief review of safety before students begin collecting data. The in-class data collec- tion days give you a chance to supervise safety. Remind students to have an adult supervise all data collection at home. In-Class Data Collection The following tips may be helpful during in-class data collection: • Take a moment in class to review the difference between quali- tative data and quantitative data. Go over with your students the kinds of projects that call for each type of data. • Make sure that students understand the importance of using an Copyright © by Holt, Rinehart and Winston. All rights reserved. adequate sample size, as discussed in Resources for Students on page 50. • Explain that in order for data to be valid, a researcher must per- form several trials of an experiment. • Watch to see that students measure accurately. (You may choose to distribute the SI Unit Conversion Chart on page 30.) • Check students’ science project journals to make sure that they keep a neat record of all aspects of the project. • If a student’s project does not lend itself to collecting data in class, ask the student to bring in a book he or she is reading for continued research so that class time will be used effectively. • Students who have collected all the data they need can use the in-class data collection days to work on analyzing the data. 22 HOLT SCIENCE AND TECHNOLOGY
  • 24.
    Menu Print Strengthening Data Collection Skills For students who require additional help with data collection, use the following worksheets from Holt Science & Technology Science Skills Worksheets: PART 1: RESOURCES FOR TEACHERS • Worksheet 14: Using the International System of Units (SI) • Worksheet 15: Measuring • Worksheet 23: Science Drawing Analysis and Conclusions Analysis When students have finished collecting data and making observations, they can begin the analysis. As part of the analysis, stu- dents will make charts and graphs in their science project journals. Page 54 includes a sheet of graph paper that can be used for graph- ing purposes. Resources for Students discusses graphing, which you may want to review in class, along with a brief lesson on useful mathematical terms, such as median and mean. Instruct students to examine the charts and graphs for trends and record these trends and all calculations in their journal. w w Strengthening Graphing and Analysis Skills For students w who require additional help with graphing and analysis, use the fol- lowing worksheets from Holt Science & Technology Science Skills Worksheets: • Worksheet 25: Introduction to Graphs • Worksheet 26: Grasping Graphing • Worksheet 27: Interpreting Your Data • Worksheet 28: Recognizing Bias in Graphs • Worksheet 29: Making Data Meaningful Copyright © by Holt, Rinehart and Winston. All rights reserved. Conclusions In the conclusion, students will determine whether the results support or disprove the hypothesis. Discourage students from simply writing opinions in the conclusion. Instead have stu- dents discuss factors that contributed to the results and explain how they would control these factors if the experiment were performed again. At the end of Phase 3, make sure you are still following the timeline. Check students’ progress on their Student’s Progress Report and Parent’s Progress Report. SCIENCE FAIR GUIDE 23
  • 25.
    Menu Print Phase 4—Writing a Report: Management Tips DURING THIS PHASE, STUDENTS WILL 1. answer the questions on page 55 2. prepare an outline and discuss it with the teacher 3. prepare a draft and discuss it with the teacher 4. revise the draft according to the teacher’s feedback 5. turn in a completed draft Assigning a Written Report If the science fair you are entering requires a written report, you will need to share the particulars (how long it should be, whether it must be typed, etc.) with your students and their parents. Not all science fairs require a written report, but a paper gives students the chance to express what about the project meant the most to them and to organize their thoughts for an oral presentation. It is also a very important part of any scientific endeavor. Having Fun Have your students use the italicized questions on page 55 of Resources for Students as a guideline for writing their reports. By asking students to answer questions about their personal experiences with the emphasis on what they enjoyed about doing a science project, you can reinforce that the science fair can be fun. The more fun they have writing the report, the easier it will be to complete and the more interesting it will be to read. Writing Tips Copyright © by Holt, Rinehart and Winston. All rights reserved. Use the following tips to help students with writing: • Require students to first write an outline for the written report. You may need to review the outlining process in class. • Explain how index cards that are grouped together by subject can be helpful in writing a paper. • Written reports can greatly improve when students write more than one draft. You may wish to add more drafts to the timeline. Strengthening Writing Skills For students who require addi- tional help with science writing, use Worksheet 22: Science Writing from Holt Science & Technology Science Skills Worksheets. 24 HOLT SCIENCE AND TECHNOLOGY
  • 26.
    Menu Print Feedback and Assessment Giving feedback to a student need not be difficult. The following tips PART 1: RESOURCES FOR TEACHERS may help: • Try to mention both the strong and weak points of a draft. • Encourage students to do several drafts, if needed, and to ask an adult to read each one. • Peer editing may be helpful and will give students a chance to see how their friends are handling similar problems. • When assessing a written report, be aware that students’ differ- ent writing abilities can affect the overall quality of presenta- tion. Try not to let that overshadow the quality of the scientific content. At the end of Phase 4, make sure you are still following the timeline. Check students’ progress on their Student’s Progress Report and Parent’s Progress Report. w w w Copyright © by Holt, Rinehart and Winston. All rights reserved. SCIENCE FAIR GUIDE 25
  • 27.
    Menu Print Phase 5—Creating and Exhibiting a Display: Management Tips DURING THIS PHASE, STUDENTS WILL 1. sketch possible designs for the display 2. create a display board within the appropriate parameters 3. display results in a clear and interesting manner 4. give an oral presentation as practice for the science fair interview The Display Board A typical display is a trifold board made from corrugated cardboard, foam core, or corkboard. Impress upon students the importance of measuring the display board more than once to ensure that it fits the size constraints of the science fair. Many science fairs require that the display be no more than 274 cm tall, 122 cm wide, and 76 cm deep. Having an oversized display can disqualify the entire project, no matter the quality of the work. Be aware that certain materials are often prohibited in the display area. A Sample Display You may want to set up a successful sample dis- play in your classroom. Students can study the sample display up close, noticing the neatness of the lettering, the layout of the dis- play, and the type of information contained in each section. Show students how a display board can have a large middle section and two smaller “wings” on the left and right that can fold up, making a display more portable. Copyright © by Holt, Rinehart and Winston. All rights reserved. Is the Data Clearly Presented and Relevant? You may decide to have conferences with students about the data that they plan to present. Check charts and graphs for accuracy and readability. Make sure that the information shown in the figures is relevant to the purpose, hypothesis, and conclusion. The purpose of a display is to present the information in the clearest manner possi- ble so that the judges will be able to recognize quickly that the stu- dent performed a successful science project. Display Design Although the display introduces the project, the design should not distract from the content. Encourage students to be creative with borders, font, and layout but not to the point that a judge would find it difficult to read the information contained in the display. Illustrations should be informative, not just decorative. A sleek, mature, and professional style can impress the judges, but they prefer presentations which are unique and are clearly a product of the student who created it. 26 HOLT SCIENCE AND TECHNOLOGY
  • 28.
    Menu Print Preparing for the Interview Many science fairs require that a student give a presentation about PART 1: RESOURCES FOR TEACHERS his or her project to the judges. The presentation summarizes each step of the science project: why the student chose his or her subject, a statement of the hypothesis, what kind of data was collected, a brief summary of the data, and the conclusions that the student came to when he or she analyzed the data. Students can also discuss how they would do the experiment differently if they were to start over again or what other questions arose during their research. A Captive Audience If the science fair your students are entering requires an interview, it is in your students’ best interest to practice the presentations at least once before the science fair. Requiring an oral presentation in front of the class can be beneficial to all stu- dents. It will give them an opportunity to practice speaking in front of a group and to determine the most effective presentation styles by watching each other. An oral presentation will give you an opportu- nity to evaluate what students have done, as well as give personal feedback that will be very helpful during the interview with the w judges. w During the interview, the judges will likely ask students a few w questions. To prepare your students for this, ask questions during their oral presentation to the class. Encourage other students to ask questions as well. Also, suggest that they make a list of possible ques- tions the judges could ask and possible answers to those questions. Practice, and Practice Again Some students dread the interview part of the science fair. The more practice a student gets for the interview, the more comfortable he or she will be speaking to the judges. Encourage students to practice as often as possible and in front of as many people as possible. For instance, students may want to practice by giving their presentation to family members at home. Copyright © by Holt, Rinehart and Winston. All rights reserved. Remind them to relax and have fun. At the end of Phase 5, make sure you are still following the timeline. Check students’ progress on their Student’s Progress Report and Parent’s Progress Report. Additional Resources On the next few pages, you will find resources that may be helpful in the science fair process. Included are: • a list of suppliers of scientific laboratory equipment • the address and phone number of Science Service, a company that supports and regulates science fair administration • a bibliography of books that can help students choose, design, and complete a science project • a standard SI unit conversion chart to help students learn to work in the SI system SCIENCE FAIR GUIDE 27
  • 29.
    Menu Print Additional Resources The following list is a compilation of resources for students and teachers. Equipment Suppliers The following is a list of a few scientific supply companies that spe- cialize in laboratory equipment: Carolina Biological Supply Co. 2600 York Road Burlington, NC 27215 (800) 334-5551 www.carolina.com Science Kit and Boreal Labs 777 East Park Drive Tonawanda, NY 14150 (800) 828-7777 www.sciencekit.com WARD’s Natural Science Establishment, Inc. 5100 W. Henrietta Rd. Rochester, NY 14586 (800) 962-2660 www.wardsci.com Science Fair Administration Science Service, Inc. 1719 N Street, NW Washington, DC 20036 (202) 785-2255 Copyright © by Holt, Rinehart and Winston. All rights reserved. www.sciserv.org 28 HOLT SCIENCE AND TECHNOLOGY
  • 30.
    Menu Print Books Beller, Joel. So You Want to Do a Science Project! Paramus, N.J.: Prentice PART 1: RESOURCES FOR TEACHERS Hall, 1984. Bochinski, Julianne. The Complete Handbook of Science Fair Projects. New York: John Wiley & Sons, 1996. Bombaugh, Ruth. Science Fair Success. Berkeley Heights, N.J.: Enslow Publishers, 1990. Bonnet, Robert and Daniel Keen. Botany: 49 Science Fair Projects. New York: McGraw-Hill, 1989. Bonnet, Robert and Daniel Keen. Earth Science: 49 Science Fair Projects. New York: McGraw-Hill, 1990. Brisk, Marion. 1001 Ideas for Science Projects. New York: Macmillan, 1992. Cook, James. The Thomas Edison Book of Easy and Incredible Experiments. New York: John Wiley & Sons, 1988. w Iritz, Maxine. Science Fair: Developing a Successful and Fun Project. New w York: McGraw-Hill, 1987. w Mandell, Muriel. Simple Science Experiments with Everyday Materials. New York: Sterling Publishing, 1989. Tant, Carl. Projects: Making Hands-On Science Easy. Angleton, Texas: Biotech Publishing, 1992. Tocci, Salvatore. How to Do a Science Fair Project. Danbury, Conn.: Franklin Watts, 1989. Wolfe, Connie. Search: A Research Guide for Science Fairs and Independent Study. Tucson, Ariz.: Zephyr Press, 1988. Wood, Robert. Physics for Kids: 49 Easy Experiments with Heat. Blue Copyright © by Holt, Rinehart and Winston. All rights reserved. Ridge Summit, Penn.: TAB Books, 1990. SCIENCE FAIR GUIDE 29
  • 31.
    30 SI Unit Conversion Chart Menu Length 1 inch = 2.54 centimeters 1 centimeter = 0.39 inch 1 foot = 30.48 centimeters 1 centimeter = 0.03 foot 1 foot = 0.30 meter 1 meter = 3.28 feet 1 yard = 0.91 meter 1 meter = 1.09 yards 1 mile = 1.61 kilometers 1 kilometer = 0.62 mile Print Mass 1 ounce = 28.35 grams 1 gram = 0.35 ounce 1 pound = 0.45 kilogram 1 kilogram = 2.20 pounds Volume 1 teaspoon = 4.93 milliliters 1 milliliter = 0.20 teaspoon HOLT SCIENCE AND TECHNOLOGY 1 tablespoon = 14.79 millilters 1 milliliter = 0.07 tablespoon 1 fluid ounce = 29.57 milliliters 1 milliliter = 0.03 fluid ounce 1 cup = 0.24 liter 1 liter = 4.23 cups 1 pint = 0.47 liter 1 liter = 2.11 pints 1 quart = 0.95 liter 1 liter = 1.06 quarts 1 gallon = 3.79 liters 1 liter = 0.26 gallon Freezing point of water 32°F = 0°C Boiling point of water 212°F = 100°C 5 To convert °F to °C ᎏᎏ (°F – 32) ϫ 9 9 To convert °C to °F ᎏᎏ °C ϫ 5 ϩ 32 Copyright © by Holt, Rinehart and Winston. All rights reserved.
  • 32.
    Menu Copyright © by Holt, Rinehart and Winston. All rights reserved. Print PART 2: RESOURCES FOR STUDENTS SCIENCE FAIR GUIDE 31 PART 2: RESOURCES FOR STUDENTS w w w
  • 33.
    Menu Print What Is a Science Project? Scientists all over the world make new discoveries by using the scien- tific method. Now, you can join their ranks! A science project is your chance to choose a subject of interest to you and study it in the exact same way that a professional scientific researcher would. You may choose to study a topic such as how lighting affects plants or how much of the air is oxygen. Whatever you choose to do, the worksheets on pp. 35–60 will lead you through each step of the scientific method and through each phase of the project. The worksheets will even help you choose your subject if you can’t decide what to do. So, don’t worry! The project is entirely yours. Your parents and teachers will be around to help you if you need it. You’ll also have plenty of tools such as timelines and progress reports to help keep you on track. Explore Your World The whole point of a science fair is to give you a chance to explore on your own. Exploration can be a lot of fun. Instead of reading about composting in a book, you can do experiments comparing store-bought fertilizer to compost that you have made. You may try to figure out what weather patterns would be like if the Earth were square. Or, you can discover what types of plants attract butterflies. Maybe you’ll build a machine to test the difference between old golf balls and new golf balls. The fact is that your science project presents your creative solution to a question or problem. So good luck, and have a blast! THE SCIENTIFIC METHOD The steps of the scientific method that you’ll be using appear below. Each step is explained in Phases 1–5 of this packet.* Copyright © by Holt, Rinehart and Winston. All rights reserved. Purpose: developing an investigative question Hypothesis: making an educated guess about the answer to the investigative question based on research Experiment: testing the hypothesis, collecting data, and making observations Analysis: organizing data from the research and experi- mentation and looking for patterns Conclusion: determining if the hypothesis is supported or disproved by the experimental results Communicating the Results: sharing the conclusion with others *In Chapter 1 of your textbook, these steps are called Ask a Question, Form a Hypothesis, Test the Hypothesis, Analyze the Results, Draw Conclusions, and Communicate Results. 32 HOLT SCIENCE AND TECHNOLOGY
  • 34.
    Menu Print Safety Guide Science is a lot of fun, and you’ll have the most fun if you avoid accidents. Some simple precautions can go a long way to ensure the safe and successful completion of your project. The major causes of laboratory accidents are carelessness, lack of attention, and inappropriate behavior. Following the safety guide- lines below will greatly reduce your chances of having an accident. While you are working on a science experiment at home, even a minor accident can cause serious injuries, so be very careful. • Know the locations of the fire extinguisher, telephone, and first- aid kit in the event of an emergency. • Always have an adult (parent or teacher) supervising the data collection phase of your science experiment. • Wear safety goggles and tie back loose hair and clothing when working with any chemical, flame, or heating device. • Wear an apron and gloves when using acids and bases. PART 2: RESOURCES FOR STUDENTS • Never smell or taste a chemical unless instructed to do so by your teacher. • Never use an electrical device with a frayed cord. Never use an electrical appliance with wet hands or with water nearby. • Never eat any part of a plant used in an experiment. • Whenever possible, use plastic test tubes, beakers, and flasks. Check all glassware for chips and cracks. Glass containers used for heating should be made of heat-resistant glass. • Whenever possible, use a hot plate rather than an open flame or burner. Make sure to turn off and unplug a heating device when Copyright © by Holt, Rinehart and Winston. All rights reserved. you are through with it. • Check with your state board of education before experimenting with and exhibiting animals. Permits and/or veterinarian super- w vision may be required. Also, wash your hands with hot water w and soap after touching any animal. w • Always exercise extreme caution when using a sharp object in the lab. Never cut an object while holding it in your hand— always use an appropriate work surface. • Students and adults should wear ultraviolet safety goggles dur- ing operation of UV light. • Do not use cultures from any warm-blooded animal. • If you are planning on using X rays, cathode ray tubes, or radioac- tive substances, you must get information on federal guidelines for their use. Consult the Consumer Affairs Office of the Center for Devices and Radiological Health, a division of the Department of Health and Human Services. • Many states require registration of lasers. Check with the state board of education for tips on how to register. • Discuss the safety of your materials with your teacher or another scientist. SCIENCE FAIR GUIDE 33
  • 35.
    Menu Print Safety Contract I, ___________________________, hereby certify that on this day of _____________________, I have successfully completed a review of safety procedures for a science project. I agree to follow the safety guidelines listed below, and I will take every necessary precaution to operate safely throughout my experiment. • I will follow the safety guidelines of my teacher and my school. • I will keep my work area neat and free of unnecessary papers, books, and materials. I will keep my clothing and hair neat and out of the way, and I will wear a safety apron and/or gloves if necessary. • I know the location of all safety equipment (such as the fire extinguisher and first-aid kit) and the nearest telephone. • I will wear safety goggles when handling chemicals, working with a flame, or performing any other activity that may cause harm to my eyes. • I will not use chemicals, heat, electricity, or sharp objects until my teacher or parent instructs me to do so, and I will follow the adult’s instructions carefully. • I will be especially careful when using glassware. Before heating glassware, I will make sure that it is made of heat-resistant material, and I will never use cracked or chipped glassware. Copyright © by Holt, Rinehart and Winston. All rights reserved. • I will wash my hands immediately after handling hazardous materials. I will clean up all work areas before I leave the laboratory, put away all equipment and supplies, and turn off all water faucets, gas outlets, burn- ers, and electric hot plates. I understand and agree to the above and all other safety precautions presented to me in class. I am hereby ready to undertake my science project with safety from this day forward. Student’s signature Teacher’s signature Parent’s/guardian’s signature 34 HOLT SCIENCE AND TECHNOLOGY
  • 36.
    Menu Print Name ____________________________________________________ Date __________________ Class _______________ Student’s Progress Report For each step of each phase of the science project, mark the date it is due and the date you completed your work. Reward yourself for your hard work! Date Date Phase 1—Generating an Idea due accomplished I brainstormed five possible topics. I came up with two investigative questions for each topic. I consulted with my teacher and parents about project possibilities. I chose a suitable topic. I formed a hypothesis. I discussed topic and hypothesis with my teacher and gained approval. I recorded ideas in my science project journal. HOORAY! You’ve completed Phase 1—now you’re on your way! Date Date Phase 2—Researching and Planning due accomplished I researched my hypothesis. I reconfirmed or changed my hypothesis based on further research and then gained teacher approval. Copyright © by Holt, Rinehart and Winston. All rights reserved. I contacted all appropriate people before beginning data collection. I recorded all details of research so far in a bibliography in my science project journal. I filled out the Procedural Plan for Action and obtained necessary signatures. I developed the initial plan for display materials. WAY TO GO! You’ve completed Phase 2—give yourself a pat on the back! Comments: SCIENCE FAIR GUIDE 35
  • 37.
    Menu Print Name ____________________________________________________ Date __________________ Class _______________ Student’s Progress Report, continued Date Date Phase 3—Data Collection and Analysis due accomplished I conducted the experiment safely. I chose an appropriate sample size. I performed several trials of my experiment. I collected data accurately. I recorded all data and observations in my science project journal. I graphed or charted data and looked for trends. I prepared a written conclusion supported by the data. ALL RIGHT! You’ve completed Phase 3—you’re halfway there! Date Date Phase 4—Writing a Report due accomplished I answered the questions on page 55. I prepared an outline and discussed it with my teacher. I prepared a draft and discussed it with my teacher. Copyright © by Holt, Rinehart and Winston. All rights reserved. I revised the draft according to my teacher’s feedback. I turned in the final draft of my written report. FANTASTIC! You’ve completed Phase 4—you’re almost done! Date Date Phase 5—Creating and Exhibiting a Display due accomplished I sketched possible designs for my display. I created a display board within the appropriate parameters. I displayed the results in a clear and interesting manner. I gave an oral presentation as practice for the science fair interview. CONGRATULATIONS! You’ve completed your science project! 36 HOLT SCIENCE AND TECHNOLOGY
  • 38.
    Menu Print Phase 1—Generating an Idea: Science Fair Success DURING THIS PHASE, YOU WILL 1. brainstorm five possible subjects 2. come up with two investigative questions per topic 3. consult with your teacher and parents about project possibilities 4. choose a suitable topic and investigative question 5. form a hypothesis 6. discuss topic and hypothesis with your teacher and gain approval 7. record ideas in your science project journal PART 2: RESOURCES FOR STUDENTS Remember to update your Student’s Progress Report as you go along. You will have until to finish Phase 1. Your Journal: The Most Important Tool You’ll Use The first thing you’ll need to do is sit down with your sci- ence project journal and brainstorm a list of possible science project topics. Keep all notes that you take and data that you collect in this journal. The point of having a science project journal is sim- ple: if you write everything down in one place, you’ll know where all of your information is during the entire project. It will also be much easier for you to show your progress to your teacher and par- ents. Because all of your project information will be in your journal, be sure to keep it in a safe place. Copyright © by Holt, Rinehart and Winston. All rights reserved. Brainstorming for Topics w Here’s where it all begins. By following the steps outlined in this sec- w tion, you will take a general idea and narrow it down into a working w science project. You will start with a general topic, choose a specific research question, and then develop the hypothesis that your experi- ment will test. SCIENCE FAIR GUIDE 37
  • 39.
    Menu Print Ideas Galore! Brainstorming means coming up with as many inter- esting ideas as possible and writing them down in a list. Don’t worry about how your ideas sound or whether you will actually pursue each topic. The important thing at this stage is to come up with a lot of ideas to choose from. The more ideas you have, the more likely it is that you will find one that is interesting and one that you’ll enjoy working on for the entire length of the project. Make It Fun Since you’ll be spending weeks or months preparing for the science fair, you really want to be sure that you have a true interest in finding out about your topic. Even though all of what you learn in school is worthwhile, most of the topics have been cho- sen by someone else. Take full advantage of the chance to choose something you’re really interested in for your science project. Getting Started Find Out More To begin the brainstorming process, think about scientific topics you’ve always wanted to know more about. Maybe you’ve always been interested in the way mirrors work or the way light waves travel. Have you been on a field trip recently that sparked your interest or brought up some interesting questions? Now is your chance to find out more about your favorite science topics. • strength of arches vs. beams • prisms • plants: cross pollination • bacteria in the kitchen • oil spills in an ecosystem Copyright © by Holt, Rinehart and Winston. All rights reserved. Solve a Mystery Another way to begin is to make a list of things that have mystified you. What makes a microwave oven cook some foods more quickly than a conventional oven? How do ants know to travel in a single line? Why are some bicycles faster than others? If the idea involves a mystery, chances are good that it would make an excellent topic for a science project. 38 HOLT SCIENCE AND TECHNOLOGY
  • 40.
    Menu Print The Library: Where the Topics Are Many kids get ideas from library books or even from the Internet. If you start researching early on in the process, you can get an idea of how much information has been written about your topic. Even though your goal is to design your own experiment, you’re still going to have to research the topic. You will want to get some background information and deter- mine how to go about testing your hypothesis. So don’t be afraid of research. In the long run, it will actually make your project much easier for you. TIP An adult can help you think of an idea, but it is very important that your science project is clearly your own. At the science fair, your work will be compared only with that of other students close to your age. From the list of topics that you brainstormed, choose five PART 2: RESOURCES FOR STUDENTS subjects that interest you most. Not all of these subjects have to be developed into an experiment; this is just a list of ideas of things that you may like to learn more about. Investigative Question When you’ve chosen five possible topics, you’ll want to figure out what you want to know about each topic. Your investigative ques- tion is what you intend to find out during the course of your experi- ment. Using the topics you brainstormed earlier, you will choose a related question that your experiment will answer. The Search Continues At the library, start by searching through the card catalog. (If you need help, ask your teacher or librarian. The Copyright © by Holt, Rinehart and Winston. All rights reserved. faster you understand how to use the library’s resources, the easier your research will be.) Look up key words from the subject that you are interested in. Looking up “oil spills” in the card catalog or w Reader’s Guide to Periodical Literature will lead you to a number of arti- w cles. If you have Internet access, you could try a search on “oil w spills.” You may include the word “penguin” in your search to find articles about how oil spills have affected penguins. SCIENCE FAIR GUIDE 39
  • 41.
    Menu Print While you’re at the library, try to think of two investigative questions that go with each topic you brainstormed. Record these ideas in your science project journal. Here’s an Example Let’s say you decide to pursue the topic oil spills. You probably already know that large amounts of oil spilled into water can hurt the animals in an environment, but you want to know more. Maybe you want to know how an oil spill would affect a penguin’s life span. Two investigative questions for this topic would be “How does oil in the water affect a marine ecosystem?” and “How do oil spills affect the life span of penguins?” Choosing the Best Investigative Question The question “How does oil in the water affect a marine ecosystem?” is too broad to study in a short-term science experiment. Now consider the next question: “How do oil spills affect the life span of penguins?” The chances that you’ll be able to do tests using penguins are very slim. You’ll have to think of experiments that use resources available to you. You don’t have to throw out the topic if a particular experiment is not workable. Instead, think of a different testable question related to the same topic. For instance, you may want to learn more about how the ecosystem or food web of an area is affected when a large quantity of oil is introduced. This food web probably includes plant matter. Therefore, “How does oil affect plants?” is an example of a reasonable investigative question that you can test. • strength of arches vs. beams • prisms • plants: cross pollination • bacteria in the kitchen • oil spills in an ecosystem • How does oil affect a penguin's life span? Copyright © by Holt, Rinehart and Winston. All rights reserved. • How does oil affect plants? Consult with Your Teacher Now you have ten investigative questions, two for each of five top- ics. It will become very clear that some of the possible experiments you are interested in would be too involved to do in a science proj- ect that lasts only 6 or 8 weeks. Or, you may be able to think of a way to do an experiment but realize that the materials you would want to use would be too expensive. At this stage, you’ll have a con- ference with your teacher about the investigative questions that you have. He or she will help you settle on one investigative question to use for your science project. 40 HOLT SCIENCE AND TECHNOLOGY
  • 42.
    Menu Print Avoiding Problems Keep in mind the limitations of the science project. Ask yourself the following questions about your topic: • Are the materials you need affordable? • Are the materials you need available? Consider the expense and availability of materials that you need for your project. For instance, unless you have access to an X-ray machine, you don’t want to study how different materials affect the path of X rays. • Does the science fair you are entering prohibit materials or specimens that you will need for your experiment? Find out the limitations of the science fair itself. Ask your teacher PART 2: RESOURCES FOR STUDENTS about any restrictions on qualified science projects. • How long will it take you to gather the necessary data? • How much time do you have for data collection? Be careful not to choose a topic that will take more time to inves- tigate than you have to carry out the science project. For instance, you don’t want to study the growth of a plant that grows only 2 cm a month. Copyright © by Holt, Rinehart and Winston. All rights reserved. w w w Creativity Is the Key There are many ways to develop a workable project that is within your budget and still study a topic that inter- ests you; it will just take a lot of creativity—and that’s the key to a winning science project. SCIENCE FAIR GUIDE 41
  • 43.
    Menu Print Forming a Hypothesis What Do You Think the Answer Is? Before you begin an experi- ment about oil spills, you would read about oil spills and guess that oil affects the health of plants in a negative way. It’s typical scientific procedure to have an idea of the answer to your investigative ques- tion before you begin. In fact, the scientific method requires that you state a possible answer to the investigative question before you begin. This statement is called the hypothesis. Some possible hypotheses for the investigative question “How does oil affect plants?” are • “Oil does not affect the health of plants.” • “Oil negatively affects the health of plants.” • “Oil improves the health of plants.” What if the Hypothesis Is Inaccurate? It doesn’t actually mat- ter whether your hypothesis is accurate. The objective of a science project is to develop a hypothesis and then design a way to test it. In fact, few people will be concerned if the results of your experiment do not support your hypothesis. It is just as acceptable to have an inaccurate hypothesis as it is to have an accurate hypothesis—the challenge is in designing an effective experiment. So take the plunge, and write down what you think will happen. After researching the example that we are using, you may come up with the following hypothesis: Topic: Oil Spills in Ecosystems Investigative Question: How does oil affect plants? Copyright © by Holt, Rinehart and Winston. All rights reserved. Hypothesis: Introducing oil into the soil of a house plant will shorten its life span. Make sure to check off the Phase 1 steps on your Student’s Progress Report as you complete each one. 42 HOLT SCIENCE AND TECHNOLOGY
  • 44.
    Menu Print Phase 2—Research and Planning: Science Fair Success DURING THIS PHASE, YOU WILL 1. research the hypothesis 2. change or reconfirm the hypothesis with the teacher 3. contact all appropriate people 4. record all research sources in the science project journal 5. fill out the Procedural Plan for Action and obtain signatures 6. develop the initial plan for display materials Remember to update your Student’s Progress Report as you go along. You will have until to finish Phase 2. PART 2: RESOURCES FOR STUDENTS Researching and Planning Doing further research will help you decide what your experiment will be. Remember to write all of your research notes in your science project journal. Imagine for a moment that your hypothesis is “Bridges with arches provide more support than simple beam bridges.” For your project, you want to build two models: one testing the forces that bridges with beams can withstand and another testing the forces that bridges with beams and arches can withstand. Before you can really do this, you will have to read about the design of bridges. Copyright © by Holt, Rinehart and Winston. All rights reserved. w w w Ensuring Success By thinking ahead, you can prevent problems from popping up later. So start planning now, and you’ll be much more likely to end up with a successful project. Now’s the time to • make sure you have enough time to complete your experiment. • make sure you can cover the costs involved. • start thinking about the science fair display. • ask others for any information or help you may need. SCIENCE FAIR GUIDE 43
  • 45.
    Menu Print Is This the Project for You? After additional library research, you’ll check in with your teacher to reconfirm your hypothesis. By now, you probably have a good feel for how much information has been written on your topic. You may also have some good ideas about what you can do to test your hypothesis. If you need to change your topic at this point, you can still do so. If you feel that you won’t have enough time or money to complete your experiment, speak to your teacher. Remember, this is your last chance to change topics! After this point you will be too far along in the timeline to safely change your plan of action. Further Research You have already begun researching your topic by the usual means, such as reading books and checking out the Internet. Perhaps you haven’t thought about the following ways of gathering information: Interview an Expert You might want to interview an expert in the field you’re studying. If you are interested in studying sedimentary rocks, for example, you could talk to a geologist. A geologist could probably give you some good tips on where to find the materials you need. Remember to record the details of the interview in the bibliography section of your journal. You’ll need to give the expert credit for the information that he or she has given you. Let the Letter Ask Writing a letter is one of the best ways to get information. It sometimes takes a while to receive a response, though, so write as early as possible. Let’s say you were interested in finding out how to dispose of paint and other chemical wastes with- out hurting the environment. You might write to someone at a paint company. You can ask for information in a letter like this one: Copyright © by Holt, Rinehart and Winston. All rights reserved. Green Paint Company 4500 East South Street Detroit, Michigan 70555 Dear Sir or Madam: I am a seventh grader preparing for the Springfield School District Annual Seventh-Grade Science Fair. The purpose of my experiment is to see how proper disposal of leftover paint can prevent heavy metals from contaminating drink- ing water supplies. Could your company provide me with a list of chemical ingredients contained in your product? I would also appreci- ate some guidelines on how to safely dispose of leftover paint. I hope you will be able to help. Thank you for your time and effort. Sincerely, Meredith Phillips 44 HOLT SCIENCE AND TECHNOLOGY
  • 46.
    Menu Print Thank Others for Their Help When you receive a response from a company, transfer any useful information into your science project journal. It’s also a good idea to keep the actual letter in a safe place so that you can refer to it again later. Remember to thank any- one who helps you by supplying information or materials. Citing All Your Sources Your sources may include books, magazines, newspapers, Web sites, television programs, videos, or even interviews with live people. You will need to include all of these sources in the bibliography for your research paper. Your science project journal is the perfect place to keep track of this information. How to Cite a Reference In your science project jour- nal, record the title, author, publisher, and copyright date of each source that you use. If you perform an interview, record who you spoke to, what you discussed, and when and where the interview took place. You can keep all this information organized by devoting a few journal pages to your notes on information PART 2: RESOURCES FOR STUDENTS sources. Preparing to Conduct the Experiment You have a hypothesis that you are happy with, and you are learning more about your topic. Now it’s time to consider a procedural plan for your experiment. Most scientific experiments follow the same basic rules, which are explained below. Being in Control When testing your hypothesis, you’ll want to establish a control group and one or more experimental groups. The control group and the experimental groups are exactly the same except for one factor, which varies in the experimental groups. The factor that differs is called the variable. Because the variable is the Copyright © by Holt, Rinehart and Winston. All rights reserved. only factor that differs between the control group and the experi- mental group, scientists know that this factor is responsible for the results of the experiment. w If you were planning to test the effects of an arch on the strength w of a bridge made of beams, you must test the strength of a bridge w that doesn’t have an arch and the strength of the same bridge with an arch. Bridges that have no arch (beam bridges) are in the control group. Bridges that have beams and arches are the experimental group. The variable is whether the bridge has an arch. Then if you wanted to test the effects of suspension cables on the strength of a bridge, you’d use the same control group as before— beam bridges. Your experimental group would include beam bridges with suspension cables. The new variable is whether the bridge has suspension cables. It Depends The physical structure of a bridge—whether it has an arch—can differ from one bridge to the next. Since the bridge’s phys- ical structure does not depend on any other characteristic, it is called the independent variable. The independent variable can be changed by the researcher. SCIENCE FAIR GUIDE 45
  • 47.
    Menu Print The strength of the bridge depends on whether the bridge has an arch, so the strength of the bridge is the dependent variable. When you measure the dependent variable you are measuring the result that occurs when the researcher changes the independent variable. The dependent variable is what the experiment is actually measuring. There Can Be Only One It is very important that you have only one variable. Otherwise you are not effectively testing your hypothe- sis. For instance, your test of the bridges’ strengths would be influ- enced by the materials from which the bridges were made, so all bridges in your experiment must be made of the same materials. All factors of the control group and the experimental group(s) must be exactly the same except for one variable. Experiments Versus Demonstrations When you don’t know what you want to do for an experiment, it can be tempt- ing to demonstrate a concept that scientists have already fig- ured out. As a researcher, you will focus on performing an experiment instead of a demonstration. Though modeling a volcano’s eruption is an interesting demonstration, it is not an experiment. Figuring out how altitude affects the boiling point of water is an experiment. Ask your teacher if you need help developing an experiment that tests your hypothesis. The Procedural Plan Look on the next page to find a blank form for your Procedural Plan for Action. You can use this worksheet to write down your ideas for your experiment. It can help you think through the details of your science fair project. When completing the procedural plan, it is important to begin Copyright © by Holt, Rinehart and Winston. All rights reserved. planning for the display. Your teacher will provide you with a list of rules for the science fair you are going to enter. The rules will include important information about display sizes and materials. You will also need to begin gathering the materials that you will need for the experiment and the science fair. Put Your Ducks in a Row Some students find it helpful to use a schedule or a list to organize all the work that they need to do. You can use the Task List (page 48) to create your own personal schedule. Fill out your task list however you like. You can use it as a personal to-do list or as a place to write down which days you want to go to the library or meet with your teacher. Make sure to check off the Phase 2 steps on your Student’s Progress Report as you complete each one. 46 HOLT SCIENCE AND TECHNOLOGY
  • 48.
    Menu Print Name ____________________________________________________ Date __________________ Class _______________ Procedural Plan for Action Describe your experiment’s procedure. What will be your control group? What will be your experimental group? What is your dependent variable? What is your independent variable? What kind of location or setting will you need for your experiment? Copyright © by Holt, Rinehart and Winston. All rights reserved. What kind of materials will you need for your experiment? What costs do you expect? Parent Signature Date Teacher Signature Date SCIENCE FAIR GUIDE 47
  • 49.
    Menu Print Name ____________________________________________________ Date __________________ Class _______________ Task List Goal Date Task to be accomplished date accomplished Copyright © by Holt, Rinehart and Winston. All rights reserved. 48 HOLT SCIENCE AND TECHNOLOGY
  • 50.
    Menu Print Phase 3—Data Collection and Analysis: Science Fair Success DURING THIS PHASE, YOU WILL 1. conduct the experiment safely 2. choose an appropriate sample size 3. perform several trials of the experiment 4. collect data accurately 5. record all data and observations in your science project journal 6. graph or chart the data and look for trends 7. prepare a written conclusion supported by the data Before You Begin PART 2: RESOURCES FOR STUDENTS • Have your teacher or parent approve your experiment. • Read over your Safety Contract. • During the data collection, make sure that there is an adult present. Your teacher will schedule some in-class data collection days, so remember to take the necessary materials to class. Don’t forget to update your Student’s Progress Report as you go along. You will have until to complete Phase 3. Types of Data Copyright © by Holt, Rinehart and Winston. All rights reserved. Data can take two different forms: data can be quantitative (a value that can be measured or counted) or qualitative (a value that can be described but cannot be measured or counted). Some projects may w combine both forms of data. w w Quantitative Data: Count It Up Quantity and quantitative have the same word root. Just remember that quantitative data have to do with numbers or quantities that you can measure. Examples of quan- titative data are the number of bird chirps that you hear on a cold day or the width of a layer of rock in a cliff wall. Qualitative Data: Spell It Out The word quality is related to the word qualitative. Taking qualitative data means that you will be describing your observations with adjectives instead of numbers. Examples of qualitative data are descriptions of the color and shape of the rock in each layer of a cliff wall. Drawings and photographs are also qualitative data. Whichever kind of data you have decided to collect, remember to write it down. Be certain to record all results of your tests in your sci- ence project journal. Recording everything as it happens not only will help you keep your information in one place but also will make it easier for you to avoid errors. SCIENCE FAIR GUIDE 49
  • 51.
    Menu Print Sample Size and Multiple Trials Test More Than One Subject Sample size is the number of sub- jects you test. Your sample size must be large enough to allow you to draw accurate conclusions from your data. For example, if you were comparing the differences in hand-eye coordination between 20-year-old and 40-year-old women, the data taken from just one woman in her 20s may not give you accurate results. She could be the fastest woman in the world! Testing only her, you would conclude—possibly incorrectly—that all women in their 20s are faster than all women in their 40s. If you tested several other women in their 20s and compared this data to the data taken from several 40-year-old women, you would have a more realistic picture of the actual trends among 40-year-olds and 20-year-olds. Record in your journal the number of subjects that you tested. Also record any details that might affect your results. For instance, in the example above, you would record each subject’s age, sex, height, weight, the time of day the subject was tested, the number of times you tested each subject, etc. Play It Again, Sam! When you are con- ducting an experiment, it is necessary to do multiple trials. This means you should perform each test several times. For instance, if you are going to compare your Copyright © by Holt, Rinehart and Winston. All rights reserved. body temperature in the morning with your body temperature in the evening as part of your project, make sure that you test your tempera- ture on several days before you try to draw any conclusions. And if one day’s temperature differs wildly from the rest, you might consider that there was an error and try to figure out what went wrong. Taking Accurate Measurements Scientists need to be as exact as possible in taking measurements. It’s almost impossible to measure something exactly, so scientists usually measure something more than once and then use the average of the results. This approach helps to account for the uncertainty of each individual measurement. Always double-check the measurements you take before you record them in your journal. Measure carefully and make each measurement level. For instance, if your experiment requires the use of measuring spoons or cups, be consistent: don’t fill some of them so that they are heaping and others so that they are not quite full. 50 HOLT SCIENCE AND TECHNOLOGY
  • 52.
    Menu Print Go Global Most scientists use the International System of Units (SI) in all their work. The International System of Units is a global meas- urement system that helps scientists share and compare their obser- vations and results. It is usually best to use this system, and some science fairs require that all measurements be expressed in SI units. Your teacher has a unit conversion chart for common measurements of length, mass, volume, and temperature that may be useful. Creating Charts and Graphs As you are collecting your data, you may want to keep in mind that you will be required to display your results and conclusions at the science fair. You can make it easy for peo- ple to understand the relationship between your variables by display- ing your data in a chart or graph. It may be useful for you to make the first drafts of your graphs in your journal. This will let you decide the best way to illustrate your data before you make the final graphs for your display. PART 2: RESOURCES FOR STUDENTS TIP When you create a graph, make sure that you leave equal spaces between the numbers on the axes and that you number the axes consistently. For instance, if you start with the number 0 and the next values are 5 and 10, you can’t skip to 20. The next number would have to be 15. Bar Graphs Use a bar graph if you want to compare different types of data. In the case of a bar graph, each bar represents a group of data. Copyright © by Holt, Rinehart and Winston. All rights reserved. • It is important to make it easy to identify each bar. For example, you could choose to use polka-dotted bars for one group of data and striped bars for another. w • Every graph always needs a key so that people can easily tell what w each color or pattern represents. w • Make each key the same so that graphs are easy to compare. That way, if you had measured data on three different days, a person could quickly distinguish between the groups of data. Tomato Plant Height: Week 1 Tomato Plant Height: Week 2 Full light 15 15 Light deprived Centimeters Centimeters 10 10 5 5 0 0 SCIENCE FAIR GUIDE 51
  • 53.
    Menu Print Line Graphs Use a line graph if you want to show how the dependent variable is affected by changes in the independent variable or if you want to show how data change over time. • In a line graph, place the dependent variable on the vertical (up- and-down) axis, or the y-axis. The independent variable should be on the horizontal (left-to-right) axis, or the x-axis. • Plot your data as carefully as possible. Then connect the points. • If you decide to record the results of more than one experiment on one line graph, you may choose to use a different color of ink for each set of points (and the connecting line). Be sure to include a key explaining the colors. Temperature Variation over 4 Days 100 Sample 1 Sample 2 99 Temperature (°F ) 98 97 96 95 1 2 3 4 Day Copyright © by Holt, Rinehart and Winston. All rights reserved. TIPS This is where graph paper will come in handy. Your graph will be much neater and easier to draw if you use graph paper. You will find a sheet of graph paper on page 54. Pie Charts Showing percentages is easy to do with a pie chart, a round chart that looks like a sliced pie. You can quickly see which group has the biggest slice and therefore contains the most data. • The size of a group’s slice indicates the proportion of the whole that the group represents. Say you want to show that 30 percent of people in an experiment sneezed when exposed to a bright light and 70 percent of people didn’t sneeze. You would use 30 percent of the circle to represent the sneezers. • A circle has 360°, so you would multiply 0.30 by 360° to get the number of degrees that should be used to represent the sneezers. 0.30 ϫ 360° = 108° 52 HOLT SCIENCE AND TECHNOLOGY
  • 54.
    Menu Print Sneezing After Exposure to 10 Minutes of Bright Light 30% of people sneezed 70% of people didn't sneeze • Using a protractor, you would measure out 108° of the circle for the sneezers. The other part of the pie chart (252°) would be reserved for the nonsneezers. • Make each section of the chart a different color and include a key or labels to make the graph easy to understand. PART 2: RESOURCES FOR STUDENTS Analyzing Data and Drawing a Conclusion After you’ve gathered all of your data, you’ll want to analyze your results. In the analysis, ask yourself, “What are the data telling me? What trends do I see in my graphs? Are the data for the control group different than the data for the experimental group?” Write your analysis in your science project journal. What Does It All Mean? If your results are mathematical, it will help you to understand the concepts of mean and median. Mean is the average of your data, and median is the middle-most value when all measurements are listed in order from smallest to largest. Two experiments may have the same average result but differ in how the Copyright © by Holt, Rinehart and Winston. All rights reserved. results are distributed. Compare the means and medians and see how they differ. Ask your teacher or your parents for help with mathematical concepts that you aren’t sure about. w w Drawing Conclusions w The main question you should ask yourself when drawing a conclu- sion is, “Do my results agree with my hypothesis?” If they do, why do you think they do? If they don’t, how are they different? And, why do you think they differ? Remember that it is not important for the hypothesis to be correct. It is important, however, that you explain why you got the results you did. Write your conclusions in your science project journal. Be sure to mention in your conclusion what factors you believe contributed to your results. Then, briefly explain possibilities for new experiments that would control these factors. Also, mention any investigative questions that came up during the experiment. These questions will guide other researchers who find your results interest- ing and want to study the topic more. Make sure to check off the Phase 3 steps on your Student’s Progress Report as you complete each one. SCIENCE FAIR GUIDE 53
  • 55.
    Menu Print Name ____________________________________________________ Date __________________ Class _______________ Copyright © by Holt, Rinehart and Winston. All rights reserved. 54 HOLT SCIENCE AND TECHNOLOGY
  • 56.
    Menu Print Phase 4—Writing a Report: Science Fair Success DURING THIS PHASE, YOU WILL 1. answer the questions on this page 2. prepare an outline and discuss it with your teacher 3. prepare a draft and discuss it with your teacher 4. revise the draft according to your teacher’s feedback 5. turn in a completed draft All of the time you’ve spent recording every little detail in your sci- ence project journal is about to pay off. Your written report will rep- resent your ideas and conclusions about your project, so you’ll want to make sure that it is well thought out and neatly prepared. Don’t PART 2: RESOURCES FOR STUDENTS forget to update your Student’s Progress Report as you go along. You will have until to complete Phase 4. Putting Your Ideas on Paper Before you begin, answer the following questions in your science project journal. When you are through, you may have a better idea of how to start on your written report. 1. How did you first decide on your idea? 2. What was your favorite aspect of the experiment? 3. What was something new that you learned? 4. What was something unexpected that happened? Copyright © by Holt, Rinehart and Winston. All rights reserved. 5. What were the ups and downs of the whole process? 6. What did your data show? w 7. What would you do differently next time? w w TIP Have fun with your report. You’ve already done most of the work. Now, just carefully describe what you did in each phase, and explain every detail of your experience. Creating an Outline Now that you’ve answered the questions on this page, you are ready to make an outline of your report. An outline is a framework of what is going to go inside a report. Most scientific reports follow the same order as the steps of the scientific method, explaining the entire process from beginning to end. Using index cards for each idea will allow you to make sure that all the information makes sense in the order that you are going to tell it. SCIENCE FAIR GUIDE 55
  • 57.
    Menu Print Making a List Include at the beginning of the report any back- ground information that a reader would need to understand your project. Then you will state the purpose and hypothesis of your proj- ect. Briefly describe your procedure and the data that you acquired. Finally, you’ll want to illustrate your conclusion using charts, graphs, or photographs of your data. You may want to include your answers to the questions on page 55. TIP You may choose to use some of your charts or graphs in your report. The best figures to use are those that clearly show the trends you found in your data. Always title and label your figures, and, if possible, write a sentence telling what they illustrate. Checking It Twice When you are done, have your teacher check your outline. Your teacher will make some suggestions about how to improve your report. Pretend the report is not your own, and try to see how your teacher’s suggestions could make it even better. Professional scientists and writers get constructive criticism about everything they do before they show their results to the world. It is an important part of the writing process, and it will help you improve your report so that it is ready to impress the science fair judges. Writing the Draft After you’ve thought about your teacher’s suggestions, you may want to change your outline. When you are happy with your out- line, you can start a draft of the written report. Copyright © by Holt, Rinehart and Winston. All rights reserved. TIPS The following are some helpful writing tips: • Before you begin, make sure that you know how many pages your report should be. • As you write, you may ask your parents to read sections to make sure that you are on the right track. • Show your finished draft to your teacher. Your teacher will make comments to help you create the best project that you possibly can. • Don’t forget about neatness and spelling! Judges will notice if you have not been careful in your work. • Finally, remember to complete a bibliography of the sources you used. Be sure to give credit to the people who helped you in your project—your teacher, your parents, professional scientists, or others. Make sure to check off the Phase 4 steps on your Student’s Progress Report as you complete each one. 56 HOLT SCIENCE AND TECHNOLOGY
  • 58.
    Menu Print Phase 5—Creating and Exhibiting a Display: Science Fair Success DURING THIS PHASE, YOU WILL 1. sketch possible designs for the display 2. create a display board within the appropriate parameters 3. display results in a clear and interesting manner 4. give an oral presentation as practice for the science fair interview After this phase, you can tell everyone that you know what it is like to be a real scientific researcher—and mean it! Don’t forget to update your Student’s Progress Report as you go along. You will have until to complete Phase 5. PART 2: RESOURCES FOR STUDENTS Before You Begin Before you begin your display, review the science fair display and interview guidelines. Some science fairs have a list of items and materials that you are not allowed to use in a display. Double-check to be sure you have followed these guidelines. You wouldn’t want to be disqualified after all of the hard work you’ve already done. Copyright © by Holt, Rinehart and Winston. All rights reserved. w w w The Layout of Your Display Displays are usually divided into three sections. You can bend a card- board box so that it has a large middle section and two smaller “wings” that fold inward across the center. This design allows your display to fold flat, making it easier to transport and store. You can purchase hinges at an art supply or hardware store if you prefer to attach the “wings” that way. SCIENCE FAIR GUIDE 57
  • 59.
    Menu Print An Example The illustration below is one example of how infor- mation can be laid out on the display. You can do it differently, but remember to place the information from left to right in the general order that you performed each item. It is also common to place models, samples, demonstration props, or small pieces of equipment in front of the display board. Here’s how the information is organized on the display shown above: • Top Left This section provides basic background information and introduces the purpose and hypothesis of the project. Copyright © by Holt, Rinehart and Winston. All rights reserved. • Bottom Left This section briefly explains the procedure that was followed (review your Procedural Plan for Action). • Right-hand Panel Brief written summaries of the data and the conclusions are located on this panel. The research is dis- played so that it is obvious that the data support the conclu- sions. • Center The middle panel contains the title of the project and the name, grade, and school of the researcher. Charts, graphs, photographs, and other illustrations are displayed here. • Keep It Simple The display touches on all aspects of the proj- ect, but keeps the information general. The details of the project belong in the written report. Designing Your Display Back to the Drawing Board Before you construct a display, sketch some ideas of how you want your display to look. Sketching it out on paper lets you easily choose colors, borders, sizes, lettering, and even arrangement of items in your display. 58 HOLT SCIENCE AND TECHNOLOGY
  • 60.
    Menu Print Materials Most students will use corrugated cardboard, cork board, or foam core to construct their display. You can recycle by calling a local appliance store to get a large, corrugated box from a refrigera- tor, washing machine, or TV. Observe appropriate safety precautions and make sure that an adult helps you cut the cardboard to regula- tion size. Remember—Neatness Counts! There may be requirements about the lettering for the display. If you write the information for your display by hand, make sure the writing is neat and easy to read. Your main title and major subtitles should be readable from a distance, and any other information can be smaller. If you use paper or plastic lettering or stencils, use a ruler to apply them in a straight line. Creative, Yet Clear While you want your display to be as interest- ing as possible, the design should not distract from the content. Be creative with borders, font, and layout, but make sure that a judge would find it easy to read the information contained in the display. Illustrations should be informative, not just decorative. In your dis- play, you want to impress the judges with the project’s seriousness PART 2: RESOURCES FOR STUDENTS yet be unique and have some fun. TIP A simple display is best if it clearly shows what you have learned. An expensive computer display or a flashy presentation is useful only if it relates to your results and helps make your conclusions more clear. The Interview If you are going to make a presentation to the judges, it’s in your Copyright © by Holt, Rinehart and Winston. All rights reserved. best interest to practice at least once. Practice explaining your proj- ect to someone who knows nothing about it. Your family and your classmates are good audiences. It may be difficult at first, but once you run through it a few times, you’ll have a great advantage over w students who haven’t bothered to practice. If you’re part of a group w project, each person in the group should be responsible for present- w ing a certain aspect of the project, such as the purpose, hypothesis, or conclusion. Summarize It! You’ll want to prepare a summary of what you did. You can do this by following the steps below. • Explain why your subject interested you. • Define the hypothesis you developed. • Describe how you decided what type of data to collect. • Outline your Procedural Plan for Action. • Summarize the data you actually collected. • Explain the conclusions you drew after you analyzed the data. • Describe to the judges what you would do differently if you had another chance, and tell them why. SCIENCE FAIR GUIDE 59
  • 61.
    Menu Print Tricks of the Trade Here are more suggestions that may help you during the interview: • Carry an index card with an outline of what you want to say, and refer to it if you forget something during your interview. • Don’t read to the judges from your report or from notes—they would rather hear you speak naturally. • Have copies of the written report near your display so that inter- ested people can learn more about your project. • Offer a copy of your report to the judges so that they can read about what you have done. • If a judge asks you a question that you are unable to answer, stay calm. Explain that you aren’t sure about the answer to that Copyright © by Holt, Rinehart and Winston. All rights reserved. question, and offer to explain a part of the project that you’re more comfortable with. • If the judge offers you suggestions or says that he or she might have done something differently, try not to react angrily. The judge is only trying to help you be a better scientist. • It is perfectly natural to be nervous—even seasoned scientists get the jitters. Just remember that this is your project and you are the best person to explain it to others! Make sure to check off the Phase 5 steps on your Student’s Progress Report as you complete each one. 60 HOLT SCIENCE AND TECHNOLOGY
  • 62.
    Menu Copyright © by Holt, Rinehart and Winston. All rights reserved. Print PART 3: RESOURCES FOR PARENTS SCIENCE FAIR GUIDE 61 PART 3: RESOURCES FOR PARENTS w w w
  • 63.
    Menu Print Welcome to the World of Science Fairs! The Science Fair Guide is designed to direct teachers, students, and parents through all phases of a science project, preparing a student to participate in a science fair. A science project serves more than one purpose. The most obvious goal is to extend a student’s under- standing of science. Science is hands-on by nature, and there is no doubt that hands-on experiences facilitate the learning process. The purpose of Resources for Parents is to help you guide your stu- dent through a science project using the following five phases, which mirror the scientific method: • Phase 1: Generating an Idea • Phase 2: Research and Planning • Phase 3: Data Collection and Analysis • Phase 4: Writing a Report • Phase 5: Creating and Exhibiting a Display The Scientific Method The scientific method allows scientists to further the advancement of knowledge in a strategic and unified manner. When students use the scientific method to design and exe- cute a project they use the same steps that professional researchers use to glean new information about the world. THE SCIENTIFIC METHOD The steps of the scientific method that your child will be using appear below. Each step is explained in greater detail in Phases 1–5 of Resources for Students.* Copyright © by Holt, Rinehart and Winston. All rights reserved. Purpose: developing an investigative question Hypothesis: making an educated guess about the answer to the investigative question based on research Experiment: testing the hypothesis, collecting data, and mak- ing observations Analysis: organizing data from the research and experimen- tation and looking for patterns Conclusion: determining if the hypothesis is supported or disproved by the experimental results Communicating the Results: sharing the conclusion with others *In Chapter 1 of your child’s textbook, these steps are called Ask a Question, Form a Hypothesis, Test the Hypothesis, Analyze the Results, Draw Conclusions, and Communicate Results. 62 HOLT SCIENCE AND TECHNOLOGY
  • 64.
    Menu Print Building Scientific Confidence Most importantly, science proj- ects make science more fun and relevant to the student. Every stu- dent, regardless of aptitude, can benefit from planning and execut- ing a science project. A science project can be a great way to spark a student’s interest in science or to help a student develop a broader interest in research. Philosophy of Science Fairs Science fairs range in scale from a single class of students showing one another their projects to an international event offering scholar- ship money as prizes. From the largest science fair to the smallest, sci- ence fairs generally share a common philosophy and similar values: • emphasis on using the scientific method • investigation by experimentation (inquiry-based learning) • development of critical thinking skills • opportunity for a positive learning experience • extension of formal science education How to Help as a Parent It is up to the student to decide what to study. You can help by motivating your child and listening to his or her ideas. However, it is crucial to remember that it is up to your child to design and execute the entire project. Judges at a science fair take particular care to note that the work is the student’s and that the student understands the topic, the research, the experiments, the analysis of data, and the conclusion. The judges expect that the student has received some help from another person, such as a parent or teacher, and that such help will be credited in the display. Copyright © by Holt, Rinehart and Winston. All rights reserved. Support the Troops Your child may need more attention than a teacher can give to each student in a large class. Some class time will be devoted to researching at the library; however, your child may find it helpful to do more library research outside of school. Expect PART 3: RESOURCES FOR PARENTS your child to spend time brainstorming, researching, planning, experimenting, analyzing data, writing a report, and constructing a display. You may offer to spend time with your child at the library. You can also help by encouraging your child to record everything in his or her science project journal, such as notes from brainstorming, sources used during research, and observations made during data collection. Your child has been told that an adult must be present during all data collection. Please supervise the experimental phase for safety purposes. You may refer to the Safety Guide to help avoid accidents during data collection. w w w SCIENCE FAIR GUIDE 63
  • 65.
    Menu Print When You Should Help It is very easy to take control of a stu- dent’s project, especially if you think it should be done differently. Remember that this project is a learning experience for your child, and he or she will not benefit from a project performed by you. If your child is performing all the necessary tasks to an acceptable stan- dard and is not requesting assistance, your job is to supervise. If your child asks for help, appears to be struggling, or is performing below acceptable standards or with disregard for safety measures, then you may wish to offer assistance. Judging The criteria on which a science fair is judged can vary, and most judges evaluate projects using the following criteria: • use of scientific thought • creativity of approach • thoroughness of investigation and research • skill of experimental technique • clarity of expression in presentation and report Besides assessing the five categories that appear above, some science fairs reward memorable presentations or displays. Student Understanding It is very important that the student’s work be evident in the project. The scientific process and the man- ner in which the research was conducted tend to outweigh the actu- al display of information. The judges will be looking carefully to see that the student has an understanding of his or her project and is responsible for the final product. In a group project, the judges will be looking for evidence that each group member completed specified tasks that furthered the progress of the group. Copyright © by Holt, Rinehart and Winston. All rights reserved. Enclosed Materials The handouts for each of the five phases will help you guide your son or daughter through each phase of the project. In preparing for the science fair, please understand that this project is a fun opportu- nity for independent learning rather than for competition to identify winners and losers. Coming away with a new interest in a particular subject or a new understanding of a scientific principle can be more rewarding than a prize. A Parent’s Progress Report is included in Resources for Parents on pp. 65–66. Please refer to this sheet throughout the project to make sure that your child is on track according to the timeline enclosed in the parent letter. The teacher may use the Parent’s Progress Report for grading purposes. 64 HOLT SCIENCE AND TECHNOLOGY
  • 66.
    Menu Print Name ____________________________________________________ Date __________________ Class _______________ Parent’s Progress Report ❏ individual project ❏ team member For each step of each phase of the science project, record the task due date and the date the student accomplished the task. You might want to reward your child for completing each phase. Date Date Phase 1—Generating an Idea due accomplished Student brainstormed five possible subjects. Student came up with two investigative questions for each topic. Student consulted with teacher and parents about project possibilities. Student chose a suitable topic. Student formed a hypothesis. Student discussed topic and hypothesis with teacher and gained approval. Student recorded ideas in the science project journal. Date Date Phase 2—Research and Planning due accomplished Copyright © by Holt, Rinehart and Winston. All rights reserved. Student researched the hypothesis. Student reconfirmed or changed the hypothesis based on further research and then gained teacher approval. Student contacted all appropriate people before beginning data collection. Student recorded all details of research so far in a bibliography in the science project journal. Student filled out the Procedural Plan for Action and obtained necessary signatures. Student developed the initial plan for display materials. Parent comments: SCIENCE FAIR GUIDE 65
  • 67.
    Menu Print Name ____________________________________________________ Date __________________ Class _______________ Parent’s Progress Report, continued Date Date Phase 3—Data Collection and Analysis due accomplished Student conducted the experiment safely. Student chose an appropriate sample size. Student performed several trials of his or her experiment. Student collected data accurately. Student recorded all data and observations in the science project journal. Student graphed or charted data and looked for trends. Student prepared a written conclusion supported by the data. Date Date Phase 4—Writing a Report due accomplished Student answered the questions on page 55. Student prepared an outline and discussed it with the teacher. Student prepared a draft and discussed it with the teacher. Copyright © by Holt, Rinehart and Winston. All rights reserved. Student revised the draft according to the teacher’s feedback. Student turned in final draft of the written report. Date Date Phase 5—Creating and Exhibiting a Display due accomplished Student sketched possible designs for display. Student created a display board within the appropriate parameters. Student displayed the results in a clear and interesting manner. Student gave an oral presentation as practice for the science fair interview. 66 HOLT SCIENCE AND TECHNOLOGY
  • 68.
    Menu Print Phase 1—Generating an Idea: Getting Involved DURING THIS PHASE, STUDENTS WILL: 1. brainstorm five possible subjects 2. come up with two investigative questions per topic 3. consult with teacher and parents about project possibilities 4. choose a suitable topic and investigative question 5. form a hypothesis 6. discuss topic and hypothesis with the teacher and gain approval 7. record ideas in their science project journal At the beginning of the project, you may wish to consult the time- line that was included in the packet of information that was sent to you. Also, you may want to contact the teacher to find out the spe- cific judging criteria and display requirements for the particular sci- ence fair that your child will be entering. This is fun! Throughout the course of the project, especially during the beginning stages, you may remind your child that one of the main goals of the project is to have fun. While healthy competition can be exciting, the purpose of a science project is to learn science through inquiry in a hands-on experiment. The Journal: Your Child’s Most Important Tool Your child will record everything he or she does in his or her science project journal. This includes all brainstorming lists, research notes, data, and observations. Your child will need the journal for all phases of Copyright © by Holt, Rinehart and Winston. All rights reserved. the science project, so it is important that he or she keep careful track of it. Also, you may want to check the journal periodically as a way of keeping up with your child’s progress. PART 3: RESOURCES FOR PARENTS Brainstorming for Topics During Phase 1, students will be brainstorming for scientific subjects that interest them. Subjects can be as simple as how light affects plant growth or as complex as how carotenes affect cancer growth. Students often find the pressure of coming up with a suitable idea the most challenging part of a project. You can help by acting as a sounding board for ideas or reminding your child of things that he or she has been curious about around the house. Students will need to brainstorm five possible topics and eventually develop two inves- tigative questions for each topic. The Investigative Question The investigative question is what the experiment is intended to find out. This question should narrow down the topics to specific areas of interest. For example, if a student chooses biological clocks w w w SCIENCE FAIR GUIDE 67
  • 69.
    Menu Print as a topic, he or she might ask, “Does the length of time for which a hamster is exposed to daylight affect how much it eats?” Ten Questions After every student has selected five topics, the class will visit the library to research the subjects that students have chosen. Students will create 2 investigative questions for each topic, a total of 10. It is likely that one of these questions will develop into a successful project. However, brainstorming more than one topic will allow students to change topics with little difficulty if they choose a topic that doesn’t prove fruitful. Choosing the Best Investigative Question As it turns out, “Does the length of time for which a hamster is exposed to daylight affect how much he eats?” may be a problematic investigative ques- tion because many science fairs prohibit the use of vertebrates in any experiment. The teacher will be familiar with the specific rules of the science fair and will steer students away from experiments that would lead to disqualification. There are many testable investigative questions within a topic, and one of them will probably fit the requirements of the science fair. Another investigative question for the subject “biological clocks” that may be more appropriate for a science project is “Does the length of time for which a flowering plant is exposed to daylight affect the rate at which it produces flowers?” The Hypothesis Once a student has selected an investigative question, the next step is for him or her to develop a hypothesis. A hypothesis is an educated guess that answers the investigative question. After reading about flowering plants and their growth patterns, the student will be able to guess whether flowering plants have biological clocks. Two appro- priate hypotheses for that investigative question would be as follows: Copyright © by Holt, Rinehart and Winston. All rights reserved. • The length of time for which a flowering plant is exposed to daylight affects the rate at which it produces flowers. • The length of time for which a flowering plant is exposed to daylight does not affect the rate at which it produces flowers. Have your child list all the possible answers to the investigative question and choose the one that is most likely to be correct accord- ing to the research he or she has done. The chosen answer will serve as your child’s hypothesis. What If the Hypothesis Is Inaccurate? Often students feel great pressure to be right about things. If you find that your child is discouraged because the results of his or her experiment disprove the hypothesis, remind him or her that the quality of the project is inde- pendent of the accuracy of the hypothesis. If your child is involved in a group project, try to monitor his or her individual participation in the project. Consult the timeline, and check your child’s progress at the end of Phase 1. 68 HOLT SCIENCE AND TECHNOLOGY
  • 70.
    Menu Print Phase 2—Research and Planning: Getting Involved DURING THIS PHASE, STUDENTS WILL 1. research the hypothesis 2. change or reconfirm the hypothesis with the teacher 3. contact all appropriate people 4. record all research sources in the science project journal 5. fill out the Procedural Plan for Action and obtain signatures 6. develop the initial plan for display materials Research By now your child has settled on an investigative question and a hypothesis, and it is time to do further research. Your child may need help with basic researching techniques both at the library and on the Internet. Further library research trips may be necessary for your child to confirm his or her hypothesis and determine how to test the hypothesis effectively. If your child has access to the Internet at home, you may want to help him or her find appropriate sites for science project research. Please continue to encourage your child by discussing the project with him or her. Your child may wish to obtain information using other methods, such as seeking an interview with a scientist or writing a letter to a company. Encourage your child to contact all sources early in Phase 2 in order to allow plenty of time for a response. Bibliography Students will need to prepare bibliographies for both Copyright © by Holt, Rinehart and Winston. All rights reserved. the research project and the display, so remind your child to keep careful note of all sources. These include documentaries, interviews, Web sites, television programs, books, newspapers, and magazines. Your child is expected to record this information in his or her journal. PART 3: RESOURCES FOR PARENTS Procedural Plans After a few trips to the library and some interviews or Internet research, your child will know whether he or she is comfortable with the chosen investigative question. Then, your child will consider how he or she is going to test the investigative question. Students’ packets include discussions of control groups versus experimental groups and dependent variables versus independent variables. The teacher will most likely discuss these concepts in class. Voice Your Concerns The teacher has required that your child fill out the Procedural Plan for Action on page 47 of Resources for Students. Students are also encouraged to use the Task List (page 48). The teacher will be watching for projects that require too much time or money. If, for some reason, you think that the project is unreasonable w (because of cost, workload, or lack of interest on your child’s part), now is w the time to contact the teacher. Soon it will be very difficult for your child w to switch topics. SCIENCE FAIR GUIDE 69
  • 71.
    Menu Print The Price is Right In most cases, there will be minor costs involved in your child’s science project. As your child formulates a science project, he or she will be asked to evaluate the costs involved with performing each experiment. You can assist your child with this process and help create an informative project that stays within your family’s budget. In certain cases, a science fair entry fee or travel expenses may be required. In general, here are a few items you can expect your child to need: • journal • materials necessary for experimentation • materials necessary for display (posterboard, markers, etc.) • books (using the library can help avoid these costs) Less Is More Judges often take creative use of materials into account when judging a science fair, and expensive projects probably will not be recognized as better just because they employ fancier equipment. The library and Internet provide resources with sugges- tions on how to make equipment using materials that are inexpen- sive or can be found around the house. Also, many businesses and institutions will lend equipment to young scientists. Encourage your child to write to local businesses for help in obtaining materials if the schedule allows enough time for him or her to receive a response. You may wish to consult a scientific supply company, such as those listed in the box below, in order to determine how much materials will cost. TIP The following is a list of a few scientific supply companies that specialize in laboratory equipment. These companies require that biological and chemical supplies be purchased by your Copyright © by Holt, Rinehart and Winston. All rights reserved. child’s school and shipped to his or her teacher. Carolina Biological Supply Co. 2600 York Road Burlington, NC 27215 (800) 334-5551 www.carolina.com Science Kit and Boreal Labs 777 East Park Drive Tonawanda, NY 14150 (800) 828-7777 www.sciencekit.com WARD’s Natural Science Establishment, Inc. 5100 West Henrietta Road Rochester, NY 14586 (800) 962-2660 www.wardsci.com If your child is involved in a group project, try to monitor his or her individual participation in the project. Consult the timeline, and check your child’s progress at the end of Phase 2. 70 HOLT SCIENCE AND TECHNOLOGY
  • 72.
    Menu Print Phase 3—Data Collection and Analysis: Getting Involved DURING THIS PHASE, STUDENTS WILL 1. conduct experiments safely 2. choose an appropriate sample size 3. perform several trials of the experiment 4. collect data accurately 5. record all data and observations in their science project journal 6. graph or chart the data and look for trends 7. prepare a written conclusion supported by the data Although your child’s science teacher will plan for some in-class data collection, much of the data collection phase of the project may be done at home. Your child has been told that an adult must be pres- ent during all data collection. For your child’s safety, please supervise the data collection phase. You may refer to the Safety Guide in the student resource packet to help avoid accidents during data collec- tion. This is a good time to review the Safety Contract with your child. Over the next few weeks, you may want to help your child in the following ways: • Familiarize yourself with the Phase 3 student instruction sheets, and help your child understand the importance of each technique, such as using an adequate sample size, collect- ing the right type of data, and performing several trials of Copyright © by Holt, Rinehart and Winston. All rights reserved. an experiment. • Make sure that your child is measuring accurately. • The International System of Units (SI) is a global measurement PART 3: RESOURCES FOR PARENTS system that helps scientists share and compare their observa- tions and results. If there is a requirement that your child express data measurements using SI, make sure that he or she understands this requirement. • Check your child’s science project journal to make sure that he or she is keeping a neat record of all aspects of the project. • Assist in explaining charts, graphs, or basic concepts of analysis when necessary. • Motivate your child by showing interest and asking questions, and allow him or her to decide how to conduct the experiment. If your child is involved in a group project, try to monitor his or her individual participation in the project. Consult the timeline, and check your child’s progress at the end of Phase 3. w w w SCIENCE FAIR GUIDE 71
  • 73.
    Menu Print Phase 4—Writing a Report: Getting Involved DURING THIS PHASE, STUDENTS WILL 1. answer the questions on page 55 of Resources for Students 2. prepare an outline and discuss it with the teacher 3. prepare a draft and discuss it with the teacher 4. revise the draft according to the teacher’s feedback 5. turn in a completed draft When your child’s teacher assigns the written report, you may want to be sure that your child understands what is expected. He or she needs to follow the rules for how long the report should be, whether it must be typed, etc., especially if a written report is required for the science fair. You may want to contact the science teacher for report guidelines. The written report will represent your child’s ideas and conclusions about the project, so it should be well thought out and neat. The Process Students will be asked to answer the questions on page 55 of Resources for Students. The questions are designed to get students thinking about what they learned and what they enjoyed the most about the science project. After answering the questions, students will create an outline of the information to include in their written reports. Using index cards may help with the organization part of the assignment. Once students have completed their outline, the Copyright © by Holt, Rinehart and Winston. All rights reserved. teacher will meet with them to offer constructive criticism. From there, students will create at least one rough draft. Positive Feedback If you help your child with an outline or draft of his or her report, remember that giving and receiving feedback can be difficult for parent and child. Here are some tips to aid the process: • You may want to mention both the strong and weak points of an outline or a draft. • You can certainly help your child with neatness, spelling, and grammar, but the ideas and writing should be his or her own. • Remind your child to cite all sources he or she used. In the bib- liography, your child should also acknowledge the help he or she received from parents, teachers, and other people. • Be aware that your child’s writing ability can affect the overall presentation of information. Imperfections in writing style may overshadow the scientific content. You may wish to check your child’s report to ensure that it is factual and organized. 72 HOLT SCIENCE AND TECHNOLOGY
  • 74.
    Menu Print What to Include in the Written Report Most scientific reports follow the same order as the steps of the sci- entific method, explaining the entire experimental process from beginning to end. Student reports should be ordered as follows: • Your child may include some background information about the topic before stating the purpose and hypothesis of the project. • A description of the procedure comes next, followed by the data acquired during the experimentation. • Your child may choose to include charts, graphs, or photo- graphs, but it is best to save most figures for the display. • Last, your child will describe the conclusions that resulted from the data analysis. The conclusion is also the place to address some of the questions asked on page 55 of Resources for Students. • You might also encourage your child to include suggestions for further study or a brief description of how he or she would do the project differently next time. • Invite your child to have fun with the written part of the project. If your child is involved in a group project, try to monitor his or her individual participation in the project. Consult the timeline, and check your child’s progress at the end of Phase 4. Copyright © by Holt, Rinehart and Winston. All rights reserved. PART 3: RESOURCES FOR PARENTS w w w SCIENCE FAIR GUIDE 73
  • 75.
    Menu Print Phase 5—Creating and Exhibiting a Display: Getting Involved DURING THIS PHASE, STUDENTS WILL 1. sketch possible designs for the display 2. create a display board within the appropriate parameters 3. display results in a clear and interesting manner 4. give an oral presentation as practice for the science fair interview The Display Board The purpose of a display is to present the information in the clearest manner possible so that the judges will be able to recognize quickly that the student performed a successful science project. You may want to encourage your child to be creative with borders, fonts, and layout, but have them make sure that a judge would find it easy to read the information contained in the display. Illustrations should be informative, not just decorative. A sleek, mature, and professional style can impress the judges, but they prefer presentations which are unique and clearly a product of the student. Portable A display board can have a large middle section and two smaller “wings” on the left and right. This design allows the display to fold up, making it more portable. If the science fair is located far away, you might ask other parents to share the expense of renting a moving truck or trailer in order to save many families the worry of transporting displays that don’t fit comfortably into cars. Copyright © by Holt, Rinehart and Winston. All rights reserved. HOW CAN I HELP? • Encourage your child to sketch out a design before he or she begins making the display. • Check charts and graphs for accuracy and readability. • Make sure that the information shown is relevant to the pur- pose, hypothesis, and conclusion. • Remember that judges are looking for conclusions based on experimental evidence, not on opinions. • Give your child a pep talk before the interview. • Tell your child some tricks that you use to remain calm and focused. 74 HOLT SCIENCE AND TECHNOLOGY
  • 76.
    Menu Print Preparing for the Interview Find out if your child needs to make a presentation to the judges at the science fair. The presentation summarizes each step of the sci- ence project: why students chose their subject, a statement of the hypothesis, what type of data was collected, a brief summary of the data, and the conclusions that students came to when they analyzed the data. Your child may also discuss how he or she would do the experiment differently if he or she were to start over again or what other questions arose during his or her research. Practice Makes Perfect If your child practices a few times he or she will have a great advantage over students who haven’t rehearsed. Your child could practice by explaining the project to your family and friends. During the interview, the judges will likely ask the stu- dent a few questions. If you ask a few questions during your child’s practice presentations, he or she may feel more comfortable answer- ing the judge’s questions. If your child is involved in a group project, try to monitor his or her individual participation in the project. Consult the timeline, and check your child’s progress at the end of Phase 5. Be Supportive Hopefully, every student will be recognized for his or her effort at the science fair. To show your support for your child, try to attend the science fair if possible and be proud of his or her individual effort and the part you played in his or her growth as a student. Copyright © by Holt, Rinehart and Winston. All rights reserved. PART 3: RESOURCES FOR PARENTS w w w SCIENCE FAIR GUIDE 75