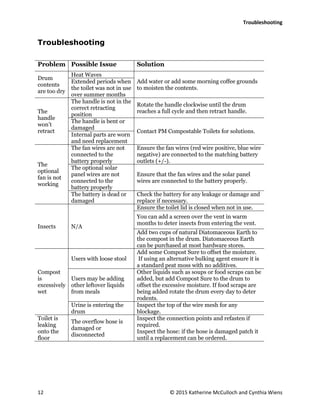
© 2015 Katherine McCulloch and Cynthia Wiens
Composting Toilet
Installation and Maintenance Manual
PM Compostable
Toilets
MODEL: Excel NE
PM Compostable Toilets
© 2015 Katherine McCulloch and Cynthia Wiens
All Rights Reserved
Courtesy of Sunmar Corp.
© 2015 Katherine McCulloch and Cynthia Wiens
Table of Contents
Introducing the Excel NE...............................................................................................................................1
Installing Your Composting Toilet.................................................................................................................3
Venting Installation...................................................................................................................................5
Overflow Security Hose Installation..........................................................................................................5
Preparing Your Composting Toilet for Use ...................................................................................................6
Operating Your Composting Toilet ...............................................................................................................7
Maintaining Your Composting Toilet ............................................................................................................8
Rotating the Drum ....................................................................................................................................8
Emptying the Drum into the Finishing Drawer.........................................................................................9
Emptying the Finishing Drawer.................................................................................................................9
Cleaning Your Composting Toilet............................................................................................................10
Winterizing Your Composting Toilet.......................................................................................................10
Seasonal Start-Up....................................................................................................................................10
Troubleshooting..........................................................................................................................................12
Frequently Asked Questions.......................................................................................................................13
Parts and Materials.....................................................................................................................................15
Contact Information....................................................................................................................................15
List of Figures
Figure 1 Basic Toilet Design Courtesy of Sunmar Corp.................................................................................2
Figure 2 Side View Rough-In Courtesy of Sunmar Corp................................................................................4
Figure 3 Top View Rough-In Courtesy of Sunmar Corp. ...............................................................................4
List of Symbols
Warning Symbol
Introducing the Excel NE
1 © 2015 Katherine McCulloch and Cynthia Wiens
Introducing the Excel NE
A composting toilet is an environmentally-friendly toilet option for locations where no
plumbing is available or as an alternative option to conventional plumbing.
The Excel NE composting toilet is a low maintenance, non-electric, odourless, medium
capacity toilet.
The toilet consists of three chambers that separate
urine from feces. The urine is sent to an evaporation
chamber while the feces is held in a composting
drum where it begins to break down into
compostable matter. The composting matter is then
transferred into the finishing drawer to complete
the composting process. Once the composting
process is complete, the composted matter can then
be manually removed and recycled back into the earth.
Prior to opening the box ensure the following criteria can be met:
 The toilet must be placed on a flat surface in a stationary location.
 This model is not compatible for use in boats, RVs, etc.
 The toilet must be placed in an area that can accommodate the following
dimensions:
 Toilet Width: 22 ½”
 Toilet Depth: 46” (to ensure space for finishing drawer removal)
 Toilet Height 33 ½”
 The toilet requires ventilation. Ensure that a qualified ventilation expert
installs the venting components.
 The optional 12 volt fan must be installed if the toilet is:
 Installed with any bends in the vent
 Installed anywhere subject to downdraft
 Used residentially
 Used heavily
 The toilet must be placed in a room that can maintain a minimum of 15
degrees Celsius if the toilet will be used frequently in winter months.
Medium Capacity:
 Residential Use (two adults or
families of three)
 Weekend and Vacation Use
(five adults or families of
seven)
Introducing the Excel NE
2 © 2015 Katherine McCulloch and Cynthia Wiens
How Your Composting Toilet Works
1. Opening for Vent Stack
2. Toilet Seat and Lid
3. Rotating Drum
4. Drum Handle
5. Stepping Stool
6. Finishing Drawer
7. Mesh Screen
8. Evaporation Chamber
Urine and feces enter the drum (3) through the opening in the toilet seat (2). The drum
contains compost and the toilet paper and feces add to the compost. The urine is filtered
through the mesh screen (6) into the evaporation chamber (7). The compost stays in the
drum until the drum is one half to two-thirds full. Some of the compost is emptied into
the finishing drawer (5) where it will continue to compost for a minimum of four weeks.
After four weeks, the finishing drawer can be removed and the compost emptied.
Figure 1 Basic Toilet Design Courtesy of Sunmar Corp.
Installing Your Composting Toilet
3 © 2015 Katherine McCulloch and Cynthia Wiens
Installing Your Composting Toilet
The Excel NE composting toilet comes fully assembled in the box. This toilet requires
the installation of a vent stack and the installation of an overflow security drain.
Included in the box
 Installation and Maintenance Guide
 Warranty card
 Assembled Excel NE composting toilet
 PVC Thinwall vent pipe (8 feet of 4 inch diameter)
 PVC Thinwall connectors (x 2)
 Diffuser vent cap
 Overflow drain hose (10 feet of 1 inch diameter)
 Stainless steel hose clamp (x 1)
 Compost Sure peat mix (30 litre bag)*
 Compost Quick enzyme (300 millilitre spray bottle)*
 Microbe Mix (1 packet)*
 Rake
*These items will need to be reordered when they have been depleted.
Not Included in the Box
 Pamphlet: Using and Maintaining Your Composting Toilet (included free
upon request)
 12 volt fan
 Venting elbows
 Guidewires
Installing Your Composting Toilet
4 © 2015 Katherine McCulloch and Cynthia Wiens
Rough In Dimensions
Figure 2 Side View Rough-In Courtesy of Sunmar Corp
Figure 3 Top View Rough-In Courtesy of Sunmar Corp.
Installing Your Composting Toilet
5 © 2015 Katherine McCulloch and Cynthia Wiens
Venting Installation
Contact a qualified ventilation expert to install the vent stack in
your home using the following guidelines:
 Do not connect the vent stack to the existing plumbing vent.
 Install the vent stack vertically. Do not install any part of the vent stack in a
horizontal position.
 If this is not possible, use no more than two 45 degree bends in the
pipe. With bends in the vent stack the optional fan (not included)
must be installed.
 Extend the top of the vent stack 60 to 90 centimetres above the peak of the
roof to prevent a downdraft.
 Secure the vent stack with guidewires (not included).
 Install the diffuser on top of the vent stack
Overflow Security Hose Installation
Follow municipal bylaws for determining how to treat excess
liquid.
 Connect the 10 foot long 1 inch overflow security hose to the overflow
security drain.
Insulate and heat the toilet if it will be used more than once a
week in temperatures colder the 15 degrees Celsius.
 Install insulation around all pipes to prevent them from freezing.
 Heat the area that contains the toilet to at least 15 degrees Celsius.
Tips!
For more information on operating your toilet in cold weather conditions contact PM
Compostables Toilets.
Preparing Your Composting Toilet for Use
6 © 2015 Katherine McCulloch and Cynthia Wiens
Preparing Your Composting Toilet for Use
Before using the toilet for the first time, you need to prepare the toilet by starting your
compost in the drum.
1. Spray the evaporation chamber with Compost Quick (included).
2. Spray the drum with Compost Quick.
3. Add 12 to 15 litres of Compost Sure
(included) into the drum.
4. Add ½ of the Microbe Mix packet
(included).
5. Sprinkle two litres of warm water into
the drum.
6. Coat the evaporation chamber in
Compost Quick.
7. Pull out the handle out of the recess
below the toilet seat and rotate the
drum clockwise four to six complete
revolutions.
8. Push the handle back into the recess.
 When the drum is in the
correct position after being turned, the handle will fit easily back
into the recess.
9. Plug in the optional fan if it has been installed.
10. Remove any loose peat moss from the evaporation chamber with the rake
(included).
 Loose peat moss may fall through the mesh vent until the compost
is active.
Compost Quick is a liquid enzyme
that accelerates the composting
process.
Compost Sure is a bulking agent
consisting of coarse peat moss and
chopped hemp stalk.
Microbe Mix is a bacteria that
increases the compost’s bacterial
population to boost composting
activity.
Operating Your Composting Toilet
7 © 2015 Katherine McCulloch and Cynthia Wiens
Operating Your Composting Toilet
Operating your composting toilet is similar to using a regular toilet except the
composting toilet does not flush; instead you will add Compost Sure (bulking agent) to
the toilet and rotate the drum.
Supplies needed
You can use any type of toilet paper in the composting toilet. The toilet paper aids in the
composting process. The only extra supply you need to operate the composting toilet is
Compost Sure or your own mixture of bulking agent.
Operating steps
1. Lift the toilet lid.
2. Use the step stool to help position yourself over the toilet.
3. Relieve yourself.
4. Use the same amount and type of toilet paper your normally would.
5. If you have a bowel movement add 250 millilitres (two handfuls) of Compost
Sure.
6. Close the lid when you are finished.
Maintaining Your Composting Toilet
8 © 2015 Katherine McCulloch and Cynthia Wiens
Maintaining Your Composting Toilet
The following steps are required to maintain your toilet:
 Rotating the drum
 Emptying the drum
 Emptying the finishing drawer
 Cleaning your composting toilet
 Winterizing your composting toilet
 Start-up after extended periods of non-use
Rotating the Drum
Rotating the drum supplies air to the compost. The extra air makes the composting
process odour free. It also reduces the moisture content within the compost to increase
the speed of the composting process.
1. Pull the handle out of the recess.
2. Turn the handle clockwise four to six complete revolutions.
 When the drum is turned clockwise, the drum door remains closed
preventing the compost from spilling into the finishing drawer.
3. Put the handle back into the recess.
 When the drum is in the correct position after being turned, the
handle will fit easily back into the recess.
Drum Rotation Frequency
Everyday Use
When the toilet is used every day, rotate the drum every other day.
Seasonal Use
When the toilet is used on weekends only, rotate the drum at the end of the
weekend.
Maintaining Your Composting Toilet
9 © 2015 Katherine McCulloch and Cynthia Wiens
Emptying the Drum into the Finishing Drawer
When the drum is one half to two thirds full, you need to empty some of the compost
into the finishing drawer.
1. Pull the handle out of the recess.
2. Pull the lock pin located near the finishing drawer.
 If the pin is not pulled, the drum will not rotate counter-clockwise.
3. Rotate the handle counter-clockwise one complete revolution.
 The drum door opens allowing compost to drop into the finishing
drawer.
4. Leave some compost in the drum.
 If the drum is emptied completely, the initial start-up steps must be
repeated to create a new batch of active compost.
5. Put the handle back in the recess.
 When the drum is in the correct position after being turned, the
handle will fit easily back into the recess.
6. Push the lock pin back in place.
 Resetting the lock pin will lock the drum door back in place.
7. Rake the contents of the finishing drawer.
Emptying the Finishing Drawer
The finishing drawer can be emptied after the contents have been in the finishing
drawer for a minimum of four weeks. Empty the drawer when space is needed to empty
the drum. With regular use, this will be every three or four months. With seasonal use, it
should only need to be emptied once a year at seasonal start-up.
1. Pull the finishing drawer out from the base of the toilet.
2. Carry contents to the recycling location and dump contents out.
3. Return drawer to toilet and slide drawer fully in.
4. Wash your hands.
Tips
If the compost appears dry, add approximately two litres of warm water to the drum after
putting the handle back in the recess.
We suggest recycling the composted matter into garden beds containing shrubs or under trees.
Do not recycle the composted matter into any gardens that contain plants that humans will eat.
Maintaining Your Composting Toilet
10 © 2015 Katherine McCulloch and Cynthia Wiens
Cleaning Your Composting Toilet
Do not use chemicals to clean the toilet bowl.
Do not clean the drum or the finishing drawer. If the drum is
cleaned the initial start-up steps must be repeated to create a
new batch of active compost.
The only parts of the toilet that will require cleaning is the toilet bowl, the lid and
outside of the toilet.
Approved Cleaning Methods:
 Clean the toilet bowl with Compost
Quick.
 Or sprinkle baking soda (or vinegar) on
a cloth. Dampen the cloth with water.
Use the cloth to wipe down surfaces and
clean inside the bowl.
Winterizing Your Composting Toilet
You can safely leave your compost in the drum and the finishing tray of the toilet during
winter months. You can use the toilet occasionally during winter months with no extra
steps. The compost will freeze at colder temperatures and will thaw when the weather
warms up. If the toilet is used more than once a week the room must maintain a
temperature of 15 degrees Celsius.
Seasonal Start-Up
There are a few simple steps to get your toilet into operating condition after a seasonal
shut down.
1. Empty the contents of the finishing
drawer.
2. Clean out any material that has fallen
into the evaporation chamber using the
rake. Focus on the back corners of the
chamber.
3. Pull the handle out of the recess.
4. Pull the lock pin located near the
finishing drawer.
Tips
To speed up the composting
process you can add some
Microbe Mix, Compost Quick or
an unsterilized black earth from
a garden center to the drum.
Tips
Use a non-abrasive cloth when
cleaning to prevent unwanted
scratches.
Maintaining Your Composting Toilet
11 © 2015 Katherine McCulloch and Cynthia Wiens
5. Rotate the handle counter-clockwise one revolution to empty some of the
contents into the finishing drawer.
6. Leave some compost in the drum.
 If the drum is emptied completely, the initial start-up steps must be
repeated to create a new batch of active compost.
7. Put the handle back in the recess.
8. Push the lock pin back in place.
9. Rake the contents of the finishing drawer.
10. Sprinkle two litres of water into the drum.
Troubleshooting
12 © 2015 Katherine McCulloch and Cynthia Wiens
Troubleshooting
Problem Possible Issue Solution
Drum
contents
are too dry
Heat Waves
Add water or add some morning coffee grounds
to moisten the contents.
Extended periods when
the toilet was not in use
over summer months
The
handle
won’t
retract
The handle is not in the
correct retracting
position
Rotate the handle clockwise until the drum
reaches a full cycle and then retract handle.
The handle is bent or
damaged
Contact PM Compostable Toilets for solutions.
Internal parts are worn
and need replacement
The
optional
fan is not
working
The fan wires are not
connected to the
battery properly
Ensure the fan wires (red wire positive, blue wire
negative) are connected to the matching battery
outlets (+/-).
The optional solar
panel wires are not
connected to the
battery properly
Ensure that the fan wires and the solar panel
wires are connected to the battery properly.
The battery is dead or
damaged
Check the battery for any leakage or damage and
replace if necessary.
Insects N/A
Ensure the toilet lid is closed when not in use.
You can add a screen over the vent in warm
months to deter insects from entering the vent.
Add two cups of natural Diatomaceous Earth to
the compost in the drum. Diatomaceous Earth
can be purchased at most hardware stores.
Compost
is
excessively
wet
Users with loose stool
Add some Compost Sure to offset the moisture.
If using an alternative bulking agent ensure it is
a standard peat moss with no additives.
Users may be adding
other leftover liquids
from meals
Other liquids such as soups or food scraps can be
added, but add Compost Sure to the drum to
offset the excessive moisture. If food scraps are
being added rotate the drum every day to deter
rodents.
Urine is entering the
drum
Inspect the top of the wire mesh for any
blockage.
Toilet is
leaking
onto the
floor
The overflow hose is
damaged or
disconnected
Inspect the connection points and refasten if
required.
Inspect the hose: if the hose is damaged patch it
until a replacement can be ordered.
Frequently Asked Questions
13 © 2015 Katherine McCulloch and Cynthia Wiens
Frequently Asked Questions
Can you install the toilet for me?
Some dealerships will install the toilet for an additional charge. If you are unable to
locate a qualified ventilation expert to install the toilet, contact us or the dealership
and we will refer you to an installer.
Can I merge this vent with my plumbing vent?
No. If the toilet is connected to existing plumbing vents ammonia odours can occur
in any of the connected device (sinks, etc.).
How many bends can I put in the vent pipe?
No more than two 45 degree bends. More than two bends will disrupt airflow. If
bends are put in the vent pipe the optional fan must be installed.
I’ve attached the overflow security hose to the drain pipe. Where does the
other end of the hose go?
The overflow security hose needs to lead to an approved recycling bed (examples:
old septic system, holding tank or drain pit). Drain pits are easy to create, but
ensure you contact your municipality for any specification they require.
What does the diffuser do?
The diffuser prevents:
 Most rain and snow from entering your stack
 Urine odour in the bathroom
Where do I get Guidewires from?
Guidewires can be purchased at any hardware store.
If I make modifications to the toilet will my warranty be void?
Contact us directly at 1-800-584-9898 (extension 4740) prior to making any
modifications to the toilet. Modifications approved* by PM Compostable Toilets
(us directly, not a dealer) will not void your warranty. *This approval will be sent in
a letter and must be kept with the original warranty card.
Frequently Asked Questions
14 © 2015 Katherine McCulloch and Cynthia Wiens
How often do I empty the drawer?
When the drum is one half to two thirds full you will rotate the drum
counter-clockwise to transfer matter into the finishing drawer.
After four weeks in the finishing drawer, remove the drawer and transfer the
contents to the recycling location.
What do I do with the contents of the drawer?
The contents of the drawer can be recycled into gardens that do not contain plants
that humans will eat. The suggested recycling locations are garden beds containing
shrubs or adding the composted matter to the soil under trees.
Should I wear gloves when I empty the drawer?
You do not have to wear gloves, but there is a small chance that bacteria could be
present in the drawer. Always wash your hands after handling the drawer.
How do I clean the toilet?
Do not use chemicals to clean the toilet.
The only parts of the toilet that will require cleaning is the toilet bowl, the lid and
outside of the toilet. Sprinkle baking soda or vinegar on a cloth then dampen the
cloth with water. Use the cloth to wipe down surfaces and clean inside the bowl.
How do I get rid of insects?
Keep the toilet lid closed when not in use.
If the toilet is installed in a location with a high insect population, consider
installing a screen over the vent.
In extreme situations add two cups of natural Diatomaceous Earth to the compost
drum. This will kill and deter any future infestation. Diatomaceous Earth can be
purchased at most hardware stores.
Parts and Materials
15 © 2015 Katherine McCulloch and Cynthia Wiens
Parts and Materials
The Excel NE composting toilet (PMEX-NE000401) will require replacement materials
and can, over time, require replacement parts.
To order parts or materials contact the service department at the number listed below.
Replacement Parts and Materials
Parts Order Code
Diffuser Vent Cap CPVT-DF006571
Drain Hose (10 feet of 1inch diameter) HS-DR0001001
Drum Handle DR-HD000141
Fan 12 volt FN-PM0000012
Finishing Drawer DR-FN000165
Hose Clamp Stainless Steel CLMP-SS001895
Mesh Screen SC-MS005858
Rake PM-RK006466
Rotating Drum DR-RT006767
Stepping Stool STP-PL0078781
Toilet seat and Lid TS-ST000575
Vent Elbow ELB-VT007621
Vent Pipe PVC Thinwall (8 feet of 4inch diameter) PIPE-VT000804
Vent Pipe Connector PVC Thinwall CON-VP048488
Materials
Compost Quick Enzyme in Spray Bottle(300 millilitres) COMP-QE000300
Compost Sure in Bag (30 litres) COMP-SB000030
Microbe Mix in packet COMP-MM000100
Pamphlet: Using and Maintaining your compostable toilet PMEX-NE000212
Contact Information
For General Inquiries:
Call our toll free number 1-800-584-9898
Visit our website at pmcompostable@gogreen.com
For The Service Department (Ordering Parts and Materials):
Call our toll free number 1-800-584-9898 Extension 4747
Order online at pmcompostable@gogreen.com/ordering

Sample Instruction Manual

  • 1.
    © 2015 KatherineMcCulloch and Cynthia Wiens Composting Toilet Installation and Maintenance Manual PM Compostable Toilets MODEL: Excel NE PM Compostable Toilets © 2015 Katherine McCulloch and Cynthia Wiens All Rights Reserved Courtesy of Sunmar Corp.
  • 2.
    © 2015 KatherineMcCulloch and Cynthia Wiens Table of Contents Introducing the Excel NE...............................................................................................................................1 Installing Your Composting Toilet.................................................................................................................3 Venting Installation...................................................................................................................................5 Overflow Security Hose Installation..........................................................................................................5 Preparing Your Composting Toilet for Use ...................................................................................................6 Operating Your Composting Toilet ...............................................................................................................7 Maintaining Your Composting Toilet ............................................................................................................8 Rotating the Drum ....................................................................................................................................8 Emptying the Drum into the Finishing Drawer.........................................................................................9 Emptying the Finishing Drawer.................................................................................................................9 Cleaning Your Composting Toilet............................................................................................................10 Winterizing Your Composting Toilet.......................................................................................................10 Seasonal Start-Up....................................................................................................................................10 Troubleshooting..........................................................................................................................................12 Frequently Asked Questions.......................................................................................................................13 Parts and Materials.....................................................................................................................................15 Contact Information....................................................................................................................................15 List of Figures Figure 1 Basic Toilet Design Courtesy of Sunmar Corp.................................................................................2 Figure 2 Side View Rough-In Courtesy of Sunmar Corp................................................................................4 Figure 3 Top View Rough-In Courtesy of Sunmar Corp. ...............................................................................4 List of Symbols Warning Symbol
  • 3.
    Introducing the ExcelNE 1 © 2015 Katherine McCulloch and Cynthia Wiens Introducing the Excel NE A composting toilet is an environmentally-friendly toilet option for locations where no plumbing is available or as an alternative option to conventional plumbing. The Excel NE composting toilet is a low maintenance, non-electric, odourless, medium capacity toilet. The toilet consists of three chambers that separate urine from feces. The urine is sent to an evaporation chamber while the feces is held in a composting drum where it begins to break down into compostable matter. The composting matter is then transferred into the finishing drawer to complete the composting process. Once the composting process is complete, the composted matter can then be manually removed and recycled back into the earth. Prior to opening the box ensure the following criteria can be met:  The toilet must be placed on a flat surface in a stationary location.  This model is not compatible for use in boats, RVs, etc.  The toilet must be placed in an area that can accommodate the following dimensions:  Toilet Width: 22 ½”  Toilet Depth: 46” (to ensure space for finishing drawer removal)  Toilet Height 33 ½”  The toilet requires ventilation. Ensure that a qualified ventilation expert installs the venting components.  The optional 12 volt fan must be installed if the toilet is:  Installed with any bends in the vent  Installed anywhere subject to downdraft  Used residentially  Used heavily  The toilet must be placed in a room that can maintain a minimum of 15 degrees Celsius if the toilet will be used frequently in winter months. Medium Capacity:  Residential Use (two adults or families of three)  Weekend and Vacation Use (five adults or families of seven)
  • 4.
    Introducing the ExcelNE 2 © 2015 Katherine McCulloch and Cynthia Wiens How Your Composting Toilet Works 1. Opening for Vent Stack 2. Toilet Seat and Lid 3. Rotating Drum 4. Drum Handle 5. Stepping Stool 6. Finishing Drawer 7. Mesh Screen 8. Evaporation Chamber Urine and feces enter the drum (3) through the opening in the toilet seat (2). The drum contains compost and the toilet paper and feces add to the compost. The urine is filtered through the mesh screen (6) into the evaporation chamber (7). The compost stays in the drum until the drum is one half to two-thirds full. Some of the compost is emptied into the finishing drawer (5) where it will continue to compost for a minimum of four weeks. After four weeks, the finishing drawer can be removed and the compost emptied. Figure 1 Basic Toilet Design Courtesy of Sunmar Corp.
  • 5.
    Installing Your CompostingToilet 3 © 2015 Katherine McCulloch and Cynthia Wiens Installing Your Composting Toilet The Excel NE composting toilet comes fully assembled in the box. This toilet requires the installation of a vent stack and the installation of an overflow security drain. Included in the box  Installation and Maintenance Guide  Warranty card  Assembled Excel NE composting toilet  PVC Thinwall vent pipe (8 feet of 4 inch diameter)  PVC Thinwall connectors (x 2)  Diffuser vent cap  Overflow drain hose (10 feet of 1 inch diameter)  Stainless steel hose clamp (x 1)  Compost Sure peat mix (30 litre bag)*  Compost Quick enzyme (300 millilitre spray bottle)*  Microbe Mix (1 packet)*  Rake *These items will need to be reordered when they have been depleted. Not Included in the Box  Pamphlet: Using and Maintaining Your Composting Toilet (included free upon request)  12 volt fan  Venting elbows  Guidewires
  • 6.
    Installing Your CompostingToilet 4 © 2015 Katherine McCulloch and Cynthia Wiens Rough In Dimensions Figure 2 Side View Rough-In Courtesy of Sunmar Corp Figure 3 Top View Rough-In Courtesy of Sunmar Corp.
  • 7.
    Installing Your CompostingToilet 5 © 2015 Katherine McCulloch and Cynthia Wiens Venting Installation Contact a qualified ventilation expert to install the vent stack in your home using the following guidelines:  Do not connect the vent stack to the existing plumbing vent.  Install the vent stack vertically. Do not install any part of the vent stack in a horizontal position.  If this is not possible, use no more than two 45 degree bends in the pipe. With bends in the vent stack the optional fan (not included) must be installed.  Extend the top of the vent stack 60 to 90 centimetres above the peak of the roof to prevent a downdraft.  Secure the vent stack with guidewires (not included).  Install the diffuser on top of the vent stack Overflow Security Hose Installation Follow municipal bylaws for determining how to treat excess liquid.  Connect the 10 foot long 1 inch overflow security hose to the overflow security drain. Insulate and heat the toilet if it will be used more than once a week in temperatures colder the 15 degrees Celsius.  Install insulation around all pipes to prevent them from freezing.  Heat the area that contains the toilet to at least 15 degrees Celsius. Tips! For more information on operating your toilet in cold weather conditions contact PM Compostables Toilets.
  • 8.
    Preparing Your CompostingToilet for Use 6 © 2015 Katherine McCulloch and Cynthia Wiens Preparing Your Composting Toilet for Use Before using the toilet for the first time, you need to prepare the toilet by starting your compost in the drum. 1. Spray the evaporation chamber with Compost Quick (included). 2. Spray the drum with Compost Quick. 3. Add 12 to 15 litres of Compost Sure (included) into the drum. 4. Add ½ of the Microbe Mix packet (included). 5. Sprinkle two litres of warm water into the drum. 6. Coat the evaporation chamber in Compost Quick. 7. Pull out the handle out of the recess below the toilet seat and rotate the drum clockwise four to six complete revolutions. 8. Push the handle back into the recess.  When the drum is in the correct position after being turned, the handle will fit easily back into the recess. 9. Plug in the optional fan if it has been installed. 10. Remove any loose peat moss from the evaporation chamber with the rake (included).  Loose peat moss may fall through the mesh vent until the compost is active. Compost Quick is a liquid enzyme that accelerates the composting process. Compost Sure is a bulking agent consisting of coarse peat moss and chopped hemp stalk. Microbe Mix is a bacteria that increases the compost’s bacterial population to boost composting activity.
  • 9.
    Operating Your CompostingToilet 7 © 2015 Katherine McCulloch and Cynthia Wiens Operating Your Composting Toilet Operating your composting toilet is similar to using a regular toilet except the composting toilet does not flush; instead you will add Compost Sure (bulking agent) to the toilet and rotate the drum. Supplies needed You can use any type of toilet paper in the composting toilet. The toilet paper aids in the composting process. The only extra supply you need to operate the composting toilet is Compost Sure or your own mixture of bulking agent. Operating steps 1. Lift the toilet lid. 2. Use the step stool to help position yourself over the toilet. 3. Relieve yourself. 4. Use the same amount and type of toilet paper your normally would. 5. If you have a bowel movement add 250 millilitres (two handfuls) of Compost Sure. 6. Close the lid when you are finished.
  • 10.
    Maintaining Your CompostingToilet 8 © 2015 Katherine McCulloch and Cynthia Wiens Maintaining Your Composting Toilet The following steps are required to maintain your toilet:  Rotating the drum  Emptying the drum  Emptying the finishing drawer  Cleaning your composting toilet  Winterizing your composting toilet  Start-up after extended periods of non-use Rotating the Drum Rotating the drum supplies air to the compost. The extra air makes the composting process odour free. It also reduces the moisture content within the compost to increase the speed of the composting process. 1. Pull the handle out of the recess. 2. Turn the handle clockwise four to six complete revolutions.  When the drum is turned clockwise, the drum door remains closed preventing the compost from spilling into the finishing drawer. 3. Put the handle back into the recess.  When the drum is in the correct position after being turned, the handle will fit easily back into the recess. Drum Rotation Frequency Everyday Use When the toilet is used every day, rotate the drum every other day. Seasonal Use When the toilet is used on weekends only, rotate the drum at the end of the weekend.
  • 11.
    Maintaining Your CompostingToilet 9 © 2015 Katherine McCulloch and Cynthia Wiens Emptying the Drum into the Finishing Drawer When the drum is one half to two thirds full, you need to empty some of the compost into the finishing drawer. 1. Pull the handle out of the recess. 2. Pull the lock pin located near the finishing drawer.  If the pin is not pulled, the drum will not rotate counter-clockwise. 3. Rotate the handle counter-clockwise one complete revolution.  The drum door opens allowing compost to drop into the finishing drawer. 4. Leave some compost in the drum.  If the drum is emptied completely, the initial start-up steps must be repeated to create a new batch of active compost. 5. Put the handle back in the recess.  When the drum is in the correct position after being turned, the handle will fit easily back into the recess. 6. Push the lock pin back in place.  Resetting the lock pin will lock the drum door back in place. 7. Rake the contents of the finishing drawer. Emptying the Finishing Drawer The finishing drawer can be emptied after the contents have been in the finishing drawer for a minimum of four weeks. Empty the drawer when space is needed to empty the drum. With regular use, this will be every three or four months. With seasonal use, it should only need to be emptied once a year at seasonal start-up. 1. Pull the finishing drawer out from the base of the toilet. 2. Carry contents to the recycling location and dump contents out. 3. Return drawer to toilet and slide drawer fully in. 4. Wash your hands. Tips If the compost appears dry, add approximately two litres of warm water to the drum after putting the handle back in the recess. We suggest recycling the composted matter into garden beds containing shrubs or under trees. Do not recycle the composted matter into any gardens that contain plants that humans will eat.
  • 12.
    Maintaining Your CompostingToilet 10 © 2015 Katherine McCulloch and Cynthia Wiens Cleaning Your Composting Toilet Do not use chemicals to clean the toilet bowl. Do not clean the drum or the finishing drawer. If the drum is cleaned the initial start-up steps must be repeated to create a new batch of active compost. The only parts of the toilet that will require cleaning is the toilet bowl, the lid and outside of the toilet. Approved Cleaning Methods:  Clean the toilet bowl with Compost Quick.  Or sprinkle baking soda (or vinegar) on a cloth. Dampen the cloth with water. Use the cloth to wipe down surfaces and clean inside the bowl. Winterizing Your Composting Toilet You can safely leave your compost in the drum and the finishing tray of the toilet during winter months. You can use the toilet occasionally during winter months with no extra steps. The compost will freeze at colder temperatures and will thaw when the weather warms up. If the toilet is used more than once a week the room must maintain a temperature of 15 degrees Celsius. Seasonal Start-Up There are a few simple steps to get your toilet into operating condition after a seasonal shut down. 1. Empty the contents of the finishing drawer. 2. Clean out any material that has fallen into the evaporation chamber using the rake. Focus on the back corners of the chamber. 3. Pull the handle out of the recess. 4. Pull the lock pin located near the finishing drawer. Tips To speed up the composting process you can add some Microbe Mix, Compost Quick or an unsterilized black earth from a garden center to the drum. Tips Use a non-abrasive cloth when cleaning to prevent unwanted scratches.
  • 13.
    Maintaining Your CompostingToilet 11 © 2015 Katherine McCulloch and Cynthia Wiens 5. Rotate the handle counter-clockwise one revolution to empty some of the contents into the finishing drawer. 6. Leave some compost in the drum.  If the drum is emptied completely, the initial start-up steps must be repeated to create a new batch of active compost. 7. Put the handle back in the recess. 8. Push the lock pin back in place. 9. Rake the contents of the finishing drawer. 10. Sprinkle two litres of water into the drum.
  • 14.
    Troubleshooting 12 © 2015Katherine McCulloch and Cynthia Wiens Troubleshooting Problem Possible Issue Solution Drum contents are too dry Heat Waves Add water or add some morning coffee grounds to moisten the contents. Extended periods when the toilet was not in use over summer months The handle won’t retract The handle is not in the correct retracting position Rotate the handle clockwise until the drum reaches a full cycle and then retract handle. The handle is bent or damaged Contact PM Compostable Toilets for solutions. Internal parts are worn and need replacement The optional fan is not working The fan wires are not connected to the battery properly Ensure the fan wires (red wire positive, blue wire negative) are connected to the matching battery outlets (+/-). The optional solar panel wires are not connected to the battery properly Ensure that the fan wires and the solar panel wires are connected to the battery properly. The battery is dead or damaged Check the battery for any leakage or damage and replace if necessary. Insects N/A Ensure the toilet lid is closed when not in use. You can add a screen over the vent in warm months to deter insects from entering the vent. Add two cups of natural Diatomaceous Earth to the compost in the drum. Diatomaceous Earth can be purchased at most hardware stores. Compost is excessively wet Users with loose stool Add some Compost Sure to offset the moisture. If using an alternative bulking agent ensure it is a standard peat moss with no additives. Users may be adding other leftover liquids from meals Other liquids such as soups or food scraps can be added, but add Compost Sure to the drum to offset the excessive moisture. If food scraps are being added rotate the drum every day to deter rodents. Urine is entering the drum Inspect the top of the wire mesh for any blockage. Toilet is leaking onto the floor The overflow hose is damaged or disconnected Inspect the connection points and refasten if required. Inspect the hose: if the hose is damaged patch it until a replacement can be ordered.
  • 15.
    Frequently Asked Questions 13© 2015 Katherine McCulloch and Cynthia Wiens Frequently Asked Questions Can you install the toilet for me? Some dealerships will install the toilet for an additional charge. If you are unable to locate a qualified ventilation expert to install the toilet, contact us or the dealership and we will refer you to an installer. Can I merge this vent with my plumbing vent? No. If the toilet is connected to existing plumbing vents ammonia odours can occur in any of the connected device (sinks, etc.). How many bends can I put in the vent pipe? No more than two 45 degree bends. More than two bends will disrupt airflow. If bends are put in the vent pipe the optional fan must be installed. I’ve attached the overflow security hose to the drain pipe. Where does the other end of the hose go? The overflow security hose needs to lead to an approved recycling bed (examples: old septic system, holding tank or drain pit). Drain pits are easy to create, but ensure you contact your municipality for any specification they require. What does the diffuser do? The diffuser prevents:  Most rain and snow from entering your stack  Urine odour in the bathroom Where do I get Guidewires from? Guidewires can be purchased at any hardware store. If I make modifications to the toilet will my warranty be void? Contact us directly at 1-800-584-9898 (extension 4740) prior to making any modifications to the toilet. Modifications approved* by PM Compostable Toilets (us directly, not a dealer) will not void your warranty. *This approval will be sent in a letter and must be kept with the original warranty card.
  • 16.
    Frequently Asked Questions 14© 2015 Katherine McCulloch and Cynthia Wiens How often do I empty the drawer? When the drum is one half to two thirds full you will rotate the drum counter-clockwise to transfer matter into the finishing drawer. After four weeks in the finishing drawer, remove the drawer and transfer the contents to the recycling location. What do I do with the contents of the drawer? The contents of the drawer can be recycled into gardens that do not contain plants that humans will eat. The suggested recycling locations are garden beds containing shrubs or adding the composted matter to the soil under trees. Should I wear gloves when I empty the drawer? You do not have to wear gloves, but there is a small chance that bacteria could be present in the drawer. Always wash your hands after handling the drawer. How do I clean the toilet? Do not use chemicals to clean the toilet. The only parts of the toilet that will require cleaning is the toilet bowl, the lid and outside of the toilet. Sprinkle baking soda or vinegar on a cloth then dampen the cloth with water. Use the cloth to wipe down surfaces and clean inside the bowl. How do I get rid of insects? Keep the toilet lid closed when not in use. If the toilet is installed in a location with a high insect population, consider installing a screen over the vent. In extreme situations add two cups of natural Diatomaceous Earth to the compost drum. This will kill and deter any future infestation. Diatomaceous Earth can be purchased at most hardware stores.
  • 17.
    Parts and Materials 15© 2015 Katherine McCulloch and Cynthia Wiens Parts and Materials The Excel NE composting toilet (PMEX-NE000401) will require replacement materials and can, over time, require replacement parts. To order parts or materials contact the service department at the number listed below. Replacement Parts and Materials Parts Order Code Diffuser Vent Cap CPVT-DF006571 Drain Hose (10 feet of 1inch diameter) HS-DR0001001 Drum Handle DR-HD000141 Fan 12 volt FN-PM0000012 Finishing Drawer DR-FN000165 Hose Clamp Stainless Steel CLMP-SS001895 Mesh Screen SC-MS005858 Rake PM-RK006466 Rotating Drum DR-RT006767 Stepping Stool STP-PL0078781 Toilet seat and Lid TS-ST000575 Vent Elbow ELB-VT007621 Vent Pipe PVC Thinwall (8 feet of 4inch diameter) PIPE-VT000804 Vent Pipe Connector PVC Thinwall CON-VP048488 Materials Compost Quick Enzyme in Spray Bottle(300 millilitres) COMP-QE000300 Compost Sure in Bag (30 litres) COMP-SB000030 Microbe Mix in packet COMP-MM000100 Pamphlet: Using and Maintaining your compostable toilet PMEX-NE000212 Contact Information For General Inquiries: Call our toll free number 1-800-584-9898 Visit our website at pmcompostable@gogreen.com For The Service Department (Ordering Parts and Materials): Call our toll free number 1-800-584-9898 Extension 4747 Order online at pmcompostable@gogreen.com/ordering