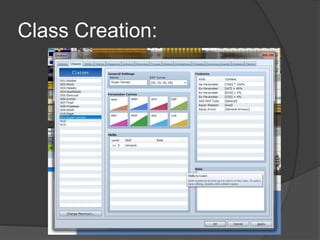
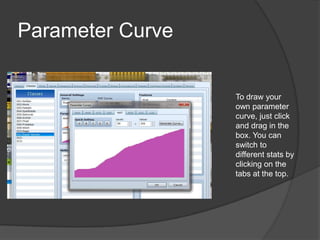
By: Matt Kiel
Objectives and
Requirements:
 The objective of this lesson is to learn
how to create characters and classes in
RPG Maker.
 Requirements: RPG Maker VX Ace
Step 1:
 The first thing you are going to want to
do is open RPG Maker
 Then you are going want to go under the
database by clicking on Tools at the top
and then Database
You should be at this
screen:
Step 2:
 Click on one of the empty slots for a
character in the left column under
Actors.
 You will then be able to fill out the
information for your character.
Character Creation:
When creating
a character,
you can name
them and
choose a class
for them. There
are many
default classes
to choose from
or you can
create your
own class in
the Classes
Tab.
Step 3: Creating Classes
 To create a class, click on one of the
empty slots in the left column under
Classes
 Just like creating a character, you can fill
in the information for your class such as
the name, EXP Curves, and different
skills.
Class Creation:
Parameter Curves:
 The parameter curves are how your
characters stats will increase as the go
trough levels.
 To change these, double click on them
and then you can choose different
presets of curves, or you can draw your
own curve if you want.
Parameter Curve
To draw your
own parameter
curve, just click
and drag in the
box. You can
switch to
different stats by
clicking on the
tabs at the top.
Summary
 Know that you have been taught the
skills to make classes and
characters, try the following.
○ Create a new class with custom stats using
the parameter curve.
○ Then apply that class to a new character that
you will create.

Rpg maker lesson 2

  • 1.
  • 2.
    Objectives and Requirements:  Theobjective of this lesson is to learn how to create characters and classes in RPG Maker.  Requirements: RPG Maker VX Ace
  • 3.
    Step 1:  Thefirst thing you are going to want to do is open RPG Maker  Then you are going want to go under the database by clicking on Tools at the top and then Database
  • 4.
    You should beat this screen:
  • 5.
    Step 2:  Clickon one of the empty slots for a character in the left column under Actors.  You will then be able to fill out the information for your character.
  • 6.
    Character Creation: When creating acharacter, you can name them and choose a class for them. There are many default classes to choose from or you can create your own class in the Classes Tab.
  • 7.
    Step 3: CreatingClasses  To create a class, click on one of the empty slots in the left column under Classes  Just like creating a character, you can fill in the information for your class such as the name, EXP Curves, and different skills.
  • 8.
  • 9.
    Parameter Curves:  Theparameter curves are how your characters stats will increase as the go trough levels.  To change these, double click on them and then you can choose different presets of curves, or you can draw your own curve if you want.
  • 10.
    Parameter Curve To drawyour own parameter curve, just click and drag in the box. You can switch to different stats by clicking on the tabs at the top.
  • 11.
    Summary  Know thatyou have been taught the skills to make classes and characters, try the following. ○ Create a new class with custom stats using the parameter curve. ○ Then apply that class to a new character that you will create.