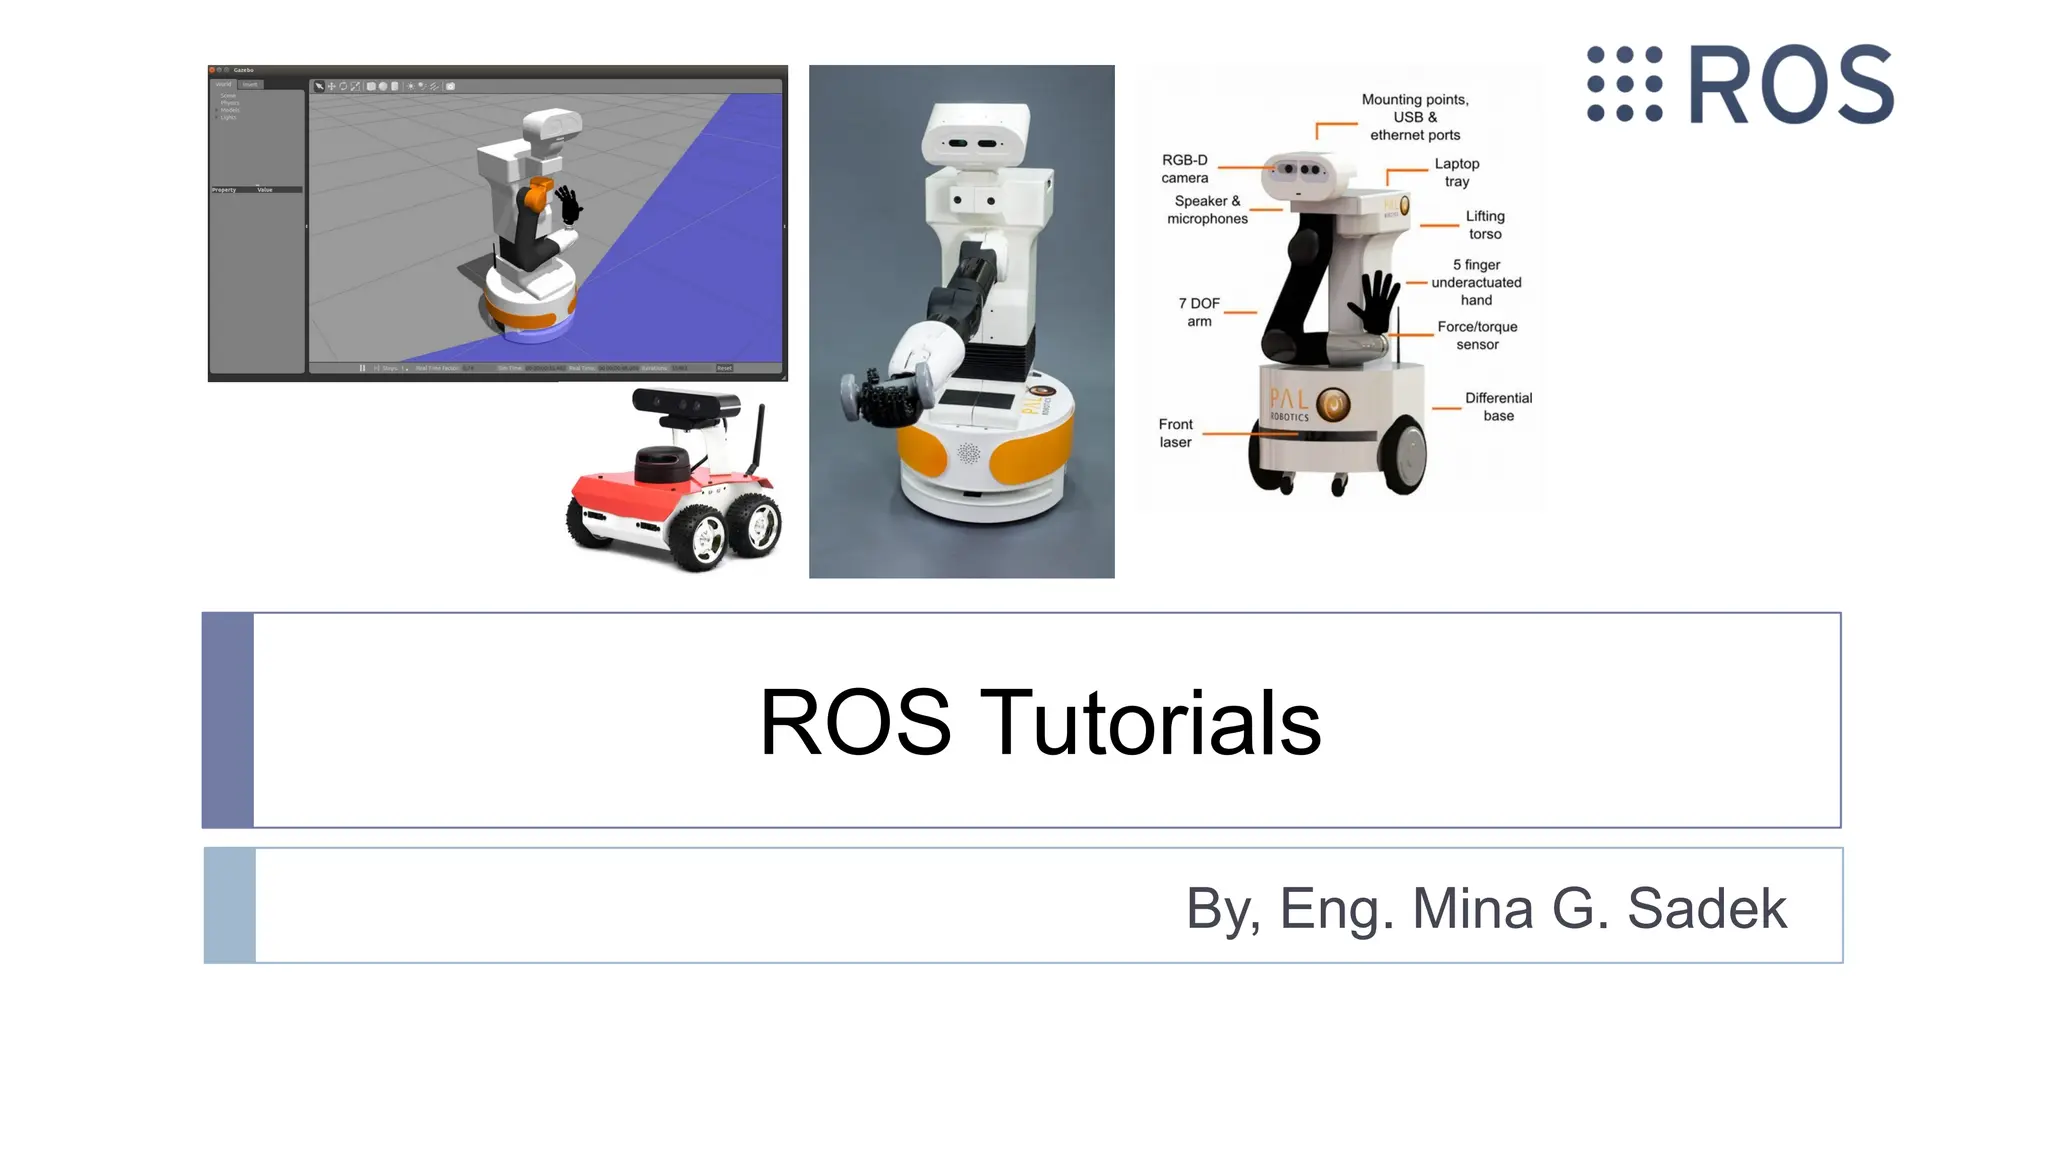
The document outlines comprehensive ROS (Robot Operating System) tutorials including installation steps, architecture, nodes, messages, topics, services, and actions. It provides instructions for creating and building packages, along with specific details for implementing publisher and subscriber nodes in both C++ and Python. Additionally, it highlights the benefits of ROS as an open-source framework and explains how to communicate between processes and utilize various libraries.

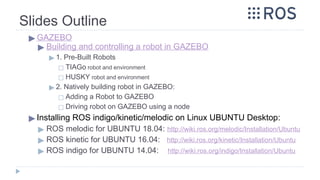
![Slides Outline
▶ Why ROS
▶ What is ROS
▶ ROS architecture
▶ ROS Nodes, Messages, Topics, Master, Services, Actions, Bags.
▶ Catkin Package:
▶ Creating catkin workspace
▶ Creating & Building Package
▶ Creating node [Publisher]
◻ [C++ Publisher]
◻ [Python Publisher]
▶ Creating node [Subscriber]
◻ [C++ Subscriber]
◻ [Python Subscriber]
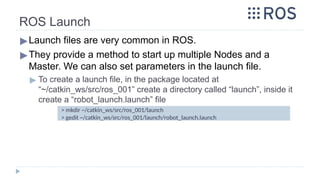
▶ ROS Launch
▶ Message passing between multiple machines](https://image.slidesharecdn.com/rostutorialsstretchnew-241031170429-f3ae546a/85/ROS-Tutorials-with-examples-for-beginners-pptx-2-320.jpg)
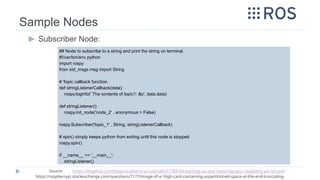
![Slides Outline
▶ Real-Time Robot using RPi
▶ A. Installing Raspbian and ROS on the RPi
▶ [METHOD_I]: Using pre-built image of Raspbian image + ROS
▶ [METHOD_II]: Native installation
◻ 1. Installing Raspbian Kinetic on RPi
◻ 2. Installing ROS on RPi
▶ C. Installing wiringPi on RPi
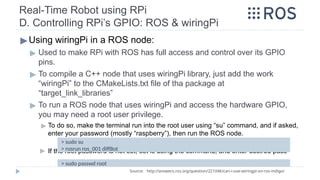
▶ D. Controlling RPi’s GPIO pins from ROS and wiringPi
▶ E. ROS Communication with Arduino [ROS Serial]
▶ Useful ROS Commands](https://image.slidesharecdn.com/rostutorialsstretchnew-241031170429-f3ae546a/85/ROS-Tutorials-with-examples-for-beginners-pptx-4-320.jpg)
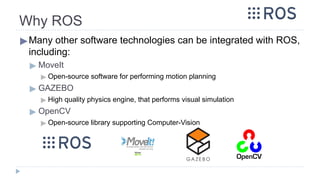
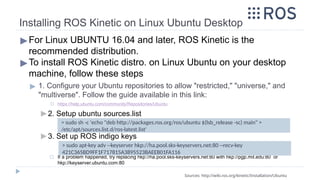
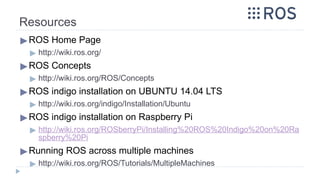
![Why ROS
▶ Open-source robotic software.
▶ Free for private and commercial use
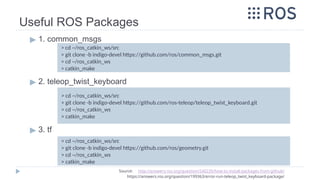
▶ Has many built-in software packages [reusable code packages] essential
in the robotic applications.
▶ Communications Infrastructure
▶ Message Passing
▶ Facilitate the communication required between processes even if they are
on different machines.
▶ Recording & Playback of Messages
▶ Remote Procedure Calls
▶ Distributed Parameter System
Source: https://www.ros.org/core-components/](https://image.slidesharecdn.com/rostutorialsstretchnew-241031170429-f3ae546a/85/ROS-Tutorials-with-examples-for-beginners-pptx-5-320.jpg)
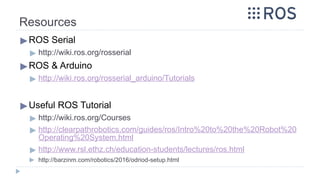
![Why ROS
▶ Community support.
▶ The Robot Operating System [ROS] is a flexible framework for writing
robot software. It is a collection of tools, libraries and conventions that aim
to simplify the task of creating complex and robust robot behavior across
a wide variety of robotic platforms.](https://image.slidesharecdn.com/rostutorialsstretchnew-241031170429-f3ae546a/85/ROS-Tutorials-with-examples-for-beginners-pptx-6-320.jpg)
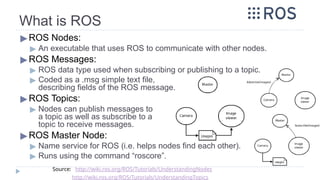
![What is ROS
▶Robot Operating System [ROS]
▶Peer to Peer
▶ Individual programs communicate over defined API (messages, services,
etc.)
▶Distributed
▶ Programs can be run on multiple computers and communicate over the
network.
▶Programming language Independent
▶ Client libraries exist for C++, Python, MATLAB, Java.
▶Free and Open-Source
▶ Most ROS software is open-source and free to use.](https://image.slidesharecdn.com/rostutorialsstretchnew-241031170429-f3ae546a/85/ROS-Tutorials-with-examples-for-beginners-pptx-8-320.jpg)
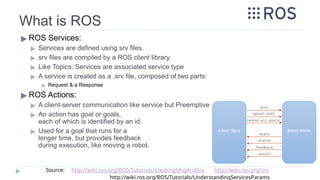
![What is ROS
▶ROS Services:
▶ Topics are many-to-many way of communication. This technique is not
appropriate for RPC [Remote Procedure Call] Request/Reply interactions.
▶ Request/Reply is done via a SERVICE.
▶ A Service is defined by a pair of messages:
▶ A message for the Request
▶ A message for the Reply
▶ Its technique:
▶ ROS node providing the service [Server Node] offers a service under a string name
▶ Client ROS node calls the service by sending the request message and awaiting the
reply.
Source: http://wiki.ros.org/ROS/Tutorials/CreatingMsgAndSrv http://wiki.ros.org/srv
http://wiki.ros.org/ROS/Tutorials/UnderstandingServicesParams](https://image.slidesharecdn.com/rostutorialsstretchnew-241031170429-f3ae546a/85/ROS-Tutorials-with-examples-for-beginners-pptx-10-320.jpg)
![▶ Follow steps available in the following link [Ubuntu 18.04]:
▶ http://wiki.ros.org/melodic/Installation/Ubuntu
▶ Follow steps available in the following link [Ubuntu 16.04]:
▶ http://wiki.ros.org/kinetic/Installation/Ubuntu
▶ Follow steps available in the following link [Ubuntu 14.04]:
▶ http://wiki.ros.org/indigo/Installation/Ubuntu
Source: http://wiki.ros.org/ROS/Tutorials/CreatingPackage
Installing ROS on UBUNTU](https://image.slidesharecdn.com/rostutorialsstretchnew-241031170429-f3ae546a/85/ROS-Tutorials-with-examples-for-beginners-pptx-13-320.jpg)
![▶ Creating catkin workspace
▶ This is a one-time step, it is only required at the first time to create a
workspace
▶ This step is for PC [not RPi], as the RPi ROS installation creates a workspace calls
“ros_catkin_ws”, as will be shown later
> mkdir -p ~/catkin_ws
> cd ~/catkin_ws/src
> catkin_init_workspace
Source: http://wiki.ros.org/ROS/Tutorials/CreatingPackage
Catkin Package:
Creating catkin workspace](https://image.slidesharecdn.com/rostutorialsstretchnew-241031170429-f3ae546a/85/ROS-Tutorials-with-examples-for-beginners-pptx-14-320.jpg)
![▶1. Creating package
▶ Catkin_create_pkg package_name [depend1] [depend2]
▶ depends: are the libraries required by the nodes that will be created in the
package [roscpp & rospy will be almost always included]
▶ The package structure should look like this:
> cd ~/catkin_ws/src
> catkin_create_pkg ros_001 roscpp rospy std_msgs
Source: http://wiki.ros.org/ROS/Tutorials/CreatingPackage
Catkin Package:
Creating & Building a Package](https://image.slidesharecdn.com/rostutorialsstretchnew-241031170429-f3ae546a/85/ROS-Tutorials-with-examples-for-beginners-pptx-15-320.jpg)
![▶1. Creating package
▶ The package will have two auto-generated files
[Will be explained in more details when creating C/C++ nodes]
▶ a. “CMakeLists.txt”: Defines which C/C++ nodes to be built, and what
dependencies the package requires, also the libraries to be linked when building
▶ b. “Package.xml”: Provides meta information about the package and required
dependencies at build and runtime also.
▶2. Building the package
▶ To compile the package, first cd to ~/catkin_ws, then use the
catkin_make command:
> cd ~/catkin_ws
> catkin_make
Source: http://wiki.ros.org/ROS/Tutorials/CreatingPackage
Catkin Package:
Creating catkin workspace & Building first package](https://image.slidesharecdn.com/rostutorialsstretchnew-241031170429-f3ae546a/85/ROS-Tutorials-with-examples-for-beginners-pptx-16-320.jpg)
![Catkin Package:
Creating node [PUBLISHER] [C++]
▶To create a C/C++ node:
▶ A. Create the C/C++ source code file “publisher.cpp”
▶ Create a source code C++ file of the node inside “src” directory inside the
package main directory
▶ B. Make some changes to the package’s “CMakeLists.txt”, located at
~/catkin_ws/src/ros_001
▶ To include the C/C++ file when building the package
▶ C. Make some changes to the package’s “package.xml”, located at
~/catkin_ws/src/ros_001
▶ To define the build and run dependencies that the package will require
Source: https://www.clearpathrobotics.com/assets/guides/ros/Creating%20publisher.html](https://image.slidesharecdn.com/rostutorialsstretchnew-241031170429-f3ae546a/85/ROS-Tutorials-with-examples-for-beginners-pptx-17-320.jpg)
![Catkin Package:
Creating node [PUBLISHER] [C++]
▶A. Create the C/C++ source code file “publisher.cpp”
Important code snippets a ROS Publisher Node should have:
▶ 1. Commonly used Libraries
▶ <ros/ros.h>: required for ROS functionality
▶ <geometry_msgs/Twist.h>: to be able to create a message of type Twist
▶ <std_msgs/String.h>: for standard string messages
> mkdir ~/catkin_ws/src/ros_001/src
> cd ~/catkin_ws/src/ros_001/src
> gedit publisher.cpp
Source: https://www.clearpathrobotics.com/assets/guides/ros/Creating%20publisher.html](https://image.slidesharecdn.com/rostutorialsstretchnew-241031170429-f3ae546a/85/ROS-Tutorials-with-examples-for-beginners-pptx-18-320.jpg)
![Catkin Package:
Creating node [PUBLISHER] [C++]
▶A. Create the C/C++ source code file “publisher.cpp”
Important code snippets a ROS Node should have:
▶ 2. Initialization
▶ [Optional]: In case of using GAZEBO husky package: To control the
husky robot, the topic name it subscribe to is:
“husky_velocity_controller/cmd_vel”
Source: https://www.clearpathrobotics.com/assets/guides/ros/Creating%20publisher.html](https://image.slidesharecdn.com/rostutorialsstretchnew-241031170429-f3ae546a/85/ROS-Tutorials-with-examples-for-beginners-pptx-19-320.jpg)
![Catkin Package:
Creating node [PUBLISHER] [C++]
▶A. Create the C/C++ source code file “publisher.cpp”
Important code snippets a ROS Node should have:
▶ 3. Loop until an exit interrupt happens [Ctrl+C]
Source: https://www.clearpathrobotics.com/assets/guides/ros/Creating%20publisher.html](https://image.slidesharecdn.com/rostutorialsstretchnew-241031170429-f3ae546a/85/ROS-Tutorials-with-examples-for-beginners-pptx-20-320.jpg)
![Catkin Package:
Creating node [PUBLISHER] [C++]
▶ B. Perform some changes to the package’s “CMakeLists.txt”, located at
~/catkin_ws/src/ros_001
▶ 1. Make the cpp source files executable by adding it as a node to the package
CMakeLists: [MANDATORY]
▶ Under
###########
## Build ##
###########
Under
## Declare a cpp executable
add the next lines:
NOTE: >>>> node_name is the given name to the node, here publisher
add_executable(node_name src/file_name.cpp)
target_link_libraries(node_name ${catkin_LIBRARIES})
Source: https://www.clearpathrobotics.com/assets/guides/ros/Creating%20publisher.html
http://wiki.ros.org/ROS/Tutorials/WritingPublisherSubscriber%28c%2B%2B%29
add_dependencies(node_name ${${PROJECT_NAME}_EXPORTED_TARGETS} ${catkin_EXPORTED_TARGETS})
# [OPTIONAL]](https://image.slidesharecdn.com/rostutorialsstretchnew-241031170429-f3ae546a/85/ROS-Tutorials-with-examples-for-beginners-pptx-21-320.jpg)
![Catkin Package:
Creating node [PUBLISHER] [C++]
▶ B. Perform some changes to the package’s “CMakeLists.txt”, located
at ~/catkin_ws/src/ros_001
▶ 2. Make sure dependencies are added: [optional]
Dependencies are components imported from ROS and used in the code
▶ At the first of the CMakeLists.txt
Under
find_package(catkin REQUIRED)
add the next lines:
find_package(catkin REQUIRED COMPONENTS
roscpp
rospy
std_msgs
geometry_msgs # mostly used, but not required here
)
Source: https://www.clearpathrobotics.com/assets/guides/ros/Creating%20publisher.html
http://wiki.ros.org/ROS/Tutorials/WritingPublisherSubscriber%28c%2B%2B%29](https://image.slidesharecdn.com/rostutorialsstretchnew-241031170429-f3ae546a/85/ROS-Tutorials-with-examples-for-beginners-pptx-22-320.jpg)
![Catkin Package:
Creating node [PUBLISHER] [C++]
▶B. Perform some changes to the package’s “CMakeLists.txt”,
located at ~/catkin_ws/src/ros_001
▶ 3. Make sure catkin specific configuration added:[optional]
▶ Under
###################################
## catkin specific configuration ##
###################################
Under
## DEPENDS: system dependencies of this project that dependent projects also
need
edit the catkin_package( ... )
to add the required configuration dependencies
catkin_package(
CATKIN_DEPENDS roscpp rospy std_msgs geometry_msgs
)
Source: https://www.clearpathrobotics.com/assets/guides/ros/Creating%20publisher.html
http://wiki.ros.org/ROS/Tutorials/WritingPublisherSubscriber%28c%2B%2B%29](https://image.slidesharecdn.com/rostutorialsstretchnew-241031170429-f3ae546a/85/ROS-Tutorials-with-examples-for-beginners-pptx-23-320.jpg)
![Catkin Package:
Creating node [PUBLISHER] [C++]
▶C. Perform some changes to the package’s “package.xml”,
located at ~/catkin_ws/src/ros_001
▶ 1. Add Build and Run dependencies: [MANDATORY]
▶ Under <buildtool_depend>catkin</buildtool_depend>
add the next lines: <build_depend>std_msgs</build_depend>
<build_depend>geometry_msgs</build_depend>
<build_export_depend>std_msgs</build_export_depend>
<build_export_depend>geometry_msgs</build_export_depend>
<exec_depend>std_msgs</exec_depend>
<exec_depend>geometry_msgs</exec_depend>
<!-- for ros indigo and before use “run_depend” instead of “exec_depend” -->
<run_depend>std_msgs</run_depend>
<run_depend>geometry_msgs</run_depend>
Source: https://www.clearpathrobotics.com/assets/guides/ros/Creating%20publisher.html
http://wiki.ros.org/ROS/Tutorials/WritingPublisherSubscriber%28c%2B%2B%29](https://image.slidesharecdn.com/rostutorialsstretchnew-241031170429-f3ae546a/85/ROS-Tutorials-with-examples-for-beginners-pptx-24-320.jpg)
![Catkin Package:
Creating node [PUBLISHER] [C++]
▶After performing A, B, and C, now cd to ~/catkin_ws and build the
package
▶ If you have error with “geometry_msgs package” not found or
something, install it manually, then rerun the “catkin_make” command
▶ If the problem still not solved, then download the geometry_msgs
manually from github indigo repo. to “~/ros_catkin_ws/src”
▶ We may need to remove some not used packages from the downloaded
folder if they generated error.
▶ Then re-build the catkin_ws as explained before.
> cd ~/catkin_ws
> catkin_make
> cd ~/ros_catkin_ws/src
> git clone -b indigo-devel https://github.com/ros/common_msgs.git
Source: https://www.clearpathrobotics.com/assets/guides/ros/Creating%20publisher.html
http://wiki.ros.org/ROS/Tutorials/WritingPublisherSubscriber%28c%2B%2B%29
> sudo apt-get install ros-geometry-msgs](https://image.slidesharecdn.com/rostutorialsstretchnew-241031170429-f3ae546a/85/ROS-Tutorials-with-examples-for-beginners-pptx-25-320.jpg)
![Catkin Package:
Creating node [PUBLISHER] [C++]
▶To run the node
▶ 1. Run the Master node in a separate terminal terminal
▶ 2. In a new terminal, source the catkin_ws
▶ 3. Then, run the node:
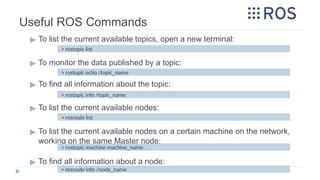
▶ > rosrun [package_name] [node_name]
▶ To list the current available topics, open a new terminal
▶ To monitor the data published by a topic
> roscore
> source ~/catkin_ws/devel/setup.bash
> rosrun ros_001 publisher
> rostopic list
> source ~/catkin_ws/devel/setup.bash
> rostopic echo /topic_name
Source: https://www.clearpathrobotics.com/assets/guides/ros/Creating%20publisher.html
http://wiki.ros.org/ROS/Tutorials/WritingPublisherSubscriber%28c%2B%2B%29](https://image.slidesharecdn.com/rostutorialsstretchnew-241031170429-f3ae546a/85/ROS-Tutorials-with-examples-for-beginners-pptx-26-320.jpg)
![Catkin Package:
Creating node [PUBLISHER] [Python]
▶To create the node in Python:
▶ In the package you created, create a folder called “scripts”
▶ In that folder “scripts”, create your python publisher node
▶ After finishing the python script coding, make the script executable
▶ Now, the python script is ready to rosrun, catkin_make is not required.
Also editing “CMakeLists.txt” is not required
> mkdir ~/catkin_ws/src/ros_001/scripts
> cd ~/catkin_ws/src/ros_001/scripts
> gedit publisher.py
> chmod a+x publisher.py
> source ~/catkin_ws/devel/setup.bash
> rosrun ros_001 publisher.py](https://image.slidesharecdn.com/rostutorialsstretchnew-241031170429-f3ae546a/85/ROS-Tutorials-with-examples-for-beginners-pptx-27-320.jpg)
![Catkin Package:
Creating node [PUBLISHER] [Python]
▶ Important python code snippets in the node:](https://image.slidesharecdn.com/rostutorialsstretchnew-241031170429-f3ae546a/85/ROS-Tutorials-with-examples-for-beginners-pptx-28-320.jpg)
![Catkin Package:
Creating node [PUBLISHER] [Python]
▶ Important python code snippets in the node:](https://image.slidesharecdn.com/rostutorialsstretchnew-241031170429-f3ae546a/85/ROS-Tutorials-with-examples-for-beginners-pptx-29-320.jpg)

![Catkin Package:
Creating node [SUBSCRIBER] [C++]
▶To create a C/C++ node:
▶ A. Create the C/C++ source code file “publisher.cpp”
▶ Create a source code C++ file of the node inside “src” directory inside the package
main directory
▶ B. Make some changes to the package’s “CMakeLists.txt”, located at
~/catkin_ws/src/ros_001
▶ To include the C/C++ file when building the package
▶ C. Make some changes to the package’s “package.xml”, located at
~/catkin_ws/src/ros_001 [if required]
▶ To define the build and run dependencies that the package will require
> cd ~/catkin_ws/src/ros_001/src
> gedit subscriber.cpp](https://image.slidesharecdn.com/rostutorialsstretchnew-241031170429-f3ae546a/85/ROS-Tutorials-with-examples-for-beginners-pptx-31-320.jpg)
![Catkin Package:
Creating node [SUBSCRIBER] [C++]
Important code snippets a ROS Subscriber should have:
Source: https://www.clearpathrobotics.com/assets/guides/ros/Creating%20publisher.html
http://wiki.ros.org/ROS/Tutorials/WritingPublisherSubscriber%28c%2B%2B%29](https://image.slidesharecdn.com/rostutorialsstretchnew-241031170429-f3ae546a/85/ROS-Tutorials-with-examples-for-beginners-pptx-32-320.jpg)
![Catkin Package:
Creating node [SUBSCRIBER] [C++]
▶ B. Perform some changes to the package’s “CMakeLists.txt”, located at
~/catkin_ws/src/ros_001
▶ 1. Make the cpp source files executable by adding it as a node to the package
CMakeLists: [MANDATORY]
▶ Under
###########
## Build ##
###########
Under
## Declare a cpp executable
add the next lines:
NOTE: >>>> node_name is the given name to the node, here publisher
## add_dependencies(subscriber ${${PROJECT_NAME}_EXPORTED_TARGETS} $
{catkin_EXPORTED_TARGETS}) [OPTIONAL]
add_executable(subscriber src/subscriber.cpp)
target_link_libraries(subscriber ${catkin_LIBRARIES})](https://image.slidesharecdn.com/rostutorialsstretchnew-241031170429-f3ae546a/85/ROS-Tutorials-with-examples-for-beginners-pptx-33-320.jpg)
![Catkin Package:
Creating node [SUBSCRIBER] [C++]
▶After performing A, B and may be C, now cd to the catkin_ws and
build the package
▶Run the subscriber node
▶ 1. source the catkin_ws
▶ 2. run the node
> cd ~/catkin_ws
> catkin_make
> source ~/catkin_ws/devel/setup.bash
> rosrun ros_001 subscriber](https://image.slidesharecdn.com/rostutorialsstretchnew-241031170429-f3ae546a/85/ROS-Tutorials-with-examples-for-beginners-pptx-34-320.jpg)
![Catkin Package:
Creating node [SUBSCRIBER] [Python]
▶To create the node in Python:
▶ In the package you created, create a folder called “scripts”
▶ In that folder “scripts”, create your python publisher node
▶ After finishing the python script coding, make the script executable
▶ Now, the python script is ready to rosrun, catkin_make is not required.
Also editing “CMakeLists.txt” is not required
> mkdir ~/catkin_ws/ros_001/scripts
> cd ~/catkin_ws/ros_001/scripts
> gedit subscriber.py
> chmod a+x subscriber.py
> source ~/catkin_ws/devel/setup.bash
> rosrun ros_001 subscriber.py](https://image.slidesharecdn.com/rostutorialsstretchnew-241031170429-f3ae546a/85/ROS-Tutorials-with-examples-for-beginners-pptx-35-320.jpg)
![Catkin Package:
Creating node [SUBSCRIBER] [Python]
▶ Important python code snippets in the node:](https://image.slidesharecdn.com/rostutorialsstretchnew-241031170429-f3ae546a/85/ROS-Tutorials-with-examples-for-beginners-pptx-36-320.jpg)
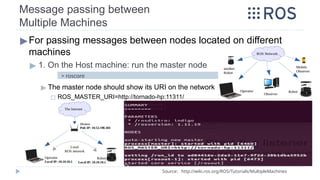
![Message passing between
Multiple Machines
▶For passing messages between nodes located on different
machines
▶ 2. On every other machine: [on the same network], on each new terminal
A. First, Configure the ROS_MASTER_URI, so that the master on the
host machine is used
▶
Then, run the node you want, now all nodes on all machines are using the
same ROS Master node
▶ Run the publisher node on the guest machine
▶ On the host machine, run the subscriber node
> source ~/catkin_ws/devel/setup.bash
> Rosrun ros_001 subscriber
> export ROS_IP=machine_IP
> export ROS_MASTER_URI=http://master_machine_IP:11311
> source ~/catkin_ws/devel/setup.bash
> rosrun ros_001 publisher
Source: http://wiki.ros.org/ROS/Tutorials/MultipleMachines](https://image.slidesharecdn.com/rostutorialsstretchnew-241031170429-f3ae546a/85/ROS-Tutorials-with-examples-for-beginners-pptx-42-320.jpg)
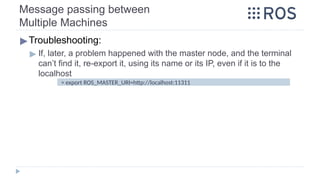
![Message passing between
Multiple Machines
▶Troubleshooting:
▶ On the guest machine, if the hostname of the Master Node [roscore]
machine is not identified, write its IP instead
▶ On every terminal on the guest machine, before running a node, we
have to identify the roscore before working
> export ROS_MASTER_URI=http://192.168.1.106:11311
> source ~/catkin_ws/devel/setup.bash
> export ROS_MASTER_URI=http://192.168.1.106:11311
> rosrun ros_001 subscriber
Source: http://wiki.ros.org/ROS/Tutorials/MultipleMachines](https://image.slidesharecdn.com/rostutorialsstretchnew-241031170429-f3ae546a/85/ROS-Tutorials-with-examples-for-beginners-pptx-43-320.jpg)
![Message passing between
Multiple Machines
▶Troubleshooting:
▶ If the host-machine (running the Master Node [roscore]) can’t find ip of
the machine running a node, on the machine, before running the
node, export its local ip
▶ Exporting the
ROS_IP can also
be useful if any node
on any machine even
the master machine
wasn’t well recognized
by the Master Node,
because its IP isn’t published > export ROS_IP=‘hostname -I’
> rosrun ros_001 subscriber
Source: http://wiki.ros.org/ROS/Tutorials/MultipleMachines](https://image.slidesharecdn.com/rostutorialsstretchnew-241031170429-f3ae546a/85/ROS-Tutorials-with-examples-for-beginners-pptx-44-320.jpg)
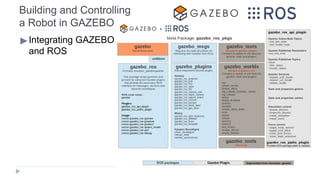
![Building and Controlling
a Robot in GAZEBO [Pre-Built]
▶First, let’s download and try a pre-built robot and world. [TIAGO]
▶ A. Make sure that the Tiago robot and world is installed:
▶ 1. Download this file and name it “tiago_public.rosinstall” in the catkin_ws directory:
https://raw.githubusercontent.com/pal-robotics/tiago_tutorials/kinetic-devel/tiago_public-mel
odic.rosinstall
▶ 2. Install the environment as follows:
▶ 3. Run the following instruction to make sure all dependencies are installed
> cd ~/catkin_ws
> rosinstall src /opt/ros/melodic tiago_public.rosinstall
> sudo rosdep init
> rosdep update
Source: http://wiki.ros.org/Robots/TIAGo/Tutorials
http://wiki.ros.org/Robots/TIAGo/Tutorials/Installation/TiagoSimulation
> rosdep install -y --from-paths src --ignore-src --rosdistro melodic --skip-keys="opencv2 opencv2-nonfree
pal_laser_filters speed_limit sensor_to_cloud hokuyo_node libdw-dev python-graphitesend-pip python-statsd
pal_filters pal_vo_server pal_usb_utils pal_pcl pal_pcl_points_throttle_and_filter pal_karto pal_local_joint_control
camera_calibration_files pal_startup_msgs pal-orbbec-openni2 dummy_actuators_manager pal_local_planner
gravity_compensation_controller current_limit_controller dynamic_footprint dynamixel_cpp tf_lookup opencv3"](https://image.slidesharecdn.com/rostutorialsstretchnew-241031170429-f3ae546a/85/ROS-Tutorials-with-examples-for-beginners-pptx-47-320.jpg)
![Building and Controlling
a Robot in GAZEBO [Pre-Built]
▶First, let’s download and try a pre-built robot and world. [TIAGO]
▶ A. Make sure that the Tiago robot and world is installed:
▶ 4. Build the workspace and source it
Note:
The public simulation of TIAGo allows two different versions:
- TIAGo Steel: in this configuration the end-effector is a parallel gripper
- TIAGo Titanium: the wrist has a 6-axis force/torque sensor and the end-effector is the
under-actuated 5-finger Hey5 hand.
▶ 5. Launch simulation:
To launch simulation of TIAGo steel or titanium, run one the following commands:
> roslaunch tiago_gazebo tiago_gazebo.launch public_sim:=true robot:=steel
Source: http://wiki.ros.org/Robots/TIAGo/Tutorials/Installation/TiagoSimulation
> cd ~/catkin_ws
> catkin_make
> source ~/catkin_ws/devel/setup.bash
> roslaunch tiago_gazebo tiago_gazebo.launch public_sim:=true robot:=titanium](https://image.slidesharecdn.com/rostutorialsstretchnew-241031170429-f3ae546a/85/ROS-Tutorials-with-examples-for-beginners-pptx-48-320.jpg)
![Building and Controlling
a Robot in GAZEBO [Pre-Built]
▶First, let’s download and try a pre-built robot and world. [TIAGO]
▶ B. Teleoperating the mobile base with keyboard:
▶ 1. Launch the simulation by running the following command in a terminal:
▶ 2. Open a new terminal and run the key_teleop using the following command:
> rosrun key_teleop key_teleop.py
Source: http://wiki.ros.org/Robots/TIAGo/Tutorials/motions/key_teleop
> roslaunch tiago_gazebo tiago_gazebo.launch public_sim:=true robot:=titanium
world:=simple_office_with_people](https://image.slidesharecdn.com/rostutorialsstretchnew-241031170429-f3ae546a/85/ROS-Tutorials-with-examples-for-beginners-pptx-49-320.jpg)
![Building and Controlling
a Robot in GAZEBO [Pre-Built]
▶First, let’s download and try a pre-built robot and world. [TIAGO]
▶ C. Moving the base through velocity commands:
▶ 1. Launch the simulation by running the following command in a terminal:
▶ 2. Open a new terminal and run the following command to find exact name of the required
node to talk to:
▶ 3. Send velocity commands through terminal
◻ a. Moving forward and backward:
◻ b. Turning left and right:
> rostopic list
Source: http://wiki.ros.org/Robots/TIAGo/Tutorials/motions/cmd_vel
> roslaunch tiago_gazebo tiago_gazebo.launch public_sim:=true robot:=titanium
world:=simple_office_with_people
> rostopic pub /mobile_base_controller/cmd_vel geometry_msgs/Twist -r 3 -- '[0.5,0.0,0.0]'
'[0.0, 0.0, 0.0]'
> rostopic pub /mobile_base_controller/cmd_vel geometry_msgs/Twist -r 3 -- '[0.0,0.0,0.0]'
'[0.0, 0.0, 0.5]'](https://image.slidesharecdn.com/rostutorialsstretchnew-241031170429-f3ae546a/85/ROS-Tutorials-with-examples-for-beginners-pptx-50-320.jpg)
![Building and Controlling
a Robot in GAZEBO [Pre-Built]
▶First, let’s download and try a pre-built robot and world. [HUSKY]
▶ Make sure that the husky robot is installed
▶ Running a virtual husky in gazebo, in new terminal write:
▶ Running a virtual husky in RViz, in a new terminal write:
▶ Now, to make the robot move, publish a geometry twist message with the
required linear and angular velocities:
> sudo apt-get update
> sudo apt-get install ros-melodic-husky-desktop
> sudo apt-get install ros-melodic-husky-simulator
> roslaunch husky_gazebo husky_empty_world.launch
Source: https://www.clearpathrobotics.com/assets/guides/ros/Drive%20a%20Husky.html
> rostopic pub -r 10 /husky_velocity_controller/cmd_vel geometry_msgs/Twist '{linear: {x: 1.0, y:
0.0, z: 0.0}, angular: {x: 0.0,y: 0.0,z: 0.0}}'
> roslaunch husky_viz view_robot.launch](https://image.slidesharecdn.com/rostutorialsstretchnew-241031170429-f3ae546a/85/ROS-Tutorials-with-examples-for-beginners-pptx-51-320.jpg)
![Building and Controlling
a Robot in GAZEBO [Pre-Built]
▶ First, let’s download and try a pre-built robot and world.
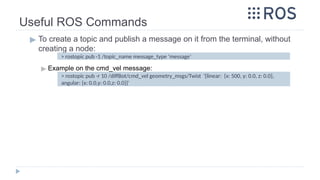
▶ Now, to make the robot move, publish a geometry twist message with the
required linear and angular velocities:
▶ “/husky_velocity_controller/cmd_vel”: topic name
▶ “geometry_msgs/Twist”: topic type
▶ “linear x: 1.0”: means go forward at 1m/s speed
▶ “-r 10”: means publish at rate 10 Hz (10 messages/sec)
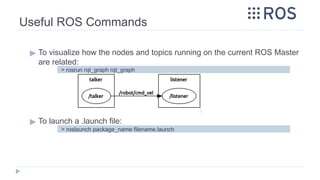
▶ We may run the “rqt_graph” ROS node to show the current nodes and topics
and their publishers and subscribers relations visually
▶ We may use teleop_twist_keyboard node to control the robot
Source: https://www.clearpathrobotics.com/assets/guides/ros/Drive%20a%20Husky.html
> rosrun rqt_graph rqt_graph
> rostopic pub -r 10 /husky_velocity_controller/cmd_vel geometry_msgs/Twist '{linear: {x: 1.0, y: 0.0, z:
0.0}, angular: {x: 0.0,y: 0.0,z: 0.0}}'
> sudo apt-get install ros-melodic-teleop-twist-keyboard
> rosrun teleop_twist_keyboard teleop_twist_keyboard.py](https://image.slidesharecdn.com/rostutorialsstretchnew-241031170429-f3ae546a/85/ROS-Tutorials-with-examples-for-beginners-pptx-52-320.jpg)
![Building and Controlling
a Robot in GAZEBO [Native]
▶A package including diffBot description with sample worlds can be
found in the following github repository:
▶ https://github.com/mina-sadek/ROS-dev_sim_1.git
▶ To clone it locally:
▶ Place the launch file code
▶ teleop_twist_keyboard can be used to control the robot.
◻ To match its topic name with that of diffBot package, run it using the following command
> cd catkin_ws/src
> git clone https://github.com/mina-sadek/ROS-dev_sim_1.git
> cd catkin_ws
> catkin_make
> roslaunch diffBot_000 diffBot_world.launch world_file:=world3 robot_name:=diffBot
> roslaunch diffBot_000 diffBot_multi_2.launch # For spawning 2 robots.
> rosrun teleop_twist_keyboard teleop_twist_keyboard.py cmd_vel:=diffBot/cmd_vel](https://image.slidesharecdn.com/rostutorialsstretchnew-241031170429-f3ae546a/85/ROS-Tutorials-with-examples-for-beginners-pptx-53-320.jpg)
![Building and Controlling
a Robot in GAZEBO [Native]
▶Simple Navigation:
▶ Run gotopoint2.py with desired x and y coordinates to make the diffBot
navigates to the desired point:
Usage: rosrun diffBot_000 gotopoint2.py x_value y_value
▶ Important topics:
▶ /diffBot/cmd_vel: Type: geometry_msgs/Twist
To control robot linear and angular movements.
▶ /diffBot/odom: Type: nav_msgs/Odometry
Gives feedback of robot’s current position and orientation.
◻ To echo odometry data in a terminal, run the following command
> rosrun diffBot_000 gotopoint2.py 2 1
> rostopic echo /diffBot/odom](https://image.slidesharecdn.com/rostutorialsstretchnew-241031170429-f3ae546a/85/ROS-Tutorials-with-examples-for-beginners-pptx-54-320.jpg)
![Building and Controlling
a Robot in GAZEBO [Native]
▶Simple Navigation:
▶ To follow the wall (wall-follower), laser scanned reading must be considered to
find the wall and follow it.
▶ Run follow_wall.py to make the diffBot start following the wall:
▶ Important topics:
▶ /diffBot/cmd_vel: Type: geometry_msgs/Twist
To control robot linear and angular movements.
▶ /diffBot/laser/scan: Type: sensor_msgs/LaserScan
Provide on-board laser sensor readings.
◻ To echo odometry data in a terminal, run the following command
> rosrun diffBot_000 follow_wall.py
> rostopic echo /diffBot/laser/scan](https://image.slidesharecdn.com/rostutorialsstretchnew-241031170429-f3ae546a/85/ROS-Tutorials-with-examples-for-beginners-pptx-55-320.jpg)
![Building and Controlling
a Robot in GAZEBO [Native]
▶We can also follow step 1 shown in this tutorial:
http://www.theconstructsim.com/ros-projects-exploring-ros-using-2-wheeled-robot-part-1/
▶
▶ Github repository of diffBot_000 package:
▶ https://github.com/mina-sadek/ROS-dev_sim_1.git
▶ To get the repository:
▶ git clone https://github.com/mina-sadek/ROS-dev_sim_1.git](https://image.slidesharecdn.com/rostutorialsstretchnew-241031170429-f3ae546a/85/ROS-Tutorials-with-examples-for-beginners-pptx-56-320.jpg)
![▶ Choose Your LINUX distribution, you can choose from:
▶ METHOD_I: ROSberryPi image: [Recommended for new users]
▶ Prebuilt SD card image of Raspbian or Ubuntu with ROS already installed
and may be OpenCV installed too:
◻ i. ROSbots provides Raspbian Stretch Lite + ROS Kinetic + OpenCV
https://github.com/ROSbots/rosbots_setup_tools
◻ ii. ROSberryPi, approved by ROS, provide ubuntu + ROS Kinetic
https://downloads.ubiquityrobotics.com/pi.html
▶ METHOD_II: New & clean installation, then install ROS manually
Two of the most famous distributions to use:
◻ Raspbian Stretch [Latest Raspbian distro to the moment], Raspbian
Lite is preferred.
◻ UBUNTU Core, which is very trending in the IOT industry.
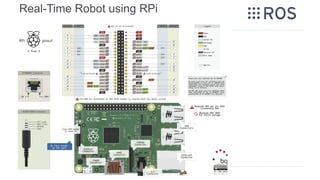
Real-Time Robot using RPi
Installing Raspbian Stretch & ROS on the RPi
Download Link for Raspbian images: https://downloads.raspberrypi.org/raspbian/images/](https://image.slidesharecdn.com/rostutorialsstretchnew-241031170429-f3ae546a/85/ROS-Tutorials-with-examples-for-beginners-pptx-58-320.jpg)
![▶ METHOD_I:
i. Installing ROSberryPi image with Raspbian Stretch Lite + ROS Kinetic +
OpenCV:
▶ 1. Download the SD card image:
◻ Open the github link of the project
https://github.com/ROSbots/rosbots_setup_tools
◻ Find the image download link and download it.
https://goo.gl/forms/d1Qa97xm8NhkLTR52
▶ 2. Flash the SD card image to your SD card
▶ Using Etcher app [linux].
◻ Run etcher application.
◻ Select the downloaded SD card image.
◻ Select your SD card.
◻ Click on Flash button.
Real-Time Robot using RPi [METHOD_I]
Installing Raspbian Stretch & ROS on the RPi
Resources: https://github.com/ROSbots/rosbots_setup_tools
https://www.balena.io/etcher/](https://image.slidesharecdn.com/rostutorialsstretchnew-241031170429-f3ae546a/85/ROS-Tutorials-with-examples-for-beginners-pptx-59-320.jpg)
![Real-Time Robot using RPi [METHOD_II]
A. Installing Raspbian Stretch on the RPi
▶ Install Clean Raspbian Stretch Lite on the RPi -- METHOD 1
▶ 1. Download Raspbian Stretch Lite:
https://www.raspberrypi.org/downloads/raspbian/
▶ 2. Download the etcher application for linux or windows from this link:
https://www.balena.io/etcher/
▶ 3. Insert the SD Card [Recommended: >16 GB]
Download Link for Raspbian images: https://downloads.raspberrypi.org/raspbian/images/](https://image.slidesharecdn.com/rostutorialsstretchnew-241031170429-f3ae546a/85/ROS-Tutorials-with-examples-for-beginners-pptx-60-320.jpg)
![▶ 1. Install Raspbian Stretch distribution on the RPi -- METHOD 1
▶ Download the etcher application for linux or windows from this link:
▶ Use the etcher application to choose the required image then choose the
target SD card, then flash it.
> https://etcher.io/
Download Link for Raspbian images: https://downloads.raspberrypi.org/raspbian/images/
Real-Time Robot using RPi [METHOD_II]
A. Installing Raspbian Stretch on the RPi](https://image.slidesharecdn.com/rostutorialsstretchnew-241031170429-f3ae546a/85/ROS-Tutorials-with-examples-for-beginners-pptx-61-320.jpg)
![Real-Time Robot using RPi [METHOD_II]
A. Installing Raspbian Stretch on the RPi
▶ 1. Install Raspbian Stretch distribution on the RPi -- METHOD 2
▶ 1. Download Raspbian Stretch Lite SD card image.
▶ 2. Insert the SD Card [Recommended: 16 GB]
▶ 3. Detect the SD card path [/dev/sdx]
▶ 4. Unmount all SD card drives
▶ 5. Copy the image to the SD card
▶ May require “sudo” to run
If the pv application is not installed, then install it using the command
▶ Wait until the copying has finished
> df -h
Sources: https://www.raspberrypi.org/documentation/installation/installing-images/linux.md
https://www.raspberrypi.org/downloads/raspbian/ https://askubuntu.com/questions/215505/how-do-you-monitor-the-progress-of-
> umount /dev/sdb1
> umount /dev/sdb2
> sudo dd if=2017-01-11-raspbian-jessie.img | pv | sudo dd of=/dev/sdb bs=4M conv=fsync
> sudo apt-get install pv](https://image.slidesharecdn.com/rostutorialsstretchnew-241031170429-f3ae546a/85/ROS-Tutorials-with-examples-for-beginners-pptx-62-320.jpg)

![Real-Time Robot using RPi
A. Installing Raspbian Stretch on the RPi
▶2. Preparing the Raspbian Stretch [Networking]
▶ If you want the RPi to connect to your wifi hotspot/router WLAN:
Add ssid and pasword of your network to the file “wpa_supplicant.conf”
located on the other drive (drive other that “boot” drive) at
“etc/wpa_supplicant/”
▶ The file, “wpa_supplicant.conf”, needs to be edited from the command line, using any
text editor you have, also it needs “sudo ” permission
▶ Add network information at the end of the form:
> sudo gedit etc/wpa_supplicant/wpa_supplicant.conf
country=GB
ctrl_interface=DIR=/var/run/wpa_supplicant GROUP=netdev
update_config=1
network={
ssid="NETWORK_SSID"
psk="NETWORK_PASS"
key_mgmt=WPA-PSK
}](https://image.slidesharecdn.com/rostutorialsstretchnew-241031170429-f3ae546a/85/ROS-Tutorials-with-examples-for-beginners-pptx-64-320.jpg)
![Real-Time Robot using RPi
A. Installing Raspbian Stretch on the RPi
▶2. Preparing the Raspbian Stretch [Networking]
▶ To enable the onboard (RPi3) or USB WiFi (RPi2) and make it try to
access networks defined in the wpa_supplicant.conf file:
▶ Edit the file “interfaces” found at “/etc/network/”, it may need “sudo ” permission
▶ At the end of the file, add these lines, to define using the wlan0 trying to access
networks found at wpa_supplicant.conf
> sudo gedit /etc/network/interfaces
auto lo
iface lo inet loopback
iface eth0 inet manual
allow-hotplug wlan0
iface wlan0 inet manual
wpa-conf /etc/wpa_supplicant/wpa_supplicant.conf](https://image.slidesharecdn.com/rostutorialsstretchnew-241031170429-f3ae546a/85/ROS-Tutorials-with-examples-for-beginners-pptx-65-320.jpg)

![Real-Time Robot using RPi
A. Installing Raspbian Stretch on the RPi
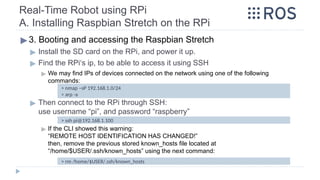
▶3. Booting and accessing the Raspbian Stretch
▶ To Run the VNC server at startup on the RPi:
▶ Create a file named “tightvnc.desktop” in “~/.config/autostart/”
▶ Then, edit the file and add the following lines:
▶ Now, next time you reboot your RPi, the vncserver will start automatically.
Source: http://diyhacking.com/connect
raspberry
pi
to
laptop
display/
[Desktop Entry]
Type=Application
Name=TightVNC
Exec=vncserver :1
StartupNotify=false
> cd ~/.config/
> mkdir autostart
> cd autostart/
> touch tightvnc.desktop
> nano tightvnc.desktop](https://image.slidesharecdn.com/rostutorialsstretchnew-241031170429-f3ae546a/85/ROS-Tutorials-with-examples-for-beginners-pptx-69-320.jpg)
![Real-Time Robot using RPi [IF METHOD_II]
B. Installing ROS on RPi
Source: https://dev.px4.io/en/ros/raspberrypi_installation.html
http://wiki.ros.org/ROSberryPi/Installing%20ROS%20Indigo%20on%20Raspberry%20Pi
▶Install ROS kinetic on the Raspbian Stretch
▶ One way to get ROS on your Raspbian Stretch OS, is to use a pre-
compiled image of Jessie with ROS indigo already installed on it.
◻ Check this link for such image:
◻ https://neverbenever.wordpress.com/2017/12/20/install-ros-and-opencv-in-raspberry-pir
aspbian-stretch/
◻ Image link:
ROS Kinetic (Robot Operating System) and OpenCV-3.3.1 on the Raspberry Pi 2 or 3 with Raspbian Stretch.
https://drive.google.com/file/d/1KMP9R-Yg3GXGDGbAxtfe_mwYa9hFUwmh/view
▶ If you installed a fresh native copy of the Jessie OS, then you need to
manually install the required ROS Distro on your Raspbian Stretch OS](https://image.slidesharecdn.com/rostutorialsstretchnew-241031170429-f3ae546a/85/ROS-Tutorials-with-examples-for-beginners-pptx-70-320.jpg)
![Real-Time Robot using RPi [IF METHOD_II]
B. Installing ROS on RPi
▶Install ROS kinetic on the Raspbian Stretch
▶ 1. Preparing prerequisites:
Source: https://dev.px4.io/en/ros/raspberrypi_installation.html
http://wiki.ros.org/ROSberryPi/Installing%20ROS%20Kinetic%20on%20the%20Raspberry%20Pi
> sudo apt-get install dirmngr
> sudo sh -c 'echo "deb http://packages.ros.org/ros/ubuntu $(lsb_release -sc) main" >
/etc/apt/sources.list.d/ros-latest.list'
> sudo apt-key adv --keyserver hkp://ha.pool.sks-keyservers.net:80 --recv-key
421C365BD9FF1F717815A3895523BAEEB01FA11
> sudo apt-get update
> sudo apt-get upgrade # [optional]
> sudo apt-get install python-rosdep python-rosinstall-generator python-wstool python-
rosinstall build-essential cmake](https://image.slidesharecdn.com/rostutorialsstretchnew-241031170429-f3ae546a/85/ROS-Tutorials-with-examples-for-beginners-pptx-71-320.jpg)
![Real-Time Robot using RPi [IF METHOD_II]
B. Installing ROS on RPi
▶Install ROS kinetic on the Raspbian Stretch
▶ 1. Preparing prerequisites:
◻ If the pip command failed, add “-H” option to the command, if it still raise errors, install the
packages separately [this step is optional]
▶ Now, initialize and update the rosdep
◻ If the “rosdep update” failed, remove the initialized file then re-run the previous 2 commands.
Source: https://dev.px4.io/en/ros/raspberrypi_installation.html
https://github.com/pypa/pip/issues/1093
> sudo -H pip install rosdep# [optional]
> sudo -H pip install rosinstall_generator # [optional]
> sudo -H pip install wstool # [optional]
> sudo -H pip install rosinstall # [optional]
> sudo rosdep init
> rosdep update
> sudo rm /etc/ros/rosdep/sources.list.d/20-default.list # [optional]](https://image.slidesharecdn.com/rostutorialsstretchnew-241031170429-f3ae546a/85/ROS-Tutorials-with-examples-for-beginners-pptx-72-320.jpg)
![Real-Time Robot using RPi [IF METHOD_II]
B. Installing ROS on RPi
▶Install ROS kinetic on the Raspbian Stretch
▶ 2.1 Now, we will download and build ROS indigo, two variants are
available: desktop (full version - recommended) & ROS-Comm (light version)
▶ This indigo packages are for robotic applications, can be added after
adding the ros_comm, [more support robots]: [optional]
◻ If wstool init fails or is interrupted, you can resume the download by running the next command.
It may require sudo privilege:
Source: https://dev.px4.io/en/ros/raspberrypi_installation.html
http://www.ros.org/reps/rep-0131.html#variants
> mkdir ~/ros_catkin_ws
> cd ~/ros_catkin_ws
> rosinstall_generator ros_comm --rosdistro kinetic --deps --wet-only --tar > kinetic-ros_comm-
wet.rosinstall
> wstool init -j8 src kinetic-ros_comm-wet.rosinstall
> rosinstall_generator robot --rosdistro kinetic --deps --wet-only --tar > kinetic-robot-wet.rosinstall
> wstool update -t src
> wstool merge -t src kinetic-robot-wet.rosinstall
> wstool update -t src # [optional]](https://image.slidesharecdn.com/rostutorialsstretchnew-241031170429-f3ae546a/85/ROS-Tutorials-with-examples-for-beginners-pptx-73-320.jpg)
![Real-Time Robot using RPi [IF METHOD_II]
B. Installing ROS on RPi
▶Install ROS kinetic on the Raspbian Stretch
▶ 2.2 Resolving Dependencies for ros_comm on Stretch
▶ 2.2.1. Resolving Unavailable Dependencies: [optional]
▶ 2.2.2. Resolving Dependencies with rosdep, and make sure all dependencies are installed:
> mkdir -p ~/ros_catkin_ws/external_src
> cd ~/ros_catkin_ws/external_src
> wget http://sourceforge.net/projects/assimp/files/assimp-3.1/assimp-
3.1.1_no_test_models.zip/download -O assimp-3.1.1_no_test_models.zip
> unzip assimp-3.1.1_no_test_models.zip
> cd assimp-3.1.1
> cmake .
> make
> sudo make install
> cd ~/ros_catkin_ws
> rosdep install -y --from-paths src --ignore-src --rosdistro kinetic -r --os=debian:stretch
Source: http://wiki.ros.org/ROSberryPi/Installing%20ROS%20Indigo%20on%20Raspberry%20Pi](https://image.slidesharecdn.com/rostutorialsstretchnew-241031170429-f3ae546a/85/ROS-Tutorials-with-examples-for-beginners-pptx-74-320.jpg)
![Real-Time Robot using RPi [IF METHOD_II]
B. Installing ROS on RPi
▶Install ROS kinetic on the Raspbian Stretch
▶ 2.3 Building the catkin workspace
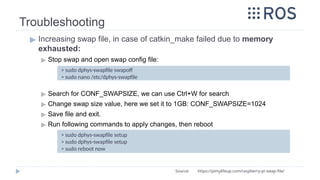
▶ Before installing ROS, it is recommended to increase the swap space on the RPi, to
avoid out-of-memory error [optional]. Note: make sure to expand file system
Note that: It is recommended to reset the swap size to 100 after ros installation.
◻ The default value in Raspbian is “CONF_SWAPSIZE=100”
Change it to: 1024
◻ Then, stop and start the service that manages the swapfile:
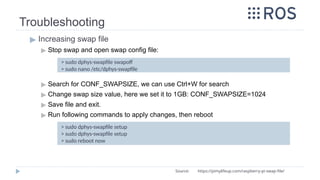
◻ To verify the amount of memory + swap:
Source: https://dev.px4.io/en/ros/raspberrypi_installation.html
http://raspberrypimaker.com/adding-swap-to-the-raspberrypi/
> sudo nano /etc/dphys-swapfile
CONF_SWAPSIZE=1024
> sudo /etc/init.d/dphys-swapfile stop
> sudo /etc/init.d/dphys-swapfile start
> free -m](https://image.slidesharecdn.com/rostutorialsstretchnew-241031170429-f3ae546a/85/ROS-Tutorials-with-examples-for-beginners-pptx-75-320.jpg)
![Real-Time Robot using RPi [IF METHOD_II]
B. Installing ROS on RPi
▶Install ROS kinetic on the Raspbian Stretch
▶ 2.3 Building the catkin workspace
▶ This will install ROS in the equivalent file location to Ubuntu in /opt/ros/kinetic
however you can modify this as you wish
This step may take too much time to finish:
◻ If compilation fail with an "internal compiler error", it may be because the RPi is out of memory:
Add swap space to the Pi and recompile.
◻ If the error persists try building with the -j2 option instead of the default -j4 option:
◻ If the compilation raised error due to the cmake file, follow the solution available in this link:
▶ https://answers.ros.org/question/266665/ros-indigo-installation-problem-on-raspbian-jessie/
> sudo ./src/catkin/bin/catkin_make_isolated --install -DCMAKE_BUILD_TYPE=Release --install-
space /opt/ros/kinetic -j2 # [optional]
> sudo ./src/catkin/bin/catkin_make_isolated --install -DCMAKE_BUILD_TYPE=Release --install-
space /opt/ros/kinetic
Source: http://wiki.ros.org/ROSberryPi/Installing%20ROS%20Indigo%20on%20Raspberry%20Pi](https://image.slidesharecdn.com/rostutorialsstretchnew-241031170429-f3ae546a/85/ROS-Tutorials-with-examples-for-beginners-pptx-76-320.jpg)
![Real-Time Robot using RPi [IF METHOD_II]
B. Installing ROS on RPi
▶Install ROS kinetic on the Raspbian Stretch
▶ 2.3 Building the catkin workspace
▶ Now, ROS should be installed. Don’t forget to source the new installation, it is
recommended to source the “setup.bash” in the ~/.bashrc, so that ROS environment
variables are automatically added to your bash session every time a new shell is
launched
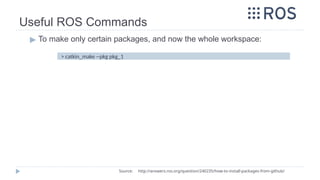
▶ Now, you can compile all the workspace by running “catkin_make”, or compile
certain packages using:
▶ If for some reason catkin_make required root permissions, change the ownership of
the ros_catkin_ws to “pi”
> echo "source /opt/ros/kinetic/setup.bash" >> ~/.bashrc
> echo "source /home/pi/ros_catkin_ws/devel/setup.bash" >> ~/.bashrc
> source ~/.bashrc
Source: http://wiki.ros.org/ROSberryPi/Installing%20ROS%20Indigo%20on%20Raspberry%20Pi
> cd ~
> sudo chown –R pi ros_catkin_ws
> catkin_make --pkg pkg_1 pkg_2](https://image.slidesharecdn.com/rostutorialsstretchnew-241031170429-f3ae546a/85/ROS-Tutorials-with-examples-for-beginners-pptx-77-320.jpg)
![Real-Time Robot using RPi [IF METHOD_II]
B. Installing ROS on RPi
▶Adding Released Packages [Optional for Future]
▶ To add additional packages to the installed ROS workspace:
▶ After updating the workspace, run rosdep to install new dependencies that
are required
▶ Then, rebuild the workspace:
> cd ~/ros_catkin_ws
> rosinstall_generator ros_comm ros_control joystick_drivers --rosdistro kinetic --deps --
wet-only --tar > kinetic-custom_ros.rosinstall
> wstool merge -t src kinetic-custom_ros.rosinstall
> wstool update -t src
Source: http://wiki.ros.org/ROSberryPi/Installing%20ROS%20Indigo%20on%20Raspberry%20Pi
> rosdep install -y --from-paths src --ignore-src --rosdistro kinetic -r --os=debian:stretch
> sudo ./src/catkin/bin/catkin_make_isolated --install -DCMAKE_BUILD_TYPE=Release
--install-space /opt/ros/kinetic](https://image.slidesharecdn.com/rostutorialsstretchnew-241031170429-f3ae546a/85/ROS-Tutorials-with-examples-for-beginners-pptx-78-320.jpg)
![Real-Time Robot using RPi
C. Installing wiringPi on RPi
▶1. Installing wiringPi [C++] on Raspbian Stretch:
▶ To make sure wiringPi is well installed, and to show the RPi‘s pinout
configuration:
> sudo apt install wiringpi
Source: http://wiringpi.com/download-and-install/
> gpio –v
> gpio readall](https://image.slidesharecdn.com/rostutorialsstretchnew-241031170429-f3ae546a/85/ROS-Tutorials-with-examples-for-beginners-pptx-80-320.jpg)
![Real-Time Robot using RPi
C. Installing wiringPi on RPi
▶1. Installing wiringPi [C++] on Raspbian Stretch:
▶ To compile a C/C++ code, the wiringPi library has to be added as a library
to the linker.
▶ To run a compiled file, a sudo privilege must be given.
▶ Either use sudo to run a file
▶ Or use “su” command to enter the root privileged shell, then all commands in that
shell will run as super user privileged.
Then “./file_output” can be run directly without “sudo” in this shell
> gcc -Wall -o file_output file.c -lwiringPi
Source: http://wiringpi.com/download-and-install/
> sudo ./file_output
> su
> ./file_output](https://image.slidesharecdn.com/rostutorialsstretchnew-241031170429-f3ae546a/85/ROS-Tutorials-with-examples-for-beginners-pptx-81-320.jpg)
![Real-Time Robot using RPi
C. Installing wiringPi on RPi
▶1. Installing wiringPi [C++] on Raspbian Stretch:
▶ This is the pinout mapping of the RPi with the wiringPi lib.:
Source: http://wiringpi.com/download-and-install/](https://image.slidesharecdn.com/rostutorialsstretchnew-241031170429-f3ae546a/85/ROS-Tutorials-with-examples-for-beginners-pptx-82-320.jpg)
![Real-Time Robot using RPi
C. Installing wiringPi on RPi
▶2. Using wiringPi [C++]: LED Blinking:
▶ To organize our work, all codes will be in “~/ros_catkin_ws/src”
▶ We will create and build a simple blink code to test the wiringpi library:
> cd ~/ros_catkin_ws/src
Source: http://wiringpi.com/download-and-install/
> mkdir blink
> cd blink
> nano blink.c](https://image.slidesharecdn.com/rostutorialsstretchnew-241031170429-f3ae546a/85/ROS-Tutorials-with-examples-for-beginners-pptx-83-320.jpg)
![Real-Time Robot using RPi
C. Installing wiringPi on RPi
▶2. Using wiringPi [C++]: LED Blinking:
▶ Then write this code in the blink.c file, the LED is connected to pin 12 in
the RPi, which is pin “1” in wiringPi
▶ To compile the code use
▶ To run the compiled file use: (don’t forget “sudo”)
> gcc -Wall -o blink blink.c -lwiringPi
#include <wiringPi.h>
int main (void) {
wiringPiSetup () ;
pinMode (1, OUTPUT) ;
for (;;) {
digitalWrite (1, HIGH) ; delay (500) ;
digitalWrite (1, LOW) ; delay (500) ;
}
return 0 ;
}
> sudo ./blink](https://image.slidesharecdn.com/rostutorialsstretchnew-241031170429-f3ae546a/85/ROS-Tutorials-with-examples-for-beginners-pptx-84-320.jpg)
![Real-Time Robot using RPi
C. Installing wiringPi on RPi
▶3. Installing wiringPi [Python] on Raspbian Stretch [NeW]:
▶ For python wiringPi, first install these prerequisites:
▶ Then, install python wiringPi directly:
Source: https://github.com/WiringPi/WiringPi-Python
> python -m pip install wiringpi
> sudo apt-get install python-dev python-setuptools swig wiringpi](https://image.slidesharecdn.com/rostutorialsstretchnew-241031170429-f3ae546a/85/ROS-Tutorials-with-examples-for-beginners-pptx-85-320.jpg)
![Real-Time Robot using RPi
C. Installing wiringPi on RPi
▶3. Installing wiringPi [Python] on Raspbian Stretch [OLD]:
▶ For python wiringPi, first install these prerequisites:
▶ Then, download and install python wiringPi:
Source: https://github.com/WiringPi/WiringPi-Python
> cd ~
> git clone --recursive https://github.com/WiringPi/WiringPi-Python.git
> cd ~/WiringPi-Python
> sudo python setup.py install
> sudo apt-get install python-dev python-setuptools swig](https://image.slidesharecdn.com/rostutorialsstretchnew-241031170429-f3ae546a/85/ROS-Tutorials-with-examples-for-beginners-pptx-86-320.jpg)
![Real-Time Robot using RPi
C. Installing wiringPi on RPi
▶4. Using wiringPi [Python]: LED Blinking:
▶ Create a blink.py file in “> cd ~/ros_catkin_ws/src/blink”:
▶ And add this code to the blink.py file:
▶ To run blink.py: (sudo is not required to run python codes)
Source: https://github.com/WiringPi/WiringPi-Python
import wiringpi
import time
wiringpi.wiringPiSetup()
wiringpi.pinMode(1,1)
while True:
time.sleep(0.5)
wiringpi.digitalWrite(1,1)
time.sleep(0.5)
wiringpi.digitalWrite(1,0)
> cd ~/ros_catkin_ws/src/blink
> nano blink.py
> python blink.py](https://image.slidesharecdn.com/rostutorialsstretchnew-241031170429-f3ae546a/85/ROS-Tutorials-with-examples-for-beginners-pptx-87-320.jpg)

![Real-Time Robot using RPi
E. ROS Communication with Arduino [ROS Serial]
▶ROS Serial:
▶ Used to make RPi with ROS installed communicate with Arduino.
▶ 1. Setup arduino environment on the developing PC
Sources: http://wiki.ros.org/rosserial
http://wiki.ros.org/rosserial_arduino/Tutorials
https://www.clearpathrobotics.com/assets/guides/ros/Driving%20Husky%20with%20ROSSerial.html
> sudo apt-get install arduino arduino-core ros-melodicrosserial ros-melodic-rosserial-arduino](https://image.slidesharecdn.com/rostutorialsstretchnew-241031170429-f3ae546a/85/ROS-Tutorials-with-examples-for-beginners-pptx-92-320.jpg)

![Backup & Restore SD Card
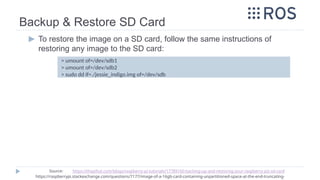
▶ To backup your SD card, we take image of it to the hard disk.
▶ 1. Use the next command to backup your sd card which is located at
“/dev/sdb”
▶ If the image is much large than the actually contained data, it can be truncated
◻ Use this to find the actual data size
◻ Now, truncate the image using number of sectors which is the value
of the “End“ sector number plus “1”
◻ A better and complete way to truncate the image using GParted app. can be found in
this link:
> sudo dd if=/dev/sdb of=./jessie_indigo.img
https://softwarebakery.com//shrinking-images-on-linux
Source: https://thepihut.com/blogs/raspberry-pi-tutorials/17789160-backing-up-and-restoring-your-raspberry-pis-sd-card
https://raspberrypi.stackexchange.com/questions/7177/image-of-a-16gb-card-containing-unpartitioned-space-at-the-end-truncating-
> fdisk -lu jessie_indigo.img
> truncate --size=$[(5872026+1)*512] image.img](https://image.slidesharecdn.com/rostutorialsstretchnew-241031170429-f3ae546a/85/ROS-Tutorials-with-examples-for-beginners-pptx-114-320.jpg)

![Robot operating system [ROS]](https://cdn.slidesharecdn.com/ss_thumbnails/robotoperatingsystemautosaved-200614222945-thumbnail.jpg?width=640&height=640&fit=bounds)