Detailed step-by-step instructions on how to replace the inner glass (for example, if shattered) on a Siemens combination microwave oven model HB86K570B
WAKUBWA TU 18+ WAANDISHI WA SIMULIZI SIMULIZI ZA SAUTI UCHAWI UPO SHUHUDA ZA KWELI SIMULIZI FUPI NA STORY ZA MAPENZI SIMULIZI ZA MAISHA SIMULIZI ZA KUSISIMUA CHOMBEZO SIMULIZI ZA KICHAWI CHOMBEZO PLUS+ SIMULIZI ZA KIJASUSI WASILIANA NASI/CONTACT US SIMULIZI MPYA - COMING SOON SIMULIZI NA HADITHI KUTOA MIMBA NA USHAURI MIMBA NA UZAZI Tv Series and Tv Shows WASAFI STORY BOOK MWALIMU WA KISWAHILI SALIM MSANGI NA ELIMU YA FREEMASON AFYA NA JAMII UFAHAMU NA MAARIFA WANAWAKE NA UREMBO NDOA UCHUMBA NA MAHUSIANO MAPISHI MBALIMBALI JUISI, MATUNDA NA MBOGAMBOGA TANZANIA COMPUTER TECHNOLOGY HISTORIA KILIMO UFUGAJI NA UVUVI DOCTOR LOVE FADHILI PAULO TABIBU WA TIBA ZA ASILI MZIZI MKAVU DAWA ZA TIBA MBADALA ZA MITISHAMB AFRICA SCHOLARSHIPS BIASHARA NA UJASIRIAMALI MIRADI YA KIJAMII UONGOZI NA UTAWALA STADI ZA MAISHA Registered and Accredited Institutions by Nacte TANZANIA COLLEGES AND INSTITUTIONS MASUALA MTAMBUKA TEHAMA NA UTANDAWAZI
Salons et Foires en France : 5 atouts pour développer votre entrepriseUNIMEV_FR
Réalisée de façon indépendante par Médiamétrie, soutenue et financée par le Ministère de l’Économie au travers de la Direction Générale des Entreprises et par UNIMEV, la CCI Paris Île-de-France et le Comité des Expositions de Paris, cette étude présente des résultats incontestables. Sa méthodologie et le soin apporté au traitement expliquent également qu’elle ait duré deux ans.
- 3 319 entreprises
- 48 salons et foires
- Une double série d’entretiens
Social Innovation is the social process to improve the innovation product, process and services. the innovator's method is the way you can use the tools to create the innovation and user journey.
Zwischen HR Tech und HR Touch - Keynote beim Online Festival HR Tech 2021Daniel Mühlbauer
Die rasante Technologisierung macht auch vor dem Personalbereich nicht Halt. Die erfolgreiche Reise in die Zukunft von HR führt über einen schmalen Grat zwischen HR Tech und HR Touch. Es gilt die Potenziale intelligenter Technologie zu erkennen, diese in Form von HR Tech zu nutzen, ohne den Blick für die menschlichen Aspekte moderner Arbeit aus den Augen zu verlieren. Ich möchte euch für ausgewählten Use Cases für diese Zukunftsreise begeistern.
Mold components refer to the general name of metal accessories used in stamping dies, plastic molds, or FA automation equipment exclusively in the mold industry.
Here we are going to introduce 60 kinds of the mold components.
Infographic showing the 12 Stages of Data, taking you along the lifecycle of data through your business. Use the infographic to see what data stages you might be missing. Each stage provides increased benefits to later stages.
More Related Content
Similar to Replacing inner glass door Siemens microwave oven HB86K570B
Mold components refer to the general name of metal accessories used in stamping dies, plastic molds, or FA automation equipment exclusively in the mold industry.
Here we are going to introduce 60 kinds of the mold components.
Infographic showing the 12 Stages of Data, taking you along the lifecycle of data through your business. Use the infographic to see what data stages you might be missing. Each stage provides increased benefits to later stages.
Practical Business Design is a method of describing your business; what it does, how it operates and what you want to achieve, all on a single Canvas page. It provides a clear, simple structure that still gives you enough detail to make informed decisions.
The Canvas can be used by:
People who want to know if their change projects are aligned with their objectives.
People who want to create a baseline model of their business to govern future change against.
A view on the components of an operating model.
An Operating Model describes how an organisation (usually a business) works. This is made up of business processes, organisation structures, data and technology.
The processes represent HOW the business works. Capabilities represent WHAT the business does. Governance ensures regulatory compliance and business efficiency.
Practical Business Design User Story - Change is ExpensiveThushan Kumaraswamy
A user story describing a COO who wants to understand why change in her business costs so much. Her business architect uses the Practical Business Design method and Canvas to gather data and document the issues.
Practical Business Design Canvas case study (Wealth management onboarding)Thushan Kumaraswamy
A sample case study from a wealth management company that wants to use the Practical Business Design Canvas to define improvements to their client onboarding processes.
Practical Business Design Canvas case study (Wealth management onboarding)
Replacing inner glass door Siemens microwave oven HB86K570B
1. Instructions to replace inner glass (shattered) for Siemens
combination microwave oven HB86K570B
Initially, it looks like you cannot get access to the shattered glass in the oven door. You have to remove the
front of the oven door (which slides off) and get access through that side. So, you need to remove and
dismantle the oven door. The process takes about 30-40 minutes.
You need the following items:
1. Replacement glass -
https://www.amazon.co.uk/gp/product/B00IUFUX5Y/ref=oh_aui_detailpage_o04_s00?ie=UTF8&psc=1
2. Torx T20 screwdriver - https://www.amazon.co.uk/Am-Tech-CRV-Folding-Torx-
Pieces/dp/B008MVG6XO/ref=sr_1_7?s=kitchen&ie=UTF8&qid=1500109250&sr=1-7&keywords=torx+t20
3. Large flat head screwdriver
4. Space to store pieces of the door as you remove them and work area to dismantle the glass front once
removed
5. Towels to protect the door pieces and to work on
6. Bag to hold broken glass
INSTRUCTIONS
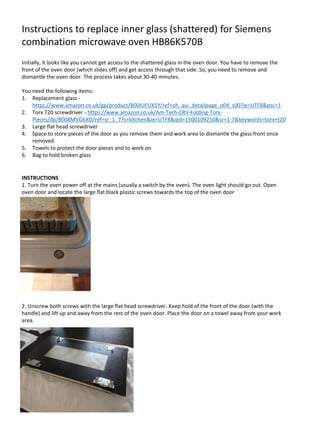
1. Turn the oven power off at the mains (usually a switch by the oven). The oven light should go out. Open
oven door and locate the large flat black plastic screws towards the top of the oven door
2. Unscrew both screws with the large flat head screwdriver. Keep hold of the front of the door (with the
handle) and lift up and away from the rest of the oven door. Place the door on a towel away from your work
area.
2. 3. You will be left with the rest of the oven door attached to the hinges
4. Now, using the T20 screwdriver, unscrew the four screws (two on each hinge) and keep them to one side.
The oven door will be OK as it is still on its hinges.
3. 5. Carefully lift off the oven door from its hinges and place face down onto a towel
6. Locate the two screws on the top left and right corners and remove them with the T20. This will release the
metal front
7. Remove the metal front piece and set aside
4. 8. There is a pane of glass resting on two light metal supports. Remove the glass and the supports
9. You should now see a fine mesh grill screwed down by 26 screws. Unscrew all 26 screws with the T20. The
large metal front can be removed
10. You should now be left with the mesh grill resting on the shattered glass on the crimped metal frame (the
one you can see when you open the oven door normally). Remove the mesh and set aside
5. 11. You are now left with the crimped frame and the shattered glass. BE VERY CAREFUL as the glass will shatter
completely. Place the whole frame into a large bag and shake to remove the glass. Make sure that all the glass
from the rubber seal has gone
12. Put the new glass on top of the rubber seal
13. Replace the mesh grill
6. 14. Replace the metal frame and screw in the 26 screws. Make sure the crimped frame, mesh grill and metal
frame holes are all aligned
15. Lay the metal supports onto the frame as shown. Take care to align them correctly
16. Lay the glass onto the metal supports
7. 17. Slightly tricky and care must be taken to do this step correctly. Get the metal frame and slot firmly into the
bottom two things, so that the two grooves are showing. This means the door section is on far enough
18. Make sure the screws at the top corners align to their holes. Best way is to remove the screw and washer
and check that the holes line up. Then screw them in
19. Slide the door back onto its hinges and reattach the metal fixings and screws
8. 20. The door should be attached firmly now
21. Get the front of the oven door (the bit with the handle) and slide it down and in. It may take a little jiggling
until you feel it attach loosely. Use the large flat head screwdriver to screw in the plastic screws at the front.
You should feel the front of the door tighten up and connect firmly to the rest of the oven door