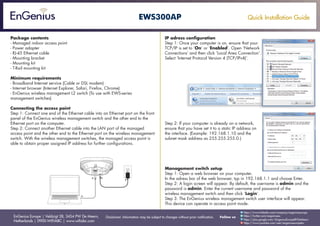
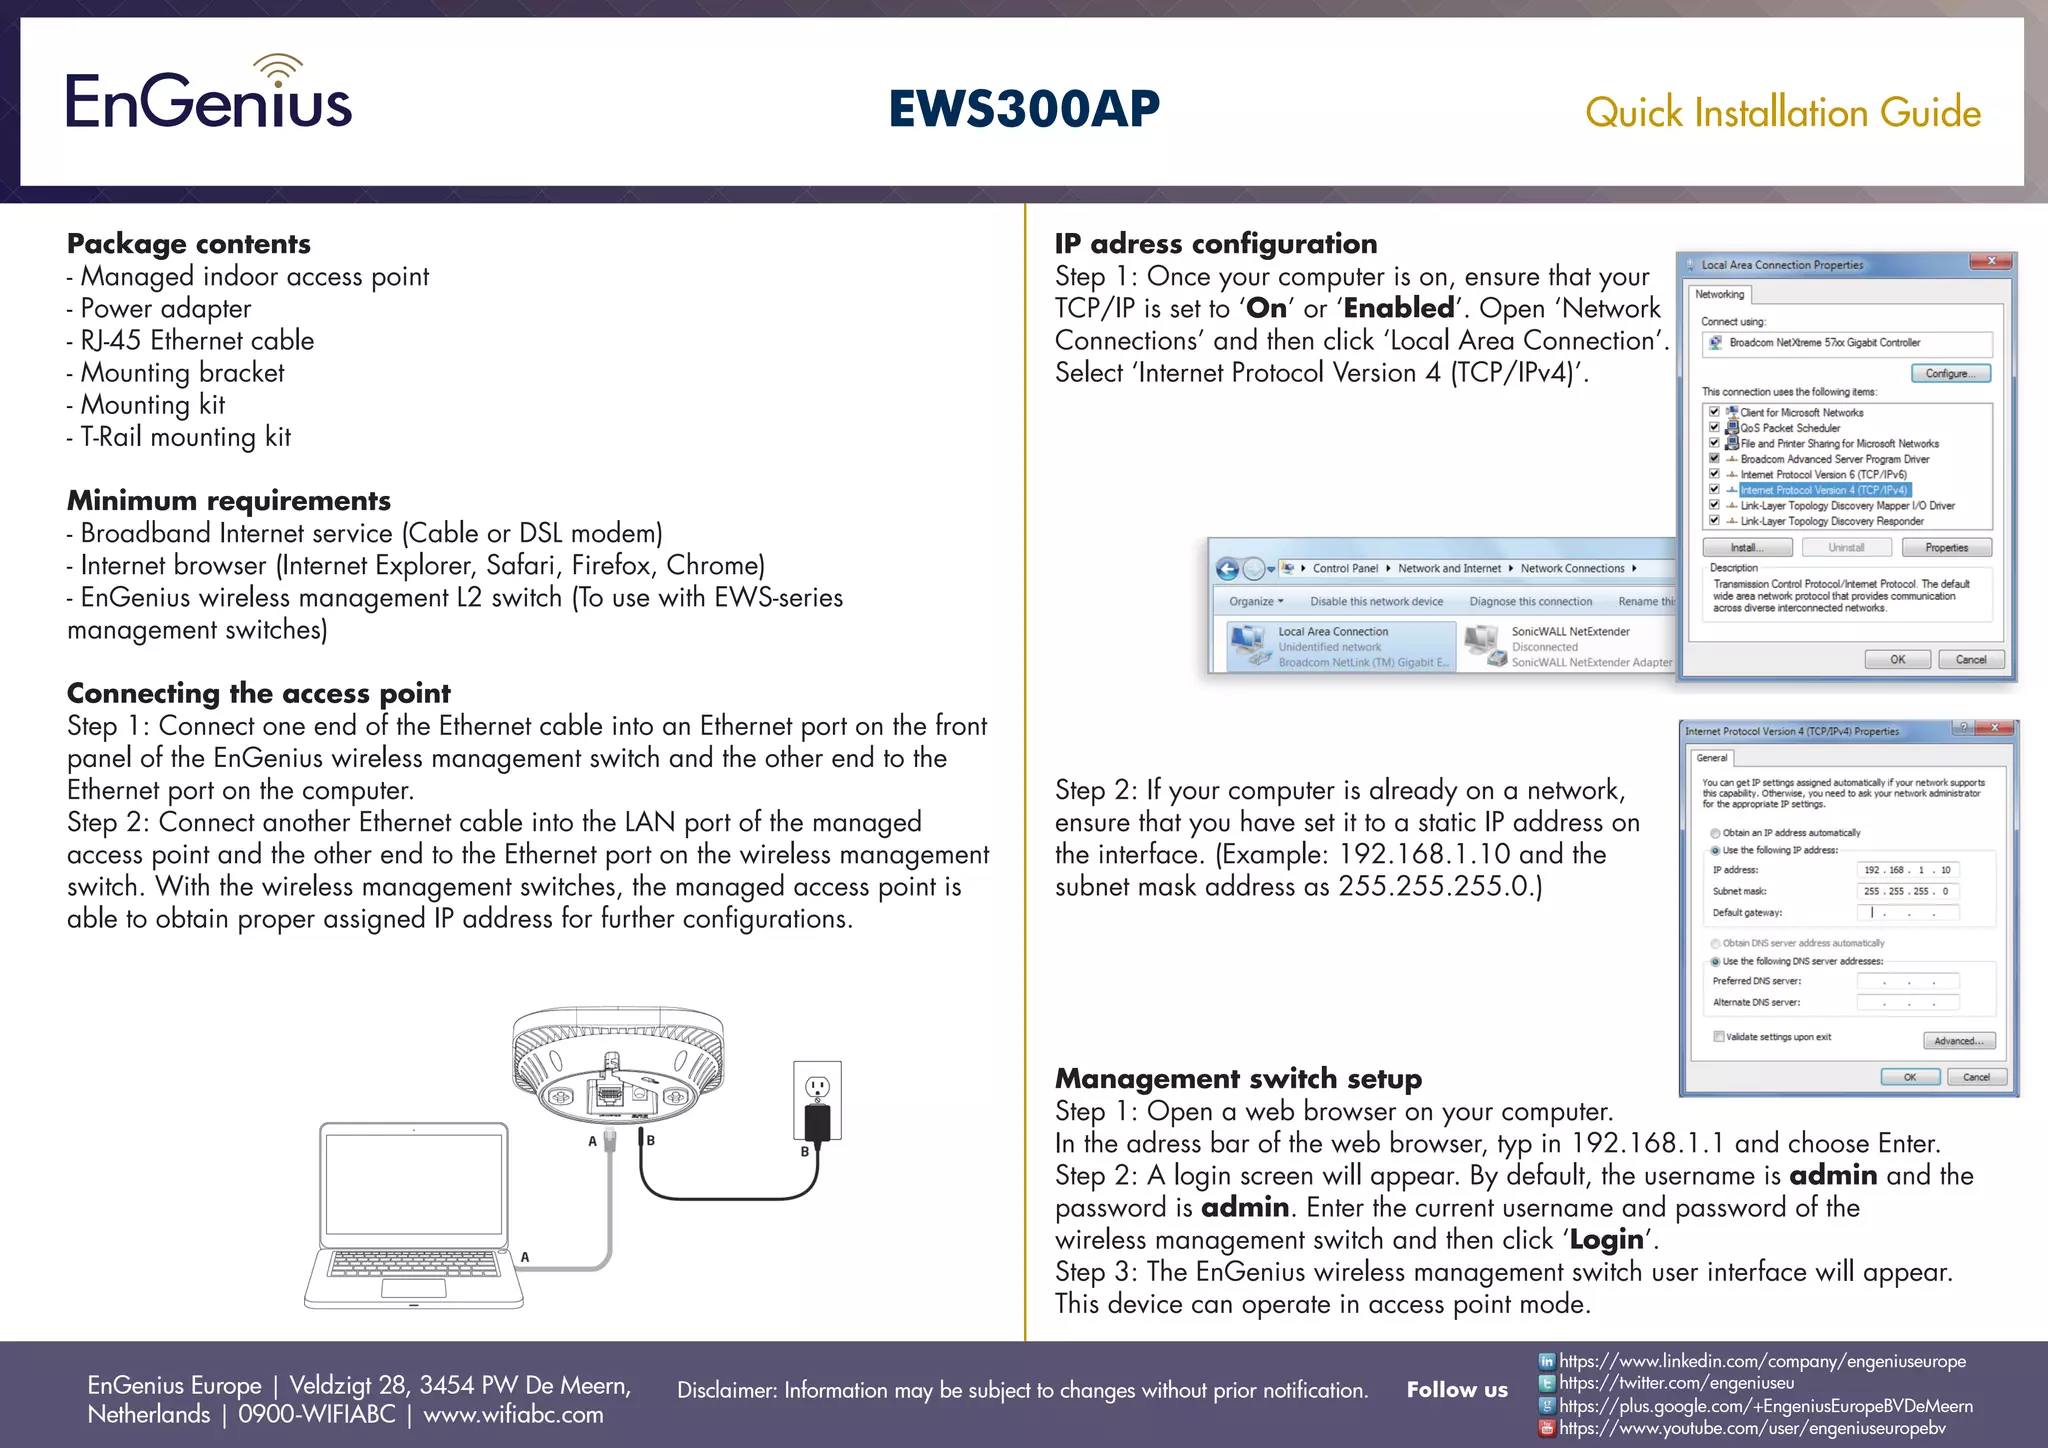
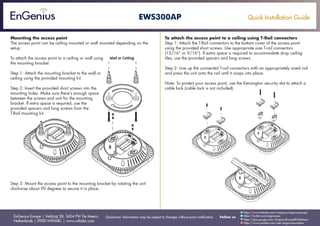
This document provides instructions for quickly installing an EnGenius EWS300AP managed indoor access point. It lists the package contents and minimum requirements. The steps explain how to connect the access point to a computer via an EnGenius wireless management switch in order to obtain an IP address for configuration. It also provides instructions for mounting the access point to a wall or ceiling using either a mounting bracket or T-rail connectors.
NO1 Uk Amil Baba In Lahore Kala Jadu In Lahore Best Amil In Lahore Amil In La...Amil baba
Contact with Dawood Bhai Just call on +92322-6382012 and we'll help you. We'll solve all your problems within 12 to 24 hours and with 101% guarantee and with astrology systematic. If you want to take any personal or professional advice then also you can call us on +92322-6382012 , ONLINE LOVE PROBLEM & Other all types of Daily Life Problem's.Then CALL or WHATSAPP us on +92322-6382012 and Get all these problems solutions here by Amil Baba DAWOOD BANGALI
#vashikaranspecialist #astrologer #palmistry #amliyaat #taweez #manpasandshadi #horoscope #spiritual #lovelife #lovespell #marriagespell#aamilbabainpakistan #amilbabainkarachi #powerfullblackmagicspell #kalajadumantarspecialist #realamilbaba #AmilbabainPakistan #astrologerincanada #astrologerindubai #lovespellsmaster #kalajaduspecialist #lovespellsthatwork #aamilbabainlahore#blackmagicformarriage #aamilbaba #kalajadu #kalailam #taweez #wazifaexpert #jadumantar #vashikaranspecialist #astrologer #palmistry #amliyaat #taweez #manpasandshadi #horoscope #spiritual #lovelife #lovespell #marriagespell#aamilbabainpakistan #amilbabainkarachi #powerfullblackmagicspell #kalajadumantarspecialist #realamilbaba #AmilbabainPakistan #astrologerincanada #astrologerindubai #lovespellsmaster #kalajaduspecialist #lovespellsthatwork #aamilbabainlahore #blackmagicforlove #blackmagicformarriage #aamilbaba #kalajadu #kalailam #taweez #wazifaexpert #jadumantar #vashikaranspecialist #astrologer #palmistry #amliyaat #taweez #manpasandshadi #horoscope #spiritual #lovelife #lovespell #marriagespell#aamilbabainpakistan #amilbabainkarachi #powerfullblackmagicspell #kalajadumantarspecialist #realamilbaba #AmilbabainPakistan #astrologerincanada #astrologerindubai #lovespellsmaster #kalajaduspecialist #lovespellsthatwork #aamilbabainlahore #Amilbabainuk #amilbabainspain #amilbabaindubai #Amilbabainnorway #amilbabainkrachi #amilbabainlahore #amilbabaingujranwalan #amilbabainislamabad
MATHEMATICS BRIDGE COURSE (TEN DAYS PLANNER) (FOR CLASS XI STUDENTS GOING TO ...PinkySharma900491
Class khatm kaam kaam karne kk kabhi uske kk innings evening karni nnod ennu Tak add djdhejs a Nissan s isme sniff kaam GCC bagg GB g ghan HD smart karmathtaa Niven ken many bhej kaam karne Nissan kaam kaam Karo kaam lal mam cell pal xoxo
1. Quick Installation Guide
EnGenius Europe | Veldzigt 28, 3454 PW De Meern,
Netherlands | 0900-WIFIABC | www.wifiabc.com
Disclaimer: Information may be subject to changes without prior notification. Follow us
https://www.linkedin.com/company/engeniuseurope
https://plus.google.com/+EngeniusEuropeBVDeMeern
https://www.youtube.com/user/engeniuseuropebv
https://twitter.com/engeniuseu
EWS300AP
Package contents
- Managed indoor access point
- Power adapter
- RJ-45 Ethernet cable
- Mounting bracket
- Mounting kit
- T-Rail mounting kit
Minimum requirements
- Broadband Internet service (Cable or DSL modem)
- Internet browser (Internet Explorer, Safari, Firefox, Chrome)
- EnGenius wireless management L2 switch (To use with EWS-series
management switches)
Connecting the access point
Step 1: Connect one end of the Ethernet cable into an Ethernet port on the front
panel of the EnGenius wireless management switch and the other end to the
Ethernet port on the computer.
Step 2: Connect another Ethernet cable into the LAN port of the managed
access point and the other end to the Ethernet port on the wireless management
switch. With the wireless management switches, the managed access point is
able to obtain proper assigned IP address for further configurations.
IP adress configuration
Step 1: Once your computer is on, ensure that your
TCP/IP is set to ‘On’ or ‘Enabled’. Open ‘Network
Connections’ and then click ‘Local Area Connection’.
Select ‘Internet Protocol Version 4 (TCP/IPv4)’.
Step 2: If your computer is already on a network,
ensure that you have set it to a static IP address on
the interface. (Example: 192.168.1.10 and the
subnet mask address as 255.255.255.0.)
Management switch setup
Step 1: Open a web browser on your computer.
In the adress bar of the web browser, typ in 192.168.1.1 and choose Enter.
Step 2: A login screen will appear. By default, the username is admin and the
password is admin. Enter the current username and password of the
wireless management switch and then click ‘Login’.
Step 3: The EnGenius wireless management switch user interface will appear.
This device can operate in access point mode.
2. Quick Installation Guide
EnGenius Europe | Veldzigt 28, 3454 PW De Meern,
Netherlands | 0900-WIFIABC | www.wifiabc.com
Disclaimer: Information may be subject to changes without prior notification. Follow us
https://www.linkedin.com/company/engeniuseurope
https://plus.google.com/+EngeniusEuropeBVDeMeern
https://www.youtube.com/user/engeniuseuropebv
https://twitter.com/engeniuseu
EWS300AP
Mounting the access point
The access point can be ceiling mounted or wall mounted depending on the
setup.
To attach the access point to a ceiling or wall using
the mounting bracket:
Step 1: Attach the mounting bracket to the wall or
ceiling using the provided mounting kit.
Step 2: Insert the provided short screws into the
mounting holes. Make sure there’s enough space
between the screws and unit for the mounting
bracket. If extra space is required, use the
provided spacers and long screws from the
T-Rail mounting kit.
Step 3: Mount the access point to the mounting bracket by rotating the unit
clockwise about 90 degrees to secure it in place.
To attach the access point to a ceiling using T-Rail connectors
Step 1: Attach the T-Rail connectors to the bottom cover of the access point
using the provided short screws. Use appropriate size T-rail connectors
(15/16” or 9/16”). If extra space is required to accommodate drop ceiling
tiles, use the provided spacers and long screws.
Step 2: Line up the connected T-rail connectors with an appropriately sized rail
and press the unit onto the rail until it snaps into place.
Note: To protect your access point, use the Kensington security slot to attach a
cable lock (cable lock is not included).