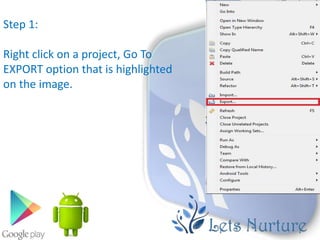
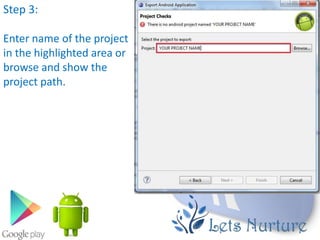
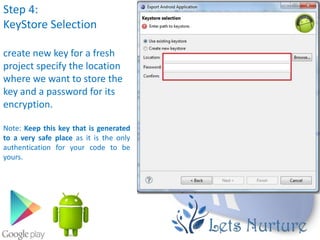
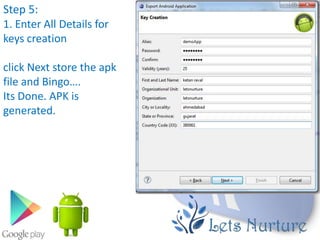
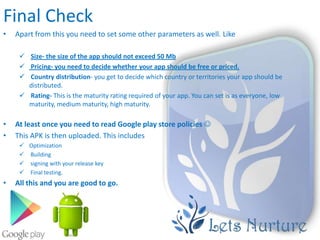
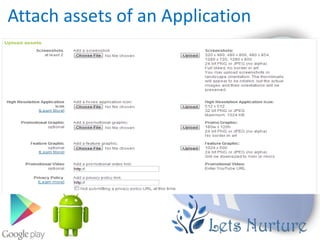
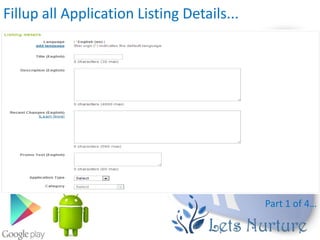
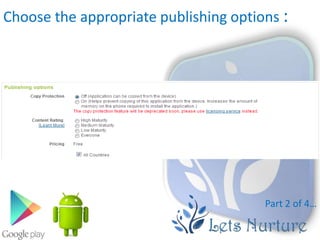
PUBLISHING AN APP ON
 GOOGLE PLAY STORE

                     By Ketan Raval
                   And Pratik Patel
             ketan@letsnurture.com
                       @ketanraval
                       @patel8490
First Lets Look How to Export APK :
•    First Step is to Generate APK
•    Firstly, .apk stands for Android Package.
•    Application needs to generate .APK .

1. Right click the project click on Export.
2. Double Click on the Android folder and click on EXPORT ANDROID APPLICATION.
3. Select project do you want to export.
4. Generate a new key if we are exporting for the first time and show the path where you
   need to store the key and provide a password for its encryption.
5. When you click next a dialog appears where the details for key comes where you can enter
   alias, validity for key password etc. Then click Next where the dialog asks for the destination
   where you want to store the apk file and Bingo….
6. Its Done. APK is generated.
Step 1:

Right click on a project, Go To
EXPORT option that is highlighted
on the image.
Step 2:

Double click on the
Android folder below
General Folder and
select the EXPORT TO
ANDROID APPLICATION
as shown in figure.
Step 3:

Enter name of the project
in the highlighted area or
browse and show the
project path.
Step 4:
KeyStore Selection

create new key for a fresh
project specify the location
where we want to store the
key and a password for its
encryption.

Note: Keep this key that is generated
to a very safe place as it is the only
authentication for your code to be
yours.
Step 5:
1. Enter All Details for
keys creation

click Next store the apk
file and Bingo….
Its Done. APK is
generated.
Things Required to Publish an App
• There are few things that you need to provide with your application while
  publishing it.
• Such as:
    Listing details
     Store Graphics
     Screenshots (Minimum 2)
     Videos (Optional)
Listing Details
• App Name :- Give suitable app name for your application.

• App Description :- Write suitable description for your app, not
  exceeding 4000 characters.
• Category :- It is required that you select an appropriate category for
  you application.
• Application Type :- It is also required that you set a category for your
  application. This could be either set as application or game
• Organization Name :- It is also required that you mention the name
  of organization while filling up the details.
• Support information :- This includes URL , Email, Phone number etc.
Store Graphics
•   App Icon
        512 x 512 px
      32-bit PNG
        Max size 1024KB
        Transparency allowed
•   Promo graphic
        180 x 120 px
      24-bit PNG
        No border
        No Transparency
•   Feature graphic This is also optional but is required to get your app featured anywhere. This image has
    the following constraints
        1024 x 500 px
        safe frame of 924 x 400 px
      24-bit PNG
        No Transparency
Screenshots
• Screenshots are important because people will see screenshot before installing app
  on phone. So it must convey your main functionality.

• Constraints for the screenshots are
       6 additional optional
       480 x 800 px, or 480 x 854 px
       72dpi, RGB, flattened
       No transparency
       High quality JPEG or 24-bit PNG
       No borders
       Can show status bar
Video (Optional)
• Finally you can even show how your app works through a video. This can greatly
  increase the chances of popularity of your app as the viewer can get synopses of
  your application. Google recommends the length of the video to be anything
  between 30 seconds to 2 minutes.
Final Check
•   Apart from this you need to set some other parameters as well. Like

      Size- the size of the app should not exceed 50 Mb
      Pricing- you need to decide whether your app should be free or priced.
      Country distribution- you get to decide which country or territories your app should be
       distributed.
      Rating- This is the maturity rating required of your app. You can set is as everyone, low
       maturity, medium maturity, high maturity.

•   At least once you need to read Google play store policies 
•   This APK is then uploaded. This includes
      Optimization
      Building
      signing with your release key
      Final testing.
•   All this and you are good to go.
Go to the URL:


Click on the following Button:
Give the path where your apk file is
placed and click on upload Button:
Attach assets of an Application
Fillup all Application Listing Details...


                                            Part 1 of 4…
Choose the appropriate publishing options :


                                       Part 2 of 4…
Contact Information :


                        Part 3 of 4…
At last....

• Once these all processes finished, You have to accept the
agreements. Finally, You can click on publish button to upload your app on
play store.

• Your App will be publish on market within 1-2 hours.
GDG Ahmedabad


           Visit us on
http://www.gdgahmedabad.com/
  http://www.letsnurture.com/

Publishing app to google play store

  • 1.
    PUBLISHING AN APPON GOOGLE PLAY STORE By Ketan Raval And Pratik Patel ketan@letsnurture.com @ketanraval @patel8490
  • 2.
    First Lets LookHow to Export APK : • First Step is to Generate APK • Firstly, .apk stands for Android Package. • Application needs to generate .APK . 1. Right click the project click on Export. 2. Double Click on the Android folder and click on EXPORT ANDROID APPLICATION. 3. Select project do you want to export. 4. Generate a new key if we are exporting for the first time and show the path where you need to store the key and provide a password for its encryption. 5. When you click next a dialog appears where the details for key comes where you can enter alias, validity for key password etc. Then click Next where the dialog asks for the destination where you want to store the apk file and Bingo…. 6. Its Done. APK is generated.
  • 3.
    Step 1: Right clickon a project, Go To EXPORT option that is highlighted on the image.
  • 4.
    Step 2: Double clickon the Android folder below General Folder and select the EXPORT TO ANDROID APPLICATION as shown in figure.
  • 5.
    Step 3: Enter nameof the project in the highlighted area or browse and show the project path.
  • 6.
    Step 4: KeyStore Selection createnew key for a fresh project specify the location where we want to store the key and a password for its encryption. Note: Keep this key that is generated to a very safe place as it is the only authentication for your code to be yours.
  • 7.
    Step 5: 1. EnterAll Details for keys creation click Next store the apk file and Bingo…. Its Done. APK is generated.
  • 8.
    Things Required toPublish an App • There are few things that you need to provide with your application while publishing it. • Such as: Listing details  Store Graphics  Screenshots (Minimum 2)  Videos (Optional)
  • 9.
    Listing Details • AppName :- Give suitable app name for your application. • App Description :- Write suitable description for your app, not exceeding 4000 characters. • Category :- It is required that you select an appropriate category for you application. • Application Type :- It is also required that you set a category for your application. This could be either set as application or game • Organization Name :- It is also required that you mention the name of organization while filling up the details. • Support information :- This includes URL , Email, Phone number etc.
  • 10.
    Store Graphics • App Icon  512 x 512 px  32-bit PNG  Max size 1024KB  Transparency allowed • Promo graphic  180 x 120 px  24-bit PNG  No border  No Transparency • Feature graphic This is also optional but is required to get your app featured anywhere. This image has the following constraints  1024 x 500 px  safe frame of 924 x 400 px  24-bit PNG  No Transparency
  • 11.
    Screenshots • Screenshots areimportant because people will see screenshot before installing app on phone. So it must convey your main functionality. • Constraints for the screenshots are  6 additional optional  480 x 800 px, or 480 x 854 px  72dpi, RGB, flattened  No transparency  High quality JPEG or 24-bit PNG  No borders  Can show status bar
  • 12.
    Video (Optional) • Finallyyou can even show how your app works through a video. This can greatly increase the chances of popularity of your app as the viewer can get synopses of your application. Google recommends the length of the video to be anything between 30 seconds to 2 minutes.
  • 13.
    Final Check • Apart from this you need to set some other parameters as well. Like  Size- the size of the app should not exceed 50 Mb  Pricing- you need to decide whether your app should be free or priced.  Country distribution- you get to decide which country or territories your app should be distributed.  Rating- This is the maturity rating required of your app. You can set is as everyone, low maturity, medium maturity, high maturity. • At least once you need to read Google play store policies  • This APK is then uploaded. This includes  Optimization  Building  signing with your release key  Final testing. • All this and you are good to go.
  • 14.
    Go to theURL: Click on the following Button:
  • 15.
    Give the pathwhere your apk file is placed and click on upload Button:
  • 16.
    Attach assets ofan Application
  • 17.
    Fillup all ApplicationListing Details... Part 1 of 4…
  • 18.
    Choose the appropriatepublishing options : Part 2 of 4…
  • 19.
    Contact Information : Part 3 of 4…
  • 20.
    At last.... • Oncethese all processes finished, You have to accept the agreements. Finally, You can click on publish button to upload your app on play store. • Your App will be publish on market within 1-2 hours.
  • 21.
    GDG Ahmedabad Visit us on http://www.gdgahmedabad.com/ http://www.letsnurture.com/