To upload a part to location file in PTL:
1. Select the desired line and model number, then select "Upload File" to assign addresses to buttons in the supermarket for a part.
2. Reconcile the bill of materials and validate that there are no errors in tray number, color, controller, or address columns.
3. Upload the PTL file once validated and quantities match the bill of materials.
More than Just Lines on a Map: Best Practices for U.S Bike Routes
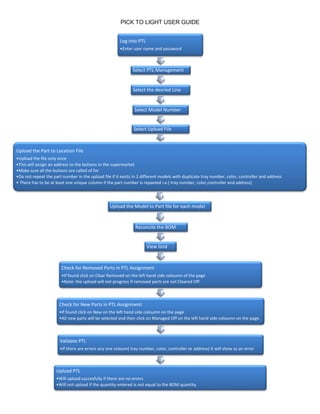
PTL Upload Flowchart
1. PICK TO LIGHT USER GUIDE
Log into PTL
•Enter user name and password
Select PTL Management
Select the desried Line
Select Model Number
Select Upload File
Upload the Part to Location File
•Upload the file only once
•This will assign an address to the buttons in the supermarket
•Make sure all the buttons are called of for
•Do not repeat the part number in the upload file if it exists in 2 different models with duplicate tray number, color, controller and address
• There has to be at least one unique column if the part number is repaeted i.e.( tray number, color,controller and address)
Upload the Model to Part file for each model.
Reconcile the BOM
View Grid
Check for Removed Parts in PTL Assignment
•If found click on Clear Removed on the left hand side coloumn of the page
•Note: the upload will not progress if removed parts are not Cleared Off.
Check for New Parts in PTL Assignment
•If found click on New on the left hand side coloumn on the page
•All new parts will be selected and then click on Managed Off on the left hand side coloumn on the page.
Validate PTL
•If there are errors any one coloum( tray number, color, controller or address) it will show as an error.
Upload PTL
•Will upload succesfully if there are no errors
•Will not upload if the quantity entered is not equal to the BOM quantity.