Halloween Countdown Game Calendar Notes on using:Based on Countdown Calendars such as (http://office.microsoft.com/en-us/templates/TC103365101033.aspx?pid=CT101425701033) this will pop up a button (one by one) corresponding to the day of the month. Clicking on the number will then allow you to proceed to the next. Some creatures are scared of the others! Can you guess who will still be there when you reach October 31st, Halloween? Sound and images from Microsoft Office Online. To customize with your own choices, read further…Template Customization Instruction:To replace the pictures (of characters) with your own pictures, do the following:On the Home tab, in the Editing group, click Select, and then click Selection Pane.Note: It is easier to select pictures from within the Selection and Visibility pane than directly on the slide. In the Selection and Visibility pane, click a reveal item (example: reveal_9)Note: Each reveal item is associated with a picture. And each reveal item has a number, where each number matches the button that covers the picture. For example, the reveal_9 (picture) is located under button number 9) After you have selected the reveal item associated with the picture that you want to replace, on the slide, locate and right-click the selected picture, and then click Format Picture. In the Format Picture dialog box, in the left pane click Fill, and in the right pane, select Picture or texture fill.Under Insert from, click File, locate the picture that you want to place on the scene, and then click Open.To reproduce the button and reveal shapes and images on this slide, do the following:On the Home tab, in the Drawing group, click Shapes. Select a “reveal” shape (such as a rectangle to cover a window, or a star in the sky), and then click and drag to draw the shape on the slide.Fill these shapes with pictures or clip art images. (see procedures above)Next, on the Home tab, in the Drawing group, click Shapes. Select a “button” shape, and then click and drag to draw the shape on the slide. (For example, a rectangle is drawn over the first window and it is now button #1).Position the “button” shape on this slide so that it completely covers the “reveal” shape.To reproduce the animation effects on the slide, do the following:On the Animations tab, in the Animations group, click Custom Animation. The CustomAnimation pane opens up.To assign an effect to the “button” (in this case Fade), select the button on the slide, and then in the Custom Animation pane, click Add Effect, point to Exit, click More Effects. In the AddExitEffect dialog box, under Subtle click Fade.Also in the Custom Animation pane, click the arrow to the right of the effect that you just added (fade exit effect) and select Timing. In the Fade dialog box, on the Timing tab, do the following:Click the double arrows to the right of Triggers.Click Start effect on click of.Next to Start effect on click of, in the list select the “button” shape.On the slide, select the picture-filled (“reveal”) shape beneath the “button” shape, and in the CustomAnimation pane, click AddEffect, point to Entrance, and click More Effects. In the AddEntranceEffect dialog box, under Subtle, click Fade.Also in the Custom Animation pane, select the effect that you just added (fade entrance effect), and then under Modify: Fade, in the Start list select WithPrevious.Follow the same procedures with the remaining 24 “button” and “reveal” pairs of objects on the slide.To add and format a background:To add the background of house scene, right-click the slide background, click Format Background.In the Format Background dialog box, in the left pane click Fill, and in the right pane, select Picture or texture fill.Under Insert from, click File, locate the picture that you want to use as the background, and then click Open.
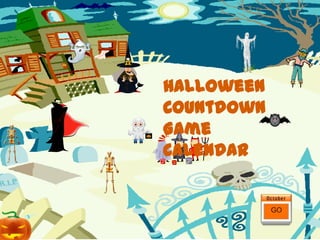
Halloween Countdown Game Calendar Notes on using:Based on Countdown Calendars such as (http://office.microsoft.com/en-us/templates/TC103365101033.aspx?pid=CT101425701033) this will pop up a button (one by one) corresponding to the day of the month. Clicking on the number will then allow you to proceed to the next. Some creatures are scared of the others! Can you guess who will still be there when you reach October 31st, Halloween?Template Customization Instruction:To replace the pictures (of characters) with your own pictures, do the following:On the Home tab, in the Editing group, click Select, and then click Selection Pane.Note: It is easier to select pictures from within the Selection and Visibility pane than directly on the slide. In the Selection and Visibility pane, click a reveal item (example: reveal_9)Note: Each reveal item is associated with a picture. And each reveal item has a number, where each number matches the button that covers the picture. For example, the reveal_9 (picture) is located under button number 9) After you have selected the reveal item associated with the picture that you want to replace, on the slide, locate and right-click the selected picture, and then click Format Picture. In the Format Picture dialog box, in the left pane click Fill, and in the right pane, select Picture or texture fill.Under Insert from, click File, locate the picture that you want to place on the scene, and then click Open.To reproduce the button and reveal shapes and images on this slide, do the following:On the Home tab, in the Drawing group, click Shapes. Select a “reveal” shape (such as a rectangle to cover a window, or a star in the sky), and then click and drag to draw the shape on the slide.Fill these shapes with pictures or clip art images. (see procedures above)Next, on the Home tab, in the Drawing group, click Shapes. Select a “button” shape, and then click and drag to draw the shape on the slide. (For example, a rectangle is drawn over the first window and it is now button #1).Position the “button” shape on this slide so that it completely covers the “reveal” shape.To reproduce the animation effects on the slide, do the following:On the Animations tab, in the Animations group, click Custom Animation. The CustomAnimation pane opens up.To assign an effect to the “button” (in this case Fade), select the button on the slide, and then in the Custom Animation pane, click Add Effect, point to Exit, click More Effects. In the AddExitEffect dialog box, under Subtle click Fade.Also in the Custom Animation pane, click the arrow to the right of the effect that you just added (fade exit effect) and select Timing. In the Fade dialog box, on the Timing tab, do the following:Click the double arrows to the right of Triggers.Click Start effect on click of.Next to Start effect on click of, in the list select the “button” shape.On the slide, select the picture-filled (“reveal”) shape beneath the “button” shape, and in the CustomAnimation pane, click AddEffect, point to Entrance, and click More Effects. In the AddEntranceEffect dialog box, under Subtle, click Fade.Also in the Custom Animation pane, select the effect that you just added (fade entrance effect), and then under Modify: Fade, in the Start list select WithPrevious.Follow the same procedures with the remaining 24 “button” and “reveal” pairs of objects on the slide.To add and format a background:To add the background of house scene, right-click the slide background, click Format Background.In the Format Background dialog box, in the left pane click Fill, and in the right pane, select Picture or texture fill.Under Insert from, click File, locate the picture that you want to use as the background, and then click Open.