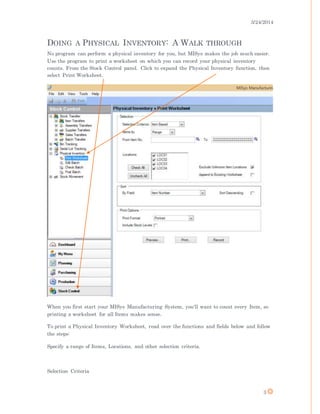
SlideShare a Scribd company logo
1 of 17
Joseph Santiago & Steve Rosendahl
3/24/2014
SAINT JOSEPH'S ABBEY
TRAINING
Baesis Business Training
This training manual will be focusing on the physical inventory process and
inventory adjustments in MISYs Manufacturing.
3/24/2014
1
Table of Contents
Doing a Physical Inventory: A Walk through .........................................................................3
Physical Inventory Text Only Summary Walk Through .......................................................15
3/24/2014
2
SAINT JOSEPH'S ABBEY TRAINING
Baesis Business Training
MISys Manufacturing is a computer program designed specifically for the small- to medium-
sized manufacturing firm that stocks a supply of common parts, builds subassemblies, and
assembles finished goods. MISys Manufacturing is an accounting approach to manufacturing
control that, with a history of thousands of installations, has proven to be very effective for
manufacturing firms with limited resources and budgets. Importantly, MISys Manufacturing
does not require a team of data processing personnel or manufacturing experts to run and
maintain it.
This training manual will be focusing on the physical inventory process and inventory
adjustments in MISYs Manufacturing. It can be used as a standalone training resource as it
offers descriptions of the many options in these process, and a walk through of the process
itself. A text only summary has been included for the walkthrough that can be used for
future reference.
3/24/2014
3
DOING A PHYSICAL INVENTORY: A WALK THROUGH
No program can perform a physical inventory for you, but MISys makes the job much easier.
Use the program to print a worksheet on which you can record your physical inventory
counts. From the Stock Control panel. Click to expand the Physical Inventory function, then
select Print Worksheet.
When you first start your MISys Manufacturing System, you'll want to count every Item, so
printing a worksheet for all Items makes sense.
To print a Physical Inventory Worksheet, read over the functions and fields below and follow
the steps:
Specify a range of Items, Locations, and other selection criteria.
Selection Criteria
3/24/2014
4
Click the selection box to choose from the available count types:
Item Range
To count a specific range of Item numbers. Items outside this range will not be included in
the count.
Cycle-based Selection
To count Item belonging to specific inventory cycles. Items not belonging to the specified
cycles will not be included in the count.
Date-based Selection
To count every Item not inventoried since a specific date.
Items By
You can specify the Item numbers you wish to have included in the worksheet either by
Range or by List from this combo box.
Items From/To
Only appears if you select Range in the Items By combo box. Enter a range of Item numbers
you wish to have included in this worksheet. Unless you have a specific need to constrain the
worksheet to a specific range of Items, leave these fields untouched.
Edit List... Button
Only appears if you select List in the Items By combo box. Clicking this button displays a
form to allow you edit the list of Items to include
Locations
Displays a list of all locations defined and you can select which locations to include in the
worksheet by checking the checkboxes for one or more of the locations in the list.
3/24/2014
5
Check All
Checks all locations in the above Locations list.
Uncheck All
Unchecks all locations in the above Locations list.
Include Items Not Inventoried Since
If you have chosen the Date-based Selection option, enter the cutoff date of your last physical
inventory. Any Item that has not been counted since this date will be included on the
Worksheet.
Exclude Unknown Item Locations
Check this box if you wish to exclude Items that are not known (have never been used,
received, assembled, etc.) at a specific Location.
If you leave this box unchecked, the Worksheet will include every selected Item at every
Location.
Include Cycles
If you have chosen a Cycle-based selection, enter the numbers of the physical inventory
cycles you want included in this Worksheet in this field as a comma separated list (the
number for each cycle with a comma between the numbers). An example Include Cycles
entry might be '1,3,4,7'.
Your most expensive items will be inventoried the more frequently and will have the shortest
cycle time.
Exclude Cycle 0
Check the Exclude Cycle 0 box if you do not wish to have Cycle 0 included in this Worksheet.
Items belonging to Physical Inventory Cycle 0 are normally included in every Worksheet.
Include Stock Levels
If you anticipate making stock transfers while you are counting your inventory, entering
your Physical Inventory Batches, and posting the Batches, check the box entitled "Include
Stock Levels." This will cause the current stock level to be printed on the worksheet. You will
need this information when you enter your counts in the Batch.
3/24/2014
6
If you can avoid making stock transfers during the Physical Inventory process, you can save
time and effort while making entries in the Physical Inventory Batch. The program will
enter the Current Stock Levels automatically – you won’t need to print this information on
the Worksheet.
When the Physical Inventory Worksheet specification criteria have been filled in to your
satisfaction, you’re ready to click one of the following buttons:
Preview
To display the worksheet as indicated, at the same time creating a file of Item numbers from
which to feed the Physical Inventory Batch.
Print
To print the worksheet as indicated, at the same time creating a file of Item numbers from
which to feed the Physical Inventory Batch. You must hit Print to change the status even if
you do not print the worksheet.
Record
After printing the worksheet, this creates a file of Item numbers from which to feed the
Physical Inventory Batch.
When you click Print, Preview or Record the first time, the program will create a Worksheet
work-file from which to feed the Physical Inventory Batch. If the Append to Existing
Worksheet checkbox is checked, subsequent prints, previews or records will append the
selected items to the previous worksheet.
Click Print to make a physical copy of the worksheet. You must click Print to change the
status of the batch, even if you do not physically print the paper copy.
3/24/2014
7
Click Record to append the records to the physical inventory batch file.
A pop up should appear stating that the Worksheet was Created Successfully.
Click ok. Then Click on Edit Batch in the Stock Control pane.
3/24/2014
8
In the MISys Manufacturing System you record your physical inventory counts in a batch.
Each user can have his or her own batch. That way, you can all be working simultaneously
on a multi-user installation, entering the results of your count. Later, you can check or post
the batch you entered and update the inventory records.
Each MISys Manufacturing User can has many Physical Inventory Batches as needed. If you
have a large inventory to count, you are advised to divide the task among multiple Users
and/or batches.
Click New to create a new batch.
The Edit Inventory Batch window will pop up.
3/24/2014
9
Note: You can edit any user's batch as long as you have Physical Inventory Modify Batch
permission as defined by the permissions for the security group the current user is a member
of.
We are utilizing the Worksheet in this walk through and if you would like any additional
information on the fields you may check the help file.
Click on the Worksheet button.
You should get a pop up if you have followed these steps here.
Click yes.
The Feed Form Worksheet pops up. Select the settings you would like.
Notice that the choices for Count Type are the same as when you started with printing your
worksheet.
3/24/2014
10
Notice the choices for Count Quantity are the same as when you started with printing your
worksheet.
You want to choose Recorded here to use the record you began in this process. You would use
current to use stock level before you recorded the entry. You would use zero if you wanted to
use stock that is at zero.
Make sure you keep your choices consistent throughout this process.
Click Ok and a pop up will announce the Feed Form Worksheet is complete.
Click Ok and the records will now be shown. You may enter and edit the quantities of the
stock here from your worksheet.
Click Save and then Print.
Close the Edit Inventory Batch Window and then Click on Check Batch in the Stock Control
pane.
3/24/2014
11
You should see the batch you will work with in the Physical Inventory Check Batch pane.
Select the batch by clicking on it or you may use select all.
Once the batch is selected choose the mode you want to use. Then click Initialize.
A pop up will appear announcing that the Initialization was complete.
3/24/2014
12
Click ok.
Click on the Check button which is to the right of the Initialize button.
You should see the system processing and a pop up will appear announcing the Check was a
success.
Click ok.
You can now Click the Display button if you like.
This allows you to see all the numbers are correct and any variance. You can print this if you
like but it is not necessary as these numbers are not posted yet.
Click Close.
Click on the Errors button and a pop up should appear.
3/24/2014
13
Click Ok.
Click Post Batch from the Stock Control Pane.
Select the batch you wish to post from the Physical Inventory Post Batch pane.
Click on the Errors button to check for errors before posting. A pop up will appear.
3/24/2014
14
Click ok.
Click on Post to adjust your inventory with these numbers.
MISys will ask you if you want to create a backup so click yes.
A pop up will appear announcing your Backup was successful.
Click ok.
You will see the system processing and then a pop up will appear announcing Post
Completed.
Click Ok.
You have successfully completed the physical inventory process.
3/24/2014
15
PHYSICAL INVENTORY TEXT ONLY SUMMARY WALK
THROUGH
Click on Stock Control and then Click Physical Inventory.
Click on Print Worksheet. To print a Physical Inventory Worksheet, read over the functions
and select the ones you wish to include.
Specify a range of Items, Locations, and other selection criteria.
Click Print to make a physical copy of the worksheet.
Click Record to append the records to the physical inventory batch file.
A pop up should appear stating that the Worksheet was Created Successfully.
Click ok. Then Click on Edit Batch in the Stock Control pane.
Click New and a window will pop up.
We are utilizing the Worksheet in this walk through and if you would like any additional
information on the fields you may check the help file.
Click on the Worksheet button.
You should get a pop up if you have followed these steps here.
Click yes.
The Feed Form Worksheet pops up. Select the settings you would like.
Click Ok and a pop up will announce the Feed Form Worksheet is complete.
Click Ok and the records will now be shown. You may enter and edit the quantities of the
stock here from your worksheet.
Click Save and then Print.
Close the Edit Inventory Batch Window and then Click on Check Batch in the Stock Control
pane.
You should see the batch you’ll work with in the Physical Inventory Check Batch pane.
Select the batch by clicking on it or you may use select all.
Once the batch is selected choose the mode you want to use. Then click Initialize.
A pop up will appear announcing that the Initialization was complete.
Click ok.
Click on the Check button which is to the right of the Initialize button.
3/24/2014
16
You should see the system processing and a pop up will appear announcing the Check was a
success.
Click ok.
You can now Click the Display button if you like.
This allows you to see all the numbers are correct and any variance. You can print this if you
like but it is not necessary as these numbers are not posted yet.
Click Close.
Click on the Errors button and a pop up should appear.
Click Ok.
Click Post Batch from the Stock Control Pane.
Select the batch you wish to post from the Physical Inventory Post Batch pane.
Click on the Errors button to check for errors before posting. A pop up will appear.
Click ok.
Click on Post to adjust your inventory with these numbers.
MISys will ask you if you want to create a backup so click yes.
A pop up will appear announcing your Backup was successful.
Click ok.
You will see the system processing and then a pop up will appear announcing Post
Completed.
Click Ok.
You have successfully completed the physical inventory process.

More Related Content

Similar to PI Training

Compiere Warehouse Management System Documentation
Compiere Warehouse Management System DocumentationCompiere Warehouse Management System Documentation
Compiere Warehouse Management System DocumentationMehmet Demirel
 
Qs2 um en_11_wall_to_wall_accuracy_physical_count
Qs2 um en_11_wall_to_wall_accuracy_physical_countQs2 um en_11_wall_to_wall_accuracy_physical_count
Qs2 um en_11_wall_to_wall_accuracy_physical_countkhayer
 
Catalogue management for Paytm Mall Shop
Catalogue management for Paytm Mall ShopCatalogue management for Paytm Mall Shop
Catalogue management for Paytm Mall ShopPaytm
 
Catalogue management for Paytm Mall Shop
Catalogue management for Paytm Mall ShopCatalogue management for Paytm Mall Shop
Catalogue management for Paytm Mall ShopPaytm
 
Catalogue management for Paytm Mall shop
Catalogue management for Paytm Mall shopCatalogue management for Paytm Mall shop
Catalogue management for Paytm Mall shopPaytm
 
Excel creating pivot table
Excel creating pivot tableExcel creating pivot table
Excel creating pivot tablesamikshaa sinha
 
Acquisitions And Budgeting In Oliver
Acquisitions And Budgeting In OliverAcquisitions And Budgeting In Oliver
Acquisitions And Budgeting In OliverBarbara Philip
 
Lesson 18 Creating Pivot Tables
Lesson 18 Creating Pivot TablesLesson 18 Creating Pivot Tables
Lesson 18 Creating Pivot Tablesguevarra_2000
 
Wholesale Search with Tactical Arbitrage
Wholesale Search with Tactical ArbitrageWholesale Search with Tactical Arbitrage
Wholesale Search with Tactical ArbitrageKarlT1
 
E book Microsoft Dynamics CRM 2013 Personal Dashboard for End Users
E book Microsoft Dynamics CRM 2013 Personal Dashboard for End UsersE book Microsoft Dynamics CRM 2013 Personal Dashboard for End Users
E book Microsoft Dynamics CRM 2013 Personal Dashboard for End UsersAileen Gusni
 
SAP Material Managament Class 1 Sample
SAP Material Managament  Class 1 SampleSAP Material Managament  Class 1 Sample
SAP Material Managament Class 1 SampleRobert Joyce
 
Catalogue management for Paytm Mall Shop
Catalogue management for Paytm Mall ShopCatalogue management for Paytm Mall Shop
Catalogue management for Paytm Mall ShopPaytm
 
catalogue_managementservices_product.pdf
catalogue_managementservices_product.pdfcatalogue_managementservices_product.pdf
catalogue_managementservices_product.pdfTRANSPACE
 

Similar to PI Training (20)

Compiere Warehouse Management System Documentation
Compiere Warehouse Management System DocumentationCompiere Warehouse Management System Documentation
Compiere Warehouse Management System Documentation
 
Qs2 um en_11_wall_to_wall_accuracy_physical_count
Qs2 um en_11_wall_to_wall_accuracy_physical_countQs2 um en_11_wall_to_wall_accuracy_physical_count
Qs2 um en_11_wall_to_wall_accuracy_physical_count
 
Planning & Route Sheet.ppt
Planning & Route Sheet.pptPlanning & Route Sheet.ppt
Planning & Route Sheet.ppt
 
Catalogue management for Paytm Mall Shop
Catalogue management for Paytm Mall ShopCatalogue management for Paytm Mall Shop
Catalogue management for Paytm Mall Shop
 
Catalogue management for Paytm Mall Shop
Catalogue management for Paytm Mall ShopCatalogue management for Paytm Mall Shop
Catalogue management for Paytm Mall Shop
 
Catalogue management for Paytm Mall shop
Catalogue management for Paytm Mall shopCatalogue management for Paytm Mall shop
Catalogue management for Paytm Mall shop
 
Excel creating pivot table
Excel creating pivot tableExcel creating pivot table
Excel creating pivot table
 
Print18
Print18Print18
Print18
 
Acquisitions And Budgeting In Oliver
Acquisitions And Budgeting In OliverAcquisitions And Budgeting In Oliver
Acquisitions And Budgeting In Oliver
 
Lesson 18 Creating Pivot Tables
Lesson 18 Creating Pivot TablesLesson 18 Creating Pivot Tables
Lesson 18 Creating Pivot Tables
 
LoMag inventory management software - users manual
LoMag inventory management software - users manualLoMag inventory management software - users manual
LoMag inventory management software - users manual
 
Overtime Module
Overtime ModuleOvertime Module
Overtime Module
 
01 Introduction
01 Introduction01 Introduction
01 Introduction
 
Wholesale Search with Tactical Arbitrage
Wholesale Search with Tactical ArbitrageWholesale Search with Tactical Arbitrage
Wholesale Search with Tactical Arbitrage
 
E book Microsoft Dynamics CRM 2013 Personal Dashboard for End Users
E book Microsoft Dynamics CRM 2013 Personal Dashboard for End UsersE book Microsoft Dynamics CRM 2013 Personal Dashboard for End Users
E book Microsoft Dynamics CRM 2013 Personal Dashboard for End Users
 
SAP Material Managament Class 1 Sample
SAP Material Managament  Class 1 SampleSAP Material Managament  Class 1 Sample
SAP Material Managament Class 1 Sample
 
Thedashboard20111018 (1)
Thedashboard20111018 (1)Thedashboard20111018 (1)
Thedashboard20111018 (1)
 
How To Set Up Insightly CRM
How To Set Up Insightly CRMHow To Set Up Insightly CRM
How To Set Up Insightly CRM
 
Catalogue management for Paytm Mall Shop
Catalogue management for Paytm Mall ShopCatalogue management for Paytm Mall Shop
Catalogue management for Paytm Mall Shop
 
catalogue_managementservices_product.pdf
catalogue_managementservices_product.pdfcatalogue_managementservices_product.pdf
catalogue_managementservices_product.pdf
 

More from Joseph Santiago A.B.D.

Lean Six Sigma in Healthcare - Joseph Santiago.pdf
Lean Six Sigma in Healthcare - Joseph Santiago.pdfLean Six Sigma in Healthcare - Joseph Santiago.pdf
Lean Six Sigma in Healthcare - Joseph Santiago.pdfJoseph Santiago A.B.D.
 
Lean Six Sigma Application in Information Technology - Joseph Santiago.pdf
Lean Six Sigma Application in Information Technology - Joseph Santiago.pdfLean Six Sigma Application in Information Technology - Joseph Santiago.pdf
Lean Six Sigma Application in Information Technology - Joseph Santiago.pdfJoseph Santiago A.B.D.
 
Lean six sigma black belt Joseph Santiago
Lean six sigma black belt   Joseph SantiagoLean six sigma black belt   Joseph Santiago
Lean six sigma black belt Joseph SantiagoJoseph Santiago A.B.D.
 
Press Release - 10.28.15 October event
Press Release - 10.28.15 October eventPress Release - 10.28.15 October event
Press Release - 10.28.15 October eventJoseph Santiago A.B.D.
 

More from Joseph Santiago A.B.D. (6)

Lean Six Sigma in Healthcare - Joseph Santiago.pdf
Lean Six Sigma in Healthcare - Joseph Santiago.pdfLean Six Sigma in Healthcare - Joseph Santiago.pdf
Lean Six Sigma in Healthcare - Joseph Santiago.pdf
 
Lean Six Sigma Application in Information Technology - Joseph Santiago.pdf
Lean Six Sigma Application in Information Technology - Joseph Santiago.pdfLean Six Sigma Application in Information Technology - Joseph Santiago.pdf
Lean Six Sigma Application in Information Technology - Joseph Santiago.pdf
 
Lean six sigma black belt Joseph Santiago
Lean six sigma black belt   Joseph SantiagoLean six sigma black belt   Joseph Santiago
Lean six sigma black belt Joseph Santiago
 
Press Release - 10.28.15 October event
Press Release - 10.28.15 October eventPress Release - 10.28.15 October event
Press Release - 10.28.15 October event
 
Rhode Island Advocacy for Children PR
Rhode Island Advocacy for Children PRRhode Island Advocacy for Children PR
Rhode Island Advocacy for Children PR
 
MiSys Documentation
MiSys DocumentationMiSys Documentation
MiSys Documentation
 

PI Training

  • 1. Joseph Santiago & Steve Rosendahl 3/24/2014 SAINT JOSEPH'S ABBEY TRAINING Baesis Business Training This training manual will be focusing on the physical inventory process and inventory adjustments in MISYs Manufacturing.
  • 2. 3/24/2014 1 Table of Contents Doing a Physical Inventory: A Walk through .........................................................................3 Physical Inventory Text Only Summary Walk Through .......................................................15
  • 3. 3/24/2014 2 SAINT JOSEPH'S ABBEY TRAINING Baesis Business Training MISys Manufacturing is a computer program designed specifically for the small- to medium- sized manufacturing firm that stocks a supply of common parts, builds subassemblies, and assembles finished goods. MISys Manufacturing is an accounting approach to manufacturing control that, with a history of thousands of installations, has proven to be very effective for manufacturing firms with limited resources and budgets. Importantly, MISys Manufacturing does not require a team of data processing personnel or manufacturing experts to run and maintain it. This training manual will be focusing on the physical inventory process and inventory adjustments in MISYs Manufacturing. It can be used as a standalone training resource as it offers descriptions of the many options in these process, and a walk through of the process itself. A text only summary has been included for the walkthrough that can be used for future reference.
  • 4. 3/24/2014 3 DOING A PHYSICAL INVENTORY: A WALK THROUGH No program can perform a physical inventory for you, but MISys makes the job much easier. Use the program to print a worksheet on which you can record your physical inventory counts. From the Stock Control panel. Click to expand the Physical Inventory function, then select Print Worksheet. When you first start your MISys Manufacturing System, you'll want to count every Item, so printing a worksheet for all Items makes sense. To print a Physical Inventory Worksheet, read over the functions and fields below and follow the steps: Specify a range of Items, Locations, and other selection criteria. Selection Criteria
  • 5. 3/24/2014 4 Click the selection box to choose from the available count types: Item Range To count a specific range of Item numbers. Items outside this range will not be included in the count. Cycle-based Selection To count Item belonging to specific inventory cycles. Items not belonging to the specified cycles will not be included in the count. Date-based Selection To count every Item not inventoried since a specific date. Items By You can specify the Item numbers you wish to have included in the worksheet either by Range or by List from this combo box. Items From/To Only appears if you select Range in the Items By combo box. Enter a range of Item numbers you wish to have included in this worksheet. Unless you have a specific need to constrain the worksheet to a specific range of Items, leave these fields untouched. Edit List... Button Only appears if you select List in the Items By combo box. Clicking this button displays a form to allow you edit the list of Items to include Locations Displays a list of all locations defined and you can select which locations to include in the worksheet by checking the checkboxes for one or more of the locations in the list.
  • 6. 3/24/2014 5 Check All Checks all locations in the above Locations list. Uncheck All Unchecks all locations in the above Locations list. Include Items Not Inventoried Since If you have chosen the Date-based Selection option, enter the cutoff date of your last physical inventory. Any Item that has not been counted since this date will be included on the Worksheet. Exclude Unknown Item Locations Check this box if you wish to exclude Items that are not known (have never been used, received, assembled, etc.) at a specific Location. If you leave this box unchecked, the Worksheet will include every selected Item at every Location. Include Cycles If you have chosen a Cycle-based selection, enter the numbers of the physical inventory cycles you want included in this Worksheet in this field as a comma separated list (the number for each cycle with a comma between the numbers). An example Include Cycles entry might be '1,3,4,7'. Your most expensive items will be inventoried the more frequently and will have the shortest cycle time. Exclude Cycle 0 Check the Exclude Cycle 0 box if you do not wish to have Cycle 0 included in this Worksheet. Items belonging to Physical Inventory Cycle 0 are normally included in every Worksheet. Include Stock Levels If you anticipate making stock transfers while you are counting your inventory, entering your Physical Inventory Batches, and posting the Batches, check the box entitled "Include Stock Levels." This will cause the current stock level to be printed on the worksheet. You will need this information when you enter your counts in the Batch.
  • 7. 3/24/2014 6 If you can avoid making stock transfers during the Physical Inventory process, you can save time and effort while making entries in the Physical Inventory Batch. The program will enter the Current Stock Levels automatically – you won’t need to print this information on the Worksheet. When the Physical Inventory Worksheet specification criteria have been filled in to your satisfaction, you’re ready to click one of the following buttons: Preview To display the worksheet as indicated, at the same time creating a file of Item numbers from which to feed the Physical Inventory Batch. Print To print the worksheet as indicated, at the same time creating a file of Item numbers from which to feed the Physical Inventory Batch. You must hit Print to change the status even if you do not print the worksheet. Record After printing the worksheet, this creates a file of Item numbers from which to feed the Physical Inventory Batch. When you click Print, Preview or Record the first time, the program will create a Worksheet work-file from which to feed the Physical Inventory Batch. If the Append to Existing Worksheet checkbox is checked, subsequent prints, previews or records will append the selected items to the previous worksheet. Click Print to make a physical copy of the worksheet. You must click Print to change the status of the batch, even if you do not physically print the paper copy.
  • 8. 3/24/2014 7 Click Record to append the records to the physical inventory batch file. A pop up should appear stating that the Worksheet was Created Successfully. Click ok. Then Click on Edit Batch in the Stock Control pane.
  • 9. 3/24/2014 8 In the MISys Manufacturing System you record your physical inventory counts in a batch. Each user can have his or her own batch. That way, you can all be working simultaneously on a multi-user installation, entering the results of your count. Later, you can check or post the batch you entered and update the inventory records. Each MISys Manufacturing User can has many Physical Inventory Batches as needed. If you have a large inventory to count, you are advised to divide the task among multiple Users and/or batches. Click New to create a new batch. The Edit Inventory Batch window will pop up.
  • 10. 3/24/2014 9 Note: You can edit any user's batch as long as you have Physical Inventory Modify Batch permission as defined by the permissions for the security group the current user is a member of. We are utilizing the Worksheet in this walk through and if you would like any additional information on the fields you may check the help file. Click on the Worksheet button. You should get a pop up if you have followed these steps here. Click yes. The Feed Form Worksheet pops up. Select the settings you would like. Notice that the choices for Count Type are the same as when you started with printing your worksheet.
  • 11. 3/24/2014 10 Notice the choices for Count Quantity are the same as when you started with printing your worksheet. You want to choose Recorded here to use the record you began in this process. You would use current to use stock level before you recorded the entry. You would use zero if you wanted to use stock that is at zero. Make sure you keep your choices consistent throughout this process. Click Ok and a pop up will announce the Feed Form Worksheet is complete. Click Ok and the records will now be shown. You may enter and edit the quantities of the stock here from your worksheet. Click Save and then Print. Close the Edit Inventory Batch Window and then Click on Check Batch in the Stock Control pane.
  • 12. 3/24/2014 11 You should see the batch you will work with in the Physical Inventory Check Batch pane. Select the batch by clicking on it or you may use select all. Once the batch is selected choose the mode you want to use. Then click Initialize. A pop up will appear announcing that the Initialization was complete.
  • 13. 3/24/2014 12 Click ok. Click on the Check button which is to the right of the Initialize button. You should see the system processing and a pop up will appear announcing the Check was a success. Click ok. You can now Click the Display button if you like. This allows you to see all the numbers are correct and any variance. You can print this if you like but it is not necessary as these numbers are not posted yet. Click Close. Click on the Errors button and a pop up should appear.
  • 14. 3/24/2014 13 Click Ok. Click Post Batch from the Stock Control Pane. Select the batch you wish to post from the Physical Inventory Post Batch pane. Click on the Errors button to check for errors before posting. A pop up will appear.
  • 15. 3/24/2014 14 Click ok. Click on Post to adjust your inventory with these numbers. MISys will ask you if you want to create a backup so click yes. A pop up will appear announcing your Backup was successful. Click ok. You will see the system processing and then a pop up will appear announcing Post Completed. Click Ok. You have successfully completed the physical inventory process.
  • 16. 3/24/2014 15 PHYSICAL INVENTORY TEXT ONLY SUMMARY WALK THROUGH Click on Stock Control and then Click Physical Inventory. Click on Print Worksheet. To print a Physical Inventory Worksheet, read over the functions and select the ones you wish to include. Specify a range of Items, Locations, and other selection criteria. Click Print to make a physical copy of the worksheet. Click Record to append the records to the physical inventory batch file. A pop up should appear stating that the Worksheet was Created Successfully. Click ok. Then Click on Edit Batch in the Stock Control pane. Click New and a window will pop up. We are utilizing the Worksheet in this walk through and if you would like any additional information on the fields you may check the help file. Click on the Worksheet button. You should get a pop up if you have followed these steps here. Click yes. The Feed Form Worksheet pops up. Select the settings you would like. Click Ok and a pop up will announce the Feed Form Worksheet is complete. Click Ok and the records will now be shown. You may enter and edit the quantities of the stock here from your worksheet. Click Save and then Print. Close the Edit Inventory Batch Window and then Click on Check Batch in the Stock Control pane. You should see the batch you’ll work with in the Physical Inventory Check Batch pane. Select the batch by clicking on it or you may use select all. Once the batch is selected choose the mode you want to use. Then click Initialize. A pop up will appear announcing that the Initialization was complete. Click ok. Click on the Check button which is to the right of the Initialize button.
  • 17. 3/24/2014 16 You should see the system processing and a pop up will appear announcing the Check was a success. Click ok. You can now Click the Display button if you like. This allows you to see all the numbers are correct and any variance. You can print this if you like but it is not necessary as these numbers are not posted yet. Click Close. Click on the Errors button and a pop up should appear. Click Ok. Click Post Batch from the Stock Control Pane. Select the batch you wish to post from the Physical Inventory Post Batch pane. Click on the Errors button to check for errors before posting. A pop up will appear. Click ok. Click on Post to adjust your inventory with these numbers. MISys will ask you if you want to create a backup so click yes. A pop up will appear announcing your Backup was successful. Click ok. You will see the system processing and then a pop up will appear announcing Post Completed. Click Ok. You have successfully completed the physical inventory process.