(Original PDF) Information Technology Project Management, Revised 7th Edition
1.
(Original PDF) InformationTechnology Project
Management, Revised 7th Edition download
https://ebooksecure.com/product/original-pdf-information-
technology-project-management-revised-7th-edition/
Download full version ebook from https://ebooksecure.com
2.
We believe theseproducts will be a great fit for you. Click
the link to download now, or visit ebooksecure.com
to discover even more!
Information Technology Project Management 7th edition
(eBook PDF)
http://ebooksecure.com/product/information-technology-project-
management-7th-edition-ebook-pdf-2/
Information Technology Project Management 7th edition
(eBook PDF)
http://ebooksecure.com/product/information-technology-project-
management-7th-edition-ebook-pdf/
(eBook PDF) Information Technology Project Management
8th Edition
http://ebooksecure.com/product/ebook-pdf-information-technology-
project-management-8th-edition/
(eBook PDF) Information Technology Project Management,
5th Edition
http://ebooksecure.com/product/ebook-pdf-information-technology-
project-management-5th-edition/
3.
Information Technology ProjectManagement 9th Edition
Kathy Schwalbe - eBook PDF
https://ebooksecure.com/download/information-technology-project-
management-ebook-pdf/
(eBook PDF) Information Technology Project Management
9th Edition by Kathy Schwalbe
http://ebooksecure.com/product/ebook-pdf-information-technology-
project-management-9th-edition-by-kathy-schwalbe/
(Original PDF) Successful Project Management 7th
Edition
http://ebooksecure.com/product/original-pdf-successful-project-
management-7th-edition/
(eBook PDF) Information Technology for Management
Digital 10th
http://ebooksecure.com/product/ebook-pdf-information-technology-
for-management-digital-10th/
(eBook PDF) Information Systems Project Management, A
Process Approach, Edition 2.0
http://ebooksecure.com/product/ebook-pdf-information-systems-
project-management-a-process-approach-edition-2-0-2/
5.
BRIEF CONTENTS
Preface xix
Chapter1
Introduction to Project Management 1
Chapter 2
The Project Management and Information Technology Context 43
Chapter 3
The Project Management Process Groups: A Case Study 81
Chapter 4
Project Integration Management 139
Chapter 5
Project Scope Management 187
Chapter 6
Project Time Management 225
Chapter 7
Project Cost Management 271
Chapter 8
Project Quality Management 311
Chapter 9
Project Human Resource Management 359
Chapter 10
Project Communications Management 405
Chapter 11
Project Risk Management 439
Copyright 2014 Cengage Learning. All Rights Reserved. May not be copied, scanned, or duplicated, in whole or in part.
6.
Chapter 12
Project ProcurementManagement 479
Chapter 13
Project Stakeholder Management 509
Appendix A
Guide to Using Microsoft Project 2013 A.1
Appendix B
(Available on CengageBrain.com)
Appendix C
(Available on CengageBrain.com)
Glossary G.1
Index I.1
viii Brief Contents
Copyright 2014 Cengage Learning. All Rights Reserved. May not be copied, scanned, or duplicated, in whole or in part.
7.
TABLE OF CONTENTS
Prefacexix
Chapter 1 Introduction to Project Management 1
Introduction 2
What Is a Project? 4
Examples of IT Projects 4
Project Attributes 6
Project Constraints 7
What Is Project Management? 9
Project Stakeholders 10
Project Management Knowledge Areas 11
Project Management Tools and Techniques 12
Project Success 14
Program and Project Portfolio Management 16
Programs 17
Project Portfolio Management 17
The Role of the Project Manager 21
Project Manager Job Description 21
Suggested Skills for Project Managers 22
Importance of People Skills and Leadership Skills 24
Careers for IT Project Managers 25
The Project Management Profession 26
History of Project Management 26
The Project Management Institute 30
Project Management Certification 30
Ethics in Project Management 32
Project Management Software 33
Chapter Summary 36
Quick Quiz 37
Quick Quiz Answers 38
Discussion Questions 38
Exercises 39
Key Terms 40
End Notes 41
Chapter 2 The Project Management and Information Technology Context 43
A Systems View of Project Management 45
What Is a Systems Approach? 45
The Three-Sphere Model for Systems Management 46
Copyright 2014 Cengage Learning. All Rights Reserved. May not be copied, scanned, or duplicated, in whole or in part.
8.
Understanding Organizations 47
TheFour Frames of Organizations 47
Organizational Structures 49
Organizational Culture 51
Stakeholder Management 52
The Importance of Top Management Commitment 54
The Need for Organizational Commitment to Information Technology 55
The Need for Organizational Standards 56
Project Phases and the Project Life Cycle 56
Product Life Cycles 59
The Importance of Project Phases and Management Reviews 62
The Context of Information Technology Projects 64
The Nature of IT Projects 64
Characteristics of IT Project Team Members 64
Diverse Technologies 65
Recent Trends Affecting Information Technology Project Management 65
Globalization 65
Outsourcing 66
Virtual Teams 67
Agile Project Management 69
The Manifesto for Agile Software Development 70
Scrum 70
Agile, the PMBOK®
Guide, and a New Certification 71
Chapter Summary 73
Quick Quiz 74
Quick Quiz Answers 75
Discussion Questions 75
Exercises 76
Key Terms 77
End Notes 78
Chapter 3 The Project Management Process Groups: A Case Study 81
Project Management Process Groups 82
Mapping the Process Groups to the Knowledge Areas 87
Developing an IT Project Management Methodology 88
Case Study 1: JWD Consulting’s Project Management Intranet Site Project
(Predictive Approach) 91
Project Pre-Initiation and Initiation 91
Pre-Initiation Tasks 92
Initiating 96
Project Planning 100
Project Execution 109
Project Monitoring and Controlling 114
Project Closing 117
Case Study 2: JWD Consulting’s Project Management Intranet Site Project
(Agile Approach) 120
Scrum Roles, Artifacts, and Ceremonies 121
Project Pre-Initiation and Initiation 123
Planning 124
x Table of Contents
Copyright 2014 Cengage Learning. All Rights Reserved. May not be copied, scanned, or duplicated, in whole or in part.
9.
Executing 127
Monitoring andControlling 127
Closing 129
Templates by Process Group 129
Chapter Summary 133
Quick Quiz 133
Quick Quiz Answers 135
Discussion Questions 135
Exercises 136
Key Terms 137
End Notes 138
Chapter 4 Project Integration Management 139
What Is Project Integration Management? 140
Strategic Planning and Project Selection 143
Strategic Planning 143
Identifying Potential Projects 145
Aligning IT with Business Strategy 146
Methods for Selecting Projects 148
Focusing on Broad Organizational Needs 148
Categorizing IT Projects 148
Performing Net Present Value Analysis, Return on Investment, and Payback
Analysis 149
Net Present Value Analysis 149
Return on Investment 152
Payback Analysis 153
Using a Weighted Scoring Model 154
Implementing a Balanced Scorecard 156
Developing a Project Charter 157
Developing a Project Management Plan 161
Project Management Plan Contents 161
Using Guidelines to Create Project Management Plans 164
Directing and Managing Project Work 166
Coordinating Planning and Execution 166
Providing Strong Leadership and a Supportive Culture 167
Capitalizing on Product, Business, and Application Area Knowledge 167
Project Execution Tools and Techniques 168
Monitoring and Controlling Project Work 169
Performing Integrated Change Control 171
Change Control on IT Projects 172
Change Control System 173
Closing Projects or Phases 175
Using Software to Assist in Project Integration Management 175
Chapter Summary 178
Quick Quiz 178
Quick Quiz Answers 180
Discussion Questions 180
Table of Contents xi
Copyright 2014 Cengage Learning. All Rights Reserved. May not be copied, scanned, or duplicated, in whole or in part.
10.
Exercises 181
Running Case182
Tasks 183
Key Terms 184
End Notes 185
Chapter 5 Project Scope Management 187
What Is Project Scope Management? 188
Planning Scope Management 189
Collecting Requirements 191
Defining Scope 194
Creating the Work Breakdown Structure 198
Approaches to Developing Work Breakdown Structures 203
Using Guidelines 203
The Analogy Approach 204
The Top-Down and Bottom-Up Approaches 204
Mind Mapping 205
The WBS Dictionary 206
Advice for Creating a WBS and WBS Dictionary 207
Validating Scope 208
Controlling Scope 210
Suggestions for Improving User Input 212
Suggestions for Reducing Incomplete and Changing Requirements 212
Using Software to Assist in Project Scope Management 214
Chapter Summary 216
Quick Quiz 216
Quick Quiz Answers 218
Discussion Questions 218
Exercises 219
Running Case 220
Tasks 221
Key Terms 221
End Notes 222
Chapter 6 Project Time Management 225
The Importance of Project Schedules 226
Planning Schedule Management 229
Defining Activities 229
Sequencing Activities 232
Dependencies 232
Network Diagrams 233
Estimating Activity Resources 236
Estimating Activity Durations 237
Developing the Schedule 238
Gantt Charts 238
Adding Milestones to Gantt Charts 240
Using Tracking Gantt Charts to Compare Planned and Actual Dates 241
Critical Path Method 243
Calculating the Critical Path 243
Growing Grass Can Be on the Critical Path 244
xii Table of Contents
Copyright 2014 Cengage Learning. All Rights Reserved. May not be copied, scanned, or duplicated, in whole or in part.
11.
Using Critical PathAnalysis to Make Schedule Trade-Offs 245
Using the Critical Path to Shorten a Project Schedule 247
Importance of Updating Critical Path Data 248
Critical Chain Scheduling 248
Program Evaluation and Review Technique (PERT) 251
Controlling the Schedule 252
Reality Checks on Scheduling and the Need for Discipline 253
Using Software to Assist in Project Time Management 255
Words of Caution on Using Project Management Software 256
Chapter Summary 258
Quick Quiz 259
Quick Quiz Answers 261
Discussion Questions 261
Exercises 261
Running Case 265
Tasks 265
Key Terms 265
End Notes 268
Chapter 7 Project Cost Management 271
The Importance of Project Cost Management 272
What Is Cost? 274
What Is Project Cost Management? 274
Basic Principles of Cost Management 275
Planning Cost Management 279
Estimating Costs 280
Types of Cost Estimates 280
Cost Estimation Tools and Techniques 282
Typical Problems with IT Cost Estimates 283
Sample Cost Estimate 284
Determining the Budget 289
Controlling Costs 291
Earned Value Management 291
Project Portfolio Management 297
Using Project Management Software to Assist in Project Cost Management 299
Chapter Summary 301
Quick Quiz 301
Quick Quiz Answers 303
Discussion Questions 303
Exercises 304
Running Case 305
Tasks 305
Key Terms 306
End Notes 308
Chapter 8 Project Quality Management 311
The Importance of Project Quality Management 312
What Is Project Quality Management? 314
Planning Quality Management 316
Performing Quality Assurance 318
Table of Contents xiii
Copyright 2014 Cengage Learning. All Rights Reserved. May not be copied, scanned, or duplicated, in whole or in part.
12.
Controlling Quality 319
Toolsand Techniques for Quality Control 320
Statistical Sampling 327
Six Sigma 328
How Is Six Sigma Quality Control Unique? 329
Six Sigma and Project Selection and Management 330
Six Sigma and Statistics 331
Testing 333
Modern Quality Management 335
Deming and His 14 Points for Management 336
Juran and the Importance of Top Management Commitment to Quality 336
Crosby and Striving for Zero Defects 337
Ishikawa’s Guide to Quality Control 338
Taguchi and Robust Design Methods 338
Feigenbaum and Workers’ Responsibility for Quality 338
Malcolm Baldrige National Quality Award 338
ISO Standards 339
Improving IT Project Quality 340
Leadership 340
The Cost of Quality 341
Organizational Influences, Workplace Factors, and Quality 343
Expectations and Cultural Differences in Quality 343
Maturity Models 344
Software Quality Function Deployment Model 344
Capability Maturity Model Integration 344
Project Management Maturity Models 345
Using Software to Assist in Project Quality Management 347
Chapter Summary 348
Quick Quiz 348
Quick Quiz Answers 350
Discussion Questions 350
Exercises 351
Running Case 352
Tasks 352
Key Terms 352
End Notes 355
Chapter 9 Project Human Resource Management 359
The Importance of Human Resource Management 360
The Global IT Workforce 360
Implications for the Future of IT Human Resource Management 361
What Is Project Human Resource Management? 363
Keys to Managing People 365
Motivation Theories 365
Maslow’s Hierarchy of Needs 365
Herzberg’s Motivation-Hygiene Theory 366
McClelland’s Acquired-Needs Theory 367
McGregor’s Theory X and Theory Y 368
Thamhain and Wilemon’s Influence and Power 368
xiv Table of Contents
Copyright 2014 Cengage Learning. All Rights Reserved. May not be copied, scanned, or duplicated, in whole or in part.
13.
Covey and ImprovingEffectiveness 370
Developing the Human Resource Plan 373
Project Organizational Charts 374
Responsibility Assignment Matrices 376
Staffing Management Plans and Resource Histograms 377
Acquiring the Project Team 378
Resource Assignment 379
Resource Loading 381
Resource Leveling 383
Developing the Project Team 384
Training 385
Team-Building Activities 386
The Myers-Briggs Type Indicator 386
The Social Styles Profile 388
DISC Profile 389
Reward and Recognition Systems 390
Managing the Project Team 390
Tools and Techniques for Managing Project Teams 391
General Advice on Managing Teams 393
Using Software to Assist in Human Resource Management 394
Chapter Summary 396
Quick Quiz 397
Quick Quiz Answers 399
Discussion Questions 399
Exercises 399
Running Case 400
Key Terms 401
End Notes 402
Chapter 10 Project Communications Management 405
The Importance of Project Communications Management 406
Keys to Good Communications 408
Focusing on Group and Individual Communication Needs 409
Formal and Informal Methods for Communicating 410
Distributing Important Information in an Effective and Timely Manner 411
Setting the Stage for Communicating Bad News 412
Determining the Number of Communication Channels 412
Planning Communications Management 414
Managing Communications 416
Using Technology to Enhance Information Creation and Distribution 416
Selecting the Appropriate Communication Methods and Media 417
Reporting Performance 420
Controlling Communications 420
Suggestions for Improving Project Communications 421
Developing Better Communication Skills 421
Running Effective Meetings 423
Using E-Mail, Instant Messaging, Texting, and Collaborative Tools Effectively 424
Using Templates for Project Communications 427
Using Software to Assist in Project Communications 430
Table of Contents xv
Copyright 2014 Cengage Learning. All Rights Reserved. May not be copied, scanned, or duplicated, in whole or in part.
14.
Chapter Summary 433
QuickQuiz 433
Quick Quiz Answers 435
Discussion Questions 435
Exercises 435
Running Case 436
Key Terms 437
End Notes 437
Chapter 11 Project Risk Management 439
The Importance of Project Risk Management 440
Planning Risk Management 447
Common Sources of Risk on IT Projects 448
Identifying Risks 452
Suggestions for Identifying Risks 453
The Risk Register 455
Performing Qualitative Risk Analysis 457
Using Probability/Impact Matrixes to Calculate Risk Factors 457
Top Ten Risk Item Tracking 459
Performing Quantitative Risk Analysis 461
Decision Trees and Expected Monetary Value 461
Simulation 463
Sensitivity Analysis 465
Planning Risk Responses 467
Controlling Risks 469
Using Software to Assist in Project Risk Management 469
Chapter Summary 471
Quick Quiz 472
Quick Quiz Answers 474
Discussion Questions 474
Exercises 474
Running Case 475
Key Terms 476
End Notes 478
Chapter 12 Project Procurement Management 479
The Importance of Project Procurement Management 480
Planning Procurement Management 483
Types of Contracts 485
Tools and Techniques for Planning Procurement Management 489
Make-or-Buy Analysis 489
Expert Judgment 490
Market Research 490
Procurement Management Plan 491
Statement of Work 491
Procurement Documents 493
Source Selection Criteria 494
Conducting Procurements 495
Controlling Procurements 497
Closing Procurements 499
xvi Table of Contents
Copyright 2014 Cengage Learning. All Rights Reserved. May not be copied, scanned, or duplicated, in whole or in part.
15.
Using Software toAssist in Project Procurement Management 499
Chapter Summary 502
Quick Quiz 503
Quick Quiz Answers 504
Discussion Questions 504
Exercises 505
Running Case 505
Key Terms 506
End Notes 507
Chapter 13 Project Stakeholder Management 509
The Importance of Project Stakeholder Management 510
Identifying Stakeholders 512
Planning Stakeholder Management 516
Managing Stakeholder Engagement 516
Controlling Stakeholder Engagement 519
Using Software to Assist in Project Stakeholder Management 522
Chapter Summary 524
Quick Quiz 524
Quick Quiz Answers 526
Discussion Questions 526
Exercises 526
Running Case 527
Key Terms 527
End Notes 527
Appendix A Guide to Using Microsoft Project 2013 A.1
Introduction A.2
Project Management Software Reviews A.3
Basic Features of Project Management Software A.5
What’s New in Project 2013 A.6
Using Project 2013 A.7
Before You Begin A.7
Using the 60-day Trial of Project 2013 A.8
Overview of Project 2013 A.9
Starting Project 2013 and Getting Started A.9
Understanding the Main Screen Elements A.12
Using Project Help and the Project Web Site A.14
Exploring Project 2013 Using an Existing File A.15
Project 2013 Views A.17
Project 2013 Reports A.19
Project 2013 Filters A.21
Creating a New File and Entering Tasks in a Work Breakdown Structure A.23
Creating a New Project File A.23
Creating a Work Breakdown Structure Hierarchy A.25
Creating Summary Tasks A.26
Numbering Tasks A.27
Saving Project Files Without a Baseline A.28
Developing the Schedule A.29
Table of Contents xvii
Copyright 2014 Cengage Learning. All Rights Reserved. May not be copied, scanned, or duplicated, in whole or in part.
16.
Calendars A.29
Entering TaskDurations A.31
Manual and Automatic Scheduling A.31
Duration Units and Guidelines for Entering Durations A.32
Entering Task Durations A.34
Establishing Task Dependencies A.38
Gantt Charts, Network Diagrams, and Critical Path Analysis A.43
Project Cost and Resource Management A.46
Entering Fixed and Variable Cost Estimates A.46
Entering Fixed Costs in the Cost Table A.47
Entering Resource Information and Cost Estimates A.47
Using the Team Planner Feature A.51
Entering Baseline Plans, Actual Costs, and Actual Times A.52
Viewing Earned Value Management Data A.56
Integrating Project 2013 with Other Applications and Apps for Office A.57
Copying Information Between Applications A.57
Creating Hyperlinks to Other Files A.59
Using Project 2013 Apps A.60
Discussion Questions A.63
Exercises A.63
End Notes A.64
Appendix B
(Available on CengageBrain.com)
Appendix C
(Available on CengageBrain.com)
Glossary G.1
Index I.1
xviii Table of Contents
Copyright 2014 Cengage Learning. All Rights Reserved. May not be copied, scanned, or duplicated, in whole or in part.
17.
PREFACE
The future ofmany organizations depends on their ability to harness the power of
information technology, and good project managers continue to be in high demand.
Colleges have responded to this need by establishing courses in project management
and making them part of the information technology, management, engineering, and
other curricula. Corporations are investing in continuing education to help develop
effective project managers and project teams. This text provides a much-needed
framework for teaching courses in project management, especially those that
emphasize managing information technology projects. The first six editions of this
text were extremely well received by people in academia and the workplace. The
Seventh Edition builds on the strengths of the previous editions and adds new,
important information and features.
It’s impossible to read a newspaper, magazine, or Web page without hearing about
the impact of information technology on our society. Information is traveling faster
and being shared by more people than ever before. You can buy just about anything
online, surf the Web on a mobile phone, or use a wireless Internet connection at your
local coffee shop. Companies have linked their systems together to help them fill
orders on time and better serve their customers. Software companies are continually
developing new products to help streamline our work and get better results. When
technology works well, it is almost invisible. But did it ever occur to you to ask,
“Who makes these complex technologies and systems happen?”
Because you’re reading this text, you must have an interest in the “behind-the-
scenes” aspects of technology. If I’ve done my job well, you’ll begin to see the many
innovations society is currently enjoying as the result of thousands of successful
information technology projects. In this text, you’ll read about IT projects around the
world that went well, including Mittal Steel Poland’s Implementation of SAP that uni-
fied IT systems to improve business and financial processes; Dell Earth and other
green computing projects that save energy and millions of dollars; Six Sigma projects
such as the project to improve case load management at Baptist St. Anthony’s
Hospital in Amarillo, Texas; the systems infrastructure project at the Boots Company
in the United Kingdom that takes advantage of supplier competition to cut costs and
improve services; and many more. Of course, not all projects are successful. Factors
such as time, money, and unrealistic expectations, among many others, can sabotage
a promising effort if it is not properly managed. In this text, you’ll also learn from the
mistakes made on many projects that were not successful. I have written this book in
an effort to educate you, tomorrow’s project managers, about what will help make a
project succeed—and what can make it fail. You’ll also see how projects are used in
everyday media, such as television and film, and how companies use best practices in
project management. Many readers tell me how much they enjoy reading these real-
world examples in the What Went Right?, What Went Wrong?, Media Snapshot, and
Best Practice features. As practitioners know, there is no “one size fits all” solution to
Copyright 2014 Cengage Learning. All Rights Reserved. May not be copied, scanned, or duplicated, in whole or in part.
18.
managing projects. Byseeing how different organizations successfully implement
project management, you can help your organization do the same.
Although project management has been an established field for many years,
managing information technology projects requires ideas and information that go
beyond standard project management. For example, many information technology
projects fail because of a lack of user input, incomplete and changing requirements,
and a lack of executive support. This book includes suggestions for dealing with these
issues. New technologies can also aid in managing information technology projects,
and examples of using software to assist in project management are included
throughout the book.
Information Technology Project Management, REVISED Seventh Edition, is the
only textbook to apply all 10 project management knowledge areas and all five pro-
cess groups to information technology projects. As you will learn, the project man-
agement knowledge areas are project integration, scope, time, cost, quality, human
resource, communications, risk, procurement, and stakeholder management. The
five process groups are initiating, planning, executing, monitoring and controlling,
and closing.
This text builds on the PMBOK® Guide, Fifth Edition, an American National
Standard, to provide a solid framework and context for managing information tech-
nology projects. It also includes an appendix, Guide to Using Microsoft Project 2013,
that many readers find invaluable. A second appendix provides advice on earning and
maintaining Project Management Professional (PMP) certification from the Project
Management Institute (PMI) as well as information on other certification programs,
such as CompTIA’s Project certification. A third appendix provides additional case
studies and information on using simulation and mind-mapping software to help
readers apply their project management skills.
Information Technology Project Management, REVISED Seventh Edition, pro-
vides practical lessons in project management for students and practitioners alike. By
weaving together theory and practice, this text presents an understandable, integrated
view of the many concepts, skills, tools, and techniques of information technology
project management. The comprehensive design of the text provides a strong founda-
tion for students and practitioners in project management.
N E W T O T H E R E V I S E D S E V E N T H E D I T I O N
Building on the success of the previous editions, Information Technology Project
Management, REVISED Seventh Edition, introduces a uniquely effective combination
of features. The main changes in the Seventh Edition include the following:
• The key update for the REVISED Seventh Edition is that Appendix A has
been updated for Microsoft Project 2013.
• Several changes were made to synchronize the Seventh Edition with the
PMBOK® Guide, Fifth Edition. Changes were made based on the exposure
draft released in February 2012. The biggest change was the addition of a
tenth knowledge area, Project Stakeholder Management. This text includes a
new chapter to address this important topic.
• Includes additional information on agile project management. Chapter 2
includes general information on this popular concept, and Chapter 3 provides
a second case study illustrating the outputs produced for the JWD Consulting
xx Preface
Copyright 2014 Cengage Learning. All Rights Reserved. May not be copied, scanned, or duplicated, in whole or in part.
19.
project when usingan agile approach. For example, you can see a sample
product backlog, a sprint backlog, a burndown chart, and key artifacts or
outputs produced when using Scrum, the most popular agile method.
• Appendix C, Additional Cases and Software, provides information about using
several simulation software tools. Several suppliers offer discounts to users of this
text. A new section provides instructions for accessing a special 60-day trial of
MindView Business software. This software provides the capability to create mind
maps, a powerful tool for creating a SWOT analysis or work breakdown structure.
The software also allows users to convert a mind map into a Gantt chart.
• A new feature, Global Issues, provides examples of how project management
concepts and practices affect people around the globe.
• Updated examples are provided throughout the text. You’ll notice several new
examples in the Seventh Edition that explain recent events in managing real
information technology projects. Several of the What Went Right?, What
Went Wrong?, Media Snapshot, and Best Practice examples have been
updated to keep you current. Additional examples and results of new studies
are included throughout the text, with appropriate citations.
• User feedback is incorporated. Based on feedback from reviewers, students,
instructors, practitioners, and translators, you’ll see several additional
changes to help clarify information. (This book has been translated into
Chinese, Japanese, Russian, and Czech.)
• A new CourseMate site for the Seventh Edition (www.cengagebrain.com)
provides access to informative links from the end notes, lecture notes, inter-
active quizzes, templates, additional running cases, suggested readings, and
many other items to enhance your learning.
A C C E S S I N G T H E C O U R S E M A T E S I T E
To access the CourseMate site, open a Web browser and go to www.cengage
brain.com. Search by ISBN, author name, or title, and click Create My Account
to begin the registration process.
A P P R O A C H
Many people have been practicing some form of project management with little or no for-
mal study in this area. New books and articles are written each year as we discover more
about the field of project management, and project management software continues to
advance. Because the project management field and the technology industry change
rapidly, you cannot assume that what worked even a few years ago is still the best
approach today. This text provides up-to-date information on how good project manage-
ment and effective use of software can help you manage projects, especially information
technology projects. Six distinct features of this text include its relationship to the Project
Management Body of Knowledge, its detailed guide for using Microsoft Project 2013, its
value in preparing for Project Management Professional and other certification exams, its
inclusion of running case studies and online templates, its companion (premium) Web
site, and its inclusion of a 60-day trial of MindView Business software.
Preface xxi
Copyright 2014 Cengage Learning. All Rights Reserved. May not be copied, scanned, or duplicated, in whole or in part.
20.
Based on PMBOK®
Guide,Fifth Edition
The Project Management Institute (PMI) created the Guide to the Project
Management Body of Knowledge (the PMBOK®
Guide) as a framework and starting
point for understanding project management. It includes an introduction to project
management, brief descriptions of all 10 project management knowledge areas, and a
glossary of terms. The PMBOK®
Guide is, however, just that—a guide. This text uses
the PMBOK®
Guide, Fifth Edition exposure draft (2012) as a foundation, but goes
beyond it by providing more details, highlighting additional topics, and providing a
real-world context for project management. Information Technology Project
Management, Seventh Edition, explains project management specifically as it applies
to managing information technology projects in the 21st century. It includes several
unique features to bring you the excitement of this dynamic field. (For more infor-
mation on features, see the Pedagogical Features section.)
Detailed Guide for How to Use Microsoft Project 2013
Software has advanced tremendously in recent years, and it is important for project
managers and their teams to use software to help manage information technology
projects. Information Technology Project Management, REVISED Seventh Edition,
includes a detailed guide in Appendix A for using the leading project management
software on the market—Microsoft Project 2013. Examples that use Project and other
software tools are integrated throughout the text. Appendix A, Guide to Using Microsoft
Project 2013, teaches you in a systematic way to use this powerful software to help in
project scope, time, cost, human resource, and communications management.
Resource for PMP and Other Certification Exams
Professional certification is an important factor in recognizing and ensuring quality in
a profession. PMI provides certification as a Project Management Professional (PMP),
and this text is an excellent resource for studying for the certification exam as well as
the entry-level Certified Associate in Project Management (CAPM) exam. This text
will also help you pass other certification exams, such as CompTIA’s Project+ exam.
Having working experience on projects does not mean you can easily pass the PMP or
other certification exams.
I like to tell my students a story about taking a driver’s license test after moving to
Minnesota. I had been driving safely and without accidents for over 16 years, so I
thought I could just walk in and take the test. I was impressed by the sophisticated
computer system used to administer the test. The questions were displayed on a large
touch-screen monitor, often with an image or video to illustrate traffic signs or driving
situations. I became concerned when I had no idea how to answer several questions,
and I was perplexed when the test seemed to stop and a message appeared: “Please see
the person at the service counter.” This was a polite way of saying I had failed the test!
After controlling my embarrassment, I picked up one of the Minnesota driving test
brochures, studied it for an hour or two that night, and passed the test the next day.
The point of this story is to emphasize the importance of studying information
from the organization that creates the test and not to be overconfident that your
experience is enough. Because this text is based on PMI’s PMBOK®
Guide, Fifth
Edition, it provides a valuable reference for studying for PMP certification.
xxii Preface
Copyright 2014 Cengage Learning. All Rights Reserved. May not be copied, scanned, or duplicated, in whole or in part.
21.
It is alsoan excellent reference for CompTIA’s Project+ exam. I have earned both
of these certifications and kept them in mind when writing this text.
Exercises, Running Cases, Templates, Sample Documents,
and Optional Simulation Software
Based on feedback from readers, the REVISED Seventh Edition continues to provide
challenging exercises and running cases to help students apply concepts in each
chapter. The text includes more than 50 templates, examples of real project docu-
ments, and information on several simulation software tools that you can use to
practice your skills in managing a project. All of these features help the subject
matter come alive and have more meaning.
O R G A N I Z A T I O N A N D C O N T E N T
Information Technology Project Management, REVISED Seventh Edition, is organized
into three main sections to provide a framework for project management, a detailed
description of each project management knowledge area, and three appendices to
provide practical information for applying project management. The first three chap-
ters form the first section, which introduces the project management framework and
sets the stage for the remaining chapters.
Chapters 4 through 13 form the second section of the text, which describes
each of the project management knowledge areas—project integration, scope, time,
cost, quality, human resource, communications, risk, procurement, and stakeholder
management—in the context of information technology projects. An entire chapter
is dedicated to each knowledge area. Each of these chapters includes sections that
map to their major processes as described in the PMBOK®
Guide, Fifth Edition. For
example, the chapter on project quality management includes sections on planning
quality management, performing quality assurance, and controlling quality.
Additional sections highlight other important concepts related to each knowledge
area, such as Six Sigma, testing, maturity models, and using software to assist in
project quality management. Each chapter also includes detailed examples of key
project management tools and techniques as applied to information technology
projects. For example, the chapter on project integration management includes
samples of various project-selection documents, such as net present value analyses,
ROI calculations, payback analyses, and weighted scoring models. The project
scope management chapter includes a sample project charter, a project scope
statement, and several work breakdown structures for information technology
projects.
Appendices A through C form the third section of the text, which provides
practical information to help you apply project management skills to real or prac-
tice projects. By following the detailed, step-by-step guide in Appendix A, which
includes more than 60 screen illustrations, you will learn how to use Project 2013.
Appendix B summarizes what you need to know to earn PMP or other certifications
related to project management. Appendix C provides additional running cases and
information on using simulation and mind-mapping software to help you practice
your new skills.
Preface xxiii
Copyright 2014 Cengage Learning. All Rights Reserved. May not be copied, scanned, or duplicated, in whole or in part.
22.
P E DA G O G I C A L F E A T U R E S
Several pedagogical features are included in this text to enhance presentation of the
materials so that you can more easily understand the concepts and apply them.
Throughout the text, emphasis is placed on applying concepts to current, real-world
information technology project management.
CourseMate
Engagement Tracker
How do you assess your students’ engagement in your course? How do you know your
students have read the material or viewed the resources you’ve assigned? How can
you tell if your students are struggling with a concept? With CourseMate, you can use
the included Engagement Tracker to assess student preparation and engagement. Use
the tracking tools to see progress for the class as a whole or for individual students.
Identify students at risk early in the course. Uncover which concepts are most diffi-
cult for your class. Monitor time on task. Keep your students engaged.
Interactive Teaching and Learning Tools
CourseMate includes interactive teaching and learning tools:
• Quizzes
• Flashcards
• Games
• and more
These assets enable students to review for tests and prepare for class, and they
address the needs of students’ varied learning styles.
Interactive eBook
In addition to interactive teaching and learning tools, CourseMate includes an inter-
active eBook. Students can take notes as well as highlight, search, and interact with
embedded media specific to their book. Use it as a supplement to the printed text or
as a substitute—the choice is your students’ with CourseMate.
Opening Case and Case Wrap-Up
To set the stage, each chapter begins with an opening case related to the material
presented in that chapter. These real-life case scenarios, most of which are based on
the author’s experiences, spark student interest and introduce important concepts in
a real-world context. As project management concepts and techniques are discussed,
they are applied to the opening case and other similar scenarios. Each chapter then
closes with a case wrap-up—with some ending successfully and some failing—to
further illustrate the real world of project management.
What Went Right? and What Went Wrong?
Failures, as much as successes, can be valuable learning experiences. Each chapter of
the text includes one or more examples of real information technology projects that
went right, as well as examples of projects that went wrong. These examples further
illustrate the importance of mastering key concepts in each chapter.
xxiv Preface
Copyright 2014 Cengage Learning. All Rights Reserved. May not be copied, scanned, or duplicated, in whole or in part.
Air Holder No.1.
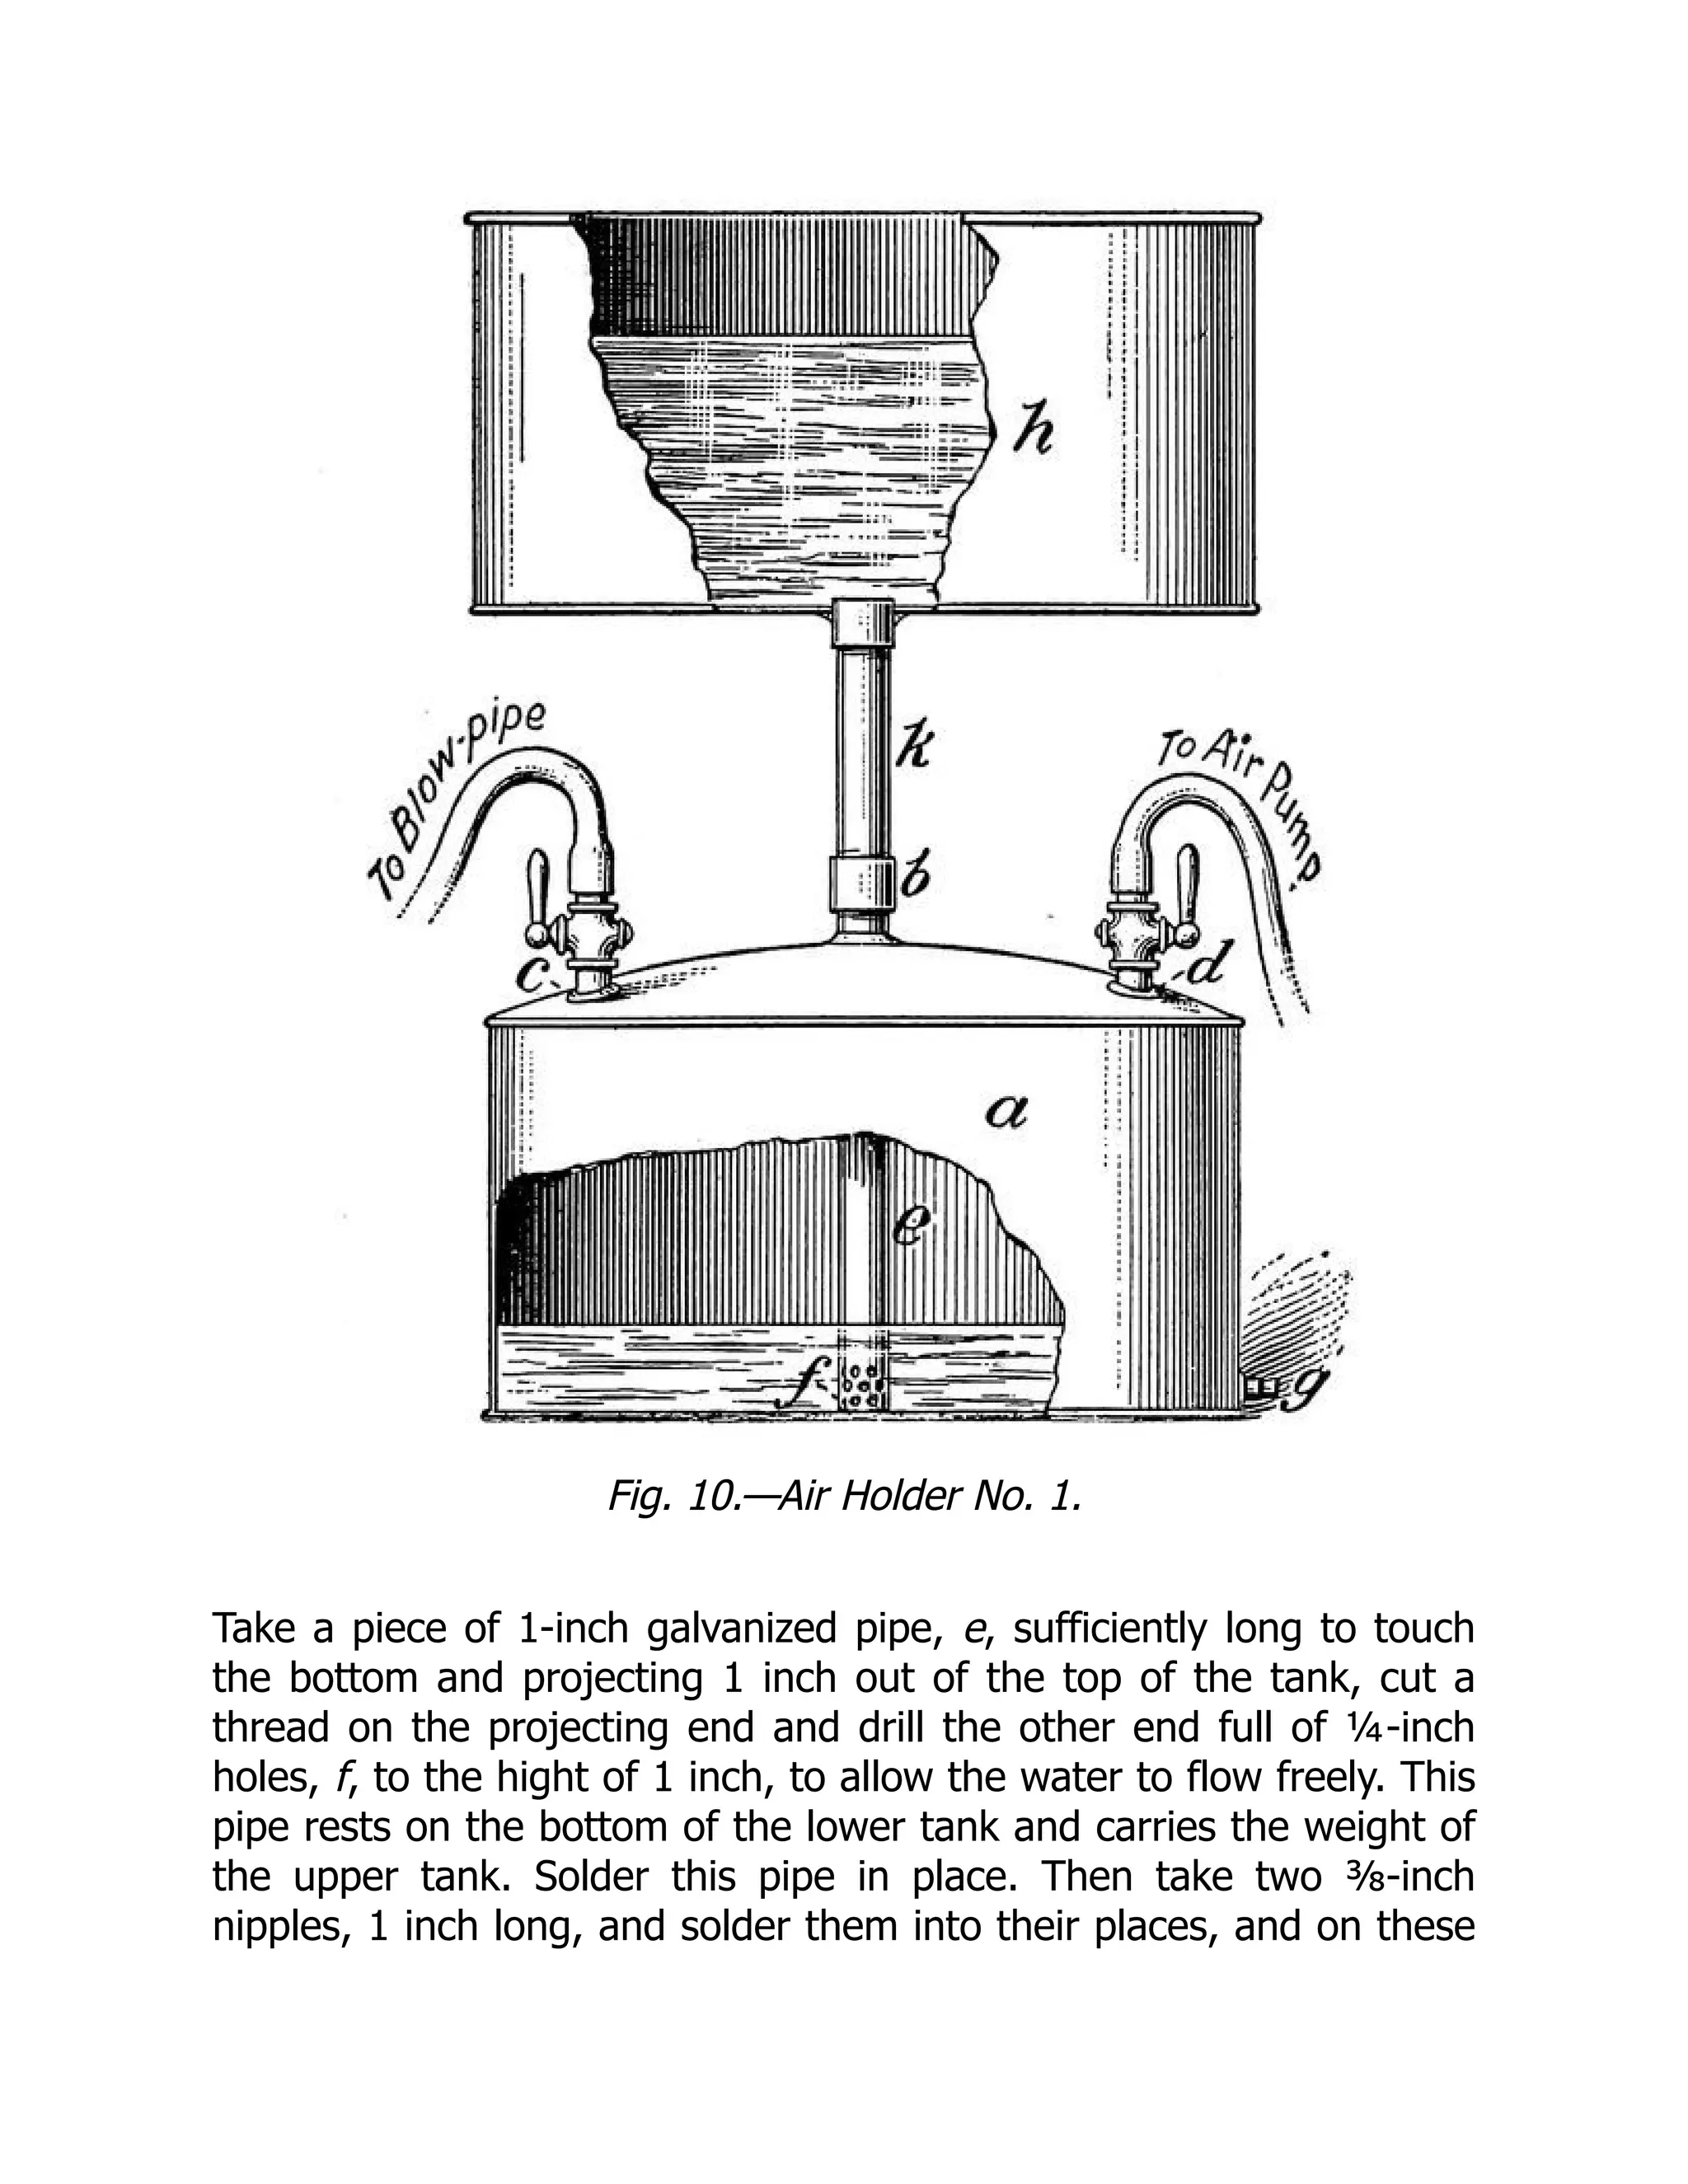
The beginner will notice in Fig. 10 that this air holder is so
constructed that it gets its air pressure direct from the head of
water, and also that this pressure can be varied by making the
connecting piece of pipe longer or shorter, as may be desired. Of
course, the pressure will vary slightly as the water descends into the
air chamber, but not enough to make it objectionable, as it will be
the helper's duty to watch the water line and renew pumping as
often as the water falls below a certain point.
To make this holder, a tank, a, Fig. 10, 12 inches high and 18 inches
in diameter, should be constructed of galvanized sheet iron. On this
tank double seam a flat bottom. The top must be raised slightly, as
shown, to give it strength. This can be done with the raising
hammer, or it can be done by making the circle for the top ¾ inch
larger than the bottom, then making a cut to the center. It can then
be drawn together and riveted in any desired pitch. A hole must be
punched in the center of this top large enough to receive a 1-inch
galvanized pipe, b. Six inches apart and 2 inches from the edge
punch two holes, c and d, large enough to receive pieces of ⅜-inch
galvanized pipe. This top should then be fitted and placed on the
body of the tank.
25.
Fig. 10.—Air HolderNo. 1.
Take a piece of 1-inch galvanized pipe, e, sufficiently long to touch
the bottom and projecting 1 inch out of the top of the tank, cut a
thread on the projecting end and drill the other end full of ¼-inch
holes, f, to the hight of 1 inch, to allow the water to flow freely. This
pipe rests on the bottom of the lower tank and carries the weight of
the upper tank. Solder this pipe in place. Then take two ⅜-inch
nipples, 1 inch long, and solder them into their places, and on these
26.
nipples screw two⅜-inch hose end gas cocks, c and d. One of these
cocks is for the purpose of connecting to the air pump, and the
other to the mixing cock. As close as possible to the bottom of the
tank solder in a ½-inch coupling, g. Into this coupling screw a plug.
This is for the purpose of draining the tank when out of use.
Now make another tank, h, 19 inches in diameter and 11 inches
deep, the top to be left open and wired with a heavy wire. Double
seam a flat bottom on this tank. Directly in the center of this bottom
punch a hole large enough to receive a 1-inch coupling. Then cut a
1-inch coupling in half and solder it into this hole, putting the thread
side down and leaving it as near flush with the outside of the tank as
possible, so that if it is desired to move the air holder to and from a
job it can be taken apart and the lower tank nested in the upper
tank, making a compact bundle and reducing the danger of damage
by careless handling.
To connect these tanks, all that is required is a piece of 1-inch iron
pipe, h, 12 inches long, with a coupling on one end. To operate this
air holder, close the two air cocks on the lower, or air, tank; then fill
the upper tank nearly full of water, taking care not to put too much
in it, or it will overflow the lower tank and get into the tubes, and if
this happens the tubes will have to be removed and hung up to dry,
or drops of water will be blown into the blow pipe and extinguish the
flame. It is then ready for use. The air in the air chamber is
compressed by the weight of the water in the upper tank, and if the
water line is at the same hight as the acid line in the hydrogen gas
generator the pressure of air must be the same as the pressure of
gas. As air is used the water descends through the pipe and will
gradually fill the lower chamber. It can then be forced back into the
water chamber by attaching the air pump to the cock h in Fig. 9, or
d in Fig. 10, without disturbing the gas or in any way interfering with
the operator. To connect with the cock h in Fig. 9 it is only necessary
to disconnect one line of hose and connect the pump; then close the
other cock and work the pump until air bubbles up in the upper
tank; then shut the cock, remove the pump and connect the hose to
the gasoline can, open the cocks and the apparatus is ready for use.
27.
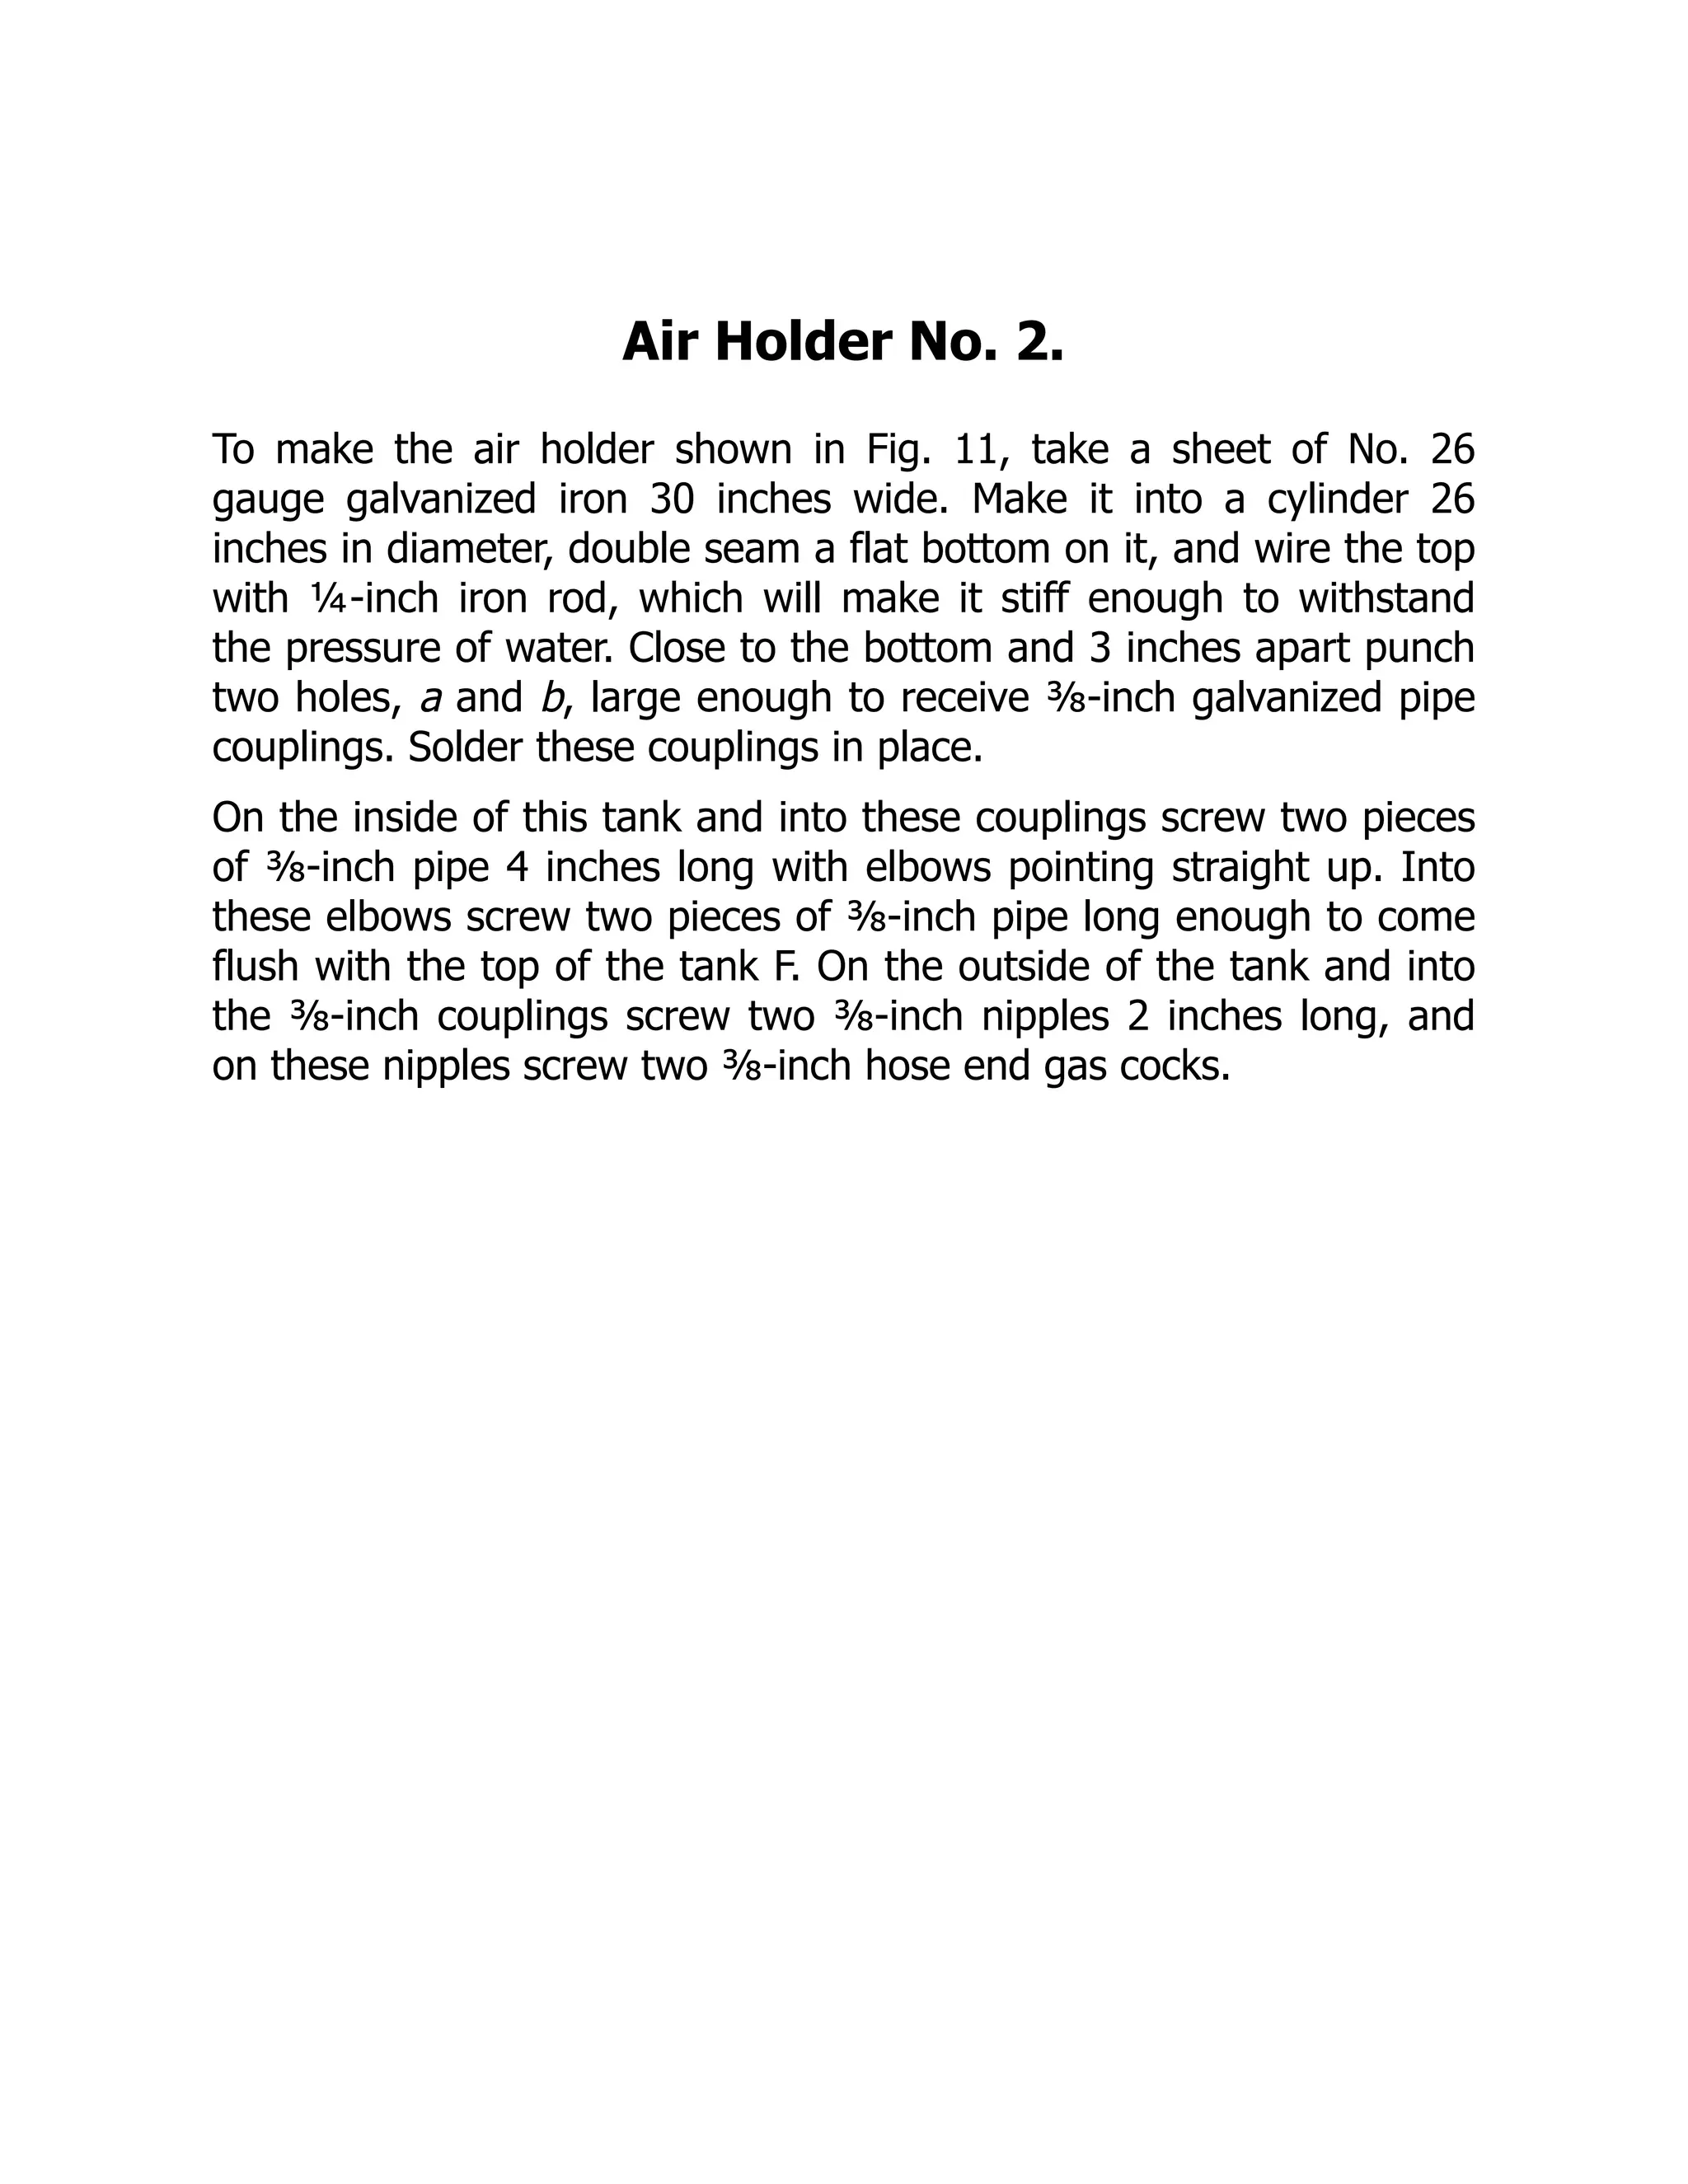
Air Holder No.2.
To make the air holder shown in Fig. 11, take a sheet of No. 26
gauge galvanized iron 30 inches wide. Make it into a cylinder 26
inches in diameter, double seam a flat bottom on it, and wire the top
with ¼-inch iron rod, which will make it stiff enough to withstand
the pressure of water. Close to the bottom and 3 inches apart punch
two holes, a and b, large enough to receive ⅜-inch galvanized pipe
couplings. Solder these couplings in place.
On the inside of this tank and into these couplings screw two pieces
of ⅜-inch pipe 4 inches long with elbows pointing straight up. Into
these elbows screw two pieces of ⅜-inch pipe long enough to come
flush with the top of the tank F. On the outside of the tank and into
the ⅜-inch couplings screw two ⅜-inch nipples 2 inches long, and
on these nipples screw two ⅜-inch hose end gas cocks.
28.
Fig. 11.—Air HolderNo. 2.
Now, with the same sized sheet iron, make another tank 2 inches
smaller in diameter than the first tank. This should have a flat
bottom, and be wired as previously described. Then take four strips
of sheet iron 30 inches long and 2 inches wide, and form each into V
shape lengthwise. Lay off the circumference of this tank in four
equal spaces. One side of the V-shaped pieces should then be
soldered on at each space. The other side should be left loose to
29.
allow for adjustment.These pieces form the guides to the upper
tank and prevent it from tipping sideways and binding. Two of the
guides are shown in the illustration, Fig. 11.
The lower tank should now be filled about one-third full of water.
The upper tank should then be inverted and placed in it. The air
pump must then be connected to one of the ⅜-inch cocks with a
short piece of hose, and the air should be pumped into it until the
upper tank rises to its highest level.
The pressure in this form of air holder must be regulated by weights,
and to secure 1 pound of pressure it is necessary to place weights
equal to 1 pound for every inch in area contained in the opening in
the upper tank. Two drop handles, such as are used on heavy milk
cans, should be riveted and soldered on the sides of the tank to
facilitate moving it about.
30.
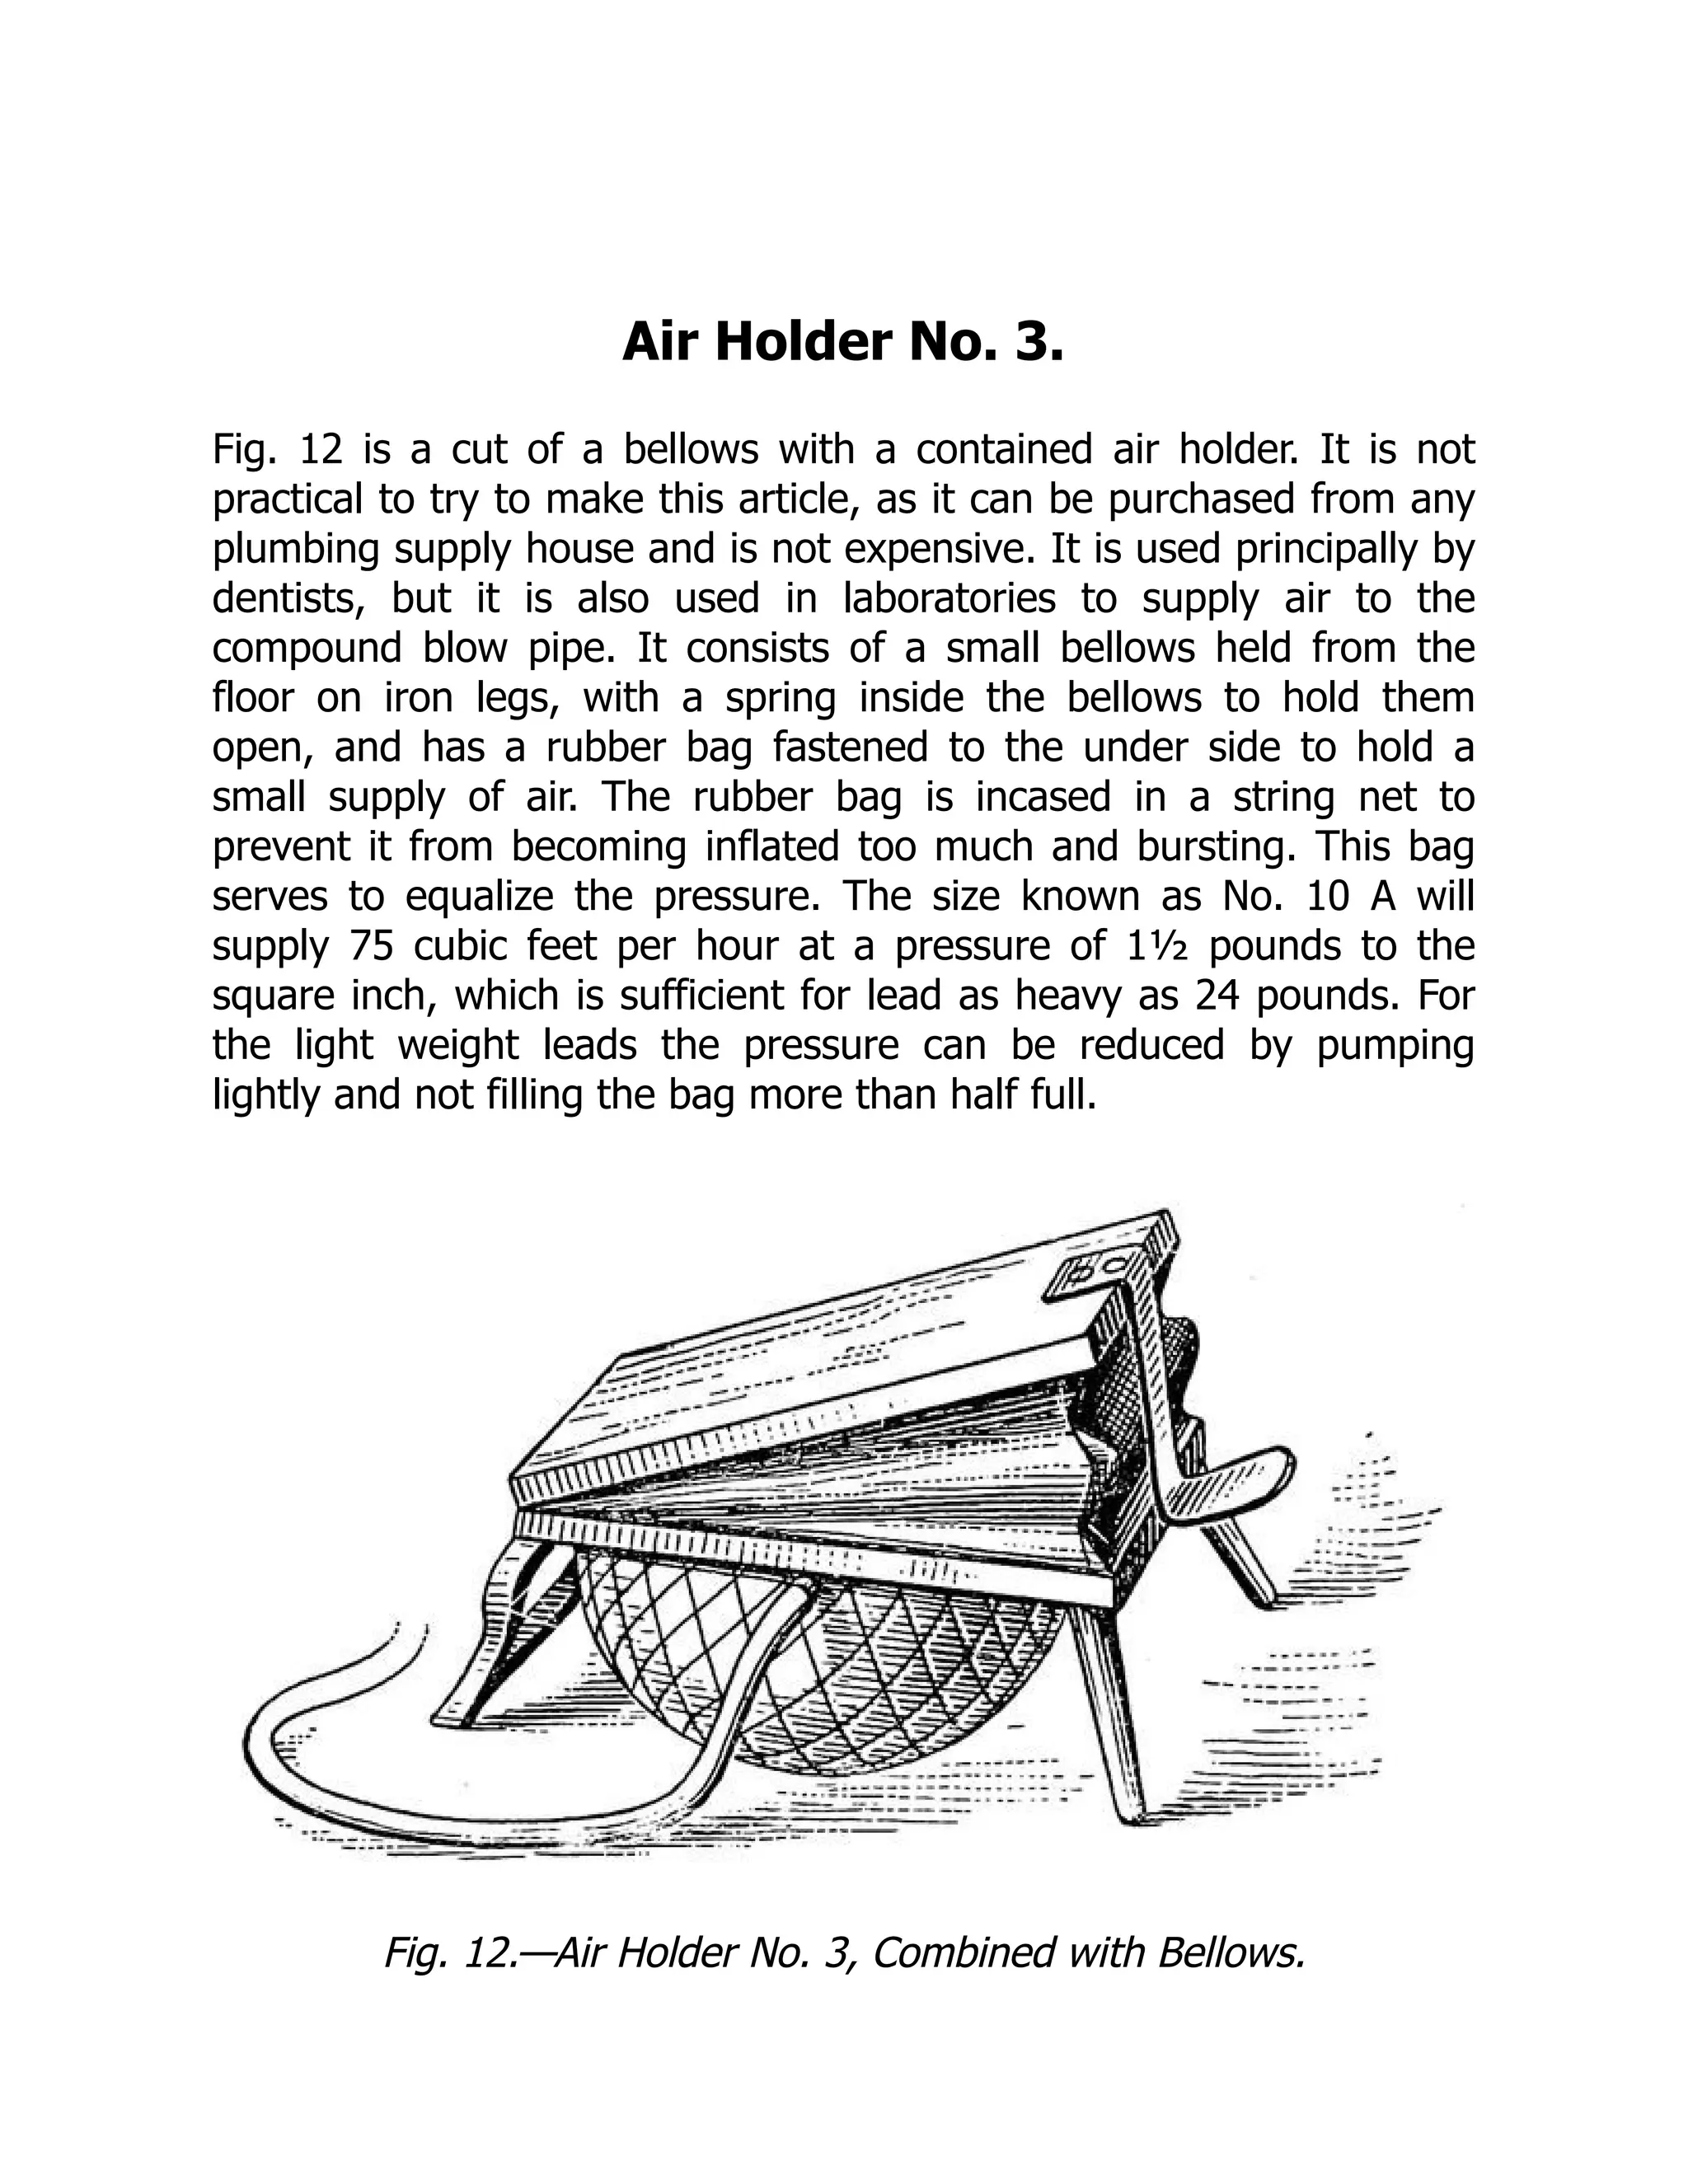
Air Holder No.3.
Fig. 12 is a cut of a bellows with a contained air holder. It is not
practical to try to make this article, as it can be purchased from any
plumbing supply house and is not expensive. It is used principally by
dentists, but it is also used in laboratories to supply air to the
compound blow pipe. It consists of a small bellows held from the
floor on iron legs, with a spring inside the bellows to hold them
open, and has a rubber bag fastened to the under side to hold a
small supply of air. The rubber bag is incased in a string net to
prevent it from becoming inflated too much and bursting. This bag
serves to equalize the pressure. The size known as No. 10 A will
supply 75 cubic feet per hour at a pressure of 1½ pounds to the
square inch, which is sufficient for lead as heavy as 24 pounds. For
the light weight leads the pressure can be reduced by pumping
lightly and not filling the bag more than half full.
Fig. 12.—Air Holder No. 3, Combined with Bellows.
31.
Any of thethree described air blast arrangements will answer the
purpose, so it is immaterial which is used, and it is left to the
discretion of the beginner to obtain whichever is the most
convenient.
32.
The Blow Pipe.
Nextcomes the blow pipe. The only practical compound blow pipe
on the market is shown in Fig. 13, and is known as Walmsley's. This
is a modification of the Bunsen burner, and consists of a bent blow
pipe with the air tube in the center, as shown in Fig. 14. It is a
perfect working blow pipe in every respect, and I should advise
every one interested in the work to purchase one. For while seams
cannot be burned with it in any other position than horizontal, it will
be found useful in lengthening traps or lead bends, for which
purpose it is well adapted and can be put into instant use, thereby
saving its cost many times over in wiping solders.
Fig. 13.—The Walmsley Compound Blow Pipe.
33.
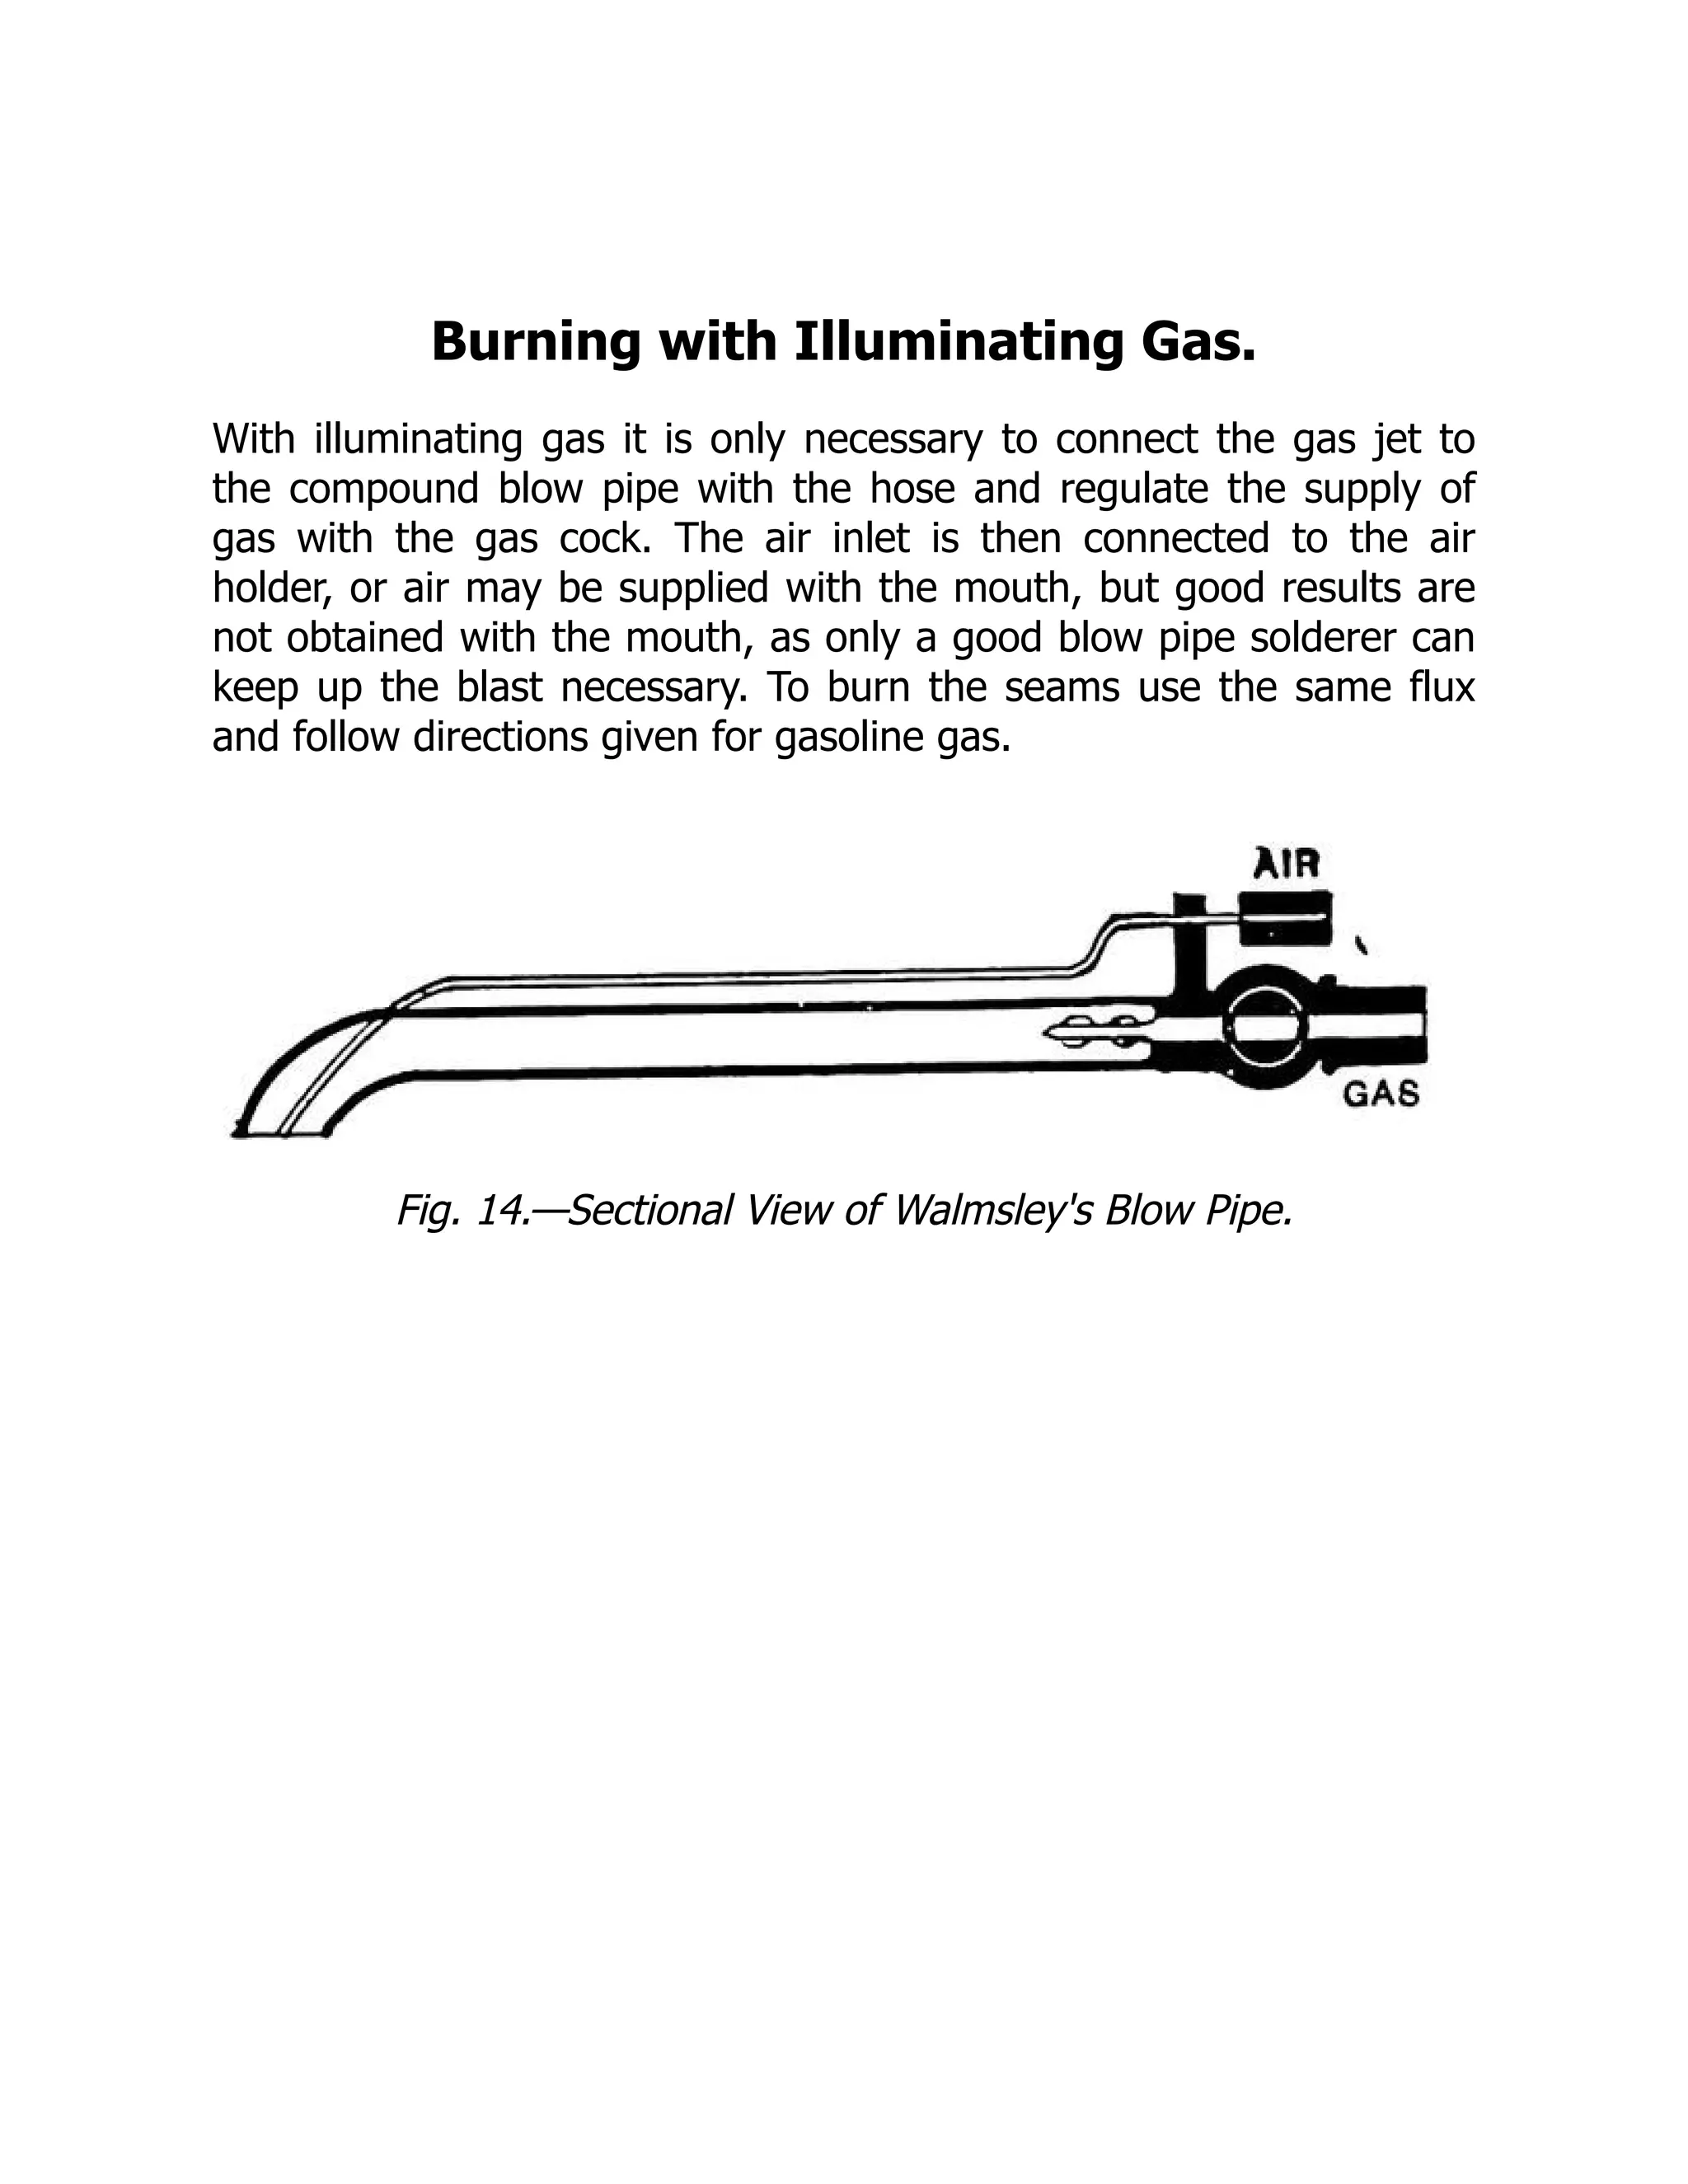
Burning with IlluminatingGas.
With illuminating gas it is only necessary to connect the gas jet to
the compound blow pipe with the hose and regulate the supply of
gas with the gas cock. The air inlet is then connected to the air
holder, or air may be supplied with the mouth, but good results are
not obtained with the mouth, as only a good blow pipe solderer can
keep up the blast necessary. To burn the seams use the same flux
and follow directions given for gasoline gas.
Fig. 14.—Sectional View of Walmsley's Blow Pipe.
34.
Making the GasolineGas for Burning the
Generator.
With a piece of ¼-inch hose connect the top of the can C, Fig. 9,
with the air holder D, then connect the spout or gas outlet e of the
can to the gas end f of the compound blow pipe. The air outlet g of
the compound blow pipe should then be connected to the remaining
cock h, in the air holder. If the bellows is used, it will be necessary to
connect the air with ¼-inch tee, m, in which three short nipples
have previously been screwed.
The apparatus is now ready for use. Gasoline being really a liquid
gas, it takes its first opportunity to assume its natural shape. The
natural way to convert gasoline into gas is by simple evaporation. So
taking advantage of this fact, the action will be thus: By forcing air
into and through a body of gasoline sufficient of the gasoline is
taken up to form a dense vapor, which will light and burn at the jet,
similar to illuminating gas. With the admixture of air in the
compound blow pipe, it gives a flame of very intense heat. But, in
common with illuminating gas, it is so rich in carbon that it gives an
oxidizing flame, and makes it necessary to use a flux, which should
be Yager's soldering salts mixed as per the directions on the bottle.
If this is difficult to procure, a good substitute can be made by
mixing equal parts of powdered borax and sal ammoniac in a little
water.
To operate this device the air should be turned on the gasoline and
lighted at the jet. The air should then be admitted gradually until the
flame is brought to the proper size and condition, indicated by its
being blue and pointed. If too much gas is admitted the flame will
be yellow and will blacken the work by depositing a coat of soot on
it. If too much air is admitted the flame will be ragged and noisy,
and the temperature will be too low to heat the metal. The flame is
35.
at its bestheat when it burns with a pale blue color which does not
show any yellow streaks.
Before attempting to burn the generator the beginner should
practice on pieces of sheet lead. It is next to impossible to burn
seams in any other position than horizontal with this flame, as it
rapidly oxidizes the lead, and in spite of all precaution the lead will
become unmanageable in upright seams, so that the beginner would
waste time in practicing on seams in any other position than
horizontal. If directions have been followed in cutting the lead for
the generator the seams will occur only in that position.
To burn the generator the seams should be shaved clean, both on
the under and upper sides, for a distance of ⅛ inch, making a seam
¼ inch wide, taking care to have the lead seams lie close to each
other, for, if they do not, this flame will cause the edges of the lead
to spread away from each other and leave a hole that is difficult to
patch.
Now apply the flux with a small brush. When the flame is in working
order bring it quickly to bear on the end of the seam nearest you to
be burned. When it starts to fuse draw the flame as quickly away,
always drawing it to one side, and from the upper to the lower
sheet. The melted drop will follow the flame and unite with the
melted drop on the lower sheet.
It is necessary to have the shave hook near at hand, so that, in case
of oxidizing when fusing, the melted drop can be broken up and
allowed to flow in place.
With a little practice and patience the generator can be burned all
right in this manner. This gas is perfectly safe and can be handled
with impunity. This method would, of course, be impracticable to use
on a job of any size, but I have used it several times where nothing
else could be obtained, and have always had very good success with
it.
36.
CHAPTER VI.
CONNECTING THEAPPARATUS.
We now assume that the generator is charged and the rest of the
apparatus is finished and ready for use, so we will proceed to
connect it up ready for a trial.
About 30 feet of ¼-inch heavy rubber tubing should be procured.
This hose should be heavy enough to allow of its being pulled
around without kinking and shutting off the supply of gas. A piece of
this hose 5 feet long should be slipped on the gas cock M on the
generator, shown in Fig. 1, and then slipped over the gas inlet tube
of the scrubbing cup n. One must be sure that this is connected to
the gas inlet tube, which is the tube that dips under the water in the
scrubbing cup.
With another 5-foot piece of hose connect the gas outlet of
scrubbing cup o to the right hand cock on the mixing fork f. Always
connect the gas on the same side so as to avoid confusion of cocks.
Then with a 10-foot piece of hose connect the air cock on the air
holder p or bellows to the remaining cock on the mixing fork g. An
8-foot piece should be connected from the gas outlet on mixing fork
e to the blow pipe i.
These tubes must fit tight to prevent any possible leak of gas, and if
they do not they should be tightened on with pieces of wire. The
remaining piece of hose can be used to connect the air pump C to
the air inlet cock s on the air holder, but if the bellows are used this
will not be needed.
37.
Now place inthe scrubbing cup a half dozen pieces of blue vitriol, or
copperas, as it is commonly called. Then pour in clear water until it
flows out of the trap screw z. This screw can be made tight by using
for packing a piece of wicking which has been saturated with tallow.
After preparing the apparatus as above, refer to the cut of the
complete apparatus and compare the connections on the cut with
those made from the above directions, to make positive that they
are right. If they agree, the apparatus is now ready for use.
38.
Testing the Apparatus.
Itis necessary to test the generator for leaks, as a small blow hole
may sometimes be left in some of the seams or the cocks or
cleaning screws become defective.
To do this, first close the gas cock on the top of the gas chamber
and make up the cleaning and charging screws, which must be set
on a bed of soft putty. Then fill the acid chamber full of hot water,
first measuring the water so as to ascertain just how much solution
is required in proportion to the amount of water, as it takes the same
quantity at all times. Allow it to stand for a few moments, then mark
the water line with a pencil or nail, when it should be left standing
for an hour. The water should stay at the mark indicated for an
indefinite time. If it sinks during this test it shows that there is a leak
in the generator and it must be located and repaired.
39.
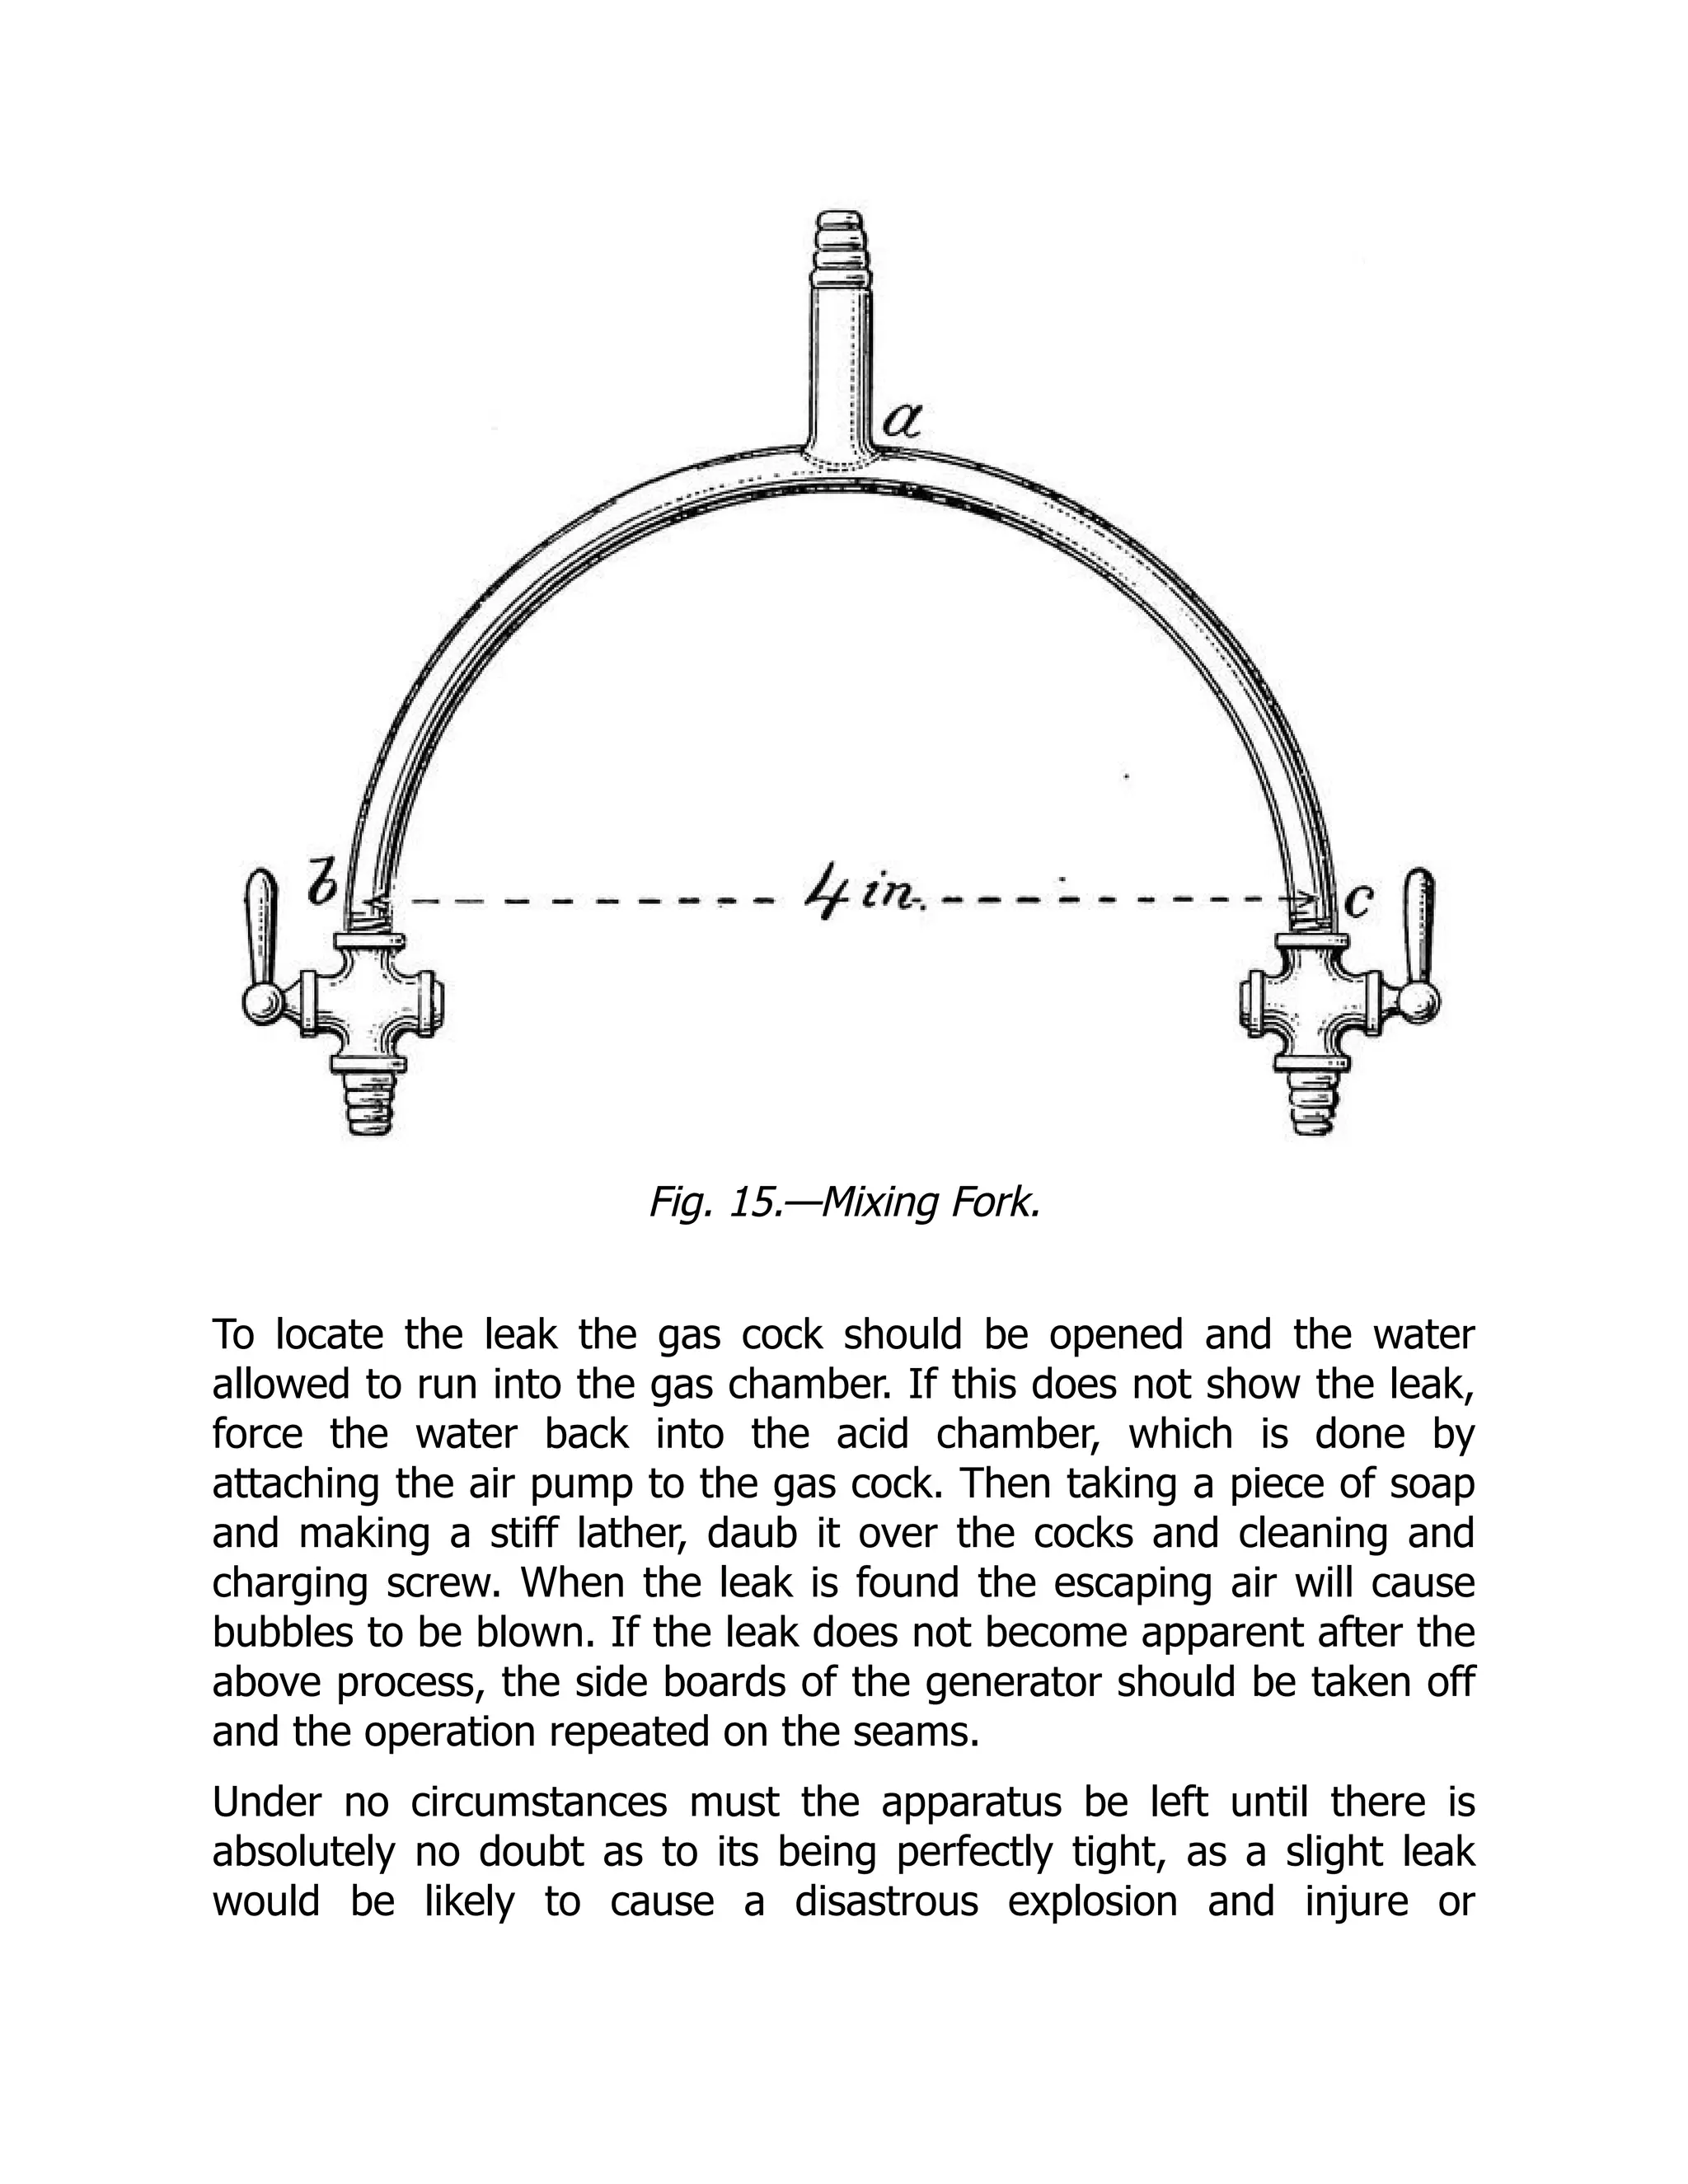
Fig. 15.—Mixing Fork.
Tolocate the leak the gas cock should be opened and the water
allowed to run into the gas chamber. If this does not show the leak,
force the water back into the acid chamber, which is done by
attaching the air pump to the gas cock. Then taking a piece of soap
and making a stiff lather, daub it over the cocks and cleaning and
charging screw. When the leak is found the escaping air will cause
bubbles to be blown. If the leak does not become apparent after the
above process, the side boards of the generator should be taken off
and the operation repeated on the seams.
Under no circumstances must the apparatus be left until there is
absolutely no doubt as to its being perfectly tight, as a slight leak
would be likely to cause a disastrous explosion and injure or
40.
probably blind theoperator. Flying vitriol is not a very pleasant thing
to get in one's eyes.
The apparatus should be frequently tested in this manner: Before
drawing off the water it is desirable to learn what amount of gas
pressure there will be when the generator is charged, so that the
pressure of air and gas can be equalized. The mathematical rule for
this is to multiply the head in feet by 0.434, and the result will be
the pressure in pounds; or an approximate way of determining the
pressure is to allow ½ pound pressure for every foot of head. For
example: The hight of liquid in the generator measured from the
bottom of the acid supply pipe to the top of the water or acid line,
when at its highest level, would be 3 feet. Allowing ½ pound for
every foot in hight would give a pressure of 1½ pounds, which is
slightly in excess of the mathematical rule, which is 3 × 0.434 =
1.302, or 1 pound 4 ounces, but to be accurate it is well to attach a
mercury gauge to the gas cock. Note the hight of the column of
mercury. Then attach the gauge to the blast apparatus, and if the
floating air holder is used, sufficient weight must be put on the top
of air holder to raise the column of mercury to a point not quite as
high as is indicated by the generator. These weights can then be
weighed and a similar weight made of lead to correspond, which can
be kept for permanent use. If the bellows are used, the size
specified should be obtained, and the pressure will be all right for
this size generator without further trouble. If the air holder indicated
by Fig. 8 is used, all that is necessary is to make the hights of the
water line in both generator and air holder equal, and the pressure
must be the same.
41.
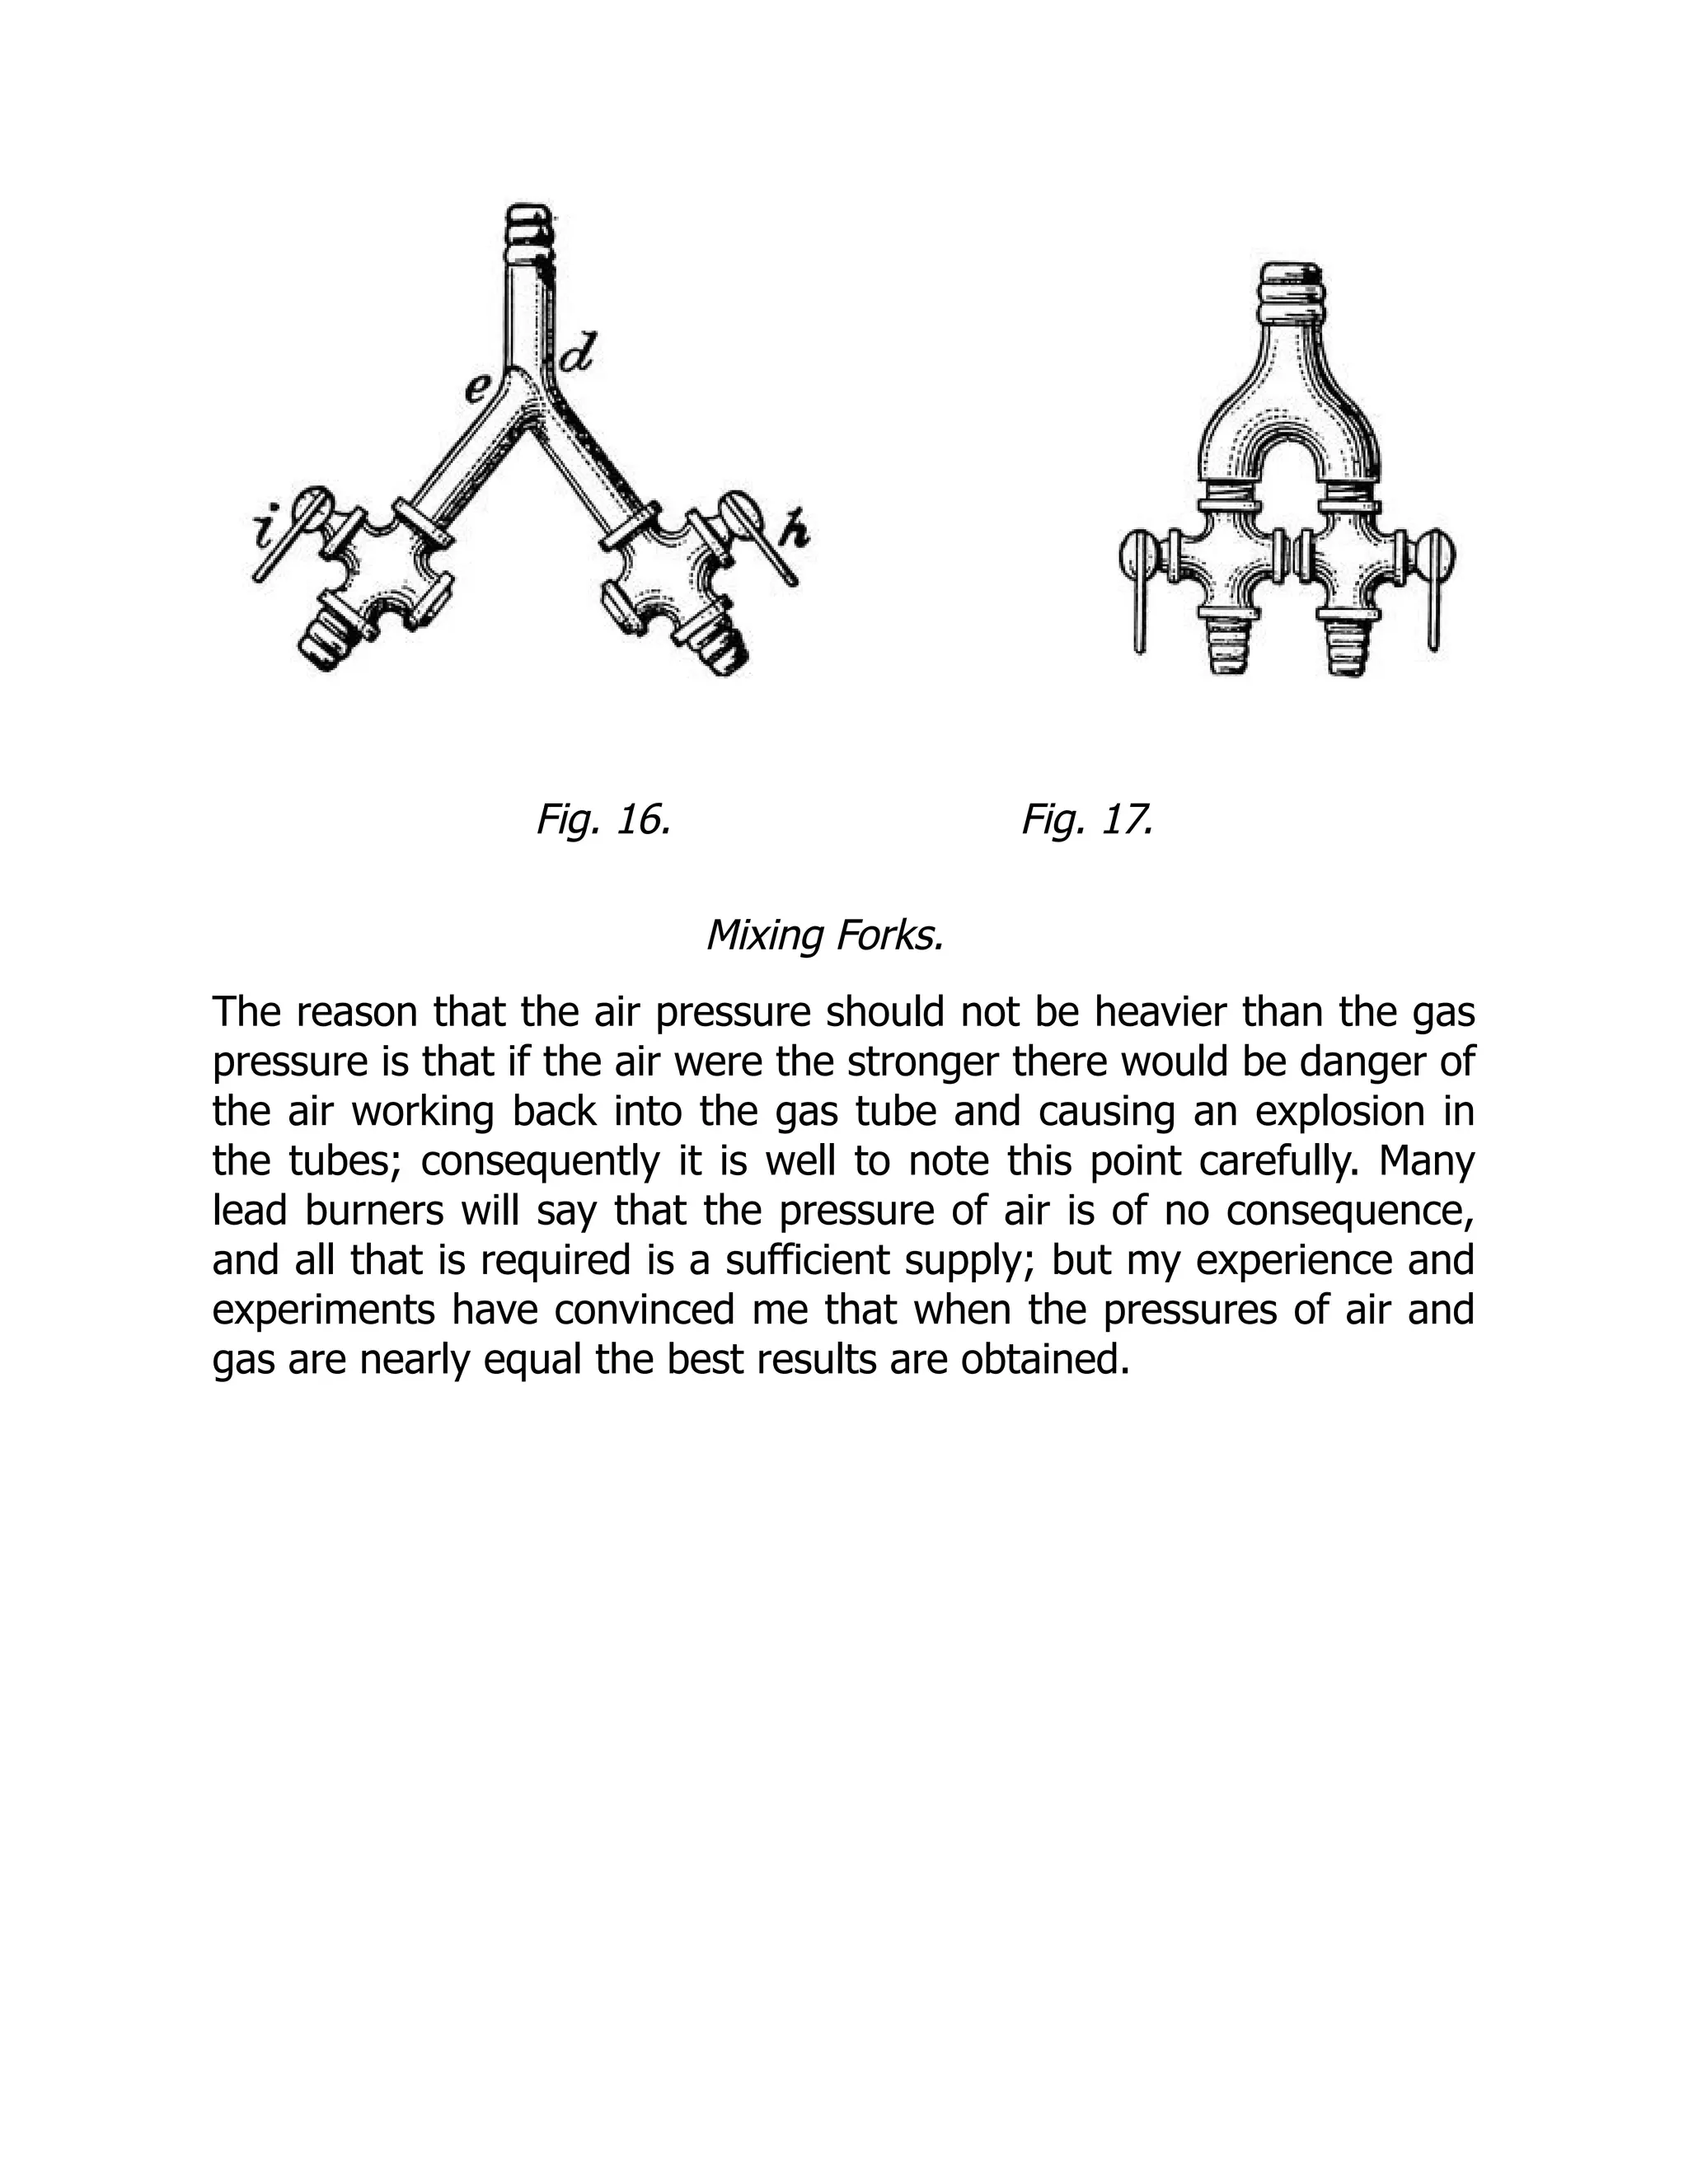
Fig. 16. Fig.17.
Mixing Forks.
The reason that the air pressure should not be heavier than the gas
pressure is that if the air were the stronger there would be danger of
the air working back into the gas tube and causing an explosion in
the tubes; consequently it is well to note this point carefully. Many
lead burners will say that the pressure of air is of no consequence,
and all that is required is a sufficient supply; but my experience and
experiments have convinced me that when the pressures of air and
gas are nearly equal the best results are obtained.
42.
The Mixing Forkand Blow Pipe.
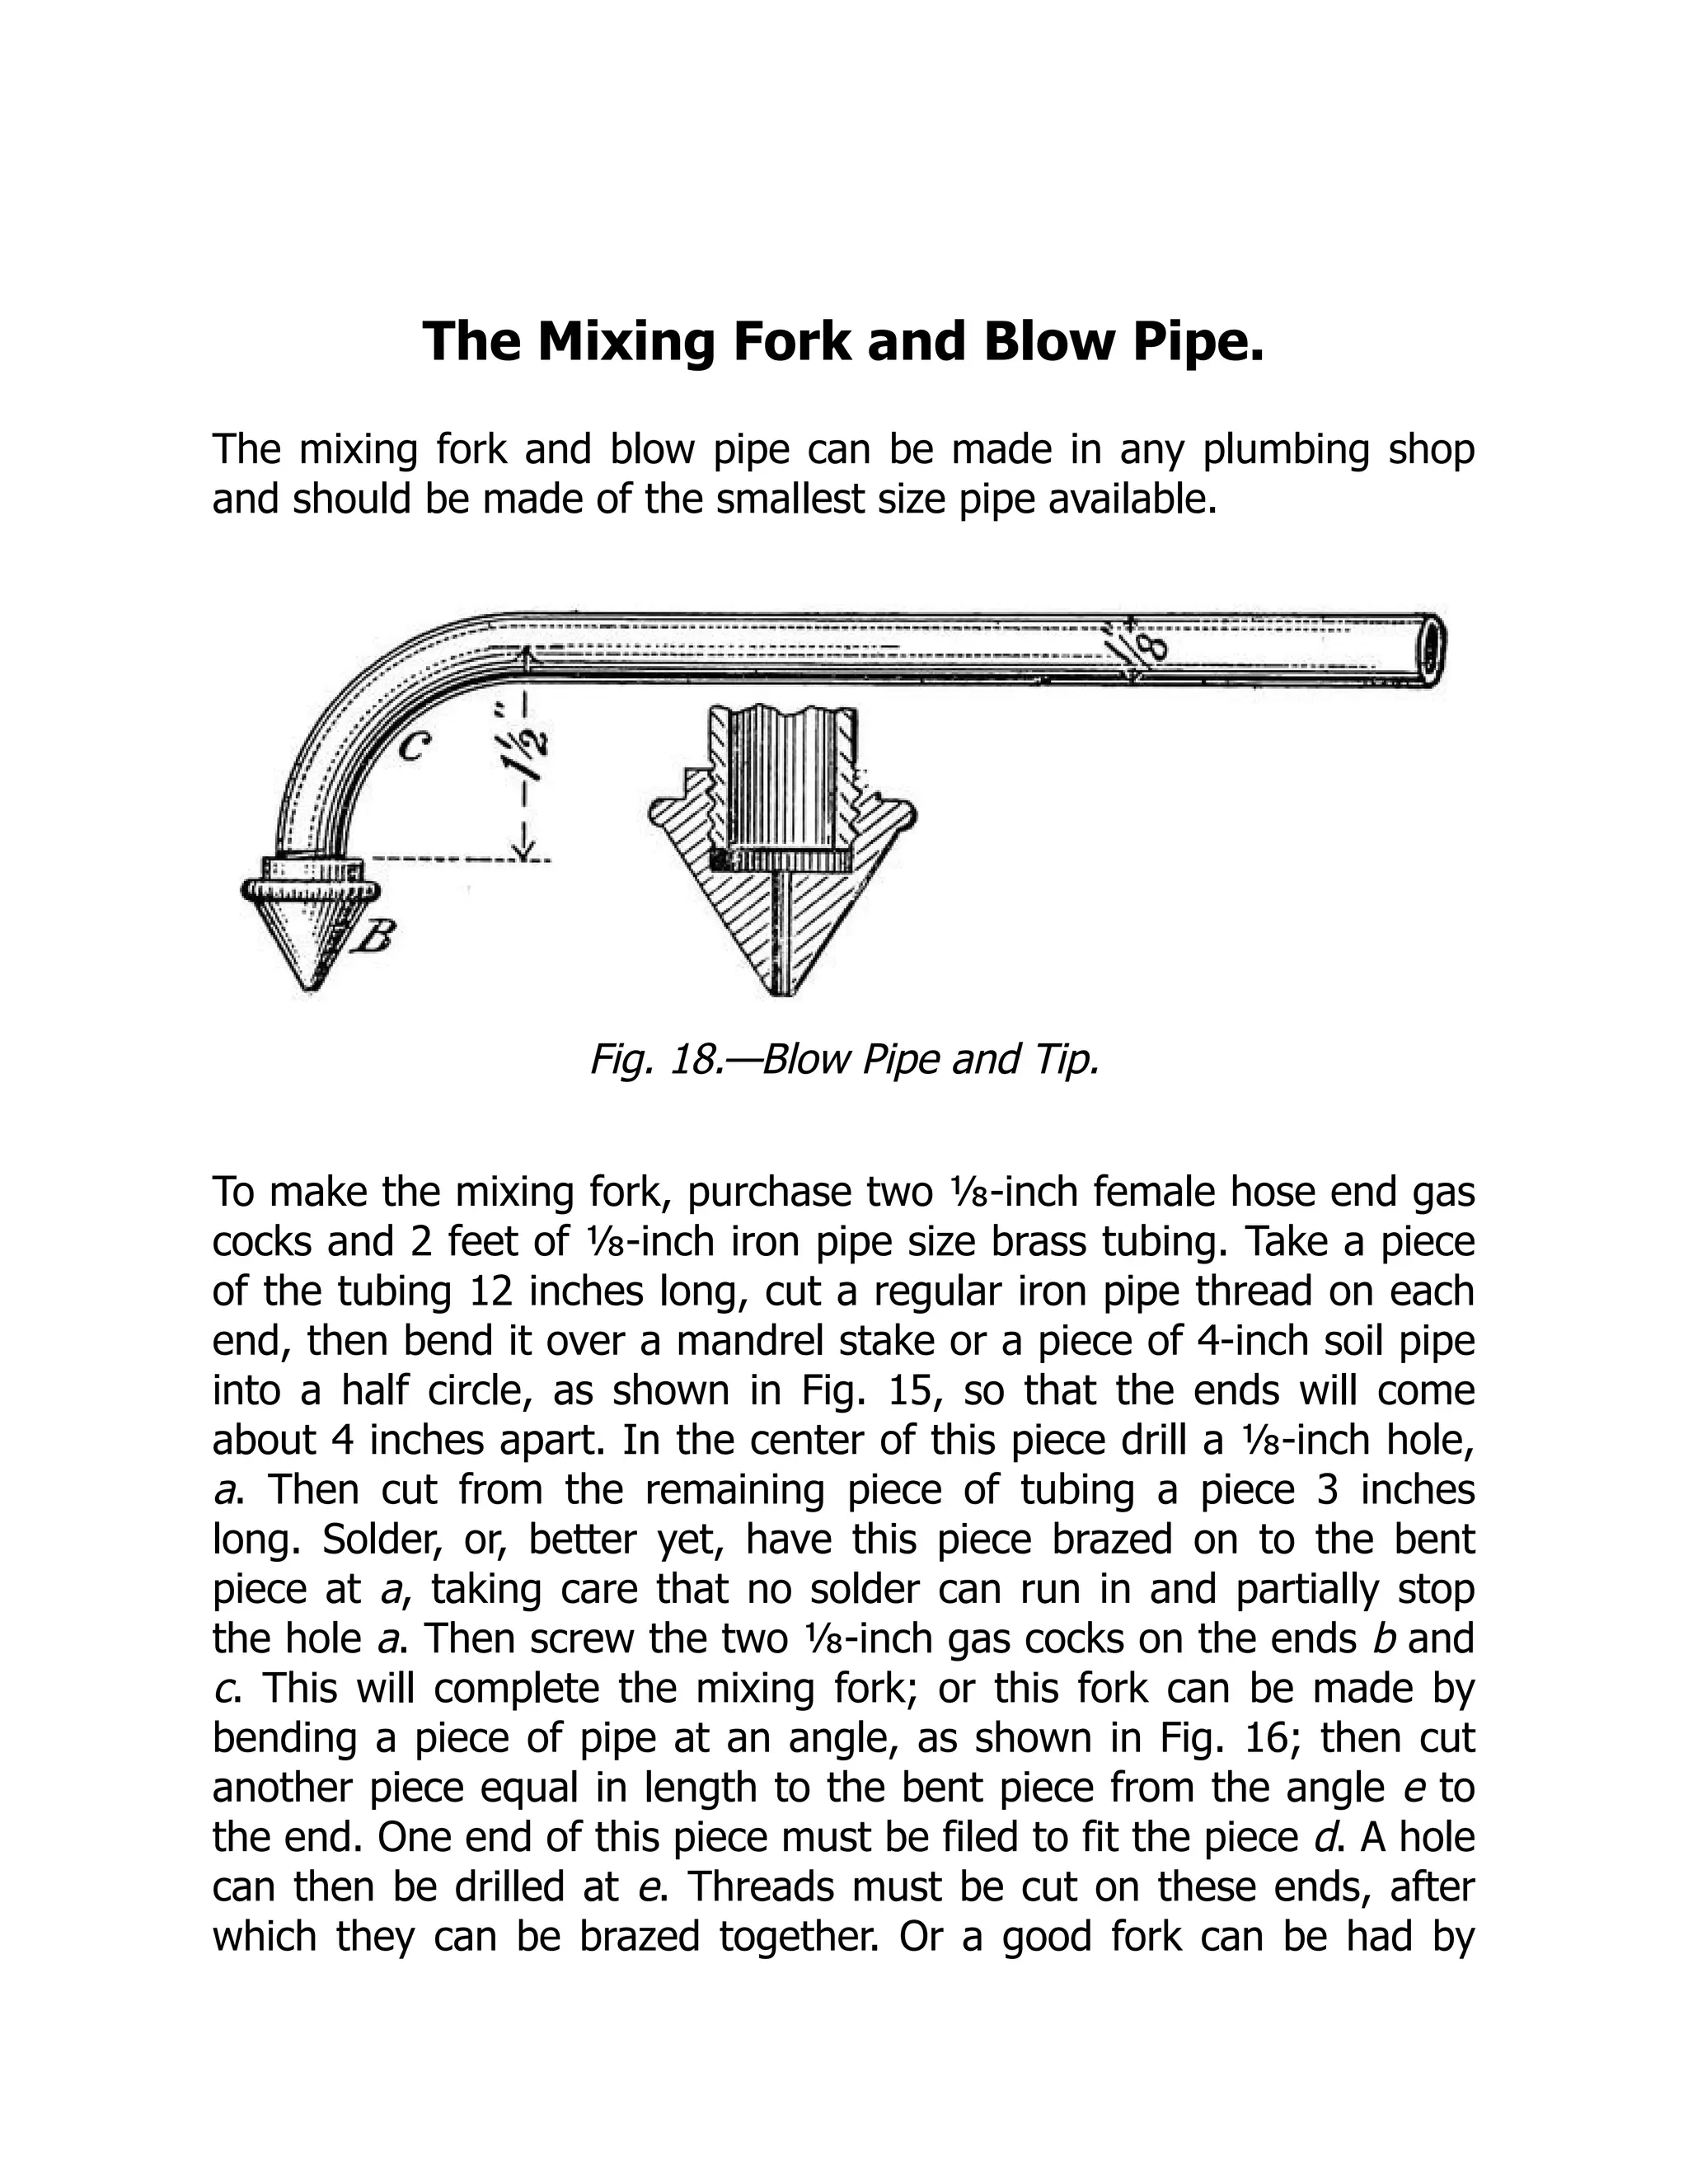
The mixing fork and blow pipe can be made in any plumbing shop
and should be made of the smallest size pipe available.
Fig. 18.—Blow Pipe and Tip.
To make the mixing fork, purchase two ⅛-inch female hose end gas
cocks and 2 feet of ⅛-inch iron pipe size brass tubing. Take a piece
of the tubing 12 inches long, cut a regular iron pipe thread on each
end, then bend it over a mandrel stake or a piece of 4-inch soil pipe
into a half circle, as shown in Fig. 15, so that the ends will come
about 4 inches apart. In the center of this piece drill a ⅛-inch hole,
a. Then cut from the remaining piece of tubing a piece 3 inches
long. Solder, or, better yet, have this piece brazed on to the bent
piece at a, taking care that no solder can run in and partially stop
the hole a. Then screw the two ⅛-inch gas cocks on the ends b and
c. This will complete the mixing fork; or this fork can be made by
bending a piece of pipe at an angle, as shown in Fig. 16; then cut
another piece equal in length to the bent piece from the angle e to
the end. One end of this piece must be filed to fit the piece d. A hole
can then be drilled at e. Threads must be cut on these ends, after
which they can be brazed together. Or a good fork can be had by
43.
using a specialcasting. This casting is used for and is known as a
beer switch, and can be purchased of any dealer in bar supplies, Fig.
17. The same pattern and size of cocks can be used for this fork as
previously described. Neither of these mixing forks has any
advantage over the other, but three styles are given, as possibly one
may be easier to make than the other. Iron pipe may be used
instead of brass if desired.
To make the blow pipe, take the remaining piece of tubing and cut a
thread on one end. As the other end slips into the hose, it does not
need a thread. The thread end must then be bent at right angles to
the tubing, as c, Fig. 16. This can be done by boring a hole in a
block of hard wood just large enough for the tubing to enter, and
1½ inches deep. Trim off the sharp edge of this hole so as not to
kink the pipe in bending. The end of the tube can then be inserted in
this hole and bent to the desired shape, as shown. This completes
the blow pipes with the exception of the tips, of which you should
have three sizes, drilled as follows: One for heavy lead, 3-32; one for
medium weight, 2-32, and one for very light sheets, 1-32. These tips
are made of small pieces of cast or turned brass, preferably with a
milled shoulder, so as to facilitate removing with the fingers.
Probably the easiest way to get these tips is to make a pattern out
of wood and have several of them cast. They can then be drilled and
tapped to any desired size, or they can be cut from a round bar of
brass or copper, filed or turned to a point, then drilled and tapped.
The dimensions and particulars can be had from B in Fig. 18 without
further description being necessary. A common blow pipe, such as is
used with the alcohol torch, can be used for practicing on light
sheets. But the beginner is advised to procure the blow pipe and a
set of tips described in Fig. 18 before attempting to burn any heavy
lead.
44.
CHAPTER VII.
CHARGING THEGENERATOR.
After making sure that the generator is perfectly tight we will
proceed to charge it. After removing the 4-inch charging screw take
15 pounds of commercial spelter, which has been broken up with a
hammer into pieces about 2 inches square, and place this in the gas
chamber, distributing it as evenly as possible over the perforated
bottom. This is done so that the zinc will expose all the surface
possible to the action of the acid, and must be observed in order to
obtain the best results. Do not put any pieces of spelter into the
generator that are small enough to drop through the perforated
bottom, for if they do they will be likely to generate gas, which will
give overpressure and blow gas out through the acid chamber. This
can do no harm unless close to a light, but it is very annoying to
have acid blown all over the generator. The charging and cleaning
screws must be screwed up tight. After closing the gas cock on the
generator take the quantity of water (less one-seventh) that was
found to be necessary when testing the apparatus, and pour this
into the acid chamber.
Mark the water line and watch it for a few moments to make sure
that everything is tight. Then take of sulphuric acid a quantity equal
to one-seventh of the water used, and pour that into the water in
the acid chamber. It will diffuse itself through the water and
thoroughly mix. Experience has taught me that acid mixed in any
proportion stronger than seven parts of water to one part of acid
does not act as quickly as when mixed in the proportion mentioned.
The reason for this is that the strong acid simply coats the zinc with
45.
a deposit orscum of sulphate of zinc, which is soluble in water, but
is not soluble in acid. Therefore, if the acid is diluted with water to
the above mentioned proportion the water readily dissolves the
sulphate and allows the acid to act freely on the zinc.
This sulphate falls to the bottom of the gas chamber and if allowed
to accumulate causes the clogging mentioned later. The beginner will
observe from the explanation that the generator cannot be crowded
by making the solution strong. It sometimes occurs that the vitriol
seems to be stronger than usual, and then again the reverse is also
true. Good vitriol should be almost as thick as cutting oil, and will
work very quickly. Care must be taken in pouring it into the
generator to prevent spattering. This is best avoided by having a
quart measure made of lead for this purpose. It should also be
borne in mind that the acid should always be added to the water,
never the water to the acid, as this mixture always generates heat,
and the result would be similar to adding water to hot lead.
46.
Automatic Action ofthe Generator.
The generator works best while hot. The gas cock on the generator
should now be opened and the mixture allowed to flow into the gas
chamber until it spurts out of the gas cock, which must then be
closed. By this action all the air in the gas chamber is expelled,
leaving it free to generate pure gas at once. This is a sure method of
exhausting the air in the gas chamber. The acid then attacks the
zinc, causing it to decompose the water and free the hydrogen
contained in the acid.
This gas, by reason of its lightness, will rise to the surface of the
acid, and as pressure increases it will force the acid back up through
the acid supply pipe into the acid chamber, until the acid falls below
the perforated bottom. When the acid and zinc cease to come in
contact with each other the generation of gas stops until gas is
used, which relieves the pressure; then more acid descends, and as
it comes in contact with the zinc more gas is generated, replacing
that which has been used. This action makes the generator
automatic, unless clogging with sulphate of zinc takes place. This
may happen at any time if the apparatus is not cleaned after each
day's use.
47.
Cleaning the Generator.
Toclean the generator in this case attach the air pump to the gas
cock on the generator and force the acid up into the acid chamber
by pumping air slowly into the gas chamber until the acid rises to
the proper hight in the acid chamber, where it can be held by forcing
a long wooden plug into the acid supply pipe. The pumping must
cease when the acid rises to the proper level, or the excess pressure
of air will work up through the supply pipe and cause a blow of acid.
The charging screw can then be removed and the zinc taken out and
washed in hot water. Remove the clean out screw and run one or
two pails of hot water through the gas chamber. This will remove the
deposits of sulphate paste. The zinc can then be replaced, the
screws tightened and the acid released again. Be sure and exhaust
the air in the gas chamber, as previously described, by letting the air
spurt out of the gas cock before connecting it to the scrubbing cup.
Care must be taken not to have any lights near the generator when
blowing out this mixture of gas and air, as it is very explosive.
The apparatus will never clog if cleaned after each day's work, which
should always be done. The tubes should be removed and hung up
over night to dry. The acid, if not spent, can be dipped out of the
acid chamber and placed in jugs. The generator can then be carried
to a drain and filled with hot water, which should be allowed to flow
out through the cleaning screw. This will clean the zinc and wash out
all the sulphate deposit. The screws may then be tightened and the
apparatus left ready for the next day's use.
48.
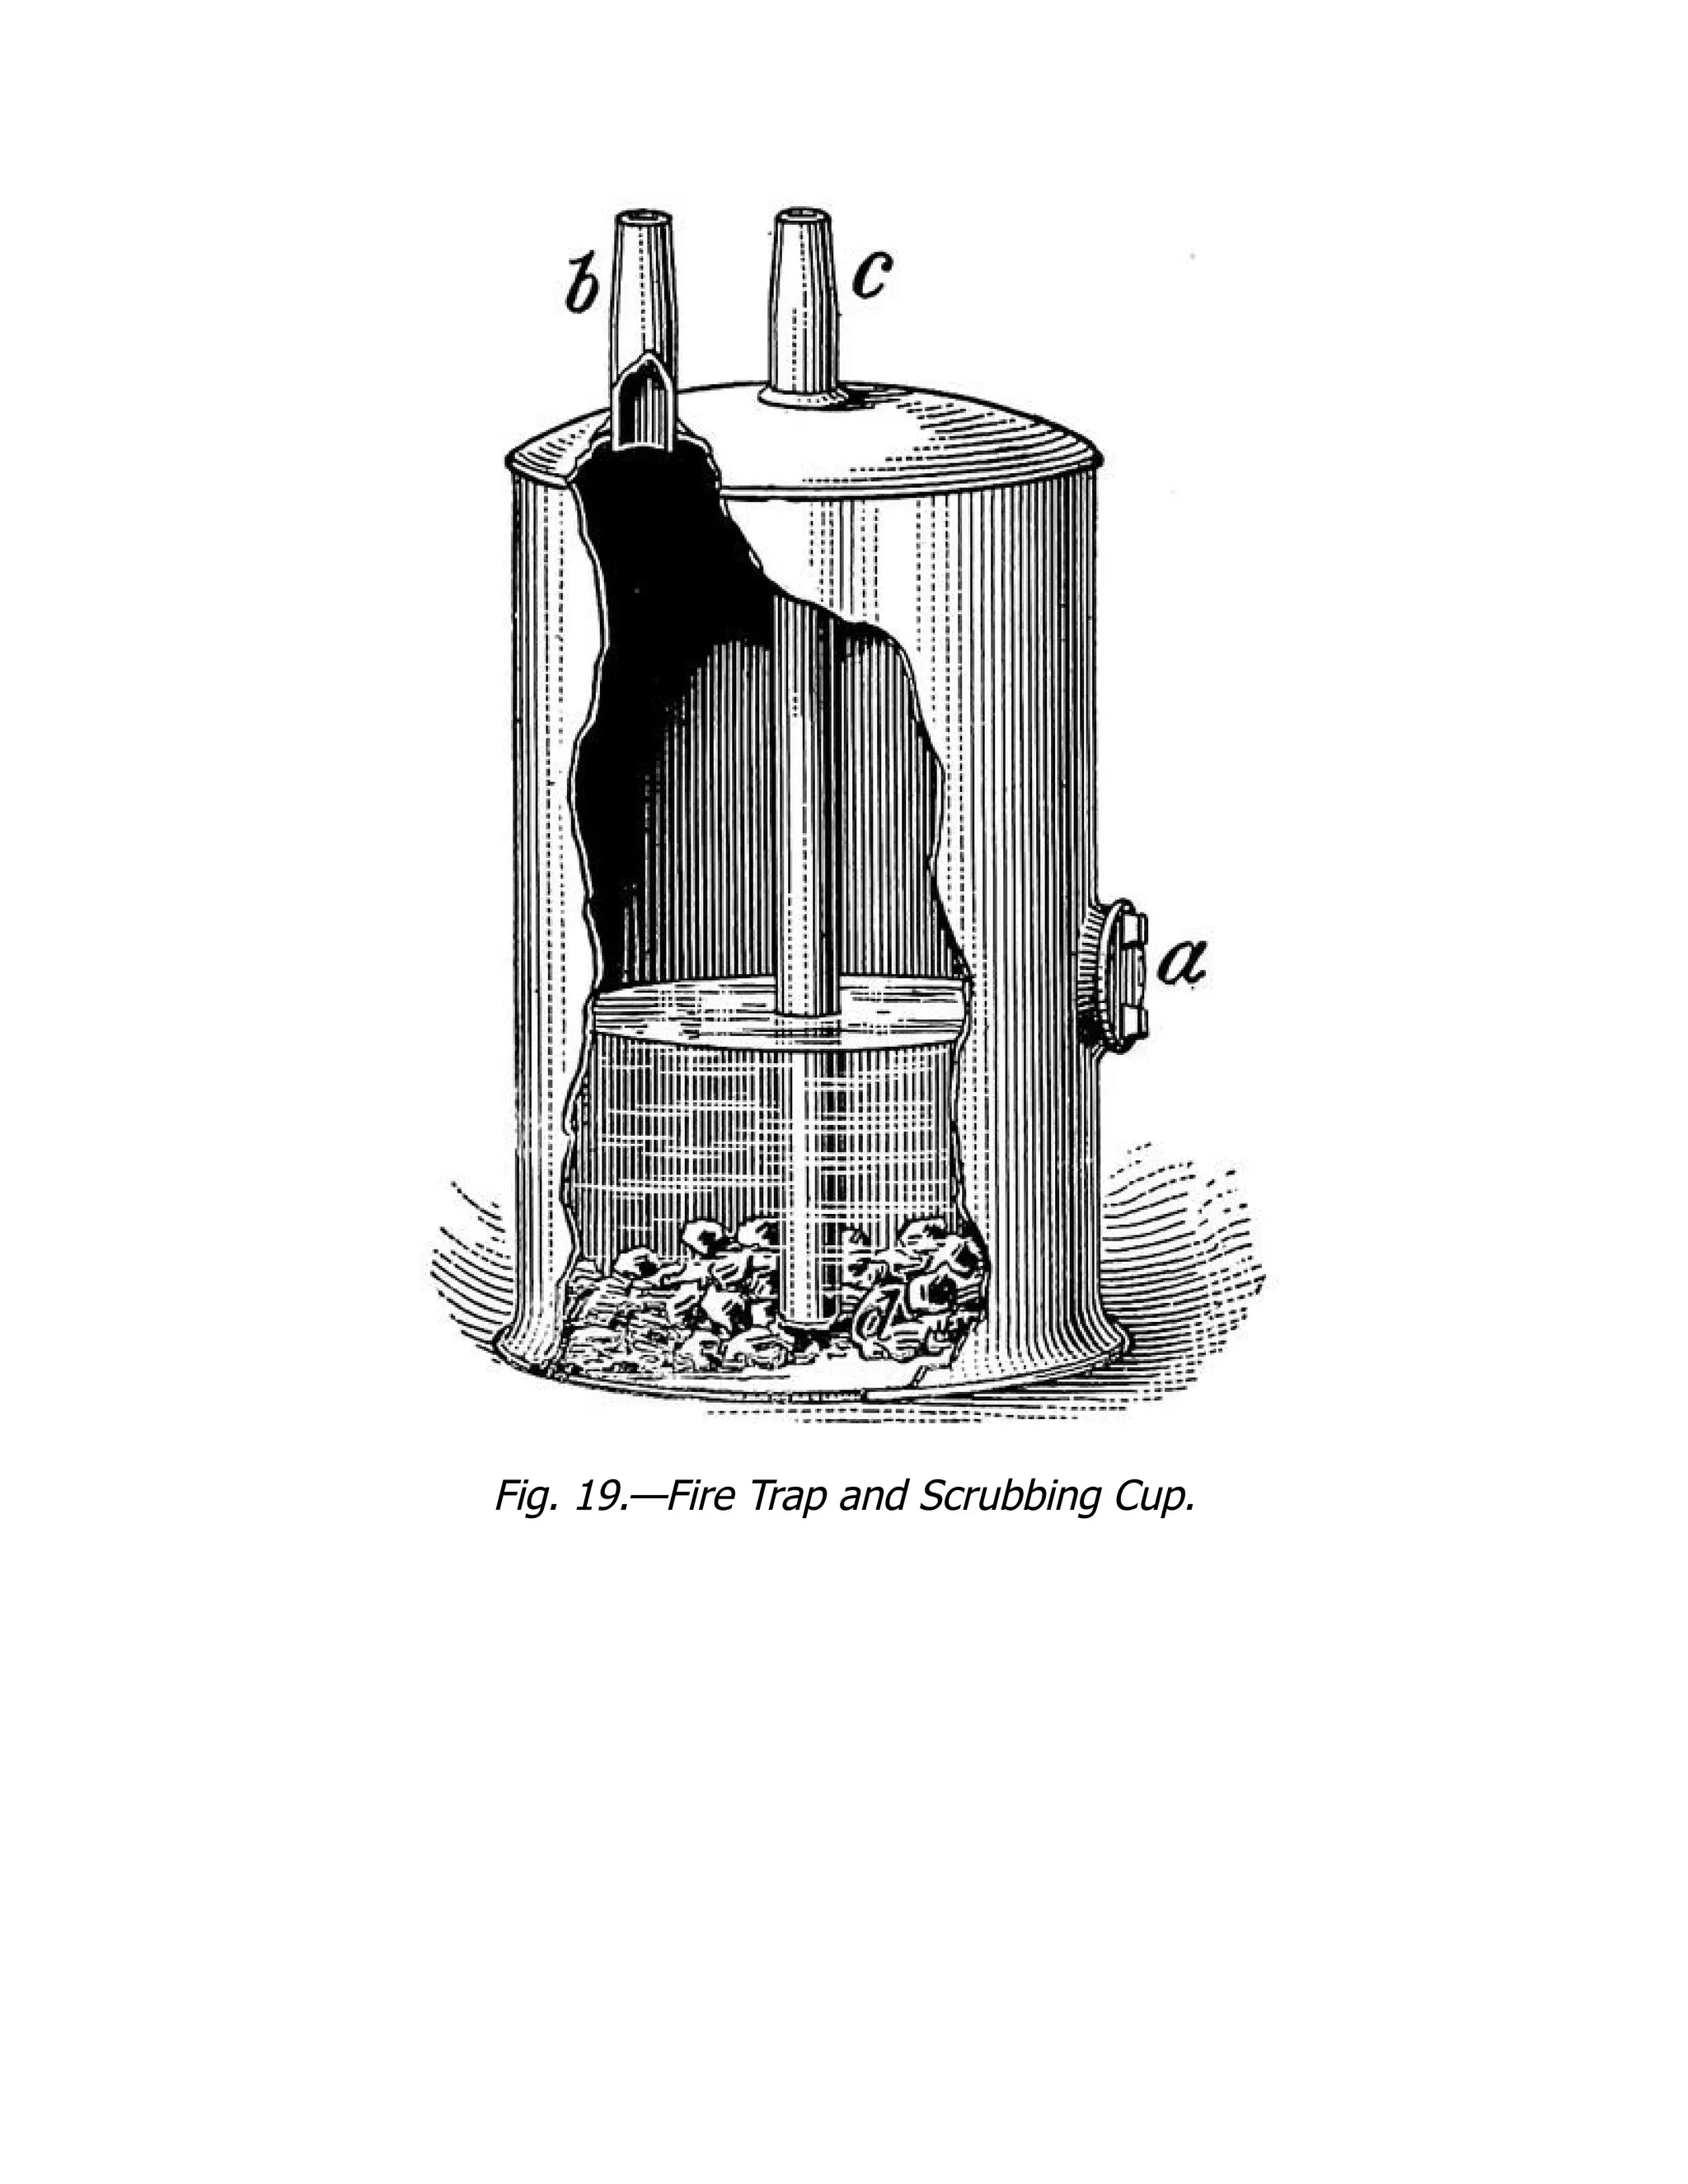
Fire Trap andScrubbing Cup.
One of the most essential parts of a lead burning apparatus is a
reliable fire trap and scrubbing cup. This trap reduces to a minimum
the danger from explosion caused by neglecting to free the gas from
air. Its use as a scrubbing cup is also of infinite value.
The action of the vitriol on the zinc produces a violent ebullition, and
a small quantity of the acid is carried in the form of spray from the
generator to the tubes, and, unless caught and removed, will
frequently get into the blow pipe tip and extinguish the flame,
making it necessary to remove the hose and hang it up to drain and
dry, which oftentimes causes waste of time and annoyance.
Almost all spelter or zinc contains more or less arsenic in a metallic
state. It is also found in sulphuric acid. This arsenic is released from
the acid or zinc as they decompose and is carried by the force of the
volume of gas to the blow pipe tip, where, owing to it being
necessary for the operator to get his eyes close to the flames in
order to see the reducing flame, this poisonous gas will be breathed
into the lungs and oftentimes cause a fatal illness. This fact has been
disputed by many, who say that it is impossible for the unit of
lightness—i. e., hydrogen gas—to pick up and carry a heavy metal
such as arsenic. Arsenic does not form a chemical combination with
hydrogen, having a very slight affinity for it, but is carried to the
blow pipe solely by the force of the volume of gas.
To prove the above assertion we will refer to Professor Marsh, who
demonstrated the ability of hydrogen to carry arsenic in the following
manner: If a solution containing arsenic be added to a solution of
sulphuric acid and zinc, the resulting hydrogen will, upon ignition,
deposit a ring of metallic arsenic upon any cold surface that the
flame be directed upon. (Professor Marsh's experiment.)
49.
It will beseen from the above that it is imperative that the operator
use a scrubbing cup and see that it is properly filled with a solution
of blue vitriol. The ordinary impurities of hydrogen generated in this
manner are sulphur and carbon, which should be removed if
possible.
The actual use of the scrubbing cup is to catch the above mentioned
spray and precipitate to some extent all other impurities contained in
the gas, and produce gas sufficiently pure for lead burning.
50.
Directions for Makingthe Cup.
To make this cup take a piece of 4-inch lead pipe 7 inches long (an
ordinary piece of 4-inch lead soil pipe will do); flange out one end
and burn in a flat bottom. Three inches from the bottom, and in the
side of this 4-inch pipe, burn in a trap screw, a, Fig. 19, a screw
taken from an old lead trap being just the thing. This is to regulate
the hight of the solution in the cup. Now make a top by taking a
piece of lead and raising it about ¾ inch; punch two holes in this
top, b and c, large enough to let a ⅜-inch lead pipe pass through;
flange out the top of the cup and fit and burn this top in place. Take
two pieces of ⅜-inch lead pipe, one to be 3 inches long and the
other to be 10 inches long, and with the dresser draw one end of
each to nearly a point, so that the hose can be slipped on tight. The
long piece c should now be slipped through one of the holes in the
top of the cup, holding it ½ inch from the bottom d and burning it
in. This is the gas inlet and should be marked as such. The short
piece is then placed in the remaining hole and burnt in place. The
action will be thus: The gas entering the gas inlet pipe is caused to
pass through a solution of blue vitriol 2½ inches deep, when the
acid is caught and the gas is scrubbed and rendered as nearly pure
as possible. It then enters the outlet pipe and is ready for use. If the
directions have been followed the cup will resemble the illustration
Fig. 17. No trouble will be experienced with this cup.
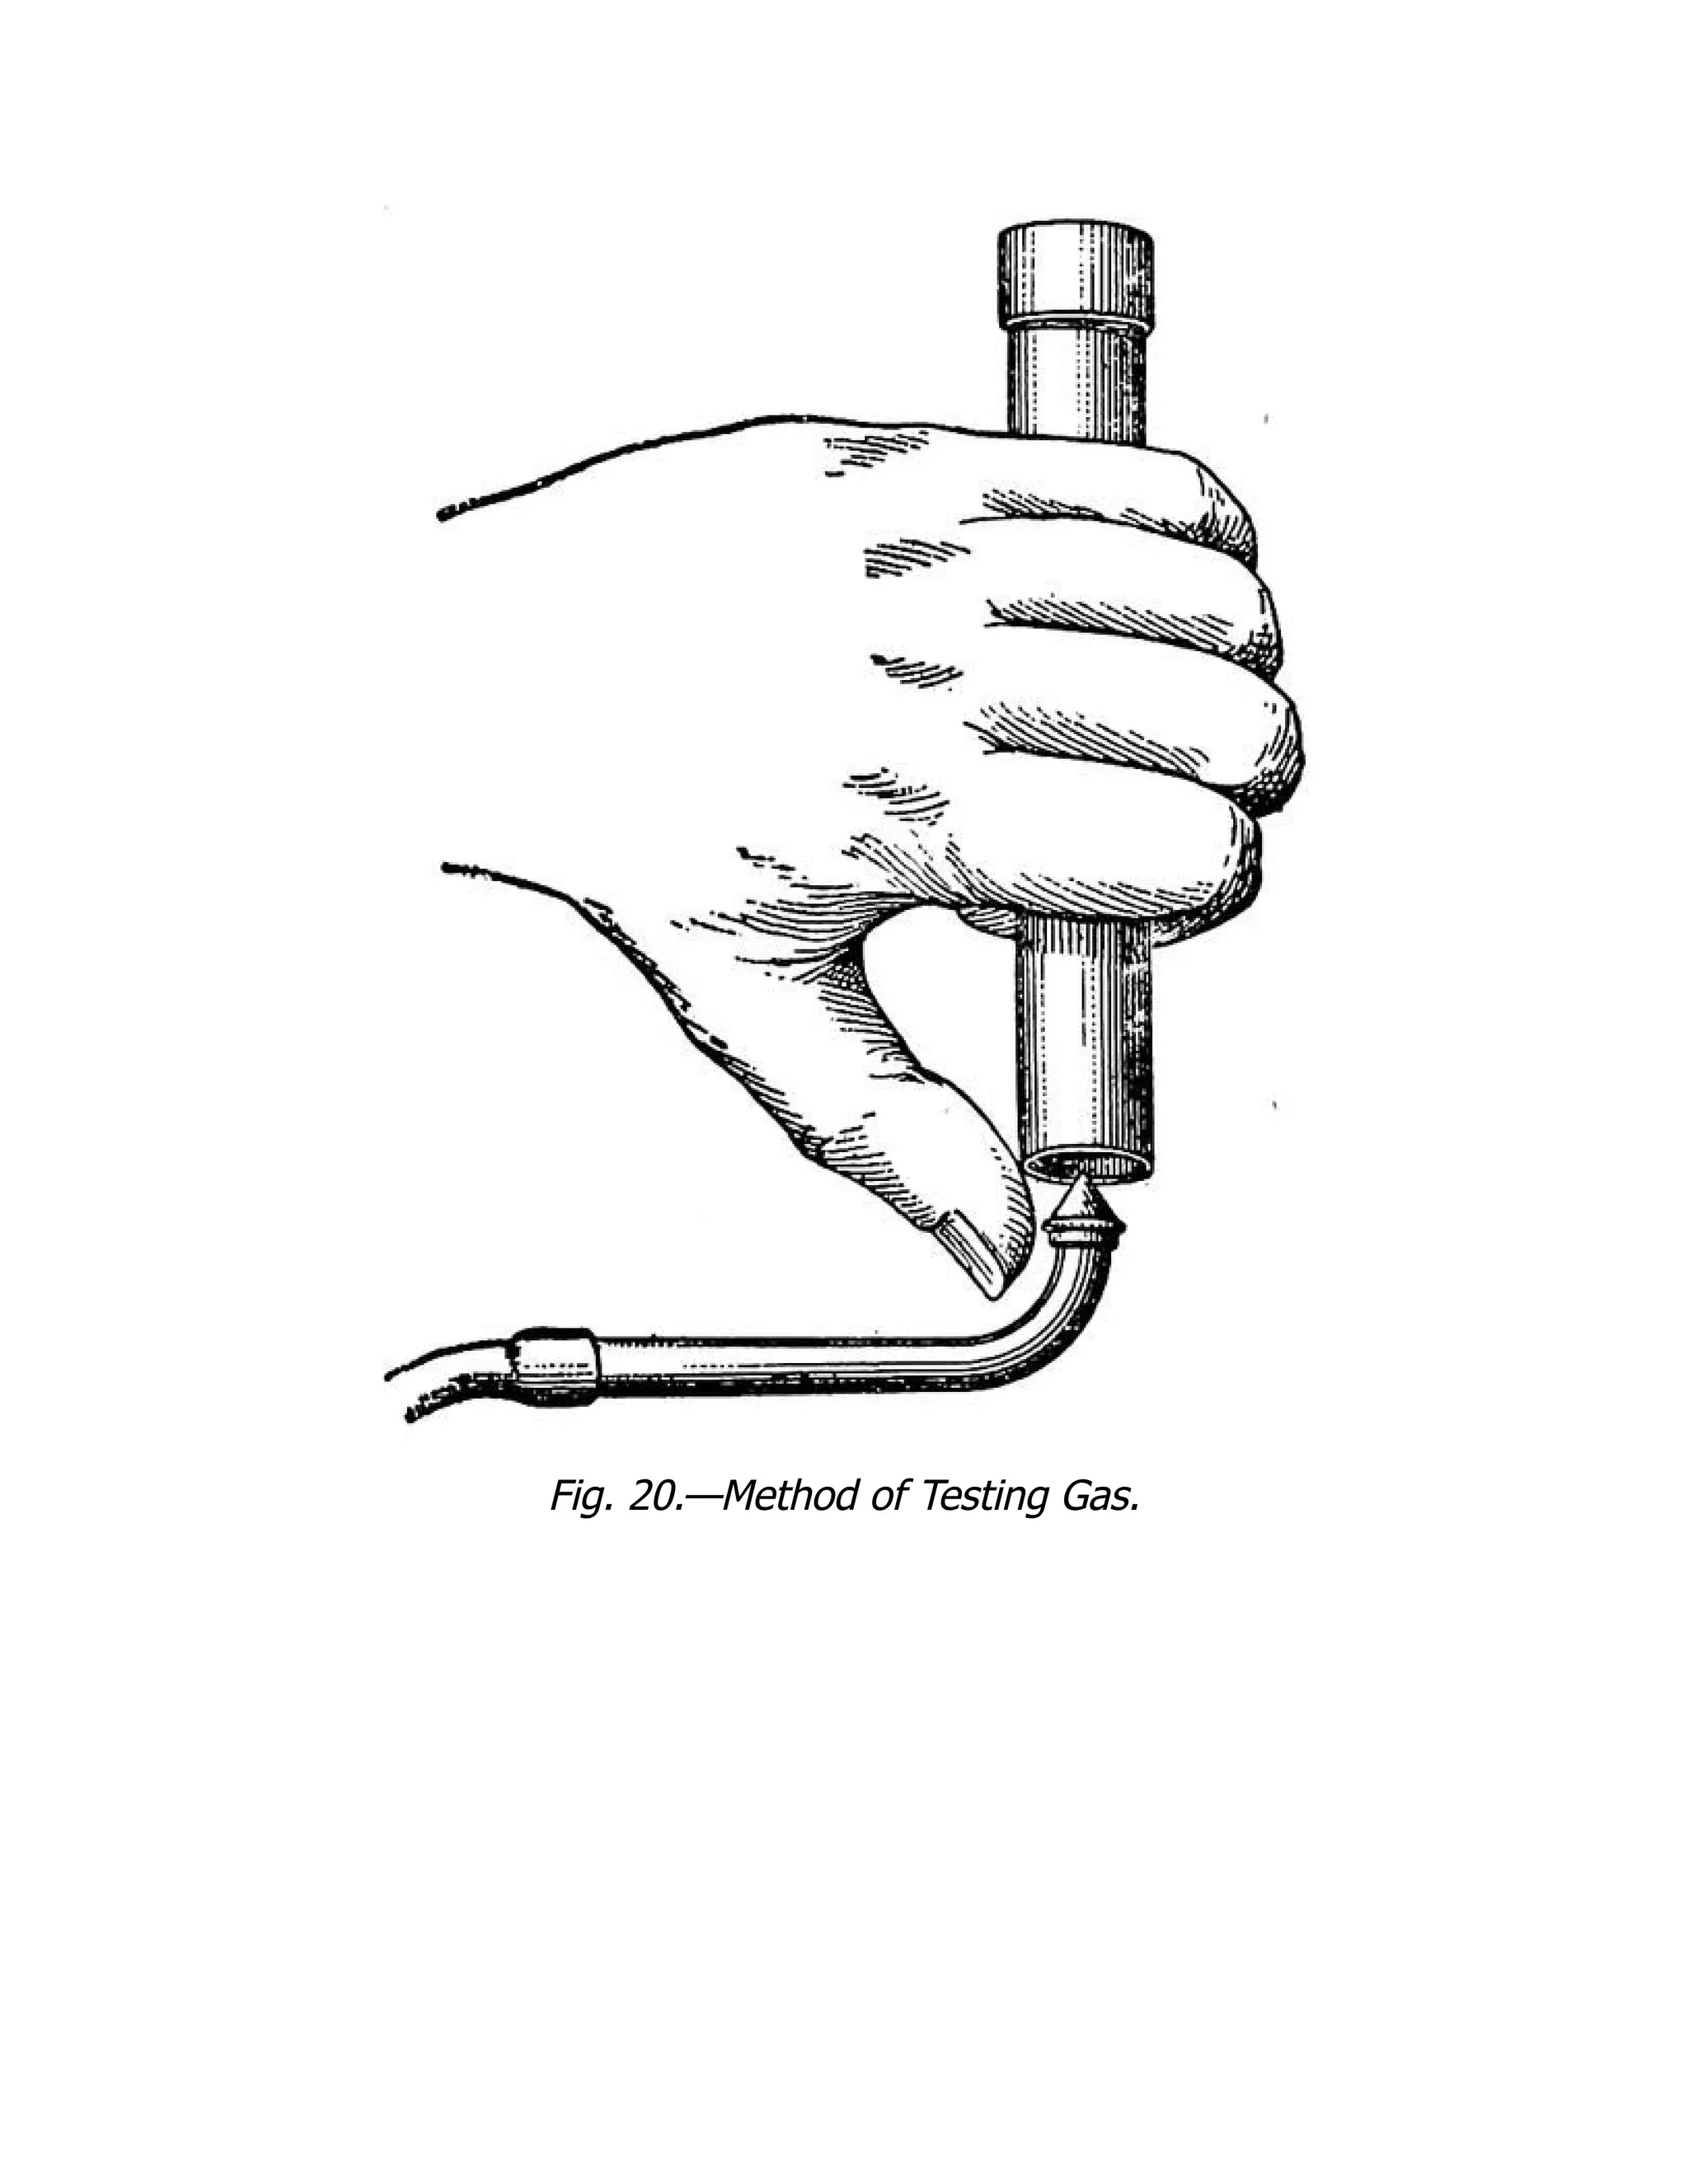
CHAPTER VIII.
THE FLAMEAND ITS MANAGEMENT.
Before attempting to light the gas the operator must be sure that all
the air is exhausted from the tubes. Otherwise the flame will go back
and explode in the tubes or fire trap. To be sure of this the beginner
must test the gas. A handy test tube can be made by capping one
end of a piece of ½-inch pipe, which should be about 6 inches long.
To test the gas, first open wide the gas cock M on the generator, Fig.
1. Then open the gas cock f on the mixing fork and let the gas
displace the air in the tubes, which it will do in about one minute.
Then invert the test tube, Fig. 20, and hold it over the blow pipe tip
for a moment until the gas has displaced the air in the tube. Then
quickly place your thumb over the opening of the test tube, which
will keep the gas from escaping. Close the gas cock f on the mixing
fork, then take the test tube to one side away from the generator,
still keeping it inverted, and bring it close to a lighted match or
candle. It will light with a pop, and if it is free from air it will burn
quietly down in the tube until the gas is exhausted. Continue to test
the gas in this manner until it burns as described, when it may be
safely lit at the jet without fear of its burning back. This precaution
is necessary only after opening the generator for some purpose.
Welcome to OurBookstore - The Ultimate Destination for Book Lovers
Are you passionate about testbank and eager to explore new worlds of
knowledge? At our website, we offer a vast collection of books that
cater to every interest and age group. From classic literature to
specialized publications, self-help books, and children’s stories, we
have it all! Each book is a gateway to new adventures, helping you
expand your knowledge and nourish your soul
Experience Convenient and Enjoyable Book Shopping Our website is more
than just an online bookstore—it’s a bridge connecting readers to the
timeless values of culture and wisdom. With a sleek and user-friendly
interface and a smart search system, you can find your favorite books
quickly and easily. Enjoy special promotions, fast home delivery, and
a seamless shopping experience that saves you time and enhances your
love for reading.
Let us accompany you on the journey of exploring knowledge and
personal growth!
ebooksecure.com