The 10th anniversary, Hyundai World Rally Team's amazing journey
new ppt.pdf
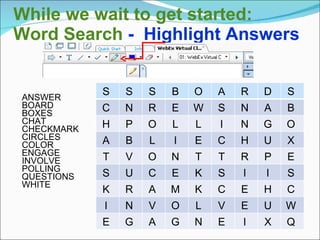
1. While we wait to get started:
Word Search - Highlight Answers
ANSWER
BOARD
BOXES
CHAT
CHECKMARK
CIRCLES
COLOR
ENGAGE
INVOLVE
POLLING
QUESTIONS
WHITE
S S S B O A R D S
C N R E W S N A B
H P O L L I N G O
A B L I E C H U X
T V O N T T R P E
S U C E K S I I S
K R A M K C E H C
I N V O L V E U W
E G A G N E I X Q
2.
3. Today’s Learning Objectives
What is required to make an online
learning event successful.
What interactive tools are available in
WebEx.
How to use the interactive tools.
4. Main Points from Seminars
If the Webinar is a learning event, and not a
meeting or marketing webinar, then you MUST:
Have at least two people for every
webinar - a “producer” and a
facilitator (think Roz & Frasier)
Chat, raised hands, white board features , and technical
difficulties should be handled by the producer
Never lecture (if you must, no
more than a minute or two at the
most) or you will loose your
audience!
5. Seminar Main Points
When designing webinars, always:
Define clear learning and performance
objectives (what & why are you training?).
Start at the end and work backwards.
Determine assessment needs – if you want
them to walk away with specific information,
they should be tested on it!
Only test online what you teach online.
Build in the “how to” use the Webinar
tools in your training and make sure you
know how to use them!
6. Assign Privileges Before Event
1. Click Participant from tool
bar and select Assign
Privileges
2. Highlight “All
Attendees” and check
“Assign all privileges.”
3. Click the Assign button.
7. From the Beginning
Get agreement from participants that it’s a
“no multi-tasking” zone.
Tell them to expect an interactive session and
that you may call on them during it, even if they
don’t have their hand raised.
• Whenever possible, if
participants are in a quiet
environment, don’t have
them mute their phones.
8. Raise Hand
The Raise Hand
tool can be used by
the participants to
let the facilitator
know they have
questions without
interrupting.
After the participant
raises their hand,
the button changes
to Lower Hand, if
they want to cancel
their request.
9. Sound Preference Options
Right click in the
Participant’s title line to get
the Sound Alerts Option and
select it.
Set desired
preferences for
notification sounds for
Chat, Joining /Leaving
Meetings and Raise
Hands and click Apply.
10. Let’s Try It!
Raise your hand!
The hand will appear on the facilitator’s screen
next to the person who answers (and/or wants to
ask a question).
11. Eraser Tool
Erases text and annotations or clears pointers on shared
content. To erase a single annotation, click it in the viewer.
For more options, click the downward-pointing arrow.
Clicking this button again turns off the Eraser tool.
12. Annotation Color Palette
Tool
Displays the Annotation Color palette, on which you can
select a color to annotate shared content. This changes the
color of your text, lines, checkmarks, Xs, highlighter, etc.
Clicking this button again closes the Annotation Color palette.
13. Arrow / Laser Pointer Tool
Lets facilitator and participants point out text and graphics on
shared content. The pointer displays an arrow with your name
and annotation color, so this tool is not anonymous.
Facilitators can use the laser pointer, to point out text and
graphics on shared content using a red "laser beam.“ Click the
downward-pointing arrow and select the laser pointer.
Clicking the button again turns off the pointer tool.
15. Text Tool
Lets participants anonymously type text on shared content.
To change the font, on the Edit menu, choose Font.
•Text can be viewed only after typing is finished and you
click your mouse in the content viewer, outside the text box.
Clicking the Text button again turns off the text tool.
16. Text Tool (cont’d)
• Because text can be viewed only after typing is
finished (and the participants click their mouse in
the content viewer outside the text box),
participants could be typing over other people’s
comments with out realizing it. Suggestions:
• If your group is small enough you could assign
different participants different lines (see next page).
• With different systems and or levels of subscriptions
there may be other options, check out what you have
available to you.
17. Let’s Try It! What do you like and
dislike about Virtual Training? Type in your answers.
Like Dislike
1. ______________________
2. ______________________
3. ______________________
4. ______________________
5. ______________________
6. ______________________
7. ______________________
8. ______________________
9. ______________________
10.______________________
1. ______________________
2. ______________________
3. ______________________
4. ______________________
5. ______________________
6. ______________________
7. ______________________
8. ______________________
9. ______________________
10.______________________
18. Whiteboard
The Whiteboard is a separate tab available for
input from the presenter or participants. Access
through the Share menu, then choose Whiteboard.
19. Whiteboard (cont’d)
A separate tab opens up that either the presenter or
the participants can type on using the Text tool.
20. Line Tool
Lets participants anonymously draw lines and arrows
on shared content. For more options, click the
downward-pointing arrow.
Clicking the Line Tool button again closes it.
21. Drawing Shapes Tool
Lets participants anonymously draw shapes, such as
rectangles, circles, checkmarks, and Xs on shared
content. For those options, click the downward-pointing
arrow.
Clicking the Drawing Shapes button again closes the
Shapes tool.
22. Let’s Try It! Where are you calling from?
Place an X on the map.
23. Lets Try It!
When you ask a question during Virtual
Training, what could Silence mean? Check all that apply.
Attendees are multitasking and /or are bored.
Attendees don’t understand the question.
Attendees don’t want to say/have trust issues with saying how
they feel.
Attendees hate me and want me to be uncomfortable.
Everyone has their phones on mute and doesn’t want to take
them off.
24. Highlighter/Pencil Tool
Lets you highlight text and other elements in shared
content. For more options, click the downward-
pointing arrow.
Clicking this button again closes the Highlighter tool.
25. Word Search - Highlight Answers
ANSWER
BOARD
BOXES
CHAT
CHECKMARK
CIRCLES
COLOR
ENGAGE
INVOLVE
POLLING
QUESTIONS
WHITE
S S S B O A R D S
C N R E W S N A B
H P O L L I N G O
A B L I E C H U X
T V O N T T R P E
S U C E K S I I S
K R A M K C E H C
I N V O L V E U W
E G A G N E I X Q
26. Let’s Try It!
Color
Find an outline
drawing of
something that
applies to your
topic and let
people color in
as you speak.
Hits those
Kinesthetic
learners!
27. Chat Function
C
ha
tisus
e
ful if yo
u
w
a
ntto
:
•Se
ndb
rie
f info
rm
a
tio
n
toa
ll p
a
rtic
ip
a
ntso
ra
s
p
e
c
ificg
ro
upo
f
p
a
rtic
ip
a
nts
.
•As
kq
ue
s
tio
nsa
ndg
e
t
re
s
p
o
ns
e
sd
uringa
s
e
s
s
io
n.
•As
kaq
ue
s
tio
nw
itho
ut
inte
rrup
tingthe
p
re
s
e
nte
r.
28. Let’s Try It! Using Chat
Take a minute and think about the following
question:
• Type your answer in the Chat function and
send to all participants within the next
minute.
What do you find challenging about the
Virtual Classroom?
29. Polling Questions
Conducting a poll can be
useful for gathering
feedback from attendees,
allowing attendees to vote
on a proposal, testing
attendees' knowledge of a
topic, and so on. Create the
polling questions ahead of
time, save, and bring into
the session before it
starts.
Once the poll is closed, the
presenter can view the
results and share them with
attendees.
30. Polling Questions (cont’d)
Access the polling questions from the Panel drop
down menu on the right of the WebEx screen.
31. Polling Questions
(cont’d)
• Click New to create a
new question and type in
the window.
• Determine if multiple
choice (works for yes/no
also) and type answer
choices.
• Determine if single or
multiple answers are
allowed.
• Use save option when
done.
Type question here.
32. Polling Questions (cont’d)
Before the Webinar starts (15-20 min), load your
polling question, by accessing them through the File
menu. Choose Open, then Poll Questions.
34. Polling Questions (cont’d)
You’ll be able to see
how many participants
have answered and
determine when you
want to close the poll.
35. Polling Questions (cont’d)
Mo
s
tlike
lyyo
uw
ill w
a
nt
tos
ha
rethep
o
ll re
s
ults
w
iththep
a
rtic
ip
a
nts
.
Se
le
c
ttheb
o
xtos
ha
rethe
re
s
ultsw
itha
tte
nd
e
e
s
.
C
lic
ktheAp
p
lyb
utto
n.
36. Virtual Meeting Software
No matter what virtual meeting software you use,
(e.g., WebEx, Go To Meeting, Adobe Connect Pro,
etc.) check out all of the interactive options and
practice until you are comfortable before the
Webinar.
Be aware, different subscription levels / virtual
meeting rooms provide different features.
For example, Blanchard’s WebEx provided breakout
rooms and other options that I don’t have access to
with our bank’s current subscription level.
37. What will you use?
What interactive tools do you like and plan to
use in WebEx? Check all that apply.
Raise hand
Chat
Checkmarks (shapes &/or lines and arrows)
Coloring
Arrows (with names)
Text
Highlighting
Whiteboard
Poll questions
38. Recap
Using the WebEx tools will make
your
presentations more interactive,
therefore moving them from
presentations to a learning
event!
• Using a producer will enable
you to fully utilize the tools,
especially the white boards,
raised hands, and chat
features. Plus, the producer
can deal with sign on issues, or
other technical difficulties.
39. Questions?
What questions do you have?
Feel free to call me at 213-443-1437 or
email me at nmcnew@calnational.com
with questions.