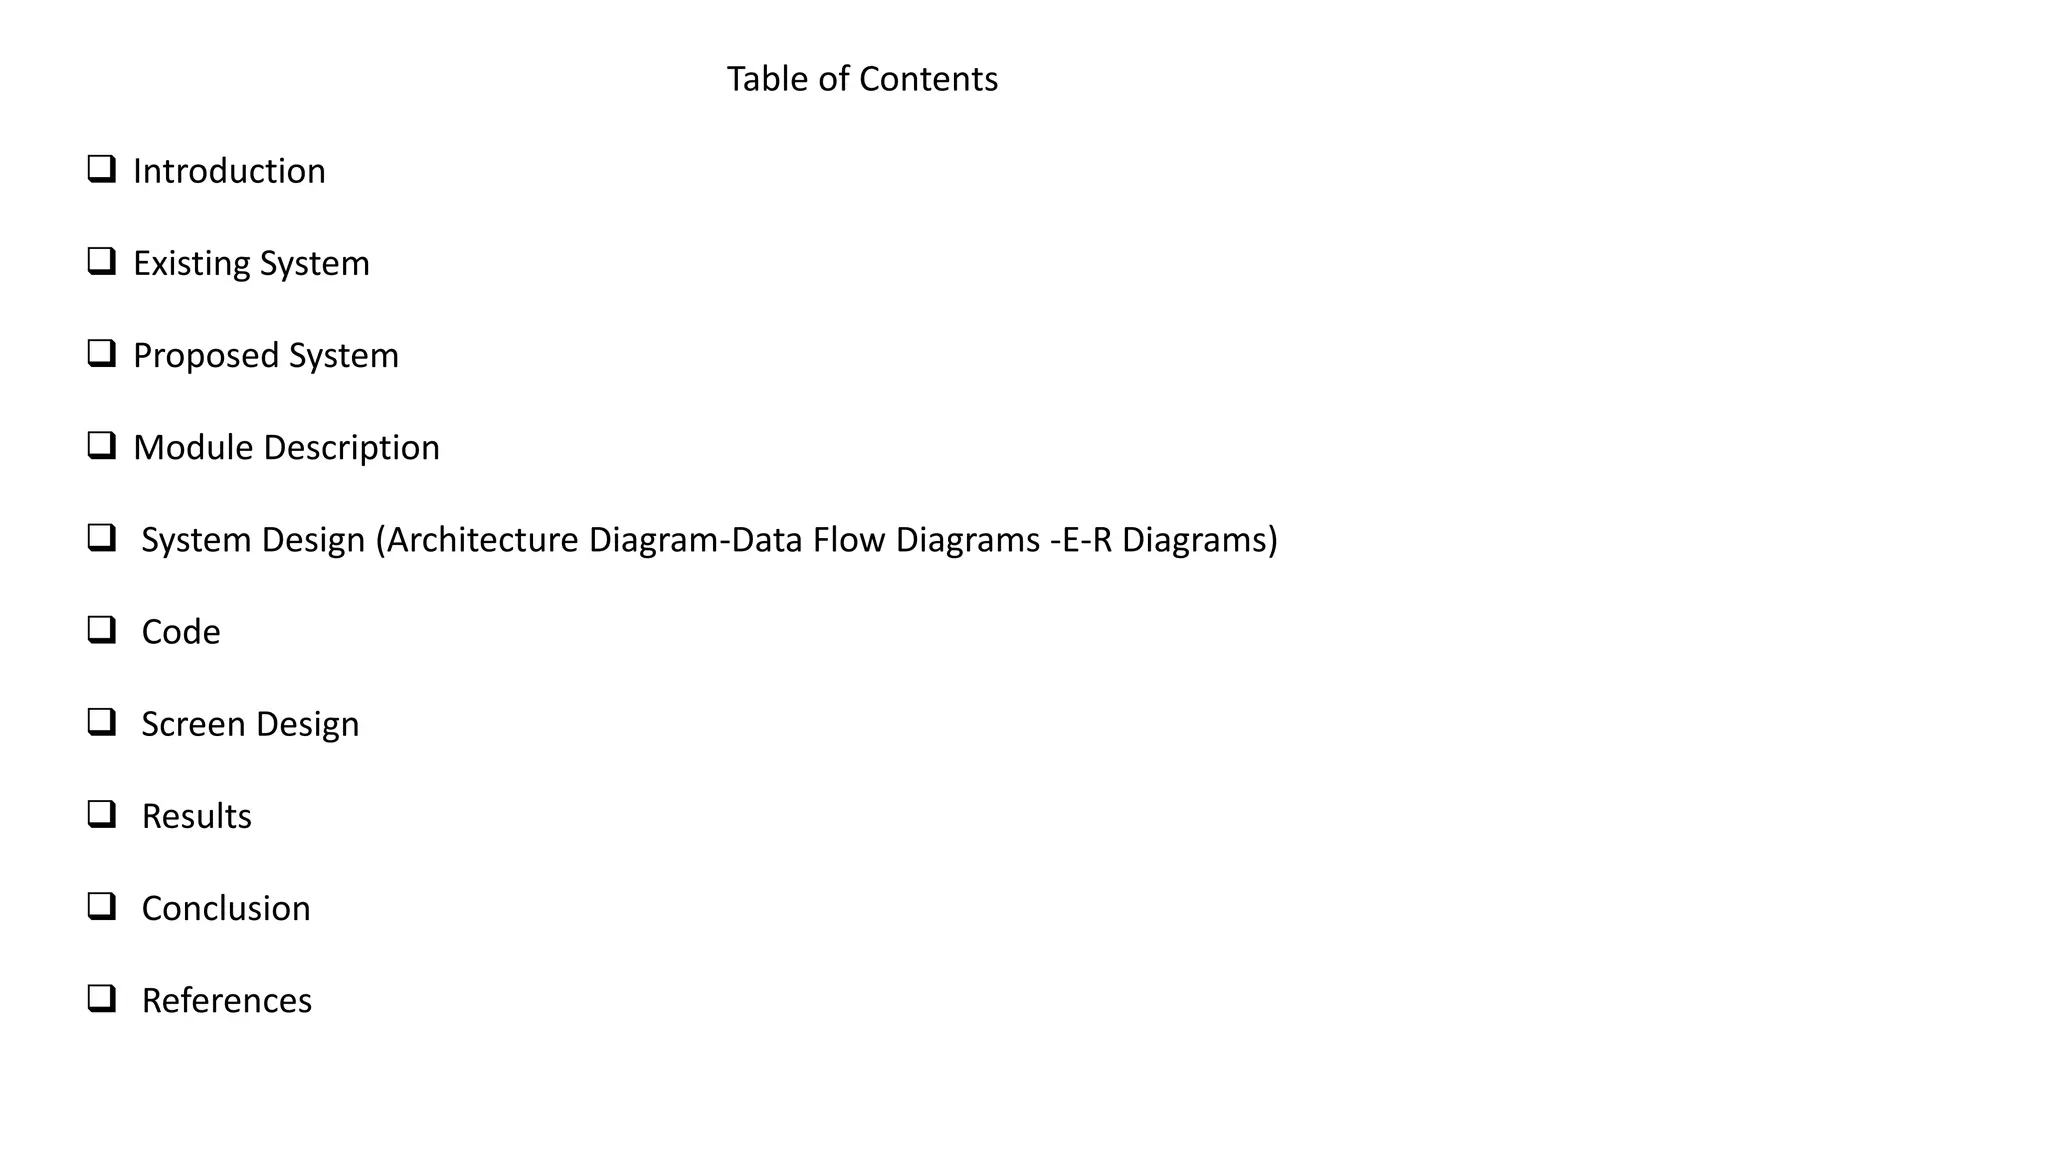
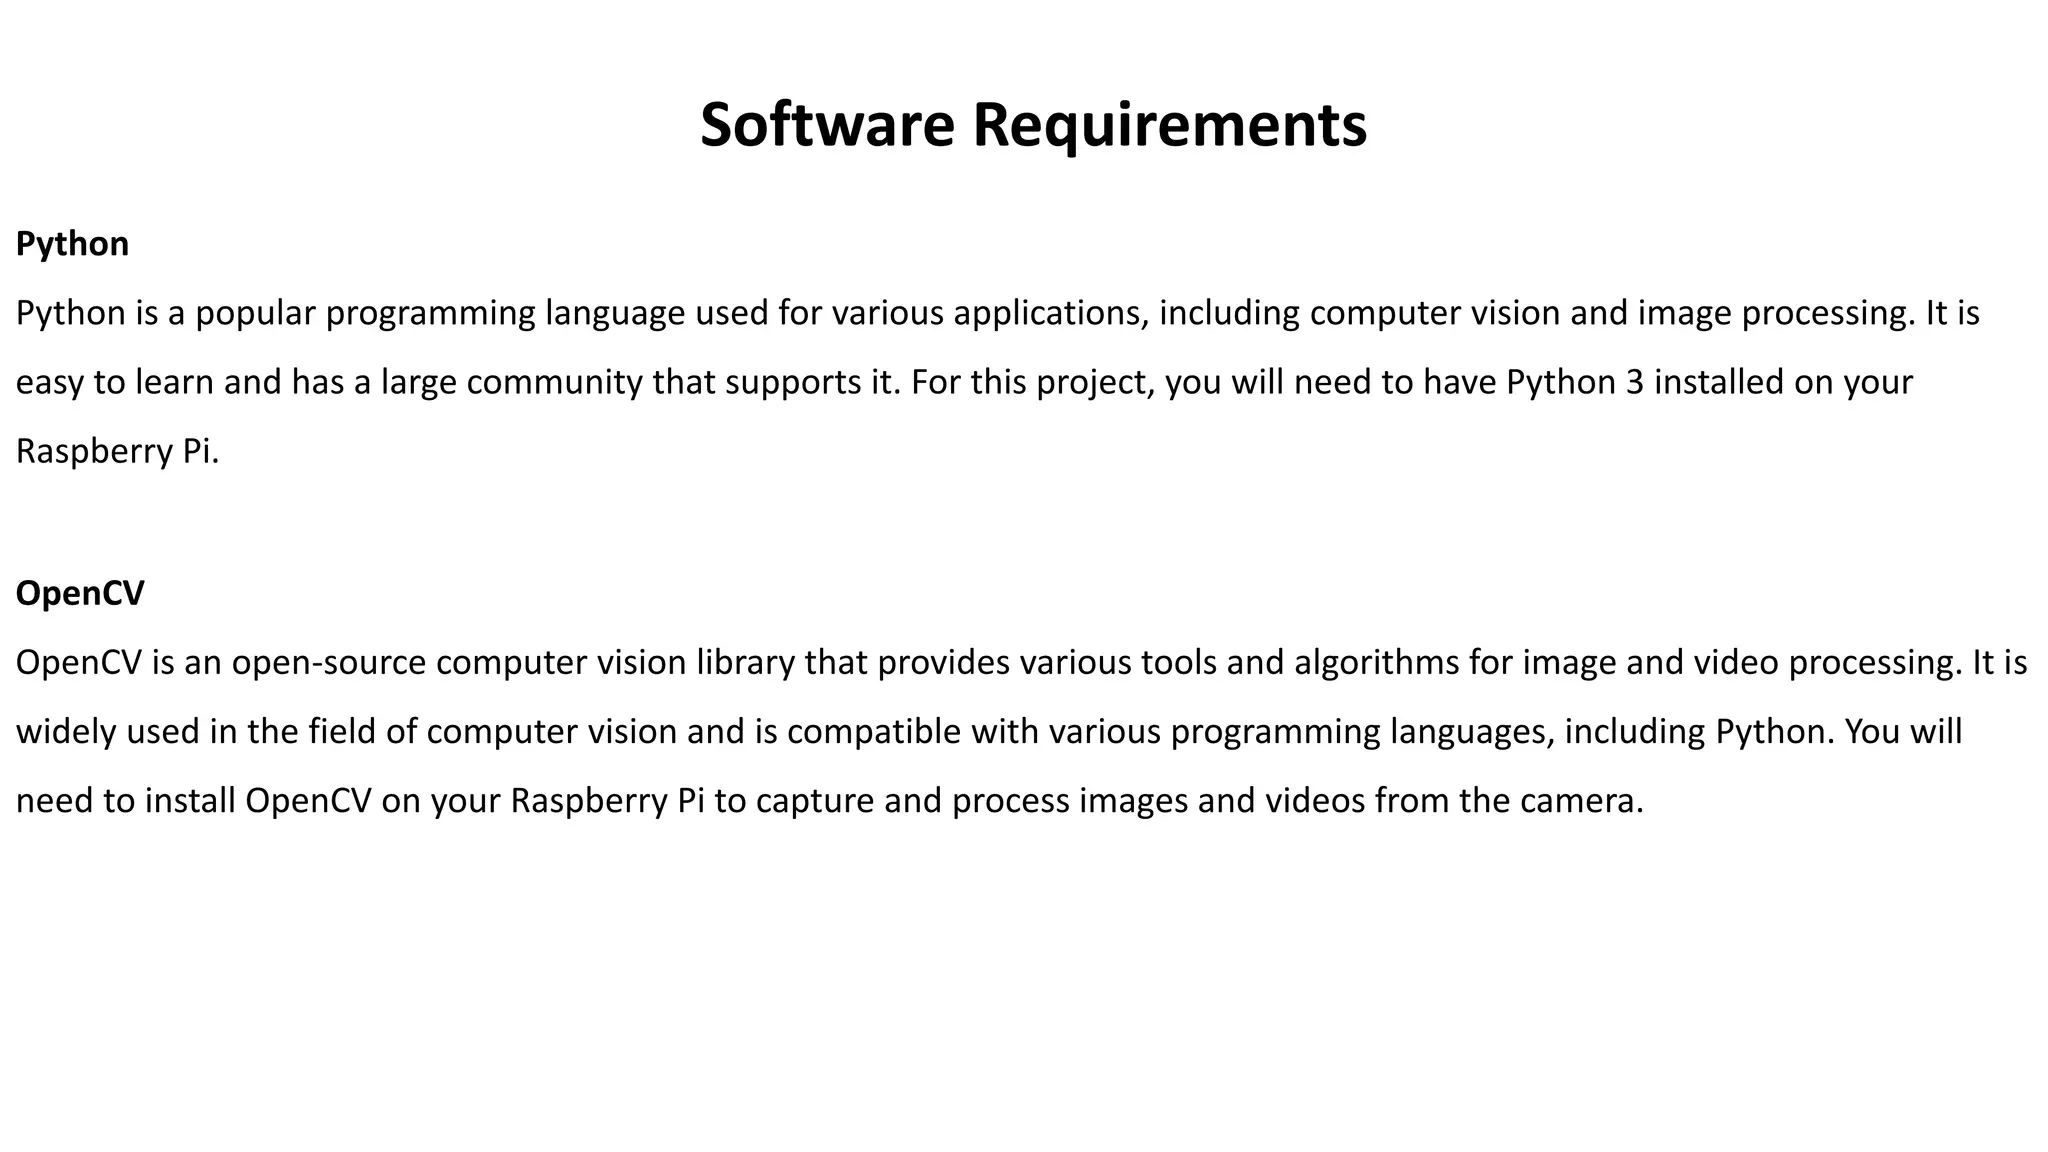
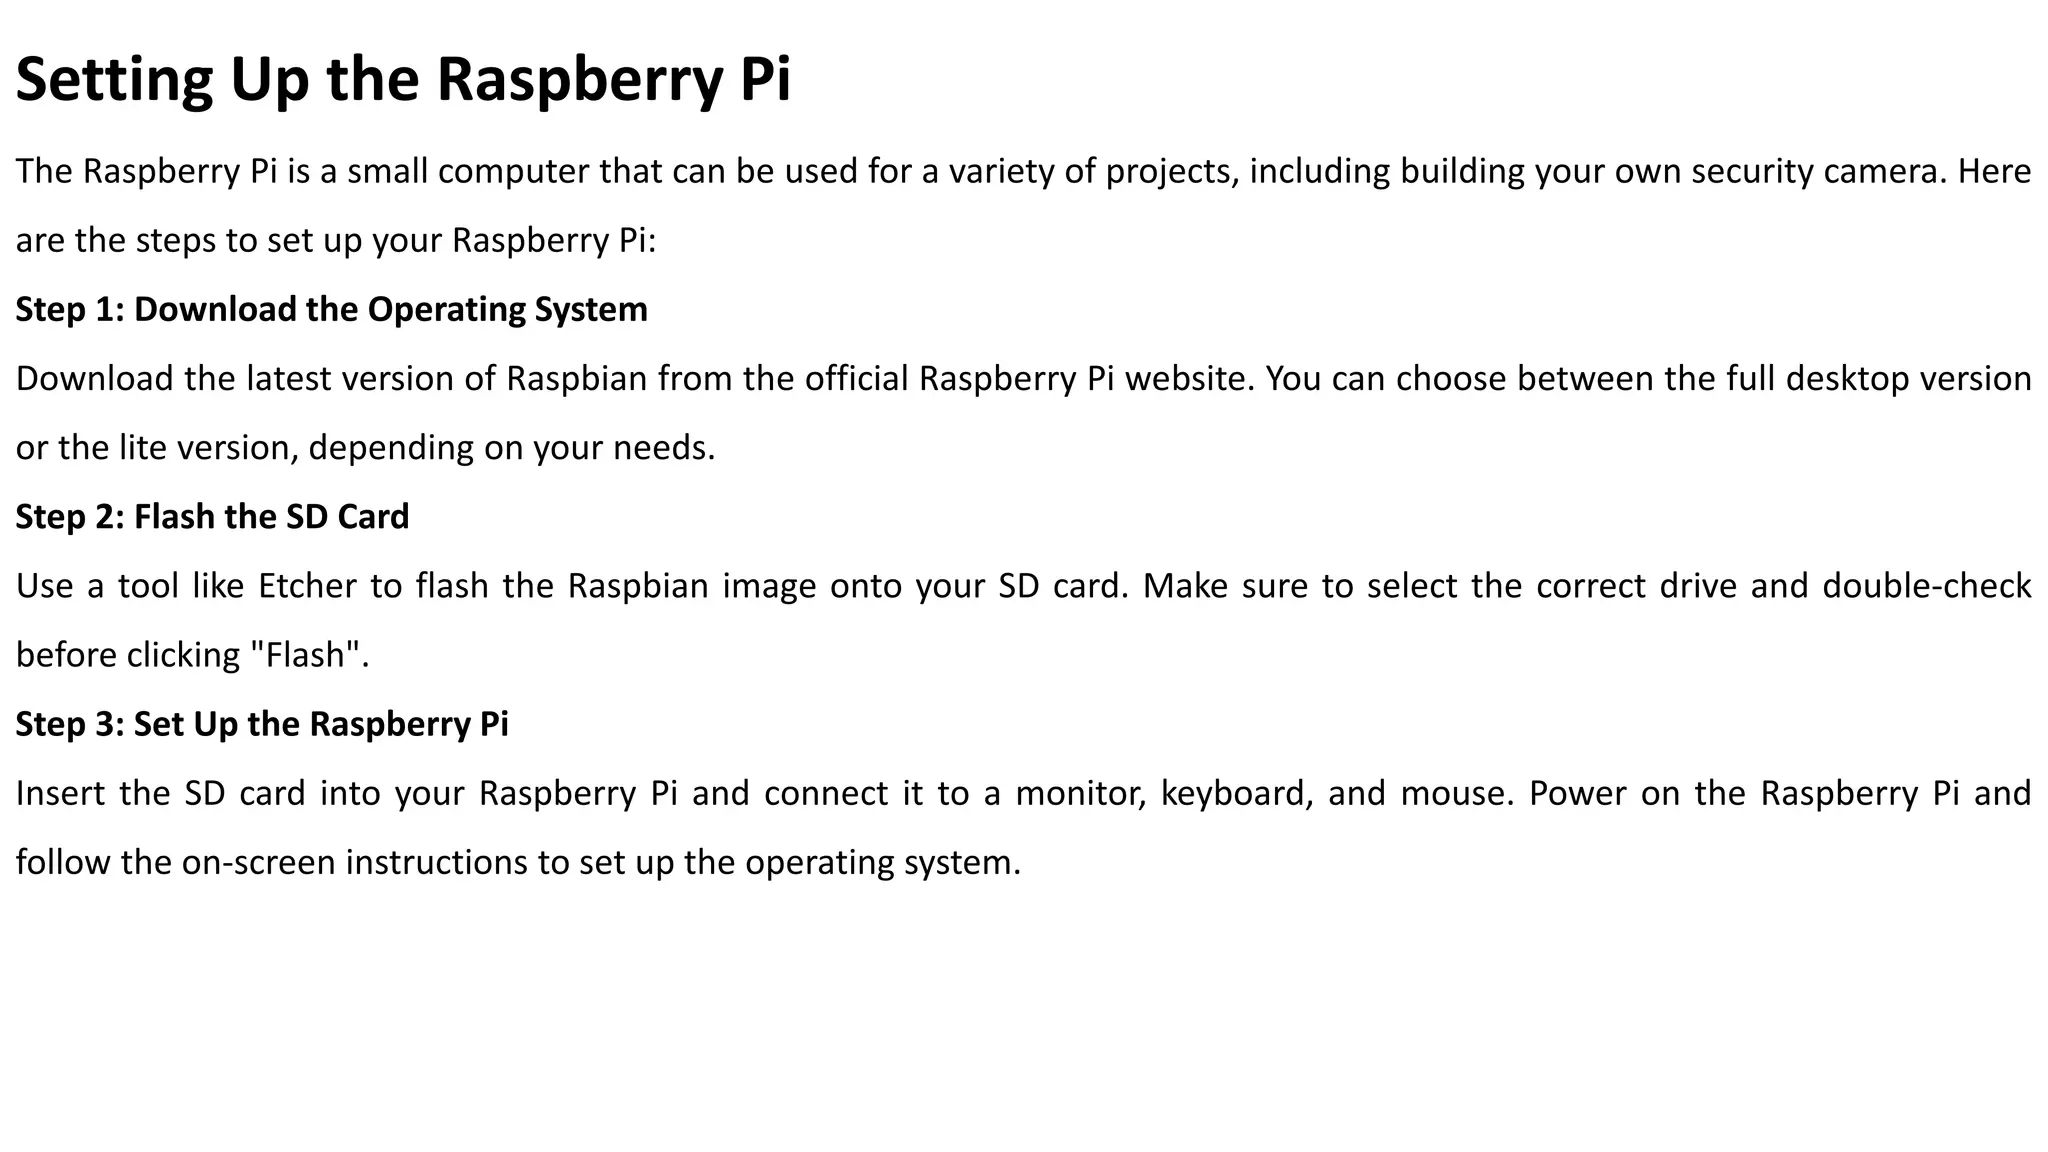
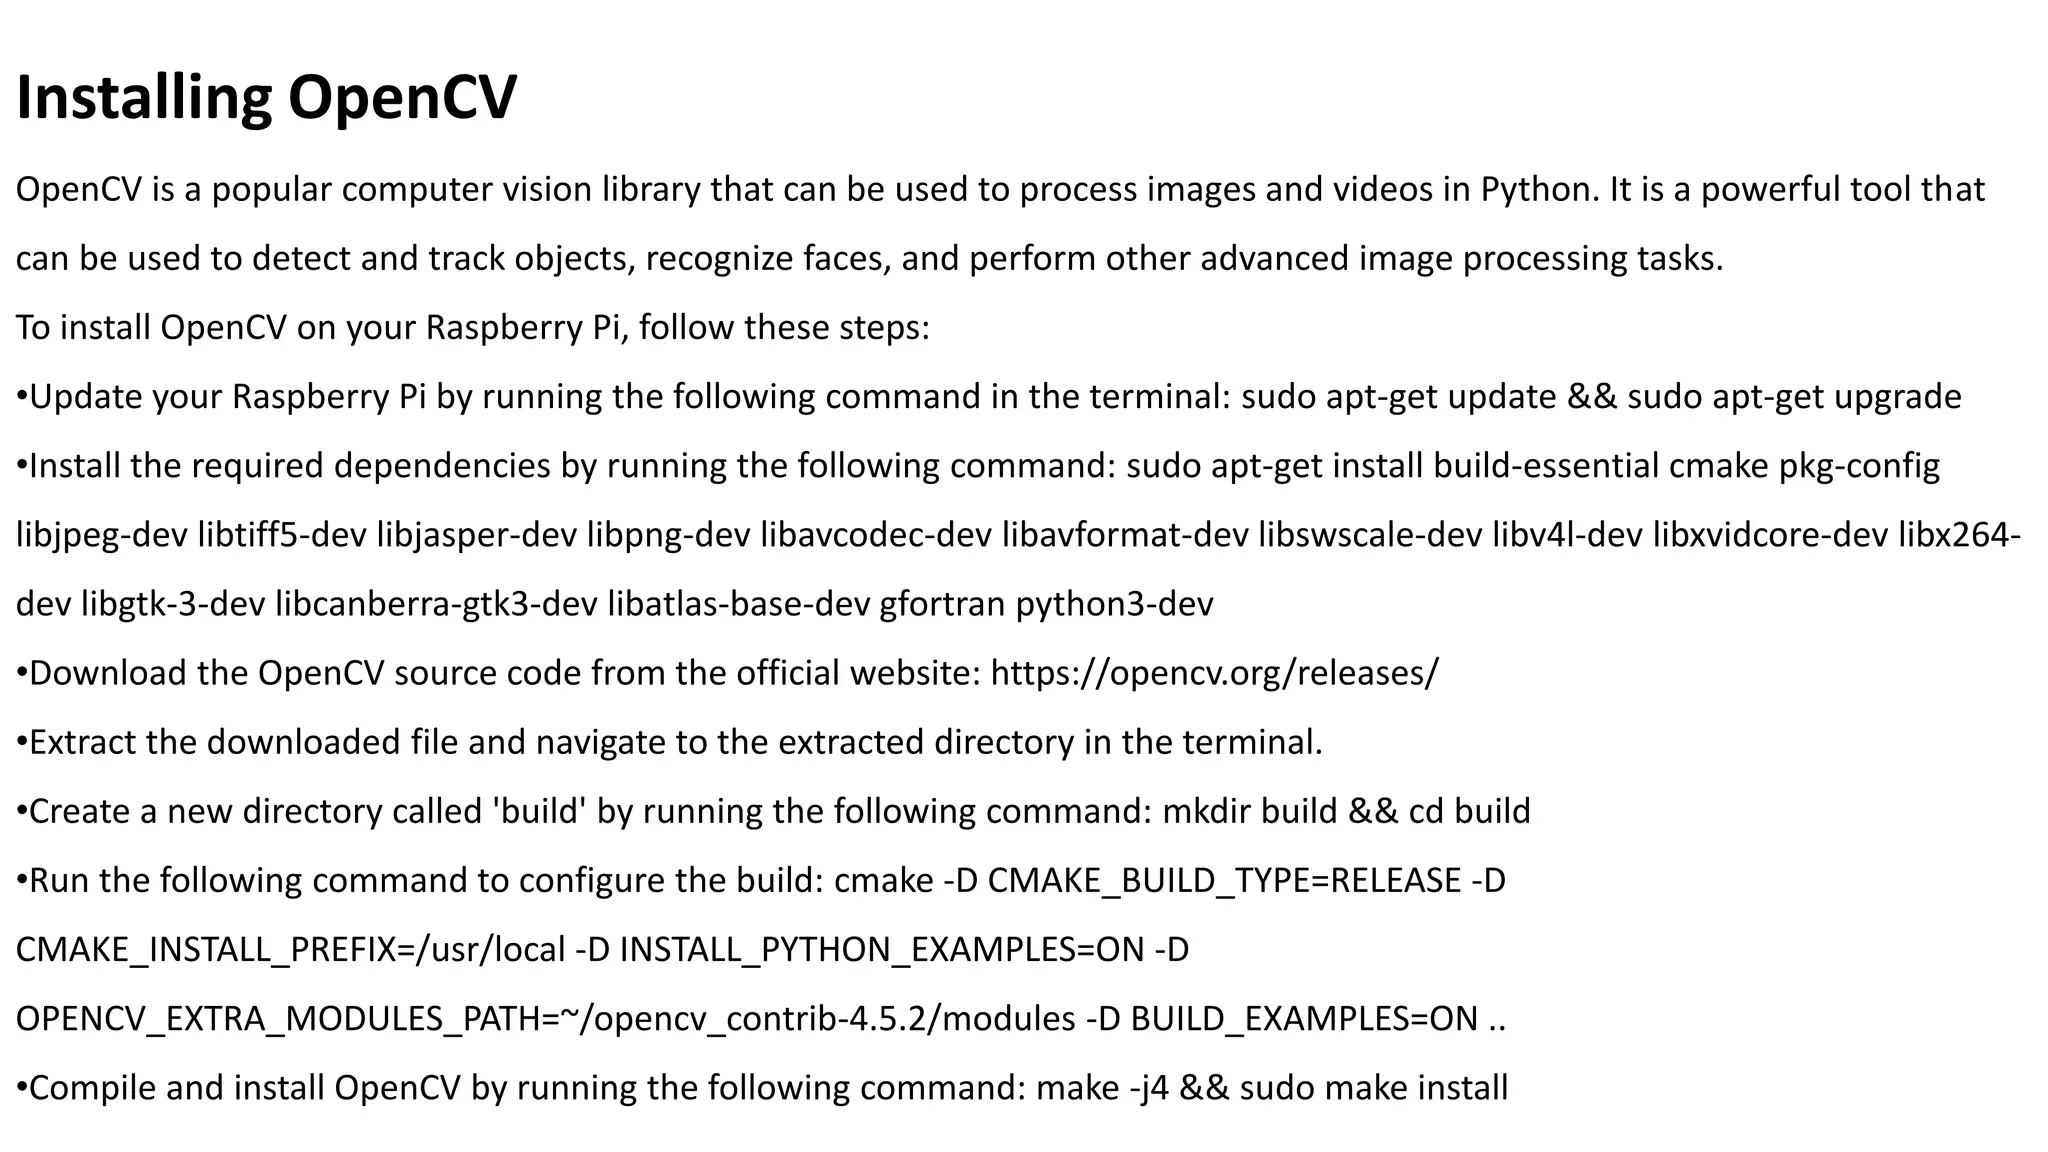
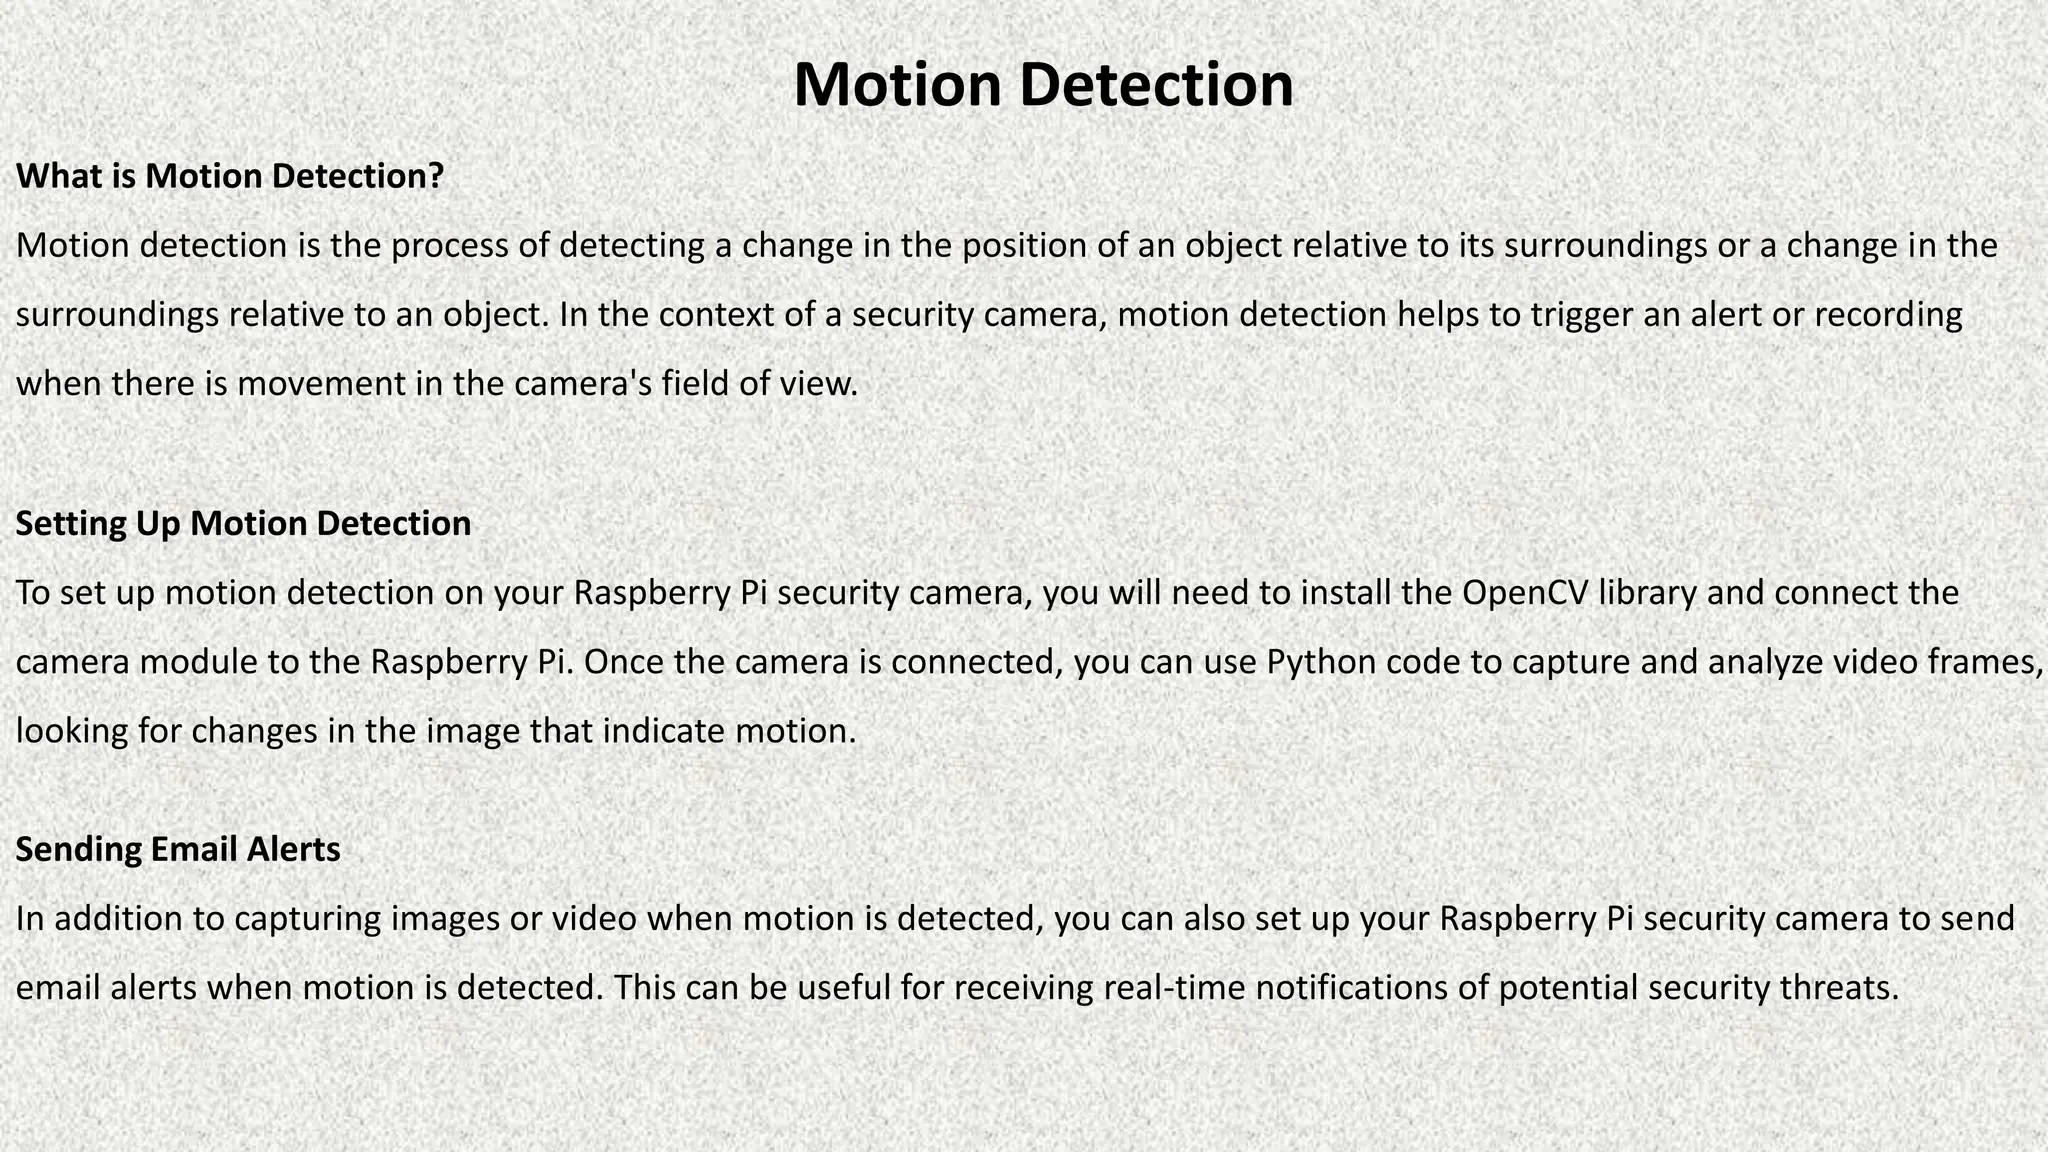
Building Your Own Security Camera with
Python
Table of Contents
 Introduction
 Existing System
 Proposed System
 Module Description
 System Design (Architecture Diagram-Data Flow Diagrams -E-R Diagrams)
 Code
 Screen Design
 Results
 Conclusion
 References
Introduction
Building your own security camera using Python is a fun and challenging project that can help you learn new skills and create a
useful device for your home or office. In this guide, we will walk you through the hardware and software requirements, as well as
the step-by-step process for setting up the camera, capturing and saving images, detecting motion, sending email alerts, and
even streaming video. Whether you're a beginner or an experienced Python developer, this project is a great way to expand your
knowledge and enhance your home security.
A security camera, also known as a closed-circuit television (CCTV) camera, is a video camera that is used to monitor
or record activity in a particular area. Security cameras are commonly used in homes, businesses, and public places to
deter crime, collect evidence, and protect people and property.
Security cameras come in a variety of types, including:
•Bullet cameras: Bullet cameras are long, cylindrical cameras that are typically mounted on walls or ceilings. They are
well-suited for outdoor use and can provide a wide field of view.
•Dome cameras: Dome cameras are round cameras that are also typically mounted on walls or ceilings. They are less
visible than bullet cameras and can be used to discreetly monitor an area.
•Turret cameras: Turret cameras are similar to bullet cameras, but they have a wider field of view. They are well-suited
for monitoring large areas, such as parking lots or warehouses.
•PTZ cameras: PTZ cameras stand for pan, tilt, and zoom cameras. They can be remotely controlled to move and
zoom in on specific areas. PTZ cameras are well-suited for monitoring large areas or tracking specific objects
Hardware Requirements
To build your own security camera using Python, you will need the following hardware:
Raspberry Pi
The Raspberry Pi is a small, affordable computer that can run the Python programming language. You will need a Raspberry Pi
board, power supply, and microSD card.
Camera Module
You will need a camera module that is compatible with the Raspberry Pi. The Raspberry Pi Camera Module V2 is a popular choice
and can capture high-quality images and video.
Case
You may want to purchase a case for your Raspberry Pi and camera module to protect them from damage and dust
Software Requirements
Python
Python is a popular programming language used for various applications, including computer vision and image processing. It is
easy to learn and has a large community that supports it. For this project, you will need to have Python 3 installed on your
Raspberry Pi.
OpenCV
OpenCV is an open-source computer vision library that provides various tools and algorithms for image and video processing. It is
widely used in the field of computer vision and is compatible with various programming languages, including Python. You will
need to install OpenCV on your Raspberry Pi to capture and process images and videos from the camera.
System Design (Architecture Diagram-Data Flow
Diagrams -E-R Diagrams)
Setting Up the Raspberry Pi
The Raspberry Pi is a small computer that can be used for a variety of projects, including building your own security camera. Here
are the steps to set up your Raspberry Pi:
Step 1: Download the Operating System
Download the latest version of Raspbian from the official Raspberry Pi website. You can choose between the full desktop version
or the lite version, depending on your needs.
Step 2: Flash the SD Card
Use a tool like Etcher to flash the Raspbian image onto your SD card. Make sure to select the correct drive and double-check
before clicking "Flash".
Step 3: Set Up the Raspberry Pi
Insert the SD card into your Raspberry Pi and connect it to a monitor, keyboard, and mouse. Power on the Raspberry Pi and
follow the on-screen instructions to set up the operating system.
Installing OpenCV
OpenCV is a popular computer vision library that can be used to process images and videos in Python. It is a powerful tool that
can be used to detect and track objects, recognize faces, and perform other advanced image processing tasks.
To install OpenCV on your Raspberry Pi, follow these steps:
•Update your Raspberry Pi by running the following command in the terminal: sudo apt-get update && sudo apt-get upgrade
•Install the required dependencies by running the following command: sudo apt-get install build-essential cmake pkg-config
libjpeg-dev libtiff5-dev libjasper-dev libpng-dev libavcodec-dev libavformat-dev libswscale-dev libv4l-dev libxvidcore-dev libx264-
dev libgtk-3-dev libcanberra-gtk3-dev libatlas-base-dev gfortran python3-dev
•Download the OpenCV source code from the official website: https://opencv.org/releases/
•Extract the downloaded file and navigate to the extracted directory in the terminal.
•Create a new directory called 'build' by running the following command: mkdir build && cd build
•Run the following command to configure the build: cmake -D CMAKE_BUILD_TYPE=RELEASE -D
CMAKE_INSTALL_PREFIX=/usr/local -D INSTALL_PYTHON_EXAMPLES=ON -D
OPENCV_EXTRA_MODULES_PATH=~/opencv_contrib-4.5.2/modules -D BUILD_EXAMPLES=ON ..
•Compile and install OpenCV by running the following command: make -j4 && sudo make install
Connecting the Camera
Before connecting the camera to the Raspberry Pi, make sure the Pi is turned off and unplugged. Connect the camera module to
the CSI (Camera Serial Interface) port on the Raspberry Pi board. The camera module should be connected to the port labeled
'CAMERA'.
Make sure the camera is securely connected to the port to avoid any connection issues.
Capturing and Saving Images
Once the camera is connected, you can start capturing images using Python and OpenCV. Here's an example code
snippet for capturing and saving images:
import cv2
camera = cv2.VideoCapture(0)
while True:
ret, frame = camera.read()
cv2.imshow('frame', frame)
if cv2.waitKey(1) & 0xFF == ord('s'):
cv2.imwrite('image.jpg', frame)
break
camera.release()
cv2.destroyAllWindows()
This code captures frames from the camera and displays them in a window. Pressing the 's' key saves the current
frame as an image named 'image.jpg'.
Code: import cv2
import winsound
cam = cv2.VideoCapture(1)
while cam.isOpened():
ret, frame1 = cam.read()
ret, frame2 = cam.read()
diff = cv2.absdiff(frame1, frame2)
gray = cv2.cvtColor(diff, cv2.COLOR_RGB2GRAY)
blur = cv2.GaussianBlur(gray, (5, 5), 0)
_, thresh = cv2.threshold(blur, 20, 255, cv2.THRESH_BINARY)
dilated = cv2.dilate(thresh, None, iterations=3)
contours, _ = cv2.findContours(dilated, cv2.RETR_TREE, cv2.CHAIN_APPROX_SIMPLE)
# cv2.drawContours(frame1, contours, -1, (0, 255, 0), 2)
for c in contours:
if cv2.contourArea(c) < 5000:
continue
x, y, w, h = cv2.boundingRect(c)
cv2.rectangle(frame1, (x, y), (x+w, y+h), (0, 255, 0), 2)
winsound.PlaySound('alert.wav', winsound.SND_ASYNC)
if cv2.waitKey(10) == ord('q'):
break
cv2.imshow('Granny Cam', frame1)
Motion Detection
What is Motion Detection?
Motion detection is the process of detecting a change in the position of an object relative to its surroundings or a change in the
surroundings relative to an object. In the context of a security camera, motion detection helps to trigger an alert or recording
when there is movement in the camera's field of view.
Setting Up Motion Detection
To set up motion detection on your Raspberry Pi security camera, you will need to install the OpenCV library and connect the
camera module to the Raspberry Pi. Once the camera is connected, you can use Python code to capture and analyze video frames,
looking for changes in the image that indicate motion.
Sending Email Alerts
In addition to capturing images or video when motion is detected, you can also set up your Raspberry Pi security camera to send
email alerts when motion is detected. This can be useful for receiving real-time notifications of potential security threats.
Setting Up Email Notifications
In order to send email notifications from the Raspberry Pi, you will need to set up an email account and configure the Pi to use it.
Here are the steps:
1.Create a new email account specifically for your security camera project. This will help keep your personal and project emails
separate.
2.Enable two-factor authentication on the email account for added security.
3.Generate an app password for the email account. This is a unique password that you will use to authenticate the Raspberry Pi
when sending emails.
4.On the Raspberry Pi, install the 'smtplib' and 'ssl' Python libraries.
5.In your Python script, import the 'smtplib' and 'ssl' libraries and use the following code to send an email:
6.import smtplib import ssl port = 465 # For SSL gmail_server = "smtp.gmail.com" sender_email = "your_email@gmail.com" #
Enter your address gmail_password = "your_app_password" # Enter your app password receiver_email =
"destination_email@example.com" # Enter receiver address message = """ Subject: Security Camera Alert Motion detected!
""" context = ssl.create_default_context() with smtplib.SMTP_SSL(gmail_server, port, context=context) as server:
server.login(sender_email, gmail_password) server.sendmail(sender_email, receiver_email, message)
Video Streaming
One of the most useful features of a security camera is the ability to stream live video. This allows you to monitor your home or
office in real-time from anywhere in the world. In order to set up video streaming on your Raspberry Pi security camera, you will
need to follow these steps:
Step 1: Install a video streaming software
There are many video streaming software options available for the Raspberry Pi, but one of the most popular is called "Motion".
Motion is a free and open-source software that is easy to install and configure.
Step 2: Configure the video streaming software
Once you have installed the video streaming software, you will need to configure it to work with your camera. This will involve
setting up the resolution, frame rate, and other settings to ensure that your video stream is high-quality and reliable.
Step 3: Access the video stream
Once your video stream is set up and configured, you will be able to access it from any device with an internet connection. This
could be a smartphone, tablet, or computer. Simply enter the IP address of your Raspberry Pi and the port number that you
configured for your video stream, and you will be able to view the live video feed.
Remote Access
One of the advantages of building your own security camera using Python is the ability to access and monitor the camera
remotely. This allows you to keep an eye on your home or office even when you are away. Here are the steps to set up remote
access:
Step 1: Set Up Port Forwarding
To access your camera remotely, you need to set up port forwarding on your router. This allows external devices to connect to
your camera through the internet. The specific steps to set up port forwarding depend on your router model, but generally
involve accessing your router's settings and creating a new port forwarding rule for your camera's IP address and port number.
Step 2: Obtain Your Public IP Address
To connect to your camera remotely, you need to know your public IP address. This is the IP address assigned to your router by
your internet service provider. You can find your public IP address by visiting a website like whatismyip.com.
Step 3: Connect to Your Camera
Once you have set up port forwarding and obtained your public IP address, you can connect to your camera remotely using a
web browser or a mobile app. You will need to enter your public IP address and the port number you set up in the port
forwarding rule. You may also need to enter a username and password if you have set up authentication for your camera.
Additional Features
Facial Recognition
With the help of machine learning and computer vision, you
can train your security camera to recognize faces and send
alerts when an unrecognized face is detected.
Object Detection
Similar to facial recognition, you can also train your camera to
detect specific objects and send alerts when they are detected.
This can be useful for monitoring specific areas or objects in
your home or office.
Conclusion
In conclusion, the project to build a security camera system using Python has been successfully implemented, providing an
affordable and customizable solution for home and small-scale security needs. The system's objectives and advantages have
been achieved, and it offers several benefits:
1. **Affordability**: The system is cost-effective compared to commercial security camera solutions, making it accessible to a
wider range of users.
2. **Customization**: Users can adapt the system to their specific requirements, choosing the number of cameras, defining
motion detection parameters, and configuring alerts.
3. **User-Friendly**: The Python-based system is designed to be user-friendly, with a straightforward setup and configuration
process.
4. **Motion Detection**: The system effectively employs computer vision techniques to detect motion, ensuring that it
captures relevant events.

New Microsoft PowerPoint Presentation (2).pptx

  • 1.
    Building Your OwnSecurity Camera with Python
  • 2.
    Table of Contents Introduction  Existing System  Proposed System  Module Description  System Design (Architecture Diagram-Data Flow Diagrams -E-R Diagrams)  Code  Screen Design  Results  Conclusion  References
  • 3.
    Introduction Building your ownsecurity camera using Python is a fun and challenging project that can help you learn new skills and create a useful device for your home or office. In this guide, we will walk you through the hardware and software requirements, as well as the step-by-step process for setting up the camera, capturing and saving images, detecting motion, sending email alerts, and even streaming video. Whether you're a beginner or an experienced Python developer, this project is a great way to expand your knowledge and enhance your home security. A security camera, also known as a closed-circuit television (CCTV) camera, is a video camera that is used to monitor or record activity in a particular area. Security cameras are commonly used in homes, businesses, and public places to deter crime, collect evidence, and protect people and property.
  • 4.
    Security cameras comein a variety of types, including: •Bullet cameras: Bullet cameras are long, cylindrical cameras that are typically mounted on walls or ceilings. They are well-suited for outdoor use and can provide a wide field of view. •Dome cameras: Dome cameras are round cameras that are also typically mounted on walls or ceilings. They are less visible than bullet cameras and can be used to discreetly monitor an area. •Turret cameras: Turret cameras are similar to bullet cameras, but they have a wider field of view. They are well-suited for monitoring large areas, such as parking lots or warehouses. •PTZ cameras: PTZ cameras stand for pan, tilt, and zoom cameras. They can be remotely controlled to move and zoom in on specific areas. PTZ cameras are well-suited for monitoring large areas or tracking specific objects
  • 5.
    Hardware Requirements To buildyour own security camera using Python, you will need the following hardware: Raspberry Pi The Raspberry Pi is a small, affordable computer that can run the Python programming language. You will need a Raspberry Pi board, power supply, and microSD card. Camera Module You will need a camera module that is compatible with the Raspberry Pi. The Raspberry Pi Camera Module V2 is a popular choice and can capture high-quality images and video. Case You may want to purchase a case for your Raspberry Pi and camera module to protect them from damage and dust
  • 6.
    Software Requirements Python Python isa popular programming language used for various applications, including computer vision and image processing. It is easy to learn and has a large community that supports it. For this project, you will need to have Python 3 installed on your Raspberry Pi. OpenCV OpenCV is an open-source computer vision library that provides various tools and algorithms for image and video processing. It is widely used in the field of computer vision and is compatible with various programming languages, including Python. You will need to install OpenCV on your Raspberry Pi to capture and process images and videos from the camera.
  • 7.
    System Design (ArchitectureDiagram-Data Flow Diagrams -E-R Diagrams)
  • 8.
    Setting Up theRaspberry Pi The Raspberry Pi is a small computer that can be used for a variety of projects, including building your own security camera. Here are the steps to set up your Raspberry Pi: Step 1: Download the Operating System Download the latest version of Raspbian from the official Raspberry Pi website. You can choose between the full desktop version or the lite version, depending on your needs. Step 2: Flash the SD Card Use a tool like Etcher to flash the Raspbian image onto your SD card. Make sure to select the correct drive and double-check before clicking "Flash". Step 3: Set Up the Raspberry Pi Insert the SD card into your Raspberry Pi and connect it to a monitor, keyboard, and mouse. Power on the Raspberry Pi and follow the on-screen instructions to set up the operating system.
  • 9.
    Installing OpenCV OpenCV isa popular computer vision library that can be used to process images and videos in Python. It is a powerful tool that can be used to detect and track objects, recognize faces, and perform other advanced image processing tasks. To install OpenCV on your Raspberry Pi, follow these steps: •Update your Raspberry Pi by running the following command in the terminal: sudo apt-get update && sudo apt-get upgrade •Install the required dependencies by running the following command: sudo apt-get install build-essential cmake pkg-config libjpeg-dev libtiff5-dev libjasper-dev libpng-dev libavcodec-dev libavformat-dev libswscale-dev libv4l-dev libxvidcore-dev libx264- dev libgtk-3-dev libcanberra-gtk3-dev libatlas-base-dev gfortran python3-dev •Download the OpenCV source code from the official website: https://opencv.org/releases/ •Extract the downloaded file and navigate to the extracted directory in the terminal. •Create a new directory called 'build' by running the following command: mkdir build && cd build •Run the following command to configure the build: cmake -D CMAKE_BUILD_TYPE=RELEASE -D CMAKE_INSTALL_PREFIX=/usr/local -D INSTALL_PYTHON_EXAMPLES=ON -D OPENCV_EXTRA_MODULES_PATH=~/opencv_contrib-4.5.2/modules -D BUILD_EXAMPLES=ON .. •Compile and install OpenCV by running the following command: make -j4 && sudo make install
  • 10.
    Connecting the Camera Beforeconnecting the camera to the Raspberry Pi, make sure the Pi is turned off and unplugged. Connect the camera module to the CSI (Camera Serial Interface) port on the Raspberry Pi board. The camera module should be connected to the port labeled 'CAMERA'. Make sure the camera is securely connected to the port to avoid any connection issues.
  • 11.
    Capturing and SavingImages Once the camera is connected, you can start capturing images using Python and OpenCV. Here's an example code snippet for capturing and saving images: import cv2 camera = cv2.VideoCapture(0) while True: ret, frame = camera.read() cv2.imshow('frame', frame) if cv2.waitKey(1) & 0xFF == ord('s'): cv2.imwrite('image.jpg', frame) break camera.release() cv2.destroyAllWindows() This code captures frames from the camera and displays them in a window. Pressing the 's' key saves the current frame as an image named 'image.jpg'.
  • 12.
    Code: import cv2 importwinsound cam = cv2.VideoCapture(1) while cam.isOpened(): ret, frame1 = cam.read() ret, frame2 = cam.read() diff = cv2.absdiff(frame1, frame2) gray = cv2.cvtColor(diff, cv2.COLOR_RGB2GRAY) blur = cv2.GaussianBlur(gray, (5, 5), 0) _, thresh = cv2.threshold(blur, 20, 255, cv2.THRESH_BINARY) dilated = cv2.dilate(thresh, None, iterations=3) contours, _ = cv2.findContours(dilated, cv2.RETR_TREE, cv2.CHAIN_APPROX_SIMPLE) # cv2.drawContours(frame1, contours, -1, (0, 255, 0), 2) for c in contours: if cv2.contourArea(c) < 5000: continue x, y, w, h = cv2.boundingRect(c) cv2.rectangle(frame1, (x, y), (x+w, y+h), (0, 255, 0), 2) winsound.PlaySound('alert.wav', winsound.SND_ASYNC) if cv2.waitKey(10) == ord('q'): break cv2.imshow('Granny Cam', frame1)
  • 13.
    Motion Detection What isMotion Detection? Motion detection is the process of detecting a change in the position of an object relative to its surroundings or a change in the surroundings relative to an object. In the context of a security camera, motion detection helps to trigger an alert or recording when there is movement in the camera's field of view. Setting Up Motion Detection To set up motion detection on your Raspberry Pi security camera, you will need to install the OpenCV library and connect the camera module to the Raspberry Pi. Once the camera is connected, you can use Python code to capture and analyze video frames, looking for changes in the image that indicate motion. Sending Email Alerts In addition to capturing images or video when motion is detected, you can also set up your Raspberry Pi security camera to send email alerts when motion is detected. This can be useful for receiving real-time notifications of potential security threats.
  • 14.
    Setting Up EmailNotifications In order to send email notifications from the Raspberry Pi, you will need to set up an email account and configure the Pi to use it. Here are the steps: 1.Create a new email account specifically for your security camera project. This will help keep your personal and project emails separate. 2.Enable two-factor authentication on the email account for added security. 3.Generate an app password for the email account. This is a unique password that you will use to authenticate the Raspberry Pi when sending emails. 4.On the Raspberry Pi, install the 'smtplib' and 'ssl' Python libraries. 5.In your Python script, import the 'smtplib' and 'ssl' libraries and use the following code to send an email: 6.import smtplib import ssl port = 465 # For SSL gmail_server = "smtp.gmail.com" sender_email = "your_email@gmail.com" # Enter your address gmail_password = "your_app_password" # Enter your app password receiver_email = "destination_email@example.com" # Enter receiver address message = """ Subject: Security Camera Alert Motion detected! """ context = ssl.create_default_context() with smtplib.SMTP_SSL(gmail_server, port, context=context) as server: server.login(sender_email, gmail_password) server.sendmail(sender_email, receiver_email, message)
  • 15.
    Video Streaming One ofthe most useful features of a security camera is the ability to stream live video. This allows you to monitor your home or office in real-time from anywhere in the world. In order to set up video streaming on your Raspberry Pi security camera, you will need to follow these steps: Step 1: Install a video streaming software There are many video streaming software options available for the Raspberry Pi, but one of the most popular is called "Motion". Motion is a free and open-source software that is easy to install and configure. Step 2: Configure the video streaming software Once you have installed the video streaming software, you will need to configure it to work with your camera. This will involve setting up the resolution, frame rate, and other settings to ensure that your video stream is high-quality and reliable. Step 3: Access the video stream Once your video stream is set up and configured, you will be able to access it from any device with an internet connection. This could be a smartphone, tablet, or computer. Simply enter the IP address of your Raspberry Pi and the port number that you configured for your video stream, and you will be able to view the live video feed.
  • 16.
    Remote Access One ofthe advantages of building your own security camera using Python is the ability to access and monitor the camera remotely. This allows you to keep an eye on your home or office even when you are away. Here are the steps to set up remote access: Step 1: Set Up Port Forwarding To access your camera remotely, you need to set up port forwarding on your router. This allows external devices to connect to your camera through the internet. The specific steps to set up port forwarding depend on your router model, but generally involve accessing your router's settings and creating a new port forwarding rule for your camera's IP address and port number. Step 2: Obtain Your Public IP Address To connect to your camera remotely, you need to know your public IP address. This is the IP address assigned to your router by your internet service provider. You can find your public IP address by visiting a website like whatismyip.com. Step 3: Connect to Your Camera Once you have set up port forwarding and obtained your public IP address, you can connect to your camera remotely using a web browser or a mobile app. You will need to enter your public IP address and the port number you set up in the port forwarding rule. You may also need to enter a username and password if you have set up authentication for your camera.
  • 17.
    Additional Features Facial Recognition Withthe help of machine learning and computer vision, you can train your security camera to recognize faces and send alerts when an unrecognized face is detected. Object Detection Similar to facial recognition, you can also train your camera to detect specific objects and send alerts when they are detected. This can be useful for monitoring specific areas or objects in your home or office.
  • 18.
    Conclusion In conclusion, theproject to build a security camera system using Python has been successfully implemented, providing an affordable and customizable solution for home and small-scale security needs. The system's objectives and advantages have been achieved, and it offers several benefits: 1. **Affordability**: The system is cost-effective compared to commercial security camera solutions, making it accessible to a wider range of users. 2. **Customization**: Users can adapt the system to their specific requirements, choosing the number of cameras, defining motion detection parameters, and configuring alerts. 3. **User-Friendly**: The Python-based system is designed to be user-friendly, with a straightforward setup and configuration process. 4. **Motion Detection**: The system effectively employs computer vision techniques to detect motion, ensuring that it captures relevant events.