์Network firewall with IPFire
•
2 likes•790 views

คู่มือติดตั้งระบบป้องกันเครือข่ายองค์กรด้วย IPFire (39 หน้า) เอกสารเผยพร่โดยทีมงาน huntra scholar https://www.facebook.com/HuntraScholar/

Recommended
Recommended
More Related Content
What's hot
What's hot (20)
Similar to ์Network firewall with IPFire
Similar to ์Network firewall with IPFire (15)
More from Asst.Prof.Dr.Arnut Ruttanatirakul
More from Asst.Prof.Dr.Arnut Ruttanatirakul (20)
์Network firewall with IPFire
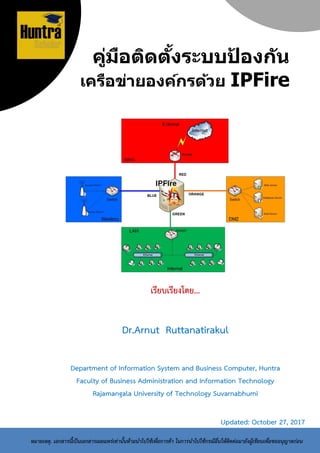
- 1. คู่มือติดตั้งระบบป้ องกัน เครือข่ายองค์กรด้วย IPFire เรียบเรียงโดย... Dr.Arnut Ruttanatirakul Department of Information System and Business Computer, Huntra Faculty of Business Administration and Information Technology Rajamangala University of Technology Suvarnabhumi หมายเหตุ. เอกสารนี้เป็นเอกสารเผยแพร่เท่านั้นห้ามนาไปใช้เพื่อการค้า ในการนาไปใช้กรณีอื่นให้ติดต่อมายังผู้เขียนเพื่อขออนุญาตก่อน Updated: October 27, 2017
- 2. ♞ คู่มือติดตั้งระบบป้องกันเครือข่ายองค์กรด้วย Page2 Write by Dr.Arnut Ruttanatirakul (arnut.r@rmutsb.ac.th) Department of Information System and Business Computer, Huntra Faculty of Business Administration and Information Technology, Rajamangala University of Technology Suvarnabhumi. เอกสารนี้เป็นเอกสารเผยแพร่เท่านั้นห้ามนาไปใช้เพื่อการค้า ในการนาไปใช้กรณีอื่นให้ติดต่อมายังผู้เขียนเพื่อขออนุญาตก่อน
- 3. ♞ คู่มือติดตั้งระบบป้องกันเครือข่ายองค์กรด้วย Page3 Write by Dr.Arnut Ruttanatirakul (arnut.r@rmutsb.ac.th) Department of Information System and Business Computer, Huntra Faculty of Business Administration and Information Technology, Rajamangala University of Technology Suvarnabhumi. ➧ รู้จัก IPFire IPFire เป็นระบบลีนุกซ์เซิร์ฟเวอร์สำเร็จรูปใช้ในกำรทำระบบป้องกันเครือข่ำยองค์กร อำทิ ไฟร์วอลล์, พร็อกซี่, ไอดีเอส, วีพีเอ็น, ล็อกซ์เซิร์ฟเวอร์ เป็นต้น โดยผู้ดูแลระบบสำมำรถบริหำรจัดกำร ผ่ำนทำงหน้ำเว็บไซต์ พัฒนำมำจำก Linux From Scratch หน้ำต่ำงกำรใช้งำนโดยรวมจะคล้ำยกับ Endian firewall ซึ่งเป็นระบบเซิร์ฟเวอร์แพ็กเกจยอดนิยมที่พัฒนำมำจำก IPCop อีกที โดยที่ IPFire เน้นพัฒนำเป็นระบบเซิร์ฟเวอร์เพื่อควบคุมระบบเครือข่ำยองค์กร มีลิขสิทธิ์แบบ Open Source ผู้ใช้งำนสำมำรถนำมำติดตั้งใช้งำนได้ฟรี สำมำรถดูรำยละเอียดและดำวน์โหลดตัวติดตั้งได้ที่เว็บไซต์ https://www.ipfire.org เว็บไซต์ www.ipfire.org ➧ ความสามารถและข้อมูลคร่าวๆ 1. IPFire เมนูใช้งำนคล้ำยกับ Endian ทำให้ผู้ใช้งำน Endian หรือ IPCop เรียนรู้ได้เร็ว 2. ควำมสำมำรถโดยรวมมำกกว่ำ Endian Community 3. สำมำรถติดตั้ง Package ผ่ำนทำงหน้ำเว็บได้เลย ทำได้เหมือน PfSense เช่น Samba, vsftpd, Asterisk, Teamspeak, Video Disk Recorder (VDR), Mail server - Postfix, SpamAssassin, ClamAV, Amavis (amavisd-new), Streaming server (MPD a.o.) คลิกดู Pakfire The IPFire package management system ได้ ที่ http://wiki.ipfire.org/en/addons/start หรือ https://pakfire.ipfire.org/ 4. สำมำรถทำ QoS - Quality of Service แบ่งแบนวิตต์แบบแยกแผนก แยกคน 5. ท่ำนที่เคยใช้งำน CentOS, RedHat, Endian, ClarkConnect สำมำรถเรียนรู้ได้ไวกว่ำ ส่วนท่ำน ที่เคยใช้ pfSense ลองติดตั้งเทียบควำมสำมำรถดู 6. กินทรัพยำกรเครื่องน้อยกว่ำ 7. แยกอินเตอร์เฟซเป็น 4 อินเตอร์เฟซเหมือนอินเดียน (Green, Red, Blue, Orange) สำมำรถ กำหนดค่ำได้ตำมควำมเหมำะสม
- 4. ♞ คู่มือติดตั้งระบบป้องกันเครือข่ายองค์กรด้วย Page4 Write by Dr.Arnut Ruttanatirakul (arnut.r@rmutsb.ac.th) Department of Information System and Business Computer, Huntra Faculty of Business Administration and Information Technology, Rajamangala University of Technology Suvarnabhumi. 8. สนับสนุนกำรทำงำนบน Virtualization อำทิ KVM, VMware, Xen, Qemu, Microsoft Hyper-V,Oracle VirtualBox 9. สนับสนุนกำรทำ Wake-on-LAN (WOL), Dynamic DNS, VPN via IPsec OpenVPN, DHCP- server, Caching-nameserver, Time server, Proxy server 10. ทีมพัฒนำอยู่ที่เยอรมัน, ฟังบทสัมภำษณ์ทีมพัฒนำในงำน Cebit http://www.ipfire.org/cebit 11. ทำงำนผ่ำนทำงพอร์ต 444 12. เป็น OpenSource สำมำรถติดตั้งทดแทน Firewall เชิงกำรค้ำได้ 13. สำมำรถทำเป็นระบบ System monitoring และ Log-Analysis ได้ ดูกำรเปรียบมวยระหว่ำง pfSense VS IPFire - pfSense VS Ipfire Connections Speed http://forum.pfsense.org/index.php?topic=60030.0 - moving from pfsense to ipfire questions http://forum.ipfire.org/index.php?topic=1668.0 กำรเชื่อมต่ออินเตอร์เฟซของ IPFire
- 5. ♞ คู่มือติดตั้งระบบป้องกันเครือข่ายองค์กรด้วย Page5 Write by Dr.Arnut Ruttanatirakul (arnut.r@rmutsb.ac.th) Department of Information System and Business Computer, Huntra Faculty of Business Administration and Information Technology, Rajamangala University of Technology Suvarnabhumi. ➧ การเชื่อมต่ออินเตอร์เฟซของ IPFire ใน IPFire มีการเชื่อมต่ออินเตอร์เฟซทั้งหมด 4 อินเตอร์เฟซ เหมือนกับระบบ Endian Firewall โดยแยกเป็น 4 อินเตอร์เฟซดังนี้ อินเตอร์เฟซ คาอธิบาย RED Zone (Internet Connection) เป็นอินเตอร์เฟซใช้เชื่อมต่อไปผู้ให้บริการ อินเทอร์เน็ต เรียกว่า Internet Connection หรือ WAN Connection GREEN Zone (Client) เป็นอินเตอร์เฟซใช้เชื่อมต่อไปยังเครื่องลูกข่าย ในหน่วยงาน (ต้องกาหนดในการติดตั้งใช้งาน ครั้งแรก) LAN Connection BLUE Zone (Wireless Network) เป็นอินเตอร์เฟซที่ใช้เชื่อมต่อไปยังจุดกระจาย สัญญาณ (Access Point) ORANGE Zone (Server - DMZ) เป็นอินเตอร์เฟซที่ใช้เชื่อมต่อไปยังเครื่อง เซิร์ฟเวอร์ที่ต้องการทาเป็นโซนพิเศษ (DMZ - Demilitarized Zone)
- 6. ♞ คู่มือติดตั้งระบบป้องกันเครือข่ายองค์กรด้วย Page6 Write by Dr.Arnut Ruttanatirakul (arnut.r@rmutsb.ac.th) Department of Information System and Business Computer, Huntra Faculty of Business Administration and Information Technology, Rajamangala University of Technology Suvarnabhumi. ➧ สิ่งที่ต้องเตรียมก่อนการติดตั้ง HUNTRA LAB TEST WAN IP (RED Zone) LAN IP (GREEN ZONE) Hostname: huntraserver WAN IP Address: 10.0.2.10 Subnet Prefix: 24 Gateway: 10.0.2.1 (Router) DNS: 10.0.2.1, 8.8.8.8 (DNS ของ ISP) LAN IP Address: 10.0.3.10 Subnet Prefix: 24 Gateway: - DNS: - IP for Client: 10.0.3.100 - 10.0.3.254 กาหนดรายละเอียดไอพีที่ต้องการติดตั้ง ตามรายละเอียดเครือข่ายตนเอง Hostname: …………………………………………………………… WAN IP Address: ……………………………………………….. Subnet Prefix: ……………………………………………………… Gateway:……………………………………………………………… DNS: ……………………………………………………………………… ……………………………………………………………………… LAN IP Address: ………………………………………….................. Subnet Prefix: ……………………………………………….............. Gateway: - DNS: - IP for Client: ……………………………………………….............. Linux root Password (Console) Username: root Password: ..………………………… Web Admin Password (Website) Username: admin Password: ..………………………… ในกำรทดสอบ LAB จะทดสอบให้ดูแค่ 2 อินเตอร์เฟซ คือ RAD Zone (WAN) และ GREEN Zone (LAN)
- 7. ♞ คู่มือติดตั้งระบบป้องกันเครือข่ายองค์กรด้วย Page7 Write by Dr.Arnut Ruttanatirakul (arnut.r@rmutsb.ac.th) Department of Information System and Business Computer, Huntra Faculty of Business Administration and Information Technology, Rajamangala University of Technology Suvarnabhumi. กำรทำ LAB ทดสอบ 2 อินเตอร์เฟซ
- 8. ♞ คู่มือติดตั้งระบบป้องกันเครือข่ายองค์กรด้วย Page8 Write by Dr.Arnut Ruttanatirakul (arnut.r@rmutsb.ac.th) Department of Information System and Business Computer, Huntra Faculty of Business Administration and Information Technology, Rajamangala University of Technology Suvarnabhumi. ➧ การติดตั้ง IPFire ขั้นตอน 1. ดำวน์โหลดตัวติดตั้งเวอร์ชั่นล่ำสุดได้ที่เว็บไซต์ https://www.ipfire.org 2. ทำกำรเขียนแผ่น CD/DVD 3. กำหนดเครื่องให้บู๊ตจำก CD/DVD 4. เปิดเครื่องเพื่อเริ่มติดตั้ง ระบบจะแสดงข้อควำมต้อนรับสู่กำรติดตั้ง IPFire ข้อควำมต้อนรับในกำรติดตั้ง
- 9. ♞ คู่มือติดตั้งระบบป้องกันเครือข่ายองค์กรด้วย Page9 Write by Dr.Arnut Ruttanatirakul (arnut.r@rmutsb.ac.th) Department of Information System and Business Computer, Huntra Faculty of Business Administration and Information Technology, Rajamangala University of Technology Suvarnabhumi. 5. เลือกภำษำในกำรติดตั้งเป็น English เลือกภำษำในกำรติดตั้ง 6. คลิกเลือก Start installation เพื่อเริ่มติดตั้ง เลือก Start installation 7. คลิกที่ [*] I accept this License เสร็จแล้วคลิกที่ปุ่ม OK
- 10. ♞ คู่มือติดตั้งระบบป้องกันเครือข่ายองค์กรด้วย Page10 Write by Dr.Arnut Ruttanatirakul (arnut.r@rmutsb.ac.th) Department of Information System and Business Computer, Huntra Faculty of Business Administration and Information Technology, Rajamangala University of Technology Suvarnabhumi. เลือก I accept this License 8. กำหนดดิสก์ที่ต้องกำรติดตั้ง ให้คลิกที่ Delete all data เลือก Delete all data 9. เลือกชนิดไฟล์ที่ต้องกำรติดตั้ง ในที่นี้ให้เลือกที่ ext4 Filesystem เสร็จแล้วให้คลิกที่ปุ่ม OK
- 11. ♞ คู่มือติดตั้งระบบป้องกันเครือข่ายองค์กรด้วย Page11 Write by Dr.Arnut Ruttanatirakul (arnut.r@rmutsb.ac.th) Department of Information System and Business Computer, Huntra Faculty of Business Administration and Information Technology, Rajamangala University of Technology Suvarnabhumi. เลือกชนิดไฟล์ที่ต้องกำรติดตั้ง 10. ระบบทำกำรฟอร์แมตดิสก์ และเริ่มติดตั้ง IPFire ขณะทำกำรติดตั้ง IPFire 11. ระบบแสดงข้อควำมสิ้นสุดกำรติดตั้ง ให้เลือกที่ปุ่ม Reboot
- 12. ♞ คู่มือติดตั้งระบบป้องกันเครือข่ายองค์กรด้วย Page12 Write by Dr.Arnut Ruttanatirakul (arnut.r@rmutsb.ac.th) Department of Information System and Business Computer, Huntra Faculty of Business Administration and Information Technology, Rajamangala University of Technology Suvarnabhumi. เลือกที่ปุ่ม Reboot 12. บู๊ตเข้ำระบบ เพื่อเข้ำใช้งำนครั้งแรก บู๊ตเข้ำระบบเพื่อเข้ำใช้งำนครั้งแรก 13. เลือกชนิดแป้นพิมพ์เป็น “us” เสร็จแล้วให้เลือกปุ่ม OK
- 13. ♞ คู่มือติดตั้งระบบป้องกันเครือข่ายองค์กรด้วย Page13 Write by Dr.Arnut Ruttanatirakul (arnut.r@rmutsb.ac.th) Department of Information System and Business Computer, Huntra Faculty of Business Administration and Information Technology, Rajamangala University of Technology Suvarnabhumi. เลือกชนิดแป้นพิมพ์เป็น “us” 14. เลือกเวลำท้องถิ่นเป็น Asia/Bangkok เสร็จแล้วให้เลือกปุ่ม OK เลือกเวลำท้องถิ่นเป็น Asia/Bangkok 15. กำหนดชื่อเครื่องบริกำร เช่น huntraserver เสร็จแล้วให้เลือกปุ่ม OK
- 14. ♞ คู่มือติดตั้งระบบป้องกันเครือข่ายองค์กรด้วย Page14 Write by Dr.Arnut Ruttanatirakul (arnut.r@rmutsb.ac.th) Department of Information System and Business Computer, Huntra Faculty of Business Administration and Information Technology, Rajamangala University of Technology Suvarnabhumi. กำหนดชื่อเครื่องบริกำร 16. กำหนดชื่อโดเมน ในที่นี่ทดสอบใช้ชื่อเดิมคือ localdomain เสร็จแล้วให้เลือกปุ่ม OK กำหนดชื่อโดเมน 17. กำหนดรหัสผ่ำน root (super user) เสร็จแล้วให้เลือกปุ่ม OK
- 15. ♞ คู่มือติดตั้งระบบป้องกันเครือข่ายองค์กรด้วย Page15 Write by Dr.Arnut Ruttanatirakul (arnut.r@rmutsb.ac.th) Department of Information System and Business Computer, Huntra Faculty of Business Administration and Information Technology, Rajamangala University of Technology Suvarnabhumi. กำหนดรหัสผ่ำน root 18. กำหนดรหัสผ่ำนผู้ใช้ admin สำหรับควบคุมระบบผ่ำนเว็บ (IPFire web administration page) เสร็จแล้วให้เลือกปุ่ม OK กำหนดรหัสผ่ำนผู้ใช้ admin สำหรับควบคุมระบบผ่ำนเว็บ 19. กำหนดรำยละเอียดกำร์ดเครือข่ำย ค่ำปกติ ระบบจะให้กำหนดขำฝั่ง GREEN และ RED เลือก Network configuration type
- 16. ♞ คู่มือติดตั้งระบบป้องกันเครือข่ายองค์กรด้วย Page16 Write by Dr.Arnut Ruttanatirakul (arnut.r@rmutsb.ac.th) Department of Information System and Business Computer, Huntra Faculty of Business Administration and Information Technology, Rajamangala University of Technology Suvarnabhumi. เลือก Network configuration type 20. เลือกรูปแบบเครือข่ำยที่ต้องกำรสร้ำง ในที่นี้ให้คลิกเลือก GREEN + RED เลือกรูปแบบเครือข่ำยที่ต้องกำรสร้ำง
- 17. ♞ คู่มือติดตั้งระบบป้องกันเครือข่ายองค์กรด้วย Page17 Write by Dr.Arnut Ruttanatirakul (arnut.r@rmutsb.ac.th) Department of Information System and Business Computer, Huntra Faculty of Business Administration and Information Technology, Rajamangala University of Technology Suvarnabhumi. 21. เลือก Drivers and card assignments เลือก Drivers and card assignments 22. เลือก GREEN เพื่อกำหนดอินเตอร์เฟซฝั่ง LAN (สำหรับจ่ำยให้เครื่องลูกข่ำย) เลือก GREEN 23. เลือกอินเตอร์เฟซฝั่ง LAN (ขำ GREEN)
- 18. ♞ คู่มือติดตั้งระบบป้องกันเครือข่ายองค์กรด้วย Page18 Write by Dr.Arnut Ruttanatirakul (arnut.r@rmutsb.ac.th) Department of Information System and Business Computer, Huntra Faculty of Business Administration and Information Technology, Rajamangala University of Technology Suvarnabhumi. เลือกอินเตอร์เฟซฝั่ง LAN (ขำ GREEN) 24. เลือก RED เพื่อกำหนดอินเตอร์เฟซฝั่ง WAN (ฝั่ง Router ที่ออกอินเทอร์เน็ต) เลือก RED เพื่อกำหนดอินเตอร์เฟซฝั่ง WAN 25. เลือกอินเตอร์เฟซฝั่ง WAN (ขำ RED) เลือกอินเตอร์เฟซฝั่ง WAN
- 19. ♞ คู่มือติดตั้งระบบป้องกันเครือข่ายองค์กรด้วย Page19 Write by Dr.Arnut Ruttanatirakul (arnut.r@rmutsb.ac.th) Department of Information System and Business Computer, Huntra Faculty of Business Administration and Information Technology, Rajamangala University of Technology Suvarnabhumi. 26. อินเตอร์เฟซที่เลือกเสร็จแล้ว เสร็จแล้วให้เลือกปุ่ม Done อินเตอร์เฟซที่เลือกเสร็จแล้ว 27. เลือกที่ Address settings เพื่อกำหนดค่ำไอพี เลือกที่ Address settings 28. เลือก RED เพื่อกำหนดไอพีแอดเดรสฝั่ง WAN (ฝั่ง Router ที่ออกอินเทอร์เน็ต)
- 20. ♞ คู่มือติดตั้งระบบป้องกันเครือข่ายองค์กรด้วย Page20 Write by Dr.Arnut Ruttanatirakul (arnut.r@rmutsb.ac.th) Department of Information System and Business Computer, Huntra Faculty of Business Administration and Information Technology, Rajamangala University of Technology Suvarnabhumi. เลือก RED เพื่อกำหนดไอพีฝั่ง WAN 29. กำหนดไอพีฝั่ง WAN (ฝั่ง Router ที่ออกอินเทอร์เน็ต) เสร็จแล้วเลือกปุ่ม OK กำหนดไอพีฝั่ง WAN (ฝั่ง Router ที่ออกอินเทอร์เน็ต) 30. เลือก GREEN เพื่อกำหนดไอพีแอดเดรสฝั่ง LAN (ฝั่งเครื่องลูกข่ำย)
- 21. ♞ คู่มือติดตั้งระบบป้องกันเครือข่ายองค์กรด้วย Page21 Write by Dr.Arnut Ruttanatirakul (arnut.r@rmutsb.ac.th) Department of Information System and Business Computer, Huntra Faculty of Business Administration and Information Technology, Rajamangala University of Technology Suvarnabhumi. เลือก GREEN เพื่อกำหนดไอพีแอดเดรสฝั่ง LAN 31. กำหนดไอพีฝั่ง LAN (ฝั่งเครื่องลูกข่ำย) เสร็จแล้วเลือกปุ่ม OK กำหนดไอพีฝั่ง LAN (ฝั่งเครื่องลูกข่ำย) 32. เลือกปุ่ม Done เพื่อย้อนกลับ
- 22. ♞ คู่มือติดตั้งระบบป้องกันเครือข่ายองค์กรด้วย Page22 Write by Dr.Arnut Ruttanatirakul (arnut.r@rmutsb.ac.th) Department of Information System and Business Computer, Huntra Faculty of Business Administration and Information Technology, Rajamangala University of Technology Suvarnabhumi. เลือกปุ่ม Done 33. เลือก DNS and Gateway settings เพื่อกำหนด DNS และ Gateway เลือก DNS and Gateway settings 34. กำหนดหมำยเลข DNS และ Gateway ขำอินเตอร์เฟซฝั่ง WAN (RED Zone) เสร็จแล้วเลือกปุ่ม OK
- 23. ♞ คู่มือติดตั้งระบบป้องกันเครือข่ายองค์กรด้วย Page23 Write by Dr.Arnut Ruttanatirakul (arnut.r@rmutsb.ac.th) Department of Information System and Business Computer, Huntra Faculty of Business Administration and Information Technology, Rajamangala University of Technology Suvarnabhumi. กำหนดหมำยเลข DNS และ Gateway ขำอินเตอร์เฟซฝั่ง WAN (RED Zone) 35. เลือก Done เพื่อย้อนกลับ เลือก Done เพื่อย้อนกลับ 36. เลือก [*] Enable เสร็จแล้วกำหนดช่วงของไอพีแอดเดรส ดีเอ็นเอส ที่ต้องกำรจ่ำยให้เครื่องลูกข่ำย เสร็จแล้วเลือกปุ่ม OK
- 24. ♞ คู่มือติดตั้งระบบป้องกันเครือข่ายองค์กรด้วย Page24 Write by Dr.Arnut Ruttanatirakul (arnut.r@rmutsb.ac.th) Department of Information System and Business Computer, Huntra Faculty of Business Administration and Information Technology, Rajamangala University of Technology Suvarnabhumi. กำหนดช่วงของไอพีแอดเดรส ดีเอ็นเอส ที่ต้องกำรจ่ำยให้เครื่องลูกข่ำย 37. ระบบแสดงหน้ำต่ำงสิ้นสุดกำรติดตั้ง ให้เลือกปุ่ม OK ระบบแสดงหน้ำต่ำงสิ้นสุดกำรติดตั้ง
- 25. ♞ คู่มือติดตั้งระบบป้องกันเครือข่ายองค์กรด้วย Page25 Write by Dr.Arnut Ruttanatirakul (arnut.r@rmutsb.ac.th) Department of Information System and Business Computer, Huntra Faculty of Business Administration and Information Technology, Rajamangala University of Technology Suvarnabhumi. ➧ การล็อกอินเข้าระบบทางหน้า Console 1. ทดสอบเข้ำระบบทำง Console โดยแอคเคำน์ “root” Username: root Password: รหัสที่ป้อนตอนติดตั้ง ทดสอบเข้ำระบบด้วยผู้ใช้ root 2. พิมพ์คำสั่ง ip a เพื่อตรวจสอบอินเตอร์เฟซ และ IP Address # ip a พิมพ์คำสั่ง ip a เพื่อตรวจสอบอินเตอร์เฟซ และ IP Address 3. พิมพ์คำสั่ง route หรือ netstat -r เพื่อตรวจสอบตำรำง Routing # route # netstat –r
- 26. ♞ คู่มือติดตั้งระบบป้องกันเครือข่ายองค์กรด้วย Page26 Write by Dr.Arnut Ruttanatirakul (arnut.r@rmutsb.ac.th) Department of Information System and Business Computer, Huntra Faculty of Business Administration and Information Technology, Rajamangala University of Technology Suvarnabhumi. อินเตอร์เฟซ 10.0.2.0 จะอยู่ที่ขำ RED0 เพื่อออกอินเทอร์เน็ต อินเตอร์เฟซ 10.0.3.0 จะอยู่ที่ขำ GREEN0 เพื่อจ่ำยให้เครื่องลูกข่ำย พิมพ์คำสั่ง route เพื่อตรวจสอบตำรำง Routing 4. ทดสอบกำรเชื่อมต่ออินเทอร์เน็ต ในที่นี้ทดสอบใช้คำสั่ง ping ไปยังเว็บ www.google.co.th ping www.google.co.th ทดสอบกำรเชื่อมต่ออินเทอร์เน็ต
- 27. ♞ คู่มือติดตั้งระบบป้องกันเครือข่ายองค์กรด้วย Page27 Write by Dr.Arnut Ruttanatirakul (arnut.r@rmutsb.ac.th) Department of Information System and Business Computer, Huntra Faculty of Business Administration and Information Technology, Rajamangala University of Technology Suvarnabhumi. ➧ การควบคุมระบบทางหน้าเว็บไซต์ IPFire WAN IP = 10.0.2.10/24 IPFire LAN IP = 10.0.3.10/24 1. เข้ำงำนจำกฝั่ง GREEN Zone (ฝั่งเครื่องลูกข่ำย) รูปแบบ https://IPFire_LAN_IP:444/ เช่น https://10.0.3.10:444 หมำยเหตุ : ในที่นี้ผู้เขียน ทดสอบโดยทำ Port Forwarding มำที่ไอพี 127.0.0.1 เข้ำงำนจำกฝั่ง GREEN Zone (ฝั่งเครื่องลูกข่ำย) 2. ทำกำรป้อนชื่อผู้ควบคุมระบบทำงหน้ำเว็บไซต์ (ipfire web admin) Username: admin Password: ค่ำที่กำหนดไว้ตอนติดตั้ง
- 28. ♞ คู่มือติดตั้งระบบป้องกันเครือข่ายองค์กรด้วย Page28 Write by Dr.Arnut Ruttanatirakul (arnut.r@rmutsb.ac.th) Department of Information System and Business Computer, Huntra Faculty of Business Administration and Information Technology, Rajamangala University of Technology Suvarnabhumi. ป้อนชื่อผู้ควบคุมระบบทำงหน้ำเว็บไซต์ (ipfire web admin) 3. หน้ำต่ำงของ IPFire Web Admin สำหรับควบคุมระบบ หน้ำต่ำงของ IPFire Web Admin สำหรับควบคุมระบบ
- 29. ♞ คู่มือติดตั้งระบบป้องกันเครือข่ายองค์กรด้วย Page29 Write by Dr.Arnut Ruttanatirakul (arnut.r@rmutsb.ac.th) Department of Information System and Business Computer, Huntra Faculty of Business Administration and Information Technology, Rajamangala University of Technology Suvarnabhumi. ➧ รายการเมนูใน IPFire web administration page เมนู System เมนู Status เมนู IPFire
- 30. ♞ คู่มือติดตั้งระบบป้องกันเครือข่ายองค์กรด้วย Page30 Write by Dr.Arnut Ruttanatirakul (arnut.r@rmutsb.ac.th) Department of Information System and Business Computer, Huntra Faculty of Business Administration and Information Technology, Rajamangala University of Technology Suvarnabhumi. เมนู Network เมนู Logs เมนู Firewall เมนู Services
- 31. ♞ คู่มือติดตั้งระบบป้องกันเครือข่ายองค์กรด้วย Page31 Write by Dr.Arnut Ruttanatirakul (arnut.r@rmutsb.ac.th) Department of Information System and Business Computer, Huntra Faculty of Business Administration and Information Technology, Rajamangala University of Technology Suvarnabhumi. การตรวจสอบสถานะบริการที่ใช้งานอยู่ เมนู Status > Services การสตรวจสอบการใช้งานเครือข่ายภายใน เมนู Status > Network (internal)
- 32. ♞ คู่มือติดตั้งระบบป้องกันเครือข่ายองค์กรด้วย Page32 Write by Dr.Arnut Ruttanatirakul (arnut.r@rmutsb.ac.th) Department of Information System and Business Computer, Huntra Faculty of Business Administration and Information Technology, Rajamangala University of Technology Suvarnabhumi. การตรวจสอบการเชื่อมต่อ เมนู Status > Connections การตรวจสอบการใช้งาน CPU และ RAM เมนู Status > System เมนู Status > Memory
- 33. ♞ คู่มือติดตั้งระบบป้องกันเครือข่ายองค์กรด้วย Page33 Write by Dr.Arnut Ruttanatirakul (arnut.r@rmutsb.ac.th) Department of Information System and Business Computer, Huntra Faculty of Business Administration and Information Technology, Rajamangala University of Technology Suvarnabhumi. การกาหนดการใช้งาน Proxy เมนู Network > Web Proxy การกาหนดกรองการใช้งานผู้ใช้ เช่น บล็อกเว็บไซต์ กาหนดช่วงเวลาในการเข้าใช้งาน เมนู Network > URL Filter
- 34. ♞ คู่มือติดตั้งระบบป้องกันเครือข่ายองค์กรด้วย Page34 Write by Dr.Arnut Ruttanatirakul (arnut.r@rmutsb.ac.th) Department of Information System and Business Computer, Huntra Faculty of Business Administration and Information Technology, Rajamangala University of Technology Suvarnabhumi. การใช้งาน Virtual Private Network เมนู Service > OpenVPN การควบคุมแบนด์วิดธ์ด้วย QoS เมนู Services > Quality of Service
- 35. ♞ คู่มือติดตั้งระบบป้องกันเครือข่ายองค์กรด้วย Page35 Write by Dr.Arnut Ruttanatirakul (arnut.r@rmutsb.ac.th) Department of Information System and Business Computer, Huntra Faculty of Business Administration and Information Technology, Rajamangala University of Technology Suvarnabhumi. การตั้งระบบแจ้งเตือนการเจอะระบบ เครือข่ายด้วย IDS เมนู Service > Instruction Detection การกาหนดกฎการใช้งาน Firewall เมนู Firewall > Firewall Rules
- 36. ♞ คู่มือติดตั้งระบบป้องกันเครือข่ายองค์กรด้วย Page36 Write by Dr.Arnut Ruttanatirakul (arnut.r@rmutsb.ac.th) Department of Information System and Business Computer, Huntra Faculty of Business Administration and Information Technology, Rajamangala University of Technology Suvarnabhumi. การควบคุม P2P Network เมนู Firewall > P2P Networks การเปิดใช้งาน Secure Shell เมนู System > SSH Access
- 37. ♞ คู่มือติดตั้งระบบป้องกันเครือข่ายองค์กรด้วย Page37 Write by Dr.Arnut Ruttanatirakul (arnut.r@rmutsb.ac.th) Department of Information System and Business Computer, Huntra Faculty of Business Administration and Information Technology, Rajamangala University of Technology Suvarnabhumi. สรุป IPFire เป็นระบบลีนุกซ์เซิร์ฟเวอร์แบบสำเร็จรูปที่มีควำมสำมำรถสูง จำกกำรทดสอบเป็นระบบที่น่ำ ใช้งำนทีเดียว มีหน้ำต่ำง User Interface ค่อนข้ำงเป็นมิตรกับผู้ใช้งำน เหมำะสำหรับนำไปควบคุม ระบบเครือข่ำยขนำดเล็กถึงขนำดกลำง ในกำรใช้งำนจริงสำมำรถนำมำทำระบบต่ำงๆ ดังนี้ 1) Network Firewall สำหรับป้องกันเครือข่ำยในรูปแบบต่ำงๆ สำมำรถำหนดกฎ กำหนดกลุ่ม และปรับออปชั่นเพิ่มเติมได้ 2) Proxy Server สำหรับทำเว็บแคชเพื่อเพิ่มควำมเร็วในกำรใช้งำนอินเทอร์เน็ต และกรองข้อมูล กำรใช้งำน 3) Log Server สำหรับใช้เก็บไฟล์บันทึกเหตุกำรณ์ต่ำงๆ และใช้ในกำรควบคุมแบนด์วิดธ์ด้วย QoS 4) VPN Server สำหรับใช้ทำระบบเครือข่ำยเสมือน 5) Dynamic DNS สำหรับใช้ประยุกต์ทำระบบควบคุมกล้องวงจรปิด 6) IDS สำหรับทำระบบแจ้งเตือนภัยอันตรำยต่ำงๆ
- 38. ♞ คู่มือติดตั้งระบบป้องกันเครือข่ายองค์กรด้วย Page38 Write by Dr.Arnut Ruttanatirakul (arnut.r@rmutsb.ac.th) Department of Information System and Business Computer, Huntra Faculty of Business Administration and Information Technology, Rajamangala University of Technology Suvarnabhumi. เอกสารอ้างอิง http://www.ipfire.org http://www.ipfire.org/cebit http://sysadmin.in.th/node/76 https://en.wikipedia.org/wiki/IPFire https://en.wikipedia.org/wiki/List_of_router_and_firewall_distributions %%%%%%%%%%%%%%%%%%%%%%%%%%%%%%%%%%%%
- 39. ♞ คู่มือติดตั้งระบบป้องกันเครือข่ายองค์กรด้วย Page39 Write by Dr.Arnut Ruttanatirakul (arnut.r@rmutsb.ac.th) Department of Information System and Business Computer, Huntra Faculty of Business Administration and Information Technology, Rajamangala University of Technology Suvarnabhumi. ♞ การปรับตัวเพื่อการทางานในโลกยุคต่อไปที่มีการแข่งขันสูง ทักษะด้านดิจิทัลจึงมีความสาคัญต่อการพัฒนาตนเอง เพื่อความสาเร็จขององค์กร @HuntraScholar Write by Dr.Arnut Ruttanatirakul ☺ ติดต่อ บรรยำยพิเศษได้ที่ ✈ ✈ ✈ ขอให้เพื่อนๆ HuntraScholar สนุกกับกำรบริหำรระบบสำรสนเทศในยุคดิจิทัล https://www.facebook.com/HuntraScholar/ Social Media: @HuntraScholar October 27, 2017