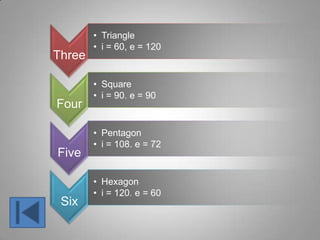
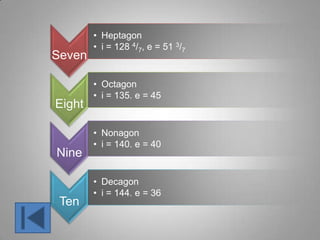
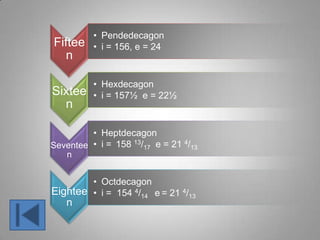
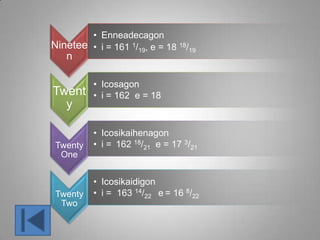
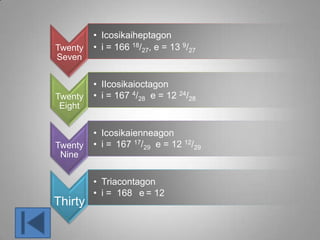
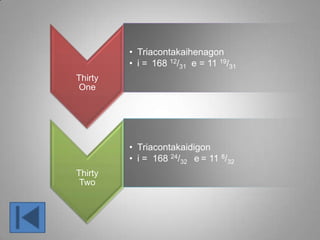
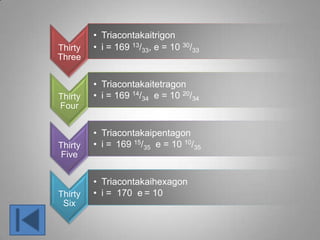
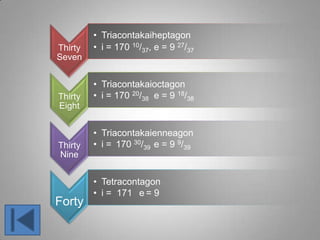
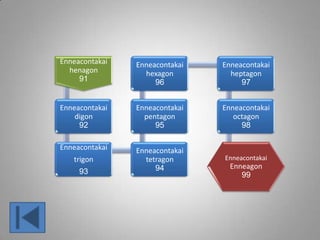
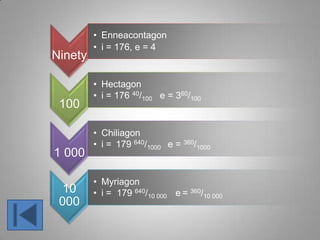
Name
Those
Polygons
3-6 Sides 27-30 sides 51-59 sides
7-10 Sides 31-32 sides 61-69 sides
11-14 Sides 33-36 sides 71-79 sides
15-18 Sides 37-40 sides 81-89 sides
19-22 Sides 50,60,70
and 80
sides
91-99 sides
23-26 sides 41-49 sides 90, 100,
1 000 and
10 000
Many Sides
Sum of all External
angles is 360 and
Internal + exterior
add to 180
Three
• Triangle
• i = 60, e = 120
Four
• Square
• i = 90. e = 90
Five
• Pentagon
• i = 108. e = 72
Six
• Hexagon
• i = 120. e = 60
Seven
• Heptagon
• i = 128 4/7, e = 51 3/7
Eight
• Octagon
• i = 135. e = 45
Nine
• Nonagon
• i = 140. e = 40
Ten
• Decagon
• i = 144. e = 36
Eleve
n
• Hendecagon
• i = 147 9/11, e = 32 2/11
Twelv
e
• Dodecagon
• i = 150. e = 30
Thirte
en
• Triskaidecagon
• i = 152 4/13. e = 27 9/13
Fourtee
n
• Tetrakaidecagon
• i = 154 4/14. e = 25 10/14
Fiftee
n
• Pendedecagon
• i = 156, e = 24
Sixtee
n
• Hexdecagon
• i = 157½ e = 22½
Seventee
n
• Heptdecagon
• i = 158 13/17 e = 21 4/13
Eightee
n
• Octdecagon
• i = 154 4/14 e = 21 4/13
Ninetee
n
• Enneadecagon
• i = 161 1/19, e = 18 18/19
Twent
y
• Icosagon
• i = 162 e = 18
Twenty
One
• Icosikaihenagon
• i = 162 18/21 e = 17 3/21
Twenty
Two
• Icosikaidigon
• i = 163 14/22 e = 16 8/22
Twenty
Three
• Icosikaitrigon
• i = 165 8/23, e = 15 15/23
Twenty
Four
• IIcosikaitetragon
• i = 165 e = 15
Twenty
Five
• Icosikaipentagon
• i = 165 15/25 e = 14 10/25
Twenty
Six
• Icosikaihexagon
• i = 166 4/26 e = 13 22/26
Twenty
Seven
• Icosikaiheptagon
• i = 166 18/27, e = 13 9/27
Twenty
Eight
• IIcosikaioctagon
• i = 167 4/28 e = 12 24/28
Twenty
Nine
• Icosikaienneagon
• i = 167 17/29 e = 12 12/29
Thirty
• Triacontagon
• i = 168 e = 12
Thirty
One
• Triacontakaihenagon
• i = 168 12/31 e = 11 19/31
Thirty
Two
• Triacontakaidigon
• i = 168 24/32 e = 11 8/32
Thirty
Three
• Triacontakaitrigon
• i = 169 13/33, e = 10 30/33
Thirty
Four
• Triacontakaitetragon
• i = 169 14/34 e = 10 20/34
Thirty
Five
• Triacontakaipentagon
• i = 169 15/35 e = 10 10/35
Thirty
Six
• Triacontakaihexagon
• i = 170 e = 10
Thirty
Seven
• Triacontakaiheptagon
• i = 170 10/37, e = 9 27/37
Thirty
Eight
• Triacontakaioctagon
• i = 170 20/38 e = 9 18/38
Thirty
Nine
• Triacontakaienneagon
• i = 170 30/39 e = 9 9/39
Forty
• Tetracontagon
• i = 171 e = 9
Tetracontakai
henagon
41
Tetracontakai
digon
42
Tetracontakai
trigon
43
Tetracontakai
tetragon
44
Tetracontakai
pentagon
45
Tetracontakai
hexagon
46
Tetracontakai
heptagon
47
Tetracontakai
octagon
48
Tetracontakai
Enneagon
49
Fifty
• Pentacontagon
• i = 172 40/50, e = 710/50
Sixty
• Hexacontagon
• i = 174 e = 6
Seven
ty
• Heptacontagon
• i = 170 30/39 e = 99/39
Eighty
• Octacontagon
• i = 175½ e = 4½
Pentacontakai
henagon
51
Pentacontakai
digon
52
Pentacontakai
trigon
53
Pentacontakai
tetragon
54
Pentacontakai
pentagon
55
Pentacontakai
hexagon
56
Pentacontakai
heptagon
57
Pentacontakai
octagon
58
Pentacontakai
Enneagon
59
Hexacontakai
henagon
61
Hexacontakai
digon
62
Hexacontakai
trigon
63
Hexacontakai
tetragon
64
Hexacontakai
pentagon
65
Hexacontakai
hexagon
66
Hexacontakai
heptagon
67
Hexacontakai
octagon
68
Hexacontakai
Enneagon
69
Heptacontakai
henagon
71
Heptacontakai
digon
72
Heptacontakai
trigon
73
Heptacontakai
tetragon
74
Heptacontakai
pentagon
75
Heptacontakai
hexagon
76
Heptacontakai
heptagon
77
Heptacontakai
octagon
78
Heptacontakai
Enneagon
79
Octacontakai
henagon
81
Octacontakai
digon
82
Octacontakai
trigon
83
Octacontakai
tetragon
84
Octacontakai
pentagon
85
Octacontakai
hexagon
86
Octacontakai
heptagon
87
Octacontakai
octagon
88
Octacontakai
Enneagon
89
Enneacontakai
henagon
91
Enneacontakai
digon
92
Enneacontakai
trigon
93
Enneacontakai
tetragon
94
Enneacontakai
pentagon
95
Enneacontakai
hexagon
96
Enneacontakai
heptagon
97
Enneacontakai
octagon
98
Enneacontakai
Enneagon
99
Ninety
• Enneacontagon
• i = 176, e = 4
100
• Hectagon
• i = 176 40/100 e = 360/100
1 000
• Chiliagon
• i = 179 640/1000 e = 360/1000
10
000
• Myriagon
• i = 179 640/10 000 e = 360/10 000
105
• Megagon
• i = 179 99 640/ 100 000 e = 360/100 000
10100
• Googolgonalmost
• i = 180 e = 0 (Almost)

Names of polygons

Editor's Notes

  • #2 SmartArt custom animation effects: pictures peek-in(Basic)To reproduce the SmartArt effects on this page, do the following:On the Home tab, in the Slides group, click Layout, and then clickBlank. On the Insert tab, in the Illustrations group, click SmartArt.In the Choose a SmartArt Graphic dialog box, in the left pane, click Matrix. In the Matrix pane, double-click Titled Matrix (second option from the left) to insert the graphic into the slide. Select the graphic. Under SmartArt Tools, on the Format tab, click Size, and then do the following:In the Height box, enter 5.67”.In the Width box, enter 8.5”.Under SmartArt Tools, on the Format tab, click Arrange, click Align, and then do the following:Click Align to Slide.Click Align Middle. Click Align Center. Select the graphic, and then click one of the arrows on the left border. In the Type your text here dialog box, enter text in the top-level bullet only (text for the rounded rectangle at the center of the graphic). To remove the [Text] placeholder in the second-level bullets, select each bullet and press SPACE.On the slide, select the graphic. Under SmartArtTools, on the Design tab, in the SmartArtStyles group, click More, and then under Best Match for Document click Moderate Effect.Select the rounded rectangle at the center of the graphic. On the Home tab, in the Font group, select 28 from the Font Size list, click the arrow next to Font Color, and then click White, Background 1 (first row, first option from the left).With the rounded rectangle selected, under SmartArtTools, on the Format tab, in the bottom right corner of the ShapeStyles group, click the FormatShape dialog box launcher. In the FormatShape dialog box, click Fill in the left pane, select Gradient fill in the Fill pane, and then do the following:In the Type list, select Linear.In the Direction list, select LinearUp (second row, second option from the left).Under Gradient stops, click Add or Remove until three stops appear in the drop-down list.Also under Gradient stops, customize the gradient stops as follows:Select Stop 1 from the list, and then do the following:In the Stop position box, enter 0%.Click the button next to Color, and then under Theme ColorsclickWhite, Background 1, Darker 35% (fifth row, first option from the left).Select Stop 2 from the list, and then do the following: In the Stop position box, enter 80%.Click the button next to Color, and then under Theme ColorsclickWhite, Background 1, Darker 35% (fifth row, first option from the left).Select Stop 3 from the list, and then do the following: In the Stop position box, enter 100%.Click the button next to Color, and then under Theme ColorsclickWhite, Background 1, Darker 15% (third row, first option from the left).Right-click the top left shape in the graphic, and then click Format Shape. In the Format Shape dialog box, in the left pane, click Fill. In the Fill pane, click Picture or texture fill,and then under Insert from, click File.In the Insert Picture dialog box, select a picture and then click Insert. Right-click the top right shape in the graphic, and then click Format Shape. In the Format Shape dialog box, in the left pane, click Fill. In the Fill pane, click Picture or texture fill,and then under Insert from, click File.In the Insert Picture dialog box, select a picture and then click Insert. Right-click the bottom left shape in the graphic, and then click Format Shape. In the Format Shape dialog box, in the left pane, click Fill. In the Fill pane, click Picture or texture fill,and then under Insert from, click File.In the Insert Picture dialog box, select a picture and then click Insert. Right-click the bottom right shape in the graphic, and then click Format Shape. In the Format Shape dialog box, in the left pane, click Fill. In the Fill pane, click Picture or texture fill,and then under Insert from, click File.In the Insert Picture dialog box, select a picture and then click Insert. To reproduce the animation effects on this slide, do the following:On the Animations tab, in the Animations group, click CustomAnimation.On the slide, select the graphic, and then do the following in the CustomAnimation task pane: Click Add Effect, point to Entrance, and then click MoreEffects. In the Add Entrance Effect dialog box, under Subtle, click Expand. Under Modify: Expand, in the Speed list, select Fast.Under Modify: Expand, in the Start list, select After Previous.Also in the Custom Animation task pane, click the arrow to the right of theanimation effect, and then click EffectOptions. In the Expand dialog box, on the SmartArt Animation tab, in the Group Graphic list, select One by one.Also in the Custom Animation taskpane, click the double-arrow below the animation effect to expand the list of effects, and then do the following:Press and hold CTRL, and then select all five animation effects in the Custom Animation task pane. Under Modify: Expand, in the Start list, select With Previous.Press and hold CTRL, select the second, third, fourth, and fifth animation effects (expand effects for the picture-filled rectangles), and then do the following:Click Change, point to Entrance, and then click MoreEffects. In the Change Entrance Effect dialog box, under Basic, click Peek In. Under Modify: Peek In, in the Speed list, select Fast.Select the second animation effect. Under Modify: Peek In, in the Start list, select After Previous.Select the third animation effect. Under Modify: Peek In, in theDirection list, select From Left.Select the fourth animation effect. Under Modify: Peek In, in the Direction list, select From Right.Select the fifth animation effect. Under Modify: Peek In, in the Direction list, select From Top.To reproduce the background effects on this slide, do the following:Right-click the slide background area, and then click Format Background. In the Format Background dialog box, click Fill in the left pane, select Gradient fill in the Fill pane, and then do the following:In the Type list, select Radial.Click the button next to Direction, and then click From Corner (fifth option from the left).Under Gradient stops, click Add or Remove until two stops appear in the drop-down list.Also under Gradient stops, customize the gradient stops as follows:Select Stop 1 from the list, and then do the following:In the Stop position box, enter 0%.Click the button next to Color, and then under Theme ColorsclickWhite, Background 1 (first row, first option from the left).Select Stop 2 from the list, and then do the following: In the Stop position box, enter 71%.Click the button next to Color, and then under Theme ColorsclickWhite, Background 1, Darker 15% (third row, first option from the left).
  • #4 SmartArt customanimation effects: vertical chevron list with dark colors(Basic)To reproduce the SmartArt effects on this slide, do the following:On the Home tab, in the Slides group, click Layout, and then clickBlank. On the Insert tab, in the Illustrations group, click SmartArt. In the Choose a SmartArt Graphic dialog box, in the left pane, click List. In the List pane, click Vertical Chevron List (fourth row, fourth option from the left), and then click OK to insert the graphic into the slide.To create a fourth chevron, select the third chevron at the bottom of the graphic, and then under SmartArtTools, on the Design tab, in the CreateGraphic group, click the arrow next to AddShape, and select AddShapeAfter.To add bullets for the fourth chevron, select the fourth chevron, and then under SmartArtTools, on the Design tab, in the CreateGraphic group, click AddBullet.To enter text, select the SmartArt graphic, and then click one of the arrows on the left border. In the Type your text here dialog box, enter text for each level. (Note: In the example slide, the first-level text boxes contain “One,” “Two,” “Three,” and “Four.” The second-level text is “Supporting Text.”)On the slide, select the SmartArt graphic and drag the right center sizing handle to the right edge of the slide.With the SmartArt graphic still selected, on the DesignTab, in the Themes group, click Colors, and then under Built-In select Median. (Note: If this action is taken in a PowerPoint presentation containing more than one slide, the theme will be applied to all of the slides.)With the SmartArt graphic still selected, under SmartArtTools, on the Design tab, in the SmartArtStyles group, click MoreStyles, and then under 3-D select Inset (first row, second option from the left). Also under SmartArtTools, on the Design tab, in the SmartArtStyles group, click ChangeColors, and then under Colorful select Colorful -AccentColors (first option from the left). To reproduce the chevron effects on this slide, do the following:Press and hold CTRL, and select all four chevrons in the SmartArt graphic. On the Home tab, in the Font group, in the Font list select Franklin Gothic Medium Cond, and then in the FontSize box select 28.On the Home tab, in the bottom right corner of the Drawing group, click the FormatShape dialog box launcher. In the FormatShape dialog box, click TextBox in the left pane, and in the TextBox pane do the following:Under Textlayout, in the Verticalalignment list select Bottom.Under Internalmargin, do the following: In the Left box, enter 0”. In the Right box, enter 0”. In the Bottom box, enter 0”. In the Top box, enter 0.6”.To reproduce the rectangle effects on this slide, do the following:Press and hold CTRL, and the four of the rectangles (with bulleted text). On the Home tab, in the Font group, do the following:In the Font list, select FranklinGothicBook.In the FontSize box, enter 21.In the FontColor list, underThemeColors select White, Background 1 (first row, first option from the left).On the Home tab, in the bottom right corner of the Drawing group, click the Format Shapedialog box launcher. In the Format Shape dialog box, click Fill in the left pane, select Gradientfill in the Fill pane, and then do the following:In the Type list, select Linear.Click the button next to Direction, and then click Linear Down (first row, second option from the left). Under Gradient stops, click Add or Remove until two stops appear in the drop-down list.Also under Gradient stops, customize the gradient stops that you added as follows:Select Stop 1 from the list, and then do the following:In the Stop position box, enter 0%.Click the button next to Color, and then under ThemeColors select Black, Text 1 (first row, second option from the left).In the Transparency box, enter 100%. Select Stop 2 from the list, and then do the following: In the Stop position box, enter 100%.Click the button next to Color, and then under ThemeColors select Black, Text 1 (first row, second option from the left).In the Transparency box, enter 45%. Also in the FormatShape dialog box, click Shadow in the left pane, and in the Shadow pane, in the Presets list, select NoShadow.Also in the FormatShape dialog box, click 3-DFormat in the left pane, and in the 3-DFormat pane, underBevel, in the Top list select NoBevel.Select the top rectangle with bulleted text.On the Home tab, in the bottom right corner of the Drawing group, click the FormatShape dialog box launcher. In the FormatShape dialog box, click LineColor in the left pane, select Gradientfill in the LineColor pane, and then do the following:In the Type list, select Linear.Click the button next to Direction, and then click Linear Down (first row, second option from the left). Under Gradient stops, click Add or Remove until two stops appear in the drop-down list.Also under Gradient stops, customize the gradient stops that you added as follows:Select Stop 1 from the list, and then do the following:In the Stop position box, enter 0%.Click the button next to Color, and then under ThemeColors select Orange, Accent 2 (first row, sixth option from the left).In the Transparency box, enter 100%. Select Stop 2 from the list, and then do the following: In the Stop position box, enter 100%.Click the button next to Color, and then under ThemeColors select Orange, Accent 2 (first row, sixth option from the left).In the Transparency box, enter 0%. Select the second rectangle from the top with bulleted text.On the Home tab, in the bottom right corner of the Drawing group, click the FormatShape dialog box launcher. In the FormatShape dialog box, click LineColor in the left pane, select Gradientfill in the LineColor pane, and then do the following:In the Type list, select Linear.Click the button next to Direction, and then click Linear Down (first row, second option from the left). Under Gradient stops, click Add or Remove until two stops appear in the drop-down list.Also under Gradient stops, customize the gradient stops that you added as follows:Select Stop 1 from the list, and then do the following:In the Stop position box, enter 0%.Click the button next to Color, and then under ThemeColors select Olive Green, Accent 3 (first row, seventh option from the left).In the Transparency box, enter 100%. Select Stop 2 from the list, and then do the following: In the Stop position box, enter 100%.Click the button next to Color, and then under ThemeColors select Olive Green, Accent 3 (first row, seventh option from the left).In the Transparency box, enter 0%. Select the third rectangle from the top with bulleted text.On the Home tab, in the bottom right corner of the Drawing group, click the FormatShape dialog box launcher. In the FormatShape dialog box, click LineColor in the left pane, select Gradient fill in the LineColor pane, and then do the following:In the Type list, select Linear.Click the button next to Direction, and then click Linear Down (first row, second option from the left). Under Gradient stops, click Add or Remove until two stops appear in the drop-down list.Also under Gradient stops, customize the gradient stops that you added as follows:Select Stop 1 from the list, and then do the following:In the Stop position box, enter 0%.Click the button next to Color, and then under ThemeColors select Gold, Accent 4 (first row, eighth option from the left).In the Transparency box, enter 100%. Select Stop 2 from the list, and then do the following: In the Stop position box, enter 100%.Click the button next to Color, and then under ThemeColors select Gold, Accent 4 (first row, eighth option from the left).In the Transparency box, enter 0%. Select the fourth rectangle from the top with bulleted text.On the Home tab, in the bottom right corner of the Drawing group, click the FormatShape dialog box launcher. In the FormatShape dialog box, click LineColor in the left pane, select Gradient fill in the LineColor pane, and then do the following:In the Type list, select Linear.Click the button next to Direction, and then click Linear Down (first row, second option from the left). Under Gradient stops, click Add or Remove until two stops appear in the drop-down list.Also under Gradient stops, customize the gradient stops that you added as follows:Select Stop 1 from the list, and then do the following:In the Stop position box, enter 0%.Click the button next to Color, and then under ThemeColors select Green, Accent 5 (first row, ninth option from the left).In the Transparency box, enter 100%. Select Stop 2 from the list, and then do the following: In the Stop position box, enter 100%.Click the button next to Color, and then under ThemeColors select Green, Accent 5 (first row, ninth option from the left).In the Transparency box, enter 0%. To reproduce the animation effects on this slide, do the following: On the Animations tab, in the Animations group, click CustomAnimation.Select the SmartArt graphic, and then in the CustomAnimation task pane do the following:Click AddEffect, point to Entrance, and select MoreEffects. In the AddEntranceEffect dialog box, under Moderate select Grow & Turn.Click the arrow to the right of the animation effect (grow & turn effect for the graphic), select EffectOptions, and then in the Grow & Turn dialog box, do the following:On the Timing tab, in the Speed list, select 0.5 seconds (Very Fast).On the SmartArtAnimation tab, in the Groupgraphic list, select Onebyone.Click the double arrow to expand the contents of the list in theCustomAnimation task pane.Press and hold CTRL, and select the second, fourth, sixth, and eighth effects (grow & turn entrance effects), and then do the following:Click Change, point to Entrance and select MoreEffects. In the ChangeEntranceEffect dialog box, under Moderate select EaseIn.With the four ease-in entrance effects still selected, under Modify: Ease In do the following:In the Start list, select WithPrevious.In the Speed list, select Fast.Select the grow & turn entrance effect (first effect in the list), and under Modify: Grow & Turn, in the Start list, select WithPrevious.To reproduce the background effects on this slide, do the following:Right-click the slide background area, and then click Format Background. In the Format Background dialog box, click Fill in the left pane, select Gradient fill in the Fill pane, and then do the following:In the Type list, select Radial.Click the button next to Direction, and then click From Center (third option from the left). Under Gradient stops, click Add or Remove until two stops appear in the drop-down list.Also under Gradient stops, customize the gradient stops that you added as follows:Select Stop 1 from the list, and then do the following:In the Stop position box, enter 20%.Click the button next to Color, and then under ThemeColors select White, Background 1, Darker 25% (fourth row, first option from the left). Select Stop 2 from the list, and then do the following: In the Stop position box, enter 100%.Click the button next to Color, and then under ThemeColors select Black, Text 1 (first row, second option from the left).
  • #5 SmartArt customanimation effects: vertical chevron list with dark colors(Basic)To reproduce the SmartArt effects on this slide, do the following:On the Home tab, in the Slides group, click Layout, and then clickBlank. On the Insert tab, in the Illustrations group, click SmartArt. In the Choose a SmartArt Graphic dialog box, in the left pane, click List. In the List pane, click Vertical Chevron List (fourth row, fourth option from the left), and then click OK to insert the graphic into the slide.To create a fourth chevron, select the third chevron at the bottom of the graphic, and then under SmartArtTools, on the Design tab, in the CreateGraphic group, click the arrow next to AddShape, and select AddShapeAfter.To add bullets for the fourth chevron, select the fourth chevron, and then under SmartArtTools, on the Design tab, in the CreateGraphic group, click AddBullet.To enter text, select the SmartArt graphic, and then click one of the arrows on the left border. In the Type your text here dialog box, enter text for each level. (Note: In the example slide, the first-level text boxes contain “One,” “Two,” “Three,” and “Four.” The second-level text is “Supporting Text.”)On the slide, select the SmartArt graphic and drag the right center sizing handle to the right edge of the slide.With the SmartArt graphic still selected, on the DesignTab, in the Themes group, click Colors, and then under Built-In select Median. (Note: If this action is taken in a PowerPoint presentation containing more than one slide, the theme will be applied to all of the slides.)With the SmartArt graphic still selected, under SmartArtTools, on the Design tab, in the SmartArtStyles group, click MoreStyles, and then under 3-D select Inset (first row, second option from the left). Also under SmartArtTools, on the Design tab, in the SmartArtStyles group, click ChangeColors, and then under Colorful select Colorful -AccentColors (first option from the left). To reproduce the chevron effects on this slide, do the following:Press and hold CTRL, and select all four chevrons in the SmartArt graphic. On the Home tab, in the Font group, in the Font list select Franklin Gothic Medium Cond, and then in the FontSize box select 28.On the Home tab, in the bottom right corner of the Drawing group, click the FormatShape dialog box launcher. In the FormatShape dialog box, click TextBox in the left pane, and in the TextBox pane do the following:Under Textlayout, in the Verticalalignment list select Bottom.Under Internalmargin, do the following: In the Left box, enter 0”. In the Right box, enter 0”. In the Bottom box, enter 0”. In the Top box, enter 0.6”.To reproduce the rectangle effects on this slide, do the following:Press and hold CTRL, and the four of the rectangles (with bulleted text). On the Home tab, in the Font group, do the following:In the Font list, select FranklinGothicBook.In the FontSize box, enter 21.In the FontColor list, underThemeColors select White, Background 1 (first row, first option from the left).On the Home tab, in the bottom right corner of the Drawing group, click the Format Shapedialog box launcher. In the Format Shape dialog box, click Fill in the left pane, select Gradientfill in the Fill pane, and then do the following:In the Type list, select Linear.Click the button next to Direction, and then click Linear Down (first row, second option from the left). Under Gradient stops, click Add or Remove until two stops appear in the drop-down list.Also under Gradient stops, customize the gradient stops that you added as follows:Select Stop 1 from the list, and then do the following:In the Stop position box, enter 0%.Click the button next to Color, and then under ThemeColors select Black, Text 1 (first row, second option from the left).In the Transparency box, enter 100%. Select Stop 2 from the list, and then do the following: In the Stop position box, enter 100%.Click the button next to Color, and then under ThemeColors select Black, Text 1 (first row, second option from the left).In the Transparency box, enter 45%. Also in the FormatShape dialog box, click Shadow in the left pane, and in the Shadow pane, in the Presets list, select NoShadow.Also in the FormatShape dialog box, click 3-DFormat in the left pane, and in the 3-DFormat pane, underBevel, in the Top list select NoBevel.Select the top rectangle with bulleted text.On the Home tab, in the bottom right corner of the Drawing group, click the FormatShape dialog box launcher. In the FormatShape dialog box, click LineColor in the left pane, select Gradientfill in the LineColor pane, and then do the following:In the Type list, select Linear.Click the button next to Direction, and then click Linear Down (first row, second option from the left). Under Gradient stops, click Add or Remove until two stops appear in the drop-down list.Also under Gradient stops, customize the gradient stops that you added as follows:Select Stop 1 from the list, and then do the following:In the Stop position box, enter 0%.Click the button next to Color, and then under ThemeColors select Orange, Accent 2 (first row, sixth option from the left).In the Transparency box, enter 100%. Select Stop 2 from the list, and then do the following: In the Stop position box, enter 100%.Click the button next to Color, and then under ThemeColors select Orange, Accent 2 (first row, sixth option from the left).In the Transparency box, enter 0%. Select the second rectangle from the top with bulleted text.On the Home tab, in the bottom right corner of the Drawing group, click the FormatShape dialog box launcher. In the FormatShape dialog box, click LineColor in the left pane, select Gradientfill in the LineColor pane, and then do the following:In the Type list, select Linear.Click the button next to Direction, and then click Linear Down (first row, second option from the left). Under Gradient stops, click Add or Remove until two stops appear in the drop-down list.Also under Gradient stops, customize the gradient stops that you added as follows:Select Stop 1 from the list, and then do the following:In the Stop position box, enter 0%.Click the button next to Color, and then under ThemeColors select Olive Green, Accent 3 (first row, seventh option from the left).In the Transparency box, enter 100%. Select Stop 2 from the list, and then do the following: In the Stop position box, enter 100%.Click the button next to Color, and then under ThemeColors select Olive Green, Accent 3 (first row, seventh option from the left).In the Transparency box, enter 0%. Select the third rectangle from the top with bulleted text.On the Home tab, in the bottom right corner of the Drawing group, click the FormatShape dialog box launcher. In the FormatShape dialog box, click LineColor in the left pane, select Gradient fill in the LineColor pane, and then do the following:In the Type list, select Linear.Click the button next to Direction, and then click Linear Down (first row, second option from the left). Under Gradient stops, click Add or Remove until two stops appear in the drop-down list.Also under Gradient stops, customize the gradient stops that you added as follows:Select Stop 1 from the list, and then do the following:In the Stop position box, enter 0%.Click the button next to Color, and then under ThemeColors select Gold, Accent 4 (first row, eighth option from the left).In the Transparency box, enter 100%. Select Stop 2 from the list, and then do the following: In the Stop position box, enter 100%.Click the button next to Color, and then under ThemeColors select Gold, Accent 4 (first row, eighth option from the left).In the Transparency box, enter 0%. Select the fourth rectangle from the top with bulleted text.On the Home tab, in the bottom right corner of the Drawing group, click the FormatShape dialog box launcher. In the FormatShape dialog box, click LineColor in the left pane, select Gradient fill in the LineColor pane, and then do the following:In the Type list, select Linear.Click the button next to Direction, and then click Linear Down (first row, second option from the left). Under Gradient stops, click Add or Remove until two stops appear in the drop-down list.Also under Gradient stops, customize the gradient stops that you added as follows:Select Stop 1 from the list, and then do the following:In the Stop position box, enter 0%.Click the button next to Color, and then under ThemeColors select Green, Accent 5 (first row, ninth option from the left).In the Transparency box, enter 100%. Select Stop 2 from the list, and then do the following: In the Stop position box, enter 100%.Click the button next to Color, and then under ThemeColors select Green, Accent 5 (first row, ninth option from the left).In the Transparency box, enter 0%. To reproduce the animation effects on this slide, do the following: On the Animations tab, in the Animations group, click CustomAnimation.Select the SmartArt graphic, and then in the CustomAnimation task pane do the following:Click AddEffect, point to Entrance, and select MoreEffects. In the AddEntranceEffect dialog box, under Moderate select Grow & Turn.Click the arrow to the right of the animation effect (grow & turn effect for the graphic), select EffectOptions, and then in the Grow & Turn dialog box, do the following:On the Timing tab, in the Speed list, select 0.5 seconds (Very Fast).On the SmartArtAnimation tab, in the Groupgraphic list, select Onebyone.Click the double arrow to expand the contents of the list in theCustomAnimation task pane.Press and hold CTRL, and select the second, fourth, sixth, and eighth effects (grow & turn entrance effects), and then do the following:Click Change, point to Entrance and select MoreEffects. In the ChangeEntranceEffect dialog box, under Moderate select EaseIn.With the four ease-in entrance effects still selected, under Modify: Ease In do the following:In the Start list, select WithPrevious.In the Speed list, select Fast.Select the grow & turn entrance effect (first effect in the list), and under Modify: Grow & Turn, in the Start list, select WithPrevious.To reproduce the background effects on this slide, do the following:Right-click the slide background area, and then click Format Background. In the Format Background dialog box, click Fill in the left pane, select Gradient fill in the Fill pane, and then do the following:In the Type list, select Radial.Click the button next to Direction, and then click From Center (third option from the left). Under Gradient stops, click Add or Remove until two stops appear in the drop-down list.Also under Gradient stops, customize the gradient stops that you added as follows:Select Stop 1 from the list, and then do the following:In the Stop position box, enter 20%.Click the button next to Color, and then under ThemeColors select White, Background 1, Darker 25% (fourth row, first option from the left). Select Stop 2 from the list, and then do the following: In the Stop position box, enter 100%.Click the button next to Color, and then under ThemeColors select Black, Text 1 (first row, second option from the left).
  • #6 SmartArt customanimation effects: vertical chevron list with dark colors(Basic)To reproduce the SmartArt effects on this slide, do the following:On the Home tab, in the Slides group, click Layout, and then clickBlank. On the Insert tab, in the Illustrations group, click SmartArt. In the Choose a SmartArt Graphic dialog box, in the left pane, click List. In the List pane, click Vertical Chevron List (fourth row, fourth option from the left), and then click OK to insert the graphic into the slide.To create a fourth chevron, select the third chevron at the bottom of the graphic, and then under SmartArtTools, on the Design tab, in the CreateGraphic group, click the arrow next to AddShape, and select AddShapeAfter.To add bullets for the fourth chevron, select the fourth chevron, and then under SmartArtTools, on the Design tab, in the CreateGraphic group, click AddBullet.To enter text, select the SmartArt graphic, and then click one of the arrows on the left border. In the Type your text here dialog box, enter text for each level. (Note: In the example slide, the first-level text boxes contain “One,” “Two,” “Three,” and “Four.” The second-level text is “Supporting Text.”)On the slide, select the SmartArt graphic and drag the right center sizing handle to the right edge of the slide.With the SmartArt graphic still selected, on the DesignTab, in the Themes group, click Colors, and then under Built-In select Median. (Note: If this action is taken in a PowerPoint presentation containing more than one slide, the theme will be applied to all of the slides.)With the SmartArt graphic still selected, under SmartArtTools, on the Design tab, in the SmartArtStyles group, click MoreStyles, and then under 3-D select Inset (first row, second option from the left). Also under SmartArtTools, on the Design tab, in the SmartArtStyles group, click ChangeColors, and then under Colorful select Colorful -AccentColors (first option from the left). To reproduce the chevron effects on this slide, do the following:Press and hold CTRL, and select all four chevrons in the SmartArt graphic. On the Home tab, in the Font group, in the Font list select Franklin Gothic Medium Cond, and then in the FontSize box select 28.On the Home tab, in the bottom right corner of the Drawing group, click the FormatShape dialog box launcher. In the FormatShape dialog box, click TextBox in the left pane, and in the TextBox pane do the following:Under Textlayout, in the Verticalalignment list select Bottom.Under Internalmargin, do the following: In the Left box, enter 0”. In the Right box, enter 0”. In the Bottom box, enter 0”. In the Top box, enter 0.6”.To reproduce the rectangle effects on this slide, do the following:Press and hold CTRL, and the four of the rectangles (with bulleted text). On the Home tab, in the Font group, do the following:In the Font list, select FranklinGothicBook.In the FontSize box, enter 21.In the FontColor list, underThemeColors select White, Background 1 (first row, first option from the left).On the Home tab, in the bottom right corner of the Drawing group, click the Format Shapedialog box launcher. In the Format Shape dialog box, click Fill in the left pane, select Gradientfill in the Fill pane, and then do the following:In the Type list, select Linear.Click the button next to Direction, and then click Linear Down (first row, second option from the left). Under Gradient stops, click Add or Remove until two stops appear in the drop-down list.Also under Gradient stops, customize the gradient stops that you added as follows:Select Stop 1 from the list, and then do the following:In the Stop position box, enter 0%.Click the button next to Color, and then under ThemeColors select Black, Text 1 (first row, second option from the left).In the Transparency box, enter 100%. Select Stop 2 from the list, and then do the following: In the Stop position box, enter 100%.Click the button next to Color, and then under ThemeColors select Black, Text 1 (first row, second option from the left).In the Transparency box, enter 45%. Also in the FormatShape dialog box, click Shadow in the left pane, and in the Shadow pane, in the Presets list, select NoShadow.Also in the FormatShape dialog box, click 3-DFormat in the left pane, and in the 3-DFormat pane, underBevel, in the Top list select NoBevel.Select the top rectangle with bulleted text.On the Home tab, in the bottom right corner of the Drawing group, click the FormatShape dialog box launcher. In the FormatShape dialog box, click LineColor in the left pane, select Gradientfill in the LineColor pane, and then do the following:In the Type list, select Linear.Click the button next to Direction, and then click Linear Down (first row, second option from the left). Under Gradient stops, click Add or Remove until two stops appear in the drop-down list.Also under Gradient stops, customize the gradient stops that you added as follows:Select Stop 1 from the list, and then do the following:In the Stop position box, enter 0%.Click the button next to Color, and then under ThemeColors select Orange, Accent 2 (first row, sixth option from the left).In the Transparency box, enter 100%. Select Stop 2 from the list, and then do the following: In the Stop position box, enter 100%.Click the button next to Color, and then under ThemeColors select Orange, Accent 2 (first row, sixth option from the left).In the Transparency box, enter 0%. Select the second rectangle from the top with bulleted text.On the Home tab, in the bottom right corner of the Drawing group, click the FormatShape dialog box launcher. In the FormatShape dialog box, click LineColor in the left pane, select Gradientfill in the LineColor pane, and then do the following:In the Type list, select Linear.Click the button next to Direction, and then click Linear Down (first row, second option from the left). Under Gradient stops, click Add or Remove until two stops appear in the drop-down list.Also under Gradient stops, customize the gradient stops that you added as follows:Select Stop 1 from the list, and then do the following:In the Stop position box, enter 0%.Click the button next to Color, and then under ThemeColors select Olive Green, Accent 3 (first row, seventh option from the left).In the Transparency box, enter 100%. Select Stop 2 from the list, and then do the following: In the Stop position box, enter 100%.Click the button next to Color, and then under ThemeColors select Olive Green, Accent 3 (first row, seventh option from the left).In the Transparency box, enter 0%. Select the third rectangle from the top with bulleted text.On the Home tab, in the bottom right corner of the Drawing group, click the FormatShape dialog box launcher. In the FormatShape dialog box, click LineColor in the left pane, select Gradient fill in the LineColor pane, and then do the following:In the Type list, select Linear.Click the button next to Direction, and then click Linear Down (first row, second option from the left). Under Gradient stops, click Add or Remove until two stops appear in the drop-down list.Also under Gradient stops, customize the gradient stops that you added as follows:Select Stop 1 from the list, and then do the following:In the Stop position box, enter 0%.Click the button next to Color, and then under ThemeColors select Gold, Accent 4 (first row, eighth option from the left).In the Transparency box, enter 100%. Select Stop 2 from the list, and then do the following: In the Stop position box, enter 100%.Click the button next to Color, and then under ThemeColors select Gold, Accent 4 (first row, eighth option from the left).In the Transparency box, enter 0%. Select the fourth rectangle from the top with bulleted text.On the Home tab, in the bottom right corner of the Drawing group, click the FormatShape dialog box launcher. In the FormatShape dialog box, click LineColor in the left pane, select Gradient fill in the LineColor pane, and then do the following:In the Type list, select Linear.Click the button next to Direction, and then click Linear Down (first row, second option from the left). Under Gradient stops, click Add or Remove until two stops appear in the drop-down list.Also under Gradient stops, customize the gradient stops that you added as follows:Select Stop 1 from the list, and then do the following:In the Stop position box, enter 0%.Click the button next to Color, and then under ThemeColors select Green, Accent 5 (first row, ninth option from the left).In the Transparency box, enter 100%. Select Stop 2 from the list, and then do the following: In the Stop position box, enter 100%.Click the button next to Color, and then under ThemeColors select Green, Accent 5 (first row, ninth option from the left).In the Transparency box, enter 0%. To reproduce the animation effects on this slide, do the following: On the Animations tab, in the Animations group, click CustomAnimation.Select the SmartArt graphic, and then in the CustomAnimation task pane do the following:Click AddEffect, point to Entrance, and select MoreEffects. In the AddEntranceEffect dialog box, under Moderate select Grow & Turn.Click the arrow to the right of the animation effect (grow & turn effect for the graphic), select EffectOptions, and then in the Grow & Turn dialog box, do the following:On the Timing tab, in the Speed list, select 0.5 seconds (Very Fast).On the SmartArtAnimation tab, in the Groupgraphic list, select Onebyone.Click the double arrow to expand the contents of the list in theCustomAnimation task pane.Press and hold CTRL, and select the second, fourth, sixth, and eighth effects (grow & turn entrance effects), and then do the following:Click Change, point to Entrance and select MoreEffects. In the ChangeEntranceEffect dialog box, under Moderate select EaseIn.With the four ease-in entrance effects still selected, under Modify: Ease In do the following:In the Start list, select WithPrevious.In the Speed list, select Fast.Select the grow & turn entrance effect (first effect in the list), and under Modify: Grow & Turn, in the Start list, select WithPrevious.To reproduce the background effects on this slide, do the following:Right-click the slide background area, and then click Format Background. In the Format Background dialog box, click Fill in the left pane, select Gradient fill in the Fill pane, and then do the following:In the Type list, select Radial.Click the button next to Direction, and then click From Center (third option from the left). Under Gradient stops, click Add or Remove until two stops appear in the drop-down list.Also under Gradient stops, customize the gradient stops that you added as follows:Select Stop 1 from the list, and then do the following:In the Stop position box, enter 20%.Click the button next to Color, and then under ThemeColors select White, Background 1, Darker 25% (fourth row, first option from the left). Select Stop 2 from the list, and then do the following: In the Stop position box, enter 100%.Click the button next to Color, and then under ThemeColors select Black, Text 1 (first row, second option from the left).
  • #7 SmartArt customanimation effects: vertical chevron list with dark colors(Basic)To reproduce the SmartArt effects on this slide, do the following:On the Home tab, in the Slides group, click Layout, and then clickBlank. On the Insert tab, in the Illustrations group, click SmartArt. In the Choose a SmartArt Graphic dialog box, in the left pane, click List. In the List pane, click Vertical Chevron List (fourth row, fourth option from the left), and then click OK to insert the graphic into the slide.To create a fourth chevron, select the third chevron at the bottom of the graphic, and then under SmartArtTools, on the Design tab, in the CreateGraphic group, click the arrow next to AddShape, and select AddShapeAfter.To add bullets for the fourth chevron, select the fourth chevron, and then under SmartArtTools, on the Design tab, in the CreateGraphic group, click AddBullet.To enter text, select the SmartArt graphic, and then click one of the arrows on the left border. In the Type your text here dialog box, enter text for each level. (Note: In the example slide, the first-level text boxes contain “One,” “Two,” “Three,” and “Four.” The second-level text is “Supporting Text.”)On the slide, select the SmartArt graphic and drag the right center sizing handle to the right edge of the slide.With the SmartArt graphic still selected, on the DesignTab, in the Themes group, click Colors, and then under Built-In select Median. (Note: If this action is taken in a PowerPoint presentation containing more than one slide, the theme will be applied to all of the slides.)With the SmartArt graphic still selected, under SmartArtTools, on the Design tab, in the SmartArtStyles group, click MoreStyles, and then under 3-D select Inset (first row, second option from the left). Also under SmartArtTools, on the Design tab, in the SmartArtStyles group, click ChangeColors, and then under Colorful select Colorful -AccentColors (first option from the left). To reproduce the chevron effects on this slide, do the following:Press and hold CTRL, and select all four chevrons in the SmartArt graphic. On the Home tab, in the Font group, in the Font list select Franklin Gothic Medium Cond, and then in the FontSize box select 28.On the Home tab, in the bottom right corner of the Drawing group, click the FormatShape dialog box launcher. In the FormatShape dialog box, click TextBox in the left pane, and in the TextBox pane do the following:Under Textlayout, in the Verticalalignment list select Bottom.Under Internalmargin, do the following: In the Left box, enter 0”. In the Right box, enter 0”. In the Bottom box, enter 0”. In the Top box, enter 0.6”.To reproduce the rectangle effects on this slide, do the following:Press and hold CTRL, and the four of the rectangles (with bulleted text). On the Home tab, in the Font group, do the following:In the Font list, select FranklinGothicBook.In the FontSize box, enter 21.In the FontColor list, underThemeColors select White, Background 1 (first row, first option from the left).On the Home tab, in the bottom right corner of the Drawing group, click the Format Shapedialog box launcher. In the Format Shape dialog box, click Fill in the left pane, select Gradientfill in the Fill pane, and then do the following:In the Type list, select Linear.Click the button next to Direction, and then click Linear Down (first row, second option from the left). Under Gradient stops, click Add or Remove until two stops appear in the drop-down list.Also under Gradient stops, customize the gradient stops that you added as follows:Select Stop 1 from the list, and then do the following:In the Stop position box, enter 0%.Click the button next to Color, and then under ThemeColors select Black, Text 1 (first row, second option from the left).In the Transparency box, enter 100%. Select Stop 2 from the list, and then do the following: In the Stop position box, enter 100%.Click the button next to Color, and then under ThemeColors select Black, Text 1 (first row, second option from the left).In the Transparency box, enter 45%. Also in the FormatShape dialog box, click Shadow in the left pane, and in the Shadow pane, in the Presets list, select NoShadow.Also in the FormatShape dialog box, click 3-DFormat in the left pane, and in the 3-DFormat pane, underBevel, in the Top list select NoBevel.Select the top rectangle with bulleted text.On the Home tab, in the bottom right corner of the Drawing group, click the FormatShape dialog box launcher. In the FormatShape dialog box, click LineColor in the left pane, select Gradientfill in the LineColor pane, and then do the following:In the Type list, select Linear.Click the button next to Direction, and then click Linear Down (first row, second option from the left). Under Gradient stops, click Add or Remove until two stops appear in the drop-down list.Also under Gradient stops, customize the gradient stops that you added as follows:Select Stop 1 from the list, and then do the following:In the Stop position box, enter 0%.Click the button next to Color, and then under ThemeColors select Orange, Accent 2 (first row, sixth option from the left).In the Transparency box, enter 100%. Select Stop 2 from the list, and then do the following: In the Stop position box, enter 100%.Click the button next to Color, and then under ThemeColors select Orange, Accent 2 (first row, sixth option from the left).In the Transparency box, enter 0%. Select the second rectangle from the top with bulleted text.On the Home tab, in the bottom right corner of the Drawing group, click the FormatShape dialog box launcher. In the FormatShape dialog box, click LineColor in the left pane, select Gradientfill in the LineColor pane, and then do the following:In the Type list, select Linear.Click the button next to Direction, and then click Linear Down (first row, second option from the left). Under Gradient stops, click Add or Remove until two stops appear in the drop-down list.Also under Gradient stops, customize the gradient stops that you added as follows:Select Stop 1 from the list, and then do the following:In the Stop position box, enter 0%.Click the button next to Color, and then under ThemeColors select Olive Green, Accent 3 (first row, seventh option from the left).In the Transparency box, enter 100%. Select Stop 2 from the list, and then do the following: In the Stop position box, enter 100%.Click the button next to Color, and then under ThemeColors select Olive Green, Accent 3 (first row, seventh option from the left).In the Transparency box, enter 0%. Select the third rectangle from the top with bulleted text.On the Home tab, in the bottom right corner of the Drawing group, click the FormatShape dialog box launcher. In the FormatShape dialog box, click LineColor in the left pane, select Gradient fill in the LineColor pane, and then do the following:In the Type list, select Linear.Click the button next to Direction, and then click Linear Down (first row, second option from the left). Under Gradient stops, click Add or Remove until two stops appear in the drop-down list.Also under Gradient stops, customize the gradient stops that you added as follows:Select Stop 1 from the list, and then do the following:In the Stop position box, enter 0%.Click the button next to Color, and then under ThemeColors select Gold, Accent 4 (first row, eighth option from the left).In the Transparency box, enter 100%. Select Stop 2 from the list, and then do the following: In the Stop position box, enter 100%.Click the button next to Color, and then under ThemeColors select Gold, Accent 4 (first row, eighth option from the left).In the Transparency box, enter 0%. Select the fourth rectangle from the top with bulleted text.On the Home tab, in the bottom right corner of the Drawing group, click the FormatShape dialog box launcher. In the FormatShape dialog box, click LineColor in the left pane, select Gradient fill in the LineColor pane, and then do the following:In the Type list, select Linear.Click the button next to Direction, and then click Linear Down (first row, second option from the left). Under Gradient stops, click Add or Remove until two stops appear in the drop-down list.Also under Gradient stops, customize the gradient stops that you added as follows:Select Stop 1 from the list, and then do the following:In the Stop position box, enter 0%.Click the button next to Color, and then under ThemeColors select Green, Accent 5 (first row, ninth option from the left).In the Transparency box, enter 100%. Select Stop 2 from the list, and then do the following: In the Stop position box, enter 100%.Click the button next to Color, and then under ThemeColors select Green, Accent 5 (first row, ninth option from the left).In the Transparency box, enter 0%. To reproduce the animation effects on this slide, do the following: On the Animations tab, in the Animations group, click CustomAnimation.Select the SmartArt graphic, and then in the CustomAnimation task pane do the following:Click AddEffect, point to Entrance, and select MoreEffects. In the AddEntranceEffect dialog box, under Moderate select Grow & Turn.Click the arrow to the right of the animation effect (grow & turn effect for the graphic), select EffectOptions, and then in the Grow & Turn dialog box, do the following:On the Timing tab, in the Speed list, select 0.5 seconds (Very Fast).On the SmartArtAnimation tab, in the Groupgraphic list, select Onebyone.Click the double arrow to expand the contents of the list in theCustomAnimation task pane.Press and hold CTRL, and select the second, fourth, sixth, and eighth effects (grow & turn entrance effects), and then do the following:Click Change, point to Entrance and select MoreEffects. In the ChangeEntranceEffect dialog box, under Moderate select EaseIn.With the four ease-in entrance effects still selected, under Modify: Ease In do the following:In the Start list, select WithPrevious.In the Speed list, select Fast.Select the grow & turn entrance effect (first effect in the list), and under Modify: Grow & Turn, in the Start list, select WithPrevious.To reproduce the background effects on this slide, do the following:Right-click the slide background area, and then click Format Background. In the Format Background dialog box, click Fill in the left pane, select Gradient fill in the Fill pane, and then do the following:In the Type list, select Radial.Click the button next to Direction, and then click From Center (third option from the left). Under Gradient stops, click Add or Remove until two stops appear in the drop-down list.Also under Gradient stops, customize the gradient stops that you added as follows:Select Stop 1 from the list, and then do the following:In the Stop position box, enter 20%.Click the button next to Color, and then under ThemeColors select White, Background 1, Darker 25% (fourth row, first option from the left). Select Stop 2 from the list, and then do the following: In the Stop position box, enter 100%.Click the button next to Color, and then under ThemeColors select Black, Text 1 (first row, second option from the left).
  • #8 SmartArt customanimation effects: vertical chevron list with dark colors(Basic)To reproduce the SmartArt effects on this slide, do the following:On the Home tab, in the Slides group, click Layout, and then clickBlank. On the Insert tab, in the Illustrations group, click SmartArt. In the Choose a SmartArt Graphic dialog box, in the left pane, click List. In the List pane, click Vertical Chevron List (fourth row, fourth option from the left), and then click OK to insert the graphic into the slide.To create a fourth chevron, select the third chevron at the bottom of the graphic, and then under SmartArtTools, on the Design tab, in the CreateGraphic group, click the arrow next to AddShape, and select AddShapeAfter.To add bullets for the fourth chevron, select the fourth chevron, and then under SmartArtTools, on the Design tab, in the CreateGraphic group, click AddBullet.To enter text, select the SmartArt graphic, and then click one of the arrows on the left border. In the Type your text here dialog box, enter text for each level. (Note: In the example slide, the first-level text boxes contain “One,” “Two,” “Three,” and “Four.” The second-level text is “Supporting Text.”)On the slide, select the SmartArt graphic and drag the right center sizing handle to the right edge of the slide.With the SmartArt graphic still selected, on the DesignTab, in the Themes group, click Colors, and then under Built-In select Median. (Note: If this action is taken in a PowerPoint presentation containing more than one slide, the theme will be applied to all of the slides.)With the SmartArt graphic still selected, under SmartArtTools, on the Design tab, in the SmartArtStyles group, click MoreStyles, and then under 3-D select Inset (first row, second option from the left). Also under SmartArtTools, on the Design tab, in the SmartArtStyles group, click ChangeColors, and then under Colorful select Colorful -AccentColors (first option from the left). To reproduce the chevron effects on this slide, do the following:Press and hold CTRL, and select all four chevrons in the SmartArt graphic. On the Home tab, in the Font group, in the Font list select Franklin Gothic Medium Cond, and then in the FontSize box select 28.On the Home tab, in the bottom right corner of the Drawing group, click the FormatShape dialog box launcher. In the FormatShape dialog box, click TextBox in the left pane, and in the TextBox pane do the following:Under Textlayout, in the Verticalalignment list select Bottom.Under Internalmargin, do the following: In the Left box, enter 0”. In the Right box, enter 0”. In the Bottom box, enter 0”. In the Top box, enter 0.6”.To reproduce the rectangle effects on this slide, do the following:Press and hold CTRL, and the four of the rectangles (with bulleted text). On the Home tab, in the Font group, do the following:In the Font list, select FranklinGothicBook.In the FontSize box, enter 21.In the FontColor list, underThemeColors select White, Background 1 (first row, first option from the left).On the Home tab, in the bottom right corner of the Drawing group, click the Format Shapedialog box launcher. In the Format Shape dialog box, click Fill in the left pane, select Gradientfill in the Fill pane, and then do the following:In the Type list, select Linear.Click the button next to Direction, and then click Linear Down (first row, second option from the left). Under Gradient stops, click Add or Remove until two stops appear in the drop-down list.Also under Gradient stops, customize the gradient stops that you added as follows:Select Stop 1 from the list, and then do the following:In the Stop position box, enter 0%.Click the button next to Color, and then under ThemeColors select Black, Text 1 (first row, second option from the left).In the Transparency box, enter 100%. Select Stop 2 from the list, and then do the following: In the Stop position box, enter 100%.Click the button next to Color, and then under ThemeColors select Black, Text 1 (first row, second option from the left).In the Transparency box, enter 45%. Also in the FormatShape dialog box, click Shadow in the left pane, and in the Shadow pane, in the Presets list, select NoShadow.Also in the FormatShape dialog box, click 3-DFormat in the left pane, and in the 3-DFormat pane, underBevel, in the Top list select NoBevel.Select the top rectangle with bulleted text.On the Home tab, in the bottom right corner of the Drawing group, click the FormatShape dialog box launcher. In the FormatShape dialog box, click LineColor in the left pane, select Gradientfill in the LineColor pane, and then do the following:In the Type list, select Linear.Click the button next to Direction, and then click Linear Down (first row, second option from the left). Under Gradient stops, click Add or Remove until two stops appear in the drop-down list.Also under Gradient stops, customize the gradient stops that you added as follows:Select Stop 1 from the list, and then do the following:In the Stop position box, enter 0%.Click the button next to Color, and then under ThemeColors select Orange, Accent 2 (first row, sixth option from the left).In the Transparency box, enter 100%. Select Stop 2 from the list, and then do the following: In the Stop position box, enter 100%.Click the button next to Color, and then under ThemeColors select Orange, Accent 2 (first row, sixth option from the left).In the Transparency box, enter 0%. Select the second rectangle from the top with bulleted text.On the Home tab, in the bottom right corner of the Drawing group, click the FormatShape dialog box launcher. In the FormatShape dialog box, click LineColor in the left pane, select Gradientfill in the LineColor pane, and then do the following:In the Type list, select Linear.Click the button next to Direction, and then click Linear Down (first row, second option from the left). Under Gradient stops, click Add or Remove until two stops appear in the drop-down list.Also under Gradient stops, customize the gradient stops that you added as follows:Select Stop 1 from the list, and then do the following:In the Stop position box, enter 0%.Click the button next to Color, and then under ThemeColors select Olive Green, Accent 3 (first row, seventh option from the left).In the Transparency box, enter 100%. Select Stop 2 from the list, and then do the following: In the Stop position box, enter 100%.Click the button next to Color, and then under ThemeColors select Olive Green, Accent 3 (first row, seventh option from the left).In the Transparency box, enter 0%. Select the third rectangle from the top with bulleted text.On the Home tab, in the bottom right corner of the Drawing group, click the FormatShape dialog box launcher. In the FormatShape dialog box, click LineColor in the left pane, select Gradient fill in the LineColor pane, and then do the following:In the Type list, select Linear.Click the button next to Direction, and then click Linear Down (first row, second option from the left). Under Gradient stops, click Add or Remove until two stops appear in the drop-down list.Also under Gradient stops, customize the gradient stops that you added as follows:Select Stop 1 from the list, and then do the following:In the Stop position box, enter 0%.Click the button next to Color, and then under ThemeColors select Gold, Accent 4 (first row, eighth option from the left).In the Transparency box, enter 100%. Select Stop 2 from the list, and then do the following: In the Stop position box, enter 100%.Click the button next to Color, and then under ThemeColors select Gold, Accent 4 (first row, eighth option from the left).In the Transparency box, enter 0%. Select the fourth rectangle from the top with bulleted text.On the Home tab, in the bottom right corner of the Drawing group, click the FormatShape dialog box launcher. In the FormatShape dialog box, click LineColor in the left pane, select Gradient fill in the LineColor pane, and then do the following:In the Type list, select Linear.Click the button next to Direction, and then click Linear Down (first row, second option from the left). Under Gradient stops, click Add or Remove until two stops appear in the drop-down list.Also under Gradient stops, customize the gradient stops that you added as follows:Select Stop 1 from the list, and then do the following:In the Stop position box, enter 0%.Click the button next to Color, and then under ThemeColors select Green, Accent 5 (first row, ninth option from the left).In the Transparency box, enter 100%. Select Stop 2 from the list, and then do the following: In the Stop position box, enter 100%.Click the button next to Color, and then under ThemeColors select Green, Accent 5 (first row, ninth option from the left).In the Transparency box, enter 0%. To reproduce the animation effects on this slide, do the following: On the Animations tab, in the Animations group, click CustomAnimation.Select the SmartArt graphic, and then in the CustomAnimation task pane do the following:Click AddEffect, point to Entrance, and select MoreEffects. In the AddEntranceEffect dialog box, under Moderate select Grow & Turn.Click the arrow to the right of the animation effect (grow & turn effect for the graphic), select EffectOptions, and then in the Grow & Turn dialog box, do the following:On the Timing tab, in the Speed list, select 0.5 seconds (Very Fast).On the SmartArtAnimation tab, in the Groupgraphic list, select Onebyone.Click the double arrow to expand the contents of the list in theCustomAnimation task pane.Press and hold CTRL, and select the second, fourth, sixth, and eighth effects (grow & turn entrance effects), and then do the following:Click Change, point to Entrance and select MoreEffects. In the ChangeEntranceEffect dialog box, under Moderate select EaseIn.With the four ease-in entrance effects still selected, under Modify: Ease In do the following:In the Start list, select WithPrevious.In the Speed list, select Fast.Select the grow & turn entrance effect (first effect in the list), and under Modify: Grow & Turn, in the Start list, select WithPrevious.To reproduce the background effects on this slide, do the following:Right-click the slide background area, and then click Format Background. In the Format Background dialog box, click Fill in the left pane, select Gradient fill in the Fill pane, and then do the following:In the Type list, select Radial.Click the button next to Direction, and then click From Center (third option from the left). Under Gradient stops, click Add or Remove until two stops appear in the drop-down list.Also under Gradient stops, customize the gradient stops that you added as follows:Select Stop 1 from the list, and then do the following:In the Stop position box, enter 20%.Click the button next to Color, and then under ThemeColors select White, Background 1, Darker 25% (fourth row, first option from the left). Select Stop 2 from the list, and then do the following: In the Stop position box, enter 100%.Click the button next to Color, and then under ThemeColors select Black, Text 1 (first row, second option from the left).
  • #9 SmartArt customanimation effects: vertical chevron list with dark colors(Basic)To reproduce the SmartArt effects on this slide, do the following:On the Home tab, in the Slides group, click Layout, and then clickBlank. On the Insert tab, in the Illustrations group, click SmartArt. In the Choose a SmartArt Graphic dialog box, in the left pane, click List. In the List pane, click Vertical Chevron List (fourth row, fourth option from the left), and then click OK to insert the graphic into the slide.To create a fourth chevron, select the third chevron at the bottom of the graphic, and then under SmartArtTools, on the Design tab, in the CreateGraphic group, click the arrow next to AddShape, and select AddShapeAfter.To add bullets for the fourth chevron, select the fourth chevron, and then under SmartArtTools, on the Design tab, in the CreateGraphic group, click AddBullet.To enter text, select the SmartArt graphic, and then click one of the arrows on the left border. In the Type your text here dialog box, enter text for each level. (Note: In the example slide, the first-level text boxes contain “One,” “Two,” “Three,” and “Four.” The second-level text is “Supporting Text.”)On the slide, select the SmartArt graphic and drag the right center sizing handle to the right edge of the slide.With the SmartArt graphic still selected, on the DesignTab, in the Themes group, click Colors, and then under Built-In select Median. (Note: If this action is taken in a PowerPoint presentation containing more than one slide, the theme will be applied to all of the slides.)With the SmartArt graphic still selected, under SmartArtTools, on the Design tab, in the SmartArtStyles group, click MoreStyles, and then under 3-D select Inset (first row, second option from the left). Also under SmartArtTools, on the Design tab, in the SmartArtStyles group, click ChangeColors, and then under Colorful select Colorful -AccentColors (first option from the left). To reproduce the chevron effects on this slide, do the following:Press and hold CTRL, and select all four chevrons in the SmartArt graphic. On the Home tab, in the Font group, in the Font list select Franklin Gothic Medium Cond, and then in the FontSize box select 28.On the Home tab, in the bottom right corner of the Drawing group, click the FormatShape dialog box launcher. In the FormatShape dialog box, click TextBox in the left pane, and in the TextBox pane do the following:Under Textlayout, in the Verticalalignment list select Bottom.Under Internalmargin, do the following: In the Left box, enter 0”. In the Right box, enter 0”. In the Bottom box, enter 0”. In the Top box, enter 0.6”.To reproduce the rectangle effects on this slide, do the following:Press and hold CTRL, and the four of the rectangles (with bulleted text). On the Home tab, in the Font group, do the following:In the Font list, select FranklinGothicBook.In the FontSize box, enter 21.In the FontColor list, underThemeColors select White, Background 1 (first row, first option from the left).On the Home tab, in the bottom right corner of the Drawing group, click the Format Shapedialog box launcher. In the Format Shape dialog box, click Fill in the left pane, select Gradientfill in the Fill pane, and then do the following:In the Type list, select Linear.Click the button next to Direction, and then click Linear Down (first row, second option from the left). Under Gradient stops, click Add or Remove until two stops appear in the drop-down list.Also under Gradient stops, customize the gradient stops that you added as follows:Select Stop 1 from the list, and then do the following:In the Stop position box, enter 0%.Click the button next to Color, and then under ThemeColors select Black, Text 1 (first row, second option from the left).In the Transparency box, enter 100%. Select Stop 2 from the list, and then do the following: In the Stop position box, enter 100%.Click the button next to Color, and then under ThemeColors select Black, Text 1 (first row, second option from the left).In the Transparency box, enter 45%. Also in the FormatShape dialog box, click Shadow in the left pane, and in the Shadow pane, in the Presets list, select NoShadow.Also in the FormatShape dialog box, click 3-DFormat in the left pane, and in the 3-DFormat pane, underBevel, in the Top list select NoBevel.Select the top rectangle with bulleted text.On the Home tab, in the bottom right corner of the Drawing group, click the FormatShape dialog box launcher. In the FormatShape dialog box, click LineColor in the left pane, select Gradientfill in the LineColor pane, and then do the following:In the Type list, select Linear.Click the button next to Direction, and then click Linear Down (first row, second option from the left). Under Gradient stops, click Add or Remove until two stops appear in the drop-down list.Also under Gradient stops, customize the gradient stops that you added as follows:Select Stop 1 from the list, and then do the following:In the Stop position box, enter 0%.Click the button next to Color, and then under ThemeColors select Orange, Accent 2 (first row, sixth option from the left).In the Transparency box, enter 100%. Select Stop 2 from the list, and then do the following: In the Stop position box, enter 100%.Click the button next to Color, and then under ThemeColors select Orange, Accent 2 (first row, sixth option from the left).In the Transparency box, enter 0%. Select the second rectangle from the top with bulleted text.On the Home tab, in the bottom right corner of the Drawing group, click the FormatShape dialog box launcher. In the FormatShape dialog box, click LineColor in the left pane, select Gradientfill in the LineColor pane, and then do the following:In the Type list, select Linear.Click the button next to Direction, and then click Linear Down (first row, second option from the left). Under Gradient stops, click Add or Remove until two stops appear in the drop-down list.Also under Gradient stops, customize the gradient stops that you added as follows:Select Stop 1 from the list, and then do the following:In the Stop position box, enter 0%.Click the button next to Color, and then under ThemeColors select Olive Green, Accent 3 (first row, seventh option from the left).In the Transparency box, enter 100%. Select Stop 2 from the list, and then do the following: In the Stop position box, enter 100%.Click the button next to Color, and then under ThemeColors select Olive Green, Accent 3 (first row, seventh option from the left).In the Transparency box, enter 0%. Select the third rectangle from the top with bulleted text.On the Home tab, in the bottom right corner of the Drawing group, click the FormatShape dialog box launcher. In the FormatShape dialog box, click LineColor in the left pane, select Gradient fill in the LineColor pane, and then do the following:In the Type list, select Linear.Click the button next to Direction, and then click Linear Down (first row, second option from the left). Under Gradient stops, click Add or Remove until two stops appear in the drop-down list.Also under Gradient stops, customize the gradient stops that you added as follows:Select Stop 1 from the list, and then do the following:In the Stop position box, enter 0%.Click the button next to Color, and then under ThemeColors select Gold, Accent 4 (first row, eighth option from the left).In the Transparency box, enter 100%. Select Stop 2 from the list, and then do the following: In the Stop position box, enter 100%.Click the button next to Color, and then under ThemeColors select Gold, Accent 4 (first row, eighth option from the left).In the Transparency box, enter 0%. Select the fourth rectangle from the top with bulleted text.On the Home tab, in the bottom right corner of the Drawing group, click the FormatShape dialog box launcher. In the FormatShape dialog box, click LineColor in the left pane, select Gradient fill in the LineColor pane, and then do the following:In the Type list, select Linear.Click the button next to Direction, and then click Linear Down (first row, second option from the left). Under Gradient stops, click Add or Remove until two stops appear in the drop-down list.Also under Gradient stops, customize the gradient stops that you added as follows:Select Stop 1 from the list, and then do the following:In the Stop position box, enter 0%.Click the button next to Color, and then under ThemeColors select Green, Accent 5 (first row, ninth option from the left).In the Transparency box, enter 100%. Select Stop 2 from the list, and then do the following: In the Stop position box, enter 100%.Click the button next to Color, and then under ThemeColors select Green, Accent 5 (first row, ninth option from the left).In the Transparency box, enter 0%. To reproduce the animation effects on this slide, do the following: On the Animations tab, in the Animations group, click CustomAnimation.Select the SmartArt graphic, and then in the CustomAnimation task pane do the following:Click AddEffect, point to Entrance, and select MoreEffects. In the AddEntranceEffect dialog box, under Moderate select Grow & Turn.Click the arrow to the right of the animation effect (grow & turn effect for the graphic), select EffectOptions, and then in the Grow & Turn dialog box, do the following:On the Timing tab, in the Speed list, select 0.5 seconds (Very Fast).On the SmartArtAnimation tab, in the Groupgraphic list, select Onebyone.Click the double arrow to expand the contents of the list in theCustomAnimation task pane.Press and hold CTRL, and select the second, fourth, sixth, and eighth effects (grow & turn entrance effects), and then do the following:Click Change, point to Entrance and select MoreEffects. In the ChangeEntranceEffect dialog box, under Moderate select EaseIn.With the four ease-in entrance effects still selected, under Modify: Ease In do the following:In the Start list, select WithPrevious.In the Speed list, select Fast.Select the grow & turn entrance effect (first effect in the list), and under Modify: Grow & Turn, in the Start list, select WithPrevious.To reproduce the background effects on this slide, do the following:Right-click the slide background area, and then click Format Background. In the Format Background dialog box, click Fill in the left pane, select Gradient fill in the Fill pane, and then do the following:In the Type list, select Radial.Click the button next to Direction, and then click From Center (third option from the left). Under Gradient stops, click Add or Remove until two stops appear in the drop-down list.Also under Gradient stops, customize the gradient stops that you added as follows:Select Stop 1 from the list, and then do the following:In the Stop position box, enter 20%.Click the button next to Color, and then under ThemeColors select White, Background 1, Darker 25% (fourth row, first option from the left). Select Stop 2 from the list, and then do the following: In the Stop position box, enter 100%.Click the button next to Color, and then under ThemeColors select Black, Text 1 (first row, second option from the left).
  • #10 SmartArt customanimation effects: vertical chevron list with dark colors(Basic)To reproduce the SmartArt effects on this slide, do the following:On the Home tab, in the Slides group, click Layout, and then clickBlank. On the Insert tab, in the Illustrations group, click SmartArt. In the Choose a SmartArt Graphic dialog box, in the left pane, click List. In the List pane, click Vertical Chevron List (fourth row, fourth option from the left), and then click OK to insert the graphic into the slide.To create a fourth chevron, select the third chevron at the bottom of the graphic, and then under SmartArtTools, on the Design tab, in the CreateGraphic group, click the arrow next to AddShape, and select AddShapeAfter.To add bullets for the fourth chevron, select the fourth chevron, and then under SmartArtTools, on the Design tab, in the CreateGraphic group, click AddBullet.To enter text, select the SmartArt graphic, and then click one of the arrows on the left border. In the Type your text here dialog box, enter text for each level. (Note: In the example slide, the first-level text boxes contain “One,” “Two,” “Three,” and “Four.” The second-level text is “Supporting Text.”)On the slide, select the SmartArt graphic and drag the right center sizing handle to the right edge of the slide.With the SmartArt graphic still selected, on the DesignTab, in the Themes group, click Colors, and then under Built-In select Median. (Note: If this action is taken in a PowerPoint presentation containing more than one slide, the theme will be applied to all of the slides.)With the SmartArt graphic still selected, under SmartArtTools, on the Design tab, in the SmartArtStyles group, click MoreStyles, and then under 3-D select Inset (first row, second option from the left). Also under SmartArtTools, on the Design tab, in the SmartArtStyles group, click ChangeColors, and then under Colorful select Colorful -AccentColors (first option from the left). To reproduce the chevron effects on this slide, do the following:Press and hold CTRL, and select all four chevrons in the SmartArt graphic. On the Home tab, in the Font group, in the Font list select Franklin Gothic Medium Cond, and then in the FontSize box select 28.On the Home tab, in the bottom right corner of the Drawing group, click the FormatShape dialog box launcher. In the FormatShape dialog box, click TextBox in the left pane, and in the TextBox pane do the following:Under Textlayout, in the Verticalalignment list select Bottom.Under Internalmargin, do the following: In the Left box, enter 0”. In the Right box, enter 0”. In the Bottom box, enter 0”. In the Top box, enter 0.6”.To reproduce the rectangle effects on this slide, do the following:Press and hold CTRL, and the four of the rectangles (with bulleted text). On the Home tab, in the Font group, do the following:In the Font list, select FranklinGothicBook.In the FontSize box, enter 21.In the FontColor list, underThemeColors select White, Background 1 (first row, first option from the left).On the Home tab, in the bottom right corner of the Drawing group, click the Format Shapedialog box launcher. In the Format Shape dialog box, click Fill in the left pane, select Gradientfill in the Fill pane, and then do the following:In the Type list, select Linear.Click the button next to Direction, and then click Linear Down (first row, second option from the left). Under Gradient stops, click Add or Remove until two stops appear in the drop-down list.Also under Gradient stops, customize the gradient stops that you added as follows:Select Stop 1 from the list, and then do the following:In the Stop position box, enter 0%.Click the button next to Color, and then under ThemeColors select Black, Text 1 (first row, second option from the left).In the Transparency box, enter 100%. Select Stop 2 from the list, and then do the following: In the Stop position box, enter 100%.Click the button next to Color, and then under ThemeColors select Black, Text 1 (first row, second option from the left).In the Transparency box, enter 45%. Also in the FormatShape dialog box, click Shadow in the left pane, and in the Shadow pane, in the Presets list, select NoShadow.Also in the FormatShape dialog box, click 3-DFormat in the left pane, and in the 3-DFormat pane, underBevel, in the Top list select NoBevel.Select the top rectangle with bulleted text.On the Home tab, in the bottom right corner of the Drawing group, click the FormatShape dialog box launcher. In the FormatShape dialog box, click LineColor in the left pane, select Gradientfill in the LineColor pane, and then do the following:In the Type list, select Linear.Click the button next to Direction, and then click Linear Down (first row, second option from the left). Under Gradient stops, click Add or Remove until two stops appear in the drop-down list.Also under Gradient stops, customize the gradient stops that you added as follows:Select Stop 1 from the list, and then do the following:In the Stop position box, enter 0%.Click the button next to Color, and then under ThemeColors select Orange, Accent 2 (first row, sixth option from the left).In the Transparency box, enter 100%. Select Stop 2 from the list, and then do the following: In the Stop position box, enter 100%.Click the button next to Color, and then under ThemeColors select Orange, Accent 2 (first row, sixth option from the left).In the Transparency box, enter 0%. Select the second rectangle from the top with bulleted text.On the Home tab, in the bottom right corner of the Drawing group, click the FormatShape dialog box launcher. In the FormatShape dialog box, click LineColor in the left pane, select Gradientfill in the LineColor pane, and then do the following:In the Type list, select Linear.Click the button next to Direction, and then click Linear Down (first row, second option from the left). Under Gradient stops, click Add or Remove until two stops appear in the drop-down list.Also under Gradient stops, customize the gradient stops that you added as follows:Select Stop 1 from the list, and then do the following:In the Stop position box, enter 0%.Click the button next to Color, and then under ThemeColors select Olive Green, Accent 3 (first row, seventh option from the left).In the Transparency box, enter 100%. Select Stop 2 from the list, and then do the following: In the Stop position box, enter 100%.Click the button next to Color, and then under ThemeColors select Olive Green, Accent 3 (first row, seventh option from the left).In the Transparency box, enter 0%. Select the third rectangle from the top with bulleted text.On the Home tab, in the bottom right corner of the Drawing group, click the FormatShape dialog box launcher. In the FormatShape dialog box, click LineColor in the left pane, select Gradient fill in the LineColor pane, and then do the following:In the Type list, select Linear.Click the button next to Direction, and then click Linear Down (first row, second option from the left). Under Gradient stops, click Add or Remove until two stops appear in the drop-down list.Also under Gradient stops, customize the gradient stops that you added as follows:Select Stop 1 from the list, and then do the following:In the Stop position box, enter 0%.Click the button next to Color, and then under ThemeColors select Gold, Accent 4 (first row, eighth option from the left).In the Transparency box, enter 100%. Select Stop 2 from the list, and then do the following: In the Stop position box, enter 100%.Click the button next to Color, and then under ThemeColors select Gold, Accent 4 (first row, eighth option from the left).In the Transparency box, enter 0%. Select the fourth rectangle from the top with bulleted text.On the Home tab, in the bottom right corner of the Drawing group, click the FormatShape dialog box launcher. In the FormatShape dialog box, click LineColor in the left pane, select Gradient fill in the LineColor pane, and then do the following:In the Type list, select Linear.Click the button next to Direction, and then click Linear Down (first row, second option from the left). Under Gradient stops, click Add or Remove until two stops appear in the drop-down list.Also under Gradient stops, customize the gradient stops that you added as follows:Select Stop 1 from the list, and then do the following:In the Stop position box, enter 0%.Click the button next to Color, and then under ThemeColors select Green, Accent 5 (first row, ninth option from the left).In the Transparency box, enter 100%. Select Stop 2 from the list, and then do the following: In the Stop position box, enter 100%.Click the button next to Color, and then under ThemeColors select Green, Accent 5 (first row, ninth option from the left).In the Transparency box, enter 0%. To reproduce the animation effects on this slide, do the following: On the Animations tab, in the Animations group, click CustomAnimation.Select the SmartArt graphic, and then in the CustomAnimation task pane do the following:Click AddEffect, point to Entrance, and select MoreEffects. In the AddEntranceEffect dialog box, under Moderate select Grow & Turn.Click the arrow to the right of the animation effect (grow & turn effect for the graphic), select EffectOptions, and then in the Grow & Turn dialog box, do the following:On the Timing tab, in the Speed list, select 0.5 seconds (Very Fast).On the SmartArtAnimation tab, in the Groupgraphic list, select Onebyone.Click the double arrow to expand the contents of the list in theCustomAnimation task pane.Press and hold CTRL, and select the second, fourth, sixth, and eighth effects (grow & turn entrance effects), and then do the following:Click Change, point to Entrance and select MoreEffects. In the ChangeEntranceEffect dialog box, under Moderate select EaseIn.With the four ease-in entrance effects still selected, under Modify: Ease In do the following:In the Start list, select WithPrevious.In the Speed list, select Fast.Select the grow & turn entrance effect (first effect in the list), and under Modify: Grow & Turn, in the Start list, select WithPrevious.To reproduce the background effects on this slide, do the following:Right-click the slide background area, and then click Format Background. In the Format Background dialog box, click Fill in the left pane, select Gradient fill in the Fill pane, and then do the following:In the Type list, select Radial.Click the button next to Direction, and then click From Center (third option from the left). Under Gradient stops, click Add or Remove until two stops appear in the drop-down list.Also under Gradient stops, customize the gradient stops that you added as follows:Select Stop 1 from the list, and then do the following:In the Stop position box, enter 20%.Click the button next to Color, and then under ThemeColors select White, Background 1, Darker 25% (fourth row, first option from the left). Select Stop 2 from the list, and then do the following: In the Stop position box, enter 100%.Click the button next to Color, and then under ThemeColors select Black, Text 1 (first row, second option from the left).
  • #11 SmartArt customanimation effects: vertical chevron list with dark colors(Basic)To reproduce the SmartArt effects on this slide, do the following:On the Home tab, in the Slides group, click Layout, and then clickBlank. On the Insert tab, in the Illustrations group, click SmartArt. In the Choose a SmartArt Graphic dialog box, in the left pane, click List. In the List pane, click Vertical Chevron List (fourth row, fourth option from the left), and then click OK to insert the graphic into the slide.To create a fourth chevron, select the third chevron at the bottom of the graphic, and then under SmartArtTools, on the Design tab, in the CreateGraphic group, click the arrow next to AddShape, and select AddShapeAfter.To add bullets for the fourth chevron, select the fourth chevron, and then under SmartArtTools, on the Design tab, in the CreateGraphic group, click AddBullet.To enter text, select the SmartArt graphic, and then click one of the arrows on the left border. In the Type your text here dialog box, enter text for each level. (Note: In the example slide, the first-level text boxes contain “One,” “Two,” “Three,” and “Four.” The second-level text is “Supporting Text.”)On the slide, select the SmartArt graphic and drag the right center sizing handle to the right edge of the slide.With the SmartArt graphic still selected, on the DesignTab, in the Themes group, click Colors, and then under Built-In select Median. (Note: If this action is taken in a PowerPoint presentation containing more than one slide, the theme will be applied to all of the slides.)With the SmartArt graphic still selected, under SmartArtTools, on the Design tab, in the SmartArtStyles group, click MoreStyles, and then under 3-D select Inset (first row, second option from the left). Also under SmartArtTools, on the Design tab, in the SmartArtStyles group, click ChangeColors, and then under Colorful select Colorful -AccentColors (first option from the left). To reproduce the chevron effects on this slide, do the following:Press and hold CTRL, and select all four chevrons in the SmartArt graphic. On the Home tab, in the Font group, in the Font list select Franklin Gothic Medium Cond, and then in the FontSize box select 28.On the Home tab, in the bottom right corner of the Drawing group, click the FormatShape dialog box launcher. In the FormatShape dialog box, click TextBox in the left pane, and in the TextBox pane do the following:Under Textlayout, in the Verticalalignment list select Bottom.Under Internalmargin, do the following: In the Left box, enter 0”. In the Right box, enter 0”. In the Bottom box, enter 0”. In the Top box, enter 0.6”.To reproduce the rectangle effects on this slide, do the following:Press and hold CTRL, and the four of the rectangles (with bulleted text). On the Home tab, in the Font group, do the following:In the Font list, select FranklinGothicBook.In the FontSize box, enter 21.In the FontColor list, underThemeColors select White, Background 1 (first row, first option from the left).On the Home tab, in the bottom right corner of the Drawing group, click the Format Shapedialog box launcher. In the Format Shape dialog box, click Fill in the left pane, select Gradientfill in the Fill pane, and then do the following:In the Type list, select Linear.Click the button next to Direction, and then click Linear Down (first row, second option from the left). Under Gradient stops, click Add or Remove until two stops appear in the drop-down list.Also under Gradient stops, customize the gradient stops that you added as follows:Select Stop 1 from the list, and then do the following:In the Stop position box, enter 0%.Click the button next to Color, and then under ThemeColors select Black, Text 1 (first row, second option from the left).In the Transparency box, enter 100%. Select Stop 2 from the list, and then do the following: In the Stop position box, enter 100%.Click the button next to Color, and then under ThemeColors select Black, Text 1 (first row, second option from the left).In the Transparency box, enter 45%. Also in the FormatShape dialog box, click Shadow in the left pane, and in the Shadow pane, in the Presets list, select NoShadow.Also in the FormatShape dialog box, click 3-DFormat in the left pane, and in the 3-DFormat pane, underBevel, in the Top list select NoBevel.Select the top rectangle with bulleted text.On the Home tab, in the bottom right corner of the Drawing group, click the FormatShape dialog box launcher. In the FormatShape dialog box, click LineColor in the left pane, select Gradientfill in the LineColor pane, and then do the following:In the Type list, select Linear.Click the button next to Direction, and then click Linear Down (first row, second option from the left). Under Gradient stops, click Add or Remove until two stops appear in the drop-down list.Also under Gradient stops, customize the gradient stops that you added as follows:Select Stop 1 from the list, and then do the following:In the Stop position box, enter 0%.Click the button next to Color, and then under ThemeColors select Orange, Accent 2 (first row, sixth option from the left).In the Transparency box, enter 100%. Select Stop 2 from the list, and then do the following: In the Stop position box, enter 100%.Click the button next to Color, and then under ThemeColors select Orange, Accent 2 (first row, sixth option from the left).In the Transparency box, enter 0%. Select the second rectangle from the top with bulleted text.On the Home tab, in the bottom right corner of the Drawing group, click the FormatShape dialog box launcher. In the FormatShape dialog box, click LineColor in the left pane, select Gradientfill in the LineColor pane, and then do the following:In the Type list, select Linear.Click the button next to Direction, and then click Linear Down (first row, second option from the left). Under Gradient stops, click Add or Remove until two stops appear in the drop-down list.Also under Gradient stops, customize the gradient stops that you added as follows:Select Stop 1 from the list, and then do the following:In the Stop position box, enter 0%.Click the button next to Color, and then under ThemeColors select Olive Green, Accent 3 (first row, seventh option from the left).In the Transparency box, enter 100%. Select Stop 2 from the list, and then do the following: In the Stop position box, enter 100%.Click the button next to Color, and then under ThemeColors select Olive Green, Accent 3 (first row, seventh option from the left).In the Transparency box, enter 0%. Select the third rectangle from the top with bulleted text.On the Home tab, in the bottom right corner of the Drawing group, click the FormatShape dialog box launcher. In the FormatShape dialog box, click LineColor in the left pane, select Gradient fill in the LineColor pane, and then do the following:In the Type list, select Linear.Click the button next to Direction, and then click Linear Down (first row, second option from the left). Under Gradient stops, click Add or Remove until two stops appear in the drop-down list.Also under Gradient stops, customize the gradient stops that you added as follows:Select Stop 1 from the list, and then do the following:In the Stop position box, enter 0%.Click the button next to Color, and then under ThemeColors select Gold, Accent 4 (first row, eighth option from the left).In the Transparency box, enter 100%. Select Stop 2 from the list, and then do the following: In the Stop position box, enter 100%.Click the button next to Color, and then under ThemeColors select Gold, Accent 4 (first row, eighth option from the left).In the Transparency box, enter 0%. Select the fourth rectangle from the top with bulleted text.On the Home tab, in the bottom right corner of the Drawing group, click the FormatShape dialog box launcher. In the FormatShape dialog box, click LineColor in the left pane, select Gradient fill in the LineColor pane, and then do the following:In the Type list, select Linear.Click the button next to Direction, and then click Linear Down (first row, second option from the left). Under Gradient stops, click Add or Remove until two stops appear in the drop-down list.Also under Gradient stops, customize the gradient stops that you added as follows:Select Stop 1 from the list, and then do the following:In the Stop position box, enter 0%.Click the button next to Color, and then under ThemeColors select Green, Accent 5 (first row, ninth option from the left).In the Transparency box, enter 100%. Select Stop 2 from the list, and then do the following: In the Stop position box, enter 100%.Click the button next to Color, and then under ThemeColors select Green, Accent 5 (first row, ninth option from the left).In the Transparency box, enter 0%. To reproduce the animation effects on this slide, do the following: On the Animations tab, in the Animations group, click CustomAnimation.Select the SmartArt graphic, and then in the CustomAnimation task pane do the following:Click AddEffect, point to Entrance, and select MoreEffects. In the AddEntranceEffect dialog box, under Moderate select Grow & Turn.Click the arrow to the right of the animation effect (grow & turn effect for the graphic), select EffectOptions, and then in the Grow & Turn dialog box, do the following:On the Timing tab, in the Speed list, select 0.5 seconds (Very Fast).On the SmartArtAnimation tab, in the Groupgraphic list, select Onebyone.Click the double arrow to expand the contents of the list in theCustomAnimation task pane.Press and hold CTRL, and select the second, fourth, sixth, and eighth effects (grow & turn entrance effects), and then do the following:Click Change, point to Entrance and select MoreEffects. In the ChangeEntranceEffect dialog box, under Moderate select EaseIn.With the four ease-in entrance effects still selected, under Modify: Ease In do the following:In the Start list, select WithPrevious.In the Speed list, select Fast.Select the grow & turn entrance effect (first effect in the list), and under Modify: Grow & Turn, in the Start list, select WithPrevious.To reproduce the background effects on this slide, do the following:Right-click the slide background area, and then click Format Background. In the Format Background dialog box, click Fill in the left pane, select Gradient fill in the Fill pane, and then do the following:In the Type list, select Radial.Click the button next to Direction, and then click From Center (third option from the left). Under Gradient stops, click Add or Remove until two stops appear in the drop-down list.Also under Gradient stops, customize the gradient stops that you added as follows:Select Stop 1 from the list, and then do the following:In the Stop position box, enter 20%.Click the button next to Color, and then under ThemeColors select White, Background 1, Darker 25% (fourth row, first option from the left). Select Stop 2 from the list, and then do the following: In the Stop position box, enter 100%.Click the button next to Color, and then under ThemeColors select Black, Text 1 (first row, second option from the left).
  • #12 SmartArt customanimation effects: vertical chevron list with dark colors(Basic)To reproduce the SmartArt effects on this slide, do the following:On the Home tab, in the Slides group, click Layout, and then clickBlank. On the Insert tab, in the Illustrations group, click SmartArt. In the Choose a SmartArt Graphic dialog box, in the left pane, click List. In the List pane, click Vertical Chevron List (fourth row, fourth option from the left), and then click OK to insert the graphic into the slide.To create a fourth chevron, select the third chevron at the bottom of the graphic, and then under SmartArtTools, on the Design tab, in the CreateGraphic group, click the arrow next to AddShape, and select AddShapeAfter.To add bullets for the fourth chevron, select the fourth chevron, and then under SmartArtTools, on the Design tab, in the CreateGraphic group, click AddBullet.To enter text, select the SmartArt graphic, and then click one of the arrows on the left border. In the Type your text here dialog box, enter text for each level. (Note: In the example slide, the first-level text boxes contain “One,” “Two,” “Three,” and “Four.” The second-level text is “Supporting Text.”)On the slide, select the SmartArt graphic and drag the right center sizing handle to the right edge of the slide.With the SmartArt graphic still selected, on the DesignTab, in the Themes group, click Colors, and then under Built-In select Median. (Note: If this action is taken in a PowerPoint presentation containing more than one slide, the theme will be applied to all of the slides.)With the SmartArt graphic still selected, under SmartArtTools, on the Design tab, in the SmartArtStyles group, click MoreStyles, and then under 3-D select Inset (first row, second option from the left). Also under SmartArtTools, on the Design tab, in the SmartArtStyles group, click ChangeColors, and then under Colorful select Colorful -AccentColors (first option from the left). To reproduce the chevron effects on this slide, do the following:Press and hold CTRL, and select all four chevrons in the SmartArt graphic. On the Home tab, in the Font group, in the Font list select Franklin Gothic Medium Cond, and then in the FontSize box select 28.On the Home tab, in the bottom right corner of the Drawing group, click the FormatShape dialog box launcher. In the FormatShape dialog box, click TextBox in the left pane, and in the TextBox pane do the following:Under Textlayout, in the Verticalalignment list select Bottom.Under Internalmargin, do the following: In the Left box, enter 0”. In the Right box, enter 0”. In the Bottom box, enter 0”. In the Top box, enter 0.6”.To reproduce the rectangle effects on this slide, do the following:Press and hold CTRL, and the four of the rectangles (with bulleted text). On the Home tab, in the Font group, do the following:In the Font list, select FranklinGothicBook.In the FontSize box, enter 21.In the FontColor list, underThemeColors select White, Background 1 (first row, first option from the left).On the Home tab, in the bottom right corner of the Drawing group, click the Format Shapedialog box launcher. In the Format Shape dialog box, click Fill in the left pane, select Gradientfill in the Fill pane, and then do the following:In the Type list, select Linear.Click the button next to Direction, and then click Linear Down (first row, second option from the left). Under Gradient stops, click Add or Remove until two stops appear in the drop-down list.Also under Gradient stops, customize the gradient stops that you added as follows:Select Stop 1 from the list, and then do the following:In the Stop position box, enter 0%.Click the button next to Color, and then under ThemeColors select Black, Text 1 (first row, second option from the left).In the Transparency box, enter 100%. Select Stop 2 from the list, and then do the following: In the Stop position box, enter 100%.Click the button next to Color, and then under ThemeColors select Black, Text 1 (first row, second option from the left).In the Transparency box, enter 45%. Also in the FormatShape dialog box, click Shadow in the left pane, and in the Shadow pane, in the Presets list, select NoShadow.Also in the FormatShape dialog box, click 3-DFormat in the left pane, and in the 3-DFormat pane, underBevel, in the Top list select NoBevel.Select the top rectangle with bulleted text.On the Home tab, in the bottom right corner of the Drawing group, click the FormatShape dialog box launcher. In the FormatShape dialog box, click LineColor in the left pane, select Gradientfill in the LineColor pane, and then do the following:In the Type list, select Linear.Click the button next to Direction, and then click Linear Down (first row, second option from the left). Under Gradient stops, click Add or Remove until two stops appear in the drop-down list.Also under Gradient stops, customize the gradient stops that you added as follows:Select Stop 1 from the list, and then do the following:In the Stop position box, enter 0%.Click the button next to Color, and then under ThemeColors select Orange, Accent 2 (first row, sixth option from the left).In the Transparency box, enter 100%. Select Stop 2 from the list, and then do the following: In the Stop position box, enter 100%.Click the button next to Color, and then under ThemeColors select Orange, Accent 2 (first row, sixth option from the left).In the Transparency box, enter 0%. Select the second rectangle from the top with bulleted text.On the Home tab, in the bottom right corner of the Drawing group, click the FormatShape dialog box launcher. In the FormatShape dialog box, click LineColor in the left pane, select Gradientfill in the LineColor pane, and then do the following:In the Type list, select Linear.Click the button next to Direction, and then click Linear Down (first row, second option from the left). Under Gradient stops, click Add or Remove until two stops appear in the drop-down list.Also under Gradient stops, customize the gradient stops that you added as follows:Select Stop 1 from the list, and then do the following:In the Stop position box, enter 0%.Click the button next to Color, and then under ThemeColors select Olive Green, Accent 3 (first row, seventh option from the left).In the Transparency box, enter 100%. Select Stop 2 from the list, and then do the following: In the Stop position box, enter 100%.Click the button next to Color, and then under ThemeColors select Olive Green, Accent 3 (first row, seventh option from the left).In the Transparency box, enter 0%. Select the third rectangle from the top with bulleted text.On the Home tab, in the bottom right corner of the Drawing group, click the FormatShape dialog box launcher. In the FormatShape dialog box, click LineColor in the left pane, select Gradient fill in the LineColor pane, and then do the following:In the Type list, select Linear.Click the button next to Direction, and then click Linear Down (first row, second option from the left). Under Gradient stops, click Add or Remove until two stops appear in the drop-down list.Also under Gradient stops, customize the gradient stops that you added as follows:Select Stop 1 from the list, and then do the following:In the Stop position box, enter 0%.Click the button next to Color, and then under ThemeColors select Gold, Accent 4 (first row, eighth option from the left).In the Transparency box, enter 100%. Select Stop 2 from the list, and then do the following: In the Stop position box, enter 100%.Click the button next to Color, and then under ThemeColors select Gold, Accent 4 (first row, eighth option from the left).In the Transparency box, enter 0%. Select the fourth rectangle from the top with bulleted text.On the Home tab, in the bottom right corner of the Drawing group, click the FormatShape dialog box launcher. In the FormatShape dialog box, click LineColor in the left pane, select Gradient fill in the LineColor pane, and then do the following:In the Type list, select Linear.Click the button next to Direction, and then click Linear Down (first row, second option from the left). Under Gradient stops, click Add or Remove until two stops appear in the drop-down list.Also under Gradient stops, customize the gradient stops that you added as follows:Select Stop 1 from the list, and then do the following:In the Stop position box, enter 0%.Click the button next to Color, and then under ThemeColors select Green, Accent 5 (first row, ninth option from the left).In the Transparency box, enter 100%. Select Stop 2 from the list, and then do the following: In the Stop position box, enter 100%.Click the button next to Color, and then under ThemeColors select Green, Accent 5 (first row, ninth option from the left).In the Transparency box, enter 0%. To reproduce the animation effects on this slide, do the following: On the Animations tab, in the Animations group, click CustomAnimation.Select the SmartArt graphic, and then in the CustomAnimation task pane do the following:Click AddEffect, point to Entrance, and select MoreEffects. In the AddEntranceEffect dialog box, under Moderate select Grow & Turn.Click the arrow to the right of the animation effect (grow & turn effect for the graphic), select EffectOptions, and then in the Grow & Turn dialog box, do the following:On the Timing tab, in the Speed list, select 0.5 seconds (Very Fast).On the SmartArtAnimation tab, in the Groupgraphic list, select Onebyone.Click the double arrow to expand the contents of the list in theCustomAnimation task pane.Press and hold CTRL, and select the second, fourth, sixth, and eighth effects (grow & turn entrance effects), and then do the following:Click Change, point to Entrance and select MoreEffects. In the ChangeEntranceEffect dialog box, under Moderate select EaseIn.With the four ease-in entrance effects still selected, under Modify: Ease In do the following:In the Start list, select WithPrevious.In the Speed list, select Fast.Select the grow & turn entrance effect (first effect in the list), and under Modify: Grow & Turn, in the Start list, select WithPrevious.To reproduce the background effects on this slide, do the following:Right-click the slide background area, and then click Format Background. In the Format Background dialog box, click Fill in the left pane, select Gradient fill in the Fill pane, and then do the following:In the Type list, select Radial.Click the button next to Direction, and then click From Center (third option from the left). Under Gradient stops, click Add or Remove until two stops appear in the drop-down list.Also under Gradient stops, customize the gradient stops that you added as follows:Select Stop 1 from the list, and then do the following:In the Stop position box, enter 20%.Click the button next to Color, and then under ThemeColors select White, Background 1, Darker 25% (fourth row, first option from the left). Select Stop 2 from the list, and then do the following: In the Stop position box, enter 100%.Click the button next to Color, and then under ThemeColors select Black, Text 1 (first row, second option from the left).
  • #13 SmartArt customanimation effects: vertical chevron list with dark colors(Basic)To reproduce the SmartArt effects on this slide, do the following:On the Home tab, in the Slides group, click Layout, and then clickBlank. On the Insert tab, in the Illustrations group, click SmartArt. In the Choose a SmartArt Graphic dialog box, in the left pane, click List. In the List pane, click Vertical Chevron List (fourth row, fourth option from the left), and then click OK to insert the graphic into the slide.To create a fourth chevron, select the third chevron at the bottom of the graphic, and then under SmartArtTools, on the Design tab, in the CreateGraphic group, click the arrow next to AddShape, and select AddShapeAfter.To add bullets for the fourth chevron, select the fourth chevron, and then under SmartArtTools, on the Design tab, in the CreateGraphic group, click AddBullet.To enter text, select the SmartArt graphic, and then click one of the arrows on the left border. In the Type your text here dialog box, enter text for each level. (Note: In the example slide, the first-level text boxes contain “One,” “Two,” “Three,” and “Four.” The second-level text is “Supporting Text.”)On the slide, select the SmartArt graphic and drag the right center sizing handle to the right edge of the slide.With the SmartArt graphic still selected, on the DesignTab, in the Themes group, click Colors, and then under Built-In select Median. (Note: If this action is taken in a PowerPoint presentation containing more than one slide, the theme will be applied to all of the slides.)With the SmartArt graphic still selected, under SmartArtTools, on the Design tab, in the SmartArtStyles group, click MoreStyles, and then under 3-D select Inset (first row, second option from the left). Also under SmartArtTools, on the Design tab, in the SmartArtStyles group, click ChangeColors, and then under Colorful select Colorful -AccentColors (first option from the left). To reproduce the chevron effects on this slide, do the following:Press and hold CTRL, and select all four chevrons in the SmartArt graphic. On the Home tab, in the Font group, in the Font list select Franklin Gothic Medium Cond, and then in the FontSize box select 28.On the Home tab, in the bottom right corner of the Drawing group, click the FormatShape dialog box launcher. In the FormatShape dialog box, click TextBox in the left pane, and in the TextBox pane do the following:Under Textlayout, in the Verticalalignment list select Bottom.Under Internalmargin, do the following: In the Left box, enter 0”. In the Right box, enter 0”. In the Bottom box, enter 0”. In the Top box, enter 0.6”.To reproduce the rectangle effects on this slide, do the following:Press and hold CTRL, and the four of the rectangles (with bulleted text). On the Home tab, in the Font group, do the following:In the Font list, select FranklinGothicBook.In the FontSize box, enter 21.In the FontColor list, underThemeColors select White, Background 1 (first row, first option from the left).On the Home tab, in the bottom right corner of the Drawing group, click the Format Shapedialog box launcher. In the Format Shape dialog box, click Fill in the left pane, select Gradientfill in the Fill pane, and then do the following:In the Type list, select Linear.Click the button next to Direction, and then click Linear Down (first row, second option from the left). Under Gradient stops, click Add or Remove until two stops appear in the drop-down list.Also under Gradient stops, customize the gradient stops that you added as follows:Select Stop 1 from the list, and then do the following:In the Stop position box, enter 0%.Click the button next to Color, and then under ThemeColors select Black, Text 1 (first row, second option from the left).In the Transparency box, enter 100%. Select Stop 2 from the list, and then do the following: In the Stop position box, enter 100%.Click the button next to Color, and then under ThemeColors select Black, Text 1 (first row, second option from the left).In the Transparency box, enter 45%. Also in the FormatShape dialog box, click Shadow in the left pane, and in the Shadow pane, in the Presets list, select NoShadow.Also in the FormatShape dialog box, click 3-DFormat in the left pane, and in the 3-DFormat pane, underBevel, in the Top list select NoBevel.Select the top rectangle with bulleted text.On the Home tab, in the bottom right corner of the Drawing group, click the FormatShape dialog box launcher. In the FormatShape dialog box, click LineColor in the left pane, select Gradientfill in the LineColor pane, and then do the following:In the Type list, select Linear.Click the button next to Direction, and then click Linear Down (first row, second option from the left). Under Gradient stops, click Add or Remove until two stops appear in the drop-down list.Also under Gradient stops, customize the gradient stops that you added as follows:Select Stop 1 from the list, and then do the following:In the Stop position box, enter 0%.Click the button next to Color, and then under ThemeColors select Orange, Accent 2 (first row, sixth option from the left).In the Transparency box, enter 100%. Select Stop 2 from the list, and then do the following: In the Stop position box, enter 100%.Click the button next to Color, and then under ThemeColors select Orange, Accent 2 (first row, sixth option from the left).In the Transparency box, enter 0%. Select the second rectangle from the top with bulleted text.On the Home tab, in the bottom right corner of the Drawing group, click the FormatShape dialog box launcher. In the FormatShape dialog box, click LineColor in the left pane, select Gradientfill in the LineColor pane, and then do the following:In the Type list, select Linear.Click the button next to Direction, and then click Linear Down (first row, second option from the left). Under Gradient stops, click Add or Remove until two stops appear in the drop-down list.Also under Gradient stops, customize the gradient stops that you added as follows:Select Stop 1 from the list, and then do the following:In the Stop position box, enter 0%.Click the button next to Color, and then under ThemeColors select Olive Green, Accent 3 (first row, seventh option from the left).In the Transparency box, enter 100%. Select Stop 2 from the list, and then do the following: In the Stop position box, enter 100%.Click the button next to Color, and then under ThemeColors select Olive Green, Accent 3 (first row, seventh option from the left).In the Transparency box, enter 0%. Select the third rectangle from the top with bulleted text.On the Home tab, in the bottom right corner of the Drawing group, click the FormatShape dialog box launcher. In the FormatShape dialog box, click LineColor in the left pane, select Gradient fill in the LineColor pane, and then do the following:In the Type list, select Linear.Click the button next to Direction, and then click Linear Down (first row, second option from the left). Under Gradient stops, click Add or Remove until two stops appear in the drop-down list.Also under Gradient stops, customize the gradient stops that you added as follows:Select Stop 1 from the list, and then do the following:In the Stop position box, enter 0%.Click the button next to Color, and then under ThemeColors select Gold, Accent 4 (first row, eighth option from the left).In the Transparency box, enter 100%. Select Stop 2 from the list, and then do the following: In the Stop position box, enter 100%.Click the button next to Color, and then under ThemeColors select Gold, Accent 4 (first row, eighth option from the left).In the Transparency box, enter 0%. Select the fourth rectangle from the top with bulleted text.On the Home tab, in the bottom right corner of the Drawing group, click the FormatShape dialog box launcher. In the FormatShape dialog box, click LineColor in the left pane, select Gradient fill in the LineColor pane, and then do the following:In the Type list, select Linear.Click the button next to Direction, and then click Linear Down (first row, second option from the left). Under Gradient stops, click Add or Remove until two stops appear in the drop-down list.Also under Gradient stops, customize the gradient stops that you added as follows:Select Stop 1 from the list, and then do the following:In the Stop position box, enter 0%.Click the button next to Color, and then under ThemeColors select Green, Accent 5 (first row, ninth option from the left).In the Transparency box, enter 100%. Select Stop 2 from the list, and then do the following: In the Stop position box, enter 100%.Click the button next to Color, and then under ThemeColors select Green, Accent 5 (first row, ninth option from the left).In the Transparency box, enter 0%. To reproduce the animation effects on this slide, do the following: On the Animations tab, in the Animations group, click CustomAnimation.Select the SmartArt graphic, and then in the CustomAnimation task pane do the following:Click AddEffect, point to Entrance, and select MoreEffects. In the AddEntranceEffect dialog box, under Moderate select Grow & Turn.Click the arrow to the right of the animation effect (grow & turn effect for the graphic), select EffectOptions, and then in the Grow & Turn dialog box, do the following:On the Timing tab, in the Speed list, select 0.5 seconds (Very Fast).On the SmartArtAnimation tab, in the Groupgraphic list, select Onebyone.Click the double arrow to expand the contents of the list in theCustomAnimation task pane.Press and hold CTRL, and select the second, fourth, sixth, and eighth effects (grow & turn entrance effects), and then do the following:Click Change, point to Entrance and select MoreEffects. In the ChangeEntranceEffect dialog box, under Moderate select EaseIn.With the four ease-in entrance effects still selected, under Modify: Ease In do the following:In the Start list, select WithPrevious.In the Speed list, select Fast.Select the grow & turn entrance effect (first effect in the list), and under Modify: Grow & Turn, in the Start list, select WithPrevious.To reproduce the background effects on this slide, do the following:Right-click the slide background area, and then click Format Background. In the Format Background dialog box, click Fill in the left pane, select Gradient fill in the Fill pane, and then do the following:In the Type list, select Radial.Click the button next to Direction, and then click From Center (third option from the left). Under Gradient stops, click Add or Remove until two stops appear in the drop-down list.Also under Gradient stops, customize the gradient stops that you added as follows:Select Stop 1 from the list, and then do the following:In the Stop position box, enter 20%.Click the button next to Color, and then under ThemeColors select White, Background 1, Darker 25% (fourth row, first option from the left). Select Stop 2 from the list, and then do the following: In the Stop position box, enter 100%.Click the button next to Color, and then under ThemeColors select Black, Text 1 (first row, second option from the left).
  • #14 SmartArt custom animation effects: bending process(Intermediate)To reproduce the SmartArt effects on this slide, do the following:On the Home tab, in the Slides group, click Layout, and then clickBlank. On the Insert tab, in the Illustrations group, click SmartArt. In the Choose a SmartArt Graphic dialog box, in the left pane, click Process. In the Process pane, click Vertical Bending Process (fifth row, third option from the left), and then click OK to insert the graphic into the slide.Select the graphic, and then click one of the arrows on the left border. In the Type your text here dialog box, enter text. On the slide, select the graphic. Under SmartArtTools, on the Design tab, in the SmartArtStyles group, do the following:Click ChangeColors, and then under Accent 1 click Colored Fill – Accent 1 (second option from the left).Click More, and then under 3-D click Polished (first option from the left).On the Home tab, in the Font group, select Gill Sans MT from the Font list, and then select 24 from the Font Size list. Select the top left shape (starting point)in the graphic, and then do the following: Under SmartArtTools, on the Format tab, in the Shape Styles group, click the arrow next to Shape Fill, and then under Theme Colors click Olive Green, Accent 3, Darker 25% (fifth row, seventh option from the left).Under SmartArtTools, on the Format tab, in the Shapes group, click Change Shape, and then under Flowchart click Off-page Connector (second row, second option from the left).Select the bottom right shape (ending point) in the graphic, and then do the following:Under SmartArtTools, on the Format tab, in the Shape Styles group, click the arrow next to Shape Fill, and then under Theme Colors click Red, Accent 2, Darker 25% (fifth row, sixth option from the left).Under SmartArtTools, on the Format tab, in the Shapes group, click Change Shape, and then under Basic Shapes click Hexagon (first row, eighth option from the left).To reproduce the animation effects on this slide, do the following:On the Animations tab, in the Animations group, click CustomAnimation.On the slide, select the graphic. In the CustomAnimationtask pane, do the following:Click Add Effect, point to Entrance, and then click MoreEffects. In the Add Entrance Effect dialog box, under Subtle, click Fade.Under Modify: Fade, in the Speed list, select Fast.Also in the Custom Animation task pane, select the fade effect. Click the arrow to the right of the fade effect, and then click EffectOptions. In the Fade dialog box, on the SmartArtAnimation tab, in the Group graphic list, select One by one, and then click OK.Also in the Custom Animation task pane, click the double arrow under the fade effect to expand the contents of the list of effects,and then do the following:Press and hold CTRL, select the first, third, fifth, seventh, ninth, 11th, 13th, 15th, and 17th animation effects (fade effects for the rectangles), and then do the following:Click Change, point to Entrance, and then click MoreEffects. In the Change Entrance Effect dialog box, under Moderate, click Stretch.Under Modify: Stretch, in the Start list, select With Previous. Under Modify: Stretch, in the Speed list, select Fast.Press and hold CTRL, and then select the first, third, fifth, 15th, and 17thanimation effects (stretch effects for the first, second, third, eighth, and ninth rectangles in the path). Under Modify: Stretch, in the Direction list, select From Top.Press and hold CTRL, and then select the seventh and 13th animation effects (stretch effects for the fourth and seventh rectangles in the path). Under Modify: Stretch, in the Direction list, select From Left. Press and hold CTRL, and then select the ninth and 11th animation effects (stretch effects for the fifth and sixth rectangles in the path). Under Modify: Stretch, in the Direction list, select From Bottom.Press and hold CTRL, and then select the second, fourth, sixth, eighth, 10th, 12th, 14th, and 16th animation effects (fade effects for the connectors). Under Modify: Fade, in the Start list, select After Previous.Select the eighth animation effect (fade effect for the connector between the fourth and fifth rectangle). Click the arrow to the right of the eighth animation effect, and then click Timing. In the Fade dialog box, on the Timing tab, in the Delay box, enter 0.5, and then click OK.Select the 10th animation effect (fade effect for the connector between the fifth and sixth rectangle). Click the arrow to the right of the 10th animation effect, and then click Timing. In the Fade dialog box, on the Timing tab, in the Delay box, enter 0.5.To reproduce the background effects on this slide, do the following:Right-click the slide background area, and then click Format Background. In the Format Background dialog box, click Fill in the left pane, select Gradient fill in the Fill pane, and then do the following:In the Type list, select Linear.In the Direction list, click Linear Down(first row, second option from the left). Under Gradient stops, click Add or Remove until two stops appear in the drop-down list.Also under Gradient stops, customize the gradient stops that you added as follows:Select Stop 1 from the list, and then do the following:In the Stop position box, enter 0%.Click the button next to Color, and then under Theme Colorsclick Blue, Accent 1, Darker 25% (fifth row, fifth option from the left). Select Stop 2 from the list, and then do the following: In the Stop position box, enter 71%.Click the button next to Color, and then under Theme Colors clickBlack, Text 1 (first row, second option from the left).
  • #15 SmartArt customanimation effects: vertical chevron list with dark colors(Basic)To reproduce the SmartArt effects on this slide, do the following:On the Home tab, in the Slides group, click Layout, and then clickBlank. On the Insert tab, in the Illustrations group, click SmartArt. In the Choose a SmartArt Graphic dialog box, in the left pane, click List. In the List pane, click Vertical Chevron List (fourth row, fourth option from the left), and then click OK to insert the graphic into the slide.To create a fourth chevron, select the third chevron at the bottom of the graphic, and then under SmartArtTools, on the Design tab, in the CreateGraphic group, click the arrow next to AddShape, and select AddShapeAfter.To add bullets for the fourth chevron, select the fourth chevron, and then under SmartArtTools, on the Design tab, in the CreateGraphic group, click AddBullet.To enter text, select the SmartArt graphic, and then click one of the arrows on the left border. In the Type your text here dialog box, enter text for each level. (Note: In the example slide, the first-level text boxes contain “One,” “Two,” “Three,” and “Four.” The second-level text is “Supporting Text.”)On the slide, select the SmartArt graphic and drag the right center sizing handle to the right edge of the slide.With the SmartArt graphic still selected, on the DesignTab, in the Themes group, click Colors, and then under Built-In select Median. (Note: If this action is taken in a PowerPoint presentation containing more than one slide, the theme will be applied to all of the slides.)With the SmartArt graphic still selected, under SmartArtTools, on the Design tab, in the SmartArtStyles group, click MoreStyles, and then under 3-D select Inset (first row, second option from the left). Also under SmartArtTools, on the Design tab, in the SmartArtStyles group, click ChangeColors, and then under Colorful select Colorful -AccentColors (first option from the left). To reproduce the chevron effects on this slide, do the following:Press and hold CTRL, and select all four chevrons in the SmartArt graphic. On the Home tab, in the Font group, in the Font list select Franklin Gothic Medium Cond, and then in the FontSize box select 28.On the Home tab, in the bottom right corner of the Drawing group, click the FormatShape dialog box launcher. In the FormatShape dialog box, click TextBox in the left pane, and in the TextBox pane do the following:Under Textlayout, in the Verticalalignment list select Bottom.Under Internalmargin, do the following: In the Left box, enter 0”. In the Right box, enter 0”. In the Bottom box, enter 0”. In the Top box, enter 0.6”.To reproduce the rectangle effects on this slide, do the following:Press and hold CTRL, and the four of the rectangles (with bulleted text). On the Home tab, in the Font group, do the following:In the Font list, select FranklinGothicBook.In the FontSize box, enter 21.In the FontColor list, underThemeColors select White, Background 1 (first row, first option from the left).On the Home tab, in the bottom right corner of the Drawing group, click the Format Shapedialog box launcher. In the Format Shape dialog box, click Fill in the left pane, select Gradientfill in the Fill pane, and then do the following:In the Type list, select Linear.Click the button next to Direction, and then click Linear Down (first row, second option from the left). Under Gradient stops, click Add or Remove until two stops appear in the drop-down list.Also under Gradient stops, customize the gradient stops that you added as follows:Select Stop 1 from the list, and then do the following:In the Stop position box, enter 0%.Click the button next to Color, and then under ThemeColors select Black, Text 1 (first row, second option from the left).In the Transparency box, enter 100%. Select Stop 2 from the list, and then do the following: In the Stop position box, enter 100%.Click the button next to Color, and then under ThemeColors select Black, Text 1 (first row, second option from the left).In the Transparency box, enter 45%. Also in the FormatShape dialog box, click Shadow in the left pane, and in the Shadow pane, in the Presets list, select NoShadow.Also in the FormatShape dialog box, click 3-DFormat in the left pane, and in the 3-DFormat pane, underBevel, in the Top list select NoBevel.Select the top rectangle with bulleted text.On the Home tab, in the bottom right corner of the Drawing group, click the FormatShape dialog box launcher. In the FormatShape dialog box, click LineColor in the left pane, select Gradientfill in the LineColor pane, and then do the following:In the Type list, select Linear.Click the button next to Direction, and then click Linear Down (first row, second option from the left). Under Gradient stops, click Add or Remove until two stops appear in the drop-down list.Also under Gradient stops, customize the gradient stops that you added as follows:Select Stop 1 from the list, and then do the following:In the Stop position box, enter 0%.Click the button next to Color, and then under ThemeColors select Orange, Accent 2 (first row, sixth option from the left).In the Transparency box, enter 100%. Select Stop 2 from the list, and then do the following: In the Stop position box, enter 100%.Click the button next to Color, and then under ThemeColors select Orange, Accent 2 (first row, sixth option from the left).In the Transparency box, enter 0%. Select the second rectangle from the top with bulleted text.On the Home tab, in the bottom right corner of the Drawing group, click the FormatShape dialog box launcher. In the FormatShape dialog box, click LineColor in the left pane, select Gradientfill in the LineColor pane, and then do the following:In the Type list, select Linear.Click the button next to Direction, and then click Linear Down (first row, second option from the left). Under Gradient stops, click Add or Remove until two stops appear in the drop-down list.Also under Gradient stops, customize the gradient stops that you added as follows:Select Stop 1 from the list, and then do the following:In the Stop position box, enter 0%.Click the button next to Color, and then under ThemeColors select Olive Green, Accent 3 (first row, seventh option from the left).In the Transparency box, enter 100%. Select Stop 2 from the list, and then do the following: In the Stop position box, enter 100%.Click the button next to Color, and then under ThemeColors select Olive Green, Accent 3 (first row, seventh option from the left).In the Transparency box, enter 0%. Select the third rectangle from the top with bulleted text.On the Home tab, in the bottom right corner of the Drawing group, click the FormatShape dialog box launcher. In the FormatShape dialog box, click LineColor in the left pane, select Gradient fill in the LineColor pane, and then do the following:In the Type list, select Linear.Click the button next to Direction, and then click Linear Down (first row, second option from the left). Under Gradient stops, click Add or Remove until two stops appear in the drop-down list.Also under Gradient stops, customize the gradient stops that you added as follows:Select Stop 1 from the list, and then do the following:In the Stop position box, enter 0%.Click the button next to Color, and then under ThemeColors select Gold, Accent 4 (first row, eighth option from the left).In the Transparency box, enter 100%. Select Stop 2 from the list, and then do the following: In the Stop position box, enter 100%.Click the button next to Color, and then under ThemeColors select Gold, Accent 4 (first row, eighth option from the left).In the Transparency box, enter 0%. Select the fourth rectangle from the top with bulleted text.On the Home tab, in the bottom right corner of the Drawing group, click the FormatShape dialog box launcher. In the FormatShape dialog box, click LineColor in the left pane, select Gradient fill in the LineColor pane, and then do the following:In the Type list, select Linear.Click the button next to Direction, and then click Linear Down (first row, second option from the left). Under Gradient stops, click Add or Remove until two stops appear in the drop-down list.Also under Gradient stops, customize the gradient stops that you added as follows:Select Stop 1 from the list, and then do the following:In the Stop position box, enter 0%.Click the button next to Color, and then under ThemeColors select Green, Accent 5 (first row, ninth option from the left).In the Transparency box, enter 100%. Select Stop 2 from the list, and then do the following: In the Stop position box, enter 100%.Click the button next to Color, and then under ThemeColors select Green, Accent 5 (first row, ninth option from the left).In the Transparency box, enter 0%. To reproduce the animation effects on this slide, do the following: On the Animations tab, in the Animations group, click CustomAnimation.Select the SmartArt graphic, and then in the CustomAnimation task pane do the following:Click AddEffect, point to Entrance, and select MoreEffects. In the AddEntranceEffect dialog box, under Moderate select Grow & Turn.Click the arrow to the right of the animation effect (grow & turn effect for the graphic), select EffectOptions, and then in the Grow & Turn dialog box, do the following:On the Timing tab, in the Speed list, select 0.5 seconds (Very Fast).On the SmartArtAnimation tab, in the Groupgraphic list, select Onebyone.Click the double arrow to expand the contents of the list in theCustomAnimation task pane.Press and hold CTRL, and select the second, fourth, sixth, and eighth effects (grow & turn entrance effects), and then do the following:Click Change, point to Entrance and select MoreEffects. In the ChangeEntranceEffect dialog box, under Moderate select EaseIn.With the four ease-in entrance effects still selected, under Modify: Ease In do the following:In the Start list, select WithPrevious.In the Speed list, select Fast.Select the grow & turn entrance effect (first effect in the list), and under Modify: Grow & Turn, in the Start list, select WithPrevious.To reproduce the background effects on this slide, do the following:Right-click the slide background area, and then click Format Background. In the Format Background dialog box, click Fill in the left pane, select Gradient fill in the Fill pane, and then do the following:In the Type list, select Radial.Click the button next to Direction, and then click From Center (third option from the left). Under Gradient stops, click Add or Remove until two stops appear in the drop-down list.Also under Gradient stops, customize the gradient stops that you added as follows:Select Stop 1 from the list, and then do the following:In the Stop position box, enter 20%.Click the button next to Color, and then under ThemeColors select White, Background 1, Darker 25% (fourth row, first option from the left). Select Stop 2 from the list, and then do the following: In the Stop position box, enter 100%.Click the button next to Color, and then under ThemeColors select Black, Text 1 (first row, second option from the left).
  • #16 SmartArt custom animation effects: bending process(Intermediate)To reproduce the SmartArt effects on this slide, do the following:On the Home tab, in the Slides group, click Layout, and then clickBlank. On the Insert tab, in the Illustrations group, click SmartArt. In the Choose a SmartArt Graphic dialog box, in the left pane, click Process. In the Process pane, click Vertical Bending Process (fifth row, third option from the left), and then click OK to insert the graphic into the slide.Select the graphic, and then click one of the arrows on the left border. In the Type your text here dialog box, enter text. On the slide, select the graphic. Under SmartArtTools, on the Design tab, in the SmartArtStyles group, do the following:Click ChangeColors, and then under Accent 1 click Colored Fill – Accent 1 (second option from the left).Click More, and then under 3-D click Polished (first option from the left).On the Home tab, in the Font group, select Gill Sans MT from the Font list, and then select 24 from the Font Size list. Select the top left shape (starting point)in the graphic, and then do the following: Under SmartArtTools, on the Format tab, in the Shape Styles group, click the arrow next to Shape Fill, and then under Theme Colors click Olive Green, Accent 3, Darker 25% (fifth row, seventh option from the left).Under SmartArtTools, on the Format tab, in the Shapes group, click Change Shape, and then under Flowchart click Off-page Connector (second row, second option from the left).Select the bottom right shape (ending point) in the graphic, and then do the following:Under SmartArtTools, on the Format tab, in the Shape Styles group, click the arrow next to Shape Fill, and then under Theme Colors click Red, Accent 2, Darker 25% (fifth row, sixth option from the left).Under SmartArtTools, on the Format tab, in the Shapes group, click Change Shape, and then under Basic Shapes click Hexagon (first row, eighth option from the left).To reproduce the animation effects on this slide, do the following:On the Animations tab, in the Animations group, click CustomAnimation.On the slide, select the graphic. In the CustomAnimationtask pane, do the following:Click Add Effect, point to Entrance, and then click MoreEffects. In the Add Entrance Effect dialog box, under Subtle, click Fade.Under Modify: Fade, in the Speed list, select Fast.Also in the Custom Animation task pane, select the fade effect. Click the arrow to the right of the fade effect, and then click EffectOptions. In the Fade dialog box, on the SmartArtAnimation tab, in the Group graphic list, select One by one, and then click OK.Also in the Custom Animation task pane, click the double arrow under the fade effect to expand the contents of the list of effects,and then do the following:Press and hold CTRL, select the first, third, fifth, seventh, ninth, 11th, 13th, 15th, and 17th animation effects (fade effects for the rectangles), and then do the following:Click Change, point to Entrance, and then click MoreEffects. In the Change Entrance Effect dialog box, under Moderate, click Stretch.Under Modify: Stretch, in the Start list, select With Previous. Under Modify: Stretch, in the Speed list, select Fast.Press and hold CTRL, and then select the first, third, fifth, 15th, and 17thanimation effects (stretch effects for the first, second, third, eighth, and ninth rectangles in the path). Under Modify: Stretch, in the Direction list, select From Top.Press and hold CTRL, and then select the seventh and 13th animation effects (stretch effects for the fourth and seventh rectangles in the path). Under Modify: Stretch, in the Direction list, select From Left. Press and hold CTRL, and then select the ninth and 11th animation effects (stretch effects for the fifth and sixth rectangles in the path). Under Modify: Stretch, in the Direction list, select From Bottom.Press and hold CTRL, and then select the second, fourth, sixth, eighth, 10th, 12th, 14th, and 16th animation effects (fade effects for the connectors). Under Modify: Fade, in the Start list, select After Previous.Select the eighth animation effect (fade effect for the connector between the fourth and fifth rectangle). Click the arrow to the right of the eighth animation effect, and then click Timing. In the Fade dialog box, on the Timing tab, in the Delay box, enter 0.5, and then click OK.Select the 10th animation effect (fade effect for the connector between the fifth and sixth rectangle). Click the arrow to the right of the 10th animation effect, and then click Timing. In the Fade dialog box, on the Timing tab, in the Delay box, enter 0.5.To reproduce the background effects on this slide, do the following:Right-click the slide background area, and then click Format Background. In the Format Background dialog box, click Fill in the left pane, select Gradient fill in the Fill pane, and then do the following:In the Type list, select Linear.In the Direction list, click Linear Down(first row, second option from the left). Under Gradient stops, click Add or Remove until two stops appear in the drop-down list.Also under Gradient stops, customize the gradient stops that you added as follows:Select Stop 1 from the list, and then do the following:In the Stop position box, enter 0%.Click the button next to Color, and then under Theme Colorsclick Blue, Accent 1, Darker 25% (fifth row, fifth option from the left). Select Stop 2 from the list, and then do the following: In the Stop position box, enter 71%.Click the button next to Color, and then under Theme Colors clickBlack, Text 1 (first row, second option from the left).
  • #17 SmartArt custom animation effects: bending process(Intermediate)To reproduce the SmartArt effects on this slide, do the following:On the Home tab, in the Slides group, click Layout, and then clickBlank. On the Insert tab, in the Illustrations group, click SmartArt. In the Choose a SmartArt Graphic dialog box, in the left pane, click Process. In the Process pane, click Vertical Bending Process (fifth row, third option from the left), and then click OK to insert the graphic into the slide.Select the graphic, and then click one of the arrows on the left border. In the Type your text here dialog box, enter text. On the slide, select the graphic. Under SmartArtTools, on the Design tab, in the SmartArtStyles group, do the following:Click ChangeColors, and then under Accent 1 click Colored Fill – Accent 1 (second option from the left).Click More, and then under 3-D click Polished (first option from the left).On the Home tab, in the Font group, select Gill Sans MT from the Font list, and then select 24 from the Font Size list. Select the top left shape (starting point)in the graphic, and then do the following: Under SmartArtTools, on the Format tab, in the Shape Styles group, click the arrow next to Shape Fill, and then under Theme Colors click Olive Green, Accent 3, Darker 25% (fifth row, seventh option from the left).Under SmartArtTools, on the Format tab, in the Shapes group, click Change Shape, and then under Flowchart click Off-page Connector (second row, second option from the left).Select the bottom right shape (ending point) in the graphic, and then do the following:Under SmartArtTools, on the Format tab, in the Shape Styles group, click the arrow next to Shape Fill, and then under Theme Colors click Red, Accent 2, Darker 25% (fifth row, sixth option from the left).Under SmartArtTools, on the Format tab, in the Shapes group, click Change Shape, and then under Basic Shapes click Hexagon (first row, eighth option from the left).To reproduce the animation effects on this slide, do the following:On the Animations tab, in the Animations group, click CustomAnimation.On the slide, select the graphic. In the CustomAnimationtask pane, do the following:Click Add Effect, point to Entrance, and then click MoreEffects. In the Add Entrance Effect dialog box, under Subtle, click Fade.Under Modify: Fade, in the Speed list, select Fast.Also in the Custom Animation task pane, select the fade effect. Click the arrow to the right of the fade effect, and then click EffectOptions. In the Fade dialog box, on the SmartArtAnimation tab, in the Group graphic list, select One by one, and then click OK.Also in the Custom Animation task pane, click the double arrow under the fade effect to expand the contents of the list of effects,and then do the following:Press and hold CTRL, select the first, third, fifth, seventh, ninth, 11th, 13th, 15th, and 17th animation effects (fade effects for the rectangles), and then do the following:Click Change, point to Entrance, and then click MoreEffects. In the Change Entrance Effect dialog box, under Moderate, click Stretch.Under Modify: Stretch, in the Start list, select With Previous. Under Modify: Stretch, in the Speed list, select Fast.Press and hold CTRL, and then select the first, third, fifth, 15th, and 17thanimation effects (stretch effects for the first, second, third, eighth, and ninth rectangles in the path). Under Modify: Stretch, in the Direction list, select From Top.Press and hold CTRL, and then select the seventh and 13th animation effects (stretch effects for the fourth and seventh rectangles in the path). Under Modify: Stretch, in the Direction list, select From Left. Press and hold CTRL, and then select the ninth and 11th animation effects (stretch effects for the fifth and sixth rectangles in the path). Under Modify: Stretch, in the Direction list, select From Bottom.Press and hold CTRL, and then select the second, fourth, sixth, eighth, 10th, 12th, 14th, and 16th animation effects (fade effects for the connectors). Under Modify: Fade, in the Start list, select After Previous.Select the eighth animation effect (fade effect for the connector between the fourth and fifth rectangle). Click the arrow to the right of the eighth animation effect, and then click Timing. In the Fade dialog box, on the Timing tab, in the Delay box, enter 0.5, and then click OK.Select the 10th animation effect (fade effect for the connector between the fifth and sixth rectangle). Click the arrow to the right of the 10th animation effect, and then click Timing. In the Fade dialog box, on the Timing tab, in the Delay box, enter 0.5.To reproduce the background effects on this slide, do the following:Right-click the slide background area, and then click Format Background. In the Format Background dialog box, click Fill in the left pane, select Gradient fill in the Fill pane, and then do the following:In the Type list, select Linear.In the Direction list, click Linear Down(first row, second option from the left). Under Gradient stops, click Add or Remove until two stops appear in the drop-down list.Also under Gradient stops, customize the gradient stops that you added as follows:Select Stop 1 from the list, and then do the following:In the Stop position box, enter 0%.Click the button next to Color, and then under Theme Colorsclick Blue, Accent 1, Darker 25% (fifth row, fifth option from the left). Select Stop 2 from the list, and then do the following: In the Stop position box, enter 71%.Click the button next to Color, and then under Theme Colors clickBlack, Text 1 (first row, second option from the left).
  • #18 SmartArt custom animation effects: bending process(Intermediate)To reproduce the SmartArt effects on this slide, do the following:On the Home tab, in the Slides group, click Layout, and then clickBlank. On the Insert tab, in the Illustrations group, click SmartArt. In the Choose a SmartArt Graphic dialog box, in the left pane, click Process. In the Process pane, click Vertical Bending Process (fifth row, third option from the left), and then click OK to insert the graphic into the slide.Select the graphic, and then click one of the arrows on the left border. In the Type your text here dialog box, enter text. On the slide, select the graphic. Under SmartArtTools, on the Design tab, in the SmartArtStyles group, do the following:Click ChangeColors, and then under Accent 1 click Colored Fill – Accent 1 (second option from the left).Click More, and then under 3-D click Polished (first option from the left).On the Home tab, in the Font group, select Gill Sans MT from the Font list, and then select 24 from the Font Size list. Select the top left shape (starting point)in the graphic, and then do the following: Under SmartArtTools, on the Format tab, in the Shape Styles group, click the arrow next to Shape Fill, and then under Theme Colors click Olive Green, Accent 3, Darker 25% (fifth row, seventh option from the left).Under SmartArtTools, on the Format tab, in the Shapes group, click Change Shape, and then under Flowchart click Off-page Connector (second row, second option from the left).Select the bottom right shape (ending point) in the graphic, and then do the following:Under SmartArtTools, on the Format tab, in the Shape Styles group, click the arrow next to Shape Fill, and then under Theme Colors click Red, Accent 2, Darker 25% (fifth row, sixth option from the left).Under SmartArtTools, on the Format tab, in the Shapes group, click Change Shape, and then under Basic Shapes click Hexagon (first row, eighth option from the left).To reproduce the animation effects on this slide, do the following:On the Animations tab, in the Animations group, click CustomAnimation.On the slide, select the graphic. In the CustomAnimationtask pane, do the following:Click Add Effect, point to Entrance, and then click MoreEffects. In the Add Entrance Effect dialog box, under Subtle, click Fade.Under Modify: Fade, in the Speed list, select Fast.Also in the Custom Animation task pane, select the fade effect. Click the arrow to the right of the fade effect, and then click EffectOptions. In the Fade dialog box, on the SmartArtAnimation tab, in the Group graphic list, select One by one, and then click OK.Also in the Custom Animation task pane, click the double arrow under the fade effect to expand the contents of the list of effects,and then do the following:Press and hold CTRL, select the first, third, fifth, seventh, ninth, 11th, 13th, 15th, and 17th animation effects (fade effects for the rectangles), and then do the following:Click Change, point to Entrance, and then click MoreEffects. In the Change Entrance Effect dialog box, under Moderate, click Stretch.Under Modify: Stretch, in the Start list, select With Previous. Under Modify: Stretch, in the Speed list, select Fast.Press and hold CTRL, and then select the first, third, fifth, 15th, and 17thanimation effects (stretch effects for the first, second, third, eighth, and ninth rectangles in the path). Under Modify: Stretch, in the Direction list, select From Top.Press and hold CTRL, and then select the seventh and 13th animation effects (stretch effects for the fourth and seventh rectangles in the path). Under Modify: Stretch, in the Direction list, select From Left. Press and hold CTRL, and then select the ninth and 11th animation effects (stretch effects for the fifth and sixth rectangles in the path). Under Modify: Stretch, in the Direction list, select From Bottom.Press and hold CTRL, and then select the second, fourth, sixth, eighth, 10th, 12th, 14th, and 16th animation effects (fade effects for the connectors). Under Modify: Fade, in the Start list, select After Previous.Select the eighth animation effect (fade effect for the connector between the fourth and fifth rectangle). Click the arrow to the right of the eighth animation effect, and then click Timing. In the Fade dialog box, on the Timing tab, in the Delay box, enter 0.5, and then click OK.Select the 10th animation effect (fade effect for the connector between the fifth and sixth rectangle). Click the arrow to the right of the 10th animation effect, and then click Timing. In the Fade dialog box, on the Timing tab, in the Delay box, enter 0.5.To reproduce the background effects on this slide, do the following:Right-click the slide background area, and then click Format Background. In the Format Background dialog box, click Fill in the left pane, select Gradient fill in the Fill pane, and then do the following:In the Type list, select Linear.In the Direction list, click Linear Down(first row, second option from the left). Under Gradient stops, click Add or Remove until two stops appear in the drop-down list.Also under Gradient stops, customize the gradient stops that you added as follows:Select Stop 1 from the list, and then do the following:In the Stop position box, enter 0%.Click the button next to Color, and then under Theme Colorsclick Blue, Accent 1, Darker 25% (fifth row, fifth option from the left). Select Stop 2 from the list, and then do the following: In the Stop position box, enter 71%.Click the button next to Color, and then under Theme Colors clickBlack, Text 1 (first row, second option from the left).
  • #19 SmartArt custom animation effects: bending process(Intermediate)To reproduce the SmartArt effects on this slide, do the following:On the Home tab, in the Slides group, click Layout, and then clickBlank. On the Insert tab, in the Illustrations group, click SmartArt. In the Choose a SmartArt Graphic dialog box, in the left pane, click Process. In the Process pane, click Vertical Bending Process (fifth row, third option from the left), and then click OK to insert the graphic into the slide.Select the graphic, and then click one of the arrows on the left border. In the Type your text here dialog box, enter text. On the slide, select the graphic. Under SmartArtTools, on the Design tab, in the SmartArtStyles group, do the following:Click ChangeColors, and then under Accent 1 click Colored Fill – Accent 1 (second option from the left).Click More, and then under 3-D click Polished (first option from the left).On the Home tab, in the Font group, select Gill Sans MT from the Font list, and then select 24 from the Font Size list. Select the top left shape (starting point)in the graphic, and then do the following: Under SmartArtTools, on the Format tab, in the Shape Styles group, click the arrow next to Shape Fill, and then under Theme Colors click Olive Green, Accent 3, Darker 25% (fifth row, seventh option from the left).Under SmartArtTools, on the Format tab, in the Shapes group, click Change Shape, and then under Flowchart click Off-page Connector (second row, second option from the left).Select the bottom right shape (ending point) in the graphic, and then do the following:Under SmartArtTools, on the Format tab, in the Shape Styles group, click the arrow next to Shape Fill, and then under Theme Colors click Red, Accent 2, Darker 25% (fifth row, sixth option from the left).Under SmartArtTools, on the Format tab, in the Shapes group, click Change Shape, and then under Basic Shapes click Hexagon (first row, eighth option from the left).To reproduce the animation effects on this slide, do the following:On the Animations tab, in the Animations group, click CustomAnimation.On the slide, select the graphic. In the CustomAnimationtask pane, do the following:Click Add Effect, point to Entrance, and then click MoreEffects. In the Add Entrance Effect dialog box, under Subtle, click Fade.Under Modify: Fade, in the Speed list, select Fast.Also in the Custom Animation task pane, select the fade effect. Click the arrow to the right of the fade effect, and then click EffectOptions. In the Fade dialog box, on the SmartArtAnimation tab, in the Group graphic list, select One by one, and then click OK.Also in the Custom Animation task pane, click the double arrow under the fade effect to expand the contents of the list of effects,and then do the following:Press and hold CTRL, select the first, third, fifth, seventh, ninth, 11th, 13th, 15th, and 17th animation effects (fade effects for the rectangles), and then do the following:Click Change, point to Entrance, and then click MoreEffects. In the Change Entrance Effect dialog box, under Moderate, click Stretch.Under Modify: Stretch, in the Start list, select With Previous. Under Modify: Stretch, in the Speed list, select Fast.Press and hold CTRL, and then select the first, third, fifth, 15th, and 17thanimation effects (stretch effects for the first, second, third, eighth, and ninth rectangles in the path). Under Modify: Stretch, in the Direction list, select From Top.Press and hold CTRL, and then select the seventh and 13th animation effects (stretch effects for the fourth and seventh rectangles in the path). Under Modify: Stretch, in the Direction list, select From Left. Press and hold CTRL, and then select the ninth and 11th animation effects (stretch effects for the fifth and sixth rectangles in the path). Under Modify: Stretch, in the Direction list, select From Bottom.Press and hold CTRL, and then select the second, fourth, sixth, eighth, 10th, 12th, 14th, and 16th animation effects (fade effects for the connectors). Under Modify: Fade, in the Start list, select After Previous.Select the eighth animation effect (fade effect for the connector between the fourth and fifth rectangle). Click the arrow to the right of the eighth animation effect, and then click Timing. In the Fade dialog box, on the Timing tab, in the Delay box, enter 0.5, and then click OK.Select the 10th animation effect (fade effect for the connector between the fifth and sixth rectangle). Click the arrow to the right of the 10th animation effect, and then click Timing. In the Fade dialog box, on the Timing tab, in the Delay box, enter 0.5.To reproduce the background effects on this slide, do the following:Right-click the slide background area, and then click Format Background. In the Format Background dialog box, click Fill in the left pane, select Gradient fill in the Fill pane, and then do the following:In the Type list, select Linear.In the Direction list, click Linear Down(first row, second option from the left). Under Gradient stops, click Add or Remove until two stops appear in the drop-down list.Also under Gradient stops, customize the gradient stops that you added as follows:Select Stop 1 from the list, and then do the following:In the Stop position box, enter 0%.Click the button next to Color, and then under Theme Colorsclick Blue, Accent 1, Darker 25% (fifth row, fifth option from the left). Select Stop 2 from the list, and then do the following: In the Stop position box, enter 71%.Click the button next to Color, and then under Theme Colors clickBlack, Text 1 (first row, second option from the left).
  • #20 SmartArt custom animation effects: bending process(Intermediate)To reproduce the SmartArt effects on this slide, do the following:On the Home tab, in the Slides group, click Layout, and then clickBlank. On the Insert tab, in the Illustrations group, click SmartArt. In the Choose a SmartArt Graphic dialog box, in the left pane, click Process. In the Process pane, click Vertical Bending Process (fifth row, third option from the left), and then click OK to insert the graphic into the slide.Select the graphic, and then click one of the arrows on the left border. In the Type your text here dialog box, enter text. On the slide, select the graphic. Under SmartArtTools, on the Design tab, in the SmartArtStyles group, do the following:Click ChangeColors, and then under Accent 1 click Colored Fill – Accent 1 (second option from the left).Click More, and then under 3-D click Polished (first option from the left).On the Home tab, in the Font group, select Gill Sans MT from the Font list, and then select 24 from the Font Size list. Select the top left shape (starting point)in the graphic, and then do the following: Under SmartArtTools, on the Format tab, in the Shape Styles group, click the arrow next to Shape Fill, and then under Theme Colors click Olive Green, Accent 3, Darker 25% (fifth row, seventh option from the left).Under SmartArtTools, on the Format tab, in the Shapes group, click Change Shape, and then under Flowchart click Off-page Connector (second row, second option from the left).Select the bottom right shape (ending point) in the graphic, and then do the following:Under SmartArtTools, on the Format tab, in the Shape Styles group, click the arrow next to Shape Fill, and then under Theme Colors click Red, Accent 2, Darker 25% (fifth row, sixth option from the left).Under SmartArtTools, on the Format tab, in the Shapes group, click Change Shape, and then under Basic Shapes click Hexagon (first row, eighth option from the left).To reproduce the animation effects on this slide, do the following:On the Animations tab, in the Animations group, click CustomAnimation.On the slide, select the graphic. In the CustomAnimationtask pane, do the following:Click Add Effect, point to Entrance, and then click MoreEffects. In the Add Entrance Effect dialog box, under Subtle, click Fade.Under Modify: Fade, in the Speed list, select Fast.Also in the Custom Animation task pane, select the fade effect. Click the arrow to the right of the fade effect, and then click EffectOptions. In the Fade dialog box, on the SmartArtAnimation tab, in the Group graphic list, select One by one, and then click OK.Also in the Custom Animation task pane, click the double arrow under the fade effect to expand the contents of the list of effects,and then do the following:Press and hold CTRL, select the first, third, fifth, seventh, ninth, 11th, 13th, 15th, and 17th animation effects (fade effects for the rectangles), and then do the following:Click Change, point to Entrance, and then click MoreEffects. In the Change Entrance Effect dialog box, under Moderate, click Stretch.Under Modify: Stretch, in the Start list, select With Previous. Under Modify: Stretch, in the Speed list, select Fast.Press and hold CTRL, and then select the first, third, fifth, 15th, and 17thanimation effects (stretch effects for the first, second, third, eighth, and ninth rectangles in the path). Under Modify: Stretch, in the Direction list, select From Top.Press and hold CTRL, and then select the seventh and 13th animation effects (stretch effects for the fourth and seventh rectangles in the path). Under Modify: Stretch, in the Direction list, select From Left. Press and hold CTRL, and then select the ninth and 11th animation effects (stretch effects for the fifth and sixth rectangles in the path). Under Modify: Stretch, in the Direction list, select From Bottom.Press and hold CTRL, and then select the second, fourth, sixth, eighth, 10th, 12th, 14th, and 16th animation effects (fade effects for the connectors). Under Modify: Fade, in the Start list, select After Previous.Select the eighth animation effect (fade effect for the connector between the fourth and fifth rectangle). Click the arrow to the right of the eighth animation effect, and then click Timing. In the Fade dialog box, on the Timing tab, in the Delay box, enter 0.5, and then click OK.Select the 10th animation effect (fade effect for the connector between the fifth and sixth rectangle). Click the arrow to the right of the 10th animation effect, and then click Timing. In the Fade dialog box, on the Timing tab, in the Delay box, enter 0.5.To reproduce the background effects on this slide, do the following:Right-click the slide background area, and then click Format Background. In the Format Background dialog box, click Fill in the left pane, select Gradient fill in the Fill pane, and then do the following:In the Type list, select Linear.In the Direction list, click Linear Down(first row, second option from the left). Under Gradient stops, click Add or Remove until two stops appear in the drop-down list.Also under Gradient stops, customize the gradient stops that you added as follows:Select Stop 1 from the list, and then do the following:In the Stop position box, enter 0%.Click the button next to Color, and then under Theme Colorsclick Blue, Accent 1, Darker 25% (fifth row, fifth option from the left). Select Stop 2 from the list, and then do the following: In the Stop position box, enter 71%.Click the button next to Color, and then under Theme Colors clickBlack, Text 1 (first row, second option from the left).
  • #21 SmartArt customanimation effects: vertical chevron list with dark colors(Basic)To reproduce the SmartArt effects on this slide, do the following:On the Home tab, in the Slides group, click Layout, and then clickBlank. On the Insert tab, in the Illustrations group, click SmartArt. In the Choose a SmartArt Graphic dialog box, in the left pane, click List. In the List pane, click Vertical Chevron List (fourth row, fourth option from the left), and then click OK to insert the graphic into the slide.To create a fourth chevron, select the third chevron at the bottom of the graphic, and then under SmartArtTools, on the Design tab, in the CreateGraphic group, click the arrow next to AddShape, and select AddShapeAfter.To add bullets for the fourth chevron, select the fourth chevron, and then under SmartArtTools, on the Design tab, in the CreateGraphic group, click AddBullet.To enter text, select the SmartArt graphic, and then click one of the arrows on the left border. In the Type your text here dialog box, enter text for each level. (Note: In the example slide, the first-level text boxes contain “One,” “Two,” “Three,” and “Four.” The second-level text is “Supporting Text.”)On the slide, select the SmartArt graphic and drag the right center sizing handle to the right edge of the slide.With the SmartArt graphic still selected, on the DesignTab, in the Themes group, click Colors, and then under Built-In select Median. (Note: If this action is taken in a PowerPoint presentation containing more than one slide, the theme will be applied to all of the slides.)With the SmartArt graphic still selected, under SmartArtTools, on the Design tab, in the SmartArtStyles group, click MoreStyles, and then under 3-D select Inset (first row, second option from the left). Also under SmartArtTools, on the Design tab, in the SmartArtStyles group, click ChangeColors, and then under Colorful select Colorful -AccentColors (first option from the left). To reproduce the chevron effects on this slide, do the following:Press and hold CTRL, and select all four chevrons in the SmartArt graphic. On the Home tab, in the Font group, in the Font list select Franklin Gothic Medium Cond, and then in the FontSize box select 28.On the Home tab, in the bottom right corner of the Drawing group, click the FormatShape dialog box launcher. In the FormatShape dialog box, click TextBox in the left pane, and in the TextBox pane do the following:Under Textlayout, in the Verticalalignment list select Bottom.Under Internalmargin, do the following: In the Left box, enter 0”. In the Right box, enter 0”. In the Bottom box, enter 0”. In the Top box, enter 0.6”.To reproduce the rectangle effects on this slide, do the following:Press and hold CTRL, and the four of the rectangles (with bulleted text). On the Home tab, in the Font group, do the following:In the Font list, select FranklinGothicBook.In the FontSize box, enter 21.In the FontColor list, underThemeColors select White, Background 1 (first row, first option from the left).On the Home tab, in the bottom right corner of the Drawing group, click the Format Shapedialog box launcher. In the Format Shape dialog box, click Fill in the left pane, select Gradientfill in the Fill pane, and then do the following:In the Type list, select Linear.Click the button next to Direction, and then click Linear Down (first row, second option from the left). Under Gradient stops, click Add or Remove until two stops appear in the drop-down list.Also under Gradient stops, customize the gradient stops that you added as follows:Select Stop 1 from the list, and then do the following:In the Stop position box, enter 0%.Click the button next to Color, and then under ThemeColors select Black, Text 1 (first row, second option from the left).In the Transparency box, enter 100%. Select Stop 2 from the list, and then do the following: In the Stop position box, enter 100%.Click the button next to Color, and then under ThemeColors select Black, Text 1 (first row, second option from the left).In the Transparency box, enter 45%. Also in the FormatShape dialog box, click Shadow in the left pane, and in the Shadow pane, in the Presets list, select NoShadow.Also in the FormatShape dialog box, click 3-DFormat in the left pane, and in the 3-DFormat pane, underBevel, in the Top list select NoBevel.Select the top rectangle with bulleted text.On the Home tab, in the bottom right corner of the Drawing group, click the FormatShape dialog box launcher. In the FormatShape dialog box, click LineColor in the left pane, select Gradientfill in the LineColor pane, and then do the following:In the Type list, select Linear.Click the button next to Direction, and then click Linear Down (first row, second option from the left). Under Gradient stops, click Add or Remove until two stops appear in the drop-down list.Also under Gradient stops, customize the gradient stops that you added as follows:Select Stop 1 from the list, and then do the following:In the Stop position box, enter 0%.Click the button next to Color, and then under ThemeColors select Orange, Accent 2 (first row, sixth option from the left).In the Transparency box, enter 100%. Select Stop 2 from the list, and then do the following: In the Stop position box, enter 100%.Click the button next to Color, and then under ThemeColors select Orange, Accent 2 (first row, sixth option from the left).In the Transparency box, enter 0%. Select the second rectangle from the top with bulleted text.On the Home tab, in the bottom right corner of the Drawing group, click the FormatShape dialog box launcher. In the FormatShape dialog box, click LineColor in the left pane, select Gradientfill in the LineColor pane, and then do the following:In the Type list, select Linear.Click the button next to Direction, and then click Linear Down (first row, second option from the left). Under Gradient stops, click Add or Remove until two stops appear in the drop-down list.Also under Gradient stops, customize the gradient stops that you added as follows:Select Stop 1 from the list, and then do the following:In the Stop position box, enter 0%.Click the button next to Color, and then under ThemeColors select Olive Green, Accent 3 (first row, seventh option from the left).In the Transparency box, enter 100%. Select Stop 2 from the list, and then do the following: In the Stop position box, enter 100%.Click the button next to Color, and then under ThemeColors select Olive Green, Accent 3 (first row, seventh option from the left).In the Transparency box, enter 0%. Select the third rectangle from the top with bulleted text.On the Home tab, in the bottom right corner of the Drawing group, click the FormatShape dialog box launcher. In the FormatShape dialog box, click LineColor in the left pane, select Gradient fill in the LineColor pane, and then do the following:In the Type list, select Linear.Click the button next to Direction, and then click Linear Down (first row, second option from the left). Under Gradient stops, click Add or Remove until two stops appear in the drop-down list.Also under Gradient stops, customize the gradient stops that you added as follows:Select Stop 1 from the list, and then do the following:In the Stop position box, enter 0%.Click the button next to Color, and then under ThemeColors select Gold, Accent 4 (first row, eighth option from the left).In the Transparency box, enter 100%. Select Stop 2 from the list, and then do the following: In the Stop position box, enter 100%.Click the button next to Color, and then under ThemeColors select Gold, Accent 4 (first row, eighth option from the left).In the Transparency box, enter 0%. Select the fourth rectangle from the top with bulleted text.On the Home tab, in the bottom right corner of the Drawing group, click the FormatShape dialog box launcher. In the FormatShape dialog box, click LineColor in the left pane, select Gradient fill in the LineColor pane, and then do the following:In the Type list, select Linear.Click the button next to Direction, and then click Linear Down (first row, second option from the left). Under Gradient stops, click Add or Remove until two stops appear in the drop-down list.Also under Gradient stops, customize the gradient stops that you added as follows:Select Stop 1 from the list, and then do the following:In the Stop position box, enter 0%.Click the button next to Color, and then under ThemeColors select Green, Accent 5 (first row, ninth option from the left).In the Transparency box, enter 100%. Select Stop 2 from the list, and then do the following: In the Stop position box, enter 100%.Click the button next to Color, and then under ThemeColors select Green, Accent 5 (first row, ninth option from the left).In the Transparency box, enter 0%. To reproduce the animation effects on this slide, do the following: On the Animations tab, in the Animations group, click CustomAnimation.Select the SmartArt graphic, and then in the CustomAnimation task pane do the following:Click AddEffect, point to Entrance, and select MoreEffects. In the AddEntranceEffect dialog box, under Moderate select Grow & Turn.Click the arrow to the right of the animation effect (grow & turn effect for the graphic), select EffectOptions, and then in the Grow & Turn dialog box, do the following:On the Timing tab, in the Speed list, select 0.5 seconds (Very Fast).On the SmartArtAnimation tab, in the Groupgraphic list, select Onebyone.Click the double arrow to expand the contents of the list in theCustomAnimation task pane.Press and hold CTRL, and select the second, fourth, sixth, and eighth effects (grow & turn entrance effects), and then do the following:Click Change, point to Entrance and select MoreEffects. In the ChangeEntranceEffect dialog box, under Moderate select EaseIn.With the four ease-in entrance effects still selected, under Modify: Ease In do the following:In the Start list, select WithPrevious.In the Speed list, select Fast.Select the grow & turn entrance effect (first effect in the list), and under Modify: Grow & Turn, in the Start list, select WithPrevious.To reproduce the background effects on this slide, do the following:Right-click the slide background area, and then click Format Background. In the Format Background dialog box, click Fill in the left pane, select Gradient fill in the Fill pane, and then do the following:In the Type list, select Radial.Click the button next to Direction, and then click From Center (third option from the left). Under Gradient stops, click Add or Remove until two stops appear in the drop-down list.Also under Gradient stops, customize the gradient stops that you added as follows:Select Stop 1 from the list, and then do the following:In the Stop position box, enter 20%.Click the button next to Color, and then under ThemeColors select White, Background 1, Darker 25% (fourth row, first option from the left). Select Stop 2 from the list, and then do the following: In the Stop position box, enter 100%.Click the button next to Color, and then under ThemeColors select Black, Text 1 (first row, second option from the left).
  • #22 SmartArt customanimation effects: vertical chevron list with dark colors(Basic)To reproduce the SmartArt effects on this slide, do the following:On the Home tab, in the Slides group, click Layout, and then clickBlank. On the Insert tab, in the Illustrations group, click SmartArt. In the Choose a SmartArt Graphic dialog box, in the left pane, click List. In the List pane, click Vertical Chevron List (fourth row, fourth option from the left), and then click OK to insert the graphic into the slide.To create a fourth chevron, select the third chevron at the bottom of the graphic, and then under SmartArtTools, on the Design tab, in the CreateGraphic group, click the arrow next to AddShape, and select AddShapeAfter.To add bullets for the fourth chevron, select the fourth chevron, and then under SmartArtTools, on the Design tab, in the CreateGraphic group, click AddBullet.To enter text, select the SmartArt graphic, and then click one of the arrows on the left border. In the Type your text here dialog box, enter text for each level. (Note: In the example slide, the first-level text boxes contain “One,” “Two,” “Three,” and “Four.” The second-level text is “Supporting Text.”)On the slide, select the SmartArt graphic and drag the right center sizing handle to the right edge of the slide.With the SmartArt graphic still selected, on the DesignTab, in the Themes group, click Colors, and then under Built-In select Median. (Note: If this action is taken in a PowerPoint presentation containing more than one slide, the theme will be applied to all of the slides.)With the SmartArt graphic still selected, under SmartArtTools, on the Design tab, in the SmartArtStyles group, click MoreStyles, and then under 3-D select Inset (first row, second option from the left). Also under SmartArtTools, on the Design tab, in the SmartArtStyles group, click ChangeColors, and then under Colorful select Colorful -AccentColors (first option from the left). To reproduce the chevron effects on this slide, do the following:Press and hold CTRL, and select all four chevrons in the SmartArt graphic. On the Home tab, in the Font group, in the Font list select Franklin Gothic Medium Cond, and then in the FontSize box select 28.On the Home tab, in the bottom right corner of the Drawing group, click the FormatShape dialog box launcher. In the FormatShape dialog box, click TextBox in the left pane, and in the TextBox pane do the following:Under Textlayout, in the Verticalalignment list select Bottom.Under Internalmargin, do the following: In the Left box, enter 0”. In the Right box, enter 0”. In the Bottom box, enter 0”. In the Top box, enter 0.6”.To reproduce the rectangle effects on this slide, do the following:Press and hold CTRL, and the four of the rectangles (with bulleted text). On the Home tab, in the Font group, do the following:In the Font list, select FranklinGothicBook.In the FontSize box, enter 21.In the FontColor list, underThemeColors select White, Background 1 (first row, first option from the left).On the Home tab, in the bottom right corner of the Drawing group, click the Format Shapedialog box launcher. In the Format Shape dialog box, click Fill in the left pane, select Gradientfill in the Fill pane, and then do the following:In the Type list, select Linear.Click the button next to Direction, and then click Linear Down (first row, second option from the left). Under Gradient stops, click Add or Remove until two stops appear in the drop-down list.Also under Gradient stops, customize the gradient stops that you added as follows:Select Stop 1 from the list, and then do the following:In the Stop position box, enter 0%.Click the button next to Color, and then under ThemeColors select Black, Text 1 (first row, second option from the left).In the Transparency box, enter 100%. Select Stop 2 from the list, and then do the following: In the Stop position box, enter 100%.Click the button next to Color, and then under ThemeColors select Black, Text 1 (first row, second option from the left).In the Transparency box, enter 45%. Also in the FormatShape dialog box, click Shadow in the left pane, and in the Shadow pane, in the Presets list, select NoShadow.Also in the FormatShape dialog box, click 3-DFormat in the left pane, and in the 3-DFormat pane, underBevel, in the Top list select NoBevel.Select the top rectangle with bulleted text.On the Home tab, in the bottom right corner of the Drawing group, click the FormatShape dialog box launcher. In the FormatShape dialog box, click LineColor in the left pane, select Gradientfill in the LineColor pane, and then do the following:In the Type list, select Linear.Click the button next to Direction, and then click Linear Down (first row, second option from the left). Under Gradient stops, click Add or Remove until two stops appear in the drop-down list.Also under Gradient stops, customize the gradient stops that you added as follows:Select Stop 1 from the list, and then do the following:In the Stop position box, enter 0%.Click the button next to Color, and then under ThemeColors select Orange, Accent 2 (first row, sixth option from the left).In the Transparency box, enter 100%. Select Stop 2 from the list, and then do the following: In the Stop position box, enter 100%.Click the button next to Color, and then under ThemeColors select Orange, Accent 2 (first row, sixth option from the left).In the Transparency box, enter 0%. Select the second rectangle from the top with bulleted text.On the Home tab, in the bottom right corner of the Drawing group, click the FormatShape dialog box launcher. In the FormatShape dialog box, click LineColor in the left pane, select Gradientfill in the LineColor pane, and then do the following:In the Type list, select Linear.Click the button next to Direction, and then click Linear Down (first row, second option from the left). Under Gradient stops, click Add or Remove until two stops appear in the drop-down list.Also under Gradient stops, customize the gradient stops that you added as follows:Select Stop 1 from the list, and then do the following:In the Stop position box, enter 0%.Click the button next to Color, and then under ThemeColors select Olive Green, Accent 3 (first row, seventh option from the left).In the Transparency box, enter 100%. Select Stop 2 from the list, and then do the following: In the Stop position box, enter 100%.Click the button next to Color, and then under ThemeColors select Olive Green, Accent 3 (first row, seventh option from the left).In the Transparency box, enter 0%. Select the third rectangle from the top with bulleted text.On the Home tab, in the bottom right corner of the Drawing group, click the FormatShape dialog box launcher. In the FormatShape dialog box, click LineColor in the left pane, select Gradient fill in the LineColor pane, and then do the following:In the Type list, select Linear.Click the button next to Direction, and then click Linear Down (first row, second option from the left). Under Gradient stops, click Add or Remove until two stops appear in the drop-down list.Also under Gradient stops, customize the gradient stops that you added as follows:Select Stop 1 from the list, and then do the following:In the Stop position box, enter 0%.Click the button next to Color, and then under ThemeColors select Gold, Accent 4 (first row, eighth option from the left).In the Transparency box, enter 100%. Select Stop 2 from the list, and then do the following: In the Stop position box, enter 100%.Click the button next to Color, and then under ThemeColors select Gold, Accent 4 (first row, eighth option from the left).In the Transparency box, enter 0%. Select the fourth rectangle from the top with bulleted text.On the Home tab, in the bottom right corner of the Drawing group, click the FormatShape dialog box launcher. In the FormatShape dialog box, click LineColor in the left pane, select Gradient fill in the LineColor pane, and then do the following:In the Type list, select Linear.Click the button next to Direction, and then click Linear Down (first row, second option from the left). Under Gradient stops, click Add or Remove until two stops appear in the drop-down list.Also under Gradient stops, customize the gradient stops that you added as follows:Select Stop 1 from the list, and then do the following:In the Stop position box, enter 0%.Click the button next to Color, and then under ThemeColors select Green, Accent 5 (first row, ninth option from the left).In the Transparency box, enter 100%. Select Stop 2 from the list, and then do the following: In the Stop position box, enter 100%.Click the button next to Color, and then under ThemeColors select Green, Accent 5 (first row, ninth option from the left).In the Transparency box, enter 0%. To reproduce the animation effects on this slide, do the following: On the Animations tab, in the Animations group, click CustomAnimation.Select the SmartArt graphic, and then in the CustomAnimation task pane do the following:Click AddEffect, point to Entrance, and select MoreEffects. In the AddEntranceEffect dialog box, under Moderate select Grow & Turn.Click the arrow to the right of the animation effect (grow & turn effect for the graphic), select EffectOptions, and then in the Grow & Turn dialog box, do the following:On the Timing tab, in the Speed list, select 0.5 seconds (Very Fast).On the SmartArtAnimation tab, in the Groupgraphic list, select Onebyone.Click the double arrow to expand the contents of the list in theCustomAnimation task pane.Press and hold CTRL, and select the second, fourth, sixth, and eighth effects (grow & turn entrance effects), and then do the following:Click Change, point to Entrance and select MoreEffects. In the ChangeEntranceEffect dialog box, under Moderate select EaseIn.With the four ease-in entrance effects still selected, under Modify: Ease In do the following:In the Start list, select WithPrevious.In the Speed list, select Fast.Select the grow & turn entrance effect (first effect in the list), and under Modify: Grow & Turn, in the Start list, select WithPrevious.To reproduce the background effects on this slide, do the following:Right-click the slide background area, and then click Format Background. In the Format Background dialog box, click Fill in the left pane, select Gradient fill in the Fill pane, and then do the following:In the Type list, select Radial.Click the button next to Direction, and then click From Center (third option from the left). Under Gradient stops, click Add or Remove until two stops appear in the drop-down list.Also under Gradient stops, customize the gradient stops that you added as follows:Select Stop 1 from the list, and then do the following:In the Stop position box, enter 20%.Click the button next to Color, and then under ThemeColors select White, Background 1, Darker 25% (fourth row, first option from the left). Select Stop 2 from the list, and then do the following: In the Stop position box, enter 100%.Click the button next to Color, and then under ThemeColors select Black, Text 1 (first row, second option from the left).