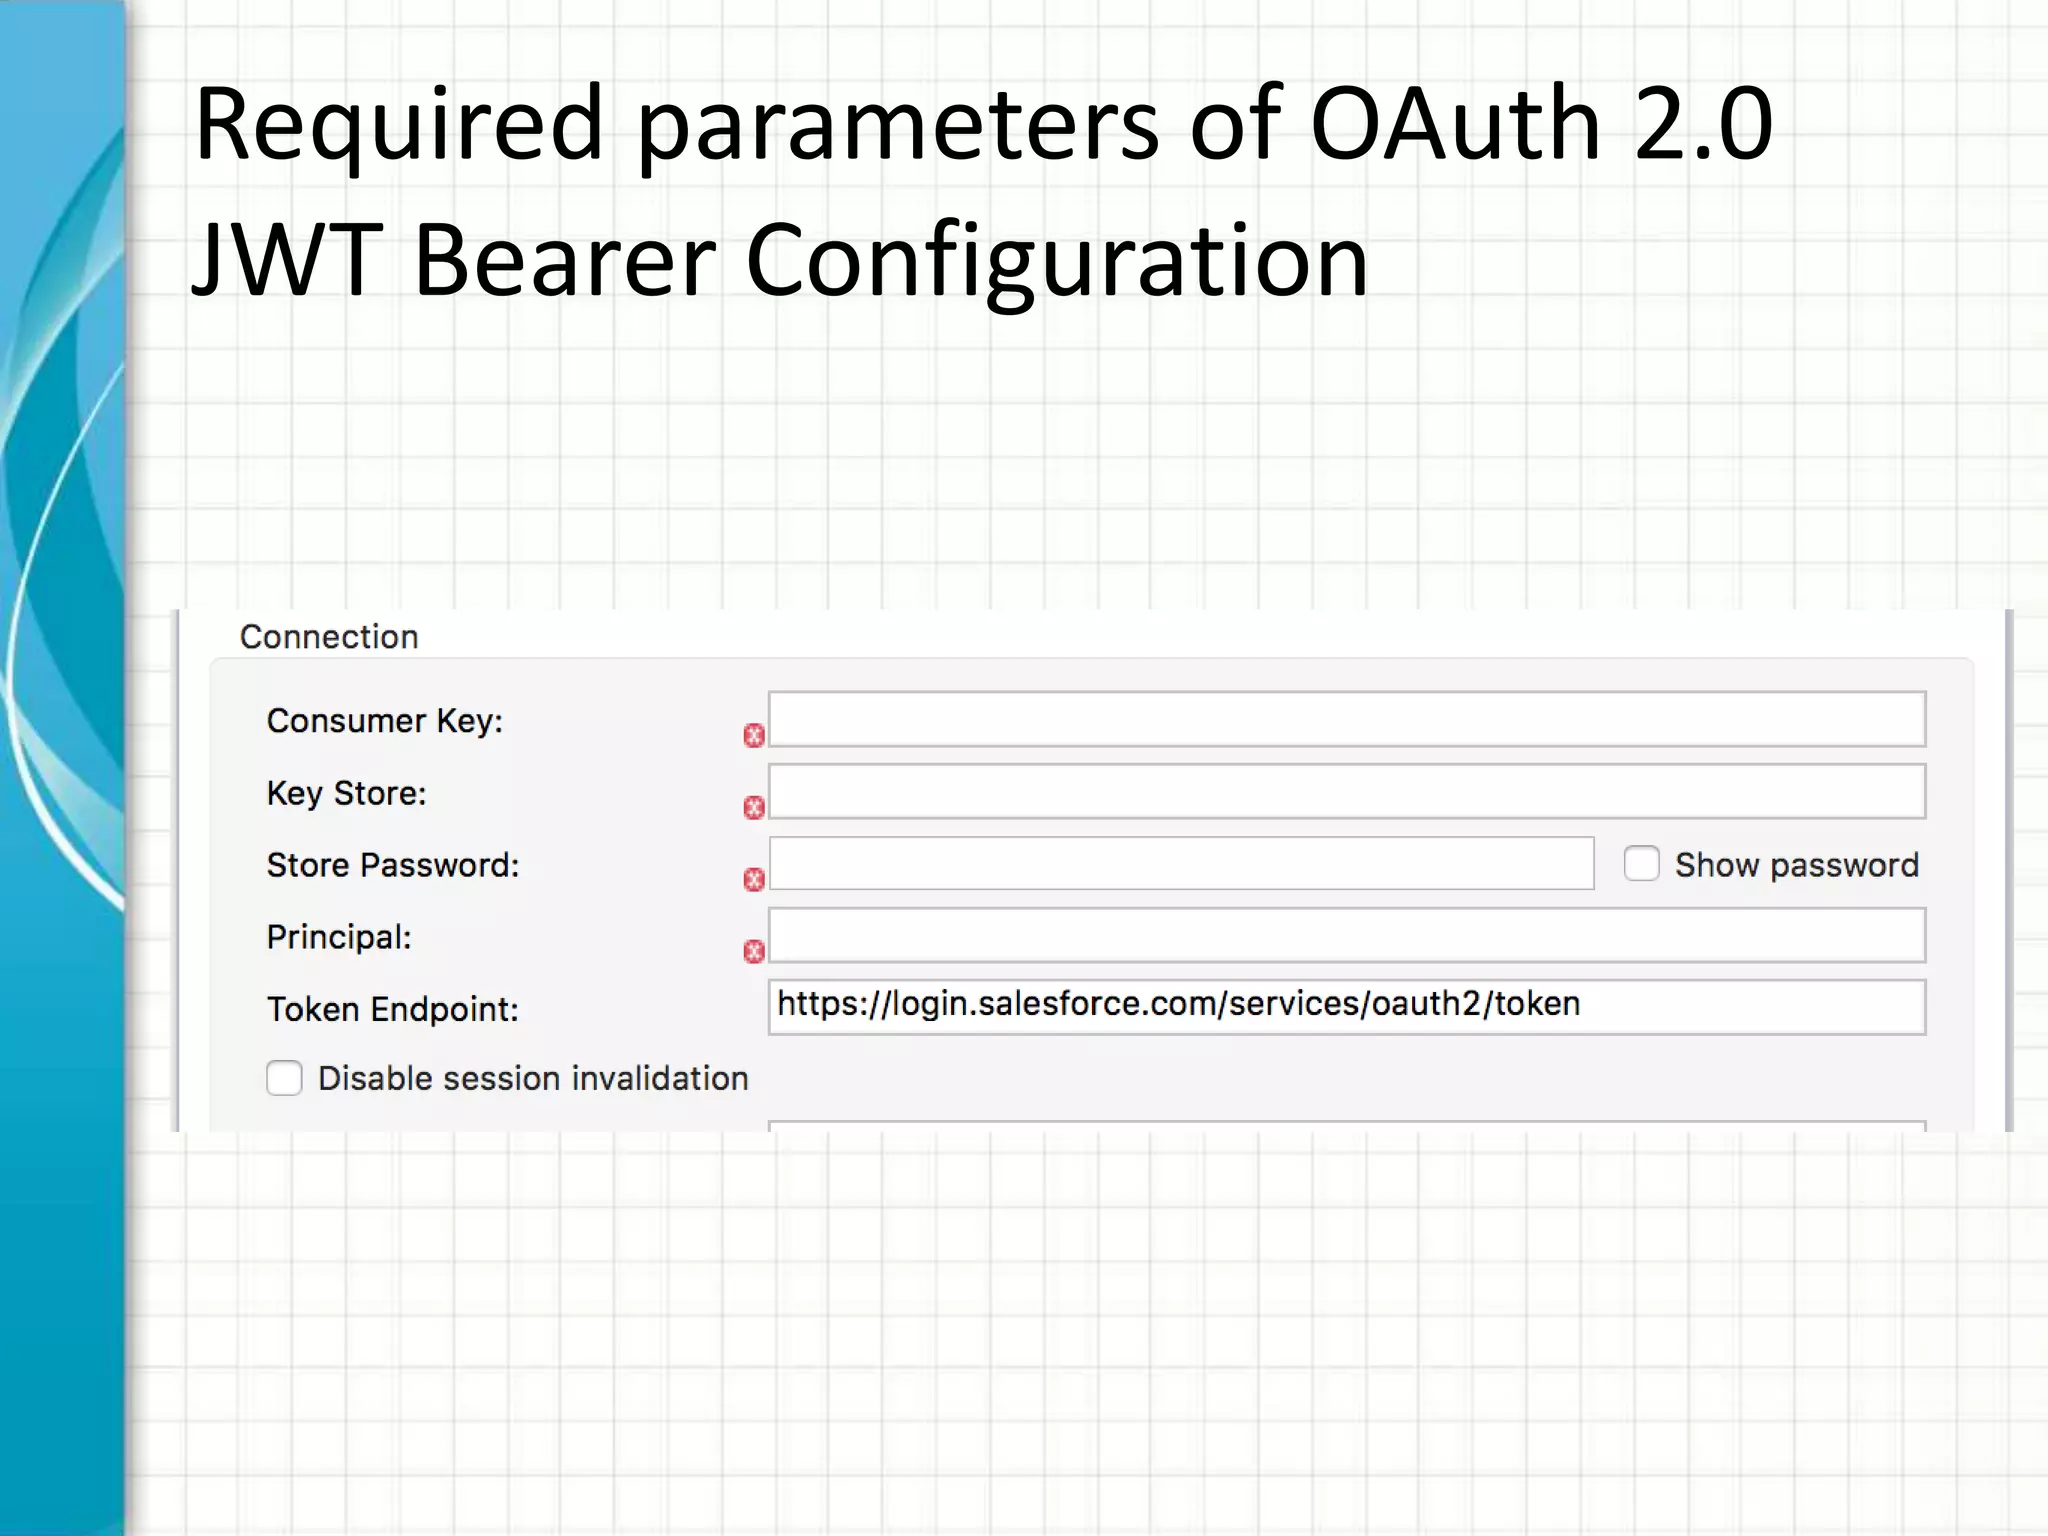
This document discusses how to integrate Salesforce with Mulesoft using the Salesforce Connector and OAuth 2.0 JWT Bearer authentication. It provides steps to create a Salesforce connected app, generate a keystore file, and configure the Salesforce connector in Mulesoft. Required parameters for the OAuth 2.0 JWT Bearer configuration include the consumer key, keystore file and password, principal, and authorizing the connected application. The document also includes a sample flow to call the Salesforce Get Server Timestamp operation and test the application connectivity.
What is Oauth2.0 JWT Bearer?
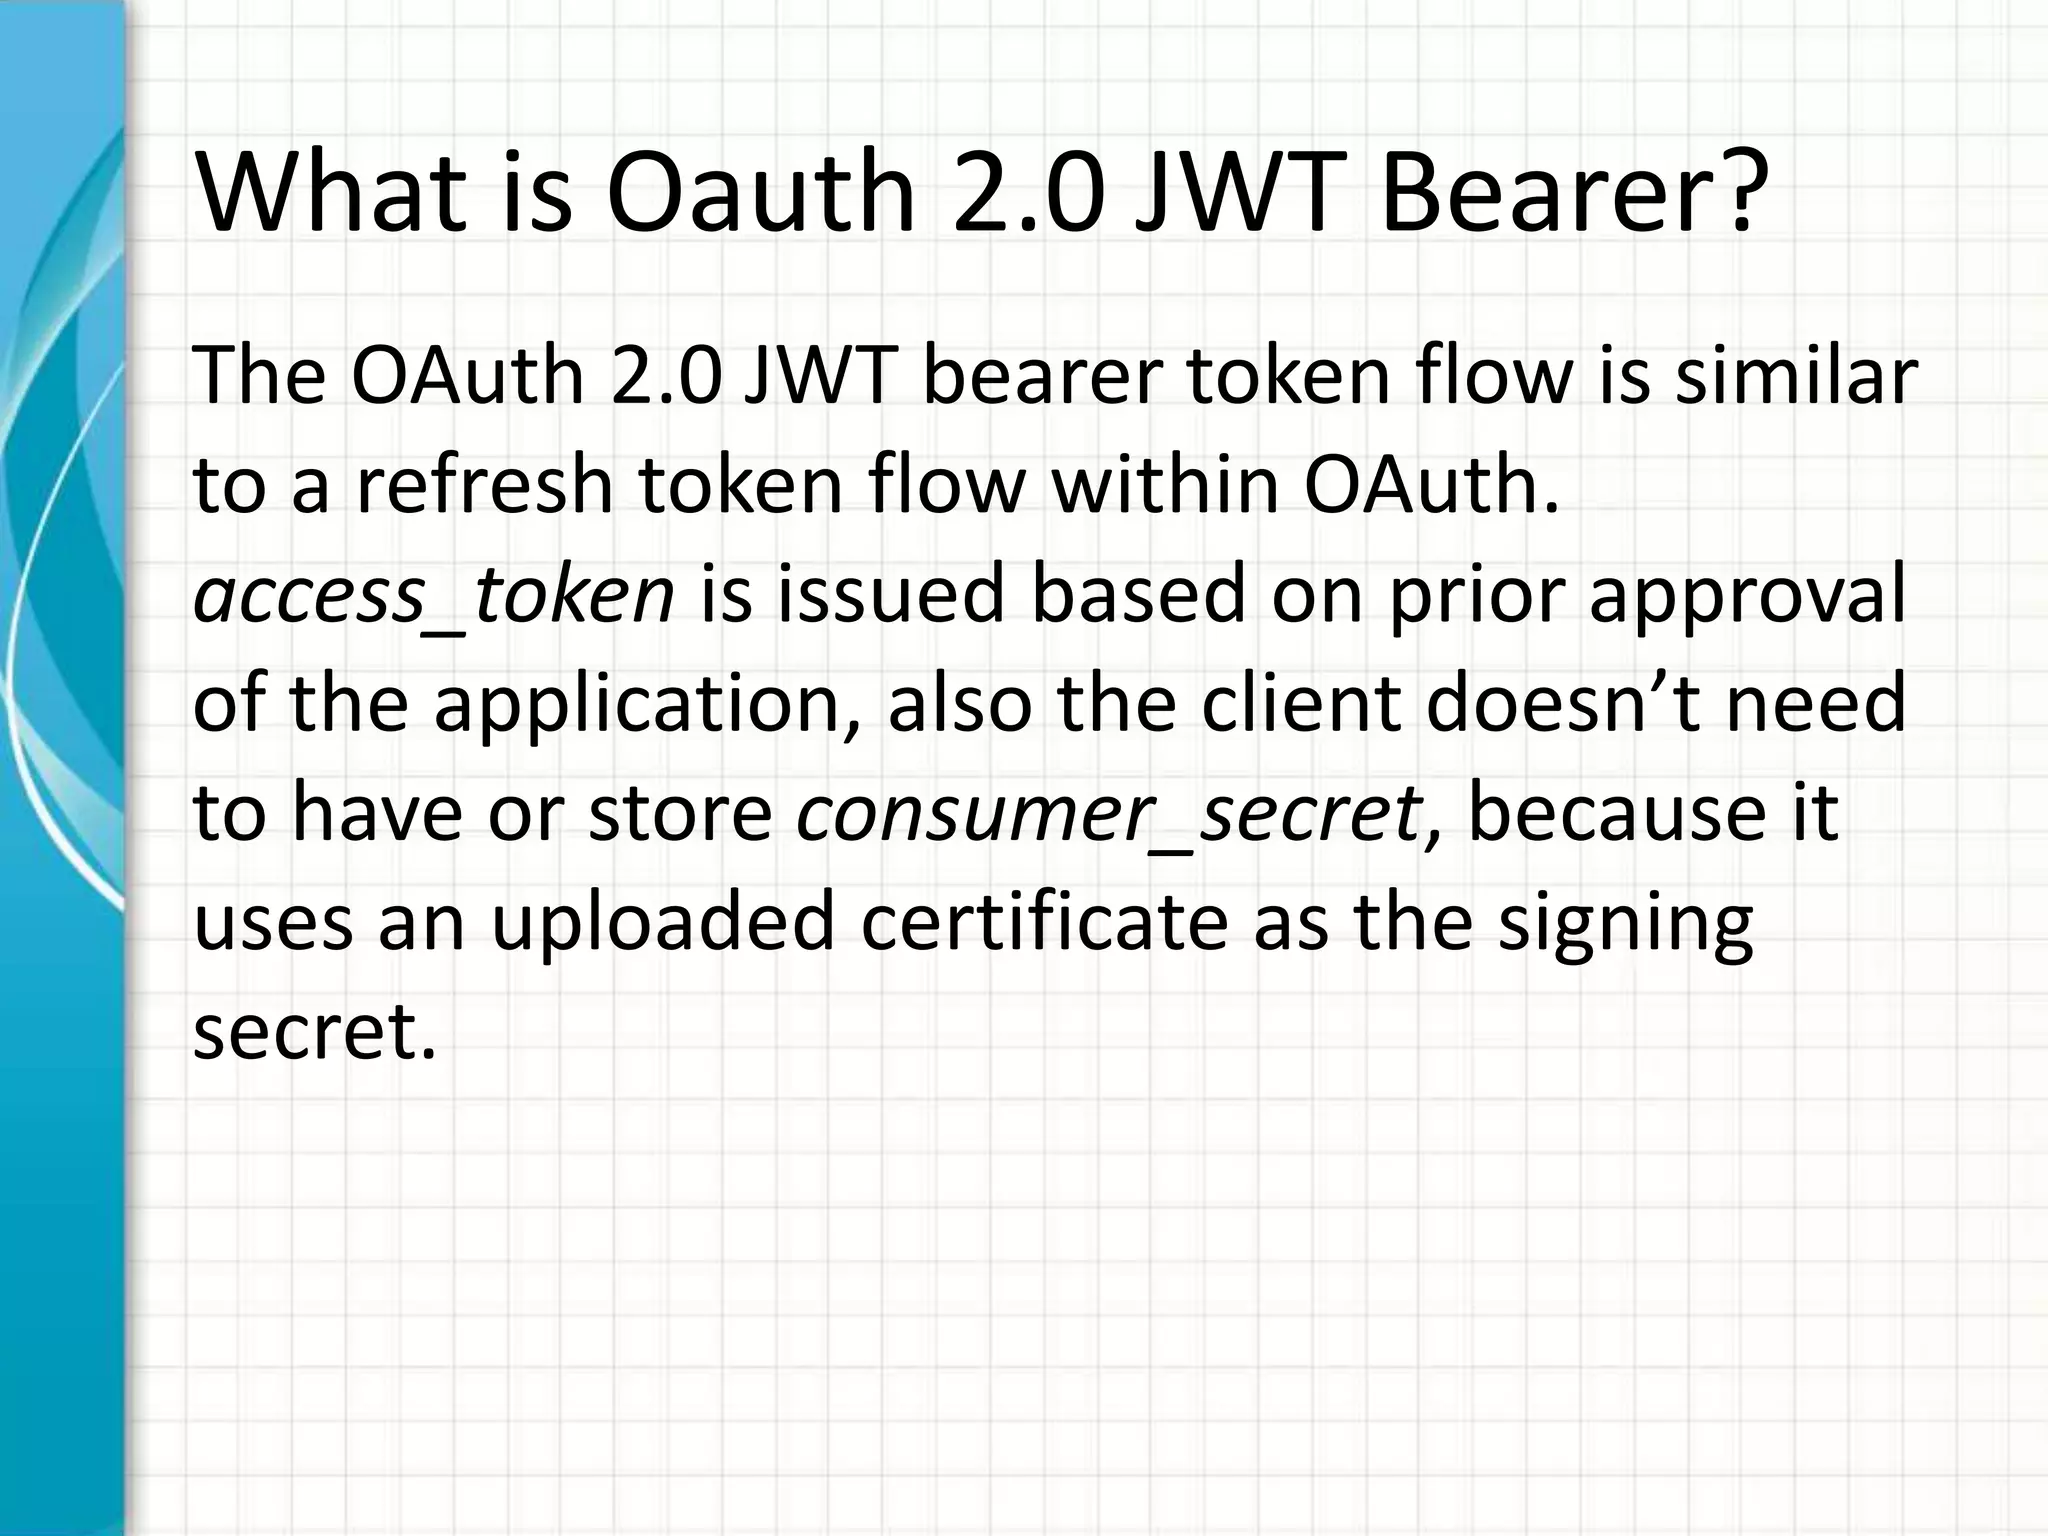
The OAuth 2.0 JWT bearer token flow is similar
to a refresh token flow within OAuth.
access_token is issued based on prior approval
of the application, also the client doesn’t need
to have or store consumer_secret, because it
uses an uploaded certificate as the signing
secret.
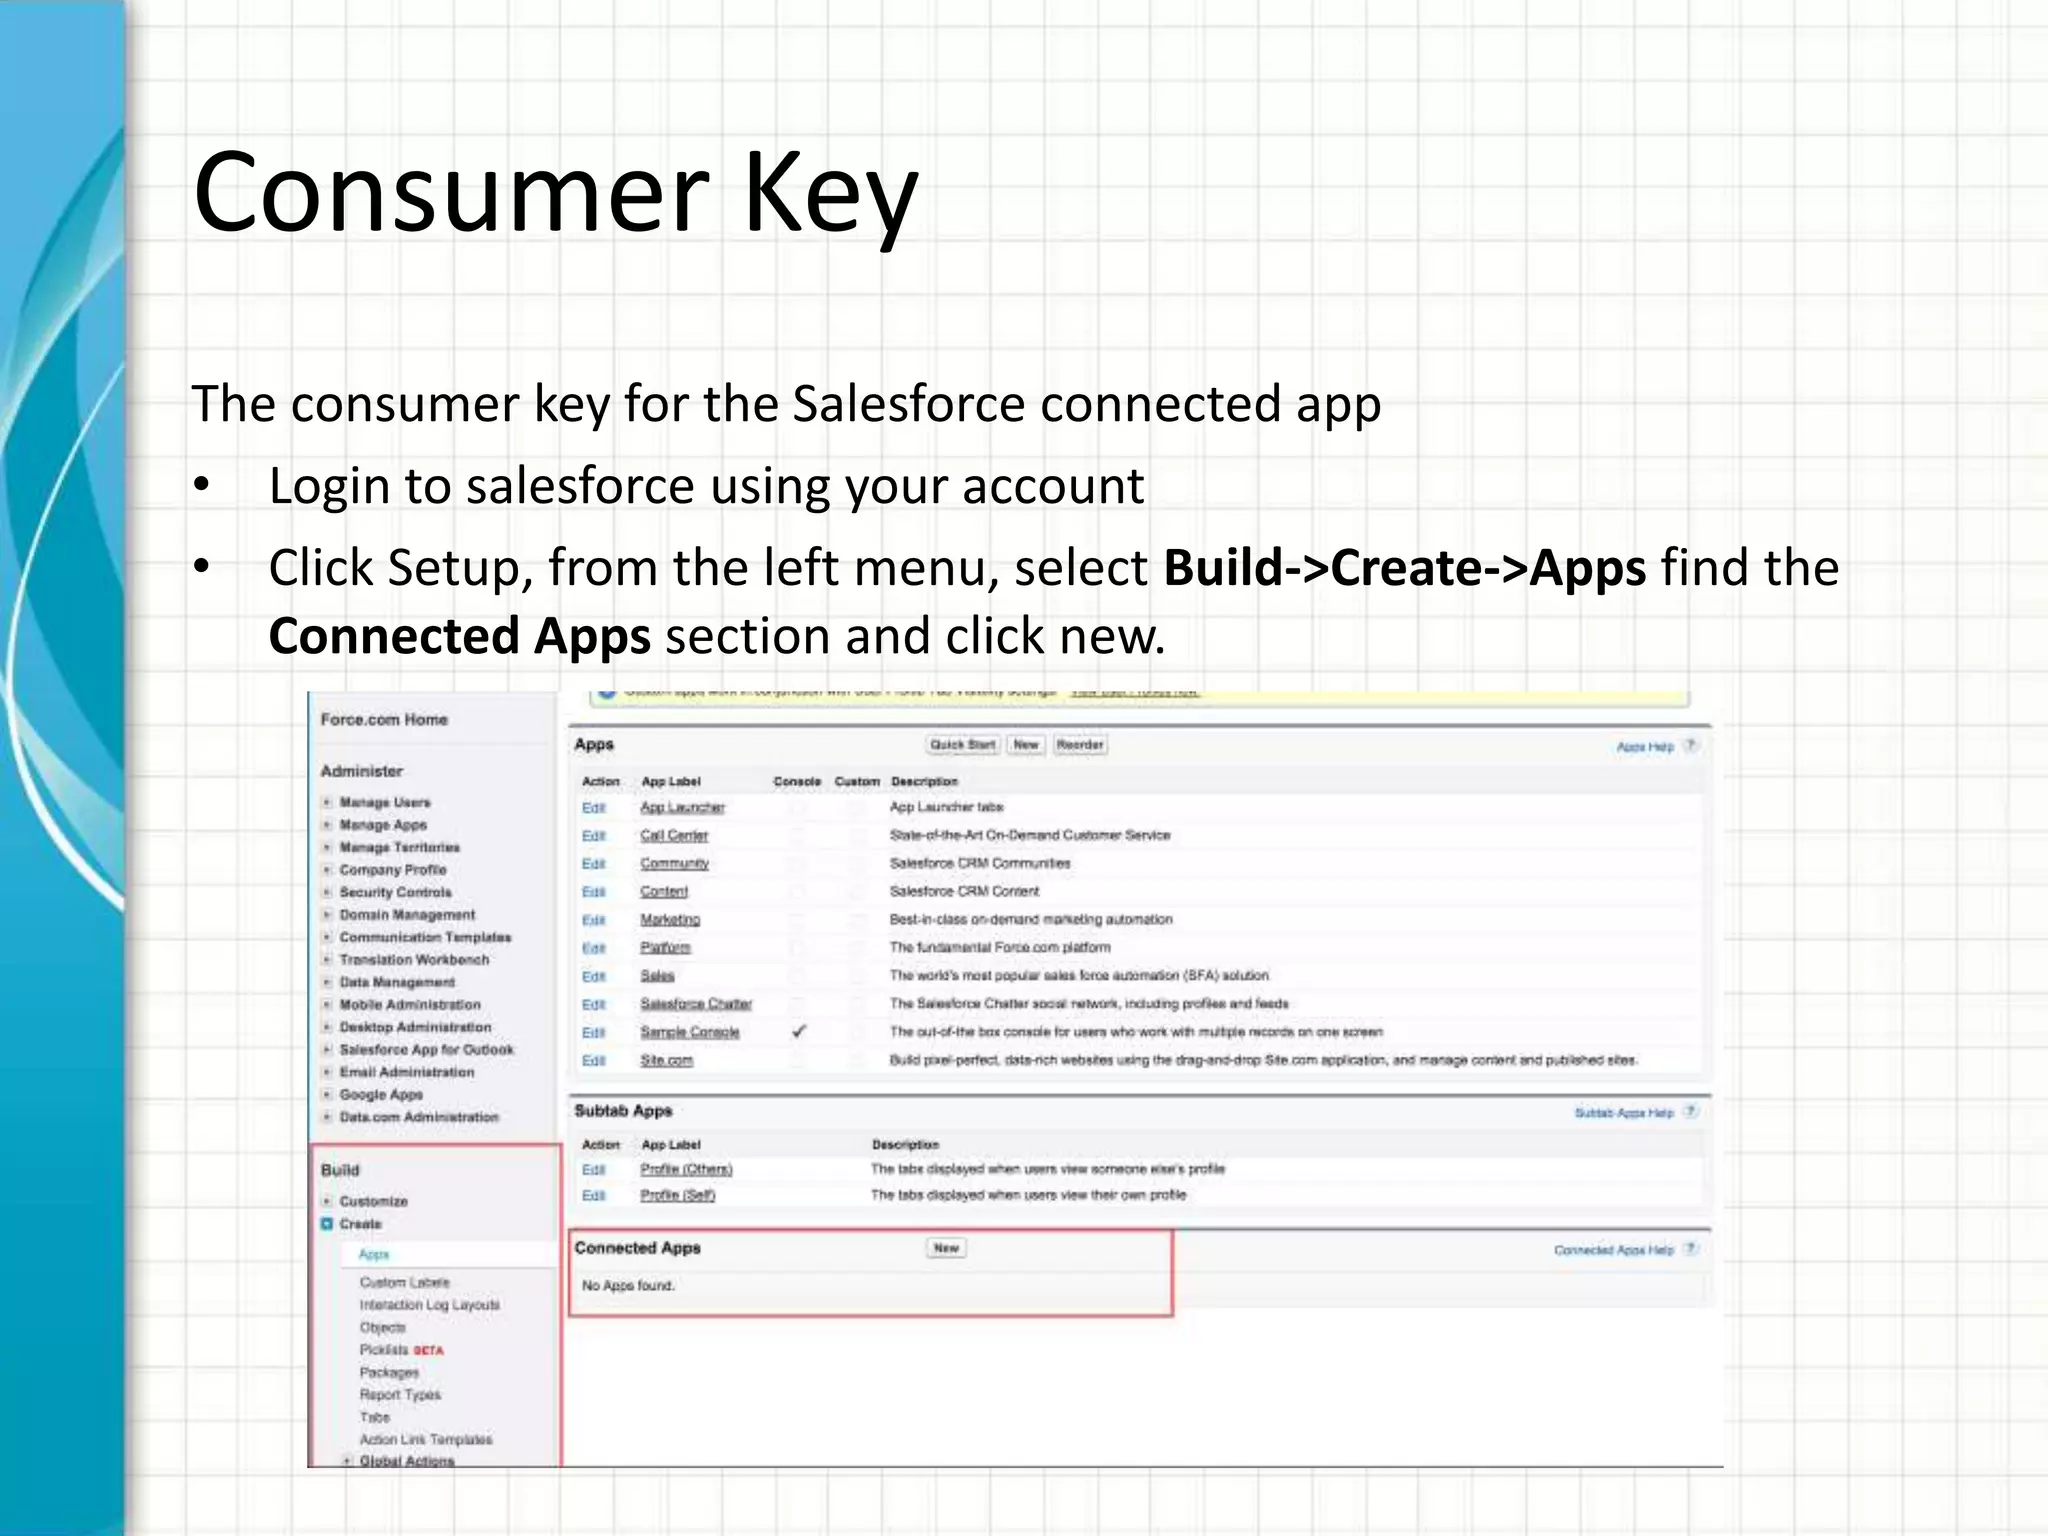
Consumer Key
The consumerkey for the Salesforce connected app
• Login to salesforce using your account
• Click Setup, from the left menu, select Build->Create->Apps find the
Connected Apps section and click new.
6.
Consumer Key
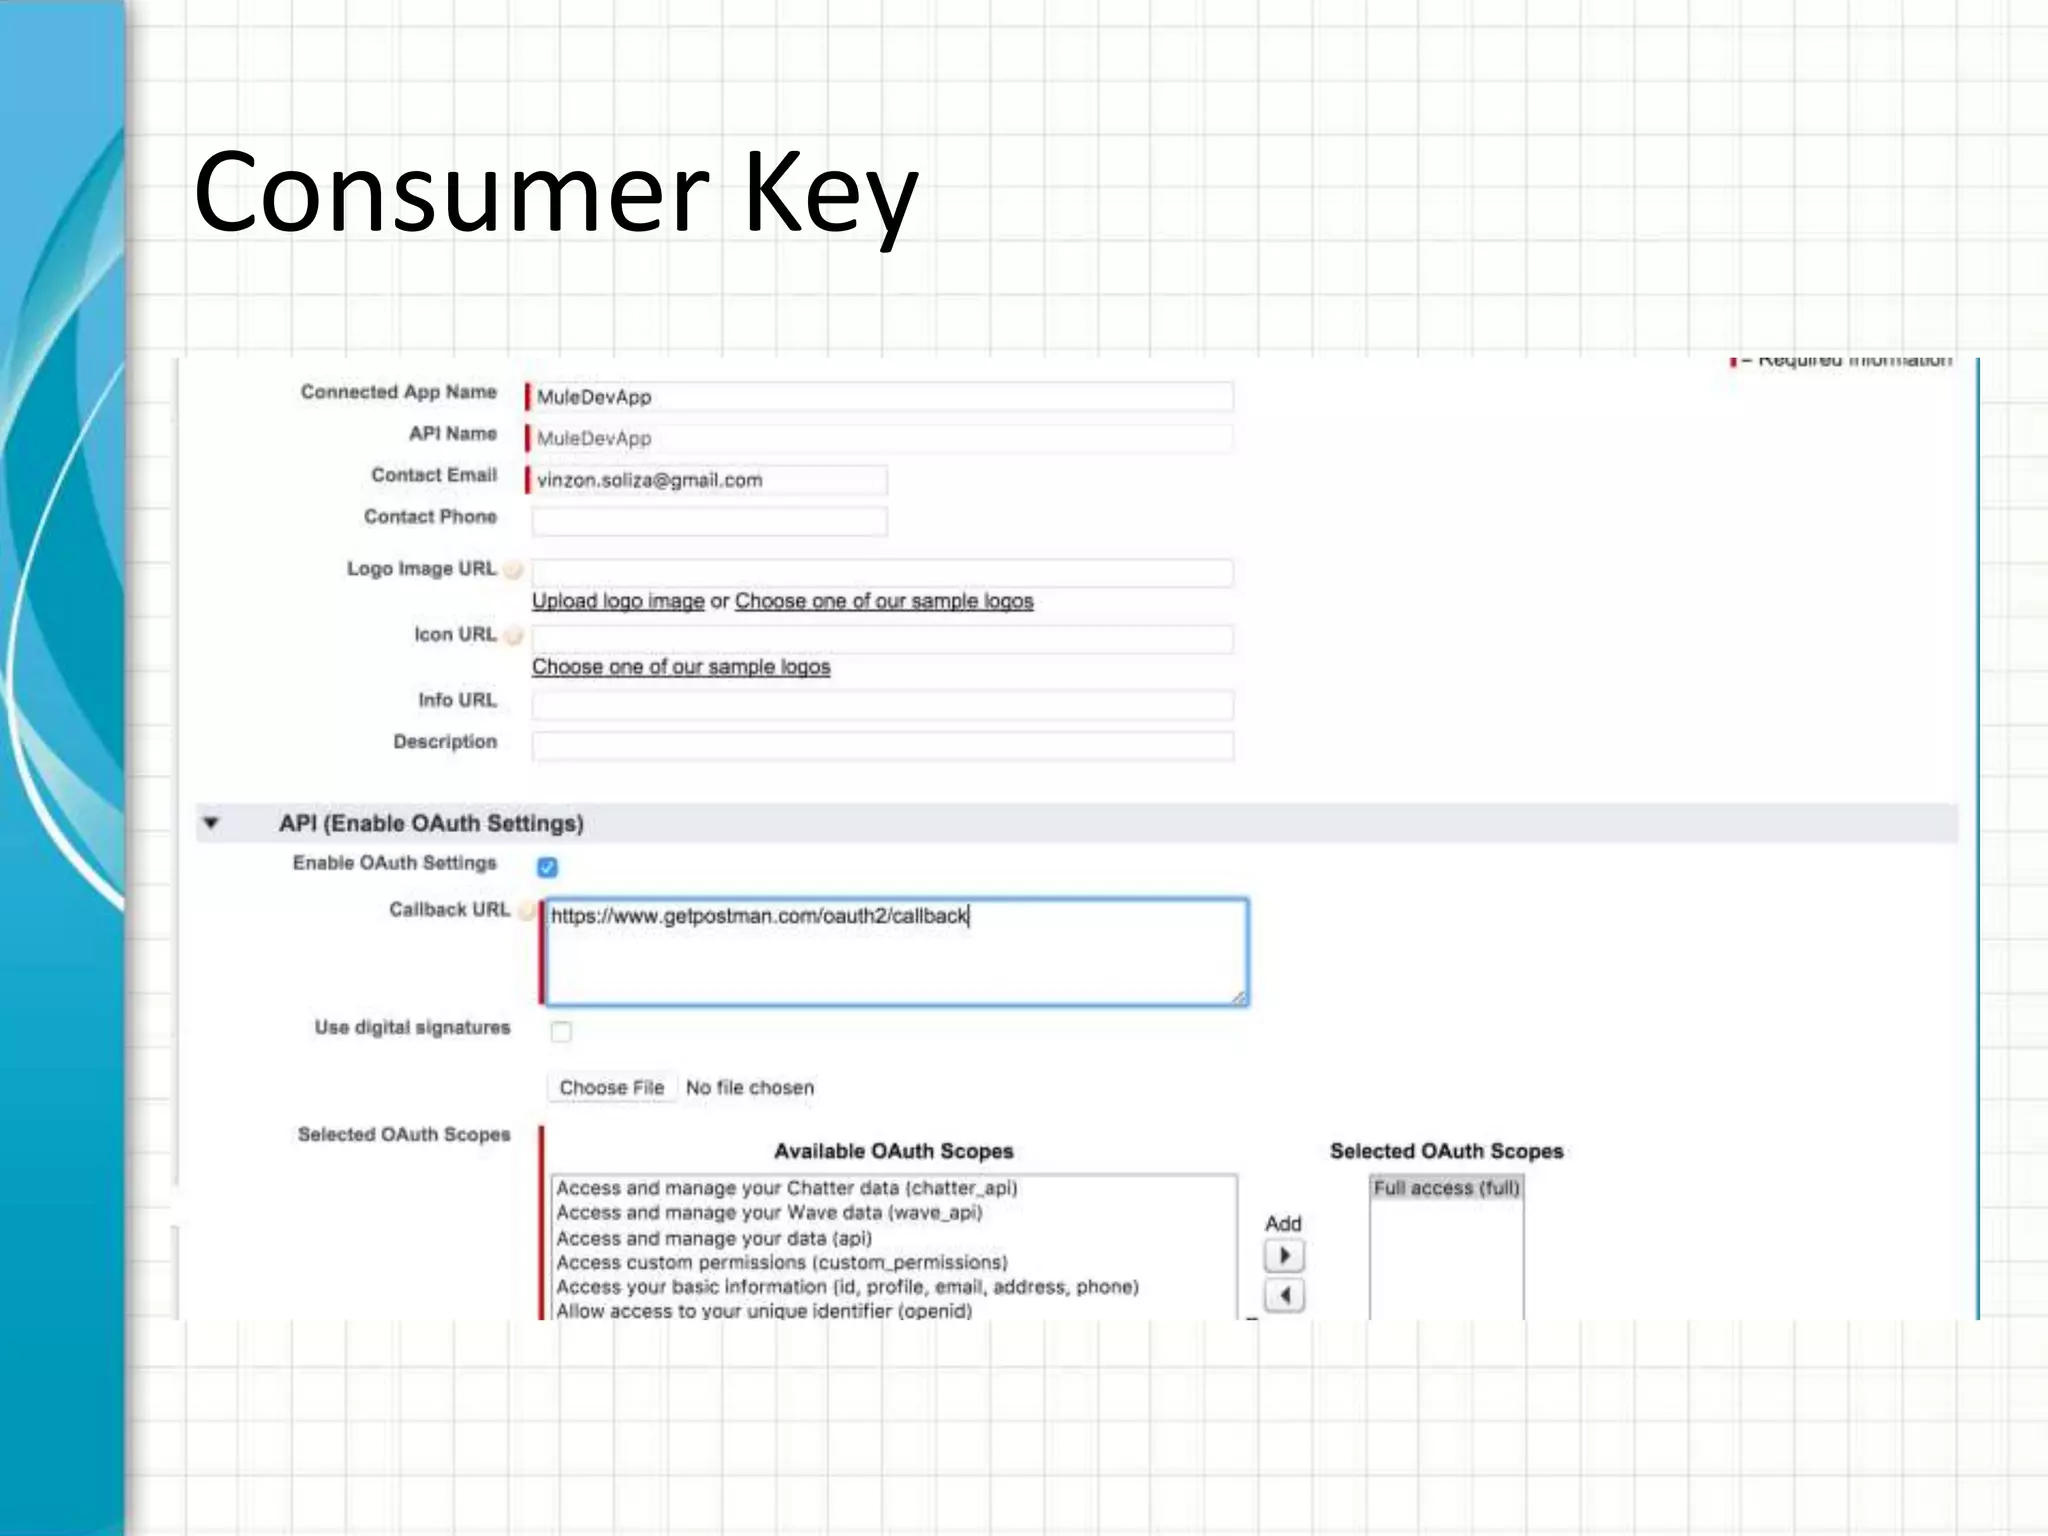
• Followthese steps to created a new connected app:
Enter the following information in the appropriate fields:
– A name for the connected app.
– The API name.
– Contact email.
• Under API (Enable OAuth Settings), select Enable OAuth Settings.
• Enter the Callback URL.
• Add the Full access (full) and Perform requests on your behalf at any
time (refresh_token, offline_access)OAuth scopes to Selected OAuth
Scopes .
• Click Save, and then click Continue. Screenshot in the next slide.
Consumer Key
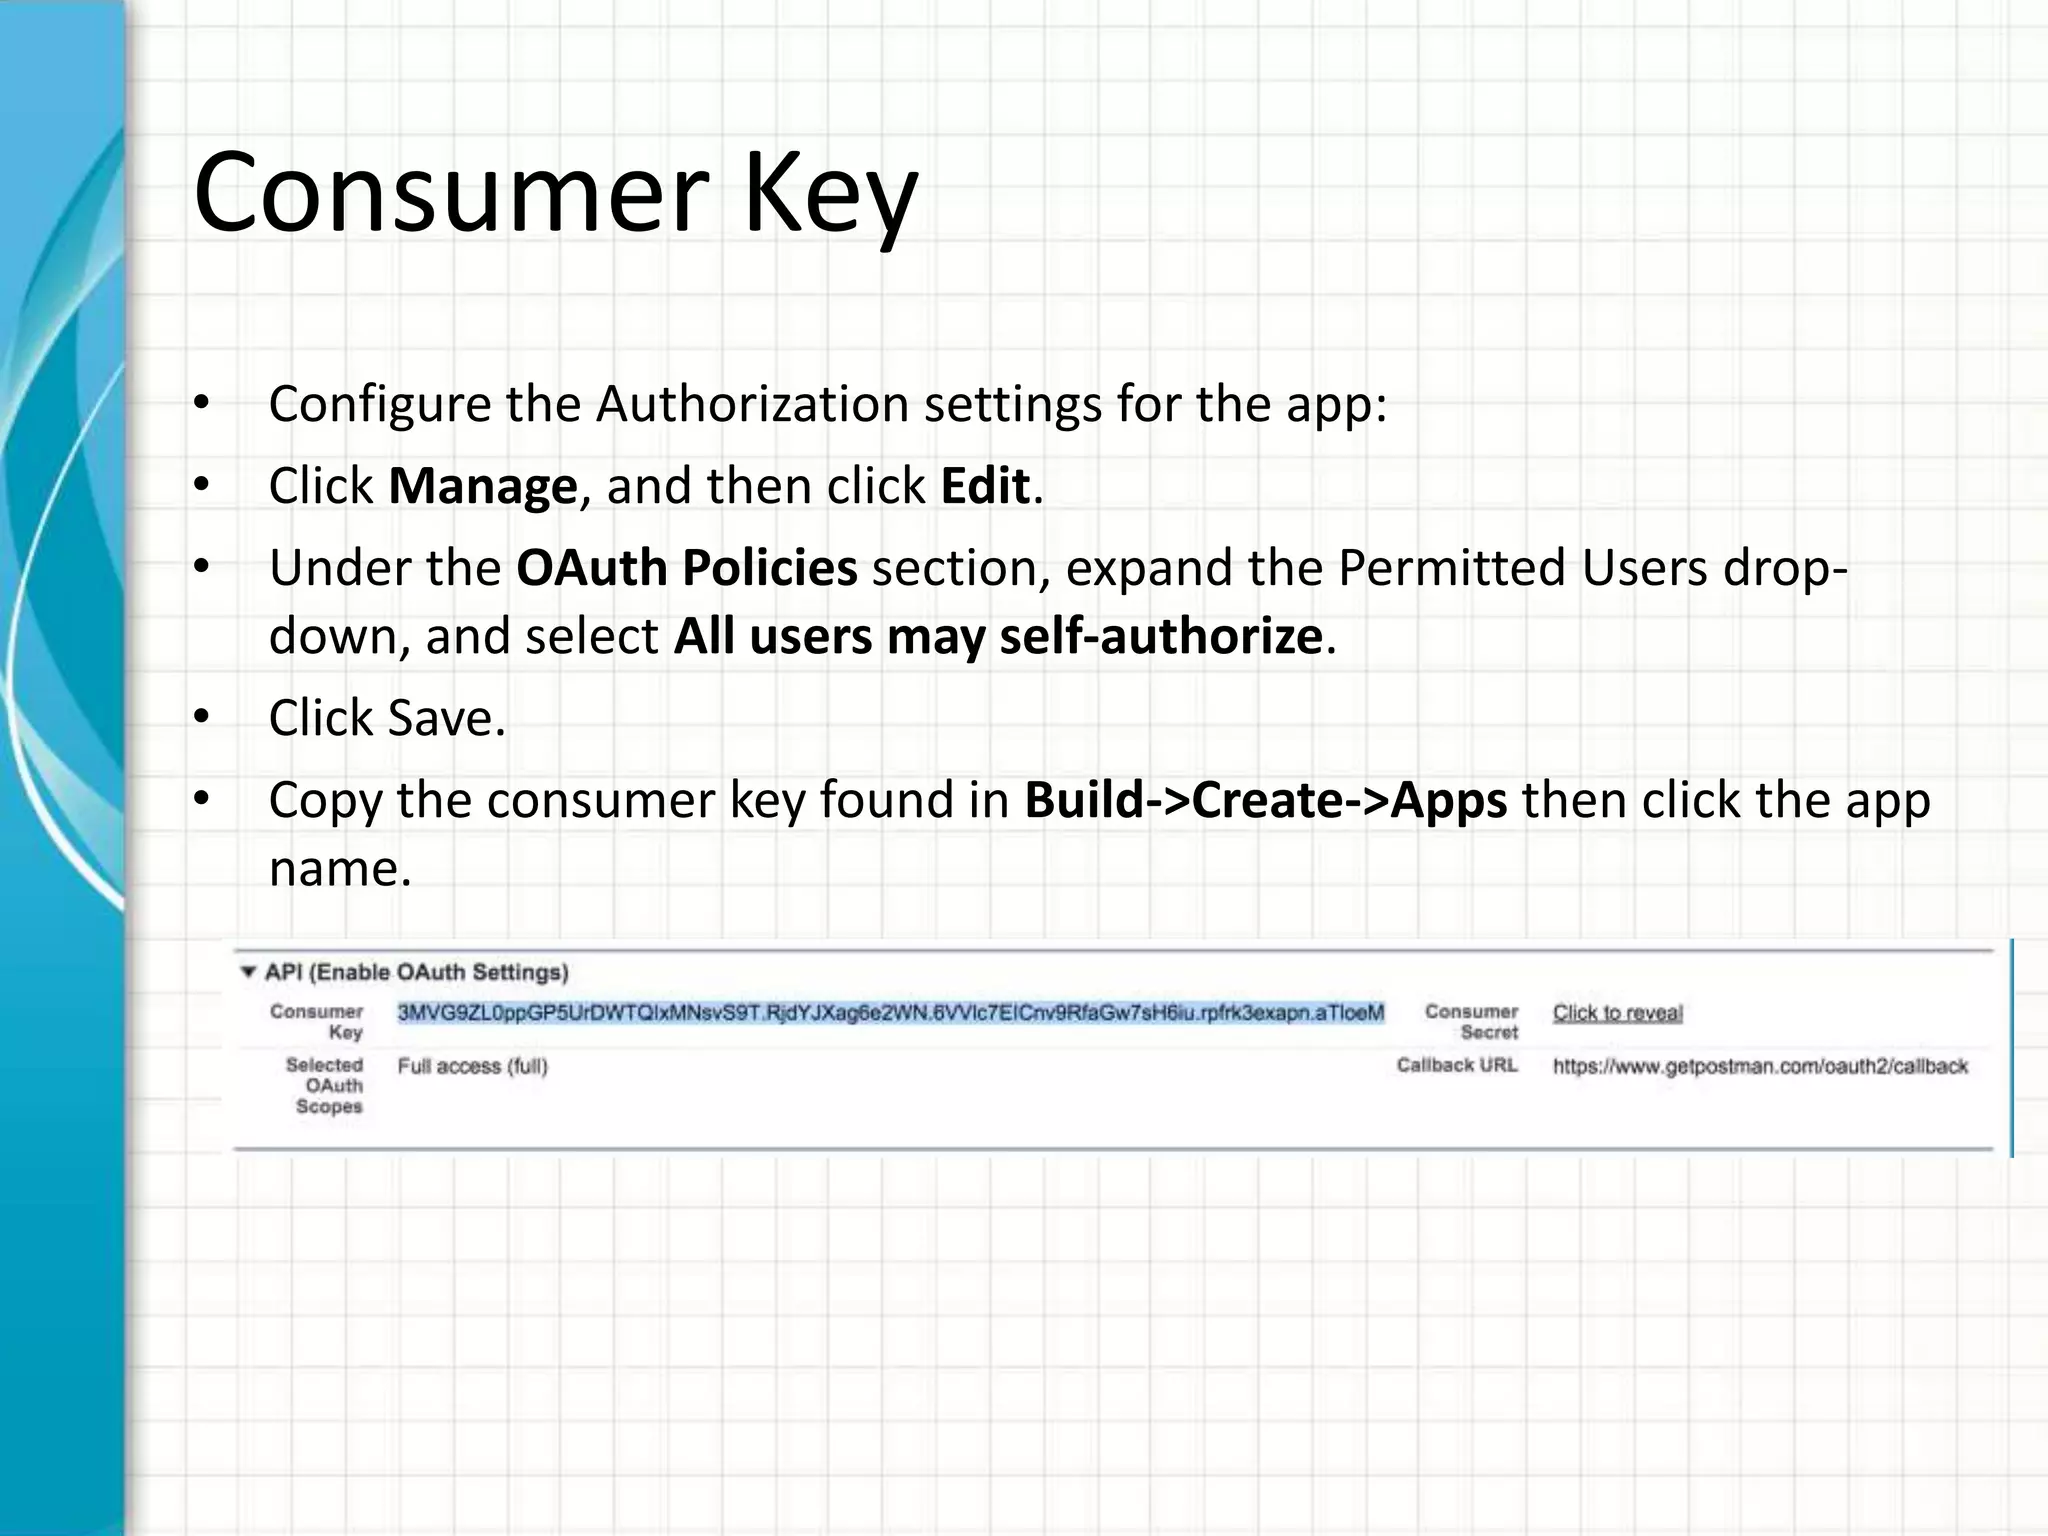
• Configurethe Authorization settings for the app:
• Click Manage, and then click Edit.
• Under the OAuth Policies section, expand the Permitted Users drop-
down, and select All users may self-authorize.
• Click Save.
• Copy the consumer key found in Build->Create->Apps then click the app
name.
9.
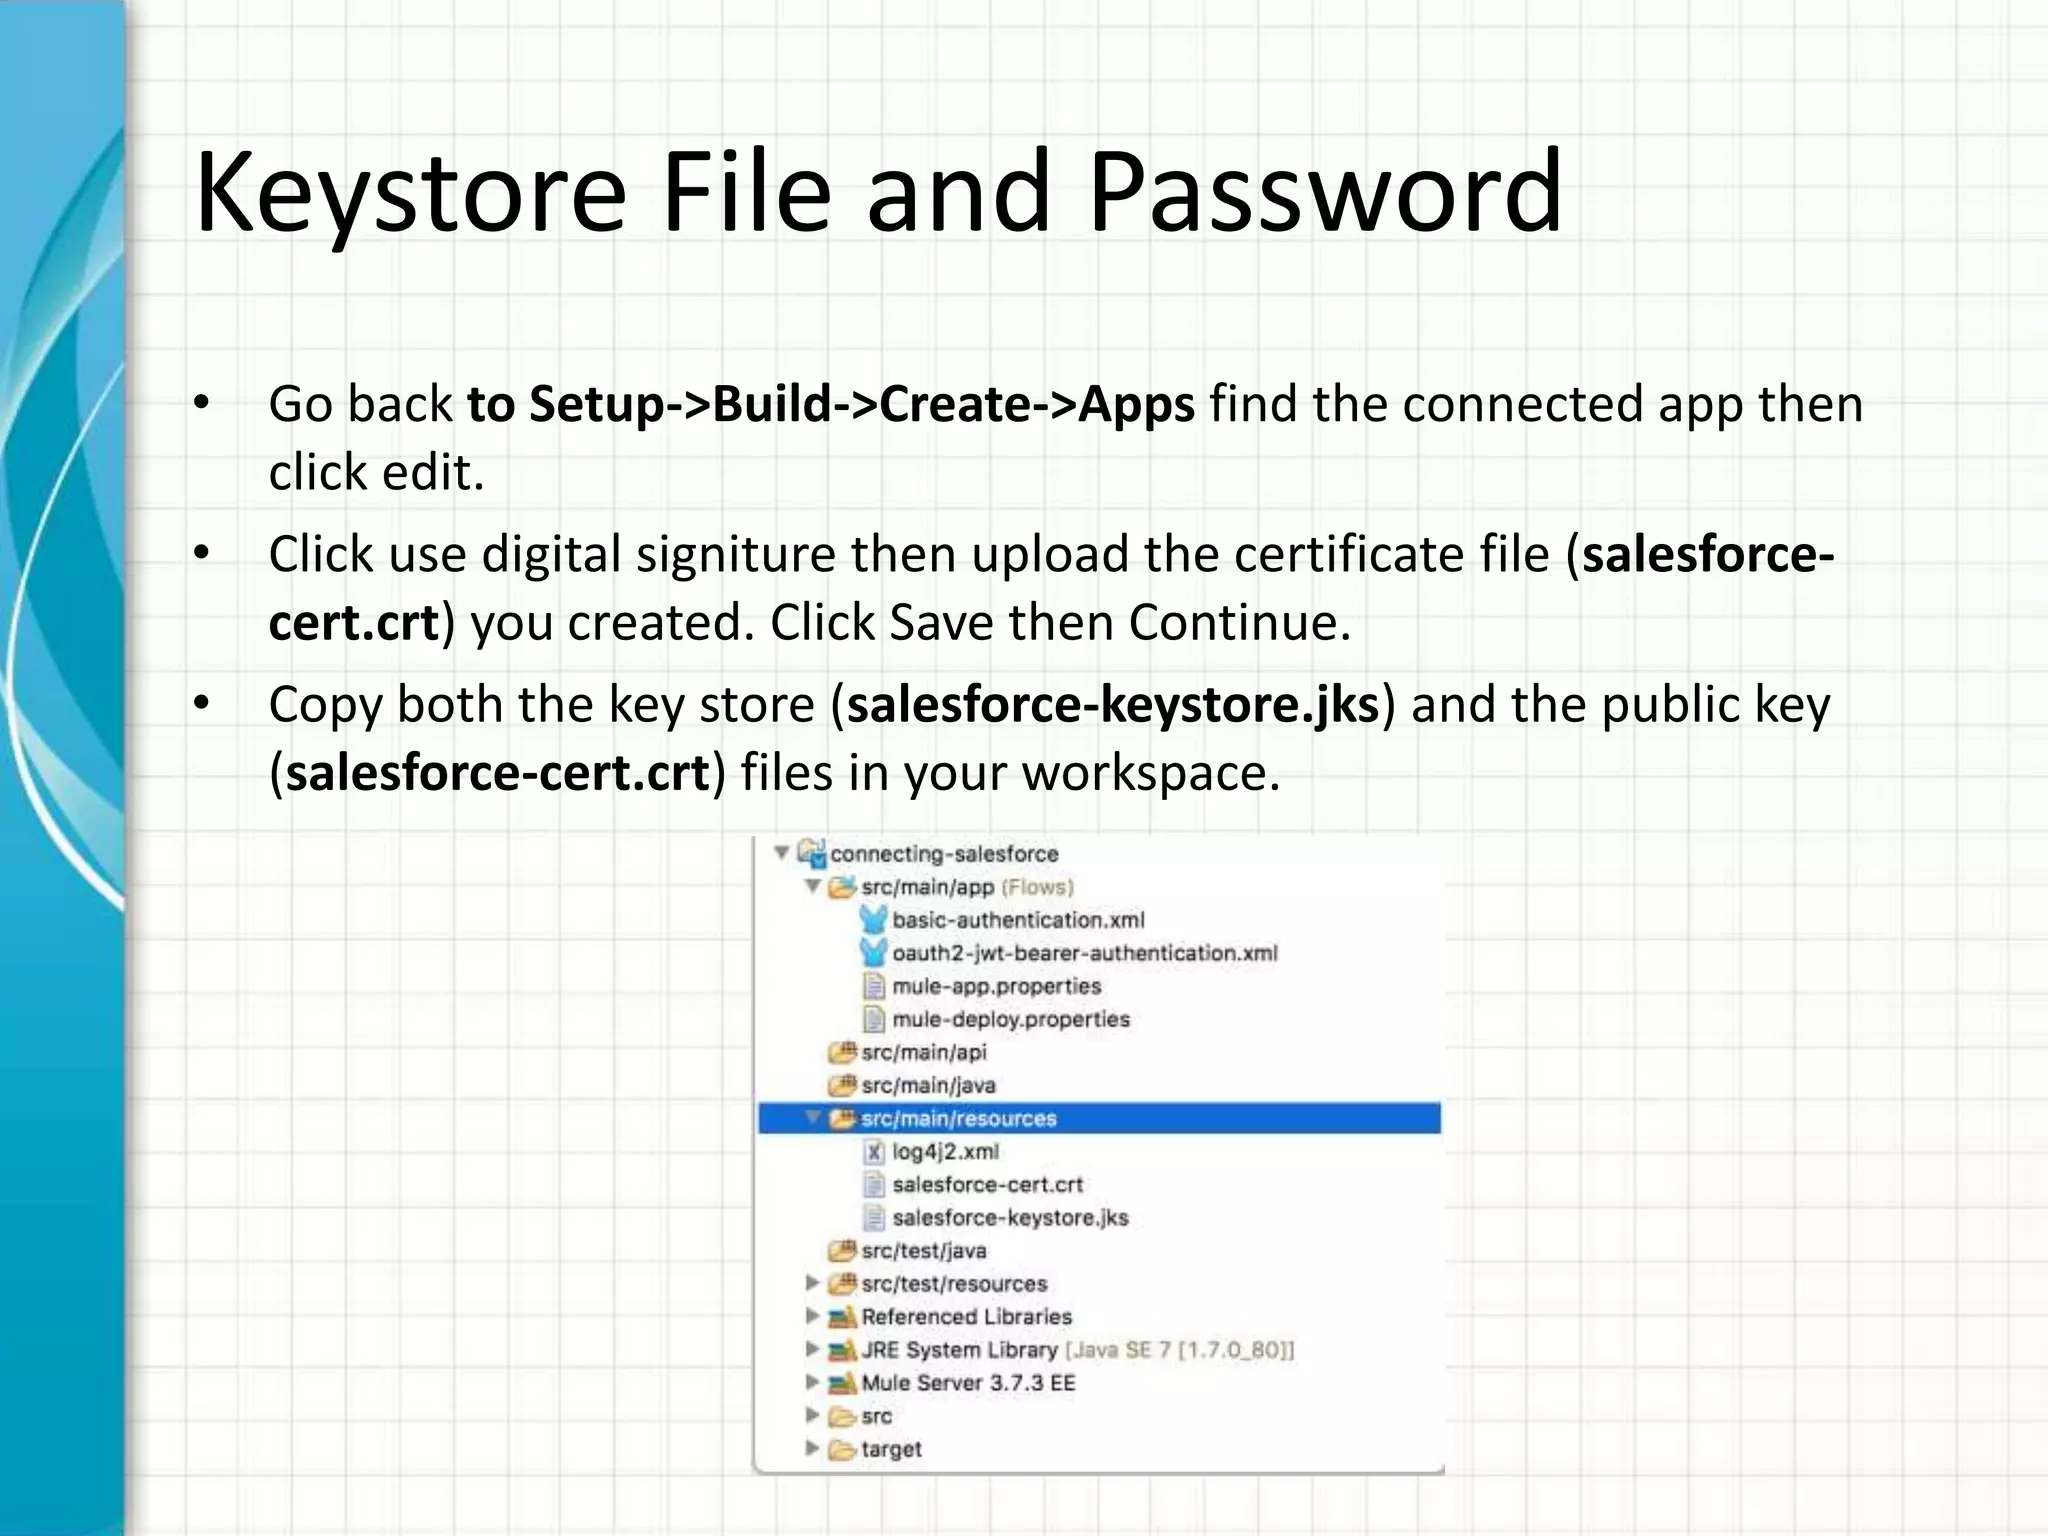
Keystore File andPassword
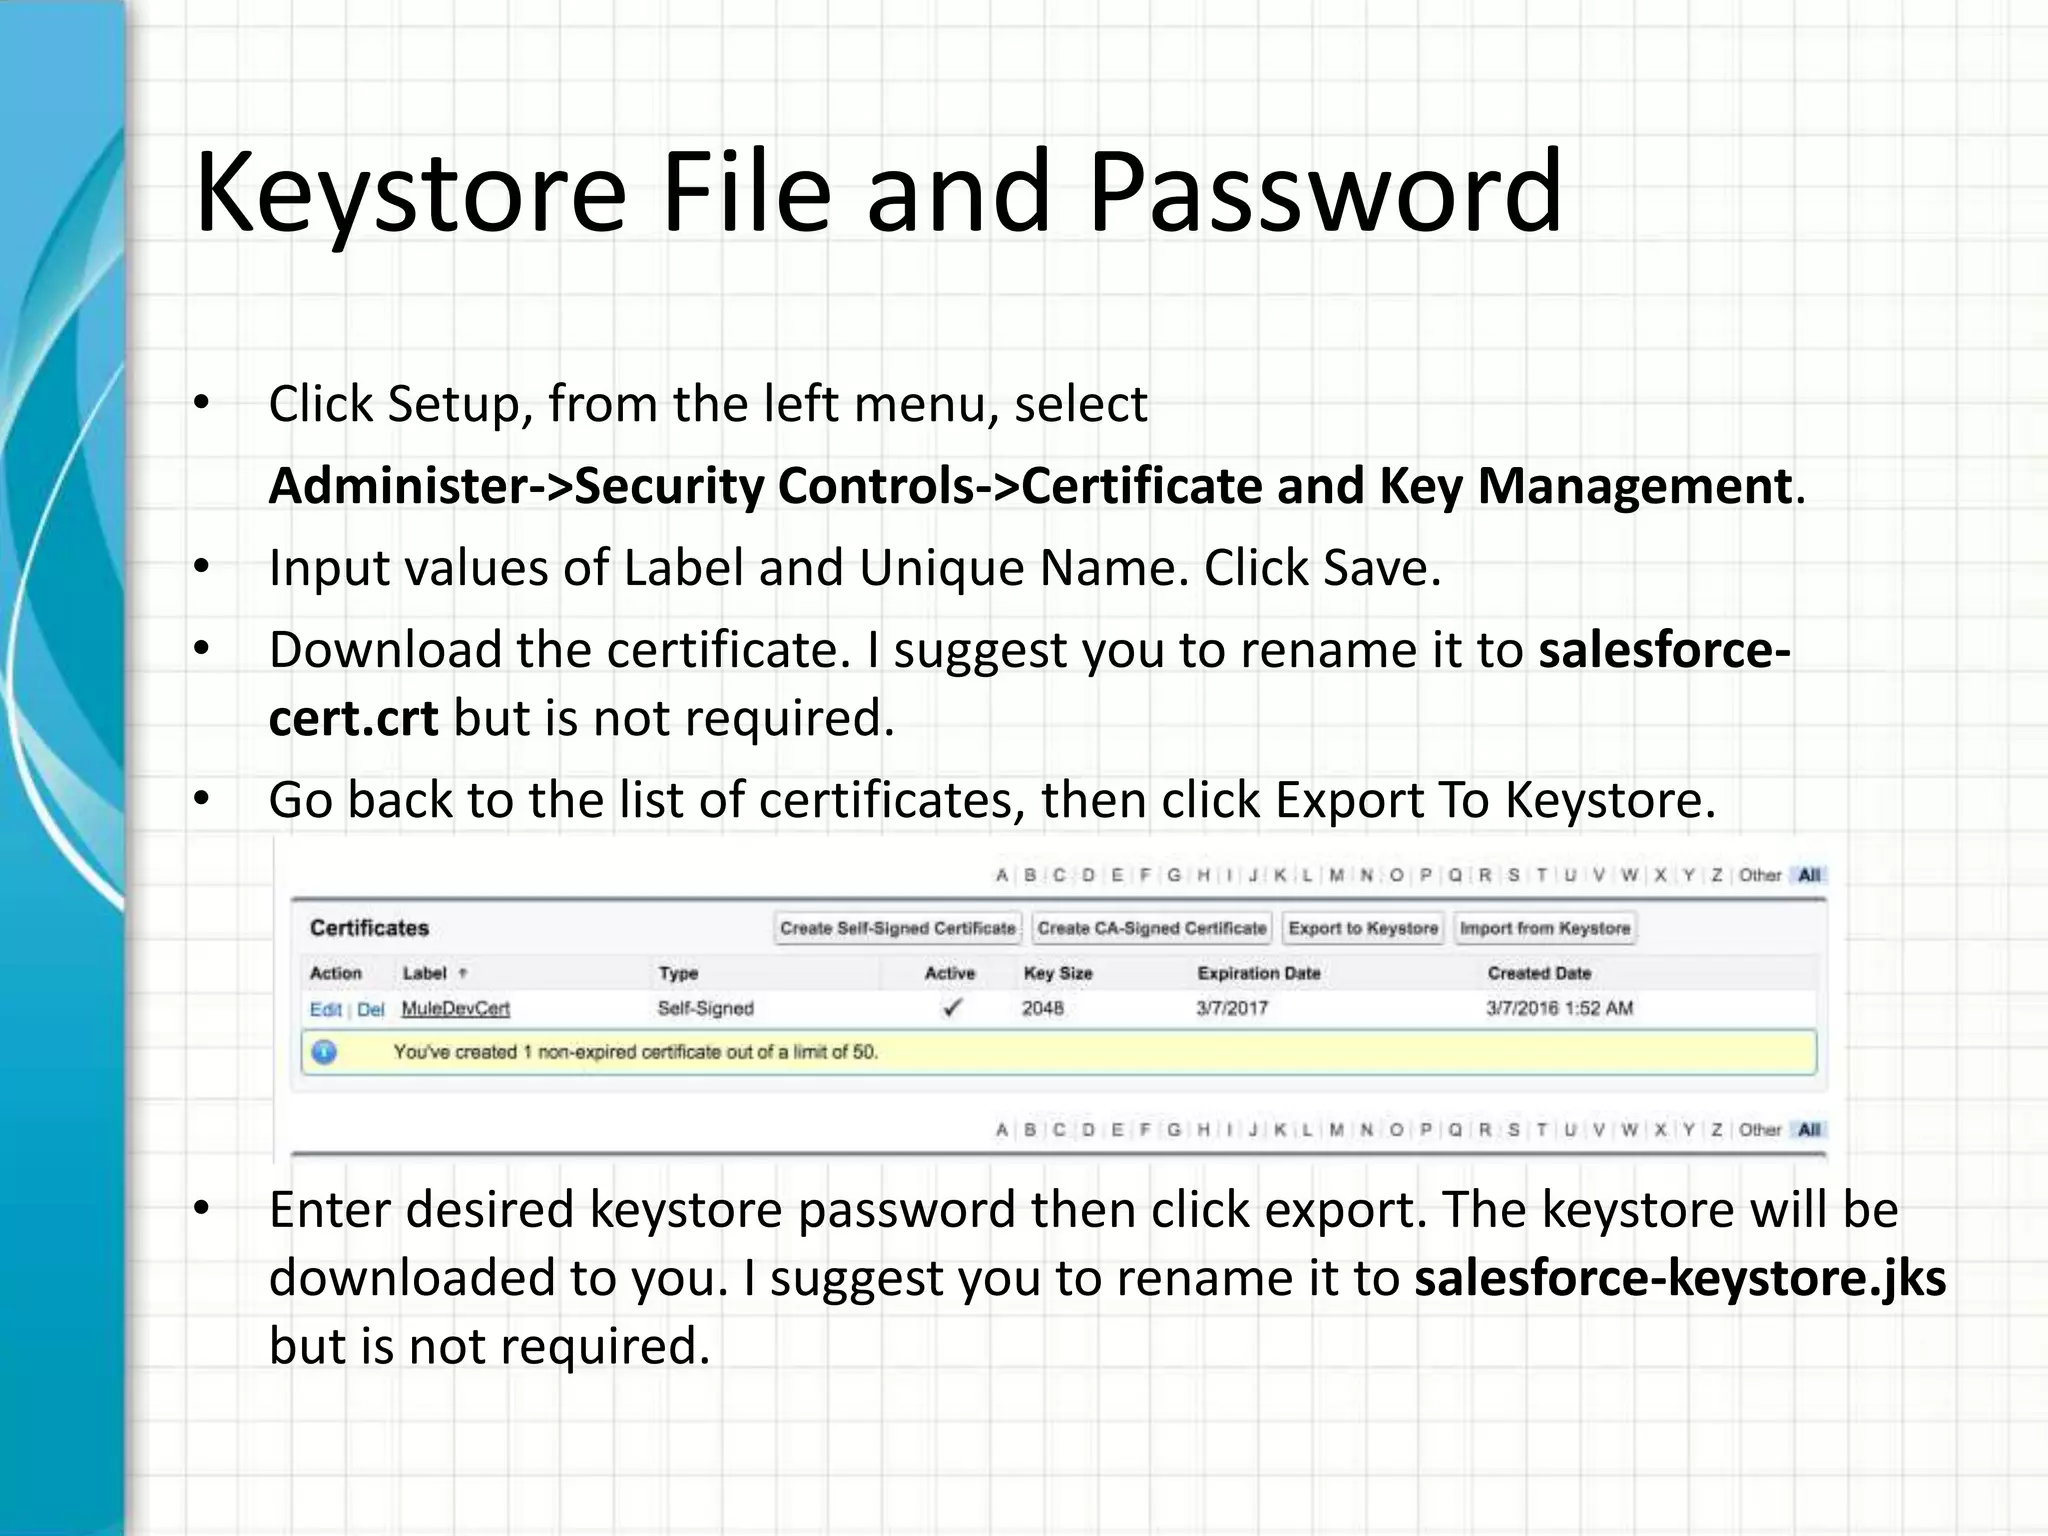
• Click Setup, from the left menu, select
Administer->Security Controls->Certificate and Key Management.
• Input values of Label and Unique Name. Click Save.
• Download the certificate. I suggest you to rename it to salesforce-
cert.crt but is not required.
• Go back to the list of certificates, then click Export To Keystore.
• Enter desired keystore password then click export. The keystore will be
downloaded to you. I suggest you to rename it to salesforce-keystore.jks
but is not required.
10.
Keystore File andPassword
• Go back to Setup->Build->Create->Apps find the connected app then
click edit.
• Click use digital signiture then upload the certificate file (salesforce-
cert.crt) you created. Click Save then Continue.
• Copy both the key store (salesforce-keystore.jks) and the public key
(salesforce-cert.crt) files in your workspace.
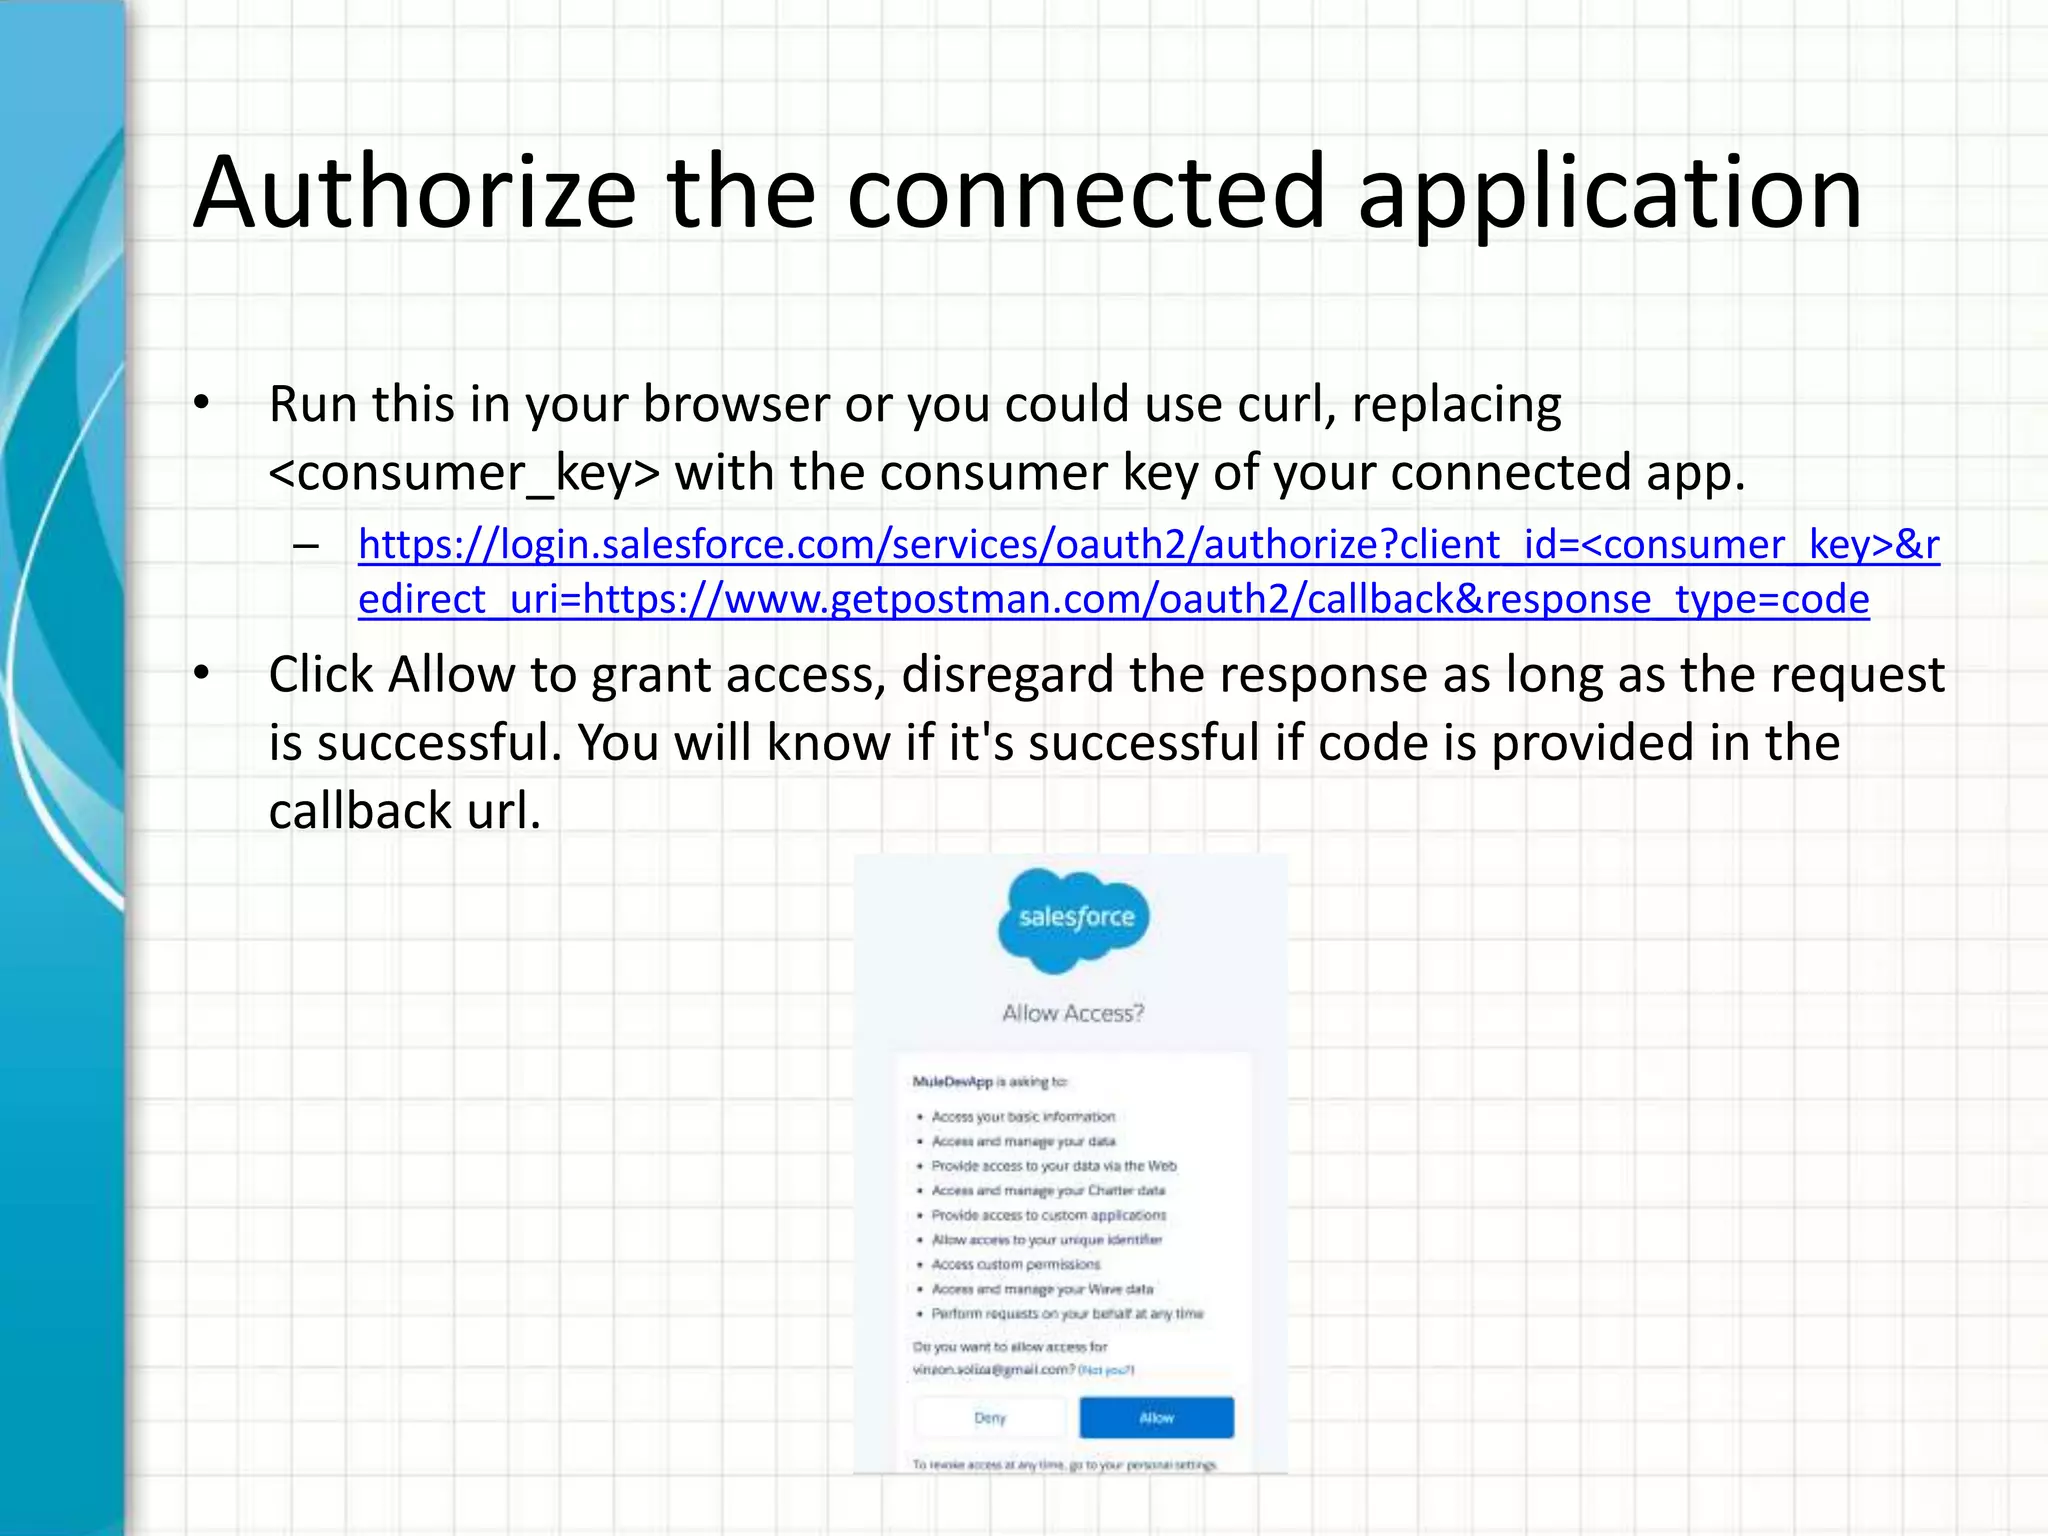
Authorize the connectedapplication
• Run this in your browser or you could use curl, replacing
<consumer_key> with the consumer key of your connected app.
– https://login.salesforce.com/services/oauth2/authorize?client_id=<consumer_key>&r
edirect_uri=https://www.getpostman.com/oauth2/callback&response_type=code
• Click Allow to grant access, disregard the response as long as the request
is successful. You will know if it's successful if code is provided in the
callback url.
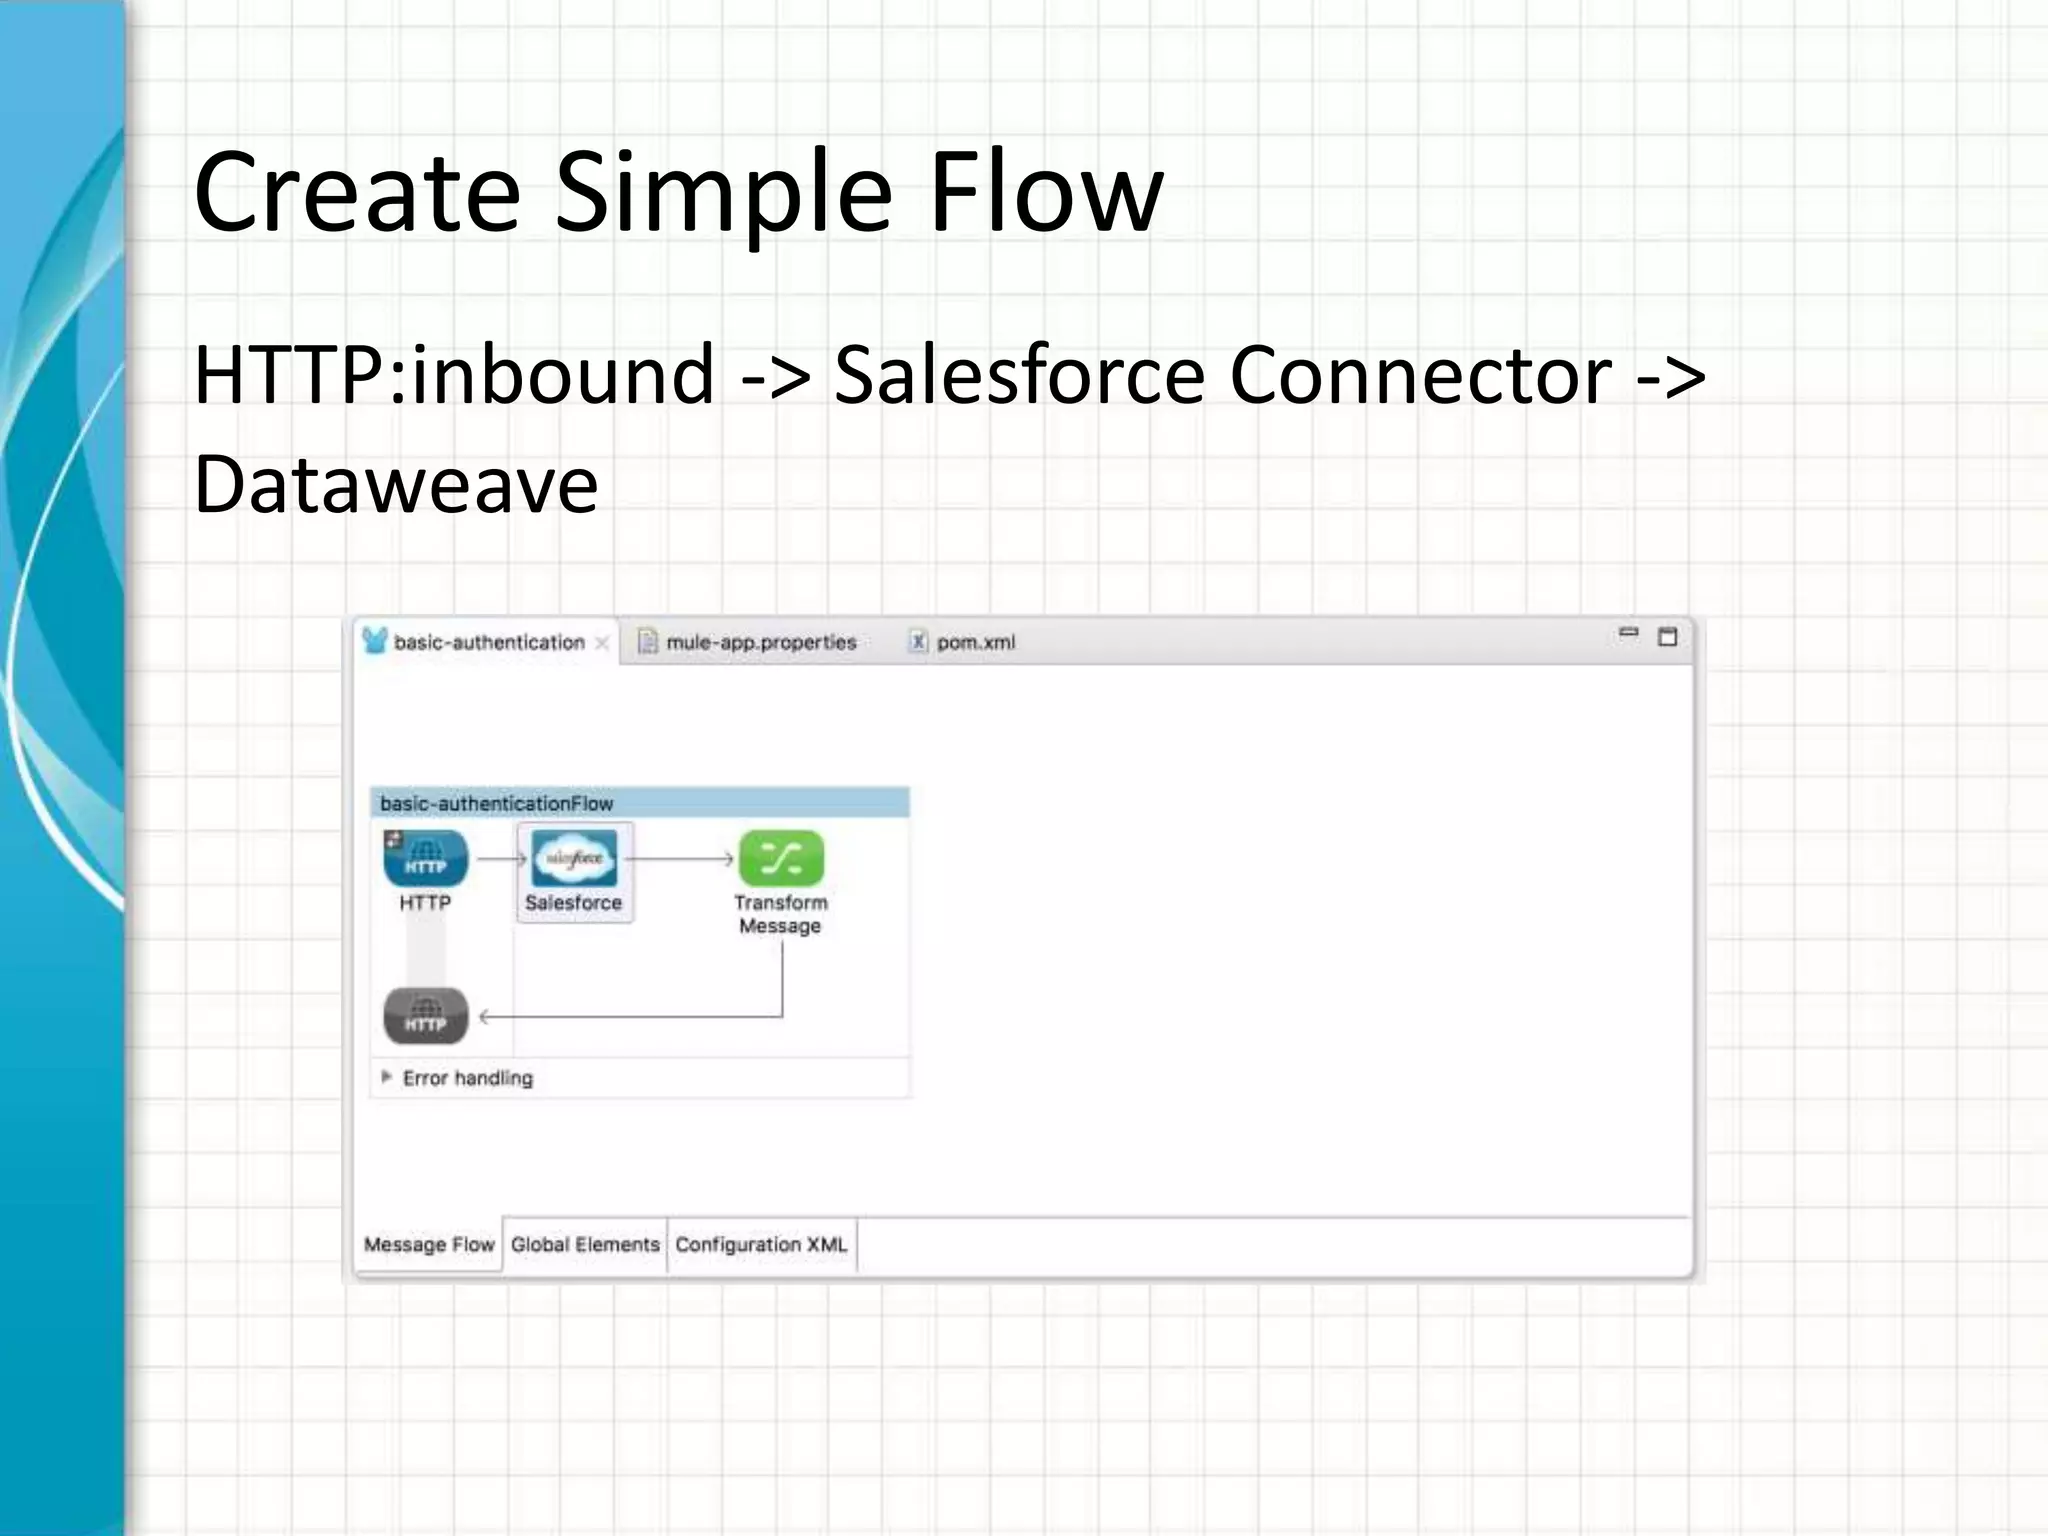
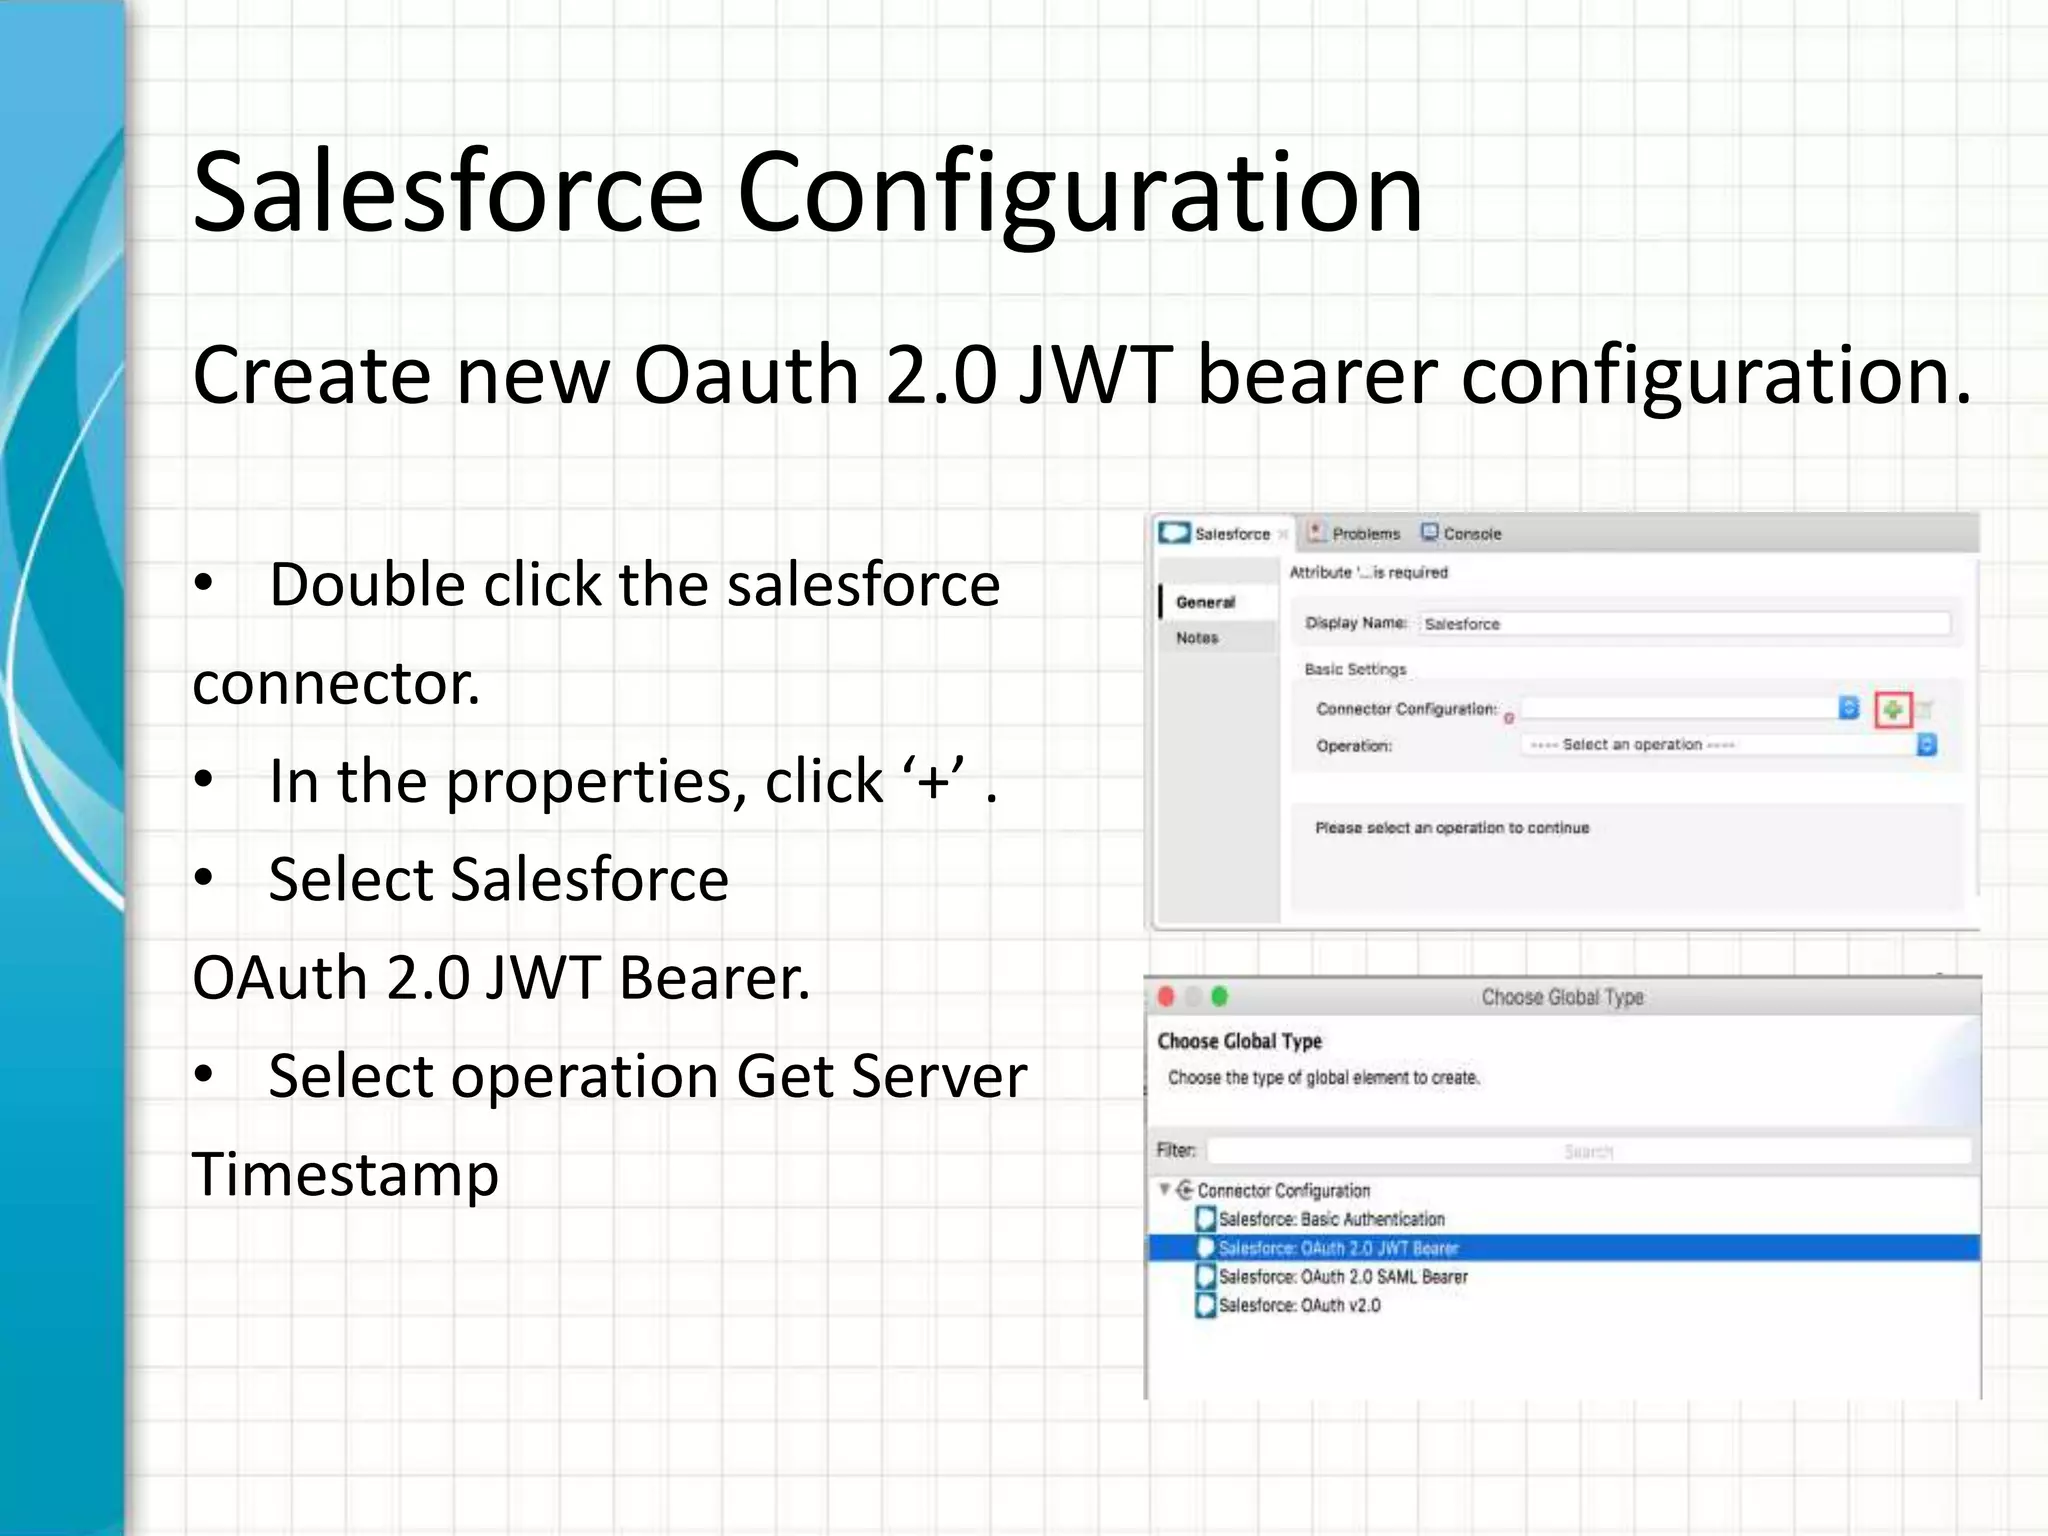
Salesforce Configuration
Create newOauth 2.0 JWT bearer configuration.
• Double click the salesforce
connector.
• In the properties, click ‘+’ .
• Select Salesforce
OAuth 2.0 JWT Bearer.
• Select operation Get Server
Timestamp
15.
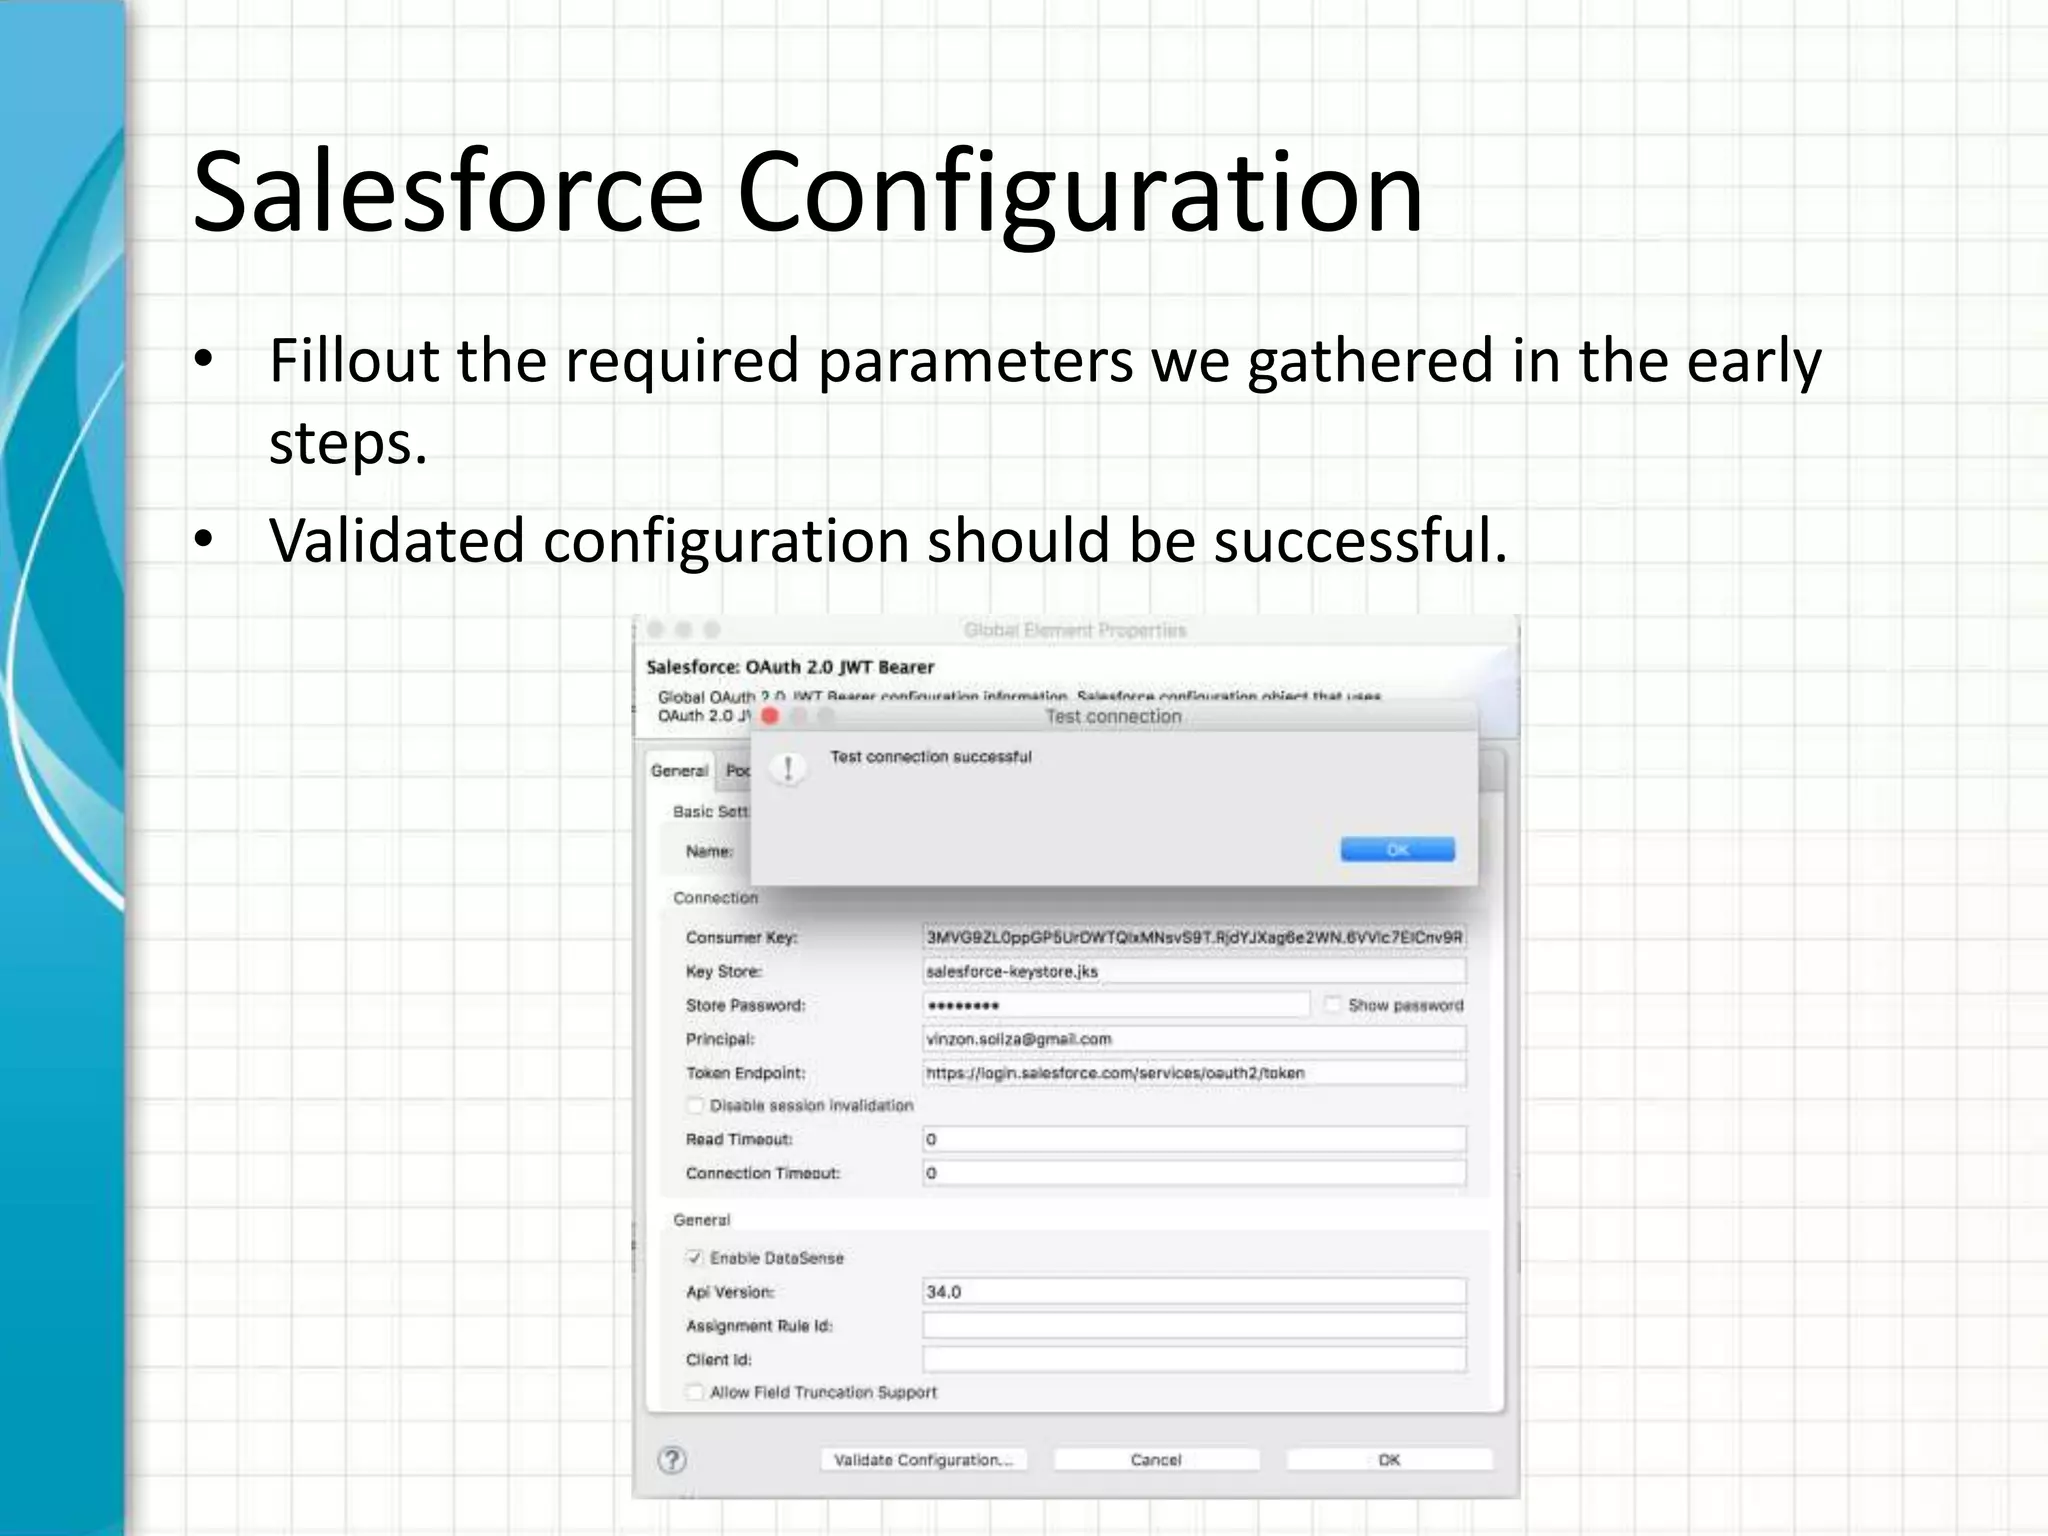
Salesforce Configuration
• Filloutthe required parameters we gathered in the early
steps.
• Validated configuration should be successful.
16.
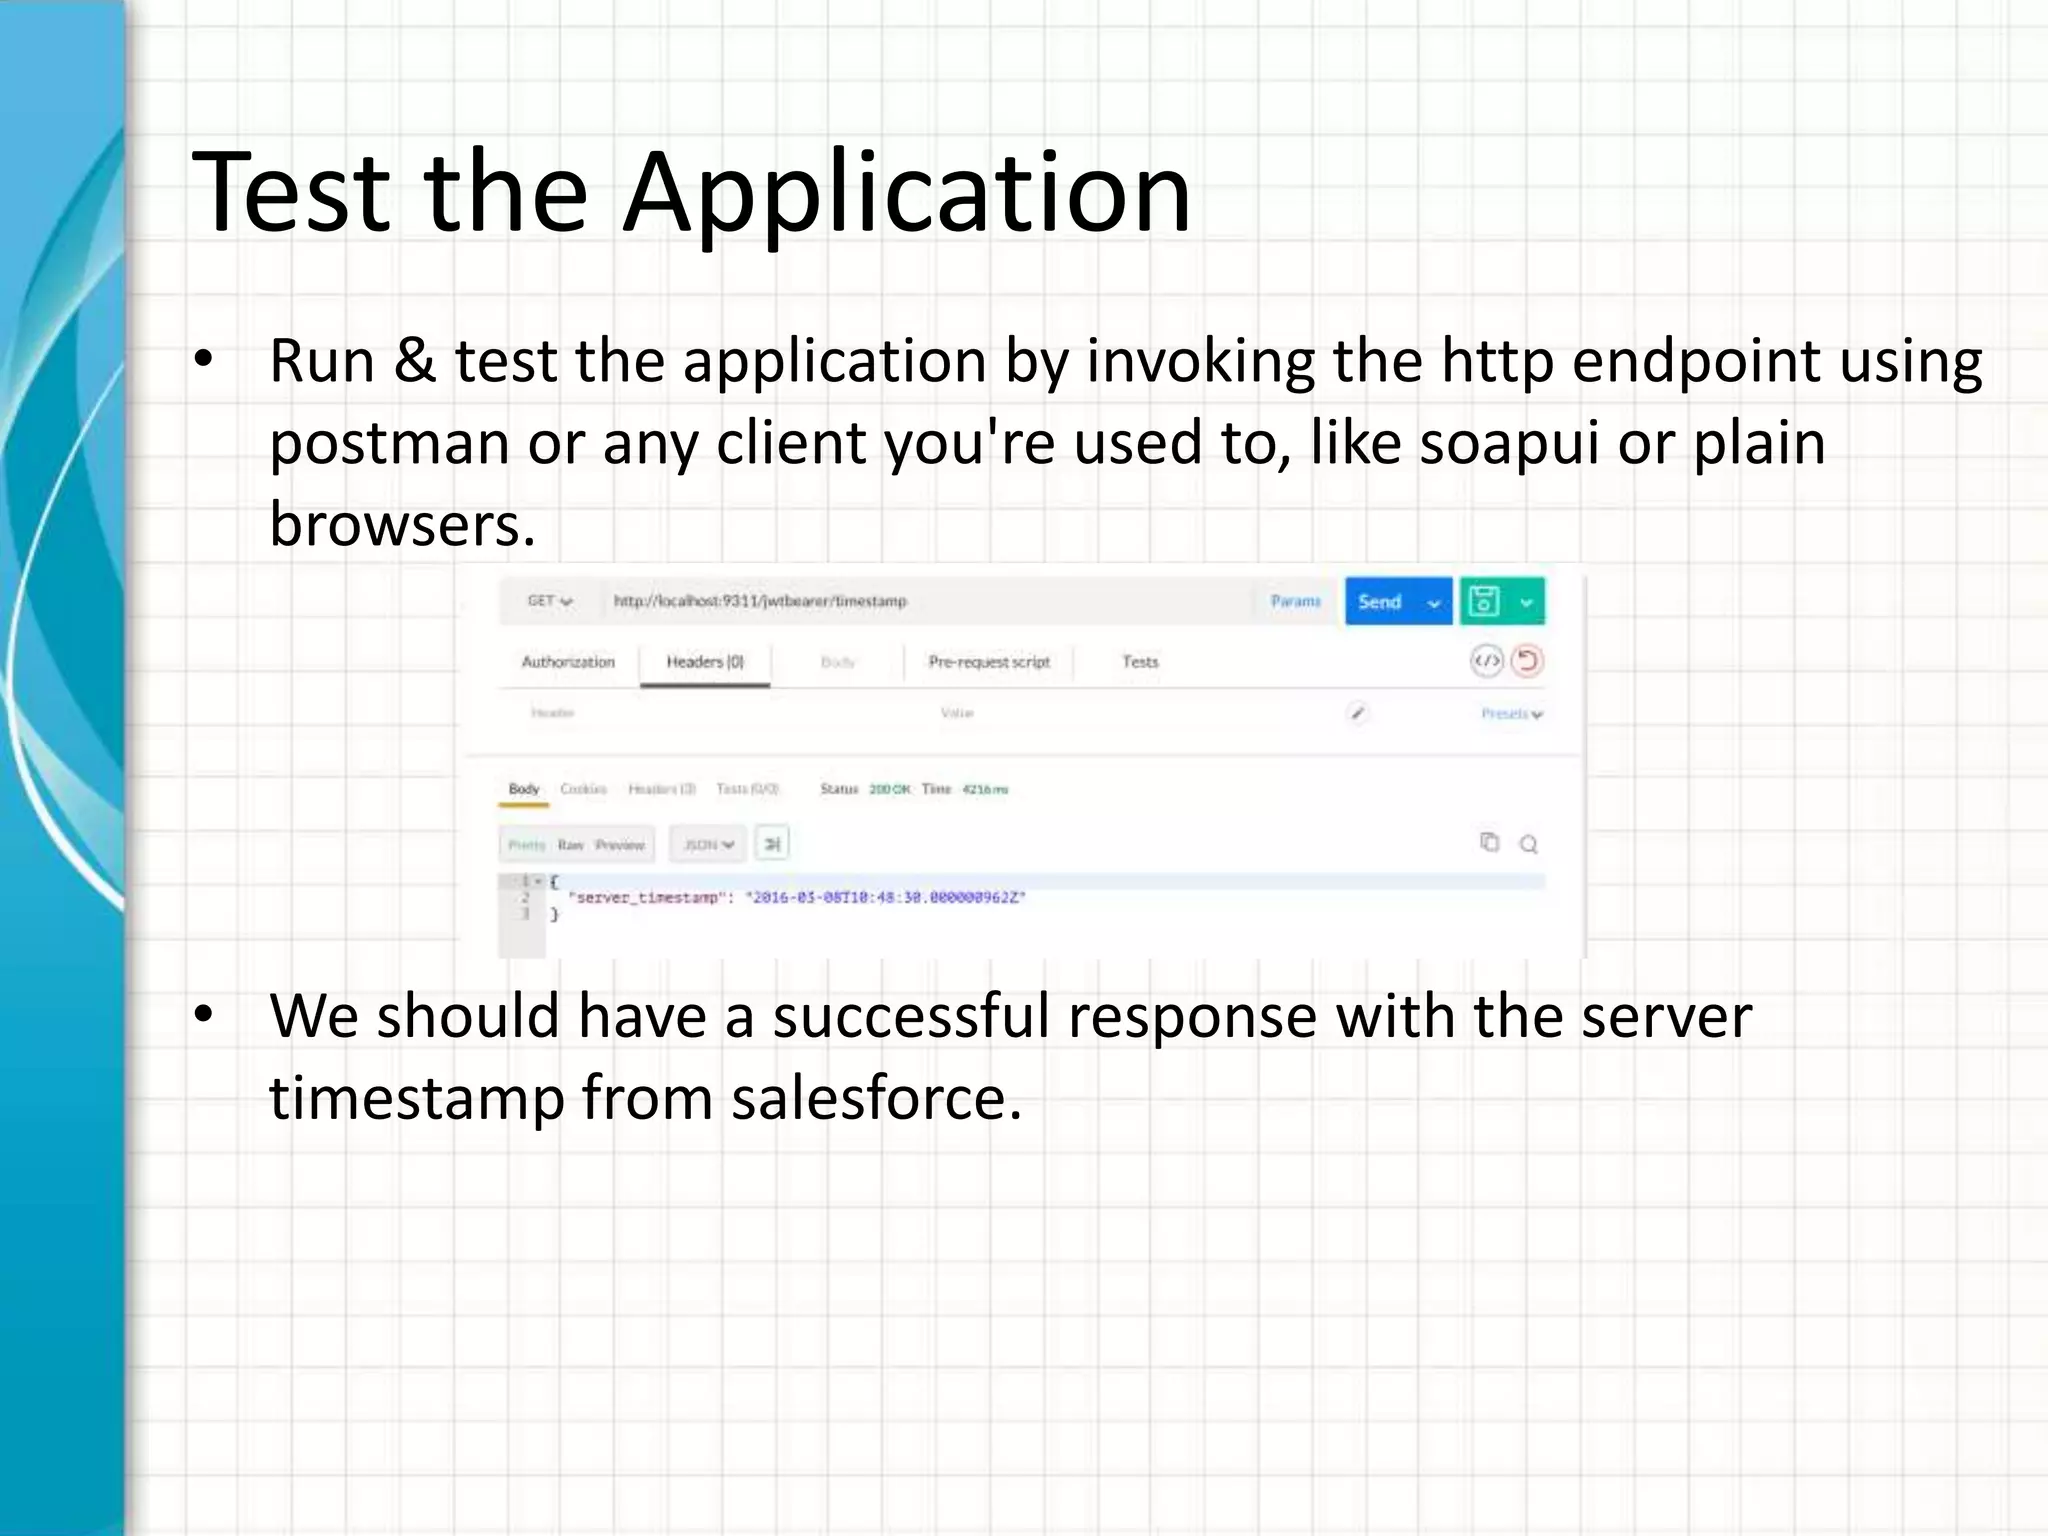
Test the Application
•Run & test the application by invoking the http endpoint using
postman or any client you're used to, like soapui or plain
browsers.
• We should have a successful response with the server
timestamp from salesforce.
17.
Summary
• Implementing OAuth2.0-related authentication
mechanisms, involves a few extra steps than
Basic Authentication, but may be preferred if
your service is exposed to external users, as it
ensures better security.
• The OAuth 2.0 JWT bearer token flow defines
how a JWT can be used to request an OAuth
access token from Salesforce when a client
wishes to utilize a previous authorization.
Authentication of the authorized application is
provided by a digital signature applied to the
JWT.
#2 This template can be used as a starter file for presenting training materials in a group setting.
Sections
Sections can help to organize your slides or facilitate collaboration between multiple authors. On the Home tab under Slides, click Section, and then click Add Section.
Notes
Use the Notes pane for delivery notes or to provide additional details for the audience. You can see these notes in Presenter View during your presentation.
Keep in mind the font size (important for accessibility, visibility, videotaping, and online production)
Coordinated colors
Pay particular attention to the graphs, charts, and text boxes.
Consider that attendees will print in black and white or grayscale. Run a test print to make sure your colors work when printed in pure black and white and grayscale.
Graphics, tables, and graphs
Keep it simple: If possible, use consistent, non-distracting styles and colors.
Label all graphs and tables.
#3 Give a brief overview of the presentation. Describe the major focus of the presentation and why it is important.
Introduce each of the major topics.
To provide a road map for the audience, you can repeat this Overview slide throughout the presentation, highlighting the particular topic you will discuss next.
#4 Give a brief overview of the presentation. Describe the major focus of the presentation and why it is important.
Introduce each of the major topics.
To provide a road map for the audience, you can repeat this Overview slide throughout the presentation, highlighting the particular topic you will discuss next.
#5 Give a brief overview of the presentation. Describe the major focus of the presentation and why it is important.
Introduce each of the major topics.
To provide a road map for the audience, you can repeat this Overview slide throughout the presentation, highlighting the particular topic you will discuss next.
#6 Give a brief overview of the presentation. Describe the major focus of the presentation and why it is important.
Introduce each of the major topics.
To provide a road map for the audience, you can repeat this Overview slide throughout the presentation, highlighting the particular topic you will discuss next.
#7 Give a brief overview of the presentation. Describe the major focus of the presentation and why it is important.
Introduce each of the major topics.
To provide a road map for the audience, you can repeat this Overview slide throughout the presentation, highlighting the particular topic you will discuss next.
#8 Give a brief overview of the presentation. Describe the major focus of the presentation and why it is important.
Introduce each of the major topics.
To provide a road map for the audience, you can repeat this Overview slide throughout the presentation, highlighting the particular topic you will discuss next.
#9 Give a brief overview of the presentation. Describe the major focus of the presentation and why it is important.
Introduce each of the major topics.
To provide a road map for the audience, you can repeat this Overview slide throughout the presentation, highlighting the particular topic you will discuss next.
#10 Give a brief overview of the presentation. Describe the major focus of the presentation and why it is important.
Introduce each of the major topics.
To provide a road map for the audience, you can repeat this Overview slide throughout the presentation, highlighting the particular topic you will discuss next.
#11 Give a brief overview of the presentation. Describe the major focus of the presentation and why it is important.
Introduce each of the major topics.
To provide a road map for the audience, you can repeat this Overview slide throughout the presentation, highlighting the particular topic you will discuss next.
#12 Give a brief overview of the presentation. Describe the major focus of the presentation and why it is important.
Introduce each of the major topics.
To provide a road map for the audience, you can repeat this Overview slide throughout the presentation, highlighting the particular topic you will discuss next.
#13 Give a brief overview of the presentation. Describe the major focus of the presentation and why it is important.
Introduce each of the major topics.
To provide a road map for the audience, you can repeat this Overview slide throughout the presentation, highlighting the particular topic you will discuss next.
#14 Give a brief overview of the presentation. Describe the major focus of the presentation and why it is important.
Introduce each of the major topics.
To provide a road map for the audience, you can repeat this Overview slide throughout the presentation, highlighting the particular topic you will discuss next.
#15 Give a brief overview of the presentation. Describe the major focus of the presentation and why it is important.
Introduce each of the major topics.
To provide a road map for the audience, you can repeat this Overview slide throughout the presentation, highlighting the particular topic you will discuss next.
#16 Give a brief overview of the presentation. Describe the major focus of the presentation and why it is important.
Introduce each of the major topics.
To provide a road map for the audience, you can repeat this Overview slide throughout the presentation, highlighting the particular topic you will discuss next.
#17 Give a brief overview of the presentation. Describe the major focus of the presentation and why it is important.
Introduce each of the major topics.
To provide a road map for the audience, you can repeat this Overview slide throughout the presentation, highlighting the particular topic you will discuss next.
#18 Summarize presentation content by restating the important points from the lessons.
What do you want the audience to remember when they leave your presentation?