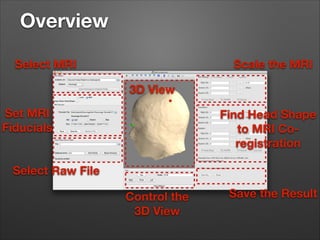
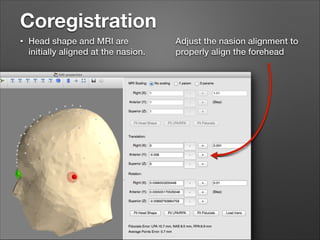
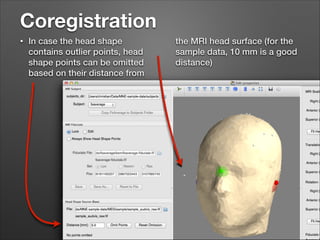
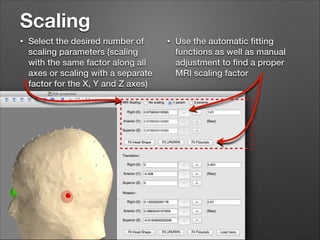
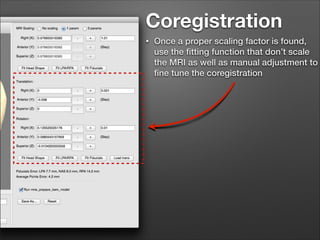
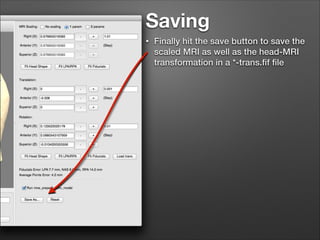
Coregistration in mne-python
Subjects without MRI
General Notes
•

The GUI uses the traits library
which supports different
backends but seems to work
best with QT4 currently. To
make QT4 the default:
• In Canopy: change
Preferences/Python/PyLab
backend
• In a terminal: $ export
ETS_TOOLKIT=“qt4”

•

The coregistration GUI is a
recent addition to MNEPython; please report
unexpected behavior to the
mne-analysis mailing list
Overview
Select MRI

Scale the MRI
3D View

Set MRI
Fiducials

Find Head Shape
to MRI Coregistration

Select Raw File
Control the
3D View

Save the Result
Input Files
•

Specify the directory containing MRIsubjects (subjects_dir)

•

Select the Raw file for which to do the
coregistration

•

Select the template brain to use. The
default template that comes with
freesurfer and MNE is fsaverage. The
fsaverage files can be copied into the
subjects directory with the “Copy
FsAverage to Subject Folder” button (the
button does not work if a subject named
“fsaverage” already exists).

•

Fsaverage comes with fiducials which
should be automatically loaded, in which
case you can skip the next slide.
Fiducials
•

Select the fiducial you want to
modify, and then click on the
head model to specify the
position. Fiducials are
displayed as small colored
spheres.

•

When all the fiducials are
specified, save the positions
so they can be loaded in the
future.

•

Lock the fiducials to proceed
to the coregistration.
Coregistration
•

Use “Fit LPA/RPA” to find an
initial approximate alignment
Coregistration
•

Head shape and MRI are
initially aligned at the nasion.

Adjust the nasion alignment to
properly align the forehead
Coregistration
•

In case the head shape
contains outlier points, head
shape points can be omitted
based on their distance from

the MRI head surface (for the
sample data, 10 mm is a good
distance)
Scaling
•

Select the desired number of
scaling parameters (scaling
with the same factor along all
axes or scaling with a separate
factor for the X, Y and Z axes)

•

Use the automatic fitting
functions as well as manual
adjustment to find a proper
MRI scaling factor
Coregistration
•

Once a proper scaling factor is found,
use the fitting function that don’t scale
the MRI as well as manual adjustment to
fine tune the coregistration
Saving
•

Finally hit the save button to save the
scaled MRI as well as the head-MRI
transformation in a *-trans.fif file

MNE-Pythyon Scale MRI

  • 1.
  • 2.
    General Notes • The GUIuses the traits library which supports different backends but seems to work best with QT4 currently. To make QT4 the default: • In Canopy: change Preferences/Python/PyLab backend • In a terminal: $ export ETS_TOOLKIT=“qt4” • The coregistration GUI is a recent addition to MNEPython; please report unexpected behavior to the mne-analysis mailing list
  • 3.
    Overview Select MRI Scale theMRI 3D View Set MRI Fiducials Find Head Shape to MRI Coregistration Select Raw File Control the 3D View Save the Result
  • 4.
    Input Files • Specify thedirectory containing MRIsubjects (subjects_dir) • Select the Raw file for which to do the coregistration • Select the template brain to use. The default template that comes with freesurfer and MNE is fsaverage. The fsaverage files can be copied into the subjects directory with the “Copy FsAverage to Subject Folder” button (the button does not work if a subject named “fsaverage” already exists). • Fsaverage comes with fiducials which should be automatically loaded, in which case you can skip the next slide.
  • 5.
    Fiducials • Select the fiducialyou want to modify, and then click on the head model to specify the position. Fiducials are displayed as small colored spheres. • When all the fiducials are specified, save the positions so they can be loaded in the future. • Lock the fiducials to proceed to the coregistration.
  • 6.
    Coregistration • Use “Fit LPA/RPA”to find an initial approximate alignment
  • 7.
    Coregistration • Head shape andMRI are initially aligned at the nasion. Adjust the nasion alignment to properly align the forehead
  • 8.
    Coregistration • In case thehead shape contains outlier points, head shape points can be omitted based on their distance from the MRI head surface (for the sample data, 10 mm is a good distance)
  • 9.
    Scaling • Select the desirednumber of scaling parameters (scaling with the same factor along all axes or scaling with a separate factor for the X, Y and Z axes) • Use the automatic fitting functions as well as manual adjustment to find a proper MRI scaling factor
  • 10.
    Coregistration • Once a properscaling factor is found, use the fitting function that don’t scale the MRI as well as manual adjustment to fine tune the coregistration
  • 11.
    Saving • Finally hit thesave button to save the scaled MRI as well as the head-MRI transformation in a *-trans.fif file