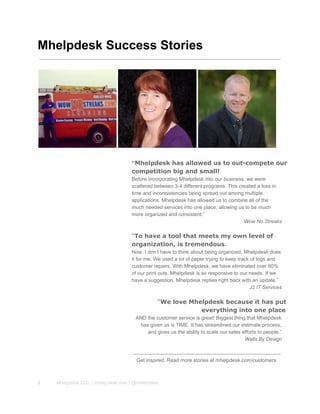
1 Mhelpdesk LLC. | mhelpdesk.com | @mhelpdesk
Mhelpdesk Success Stories
“Mhelpdesk has allowed us to out-compete our
competition big and small!
Before incorporating Mhelpdesk into our business, we were
scattered between 3­4 different programs. This created a loss in
time and inconsistencies being spread out among multiple
applications. Mhelpdesk has allowed us to combine all of the
much needed services into one place, allowing us to be much
more organized and consistent.”
Wow No Streaks
“To have a tool that meets my own level of
organization, is tremendous.
Now, I don’t have to think about being organized, Mhelpdesk does
it for me. We used a lot of paper trying to keep track of logs and
customer repairs. With Mhelpdesk, we have eliminated over 80%
of our print outs. Mhelpdesk is so responsive to our needs. If we
have a suggestion, Mhelpdesk replies right back with an update.”
J2 IT Services
“We love Mhelpdesk because it has put
everything into one place
AND the customer service is great! Biggest thing that Mhelpdesk
has given us is TIME. It has streamlined our estimate process,
and gives us the ability to scale our sales efforts to people.”
Walls By Design
Get inspired. Read more stories at mhelpdesk.com/customers
2 Mhelpdesk LLC. | mhelpdesk.com | @mhelpdesk
Put Mhelpdesk to work
for your business
Mhelpdesk is a powerful tool. A wide variety of businesses in the
service industry­­big and small­­ use Mhelpdesk to simplify their daily
workflow. Every day, dozens of businesses save time and money by
going paperless with our cloud applications.
This guide is intended to help you understand how to use Mhelpdesk
better. Mhelpdesk can help you get organized, streamline your
workflow, and ultimately, grow your business.
We’ll show you how in these three chapters.
1. GET STARTED
Enter your company info and upload your logo. This will automatically
show on all emails, estimates and invoices you create in Mhelpdesk
to help your customers stay connected with you.
2. TAILOR MHELPDESK TO FIT YOU
Learn about our available features to pick and choose what’s right for
your company. Customize Mhelpdesk to either amplify or simplify your
workflow.
3. CONNECT WITH CUSTOMERS
Our online tools helps you stay connected with customers. Allow your
customers to submit a payment, check the status of a job, or even
schedule an appointment according to your schedule. Need emails to
turn into service tickets? There’s a tool for that too.
3 Mhelpdesk LLC. | mhelpdesk.com | @mhelpdesk
Get started
Understand  how Mhelpdesk works so your business can actively and
effectively move to the cloud.
COMPANY & CUSTOMER  INFO
STAFF & TEAMS
ANATOMY OF A SERVICE TICKET
SCHEDULING
TRANSACTIONS
4 Mhelpdesk LLC. | mhelpdesk.com | @mhelpdesk
Company Info
Fill out your company’s contact info and upload a logo that will show up on all emails, estimates and service
tickets.
1. FILL OUT COMPANY INFO
To fill out your company’s contact information, go to Settings > My
Company  in the top right corner. This information will show up in the
PDF of your service tickets, estimates and invoices.
2. UPLOAD COMPANY LOGO
Upload your company logo under Settings > My Company. This logo
will appear on PDFs of all service tickets, estimates and invoices. We
recommend an img that is 300 x 100 pixels or fewer.
3. IMPORT CUSTOMER INFO
If you have your customer’s CSV files, go to Settings > Import from
CSV to transfer your customers to Mhelpdesk. Make sure you choose
“tab delimited” when saving your CSV file, and that each entry follows
these guidelines:
1. CustomerName
2. Address1
3. Address2
4. City
5. State
6. Zip
7. CountryCode
8. PrimaryPhone
9. SecondaryPhone
10. Fax
11. Email
12. ContactFirstName
13. ContactLastName
14. Notes
Need to capture more information for each Customer? Click on
Customize to add new customized fields.
4. ADD PAYMENT PROCESSES
Mhelpdesk integrates with PayPal and Authorize.net. This means you
can allow your customers to pay online, via the “Pay Online” button at
the bottom of each Invoice Email. Navigate to Settings > Payment
Processing.
5 Mhelpdesk LLC. | mhelpdesk.com | @mhelpdesk
Staff & Teams
Add staff members and create teams so your employees can sign in and view their jobs.
1. ADDING STAFF
To add a Staff member or Administrator, navigate to People > Staff
and begin entering their contact information. An active email address
will be needed for them to sign in.
2. DELETING STAFF
Click on a Staff member and click the “delete” button. If you want to
remove the actual license from your account you will need to update
your billing under My Account.
3. STAFF PERMISSIONS
Users designated as Administrators have access to virtually
everything; this includes: scheduling, financial transactions, all service
tickets, customization, settings, and more. To apply permissions to
staff members, navigate to People > Staff and scroll down to see the
list of permissions you can give or deny staff members. For example, if
you want staff members to only see jobs assigned to them­­make
sure the “Allow staff to see all appointments” box is unchecked.
4. CREATING TEAMS
Creating teams can be helpful when assigning jobs to multiple users.
While you could assign multiple users to a job one at a time,, creating
a “Billing Team” or  “Technical Team” of users who normally need to
be assigned to certain jobs together can save you time. To add a
team, navigate to People > Teams.
5. USER NOTIFICATIONS
To pick and choose which users receive email notifications on status
changes, new logs or new updates­­go to Settings > Notifications.
6 Mhelpdesk LLC. | mhelpdesk.com | @mhelpdesk
Anatomy of a Service Ticket
The service ticket is where your workflow should begin. Here, you can capture details of a job, create an estimate,
invoice and receive payment. You can also keep time­stamped  logs and send messages to your customer.
1. CREATING A SERVICE TICKET
To add a Staff member or Administrator, navigate to People > Staff
and begin entering their contact information. An active email address
will be needed for them to sign in.
2. KNOW YOUR WAY AROUND
There are multiple tabs in a service ticket  to organize all associated
information in one window. Here is some basic information on how
these tabs and features can help you.
SERVICE TICKET
Here, begin entering your customer’s contact information and
service location. Pick an issue type relevant to the job, and
then enter the details. Don’t see the details? Click “See More”
above the save button.
Now assign this service ticket to a staff member. Pick and
choose from a list of your staff members next to
“Assign/Appointment”, and then schedule and appointment
according to his schedule.
Need to capture more information with customized fields? Go
to Settings > Custom Fields.
ESTIMATE
In the Estimate tab, your customer’s information will
automatically be brought over from the service ticket. Here,
you can begin adding items to the estimate, then email it to
your customer for review. In our mobile application, you can
also receive a customer’s signature on site by having them
sign with their finger.
INVOICE
Once the job is finished, you can create an invoice from the
estimate by clicking “Add an Invoice for this Job” in the
Invoice tab. You can edit or remove items from the estimate,
and you can add a P.O. number or change the invoice
number by clicking “Show More”.
Similar to the Estimate tab, you can also download a PDF of
the Invoice, or Email it to your customer using the buttons at
the bottom of the page. Need a quick signature? Ask your
customer to finger sign the estimate using our Mobile App!
Invoices will either be labeled “paid” or “unpaid” at the top left.
7 Mhelpdesk LLC. | mhelpdesk.com | @mhelpdesk
PAYMENT
Ready to add a payment? Simply click the payment tab, and
click the Add Payment button and follow the directions. To
allow your customers to pay online, simply email the invoice
to your customer. At the bottom of your email, there will be a
“Pay Online” button for your customer to click.
TIME & MATERIALS
Here, you can access our Time Tracking feature to track the
amount of time spend on a job. Simply click “Add time”, fill out
the details and click “Save & Start”. When the job is complete,
hit the “Stop” button. This will automatically show up in your
invoice as “Show Outstanding Billable Time & Materials” on
top. To add this to your invoice, click the link, check the box
and click “Add”.
LOG/NOTES
This is where you can send time­stamped messages and
updates to all users assigned to that particular service ticket.
Customers will not see any log or notes.
MESSAGES
To send a message to your customer regarding a particular
service ticket, click on “Messages” to type and send your
message. Your customer’s email will autopopulate in the
“To:” field, but if you need to send to more than one email
address­­separate each email with a comma and no space.
FILES
Upload files specific to each service ticket (whether they’re
documents, photos or zip files) through the Files tab.
Currently, the file types allowed for uploading are: jpg, jpeg,
png, gif, tiff zip, 7z, rar, xls, xlxs, doc, docx, txt, pdf under 8 MB.
3. NOW CUSTOMIZE IT
Don’t like the way your PDF’s look? Navigate to Settings > Templates
to add, remove or customize the way your printed  invoice, email,
estimate or service ticket template looks like.
Don’t need the Estimate, Invoicing or Time & Materials tab? Turn
features on or off by going to Settings > Turn On/ Off Features.
8 Mhelpdesk LLC. | mhelpdesk.com | @mhelpdesk
Scheduling
View your calendar and manage all appointments using our drag­and­drop scheduler.
1. SCHEDULE AN APPOINTMENT
When scheduling an appointment, simply click a block on the
calendar. In the appointment details, you can give the appointment a
name, assign it to a user or team, schedule an email alert for the
assigned staff member(s), and choose whether you want it to be a
recurring appointment.
2. MOVE AN APPOINTMENT
To move the appointment, simply drag the block to a different time or
date.
3. SCHEDULING A NEW SERVICE TICKET
In your calendar, click on the “Assign” view. Here, you’ll have a list of
unassigned service tickets, and a calendar of columns with all staff
members. Simply drag a service ticket under one of these columns to
automatically assign it to a staff member or team.
3. ONLINE SCHEDULER
Navigate to Calendar > Online Scheduler to create an online
scheduler for your customers. Pick and choose who you want to allow
your customers to schedule appointments with, and then designate
his available hours. Copy and paste the generated code somewhere
on your website to allow customers to schedule appointments with a
staff member according to his or her schedule.
9 Mhelpdesk LLC. | mhelpdesk.com | @mhelpdesk
Transactions
Access all invoices and payments through the transaction tab.
1. COMBINE INVOICES
To combine invoices into one PDF, go to Transactions > Invoices >
Combine Invoices. Choose the customer you’d like to combine
invoices for, and then pick the invoices you’d like to combine.
2. CREATE RECURRING INVOICES
To add a recurring invoice, go to Transactions > Recurring Invoices >
Add Recurring Invoice.
3. SEND TO QUICKBOOKS
If you are using Quickbooks, you need to follow the Quickbooks Import
instructions first, before exporting anything from Mhelpdesk. Go ot
Settings > Import from Quickbooks.
When you are ready to export invoices to Quickbooks, go to
Transactions > Invoices > Quickbooks View and choose the invoices
you’d like to send. Mhelpdesk will help you remember which were sent
and which are ready to send. Finally, click “Sent To Quickbooks” to
export your Mhelpdesk invoices.
Need your invoice numbers to start at the last number of your latest
invoice in Quickbooks? Go to Settings > Numbering to enter the last
invoice number you created in Mhelpdesk, and even add a prefix
name, like “MHD” so you know which invoices in Quickbooks were
created in Mhelpdesk.
10 Mhelpdesk LLC. | mhelpdesk.com | @mhelpdesk
Tailor To Fit
Customize Mhelpdesk to fit your company’s needs.
ADD OR REMOVE FEATURES
CUSTOMIZE TEMPLATES
INTEGRATION TOOLS
CUSTOM FIELDS & FORMS
11 Mhelpdesk LLC. | mhelpdesk.com | @mhelpdesk
Add or remove features
Mhelpdesk can amplify or simplify your daily workflow. Find out which features are right for your business.
1. ESTIMATES & INVOICING
If your company does not send out estimates or invoices, turn this
feature off to simplify your service tickets. Go to Settings > Turn On/Off
Features and uncheck either or both the Enable Estimates or Keep
Track of Invoices & Payments check box.
2. BUSINESS UNITS
If your company has multiple locations, the Business Units feature can
distinguish which service ticket belongs to the correct business
location. This will allow you to have different company addresses on
Invoice and Estimate PDFs.
Note: This feature is available to customers under the Business and
Enterprise plan. To enable this feature, submit a ticket at
mhelpdesk.com/support.
3. SERVICE ITEMS
The Items To Service tab allows you to generate barcodes for items
that need to be serviced. For example, if a customer brings in a laptop
that needs to be repaired­­the service item tab will allow you to enter
the details of the laptop, create a service ticket from it, and generate a
barcode that can be printed and attached to the item that can be
scanned later to bring up its service ticket. To turn this feature on or off,
go to Settings > Turn On/Off Features.
4. TIME TRACKING
To track billable hours spent on a job, use the Time & Materials tab in
your service ticket. These hours will show as “Outstanding Billable
Hours & Materials” in your invoice. To turn this feature on or off, go to
Settings > Turn On/Off Features.
5. CUSTOM FORMS
Having customized forms will allow you to have different custom fields
autopopulate for specific issue types. For example, when choosing
“Installation” as an issue type in your service ticket, you can have
specific customized fields shown at the bottom of the service ticket,
like “Model Number”, “Brand Name”, and “Temperature”.
Note: This feature is available to customers under the Professional,
Business and Enterprise plan. To enable this feature, submit a ticket at
mhelpdesk.com/support.
12 Mhelpdesk LLC. | mhelpdesk.com | @mhelpdesk
Customizing templates
Change the way your printed invoice, service ticket or estimate looks.
1. ADD OR REMOVE KEYWORDS
Navigate to Settings > Templates, and choose which template you’d
like to change. Using the keywords on the right hand side, you can add
or remove certain information on your PDF template.
2. FORMATTING
Either create your template from scratch with our keywords in the
HTML view, or use our style buttons at the top of our “Design” view.
3. HEADER & FOOTER
In your template, you can add either a header or footer by going to
“Settings > Templates” and choosing the template you’d like to edit.
Similar to editting the body of the template, click either the header or
footer button to add one.
13 Mhelpdesk LLC. | mhelpdesk.com | @mhelpdesk
Integration Tools
Mhelpdesk integrates with programs you might be currently using. Find out which ones can connect to Mhelpdesk.
1. QUICKBOOKS
To import your products and services from Quickbooks, go to Settings
> Import from Quickbooks and follow the instructions.
2. GOOGLE CALENDAR
To push all your Mhelpdesk appointments to your Google Calendar,
navigate to Settings > My Account. Under Google Calendar
Integration, check Yes. Enter your Google Calendar credentials and
click Update. Open your Google Calendar and check for an event titled
Mhelpdesk Connected.
3. PAYPAL
Mhelpdesk can allow your customers to pay online. After you’ve
enabled PayPal, each time you send out an invoice to your customer,
there will be a “Pay Online” button at the bottom of the email. To
enable PayPal, go to Settings  > Payment Processing and check the
box Enable PayPal. Enter your credentials and save.
3. AUTHORIZE.NET
Login to Authorize.Net and click on Account.
Under Security Settings, click API Login ID and Transaction
Key. Enter the API Login ID and Transaction Key into Mhelpdesk.
Check the box only next to the cards you accept. Uncheck the box This
is a test API Login ID. Click Save. Verify everything works by sending
yourself an invoice and paying for it Applying for an Authorize.Net
account. Click here to register for a new account. Click the Create
Login ID button. Login with your new username and password. At a
minimum check the two boxes seen below:
Continue filling out the rest of the application. Once your account
14 Mhelpdesk LLC. | mhelpdesk.com | @mhelpdesk
has been approved, follow the instructions above.
Note: On the last step of the application, you must click the links
in their agreement to open the agreement forms. If you don’t, you
will not be able to submit the application.
4. CREDIT CARD SWIPERS
Any swiper that supports keyboard emulation will work. Attach
your Keyboard Emulated Credit Card Swiper to your computer,
and navigate to the payment tab of an invoice you’d like to accept
payment for.Once the credit card is swiped in the Payment page,
the credit card’s information will automatically be filled.
Suggest another integration at mhelpdesk.com/feature­requests
15 Mhelpdesk LLC. | mhelpdesk.com | @mhelpdesk
Custom Fields & Forms
Use our custom fields and forms feature to capture more information in your service tickets.
Mhelpdesk works for virtually any type of business. Naturally, the
interface is also customizable.  One of the first things you’ll want to do
is customize your Job (Service Request, Ticket) form.  Here’s how:
1) Open the Job Form.
2) Click the Customize Link.
3) Click Add New Field.
16 Mhelpdesk LLC. | mhelpdesk.com | @mhelpdesk
4) Create a group (optional)
5) Enter the details of your custom field.
6) Click Save.
To add custom fields to a certain form, go to Settings > Custom Forms
and pick which issue type you’d like your custom fields to fall under.
Check the fields you want to add and save.
Repeat these steps for each issue type.
17 Mhelpdesk LLC. | mhelpdesk.com | @mhelpdesk
Connect with customers
Allow your customers to submit a payment, check the status of a job,
or even schedule an appointment according to your schedule.
CUSTOMER PORTAL
ONLINE SCHEDULER
ONLINE SERVICE REQUESTS
18 Mhelpdesk LLC. | mhelpdesk.com | @mhelpdesk
Customer Portal
Our online customer portal allows customers to sign in, check the status of a job, submit tickets and pay online.
1. WEBSITE INTEGRATION
Go to Settings > Website Integration to copy and paste the customer
portal code on to your website. Now, customers can sign in to view the
status of a job, view their service ticket history, submit a request or pay
online.
2. ADD CUSTOMER LOGINS
To give a customer a login:
1) Open the Customer Details page for any customer.
2) Click on the Contacts tab.
3) Click on the name of the Contact that you want to give
Login access to.
4) Check the Box Allow Login and assign this contact a
Password. Make sure you enter a valid email address for the
contact so they can receive an email with login instructions.
19 Mhelpdesk LLC. | mhelpdesk.com | @mhelpdesk
Online Scheduler
Our online scheduler allows customers to schedule appointments according to your schedule.
1. SETUP
Navigate to Calendar > Online Scheduler to create an online
scheduler for your customers. Pick and choose who you want to allow
your customers to schedule appointments with, and then designate
his available hours. Copy and paste the generated code somewhere
on your website to allow customers to schedule appointments with a
staff member according to his or her schedule.
Online Service Requests
Our online scheduler allows customers to schedule appointments according to your schedule.
1. SETUP
The online Service Request Form allows your clients to submit their
own tickets. Once submitted, this request will be added to your queue
as a new item. You can even add custom fields  to the form to collect
more info about the job. Make sure these fields are marked “Show To
Customer”.
Browse to Settings > Customize > Website Integration.
Copy the code in the box Embed Online Request Form.
Paste the code into the webpage that will be used for MHelpdesk.
2. AUTO­ASSIGN WEB SUBMITTED REQUESTS
When a customer fills out the online request form, it’s a good idea
to auto­assign these tickets to the correct technician. This
ensures that web requests don’t get lost. To auto­assign service
requests made on the web:
Navigate to Settings > Automation > Auto­Update Rules
Set the Assign To drop­down to your desired technician
When new requests come in, it will be auto­assigned to this tech.
20 Mhelpdesk LLC. | mhelpdesk.com | @mhelpdesk
21 Mhelpdesk LLC. | mhelpdesk.com | @mhelpdesk

Mhelpdesk Manual