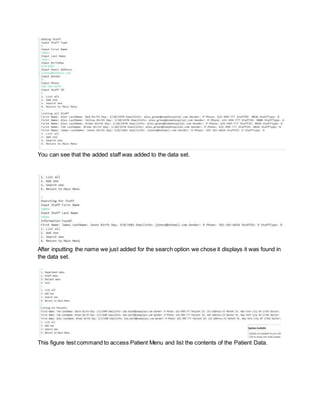
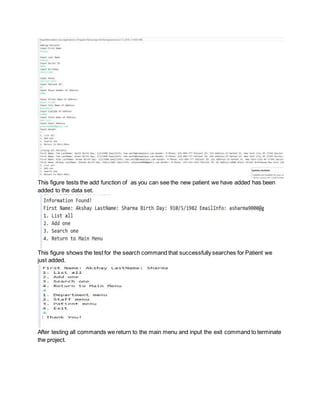
Akshay Sharma
Menu Driven Hospital Interface
Table of Contents
Introduction
Main menu
Sub Menus (one for each Department, Staff, and Patient List )
Department List
Staff List
Patient List
Introduction
The project is designed to implement a menu-based hospital simulation software
using Java programming language and object oriented programming concepts. The Menu
Driven Hospital Interface will help the user to manipulate and process three entities of a
hospital: Departments, Staff, and Patients using menu options. The project will provide a text-
based menu to the user to use the program.
Main menu
Main menu will have three sub menus and an option to exit the program.
1. Department menu
2. Staff menu
3. Patient menu
4. Exit
The project will ask the user what the choice is and then accordingly show the corresponding
sub menu or exit the program.
The project will terminate only if the user chooses the 'Exit' option in the main menu.
Sub Menus (one for each List of Department, Staff, and Patient)
Each sub menu will have options to
1. List all
2. Add one
3. Search one
4. Return to main menu
for each the corresponding list of Department, Staff, and Patient. Until the user picks the "Return
to main menu" option, the program will remain in the selected sub menu and will allow the user
to select the next choice from the corresponding sub menu. Further explanation for each sub
menu choice is below.
1. List all option: All the information about all the members of the corresponding list
(Department, Staff, or Patient) will be listed on the screen in a nicely formatted way.
2. Add one option: Will add a new member (a new patient, department, or staff) to
the corresponding list.
3. Search one option: Will search for a specific member (a patient, department, or
staff) of a list using the ID of the member. If found, the program will list all the information
about the searched member on the screen in a nicely formatted way. If not found, the
program will print a “Not found” message to the user on the screen.
4. Return to main menu option: Will exit the sub menu and go back to the main
menu and show the main menu to the user again.
Department List
Each department will have the following information: Department Name, Department ID
● Department Name: can be composed of multiple words
● Department ID: will be a unique number per department
The department list information will be read from an input text file, when your program first
starts. The input file will be formatted as a CSV (Comma Separated Values). For instance, a
hospital with three departments may have an input file such as below.
Pediatrics,11
Oncology,5
Human Resources,23
The code will manipulate the department list using the sub menu options.
Staff List
The hospital will have three types of staff:
Doctors, Nurses, Administrative Personnel
Each staff member will have the following information:
Staff Type, First Name, Last Name, Staff ID, Department, Personal
info, Contact info
where
● Staff ID: will be a unique number per staff member
● Department: must be one of the department ID in the system as each staff is a
member of a department.
● Personal info will include: birth date, gender
● Contact info will include: phone info, email info
● Phone info: is a single phone number
● Email info: is a single email address
The staff list information will be read from an input text file that the user will provide, when
the code first executes. The input file will be formatted as a CSV (Comma Separated Values).
The first field in the input file will tell what type of staff the line is for (you can use D for Doctors,
N for Nurses, and A for Administrative Personnel). For instance, Dr. Alex Green who is
working at Oncology department can be recorded as below into the input file.
D,Alex,Green,9000,5,1/10/1970,M,631-999-
777,alex.green@somehospital.com
The code will manipulate the staff list using the sub menu options.
Patient List
Each patient will have the following information:
First Name, Last Name, Patient ID, Doctor, Personal info,Contact info
where
● Patient ID: is a unique number per patient
● Doctor: must be ID of one of the of the doctors in the system, since each patient is
assigned one doctor
● Personal info will include: birth date, gender
● Contact info will include: home address info, phone info, email info
● home address info will include: no, street, city, state, zip
● phone info: is a single phone number
● email info: is a single email address
The patient information will be read from an input text file when the code first executes. Input file
will be formatted as a CSV (Comma Separated Values). For instance, patient Tom Smith
whose doctor is Dr. Alex Green can be recorded as below from the input file.
Tom,Smith,333,9000,2/2/1990,M,33,Market St., New York City,
NY,17345,631-999-777,tom.smith@someplace.com
The project will manipulate the patient list using the patient sub menu options.
Screen Shots
As seen in this figure the menu is displayed at the start and we decide to choose the
department menu. We test the list all command by displaying the data before we used the add
command and after we inputted a department into the console we displayed the data by using
the list all command.
In this figure we are using the search command to see if a specific department we are looking
for is included in the data set. We inputted the number 3 to select the Search one option. We
input the department we just added to see if it will come back that it was inputted and the
console displays that information was found with the Department ID.
Above we returned to the main menu and decided to test out the Staff menu. We display all data
for and move forward by testing the Add command by inputting 2 into the console. We input all
data that was asked for and then display the contents as seen below
You can see that the added staff was added to the data set.
After inputting the name we just added for the search option we chose it displays it was found in
the data set.
This figure test command to access Patient Menu and list the contents of the Patient Data.
This figure tests the add function of as you can see the new patient we have added has been
added to the data set.
This figure shows the test for the search command that successfully searches for Patient we
just added.
After testing all commands we return to the main menu and input the exit command to terminate
the project.

Menu Driven Hospital Interface Desciption

  • 1.
    Akshay Sharma Menu DrivenHospital Interface Table of Contents Introduction Main menu Sub Menus (one for each Department, Staff, and Patient List ) Department List Staff List Patient List Introduction The project is designed to implement a menu-based hospital simulation software using Java programming language and object oriented programming concepts. The Menu Driven Hospital Interface will help the user to manipulate and process three entities of a hospital: Departments, Staff, and Patients using menu options. The project will provide a text- based menu to the user to use the program. Main menu Main menu will have three sub menus and an option to exit the program. 1. Department menu 2. Staff menu 3. Patient menu 4. Exit The project will ask the user what the choice is and then accordingly show the corresponding sub menu or exit the program. The project will terminate only if the user chooses the 'Exit' option in the main menu.
  • 2.
    Sub Menus (onefor each List of Department, Staff, and Patient) Each sub menu will have options to 1. List all 2. Add one 3. Search one 4. Return to main menu for each the corresponding list of Department, Staff, and Patient. Until the user picks the "Return to main menu" option, the program will remain in the selected sub menu and will allow the user to select the next choice from the corresponding sub menu. Further explanation for each sub menu choice is below. 1. List all option: All the information about all the members of the corresponding list (Department, Staff, or Patient) will be listed on the screen in a nicely formatted way. 2. Add one option: Will add a new member (a new patient, department, or staff) to the corresponding list. 3. Search one option: Will search for a specific member (a patient, department, or staff) of a list using the ID of the member. If found, the program will list all the information about the searched member on the screen in a nicely formatted way. If not found, the program will print a “Not found” message to the user on the screen. 4. Return to main menu option: Will exit the sub menu and go back to the main menu and show the main menu to the user again. Department List Each department will have the following information: Department Name, Department ID ● Department Name: can be composed of multiple words ● Department ID: will be a unique number per department The department list information will be read from an input text file, when your program first starts. The input file will be formatted as a CSV (Comma Separated Values). For instance, a hospital with three departments may have an input file such as below. Pediatrics,11 Oncology,5 Human Resources,23
  • 3.
    The code willmanipulate the department list using the sub menu options. Staff List The hospital will have three types of staff: Doctors, Nurses, Administrative Personnel Each staff member will have the following information: Staff Type, First Name, Last Name, Staff ID, Department, Personal info, Contact info where ● Staff ID: will be a unique number per staff member ● Department: must be one of the department ID in the system as each staff is a member of a department. ● Personal info will include: birth date, gender ● Contact info will include: phone info, email info ● Phone info: is a single phone number ● Email info: is a single email address The staff list information will be read from an input text file that the user will provide, when the code first executes. The input file will be formatted as a CSV (Comma Separated Values). The first field in the input file will tell what type of staff the line is for (you can use D for Doctors, N for Nurses, and A for Administrative Personnel). For instance, Dr. Alex Green who is working at Oncology department can be recorded as below into the input file. D,Alex,Green,9000,5,1/10/1970,M,631-999- 777,alex.green@somehospital.com The code will manipulate the staff list using the sub menu options. Patient List Each patient will have the following information: First Name, Last Name, Patient ID, Doctor, Personal info,Contact info where ● Patient ID: is a unique number per patient
  • 4.
    ● Doctor: mustbe ID of one of the of the doctors in the system, since each patient is assigned one doctor ● Personal info will include: birth date, gender ● Contact info will include: home address info, phone info, email info ● home address info will include: no, street, city, state, zip ● phone info: is a single phone number ● email info: is a single email address The patient information will be read from an input text file when the code first executes. Input file will be formatted as a CSV (Comma Separated Values). For instance, patient Tom Smith whose doctor is Dr. Alex Green can be recorded as below from the input file. Tom,Smith,333,9000,2/2/1990,M,33,Market St., New York City, NY,17345,631-999-777,tom.smith@someplace.com The project will manipulate the patient list using the patient sub menu options. Screen Shots As seen in this figure the menu is displayed at the start and we decide to choose the department menu. We test the list all command by displaying the data before we used the add
  • 5.
    command and afterwe inputted a department into the console we displayed the data by using the list all command. In this figure we are using the search command to see if a specific department we are looking for is included in the data set. We inputted the number 3 to select the Search one option. We input the department we just added to see if it will come back that it was inputted and the console displays that information was found with the Department ID. Above we returned to the main menu and decided to test out the Staff menu. We display all data for and move forward by testing the Add command by inputting 2 into the console. We input all data that was asked for and then display the contents as seen below
  • 6.
    You can seethat the added staff was added to the data set. After inputting the name we just added for the search option we chose it displays it was found in the data set. This figure test command to access Patient Menu and list the contents of the Patient Data.
  • 7.
    This figure teststhe add function of as you can see the new patient we have added has been added to the data set. This figure shows the test for the search command that successfully searches for Patient we just added. After testing all commands we return to the main menu and input the exit command to terminate the project.