A good collection of brushes is a must-have for every makeup enthusiast. Brushes not only make applying makeup quick and easy, but they also help the product go on smoothly and evenly, creating a more flawless finish. If you're just getting into makeup, a good set of brushes makes the process much easier. There are several different types of makeup brushes, so it's important to know which ones to use in your makeup routine. Here is a selection of important makeup brushes to add to your collection.
Beautiful skin takes work and in most cases is enhanced by artfully applied foundation. Foundations protect the skin, even out skin tone, and give the skin a more radiant appearance. Many foundations contain pigments that brighten the skin and hide imperfections. Guarantee a flawless finish by following a few simple steps.
Tips to clean remove stains and take care of your Rug and Carpets!Love Your R...RAJIV KHANNA
Take care of your Beautiful Hand Made Rug to increase its life and longevity!
Small tips to protect clean and maintain your rugs at home ,you will cherish them and find them easy to use
All that Hand Made Rugs ,Hand Knotted Rugs,Woolen RUgs,Blended Rugs,Art Silk Rugs,need is to know these special small tips that we give in this presentation
Save it Print and use it Your Carpet and Rug will be cleaner and longer lasting!
Makeup brushes that Every Women should ownfashableblog
Hello ladies! I am here to share amazing useful makeup brushes that every women should own to apply makeup. This post is especially for those who always prefer to apply makeup with perfection.
Follow these easy steps to learn ‘how to do pedicure at home’ effectively. We accept that finding time for ourselves has become a difficult task in this fast racing world. Due to which we end up neglecting to spare even few minutes to pamper ourselves. Now you don’t need to waste time in ‘salons’ to get appointment and reach far places on time. You can be your own ‘pedicure machine’ by following these easy steps at home.
Create your own winter luminary by following these easy steps. Feel free to get creative with your creation! If you didn't register for a kit, all the supplied are listed on the second slide!
Do not miss our ⚗️“Chemistry experiments for Kids at Home” The booklet contains few easy science experiments that can keep scientists’ kids entertained ❤️
This is our IT coursework presentation, designed and edited by me. I super like this, and miss my coursemate so much :')
Presenter:
1. Venisri A/P Vijayakumar
2. Vidhya A/P Jeeva
3. Wong Ying Ying
4. Ting Chiou Yun
party makeup is very important when you are going for any kind of party . i which this presentation I tell you that you to make party makeup correctly.
Do not miss our ⚗️“Chemistry experiments for Kids at Home ”The booklet contains few easy science experiments that can keep scientists’ kids entertained ❤️
10 beauty and makeup hacks you can try dailyBig Stylist
We all have some sort of beauty emergency and we need a solution to it instantly. Try out these simple makeup hacks for the most common beauty/ makeup problems.
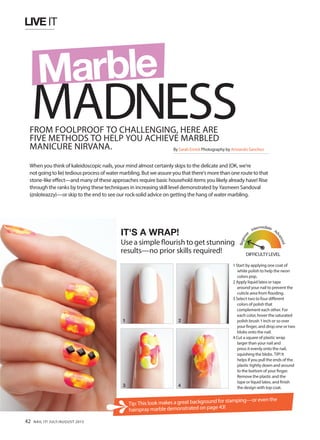
1. LIVE IT
FROM FOOLPROOF TO CHALLENGING, HERE ARE
FIVE METHODS TO HELP YOU ACHIEVE MARBLED
MANICURE NIRVANA.
When you think of kaleidoscopic nails, your mind almost certainly skips to the delicate and (OK, we’re
notgoingtolie) tediousprocessofwatermarbling.Butweassureyouthatthere’smorethanoneroutetothat
stone-like effect—and many of these approaches require basic household items you likely already have! Rise
through the ranks by trying these techniques in increasing skill level demonstrated by Yasmeen Sandoval
(@sloteazzy)—or skip to the end to see our rock-solid advice on getting the hang of water marbling.
IT'S A WRAP!
Use a simple flourish to get stunning
results—no prior skills required!
1 Start by applying one coat of
white polish to help the neon
colors pop.
2 Apply liquid latex or tape
around your nail to prevent the
cuticle area from flooding.
3 Select two to four different
colors of polish that
complement each other. For
each color, hover the saturated
polish brush 1 inch or so over
your finger, and drop one or two
blobs onto the nail.
4 Cut a square of plastic wrap
larger than your nail and
press it evenly onto the nail,
squishing the blobs. TIP! It
helps if you pull the ends of the
plastic tightly down and around
to the bottom of your finger.
Remove the plastic and the
tape or liquid latex, and finish
the design with top coat.
1 2
3 4
Tip: This look makes a great background for stamping—or even the
hairspray marble demonstrated on page 43!
MADNESS
Marble
By Sarah Emick Photography by Armando Sanchez
DIFFICULTYLEVEL
Beginne
r
Intermediate
Ad
vanced
42 NAIL IT! JULY/AUGUST 2015
2. A MATTER OF
SPLATTER
Getting a little messy can
have a beautiful payoff.
HAIRSPRAY
HACK
Pull an everyday
beauty product
fromyourstashto
achieve a veined
stone effect.
Bonus Tip: You can use a straw or
coffee stirrer in lieu of a bobby pin.
Test out all three to see which gives you
the best results.
1 Paint the nail with nude polish. (We used a matte
nude!)
2 Dip the looped end of a bobby pin sideways into the
first polish. Bring your face close to the nail, and
then hold the bobby pin near your lips, like a bubble
wand. Blow through it quickly one or two times to
spray polish onto the nail.
3 Repeat Step 2 with the other colors you wish to
splatter. Clean up around the nail. If you used a
matte base color or glitzy metallic, skip the top coat.
Tip:
Save the coloryou want to be thecenter of attention
for last.
1 Polish the nail with lilac
lacquer.
2 Fill a disposable
plastic cup with room-
temperature filtered
water. Drop several
beads of black nail polish
(a thinner consistency
is best) into it. Gently
swish a Q-tip in the water
around the polish to help
the lacquer spread.
3 Spray a pump or two
of hairspray onto the
thinly spread polish. This
should create a water-
spotted effect.
4 Tape around your nail
to make cleanup easier.
Hold your nail parallel
above the water, and
then dunk it in and hold
it there. Swirl a Q-tip
around your finger to
pick up any excess polish
from the water, and
then pull out your nail.
Remove the tape from
around your nail and
allow the design to dry.
Finish with top coat.
Tip:
Don’t have hairspray?
Many products in a
pumpbottlethatcontain
alcohol will do the job.
Try sanitizer spray or
body spray.
DIFFICULTYLEVEL
Beginne
r
Intermediate
Ad
vanced
DIFFICULTYLEVEL
Beginne
r
Intermediate
Ad
vanced
1
1
2
3
4
2
3
3. 1 Fill a small disposable cup with room-
temperature filtered water. Apply one coat
of white polish. Tape around your cuticles to
make cleanup easier.
2 Drop a bead of lacquer into the water. Swirl
a Q-tip in the water around the polish to help
it spread to the sides of the cup. If it isn’t
spreading, try a thinner polish or see our other
troubleshooting tips in the sidebar, “Tips for a
Perfect Water Marble,” on page 45.
3 Continue dropping other polish colors into
the center of the cup, allowing each color to
spread and separate. A good water marble
needs around 15 drops, so repeat the color
pattern until you reach that number.
4 Take a needle and lower it into the design,
five rings in from the outermost color. Slowly
drag the needle inward until you reach the
center of the bull’s-eye.
5 Continue this process, first with 4 lines, then
8, then 16.
6 Hold your nail facedown and parallel to
the water. Quickly lower your nail at a
45-degree angle into the water and hold it
there momentarily. Use a Q-tip to pick up
all of the excess polish around your finger.
Remove your finger from the water. Remove
the tape and use an angled brush dipped in
acetone to wipe away any unwanted polish
left around the cuticle. Allow the design to
dry and apply top coat.
WATER MARBLING 101
It’sachallenge,butmasteringthistechniquewillrewardyouwitha
perfect flower print every time!DIFFICULTYLEVEL
Beginne
r
Intermediate
Ad
vanced
1
4
2
5
3
6
44 NAIL IT! JULY/AUGUST 2015
4. 1 Like with traditional water marble, begin with a small
disposable cup of room-temperature filtered water.
Drop a bead of purple polish into the water and let
it spread to the edge of the cup. Follow with a drop
of blue and then teal polish. Repeat until the cup
contains at least 12 rings.
2 To create a fishtail pattern, start by lowering your needle
into the center of the rings and pulling outward. Stop
when you reach the third outermost circle.
3 Repeat until you’ve divvied up the bull’s-eye into
eighths.
4 Let the polish sit in the cup for 15 to 20 minutes.
Then, use tweezers to carefully remove the dried layer
of lacquer from the surface of the water.
5 Use scissors to cut slices of the circle slightly bigger
than the size of your nail. TIP! You can divide each
decal into up to eight pieces, but it’s helpful to have
an extra cup of marbled polish in case some pieces
tear as you’re handling them.
6 Place the decal on the nail. Then, use acetone and an
angled brush to wipe away the excess edges on the
decal. Finish with top coat.
• Make sure to turn off any fans,
air conditioners or heaters before
starting. Air can dry out the polish
too quickly and affect the way it
spreads.
• Use a small disposable cup (rather
than a large drinking cup) to hold
the water. The 3-oz.-size clear
cup you use for condiments at a
restaurant is perfect.
• Filtered, room-temperature water
works best. Bottled spring water
may seem like a good idea, but
often doesn’t work.
• Choose thin, newer polishes. If
you’re having trouble getting the
polish to spread in the water, snag
some nail polish thinner from a
beauty supply store. Note: Acetone
does not count as nail polish
thinner!
• Using polishes from the same
brand tends to work best.
• Gently pull the water around the
edge of the polish with a Q-tip to
encourage the lacquer to spread to
the sides of the cup.
• Use a needle (instead of a
toothpick) to create the designs.
• Clean off the needle on a paper
towel each time you draw a line in
the polish.
• Never drag the polish from the
outermost circle, as it will have
already dried by the time you get
to this step. Always start from
the third or fourth ring from the
outside.
You don’t need to cross your fingers and hold your breath to get the perfect
water marble. Here are a few pointers to make you a pro right out of the gate.
Tips for a Perfect
Water Marble
DIFFICULTYLEVEL
Beginne
r
Intermediate
Ad
vanced
DO THEM
AS DECALS
If you’re having difficulty placing
the water marble designs in the
rightpositiononyournail,letthem
dry first and then apply them with
greater precision.
1
3
5
2
4
6
Tip:
If your decals rip
during application,
take a thin brush
dipped in the same
color(s) used in the
marble decal to do
touch-ups.
JULY/AUGUST 2015 NAIL IT! 45