SlideShare a Scribd company logo
OPERATOR’S MANUAL
for
Supra 422, 622
644, 722, 744,
844, 922 & 944
Truck Refrigeration Units
62--02698 Rev E
Truck Refrigeration
BOX TEMPERATURE
AUTO START/STOP
I
UNIT DATA
PRETRIP
ALARM/FAULT
STANDBYBUZZER
OFF
MAN
DEFROST
CITY
SPEEDROAD
FUNCTION ENTER
SETPOINT
-20 35 F
I
0
MANUAL
OPERATOR’S
TRUCK
REFRIGERATION UNITS
Supra 422, 622,
644, 722, 744, 844,
922 & 944
CONTENTS
Page
Unit Identification 1. . . . . . . . . . . . . . . . . . . . . . . . . .
Safety 3. . . . . . . . . . . . . . . . . . . . . . . . . . . . . . . . . . . .
Features -- Microprocessor Controls 4. . . . . . . . . .
Function Change 8. . . . . . . . . . . . . . . . . . . . . . . . . .
Features -- Solid State Controls 9. . . . . . . . . . . . . .
Pre-Trip Inspection 12. . . . . . . . . . . . . . . . . . . . . . . .
Unit Operation -- Microprocessor Controls 14. . . .
Unit Operation -- Solid-State Controls 15. . . . . . . .
Product Loading 16. . . . . . . . . . . . . . . . . . . . . . . . . .
Recommended Transport Temperatures 18. . . . .
Problems 19. . . . . . . . . . . . . . . . . . . . . . . . . . . . . . . .
Troubleshooting 20. . . . . . . . . . . . . . . . . . . . . . . . . .
Microprocessor Control Fuses 22. . . . . . . . . . . . . .
Solid-State Control Fuses 24. . . . . . . . . . . . . . . . . .
Circuit Board Fuses 25. . . . . . . . . . . . . . . . . . . . . . .
Unit Maintenance 26. . . . . . . . . . . . . . . . . . . . . . . . .
Unit Maintenance Schedule 27. . . . . . . . . . . . . . . .
Standby Operation Guidelines 29. . . . . . . . . . . . . .
Emergency Road Service 30. . . . . . . . . . . . . . . . . .
SUPRA OPERATOR’S MANUAL
This guide has been prepared for the operator of Carrier Transicold
diesel truck refrigeration units. It contains basic instructions for the
daily operation of the refrigeration unit as well as safety information,
troubleshooting tips, and other information that will help you to
deliver the load in the best possible condition. Please take the time
to read the information contained in this booklet and refer to it
whenever you have a question about the operation of your Carrier
Transicold Supra unit.
Your refrigeration unit has been engineered to provide long,
trouble-free performance when it is properly operated and
maintained. The checks outlined in this guide will help to minimize
over-the-road problems. In addition, a comprehensive
maintenance program will help to insure that the unit continues to
operate reliably. Such a maintenance program will also help to
control operating costs, increase the unit’s working life, and
improve performance.
This guide is intended as an introduction to your unit and to provide
general assistance when needed. More comprehensive
information can be found in the Operation and Service Manual for
your unit. This manual can be obtained from your local Carrier
Transicold dealer.
When having your unit serviced, be sure to specify genuine Carrier
Transicold replacement parts for the highest quality and best
reliability.
At Carrier Transicold, we are continually working to improve the
products that we build for our customers. As a result, unit
specifications may change without notice.
1 62--02698
UNIT IDENTIFICATION
Each Supra unit is identified by a nameplate attached to the frame
of the unit. On the Supra, this nameplate is inside the curb-side side
door of the unit. This nameplate identifies the complete model
number of the unit, the serial number, the refrigerant charge and
quantity, and the date the unit was placed in service.
If a problem occurs, please refer to the information on this plate,
and make a note of the model and serial number before calling for
assistance. This information will be needed when you contact a
technician or Carrier Transicold Service Engineer so that he or she
may properly assist you.
Serial Plate Used Before August 2001
Serial Decal Used After August 2001
262--02698
3 62--02698
SAFETY
Your Carrier Transicold refrigeration unit has been designed with
the safety of the operator in mind. During normal operation, all
moving parts are fully guarded to help prevent injury. During all
pre-trip inspections, daily inspections, and problem
troubleshooting, you may be exposed to moving parts; please stay
clear of all moving parts when the unit is in operation and when the
unit main power switch is in the RUN (1) position.
WARNING
Under no circumstances should ether or any other
starting aids be used to start engine.
AUTO-START/STOP
Your refrigeration unit is equipped with Auto-Start/Stop, a valuable
fuel saving feature. When the unit is set for Auto-Start/Stop
operation it may start at any time and without warning. When
performing any check of the refrigeration unit (e.g., checking the
belts, checking the oil), make certain that the main power switch is
in the OFF (0) position.
ENGINE COOLANT
The engine is equipped with a pressurized cooling system. Under
normal operating conditions, the coolant in the engine and radiator
is under high pressure and is very hot. Contact with hot coolant can
cause severe burns. Do not remove the cap from a hot radiator; if
the cap must be removed, do so very slowly in order to release the
pressure without spray.
REFRIGERANTS
The refrigerant contained in the refrigeration system of your unit
can cause frostbite, severe burns, or blindness when in direct
contact with the skin or eyes. For this reason, and because of
legislation regarding the handling of refrigerants during system
service, we recommend that, whenever your unit requires service
of the refrigeration system, you contact your nearest Carrier
Transicold authorized repair facility for service.
BATTERY
This unit utilizes a lead-acid type battery. The battery normally
vents small amounts of flammable hydrogen gas. Do not smoke
when checking the battery. A battery explosion can cause serious
physical harm and/or blindness.
462--02698
FEATURES -- MICROPROCESSOR CONTROLS
This refrigeration unit is equipped with a wide range of features that
are designed to improve reliability and temperature control within
the load space.
MICROPROCESSOR CONTROLS
The microprocessor controls incorporated into this unit are the
most reliable control system available in the industry. They are also
designed to be the easiest to use, offering great flexibility in control,
yet minimal user input for normal operation -- a true “set it and forget
it” design.
1. Display window -- shows set point, box temperature, operating
mode, alarm displays.
2. Function Change key -- accesses unit set-up
displays. Refer to Page 7 for Function Settings.
5 62--02698
3 And 4. The UP ARROW and DOWN ARROW keys are
used to alter the set point. Press the up or down arrow
keys until the desired set point is displayed on the left side
of the display window. When the correct set point is displayed,
press the ENTER key to confirm the setting.
The UP ARROW and DOWN ARROW keys are also used to
change the unit functions and scroll through the FUNCTION and
UNIT DATA screens.
5. The ENTER key confirms changes made to unit
operation and changes the set point after using the arrow
keys to adjust it. If the ENTER key is not pressed, the set
point and functions will revert to the previous settings.
6. The main unit RUN/STOP (I = Run / 0 = Stop) switch
controls the unit operation. When switched to the Run (I)
position, the unit will start in the operating mode last
entered (Road or Standby). The set point will be at the last set point
entered on the keypad.
7. The ROAD key puts the unit into Road (or diesel
engine) operation when standby operation has been
previously selected.
8. The CITY SPEED key toggles the unit between City
Speed and normal operating modes. When City Speed is
selected, the unit will run only in low speed except during defrost
cycles. This feature is useful in areas where noise is restricted.
9. The MANUAL DEFROST key places the unit in a
defrost cycle when evaporator coild temperature is cold
enough. Under most conditions it is not necessary to defrost the
unit manually as it is equipped with an air switch and defrost timer to
defrost on demand. Manual defrost may become necessary due to
ice accumulated on the evaporator coil during frequent door
openings in humid environments.
10. The BUZZER OFF key temporarily turns off the
FAULT ALARM buzzer. The buzzer indicates that a
condition exists that may affect the temperature of the
load; for example, the unit failed to start automatically, or
the box temperature is out-of-range.
11. The STANDBY key places the unit in Standby (or
electric motor) mode when the unit has been operting in
road (or diesel engine) mode.
662--02698
12. The PRETRIP key initiates a check of all normal
operating modes. The temperature inside the box must
be below 5_C ¦ 1_C (35_F ¦ 2_F) to start this check.
Upon initiation, the unit will cycle through all operating modes at 30
second intervals. The display will show “PPPP” at the beginning
and will show various unit data during the pre-trip cycle. Upon
completion of the pre-trip cycle the unit will be placed into the
defrost mode.
13. The AUTO-START/STOP key toggles the unit
operating mode between Auto-Start/Stop and
continuous run. When the unit is set for Auto-Start/Stop
operation, the unit will run until the box temperature reaches set
point and then cycle off (after the minimum run time has been met)
until further cooling or heating is necessary. When in the continuous
mode, the unit will cycle between heat and cool as required to
maintain the set temperature in the body. If the set point is below
--12_C (10_F) the unit will not heat, it will run continuously in low
speed cool. When set for continuous run operation the unit does not
shut off unless the Run/Stop switch is moved to the Stop (O) position
or a unit fault occurs.
14. Unit Data -- pressing this button scrolls the
display through the various operating condition
displays: engine temperature or battery voltage, for
example. A more complete description of the
function of this key is found later in ”Unit Data”
Section.
15. Fault Alarm -- this LED illuminates when a unit fault has been
detected.
i
7 62--02698
UNIT DATA
TO DISPLAY UNIT DATA
The unit data list can be scrolled through by pressing
the UNIT DATA key. The list will advance by one with
each key press; or press the UNIT DATA key once
and use the UP or DOWN ARROW keys to scroll through the list
quickly. Press the ENTER key to display the data for 30 seconds.
UNIT DATA
CODE ENGLISH DATA
CD1 SUCT Suction Pressure
CD2 ENG Engine Hours
CD3 WT Engine Temperature
CD4 RAS Return Air Temperature
*CD5 SAS Supply Air Temperature
*CD6 REM Remote Air Temperature
CD7 ATS Ambient Temperature
CD8 EVP Future Expansion
CD9 CDT Discharge Temperature
CD10 BATT Battery Voltage
CD11 SBY Standby Hours
CD12 MOD V Future Expansion
CD13 REV Software Revision
CD14 SERL Serial Number Low
CD15 SERU Serial Number Upper
CD16 2RA Compartment 2 Air Temperature
CD17 3RA Compartment 3 Air Temperature
CD18 MHR1 Maintenance Hour Meter 1
CD19 MHR2 Maintenance Hour Meter 2
CD20 SON Switch On Hour Meter
* Codes 5 & 6 are variable. SAS is displayed when the SUP Probe
Function is selected. REM is displayed when the REM Probe Function
is selected.
i
862--02698
FUNCTION CHANGE
TO CHANGE A FUNCTION
1. Press the FUNCTION CHANGE key until the
function you want to change appears on the display.
2. Press ENTER
3. Press the UP or DOWN ARROW key until the function
setting you want appears on the display.
4. Press ENTER
FUNCTION PARAMETERS
CODE ENGLISH DATA
FN0 DEFR Defrost Interval 1.5, 3, 6, or 12 hours
FN1 ON CITY SPD Low Speed Operation Only
FN1 OFF HIGH SPD Hi Spd (Cycle Between Low & Hi Spds)
FN2
OFF T
Minimum Off-time 10, 20, 30, 45, or 90
minutes
FN3 ON T On-time 4 or 7 minutes
FN4 A
REM
PROBE
Controlling Probe -- Return Air
FN4 B
SUP
PROBE
Controlling Probe -- Supply Air
FN5
Degrees
F or C
Temperature Unit °F or °C
FN6 ON TIME STRT Maximum Off-time 30 Min.
FN6 OFF TEMP STRT Temperature Based Restarting
FN7 MOP STD Future Expansion
FN8 2SET Compartment 2 Setpoint
FN9 3SET Compartment 3 Setpoint
FN10 ON AUTO OP Auto Start Operation
FN10 OFF MAN OP Manual Start Operation
FN11 T RANGE Out-of-Range Tolerance 2, 3, or 4°C
Code vs English = Code or English display format
Manual Glow Override = Normal or Add 30sec
Alarm RST = Alarm Reset Required
Alarm CLR = No Alarm Active
9 62--02698
FEATURES -- SOLID-STATE CONTROLS
SOLID-STATE CONTROLS
As an alternative to the Microprocessor controller, Carrier
Transicold offered a Solid-State control system. This system is a
more conventional one that is started and stopped manually.
Below is the solid-state control panel:
The solid-state control system is designed for simple operation
while offering the maximum number of features possible.
1062--02698
GLOW/DEFROST SWITCH
When held in the upper position (GLOW) the glow plugs in
the engine are energized, bringing the combustion
chamber to a temperature that is sufficient to ignite the fuel
when the starter is engaged. When this switch is moved
momentarily to the lower (DEFROST) position, the unit is
place in the defrost cycle.
START/RUN/STOP SWITCH
This switch, when held in the up (START) position,
engages the engine’s starter.
When released it moves to the center (RUN) position. In
this position the unit will run in either the engine or standby mode,
depending on which is selected on the ROAD/STANDBY switch.
ROAD/STANDBY SWITCH
When placed in the upper position this switch enables the
unit to operate on the diesel engine contained in the unit.
In the lower position, the unit will operate in the standby
(electric) mode. In order to operate in this mode, the unit
must be connected to an acceptable power source.
WARNING
Under no circumstances should ether or any other
starting aids be used to start engine.
TEMPERATURE SELECTOR
The temperature selector is used to select the temperature at which
the product is to be held. It is simply rotated until the small arrow
points to the required temperature.
ROAD HOUR METER
Keeps track of the number of hours that the engine operates for
maintenance purposes.
STANDBY HOUR METER
Tracks the number of hours the standby motor in the unit runs.
11 62--02698
This symbol represents the hour meter or running time
meter. The solid-state control system is equipped with two
running time meters; one for road operation, which is
indicated by the road symbol next to the meter, and the other
meter accumulates timer during operation in standby mode.
This indicates operation in the over-the-road operating
mode. When the switch is placed in this position, the unit
will operate the on the diesel engine. The hour meter
marked with this symbol will accumulate hours when the engine is
running.
This is the symbol representing standby operation. When
the ROAD/STANDBY switch is placed in this position, the
unit will operate in the standby (electric) mode of
operation and the standby hour meter will accumulate hours.
COOL light -- when this is illuminated on the control panel,
the unit is operating in the cool mode. The temperature
inside the body is being lowered to the required set point.
HEAT light -- when illuminated the unit is operating in the
heat mode. The temperature in the body is being raised to
the desired set point.
DEFROST -- when this light is on, the unit is in a defrost
cycle in order to remove ice build-up from the evaporator
coil. In this mode, the temperature on the thermostat
display may rise above set point for a short period of time. This in
normal and the temperature will again start to fall when the defrost
cycle is completed and the unit returns to the COOL cycle. During
defrost air is not circulated inside the body.
MARKS ONLY
NO WORDING
1262--02698
PRE-TRIP INSPECTION
The pre-trip inspection should be performed before picking up any
load. This inspection is essential to anticipate andhelp minimizethe
possibility of “over-the-road” problems. These checks take only a
few minutes.
1. Place the unit’s main switch in the STOP (0) position.
2. Fuel -- drain any water and impurities from the sump of the
refrigeration unit fuel tank by opening the drain-cock located on
the bottom of the tank (if so equipped). Close the valve when
only pure fuel emerges. Check the fuel level in the tank,
ensuring that the fuel supply is adequate for unit operation.
Refuel if necessary.
3. Belts -- Check the belt tension by depressing the belt with your
thumb, near the center of the longest free run of each belt.
Under moderate pressure each belt should deflect
approximately 6 mm to 13mm (1/4 inch to 1/2 inch). If the belts
deflect more than this they should be tightened (loose belts
may slip, generating heat and reducing belt life). If the belts are
too tight they should be loosened; tight belts can reduce
bearing life.
4. Battery -- on unit equipped with serviceable batteries, the level
of the electrolyte in each of the cells should be checked. If the
level is low, distilled water should be added to the correct level.
Most units, however, are equipped with low or no-maintenance
batteries; these should be
inspected to ensure that the
connections are clean and tight,
and the battery hold-down should
be checked for tightness.
5. Engine Oil -- the engine oil should
be checked last since it is
necessary for oil to drain from the
block and into the oil pan to obtain
a correct reading. Remove the
dipstick, wipe it off and re-insert it
fully into the engine block. Once
again, remove the dip-stick and
observe the oil level; it should be
somewhere between the full and
13 62--02698
add marks. If it is below the add mark, add oil until the level is
correct.
6. Over-all Unit -- visually inspect the entire unit for leaks, loose
bolts, frayed, loose, or broken wires, etc. The radiator and
condenser coils of the unit should be free of dirt, bugs,
cardboard, or any other debris that may obstruct airflow across
the coils. The evaporator (located inside the body) should be
free of debris also, especially stretch-wrap, which is often used
during transport to prevent cargo shifting.
7. Truck body -- The body should be inspected prior to loading.
Check the door and vent seals for damage and wear. Inspect
the entire interior and exterior of the body for damage; check
for damage to the inner and outer skins of the body. Damage
to the insulation may compromise the unit’s ability to maintain
the product temperature by increasing the amount of heat gain
across the truck body.
1462--02698
UNIT OPERATION MICROPROCESSOR CONTROLS
MICROPROCESSOR CONTROLS
STARTING THE UNIT
Complete the Pre-Trip Inspection described inthe previoussection.
Road Operation
Place the RUN/STOP (1/0) switch on the cab command in the RUN
(1) position. If the unit has been used previously in the standby
mode, press the road operation button. Under normal
circumstances this is all this is required to start the unit. The unit will
then perform a complete diagnostic check on the microprocessor
controller, pre-heat for the required amount of time based on the
engine temperature and start automatically.
Standby Operation
Be certain that the unit is connected to an appropriate power
source. Move the RUN/STOP (1/0) switch to the RUN (1) position
and depress the STANDBY button. The unit will begin to run on
electric power. See table on page 27 for information on correct
cable for proper operation.
WARNING
Under no circumstances should ether or any other
starting aids be used to start engine.
CHANGING THE SET POINT:
Press the UP ARROW or DOWN ARROW key until the desired set
point is displayed on the left side of the cab command display
window. When the arrow key is released, the set point will begin
flashing; this is a sign that you must press the ENTER key to
confirm the new set point. Otherwise, the set point will revert to the
previously entered set point.
MANUAL DEFROST
Press the MANUAL DEFROST key on the Cab Command; if the
evaporator temperature is cold enough a defrost cycle will be
initiated.
15 62--02698
UNIT OPERATION SOLID-STATE CONTROLS
SOLID-STATE CONTROLS
STARTING THE UNIT
Complete the Pre-Trip Inspection described inthe previoussection.
Road Operation
Place the ROAD/STANDBY switch in the ROAD position.
Place the START/RUN/STOP switch in the RUN position. Press up
on the GLOW/DEFROST switch to energize the glow plugs; this
switch should be held in the glow position for approximately 30
seconds. After 30 seconds, engage the starter by pressing up on
the START/RUN/STOP switch; the unit should start very quickly.
When the unit starts, release the START/RUN/STOP switch,
allowing it to return to the RUN position. Release the
GLOW/DEFROST switch.
If the unit should fail to start after about 15 seconds of starter
engagement, release the START/RUN/STOP switch and
GLOW/DEFROST switch and allow the battery to rest for about 30
seconds, repeat the above procedure.
Standby Operation
Ensure that the unit is connected to an appropriate power source.
Place the ROAD/STANDBY switch in the standby position. Place
the START/RUN/STOP switch in the RUN position. See table on
page 27 for information on correct cable for proper operation.
WARNING
Under no circumstances should ether or any other
starting aids be used to start engine.
CHANGING THE SET POINT
Rotate the knob on the TEMPERATURE SELECTOR until it points
to the desired set point.
MANUAL DEFROST
Momentarily depress the GLOW/DEFROST switch into the
DEFROST position and release it. If the temperature of the
evaporator is cold enough a defrost cycle will be initiated.
1662--02698
PRODUCT LOADING
BEFORE LOADING:
D Pre-cool the body. This will remove much of the heat from the
inside of the body, and give the product better protection when
it is loaded.
D Place the unit in a defrost cycle immediately before loading. This
will remove moisture accumulated on the evaporator coil.
DURING LOADING:
D Turn the unit off!
D Check product temperature during loading.
D Ensure that the air return and supply opening remain
unobstructed.
D Leave approximately 4 to 5 inches between the load and the front
wall for air return to the unit.
D Leave at least 10 to 12 inches between the top of the load and
the
ceiling to ensure that there is nothing to prevent airflow to the
rear of the body
D Load product on pallets to provide free air return to unit and
improve product protection.
Proper air circulation in the truck body, air that can move around
and through the load, is a critical element in maintaining product
quality during transport. If air cannot circulate completely around
the load, hot spots or top-freeze can occur.
The use of pallets is highly recommended. Pallets, when loaded so
air can flow freely through the pallets to return to the evaporator,
help protect the product from heat passing through the floor of the
trailer. When using pallets, it is important to refrain from stacking
extra boxes on the floor at he rear of the trailer, this will cut off the
airflow.
Product stacking is another important factor in protecting the
product. Products that generate heat -- fruits and vegetables, for
example -- should be stacked so the aircan flowthrough theproduct
to remove the heat; this is called “air stacking” the product.
Products that do not create heat -- meats and frozen products --
should be
17 62--02698
stacked tightly in the center of the trailer. All productsshould bekept
away from the side-walls of the body, to allow air flow between the
body and the load; this prevents heat filtering through the walls from
affecting the product.
It is important to check the temperature of the product being loaded
to ensure that it is at the correct temperature for transport. The
refrigeration unit is designed to maintain the temperature of the
product at the temperature at which it was loaded; it was not
designed to cool warm product.
1862--02698
RECOMMENDED TRANSPORT TEMPERATURES
Below are some general recommendations on product transport
temperatures and operating modes for the unit. These are included
for reference only and should not be considered preemptive of the
set point required by the shipper or receiver.
More detailed information can be obtained from your Carrier
Transicold dealer.
Product
set point Range
Operating Mode*Product
_F _C
Operating Mode*
Bananas 55 to 60 13 to 16 Continuous
Fresh fruits and
vegetables
33 to 38 0 to 3 Continuous
Fresh meats and
seafood
28 to 32 --2 to 0
Auto-Start/Stop or
Continuous
Dairy Products 33 to 38 0 to 3
Auto-Start/Stop or
Continuous
Ice 15 to 20 --10 to --7 Auto-Start/Stop
Frozen fruits and
vegetables
0 --18 Auto-Start/Stop
Frozen meats and
seafood
--10 to 0 --23 to 18 Auto-Start/Stop
Ice Cream --20 --29 Auto-Start/Stop
* During delivery cycles that include frequent stops and door
openings, it is recommended that the unit always be operated in the
continuous run mode to help insure product quality. If it is possible,
the unit should be turned off during the time the body doors are
open
to help conserve the product temperature.
19 62--02698
PROBLEMS
Everything possible has been done to ensure that your unit is the
most reliable, trouble-free equipment available today. If, however
you run into problems the following section may be of assistance.
If you do not find the trouble that you have experienced listed,
please call your Carrier Transicold dealer for assistance.
General Problems
Unit won’t crank. Check battery condition.
Check battery connections.
Check all fuses
Unit won’t start. Check fuel level.
Check all fuses
Unit won’t run. Check fuel level.
Check engine oil level.
Check all fuses
Unit stops running. Check belts.
Check engine oil level.
Check coolant level.
Check fuel level.
Check all fuses.
Unit not cooling properly. Defrost unit.
Check evaporator for airflow restriction.
Check condenser for airflow restriction.
Check body for damage or air leaks.
Fault Display on Cab Command
(Microprocessor Controls Only)
Service 1
Service 2
Unit is calling attention to a normal ser-
vice
requirement (oil change, etc.). Normally
this does not require immediate attention.
2062--02698
TROUBLESHOOTING
Fault Display on Cab Command
(Microprocessor Controls Only)
AL0 ENG OIL Low engine oil pressure condition. Check en-
gine oil level.
AL1 ENG HOT The engine has overheated. Check the coolant
level, belts, and radiator coil for air restriction.
AL2 HIGH
PRESS
High compressor discharge pressure. Check all
belts, check condenser coil for airflow obstruc-
tion and cleanliness
AL3 STARTFAIL The engine has failed to start. Check battery,
fuses and fuel level.
AL4 LOW BATT The battery voltage has fallen below 10 VDC.
Check battery.
AL5 HI BATT The battery voltage is above 10 VDC. Check
battery.
AL6 DEFR FAIL The unit is in a defrost override mode.
AL7 ALT AUX The alternator signal is not present with the en-
gine running or with the standby electric mode
active. Check alternator.
AL8 STARTER The starter motor input signal is not present
with the starter solenoid output on. Check start-
er solenoid.
AL9 RA
SENSOR
The return air sensor is not working and the unit
has shut down. Check probe.
AL10 SA
SENSOR
The supply air sensor has been chosen in the
functional parameters and is not working.
AL11 WT
SENSOR
The coolant termperature sensor is not working.
AL12 HIGH CDT The discharge termperature is above 310°F or
340°F if ambient temperature is above 120°F.
AL13 CD
SENSOR
The discharge sensor is not working.
AL14 SBY
MOTOR
The standby motor is overloaded.
AL15 FUSE BAD One of the fuses has low input. Check fuses.
AL16 SYS CHK
After Rev.
3.221
Low refrigerant pressure detected. Have sys-
tem checked for leaks.
21 62--02698
AL17 DISPLAY Communication between main board and the
display board has been interrupted.
AL18 SERVICE 1 Hour meter is greater than maintenance hour
meter 1.
AL19 SERVICE 2 Hour meter is greater than maintenance hour
meter 2.
AL20 RAS OUT Box temperature is Out--of--Range.
AL23
SYS CHK
Prior to Rev.
3.21
Low refrigerant pressure detected. Have sys-
tem checked for leaks.
AL23
NO POWER
After Rev.
3.21
No AC power when unit is in Standby.
2262--02698
MICROPROCESSOR CONTROL FUSES
PRE--GLOBAL MODEL (--0)
The fuses that protect the circuits of the Microprocessor control
system are located in the control box on the roadside of the unit.
They may be accessed by loosening the screws that hold the
control panel closed.
F3
F4
F5
F6
F7
F8
F9
F10
F2
F1
Fuse Purpose
Capacity
(Amps)
F1 Main protection fuse 80A
F2 Microprocessor fuse 5A
F3 Secondary fuse 25A
F4 Speed control solenoid 15A
F5 Auto-restart and defrost lights 7.5A
F6 Fault light 5A
F7 Evaporator fan 1 15A
F8 Evaporator fan 2 15A
F9 Evaporator fan 3 15A
F10 Fuel heater 25A
23 62--02698
MICROPROCESSOR CONTROL FUSES
GLOBAL MODEL (--A)
The fuses that protect the circuits of the Microprocessor control
system are located in the control box on the roadside of the unit.
They may be accessed by loosening the screws that hold the
control panel closed.
F2
F1
F3
F4 F5
F8
F7
F6
Fuse Purpose
Capacity
(Amps)
F1 Main protection fuse 80A
F2 Microprocessor fuse 5A
F3 Secondary fuse 25A
F4 Speed control solenoid 15A
F5 Defrost Damper solenoid 15A
F6 Evaporator fan motor 1 20A
F7 Evaporator fan motor 2 20A
F8 Evaporator fan motor 3 20A
2462--02698
SOLID-STATE CONTROL FUSES
The fuses that protect the circuits of the Solid-state control system
are located in the control box on the roadside of the unit. They may
be accessed by loosening the screws that hold the control panel
closed.
F3
F4
F5
F6
F7
F8
F9
F2
F1
Fuse Purpose
Capacity
(Amps)
F1 Main protection fuse 80A
F2 Solid-state control fuse 20A
F3 Secondary fuse 20A
F4 Fuel heater 25A
F5 Evaporator fan 1 20A
F6 Evaporator fan 2 20A
F7 Evaporator fan 3 20A
F8 Future --
F9 Fuel pump and run solenoid 15A
25 62--02698
INTEGRATED CIRCUIT BOARD
The fuses that protect the circuits of the Microprocessor control
system are located in the control box on the roadside of the unit.
They may be accessed by loosening the screws that hold the
control panel closed.
F2
F1
F3
F4
F5
F8
F7
F6
F10F9
Fuse Purpose
Capacity
(Amps)
F1 Main protection fuse 80A
F2 Microprocessor fuse 5A
F3
Run solenoid, Evaporator fan power
transistor
15A
F4 Hot gas solenoid 1 & 2 5A
F5 Speed Control solenoid 10A
F6 Compressor Unloader (844) 5A
F7 Defrost damper solenoid 15A
F8 Evaporator fan motor 1 20A
F9 Evaporator fan motor 2 20A
F10 Evaporator fan motor 3 20A
2662--02698
UNIT MAINTENANCE
Engine oil -- the oils recommended for use in your refrigeration unit
must comply with the American Petroleum Institute’s (API) SG/CD
rating. The use of any oil that does not meet this rating may affect
the warranty on the engine in the unit. The use of oil of the proper
weight (viscosity) is also essential. The following chart indicates the
SAE Weight Rating of the oil to be used in various climates:
_F
_C
10W or 10W30
20W or 15W40
30W or
15W40
The following oils are approved for use in the Supra range of units:
In the US, Canada Mexico, Central and South America, any oil that
meets the above API specification is suitable for use in the Supra
range of units.
27 62--02698
UNIT MAINTENANCE SCHEDULE
For the most reliable operation and for maximum life, your unit
requires regular maintenance. This includes oil and filter changes,
fuel and air filter replacement, coolant replacement. Maintenance
should be performed on the following schedule:
SERVICE
SUPRA 422
Every 500 Hours
SUPRA 622/644/
722/744/844
Every 750 Hours
SUPRA 922/944
Every 1000
Hours
D Drain the engine oil, replace oil filter and by-
pass filter (if so equipped). *
D Check engine cooling system.
D Clean air cleaner and change air cleaner oil.
D Check all bolts, screws and unit mounting bolts
for tightness. Tighten as required.
D Check all belts.
D Replace fuel filter.
D Clean fuel pump filter.
SUPRA 422
Every 1000
Hours
SUPRA 622/644/
722/744/844/922/
944
Every 1500
Hours
D Check battery terminals and fluid level.
D Check compressor oil level.
D Check alternator brushes.
D Check engine thermostat.
D Check defrost:
-- Check timer setting and function
-- Check refrigerant control valves
-- Fans stop or defrost damper closes
-- Defrost ends automatically
-- Water drains from evaporator
D Check fan motor brushes.
D Check and adjust rocker arms.
D Check belts as necessary.
SUPRA 422
Every 2000
Hours
SUPRA 622/644
722/744/844/922/
944
Every 3000
Hours
D Clean radiator and condenser.
D Check engine speed under load:
Supra 422 -- 2300/1800 rpm
Supra 622/644 -- 2050/1800 rpm
Supra 722 /744-- 2200/1800 rpm
Supra 922/944 -- 2250/1800 rpm
D Check fan motor brushes.
D Check alternator.
D Clean and adjust fuel injectors.
* These hours for oil change are based on units lubricated with
conventional oil. The required oil change for units lubricated with
Delvac 1 synthetic oil should be done at twice the run time as listed
above. New oil filters are required at 1 year intervals.
2862--02698
SERVICE
SUPRA
All Models
every 3750 hours
D Check all belt tension pulleys.
D Change anti-freeze.
D Check bearings in clutch(es) and electric
motors.
These maintenance schedules are based on the use of approved
oils and regular Pre-Trip inspections of the unit. Failure to follow the
recommended maintenance schedule may affect the life and
reliability of the refrigeration unit.
In addition to the above service requirements please adhere to the
following:
D Conventional engine oils should be changed at least once per
year, even if the engine has not run the necessary number of
hours.
D Delvac 1 synthetic oil should be changed at least once every
two years, even if the engine has not run the necessary number
of hours.
D The coolant (anti-freeze) should be replaced or recycled every
two years.
A more detailed description of service requirements and
procedures can be found in the Service and Operations Manual for
your unit. This manual may be obtained from any Carrier Transicold
dealer.
29 62--02698
STANDBY OPERATION GUIDELINES
For safe, reliable operation in Standby mode, it is important to
follow a few guidelines:
D Never plug the unit in to the power source with the main switch
in the RUN position. The main switch should always be in the
STOP position when connecting the unit to the power source.
D The circuit breaker and extension cable used for Standby
operation should conform to the following:
Unit
Operating
Voltage
FLA
Rating
Circuit
Breaker
Capacity
Cable
Requirement
Supra 422
208/230 V
60 hz
3 phase
13.7 A 30 A
8/3 with
ground
(up to 50 ft)
Supra 422
460 V 60 hz
3 phase
7.1 A 20 A
10/3 with
ground
(up to 75 ft)
Supra
622/644
208/230 V
60 hz
3 phase
23 A 50 A
8/3 with
ground
(up to 50 ft)622/644
722/744
844 460 V 60 hz
3 phase
13 A 30 A
10/3 with
ground
(up to 75 ft)
Supra
208/230 V
60 hz
3 phase
38.6 A 50 A
8/3 with
ground
(up to 50 ft)Supra
922/944
460 V 60 hz
3 phase
23 A 30 A
10/3 with
ground
(up to 75 ft)
D When multiple units are in use, each unit must be operated
on its own electrical circuit. You should never operate more
than one unit on a circuit breaker.
Important note: This information is provided as a guideline only.
When preparing a circuit for operation of the refrigeration unit, a
licensed electrician should be contracted. A licensed electrician is
familiar with all local ordinances and special requirements for your
area and can ensure that the circuits are properly designed and
installed, and that connections are correct.
3062--02698
EMERGENCY ROAD SERVICE
At Carrier Transicold we’re working hard to give you complete
service when and where you need it. That means a worldwide
network of dealers that offer 24-hour emergency service. These
service centers are manned by factory trained service personnel
and backed by extensive parts inventories that will assure you of
prompt repair.
Should you experience a unit problem with your refrigeration unit
during transit, follow your company’s emergency procedure or
contact the nearest Carrier Transicold service center. Consult the
Shortstop Service Centers directory to locate the service center
nearest you. This directory may be obtained from your Carrier
Transicold dealer.
If you are unable to reach a service center, call our 24-hour Action
Line:
Call (800) 448-1661 from any phone in the United States or
Canada. When calling, please have the following information ready
for fastest service:
S Your name, the name of your company, and your location.
S A telephone number where you can be called back.
S Refrigeration unit model number and serial number.
S Box temperature, set point and product.
S Brief description of the problem you are having, and what you
have already done to correct the problem.
We will do everything we can to get your problem taken care of and
get you back on the road.
ã2004 Carrier Corporation D Printed in U. S. A. 0304
Carrier Transicold Division,
Carrier Corporation
Truck/Trailer Products Group
P.O. Box 4805
Syracuse, N.Y. 13221 U.S A
www.carrier.transicold.com
North America
Carrier Transicold
700 Olympic Drive
Athens, GA 30601 USA
Tel: 1--706--546--6469
Fax: 1--706--546--5207
Central America
and Mexico
Ejercito Nacional No. 418
Piso 9, Torre Yumal
Col. Chapultepec Morales
11570 Mexico, D.F.
Tel: (5255) 9126.0300
Fax: (5255) 9126.0373
A member of the United Technologies Corporation family. Stock symbol UTX
CALIFORNIA
Proposition 65 Warning
Diesel engine exhaust and some of
its constituents are known to the
State of California to cause cancer,
birth defects,and other reproductive
harm.

More Related Content

What's hot

manual de toyota (1)
manual de  toyota (1)manual de  toyota (1)
manual de toyota (1)
Jordan Felipe Cabrera Nuñez
 
PERKINS 2000 SERIES 2006 DIESEL ENGINE(model 2006TG2A)Service Repair Manual
PERKINS 2000 SERIES 2006 DIESEL ENGINE(model 2006TG2A)Service Repair ManualPERKINS 2000 SERIES 2006 DIESEL ENGINE(model 2006TG2A)Service Repair Manual
PERKINS 2000 SERIES 2006 DIESEL ENGINE(model 2006TG2A)Service Repair Manual
hjnskmdje
 
Sistema electrico
Sistema electricoSistema electrico
Sistema electrico
cildaisabel
 
New holland tl100 a tractor service repair manual
New holland tl100 a tractor service repair manualNew holland tl100 a tractor service repair manual
New holland tl100 a tractor service repair manual
uudjjjkskkmem
 
Manual de Partes Cargador de Ruedas 938G II Caterpillar - www.oroscocat.com
Manual de Partes Cargador de Ruedas 938G II Caterpillar -  www.oroscocat.comManual de Partes Cargador de Ruedas 938G II Caterpillar -  www.oroscocat.com
Manual de Partes Cargador de Ruedas 938G II Caterpillar - www.oroscocat.com
Corporación www.oroscocat.com - Maquinaria Pesada.org
 
Caterpillar cat 420 e backhoe loader parts catalogue manual
Caterpillar cat 420 e backhoe loader parts catalogue manualCaterpillar cat 420 e backhoe loader parts catalogue manual
Caterpillar cat 420 e backhoe loader parts catalogue manual
didkkmmdm
 
Kode error-dan-manual-kelistrikan-mesin-3 sz-ve-k3-ve
Kode error-dan-manual-kelistrikan-mesin-3 sz-ve-k3-veKode error-dan-manual-kelistrikan-mesin-3 sz-ve-k3-ve
Kode error-dan-manual-kelistrikan-mesin-3 sz-ve-k3-ve
Agus Irawan
 
Volvo wiring diagram fh
Volvo wiring diagram fhVolvo wiring diagram fh
Volvo wiring diagram fh
Sergio Andres Aburto
 
Perkins 2200 series 2206 f e13ta industrial engine (model pp3 engine)service ...
Perkins 2200 series 2206 f e13ta industrial engine (model pp3 engine)service ...Perkins 2200 series 2206 f e13ta industrial engine (model pp3 engine)service ...
Perkins 2200 series 2206 f e13ta industrial engine (model pp3 engine)service ...
jksnmdm
 
Jcb 540 170 telescopic handler service repair manual from 2902000
Jcb 540 170 telescopic handler service repair manual from 2902000Jcb 540 170 telescopic handler service repair manual from 2902000
Jcb 540 170 telescopic handler service repair manual from 2902000
dufjsjekkkemm
 
MANUAL ENGINE 1/2KD-FTV TOYOTA SISTEMA COMNON RAIL
MANUAL ENGINE 1/2KD-FTV TOYOTA SISTEMA COMNON RAILMANUAL ENGINE 1/2KD-FTV TOYOTA SISTEMA COMNON RAIL
MANUAL ENGINE 1/2KD-FTV TOYOTA SISTEMA COMNON RAILInês Krug
 
Manual scania-diagramas-electricos-autobuses (1)
Manual scania-diagramas-electricos-autobuses (1)Manual scania-diagramas-electricos-autobuses (1)
Manual scania-diagramas-electricos-autobuses (1)
Fredy Muñoz
 
New Holland B90B Backhoe Loader Parts Catalogue Manual
New Holland B90B Backhoe Loader Parts Catalogue ManualNew Holland B90B Backhoe Loader Parts Catalogue Manual
New Holland B90B Backhoe Loader Parts Catalogue Manual
hjnnsemmm
 
Cajas de cambios manuales vt2214 b vt2514b y vt2814b
Cajas de cambios manuales vt2214 b vt2514b y vt2814bCajas de cambios manuales vt2214 b vt2514b y vt2814b
Cajas de cambios manuales vt2214 b vt2514b y vt2814b
jjhernandezch
 
Sistema de arranque y carga
Sistema de arranque y cargaSistema de arranque y carga
Sistema de arranque y carga
cildaisabel
 
Manual de Serviço
Manual de ServiçoManual de Serviço
Manual de Serviço
cerjs
 
Isuzu diesel-engine-4 ja1-and-4jb1
Isuzu diesel-engine-4 ja1-and-4jb1Isuzu diesel-engine-4 ja1-and-4jb1
Isuzu diesel-engine-4 ja1-and-4jb1
Yoga Ariant
 
Ddec pin dat
Ddec pin datDdec pin dat
Ddec pin dat
eckardguendel
 
MB - Om 926 LA
MB - Om 926 LAMB - Om 926 LA
MB - Om 926 LA
Jotta Castro
 
Zf error codes (1)
Zf error codes (1)Zf error codes (1)
Zf error codes (1)
Rached Douahchia
 

What's hot (20)

manual de toyota (1)
manual de  toyota (1)manual de  toyota (1)
manual de toyota (1)
 
PERKINS 2000 SERIES 2006 DIESEL ENGINE(model 2006TG2A)Service Repair Manual
PERKINS 2000 SERIES 2006 DIESEL ENGINE(model 2006TG2A)Service Repair ManualPERKINS 2000 SERIES 2006 DIESEL ENGINE(model 2006TG2A)Service Repair Manual
PERKINS 2000 SERIES 2006 DIESEL ENGINE(model 2006TG2A)Service Repair Manual
 
Sistema electrico
Sistema electricoSistema electrico
Sistema electrico
 
New holland tl100 a tractor service repair manual
New holland tl100 a tractor service repair manualNew holland tl100 a tractor service repair manual
New holland tl100 a tractor service repair manual
 
Manual de Partes Cargador de Ruedas 938G II Caterpillar - www.oroscocat.com
Manual de Partes Cargador de Ruedas 938G II Caterpillar -  www.oroscocat.comManual de Partes Cargador de Ruedas 938G II Caterpillar -  www.oroscocat.com
Manual de Partes Cargador de Ruedas 938G II Caterpillar - www.oroscocat.com
 
Caterpillar cat 420 e backhoe loader parts catalogue manual
Caterpillar cat 420 e backhoe loader parts catalogue manualCaterpillar cat 420 e backhoe loader parts catalogue manual
Caterpillar cat 420 e backhoe loader parts catalogue manual
 
Kode error-dan-manual-kelistrikan-mesin-3 sz-ve-k3-ve
Kode error-dan-manual-kelistrikan-mesin-3 sz-ve-k3-veKode error-dan-manual-kelistrikan-mesin-3 sz-ve-k3-ve
Kode error-dan-manual-kelistrikan-mesin-3 sz-ve-k3-ve
 
Volvo wiring diagram fh
Volvo wiring diagram fhVolvo wiring diagram fh
Volvo wiring diagram fh
 
Perkins 2200 series 2206 f e13ta industrial engine (model pp3 engine)service ...
Perkins 2200 series 2206 f e13ta industrial engine (model pp3 engine)service ...Perkins 2200 series 2206 f e13ta industrial engine (model pp3 engine)service ...
Perkins 2200 series 2206 f e13ta industrial engine (model pp3 engine)service ...
 
Jcb 540 170 telescopic handler service repair manual from 2902000
Jcb 540 170 telescopic handler service repair manual from 2902000Jcb 540 170 telescopic handler service repair manual from 2902000
Jcb 540 170 telescopic handler service repair manual from 2902000
 
MANUAL ENGINE 1/2KD-FTV TOYOTA SISTEMA COMNON RAIL
MANUAL ENGINE 1/2KD-FTV TOYOTA SISTEMA COMNON RAILMANUAL ENGINE 1/2KD-FTV TOYOTA SISTEMA COMNON RAIL
MANUAL ENGINE 1/2KD-FTV TOYOTA SISTEMA COMNON RAIL
 
Manual scania-diagramas-electricos-autobuses (1)
Manual scania-diagramas-electricos-autobuses (1)Manual scania-diagramas-electricos-autobuses (1)
Manual scania-diagramas-electricos-autobuses (1)
 
New Holland B90B Backhoe Loader Parts Catalogue Manual
New Holland B90B Backhoe Loader Parts Catalogue ManualNew Holland B90B Backhoe Loader Parts Catalogue Manual
New Holland B90B Backhoe Loader Parts Catalogue Manual
 
Cajas de cambios manuales vt2214 b vt2514b y vt2814b
Cajas de cambios manuales vt2214 b vt2514b y vt2814bCajas de cambios manuales vt2214 b vt2514b y vt2814b
Cajas de cambios manuales vt2214 b vt2514b y vt2814b
 
Sistema de arranque y carga
Sistema de arranque y cargaSistema de arranque y carga
Sistema de arranque y carga
 
Manual de Serviço
Manual de ServiçoManual de Serviço
Manual de Serviço
 
Isuzu diesel-engine-4 ja1-and-4jb1
Isuzu diesel-engine-4 ja1-and-4jb1Isuzu diesel-engine-4 ja1-and-4jb1
Isuzu diesel-engine-4 ja1-and-4jb1
 
Ddec pin dat
Ddec pin datDdec pin dat
Ddec pin dat
 
MB - Om 926 LA
MB - Om 926 LAMB - Om 926 LA
MB - Om 926 LA
 
Zf error codes (1)
Zf error codes (1)Zf error codes (1)
Zf error codes (1)
 

Similar to Manual supra carrier

Zf ecomat and-ecomat_2
Zf ecomat and-ecomat_2Zf ecomat and-ecomat_2
Zf ecomat and-ecomat_2
Joendry Chirinos Colina
 
Toro groundsmaster 360 service repair manual
Toro groundsmaster 360 service repair manualToro groundsmaster 360 service repair manual
Toro groundsmaster 360 service repair manual
fjskkdmmmse
 
Toro groundsmaster 360 service repair manual
Toro groundsmaster 360 service repair manualToro groundsmaster 360 service repair manual
Toro groundsmaster 360 service repair manual
ufjsjefjkkemd
 
Toro groundsmaster 360 service repair manual
Toro groundsmaster 360 service repair manualToro groundsmaster 360 service repair manual
Toro groundsmaster 360 service repair manual
fjsjekfkselmm
 
Bobcat 721 Skid Steer Loader Service Repair Manual.pdf
Bobcat 721 Skid Steer Loader Service Repair Manual.pdfBobcat 721 Skid Steer Loader Service Repair Manual.pdf
Bobcat 721 Skid Steer Loader Service Repair Manual.pdf
fujskmdidjd3e
 
Bobcat 722 Skid Steer Loader Service Repair Manual.pdf
Bobcat 722 Skid Steer Loader Service Repair Manual.pdfBobcat 722 Skid Steer Loader Service Repair Manual.pdf
Bobcat 722 Skid Steer Loader Service Repair Manual.pdf
fujskmdidjd3e
 
Bobcat 700 Skid Steer Loader Service Repair Manual.pdf
Bobcat 700 Skid Steer Loader Service Repair Manual.pdfBobcat 700 Skid Steer Loader Service Repair Manual.pdf
Bobcat 700 Skid Steer Loader Service Repair Manual.pdf
qota89783037
 
Bobcat 700 Skid Steer Loader Service Repair Manual.pdf
Bobcat 700 Skid Steer Loader Service Repair Manual.pdfBobcat 700 Skid Steer Loader Service Repair Manual.pdf
Bobcat 700 Skid Steer Loader Service Repair Manual.pdf
fujskmdidjd3e
 
Bobcat 721 Skid Steer Loader Service Repair Manual.pdf
Bobcat 721 Skid Steer Loader Service Repair Manual.pdfBobcat 721 Skid Steer Loader Service Repair Manual.pdf
Bobcat 721 Skid Steer Loader Service Repair Manual.pdf
qota89783037
 
Bobcat 722 Skid Steer Loader Service Repair Manual.pdf
Bobcat 722 Skid Steer Loader Service Repair Manual.pdfBobcat 722 Skid Steer Loader Service Repair Manual.pdf
Bobcat 722 Skid Steer Loader Service Repair Manual.pdf
qota89783037
 
Grand vitara en ingles
Grand vitara en inglesGrand vitara en ingles
Grand vitara en inglesRonald Garcia
 
2009 NISSAN QUEST Service Repair Manual.pdf
2009 NISSAN QUEST Service Repair Manual.pdf2009 NISSAN QUEST Service Repair Manual.pdf
2009 NISSAN QUEST Service Repair Manual.pdf
fbrx388606
 
Komatsu pc400 lc 7l galeo hydraulic excavator service repair manual (a86001 a...
Komatsu pc400 lc 7l galeo hydraulic excavator service repair manual (a86001 a...Komatsu pc400 lc 7l galeo hydraulic excavator service repair manual (a86001 a...
Komatsu pc400 lc 7l galeo hydraulic excavator service repair manual (a86001 a...
dfujsjefjkskemm
 
Komatsu pc400 lc 7l galeo hydraulic excavator service repair manual (a86001 a...
Komatsu pc400 lc 7l galeo hydraulic excavator service repair manual (a86001 a...Komatsu pc400 lc 7l galeo hydraulic excavator service repair manual (a86001 a...
Komatsu pc400 lc 7l galeo hydraulic excavator service repair manual (a86001 a...
fjjskdmnenemm
 
Komatsu pc400 lc 7l galeo hydraulic excavator service repair manual (a86001 a...
Komatsu pc400 lc 7l galeo hydraulic excavator service repair manual (a86001 a...Komatsu pc400 lc 7l galeo hydraulic excavator service repair manual (a86001 a...
Komatsu pc400 lc 7l galeo hydraulic excavator service repair manual (a86001 a...
fjjsekmsmmes
 
Komatsu pc400 lc 7l galeo hydraulic excavator service repair manual (a86001 a...
Komatsu pc400 lc 7l galeo hydraulic excavator service repair manual (a86001 a...Komatsu pc400 lc 7l galeo hydraulic excavator service repair manual (a86001 a...
Komatsu pc400 lc 7l galeo hydraulic excavator service repair manual (a86001 a...
ufjjdjkkskemmd
 
Komatsu pc400 lc 7l galeo hydraulic excavator service repair manual (a86001 a...
Komatsu pc400 lc 7l galeo hydraulic excavator service repair manual (a86001 a...Komatsu pc400 lc 7l galeo hydraulic excavator service repair manual (a86001 a...
Komatsu pc400 lc 7l galeo hydraulic excavator service repair manual (a86001 a...
fujsjefjskkem
 
Bobcat s220 skid steer loader service repair manual sn 530711001 & above
Bobcat s220 skid steer loader service repair manual sn 530711001 & aboveBobcat s220 skid steer loader service repair manual sn 530711001 & above
Bobcat s220 skid steer loader service repair manual sn 530711001 & above
fjskemedcdmme
 
Toro groundsmaster 7210 service repair manual
Toro groundsmaster 7210 service repair manualToro groundsmaster 7210 service repair manual
Toro groundsmaster 7210 service repair manual
fujsjejfkskekem
 
Toro groundsmaster 7210 service repair manual
Toro groundsmaster 7210 service repair manualToro groundsmaster 7210 service repair manual
Toro groundsmaster 7210 service repair manual
fujdjsfjkskeemem
 

Similar to Manual supra carrier (20)

Zf ecomat and-ecomat_2
Zf ecomat and-ecomat_2Zf ecomat and-ecomat_2
Zf ecomat and-ecomat_2
 
Toro groundsmaster 360 service repair manual
Toro groundsmaster 360 service repair manualToro groundsmaster 360 service repair manual
Toro groundsmaster 360 service repair manual
 
Toro groundsmaster 360 service repair manual
Toro groundsmaster 360 service repair manualToro groundsmaster 360 service repair manual
Toro groundsmaster 360 service repair manual
 
Toro groundsmaster 360 service repair manual
Toro groundsmaster 360 service repair manualToro groundsmaster 360 service repair manual
Toro groundsmaster 360 service repair manual
 
Bobcat 721 Skid Steer Loader Service Repair Manual.pdf
Bobcat 721 Skid Steer Loader Service Repair Manual.pdfBobcat 721 Skid Steer Loader Service Repair Manual.pdf
Bobcat 721 Skid Steer Loader Service Repair Manual.pdf
 
Bobcat 722 Skid Steer Loader Service Repair Manual.pdf
Bobcat 722 Skid Steer Loader Service Repair Manual.pdfBobcat 722 Skid Steer Loader Service Repair Manual.pdf
Bobcat 722 Skid Steer Loader Service Repair Manual.pdf
 
Bobcat 700 Skid Steer Loader Service Repair Manual.pdf
Bobcat 700 Skid Steer Loader Service Repair Manual.pdfBobcat 700 Skid Steer Loader Service Repair Manual.pdf
Bobcat 700 Skid Steer Loader Service Repair Manual.pdf
 
Bobcat 700 Skid Steer Loader Service Repair Manual.pdf
Bobcat 700 Skid Steer Loader Service Repair Manual.pdfBobcat 700 Skid Steer Loader Service Repair Manual.pdf
Bobcat 700 Skid Steer Loader Service Repair Manual.pdf
 
Bobcat 721 Skid Steer Loader Service Repair Manual.pdf
Bobcat 721 Skid Steer Loader Service Repair Manual.pdfBobcat 721 Skid Steer Loader Service Repair Manual.pdf
Bobcat 721 Skid Steer Loader Service Repair Manual.pdf
 
Bobcat 722 Skid Steer Loader Service Repair Manual.pdf
Bobcat 722 Skid Steer Loader Service Repair Manual.pdfBobcat 722 Skid Steer Loader Service Repair Manual.pdf
Bobcat 722 Skid Steer Loader Service Repair Manual.pdf
 
Grand vitara en ingles
Grand vitara en inglesGrand vitara en ingles
Grand vitara en ingles
 
2009 NISSAN QUEST Service Repair Manual.pdf
2009 NISSAN QUEST Service Repair Manual.pdf2009 NISSAN QUEST Service Repair Manual.pdf
2009 NISSAN QUEST Service Repair Manual.pdf
 
Komatsu pc400 lc 7l galeo hydraulic excavator service repair manual (a86001 a...
Komatsu pc400 lc 7l galeo hydraulic excavator service repair manual (a86001 a...Komatsu pc400 lc 7l galeo hydraulic excavator service repair manual (a86001 a...
Komatsu pc400 lc 7l galeo hydraulic excavator service repair manual (a86001 a...
 
Komatsu pc400 lc 7l galeo hydraulic excavator service repair manual (a86001 a...
Komatsu pc400 lc 7l galeo hydraulic excavator service repair manual (a86001 a...Komatsu pc400 lc 7l galeo hydraulic excavator service repair manual (a86001 a...
Komatsu pc400 lc 7l galeo hydraulic excavator service repair manual (a86001 a...
 
Bobcat s220 skid steer loader service repair manual sn 530711001 & above
Bobcat s220 skid steer loader service repair manual sn 530711001 & aboveBobcat s220 skid steer loader service repair manual sn 530711001 & above
Bobcat s220 skid steer loader service repair manual sn 530711001 & above
 
Toro groundsmaster 7210 service repair manual
Toro groundsmaster 7210 service repair manualToro groundsmaster 7210 service repair manual
Toro groundsmaster 7210 service repair manual
 
Toro groundsmaster 7210 service repair manual
Toro groundsmaster 7210 service repair manualToro groundsmaster 7210 service repair manual
Toro groundsmaster 7210 service repair manual
 

Recently uploaded

Investor-Presentation-Q1FY2024 investor presentation document.pptx
Investor-Presentation-Q1FY2024 investor presentation document.pptxInvestor-Presentation-Q1FY2024 investor presentation document.pptx
Investor-Presentation-Q1FY2024 investor presentation document.pptx
AmarGB2
 
power quality voltage fluctuation UNIT - I.pptx
power quality voltage fluctuation UNIT - I.pptxpower quality voltage fluctuation UNIT - I.pptx
power quality voltage fluctuation UNIT - I.pptx
ViniHema
 
Architectural Portfolio Sean Lockwood
Architectural Portfolio Sean LockwoodArchitectural Portfolio Sean Lockwood
Architectural Portfolio Sean Lockwood
seandesed
 
J.Yang, ICLR 2024, MLILAB, KAIST AI.pdf
J.Yang,  ICLR 2024, MLILAB, KAIST AI.pdfJ.Yang,  ICLR 2024, MLILAB, KAIST AI.pdf
J.Yang, ICLR 2024, MLILAB, KAIST AI.pdf
MLILAB
 
RAT: Retrieval Augmented Thoughts Elicit Context-Aware Reasoning in Long-Hori...
RAT: Retrieval Augmented Thoughts Elicit Context-Aware Reasoning in Long-Hori...RAT: Retrieval Augmented Thoughts Elicit Context-Aware Reasoning in Long-Hori...
RAT: Retrieval Augmented Thoughts Elicit Context-Aware Reasoning in Long-Hori...
thanhdowork
 
Gen AI Study Jams _ For the GDSC Leads in India.pdf
Gen AI Study Jams _ For the GDSC Leads in India.pdfGen AI Study Jams _ For the GDSC Leads in India.pdf
Gen AI Study Jams _ For the GDSC Leads in India.pdf
gdsczhcet
 
Fundamentals of Electric Drives and its applications.pptx
Fundamentals of Electric Drives and its applications.pptxFundamentals of Electric Drives and its applications.pptx
Fundamentals of Electric Drives and its applications.pptx
manasideore6
 
The role of big data in decision making.
The role of big data in decision making.The role of big data in decision making.
The role of big data in decision making.
ankuprajapati0525
 
road safety engineering r s e unit 3.pdf
road safety engineering  r s e unit 3.pdfroad safety engineering  r s e unit 3.pdf
road safety engineering r s e unit 3.pdf
VENKATESHvenky89705
 
Runway Orientation Based on the Wind Rose Diagram.pptx
Runway Orientation Based on the Wind Rose Diagram.pptxRunway Orientation Based on the Wind Rose Diagram.pptx
Runway Orientation Based on the Wind Rose Diagram.pptx
SupreethSP4
 
Pile Foundation by Venkatesh Taduvai (Sub Geotechnical Engineering II)-conver...
Pile Foundation by Venkatesh Taduvai (Sub Geotechnical Engineering II)-conver...Pile Foundation by Venkatesh Taduvai (Sub Geotechnical Engineering II)-conver...
Pile Foundation by Venkatesh Taduvai (Sub Geotechnical Engineering II)-conver...
AJAYKUMARPUND1
 
Governing Equations for Fundamental Aerodynamics_Anderson2010.pdf
Governing Equations for Fundamental Aerodynamics_Anderson2010.pdfGoverning Equations for Fundamental Aerodynamics_Anderson2010.pdf
Governing Equations for Fundamental Aerodynamics_Anderson2010.pdf
WENKENLI1
 
Sachpazis:Terzaghi Bearing Capacity Estimation in simple terms with Calculati...
Sachpazis:Terzaghi Bearing Capacity Estimation in simple terms with Calculati...Sachpazis:Terzaghi Bearing Capacity Estimation in simple terms with Calculati...
Sachpazis:Terzaghi Bearing Capacity Estimation in simple terms with Calculati...
Dr.Costas Sachpazis
 
Hybrid optimization of pumped hydro system and solar- Engr. Abdul-Azeez.pdf
Hybrid optimization of pumped hydro system and solar- Engr. Abdul-Azeez.pdfHybrid optimization of pumped hydro system and solar- Engr. Abdul-Azeez.pdf
Hybrid optimization of pumped hydro system and solar- Engr. Abdul-Azeez.pdf
fxintegritypublishin
 
Immunizing Image Classifiers Against Localized Adversary Attacks
Immunizing Image Classifiers Against Localized Adversary AttacksImmunizing Image Classifiers Against Localized Adversary Attacks
Immunizing Image Classifiers Against Localized Adversary Attacks
gerogepatton
 
Water Industry Process Automation and Control Monthly - May 2024.pdf
Water Industry Process Automation and Control Monthly - May 2024.pdfWater Industry Process Automation and Control Monthly - May 2024.pdf
Water Industry Process Automation and Control Monthly - May 2024.pdf
Water Industry Process Automation & Control
 
一比一原版(SFU毕业证)西蒙菲莎大学毕业证成绩单如何办理
一比一原版(SFU毕业证)西蒙菲莎大学毕业证成绩单如何办理一比一原版(SFU毕业证)西蒙菲莎大学毕业证成绩单如何办理
一比一原版(SFU毕业证)西蒙菲莎大学毕业证成绩单如何办理
bakpo1
 
English lab ppt no titlespecENG PPTt.pdf
English lab ppt no titlespecENG PPTt.pdfEnglish lab ppt no titlespecENG PPTt.pdf
English lab ppt no titlespecENG PPTt.pdf
BrazilAccount1
 
Student information management system project report ii.pdf
Student information management system project report ii.pdfStudent information management system project report ii.pdf
Student information management system project report ii.pdf
Kamal Acharya
 
DESIGN A COTTON SEED SEPARATION MACHINE.docx
DESIGN A COTTON SEED SEPARATION MACHINE.docxDESIGN A COTTON SEED SEPARATION MACHINE.docx
DESIGN A COTTON SEED SEPARATION MACHINE.docx
FluxPrime1
 

Recently uploaded (20)

Investor-Presentation-Q1FY2024 investor presentation document.pptx
Investor-Presentation-Q1FY2024 investor presentation document.pptxInvestor-Presentation-Q1FY2024 investor presentation document.pptx
Investor-Presentation-Q1FY2024 investor presentation document.pptx
 
power quality voltage fluctuation UNIT - I.pptx
power quality voltage fluctuation UNIT - I.pptxpower quality voltage fluctuation UNIT - I.pptx
power quality voltage fluctuation UNIT - I.pptx
 
Architectural Portfolio Sean Lockwood
Architectural Portfolio Sean LockwoodArchitectural Portfolio Sean Lockwood
Architectural Portfolio Sean Lockwood
 
J.Yang, ICLR 2024, MLILAB, KAIST AI.pdf
J.Yang,  ICLR 2024, MLILAB, KAIST AI.pdfJ.Yang,  ICLR 2024, MLILAB, KAIST AI.pdf
J.Yang, ICLR 2024, MLILAB, KAIST AI.pdf
 
RAT: Retrieval Augmented Thoughts Elicit Context-Aware Reasoning in Long-Hori...
RAT: Retrieval Augmented Thoughts Elicit Context-Aware Reasoning in Long-Hori...RAT: Retrieval Augmented Thoughts Elicit Context-Aware Reasoning in Long-Hori...
RAT: Retrieval Augmented Thoughts Elicit Context-Aware Reasoning in Long-Hori...
 
Gen AI Study Jams _ For the GDSC Leads in India.pdf
Gen AI Study Jams _ For the GDSC Leads in India.pdfGen AI Study Jams _ For the GDSC Leads in India.pdf
Gen AI Study Jams _ For the GDSC Leads in India.pdf
 
Fundamentals of Electric Drives and its applications.pptx
Fundamentals of Electric Drives and its applications.pptxFundamentals of Electric Drives and its applications.pptx
Fundamentals of Electric Drives and its applications.pptx
 
The role of big data in decision making.
The role of big data in decision making.The role of big data in decision making.
The role of big data in decision making.
 
road safety engineering r s e unit 3.pdf
road safety engineering  r s e unit 3.pdfroad safety engineering  r s e unit 3.pdf
road safety engineering r s e unit 3.pdf
 
Runway Orientation Based on the Wind Rose Diagram.pptx
Runway Orientation Based on the Wind Rose Diagram.pptxRunway Orientation Based on the Wind Rose Diagram.pptx
Runway Orientation Based on the Wind Rose Diagram.pptx
 
Pile Foundation by Venkatesh Taduvai (Sub Geotechnical Engineering II)-conver...
Pile Foundation by Venkatesh Taduvai (Sub Geotechnical Engineering II)-conver...Pile Foundation by Venkatesh Taduvai (Sub Geotechnical Engineering II)-conver...
Pile Foundation by Venkatesh Taduvai (Sub Geotechnical Engineering II)-conver...
 
Governing Equations for Fundamental Aerodynamics_Anderson2010.pdf
Governing Equations for Fundamental Aerodynamics_Anderson2010.pdfGoverning Equations for Fundamental Aerodynamics_Anderson2010.pdf
Governing Equations for Fundamental Aerodynamics_Anderson2010.pdf
 
Sachpazis:Terzaghi Bearing Capacity Estimation in simple terms with Calculati...
Sachpazis:Terzaghi Bearing Capacity Estimation in simple terms with Calculati...Sachpazis:Terzaghi Bearing Capacity Estimation in simple terms with Calculati...
Sachpazis:Terzaghi Bearing Capacity Estimation in simple terms with Calculati...
 
Hybrid optimization of pumped hydro system and solar- Engr. Abdul-Azeez.pdf
Hybrid optimization of pumped hydro system and solar- Engr. Abdul-Azeez.pdfHybrid optimization of pumped hydro system and solar- Engr. Abdul-Azeez.pdf
Hybrid optimization of pumped hydro system and solar- Engr. Abdul-Azeez.pdf
 
Immunizing Image Classifiers Against Localized Adversary Attacks
Immunizing Image Classifiers Against Localized Adversary AttacksImmunizing Image Classifiers Against Localized Adversary Attacks
Immunizing Image Classifiers Against Localized Adversary Attacks
 
Water Industry Process Automation and Control Monthly - May 2024.pdf
Water Industry Process Automation and Control Monthly - May 2024.pdfWater Industry Process Automation and Control Monthly - May 2024.pdf
Water Industry Process Automation and Control Monthly - May 2024.pdf
 
一比一原版(SFU毕业证)西蒙菲莎大学毕业证成绩单如何办理
一比一原版(SFU毕业证)西蒙菲莎大学毕业证成绩单如何办理一比一原版(SFU毕业证)西蒙菲莎大学毕业证成绩单如何办理
一比一原版(SFU毕业证)西蒙菲莎大学毕业证成绩单如何办理
 
English lab ppt no titlespecENG PPTt.pdf
English lab ppt no titlespecENG PPTt.pdfEnglish lab ppt no titlespecENG PPTt.pdf
English lab ppt no titlespecENG PPTt.pdf
 
Student information management system project report ii.pdf
Student information management system project report ii.pdfStudent information management system project report ii.pdf
Student information management system project report ii.pdf
 
DESIGN A COTTON SEED SEPARATION MACHINE.docx
DESIGN A COTTON SEED SEPARATION MACHINE.docxDESIGN A COTTON SEED SEPARATION MACHINE.docx
DESIGN A COTTON SEED SEPARATION MACHINE.docx
 

Manual supra carrier

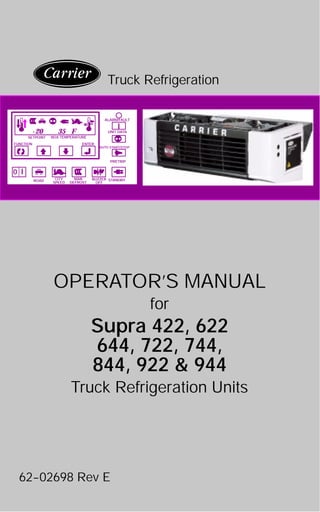
  • 1. OPERATOR’S MANUAL for Supra 422, 622 644, 722, 744, 844, 922 & 944 Truck Refrigeration Units 62--02698 Rev E Truck Refrigeration BOX TEMPERATURE AUTO START/STOP I UNIT DATA PRETRIP ALARM/FAULT STANDBYBUZZER OFF MAN DEFROST CITY SPEEDROAD FUNCTION ENTER SETPOINT -20 35 F I 0
  • 2. MANUAL OPERATOR’S TRUCK REFRIGERATION UNITS Supra 422, 622, 644, 722, 744, 844, 922 & 944
  • 3. CONTENTS Page Unit Identification 1. . . . . . . . . . . . . . . . . . . . . . . . . . Safety 3. . . . . . . . . . . . . . . . . . . . . . . . . . . . . . . . . . . . Features -- Microprocessor Controls 4. . . . . . . . . . Function Change 8. . . . . . . . . . . . . . . . . . . . . . . . . . Features -- Solid State Controls 9. . . . . . . . . . . . . . Pre-Trip Inspection 12. . . . . . . . . . . . . . . . . . . . . . . . Unit Operation -- Microprocessor Controls 14. . . . Unit Operation -- Solid-State Controls 15. . . . . . . . Product Loading 16. . . . . . . . . . . . . . . . . . . . . . . . . . Recommended Transport Temperatures 18. . . . . Problems 19. . . . . . . . . . . . . . . . . . . . . . . . . . . . . . . . Troubleshooting 20. . . . . . . . . . . . . . . . . . . . . . . . . . Microprocessor Control Fuses 22. . . . . . . . . . . . . . Solid-State Control Fuses 24. . . . . . . . . . . . . . . . . . Circuit Board Fuses 25. . . . . . . . . . . . . . . . . . . . . . . Unit Maintenance 26. . . . . . . . . . . . . . . . . . . . . . . . . Unit Maintenance Schedule 27. . . . . . . . . . . . . . . . Standby Operation Guidelines 29. . . . . . . . . . . . . . Emergency Road Service 30. . . . . . . . . . . . . . . . . .
  • 4. SUPRA OPERATOR’S MANUAL This guide has been prepared for the operator of Carrier Transicold diesel truck refrigeration units. It contains basic instructions for the daily operation of the refrigeration unit as well as safety information, troubleshooting tips, and other information that will help you to deliver the load in the best possible condition. Please take the time to read the information contained in this booklet and refer to it whenever you have a question about the operation of your Carrier Transicold Supra unit. Your refrigeration unit has been engineered to provide long, trouble-free performance when it is properly operated and maintained. The checks outlined in this guide will help to minimize over-the-road problems. In addition, a comprehensive maintenance program will help to insure that the unit continues to operate reliably. Such a maintenance program will also help to control operating costs, increase the unit’s working life, and improve performance. This guide is intended as an introduction to your unit and to provide general assistance when needed. More comprehensive information can be found in the Operation and Service Manual for your unit. This manual can be obtained from your local Carrier Transicold dealer. When having your unit serviced, be sure to specify genuine Carrier Transicold replacement parts for the highest quality and best reliability. At Carrier Transicold, we are continually working to improve the products that we build for our customers. As a result, unit specifications may change without notice.
  • 5. 1 62--02698 UNIT IDENTIFICATION Each Supra unit is identified by a nameplate attached to the frame of the unit. On the Supra, this nameplate is inside the curb-side side door of the unit. This nameplate identifies the complete model number of the unit, the serial number, the refrigerant charge and quantity, and the date the unit was placed in service. If a problem occurs, please refer to the information on this plate, and make a note of the model and serial number before calling for assistance. This information will be needed when you contact a technician or Carrier Transicold Service Engineer so that he or she may properly assist you. Serial Plate Used Before August 2001 Serial Decal Used After August 2001
  • 7. 3 62--02698 SAFETY Your Carrier Transicold refrigeration unit has been designed with the safety of the operator in mind. During normal operation, all moving parts are fully guarded to help prevent injury. During all pre-trip inspections, daily inspections, and problem troubleshooting, you may be exposed to moving parts; please stay clear of all moving parts when the unit is in operation and when the unit main power switch is in the RUN (1) position. WARNING Under no circumstances should ether or any other starting aids be used to start engine. AUTO-START/STOP Your refrigeration unit is equipped with Auto-Start/Stop, a valuable fuel saving feature. When the unit is set for Auto-Start/Stop operation it may start at any time and without warning. When performing any check of the refrigeration unit (e.g., checking the belts, checking the oil), make certain that the main power switch is in the OFF (0) position. ENGINE COOLANT The engine is equipped with a pressurized cooling system. Under normal operating conditions, the coolant in the engine and radiator is under high pressure and is very hot. Contact with hot coolant can cause severe burns. Do not remove the cap from a hot radiator; if the cap must be removed, do so very slowly in order to release the pressure without spray. REFRIGERANTS The refrigerant contained in the refrigeration system of your unit can cause frostbite, severe burns, or blindness when in direct contact with the skin or eyes. For this reason, and because of legislation regarding the handling of refrigerants during system service, we recommend that, whenever your unit requires service of the refrigeration system, you contact your nearest Carrier Transicold authorized repair facility for service. BATTERY This unit utilizes a lead-acid type battery. The battery normally vents small amounts of flammable hydrogen gas. Do not smoke when checking the battery. A battery explosion can cause serious physical harm and/or blindness.
  • 8. 462--02698 FEATURES -- MICROPROCESSOR CONTROLS This refrigeration unit is equipped with a wide range of features that are designed to improve reliability and temperature control within the load space. MICROPROCESSOR CONTROLS The microprocessor controls incorporated into this unit are the most reliable control system available in the industry. They are also designed to be the easiest to use, offering great flexibility in control, yet minimal user input for normal operation -- a true “set it and forget it” design. 1. Display window -- shows set point, box temperature, operating mode, alarm displays. 2. Function Change key -- accesses unit set-up displays. Refer to Page 7 for Function Settings.
  • 9. 5 62--02698 3 And 4. The UP ARROW and DOWN ARROW keys are used to alter the set point. Press the up or down arrow keys until the desired set point is displayed on the left side of the display window. When the correct set point is displayed, press the ENTER key to confirm the setting. The UP ARROW and DOWN ARROW keys are also used to change the unit functions and scroll through the FUNCTION and UNIT DATA screens. 5. The ENTER key confirms changes made to unit operation and changes the set point after using the arrow keys to adjust it. If the ENTER key is not pressed, the set point and functions will revert to the previous settings. 6. The main unit RUN/STOP (I = Run / 0 = Stop) switch controls the unit operation. When switched to the Run (I) position, the unit will start in the operating mode last entered (Road or Standby). The set point will be at the last set point entered on the keypad. 7. The ROAD key puts the unit into Road (or diesel engine) operation when standby operation has been previously selected. 8. The CITY SPEED key toggles the unit between City Speed and normal operating modes. When City Speed is selected, the unit will run only in low speed except during defrost cycles. This feature is useful in areas where noise is restricted. 9. The MANUAL DEFROST key places the unit in a defrost cycle when evaporator coild temperature is cold enough. Under most conditions it is not necessary to defrost the unit manually as it is equipped with an air switch and defrost timer to defrost on demand. Manual defrost may become necessary due to ice accumulated on the evaporator coil during frequent door openings in humid environments. 10. The BUZZER OFF key temporarily turns off the FAULT ALARM buzzer. The buzzer indicates that a condition exists that may affect the temperature of the load; for example, the unit failed to start automatically, or the box temperature is out-of-range. 11. The STANDBY key places the unit in Standby (or electric motor) mode when the unit has been operting in road (or diesel engine) mode.
  • 10. 662--02698 12. The PRETRIP key initiates a check of all normal operating modes. The temperature inside the box must be below 5_C ¦ 1_C (35_F ¦ 2_F) to start this check. Upon initiation, the unit will cycle through all operating modes at 30 second intervals. The display will show “PPPP” at the beginning and will show various unit data during the pre-trip cycle. Upon completion of the pre-trip cycle the unit will be placed into the defrost mode. 13. The AUTO-START/STOP key toggles the unit operating mode between Auto-Start/Stop and continuous run. When the unit is set for Auto-Start/Stop operation, the unit will run until the box temperature reaches set point and then cycle off (after the minimum run time has been met) until further cooling or heating is necessary. When in the continuous mode, the unit will cycle between heat and cool as required to maintain the set temperature in the body. If the set point is below --12_C (10_F) the unit will not heat, it will run continuously in low speed cool. When set for continuous run operation the unit does not shut off unless the Run/Stop switch is moved to the Stop (O) position or a unit fault occurs. 14. Unit Data -- pressing this button scrolls the display through the various operating condition displays: engine temperature or battery voltage, for example. A more complete description of the function of this key is found later in ”Unit Data” Section. 15. Fault Alarm -- this LED illuminates when a unit fault has been detected. i
  • 11. 7 62--02698 UNIT DATA TO DISPLAY UNIT DATA The unit data list can be scrolled through by pressing the UNIT DATA key. The list will advance by one with each key press; or press the UNIT DATA key once and use the UP or DOWN ARROW keys to scroll through the list quickly. Press the ENTER key to display the data for 30 seconds. UNIT DATA CODE ENGLISH DATA CD1 SUCT Suction Pressure CD2 ENG Engine Hours CD3 WT Engine Temperature CD4 RAS Return Air Temperature *CD5 SAS Supply Air Temperature *CD6 REM Remote Air Temperature CD7 ATS Ambient Temperature CD8 EVP Future Expansion CD9 CDT Discharge Temperature CD10 BATT Battery Voltage CD11 SBY Standby Hours CD12 MOD V Future Expansion CD13 REV Software Revision CD14 SERL Serial Number Low CD15 SERU Serial Number Upper CD16 2RA Compartment 2 Air Temperature CD17 3RA Compartment 3 Air Temperature CD18 MHR1 Maintenance Hour Meter 1 CD19 MHR2 Maintenance Hour Meter 2 CD20 SON Switch On Hour Meter * Codes 5 & 6 are variable. SAS is displayed when the SUP Probe Function is selected. REM is displayed when the REM Probe Function is selected. i
  • 12. 862--02698 FUNCTION CHANGE TO CHANGE A FUNCTION 1. Press the FUNCTION CHANGE key until the function you want to change appears on the display. 2. Press ENTER 3. Press the UP or DOWN ARROW key until the function setting you want appears on the display. 4. Press ENTER FUNCTION PARAMETERS CODE ENGLISH DATA FN0 DEFR Defrost Interval 1.5, 3, 6, or 12 hours FN1 ON CITY SPD Low Speed Operation Only FN1 OFF HIGH SPD Hi Spd (Cycle Between Low & Hi Spds) FN2 OFF T Minimum Off-time 10, 20, 30, 45, or 90 minutes FN3 ON T On-time 4 or 7 minutes FN4 A REM PROBE Controlling Probe -- Return Air FN4 B SUP PROBE Controlling Probe -- Supply Air FN5 Degrees F or C Temperature Unit °F or °C FN6 ON TIME STRT Maximum Off-time 30 Min. FN6 OFF TEMP STRT Temperature Based Restarting FN7 MOP STD Future Expansion FN8 2SET Compartment 2 Setpoint FN9 3SET Compartment 3 Setpoint FN10 ON AUTO OP Auto Start Operation FN10 OFF MAN OP Manual Start Operation FN11 T RANGE Out-of-Range Tolerance 2, 3, or 4°C Code vs English = Code or English display format Manual Glow Override = Normal or Add 30sec Alarm RST = Alarm Reset Required Alarm CLR = No Alarm Active
  • 13. 9 62--02698 FEATURES -- SOLID-STATE CONTROLS SOLID-STATE CONTROLS As an alternative to the Microprocessor controller, Carrier Transicold offered a Solid-State control system. This system is a more conventional one that is started and stopped manually. Below is the solid-state control panel: The solid-state control system is designed for simple operation while offering the maximum number of features possible.
  • 14. 1062--02698 GLOW/DEFROST SWITCH When held in the upper position (GLOW) the glow plugs in the engine are energized, bringing the combustion chamber to a temperature that is sufficient to ignite the fuel when the starter is engaged. When this switch is moved momentarily to the lower (DEFROST) position, the unit is place in the defrost cycle. START/RUN/STOP SWITCH This switch, when held in the up (START) position, engages the engine’s starter. When released it moves to the center (RUN) position. In this position the unit will run in either the engine or standby mode, depending on which is selected on the ROAD/STANDBY switch. ROAD/STANDBY SWITCH When placed in the upper position this switch enables the unit to operate on the diesel engine contained in the unit. In the lower position, the unit will operate in the standby (electric) mode. In order to operate in this mode, the unit must be connected to an acceptable power source. WARNING Under no circumstances should ether or any other starting aids be used to start engine. TEMPERATURE SELECTOR The temperature selector is used to select the temperature at which the product is to be held. It is simply rotated until the small arrow points to the required temperature. ROAD HOUR METER Keeps track of the number of hours that the engine operates for maintenance purposes. STANDBY HOUR METER Tracks the number of hours the standby motor in the unit runs.
  • 15. 11 62--02698 This symbol represents the hour meter or running time meter. The solid-state control system is equipped with two running time meters; one for road operation, which is indicated by the road symbol next to the meter, and the other meter accumulates timer during operation in standby mode. This indicates operation in the over-the-road operating mode. When the switch is placed in this position, the unit will operate the on the diesel engine. The hour meter marked with this symbol will accumulate hours when the engine is running. This is the symbol representing standby operation. When the ROAD/STANDBY switch is placed in this position, the unit will operate in the standby (electric) mode of operation and the standby hour meter will accumulate hours. COOL light -- when this is illuminated on the control panel, the unit is operating in the cool mode. The temperature inside the body is being lowered to the required set point. HEAT light -- when illuminated the unit is operating in the heat mode. The temperature in the body is being raised to the desired set point. DEFROST -- when this light is on, the unit is in a defrost cycle in order to remove ice build-up from the evaporator coil. In this mode, the temperature on the thermostat display may rise above set point for a short period of time. This in normal and the temperature will again start to fall when the defrost cycle is completed and the unit returns to the COOL cycle. During defrost air is not circulated inside the body.
  • 16. MARKS ONLY NO WORDING 1262--02698 PRE-TRIP INSPECTION The pre-trip inspection should be performed before picking up any load. This inspection is essential to anticipate andhelp minimizethe possibility of “over-the-road” problems. These checks take only a few minutes. 1. Place the unit’s main switch in the STOP (0) position. 2. Fuel -- drain any water and impurities from the sump of the refrigeration unit fuel tank by opening the drain-cock located on the bottom of the tank (if so equipped). Close the valve when only pure fuel emerges. Check the fuel level in the tank, ensuring that the fuel supply is adequate for unit operation. Refuel if necessary. 3. Belts -- Check the belt tension by depressing the belt with your thumb, near the center of the longest free run of each belt. Under moderate pressure each belt should deflect approximately 6 mm to 13mm (1/4 inch to 1/2 inch). If the belts deflect more than this they should be tightened (loose belts may slip, generating heat and reducing belt life). If the belts are too tight they should be loosened; tight belts can reduce bearing life. 4. Battery -- on unit equipped with serviceable batteries, the level of the electrolyte in each of the cells should be checked. If the level is low, distilled water should be added to the correct level. Most units, however, are equipped with low or no-maintenance batteries; these should be inspected to ensure that the connections are clean and tight, and the battery hold-down should be checked for tightness. 5. Engine Oil -- the engine oil should be checked last since it is necessary for oil to drain from the block and into the oil pan to obtain a correct reading. Remove the dipstick, wipe it off and re-insert it fully into the engine block. Once again, remove the dip-stick and observe the oil level; it should be somewhere between the full and
  • 17. 13 62--02698 add marks. If it is below the add mark, add oil until the level is correct. 6. Over-all Unit -- visually inspect the entire unit for leaks, loose bolts, frayed, loose, or broken wires, etc. The radiator and condenser coils of the unit should be free of dirt, bugs, cardboard, or any other debris that may obstruct airflow across the coils. The evaporator (located inside the body) should be free of debris also, especially stretch-wrap, which is often used during transport to prevent cargo shifting. 7. Truck body -- The body should be inspected prior to loading. Check the door and vent seals for damage and wear. Inspect the entire interior and exterior of the body for damage; check for damage to the inner and outer skins of the body. Damage to the insulation may compromise the unit’s ability to maintain the product temperature by increasing the amount of heat gain across the truck body.
  • 18. 1462--02698 UNIT OPERATION MICROPROCESSOR CONTROLS MICROPROCESSOR CONTROLS STARTING THE UNIT Complete the Pre-Trip Inspection described inthe previoussection. Road Operation Place the RUN/STOP (1/0) switch on the cab command in the RUN (1) position. If the unit has been used previously in the standby mode, press the road operation button. Under normal circumstances this is all this is required to start the unit. The unit will then perform a complete diagnostic check on the microprocessor controller, pre-heat for the required amount of time based on the engine temperature and start automatically. Standby Operation Be certain that the unit is connected to an appropriate power source. Move the RUN/STOP (1/0) switch to the RUN (1) position and depress the STANDBY button. The unit will begin to run on electric power. See table on page 27 for information on correct cable for proper operation. WARNING Under no circumstances should ether or any other starting aids be used to start engine. CHANGING THE SET POINT: Press the UP ARROW or DOWN ARROW key until the desired set point is displayed on the left side of the cab command display window. When the arrow key is released, the set point will begin flashing; this is a sign that you must press the ENTER key to confirm the new set point. Otherwise, the set point will revert to the previously entered set point. MANUAL DEFROST Press the MANUAL DEFROST key on the Cab Command; if the evaporator temperature is cold enough a defrost cycle will be initiated.
  • 19. 15 62--02698 UNIT OPERATION SOLID-STATE CONTROLS SOLID-STATE CONTROLS STARTING THE UNIT Complete the Pre-Trip Inspection described inthe previoussection. Road Operation Place the ROAD/STANDBY switch in the ROAD position. Place the START/RUN/STOP switch in the RUN position. Press up on the GLOW/DEFROST switch to energize the glow plugs; this switch should be held in the glow position for approximately 30 seconds. After 30 seconds, engage the starter by pressing up on the START/RUN/STOP switch; the unit should start very quickly. When the unit starts, release the START/RUN/STOP switch, allowing it to return to the RUN position. Release the GLOW/DEFROST switch. If the unit should fail to start after about 15 seconds of starter engagement, release the START/RUN/STOP switch and GLOW/DEFROST switch and allow the battery to rest for about 30 seconds, repeat the above procedure. Standby Operation Ensure that the unit is connected to an appropriate power source. Place the ROAD/STANDBY switch in the standby position. Place the START/RUN/STOP switch in the RUN position. See table on page 27 for information on correct cable for proper operation. WARNING Under no circumstances should ether or any other starting aids be used to start engine. CHANGING THE SET POINT Rotate the knob on the TEMPERATURE SELECTOR until it points to the desired set point. MANUAL DEFROST Momentarily depress the GLOW/DEFROST switch into the DEFROST position and release it. If the temperature of the evaporator is cold enough a defrost cycle will be initiated.
  • 20. 1662--02698 PRODUCT LOADING BEFORE LOADING: D Pre-cool the body. This will remove much of the heat from the inside of the body, and give the product better protection when it is loaded. D Place the unit in a defrost cycle immediately before loading. This will remove moisture accumulated on the evaporator coil. DURING LOADING: D Turn the unit off! D Check product temperature during loading. D Ensure that the air return and supply opening remain unobstructed. D Leave approximately 4 to 5 inches between the load and the front wall for air return to the unit. D Leave at least 10 to 12 inches between the top of the load and the ceiling to ensure that there is nothing to prevent airflow to the rear of the body D Load product on pallets to provide free air return to unit and improve product protection. Proper air circulation in the truck body, air that can move around and through the load, is a critical element in maintaining product quality during transport. If air cannot circulate completely around the load, hot spots or top-freeze can occur. The use of pallets is highly recommended. Pallets, when loaded so air can flow freely through the pallets to return to the evaporator, help protect the product from heat passing through the floor of the trailer. When using pallets, it is important to refrain from stacking extra boxes on the floor at he rear of the trailer, this will cut off the airflow. Product stacking is another important factor in protecting the product. Products that generate heat -- fruits and vegetables, for example -- should be stacked so the aircan flowthrough theproduct to remove the heat; this is called “air stacking” the product. Products that do not create heat -- meats and frozen products -- should be
  • 21. 17 62--02698 stacked tightly in the center of the trailer. All productsshould bekept away from the side-walls of the body, to allow air flow between the body and the load; this prevents heat filtering through the walls from affecting the product. It is important to check the temperature of the product being loaded to ensure that it is at the correct temperature for transport. The refrigeration unit is designed to maintain the temperature of the product at the temperature at which it was loaded; it was not designed to cool warm product.
  • 22. 1862--02698 RECOMMENDED TRANSPORT TEMPERATURES Below are some general recommendations on product transport temperatures and operating modes for the unit. These are included for reference only and should not be considered preemptive of the set point required by the shipper or receiver. More detailed information can be obtained from your Carrier Transicold dealer. Product set point Range Operating Mode*Product _F _C Operating Mode* Bananas 55 to 60 13 to 16 Continuous Fresh fruits and vegetables 33 to 38 0 to 3 Continuous Fresh meats and seafood 28 to 32 --2 to 0 Auto-Start/Stop or Continuous Dairy Products 33 to 38 0 to 3 Auto-Start/Stop or Continuous Ice 15 to 20 --10 to --7 Auto-Start/Stop Frozen fruits and vegetables 0 --18 Auto-Start/Stop Frozen meats and seafood --10 to 0 --23 to 18 Auto-Start/Stop Ice Cream --20 --29 Auto-Start/Stop * During delivery cycles that include frequent stops and door openings, it is recommended that the unit always be operated in the continuous run mode to help insure product quality. If it is possible, the unit should be turned off during the time the body doors are open to help conserve the product temperature.
  • 23. 19 62--02698 PROBLEMS Everything possible has been done to ensure that your unit is the most reliable, trouble-free equipment available today. If, however you run into problems the following section may be of assistance. If you do not find the trouble that you have experienced listed, please call your Carrier Transicold dealer for assistance. General Problems Unit won’t crank. Check battery condition. Check battery connections. Check all fuses Unit won’t start. Check fuel level. Check all fuses Unit won’t run. Check fuel level. Check engine oil level. Check all fuses Unit stops running. Check belts. Check engine oil level. Check coolant level. Check fuel level. Check all fuses. Unit not cooling properly. Defrost unit. Check evaporator for airflow restriction. Check condenser for airflow restriction. Check body for damage or air leaks. Fault Display on Cab Command (Microprocessor Controls Only) Service 1 Service 2 Unit is calling attention to a normal ser- vice requirement (oil change, etc.). Normally this does not require immediate attention.
  • 24. 2062--02698 TROUBLESHOOTING Fault Display on Cab Command (Microprocessor Controls Only) AL0 ENG OIL Low engine oil pressure condition. Check en- gine oil level. AL1 ENG HOT The engine has overheated. Check the coolant level, belts, and radiator coil for air restriction. AL2 HIGH PRESS High compressor discharge pressure. Check all belts, check condenser coil for airflow obstruc- tion and cleanliness AL3 STARTFAIL The engine has failed to start. Check battery, fuses and fuel level. AL4 LOW BATT The battery voltage has fallen below 10 VDC. Check battery. AL5 HI BATT The battery voltage is above 10 VDC. Check battery. AL6 DEFR FAIL The unit is in a defrost override mode. AL7 ALT AUX The alternator signal is not present with the en- gine running or with the standby electric mode active. Check alternator. AL8 STARTER The starter motor input signal is not present with the starter solenoid output on. Check start- er solenoid. AL9 RA SENSOR The return air sensor is not working and the unit has shut down. Check probe. AL10 SA SENSOR The supply air sensor has been chosen in the functional parameters and is not working. AL11 WT SENSOR The coolant termperature sensor is not working. AL12 HIGH CDT The discharge termperature is above 310°F or 340°F if ambient temperature is above 120°F. AL13 CD SENSOR The discharge sensor is not working. AL14 SBY MOTOR The standby motor is overloaded. AL15 FUSE BAD One of the fuses has low input. Check fuses. AL16 SYS CHK After Rev. 3.221 Low refrigerant pressure detected. Have sys- tem checked for leaks.
  • 25. 21 62--02698 AL17 DISPLAY Communication between main board and the display board has been interrupted. AL18 SERVICE 1 Hour meter is greater than maintenance hour meter 1. AL19 SERVICE 2 Hour meter is greater than maintenance hour meter 2. AL20 RAS OUT Box temperature is Out--of--Range. AL23 SYS CHK Prior to Rev. 3.21 Low refrigerant pressure detected. Have sys- tem checked for leaks. AL23 NO POWER After Rev. 3.21 No AC power when unit is in Standby.
  • 26. 2262--02698 MICROPROCESSOR CONTROL FUSES PRE--GLOBAL MODEL (--0) The fuses that protect the circuits of the Microprocessor control system are located in the control box on the roadside of the unit. They may be accessed by loosening the screws that hold the control panel closed. F3 F4 F5 F6 F7 F8 F9 F10 F2 F1 Fuse Purpose Capacity (Amps) F1 Main protection fuse 80A F2 Microprocessor fuse 5A F3 Secondary fuse 25A F4 Speed control solenoid 15A F5 Auto-restart and defrost lights 7.5A F6 Fault light 5A F7 Evaporator fan 1 15A F8 Evaporator fan 2 15A F9 Evaporator fan 3 15A F10 Fuel heater 25A
  • 27. 23 62--02698 MICROPROCESSOR CONTROL FUSES GLOBAL MODEL (--A) The fuses that protect the circuits of the Microprocessor control system are located in the control box on the roadside of the unit. They may be accessed by loosening the screws that hold the control panel closed. F2 F1 F3 F4 F5 F8 F7 F6 Fuse Purpose Capacity (Amps) F1 Main protection fuse 80A F2 Microprocessor fuse 5A F3 Secondary fuse 25A F4 Speed control solenoid 15A F5 Defrost Damper solenoid 15A F6 Evaporator fan motor 1 20A F7 Evaporator fan motor 2 20A F8 Evaporator fan motor 3 20A
  • 28. 2462--02698 SOLID-STATE CONTROL FUSES The fuses that protect the circuits of the Solid-state control system are located in the control box on the roadside of the unit. They may be accessed by loosening the screws that hold the control panel closed. F3 F4 F5 F6 F7 F8 F9 F2 F1 Fuse Purpose Capacity (Amps) F1 Main protection fuse 80A F2 Solid-state control fuse 20A F3 Secondary fuse 20A F4 Fuel heater 25A F5 Evaporator fan 1 20A F6 Evaporator fan 2 20A F7 Evaporator fan 3 20A F8 Future -- F9 Fuel pump and run solenoid 15A
  • 29. 25 62--02698 INTEGRATED CIRCUIT BOARD The fuses that protect the circuits of the Microprocessor control system are located in the control box on the roadside of the unit. They may be accessed by loosening the screws that hold the control panel closed. F2 F1 F3 F4 F5 F8 F7 F6 F10F9 Fuse Purpose Capacity (Amps) F1 Main protection fuse 80A F2 Microprocessor fuse 5A F3 Run solenoid, Evaporator fan power transistor 15A F4 Hot gas solenoid 1 & 2 5A F5 Speed Control solenoid 10A F6 Compressor Unloader (844) 5A F7 Defrost damper solenoid 15A F8 Evaporator fan motor 1 20A F9 Evaporator fan motor 2 20A F10 Evaporator fan motor 3 20A
  • 30. 2662--02698 UNIT MAINTENANCE Engine oil -- the oils recommended for use in your refrigeration unit must comply with the American Petroleum Institute’s (API) SG/CD rating. The use of any oil that does not meet this rating may affect the warranty on the engine in the unit. The use of oil of the proper weight (viscosity) is also essential. The following chart indicates the SAE Weight Rating of the oil to be used in various climates: _F _C 10W or 10W30 20W or 15W40 30W or 15W40 The following oils are approved for use in the Supra range of units: In the US, Canada Mexico, Central and South America, any oil that meets the above API specification is suitable for use in the Supra range of units.
  • 31. 27 62--02698 UNIT MAINTENANCE SCHEDULE For the most reliable operation and for maximum life, your unit requires regular maintenance. This includes oil and filter changes, fuel and air filter replacement, coolant replacement. Maintenance should be performed on the following schedule: SERVICE SUPRA 422 Every 500 Hours SUPRA 622/644/ 722/744/844 Every 750 Hours SUPRA 922/944 Every 1000 Hours D Drain the engine oil, replace oil filter and by- pass filter (if so equipped). * D Check engine cooling system. D Clean air cleaner and change air cleaner oil. D Check all bolts, screws and unit mounting bolts for tightness. Tighten as required. D Check all belts. D Replace fuel filter. D Clean fuel pump filter. SUPRA 422 Every 1000 Hours SUPRA 622/644/ 722/744/844/922/ 944 Every 1500 Hours D Check battery terminals and fluid level. D Check compressor oil level. D Check alternator brushes. D Check engine thermostat. D Check defrost: -- Check timer setting and function -- Check refrigerant control valves -- Fans stop or defrost damper closes -- Defrost ends automatically -- Water drains from evaporator D Check fan motor brushes. D Check and adjust rocker arms. D Check belts as necessary. SUPRA 422 Every 2000 Hours SUPRA 622/644 722/744/844/922/ 944 Every 3000 Hours D Clean radiator and condenser. D Check engine speed under load: Supra 422 -- 2300/1800 rpm Supra 622/644 -- 2050/1800 rpm Supra 722 /744-- 2200/1800 rpm Supra 922/944 -- 2250/1800 rpm D Check fan motor brushes. D Check alternator. D Clean and adjust fuel injectors. * These hours for oil change are based on units lubricated with conventional oil. The required oil change for units lubricated with Delvac 1 synthetic oil should be done at twice the run time as listed above. New oil filters are required at 1 year intervals.
  • 32. 2862--02698 SERVICE SUPRA All Models every 3750 hours D Check all belt tension pulleys. D Change anti-freeze. D Check bearings in clutch(es) and electric motors. These maintenance schedules are based on the use of approved oils and regular Pre-Trip inspections of the unit. Failure to follow the recommended maintenance schedule may affect the life and reliability of the refrigeration unit. In addition to the above service requirements please adhere to the following: D Conventional engine oils should be changed at least once per year, even if the engine has not run the necessary number of hours. D Delvac 1 synthetic oil should be changed at least once every two years, even if the engine has not run the necessary number of hours. D The coolant (anti-freeze) should be replaced or recycled every two years. A more detailed description of service requirements and procedures can be found in the Service and Operations Manual for your unit. This manual may be obtained from any Carrier Transicold dealer.
  • 33. 29 62--02698 STANDBY OPERATION GUIDELINES For safe, reliable operation in Standby mode, it is important to follow a few guidelines: D Never plug the unit in to the power source with the main switch in the RUN position. The main switch should always be in the STOP position when connecting the unit to the power source. D The circuit breaker and extension cable used for Standby operation should conform to the following: Unit Operating Voltage FLA Rating Circuit Breaker Capacity Cable Requirement Supra 422 208/230 V 60 hz 3 phase 13.7 A 30 A 8/3 with ground (up to 50 ft) Supra 422 460 V 60 hz 3 phase 7.1 A 20 A 10/3 with ground (up to 75 ft) Supra 622/644 208/230 V 60 hz 3 phase 23 A 50 A 8/3 with ground (up to 50 ft)622/644 722/744 844 460 V 60 hz 3 phase 13 A 30 A 10/3 with ground (up to 75 ft) Supra 208/230 V 60 hz 3 phase 38.6 A 50 A 8/3 with ground (up to 50 ft)Supra 922/944 460 V 60 hz 3 phase 23 A 30 A 10/3 with ground (up to 75 ft) D When multiple units are in use, each unit must be operated on its own electrical circuit. You should never operate more than one unit on a circuit breaker. Important note: This information is provided as a guideline only. When preparing a circuit for operation of the refrigeration unit, a licensed electrician should be contracted. A licensed electrician is familiar with all local ordinances and special requirements for your area and can ensure that the circuits are properly designed and installed, and that connections are correct.
  • 34. 3062--02698 EMERGENCY ROAD SERVICE At Carrier Transicold we’re working hard to give you complete service when and where you need it. That means a worldwide network of dealers that offer 24-hour emergency service. These service centers are manned by factory trained service personnel and backed by extensive parts inventories that will assure you of prompt repair. Should you experience a unit problem with your refrigeration unit during transit, follow your company’s emergency procedure or contact the nearest Carrier Transicold service center. Consult the Shortstop Service Centers directory to locate the service center nearest you. This directory may be obtained from your Carrier Transicold dealer. If you are unable to reach a service center, call our 24-hour Action Line: Call (800) 448-1661 from any phone in the United States or Canada. When calling, please have the following information ready for fastest service: S Your name, the name of your company, and your location. S A telephone number where you can be called back. S Refrigeration unit model number and serial number. S Box temperature, set point and product. S Brief description of the problem you are having, and what you have already done to correct the problem. We will do everything we can to get your problem taken care of and get you back on the road.
  • 35. ã2004 Carrier Corporation D Printed in U. S. A. 0304 Carrier Transicold Division, Carrier Corporation Truck/Trailer Products Group P.O. Box 4805 Syracuse, N.Y. 13221 U.S A www.carrier.transicold.com North America Carrier Transicold 700 Olympic Drive Athens, GA 30601 USA Tel: 1--706--546--6469 Fax: 1--706--546--5207 Central America and Mexico Ejercito Nacional No. 418 Piso 9, Torre Yumal Col. Chapultepec Morales 11570 Mexico, D.F. Tel: (5255) 9126.0300 Fax: (5255) 9126.0373 A member of the United Technologies Corporation family. Stock symbol UTX CALIFORNIA Proposition 65 Warning Diesel engine exhaust and some of its constituents are known to the State of California to cause cancer, birth defects,and other reproductive harm.