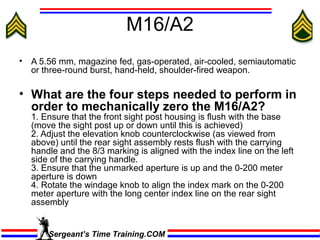
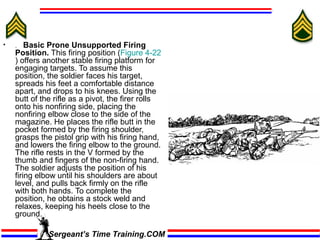
Sergeant’s
                   Time
                   Training.Com


Sergeant’s Time Training.COM
PMI

      Preliminary Marksmanship
              Instruction
                3-22-9


Sergeant’s Time Training.COM
M16/A2
• A 5.56 mm, magazine fed, gas-operated, air-cooled, semiautomatic
  or three-round burst, hand-held, shoulder-fired weapon.

• What are the four steps needed to perform in
  order to mechanically zero the M16/A2?
  1. Ensure that the front sight post housing is flush with the base
  (move the sight post up or down until this is achieved)
  2. Adjust the elevation knob counterclockwise (as viewed from
  above) until the rear sight assembly rests flush with the carrying
  handle and the 8/3 marking is aligned with the index line on the left
  side of the carrying handle.
  3. Ensure that the unmarked aperture is up and the 0-200 meter
  aperture is down
  4. Rotate the windage knob to align the index mark on the 0-200
  meter aperture with the long center index line on the rear sight
  assembly


       Sergeant’s Time Training.COM
M16 Marksmanship


Sergeant’s Time Training.COM
•   Steady Position. When the soldier approaches the firing line, he should assume a
    comfortable, steady firing position. The time and supervision each soldier has on
    the firing line are limited. He must learn how to establish a steady position during
    integrated act of dry-fire training (Figure 4-15). The firer is the best judge of the
    quality of his position. If he can hold the front sight post steady through the fall of
    the hammer, he has a good position. The steady position elements are as follows.
•   (1) Nonfiring Handgrip. The rifle hand guard rests on the heel of the hand in
    the V formed by the thumb and fingers. The grip of the non-firing hand is
    light.
•   (2) Rifle Butt Position. The butt of the rifle is placed in the pocket of the
    firing shoulder. This reduces the effect of recoil and helps ensure a steady
    position.
•   (3) Firing Handgrip. The firing hand grasps the pistol grip so it fits the V
    formed by the thumb and forefinger. The forefinger is placed on the trigger
    so the lay of the rifle is not disturbed when the trigger is squeezed. A slight
    rearward pressure is exerted by the remaining three fingers to ensure that
    the butt of the stock remains in the pocket of the shoulder, minimizing the
    effect of recoil.
•   (4) Firing Elbow Placement. The firing elbow is important in providing
    balance. Its exact location depends on the firing/fighting position used.
    Placement should allow shoulders to remain level.
•   (5) Nonfiring Elbow. The non-firing elbow is positioned firmly under the rifle
    to allow a comfortable and stable position. When the soldier engages a wide
    sector of fire, moving targets, and targets at various elevations, his non-
    firing elbow should remain free from support.
•   (6) Cheek-to-Stock Weld. The stock weld should provide a natural line of
    sight through the center of the rear sight aperture to the front sight post and
    on to the target. The firer's neck should be relaxed, allowing his cheek to fall
    naturally onto the stock. Through dry-fire training, the soldier practices this
    position until he assumes the same cheek-to-stock weld each time he
    assumes a given position, which provides consistency in aiming. Proper eye
    relief is obtained when a soldier establishes a good cheek-to-stock weld. A
    small change in eye relief normally occurs each time that the firer assumes a
    different firing position. The soldier should begin by trying to touch the
    charging handle with his nose when assuming a firing position. This will aid
    the soldier in maintaining the same cheek-to-stock weld hold each time the
    weapon is aimed. The soldier should be mindful of how the nose touches the
    charging handle and should be consistent when doing so. This should be
    critiqued and reinforced during dry-fire training.


                     Sergeant’s Time Training.COM
Sergeant’s Time Training.COM
Breath Control


The first technique is used during zeroing (and when time is available to fire a shot) (
Figure 4-19). There is a moment of natural respiratory pause while breathing when most
of the air has been exhaled from the lungs and before inhaling. Breathing should stop
after most of the air has been exhaled during the normal breathing cycle. The shot must
be fired before the soldier feels any discomfort.


The second breath control technique is employed during rapid fire (short-exposure
targets) (Figure 4-20). Using this technique, the soldier stops his breath when he is
about to squeeze the trigger.

             Sergeant’s Time Training.COM
•   . Individual Foxhole Supported Firing Position.
    This position provides the most stable platform for
    engaging targets (Figure 4-21). Upon entering the
    position, the soldier adds or removes dirt,
    sandbags, or other supports to adjust for his height.
    He then faces the target, executes a half-face to his
    firing side, and leans forward until his chest is
    against the firing-hand corner of the position. He
    places the rifle hand guard in a V formed by the
    thumb and fingers of his nonfiring hand, and rests
    the nonfiring hand on the material (sandbags or
    berm) to the front of the position. The soldier places
    the butt of the weapon in the pocket of his firing
    shoulder and rests his firing elbow on the ground
    outside the position. (When prepared positions are
    not available, the prone supported position can be
    substituted.) Once the individual supported fighting
    position has been mastered, the firer should
    practice various unsupported positions to obtain the
    smallest possible wobble area during final aiming
    and hammer fall. The coach-trainer can check the
    steadiness of the position by observing movement
    at the forward part of the rifle, by looking through
    the Ml6 sighting device, or by checking to see
    support is being used.


               Sergeant’s Time Training.COM
•   .   Basic Prone Unsupported Firing
    Position. This firing position (Figure 4-22
    ) offers another stable firing platform for
    engaging targets. To assume this
    position, the soldier faces his target,
    spreads his feet a comfortable distance
    apart, and drops to his knees. Using the
    butt of the rifle as a pivot, the firer rolls
    onto his nonfiring side, placing the
    nonfiring elbow close to the side of the
    magazine. He places the rifle butt in the
    pocket formed by the firing shoulder,
    grasps the pistol grip with his firing hand,
    and lowers the firing elbow to the ground.
    The rifle rests in the V formed by the
    thumb and fingers of the non-firing hand.
    The soldier adjusts the position of his
    firing elbow until his shoulders are about
    level, and pulls back firmly on the rifle
    with both hands. To complete the
    position, he obtains a stock weld and
    relaxes, keeping his heels close to the
    ground.

              Sergeant’s Time Training.COM
Stoppage
• How many times should immediate action be
  applied to a weapon?
  Sports- Once. (If Rifle still fails to fire, apply
  remedial action)
• Describe the proper procedures for applying
  remedial action.
  1. Try to place the weapon on safe
  2. Remove the magazine
  3. Lock the bolt to the rear
  4. Place the weapon on safe if not already done

     Sergeant’s Time Training.COM
Automatic Range

• What are the qualification standards for
  a Record Fire Range (pop-up targets)?
  • Expert - 36-40
  • Sharpshooter - 30-35
  • Marksman - 23-29
  • Unqualified - 22-Below


    Sergeant’s Time Training.COM
• TASK- Zero an M16A2 Rifle
  CONDITIONS- On a 25-meter range, given an M16A2
  rifle, 18 rounds of 5.56-mm ammunition, a 300-meter
  zero target, and sandbags for support.
  STANDARDS- Using 18 rounds or less, the soldier must
  battlesight zero his rifle by achieving five out of six
  rounds in two consecutive shot groups within the 4-
  centimeter circle. Bullets that break the line of the 4-
  centimeter circle will be used in evaluating the soldier's
  performance.


      Sergeant’s Time Training.COM
5 out of 6 consecutive


Sergeant’s Time Training.COM
Aiming
     Correct sight picture


Sergeant’s Time Training.COM

M16 pmi

  • 1.
    Sergeant’s Time Training.Com Sergeant’s Time Training.COM
  • 2.
    PMI Preliminary Marksmanship Instruction 3-22-9 Sergeant’s Time Training.COM
  • 3.
    M16/A2 • A 5.56mm, magazine fed, gas-operated, air-cooled, semiautomatic or three-round burst, hand-held, shoulder-fired weapon. • What are the four steps needed to perform in order to mechanically zero the M16/A2? 1. Ensure that the front sight post housing is flush with the base (move the sight post up or down until this is achieved) 2. Adjust the elevation knob counterclockwise (as viewed from above) until the rear sight assembly rests flush with the carrying handle and the 8/3 marking is aligned with the index line on the left side of the carrying handle. 3. Ensure that the unmarked aperture is up and the 0-200 meter aperture is down 4. Rotate the windage knob to align the index mark on the 0-200 meter aperture with the long center index line on the rear sight assembly Sergeant’s Time Training.COM
  • 4.
  • 5.
  • 6.
  • 7.
    Steady Position. When the soldier approaches the firing line, he should assume a comfortable, steady firing position. The time and supervision each soldier has on the firing line are limited. He must learn how to establish a steady position during integrated act of dry-fire training (Figure 4-15). The firer is the best judge of the quality of his position. If he can hold the front sight post steady through the fall of the hammer, he has a good position. The steady position elements are as follows. • (1) Nonfiring Handgrip. The rifle hand guard rests on the heel of the hand in the V formed by the thumb and fingers. The grip of the non-firing hand is light. • (2) Rifle Butt Position. The butt of the rifle is placed in the pocket of the firing shoulder. This reduces the effect of recoil and helps ensure a steady position. • (3) Firing Handgrip. The firing hand grasps the pistol grip so it fits the V formed by the thumb and forefinger. The forefinger is placed on the trigger so the lay of the rifle is not disturbed when the trigger is squeezed. A slight rearward pressure is exerted by the remaining three fingers to ensure that the butt of the stock remains in the pocket of the shoulder, minimizing the effect of recoil. • (4) Firing Elbow Placement. The firing elbow is important in providing balance. Its exact location depends on the firing/fighting position used. Placement should allow shoulders to remain level. • (5) Nonfiring Elbow. The non-firing elbow is positioned firmly under the rifle to allow a comfortable and stable position. When the soldier engages a wide sector of fire, moving targets, and targets at various elevations, his non- firing elbow should remain free from support. • (6) Cheek-to-Stock Weld. The stock weld should provide a natural line of sight through the center of the rear sight aperture to the front sight post and on to the target. The firer's neck should be relaxed, allowing his cheek to fall naturally onto the stock. Through dry-fire training, the soldier practices this position until he assumes the same cheek-to-stock weld each time he assumes a given position, which provides consistency in aiming. Proper eye relief is obtained when a soldier establishes a good cheek-to-stock weld. A small change in eye relief normally occurs each time that the firer assumes a different firing position. The soldier should begin by trying to touch the charging handle with his nose when assuming a firing position. This will aid the soldier in maintaining the same cheek-to-stock weld hold each time the weapon is aimed. The soldier should be mindful of how the nose touches the charging handle and should be consistent when doing so. This should be critiqued and reinforced during dry-fire training. Sergeant’s Time Training.COM
  • 8.
  • 9.
    Breath Control The firsttechnique is used during zeroing (and when time is available to fire a shot) ( Figure 4-19). There is a moment of natural respiratory pause while breathing when most of the air has been exhaled from the lungs and before inhaling. Breathing should stop after most of the air has been exhaled during the normal breathing cycle. The shot must be fired before the soldier feels any discomfort. The second breath control technique is employed during rapid fire (short-exposure targets) (Figure 4-20). Using this technique, the soldier stops his breath when he is about to squeeze the trigger. Sergeant’s Time Training.COM
  • 10.
    . Individual Foxhole Supported Firing Position. This position provides the most stable platform for engaging targets (Figure 4-21). Upon entering the position, the soldier adds or removes dirt, sandbags, or other supports to adjust for his height. He then faces the target, executes a half-face to his firing side, and leans forward until his chest is against the firing-hand corner of the position. He places the rifle hand guard in a V formed by the thumb and fingers of his nonfiring hand, and rests the nonfiring hand on the material (sandbags or berm) to the front of the position. The soldier places the butt of the weapon in the pocket of his firing shoulder and rests his firing elbow on the ground outside the position. (When prepared positions are not available, the prone supported position can be substituted.) Once the individual supported fighting position has been mastered, the firer should practice various unsupported positions to obtain the smallest possible wobble area during final aiming and hammer fall. The coach-trainer can check the steadiness of the position by observing movement at the forward part of the rifle, by looking through the Ml6 sighting device, or by checking to see support is being used. Sergeant’s Time Training.COM
  • 11.
    . Basic Prone Unsupported Firing Position. This firing position (Figure 4-22 ) offers another stable firing platform for engaging targets. To assume this position, the soldier faces his target, spreads his feet a comfortable distance apart, and drops to his knees. Using the butt of the rifle as a pivot, the firer rolls onto his nonfiring side, placing the nonfiring elbow close to the side of the magazine. He places the rifle butt in the pocket formed by the firing shoulder, grasps the pistol grip with his firing hand, and lowers the firing elbow to the ground. The rifle rests in the V formed by the thumb and fingers of the non-firing hand. The soldier adjusts the position of his firing elbow until his shoulders are about level, and pulls back firmly on the rifle with both hands. To complete the position, he obtains a stock weld and relaxes, keeping his heels close to the ground. Sergeant’s Time Training.COM
  • 12.
    Stoppage • How manytimes should immediate action be applied to a weapon? Sports- Once. (If Rifle still fails to fire, apply remedial action) • Describe the proper procedures for applying remedial action. 1. Try to place the weapon on safe 2. Remove the magazine 3. Lock the bolt to the rear 4. Place the weapon on safe if not already done Sergeant’s Time Training.COM
  • 13.
    Automatic Range • Whatare the qualification standards for a Record Fire Range (pop-up targets)? • Expert - 36-40 • Sharpshooter - 30-35 • Marksman - 23-29 • Unqualified - 22-Below Sergeant’s Time Training.COM
  • 14.
    • TASK- Zeroan M16A2 Rifle CONDITIONS- On a 25-meter range, given an M16A2 rifle, 18 rounds of 5.56-mm ammunition, a 300-meter zero target, and sandbags for support. STANDARDS- Using 18 rounds or less, the soldier must battlesight zero his rifle by achieving five out of six rounds in two consecutive shot groups within the 4- centimeter circle. Bullets that break the line of the 4- centimeter circle will be used in evaluating the soldier's performance. Sergeant’s Time Training.COM
  • 15.
    5 out of6 consecutive Sergeant’s Time Training.COM
  • 16.
    Aiming Correct sight picture Sergeant’s Time Training.COM