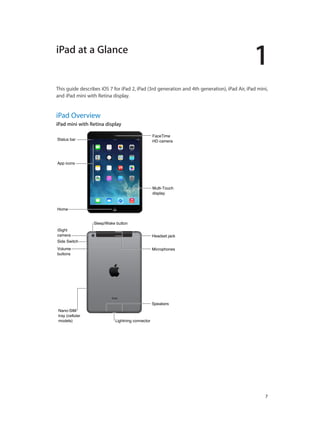
seo on page bangla tutorial
seo off page tutorial
on page seo tutorial pdf
on page seo tutorials
on page seo video tutorial
on page optimization in seo tutorial
seo onpage tutorial with example
seo onpage optimization tutorial
seo off page optimization tutorial
This chapter discusses setting up iPad, including what is needed to use iPad, how to set it up, and how to set up mail and other accounts. It also covers using iCloud to manage content on iPad, connecting iPad to a computer, and viewing the user guide on iPad.
Tap to use Siri to find and join Wi-Fi networks.
••
Forget a network: Tap next to a network you’ve joined before, then tap Forget this
Network. You need to enter the password again if you want to join that network another
time.
••
Turn Wi-Fi off: Tap the Wi-Fi switch to off. This also turns off Personal Hotspot if it’s on.
••
Adjust settings: Tap Other Wi-Fi Settings to adjust additional options.
You can also join a Wi-Fi network from Control Center. See Control Center on page 28.
Chapter 2 Getting Started
13
The document provides an overview and user guide for the iPad operating system iOS 8.4. It includes chapters on getting started with the iPad, the basics of using apps and navigating the interface, settings and features for connectivity, media apps like Music and Photos, Siri, and troubleshooting. The document outlines the hardware features of different iPad models and provides guidance on topics like iCloud, Bluetooth, restrictions, and battery life. It also includes appendices on accessibility options, using iPad for business, international keyboards, safety information, and service and support.
This document provides an overview and user guide for the iPad and its features for iOS 7 software. It covers topics such as the iPad hardware, setting up the iPad, connecting to Wi-Fi and accounts, using basic functions and apps, and contains additional chapters on specific apps and settings. The document is the official iPad user guide for iOS 7 from Apple.
This document provides an overview and user guide for the iPod touch 5th generation. It includes information on the device's accessories, buttons, screen, setting up accounts and syncing with iTunes. It also provides chapters on the various apps and features available, including Siri, Messages, Mail, Safari, Music, Camera, Weather, Maps and more. It concludes with appendices on international keyboards, safety information, and support resources.
This document provides an overview and user guide for the iPhone. It begins with an overview of the iPhone hardware including the multi-touch screen, buttons, cameras, ports and sensors. It then covers basic setup and use including connecting to Wi-Fi, accounts, iCloud and iTunes. The remainder of the document is divided into chapters covering the basic iPhone apps and their features such as Phone, Mail, Safari, Music, Photos and more. It includes tutorials and tips for using each app.
This document provides an overview and guide to using an iPad, including:
- An overview of the iPad buttons, including the Home button, Sleep/Wake button, and Volume buttons.
- Instructions for basic tasks like locking/unlocking the iPad, adjusting the volume, and putting the iPad to sleep.
- A description of the iPad accessories that are included and their uses.
- An introduction to the iPad's multi-touch screen and navigation of the Home screen and apps.
- Chapters that provide detailed instructions for using key iPad apps and features like Safari, Mail, Camera, Photos, and Settings.
This document provides a summary of the iPhone User Guide for the iPhone OS 3.1 software. It covers getting started with the iPhone, including activation, installing the SIM card, and registering with iTunes. It also provides overviews of the iPhone's basic features and applications such as Phone, Mail, Safari, iPod, Messages, Calendar, Photos, Camera, YouTube, Stocks, Maps, Weather, and more. The document includes instructions for settings and troubleshooting.
The document provides a user guide for the iPod touch operating system iOS 6.1. It contains 32 chapters that cover the basic and advanced features of the iPod touch, including how to set up the device, use built-in apps like Music, Videos, Camera, Photos, and more. It also covers topics like Siri, iCloud, Bluetooth, WiFi and provides troubleshooting tips.
Your HTC Explorer user guide provides instructions on basic device set up and use. It covers getting started topics like inserting the SIM card and storage card, charging the battery, and turning the device on or off. The guide also explains how to personalize the home screen and customize settings. Sections are included on making calls, using apps, browsing the web, syncing accounts, and adjusting device settings.
Portable Gaming Spotlight, 2Q14 September 2014 Andrew Gumenniy
This document summarizes portable gaming trends in the second quarter of 2014. It finds that consumer spending on mobile games significantly increased year-over-year for both iOS and Google Play, with iOS revenue growing over 70% and Google Play more than doubling. Meanwhile, revenue from dedicated handheld gaming devices like the 3DS and PS Vita declined 28% due to a lack of major game releases and typical seasonal trends. Top-grossing games were dominated by free-to-play titles like Clash of Clans and Puzzle & Dragons on mobile, and Pokémon X/Y and Kirby: Triple Deluxe on dedicated handhelds.
Wireless solar keyboard k760 quickstart guidemustafa sarac
This document provides instructions for setting up and using the Logitech Wireless Solar Keyboard K760. It describes how to turn the keyboard on and off, check the battery status, pair the keyboard with up to three Apple devices using Bluetooth, switch between paired devices, troubleshoot issues, and dispose of batteries at the end of the product life. The keyboard uses solar power to charge its internal batteries and includes media keys and shortcuts for Mac functions.
The document provides an overview of Android Lollipop including its advantages like material design and improved notifications. It compares Android and iOS on aspects like interface, customizability, security, and market share. Finally, it discusses ways to protect Android devices such as using screen locks, device administrators, and antivirus apps to prevent theft, hacking, malware and viruses.
This document provides instructions for setting up and using a Nintendo Wii gaming console. It explains how to connect the AV cables to the Wii and television, insert batteries and sync the Wii remote, and insert game discs to play. Additional sections cover connecting accessories like the nunchuk, balance board and microphone. It also describes how to access channels and downloadable content from the Wii Shop, use online features, and troubleshoot some common issues. The conclusion recommends popular Wii games and emphasizes that the Wii is a fun way to explore gaming adventures and get exercise.
This document provides an overview and user guide for the iPhone:
1. It describes the basic hardware features of the iPhone such as the buttons, ports, cameras, and accessories included.
2. It provides instructions for basic setup and use such as installing apps, making calls, browsing the web, and connecting to WiFi and iTunes.
3. It includes chapters on the main iPhone apps like Phone, Mail, Safari, Music, Camera, Videos, Maps, and an accessibility chapter for users with disabilities.
Android is an open-source, Linux-based operating system designed for touchscreen mobile devices. It was initially developed by Android Inc, which was later acquired by Google. The open-source nature allows manufacturers, carriers, and developers to freely modify and distribute Android. It uses a touch-based interface and sensors to provide an immediate, fluid experience to users. Applications can be acquired through app stores or by direct downloads. While initially on older devices, Android now powers a wide variety of smartphones, tablets and other internet-enabled devices.
Vodafone Smart Platinum 7 Manual / User Guidemanualsheet
This user manual provides instructions for using the key features and applications of a smartphone. It describes the physical buttons and connectors, how to power on and set up the device, customize and navigate the home screen, make phone calls, send messages, manage contacts, browse the internet, use apps like the camera and maps, connect to other devices, and change system settings. The manual is intended to help new users understand and optimize the usage of the core smartphone functions.
This document provides a user guide for the iPad, covering various topics:
1. An overview of the iPad, its features like the multi-touch screen, buttons, ports and accessories.
2. Getting started with setting up the iPad, connecting to WiFi and other accounts, syncing with iTunes and international settings.
3. The basics of using apps, continuity features, customizing the iPad, typing, searching and controlling alerts and notifications.
4. Details are given for the built-in apps like Camera, Safari, Mail, Music and tips for travel and battery use. Settings for these apps are also covered.
This document provides an overview of the features and apps included on the iPad. It describes the multi-touch display, buttons including the home and side buttons, ports including the dock connector and headphone jack. It provides instructions for basic functions like locking the screen, adjusting the volume, and installing the micro-SIM card. The home screen and included apps like Safari, Mail, Photos, Video and others are outlined. The guide is intended to help users get started with the basic operation and settings of the iPad.
This document provides an overview of the features and apps included on the iPad. It describes the multi-touch display, buttons including the home and volume buttons, and ports including the dock connector and headphone jack. It provides instructions for basic functions like locking the screen, adjusting volume, and charging the battery. The document also summarizes the main apps included like Safari, Mail, Photos, and includes brief descriptions of their core functionality.
This document provides an overview of the features and controls of the iPad, including:
- The Home screen, buttons, SIM card tray, and Multi-Touch display
- Setting up the iPad, connecting it to a computer, and using accessories like the power adapter
- Using basic functions like apps, typing, searching, printing and file sharing
- Features of popular apps like Safari, Mail, Messages, Camera, FaceTime, Photo Booth, Photos, Videos, YouTube, Calendar, Contacts, Notes, Reminders, Maps, Music, iTunes Store, App Store, Newsstand, iBooks, Game Center and Settings
- Accessibility, international keyboards, support information, and safety guidelines
This document provides an overview of the features and apps included on the iPad. It describes the multi-touch display, buttons including the home and side buttons, ports including the dock connector and headphone jack. It provides instructions for basic functions like locking the screen, adjusting the volume, and installing the micro-SIM card. The home screen and included apps like Safari, Mail, Photos, Video and others are outlined. The guide is intended to help users understand the basic operation and capabilities of the iPad.
This document provides an overview of the features and controls of the iPad, including:
- The Home screen, buttons, SIM card tray, and Multi-Touch display
- Setting up the iPad, connecting it to a computer, and using accessories like the power adapter
- Using basic functions like apps, typing, searching, printing and file sharing
- Features of popular apps like Safari, Mail, Messages, Camera, FaceTime, Photo Booth, Photos, Videos, YouTube, Calendar, Contacts, Notes, Reminders, Maps, Music, iTunes Store, App Store, Newsstand, iBooks, Game Center and Settings
- Accessibility, international keyboards, support information, and safety guidelines
This document provides an overview of the features and controls of the iPad, including:
- The Home screen, buttons, and ports
- How to lock/unlock, turn on/off, and adjust the volume
- Using accessories like the power adapter and USB cable
- Controlling apps and switching between them using the Home and Side buttons
- Customizing the screen lock settings and auto-lock times
This document provides an overview of the iPhone user guide for iOS 6.1 software. It describes the basic features and functions of the iPhone, including [1] an overview of the iPhone 5 and accessories that are included, [2] descriptions of the buttons and how to use them, and [3] explanations of status icons and basic usage. It then provides a brief chapter-by-chapter outline of the contents of the user guide, covering topics like making calls, using apps, browsing the internet, taking photos and more. The document aims to familiarize users with the core capabilities and components of the iPhone.
This document provides an overview and user guide for the iPhone:
- It describes the basic iPhone features and accessories that come with the device. This includes the display, buttons, cameras, and included cables and adapters.
- It provides instructions for basic setup and use of the iPhone, including connecting to WiFi, setting up accounts, syncing with iTunes, customizing the Home screen, making calls, browsing the web, and using apps.
- It includes chapters on the built-in apps like Phone, Mail, Music, Camera, Videos, Photos, and the App Store. It describes how to use each app's basic and advanced features.
- It also covers settings and options to customize
The document is a module that provides an overview of the iPad, including its parts, accessories, buttons, SIM card tray, and status icons. It contains 5 lessons that cover the iPad overview, accessories, buttons, SIM card tray, and status icons. The module aims to teach students about the basic features and functions of the iPad.
Join us as we host iPad Academy for the Beginner! Integrating iPads into your curriculum is easier than ever - it's just about knowing where to start and how to find the good stuff! In our sessions, we will start with the basics, then move on to how it can improve your productivity and effectively improve student learning. Each session will focus on one particular area: Getting to Know Your iPad & Productivity Tools; Communication & Collaboration Tools; and Curation & Creation Tools. You'll be shown how to use the apps in practical ways at a pace that is right for you! You can feel comfortable knowing that when you walk away from this academy, you will be armed with a toolbox of resources and skills to help foster creativity and increase student learning. Look forward to an Advanced iPad Academy in Spring 2015!
This document provides an overview and user guide for the iPhone. It describes the iPhone hardware including buttons, apps, and status icons. It then covers getting started tasks like setting up accounts and connecting to WiFi. The bulk of the document provides step-by-step instructions for using key iPhone apps and features like Phone, Mail, Safari, iPod, Camera, YouTube, Stocks, Maps, Weather, and more. It also includes chapters on settings, contacts, and accessories. In total, the guide aims to help users understand and fully utilize all aspects of the iPhone.
A presentation covering tips & tricks to do more with your iPad, including adjusting settings, using Safari, iCloud, manipulating text, editing photos, and more.
iPad class for beginners who have little experience with mobile technology. Includes overview of iPad, including hardware and controls, becoming familiar with the home screen and introduces how to use the iPad with multi-touch controls. Additional resources for more information included. Illustrated.
Talk to Siri to practice speaking and listening skills
ABC Mouse: Educational games for early learners
Endless Alphabet: Interactive alphabet app
Starfall ABCs: Learn letters and sounds through games and activities
LeapFrog Phonics: Learn phonics through interactive games
Sago Mini: Early learning games for numbers, letters, art, music
Toddler Learning Games: Fun games for colors, shapes, numbers
Kids A-Z: Learn letters, sounds, sight words through games and activities
PBS Kids: Games and videos from your favorite PBS shows
Sesame Street: Games and videos from Sesame Street
Apps for 2-3
Samsung Galaxy Note 9 Manual / User Guidemanualsheet
The document provides instructions for setting up a Samsung device, including installing SIM and memory cards, charging the battery, using the S Pen, locking and unlocking the screen, and adding accounts. It also describes transferring data from an old device using Smart Switch and includes an overview of some special features like Bixby assistance, the S Pen, dual cameras, and water and dust resistance.
iPad, iOS & Apps Fundamentals for the Classroom
iPads are becoming a common sight in the classroom, in the hands of both teachers and students, and the number of educational apps is growing everyday. Learn how to get the most from the iPad as a classroom teaching tool and enhance student achievement, save time, and be more productive. How does a teacher start to use iPads in the classroom? This workshop will include the basics for getting started and on the hardware fundamentals with iOS.
This document provides a summary of the book "My iPad" including key details about the book such as its author, number of pages, publisher, and description. The book offers a fully illustrated guide to using an iPad, with each task accompanied by numbered visuals. It covers setup and configuration, using apps like Pages and Maps, and provides tips and help for troubleshooting issues. The book description indicates it helps users connect to Wi-Fi and mobile networks, use the keyboard and dictation, control iPad settings, use iCloud and more to get the most from their iPad.
This document provides a summary of the book "My iPad" including key details about the book such as its author, number of pages, publisher, and description. The book offers a fully illustrated guide to using an iPad, with each task accompanied by numbered visuals. It covers setup and configuration, using apps like Pages and Maps, connecting to Wi-Fi and mobile carriers, using features like Control Center, Siri, iCloud, the camera, and popular apps. The book aims to clearly illustrate the steps needed to accomplish tasks on an iPad.
Meta Revolutionizes Product Promotion with Automated Video Catalog Ads.pptxprovidenceadworks416
As a digital marketer, I am thrilled to see Meta revolutionizing product promotion with its new automated video catalog ads. This innovative feature allows anyone to seamlessly integrate dynamic video content into my catalog product ads, enhancing the visual appeal and engagement of campaigns. By leveraging Meta's advanced AI and machine learning capabilities, one can automatically deliver tailored video ads to the most interested users, boosting traffic and conversions. This new approach not only simplifies the ad creation process but also significantly improves performance and ROI.
This document was submitted as part of interview process for Content Strategist position at Viapulsa, an Indonesian tech company which offers service to convert/transfer mobile credits into bank account.
E-Learning Vs Traditional Learning_ Benefits and Differences.pdfMega P
E-learning and traditional learning are two distinct approaches to education, each offering unique advantages and facing specific challenges. E-learning provides flexibility and convenience, allowing students to access materials and complete assignments at their own pace and schedule. Traditional learning fosters direct, face-to-face interaction between students and instructors, which can enhance communication, immediate feedback, and a sense of community.
How to Generate Add to Calendar Link using Cal.etY
Cal.et is a free tool that helps you create “Add to Calendar” links for your events. It supports popular calendar platforms like Google, Apple, Outlook, Yahoo, and Office365. Users can generate short, shareable URLs, customize event details, and even create QR codes for easy access. It’s ideal for embedding event links in emails, websites, and social media, making it easier for participants to save event information directly to their calendars.
Transforming Digital Marketing with Top AI Tools of 2024.pdfTirupati Gayaph
In today's rapidly evolving digital marketing landscape, leveraging advanced technologies is essential for achieving competitive advantage. Artificial Intelligence (AI) is at the forefront of this transformation, providing businesses with innovative tools to enhance engagement, streamline operations, and optimize strategies. This presentation covers some of the leading AI marketing tools that are revolutionizing the industry in 2024.
Slide 1: Introduction to AI in Marketing
• Overview of AI’s impact on digital marketing
• Importance of integrating AI tools in marketing strategies
Slide 2: HubSpot’s AI Features
• Predictive lead scoring
• AI-driven content recommendations
• Enhancing customer relationship management
Slide 3: OpenAI’s ChatGPT
• Human-like text generation for chatbots
• Real-time customer support solutions
• Improving customer engagement and satisfaction
Slide 4: Marketo’s AI Capabilities
• Automated email marketing
• Predictive content and customer segmentation
• Personalized marketing for increased conversions
Slide 5: Mailchimp’s AI-Powered Campaigns
• Predictive email sending times
• AI for personalized product recommendations
• Optimizing email marketing effectiveness
Slide 6: Canva’s AI Design Tools
• AI-powered design suggestions
• Access to current design trends
• Simplifying the creation of professional marketing materials
Slide 7: Hootsuite’s AI-Enhanced Social Media Tools
• AI-driven analytics for social media management
• Optimal posting times based on audience insights
• Enhancing social media strategy with data-driven decisions
Slide 8: Conclusion
• Recap of the benefits of AI marketing tools
• The importance of adopting AI technologies in marketing
• Call to explore our blog on Best AI Marketing Tools for more insights
These AI marketing tools are essential for businesses that want to harness the power of AI to enhance their marketing efforts. By adopting these technologies, companies can achieve more personalized customer interactions, efficient operations, and improved marketing outcomes.
For an in-depth understanding of how these AI marketing tools can transform your marketing approach, please visit our blog on Best AI Marketing Tools.
Top 10 AI Trends to Watch in 2024 with Intelisyncnehapardhi711
As we advance further into the digital age, artificial intelligence (AI) continues to evolve, shaping various industries and aspects of our daily lives. The advancements in AI for 2024 promise significant transformations across multiple sectors. From agentic AI and open-source AI to AI-powered cybersecurity and sustainability, these trends highlight the growing influence of AI on our world. By staying informed and embracing these trends, businesses and individuals can harness the power of AI to innovate and thrive.
This article explores the top 10 AI trends to watch in 2024, providing an overview, impact, and examples of each trend.
Top 10 AI Trends to Watch in 2024
Trend 1: Agentic AI
Overview of Agentic AI
Agentic AI represents a fundamental shift in artificial intelligence. These AI systems are designed to comprehend complex workflows and pursue difficult objectives autonomously, with minimal human assistance. Essentially, agentic AI functions similarly to human employees, understanding intricate contexts and instructions in normal language, defining goals, deducing subtasks, and adapting actions to changing circumstances.
Impact of Agentic AI
Agentic AI has the potential to drastically alter organizational roles, procedures, and relationships. AI assistants with advanced thinking and planning capabilities can perform tasks previously managed by humans. This shift enhances productivity by fully automating complex processes, freeing workers from repetitive tasks to focus on more critical activities. The ability to adapt quickly to changing circumstances ensures continuous operational improvements.
Examples and Use Cases of Agentic AI
Autonomous Vehicles: Self-driving cars use agentic AI to navigate roads, interpret traffic signals, and make real-time decisions to ensure passenger safety.
Smart Home Devices: AI-powered home assistants, like smart thermostats and security systems, operate autonomously to optimize energy usage and enhance security.
Customer Service Bots: Advanced chatbots handle complex customer queries, provide solutions, and escalate issues to human agents when necessary.
Trend 2: Open Source AI
Overview of Open Source AI
Open-source AI involves freely available source code, encouraging developers to collaborate, use, adapt, and share AI technology. This openness fosters innovation and speeds up the development of practical AI solutions across various sectors, including healthcare, finance, and education.
Impact of Open Source AI
The collaborative nature of open-source AI promotes transparency and facilitates continuous improvement, leading to feature-rich, reliable, and modular solutions. These platforms enable the creation of applications such as real-time fraud detection, medical image analysis, personalized recommendations, and customized learning experiences.
Examples and Use Cases of Open Source AI
TensorFlow: An open-source machine learning framework by Google, widely used for building and deploying AI models.
2024 Trend Updates: What Really Works In SEO & Content MarketingSearch Engine Journal
The future of SEO is trending toward a more human-first and user-centric approach, powered by AI intelligence and collaboration. Are you ready?
Watch as we explore which SEO trends to prioritize to achieve sustainable growth and deliver reliable results. We’ll dive into best practices to adapt your strategy around industry-wide disruptions like SGE, how to navigate the top challenges SEO professionals are facing, and proven tactics for prioritizing quality and building trust.
You’ll hear:
- The top SEO trends to prioritize in 2024 to achieve long-term success.
- Predictions for SGE’s impact, and how to adapt.
- What E-E-A-T really means, and how to implement it holistically (hint: it’s never been more important).
With Zack Kadish and Alex Carchietta, we’ll show you which SEO trends to ignore and which to focus on, along with the solution to overcoming rapid, significant and disruptive Google algorithm updates.
If you’re looking to cut through the noise of constant SEO and content trends to drive success, you won’t want to miss this webinar.
Title: Making Money the Easy Way: A Quick Guide to Generating IncomeWilliamZinsmeister
Welcome to "Making Money the Easy Way: A Quick Guide to Generating Income." This book is designed to provide you with practical, actionable strategies to generate income with minimal effort. Whether you’re looking to supplement your current income or create a full-time revenue stream, this guide covers a variety of methods to help you achieve your financial goals. We will explore opportunities available online, various investment strategies, profitable side hustles, creative approaches, and essential financial tips to ensure sustainable income growth.
TAM AdEx-Quarterly Report on Television Advertising_2024.pdfSocial Samosa
According to the report, there was a 4% decrease in television advertising volumes compared to the same period in 2023, indicating shifts in advertising strategies or market dynamics.
This document, created by Vemio Advertising, the leading digital marketing agency in Delhi NCR, provides a concise and actionable guide to developing an effective Google Ad strategy. It covers essential aspects such as setting clear objectives, conducting thorough keyword research, creating compelling ad copy, targeting the right audience, and optimizing ad spend. Additionally, it emphasizes the importance of ad quality, relevance, and continuous performance analysis. By following these best practices, businesses can enhance their Google Ad campaigns, drive targeted traffic, and achieve a higher return on investment. For more details please visit on https://vemioadvt.in/services/digitalmarketing/
2. Contents
7 Chapter 1: iPad at a Glance
7 iPad Overview
9 Accessories
9 Multi-Touch screen
10 Sleep/Wake button
10 Home button
11 Volume buttons and the Side Switch
11 SIM card tray
12 Status icons
13 Chapter 2: Getting Started
13 Set up iPad
13 Connect to Wi-Fi
14 Apple ID
14 Set up mail and other accounts
14 Manage content on your iOS devices
15 iCloud
16 Connect iPad to your computer
17 Sync with iTunes
17 Your iPad name
17 Date and time
18 International settings
18 View this user guide on iPad
19 Chapter 3: Basics
19 Use apps
21 Customize iPad
23 Type text
26 Dictation
27 Search
28 Control Center
28 Alerts and Notification Center
29 Sounds and silence
29 Do Not Disturb
30 AirDrop, iCloud, and other ways to share
30 Transfer files
31 Personal Hotspot
31 AirPlay
32 AirPrint
32 Bluetooth devices
32 Restrictions
33 Privacy
2
3. 33 Security
35 Charge and monitor the battery
36 Travel with iPad
37 Chapter 4: Siri
37 Use Siri
38 Tell Siri about yourself
38 Make corrections
38 Siri settings
39 Chapter 5: Messages
39 iMessage service
39 Send and receive messages
40 Manage conversations
41 Share photos, videos, and more
41 Messages settings
42 Chapter 6: Mail
42 Write messages
43 Get a sneak peek
43 Finish a message later
43 See important messages
44 Attachments
44 Work with multiple messages
45 See and save addresses
45 Print messages
45 Mail settings
46 Chapter 7: Safari
46 Safari at a glance
47 Search the web
47 Browse the web
48 Keep bookmarks
48 Share what you discover
49 Fill in forms
49 Avoid clutter with Reader
50 Save a reading list for later
50 Privacy and security
51 Safari settings
52 Chapter 8: Music
52 iTunes Radio
53 Get music
53 Browse and play
55 Playlists
55 Genius—made for you
56 Siri
56 iTunes Match
57 Music settings
Contents 3
4. 58 Chapter 9: FaceTime
58 FaceTime at a glance
59 Make and answer calls
59 Manage calls
60 Chapter 10: Calendar
60 Calendar at a glance
61 Invitations
61 Use multiple calendars
62 Share iCloud calendars
62 Calendar settings
63 Chapter 11: Photos
63 View photos and videos
64 Organize your photos and videos
64 iCloud Photo Sharing
65 My Photo Stream
66 Share photos and videos
66 Edit photos and trim videos
67 Print photos
67 Import photos and videos
67 Photos settings
68 Chapter 12: Camera
68 Camera at a glance
69 Take photos and videos
69 HDR
69 View, share, and print
70 Camera settings
71 Chapter 13: Contacts
71 Contacts at a glance
72 Add contacts
73 Contacts settings
74 Chapter 14: Clock
74 Clock at a glance
75 Alarms and timers
76 Chapter 15: Maps
76 Find places
77 Get more info
77 Get directions
78 3D and Flyover
78 Maps settings
79 Chapter 16: Videos
79 Videos at a glance
80 Add videos to your library
80 Control playback
81 Videos settings
Contents 4
5. 82 Chapter 17: Notes
82 Notes at a glance
83 Share notes in multiple accounts
84 Chapter 18: Reminders
85 Scheduled reminders
85 Location reminders
85 Reminders settings
86 Chapter 19: Photo Booth
86 Take photos
87 Manage photos
88 Chapter 20: Game Center
88 Game Center at a glance
89 Play games with friends
89 Game Center settings
90 Chapter 21: Newsstand
90 Newsstand at a glance
91 Chapter 22: iTunes Store
91 iTunes Store at a glance
92 Browse or search
92 Purchase, rent, or redeem
93 iTunes Store settings
94 Chapter 23: App Store
94 App Store at a glance
95 Find apps
95 Purchase, redeem, and download
96 App Store settings
97 Chapter 24: Podcasts
97 Podcasts at a glance
98 Get podcasts
98 Control playback
99 Organize your podcasts
99 Podcasts settings
100 Appendix A: Accessibility
100 Accessibility features
100 Accessibility Shortcut
101 VoiceOver
111 Siri
111 Zoom
111 Invert Colors
111 Speak Selection
112 Speak Auto-Text
112 Large, bold, and high-contrast text
112 Reduced screen motion
112 On/off switch labels
Contents 5
6. 112 Subtitles and closed captions
113 Mono audio and balance
113 Assignable tones
113 Guided Access
114 Switch Control
116 AssistiveTouch
117 Widescreen keyboards
117 Accessibility in OS X
118 Appendix B: iPad in Business
118 iPad in the enterprise
118 Mail, Contacts, and Calendar
118 Network access
118 Apps
120 Appendix C: International Keyboards
120 Use international keyboards
121 Special input methods
123 Appendix D: Safety, Handling, & Support
123 Important safety information
125 Important handling information
125 iPad Support site
126 Restart or reset iPad
126 Reset iPad settings
126 An app doesn’t fill the screen
127 Onscreen keyboard doesn’t appear
127 Get information about your iPad
127 Usage information
127 Disabled iPad
127 VPN settings
128 Profiles settings
128 Back up iPad
129 Update and restore iPad software
129 Cellular settings
130 Sound, music, and video
131 Sell or give away iPad?
132 Learning more, service, and support
132 FCC compliance statement
133 Canadian regulatory statement
133 Disposal and recycling information
134 Apple and the environment
Contents 6
7. 1
7
iPad at a Glance
This guide describes iOS 7 for iPad 2, iPad (3rd generation and 4th generation), iPad Air, iPad mini,
and iPad mini with Retina display.
iPad Overview
iPad mini with Retina display
Multi-Touch
display
Multi-Touch
display
FaceTime
HD camera
FaceTime
HD camera
HomeHome
App iconsApp icons
Status barStatus bar
Lightning connectorLightning connector
SpeakersSpeakers
Headset jackHeadset jack
Sleep/Wake buttonSleep/Wake button
iSight
camera
iSight
camera
Volume
buttons
Volume
buttons
Nano-SIM
tray (cellular
models)
Nano-SIM
tray (cellular
models)
Side SwitchSide Switch
MicrophonesMicrophones
8. Chapter 1 iPad at a Glance 8
iPad Air
Multi-Touch
display
Multi-Touch
display
FaceTime
HD camera
FaceTime
HD camera
HomeHome
App iconsApp icons
Status barStatus bar
Lightning connectorLightning connector
MicrophonesMicrophones
Headset jackHeadset jack
Nano-SIM
tray (cellular
models)
Nano-SIM
tray (cellular
models)
Sleep/Wake
button
Sleep/Wake
button
iSight
camera
iSight
camera
Volume
buttons
Volume
buttons
Side SwitchSide Switch
SpeakersSpeakers
Your features and apps may vary depending on the model of iPad you have, and on your
location, language, and carrier. To find out which features are supported in your area, see
www.apple.com/ios/feature-availability.
9. Chapter 1 iPad at a Glance 9
Accessories
The following accessories are included with iPad:
USB power adapter. Use the included adapter to power iPad and charge the battery. Your
adapter looks like one shown below, depending on the iPad model and your region.
Lightning to USB Cable. Use this to connect iPad (4th generation or later) or iPad mini to the
USB power adapter or to your computer.
30-pin to USB Cable. Use this to connect iPad 2 or iPad (3rd generation) to the USB power
adapter or to your computer. Use the cable with the optional iPad Dock, or plug it directly
into iPad.
Multi-Touch screen
A few simple gestures—tap, drag, swipe, and pinch—are all you need to use iPad and its apps.
10. Chapter 1 iPad at a Glance 10
Sleep/Wake button
You can lock iPad and put it to sleep when you’re not using it. When iPad is locked,
nothing happens if you touch the screen, but music continues playing and you can use the
volume buttons.
Sleep/Wake
button
Sleep/Wake
button
Lock iPad. Press the Sleep/Wake button.
Unlock iPad. Press the Home button or the Sleep/Wake button, then drag the slider that
appears onscreen.
Turn iPad on. Hold down the Sleep/Wake button until the Apple logo appears.
Turn iPad off. Hold down the Sleep/Wake button for a few seconds until the red slider appears
onscreen, then drag the slider.
If you don’t touch the screen for two minutes, iPad locks itself. You can change how long iPad
waits to lock itself, or set a passcode to unlock iPad.
Set the auto-lock time. Go to Settings > General > Auto-Lock.
Set a passcode. Go to Settings > General > Passcode Lock.
An iPad Smart Cover or iPad Smart Case, sold separately, can lock or unlock iPad for you (iPad 2
or later).
Set your iPad Smart Cover or iPad Smart Case to lock and unlock iPad. Go to Settings >
General, then turn on Lock/Unlock.
Home button
The Home button takes you back to the Home screen at any time. It also provides other
convenient shortcuts.
Go to the Home screen. Press the Home button.
On the Home screen, tap an app to open it. See Start from home on page 19.
See apps you’ve opened. Double-click the Home button when iPad is unlocked, then swipe left
or right.
Use Siri (iPad 3rd generation or later). Press and hold the Home button. See Use Siri on page 37.
11. Chapter 1 iPad at a Glance 11
Volume buttons and the Side Switch
Use the Volume buttons to adjust the volume of songs and other media, and of alerts and sound
effects. Use the Side Switch to silence audio alerts and notifications. Or, set it to prevent iPad
from switching between portrait and landscape orientation.
Volume
buttons
Volume
buttons
Side
Switch
Side
Switch
Adjust the volume. Press the Volume buttons.
•• Mute the sound: Press and hold the Volume Down button.
•• Set a volume limit: Go to Settings > Music > Volume Limit.
WARNING: For important information about avoiding hearing loss, see Important safety
information on page 123.
Mute notifications, alerts, and sound effects. Slide the Side Switch toward the Volume buttons.
The Side Switch doesn’t mute the audio from music, podcasts, movies, and TV shows.
Use the Side Switch to lock the screen orientation. Go to Settings > General, then tap
Lock Rotation.
You can also use Do Not Disturb to silence FaceTime calls, alerts, and notifications.
Set iPad to Do Not Disturb: Swipe up from the bottom edge of the screen to open Control
Center, then tap . Do Not Disturb keeps alerts and notifications from making any sounds or
lighting up the screen when the screen is locked. Alarms, however, still sound. If the screen is
unlocked, Do Not Disturb has no effect.
To schedule quiet hours, allow FaceTime calls from specific people, or allow repeated FaceTime
calls to ring through, go to Settings > Do Not Disturb. See Do Not Disturb on page 29.
SIM card tray
The SIM card in iPad Wi-Fi + Cellular models is used for your cellular data connection. If your SIM
card isn’t installed or if you change carriers, you may need to install or replace the SIM card.
Nano-SIM
card
Nano-SIM
card
SIM
tray
SIM
tray
SIM eject
tool
SIM eject
tool
Open the SIM tray. Insert the SIM eject tool into the hole on the SIM tray, then press firmly and
push the tool straight in until the tray pops out. Pull out the SIM tray to install or replace the SIM
card. If you don’t have a SIM eject tool, try the end of a small paper clip.
For more information, see Cellular settings on page 129.
12. Chapter 1 iPad at a Glance 12
Status icons
The icons in the status bar at the top of the screen give information about iPad:
Status icon What it means
Wi-Fi iPad has a Wi-Fi Internet connection. The more bars, the stronger the
connection. See Connect to Wi-Fi on page 13.
Cell signal iPad (Wi-Fi + Cellular models) is in range of the cellular network. If
there’s no signal,“No service”appears.
Airplane Mode Airplane Mode is on—you can’t access the Internet, or use
Bluetooth® devices. Non-wireless features are available. See Travel
with iPad on page 36.
LTE iPad (Wi-Fi + Cellular models) is connected to the Internet over a 4G
LTE network.
4G iPad (Wi-Fi + Cellular models) is connected to the Internet over a 4G
network.
3G iPad (Wi-Fi + Cellular models) is connected to the Internet over a 3G
network.
EDGE iPad (Wi-Fi + Cellular models) is connected to the Internet over an
EDGE network.
GPRS iPad (Wi-Fi + Cellular models) is connected to the Internet over a
GPRS network.
Do Not Disturb Do Not Disturb is turned on. See Do Not Disturb on page 29.
Personal Hotspot iPad is providing a Personal Hotspot for other iOS devices. See
Personal Hotspot on page 31.
Syncing iPad is syncing with iTunes. See Sync with iTunes on page 17.
Activity There is network or other activity. Some third-party apps use this
icon to show app activity.
VPN iPad is connected to a network using VPN. See Network access on
page 118.
Lock iPad is locked. See Sleep/Wake button on page 10.
Alarm An alarm is set. See Chapter 14, Clock, on page 74.
Screen orientation
lock
Screen orientation is locked. See Change the screen orientation on
page 21.
Location Services An app is using Location Services. See Privacy on page 33.
Bluetooth® Blue or White icon: Bluetooth is on and paired with a device, such as
a headset or keyboard.
Gray icon: Bluetooth is on and paired with a device, but the device is
out of range or turned off.
No icon: Bluetooth is not paired with a device.
See Bluetooth devices on page 32.
Bluetooth battery Shows the battery level of a supported paired Bluetooth device.
Battery Shows the battery level or charging status. See Charge and monitor
the battery on page 35.
13. 2
13
Getting Started
Read this chapter to learn how to set up iPad, set up mail accounts, use iCloud, and more.
· WARNING: To avoid injury, read Important safety information on page 123 before using iPad.
Set up iPad
Set up iPad. Turn on iPad and follow the Setup Assistant.
The Setup Assistant guides you through the setup process, including:
•• Connecting to a Wi-Fi network
•• Signing in with or creating a free Apple ID
•• Entering a passcode
•• Setting up iCloud and iCloud Keychain
•• Turning on recommended features, such as Location Services and Find My iPad
During setup, you can copy your apps, settings, and content from another iPad by restoring from
an iCloud backup or from iTunes. See Back up iPad on page 128.
If you don’t have access to a Wi-Fi Internet connection during setup, you can use your computer’s
Internet connection—just connect iPad to your computer when prompted by the Setup
Assistant. For help connecting iPad to your computer, see Connect iPad to your computer on
page 16.
Connect to Wi-Fi
If appears at the top of the screen, you’re connected to a Wi-Fi network, and iPad reconnects
anytime you return to the same location.
Join a Wi-Fi network or adjust Wi-Fi settings. Go to Settings > Wi-Fi.
•• Choose a network: Tap one of the listed networks and enter the password, if asked.
•• Ask to join networks: Turn on Ask to Join Networks to be prompted when a Wi-Fi network
is available. Otherwise, you must manually join a network when a previously used network
isn’t available.
•• Forget a network: Tap next to a network you’ve joined before. Then tap Forget this Network.
•• Join other network: Tap Other, then enter the name of the network. You need to know the
network name, security type, and password.
Set up your own Wi-Fi network. If you have a new or unconfigured AirPort base station turned
on and within range, you can use iPad to set it up. Go to Settings > Wi-Fi and look for“Set up an
AirPort base station.”Tap your base station and the Setup Assistant does the rest.
14. Chapter 2 Getting Started 14
Manage your AirPort network. If iPad is connected to an AirPort base station, go to Settings >
Wi-Fi, tap next to the network name, then tap Manage this Network. If you haven’t yet
downloaded AirPort Utility, tap OK to open the App Store and download it (this requires an
Internet connection).
Apple ID
Your Apple ID is the user name for a free account that lets you access Apple services, such as the
iTunes Store, the App Store, and iCloud. You need only one Apple ID for everything you do with
Apple. There may be charges for services and products that you use, purchase, or rent.
If you have an Apple ID, use it when you first set up iPad, and whenever you need to sign in to
an Apple service. If you don’t already have an Apple ID, you can create one when you’re asked to
sign in.
Create an Apple ID. Go to Settings > iTunes & App Stores and tap Sign In. (If you’re already
signed in and want to create another Apple ID, first tap your Apple ID, then tap Sign Out.)
For more information, see support.apple.com/kb/he37.
Set up mail and other accounts
iPad works with iCloud, Microsoft Exchange, and many of the most popular Internet-based mail,
contact, and calendar services.
If you don’t already have a mail account, you can set up a free iCloud account when you set up
iPad, or set one up later in Settings > iCloud. See iCloud on page 15.
Set up an iCloud mail account. Go to Settings > iCloud.
Set up another account. Go to Settings > Mail, Contacts, Calendars.
You can add contacts using an LDAP or CardDAV account, if your company or organization
supports it. See Add contacts on page 72.
For information about setting up a Microsoft Exchange account in a corporate environment, see
Mail, Contacts, and Calendar on page 118.
Manage content on your iOS devices
You can transfer information and files between iPad and your other iOS devices and computers,
using either iCloud or iTunes.
•• iCloud stores content such as music, photos, calendars, contacts, documents, and more, and
wirelessly pushes it to your other iOS devices and computers, keeping everything up to date.
See iCloud, below.
•• iTunes syncs music, video, photos, and more between your computer and iPad. Changes
you make on one device are copied to the other when you sync. You can also use iTunes to
copy a file to iPad for use with an app, or to copy a document you’ve created on iPad to your
computer. See Sync with iTunes on page 17.
You can use iCloud or iTunes, or both, depending on your needs. For example, you can use
iCloud Photo Stream to automatically push photos you take on iPad to your other devices, and
use iTunes to sync photo albums from your computer to iPad.
15. Chapter 2 Getting Started 15
Important: Don’t sync items in the Info pane of iTunes (such as contacts, calendars, and notes)
and also use iCloud to keep that information up to date on your devices. Otherwise, you may see
duplicated data on iPad.
You can also choose to manually manage content from iTunes by selecting that option in the
iPad Summary pane. Then you can drag songs or videos from your iTunes library to iPad in
iTunes. This is useful if your iTunes library contains more items than can fit on your iPad.
Note: If you use iTunes Match, you can manually manage only video.
iCloud
iCloud stores your content, including music, photos, contacts, calendars, and supported
documents. Content stored in iCloud is pushed wirelessly to your other iOS devices and
computers set up with the same iCloud account.
iCloud is available on:
•• iOS devices with iOS 5 or later
•• Mac computers with OS X Lion v10.7.2 or later
•• PCs with the iCloud Control Panel for Windows (Windows 7 or Windows 8 is required)
Note: iCloud may not be available in all areas, and iCloud features may vary by area. For more
information, go to www.apple.com/icloud.
iCloud features include:
•• Apps and Books—Download previous App Store and iBooks Store purchases for free, anytime.
•• Mail, Contacts, Calendars—Keep your mail contacts, calendars, notes, and reminders up to date
across all your devices.
•• Documents in the Cloud—For iCloud-enabled apps, keep documents and app data up to date
across all your devices.
•• iTunes in the Cloud—Download previous iTunes music and TV show purchases to iPad for
free, anytime.
•• Find My iPad—Locate your iPad on a map, display a message, play a sound, lock the screen, or
remotely wipe the data. See Find My iPad on page 35.
•• Photos—Use My Photo Stream to send photos you take with your iPad to your other devices,
automatically. Use iCloud Photo Sharing to share photos and videos with just the people
you choose, and let them add photos, videos, and comments. See iCloud Photo Sharing on
page 64 and My Photo Stream on page 65.
•• Backup—Back up iPad to iCloud automatically when connected to power and Wi-Fi. See Back
up iPad on page 128.
•• Find My Friends—Keep track of your family and friends (when connected to a Wi-Fi or cellular
network) using the Find My Friends app. Download the free app from the App Store.
•• iTunes Match—With an iTunes Match subscription, all your music, including music you’ve
imported from CDs or purchased somewhere other than iTunes, appears on all your devices
and can be downloaded and played on demand. See iTunes Match on page 56.
•• iCloud Tabs—See the webpages you have open on your other iOS devices and OS X
computers. See Chapter 7, Safari, on page 46.
•• iCloud Keychain—Keep your saved passwords and credit card information up to date on your
devices. See iCloud Keychain on page 34.
16. Chapter 2 Getting Started 16
With iCloud, you get a free mail account and 5 GB of storage for your mail, documents, and
backups. Your purchased music, apps, TV shows, and books, as well as your Photo Stream, don’t
count against your free space.
Sign in, create an iCloud account, or set iCloud options. Go to Settings > iCloud.
Buy more iCloud storage. Go to Settings > iCloud > Storage & Backup, then tap Buy More
Storage or Change Storage Plan. For information about purchasing iCloud storage, see
help.apple.com/icloud.
Turn on Automatic Downloads for music, apps, or books. Go to Settings > iTunes & App Store.
View and download previous purchases.
•• iTunes Store: You can access your purchased songs and videos in the Music and Videos apps.
Or, in iTunes Store, tap Purchased .
•• App Store: Go to App Store, then tap Purchased .
•• iBooks Store: Go to iBooks, tap Store, then tap Purchased .
Find your iPad. Go to www.icloud.com, sign in with your Apple ID, then open Find My iPhone.
Use it to find an iPad or iPod touch, too.
Important: Find My iPad must first be turned on in Settings > iCloud.
For more information about iCloud, see www.apple.com/icloud. For support information, see
www.apple.com/support/icloud.
Connect iPad to your computer
Use the included USB cable to connect iPad to your computer. Connecting iPad to your
computer lets you sync information, music, and other content with iTunes. You can also sync with
iTunes wirelessly. See Sync with iTunes on page 17. To use iPad with your computer, you need:
•• A Mac with a USB 2.0 or 3.0 port, or a PC with a USB 2.0 port, and one of the following
operating systems:
•• OS X version 10.6.8 or later
•• Windows 8, Windows 7, Windows Vista, or Windows XP Home or Professional with Service
Pack 3 or later
•• iTunes, available at www.itunes.com/download
Unless iPad is actively syncing with your computer, you can disconnect it at any time. Look
at the top of the iTunes screen on your computer or on iPad to see if syncing is in progress. If
you disconnect iPad while it’s syncing, some data may not get synced until the next time you
connect iPad to your computer.
17. Chapter 2 Getting Started 17
Sync with iTunes
Syncing with iTunes copies information from your computer to iPad, and vice versa. You can sync
by connecting iPad to your computer with the included USB cable, or you can set up iTunes to
sync wirelessly using Wi-Fi. You can set iTunes to sync music, photos, videos, podcasts, apps, and
more. For information about syncing iPad, open iTunes on your computer, then select iTunes
Help from the Help menu.
Sync wirelessly. Connect iPad to your computer using the included USB cable. In iTunes on your
computer, select iPad, click Summary, then turn on“Sync with this iPad over Wi-Fi.”
When Wi-Fi syncing is turned on, iPad syncs when it’s connected to a power source, both
iPad and your computer are connected to the same wireless network, and iTunes is open on
the computer.
Tips for syncing with iTunes on your computer
Connect iPad to your computer, select it in iTunes, and set options in the different panes.
•• In the Summary pane, you can set iTunes to sync iPad automatically when it’s attached to your
computer. To temporarily override this setting, hold down Command and Option (Mac) or Shift
and Control (PC) until you see iPad appear in the iTunes window.
•• If you want to encrypt the information stored on your computer when iTunes makes a backup,
select“Encrypt iPad backup”in the Summary pane. Encrypted backups are indicated by a
lock icon , and a password is required in order to restore the backup. If you don’t select this
option, other passwords (such as those for mail accounts) aren’t included in the backup and
you’ll have to reenter them if you use the backup to restore iPad.
•• When you sync mail accounts in the Info pane, only the settings are transferred from your
computer to iPad. Changes you make to an account on iPad don’t sync to your computer.
•• In the Info pane, click Advanced to select options that let you replace the information on iPad
with the information from your computer during the next sync.
•• In the Photo pane, you can sync photos and videos from a folder on your computer.
Your iPad name
The name of your iPad is used by iTunes and iCloud.
Change the name of your iPad. Go to Settings > General > About > Name.
Date and time
The date and time are usually set for you based on your location—take a look at the Lock screen
to see if they’re correct.
Set whether iPad updates the date and time automatically. Go to Settings > General > Date &
Time, then turn Set Automatically on or off. If you set iPad to update the time automatically, it
gets the correct time over the network and updates it for the time zone you’re in. Some networks
don’t support network time, so in some areas iPad may not be able to automatically determine
the local time.
Set the date and time manually. Go to Settings > General > Date & Time, then turn off Set
Automatically.
Set whether iPad shows 24-hour time or 12-hour time. Go to Settings > General > Date & Time,
then turn 24-Hour Time on or off. (24-Hour Time may not be available in all areas.)
18. Chapter 2 Getting Started 18
International settings
Go to Settings > General > International to set:
•• The language for iPad
•• The keyboards you use
•• The region format (for dates, times, and telephone numbers)
•• The calendar format
View this user guide on iPad
You can view the iPad User Guide on iPad in Safari, and in the free iBooks app.
View the user guide in Safari. In Safari, tap , then tap the iPad User Guide bookmark. Or go to
help.apple.com/ipad.
Add an icon for the user guide to the Home screen. Tap , then tap Add to Home Screen.
View the user guide in iBooks. If you haven’t installed iBooks, open the App Store, then search
for and install iBooks. Open iBooks and tap Store. Search for“iPad User Guide,”then select and
download the user guide.
19. 3
19
Basics
Use apps
All the apps that come with iPad—as well as the apps you download from the App Store—are
on the Home screen.
Start from home
Tap an app to open it.
Press the Home button anytime to return to the Home screen. Swipe left or right to see
other screens.
Multitasking
iPad lets you run many apps at the same time.
View running apps. Double-click the Home button to reveal the multitasking screen. Swipe left
or right to see more. To switch to another app, tap it.
Drag an app
up to close it.
Drag an app
up to close it.
20. Chapter 3 Basics 20
Close an app. If an app isn’t working properly, you can force it to quit. Drag the app up from the
multitasking screen. Then try opening the app again.
If you have lots of apps, you can use Spotlight to find and open them. Pull down the center of
the Home screen to see the search field. See Search on page 27.
Look around
Drag a list up or down to see more. Swipe to scroll quickly; touch the screen to stop it. Some lists
have an index—tap a letter to jump ahead.
Drag a photo, map, or webpage in any direction to see more.
To quickly jump to the top of a page, tap the status bar at the top of the screen.
Zoom in or out
Stretch a photo, webpage, or map for a close-up—then pinch to zoom back out. In Photos, keep
pinching to see the collection or album the photo’s in.
Or double-tap a photo or webpage to zoom in, and double-tap again to zoom out. In Maps,
double-tap to zoom in and tap once with two fingers to zoom out.
21. Chapter 3 Basics 21
Multitasking gestures
You can use multitasking gestures on iPad to return to the Home screen, reveal the multitasking
display, or switch to another app.
Return to the Home screen. Pinch four or five fingers together.
Reveal the multitasking display. Swipe up with four or five fingers.
Switch apps. Swipe left or right with four or five fingers.
Turn multitasking gestures on or off. Go to Settings > General > Multitasking Gestures.
Change the screen orientation
Many apps give you a different view when you rotate iPad.
Lock the screen orientation. Swipe up from the bottom edge of the screen to open Control
Center, then tap .
The orientation lock icon appears in the status bar when the screen orientation is locked.
You can also set the Side Switch to lock the screen orientation instead of silencing sound effects
and notifications. Go to Settings > General, and under“Use Side Switch to,”tap Lock Rotation.
Customize iPad
Arrange your apps
Arrange apps. Touch and hold any app on the Home screen until it jiggles, then drag apps
around. Drag an app to the edge of the screen to move it to a different Home screen, or to the
Dock at the bottom of the screen. Press the Home button to save your arrangement.
22. Chapter 3 Basics 22
Create a new Home screen. While arranging apps, drag an app to the right edge of the
rightmost Home screen. The dots above the Dock show which of your Home screens
you’re viewing.
When iPad is connected to your computer, you can customize the Home screen using iTunes. In
iTunes, select iPad, then click Apps.
Start over. Go to Settings > General > Reset, then tap Reset Home Screen Layout to return the
Home screen and apps to their original layout. Folders are removed and the original wallpaper
is restored.
Organize with folders
Create a folder. While arranging apps, drag one app onto another. Tap the name of the folder to
rename it. Drag apps to add or remove them. Press the Home button when you finish.
You can have multiple pages of apps in a folder.
Delete a folder. Drag out all the apps—the folder is deleted automatically.
Change the wallpaper
Wallpaper settings let you set an image or photo as wallpaper for the Lock screen or Home screen.
Change the wallpaper. Go to Settings > Wallpapers & Brightness.
23. Chapter 3 Basics 23
Adjust the screen brightness
Adjust the screen brightness. Go to Settings > Wallpapers & Brightness and drag the slider. If
Auto-Brightness is on, iPad adjusts the screen brightness for current light conditions using the
built-in ambient light sensor.
You can also adjust the screen brightness in Control Center.
Type text
The onscreen keyboard lets you enter text when needed.
Enter text
Tap a text field to see the onscreen keyboard, then tap letters to type. If you touch the wrong
key, you can slide your finger to the correct key. The letter isn’t entered until you release your
finger from the key.
You can also use an Apple Wireless Keyboard to type. See Use an Apple Wireless Keyboard on
page 25. To use dictation instead of typing, see Dictation on page 26.
24. Chapter 3 Basics 24
Tap Shift to type uppercase, or touch the Shift key and slide to a letter. Double-tap Shift for
caps lock. To enter numbers, punctuation, or symbols, tap the Number key or the Symbol
key . To quickly end a sentence with a period and a space, just double-tap the space bar.
Enter accented letters or other alternate characters. Touch and hold a key, then slide to choose
one of the options.
Hide the onscreen keyboard. Tap the Keyboard key .
Depending on the app and language you’re using, iPad may correct misspellings and anticipate
what you’re typing. Accept a suggestion by entering a space or punctuation, or by tapping
return. To reject a suggestion, tap the“x.”If you reject the same suggestion a few times, iPad
stops suggesting it. If you see a word underlined in red, tap it to see suggested corrections. If the
word you want doesn’t appear, type the correction.
Set options for typing. Go to Settings > General > Keyboard.
Edit text
Revise text. Touch and hold the text to show the magnifying glass, then drag to position the
insertion point.
25. Chapter 3 Basics 25
Select text. Tap the insertion point to display the selection options. Or double-tap a word
to select it. Drag the grab points to select more or less text. In read-only documents, such as
webpages, touch and hold to select a word.
Grab pointsGrab points
You can cut, copy, or paste over selected text. With some apps, you can also get bold, italic, or
underlined text (tap B/I/U); get the definition of a word; or have iPad suggest an alternative. You
may need to tap to see all the options.
Undo the last edit. Shake iPad, then tap Undo.
Justify text. Select the text, then tap the left or right arrow (not always available).
Save keystrokes
A shortcut lets you enter a word or phrase by typing just a few characters. For example, type
“omw”to enter“On my way!”That one’s already set up for you—to add more, go to Settings >
General > Keyboard.
Create a shortcut. Go to Settings > General > Keyboard, then tap Add New Shortcut.
Have a word or phrase you use and don’t want it corrected? Create a shortcut, but leave the
Shortcut field blank.
Use iCloud to keep your personal dictionary up to date on your other devices. Go to Settings >
iCloud, then turn on Documents & Data.
Use an Apple Wireless Keyboard
You can use an Apple Wireless Keyboard (available separately) to enter text on your iPad. The
keyboard connects via Bluetooth, so you must first pair it with iPad.
Pair an Apple Wireless Keyboard with iPad. Turn on the keyboard, go to Settings > Bluetooth
and turn on Bluetooth, then tap the keyboard when it appears in the Devices list.
Once it’s paired, the keyboard reconnects to iPad whenever it’s in range—up to about 30 feet
(10 meters). When it’s connected, the onscreen keyboard doesn’t appear.
Save your batteries. Turn off Bluetooth and the wireless keyboard when not in use. You can turn
off Bluetooth in Control Center. To turn off the keyboard, hold down the On/off switch until the
green light goes off.
Unpair a wireless keyboard. Go to Settings > Bluetooth, tap next to the keyboard name, then
tap“Forget this Device.”
See Bluetooth devices on page 32.
26. Chapter 3 Basics 26
Add or change keyboards
You can turn typing features, such as spell checking, on or off; add keyboards for writing in
different languages; and change the layout of your onscreen keyboard or Apple Wireless
Keyboard.
Set typing features. Go to Settings > General > Keyboard.
Add a keyboard for another language. Go to Settings > General > Keyboard > Keyboards >
Add New Keyboard.
Switch keyboards. If you’ve set up keyboards for other languages in Settings > General >
International > Keyboards, you can switch among them by pressing Command-Space.
For information about international keyboards, see Use international keyboards on page 120.
Change the keyboard layout. Go to Settings > General > Keyboard > Keyboards, select a
keyboard, then choose a layout.
Keyboard layouts
On iPad, you can type with a split keyboard that’s at the bottom of the screen, or undocked and
in the middle of the screen.
Adjust the keyboard. Touch and hold , then:
•• Use a split keyboard: Slide your finger to Split, then release. Or spread the keyboard apart from
the middle.
•• Move the keyboard to the middle of the screen: Slide your finger to Undock, then release.
•• Return to a full keyboard: Slide your finger to Dock and Merge, then release.
•• Return a full keyboard to the bottom of the screen: Slide your finger to Dock, then release.
Turn Split Keyboard on or off. Go to Settings > General > Keyboard > Split Keyboard.
Dictation
On an iPad that supports it, you can dictate instead of typing. Make sure Siri is turned on (in
Settings > General > Siri) and iPad is connected to the Internet.
Note: Dictation may not be available in all languages or in all areas, and features may vary.
Cellular data charges may apply.
Dictate text. Tap on the iPad keyboard, then speak. When you finish, tap Done.
Tap to begin dictation.Tap to begin dictation.
Add text. Tap again and continuing dictating. To insert text, tap to place the insertion point
first. You can also replace selected text by dictating.
27. Chapter 3 Basics 27
Add punctuation or format text. Say the punctuation or format. For example,“Dear Mary
comma the check is in the mail exclamation mark”becomes“Dear Mary, the check is in the mail!”
Punctuation and formatting commands include:
•• quote … end quote
•• new paragraph
•• new line
•• cap—to capitalize the next word
•• caps on … caps off—to capitalize the first character of each word
•• all caps—to make the next word all uppercase
•• all caps on … all caps off—to make the enclosed words all uppercase
•• no caps on … no caps off—to make the enclosed words all lowercase
•• no space on … no space off—to run a series of words together
•• smiley—to insert :-)
•• frowny—to insert :-(
•• winky—to insert ;-)
Search
Many apps include a search field you can type in to find something that the app knows about.
With Spotlight Search, you can search all your apps at once.
Search iPad. Drag down the middle of any Home screen to reveal the search field. Results occur
as you type; to hide the keyboard and see more results on the screen, tap Search. Tap an item in
the list to open it.
You can use Spotlight Search to find and open apps, too.
Choose which apps and content are searched. Go to Settings > General > Spotlight Search. You
can also change the search order.
28. Chapter 3 Basics 28
Control Center
Control Center gives you instant access to the camera, AirDrop, AirPlay, timer, audio playback
controls, and other handy features. You can adjust the brightness, lock the screen orientation,
turn wireless services on or off, and turn on AirDrop to exchange photos and other items with
nearby iOS 7 devices that support AirPlay. See AirDrop, iCloud, and other ways to share on
page 30.
Open Control Center. Swipe up from the bottom edge of any screen (even the Lock screen).
Open the currently playing audio app. Tap the song title.
Close Control Center. Swipe down, tap the top of the screen, or press the Home button.
Turn off access to Control Center in apps or on the Lock screen. Go to Settings > Control Center.
Alerts and Notification Center
Alerts
Alerts let you know about important events. They can appear briefly at the top of the screen, or
remain in the center of the screen until you acknowledge them.
Some apps may include a badge on their Home screen icon, to let you know how many new
items await—for example, the number of new email messages. If there’s a problem—such as a
message that couldn’t be sent—an exclamation mark appears on the badge. On a folder, a
numbered badge indicates the total number of notifications for all the apps inside.
Alerts can also appear on the Lock screen.
Respond to an alert when iPad is locked. Swipe the alert from left to right.
Silence your alerts. Go to Settings > Do Not Disturb.
Set sounds. Go to Settings > Sounds.
Notification Center
Notification Center collects your notifications in one place, so you can review them whenever
you’re ready. Review all your alerts, or just the ones you missed. Or tap the Today tab for a
summary of the day’s events—such as the weather forecast, appointments, birthdays, stock
quotes, and even a quick summary of what’s coming up tomorrow.
29. Chapter 3 Basics 29
Open Notification Center. Swipe down from the top edge of the screen.
Set notification options. Go to Settings > Notification Center. Tap an app to set its notification
options. You can also tap Edit to arrange the order of app notifications. Touch and drag it to
a new position.
Close Notification Center. Swipe up.
Sounds and silence
You can change or turn off the sounds iPad plays when you get a FaceTime call, text message,
email, tweet, Facebook post, reminder, or other event.
Set sound options. Go to Settings > Sounds for options such as alert tones and ringtones, and
ringer and alert volumes.
If you want to temporarily silence incoming FaceTime calls, alerts, and sound effects, see the
following section.
Do Not Disturb
Do Not Disturb is an easy way to silence iPad, whether you’re going to dinner or to sleep. It keeps
FaceTime calls and alerts from making any sounds or lighting up the screen.
Turn on Do Not Disturb. Swipe up from the bottom edge of the screen to open Control Center,
then tap . When Do Not Disturb is on, appears in the status bar.
Note: Alarms still sound, even when Do Not Disturb is on. To make sure iPad stays silent, turn
it off.
Configure Do Not Disturb. Go to Settings > Do Not Disturb.
You can schedule quiet hours, allow FaceTime calls from your Favorites or groups of contacts, and
allow repeated FaceTime calls to ring through for those emergency situations. You can also set
whether Do Not Disturb silences iPad only when it’s locked, or even when it’s unlocked.
30. Chapter 3 Basics 30
AirDrop, iCloud, and other ways to share
In many apps, you can tap Share or to see sharing and other options. The options vary
depending on the app you’re using.
AirDrop lets you share your photos, videos, websites, locations, and other items wirelessly with
other nearby iOS 7 devices that support AirDrop. AirDrop requires an iCloud account, and
transfers info using Wi-Fi and Bluetooth. You must be on the same Wi-Fi network, or within
approximately 30 feet (10 meters) of the other device. Transfers are encrypted for security.
Share an item using AirDrop. Tap Share or , then tap AirDrop and tap the name of a nearby
AirDrop user. AirDrop is also available in Control Center—just swipe up from the bottom edge of
the screen.
Receive AirDrop items from others. Swipe up from the bottom edge of the screen to open
Control Center. Tap AirDrop, then choose to receive items from Contacts only or from Everyone.
You can accept or decline each request as it arrives.
Add photo or video to a shared stream. Tap iCloud (a sharing option in the Photos app), choose
a stream (or create a new one), then tap Post.
Use Twitter, Facebook, Flickr, or Vimeo. Sign in to your account in Settings. The Twitter, Facebook,
Flickr, and Vimeo sharing buttons take you to the appropriate setting if you’re not yet signed in.
Note: While you’re composing a tweet, the number in the lower-right corner shows the number
of characters remaining. Attachments use some of a tweet’s 140 characters.
Transfer files
There are several ways to transfer files between iPad and your computer or other iOS device. If
you have an app that works with iCloud on multiple devices, you can use iCloud to automatically
keep the app’s documents up to date across your devices. See iCloud on page 15.
Transfer files using iTunes. Connect iPad to your computer using the included cable. In iTunes on
your computer, select iPad, then click Apps. Use the File Sharing section to transfer documents
between iPad and your computer. Apps that support file sharing appear in the Apps list. To
delete a file, select it in the Documents list, then press the Delete key.
You can also view files received as email attachments on iPad.
Some apps may share content using AirDrop. See AirDrop, iCloud, and other ways to share on
page 30.
31. Chapter 3 Basics 31
Personal Hotspot
Use Personal Hotspot to share your iPad (Wi-Fi + Cellular models) Internet connection.
Computers can share your Internet connection using Wi-Fi, Bluetooth, or a USB cable. Other iOS
devices can share the connection using Wi-Fi. Personal Hotspot works only if iPad is connected to
the Internet over the cellular data network.
Note: This feature may not be available with all carriers. Additional fees may apply. Contact your
carrier for more information.
Share an Internet connection. Go to Settings > Cellular and tap Set Up Personal Hotspot—if it
appears—to set up the service with your carrier.
After you turn on Personal Hotspot, other devices can connect in the following ways:
•• Wi-Fi: On the device, choose your iPad in the list of available Wi-Fi networks.
•• USB: Connect your iPad to your computer using the cable that came with it. In your
computer’s Network preferences, choose iPad and configure the network settings.
•• Bluetooth: On iPad, go to Settings > Bluetooth and turn on Bluetooth. To pair and connect iPad
with your device, refer to the documentation that came with your computer.
Note: When a device is connected, a blue band appears at the top of the iPad screen. The
Personal Hotspot icon appears in the status bar of iOS devices using Personal Hotspot.
Change the Wi-Fi password for iPad. Go to Settings > Personal Hotspot > Wi-Fi Password, then
enter a password of at least eight characters.
Monitor your cellular data network usage. Go to Settings > Cellular. See Cellular settings on
page 129.
AirPlay
Use AirPlay to stream music, photos, and video wirelessly to Apple TV and other AirPlay-enabled
devices on the same Wi-Fi network as iPad.
Display the AirPlay controls.Swipe up from the bottom edge of the screen to open Control Center,
then tap .
Stream content. Tap , then choose the device you want to stream to.
Switch back to iPad. Tap , then choose iPad.
Mirror the iPad screen on a TV. Tap , choose an Apple TV, then tap Mirroring. A blue bar
appears at the top of the iPad screen when AirPlay mirroring is turned on.
You can also connect iPad to a TV, projector, or other external display using the appropriate
Apple cable or adapter. See support.apple.com/kb/HT4108.
32. Chapter 3 Basics 32
AirPrint
Use AirPrint to print wirelessly to an AirPrint-enabled printer, from apps such as Mail, Photos, and
Safari. Many apps available on the App Store also support AirPrint.
iPad and the printer must be on the same Wi-Fi network. For more information about AirPrint,
see support.apple.com/kb/HT4356.
Print a document. Tap or (depending on the app you’re using).
See the status of a print job. Double-click the Home button, then tap Print Center. The badge on
the icon shows how many documents are in the queue.
Cancel a job. Select it in the Print Center, then tap Cancel Printing.
Bluetooth devices
You can use Bluetooth devices with iPad, such as stereo headphones or an Apple Wireless
Keyboard. For supported Bluetooth profiles, go to support.apple.com/kb/HT3647.
WARNING: For important information about avoiding hearing loss and avoiding distraction
while driving, see Important safety information on page 123.
Note: The use of certain accessories with iPad may affect wireless performance. Not all iPhone
and iPod touch accessories are fully compatible with iPad. Turning on airplane mode may
eliminate audio interference between iPad and an accessory. Reorienting or relocating iPad and
the connected accessory may improve wireless performance.
Turn on Bluetooth. Go to Settings > Bluetooth.
Connect to a Bluetooth device. Tap the device in the Devices list, then follow the onscreen
instructions to connect to it. See the documentation that came with the device for information
about Bluetooth pairing. For information about using an Apple Wireless Keyboard, see Use an
Apple Wireless Keyboard on page 25.
iPad must be within about 30 feet (10 meters) of the Bluetooth device.
Return audio output to iPad. Turn off or unpair the device, turn off Bluetooth in Settings >
Bluetooth, or use AirPlay to switch audio output to iPad. See AirPlay on page 31. Audio output
returns to iPad if the Bluetooth device moves out of range.
Unpair a device. Go to Settings > Bluetooth, tap next to the device, then tap“Forget this
Device.”If you don’t see the Devices list, make sure Bluetooth is on.
Restrictions
You can set restrictions for some apps, and for purchased content. For example, parents can
restrict explicit music from appearing in playlists, or disallow changes to certain settings. Use
restrictions to prevent the use of certain apps, the installation of new apps, or changes to
accounts or the volume limit.
Turn on restrictions. Go to Settings > General > Restrictions, then tap Enable Restrictions. You’ll
be asked to define a restrictions passcode that’s necessary in order to change the settings you
make. This can be different than the passcode for unlocking iPad.
Important: If you forget your restrictions passcode, you must restore the iPad software. See
Restore iPad on page 129.
33. Chapter 3 Basics 33
Privacy
Privacy settings let you see and control which apps and system services have access to Location
Services, and to contacts, calendars, reminders, and photos.
Location Services lets location-based apps such as Maps, Weather, and Camera gather and
use data indicating your location. Your approximate location is determined using available
information from local Wi-Fi networks, if you have Wi-Fi turned on. The location data collected
by Apple isn’t collected in a form that personally identifies you. When an app is using Location
Services, appears in the menu bar.
Turn Location Services on or off. Go to Settings > Privacy > Location Services. You can turn it off
for some or for all apps and services. If you turn off Location Services, you’re prompted to turn it
on again the next time an app or service tries to use it.
Turn Location Services off for system services. Several system services, such as location-based
iAds, use Location Services. To see their status, turn them on or off, or show in the menu
bar when these services use your location, go to Settings > Privacy > Location Services >
System Services.
Turn off access to private information. Go to Settings > Privacy. You can see which apps and
features have requested and been granted access to the following information:
•• Contacts
•• Calendar
•• Reminders
•• Photos
•• Bluetooth Sharing
•• Microphone
•• Twitter
•• Facebook
You can turn off each app’s access to each category of information. Review the terms and privacy
policy for each third-party app to understand how it uses the data it’s requesting.
Security
Security features help protect the information on your iPad from being accessed by others.
Use a passcode with data protection
Initially, iPad doesn’t require you to enter a passcode to unlock it. You can set a passcode that
must be entered each time you turn on or wake up iPad.
Set a passcode. Go to Settings > General > Passcode Lock and set a 4-digit passcode.
Setting a passcode turns on data protection, using your passcode as a key to encrypt Mail
messages and attachments stored on iPad, using 256-bit AES encryption. (Other apps may also
use data protection.)
Increase security. Turn off Simple Passcode and use a longer passcode. To enter a passcode that’s
a combination of numbers and letters, you use the keyboard. If you prefer to unlock iPad using
the numeric keypad, set up a longer passcode using numbers only.
Allow access to features when iPad is locked. Go to Settings > General > Passcode Lock.
Optional features include:
•• Siri (if enabled; see Siri settings on page 38)
34. Chapter 3 Basics 34
Allow access to Control Center when iPad is locked. Go to Settings > Control Center. See Control
Center on page 28.
Erase data after ten failed passcode attempts. Go to Settings > General > Passcode Lock and
tap Erase Data. After ten failed passcode attempts, all settings are reset, and all your information
and media are erased by removing the encryption key to the data.
If you forget your passcode, you must restore the iPad software. See Restore iPad on page 129.
iCloud Keychain
iCloud Keychain keeps your website user names and passwords, and credit card information
that you set up with Safari, up to date on iPad and your other iOS devices and Macs running
OS X Mavericks.
iCloud Keychain works with Safari Password Generator and AutoFill. When you’re setting up a
new account, Safari Password Generator suggests unique, hard-to-guess passwords. You can
use AutoFill to have iPad enter your user name and password info, making login easy. See Fill in
forms on page 49.
Note: Some websites do not support AutoFill.
iCloud Keychain works on all your approved iOS 7 devices and Macs running OS X Mavericks.
iCloud Keychain is secured with 256-bit AES encryption during storage and transmission, and
cannot be read by Apple.
Set up iCloud Keychain. Go to Settings > iCloud > Keychain. Turn on iCloud Keychain and
follow the onscreen instructions. If you’ve set up iCloud Keychain on other devices, you need to
approve use of iCloud Keychain from one of those devices, or use your iCloud Security Code.
Important: Your iCloud Security Code cannot be retrieved by Apple. If you forget your security
code, you’ll have to start over and set up your iCloud Keychain again.
Set up AutoFill. Go to Settings > Safari > Passwords & AutoFill. Make sure Names and Passwords,
and Credit Cards, are turned on (they’re on by default). To add credit card info, tap Saved
Credit Cards.
The security code for your credit card is not saved—you have to enter that manually.
To automatically fill in names, passwords, or credit card info on sites that support it, tap a text
field, then tap AutoFill.
Limit Ad Tracking
Restrict or reset Ad Tracking. Go to Settings > Privacy > Advertising. Turn on Limit Ad Tracking
to prevent apps from accessing your iPad advertising identifier. For more information, tap
Learn More.
35. Chapter 3 Basics 35
Find My iPad
Find My iPad can help you locate and secure your iPad using the free Find My iPhone app
(available in the App Store) on another iPad, iPhone, or iPad, or using a Mac or PC web browser
signed in to www.icloud.com/find. Find My iPhone includes Activation Lock, which makes it more
difficult for anyone else to use or sell your iPad if you ever lose it. Your Apple ID and password are
required in order to turn off Find My iPad or to erase and reactivate your iPad.
Turn on Find My iPad. Go to Settings > iCloud.
Important: To use these features, Find My iPad must be turned on before your iPad is lost. iPad
must be able to connect to the Internet for you to locate and secure the device.
Use Find My iPhone. Open the Find My iPhone app on an iOS device, or go to
www.icloud.com/find on your computer. Sign in and select your device.
•• Play Sound: Play a sound for two minutes.
•• Lost Mode: You can immediately lock your missing iPad with a passcode and send it a message
displaying a contact number. iPad also tracks and reports its location, so you can see where it’s
been when you check the Find My iPhone app.
•• Erase iPad: Erase all the information and media on your iPad and restore it to its original
factory settings.
Note: Before selling or giving away your iPad, you should erase it completely to remove all of
your personal data and turn off Find My iPad Activation Lock. Go to Settings > General > Reset >
Erase All Content and Settings. See Sell or give away iPad? on page 131.
Charge and monitor the battery
iPad has an internal, lithium-ion rechargeable battery. For more information about the battery—
including tips for maximizing battery life—see www.apple.com/batteries.
WARNING: For important safety information about the battery and charging iPad, see
Important safety information on page 123.
Charge the battery. The best way to charge the iPad battery is to connect iPad to a power outlet
using the included cable and USB power adapter.
iPad may also charge slowly when you connect it to a USB 2.0 port on your computer. If your
Mac or PC doesn’t provide enough power to charge iPad, a“Not Charging”message appears in
the status bar.
Important: The iPad battery may drain instead of charge if iPad is connected to a computer
that’s turned off or is in sleep or standby mode, to a USB hub, or to the USB port on a keyboard.
36. Chapter 3 Basics 36
The battery icon in the upper-right corner of the status bar shows the battery level or
charging status.
Display the percentage of battery charge. Go to Settings > General > Usage and turn on
Battery Percentage.
Important: If iPad is very low on power, it may display an image of a nearly depleted battery,
indicating that iPad needs to charge for up to twenty minutes before you can use it. If iPad is
extremely low on power, the display may be blank for up to two minutes before the low-battery
image appears.
Rechargeable batteries have a limited number of charge cycles and may eventually need to be
replaced. The iPad battery isn’t user replaceable; it can be replaced only by an authorized service
provider. See www.apple.com/batteries/replacements.html.
Travel with iPad
Your airline carrier may let you keep your iPad turned on if you switch to Airplane Mode—listen
for an announcement after boarding, or ask a member of the crew. Wi-Fi and Bluetooth are
turned off in Airplane Mode, so you can’t make or receive FaceTime calls or use features that
require wireless communication. You can listen to music, play games, watch videos, or use other
apps that don’t require Internet access. If your airline allows it, you can turn Wi-Fi or Bluetooth
back on, even while in Airplane Mode.
Turn on Airplane Mode. Swipe up from the bottom edge of the screen to open Control Center,
then tap . You can also turn Airplane Mode on or off in Settings. When airplane mode is on,
appears in the status bar at the top of the screen.
You can also turn Wi-Fi and Bluetooth on or off in Control Center. See Control Center on page 28.
37. 4
37
Siri
Use Siri
The power of Siri is yours for the asking.
Summon Siri. Press and hold the Home button, until Siri beeps.
Note: To use Siri, iPad must be connected to the Internet. See Connect to Wi-Fi on page 13.
Cellular charges may apply.
Ask Siri anything, from“set the timer for 3 minutes”to“what movies are showing tonight?”
Open apps, and turn features on or off, like Bluetooth, Do Not Disturb, and Accessibility. Siri
understands natural speech, so you don’t have to learn special commands or keywords.
Tap to speak to Siri.Tap to speak to Siri.
Siri’s responseSiri’s response
For hints, ask Siri“what can you do,”or tap .
Siri often displays helpful info on your screen. Tap the info to open a related app or get
more details.
Change Siri’s voice gender. Go to Settings > General > Siri (may not be available in all areas).
Talk to Siri using a headset. Connect the headset, then press and hold the center or call button.
38. Chapter 4 Siri 38
Tell Siri about yourself
If you let Siri know who you are, you can get personalized service—like,“tell me how to get home.”
Tell Siri who you are. Fill out your contact card in Contacts, then go to Settings > General > Siri >
My Info and tap your contact card.
Be sure to include your home and work addresses, and your relationships.
Note: Location information isn’t tracked or stored outside iPad. If you don’t want to use Location
Services, go to Settings > Privacy > Location Services to turn it off. You can still use Siri, but Siri
won’t be able to do anything that requires knowing your location.
Make corrections
Want to cancel that last command? Say“cancel,”tap the Siri icon, or press the Home button.
If Siri doesn’t get something right, you can tap to edit your request.
Or tap again and clarify your request. For example,“I meant Boston.”Don’t bother saying what
you didn’t mean.
Siri settings
To set options for Siri, go to Settings > General > Siri. Options include:
•• Turning Siri on or off
•• Language
•• Voice gender (may not be available in all areas)
•• Voice feedback
•• My Info card
Prevent access to Siri when iPad is locked. Go to Settings > General > Passcode Lock. You can
also disable Siri by turning on restrictions. See Restrictions on page 32.
39. 5
39
Messages
iMessage service
With the Messages app and the built-in iMessage service, you can send unlimited text messages
over Wi-Fi using iOS 5 or later, or using OS X Mountain Lion or later. Messages can include
photos, videos, and other info. You can see when people are typing, and let them know when
you’ve read their messages. iMessages are displayed on all of your iOS devices logged in to the
same account, so you can start a conversation on one device and continue it on another. For
security, iMessages are encrypted before they’re sent.
WARNING: For important information about avoiding distractions while driving, see Important
safety information on page 123.
Note: Cellular data charges or additional fees may apply for you, and for the iPhone and iPad
users you exchange messages with over their cellular data network.
Send and receive messages
Tap the compose button to
start a new conversation.
Tap the compose button to
start a new conversation.
Tap the Attach Media
button to include a
photo or video.
Tap the Attach Media
button to include a
photo or video.
40. Chapter 5 Messages 40
Start a text conversation. Tap , then enter a phone number or email address, or tap and
choose a contact.
Note: An alert appears if a message can’t be sent. Tap the alert in a conversation to try
sending the message again.
Resume a conversation. Tap the conversation in the Messages list.
Hide the keyboard. Tap in the lower-right corner.
Use picture characters. Go to Settings > General > Keyboard > Keyboards > Add New Keyboard,
then tap Emoji to make that keyboard available. Then while typing a message, tap to bring up
the Emoji keyboard. See Special input methods on page 121.
See what time a message was sent or received. Drag any bubble to the left.
Make a FaceTime call to the person you’re texting. Tap Contact at the top of the screen, then
tap .
See a person’s contact info. Tap Contact at the top of the screen, then tap . Tap info items to
perform actions, such as making a FaceTime call.
See earlier messages in the conversation. Tap the status bar to scroll to the top. Tap Load Earlier
Messages, if necessary.
Send messages to a group. Tap , then enter multiple recipients.
Block unwanted messages. On a contact card, tap Block this Caller. To see someone’s contact
card while viewing a message, tap Contact, then tap . You can also block callers in Settings >
FaceTime > Blocked. You won’t receive FaceTime calls or text messages from blocked callers. For
more information about blocking calls, see support.apple.com/kb/HT5845.
Manage conversations
Conversations are saved in the Messages list. A blue dot indicates unread messages. Tap a
conversation to view or continue it.
View the Messages list. Swipe to the right.
Forward a conversation. Select the conversation, touch and hold a message, tap More, select the
parts to include, then tap .
Delete a message. Touch and hold a message or attachment, tap More, select more if desired,
then tap . To delete all text and attachments without deleting the conversation, tap Delete All.
Delete a conversation. In the Messages list, swipe the conversation from right to left, then
tap Delete.
Search conversations. In the Messages list, tap the top of the screen to display the search field,
then enter the text you’re looking for. You can also search conversations from the Home screen.
See Search on page 27.
41. Chapter 5 Messages 41
Share photos, videos, and more
You can send photos, videos, locations, contact info, and voice memos. The size limit of
attachments is determined by your service provider—iPad compresses photo and video
attachments if necessary.
Send a photo or video. Tap . You can choose an existing photo or video on iPad, or take a
new one.
See full-size photos or video. Tap the photo or video. To see other photos and videos in the
conversation, tap . Tap to return to the conversation.
Send items from another app. In the other app, tap Share or , then tap Message.
Share, save, or print an attachment. Tap the attachment, then tap .
Copy a photo or video. Touch and hold the attachment, then tap Copy.
Add someone to your contacts. In a conversation, tap Contact, then tap Create New Contact.
Save contact info. Tap Contact at the top of the screen, tap , then tap Create New Contact or
Add to Existing Contact.
Messages settings
Go to Settings > Messages, where you can:
•• Turn iMessage on or off
•• Notify others when you’ve read their messages
•• Specify a phone number, Apple ID, or email address to use with Messages
•• Show the Subject field
•• Block unwanted messages
Manage notifications for messages. See Notification Center on page 28.
Set the alert sound for incoming text messages. See Sounds and silence on page 29.
42. 6
42
Mail
Write messages
Mail lets you access your email accounts, on the go.
Compose a
message.
Compose a
message.
Change mailboxes
or accounts.
Change mailboxes
or accounts.
Delete, move, or mark
multiple messages.
Delete, move, or mark
multiple messages.
Search for
messages.
Search for
messages.
Change the preview length in
Settings > Mail, Contacts, Calendars.
Change the preview length in
Settings > Mail, Contacts, Calendars.
Insert a photo or video. Tap the insertion point, then tap Insert Photo or Video. Also see Edit
text on page 24.
Quote some text when you reply. Tap the insertion point, then select the text you want to
include. Tap , then tap Reply. You can turn off the indentation of the quoted text in Settings >
Mail, Contacts, Calendars > Increase Quote Level.
Send a message from a different account. Tap the From field to choose an account.
Change a recipient from Cc to Bcc. After you enter recipients, you can drag them from one field
to another or change their order.
43. Chapter 6 Mail 43
Get a sneak peek
See a longer preview. Go to Settings > Mail, Contacts, Calendars > Preview. You can show up to
five lines.
Is this message for me? Turn on Settings > Mail, Contacts, Calendars > Show To/Cc Label. If
the label says Cc instead of To, you were just copied. You can also use the To/Cc mailbox, which
gathers all mail addressed to you. To show it, tap Edit while viewing the Mailboxes list.
Finish a message later
Save it, don’t send it. If you’re writing a message and want to finish it later, tap Cancel, then tap
Save Draft.
Finish a saved draft. Touch and hold Compose. Pick the draft from the list, then finish it up and
send, or save it again as a draft.
Show draft messages from all of your accounts. While viewing the Mailboxes list, tap Edit, tap
Add Mailbox, then turn on the All Drafts mailbox.
Delete a draft. In the Previous Drafts list, swipe left across a draft, then tap Delete.
See important messages
Gather important messages. Add important people to your VIP list, and their messages all
appear in the VIP mailbox. Tap the sender’s name in a message, then tap Add to VIP. To show
the VIP mailbox, tap Edit while viewing the Mailboxes list.
Get notified of important messages. Notification Center lets you know when you
receive messages in favorite mailboxes or messages from your VIPs. Go to Settings >
Notification Center > Mail.
44. Chapter 6 Mail 44
Flag a message so you can find it later. Tap while reading the message. You can change the
appearance of the flagged message indicator in Settings > Mail, Contacts, Calendars > Flag Style.
To see the Flagged smart mailbox, tap Edit while viewing the Mailboxes list, then tap Flagged.
Search for a message. Scroll to or tap the top of the message list to reveal the search field.
Searching looks at the address fields, the subject, and the message body. To search multiple
accounts at once, search from a smart mailbox, such as All Sent.
Search by timeframe. Scroll to or tap the top of the message list to reveal the search field, then
type something like“February meeting”to find all messages from February with word“meeting.”
Search by message state. To find all flagged, unread messages from people in your VIP list, type
“flag unread vip.”You can also search for other message attributes, such as“attachment.”
Junk be gone! Tap while you’re reading a message, then tap Move to Junk to file it in the Junk
folder. If you accidentally move a message, shake iPad immediately to undo.
Make a favorite mailbox. Favorite mailboxes appear at the top of the Mailboxes list. To add a
favorite, view the Mailboxes list and tap Edit. Tap Add Mailbox, then select the mailbox to add.
You’ll also get push notifications for your favorite mailboxes.
Attachments
Save a photo or video to your Camera Roll. Touch and hold the photo or video until a menu
appears, then tap Save Image.
Use an attachment with another app. Touch and hold the attachment until a menu appears,
then tap the app you want to open the attachment with.
See messages with attachments. The Attachments mailbox shows messages with attachments
from all accounts. To add it, view the Mailboxes list and tap Edit.
Work with multiple messages
Delete, move, or mark multiple messages. While viewing a list of messages, tap Edit. Select
some messages, then choose an action. If you make a mistake, shake iPad immediately to undo.
45. Chapter 6 Mail 45
Organize your mail with mailboxes. Tap Edit in the mailboxes list to create a new one, or
rename or delete one. (Some built-in mailboxes can’t be changed.) There are several smart
mailboxes, such as Unread, that show messages from all your accounts. Tap the ones you want
to use.
Recover a deleted message. Open the message in the account’s Trash mailbox, then tap and
move the message. Or, if you just deleted it, shake iPad to undo. To see deleted messages in all
your accounts, add the Trash smart mailbox. To add it, tap Edit in the mailboxes list and select it
from the list.
Archive instead of delete. Instead of deleting messages, you can archive them so they’re still
around if you need them. Select Archive Mailbox in Settings > Mail, Contacts, Calendars >
account name > Account > Advanced. To delete a message instead of archiving it, touch and
hold , then tap Delete.
Deal with a message without opening it. Swipe left on a message, then tap Trash or Archive. Or
tap More to move, forward, reply, flag, mark as read, or move it to the Junk folder.
Stash your trash. You can set how long deleted messages stay in the Trash mailbox. Go to
Settings > Mail, Contacts, Calendars > account name > Account > Advanced.
See and save addresses
See who received a message. While viewing the message, tap More in the To field.
Add someone to Contacts or make them a VIP. Tap the person’s name or email address.
Print messages
Print a message. Tap , then tap Print.
Print an attachment or picture. Tap to view it, then tap and choose Print.
See AirPrint on page 32.
Mail settings
Go to Settings > Mail, Contacts, Calendars, where you can:
•• Create a different mail signature for each account
•• Add mail accounts
•• Bcc yourself on every message you send
•• Turn on Organize by Thread to group related messages together
•• Turn off confirmation for deleting a message
•• Turn off Push delivery of new messages, to save on battery power
•• Temporarily turn off an account
46. 7
46
Safari
Safari at a glance
Use Safari on iPad to browse the web. Add web clips to the Home screen for quick access.
Use Reading List to collect sites to read later. Use iCloud to see pages you have open on other
devices, and to keep your bookmarks and reading list up to date on your other devices.
Tap to enter a search
item or web address.
Tap to enter a search
item or web address.
Share or save.Share or save.
Revisit recent pages.Revisit recent pages.
Your open tabsYour open tabs
See pages open
on other devices.
See pages open
on other devices.
See your bookmarks,
reading list, browsing
history, and tweeted links.
See your bookmarks,
reading list, browsing
history, and tweeted links.
Open a new tab.Open a new tab.
47. Chapter 7 Safari 47
Search the web
Or tap a suggestion.Or tap a suggestion.
Enter what you’re searching
for, then tap Go.
Enter what you’re searching
for, then tap Go.
Tap to search the current page.Tap to search the current page.
Search the web. Enter a URL or search term in the smart search field at the top of the page. Then
tap a suggested term, or tap Go on the keyboard to search for exactly what you typed. If you
don’t want to see suggested search terms, go to Settings > Safari > Smart Search Field and turn
off Search Engine Suggestions.
Have your favorites top the list. Select them at Settings > Safari > Favorites.
Search the page. Scroll to the bottom of the suggested results list and tap the entry under On
This Page.Tap in the bottom left to see the next occurrence on the page.To search the page for
a different term, enter it in the field at the bottom of the page.To continue browsing, tap Done.
Choose your search tool. Go to Settings > Safari > Search Engine.
Browse the web
Touch and hold a link
to see these options.
Touch and hold a link
to see these options.
Look before you leap. To see the URL of a link before you go there, touch and hold the link.
Open a link in a new tab. Touch and hold the link, then tap Open in New Tab. If you’d like to
switch to a new tab when you open it, go to Settings > Safari and turn off Open New Tabs
in Background.
Switch tabs. Tap a tab at the top of the page.
Close a tab. Tap on the tab.
Pick up where you left off. If you turn on Settings > iCloud > Safari, you can Tap to view a
page that your left open on one of your other devices.
Get back to the top. Tap the top edge of the screen to quickly return to the top of a long page.
See more. Turn iPad to landscape orientation.
See the latest. Tap next to the address in the search field to update the page.
48. Chapter 7 Safari 48
Keep bookmarks
Links in tweetsLinks in tweets
Reading listReading list
BookmarksBookmarks
Bookmark the current page. Tap , then tap Bookmark. To revisit the page, tap , then tap
the bookmark.
Get organized. To create a folder for bookmarks, tap , then tap Edit.
Choose which favorites appear when you tap the search field. Go to Settings > Safari > Favorites.
Bookmarks bar on your Mac? Turn on Settings > iCloud > Safari if you want items from the
bookmarks bar in Safari on your Mac to appear in Favorites on iPad.
Save a webclip shortcut on your Home screen. Tap , then tap Add to Home Screen. The
webclip appears only on the device where you create it.
Share what you discover
Tap to share with
someone nearby
using AirDrop.
Tap to share with
someone nearby
using AirDrop.
Other sharing
options
Other sharing
options
Spread the news. Tap .
See who’s tweeting what. Go to Settings > Twitter and sign in, then tap and look under to
see links tweeted by your friends and others you follow.
49. Chapter 7 Safari 49
Fill in forms
Whether you’re logging in to a website, signing up for a service, or making a purchase, you can
fill in a web form using the onscreen keyboard or have Safari fill it in for you using AutoFill.
Tap AutoFill instead of
typing your contact info.
Tap AutoFill instead of
typing your contact info.
Tired of always having to log in? When you’re asked if you want to save the password for the
site, tap Yes. The next time you visit, your user name and password will be filled in for you.
Fill in a form. Tap any field to bring up the onscreen keyboard. Tap or above the keyboard to
move from field to field.
Fill it in automatically. Go to Settings > Safari > Passwords & Autofill and turn on Use Contact
Info. Then, tap AutoFill above the onscreen keyboard when you’re filling in the form. Not all
websites support AutoFill.
Enter your credit card information. Go to Settings > Safari > Autofill and save your credit
card information, then look for the AutoFill Credit Card button above the onscreen keyboard
whenever you’re in a credit card field. Your card’s security code is not stored, so you still enter
that yourself.
Submit the form. Tap Go, Search, or the link on the webpage.
Avoid clutter with Reader
Use Safari Reader to focus on a page’s primary content.
Tap to view the page in Reader.Tap to view the page in Reader.
Focus on content. Tap at the left end of the address field. If you don’t see the icon, reader isn’t
available for the page you’re looking at.
Share just the good stuff. To share just the article text and a link to it, tap while viewing the
page in Reader.
Return to the full page. Tap the reader icon in the address field again.
50. Chapter 7 Safari 50
Save a reading list for later
Save interesting items in your reading list so you can return to them later. You can read pages in
your reading list even when you’re not connected to the Internet.
Add the current page to your reading list. Tap , then tap Add to Reading List.
Add a linked page without opening it. Touch and hold the link, then tap Add to Reading List.
View your reading list. Tap , then tap .
Delete something from your reading list. Swipe left on the item in your reading list.
Don’t want to use cellular data to download reading list items? Turn off Settings > Safari >
Use Cellular Data.
Privacy and security
You can adjust Safari settings to keep your browsing activities to yourself and protect yourself
from malicious websites.
Want to keep a low profile? Turn on Settings > Safari > Do Not Track. Safari will ask websites you
visit to not track your browsing, but beware—a website can choose not to honor the request.
Control cookies. Go to Settings > Safari > Block Cookies. To remove cookies already on iPad, go
to Settings > Safari > Clear Cookies and Data.
Let Safari create secure passwords and store them for you. Tap the password field when
creating a new account and Safari will offer to create a password for you.
Erase your browsing history and data from iPad. Go to Settings > Safari > Clear History, and
Settings > Safari > Clear Cookies and Data.
51. Chapter 7 Safari 51
Visit sites without making history. Tap Private while viewing your open pages or bookmarks.
Sites you visit will no longer be added to History on your iPad.
Watch for suspicious websites. Turn on Settings > Safari > Fraudulent Website Warning.
Safari settings
Go to Settings > Safari, where you can:
•• Choose your search engine
•• Provide AutoFill information
•• Choose which favorites are displayed when you search
•• Have new tabs open in the background
•• Display your Favorites at the top of the page
•• Block pop-ups
•• Tighten privacy and security
•• Clear your history, cookies, and data
52. 8
52
Music
iTunes Radio
Featured stations provide a great way to explore and enjoy new music in a variety of genres. You
can also create your own custom stations, based on your pick of artist, song, or genre. See iTunes
Match on page 56.
WARNING: For important information about avoiding hearing loss, see Important safety
information on page 123.
Note: iTunes Radio may not be available in all areas. For more information about iTunes Radio,
see support.apple.com/kb/HT5848.
Create, share, fine-tune,
rename, or delete a station.
Create, share, fine-tune,
rename, or delete a station.
Play more like this song, never
play it, or add it to your wish list.
Play more like this song, never
play it, or add it to your wish list.
Skip to the
next song.
Skip to the
next song.
Options for browsing your music libraryOptions for browsing your music library
When you pick a station and play a song, the Now Playing screen shows the album art and the
playback controls. Tap to find out more, create a new station, fine-tune the station, or share it.
See AirDrop, iCloud, and other ways to share on page 30.
Create a station based on an artist, genre, or song. Tap New Station on the iTunes Radio screen.
Choose a genre, or do a search for your favorite artist, song, or genre.
53. Chapter 8 Music 53
Create your own station. On the Now Playing screen, tap , then tap one of the New
Station options.
Influence upcoming song selections. Tap , then tap Play More Like This or Never Play This
Song. You can also add the song to your iTunes Wish List.
Skip to the next song. Tap . You can skip a limited number of songs per hour.
Edit your stations. Tap Edit. You can include or exclude other artists, songs, or genres, or delete
a station.
See the songs you’ve heard, or view your wishlist. Tap History, then tap Played or Wishlist. You
can purchase songs for your library. Tap a song to preview it.
Purchase songs for your personal library. Tap the price button.
Share a station you created. While playing the station, tap , then tap Share Station.
Listen to iTunes Radio ad free. Subscribe to iTunes Match and turn it on. See iTunes Match on
page 56.
Get music
Get music and other audio content onto iPad:
•• Purchase and download from the iTunes Store: In Music, tap Store. See Chapter 22, iTunes
Store, on page 91.
•• iTunes in the Cloud: When you’re signed in to the iTunes Store, all of your previous purchases
automatically appear in Music. See iCloud on page 15.
•• Sync content with iTunes on your computer: See Sync with iTunes on page 17.
•• Use iTunes Match to store your music library in iCloud: See iTunes Match on page 56.
Browse and play
Browse your music by playlist, artist, song, or other category. For additional browse options, tap
More, if it appears in the lower-right corner. Tap any song to play it.
You can listen to audio from the built-in speaker, from headphones attached to the headset jack,
or from wireless Bluetooth stereo headphones paired with iPad. If headphones are attached or
paired, no sound comes from the speaker.
Rearrange the browse buttons. Tap More (if it’s visible), then tap Edit and drag a button onto the
one you want to replace.
54. Chapter 8 Music 54
The Now Playing screen provides playback controls and shows you what’s playing.
VolumeVolume
PlayheadPlayhead
Tap to create a
Genius Playlist or an
iTunes Radio station.
Tap to create a
Genius Playlist or an
iTunes Radio station.
BackBack Track listTrack list
Skip to any point in a song. Drag the playhead. Slow down the scrub rate by sliding your finger
down the screen.
Shuffle. Tap Shuffle on the Now Playing screen to play your tunes in random order.
See all tracks from the album containing the current song. Tap . To play a track, tap it.
Search music. While browsing, tap the status bar to reveal the search field at the top of the
screen, then enter your search text. You can also search audio content from the Home screen. See
Search on page 27.
Rate a song for smart playlists in iTunes. Tap the screen to reveal the rating dots, then tap a dot
to assign a rating.
Get audio controls from the Lock screen or when using another app. Swipe up from the
bottom edge of the screen to open Control Center. See Control Center on page 28.
Play music on AirPlay speakers or Apple TV. Open Control Center, then tap . See AirPlay on
page 31.
55. Chapter 8 Music 55
Playlists
Create playlists to organize your music. View Playlists, tap New Playlist near the top of the list,
then enter a title. Tap to add songs or videos.
Edit a playlist. Select the playlist, then tap Edit.
•• Add more songs: Tap .
•• Delete a song: Tap , then tap Remove. Deleting a song from a playlist doesn’t delete it
from iPad.
•• Change the song order: Drag .
New and changed playlists are copied to your iTunes library the next time you sync iPad with
your computer, or through iCloud if you’ve subscribed to iTunes Match.
Clear or delete a playlist you created on iPad. Select the playlist, then tap Clear or Delete.
Remove a song from iPad. Tap Songs, swipe the song, then tap Delete. The song is deleted from
iPad, but not from your iTunes library on your Mac or PC, or from iCloud.
Genius—made for you
A Genius playlist is a collection of songs from your library that go together. Genius is a free
service, but it requires an Apple ID.
A Genius Mix is a selection of songs of the same kind of music, recreated from your library each
time you listen to the mix.
Use Genius. Turn on Genius in iTunes on your computer, then sync iPad with iTunes. Genius
Mixes are synced automatically, unless you manually manage your music. You can also sync
Genius playlists.
Browse and play Genius Mixes. Tap Genius (tap More first, if Genius isn’t visible). Swipe to view
additional mixes. To play a mix, tap .
Make a Genius playlist. View Playlists, then tap Genius Playlist and choose a song. Or from the
Now Playing screen, tap Create, then tap Genius Playlist.
•• Replace the playlist using a different song: Tap New and pick a song.
•• Refresh the playlist: Tap Refresh.
56. Chapter 8 Music 56
•• Save the playlist: Tap Save. The playlist is saved with the title of the song you picked, and
marked by .
Genius playlists created on iPad are copied to your computer when you sync with iTunes.
Note: Once a Genius playlist is synced to iTunes, you can’t delete it directly from iPad. Use iTunes
to edit the playlist name, stop syncing, or delete the playlist.
Delete a saved Genius playlist. Tap the Genius playlist, then tap Delete.
Siri
You can use Siri (iPad 3rd generation or later) to control music playback. See Use Siri on page 37.
Use Siri to play music. Press and hold the Home button.
•• Play or pause music: Say“play”or“play music.”To pause, say“pause,”“pause music,”or“stop.”
You can also say“next song”or“previous song.”
•• Play an album, artist, or playlist: Say“play,”then say“album,”“artist,”or“playlist”and the name.
•• Shuffle the current playlist: Say“shuffle.”
•• Find out more about the current song: Say“what’s playing,”“who sings this song,”or“who is this
song by.”
•• Use Genius to play similar songs: Say“Genius”or“play more songs like this.”
iTunes Match
iTunes Match stores your music library in iCloud—including songs imported from CDs—and lets
you play your collection on iPad and your other iOS devices and computers. iTunes Match also
lets you listen to iTunes Radio ad-free (see iTunes Radio on page 52). iTunes Match is offered as a
paid subscription.
Note: iTunes Match may not be available in all areas. See support.apple.com/kb/HT5085.
Subscribe to iTunes Match in iTunes on your computer. Choose Store > Turn On iTunes Match,
then click the Subscribe button.
Once you subscribe, iTunes adds your music, playlists, and Genius Mixes to iCloud. For more
information, see www.apple.com/itunes/itunes-match.
Turn on iTunes Match. Go to Settings > Music. Turning on iTunes Match removes synced music
from iPad.
Songs are downloaded to iPad when you play them. You can also download songs and albums
manually—while browsing, tap .
Note: When iTunes Match is on, downloaded music is automatically removed from iPad as space
is needed, starting with the oldest and least-played songs. An iCloud icon ( ) appears next to
removed songs and albums, indicating that the songs and albums are still available through
iCloud but not stored locally on iPad.
Remove a song that’s been downloaded. Swipe left, then tap Delete.
Just show music that’s been downloaded from iCloud. Go to Settings > Music, then turn off
Show All Music.
Remove iPad from your list of“iTunes in the Cloud”devices. In iTunes on your computer, choose
Store > View Account. Sign in, then click Manage Devices in the“iTunes in the Cloud”section.
57. Chapter 8 Music 57
Music settings
Go to Settings > Music to set options for Music, including:
•• Sound Check (to normalize the volume level of your audio content)
•• Equalization (EQ)
Note: EQ settings affect all sound output, including the headset jack and AirPlay. These
settings generally apply only to music played from the Music app.
The Late Night setting compresses the dynamic range of the audio output, reducing the
volume of loud passages and increasing the volume of quiet passages. You might want to use
this setting when listening to music on an airplane or in some other noisy environment. The
Late Night setting applies to all audio output—video as well as music.
•• Grouping by album artist
Set the volume limit. Go Settings > Music > Volume Limit.
Note: In some European Union (EU) countries, iPad may indicate when you’re setting the volume
above the EU recommended level for hearing safety. To increase the volume beyond this level,
you may need to briefly release the volume control. To limit the maximum headset volume
to this level, go to Settings > Music > Volume Limit and turn on EU Volume Limit. To prevent
changes to the volume limit, go to Settings > General > Restrictions.
Prevent changes to the volume limit. Go to Settings > General > Restrictions > Volume Limit
and tap Don’t Allow Changes.
58. 9
58
FaceTime
FaceTime at a glance
Use FaceTime to make video or audio calls to other iOS devices or computers that support
FaceTime. The FaceTime camera lets you talk face-to-face; switch to the rear iSight camera to
share what you see around you.
Note: FaceTime may not be available in all areas. On iPad Wi-Fi + Cellular models, you can make
FaceTime calls over a cellular data connection. Cellular data charges may apply. See Cellular
settings on page 129.
Drag your image
to any corner.
Drag your image
to any corner.
Switch between cameras.Switch between cameras.
Mute (you can hear
and see; the caller
can see but not hear).
Mute (you can hear
and see; the caller
can see but not hear).
With a Wi-Fi connection and an Apple ID, you can make and receive FaceTime calls (first sign in
using your Apple ID, or create a new account).
59. Chapter 9 FaceTime 59
Make and answer calls
Make a FaceTime call. Make sure FaceTime is turned on in Settings > FaceTime, then in FaceTime,
tap Contacts and choose a contact. Tap to make a video call, or tap to make an audio call.
Tap an icon to start
a FaceTime call.
Tap an icon to start
a FaceTime call.
Use your voice to start the call. Press and hold the Home button, then say“FaceTime,”followed
by the name of the person to call.
Want to call again? Tap Recents, then choose a name or number.
Can’t take a call right now? When a FaceTime call comes in, you can answer, decline, or choose
another option.
Set up a reminder to return the call later.Set up a reminder to return the call later.
Send the caller
a text message.
Send the caller
a text message.
See the whole gang. Rotate iPad to use FaceTime in landscape orientation. To avoid unwanted
orientation changes, lock iPad in portrait orientation. See Change the screen orientation on
page 21.
Manage calls
Multitask during a call. Press the Home button, then tap an app icon. You can still talk with
your friend, but you can’t see each other. To return to the video, tap the green bar at the top of
the screen.
Take advantage of Favorites. Tap Favorites. To add a favorite, Tap , then choose a contact and
add to Favorites as FaceTime Audio or FaceTime. To call a favorite, tap a name in the list. Make
sure phone numbers for contacts outside your region include the country code and area code.
Juggle calls. FaceTime calls aren’t forwarded. If another call comes in while you’re on a FaceTime
call, you can either end the FaceTime call and answer the incoming call, decline the incoming
call, or reply with a text message.
Block unwanted callers. Go to Settings > FaceTime > Blocked > Add New. You won’t receive
FaceTime calls or text messages from blocked callers. For more information about blocking calls,
see support.apple.com/kb/HT5845.
Other options in Settings let you turn FaceTime on or off, specify a phone number, Apple ID, or
email address to use with FaceTime, and set your caller ID.
60. 10
60
Calendar
Calendar at a glance
Change calendars or accounts.Change calendars or accounts.
Change views.Change views.
View invitations.View invitations.
Search for events.Search for events.
Search for events. Tap , then enter text in the search field. The titles, invitees, locations, and
notes for the calendars you’re viewing are searched.
Change your view. Tap Day, Week, Month, or Year. Tap to view upcoming events as a list.
Change the color of a calendar. Tap Calendars, then tap next to the calendar and choose a
color from the list. For some calendar accounts, such as Google, the color is set by the server.
Adjust an event. Touch and hold the event, then adjust the grab points, or drag it to a new time.
61. Chapter 10 Calendar 61
Invitations
If you have an iCloud account, a Microsoft Exchange account, or a supported CalDAV account,
you can send and receive meeting invitations.
Invite others to an event. Tap an event, tap Edit, then tap Invitees. Type names, or tap to pick
people from Contacts.
RSVP. Tap an event you’ve been invited to, or tap Inbox and tap an invitation. If you add
comments (which may not be available for all calendars), your comments can be seen by the
organizer but not by other attendees. To see events you’ve declined, tap Calendars, then turn on
Show Declined Events.
Schedule a meeting without blocking your schedule. Tap the event, then tap Availability and
tap“free.”If it’s an event you created, tap“Show As”and then tap“free.”The event stays on your
calendar, but it doesn’t appear as busy to others who send you invitations.
Use multiple calendars
Turn on Facebook
events in Settings >
Facebook.
Turn on Facebook
events in Settings >
Facebook.
Select which
calendars to view.
Select which
calendars to view.
Turn on iCloud, Google, Exchange, or Yahoo! calendars. Go to Settings > Mail, Contacts,
Calendars, tap an account, then turn on Calendar.
Add a CalDAV account. Go to Settings > Mail, Contacts, Calendars, tap Add an Account, then tap
Other. Under Calendars, tap Add CalDAV Account.
View Facebook events. Go to Settings > Facebook, then sign in to your Facebook account and
turn on access to Calendar.
See multiple calendars at once. Tap Calendars, then select the calendars you want to view.
Move an event to another calendar. Tap the event, tap Edit, then select a calendar to move it to.
You can subscribe to any calendar that uses the iCalendar (.ics) format. Supported calendar-
based services include iCloud, Yahoo!, Google, and the Calendar application in OS X. You can read
events from a subscribed calendar on iPad, but you can’t edit events or create new ones.
Subscribe to a calendar. Go to Settings > Mail, Contacts, Calendars, then tap Add Account. Tap
Other, then tap Add Subscribed Calendar. Enter the URL of the .ics file to subscribe to. You can
also subscribe to an iCalendar (.ics) calendar by tapping a link to the calendar.
62. Chapter 10 Calendar 62
Share iCloud calendars
You can share an iCloud calendar with other iCloud users. When you share a calendar, others can
see it, and you can let them add or change events. You can also share a read-only version that
anyone can view.
Create an iCloud calendar. Tap Calendars, tap Edit, then tap Add Calendar in the iCloud section.
Share an iCloud calendar. Tap Calendars, tap Edit, then tap the iCloud calendar you want to
share. Tap Add Person and enter a name, or tap to browse your Contacts. Those you invite
receive an email invitation to join the calendar, but they need an iCloud account in order
to accept.
Change a person’s access to a shared calendar. Tap Calendars, tap Edit, tap the shared calendar,
then tap the person. You can turn off their ability to edit the calendar, resend the invitation to
join the calendar, or stop sharing the calendar with them.
Turn off notifications for shared calendars. When someone modifies a shared calendar, you’re
notified of the change. To turn off notifications for shared calendars, go to Settings > Mail,
Contacts, Calendars > Shared Calendar Alerts.
Share a read-only calendar with anyone. Tap Calendars, tap Edit, then tap the iCloud calendar
you want to share. Turn on Public Calendar, then tap Share Link to copy or send the URL for the
calendar. Anyone can use the URL to subscribe to your calendar using a compatible app.
Calendar settings
There are several settings in Settings > Mail, Contacts, Calendars that affect Calendar and your
calendar accounts. These include:
•• Syncing of past events (future events are always synced)
•• Alert tone played for new meeting invitations
•• Default calendar for new events
•• Default time for alerts
•• Time zone support, to show dates and times using a different time zone
•• Which day starts the week
63. 11
63
Photos
View photos and videos
Photos lets you view your:
•• Camera Roll—photos and videos you took on iPad, or saved from an email, text message,
webpage, or screenshot
•• Shared photos and videos—Photos and videos that you’ve shared with iCloud Photo Sharing
or that other have shared with you (see iCloud Photo Sharing on page 64)
•• Photos and videos synced from your computer (see Sync with iTunes on page 17)
Select a photo to view.Select a photo to view.
Edit the photo.Edit the photo.
Delete the photo.Delete the photo.
Share the photo, play a slideshow,
assign it to a contact, print it, and more.
Share the photo, play a slideshow,
assign it to a contact, print it, and more.
Tap the screen to
display the controls.
Tap the screen to
display the controls.
View your photos and videos. Tap Photos. Photos automatically organizes your photos and
videos by year, by collection, and by moment. To quickly browse the photos in a collection or
year, touch and hold for a moment, then drag.
By default, Photos displays a representative subset of your photos when you view by year
or by collection. To see all your photos, go to Settings > Photos & Camera and turn off
Summarize Photos.
View by events or by faces. Albums you sync with iPhoto 8.0 or later, or Aperture v3.0.2 or later,
can be viewed by events or by faces. Tap Albums, then scroll to find Events or Faces.