2) cookie
在 Java Servlet 中,如果你光 Cookie cookie = new Cookie(name,value)
那么当用户退出 Browser 时,cookie 会被删除掉,而不会被存储在客户端的硬盘
上。
如果要存储 cookie,需加一句 cookie.setMaxAge(200)
cookie 是跟某一个 server 相关的,运行在同一个 server 上的 servlet 共享一个
cookie.
3) URL Rewriting
在使用 URL Rewriting 来维护 Session ID 的时候, 每一次 HTTP 请求都需要 EncodeURL()
典型的用在两个地方
1) out.print(“form action=” ”);
out.print(response.encodeURL(“sessionExample”));
out.print(“form action=” ”);
out.print(“method = GET>”);
2) out.print(“<p><a href=” ”);
out.print(response.encodeURL(“SessionExample?database=foo&datavalue
=bar”));
out.println(“” >URL encoded </a>”);
3.SingleThreadModel
默认的,每一个 servlet definition in a container 只有一个 servlet class 的实例。
只有实现了 SingleThreadModel,container 才会让 servlet 有多个实例。
Servlet specification 上建议,不要使用 synchronized,而使用 SingleThreadModel。
SingleThreadModel(没有方法)
保证 servlet 在同一时刻只处理一个客户的请求。
SingleThreadModel 是耗费资源的,特别是当有大量的请求发送给 Servlet 时,
SingleThreadModel 的作用是使包容器以同步时钟的方式调用 service 方法。
这等同于在 servlet 的 service()方法种使用 synchronized.
Single Thread Model 一般使用在需要响应一个 heavy request 的时候,比如是一个需要和
数据库打交道的连接。
5.
2. 在重载 Servlet地 init( )方法后,一定要记得调用 super.init( );
3. the client 通过发送一个 blank line 表示它已经结束 request
而 the server 通过关闭 the socket 来表示 response 已结束了。
4. 一个 Http Servlet 可以送三种东西给 Client
1) a single status code
2) any number of http headers
3) a response body
5. Servlet 之间信息共享的一个最简单的方法就是
System.getProperties().put(“key”,”value”);
6. Post 和 Get
Post:将 form 内各字段名称和内容放置在 html header 内传送给 server
Get: ?之后的查询字符串要使用 URLEncode,经过 URLEncode 后,这个字符串不再
带有空格,以后将在 server 上恢复所带有的空格。
Get 是 Web 上最经常使用的一种请求方法,每个超链接都使用这种方法。
7. Web.xml 就是 Web Applicatin 的 deployment descriptor
作用有:组织各类元素
设置 init param
设置安全性
8. Request Dispatcher 用来把接收到的 request forward processing 到另一个 servlet
要在一个 response 里包含另一个 servlet 的 output 时, 也要用到 Request Dispatcher.
9. Servlet 和 Jsp 在同一个 JVM 中,可以通过 ServeltContext 的
setAttribute( )
getAttribute( )
removeAttribute( )
来共享对象
10. 利用 request.getParameter( )得到的 String 存在字符集问题。
可以用 strTitle = request.getParameter(“title”);
strTitle = new String(strTitle.getBytes(“8859-1”),”gb2312”);
如果你希望得到更大得兼容性
String encoding = response.getCharacterEncoding();
//确定 Application server 用什么编码来读取输入的。
strTitle = new String(strTitle.getBytes(encoding),”gb2312”);
6.
XML
1.XML 基础知识
1. 一个xml 文档可以分成两个基本部分:
首部( header )
内容( content )
2. xml 名字空间规范中指定:
xml 文档中的每一个元素都处在一个名字空间中;如果没有指定的名字空间,缺省的名
字空间就是和该元素相关联的名字空间。
3. A document that is well-formed obeys all of the rules of XML documents (nested
tags, etc.)
" If a well-formed document uses a Document Type Definition (more on these in
a minute), and it follows all the rules of the DTD, then it is also a valid
document
4. A tag is the text between the <angle brackets>
" An element is the start tag, the end tag,and everything (including other
elements) in between
5. 标签( tags ) 实际上包含了“元素”( elements ) 和 “属性”( attributes )两部
分。
用元素( elements )来描述有规律的数据。
用属性( attributes ) 来描述系统数据。
如果你有一些数据要提供给某个应用程序,该数据就可能要用到一个元素。
如果该数据用于分类,或者用于告知应用程序如何处理某部分数据,或者该数据从来没
有直接对客户程序公开,那么它就可能成为一种属性。
6. CDATA (读作:C data ) C 是 character 的缩写。
7. org.xml.sax.Reader
/|
org.xm.l.sax.XMLReader
/|
org.apche.xerces.parsers.SAXParser
if ( rs.next()) {
// Retrieve the auto generated key(s).
int key = rs.getInt();
}
JTA/JTS
1.JTA/JTS 基本知识
服务器实现 JTS 是否对应用程序开发人员来说不是很重要的。
对你来说,应该把 JTA 看作是可用的 API。
JTA 是用来开发 distributed tansaction 的 API.
而 JTS 定义了支持 JTA 中实现 Transaction Manager 的规范。
JavaTransaction Service (JTS) specifies the implementation of a
Transaction Manager which supports the Java Transaction API (JTA) 1.0
Specification at the high-level and implements the Java mapping of the OMG Object
Transaction Service (OTS) 1.1 Specification at the low-level. JTS uses the
standard CORBA ORB/TS interfaces and Internet Inter-ORB Protocol (IIOP) for
transaction context propagation between JTS Transaction Managers.
A JTS Transaction Manager provides transaction services to the parties
involved in distributed transactions: the application server, the resource
manager, the standalone transactional application, and the Communication
Resource Manager (CRM).
2.JTA
1.1 事务处理的概念
JTA 实际上是由两部分组成的:一个高级的事务性客户接口和一个低级的 X/Open XA 接口。
我们关心的是高级客户接口,因为 bean 可以访问它,而且是推荐的客户应用程序的事
务性接口。
40.
低级的 XA 接口是由EJB 服务器和容器使用来自动协调事务和资源(如数据库)的
1.1.1 事务划分
a.程序划分
使用 UserTransaction 启动 JTA 事务
The UserTransaction interface defines the methods that allow an application to
explicitly manage transaction boundaries.(from j2ee API document)
b.声明划分
EJB 容器使用 TransactionManager 启动 JTA 事务
The TransactionManager interface defines the methods that allow an application
server to manage transaction boundaries. (from j2ee API document)
1.1.2 事务上下文及其传播
事务上下文是一种对资源上的事务操作之间和调用操作的组件之间的联系。
1.1.3 资源加入
资源加入(resource enlistment)是一个过程,在这个过程中资源管理器通知事务管理器
它要参与事务。
1.1.4 两阶段提交
两阶段提交是事务管理器和所有加入到事务中的资源之间的协议,确保要么所有的资源管
理器都提交了事务,要么都撤销了事务。
如果在一个事务内部只是访问一个单一资源管理器,不需要执行一个两阶段提交。
如果在一个事务内部只是访问多个资源管理器,两阶段提交是有益的。
1.2 事务处理系统中的构件模块
应用组件
JMS
THE basic building blocks of a JMS application are as follows:
• Administered objects (connection factories and destinations)
• Connections
• Sessions
• Message producers
• Message consumers
• Messages
消息系统允许分开的未耦合的应用程序之间可靠地异步通信。类同邮件系统.
通常有两种消息类型。
1.发布/订阅(publish/subscribe)
发布/订阅消息系统支持一个事件驱动模型, 消息产生者和使用者都参与消息的传递。
产生者发布事件,而使用者订阅感兴趣的事件,并使用事件。产生者将消息和一个特定
的主题(Topic)连在一起,消息系统根据使用者注册的兴趣,将消息传给使用者。
2.点对点(Peer to peer)
在点对点的消息系统中, 消息分发给一个单独的使用者。 它维持一个"进入"消息队列。
消息应用程序发送消息到一个特定的队列, 而客户端从一个队列中得到消息 JMS 和 EJB
一样是 WEBLOGIC 提供的服务,客户端通过 JNDI 名字查找。
在控制台 先创建一个 JMS 的主题,设定一个 JNDI(参照提示做啊,跟前边的介绍雷
同)
一个典型的 JMS 客户端由下面的几个基本步骤来创建:
创建一个到消息系统提供者的连接(Connection)
创建一个 Session,用于接收和发送消息
创建 MessageProducer 和 MessageConsumer 来创建和接收消息
当完成了上述步骤后,一个消息产生者客户端将创建并发布消息到一个主题,
(JNDI)
而消息使用者客户端会接收与一个主题相关的消息。
1.创建一个 Connection
A connection encapsulates a virtual connection with a JMS provider. It could
represent an open TCP/IP socket between a client and a provider service
daemon. You use a connection to create one or more sessions.
一个 Connection 提供客户端对底层的消息系统的访问。并实现资源的分配和管
理。通过使用一个 ConnectionFactory 来创建一个 Connection,通常用 JDNI 来指定:
Connection message=new initialContext();
TopicConnectionFactory topicConnectionFactory=(TopicConnectionFactory);
topic = (Topic) jndiContext.lookup(topicName);
50.
topicConnection =topicConnectionFactory.createTopicConnection();
2.创建一个 Session
A session is a single-threaded context for producing and consuming messages.
You use sessions to create message producers, message consumers, and
messages.
Session 是一个比较大的 JMS 对象,他提供了生产和消费消息的手段。
用于创建消息使用者和消息产生者。
topicSession =
topicConnection.createTopicSession(false,Session.AUTO_ACKNOWLEDGE);
两个参数用于控制事务和消息确认。
3.定位一个 Topic
用 JDNI 来定位一个 Topic, Topic 用于识别发送或接收的消息, 在发布/订阅系统中。
订阅者订阅一个给定的 Topic,而发布者将它发布的消息与一个 Topic 相连。
下面是创建一个 Topic "WeatherReport"
Topic weatherTopic=messaging.lookup("WeatherReport");
4.启动 Connection
在上面的初始化步骤之后, 消息流是禁止的,用于防止在初始化时发生不可预料的
行为。
一旦初始化结束,必须让 Connection 启动消息系统。
topicConnection.start();
5.创建一个消息产生者
在发布/订阅里,一个产生者发布消息到一个指定的 Topic。
下面的代码显示创建一个产生者,以及后续的建立和发布一个简单文本消息。
TopicPublisher publisher=session.createPublisher(weatherTopic);
TexeMessage message=session.createMessage();
message.setText("ssss");
publisher.publish(message);
下面是一个消息使用者的代码
topicConnection =topicConnectionFactory.createTopicConnection();
topicSession = topicConnection.createTopicSession(false,
Session.AUTO_ACKNOWLEDGE);
topicSubscriber = topicSession.createSubscriber(topic);
topicListener = new MsgListener();
topicSubscriber.setMessageListener(this);
topicConnection.start();
java.naming.factory.initial=
weblogic.jndi.WLInitialContextFactory
java.naming.provider.url= t3://localhost:7001
其他的如文件系统访问的例子参看《EJB2.0 企业级应用程序开发》
3.关闭 InitialContext
在结束 InitialContext 对象的使用后,总要关闭该对象。
这类似于关闭其他的有限资源,比如 JDBC 连接。
即使抛出了某个异常,也要保证关闭 InitialConext 对象
Application Server
1.WebSphere
1.1 初步安装
6.29.2002
安装 developerWorks toolbox sample CD(disk1)上的
Websphere application server advanced single server
在 server 机器上进行 “典型安装” 安装很顺利, websphere application server
, 比
3.0 要好很多
由于 wingate 可能使用了 7000 端口,第一次启动 WAS 没有成功,把 wingate stop
掉,就可以启动 WAS 了 (后来修改 server-config.xml,把 7000 端口改为别的端口,
即使 wingate starting ,也可以启动 WAS)
现在 WAS 典型安装的时候自动安装了 IBM HttpServer,比以前方便多了(以前还
要担心 IBM HttpServer 的安装问题,况且这次我是安装在 win2000 prefessional 上面
的,本来机器上就没有 IIS) 。
可以使用 http://server:9090/admin 进行管理
在 gu 机器上进行“定制安装”,不安装 IBM HttpServer,也顺利搞定。
安装忘了可以在 IE 中访问以下网址测试
http://localhost:9080/webapp/examples/
http://localhost:9080/estore/
http://localhost:9080/estore/是不需要配置就可以使用的,况且用到了数据库,
53.
根据 petstore.ear 中的customerEjb.jar 中的 ibm-web-bnd.xmi 中看来,使用的数据源为
jdbc/EstoreDataSource
说明在 WAS 安装完后,这个 DataSource 就是可用的,可供测试
1.2 配置样本
可以通过“样本”(http://localhost/WSsamples/index.html)来学习 WAS
Database Configuration
选择“Start Samples.ear SQL Server with Merant Database Configuration”
JDBC 驱动程序(Microsoft SQLServer via Merant SequeLink JDBC Driver)
服务器类路径:${WAS_ROOT}/lib/sljc.jar;${WAS_ROOT}/lib/sljcx.jar
1.3 部署示例应用(MyBank)
根据“将应用安装到 WebSphere 4.0 高级单服务器版(AEs) .pdf”的指导,可以
顺利的部署应用程序
1.3.1 停止 WAS 服务
可以在命令行下用 stopserver。
1.3.2 db2 的 JDBC 版本
When IBM DB2 Universal Database Version 7 is first installed, it uses
the JDBC 1.0 API for connections. WebSphere V4.0 and J2EE require JDBC 2.0.
Stop the DB2 JDBC Applet Server, then run a batch file to change from JDBC
1.0 to JDBC 2.0.
__ Click the Windows Start button, and select Settings --> Control Panel.
__ In the Control Panel, double-click Services.
__ In the Services window, select the DB2 JDBC Applet Server, and click
Stop.
__ Click Yes, you are sure you want to stop the DB2 JDBC Applet Server
service.
__ Verify the WebSphere Server is stopped. In a Command window, type:
stopserver.
54.
__ In aCommand window, change directories to where DB2 is installed.
For example: cd C:SQLLIB (Could be C:Program FilesSQLLIB on your
system.)
__ In the Command window, type: cd java12
__ In the Command window, type: usejdbc2
Six files are copied, and a file named inuse is updated.
__ In the Command window, type: type inuse.
This should display: JDBC 2.0
__ In the Control Panel, double-click Services.
__ In the Services window, select the DB2 JDBC Applet Server, and click
Start.
1.3.3 设置 DataSource
When you created the DataSource, you specified that the Default User
ID for the application database is USERID, and the Default Password is
PASSWORD.You need to create this User ID in the operating system
registry.
1.4 开发和部署自己的应用
成功的在 WAS4.0 中部署 bidding2.ear,使用的是通过 Web 页面部署,而不是通过
SEAppInstall 命令行方式
看来 JBuilder7 和 WAS4.0 集成开发还是比较方便的。
简 单 的 还 行 , 复 杂 一 点 就 不 行 了 , 例 如 开 发 WebApplication 的 时 候 ,
ibm-web-bnd.xmi 和 ibm-web-ext.xmi 根本不知道怎么写,也没有资料可以查
看来,开发 WebSphere 的东西,还是要使用 WSAD.
可以在 Jbuilder 中开发后,使用“应用程序组装工具”(assembly.bat)来配置
程序,然后再安装到 WebSphere 中去。
也可以不使用“应用程序组装工具” ,不管 ibm-web-bnd.xmi 和 ibm-web-ext.xmi,
直接通过 http:localhost:9090/admin 来安装应用程序的时候,会提示你输入对应的
实际的 jndi 资源名
在 WebSphere 中部署了 bidding2 企业应用程序后,关闭重新启动 WAS 还是不行,
bidding2 还是无法运行,结果,重新启动一下计算机就可以了,这一点不如 Weblogic


![1.它需要依靠的受限制的特点在特定 EJB 容器中没有得到加强。
2.它需要依靠的非标准的服务从容器中可获得。
为了保证 EJB 组件的可移植性和一致的行为,你应该使用一个具有与 Java2 平台安全
策略集相一致的策略集的容器来测试 EJB 组件,并且其加强了前述的编程限制。
总结
EJB 组件开发者应该知道这些推荐的关于 EJB 组件的编程限制,明白它们的重要性,并
且从组件的稳定性和可移植性利益方面考虑来遵循它们。 因为这些编程限制能阻止你使用标
准的 Java 语言的特点,违背了这些编程限制在编译时不会知道,并且加强这些限制也不是
EJB 容器的责任。所有这些原因都使你应很小心地遵守这些编程限制,这些限制在组件的合
同中已经成为了一个条款,并且它们对于建造可靠的、可移植的组件是非常重要的。
2. 优化 EJB
entity bean 为在应用程序和设计中描述持久化商业对象(persistent business objec
ts)提供了一个清晰的模型。在 java 对象模型中,简单对象通常都是以一种简单的方式进
行处理但是,很多商业对象所需要的事务化的持久性管理没有得到实现。entity bean 将持
久化机制封装在容器提供的服务里,并且隐藏了所有的复杂性。entity bean 允许应用程序
操纵他们就像处理一个一般的 java 对象应用。除了从调用代码中隐藏持久化的形式和机制
外,entity bean 还允许 EJB 容器对对象的持久化进行优化,保证数据存储具有开放性,灵
活性,以及可部署性。在一些基于 EJB 技术的项目中,广泛的使用 OO 技术导致了对 entity
bean 的大量使用,SUN 的工程师们已经积累了很多使用 entity Bean 的经验,这篇文章就详
细阐述的这些卡发经验:
*探索各种优化方法
*提供性能优化和提高适用性的法则和建议
*讨论如何避免一些教训。
法则 1:只要可以,尽量使用 CMP
CMP 方式不仅减少了编码的工作量,而且在 Container 中以及 container 产生的数据库
访问代码中包括了许多优化的可能。Container 可以访问内存缓冲中的 bean,这就允许它可
以监视缓冲中的任何变化。 这样的话就在事物没有提交之前, 如果缓存的数据没有变化就不
用写到数据库中。就可以避免许多不必要的数据库写操作。另外一个优化是在调用 find 方
法的时候。通常情况下 find 方法需要进行以下数据库操作:
查找数据库中的纪录并且获得主键
将纪录数据装入缓存
CMP 允许将这两步操作优化为一步就可以搞定。[具体怎么做我也没弄明白,原文没有具体
阐述]
法则 2:写代码时尽量保证对 BMP 和 CMP 都支持
许多情况下,EJB 的开发者可能无法控制他们写的 bean 怎么样被部署,以及使用的
container 是不是支持 CMP.
一个有效的解决方案是, 将商业逻辑的编码完全和持久化机制分离。 CMP 类中实现商
再
业逻辑,然后再编写一个 BMP 类,用该类继承 CMP 类。这样的话,所有的商业逻辑都在 CMP
类中,而持久化机制在 BMP 中实现。[我觉得这种情况在实际工作中很少遇到,但是作者解](https://image.slidesharecdn.com/j2ee-091113233022-phpapp02/85/J2ee-16-320.jpg)
![决问题的思路值得学习]
法则 3:把 ejbStore 中的数据库访问减小到最少。
如果使用 BMP,设置一个缓存数据改变标志 dirty 非常有用。所有改变数据库中底层数据的
操作,都要设置 dirty,而在 ejbStore()中,首先检测 dirty 的值,如果 dirty 的值没有
改变,表明目前数据库中的数据与缓存的一致,就不必进行数据库操作了,反之,就要把缓
存数据写入数据库。
法则 4:总是将从 lookup 和 find 中获得的引用进行缓存。 (cache)
引用缓存对 session bean 和 entity bean 都是适用的。
通过 JNDI lookup 获得 EJB 资源。 比如 DataSource,bean 的引用等等都要付出相当大的
代价。因此应该避免多余的 lookup.可以这样做:
将这些引用定义为实例变量。
从 setEntityContext(session Bean 使 用 setSessionContext) 方 法 查 找 他 们 。
SetEntityContext 方法对于一个 bean 实例只执行一次,所有的相关引用都在这一次中进行
查找,这样查找的代价就不是那么昂贵了。应该避免在其他方法中查找引用。尤其是访问数
据库的方法:ejbLoad()和 ejbStore(),如果在这些频繁调用的方法中进行 DataSource 的查
找,势必造成时间的浪费。
调用其他 entity bean 的 finder 方法也是一种重量级的调用。多次调用 finder()方法
的代价非常高。如果这种引用不适合放在 setEntityContext 这样的初始化时执行的方法中
执行,就应该在适当的时候缓存 finder 的执行结果。只是要注意的是,如果这个引用只对
当前的 entity 有效, 你就需要在 bean 从缓冲池中取出来代表另外一个实体时清除掉这些引
用。 ,这些操作应该在 ejbActivate()中进行。
法则 5:总是使用 prepare statements
这条优化法则适用于所有访问关系数据库的操作。
数据库在处理每一个 SQL Statement 的时候,执行前都要对 Statement 进行编译。一些
数据库具有缓存 statement 和 statement 的编译后形式的功能。数据库可以把新的
Statement 和缓存中的进行匹配。然而,如果要使用这一优化特性,新的 Statement 要必须
和缓存中的 Statement 完全匹配。
对于 Non-prepared Statement,数据和 Statement 本身作为一个字符串传递,这样由于
前后调用的数据不同而不能匹配,就导致无法使用这种优化。而对于 prepared Statement,
数据和 Statement 是分开传递给数据库的,这样 Statement 就可以和 cache 中已编译的
Statement 进行匹配。Statement 就不必每次都进行编译操作。从而使用该优化属性。
这项技术在一些小型的数据库访问中能够减少 Statement 将近 90%的执行时间。
法则 6:完全关闭所有的 Statement
在编写 BMP 的数据库访问代码时,记住一定要在数据库访问调用之后关闭 Statement,
因为每个打开的 Statement 对应于数据库中的一个打开的游标。](https://image.slidesharecdn.com/j2ee-091113233022-phpapp02/85/J2ee-17-320.jpg)


![public static Object
doAs(Subject subject, java.security.PrivilegedAction action)
public static Object
doAs(Subject subject, java.security.PrivilegedAction action)
throws java.security.PrivilegedActionException
注意, 用来保护敏感代码的方法与 “Java 2 代码源访问控制”Java 2 CodeSource Access
(
Control)概述中描述的方法相同。请参阅参考资料部分以了解更多关于 JAAS 中代码
源访问控制和认证的信息。
JAAS 中的授权
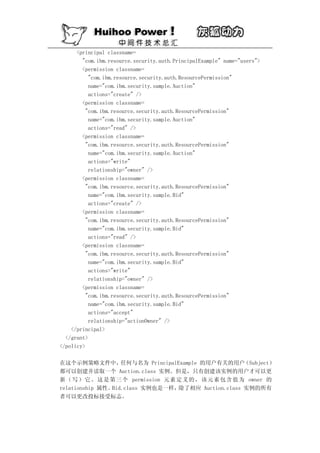
清单 4 显示一个授权请求的结果, 该请求使用清单 3 中显示的 JAAS 策略文件。 假设
已经安装了 SecurityManager, 并且 loginContext 已经认证了一个带有名为 “admin”
的 com.ibm.resource.security.auth.PrincipalExample 主体的 Subject。
清单 4. 一个简单的授权请求
public class JaasExample {
public static void main(String[] args) {
...
// where authenticatedUser is a Subject with
// a PrincipalExample named admin.
Subject.doAs(authenticatedUser, new JaasExampleAction());
...
}
}
public class JaasExampleAction implements PrivilegedAction {
public Object run() {
FileWriter fw = new FileWriter("hi.txt");
fw.write("Hello, World!");
fw.close();
}
}
这里,敏感代码被封装在 JaasExampleAction 类中。还要注意,调用类不要求为
JaasExampleAction 类代码源授予许可权,因为它实现了一个 PrivilegedAction。
扩展 JAAS
大多数应用程序都有定制逻辑, 它授权用户不仅仅在类上执行操作,而且还在该类的实
例上执行操作。 这种授权通常建立在用户和实例之间的关系上。这是 JAAS 的一个小缺](https://image.slidesharecdn.com/j2ee-091113233022-phpapp02/85/J2ee-30-320.jpg)
![点。然而,幸运的是,这样设计 JAAS 使得 JAAS 可以扩展。只要做一点工作,我们将
可以扩展 JAAS,使其包含一个通用的、类实例级的授权框架。
在文章开头处我已经说明了,抽象类 javax.security.auth.Policy 被用于代表 JAAS
安 全 性 策 略 。 它 的 缺 省 实 现 是 由 com.sun.security.auth.PolicyFile 类 提 供 。
PolicyFile 类从 JAAS 格式的文件(象清单 3 中显示的那个一样)中读取策略。
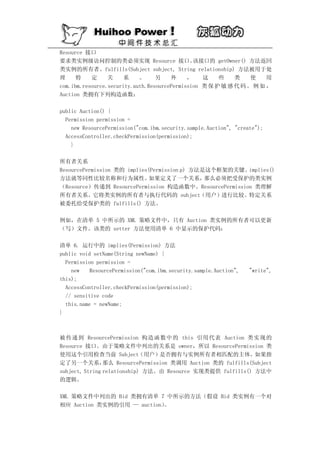
我们需要向这个文件添加一个东西为类实例级授权扩展策略定义:一个与许可权语句相
关的可选关系参数。
缺省 JAAS 许可权语句的格式如下:
permission <permission implementation class> [name], [actions];
我们在这个许可权语句的末尾添加一个可选的关系参数来完成策略定义。下面是新许可
权语句的格式:
permission <permission implementation class>
[name], [actions], [relationship];
在为类实例级授权扩展 JAAS 时要注意的最重要的一点是:许可权实现类必须有一个带
三个参数的构造函数。第一个参数是名称参数,第二个是行为参数,最后一个是关系参
数。
解析新文件格式
既然文件格式已经改变,就需要一个新的 javax.security.auth.Policy 子类来解析文
件。
为 简 单 起 见 , 我 们 的 示 例 使 用 了 一 个 新 的 javax.security.auth.Policy 子 类
com.ibm.resource.security.auth.XMLPolicyFile,来从 XML 文件读取策略。在实际
的企业应用程序中,关系数据库更适合执行这个任务。
使用 XMLPolicyFile 类代替缺省的 JAAS 访问控制策略实现的最容易的方法是向
java.security 属 性 文 件 添 加
auth.policy.provider=com.ibm.resource.security.auth.XMLPolicyFile 条 目 。
java.security 属性文件位于 Java 2 平台运行时的 lib/security 目录下。清单 5
是与 XMLPolicyFile 类一起使用的样本 XML 策略文件:
清单 5. 一个 XML 策略文件
<?xml version="1.0"?>
<policy>
<grant codebase="file:/D:/sample_actions.jar">](https://image.slidesharecdn.com/j2ee-091113233022-phpapp02/85/J2ee-31-320.jpg)


![Lucene 3[1] 0 原理与代码分析](https://cdn.slidesharecdn.com/ss_thumbnails/lucene31-0-100225194736-phpapp02-thumbnail.jpg?width=640&height=640&fit=bounds)


