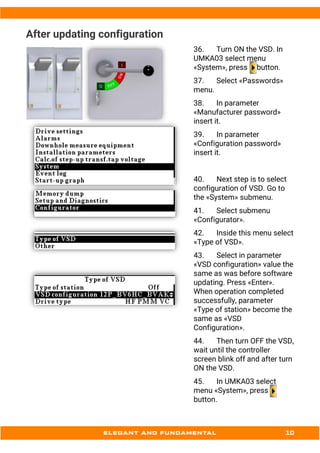
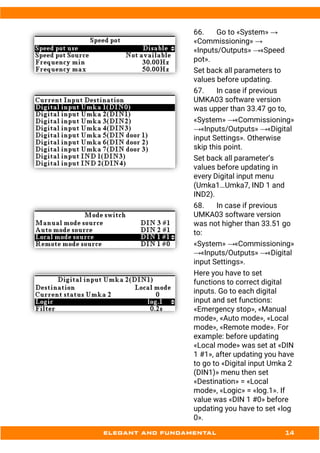
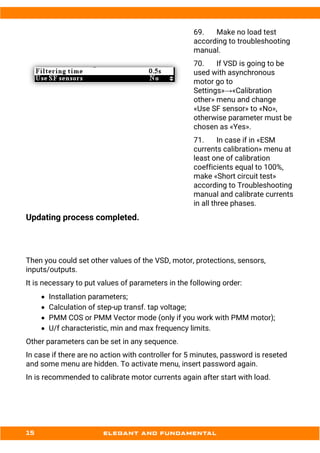
Instruction for updating software UMKA03 and IND
Contents
Preparation processes ...............................................................................................................................3
IND updating .................................................................................................................................................8
UMKA03 updating........................................................................................................................................9
After updating configuration.................................................................................................................. 10
Preparation processes
Turn on VSD. Go to the
«System» menu.
1. Select «Passwords»
menu.
2. Select parameter
«Manufacturer password»
and insert it.
In case if you don’t know the
password, please contact
Triol Service.
3. Go to «System»→«VSD
parameters».
Here you need to write down
or take a photo of all
parameter’s values (in the
picture is just example).
4. Go to the «Alarms»
menu.
Here you need to write down
or take a photo of all
parameter’s values in
«Voltage of direct current
circuit», «Power switches
overheating», «Overcurrent»
menus.
5. Go to the «Drive
settings» menu.
6. Go to the «Calibration
other» menu.
7. If your current
software version is 33.58 or
upper, change «Use SF
sensors» to «No», otherwise
skip this point.
8. Write down or take a
photo of values (picture is
just example).
9. Go to the «ESM
currents calibration».
Here you need to write down
or take a photo of values of
current calibration (the values
should differ from 100%), (in
the picture is just example).
10. Go to the «Input
voltages calibration».
Write down or take a photo of
values of voltage calibration
(the values must differ from
100%, in the picture is just
example).
11. Go the «Currents after
filter calibration».
Here you need to write down
or take a photo of values of
current calibration (the values
should differ from 100%), (in
the picture is just example).
12. Go to the «DC bus
calibration» in «Drive
settings» menu.
Write down or take a photo of
values of voltage calibration
(the values must differ from
100%, picture is just
example).
13. In menu «System» →
«Passwords», select
parameter «Configurator
password» and insert it. In
case if you don’t know the
password, please contact
Triol Service.
14. Go to menu «System»
→ «Configurator».
15. Inside this menu select
«Type of VSD».
16. Take a photo of all
parameters in this menu.
17. Select in previous
menu parameter «other».
18. Take photo of all
parameters in this menu also.
19. In case if current
UMKA03 software version is
not higher than 33.51 go to:
«System» →«Commissioning»
→«Inputs/Outputs» →«Mode
switch», otherwise skip this
point.
Here you need to write down
or take a photo of all
parameter’s values (in the
picture is just example).
Go to «System» →
«Commissioning» →«Digital
inputs» →«Emergency stop».
Here you need to write down
or take a photo of all
parameter’s values (in the
picture is just example).
20. In case if current
UMKA03 software version is
upper than 33.47 go to:
«System» →«Commissioning»
→«Inputs/Outputs» →«Digital
input Settings». Otherwise
skip this point.
Here you need to write down
or take a photo of all
parameter’s values in every
Digital input menu
(Umka1…Umka7, IND 1 and
IND2).
21. Go to «System» →
«Commissioning» →
«Inputs/Outputs» →«Speed
pot».
Here you need to write down
or take a photo of all
parameter’s values (in the
picture is just example).
22. Turn OFF the VSD.
23. Connect USB flash
drive to the laptop or PC.
Create on the flash drive new
folder, named «UMKA-03».
The USB flash drive must be
formatted for the FAT32 file
system and have a capacity
of 4 to 8 GB. Then, you need
to copy to this folder files:
«U_XXXX.hex», «U_XXXX.hlu»,
«U_XXXX.ldr», «U_XXXX.SCR».
Then create another folder
and name it «IND», copy into
it file «INDXXXXX.hex».
IND updating
24. Turn ON the VSD,
insert usb flash drive into the
usb connector. In UMKA03
select menu «System», press
button.
25. Select «Passwords»
menu.
26. In parameter
«Manufacturer password»
insert it.
27. Select there item
«Change IND firmware» and
change value to «Yes».
28. Select «INDXXXX»
version of software and press
«Enter».
Note! turning off power of VSD is prohibited during updating.
29. Wait until updating
process is finished.
Then turn OFF the VSD, wait
until the controller screen
blink off and after turn ON the
VSD.
If you don’t need to update UMKA03 software go to «After updating
configuration» otherwise go to «UMKA03 updating».
UMKA03 updating
30. Turn ON the VSD,
insert usb flash drive into the
usb connector. In UMKA03
select menu «System», press
button.
31. Select «Passwords»
menu.
32. Enter the
«Manufacturer password»
again, then go to the
submenu «Operation with
USB».
33. Go to the «Operation
with USB» menu, select item
«Change firmware» and
change value to «Yes».
34. Select «U_XXXX»
version of software and press
«Enter». Wait until updating
process is finished.
Note! turning off power of VSD is prohibited during updating.
35. Turn OFF the VSD, wait
until the controller screen
blink off and after turn ON the
VSD.
After updating configuration
36. Turn ON the VSD. In
UMKA03 select menu
«System», press button.
37. Select «Passwords»
menu.
38. In parameter
«Manufacturer password»
insert it.
39. In parameter
«Configuration password»
insert it.
40. Next step is to select
configuration of VSD. Go to
the «System» submenu.
41. Select submenu
«Configurator».
42. Inside this menu select
«Type of VSD».
43. Select in parameter
«VSD configuration» value the
same as was before software
updating. Press «Enter».
When operation completed
successfully, parameter
«Type of station» become the
same as «VSD
Configuration».
44. Then turn OFF the VSD,
wait until the controller
screen blink off and after turn
ON the VSD.
45. In UMKA03 select
menu «System», press
button.
46. Select «Passwords»
menu.
47. In parameter
«Manufacturer password»
insert it.
48. In parameter
«Configuration password»
insert it.
49. Next step is to select
configuration of VSD. Go to
the «System» submenu.
50. Select submenu
«Configurator».
51. Inside this menu select
«Type of VSD».
52. Check that «Type of
station» the same as «VSD
Configuration».
53. Select in previous
menu parameter «Other».
54. Set parameters:
• «Type of PWM» = «PWM
Texas»;
• «Power system» set the
nominal supply
frequency;
• In «PWM frequency»
install the same value,
which was in the menu
«Calibration other»
before updating;
• «Commutation pause» =
3µs;
• «Monitoring time of Ud
short» = 6 sec;
• «Passive filter»
according to VSD’s line:
Triol VSD line Value
UD, RD Not available
CP, LH Available
• Exp. Func = «On».
55. Go to «System»→«VSD
parameters».
56. Set back parameters
values (you had to take a
photo or write down values of
this menu before updating).
57. Go to
«System»→«Setting universal
time» and set your local time.
58. In menu «Installation
parameters» install value of
parameter «Work voltage» to
the level of supplying line,
which is connected to the
VSD.
59. Go to the «Installation
Parameters» menu and in
parameter «Filter Capacity
manual» install the same
value, which was in parameter
«Filter Capacitance» in menu
«Calibration other» (you had
to take a photo or write down
values of this menu before
updating).
60. Go to the «Calibration
other» menu.
61. Select parameter
«Reactive current
adjustment» and change
value to «Yes».
62. The value in parameter
«Filter capacitance» is change
from 0 to the same value,
which you set in parameter
«Filter Capacity manual».
63. Set back parameters
values below in «Calibration
other» to values before
updating:
• «Off alarm «Contactor»»;
• «Nom VSD current»;
• «Adjusting Output
Current»;
• «Iin adjusting factor»;
• «Uin adjusting factor»;
• «L sin Filter»;
• «Fan on Temperature».
64. After that you need to
set back values of
calibrations and adjustments,
in menus «ESM currents
calibration», «Input voltages
calibration», «Currents after
filter calibration», «DC bus
calibration».
65. Go to the «Alarms»
menu.
Then you need to set back
values of all parameter’s
values in «Voltage of direct
current circuit», «Power
switches overheating»,
«Overcurrent» menus.
66. Go to «System» →
«Commissioning» →
«Inputs/Outputs» →«Speed
pot».
Set back all parameters to
values before updating.
67. In case if previous
UMKA03 software version
was upper than 33.47 go to,
«System» →«Commissioning»
→«Inputs/Outputs» →«Digital
input Settings». Otherwise
skip this point.
Set back all parameter’s
values before updating in
every Digital input menu
(Umka1…Umka7, IND 1 and
IND2).
68. In case if previous
UMKA03 software version
was not higher than 33.51 go
to:
«System» →«Commissioning»
→«Inputs/Outputs» →«Digital
input Settings».
Here you have to set
functions to correct digital
inputs. Go to each digital
input and set functions:
«Emergency stop», «Manual
mode», «Auto mode», «Local
mode», «Remote mode». For
example: before updating
«Local mode» was set at «DIN
1 #1», after updating you have
to go to «Digital input Umka 2
(DIN1)» menu then set
«Destination» = «Local
mode», «Logic» = «log.1». If
value was «DIN 1 #0» before
updating you have to set «log
0».
69. Make no load test
according to troubleshooting
manual.
70. If VSD is going to be
used with asynchronous
motor go to
Settings»→«Calibration
other» menu and change
«Use SF sensor» to «No»,
otherwise parameter must be
chosen as «Yes».
71. In case if in «ESM
currents calibration» menu at
least one of calibration
coefficients equal to 100%,
make «Short circuit test»
according to Troubleshooting
manual and calibrate currents
in all three phases.
Updating process completed.
Then you could set other values of the VSD, motor, protections, sensors,
inputs/outputs.
It is necessary to put values of parameters in the following order:
• Installation parameters;
• Calculation of step-up transf. tap voltage;
• PMM COS or PMM Vector mode (only if you work with PMM motor);
• U/f characteristic, min and max frequency limits.
Other parameters can be set in any sequence.
In case if there are no action with controller for 5 minutes, password is reseted
and some menu are hidden. To activate menu, insert password again.
In is recommended to calibrate motor currents again after start with load.
Instruction for updating ind and software umka

Instruction for updating ind and software umka

  • 1.
    Instruction for updatingsoftware UMKA03 and IND
  • 2.
    Contents Preparation processes ...............................................................................................................................3 INDupdating .................................................................................................................................................8 UMKA03 updating........................................................................................................................................9 After updating configuration.................................................................................................................. 10
  • 3.
    Preparation processes Turn onVSD. Go to the «System» menu. 1. Select «Passwords» menu. 2. Select parameter «Manufacturer password» and insert it. In case if you don’t know the password, please contact Triol Service. 3. Go to «System»→«VSD parameters». Here you need to write down or take a photo of all parameter’s values (in the picture is just example). 4. Go to the «Alarms» menu. Here you need to write down or take a photo of all parameter’s values in «Voltage of direct current circuit», «Power switches overheating», «Overcurrent» menus.
  • 4.
    5. Go tothe «Drive settings» menu. 6. Go to the «Calibration other» menu. 7. If your current software version is 33.58 or upper, change «Use SF sensors» to «No», otherwise skip this point. 8. Write down or take a photo of values (picture is just example). 9. Go to the «ESM currents calibration». Here you need to write down or take a photo of values of current calibration (the values should differ from 100%), (in the picture is just example). 10. Go to the «Input voltages calibration». Write down or take a photo of values of voltage calibration (the values must differ from 100%, in the picture is just example). 11. Go the «Currents after filter calibration».
  • 5.
    Here you needto write down or take a photo of values of current calibration (the values should differ from 100%), (in the picture is just example). 12. Go to the «DC bus calibration» in «Drive settings» menu. Write down or take a photo of values of voltage calibration (the values must differ from 100%, picture is just example). 13. In menu «System» → «Passwords», select parameter «Configurator password» and insert it. In case if you don’t know the password, please contact Triol Service. 14. Go to menu «System» → «Configurator». 15. Inside this menu select «Type of VSD».
  • 6.
    16. Take aphoto of all parameters in this menu. 17. Select in previous menu parameter «other». 18. Take photo of all parameters in this menu also. 19. In case if current UMKA03 software version is not higher than 33.51 go to: «System» →«Commissioning» →«Inputs/Outputs» →«Mode switch», otherwise skip this point. Here you need to write down or take a photo of all parameter’s values (in the picture is just example). Go to «System» → «Commissioning» →«Digital inputs» →«Emergency stop». Here you need to write down or take a photo of all parameter’s values (in the picture is just example). 20. In case if current UMKA03 software version is upper than 33.47 go to:
  • 7.
    «System» →«Commissioning» →«Inputs/Outputs» →«Digital inputSettings». Otherwise skip this point. Here you need to write down or take a photo of all parameter’s values in every Digital input menu (Umka1…Umka7, IND 1 and IND2). 21. Go to «System» → «Commissioning» → «Inputs/Outputs» →«Speed pot». Here you need to write down or take a photo of all parameter’s values (in the picture is just example). 22. Turn OFF the VSD. 23. Connect USB flash drive to the laptop or PC. Create on the flash drive new folder, named «UMKA-03». The USB flash drive must be formatted for the FAT32 file system and have a capacity of 4 to 8 GB. Then, you need to copy to this folder files: «U_XXXX.hex», «U_XXXX.hlu», «U_XXXX.ldr», «U_XXXX.SCR». Then create another folder and name it «IND», copy into it file «INDXXXXX.hex».
  • 8.
    IND updating 24. TurnON the VSD, insert usb flash drive into the usb connector. In UMKA03 select menu «System», press button. 25. Select «Passwords» menu. 26. In parameter «Manufacturer password» insert it. 27. Select there item «Change IND firmware» and change value to «Yes». 28. Select «INDXXXX» version of software and press «Enter». Note! turning off power of VSD is prohibited during updating. 29. Wait until updating process is finished. Then turn OFF the VSD, wait until the controller screen blink off and after turn ON the VSD. If you don’t need to update UMKA03 software go to «After updating configuration» otherwise go to «UMKA03 updating».
  • 9.
    UMKA03 updating 30. TurnON the VSD, insert usb flash drive into the usb connector. In UMKA03 select menu «System», press button. 31. Select «Passwords» menu. 32. Enter the «Manufacturer password» again, then go to the submenu «Operation with USB». 33. Go to the «Operation with USB» menu, select item «Change firmware» and change value to «Yes». 34. Select «U_XXXX» version of software and press «Enter». Wait until updating process is finished. Note! turning off power of VSD is prohibited during updating. 35. Turn OFF the VSD, wait until the controller screen blink off and after turn ON the VSD.
  • 10.
    After updating configuration 36.Turn ON the VSD. In UMKA03 select menu «System», press button. 37. Select «Passwords» menu. 38. In parameter «Manufacturer password» insert it. 39. In parameter «Configuration password» insert it. 40. Next step is to select configuration of VSD. Go to the «System» submenu. 41. Select submenu «Configurator». 42. Inside this menu select «Type of VSD». 43. Select in parameter «VSD configuration» value the same as was before software updating. Press «Enter». When operation completed successfully, parameter «Type of station» become the same as «VSD Configuration». 44. Then turn OFF the VSD, wait until the controller screen blink off and after turn ON the VSD. 45. In UMKA03 select menu «System», press button.
  • 11.
    46. Select «Passwords» menu. 47.In parameter «Manufacturer password» insert it. 48. In parameter «Configuration password» insert it. 49. Next step is to select configuration of VSD. Go to the «System» submenu. 50. Select submenu «Configurator». 51. Inside this menu select «Type of VSD». 52. Check that «Type of station» the same as «VSD Configuration». 53. Select in previous menu parameter «Other». 54. Set parameters: • «Type of PWM» = «PWM Texas»; • «Power system» set the nominal supply frequency; • In «PWM frequency» install the same value, which was in the menu «Calibration other» before updating; • «Commutation pause» = 3µs; • «Monitoring time of Ud short» = 6 sec;
  • 12.
    • «Passive filter» accordingto VSD’s line: Triol VSD line Value UD, RD Not available CP, LH Available • Exp. Func = «On». 55. Go to «System»→«VSD parameters». 56. Set back parameters values (you had to take a photo or write down values of this menu before updating). 57. Go to «System»→«Setting universal time» and set your local time. 58. In menu «Installation parameters» install value of parameter «Work voltage» to the level of supplying line, which is connected to the VSD. 59. Go to the «Installation Parameters» menu and in parameter «Filter Capacity manual» install the same value, which was in parameter «Filter Capacitance» in menu «Calibration other» (you had to take a photo or write down values of this menu before updating). 60. Go to the «Calibration other» menu. 61. Select parameter «Reactive current adjustment» and change value to «Yes».
  • 13.
    62. The valuein parameter «Filter capacitance» is change from 0 to the same value, which you set in parameter «Filter Capacity manual». 63. Set back parameters values below in «Calibration other» to values before updating: • «Off alarm «Contactor»»; • «Nom VSD current»; • «Adjusting Output Current»; • «Iin adjusting factor»; • «Uin adjusting factor»; • «L sin Filter»; • «Fan on Temperature». 64. After that you need to set back values of calibrations and adjustments, in menus «ESM currents calibration», «Input voltages calibration», «Currents after filter calibration», «DC bus calibration». 65. Go to the «Alarms» menu. Then you need to set back values of all parameter’s values in «Voltage of direct current circuit», «Power switches overheating», «Overcurrent» menus.
  • 14.
    66. Go to«System» → «Commissioning» → «Inputs/Outputs» →«Speed pot». Set back all parameters to values before updating. 67. In case if previous UMKA03 software version was upper than 33.47 go to, «System» →«Commissioning» →«Inputs/Outputs» →«Digital input Settings». Otherwise skip this point. Set back all parameter’s values before updating in every Digital input menu (Umka1…Umka7, IND 1 and IND2). 68. In case if previous UMKA03 software version was not higher than 33.51 go to: «System» →«Commissioning» →«Inputs/Outputs» →«Digital input Settings». Here you have to set functions to correct digital inputs. Go to each digital input and set functions: «Emergency stop», «Manual mode», «Auto mode», «Local mode», «Remote mode». For example: before updating «Local mode» was set at «DIN 1 #1», after updating you have to go to «Digital input Umka 2 (DIN1)» menu then set «Destination» = «Local mode», «Logic» = «log.1». If value was «DIN 1 #0» before updating you have to set «log 0».
  • 15.
    69. Make noload test according to troubleshooting manual. 70. If VSD is going to be used with asynchronous motor go to Settings»→«Calibration other» menu and change «Use SF sensor» to «No», otherwise parameter must be chosen as «Yes». 71. In case if in «ESM currents calibration» menu at least one of calibration coefficients equal to 100%, make «Short circuit test» according to Troubleshooting manual and calibrate currents in all three phases. Updating process completed. Then you could set other values of the VSD, motor, protections, sensors, inputs/outputs. It is necessary to put values of parameters in the following order: • Installation parameters; • Calculation of step-up transf. tap voltage; • PMM COS or PMM Vector mode (only if you work with PMM motor); • U/f characteristic, min and max frequency limits. Other parameters can be set in any sequence. In case if there are no action with controller for 5 minutes, password is reseted and some menu are hidden. To activate menu, insert password again. In is recommended to calibrate motor currents again after start with load.