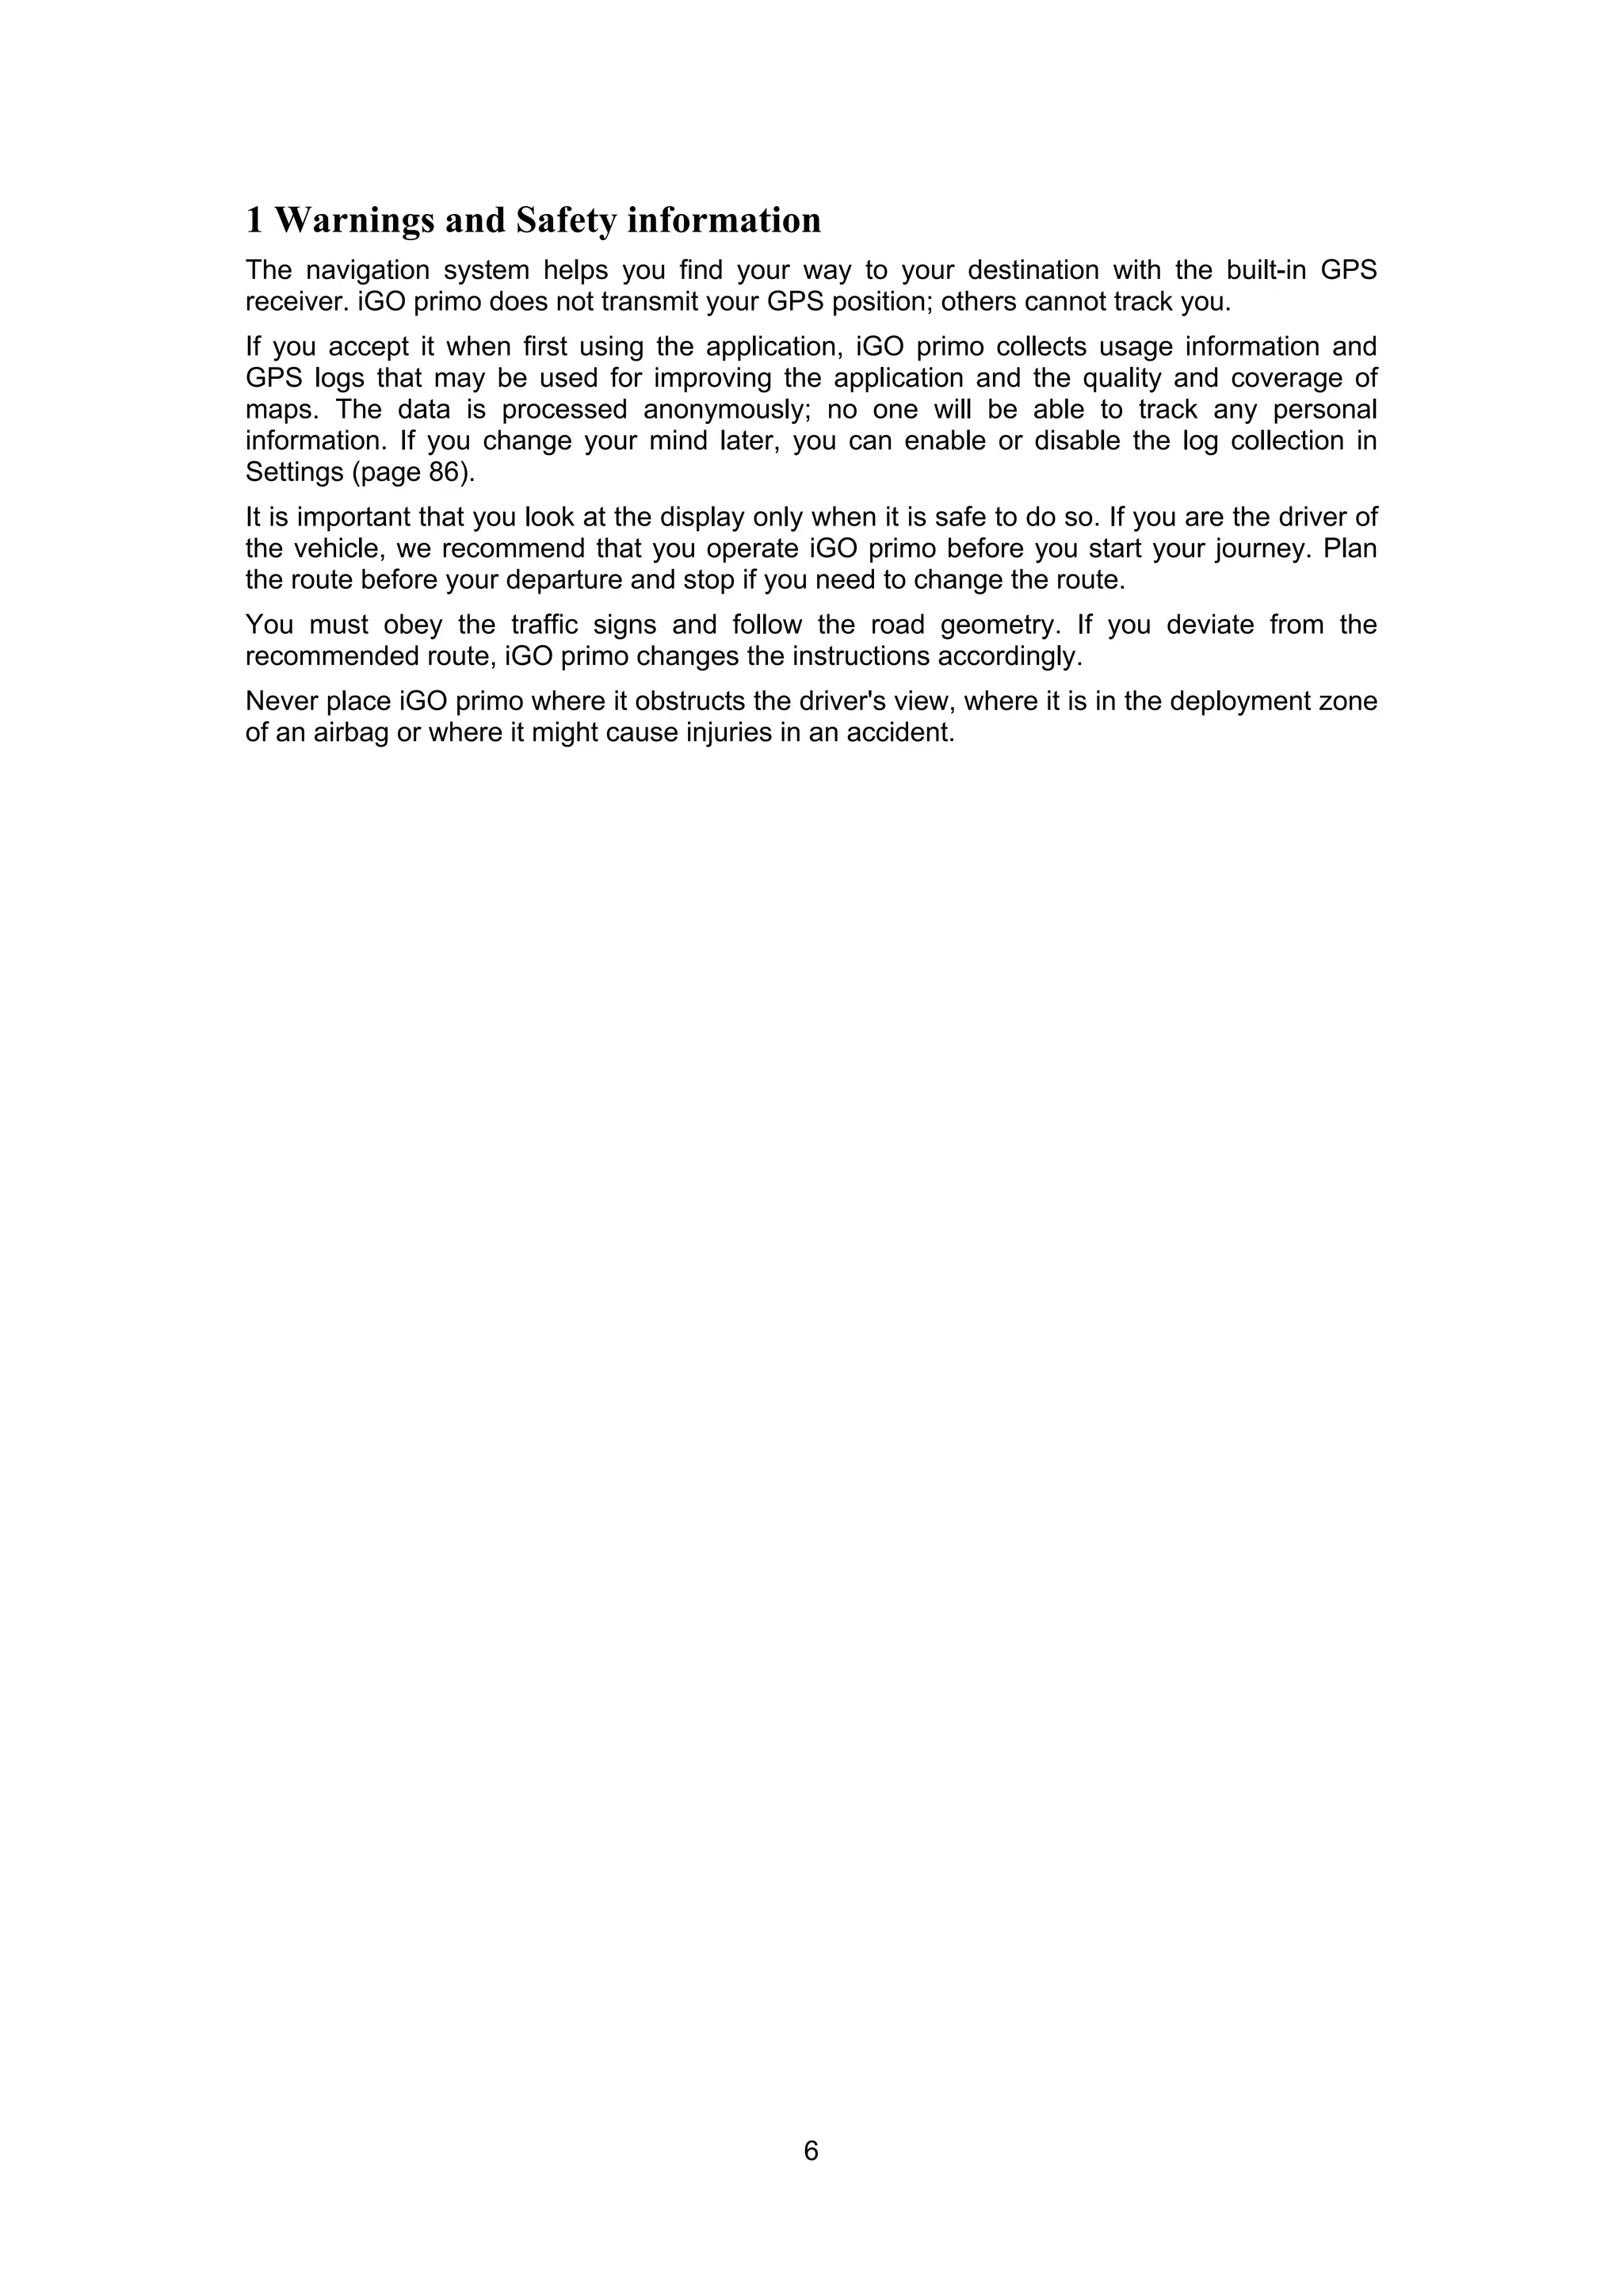
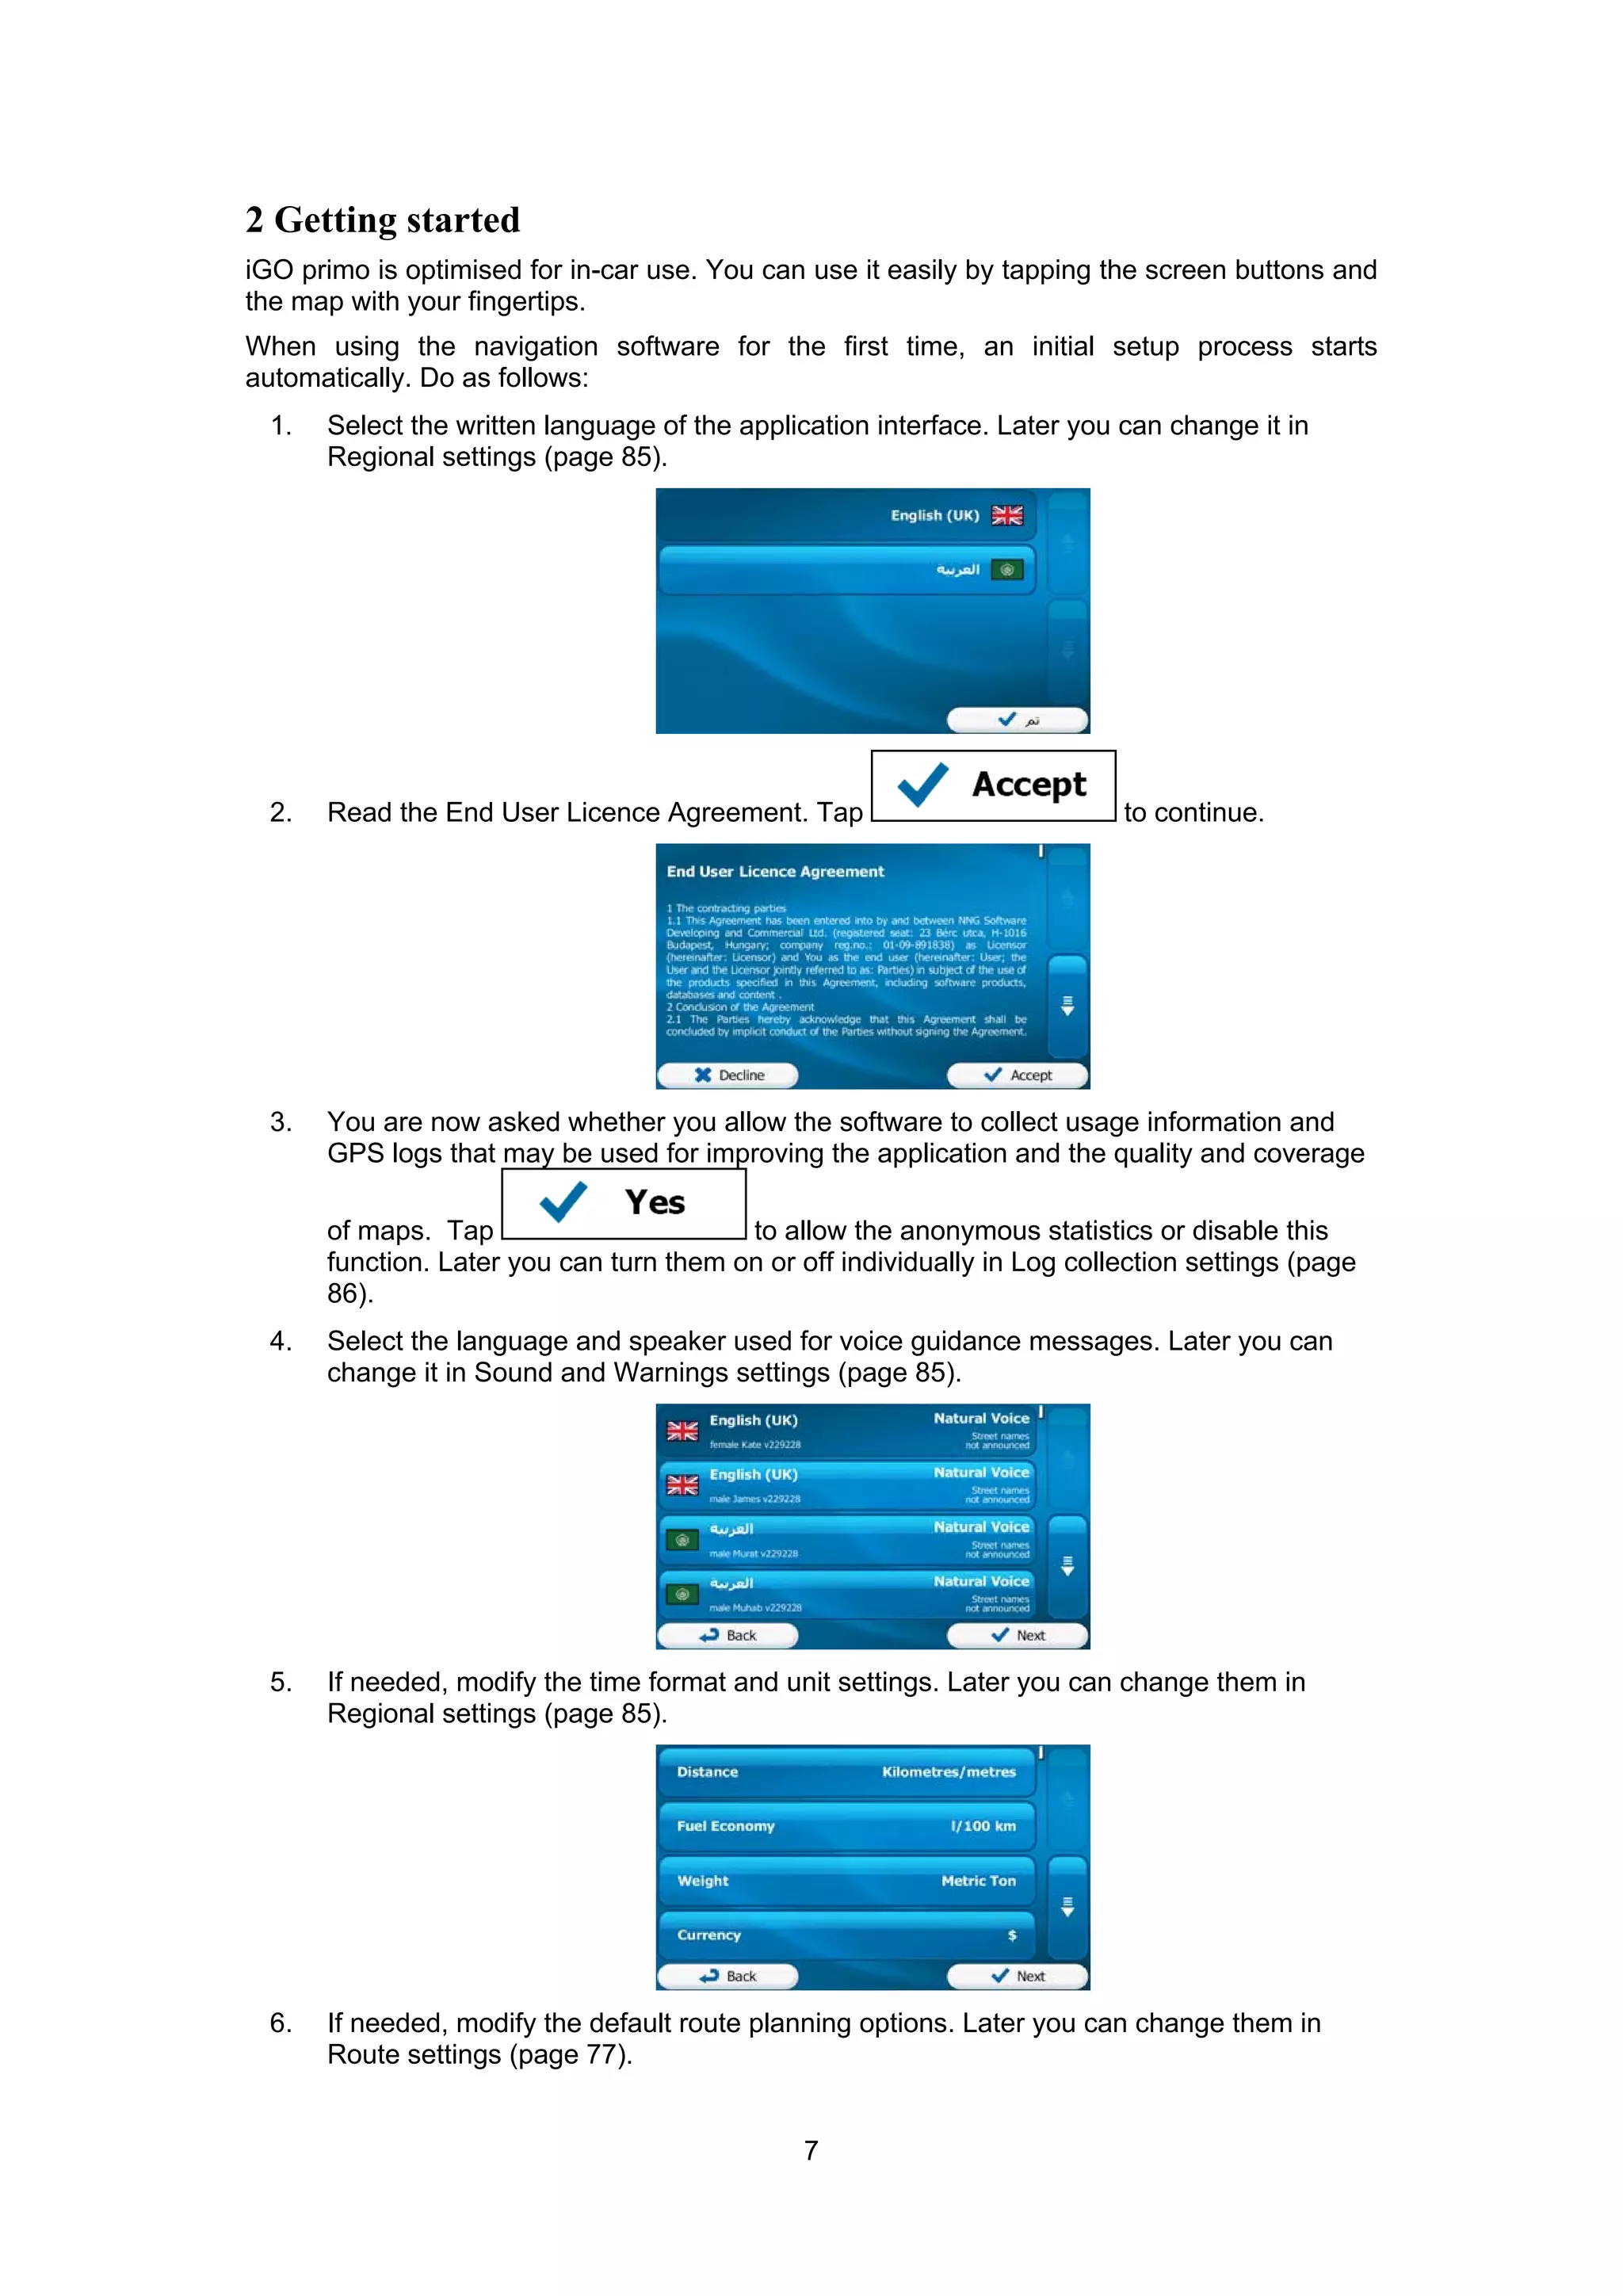
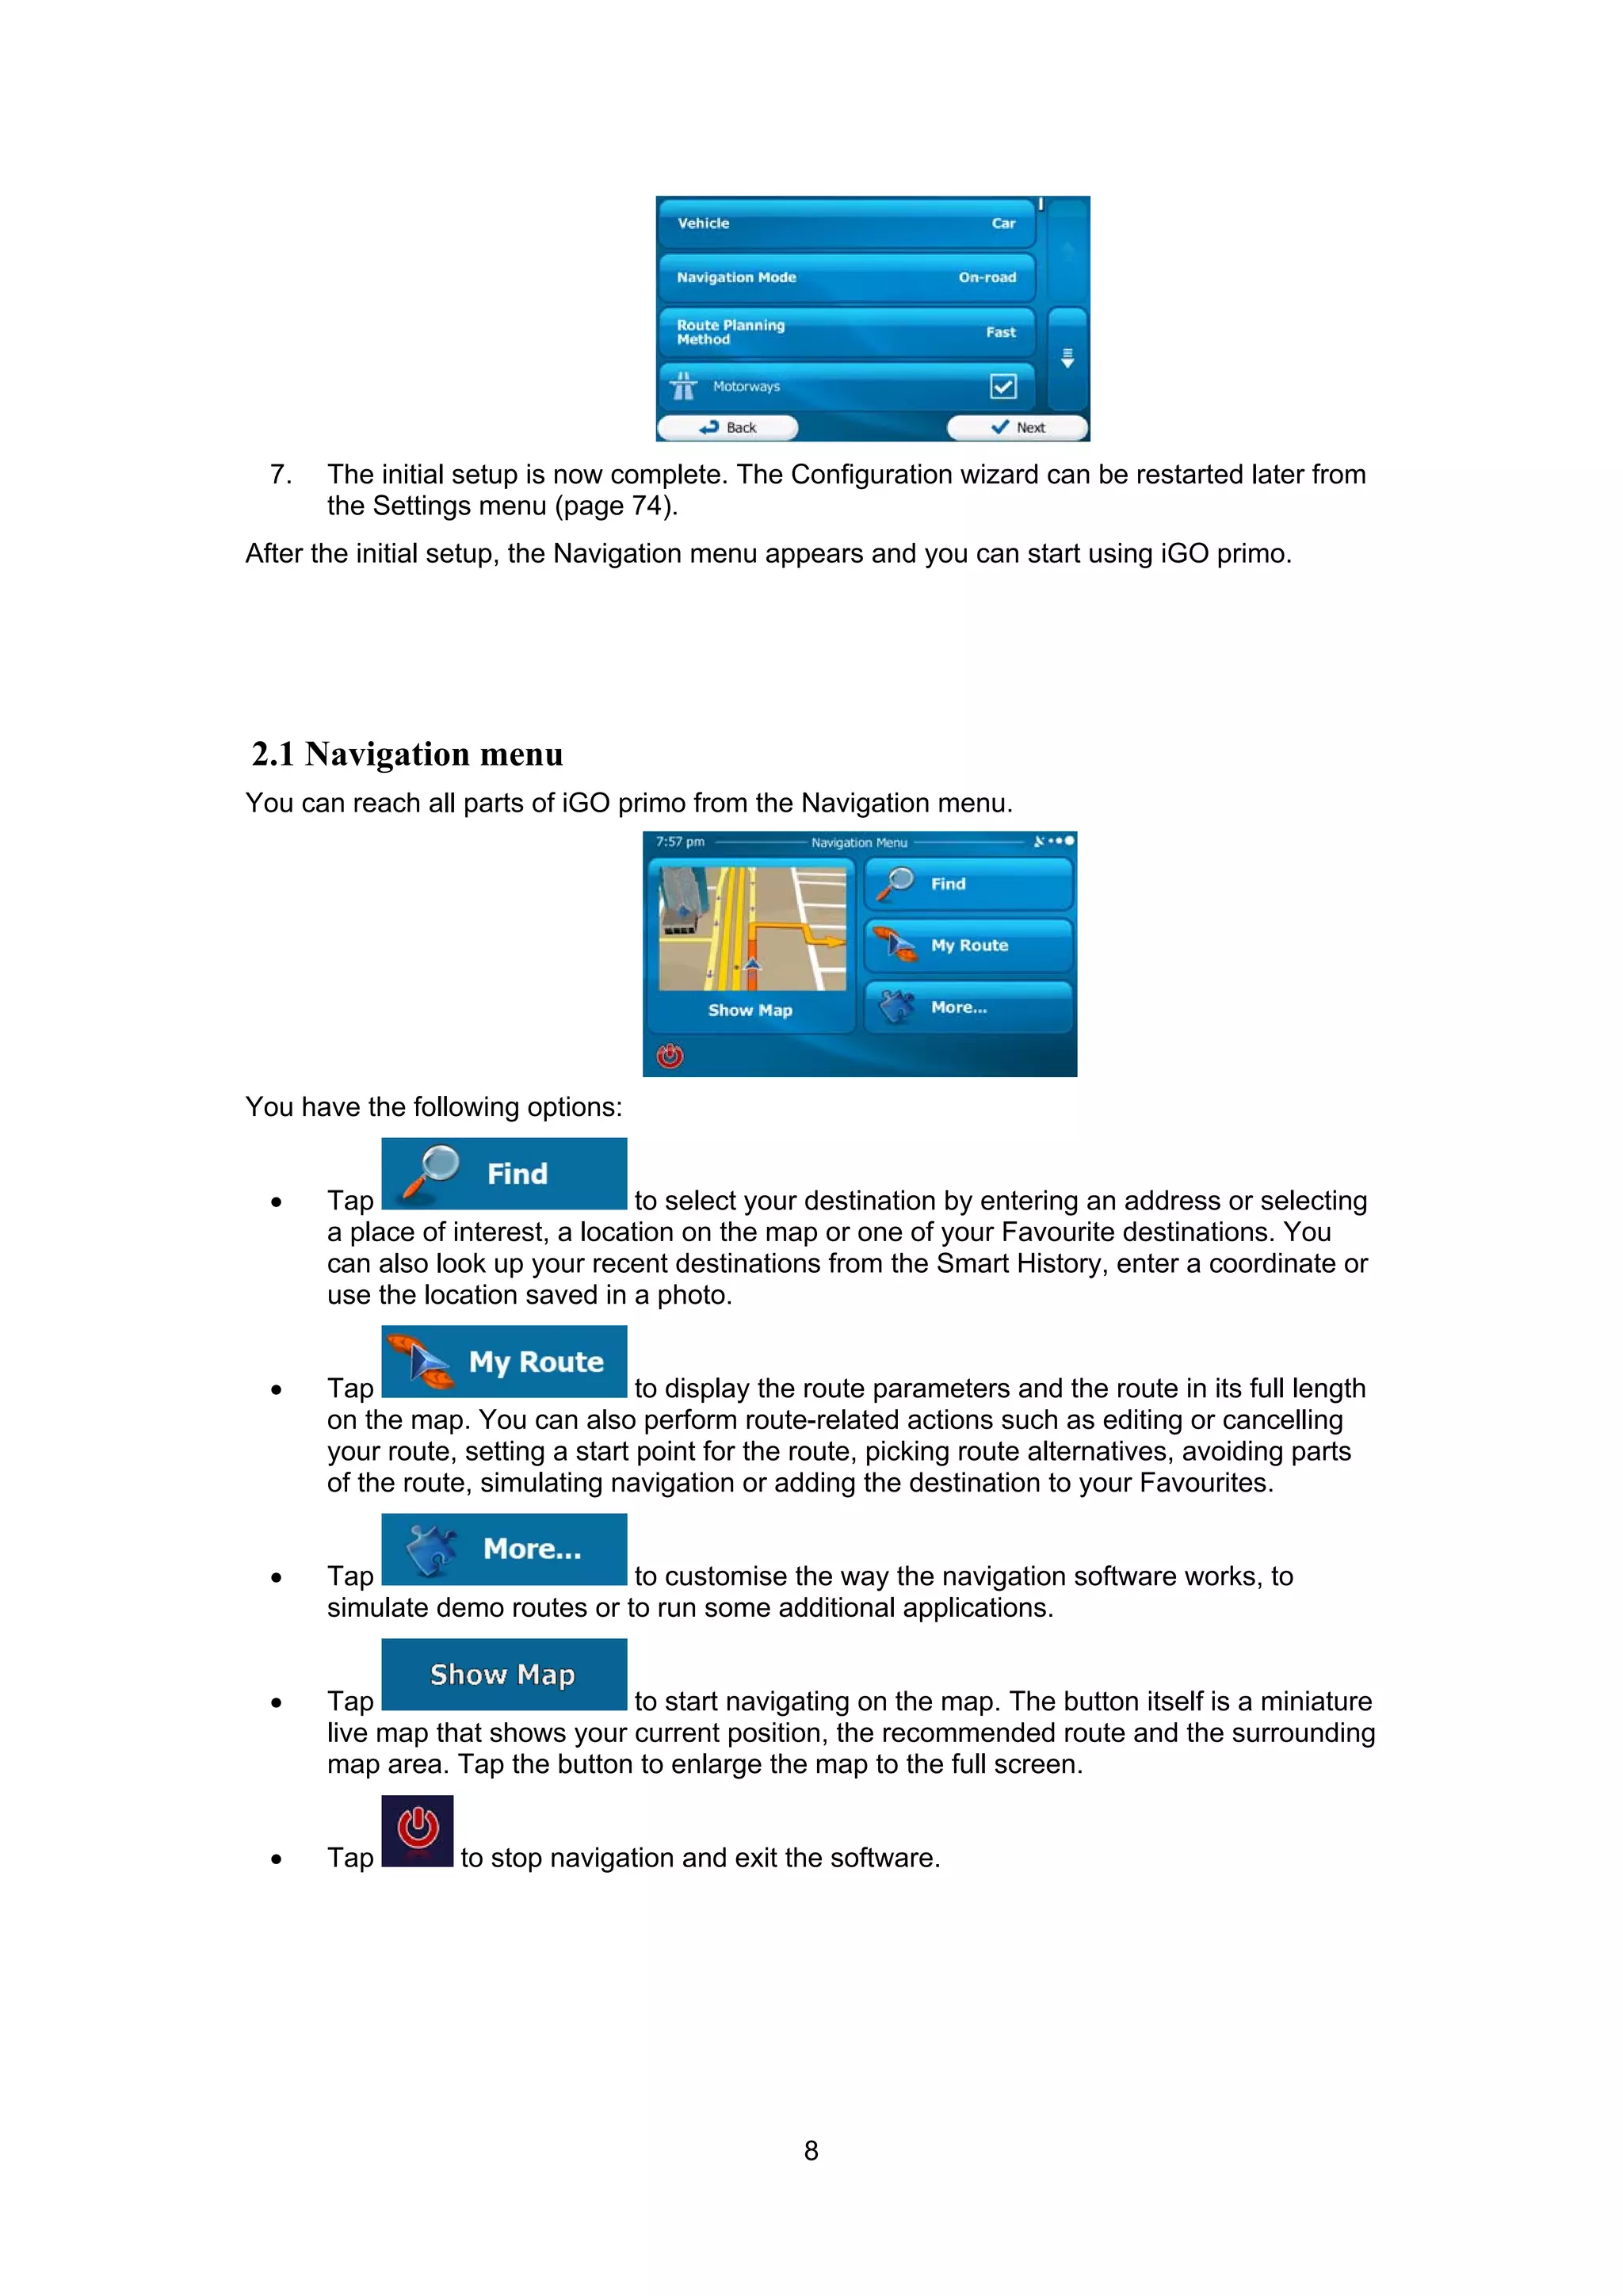
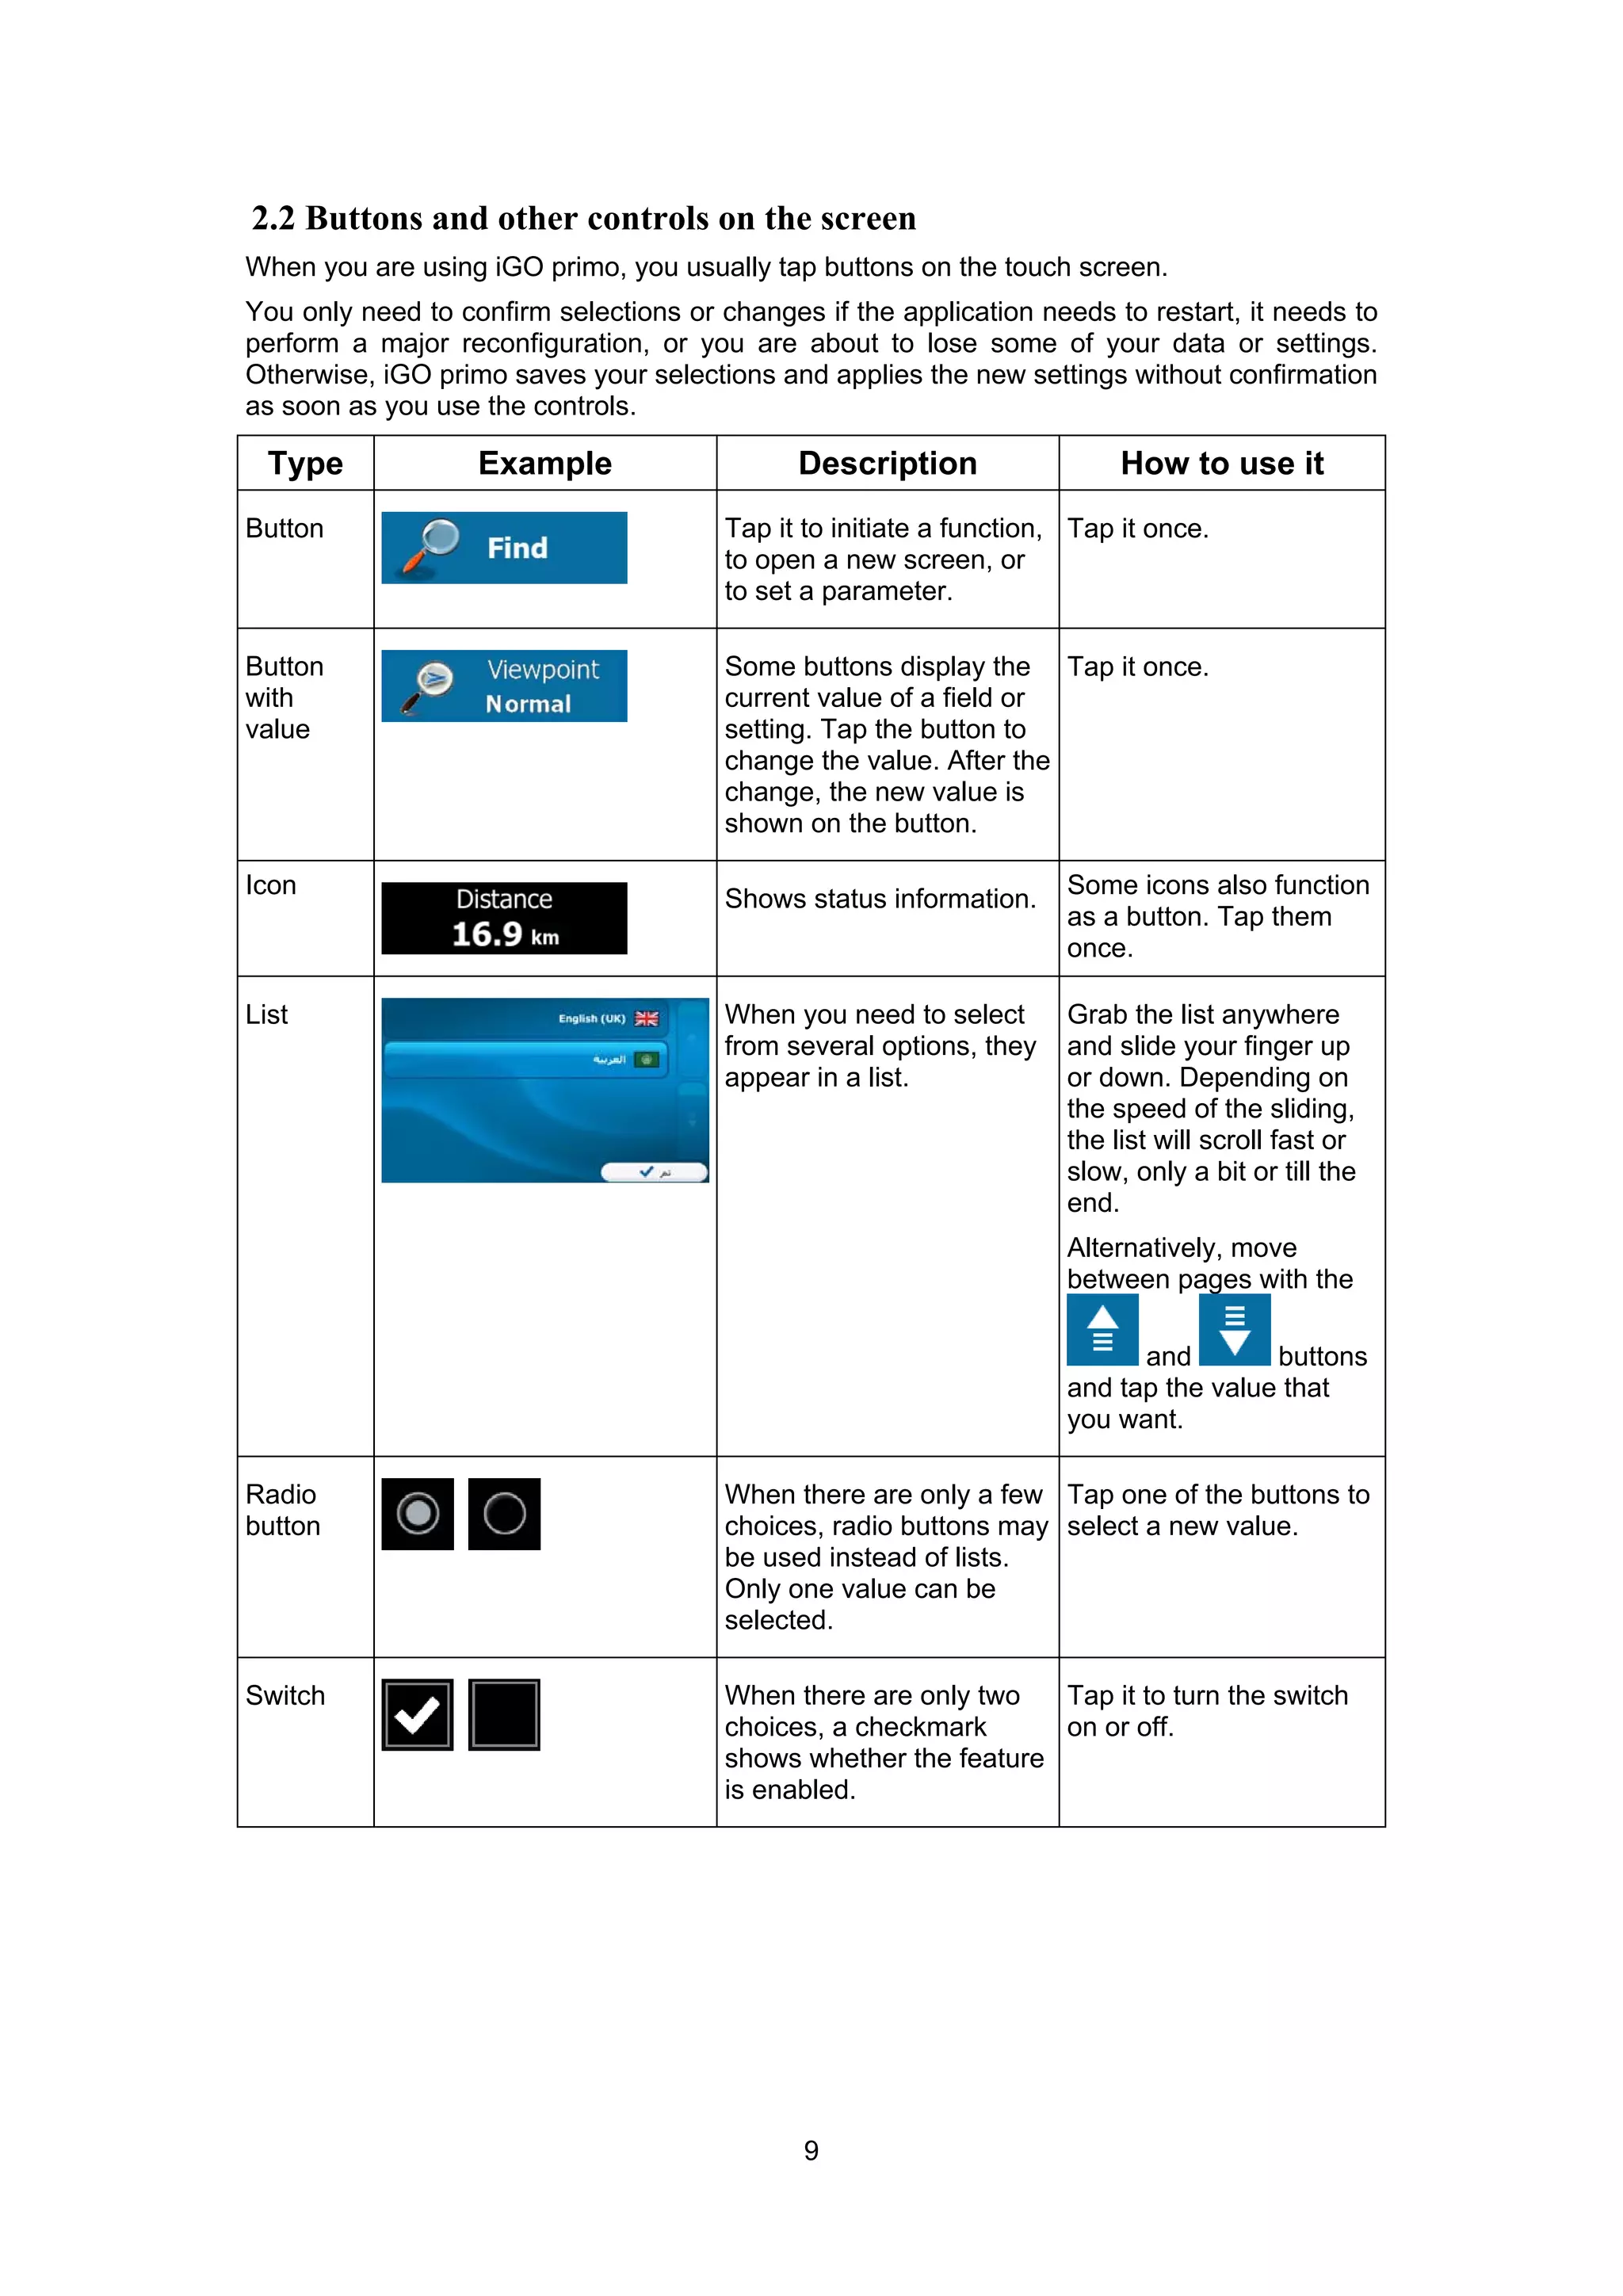
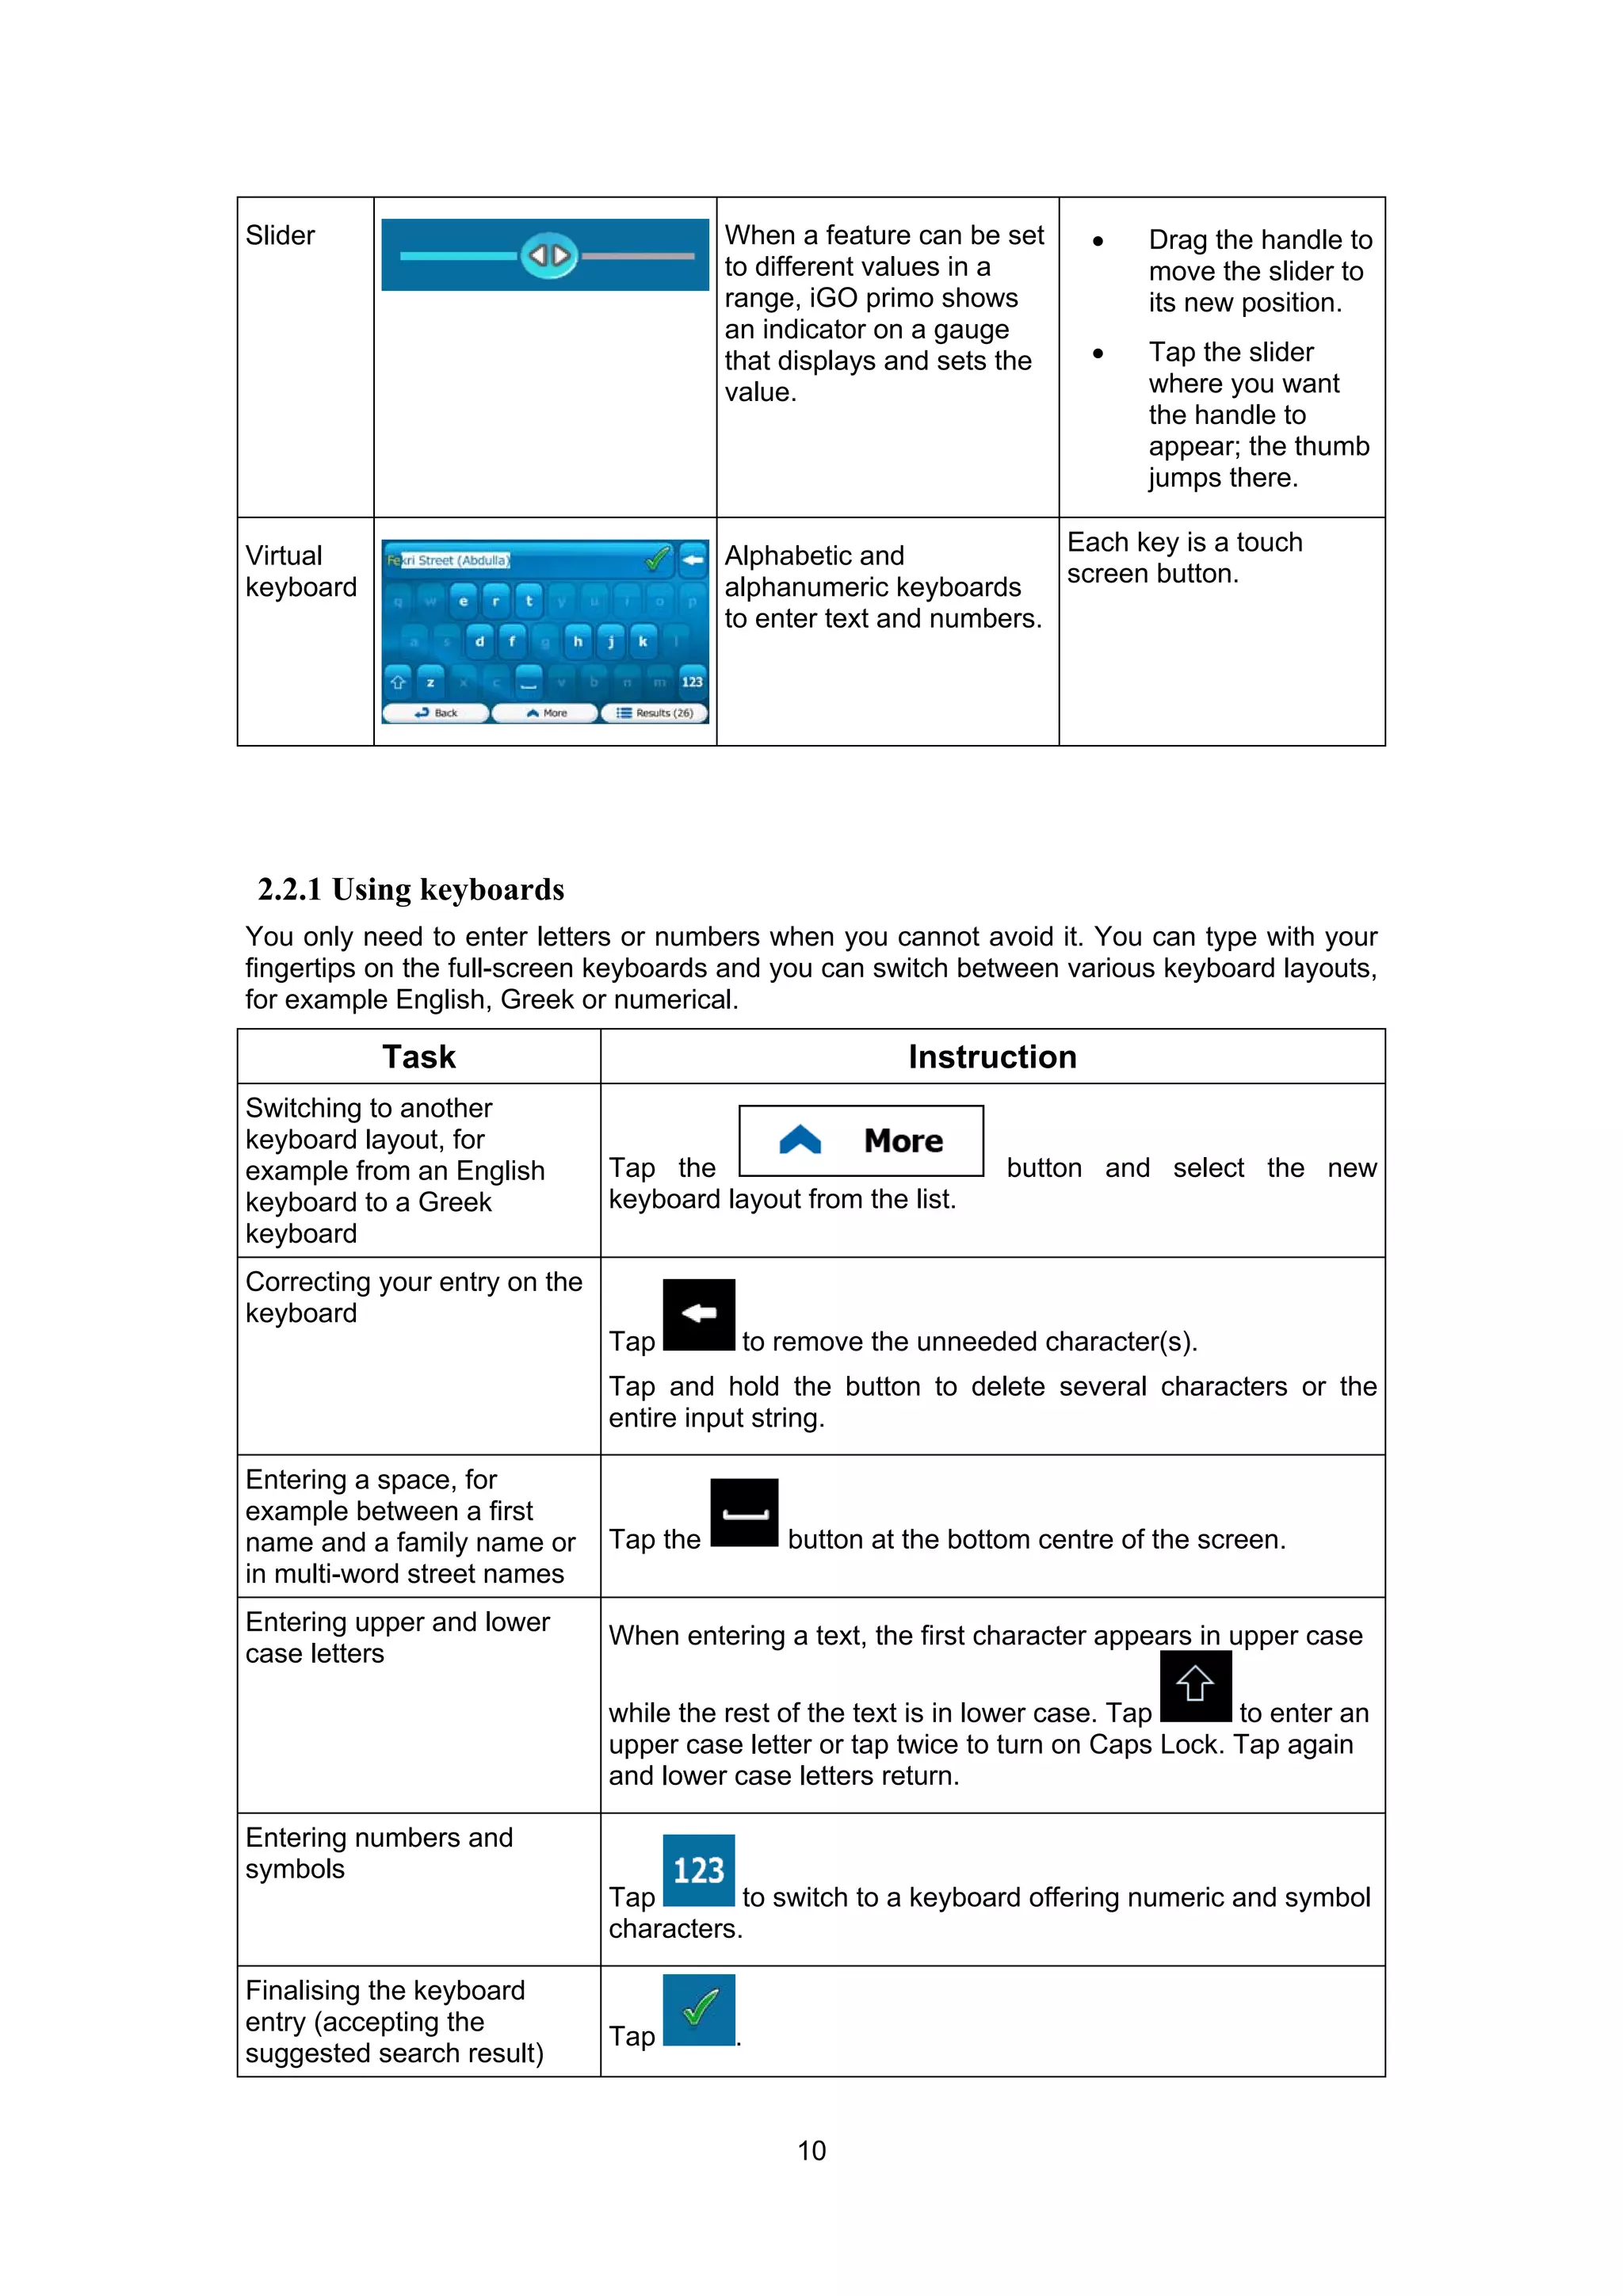
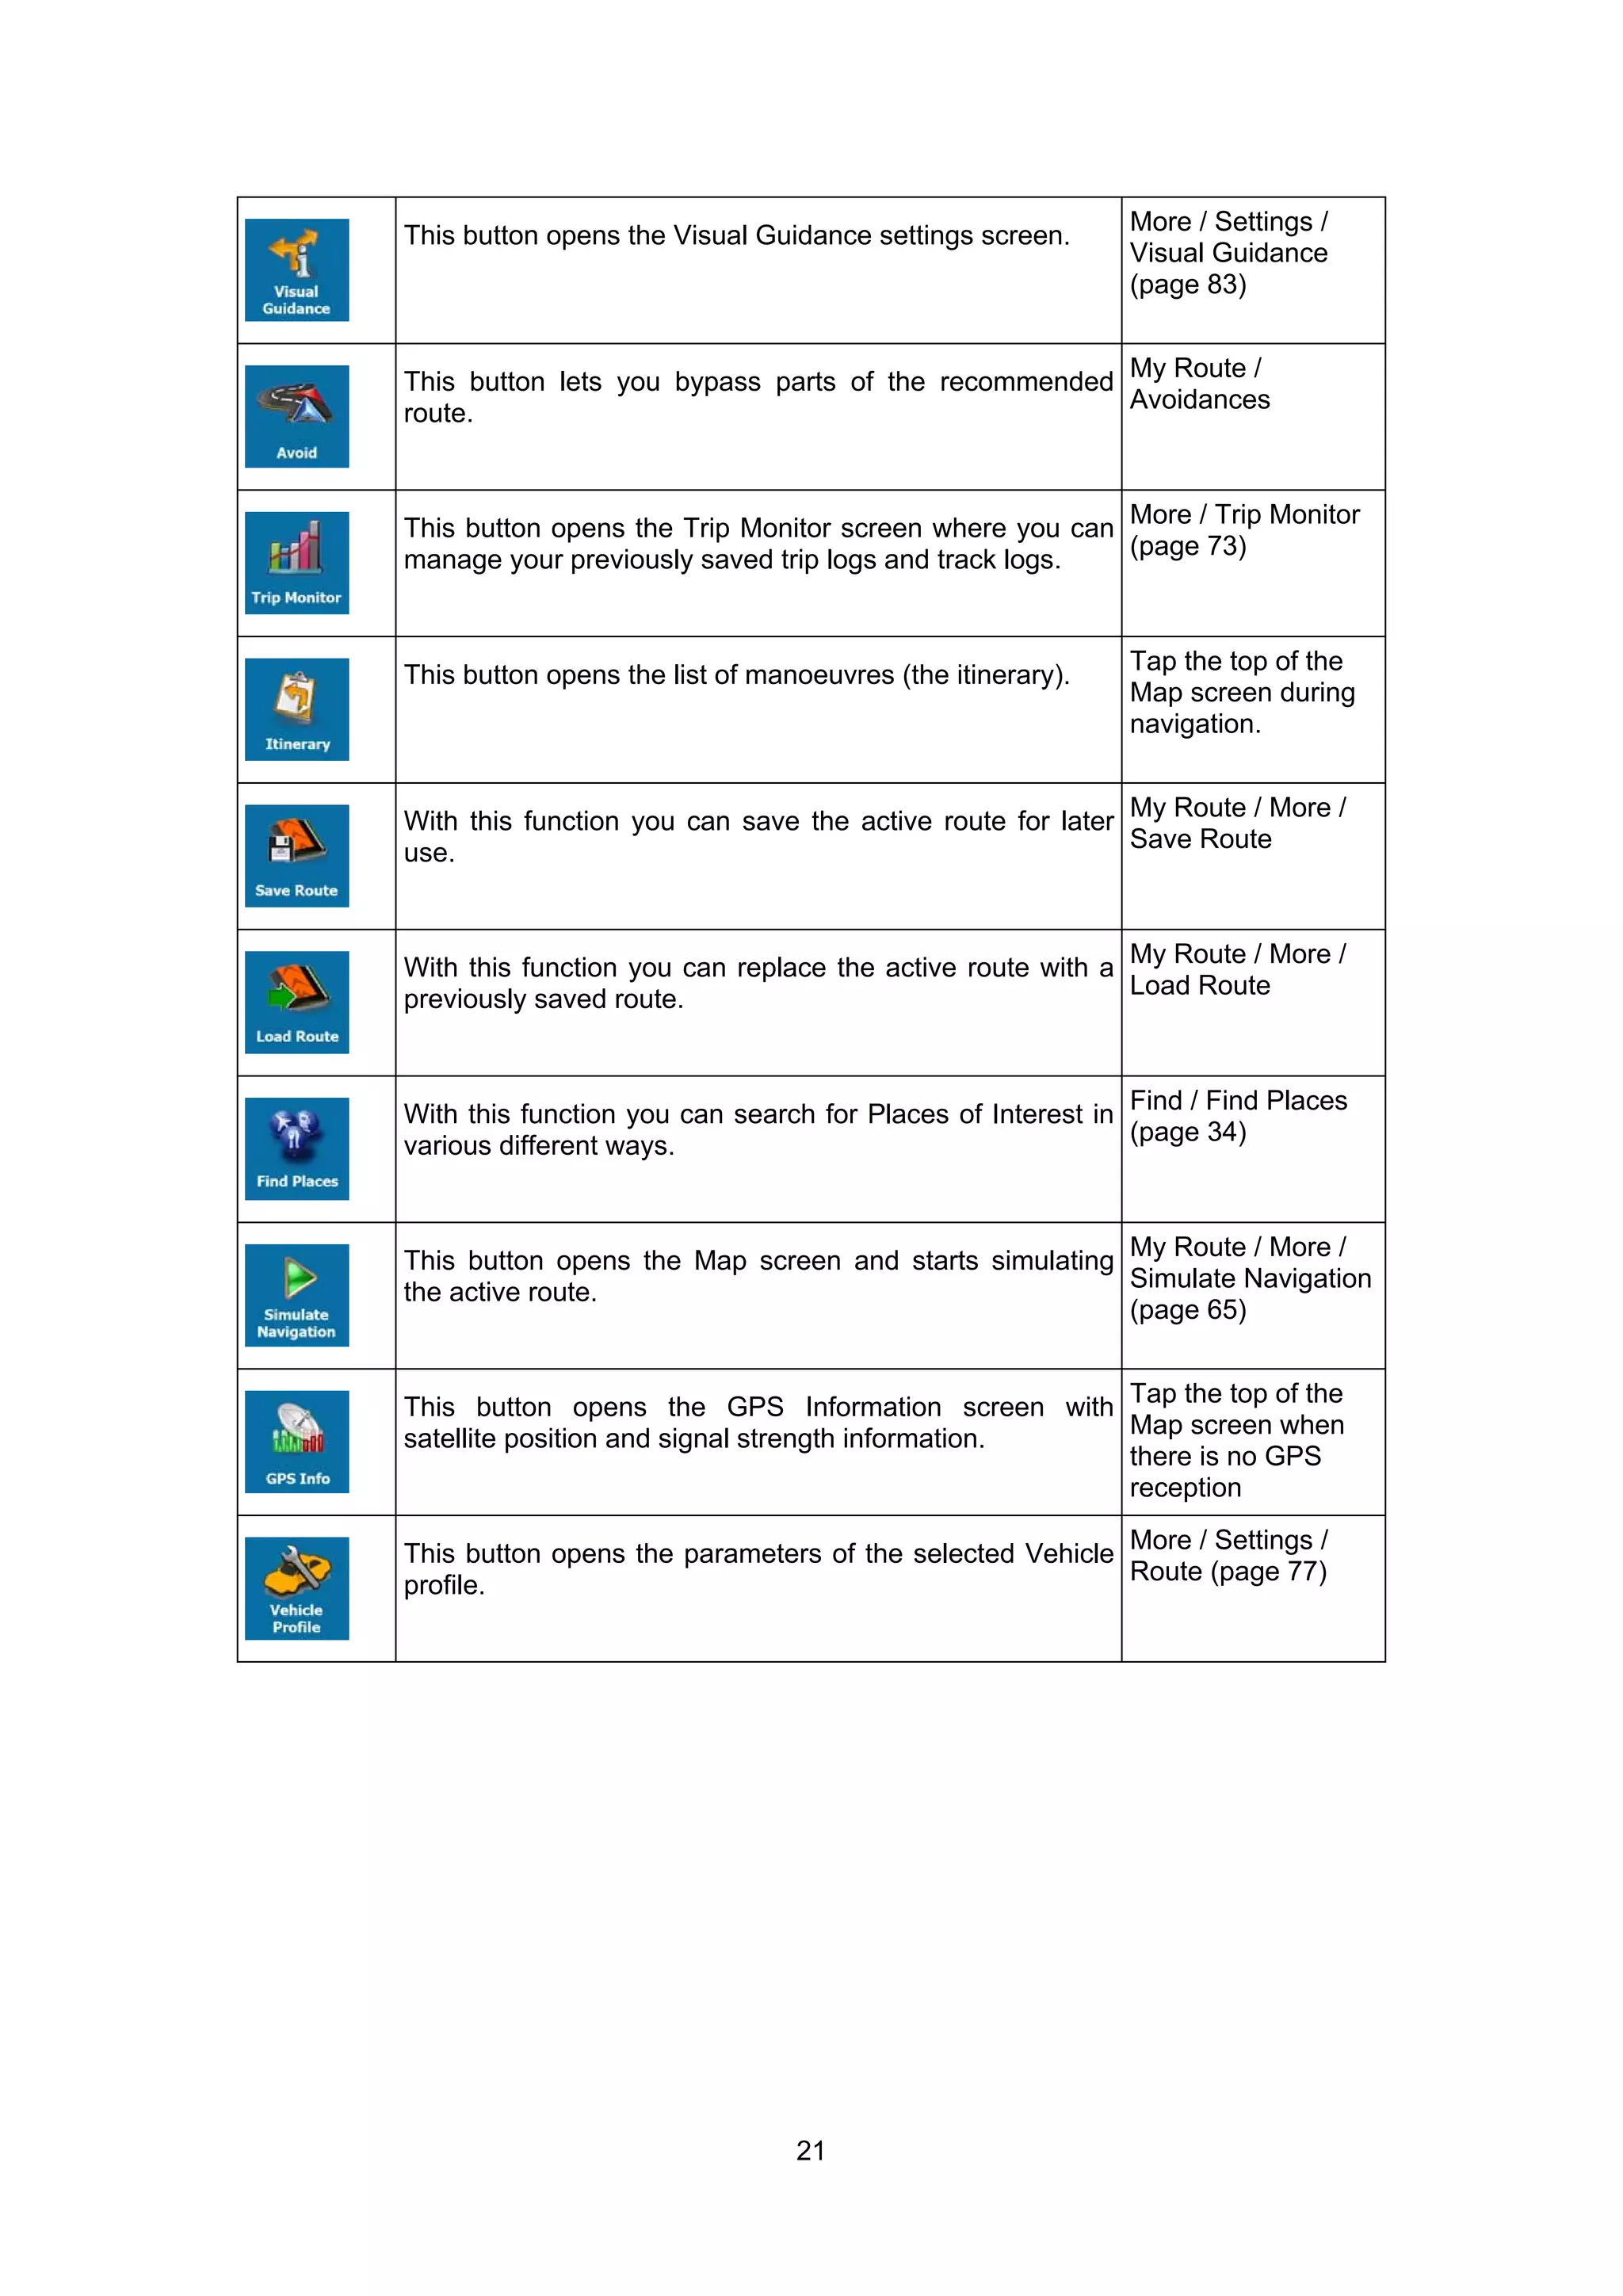
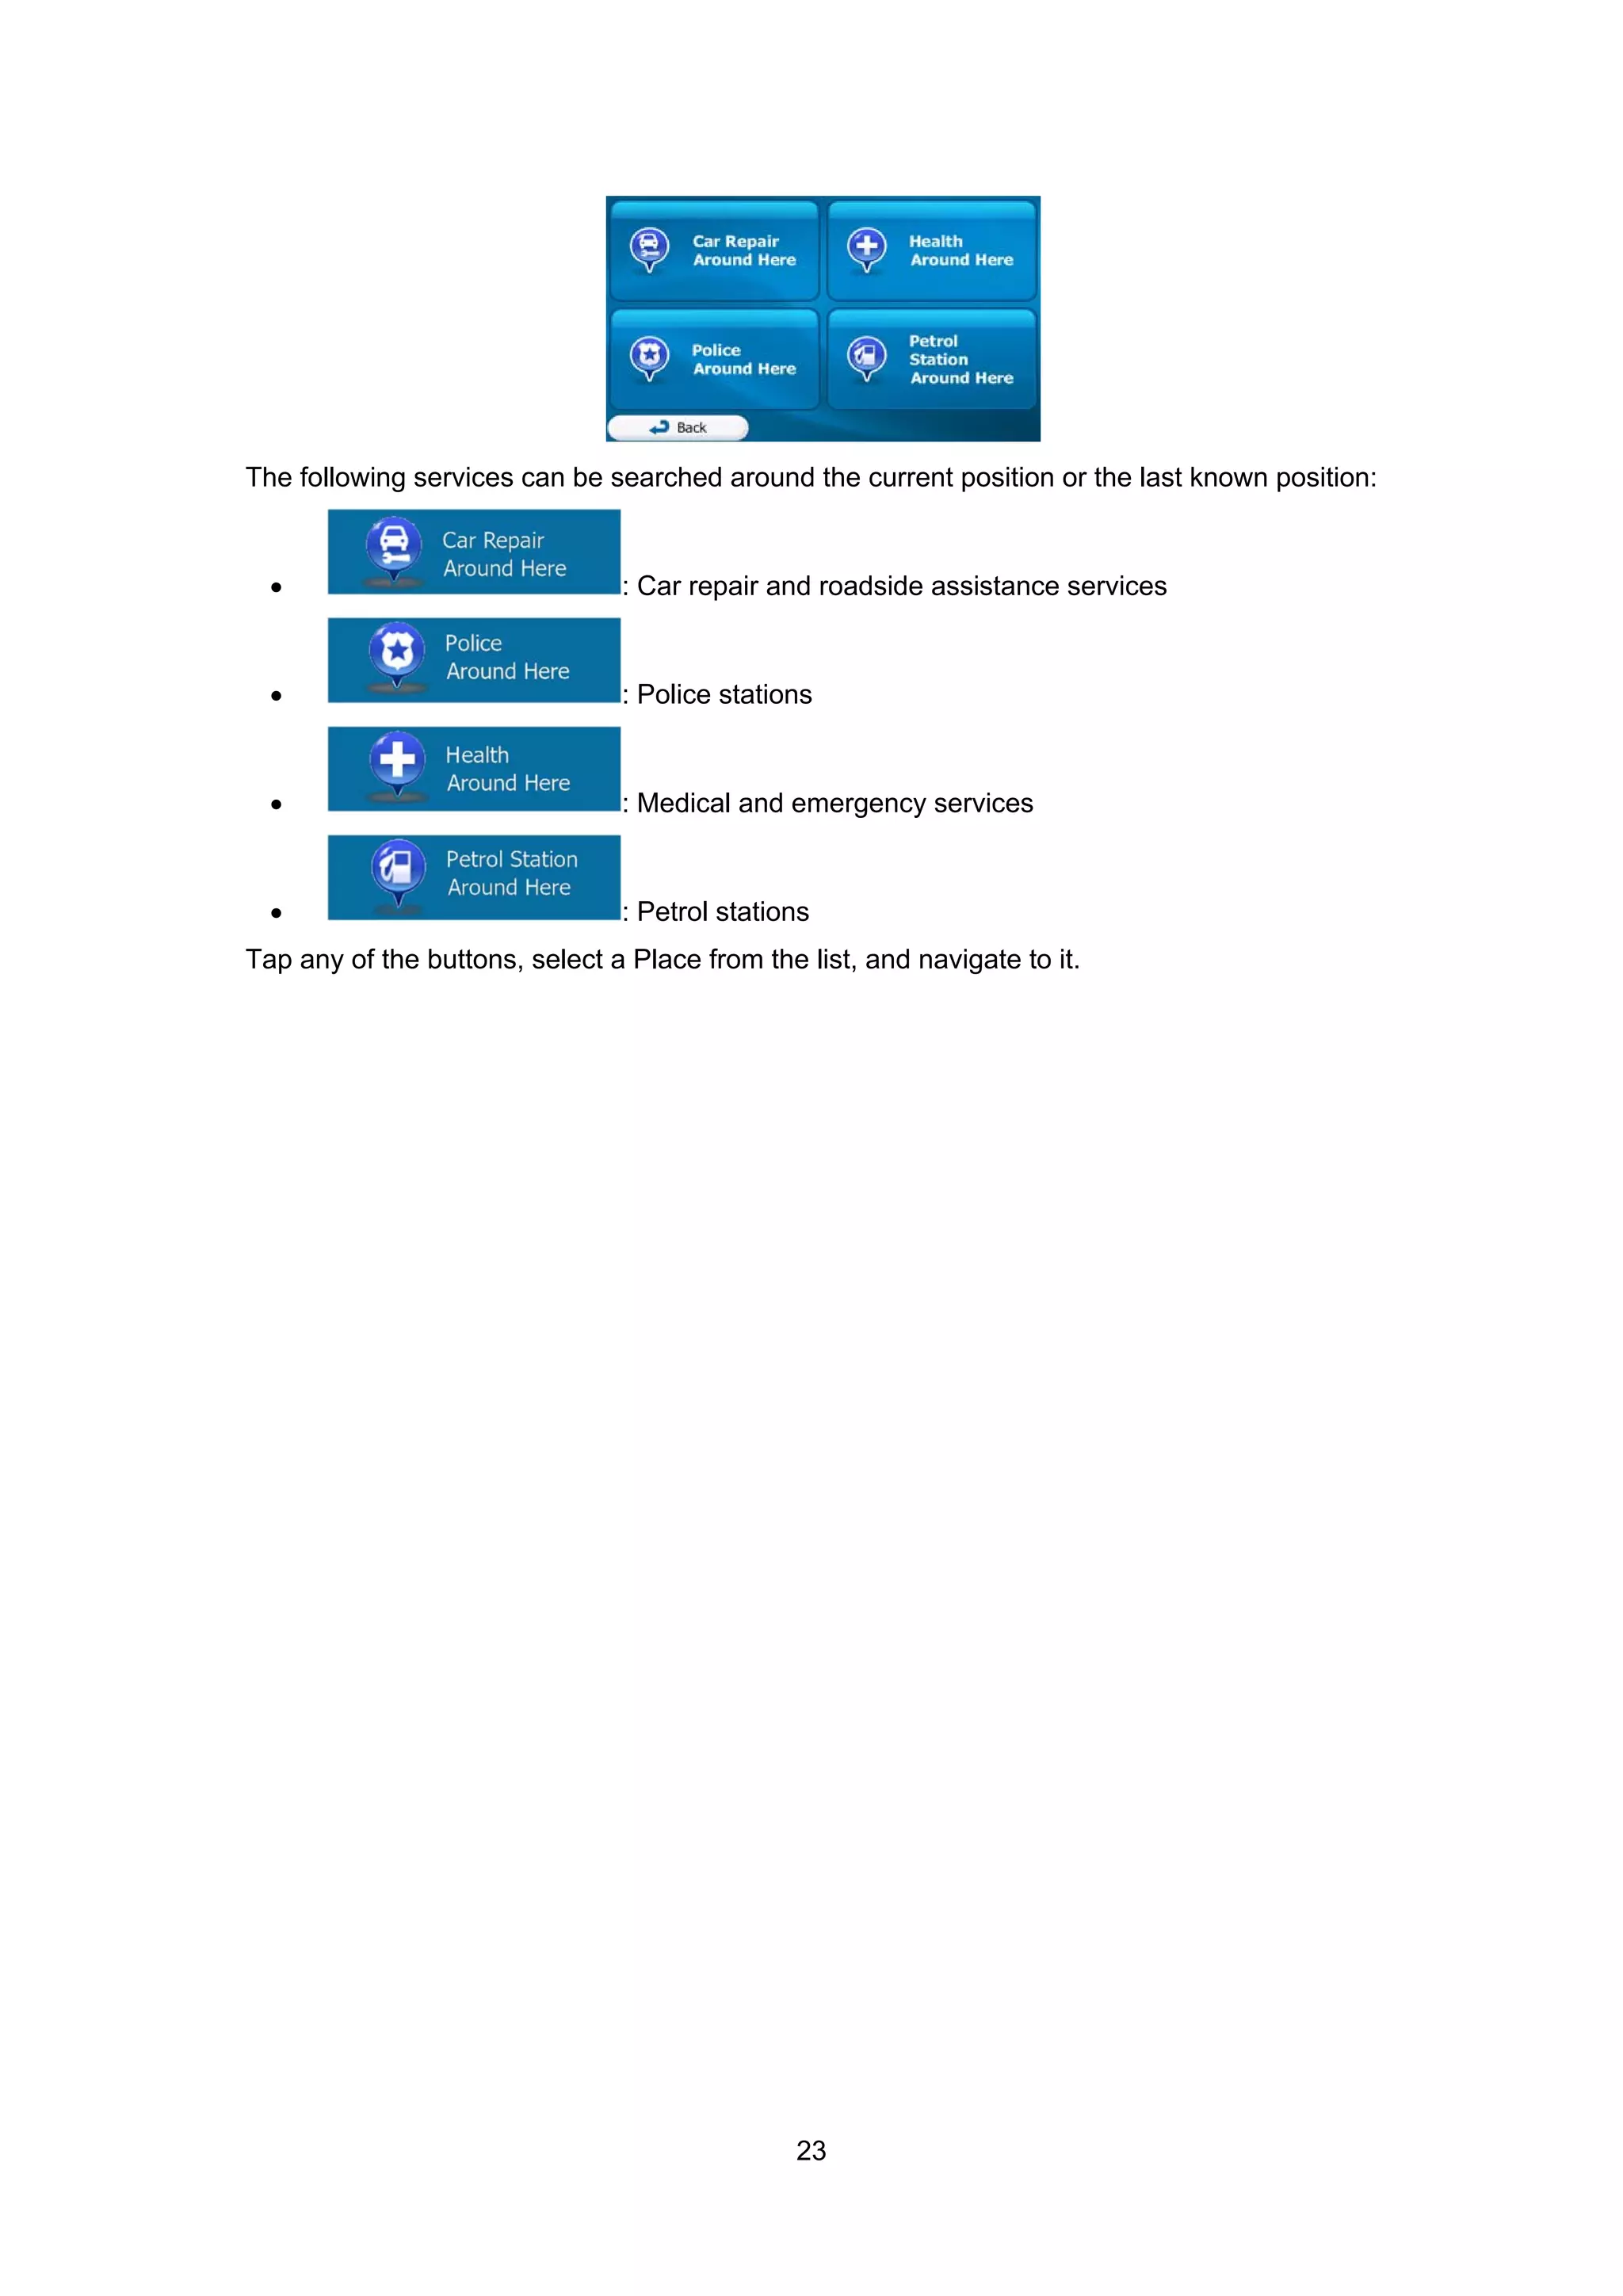
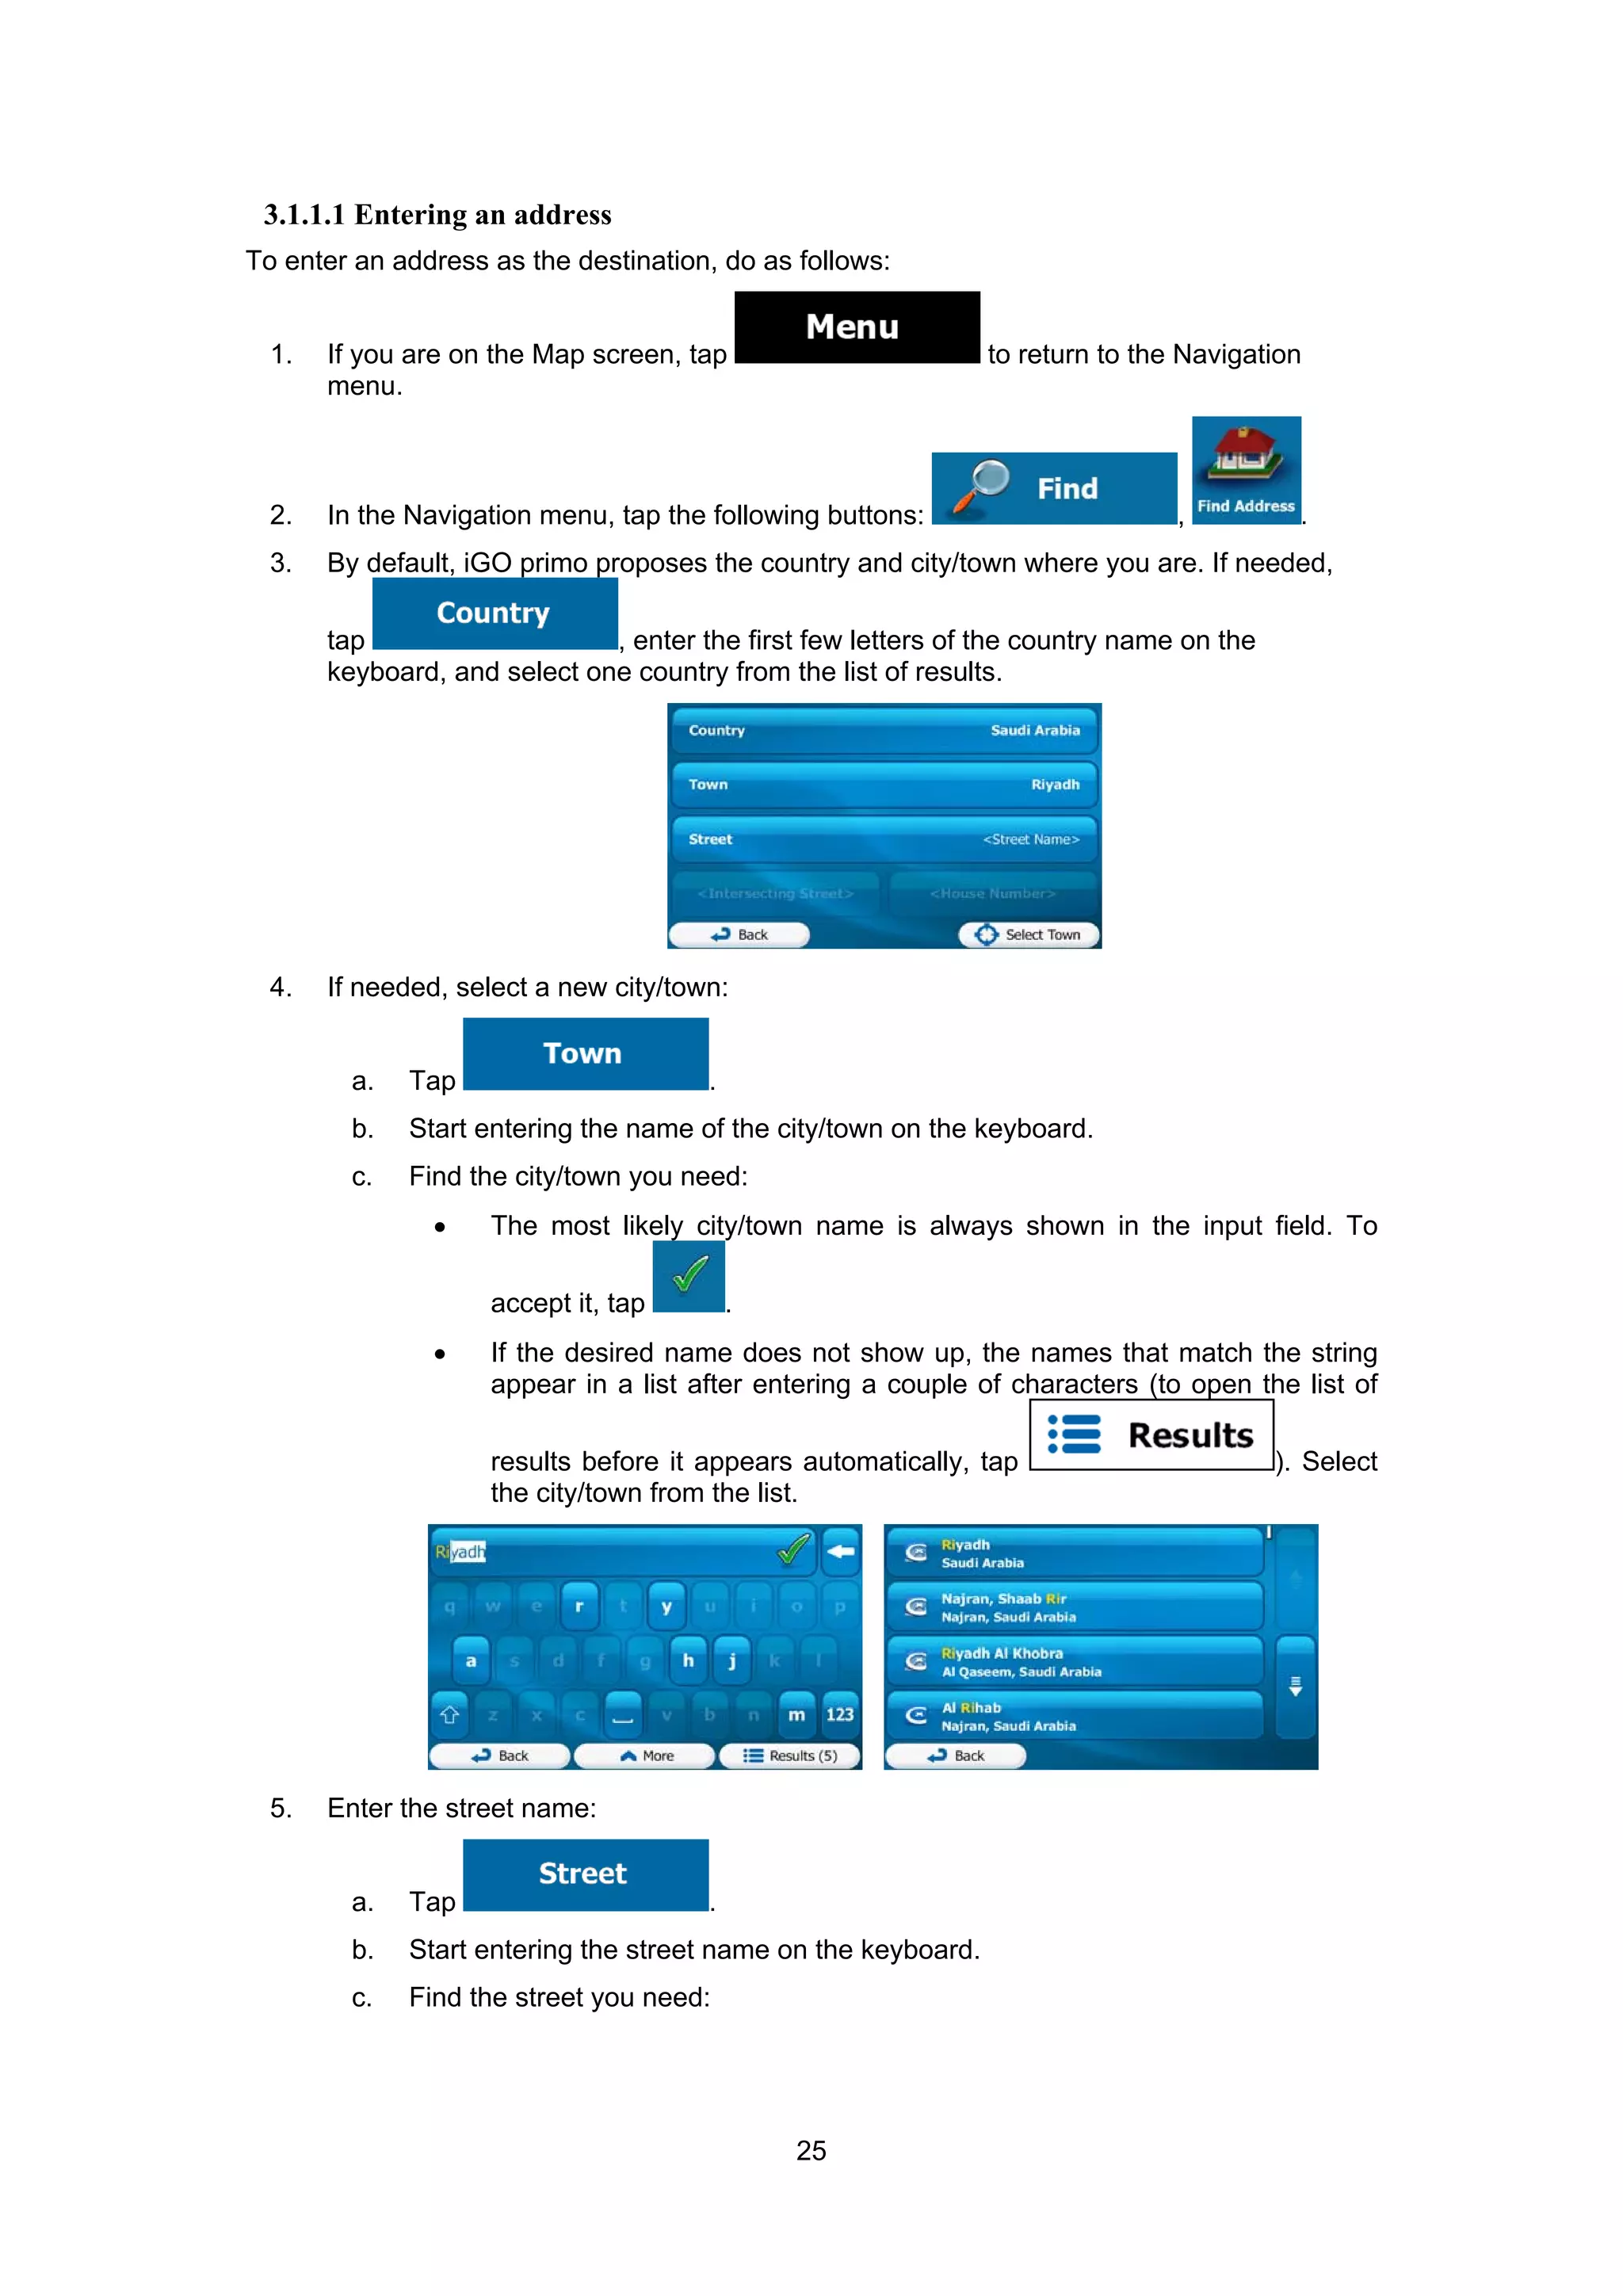
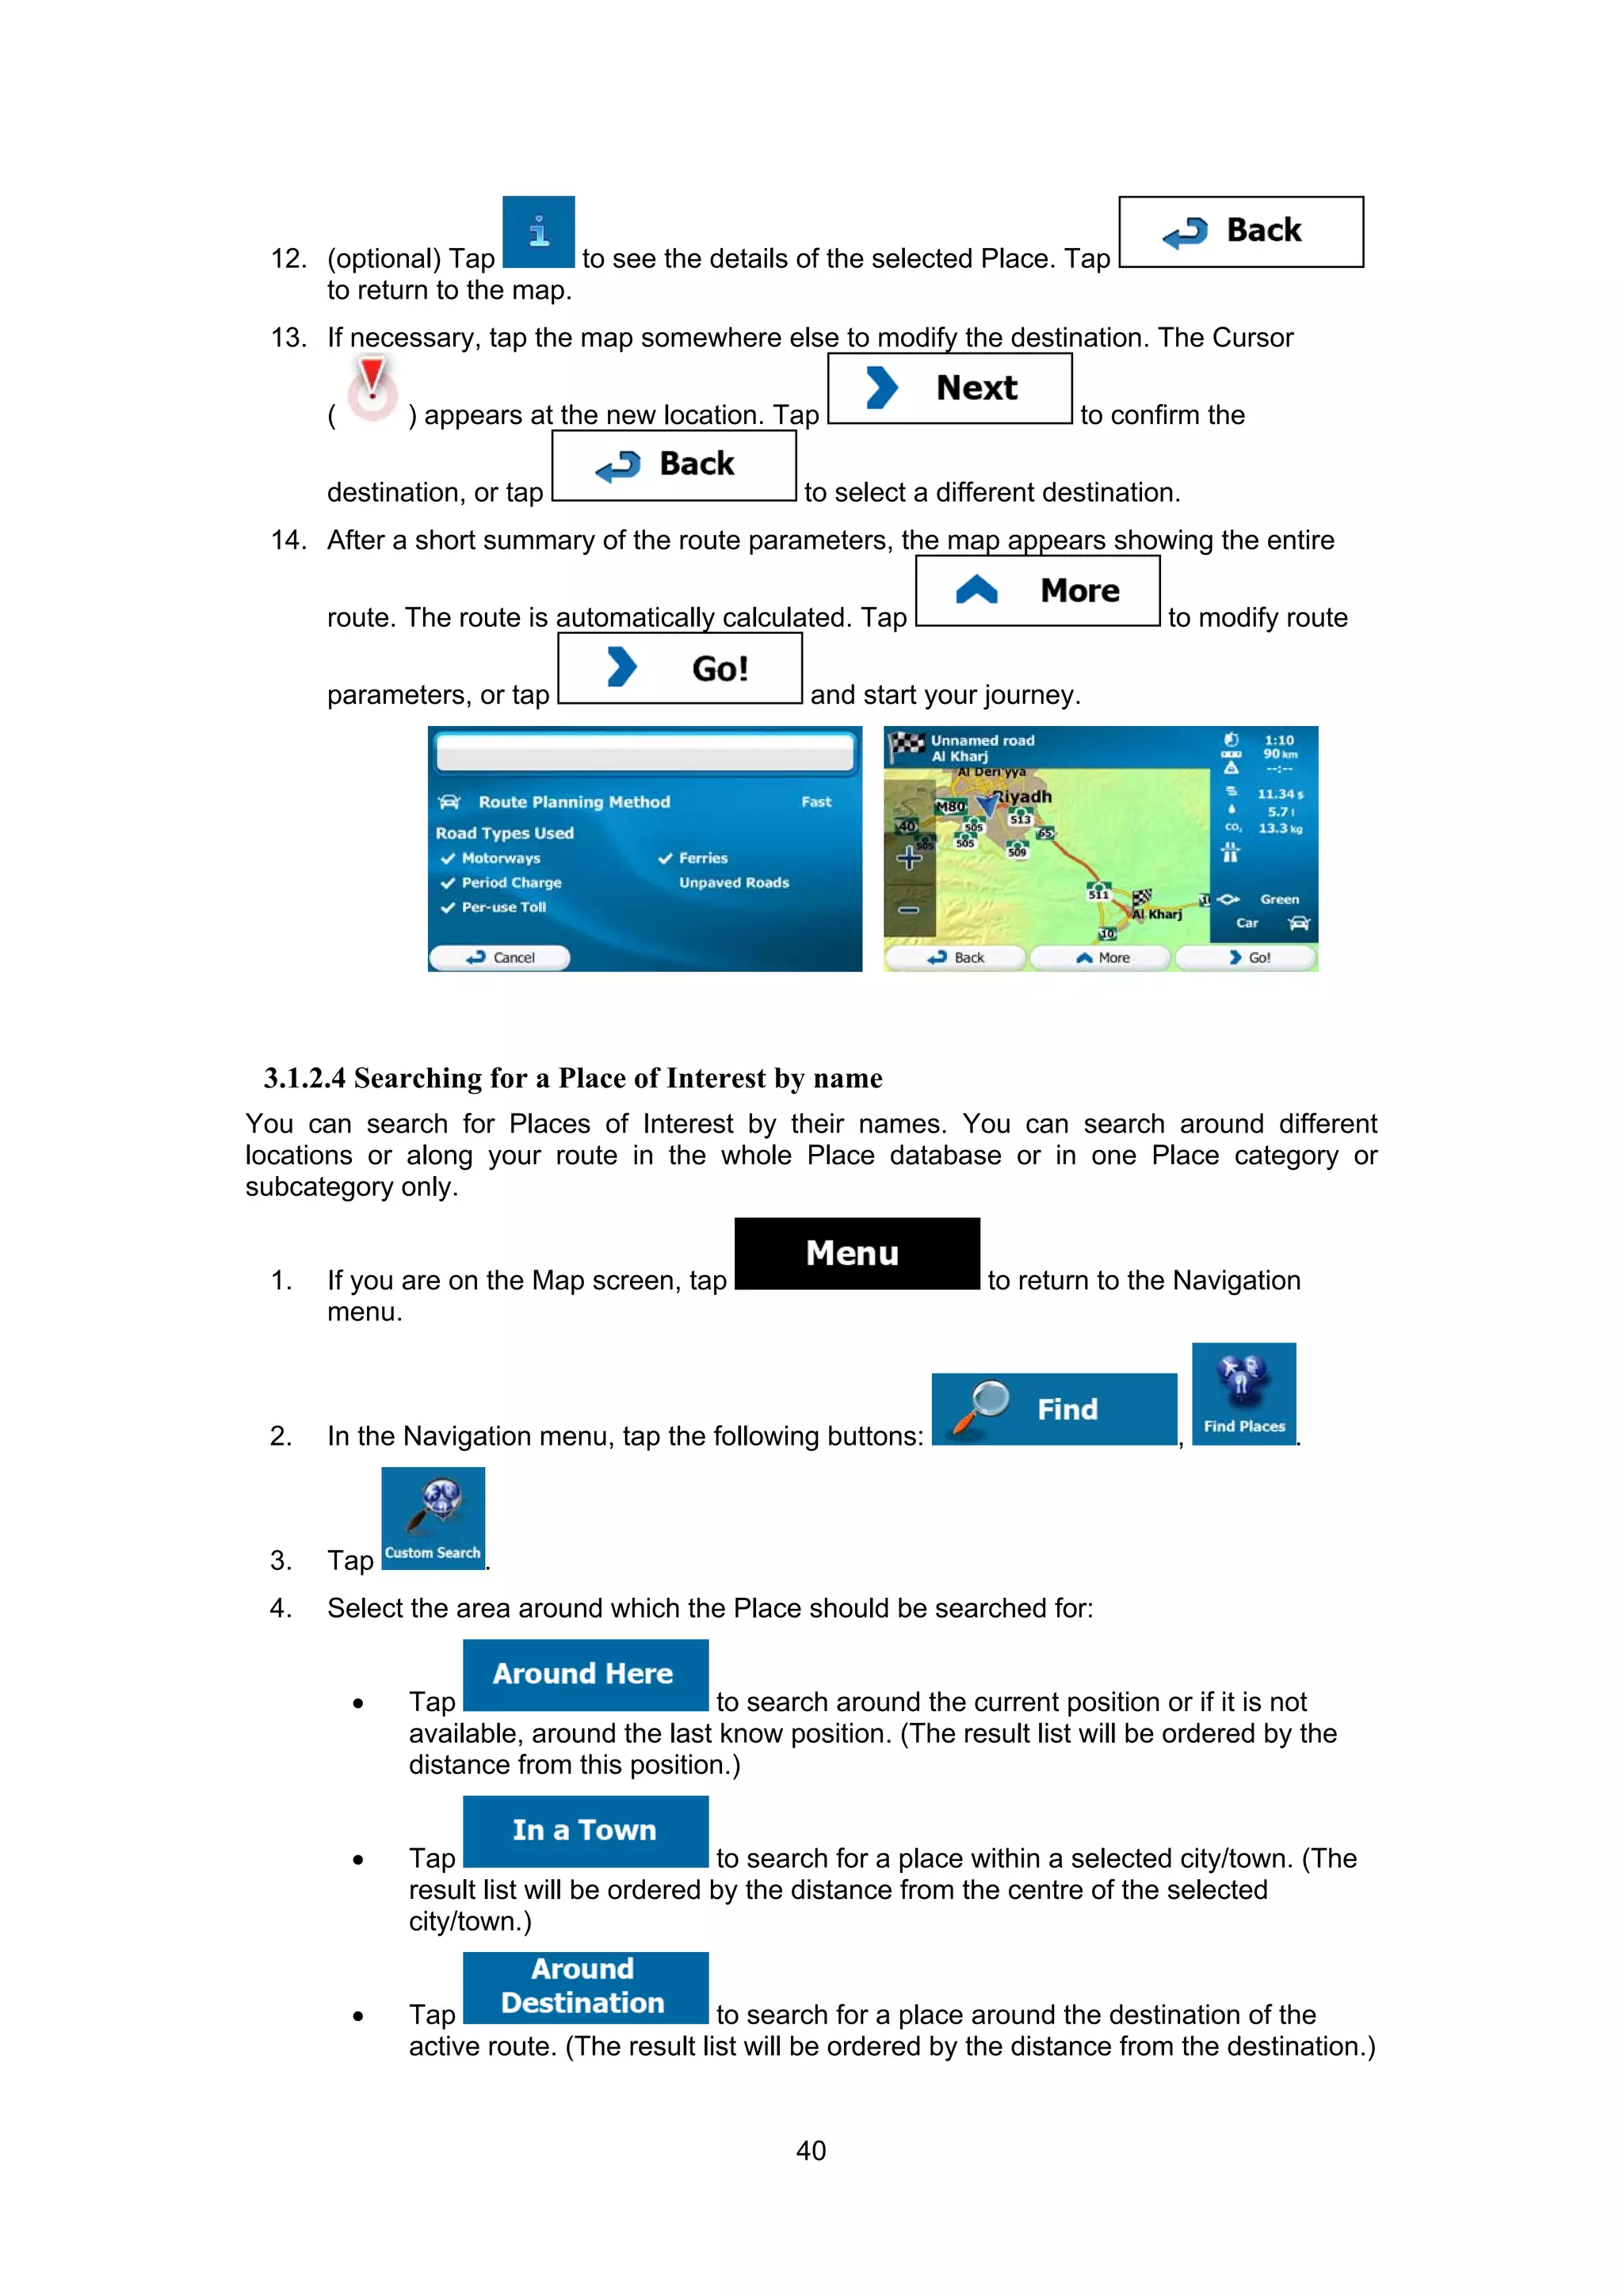
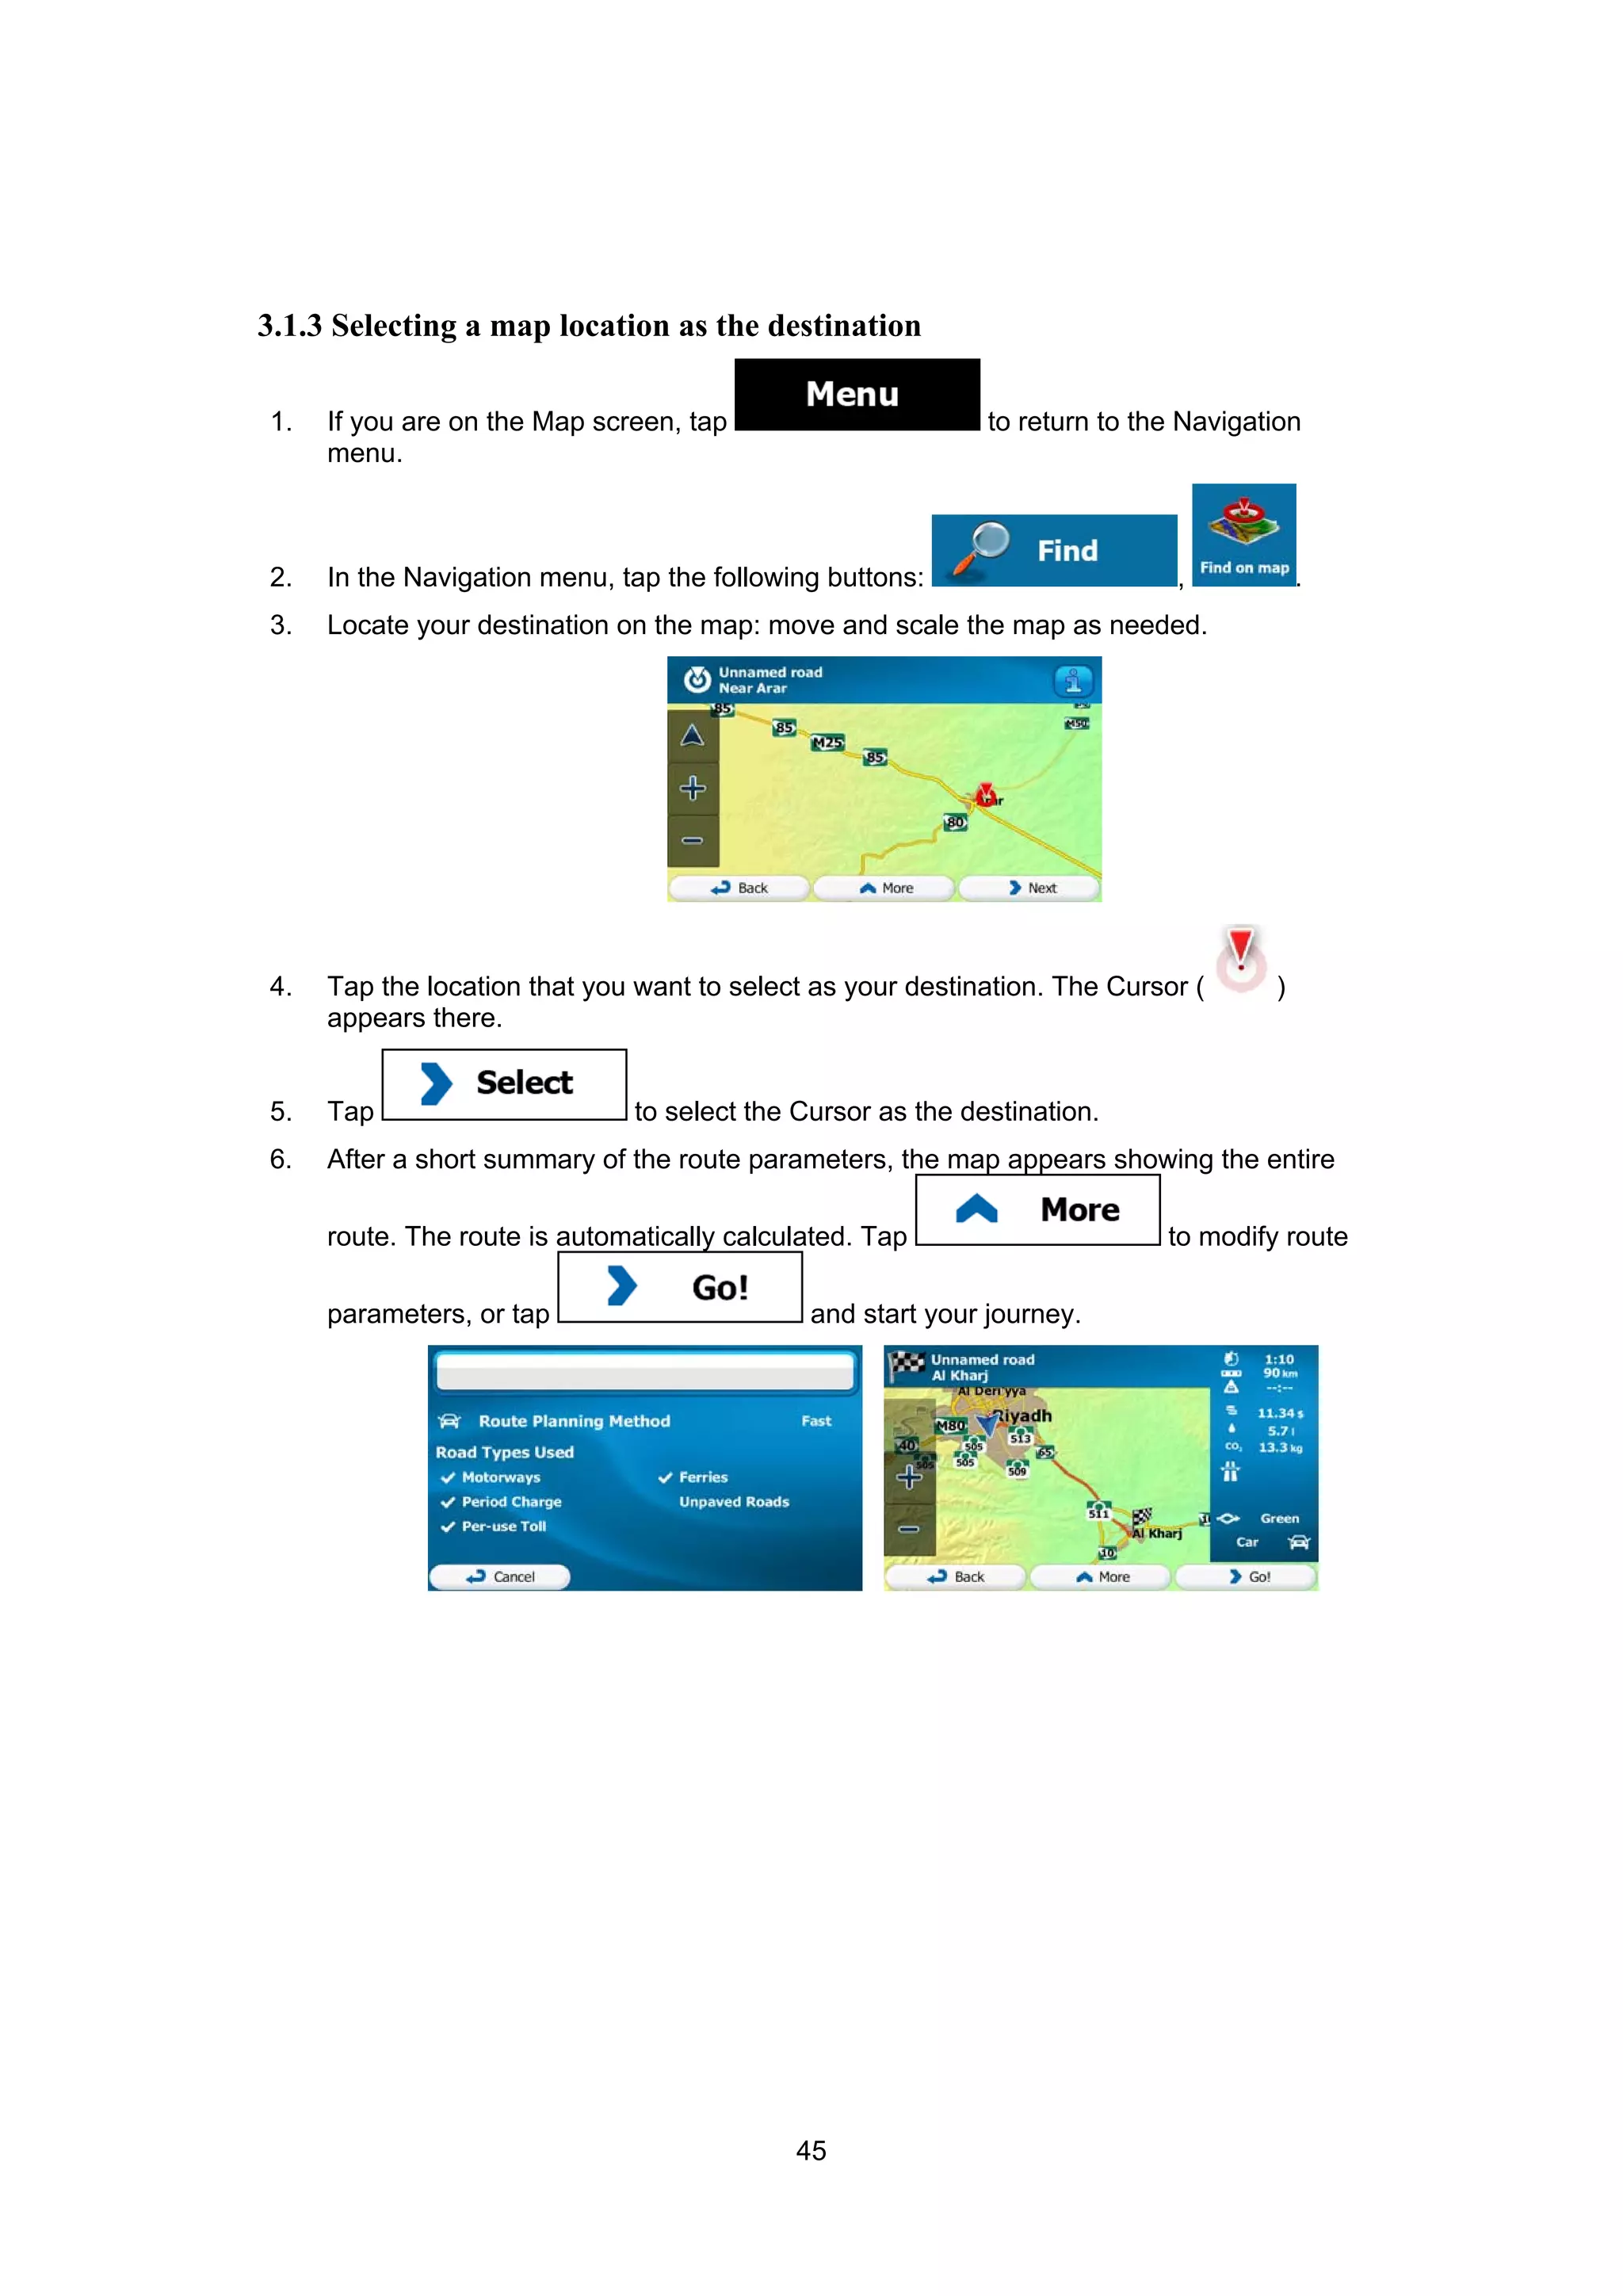
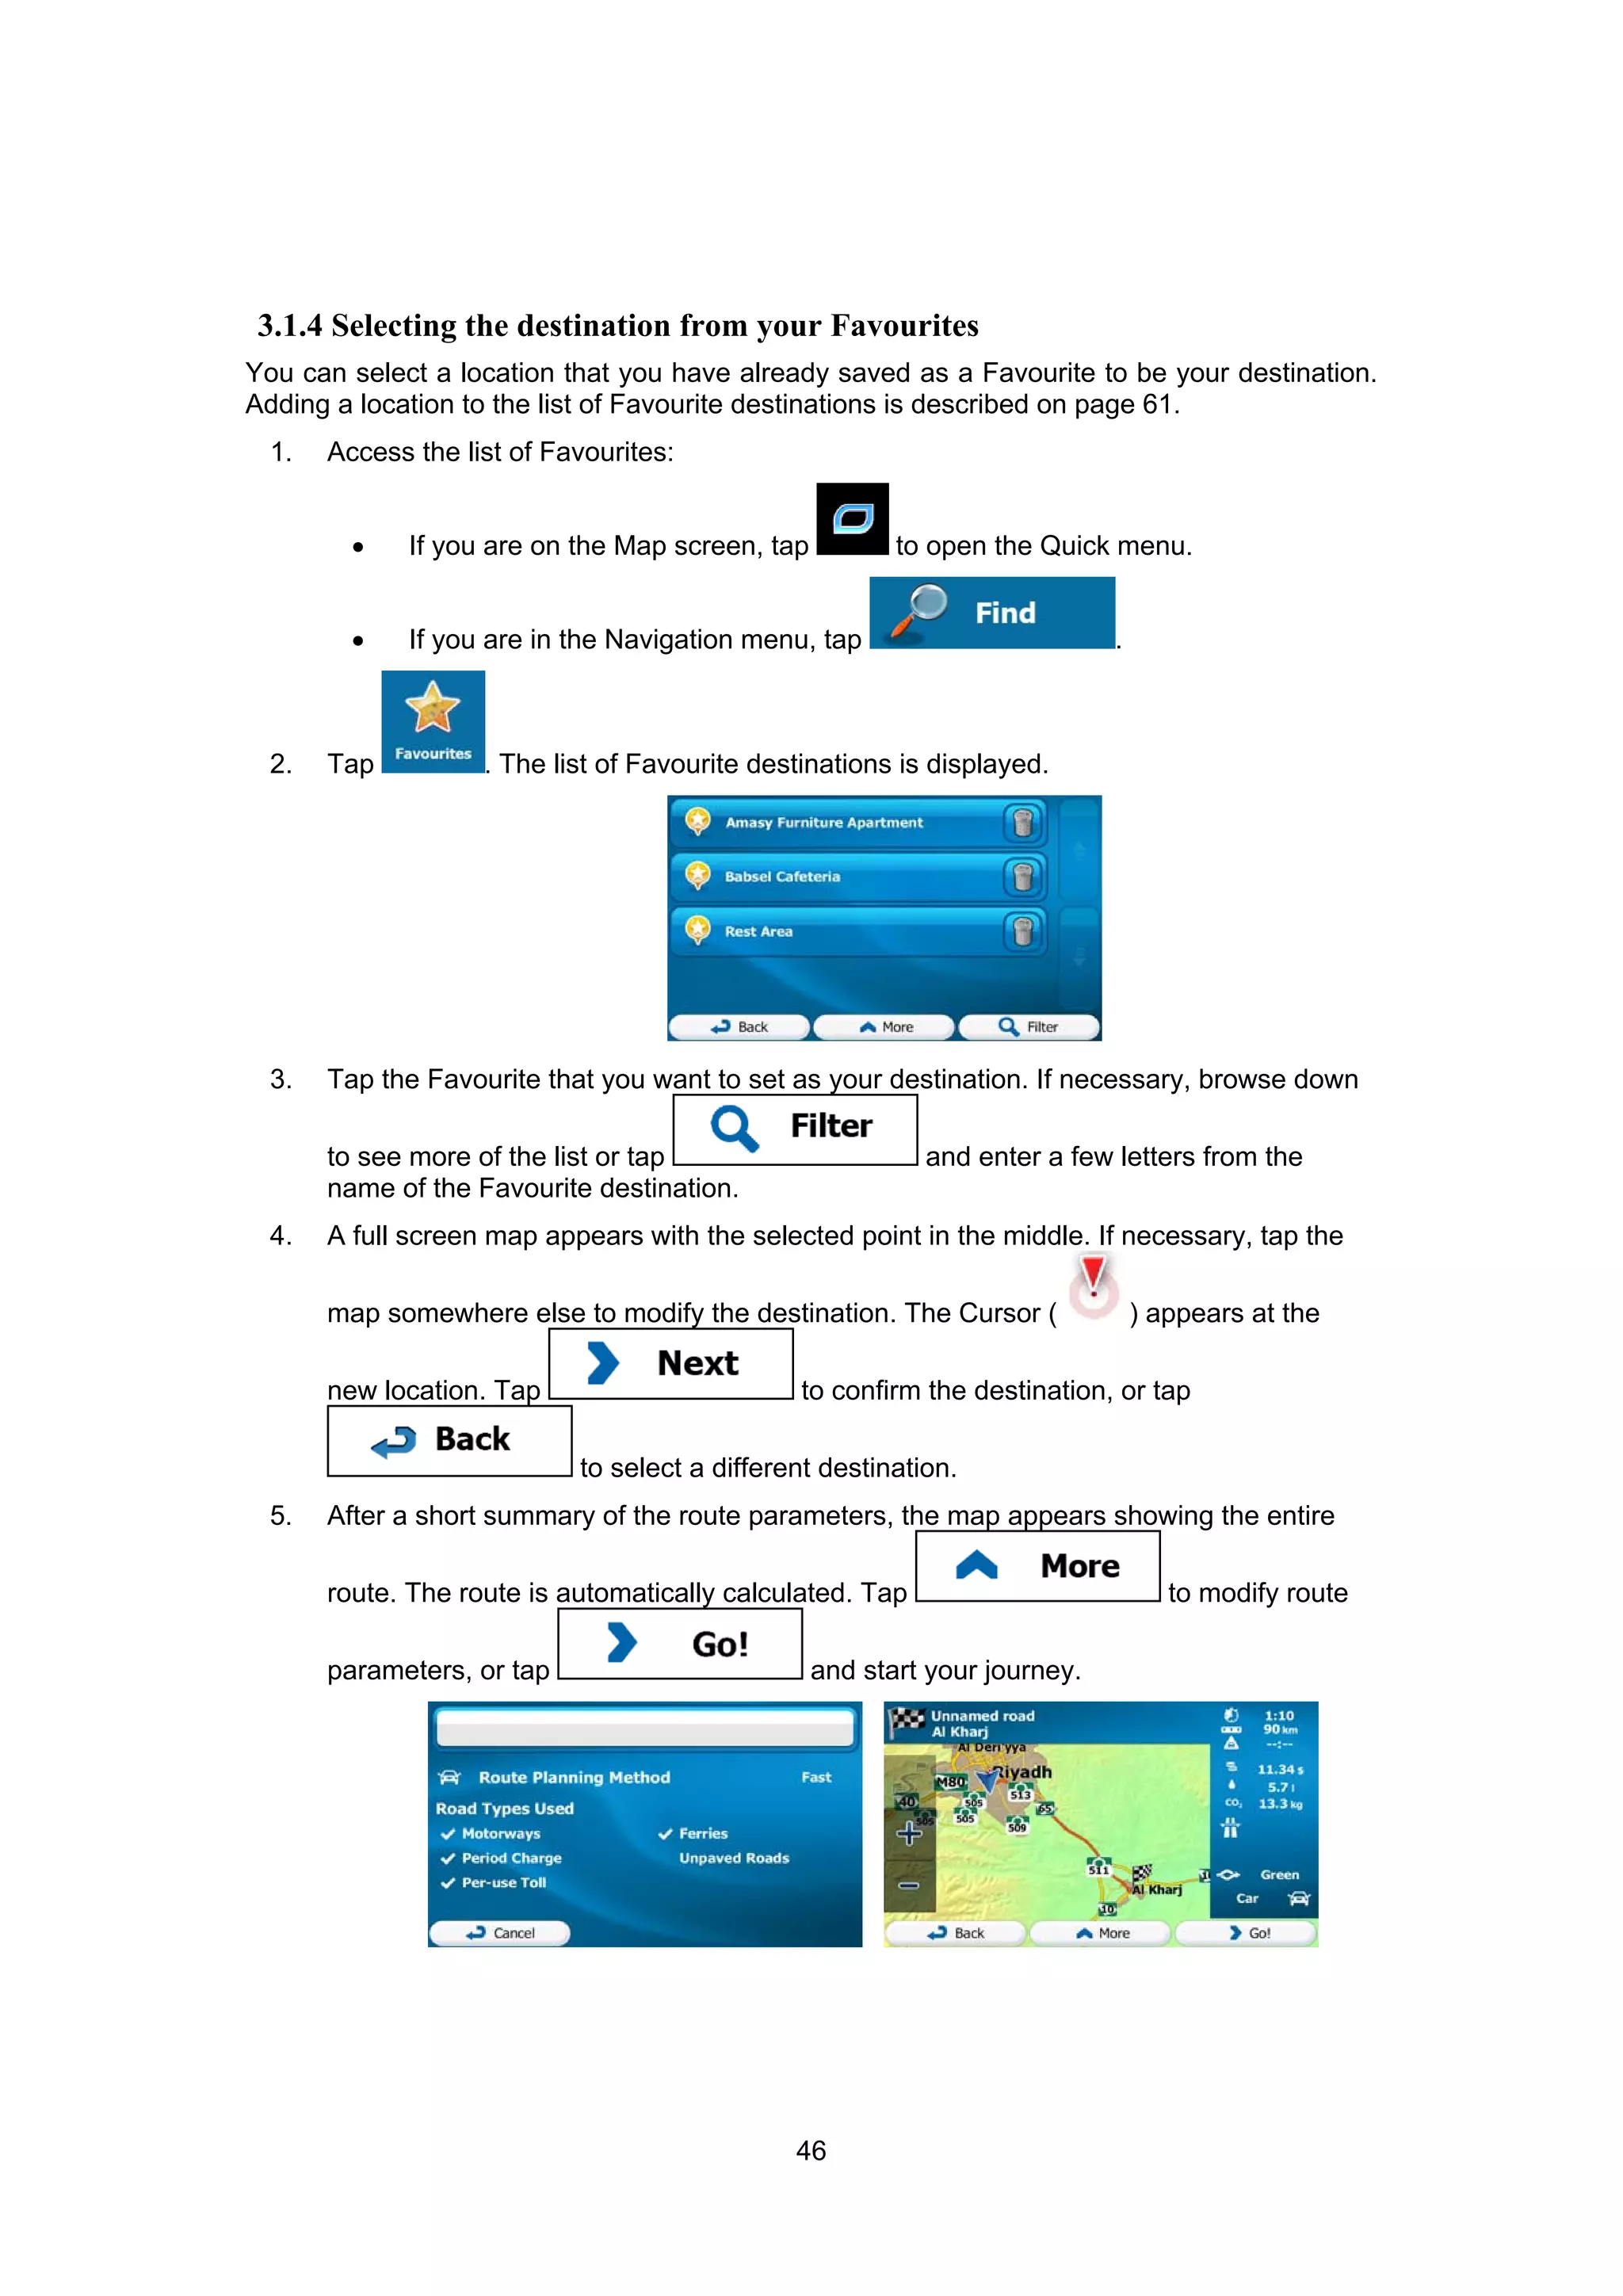
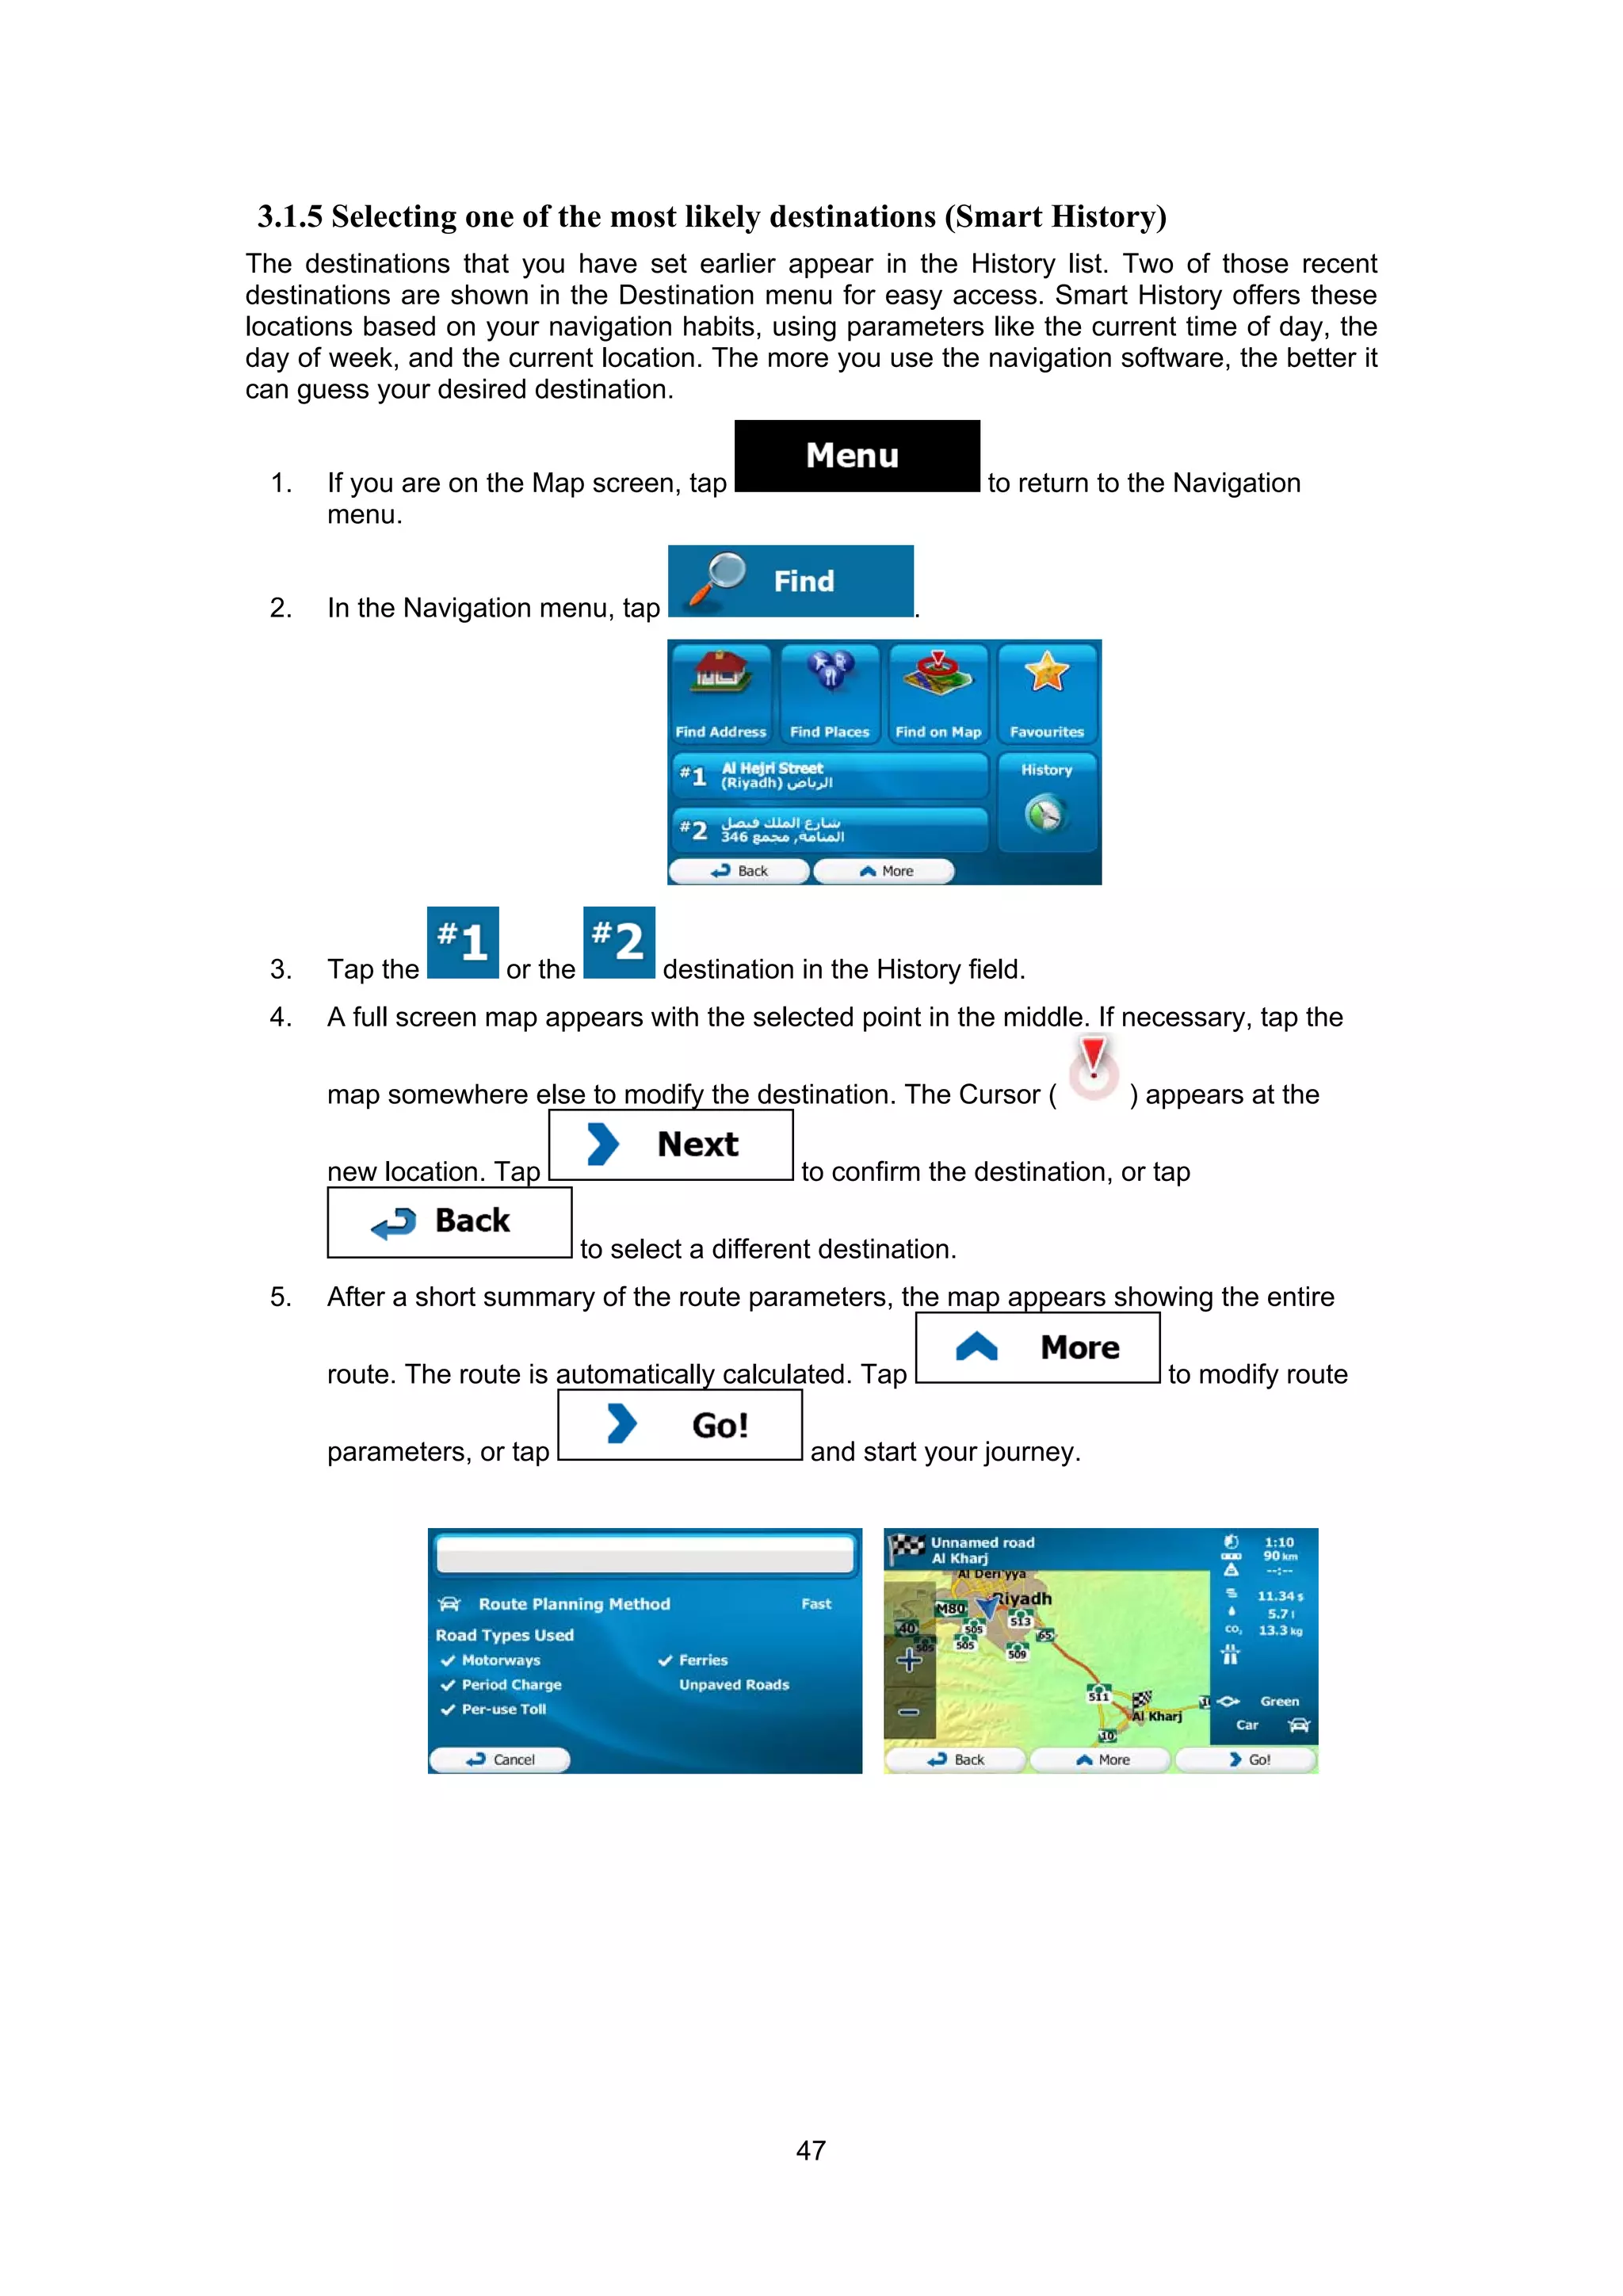
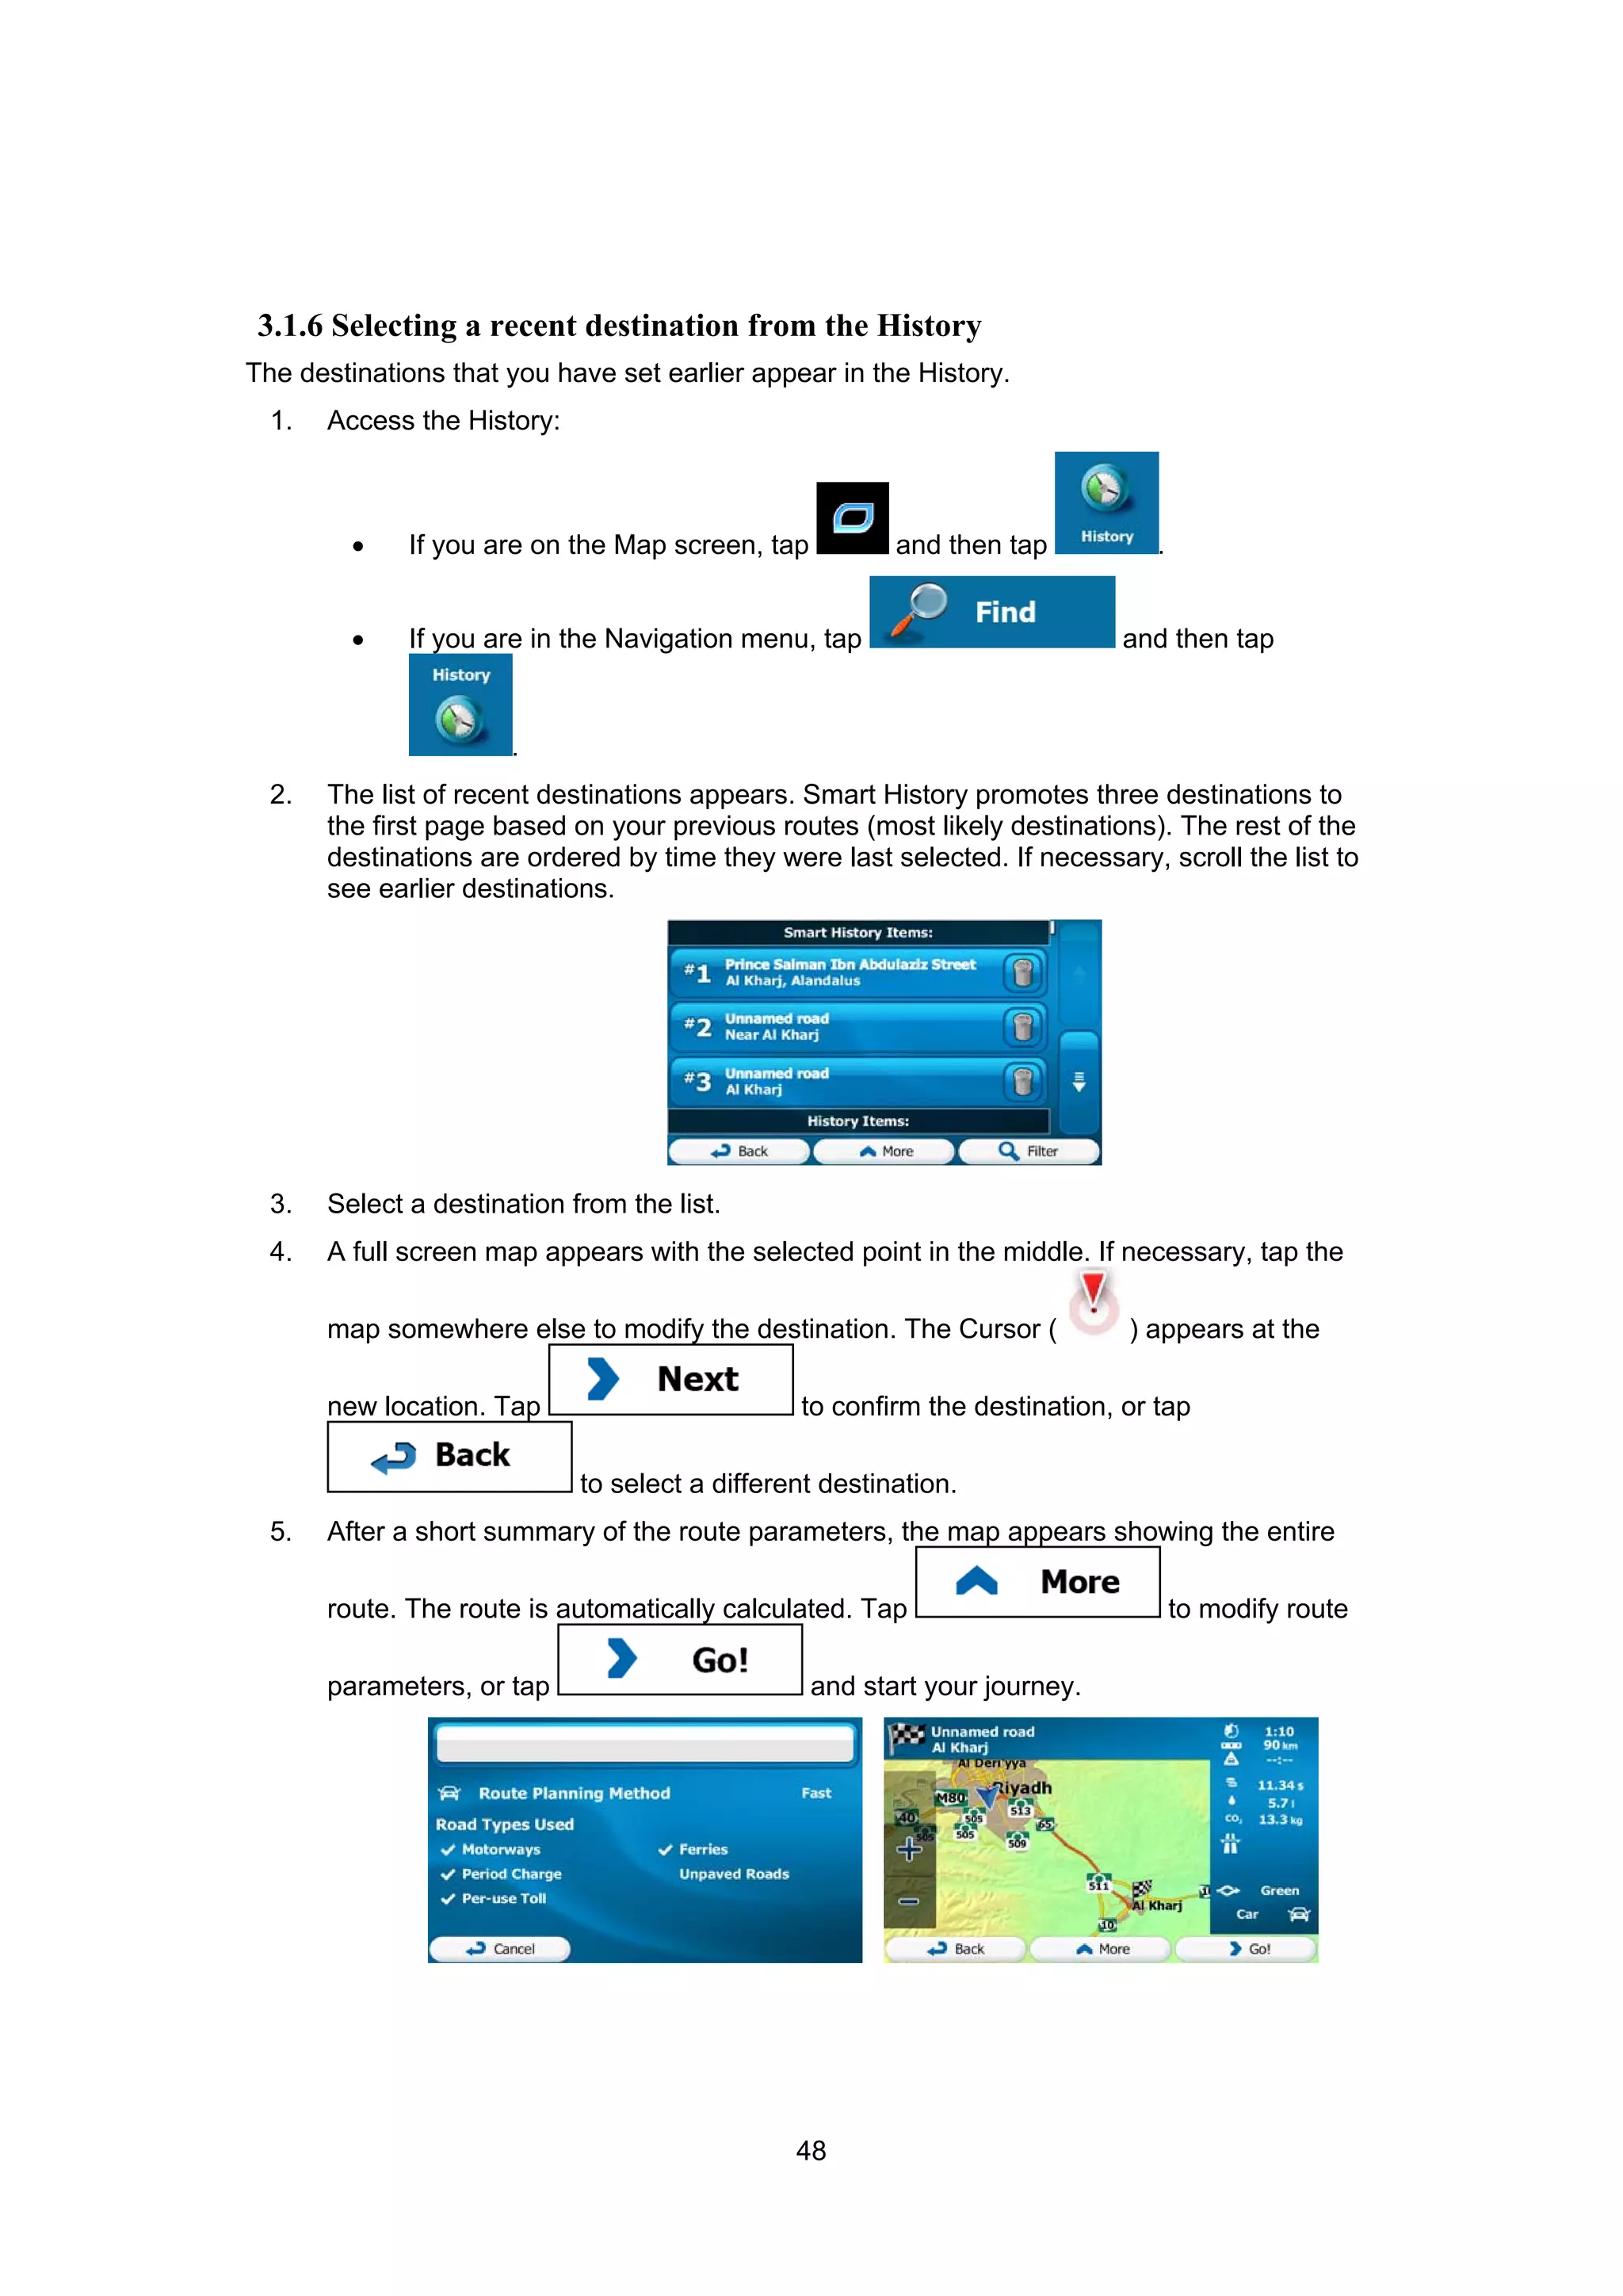
SlideShare a Scribd company logo
1 of 89
Download to read offline
User Manual
iGO primo
Navigation software for the iGO primo
UK English
July 2012, ver. 2.0
2
Thank you for choosing the iGO primo as your navigator. Start using iGO primo right away.
This document is the detailed description of the navigation software. You can easily discover
iGO primo while you are using it; however, we still recommend that you read this manual to
fully understand the screens and features.
3
Table of contents
1 Warnings and Safety information .........................................................................6 
2 Getting started.........................................................................................................7 
2.1 Navigation menu ............................................................................................................8 
2.2 Buttons and other controls on the screen.......................................................................9 
2.2.1 Using keyboards ................................................................................................................ 10 
2.2.2 Beyond single screen tap ................................................................................................... 11 
2.3 Map screen...................................................................................................................12 
2.3.1 Navigating on the map....................................................................................................... 12 
2.3.2 Position markers ................................................................................................................ 14 
2.3.2.1 Vehimarker and Lock-on-Road.................................................................................................. 14 
2.3.2.2 Selected map location (Cursor) and selected map object .......................................................... 14 
2.3.3 Objects on the map ............................................................................................................ 14 
2.3.3.1 Streets and roads ....................................................................................................................... 14 
2.3.3.2 Turn preview and Next street..................................................................................................... 14 
2.3.3.3 Lane information and Signposts................................................................................................. 16 
2.3.3.4 Motorway exit services .............................................................................................................. 16 
2.3.3.5 3D object types........................................................................................................................... 17 
2.3.3.6 Elements of the active route....................................................................................................... 17 
2.3.4 Manipulating the map ........................................................................................................ 18 
2.3.5 Quick menu........................................................................................................................ 19 
2.3.6 Checking the details of the current position (Where Am I?) ............................................. 22 
3 On-road navigation...............................................................................................24 
3.1 Selecting the destination of a route..............................................................................24 
3.1.1 Entering an address or a part of the address....................................................................... 24 
3.1.1.1 Entering an address................................................................................................................... 25 
3.1.1.2 Entering the midpoint of a street as the destination................................................................... 27 
3.1.1.3 Selecting an intersection as the destination ............................................................................... 28 
3.1.1.4 Selecting a city/town centre as the destination........................................................................... 30 
3.1.1.5 Entering an address with a postal code ..................................................................................... 31 
3.1.1.6 Tips on entering addresses quickly ............................................................................................ 33 
3.1.2 Selecting the destination from the Places of Interest ......................................................... 34 
3.1.2.1 Quick search for a Place of Interest........................................................................................... 34 
3.1.2.2 Searching for a Place of Interest using preset categories.......................................................... 36 
3.1.2.3 Searching for a Place of Interest by category............................................................................ 38 
3.1.2.4 Searching for a Place of Interest by name ................................................................................. 40 
3.1.2.5 Selecting nearby assistance from 'Where Am I?' ....................................................................... 43 
3.1.3 Selecting a map location as the destination ....................................................................... 45 
3.1.4 Selecting the destination from your Favourites ................................................................. 46 
3.1.5 Selecting one of the most likely destinations (Smart History)........................................... 47 
3.1.6 Selecting a recent destination from the History................................................................. 48 
4
3.1.7 Entering the coordinate of the destination ......................................................................... 49 
3.1.8 Navigate to a location stored in a photo............................................................................. 50 
3.1.9 Building a route from the list of destinations (Create Route) ............................................ 51 
3.2 Viewing the entire route on the map ............................................................................52 
3.3 Checking route parameters and accessing route related functions .............................52 
3.4 Modifying the route......................................................................................................53 
3.4.1 Selecting a new destination when already having a route: New Route, Waypoint or Final
Destination.................................................................................................................................... 53 
3.4.2 Setting a new starting position for the route ...................................................................... 54 
3.4.3 Editing the list of destinations (Edit Route)....................................................................... 55 
3.4.4 Pausing the active route..................................................................................................... 56 
3.4.5 Cancelling the active route ................................................................................................ 56 
3.4.6 Checking route alternatives when planning the route........................................................ 57 
3.4.7 Checking route alternatives for an existing route .............................................................. 58 
3.4.8 Changing the vehicle used in route planning..................................................................... 59 
3.4.9 Changing the road types used in route planning ................................................................ 60 
3.5 Saving a location as a Favourite destination...............................................................61 
3.5.1 Editing the details of a Favourite destination..................................................................... 62 
3.6 Saving a map location as an alert point.......................................................................63 
3.7 Editing an alert point...................................................................................................64 
3.8 Watching the simulation of the route ...........................................................................65 
4 Off-road navigation...............................................................................................67 
4.1 Selecting the destination of the route...........................................................................67 
4.2 Navigating in off-road mode........................................................................................67 
5 Reference Guide ....................................................................................................68 
5.1 Concepts.......................................................................................................................68 
5.1.1 Smart Zoom ....................................................................................................................... 68 
5.1.2 Daytime and night colour themes ...................................................................................... 68 
5.1.3 Tunnel view ....................................................................................................................... 68 
5.1.4 Route calculation and recalculation................................................................................... 69 
5.1.5 Green routing..................................................................................................................... 71 
5.1.6 Speed limit warning........................................................................................................... 71 
5.1.7 GPS position quality indicator and current time................................................................ 72 
5.2 'More' menu..................................................................................................................73 
5.3 Settings menu ............................................................................................................... 74 
5.3.1 Sound and Warnings.......................................................................................................... 75 
5.3.2 Customise Quick menu...................................................................................................... 77 
5.3.3 Route settings..................................................................................................................... 77 
5.3.4 User profiles....................................................................................................................... 81 
5.3.5 Map settings....................................................................................................................... 81 
5.3.6 Visual guidance settings .................................................................................................... 83 
5
5.3.7 Display settings.................................................................................................................. 84 
5.3.8 Regional settings................................................................................................................ 85 
5.3.9 Trip monitor settings.......................................................................................................... 85 
5.3.10 Log collection settings..................................................................................................... 86 
6 Glossary..................................................................................................................87 
7 Copyright note.......................................................................................................89 
6
1 Warnings and Safety information
The navigation system helps you find your way to your destination with the built-in GPS
receiver. iGO primo does not transmit your GPS position; others cannot track you.
If you accept it when first using the application, iGO primo collects usage information and
GPS logs that may be used for improving the application and the quality and coverage of
maps. The data is processed anonymously; no one will be able to track any personal
information. If you change your mind later, you can enable or disable the log collection in
Settings (page 86).
It is important that you look at the display only when it is safe to do so. If you are the driver of
the vehicle, we recommend that you operate iGO primo before you start your journey. Plan
the route before your departure and stop if you need to change the route.
You must obey the traffic signs and follow the road geometry. If you deviate from the
recommended route, iGO primo changes the instructions accordingly.
Never place iGO primo where it obstructs the driver's view, where it is in the deployment zone
of an airbag or where it might cause injuries in an accident.
7
2 Getting started
iGO primo is optimised for in-car use. You can use it easily by tapping the screen buttons and
the map with your fingertips.
When using the navigation software for the first time, an initial setup process starts
automatically. Do as follows:
1. Select the written language of the application interface. Later you can change it in
Regional settings (page 85).
2. Read the End User Licence Agreement. Tap to continue.
3. You are now asked whether you allow the software to collect usage information and
GPS logs that may be used for improving the application and the quality and coverage
of maps. Tap to allow the anonymous statistics or disable this
function. Later you can turn them on or off individually in Log collection settings (page
86).
4. Select the language and speaker used for voice guidance messages. Later you can
change it in Sound and Warnings settings (page 85).
5. If needed, modify the time format and unit settings. Later you can change them in
Regional settings (page 85).
6. If needed, modify the default route planning options. Later you can change them in
Route settings (page 77).
8
7. The initial setup is now complete. The Configuration wizard can be restarted later from
the Settings menu (page 74).
After the initial setup, the Navigation menu appears and you can start using iGO primo.
2.1 Navigation menu
You can reach all parts of iGO primo from the Navigation menu.
You have the following options:
• Tap to select your destination by entering an address or selecting
a place of interest, a location on the map or one of your Favourite destinations. You
can also look up your recent destinations from the Smart History, enter a coordinate or
use the location saved in a photo.
• Tap to display the route parameters and the route in its full length
on the map. You can also perform route-related actions such as editing or cancelling
your route, setting a start point for the route, picking route alternatives, avoiding parts
of the route, simulating navigation or adding the destination to your Favourites.
• Tap to customise the way the navigation software works, to
simulate demo routes or to run some additional applications.
• Tap to start navigating on the map. The button itself is a miniature
live map that shows your current position, the recommended route and the surrounding
map area. Tap the button to enlarge the map to the full screen.
• Tap to stop navigation and exit the software.
9
2.2 Buttons and other controls on the screen
When you are using iGO primo, you usually tap buttons on the touch screen.
You only need to confirm selections or changes if the application needs to restart, it needs to
perform a major reconfiguration, or you are about to lose some of your data or settings.
Otherwise, iGO primo saves your selections and applies the new settings without confirmation
as soon as you use the controls.
Type Example Description How to use it
Button Tap it to initiate a function,
to open a new screen, or
to set a parameter.
Tap it once.
Button
with
value
Some buttons display the
current value of a field or
setting. Tap the button to
change the value. After the
change, the new value is
shown on the button.
Tap it once.
Icon
Shows status information.
Some icons also function
as a button. Tap them
once.
List When you need to select
from several options, they
appear in a list.
Grab the list anywhere
and slide your finger up
or down. Depending on
the speed of the sliding,
the list will scroll fast or
slow, only a bit or till the
end.
Alternatively, move
between pages with the
and buttons
and tap the value that
you want.
Radio
button
When there are only a few
choices, radio buttons may
be used instead of lists.
Only one value can be
selected.
Tap one of the buttons to
select a new value.
Switch When there are only two
choices, a checkmark
shows whether the feature
is enabled.
Tap it to turn the switch
on or off.
10
Slider When a feature can be set
to different values in a
range, iGO primo shows
an indicator on a gauge
that displays and sets the
value.
• Drag the handle to
move the slider to
its new position.
• Tap the slider
where you want
the handle to
appear; the thumb
jumps there.
Virtual
keyboard
Alphabetic and
alphanumeric keyboards
to enter text and numbers.
Each key is a touch
screen button.
2.2.1 Using keyboards
You only need to enter letters or numbers when you cannot avoid it. You can type with your
fingertips on the full-screen keyboards and you can switch between various keyboard layouts,
for example English, Greek or numerical.
Task Instruction
Switching to another
keyboard layout, for
example from an English
keyboard to a Greek
keyboard
Tap the button and select the new
keyboard layout from the list.
Correcting your entry on the
keyboard
Tap to remove the unneeded character(s).
Tap and hold the button to delete several characters or the
entire input string.
Entering a space, for
example between a first
name and a family name or
in multi-word street names
Tap the button at the bottom centre of the screen.
Entering upper and lower
case letters
When entering a text, the first character appears in upper case
while the rest of the text is in lower case. Tap to enter an
upper case letter or tap twice to turn on Caps Lock. Tap again
and lower case letters return.
Entering numbers and
symbols
Tap to switch to a keyboard offering numeric and symbol
characters.
Finalising the keyboard
entry (accepting the
suggested search result)
Tap .
11
Finalising the keyboard
entry (opening the list of
search results) Tap .
Finalising the keyboard
entry (saving your input)
Tap .
Cancelling the keyboard
entry (returning to the
previous screen)
Tap .
2.2.2 Beyond single screen tap
You usually need to tap the screen only once. However, some useful features can be
accessed with combined touch screen tapping. Those are the following:
Action Details
Tapping and holding
the screen
Tap and keep pressing the following buttons to reach extra functions:
• Tap and hold on list and menu screens:
the Map screen appears.
• Tap and hold any of the , , , , , and
buttons on the Map screen: you can rotate, tilt or scale
the map continuously.
• Tap and hold on keyboard screens: you can delete
several characters quickly.
• Tap and hold or in long lists: you can scroll pages
continuously.
Gestures
(drag&drop)
You need to drag and drop the screen only in cases like:
• Moving the handle on a slider.
• Scrolling the list: grab the list anywhere and slide your finger up
or down. Depending on the speed of the sliding, the list will
scroll fast or slow, only a bit or till the end.
• Moving the map in map browsing mode: grab the map, and
move it in the desired direction.
12
2.3 Map screen
2.3.1 Navigating on the map
The Map screen is the most frequently used screen of iGO primo.
A small live map is displayed on the Navigation menu, as a part of the
button.
To enlarge this small map and open the Map screen, tap .
This map shows the current position (the Vehimarker, a blue arrow by default), the
recommended route (an orange line), and the surrounding map area.
When there is no GPS position, the Vehimarker is transparent. It shows your last known
position.
You see coloured dots circling around a satellite symbol in the top left corner. The more green
dots you see, the closer you are to get the valid GPS position.
When GPS position is available, the Vehimarker is displayed in full colour, now showing your
current position.
There are screen buttons and data fields on the screen to help you navigate. During
navigation, the screen shows route information.
The button gives quick access to frequently used functions. You can change the
available functions in Settings.
By default, only one data field is displayed in the bottom right corner. Tap this field to see all
route data fields. Tap any of the data fields to suppress others and display only the selected
one.
13
The data fields are different when you are navigating an active route and when you have no
specified destination (the orange line is not displayed).
Default data fields when cruising without a destination (tap and hold any of the fields to
change its value):
Field Description
Shows your current speed given by the GPS receiver.
Shows the speed limit of the current road if the map contains it.
Shows the current time corrected with time zone offset. The accurate
time comes from the GPS satellites, and the time zone information
comes from the map or it can be set manually in Regional settings.
(The current time is always displayed in the top left corner of menu
screens.)
Default data fields when navigating a route (tap and hold any of the fields to change its value):
Field Description
Shows the distance you need to travel on the route before reaching
your final destination.
Shows the time needed to reach the final destination of the route
based on information available for the remaining segments of the
route.
The calculation cannot take into account traffic jams and other possible
delays.
Shows the estimated arrival time at the final destination of the route
based on information available for the remaining segments of the
route.
The calculation cannot take into account traffic jams and other possible
delays.
14
2.3.2 Position markers
2.3.2.1 Vehimarker and Lock-on-Road
When your GPS position is available, iGO primo marks your current position with the
Vehimarker. By default, this marker is a blue arrow, but you can change this icon in Settings.
When on-road navigation is selected, the Vehimarker may not show your exact GPS position
and heading. If roads are near, it is aligned to the nearest road to suppress GPS position
errors, and the direction of the icon is aligned to the direction of the road.
If you select off-road navigation: The Vehimarker is at your exact GPS position. The direction
of the icon shows your current heading.
2.3.2.2 Selected map location (Cursor) and selected map object
You can mark a map location in the following ways:
• Tap the map when navigating,
• Tap the map when you are asked to confirm the destination at the end of a search, or
• Tap the map in Find on Map (page 45)
When a map location is selected, the Cursor appears at the selected point on the map. The
Cursor is displayed with a radiating red dot ( ) to make it visible at all zoom levels.
The location of the Cursor can be used as the destination of the route, a new alert point, you
can search for Places around it, or you can save this location as one of your Favourite
destinations.
You can also select some of the objects on the map. If you tap the map at the icon of a Place
of Interest or an alert point, the object will be selected (you see a red circling border around
the object), and you can get information about this object or use it as a route point.
2.3.3 Objects on the map
2.3.3.1 Streets and roads
iGO primo shows the streets in a way that is similar to how the paper road maps show them.
Their width and colours correspond to their importance: you can easily tell a motorway from a
small street.
2.3.3.2 Turn preview and Next street
When navigating a route, the top section of the Map screen shows information about the next
route event (manoeuvre) and the next street or the next city/town.
15
There is a field in the top left corner that displays the next manoeuvre. Both the type of the
event (turn, roundabout, exiting motorway, etc.) and its distance from the current position are
displayed.
A smaller icon shows the type of the second next manoeuvre if it is near the first one.
Otherwise, only the next manoeuvre is displayed.
Most of these icons are very intuitive. The following table lists some of the frequently shown
route events. The same symbols are used in both fields:
Icon Description
Turn left.
Turn right.
Turn back.
Bear right.
Turn sharp left.
Keep left.
Continue straight in the intersection.
Go left on the roundabout, 3rd exit (next
manoeuvre).
Enter roundabout (second next manoeuvre).
Enter motorway.
Exit motorway.
Board ferry.
Leave ferry.
Approaching a waypoint.
16
Approaching the destination.
2.3.3.3 Lane information and Signposts
When navigating on multilane roads, it is important to take the appropriate lane in order to
follow the recommended route. If lane information is available in the map data, iGO primo
displays the lanes and their directions using small arrows at the bottom of the map.
Highlighted arrows represent the lanes you need to take.
Where additional information is available, signposts substitute arrows. Signposts are
displayed at the top of the map. The colour and style of the signposts are similar to the real
ones you can see above road or by the roadside. They show the available destinations and
the number of the road the lane leads to.
All signposts look similar when cruising (when there is no recommended route). When
navigating a route, only the signpost that points to the lane(s) to be taken is displayed in vivid
colours; all others are darker.
If you want to hide the currently displayed signposts, tap any of them and the normal Map
screen returns until new signpost information is received.
2.3.3.4 Motorway exit services
You may need a petrol station or a restaurant during your journey. This feature displays a
new button on the map when you are driving on motorways.
Tap this button to open a panel with the details of the next few exits or service stations.
Tap any of them to display the exit area on the map. You can now easily add this exit as a
waypoint to your route if needed.
If you want to display other types of Places for the exits, you can change the icons in Visual
Guidance settings (page 83).
17
2.3.3.5 3D object types
iGO primo supports the following 3D object types:
Type Description
3D terrain 3D terrain map data shows changes in terrain, elevations or depressions in
the land when you view the map in 2D, and use it to plot the route map in
3D when you navigate. Hills and mountains are shown in the background of
the 3D map, and illustrated by colour and shading on the 2D map.
Elevated roads Complex intersections and vertically isolated roads (such as overpasses or
bridges) are displayed in 3D.
3D landmarks Landmarks are 3D artistic or block representations of prominent or well-
known objects.
3D buildings 3D block representation of full city building data containing actual building
size and position on the map.
2.3.3.6 Elements of the active route
iGO primo shows the route in the following way:
Symbol Name Description
Current GPS position and
Start point
Your current position displayed on the map. If
roads are near, it is aligned to the nearest road.
Normally if GPS position is available, the route
starts from the current position. If there is no valid
GPS position, iGO primo uses the last known
position as the start point.
Waypoint (intermediate
destination)
An intermediate destination of the route before
reaching the final destination.
Destination (end point) The final destination of the route.
Route colour The route always stands out with its colour on the
map, both in daytime and in night colour mode.
Streets and roads that are
excluded from the navigation
You can choose whether you want to use or
avoid certain road types (page 77). However,
when iGO primo cannot avoid such roads, the
route will include them and it will show them in a
colour that is different from the route colour.
18
2.3.4 Manipulating the map
Tap the map anywhere to browse it during navigation. The map stops following the current
position (the Vehimarker, a blue arrow by default, is not locked in a fix position on the screen
any more) and control buttons appear to help you modify the map view.
Action Button(s) Description
Moving the map
with drag&drop
No buttons You can move the map in any direction: tap
and hold the map, and move your finger
towards the direction you want to move the
map.
Zooming in and out
,
Changes how much of the map is displayed on
the screen.
iGO primo uses high-quality vector maps that
let you examine the map at various zoom
levels, always with optimised content. It always
displays street names and other text with the
same font size, never upside-down, and you
only see the streets and objects that you need.
Map scaling has a limit in 3D map view mode.
If you zoom out further, the map switches to
2D view mode.
Tap the button once to modify the view in large
steps, or tap and hold the button to modify it
continuously and smoothly.
Tilting up and down
,
Changes the vertical view angle of the map in
3D mode.
Tap the button once to modify the view in large
steps, or tap and hold the button to modify it
continuously and smoothly.
Rotating left and
right
,
Changes the horizontal view angle of the map.
Tap the button once to modify the view in large
steps, or tap and hold the button to modify it
continuously and smoothly.
2D or 3D view
,
Tap this button to switch between the 3D
perspective and 2D top-down map view
modes.
19
Compass in 2D
map view mode
,
The direction of the compass shows North.
Tap the button to switch to North-up view, and
then tap again to rotate the map in the
previous direction.
Compass in 3D
map view mode
,
The direction of the compass shows North.
Tap the button to switch to North-up view, and
then tap again to rotate the map in the
previous direction.
Location
information
Tap this button to open a new screen with
information about the selected map point, the
Cursor.
Return to normal
navigation
Tap this button to move the map back to follow
the current GPS position. Automatic map
rotation is also re-enabled.
The map manipulation buttons disappear and
navigation continues.
Additional options Tap this button to open a list of additional
features like saving the Cursor as a Favourite
destination, or searching for Places around the
Cursor.
Select destination Tap this button to select the Cursor as a new
destination. The route is automatically
calculated.
2.3.5 Quick menu
The Quick menu is a selection of controls and functions that are frequently needed during
navigation. It can be opened directly from the Map screen by tapping .
The menu will close after a few seconds of inactivity or if you tap .
Most of these functions are shortcuts. They are accessible from the menu system.
20
There are more functions available than the number of buttons in the menu. In Settings, you
can choose the function of each button (page 77). The following options are available:
Button Description Shortcut for
Open the Quick menu, and tap the Makkah button to open
the screen that points in the direction of the Kaaba.
This function lets you search for a Place by its name. The
search is carried out either along your route or around
your current location if there is no route calculated.
Find / Find Places /
Quick Search (page
34)
This button opens the list of your Favourite destinations.
Find / Favourite
(page 46)
This button opens the History list. You can select one of
your previous destinations.
Find / History (page
48)
This button opens the route editing function.
My Route / Edit
Route
This button opens the route related settings.
More / Settings /
Route Settings
(page 77)
This button opens the map related settings.
More / Settings /
Map Settings (page
81)
This button opens a special screen with information about
the current position and a button to search for nearby
emergency or roadside assistance. For details, see the
next chapter.
Tap the Current
Street field on the
Map screen
This button cancels the route and stops navigation. The
button is replaced with the next one if waypoints are given.
My Route / Cancel
Route (page 56)
This button skips the next waypoint from the route.
n/a
This button opens a 2D map scaled and positioned to
show the entire route.
My Route /
Overview (page 52)
21
This button opens the Visual Guidance settings screen.
More / Settings /
Visual Guidance
(page 83)
This button lets you bypass parts of the recommended
route.
My Route /
Avoidances
This button opens the Trip Monitor screen where you can
manage your previously saved trip logs and track logs.
More / Trip Monitor
(page 73)
This button opens the list of manoeuvres (the itinerary).
Tap the top of the
Map screen during
navigation.
With this function you can save the active route for later
use.
My Route / More /
Save Route
With this function you can replace the active route with a
previously saved route.
My Route / More /
Load Route
With this function you can search for Places of Interest in
various different ways.
Find / Find Places
(page 34)
This button opens the Map screen and starts simulating
the active route.
My Route / More /
Simulate Navigation
(page 65)
This button opens the GPS Information screen with
satellite position and signal strength information.
Tap the top of the
Map screen when
there is no GPS
reception
This button opens the parameters of the selected Vehicle
profile.
More / Settings /
Route (page 77)
22
2.3.6 Checking the details of the current position (Where Am I?)
This screen contains information about the current position (or about the last known position if
GPS reception is not available) and a button to search for useful Places nearby.
.
You can access this screen from the map in one of the following ways:
• If the current street is displayed below the Vehimarker (the current position on the
map), tap it to open the Where Am I? screen.
• Open the Quick menu and tap the button.
Information on this screen:
• , : Latitude and Longitude (coordinate of the current position in WGS84
format).
• : Altitude (elevation information coming from the GPS receiver - often
inaccurate).
• : House number on the left.
• : House number on the right.
• In the middle of the screen you can see whether the position is current, or the time left
since it was last updated.
• Address details (when available) of the current position are displayed at the bottom.
You can also perform some actions on this screen:
Tap to save the current position as a Favourite destination.
You can also search for assistance near your current position. Tap to
open a new screen for the Quick search:
23
The following services can be searched around the current position or the last known position:
• : Car repair and roadside assistance services
• : Police stations
• : Medical and emergency services
• : Petrol stations
Tap any of the buttons, select a Place from the list, and navigate to it.
24
3 On-road navigation
When first started, iGO primo calculates routes using the road network of the high quality
vector maps provided with the product.
You can set up your route in different ways:
• If you need a route for immediate navigation, you can select the destination and start
navigating to it right away (normal navigation).
• You can also plan a route independently of your current GPS position or even without
GPS reception. To achieve this you need to set a new starting point in My Route / Edit
Route by tapping the flag icon at the current position. This will also turn off the GPS
receiver so that the route is not recalculated when a new position is received.
You can plan routes with multiple destinations. Select the first destination. Then select a
second destination and add it to your route to create a multi-point route. You can add as
many destinations to your route as you like.
You can also use iGO primo for off-road navigation. For details, see page 67.
3.1 Selecting the destination of a route
iGO primo offers you several ways of choosing your destination:
• Enter a full address or a part of an address, for example a street name without a house
number or the names of two intersecting streets (page 24).
• Enter an address with postal code (page 31). This way you do not need to select the
name of the city/town and the search for street names might be faster as well.
• Use a built-in Place of Interest as your destination (page 34).
• Select a location on the map with the Find on Map feature (page 45).
• Use a previously saved Favourite destination (page 46).
• Select a location from the History of previously used destinations (page 48).
• Enter the coordinate of the destination (page 49).
• Use the location where a photo was taken (page 50).
3.1.1 Entering an address or a part of the address
If you know at least a part of the address, it is the quickest way to select the destination of the
route.
Using the same screen, you can find an address by entering:
• the exact address, including house number
• the centre of a city/town
• an intersection
• the midpoint of a street
• any of the above, starting the search with the postal code (page 31)
25
3.1.1.1 Entering an address
To enter an address as the destination, do as follows:
1. If you are on the Map screen, tap to return to the Navigation
menu.
2. In the Navigation menu, tap the following buttons: , .
3. By default, iGO primo proposes the country and city/town where you are. If needed,
tap , enter the first few letters of the country name on the
keyboard, and select one country from the list of results.
4. If needed, select a new city/town:
a. Tap .
b. Start entering the name of the city/town on the keyboard.
c. Find the city/town you need:
• The most likely city/town name is always shown in the input field. To
accept it, tap .
• If the desired name does not show up, the names that match the string
appear in a list after entering a couple of characters (to open the list of
results before it appears automatically, tap ). Select
the city/town from the list.
5. Enter the street name:
a. Tap .
b. Start entering the street name on the keyboard.
c. Find the street you need:
26
• The most likely street name is always shown in the input field. To accept
it, tap .
• If the desired name does not show up, the names that match the string
appear in a list after entering a couple of characters (to open the list of
results before it appears automatically, tap ). Select
the street from the list.
-
6. Enter the house number:
a. Tap .
b. Enter the house number on the keyboard. (To enter letters, tap ).
c. Tap to finish entering the address. (If the entered house
number cannot be found, the midpoint of the street is selected as the
destination.)
7. A full screen map appears with the selected point in the middle. If necessary, tap the
map somewhere else to modify the destination. The Cursor ( ) appears at the
new location. Tap to confirm the destination, or tap
to select a different destination.
8. After a short summary of the route parameters, the map appears showing the entire
route. The route is automatically calculated. Tap to modify route
parameters, or tap and start your journey.
27
Tip!
If you know that you will use this destination frequently, before tapping
to confirm the destination, put it on the list of your
Favourites first: tap then , give a
name for the new Favourite, and tap to save the location.
The map with the destination returns automatically. Now you can start your
journey.
3.1.1.2 Entering the midpoint of a street as the destination
You can navigate to the midpoint of a street if the house number is not available:
1. If you are on the Map screen, tap to return to the Navigation
menu.
2. In the Navigation menu, tap the following buttons: , .
3. If necessary, modify the country and city/town as described earlier (page 25).
4. Enter the street name:
a. Tap .
b. Start entering the street name on the keyboard.
c. Find the street you need:
• The most likely street name is always shown in the input field. To accept
it, tap .
• If the desired name does not show up, the names that match the string
appear in a list after entering a couple of characters (to open the list of
results before it appears automatically, tap ). Select
the street from the list.
28
5. Instead of entering the house number, tap . The midpoint of the
street is selected as the destination.
6. A full screen map appears with the selected point in the middle. If necessary, tap the
map somewhere else to modify the destination. The Cursor ( ) appears at the
new location. Tap to confirm the destination, or tap
to select a different destination.
7. After a short summary of the route parameters, the map appears showing the entire
route. The route is automatically calculated. Tap to modify route
parameters, or tap and start your journey.
3.1.1.3 Selecting an intersection as the destination
To enter an address as the destination, do as follows:
1. If you are on the Map screen, tap to return to the Navigation
menu.
2. In the Navigation menu, tap the following buttons: , .
3. If necessary, modify the country and city/town as described earlier (page 25).
29
4. Enter the street name:
a. Tap .
b. Start entering the street name on the keyboard.
c. Find the street you need:
• The most likely street name is always shown in the input field. To accept
it, tap .
• If the desired name does not show up, the names that match the string
appear in a list after entering a couple of characters (to open the list of
results before it appears automatically, tap ). Select
the street from the list.
5. Enter the intersecting street name:
1. Tap .
• If only a few intersecting streets exist, their list appears immediately.
• In case of a longer street, the keyboard screen appears. Start entering
the name of the intersecting street on the keyboard. As soon as the street
names that match the entered string can be shown on one screen, their
list appears automatically. Select from the list.
6. A full screen map appears with the selected point in the middle. If necessary, tap the
map somewhere else to modify the destination. The Cursor ( ) appears at the
new location. Tap to confirm the destination, or tap
to select a different destination.
7. After a short summary of the route parameters, the map appears showing the entire
route. The route is automatically calculated. Tap to modify route
parameters, or tap and start your journey.
30
3.1.1.4 Selecting a city/town centre as the destination
The city/town centre is not the geometric centre of the city/town but an arbitrary point the map
creators have chosen. In towns and villages, it is usually the most important intersection; in
larger cities, it is one of the important intersections.
1. If you are on the Map screen, tap to return to the Navigation
menu.
2. In the Navigation menu, tap the following buttons: , .
3. If necessary, modify the country as described earlier (page 25).
4. Select the destination city/town:
a. Tap .
b. Start entering the name of the city/town on the keyboard.
c. Find the city/town you need:
• The most likely city/town name is always shown in the input field. To
accept it, tap .
• If the desired name does not show up, the names that match the string
appear in a list after entering a couple of characters (to open the list of
results before it appears automatically, tap ). Select
the city/town from the list.
5. Instead of entering the street name, tap . This way the centre of
the displayed city/town becomes the destination of the route.
31
6. A full screen map appears with the selected point in the middle. If necessary, tap the
map somewhere else to modify the destination. The Cursor ( ) appears at the
new location. Tap to confirm the destination, or tap
to select a different destination.
7. After a short summary of the route parameters, the map appears showing the entire
route. The route is automatically calculated. Tap to modify route
parameters, or tap and start your journey.
3.1.1.5 Entering an address with a postal code
All of the above address searching possibilities can be performed with entering the postal
code instead of the city/town name. Find below an example with a full address:
1. If you are on the Map screen, tap to return to the Navigation
menu.
2. In the Navigation menu, tap the following buttons: , .
3. If necessary, modify the country as described earlier (page 25).
4. Enter a new city/town using its postal code:
a. Tap .
b. Tap to open the numeric keypad.
c. Start entering the postal code.
d. Find the city/town you need:
32
• The most likely postal code is always shown in the input field. To accept
it, tap .
• If the desired number does not show up, open the list of results by
tapping . Select the postal code from the list.
5. Enter the street name:
a. Tap .
b. Start entering the street name on the keyboard.
c. Find the street you need:
• The most likely street name is always shown in the input field. To accept
it, tap .
• If the desired name does not show up, the names that match the string
appear in a list after entering a couple of characters (to open the list of
results before it appears automatically, tap ). Select
the street from the list.
6. Enter the house number:
a. Tap .
b. Enter the house number on the keyboard. (To enter letters, tap ).
c. Tap to finish entering the address. (If the entered house
number cannot be found, the midpoint of the street is selected as the
destination.)
33
7. A full screen map appears with the selected point in the middle. If necessary, tap the
map somewhere else to modify the destination. The Cursor ( ) appears at the
new location. Tap to confirm the destination, or tap
to select a different destination.
8. After a short summary of the route parameters, the map appears showing the entire
route. The route is automatically calculated. Tap to modify route
parameters, or tap and start your journey.
3.1.1.6 Tips on entering addresses quickly
• When you are entering the name of a city/town or a street:
• Only those letters are offered on the keyboard that appear in possible search
results. All other characters are greyed out.
• As you are typing, the most likely result is always displayed in the input field. If
the guess is correct, tap to select it.
• After entering a couple of letters, tap to list the items that
contain the specified letters.
• You can speed up finding an intersection:
• Search first for the street with a less common or less usual name; fewer letters
are enough to find it.
• If one of the streets is shorter, search for that one first. You can then find the
second one faster.
• You can search for both the type and the name of a road. If the same word appears in
several names, for example in the name of streets, roads and avenues, you can obtain
the result faster if you enter the first letter of the street type: For example, enter 'PI A' to
obtain Pine Avenue and skip all Pine Streets and Pickwick Roads.
34
• You can also search in postal codes. As postal codes consist of only a few characters,
this is usually faster than entering the name of the city/town.
3.1.2 Selecting the destination from the Places of Interest
You can select your destination from the Places of Interest included with iGO primo.
Using the same screen, you can find a Place in different ways:
• with the Quick search feature, you can quickly find a nearby Place by its name
• with the Preset search feature, you can find frequently searched types of Places with
only a few screen taps
• you can search for a Place by its category
• you can search for a Place by its name
In addition, you can search for special services from the 'Where Am I?' screen.
3.1.2.1 Quick search for a Place of Interest
The Quick search feature lets you quickly find a Place by its name. The search is always
carried out
• along the recommended route if it exists or
• around your current location if there is no destination given.
1. Start the Quick search function:
• If you are on the Map screen, tap and then tap .
• If you are in the Navigation menu, tap , and then
tap .
2. Using the keyboard, start entering the name of the Place.
3. After entering a few letters, tap to open the list of Places with
names containing the entered character sequence.
35
4. (optional) The Places in the list are ordered by the length of the necessary detour
(when navigating a route) or by their distance from the current position (when no
destination is given). If you need to reorder the list, tap .
5. Browse the list if necessary and tap one of the list items. A full screen map appears
with the selected point in the middle. The name and address of the Place is displayed
at the top of the screen.
6. (optional) Tap to see the details of the selected Place. Tap
to return to the map.
7. If necessary, tap the map somewhere else to modify the destination. The Cursor
( ) appears at the new location. Tap to confirm the
destination, or tap to select a different destination.
8. After a short summary of the route parameters, the map appears showing the entire
route. The route is automatically calculated. Tap to modify route
parameters, or tap and start your journey.
36
3.1.2.2 Searching for a Place of Interest using preset categories
The Preset search feature lets you quickly find the most frequently selected types of Places.
1. If you are on the Map screen, tap to return to the Navigation
menu.
2. In the Navigation menu, tap the following buttons: , .
3. The preset search categories appear:
• :
• If an active route exists, petrol stations are searched along the route.
• If there is no active route (destination is not selected), they are searched
around the current position.
• If the current position is not available either (no GPS signal), they are
searched around the last known position.
• :
• If an active route exists, parking lots are searched around the destination
of the route.
• If there is no active route (destination is not selected), they are searched
around the current position.
• If the current position is not available either (no GPS signal), they are
searched around the last known position.
• :
• If an active route exists, restaurants are searched along the route.
• If there is no active route (destination is not selected), they are searched
around the current position.
• If the current position is not available either (no GPS signal), they are
searched around the last known position.
• :
• If an active route exists, accommodation is searched around the
destination of the route.
37
• If there is no active route (destination is not selected), they are searched
around the current position.
• If the current position is not available either (no GPS signal), they are
searched around the last known position.
4. Tap any of the quick search buttons to get an instant list of Places.
5. (optional) The Places in the list are ordered by their distance from the current or last
known position, from the destination or by the length of the necessary detour. If you
need to reorder the list, tap .
6. Browse the list if necessary and tap one of the list items. A full screen map appears
with the selected point in the middle. The name and address of the Place is displayed
at the top of the screen.
7. (optional) Tap to see the details of the selected Place. Tap
to return to the map.
8. If necessary, tap the map somewhere else to modify the destination. The Cursor
( ) appears at the new location. Tap to confirm the
destination, or tap to select a different destination.
9. After a short summary of the route parameters, the map appears showing the entire
route. The route is automatically calculated. Tap to modify route
parameters, or tap and start your journey.
38
3.1.2.3 Searching for a Place of Interest by category
You can search for Places of Interest by their categories and subcategories.
1. If you are on the Map screen, tap to return to the Navigation
menu.
2. In the Navigation menu, tap the following buttons: , .
3. Tap .
4. Select the area around which the Place should be searched for:
• Tap to search around the current position or if it is not
available, around the last know position. (The result list will be ordered by the
distance from this position.)
• Tap to search for a place within a selected city/town. (The
result list will be ordered by the distance from the centre of the selected
city/town.)
• Tap to search for a place around the destination of the
active route. (The result list will be ordered by the distance from the destination.)
• Tap to search along the active route, and not around a
given point. This is useful when you search for a later stopover that results in a
minimal detour only, such as searching for upcoming petrol stations or
restaurants. (The result list will be ordered by the length of the necessary
detour.)
5. (optional) If you have selected , select the city/town to search in.
39
6. Select one of the main Place categories (e.g. Accommodation) or tap
to list all Places around the selected location or along the route.
7. Select one of the Place subcategories (e.g. Hotel or Motel) or tap
to list all Places in the selected main category around the selected location or along the
route.
8. Sometimes the list of brands in the selected Place subcategory appears. Select one
brand or tap to list all Places in the selected subcategory around
the selected location or along the route.
9. Finally, the results appear in a list.
10. (optional) The Places in the list are ordered by their distance from the current or last
known position, from the selected city/town, from the destination or by the length of the
necessary detour. If you need to reorder the list, tap .
11. Browse the list if necessary and tap one of the list items. A full screen map appears
with the selected point in the middle. The name and address of the Place is displayed
at the top of the screen.
40
12. (optional) Tap to see the details of the selected Place. Tap
to return to the map.
13. If necessary, tap the map somewhere else to modify the destination. The Cursor
( ) appears at the new location. Tap to confirm the
destination, or tap to select a different destination.
14. After a short summary of the route parameters, the map appears showing the entire
route. The route is automatically calculated. Tap to modify route
parameters, or tap and start your journey.
3.1.2.4 Searching for a Place of Interest by name
You can search for Places of Interest by their names. You can search around different
locations or along your route in the whole Place database or in one Place category or
subcategory only.
1. If you are on the Map screen, tap to return to the Navigation
menu.
2. In the Navigation menu, tap the following buttons: , .
3. Tap .
4. Select the area around which the Place should be searched for:
• Tap to search around the current position or if it is not
available, around the last know position. (The result list will be ordered by the
distance from this position.)
• Tap to search for a place within a selected city/town. (The
result list will be ordered by the distance from the centre of the selected
city/town.)
• Tap to search for a place around the destination of the
active route. (The result list will be ordered by the distance from the destination.)
41
• Tap to search along the active route, and not around a
given point. This is useful when you search for a later stopover that results in a
minimal detour only, such as searching for upcoming petrol stations or
restaurants. (The result list will be ordered by the length of the necessary
detour.)
5. (optional) If you have selected , select the city/town to search in.
6. Select one of the main Place categories (e.g. Accommodation) to search in or tap
to search among all Places.
7. Select one of the Place subcategories (e.g. Hotel or Motel) to search in or tap
to search in the selected Place category.
8. Tap if you have not done it before.
42
9. Using the keyboard, start entering the name of the Place.
10. After entering a few letters, tap to open the list of Places with
names containing the entered character sequence.
11. (optional) The Places in the list are ordered by their distance from the current or last
known position, from the selected city/town, from the destination or by the length of the
necessary detour. If you need to reorder the list, tap .
12. Browse the list if necessary and tap one of the list items. A full screen map appears
with the selected point in the middle. The name and address of the Place is displayed
at the top of the screen.
13. (optional) Tap to see the details of the selected Place. Tap
to return to the map.
14. If necessary, tap the map somewhere else to modify the destination. The Cursor
( ) appears at the new location. Tap to confirm the
destination, or tap to select a different destination.
15. After a short summary of the route parameters, the map appears showing the entire
route. The route is automatically calculated. Tap to modify route
parameters, or tap and start your journey.
43
3.1.2.5 Selecting nearby assistance from 'Where Am I?'
You can quickly search for nearby assistance from the 'Where Am I?' screen.
1. On the Map screen, tap to open the Quick menu.
2. Tap , and then .
3. Preset search categories appear, all for searching around the current position (or
around the last known position if the current position is not available):
• : Car repair and roadside assistance services
• : Medical and emergency services
• : Police stations
• : Petrol stations
4. Tap any of the quick search buttons to get an instant list of that type of Places.
44
5. (optional) The Places in the list are ordered by their distance from the current or last
known position, from the selected city/town, from the destination or by the length of the
necessary detour. If you need to reorder the list, tap .
6. Browse the list if necessary and tap one of the list items. A full screen map appears
with the selected point in the middle. The name and address of the Place is displayed
at the top of the screen.
7. (optional) Tap to see the details of the selected Place. Tap
to return to the map.
8. If necessary, tap the map somewhere else to modify the destination. The Cursor
( ) appears at the new location. Tap to confirm the
destination, or tap to select a different destination.
9. After a short summary of the route parameters, the map appears showing the entire
route. The route is automatically calculated. Tap to modify route
parameters, or tap and start your journey.
45
3.1.3 Selecting a map location as the destination
1. If you are on the Map screen, tap to return to the Navigation
menu.
2. In the Navigation menu, tap the following buttons: , .
3. Locate your destination on the map: move and scale the map as needed.
4. Tap the location that you want to select as your destination. The Cursor ( )
appears there.
5. Tap to select the Cursor as the destination.
6. After a short summary of the route parameters, the map appears showing the entire
route. The route is automatically calculated. Tap to modify route
parameters, or tap and start your journey.
46
3.1.4 Selecting the destination from your Favourites
You can select a location that you have already saved as a Favourite to be your destination.
Adding a location to the list of Favourite destinations is described on page 61.
1. Access the list of Favourites:
• If you are on the Map screen, tap to open the Quick menu.
• If you are in the Navigation menu, tap .
2. Tap . The list of Favourite destinations is displayed.
3. Tap the Favourite that you want to set as your destination. If necessary, browse down
to see more of the list or tap and enter a few letters from the
name of the Favourite destination.
4. A full screen map appears with the selected point in the middle. If necessary, tap the
map somewhere else to modify the destination. The Cursor ( ) appears at the
new location. Tap to confirm the destination, or tap
to select a different destination.
5. After a short summary of the route parameters, the map appears showing the entire
route. The route is automatically calculated. Tap to modify route
parameters, or tap and start your journey.
47
3.1.5 Selecting one of the most likely destinations (Smart History)
The destinations that you have set earlier appear in the History list. Two of those recent
destinations are shown in the Destination menu for easy access. Smart History offers these
locations based on your navigation habits, using parameters like the current time of day, the
day of week, and the current location. The more you use the navigation software, the better it
can guess your desired destination.
1. If you are on the Map screen, tap to return to the Navigation
menu.
2. In the Navigation menu, tap .
3. Tap the or the destination in the History field.
4. A full screen map appears with the selected point in the middle. If necessary, tap the
map somewhere else to modify the destination. The Cursor ( ) appears at the
new location. Tap to confirm the destination, or tap
to select a different destination.
5. After a short summary of the route parameters, the map appears showing the entire
route. The route is automatically calculated. Tap to modify route
parameters, or tap and start your journey.
48
3.1.6 Selecting a recent destination from the History
The destinations that you have set earlier appear in the History.
1. Access the History:
• If you are on the Map screen, tap and then tap .
• If you are in the Navigation menu, tap and then tap
.
2. The list of recent destinations appears. Smart History promotes three destinations to
the first page based on your previous routes (most likely destinations). The rest of the
destinations are ordered by time they were last selected. If necessary, scroll the list to
see earlier destinations.
3. Select a destination from the list.
4. A full screen map appears with the selected point in the middle. If necessary, tap the
map somewhere else to modify the destination. The Cursor ( ) appears at the
new location. Tap to confirm the destination, or tap
to select a different destination.
5. After a short summary of the route parameters, the map appears showing the entire
route. The route is automatically calculated. Tap to modify route
parameters, or tap and start your journey.
49
3.1.7 Entering the coordinate of the destination
You can also select a destination by entering its coordinate. Do as follows:
1. If you are on the Map screen, tap to return to the Navigation
menu.
2. In the Navigation menu, tap .
3. Open the menu and tap .
4. You can enter the latitude and longitude values in any of the following formats: decimal
degrees; degrees and decimal minutes; or degrees, minutes and decimal seconds.
5. (optional) If necessary, tap then and enter
the coordinate in UTM format.
6. When finished, tap .
7. A full screen map appears with the selected point in the middle. If necessary, tap the
map somewhere else to modify the destination. The Cursor ( ) appears at the
new location. Tap to confirm the destination, or tap
to select a different destination.
8. After a short summary of the route parameters, the map appears showing the entire
route. The route is automatically calculated. Tap to modify route
parameters, or tap and start your journey.
50
3.1.8 Navigate to a location stored in a photo
You can also set the location stored in a photo as your destination. Do as follows:
1. In the More menu, tap .
2. The photos stored in the device appear. Select one photo to set its location as the
destination.
3. A full screen map appears with the selected point in the middle. If necessary, tap the
map somewhere else to modify the destination. The Cursor ( ) appears at the
new location. Tap to confirm the destination, or tap
to select a different destination.
4. After a short summary of the route parameters, the map appears showing the entire
route. The route is automatically calculated. Tap to modify route
parameters, or tap and start your journey.
Note!
Only geotagged JPG files contain location information. That is why these kind of
files can only be used in navigation. Other picture files do not appear in the list.
Files must be located on an inserted SD card, either in the root folder or in a
"pictures" folder.
51
3.1.9 Building a route from the list of destinations (Create Route)
You can also build your route destination by destination from the My Route menu.
1. If you are on the Map screen, tap to return to the Navigation
menu.
2. In the Navigation menu, tap .
3. Tap .
4. There is only one line in the list of route points, the start point of the route, normally the
current GPS position.
5. Tap to select the destination.
6. The Destination menu appears and you can select the destination of the route the
same way as described in the previous sections.
7. When the new destination is selected, the list returns.
8. To add more destinations, tap where you want to insert the new route point in
the list, and repeat the above procedure.
52
3.2 Viewing the entire route on the map
It is easy to get a map overview of the active route. Do as follows:
1. If you are on the Map screen, tap to return to the Navigation
menu.
2. In the Navigation menu, tap .
3. Tap . The active route is displayed in its full length on the map
together with additional information and controls.
3.3 Checking route parameters and accessing route related functions
You can check different parameters of the route recommended by iGO primo.
1. If you are on the Map screen, tap to return to the Navigation
menu.
2. In the Navigation menu, tap .
3. The following pieces of information are displayed:
• The name and/or address of the destination.
• Warning icons (if any). They provide extra information about your route (e.g.
unpaved roads or toll roads to be taken).
• The total time of the route.
• The total length of the route.
• Estimated delay calculated from traffic events on your route.
• The symbol of the vehicle type used in route calculation.
• The route planning method (e.g. Fast).
53
4. You have the following options on this screen (for detailed instructions on how to use
them, see the next chapter):
• Tap to edit the route: to add or remove destinations or
change their sequence. You can also set a route start point other than your
current location. This can be useful to plan and save a future trip.
• Tap to display the entire route on the map.
• Tap to bypass a part of the route.
• Tap to delete the active route.
• Tap to open a list with more options like selecting from
route alternatives, changing route parameters, simulating the route, saving the
active route or loading a previously saved route.
• Tap to return to the Navigation menu.
3.4 Modifying the route
When navigation is already started, there are several ways to modify the active route. The
following sections show some of those options.
3.4.1 Selecting a new destination when already having a route: New Route,
Waypoint or Final Destination
If you already have a recommended route and you select a new destination as described in
the above sections, the application will ask you whether to start a new route, add a new
waypoint (intermediate destination) to the route or append the newly selected destination at
the end of the current route.
• Tap to plan a new route to the newly selected location. The previous
destination and waypoint(s) are deleted.
54
• Tap to add the newly selected location as an intermediate destination to your
route. The other destinations of the route remain intact. Note: the new waypoint is
placed among destinations to keep the route optimal. To decide where a waypoint to
appear, use the Edit Route feature.
• Tap to append the newly selected destination at the end of the route. The
other destinations of the route remain intact. The previous final destination is now the
last waypoint.
3.4.2 Setting a new starting position for the route
For normal navigation, all routes are planned from the current position. In order to check
future routes, simulate them or see their length in time and distance, you can turn off the GPS
receiver. Then you can set the starting point of the route to a different location than the
current GPS position.
1. If you are on the Map screen, tap to return to the Navigation
menu.
2. In the Navigation menu, tap .
3. If you already have a route, tap . If you are starting a new route,
tap .
55
4. The first line is the start of the route, normally the current GPS position. Tap and
confirm your action at the warning message.
5. The Destination menu appears and you can select the start point of the route the same
way you select a destination.
6. When the new start point is set, tap .
7. The map returns with a transparent Vehimarker (showing that there is no GPS
reception). If an active route already existed, it is now recalculated starting from the
selected location.
8. To return to normal navigation, tap .
3.4.3 Editing the list of destinations (Edit Route)
You can edit the route by modifying the list of destinations. You can add or remove
destinations, modify the start position or reorder the list.
1. If you are on the Map screen, tap to return to the Navigation
menu.
2. In the Navigation menu, tap .
3. Tap .
56
4. You have the following options:
• Tap to add a new destination.
• Tap to delete a destination.
• Tap to modify the start point of the route.
• Tap to reorder the list. You can do it manually or you can
let the application optimise the route for you.
3.4.4 Pausing the active route
You do not need to pause the active route: when you start driving again, iGO primo restarts
the voice instructions from your position.
3.4.5 Cancelling the active route
To cancel the navigated route, do one of the following:
• If you are on the Map screen, tap and then tap . (If you have a route
with waypoints, you need to tap until all waypoints are deleted.)
• In the Navigation menu, tap and then tap ..
The active route is deleted with all its waypoints.
57
3.4.6 Checking route alternatives when planning the route
You can select from different route alternatives or change the route planning method after you
have selected a new destination. Do as follows:
1. Select a destination as explained earlier, and get to the route confirmation screen.
2. Tap .
3. Tap .
4. You see the basic details of three route alternatives with the selected route planning
method. Tap any of them to see it on the map.
5. Or if you cannot find a good alternative, tap and scroll down for
routes with different routing methods.
6. Select one of the route alternatives and tap to return to the
previous screen. iGO primo recalculates the route. The orange line now shows the new
recommended route.
58
3.4.7 Checking route alternatives for an existing route
To recalculate the active route with a different route planning method, you can modify the
Route settings (page 77). There is another way to do this and to compare different route
alternatives with the same route planning method. Do as follows:
1. If you are on the Map screen, tap to return to the Navigation
menu.
2. In the Navigation menu, tap .
3. Tap .
4. Tap .
5. You see the basic details of three route alternatives with the selected route planning
method. Tap any of them to see it on the map.
6. Or if you cannot find a good alternative, tap and scroll down for
routes with different routing methods.
59
7. Select one of the route alternatives then tap and hold for a few
seconds to return to the Map screen. iGO primo recalculates the route. The orange line
now shows the new recommended route.
3.4.8 Changing the vehicle used in route planning
To recalculate the active route for a different vehicle, do as follows. These changes can also
be made in Settings (page 77).
1. On the Map screen, tap and then tap .
2. Tap and then tap one of the following:
•
•
•
•
•
•
3. iGO primo recalculates the route optimised for the new vehicle type. The orange line
now shows the new recommended route.
60
3.4.9 Changing the road types used in route planning
To recalculate the active route with different road type preferences, do as follows. These
changes can also be made in Settings (page 77).
1. On the Map screen, tap and then tap .
2. Tap any of the listed road types to modify the route. If needed, scroll the list for all road
types. You have the following options (their order depends on the selected vehicle
type):
• - You might need to avoid motorways when you are driving
a slow car or you are towing another vehicle.
• - Charge roads are pay roads where you can purchase a
pass or vignette to use the road for a longer period of time. They can be
enabled or disabled separately from toll roads.
• - iGO primo includes toll roads (pay roads where there is a
per-use charge) in the routes by default. If you disable toll roads, iGO primo
plans the best toll-free route.
• - iGO primo includes ferries in a planned route by default.
However, a map does not necessarily contain information about the accessibility
of temporary ferries. You might also need to pay a fare on ferries.
• - iGO primo excludes unpaved roads by default: unpaved
roads can be in a bad condition and usually you cannot reach the speed limit on
them.
3. The route has already been recalculated. Tap to return to the Map
screen. The orange line now shows the new recommended route.
61
3.5 Saving a location as a Favourite destination
You can add any location to Favourites, the list of frequently used destinations. Planning a
route to one of the Favourite destinations is described on page 46.
1. Select a destination as described before. It can be an address, a Place, any location
on the map, a previously used destination from History, etc.
2. When the full screen map appears with the selected location in the middle, tap
.
3. Tap .
4. (optional) Using the keyboard, you can change the name offered for the Favourite. Tap
to enter numbers or symbols.
5. Tap to save the location as a new Favourite destination.
62
3.5.1 Editing the details of a Favourite destination
You can select a location that you have already saved as a Favourite and edit its details.
Adding a location to the list of Favourite destinations is described on page 61.
1. Access the list of Favourites:
• If you are on the Map screen, tap and then tap .
• If you are in the Navigation menu, tap and then tap
.
2. The list of Favourite destinations is displayed.
3. Tap the Favourite that you want to edit. If necessary, browse down to see more of the
list or tap and enter a few letters from the name of the Favourite
destination.
4. A full screen map appears with the selected point in the middle.
5. Tap to see the details of the selected Place.
6. Tap any of the data fields and modify its content.
7. Tap and hold to return to the map.
63
3.6 Saving a map location as an alert point
You can save any map location as an alert point (for example a speed camera or a railway
crossing).
1. Browse the map and select a location. The red Cursor appears there.
2. Tap .
3. Scroll down the list and tap .
4. On the newly opened screen, select the type of the alert point, the direction from which
you expect the alert, and (if applicable) the speed limit for this alert point.
5. Tap to save the location as a new alert point.
64
3.7 Editing an alert point
You can edit a previously saved or uploaded alert point (for example a speed camera or a
railway crossing).
1. Browse the map and select the alert point to edit. The red circle appears around the
alert point.
2. Tap .
3. Scroll down the list and tap .
4. On the newly opened screen, modify the type of the alert point, the direction from
which you expect the alert, or (if applicable) the speed limit for this alert point.
5. Tap to save the changes to the alert point.
65
3.8 Watching the simulation of the route
You can run a simulated navigation that demonstrates the active route. Do as follows:
1. If you are on the Map screen, tap to return to the Navigation
menu.
2. In the Navigation menu, tap .
3. Tap .
4. Scroll down the list and tap . The simulation starts from the starting
point of the route, and using a realistic speed, it leads you through the whole
recommended route.
1. (optional) You have the following controls during the simulation (the control
buttons disappear after a few seconds but you can open them again if you tap
the map):
• : Jump to the next route event (manoeuvre).
• : Pause the simulation.
66
• : Jump to the previous route event (manoeuvre).
• : Tap to increase the speed of the simulation to 4, 8 or 16 times faster.
Now tap again to return to the normal speed.
2. Tap to stop the simulation.
67
4 Off-road navigation
When first started, iGO primo calculates routes using the road network of the high quality
vector maps provided with the product. You can switch the application to off-road mode in
Navigation settings in one of the following ways:
• From the Main menu, tap , , and
then .
• From the Map screen, tap , and then .
Most of the procedures described for on-road navigation also apply to off-road navigation.
However, there are some that are not available in this navigation mode (for example you
cannot open the itinerary as you have no manoeuvres just route points and straight lines
between them).
4.1 Selecting the destination of the route
Selecting the start point or a destination (waypoint or final destination) is the same as
described at on-road navigation. The only difference is that route points are linked to form a
route with straight lines regardless of the road network and traffic regulations.
4.2 Navigating in off-road mode
The real difference between the on-road and off-road modes is the navigation itself. When
you are on the Map screen with an off-road route:
• your position and heading is not aligned with the nearest road and
• there is no turn by turn navigation just a recommended direction.
You see a orange line drawn between your current position and the next destination to reach.
The Turn Preview field in the top left corner shows a compass with your bearing and the
distance of the next destination.
When you reach a waypoint, the orange line will show the direction to the next destination.
(Future legs of the route are shown with orange lines.)
When you reach the final destination, navigation ends.
68
5 Reference Guide
On the following pages you will find the description of the different concepts and menu
screens of iGO primo.
5.1 Concepts
5.1.1 Smart Zoom
Smart Zoom provides much more than just a usual automatic zoom feature:
• While following a route: when approaching a turn, it will zoom in and raise the view
angle to let you easily recognise your manoeuvre at the next junction. If the next turn is
at a distance, it will zoom out and lower the view angle to be flat so you can see the
road in front of you.
• While driving without an active route: Smart Zoom will zoom in if you drive slowly
and zoom out when you drive at high speed.
5.1.2 Daytime and night colour themes
iGO primo uses different colour themes during the day and during the night for both the map
and the menu screens.
• Daytime colours are similar to paper road maps, and the menus are bright.
• The night colour themes use dark colours for large objects to keep the average
brightness of the screen low.
iGO primo offers different daytime and night colour profiles. It can also switch automatically
between the daytime and the night schemes based on the current time and GPS position a
few minutes before sunrise, when the sky has already turned bright, and a few minutes after
sunset, before it becomes dark.
5.1.3 Tunnel view
When entering a tunnel, the map is replaced with a generic tunnel image so that surface
roads and buildings cannot distract you.
The top-down overview of the tunnel helps you orientate yourself. The remaining distance in
the tunnel is also displayed.
After leaving the tunnel, the original map view returns.
69
This feature can be turned off in Settings (page 83).
5.1.4 Route calculation and recalculation
iGO primo calculates the route based on your preferences:
• Route planning methods:
• : Gives a quick route if you can travel at or near the speed
limit on all roads. Usually the best selection for fast and normal cars.
• : Gives a route that has the smallest total distance of all
possible routes. It can be practical for slow vehicles.
• : Gives a quick but fuel efficient route based on the fuel
consumption data given in Route settings (page 77). Travel cost and CO2
emission calculations are estimations only. They cannot take elevations, curves
and traffic conditions into account.
• : For vehicle types where Green routing is not available, this
method combines the benefits of Fast and Short: iGO primo calculates as if it
were calculating the Fast route, but it takes other roads as well to save fuel.
• : Results in a route with fewer turns and no difficult
manoeuvres. With this option, you can make iGO primo to take, for example, the
motorway instead of a series of smaller roads or streets.
• Vehicle types:
When creating a new vehicle profile, select one of the below vehicle types. Besides
the below mentioned conditions, dimension, weight and freight hazard restrictions
can also be taken into account when planning a route.
• :
• Manoeuvre restrictions and directional constraints are taken into account
when planning a route.
• Roads are used only if access for cars is allowed.
• Private roads and resident-only roads are used only if they are inevitable
to reach the destination.
• Walkways are excluded from routes.
• :
• Manoeuvre restrictions and directional constraints (if they are applied to
bicycles in the map data) are taken into account when planning a route.
• Roads are used only if access for bicycles or pedestrians is allowed.
• Controlled-access roads are excluded from routes.
• A private road is used only if the destination is there.
70
• Speed limits are not used in route calculation and an average cycling
speed is used when calculating the estimated time of arrival.
• :
• All manoeuvres are available in intersections.
• Directional constraints are taken into account the way that opposite
direction is allowed with a low speed.
• A private road is used only if the destination is there.
• Walkways are excluded from routes.
• :
• Manoeuvre restrictions and directional constraints are taken into account
when planning a route.
• Roads are used only if access for buses is allowed.
• Private roads, resident-only roads and walkways are excluded from
routes.
• :
• Manoeuvre restrictions and directional constraints are taken into account
when planning a route.
• Roads are used only if access for taxis is allowed.
• Private roads, resident-only roads and walkways are excluded from
routes.
• :
• Manoeuvre restrictions and directional constraints are taken into account
when planning a route.
• Roads are used only if access for lorries is allowed.
• Private roads, resident-only roads and walkways are excluded from
routes.
• U-turns are excluded from routes (turning back on a divided road is not
considered as a U-turn).
• Road types used or avoided in route calculation:
•
•
•
•
•
71
iGO primo automatically recalculates the route if you deviate from the proposed itinerary.
For further information about Route settings, see page 77.
5.1.5 Green routing
Route calculation is not only about finding the quickest or shortest route. For some of the
vehicle types, you can also check the fuel consumption and CO2 emission when planning a
route, and you can create cost effective routes with less effect on the environment.
In Route settings, you can edit the parameters of the selected vehicle. Enter the fuel
consumption values and the price of the fuel. You can also select whether you want to see
the difference between your route and the green route even if the selected routing method is
not Green.
After the above parameters are set, select as route planning method to
get a fast but also fuel efficient route. Note that travel cost and CO2 emission calculations are
estimations only. They cannot take elevations, turns, curves and traffic conditions into
account. Also, this routing is not meant to give you the "greenest" route of all. It is still
important to travel quickly so the result is a fast route with low fuel consumption and CO2
emission.
With a vehicle type where green routing is selectable, whichever route planning method is
selected, the Green details are also shown when you confirm the route:
If the selected route planning method is not Green, and you have allowed the application to
show the green alternative, the price, fuel consumption and CO2 emission differences
between your selected route and the Green route are also shown on this screen:
Tap the field with these details to switch the route to Green immediately.
5.1.6 Speed limit warning
Maps may contain information about the speed limits of the road segments. iGO primo is able
to warn you if you exceed the current limit. This information may not be available for your
region (ask your local dealer), or may not be fully correct for all roads in the map.
The maximum speed set in the vehicle profile is also used for this warning. iGO primo alerts
you if you exceed the preset value even if the legal speed limit is higher.
Speed warning can be fine-tuned in Sound and Warning settings (page 75).
72
You can set the relative speed above which the application initiates the warning.
The following alert types are available:
• Audio warning: you receive a verbal warning when you exceed the speed limit with the
given percentage.
• Visual warning: the current speed limit is shown on the map when you exceed it (for
example: ).
You can also choose to see the speed limit sign on the map all the time.
5.1.7 GPS position quality indicator and current time
You can find useful information in the top corners of the Navigation menu.
The current time is displayed in the top left corner.
In the top right corner, the GPS reception quality icon shows the current accuracy of the
position information.
Icon Description
iGO primo has no connection to the GPS receiver: GPS navigation
is not possible.
Devices with a built-in GPS receiver are permanently connected.
On such devices, the icon does not appear in normal
circumstances.
iGO primo is connected to the GPS receiver, but the signal is too
weak and the receiver cannot determine the GPS position.
GPS navigation is not possible.
Only a few satellites are received. Position information is available,
but elevation (altitude) cannot be calculated.
GPS navigation is possible, but the position error may be
significant.
Altitude information is available, the position is a 3D position.
GPS navigation is possible.
73
5.2 'More' menu
The 'More' menu provides you with various options and additional applications. Tap the
following buttons: , .
Button Description
You can configure the program settings, and modify the behaviour of
iGO primo. Fine-tune route planning options, change the look of the
Map screen, turn on or off warnings, or restart the Configuration wizard,
etc.
See the next chapter for details.
Visit www.mappy.naviextras.com to get additional content, such as new
maps or 3D landmarks and useful applications.
Access the Picture Viewer application. View the pictures stored on your
device. If coordinates are stored in your photos, you can start navigating
to the place where the selected photo was taken.
Access travel applications: the unit converter helps you convert
between various different international units for temperature, speed,
area or pressure, etc.
Access travel applications: the clothing size converter helps you convert
between various different international size units for men's or women's
cloth types and shoes.
The scientific calculator helps you in all your calculation needs. Tap the
Mode button for additional functions and use the memory to save your
results.
The Fuel consumption monitor helps you keep track of the consumption
of your car even if you do not use navigation for all your journeys. Set
the initial odometer value and then record the distance taken and fuel
filled in whenever you fill your car. You can also set reminders for
regular car maintenance.
Tap this button to see the sunlit and dark areas of the world. Your
current location and route points are marked on the map. Tap the
Details button to see the exact sunrise and sunset times for all your
route points (your current location, all waypoints and the final
destination).
74
If you save your trip logs when you arrive at some of your destinations
or let the application automatically save the trip logs for you, those logs
are all listed here. Tap one of the trips to see the trip statistics, speed
and altitude profile. If track log has also been saved, you can display it
on the map with the selected colour. Track logs can be exported to GPX
files for later use.
Select a country from the list and see useful driving information about
the selected country. Information may include speed limits on different
road types, the maximum blood alcohol level and any compulsory
equipment you need to show when stopped by the police.
Run the Demo and watch sample route simulations to see how
navigation works.
The About section provides you with product information. Read the
Software and Database End User License Agreement, or check the
map and other contents of the application. You can also access
program usage statistics.
5.3 Settings menu
You can configure the program settings, and modify the behaviour of iGO primo. Tap the
following buttons: , , .
The Settings menu has several options. Tap or scroll with your finger to see the full list.
Button Description
The content of the Quick menu (page 19) is fully customisable. Tap
the button you want to change, and select its new function from the
list.
These settings determine how routes will be calculated. Select the
type of vehicle you are driving, the road types used in route planning,
and the route planning method.
If more drivers use iGO primofor navigating, their settings can be
remembered by using one of the user profiles.
75
You can fine-tune the appearance of the Map screen. Adjust the map
view to your needs, choose suitable colour themes from the list for
both daytime and night use, change the blue arrow to a 3D car model,
show or suppress 3D buildings, turn track logging on or off, and
manage you Place visibility sets (which Places to show on the map).
Adjust how the software helps you navigate with different kinds of
route related information on the Map screen.
Display related settings include menu animations and separate skins
for daytime and night use.
These settings allow you to customise the application for your local
language, measurement units, time and date settings and formats, as
well as to choose the time zone.
Trip logs and track logs contain useful information about your trips.
Trip logs can be saved manually when you reach your destination or
you can turn on the automatic saving here.
The application collects usage information and GPS logs that may be
used for improving the application and the quality and coverage of
maps. Here you can enable or disable collecting these logs.
Modify the basic software parameters set during the initial setup
process. For details, see page 7.
Delete all saved data and reset all settings to their factory defaults.
5.3.1 Sound and Warnings
Button Description
This button shows the current voice guidance profile. By tapping the
button, you can select a new profile from the list of available
languages and speakers. Tap any of these to hear a sample voice
prompt. Just tap when you have selected the new
spoken language.
Different voice profiles are capable of different levels of service:
• Natural Voice: These prerecorded sounds can only tell you
basic information about turns and distances.
• TTS Voice: These computed voices can tell you complex
instructions, they can tell you the street names or read out the
system messages for you.
76
Tap this button to adjust the enhanced TTS features. The following
settings are available:
• You can set the feature to read out traffic messages.
• Whenever a route is calculated, the software can read out the
quick summary of the route.
• When you cross country borders, the application can read out
the information about the country you have just entered.
• All system messages can also be announced.
Street names sound correctly only if you use a native voice profile for
the country. You can decide whether the application
• tries to read the street names in a foreign country,
• use road numbers in your language or
• announces the manoeuvre only.
You can also decide whether you want an announcement for distance
manoeuvres or it is enough to receive the information when the turn is
near.
Tap this button to set the verbosity of the voice instructions: how much
they tell and how often they speak.
Maps may contain information about the speed limits of the road
segments. iGO primo is able to warn you if you exceed the current
limit. This information may not be available for your region (ask your
local dealer), or may not be fully correct for all roads in the map.
The maximum speed set in the vehicle profile is also used for this
warning. iGO primo alerts you if you exceed the preset value even if
the legal speed limit is higher.
This setting lets you decide whether you wish to receive visible and/or
audible warnings.
Adjust the slider to set the relative speed above which the application
initiates the warning.
The following alert types are available:
• Audio warning: you receive a verbal warning when you exceed
the speed limit with the given percentage.
• Visual warning: the current speed limit is shown on the map
when you exceed it.
If you prefer to see the speed limit sign on the map all the time
(normally it is shown only if your speed exceeds it), you can set it here.
Maps may contain driver alert information. Tap this button to turn on or
off these warnings and to set the distance from the hazard to receive
the warning at. These can be set individually for the different warning
types.
77
5.3.2 Customise Quick menu
The content of the Quick menu (page 19) is fully customisable. Tap the button you want to
change, and select its new function from the list.
The list of available functions and their descriptions are on page 19.
5.3.3 Route settings
These settings determine how routes will be calculated.
Button Description
You can set the type of vehicle you will use to navigate the route.
Based upon this setting, some of the road types can be excluded from
the route, or some of the restrictions may not be taken into account in
route calculation.
You can edit the parameters of the selected vehicle profile, or you can
even create new vehicle profiles if you tap More.
On-road navigation creates a turn by turn itinerary using the road
network on the map. Switch to off-road navigation to navigate between
destinations in a straight line.
The route calculation can be optimised for different situations and
vehicle types by changing the planning method. See below for details.
If the selected routing method is not Green, you can have your route
compared to the best green alternative on the screen when confirming
the route. If this alternative is much better than the selected method,
you can quickly switch to Green mode.
To let the route fit your needs, you can also set which road types are to be considered for or
to be excluded from the route if possible.
Excluding a road type is a preference. It does not necessarily mean total prohibition. If your
destination can only be accessed using some of the excluded road types, they will be used
but only as much as necessary. In this case a warning icon will be shown on the My Route
screen, and the part of the route not matching your preference will be displayed in a different
colour on the map.
In the list of road types you can see in how many segments and what total length of the road
type is used in the current route.
Button Description
You might need to avoid motorways when you are driving a slow car
or you are towing another vehicle.
Charge roads are pay roads where you can purchase a pass or
vignette to use the road for a longer period of time. They can be
enabled or disabled separately from toll roads.
iGO primo includes toll roads (pay roads where there is a per-use
charge) in the routes by default. If you disable toll roads, iGO primo
plans the best toll-free route.
78
iGO primo includes ferries in a planned route by default. However, a
map does not necessarily contain information about the accessibility of
temporary ferries. You might also need to pay a fare on ferries.
iGO primo excludes unpaved roads by default: unpaved roads can be
in a bad condition and usually you cannot reach the speed limit on
them.
Vehicle profiles:
When you first tap , you see the list of default vehicle profiles. You have
the following options:
Button Description
You can edit the parameters of the vehicle profile.
Tap this button to reveal the below options.
Tap this button to create your own vehicle profile.
Tap this button to reset all vehicle profiles to their default settings.
When creating a new vehicle profile, first you need to select the vehicle type. Then you need
to set the following parameters (some of them may not exist for the selected vehicle type).
You can modify the same parameters when you edit an existing profile:
Button Description
Tap this button to rename the profile for something meaningful.
Enter the average consumption of your vehicle when used in built-up
areas. The unit for consumption can be set in Regional Settings.
Enter the average consumption of your vehicle when used on
highways. The unit for consumption can be set in Regional Settings.
Select the engine and fuel type of your vehicle. This helps in
estimating the CO2 emission.
Enter the average fuel price for travel cost calculation. The currency
can be set in Regional Settings.
Set the maximum speed you travel with the vehicle.
Check this box to enable more settings for the below parameters.
Igo Primo Navigation Software User Manual

More Related Content

Similar to Igo Primo Navigation Software User Manual

Manual instructiuni-pirelli-dpl-10-black
Manual instructiuni-pirelli-dpl-10-blackManual instructiuni-pirelli-dpl-10-black
Manual instructiuni-pirelli-dpl-10-blackQuickmobile
 
Motorola air defense mobile 6.1 user guide
Motorola air defense mobile 6.1 user guideMotorola air defense mobile 6.1 user guide
Motorola air defense mobile 6.1 user guideAdvantec Distribution
 
95763406 atoll-3-1-0-user-manual-lte
95763406 atoll-3-1-0-user-manual-lte95763406 atoll-3-1-0-user-manual-lte
95763406 atoll-3-1-0-user-manual-ltearif budiman
 
Qgis 1.7.0 user-guide_en
Qgis 1.7.0 user-guide_enQgis 1.7.0 user-guide_en
Qgis 1.7.0 user-guide_enxp5000
 
Tap watch 22 user manual-03253d
Tap watch 22 user manual-03253dTap watch 22 user manual-03253d
Tap watch 22 user manual-03253dczimet
 
Motorola air defense mobile 6.1 user guide
Motorola air defense mobile 6.1 user guideMotorola air defense mobile 6.1 user guide
Motorola air defense mobile 6.1 user guideAdvantec Distribution
 
Motorola air defense mobile 6.1 user guide
Motorola air defense mobile 6.1 user guideMotorola air defense mobile 6.1 user guide
Motorola air defense mobile 6.1 user guideAdvantec Distribution
 
What's New in ZW3D 2012 v1.0
What's New in ZW3D 2012 v1.0What's New in ZW3D 2012 v1.0
What's New in ZW3D 2012 v1.0VX
 
Mazda 2013-2014 Navigation Owners Manual
Mazda 2013-2014 Navigation Owners ManualMazda 2013-2014 Navigation Owners Manual
Mazda 2013-2014 Navigation Owners ManualNaples Mazda
 
Gesx a table_ofcontents
Gesx a table_ofcontentsGesx a table_ofcontents
Gesx a table_ofcontentsJorshAlbert
 
Nortel Call Pilot telephone administration guide
Nortel Call Pilot telephone administration guideNortel Call Pilot telephone administration guide
Nortel Call Pilot telephone administration guideClearlines Telephone Co.
 
ZTE Zmax 2 Manual / User Guide
ZTE Zmax 2 Manual / User GuideZTE Zmax 2 Manual / User Guide
ZTE Zmax 2 Manual / User Guidemanualsheet
 

Similar to Igo Primo Navigation Software User Manual (20)

Gemini Manual
Gemini ManualGemini Manual
Gemini Manual
 
Manual instructiuni-pirelli-dpl-10-black
Manual instructiuni-pirelli-dpl-10-blackManual instructiuni-pirelli-dpl-10-black
Manual instructiuni-pirelli-dpl-10-black
 
Motorola air defense mobile 6.1 user guide
Motorola air defense mobile 6.1 user guideMotorola air defense mobile 6.1 user guide
Motorola air defense mobile 6.1 user guide
 
95763406 atoll-3-1-0-user-manual-lte
95763406 atoll-3-1-0-user-manual-lte95763406 atoll-3-1-0-user-manual-lte
95763406 atoll-3-1-0-user-manual-lte
 
Qgis 1.7.0 user-guide_en
Qgis 1.7.0 user-guide_enQgis 1.7.0 user-guide_en
Qgis 1.7.0 user-guide_en
 
Tap watch 22 user manual-03253d
Tap watch 22 user manual-03253dTap watch 22 user manual-03253d
Tap watch 22 user manual-03253d
 
Motorola air defense mobile 6.1 user guide
Motorola air defense mobile 6.1 user guideMotorola air defense mobile 6.1 user guide
Motorola air defense mobile 6.1 user guide
 
Motorola air defense mobile 6.1 user guide
Motorola air defense mobile 6.1 user guideMotorola air defense mobile 6.1 user guide
Motorola air defense mobile 6.1 user guide
 
What's New in ZW3D 2012 v1.0
What's New in ZW3D 2012 v1.0What's New in ZW3D 2012 v1.0
What's New in ZW3D 2012 v1.0
 
Mazda 2013-2014 Navigation Owners Manual
Mazda 2013-2014 Navigation Owners ManualMazda 2013-2014 Navigation Owners Manual
Mazda 2013-2014 Navigation Owners Manual
 
Expert_Programming_manual.pdf
Expert_Programming_manual.pdfExpert_Programming_manual.pdf
Expert_Programming_manual.pdf
 
Joints manual
Joints manualJoints manual
Joints manual
 
By d ui_styleguide_2012_fp35
By d ui_styleguide_2012_fp35By d ui_styleguide_2012_fp35
By d ui_styleguide_2012_fp35
 
Zwcad2011 tutorialbook+
Zwcad2011 tutorialbook+Zwcad2011 tutorialbook+
Zwcad2011 tutorialbook+
 
Sample training manual
Sample training manualSample training manual
Sample training manual
 
Z4 mz6musersguide
Z4 mz6musersguideZ4 mz6musersguide
Z4 mz6musersguide
 
Gesx a table_ofcontents
Gesx a table_ofcontentsGesx a table_ofcontents
Gesx a table_ofcontents
 
Nortel Call Pilot telephone administration guide
Nortel Call Pilot telephone administration guideNortel Call Pilot telephone administration guide
Nortel Call Pilot telephone administration guide
 
Open VAS Manual
Open VAS ManualOpen VAS Manual
Open VAS Manual
 
ZTE Zmax 2 Manual / User Guide
ZTE Zmax 2 Manual / User GuideZTE Zmax 2 Manual / User Guide
ZTE Zmax 2 Manual / User Guide
 

Recently uploaded

(办理学位证)(Rice毕业证)莱斯大学毕业证成绩单修改留信学历认证原版一模一样
(办理学位证)(Rice毕业证)莱斯大学毕业证成绩单修改留信学历认证原版一模一样(办理学位证)(Rice毕业证)莱斯大学毕业证成绩单修改留信学历认证原版一模一样
(办理学位证)(Rice毕业证)莱斯大学毕业证成绩单修改留信学历认证原版一模一样gfghbihg
 
BLUE VEHICLES the kids picture show 2024
BLUE VEHICLES the kids picture show 2024BLUE VEHICLES the kids picture show 2024
BLUE VEHICLES the kids picture show 2024AHOhOops1
 
(办理学位证)墨尔本大学毕业证(Unimelb毕业证书)成绩单留信学历认证原版一模一样
(办理学位证)墨尔本大学毕业证(Unimelb毕业证书)成绩单留信学历认证原版一模一样(办理学位证)墨尔本大学毕业证(Unimelb毕业证书)成绩单留信学历认证原版一模一样
(办理学位证)墨尔本大学毕业证(Unimelb毕业证书)成绩单留信学历认证原版一模一样whjjkkk
 
2024 WRC Hyundai World Rally Team’s i20 N Rally1 Hybrid
2024 WRC Hyundai World Rally Team’s i20 N Rally1 Hybrid2024 WRC Hyundai World Rally Team’s i20 N Rally1 Hybrid
2024 WRC Hyundai World Rally Team’s i20 N Rally1 HybridHyundai Motor Group
 
定制昆士兰大学毕业证(本硕)UQ学位证书原版一比一
定制昆士兰大学毕业证(本硕)UQ学位证书原版一比一定制昆士兰大学毕业证(本硕)UQ学位证书原版一比一
定制昆士兰大学毕业证(本硕)UQ学位证书原版一比一fjjhfuubb
 
UNIT-II-ENGINE AUXILIARY SYSTEMS &TURBOCHARGER
UNIT-II-ENGINE AUXILIARY SYSTEMS &TURBOCHARGERUNIT-II-ENGINE AUXILIARY SYSTEMS &TURBOCHARGER
UNIT-II-ENGINE AUXILIARY SYSTEMS &TURBOCHARGERDineshKumar4165
 
如何办理(UQ毕业证书)昆士兰大学毕业证毕业证成绩单原版一比一
如何办理(UQ毕业证书)昆士兰大学毕业证毕业证成绩单原版一比一如何办理(UQ毕业证书)昆士兰大学毕业证毕业证成绩单原版一比一
如何办理(UQ毕业证书)昆士兰大学毕业证毕业证成绩单原版一比一hnfusn
 
UNIT-1-VEHICLE STRUCTURE AND ENGINES.ppt
UNIT-1-VEHICLE STRUCTURE AND ENGINES.pptUNIT-1-VEHICLE STRUCTURE AND ENGINES.ppt
UNIT-1-VEHICLE STRUCTURE AND ENGINES.pptDineshKumar4165
 
定制(Plymouth文凭证书)普利茅斯大学毕业证毕业证成绩单学历认证原版一比一
定制(Plymouth文凭证书)普利茅斯大学毕业证毕业证成绩单学历认证原版一比一定制(Plymouth文凭证书)普利茅斯大学毕业证毕业证成绩单学历认证原版一比一
定制(Plymouth文凭证书)普利茅斯大学毕业证毕业证成绩单学历认证原版一比一fhhkjh
 
What Could Cause A VW Tiguan's Radiator Fan To Stop Working
What Could Cause A VW Tiguan's Radiator Fan To Stop WorkingWhat Could Cause A VW Tiguan's Radiator Fan To Stop Working
What Could Cause A VW Tiguan's Radiator Fan To Stop WorkingEscondido German Auto
 
VIP Kolkata Call Girl Kasba 👉 8250192130 Available With Room
VIP Kolkata Call Girl Kasba 👉 8250192130  Available With RoomVIP Kolkata Call Girl Kasba 👉 8250192130  Available With Room
VIP Kolkata Call Girl Kasba 👉 8250192130 Available With Roomdivyansh0kumar0
 
UNIT-V-ELECTRIC AND HYBRID VEHICLES.pptx
UNIT-V-ELECTRIC AND HYBRID VEHICLES.pptxUNIT-V-ELECTRIC AND HYBRID VEHICLES.pptx
UNIT-V-ELECTRIC AND HYBRID VEHICLES.pptxDineshKumar4165
 
Call Girls in Karachi | +923081633338 | Karachi Call Girls
Call Girls in Karachi  | +923081633338 | Karachi Call GirlsCall Girls in Karachi  | +923081633338 | Karachi Call Girls
Call Girls in Karachi | +923081633338 | Karachi Call GirlsAyesha Khan
 
办理埃默里大学毕业证Emory毕业证原版一比一
办理埃默里大学毕业证Emory毕业证原版一比一办理埃默里大学毕业证Emory毕业证原版一比一
办理埃默里大学毕业证Emory毕业证原版一比一mkfnjj
 
原版工艺美国普林斯顿大学毕业证Princeton毕业证成绩单修改留信学历认证
原版工艺美国普林斯顿大学毕业证Princeton毕业证成绩单修改留信学历认证原版工艺美国普林斯顿大学毕业证Princeton毕业证成绩单修改留信学历认证
原版工艺美国普林斯顿大学毕业证Princeton毕业证成绩单修改留信学历认证jjrehjwj11gg
 
Russian Call Girls Delhi Indirapuram {9711199171} Aarvi Gupta ✌️Independent ...
Russian  Call Girls Delhi Indirapuram {9711199171} Aarvi Gupta ✌️Independent ...Russian  Call Girls Delhi Indirapuram {9711199171} Aarvi Gupta ✌️Independent ...
Russian Call Girls Delhi Indirapuram {9711199171} Aarvi Gupta ✌️Independent ...shivangimorya083
 
꧁༒☬ 7042364481 (Call Girl) In Dwarka Delhi Escort Service In Delhi Ncr☬༒꧂
꧁༒☬ 7042364481 (Call Girl) In Dwarka Delhi Escort Service In Delhi Ncr☬༒꧂꧁༒☬ 7042364481 (Call Girl) In Dwarka Delhi Escort Service In Delhi Ncr☬༒꧂
꧁༒☬ 7042364481 (Call Girl) In Dwarka Delhi Escort Service In Delhi Ncr☬༒꧂Hot Call Girls In Sector 58 (Noida)
 
John Deere 300 3029 4039 4045 6059 6068 Engine Operation and Service Manual
John Deere 300 3029 4039 4045 6059 6068 Engine Operation and Service ManualJohn Deere 300 3029 4039 4045 6059 6068 Engine Operation and Service Manual
John Deere 300 3029 4039 4045 6059 6068 Engine Operation and Service ManualExcavator
 

Recently uploaded (20)

(办理学位证)(Rice毕业证)莱斯大学毕业证成绩单修改留信学历认证原版一模一样
(办理学位证)(Rice毕业证)莱斯大学毕业证成绩单修改留信学历认证原版一模一样(办理学位证)(Rice毕业证)莱斯大学毕业证成绩单修改留信学历认证原版一模一样
(办理学位证)(Rice毕业证)莱斯大学毕业证成绩单修改留信学历认证原版一模一样
 
BLUE VEHICLES the kids picture show 2024
BLUE VEHICLES the kids picture show 2024BLUE VEHICLES the kids picture show 2024
BLUE VEHICLES the kids picture show 2024
 
(办理学位证)墨尔本大学毕业证(Unimelb毕业证书)成绩单留信学历认证原版一模一样
(办理学位证)墨尔本大学毕业证(Unimelb毕业证书)成绩单留信学历认证原版一模一样(办理学位证)墨尔本大学毕业证(Unimelb毕业证书)成绩单留信学历认证原版一模一样
(办理学位证)墨尔本大学毕业证(Unimelb毕业证书)成绩单留信学历认证原版一模一样
 
2024 WRC Hyundai World Rally Team’s i20 N Rally1 Hybrid
2024 WRC Hyundai World Rally Team’s i20 N Rally1 Hybrid2024 WRC Hyundai World Rally Team’s i20 N Rally1 Hybrid
2024 WRC Hyundai World Rally Team’s i20 N Rally1 Hybrid
 
定制昆士兰大学毕业证(本硕)UQ学位证书原版一比一
定制昆士兰大学毕业证(本硕)UQ学位证书原版一比一定制昆士兰大学毕业证(本硕)UQ学位证书原版一比一
定制昆士兰大学毕业证(本硕)UQ学位证书原版一比一
 
sauth delhi call girls in Connaught Place🔝 9953056974 🔝 escort Service
sauth delhi call girls in  Connaught Place🔝 9953056974 🔝 escort Servicesauth delhi call girls in  Connaught Place🔝 9953056974 🔝 escort Service
sauth delhi call girls in Connaught Place🔝 9953056974 🔝 escort Service
 
UNIT-II-ENGINE AUXILIARY SYSTEMS &TURBOCHARGER
UNIT-II-ENGINE AUXILIARY SYSTEMS &TURBOCHARGERUNIT-II-ENGINE AUXILIARY SYSTEMS &TURBOCHARGER
UNIT-II-ENGINE AUXILIARY SYSTEMS &TURBOCHARGER
 
如何办理(UQ毕业证书)昆士兰大学毕业证毕业证成绩单原版一比一
如何办理(UQ毕业证书)昆士兰大学毕业证毕业证成绩单原版一比一如何办理(UQ毕业证书)昆士兰大学毕业证毕业证成绩单原版一比一
如何办理(UQ毕业证书)昆士兰大学毕业证毕业证成绩单原版一比一
 
Hot Sexy call girls in Pira Garhi🔝 9953056974 🔝 escort Service
Hot Sexy call girls in Pira Garhi🔝 9953056974 🔝 escort ServiceHot Sexy call girls in Pira Garhi🔝 9953056974 🔝 escort Service
Hot Sexy call girls in Pira Garhi🔝 9953056974 🔝 escort Service
 
UNIT-1-VEHICLE STRUCTURE AND ENGINES.ppt
UNIT-1-VEHICLE STRUCTURE AND ENGINES.pptUNIT-1-VEHICLE STRUCTURE AND ENGINES.ppt
UNIT-1-VEHICLE STRUCTURE AND ENGINES.ppt
 
定制(Plymouth文凭证书)普利茅斯大学毕业证毕业证成绩单学历认证原版一比一
定制(Plymouth文凭证书)普利茅斯大学毕业证毕业证成绩单学历认证原版一比一定制(Plymouth文凭证书)普利茅斯大学毕业证毕业证成绩单学历认证原版一比一
定制(Plymouth文凭证书)普利茅斯大学毕业证毕业证成绩单学历认证原版一比一
 
What Could Cause A VW Tiguan's Radiator Fan To Stop Working
What Could Cause A VW Tiguan's Radiator Fan To Stop WorkingWhat Could Cause A VW Tiguan's Radiator Fan To Stop Working
What Could Cause A VW Tiguan's Radiator Fan To Stop Working
 
VIP Kolkata Call Girl Kasba 👉 8250192130 Available With Room
VIP Kolkata Call Girl Kasba 👉 8250192130  Available With RoomVIP Kolkata Call Girl Kasba 👉 8250192130  Available With Room
VIP Kolkata Call Girl Kasba 👉 8250192130 Available With Room
 
UNIT-V-ELECTRIC AND HYBRID VEHICLES.pptx
UNIT-V-ELECTRIC AND HYBRID VEHICLES.pptxUNIT-V-ELECTRIC AND HYBRID VEHICLES.pptx
UNIT-V-ELECTRIC AND HYBRID VEHICLES.pptx
 
Call Girls in Karachi | +923081633338 | Karachi Call Girls
Call Girls in Karachi  | +923081633338 | Karachi Call GirlsCall Girls in Karachi  | +923081633338 | Karachi Call Girls
Call Girls in Karachi | +923081633338 | Karachi Call Girls
 
办理埃默里大学毕业证Emory毕业证原版一比一
办理埃默里大学毕业证Emory毕业证原版一比一办理埃默里大学毕业证Emory毕业证原版一比一
办理埃默里大学毕业证Emory毕业证原版一比一
 
原版工艺美国普林斯顿大学毕业证Princeton毕业证成绩单修改留信学历认证
原版工艺美国普林斯顿大学毕业证Princeton毕业证成绩单修改留信学历认证原版工艺美国普林斯顿大学毕业证Princeton毕业证成绩单修改留信学历认证
原版工艺美国普林斯顿大学毕业证Princeton毕业证成绩单修改留信学历认证
 
Russian Call Girls Delhi Indirapuram {9711199171} Aarvi Gupta ✌️Independent ...
Russian  Call Girls Delhi Indirapuram {9711199171} Aarvi Gupta ✌️Independent ...Russian  Call Girls Delhi Indirapuram {9711199171} Aarvi Gupta ✌️Independent ...
Russian Call Girls Delhi Indirapuram {9711199171} Aarvi Gupta ✌️Independent ...
 
꧁༒☬ 7042364481 (Call Girl) In Dwarka Delhi Escort Service In Delhi Ncr☬༒꧂
꧁༒☬ 7042364481 (Call Girl) In Dwarka Delhi Escort Service In Delhi Ncr☬༒꧂꧁༒☬ 7042364481 (Call Girl) In Dwarka Delhi Escort Service In Delhi Ncr☬༒꧂
꧁༒☬ 7042364481 (Call Girl) In Dwarka Delhi Escort Service In Delhi Ncr☬༒꧂
 
John Deere 300 3029 4039 4045 6059 6068 Engine Operation and Service Manual
John Deere 300 3029 4039 4045 6059 6068 Engine Operation and Service ManualJohn Deere 300 3029 4039 4045 6059 6068 Engine Operation and Service Manual
John Deere 300 3029 4039 4045 6059 6068 Engine Operation and Service Manual
 

Igo Primo Navigation Software User Manual

  • 1. User Manual iGO primo Navigation software for the iGO primo UK English July 2012, ver. 2.0
  • 2. 2 Thank you for choosing the iGO primo as your navigator. Start using iGO primo right away. This document is the detailed description of the navigation software. You can easily discover iGO primo while you are using it; however, we still recommend that you read this manual to fully understand the screens and features.
  • 3. 3 Table of contents 1 Warnings and Safety information .........................................................................6  2 Getting started.........................................................................................................7  2.1 Navigation menu ............................................................................................................8  2.2 Buttons and other controls on the screen.......................................................................9  2.2.1 Using keyboards ................................................................................................................ 10  2.2.2 Beyond single screen tap ................................................................................................... 11  2.3 Map screen...................................................................................................................12  2.3.1 Navigating on the map....................................................................................................... 12  2.3.2 Position markers ................................................................................................................ 14  2.3.2.1 Vehimarker and Lock-on-Road.................................................................................................. 14  2.3.2.2 Selected map location (Cursor) and selected map object .......................................................... 14  2.3.3 Objects on the map ............................................................................................................ 14  2.3.3.1 Streets and roads ....................................................................................................................... 14  2.3.3.2 Turn preview and Next street..................................................................................................... 14  2.3.3.3 Lane information and Signposts................................................................................................. 16  2.3.3.4 Motorway exit services .............................................................................................................. 16  2.3.3.5 3D object types........................................................................................................................... 17  2.3.3.6 Elements of the active route....................................................................................................... 17  2.3.4 Manipulating the map ........................................................................................................ 18  2.3.5 Quick menu........................................................................................................................ 19  2.3.6 Checking the details of the current position (Where Am I?) ............................................. 22  3 On-road navigation...............................................................................................24  3.1 Selecting the destination of a route..............................................................................24  3.1.1 Entering an address or a part of the address....................................................................... 24  3.1.1.1 Entering an address................................................................................................................... 25  3.1.1.2 Entering the midpoint of a street as the destination................................................................... 27  3.1.1.3 Selecting an intersection as the destination ............................................................................... 28  3.1.1.4 Selecting a city/town centre as the destination........................................................................... 30  3.1.1.5 Entering an address with a postal code ..................................................................................... 31  3.1.1.6 Tips on entering addresses quickly ............................................................................................ 33  3.1.2 Selecting the destination from the Places of Interest ......................................................... 34  3.1.2.1 Quick search for a Place of Interest........................................................................................... 34  3.1.2.2 Searching for a Place of Interest using preset categories.......................................................... 36  3.1.2.3 Searching for a Place of Interest by category............................................................................ 38  3.1.2.4 Searching for a Place of Interest by name ................................................................................. 40  3.1.2.5 Selecting nearby assistance from 'Where Am I?' ....................................................................... 43  3.1.3 Selecting a map location as the destination ....................................................................... 45  3.1.4 Selecting the destination from your Favourites ................................................................. 46  3.1.5 Selecting one of the most likely destinations (Smart History)........................................... 47  3.1.6 Selecting a recent destination from the History................................................................. 48 
  • 4. 4 3.1.7 Entering the coordinate of the destination ......................................................................... 49  3.1.8 Navigate to a location stored in a photo............................................................................. 50  3.1.9 Building a route from the list of destinations (Create Route) ............................................ 51  3.2 Viewing the entire route on the map ............................................................................52  3.3 Checking route parameters and accessing route related functions .............................52  3.4 Modifying the route......................................................................................................53  3.4.1 Selecting a new destination when already having a route: New Route, Waypoint or Final Destination.................................................................................................................................... 53  3.4.2 Setting a new starting position for the route ...................................................................... 54  3.4.3 Editing the list of destinations (Edit Route)....................................................................... 55  3.4.4 Pausing the active route..................................................................................................... 56  3.4.5 Cancelling the active route ................................................................................................ 56  3.4.6 Checking route alternatives when planning the route........................................................ 57  3.4.7 Checking route alternatives for an existing route .............................................................. 58  3.4.8 Changing the vehicle used in route planning..................................................................... 59  3.4.9 Changing the road types used in route planning ................................................................ 60  3.5 Saving a location as a Favourite destination...............................................................61  3.5.1 Editing the details of a Favourite destination..................................................................... 62  3.6 Saving a map location as an alert point.......................................................................63  3.7 Editing an alert point...................................................................................................64  3.8 Watching the simulation of the route ...........................................................................65  4 Off-road navigation...............................................................................................67  4.1 Selecting the destination of the route...........................................................................67  4.2 Navigating in off-road mode........................................................................................67  5 Reference Guide ....................................................................................................68  5.1 Concepts.......................................................................................................................68  5.1.1 Smart Zoom ....................................................................................................................... 68  5.1.2 Daytime and night colour themes ...................................................................................... 68  5.1.3 Tunnel view ....................................................................................................................... 68  5.1.4 Route calculation and recalculation................................................................................... 69  5.1.5 Green routing..................................................................................................................... 71  5.1.6 Speed limit warning........................................................................................................... 71  5.1.7 GPS position quality indicator and current time................................................................ 72  5.2 'More' menu..................................................................................................................73  5.3 Settings menu ............................................................................................................... 74  5.3.1 Sound and Warnings.......................................................................................................... 75  5.3.2 Customise Quick menu...................................................................................................... 77  5.3.3 Route settings..................................................................................................................... 77  5.3.4 User profiles....................................................................................................................... 81  5.3.5 Map settings....................................................................................................................... 81  5.3.6 Visual guidance settings .................................................................................................... 83 
  • 5. 5 5.3.7 Display settings.................................................................................................................. 84  5.3.8 Regional settings................................................................................................................ 85  5.3.9 Trip monitor settings.......................................................................................................... 85  5.3.10 Log collection settings..................................................................................................... 86  6 Glossary..................................................................................................................87  7 Copyright note.......................................................................................................89 
  • 6. 6 1 Warnings and Safety information The navigation system helps you find your way to your destination with the built-in GPS receiver. iGO primo does not transmit your GPS position; others cannot track you. If you accept it when first using the application, iGO primo collects usage information and GPS logs that may be used for improving the application and the quality and coverage of maps. The data is processed anonymously; no one will be able to track any personal information. If you change your mind later, you can enable or disable the log collection in Settings (page 86). It is important that you look at the display only when it is safe to do so. If you are the driver of the vehicle, we recommend that you operate iGO primo before you start your journey. Plan the route before your departure and stop if you need to change the route. You must obey the traffic signs and follow the road geometry. If you deviate from the recommended route, iGO primo changes the instructions accordingly. Never place iGO primo where it obstructs the driver's view, where it is in the deployment zone of an airbag or where it might cause injuries in an accident.
  • 7. 7 2 Getting started iGO primo is optimised for in-car use. You can use it easily by tapping the screen buttons and the map with your fingertips. When using the navigation software for the first time, an initial setup process starts automatically. Do as follows: 1. Select the written language of the application interface. Later you can change it in Regional settings (page 85). 2. Read the End User Licence Agreement. Tap to continue. 3. You are now asked whether you allow the software to collect usage information and GPS logs that may be used for improving the application and the quality and coverage of maps. Tap to allow the anonymous statistics or disable this function. Later you can turn them on or off individually in Log collection settings (page 86). 4. Select the language and speaker used for voice guidance messages. Later you can change it in Sound and Warnings settings (page 85). 5. If needed, modify the time format and unit settings. Later you can change them in Regional settings (page 85). 6. If needed, modify the default route planning options. Later you can change them in Route settings (page 77).
  • 8. 8 7. The initial setup is now complete. The Configuration wizard can be restarted later from the Settings menu (page 74). After the initial setup, the Navigation menu appears and you can start using iGO primo. 2.1 Navigation menu You can reach all parts of iGO primo from the Navigation menu. You have the following options: • Tap to select your destination by entering an address or selecting a place of interest, a location on the map or one of your Favourite destinations. You can also look up your recent destinations from the Smart History, enter a coordinate or use the location saved in a photo. • Tap to display the route parameters and the route in its full length on the map. You can also perform route-related actions such as editing or cancelling your route, setting a start point for the route, picking route alternatives, avoiding parts of the route, simulating navigation or adding the destination to your Favourites. • Tap to customise the way the navigation software works, to simulate demo routes or to run some additional applications. • Tap to start navigating on the map. The button itself is a miniature live map that shows your current position, the recommended route and the surrounding map area. Tap the button to enlarge the map to the full screen. • Tap to stop navigation and exit the software.
  • 9. 9 2.2 Buttons and other controls on the screen When you are using iGO primo, you usually tap buttons on the touch screen. You only need to confirm selections or changes if the application needs to restart, it needs to perform a major reconfiguration, or you are about to lose some of your data or settings. Otherwise, iGO primo saves your selections and applies the new settings without confirmation as soon as you use the controls. Type Example Description How to use it Button Tap it to initiate a function, to open a new screen, or to set a parameter. Tap it once. Button with value Some buttons display the current value of a field or setting. Tap the button to change the value. After the change, the new value is shown on the button. Tap it once. Icon Shows status information. Some icons also function as a button. Tap them once. List When you need to select from several options, they appear in a list. Grab the list anywhere and slide your finger up or down. Depending on the speed of the sliding, the list will scroll fast or slow, only a bit or till the end. Alternatively, move between pages with the and buttons and tap the value that you want. Radio button When there are only a few choices, radio buttons may be used instead of lists. Only one value can be selected. Tap one of the buttons to select a new value. Switch When there are only two choices, a checkmark shows whether the feature is enabled. Tap it to turn the switch on or off.
  • 10. 10 Slider When a feature can be set to different values in a range, iGO primo shows an indicator on a gauge that displays and sets the value. • Drag the handle to move the slider to its new position. • Tap the slider where you want the handle to appear; the thumb jumps there. Virtual keyboard Alphabetic and alphanumeric keyboards to enter text and numbers. Each key is a touch screen button. 2.2.1 Using keyboards You only need to enter letters or numbers when you cannot avoid it. You can type with your fingertips on the full-screen keyboards and you can switch between various keyboard layouts, for example English, Greek or numerical. Task Instruction Switching to another keyboard layout, for example from an English keyboard to a Greek keyboard Tap the button and select the new keyboard layout from the list. Correcting your entry on the keyboard Tap to remove the unneeded character(s). Tap and hold the button to delete several characters or the entire input string. Entering a space, for example between a first name and a family name or in multi-word street names Tap the button at the bottom centre of the screen. Entering upper and lower case letters When entering a text, the first character appears in upper case while the rest of the text is in lower case. Tap to enter an upper case letter or tap twice to turn on Caps Lock. Tap again and lower case letters return. Entering numbers and symbols Tap to switch to a keyboard offering numeric and symbol characters. Finalising the keyboard entry (accepting the suggested search result) Tap .
  • 11. 11 Finalising the keyboard entry (opening the list of search results) Tap . Finalising the keyboard entry (saving your input) Tap . Cancelling the keyboard entry (returning to the previous screen) Tap . 2.2.2 Beyond single screen tap You usually need to tap the screen only once. However, some useful features can be accessed with combined touch screen tapping. Those are the following: Action Details Tapping and holding the screen Tap and keep pressing the following buttons to reach extra functions: • Tap and hold on list and menu screens: the Map screen appears. • Tap and hold any of the , , , , , and buttons on the Map screen: you can rotate, tilt or scale the map continuously. • Tap and hold on keyboard screens: you can delete several characters quickly. • Tap and hold or in long lists: you can scroll pages continuously. Gestures (drag&drop) You need to drag and drop the screen only in cases like: • Moving the handle on a slider. • Scrolling the list: grab the list anywhere and slide your finger up or down. Depending on the speed of the sliding, the list will scroll fast or slow, only a bit or till the end. • Moving the map in map browsing mode: grab the map, and move it in the desired direction.
  • 12. 12 2.3 Map screen 2.3.1 Navigating on the map The Map screen is the most frequently used screen of iGO primo. A small live map is displayed on the Navigation menu, as a part of the button. To enlarge this small map and open the Map screen, tap . This map shows the current position (the Vehimarker, a blue arrow by default), the recommended route (an orange line), and the surrounding map area. When there is no GPS position, the Vehimarker is transparent. It shows your last known position. You see coloured dots circling around a satellite symbol in the top left corner. The more green dots you see, the closer you are to get the valid GPS position. When GPS position is available, the Vehimarker is displayed in full colour, now showing your current position. There are screen buttons and data fields on the screen to help you navigate. During navigation, the screen shows route information. The button gives quick access to frequently used functions. You can change the available functions in Settings. By default, only one data field is displayed in the bottom right corner. Tap this field to see all route data fields. Tap any of the data fields to suppress others and display only the selected one.
  • 13. 13 The data fields are different when you are navigating an active route and when you have no specified destination (the orange line is not displayed). Default data fields when cruising without a destination (tap and hold any of the fields to change its value): Field Description Shows your current speed given by the GPS receiver. Shows the speed limit of the current road if the map contains it. Shows the current time corrected with time zone offset. The accurate time comes from the GPS satellites, and the time zone information comes from the map or it can be set manually in Regional settings. (The current time is always displayed in the top left corner of menu screens.) Default data fields when navigating a route (tap and hold any of the fields to change its value): Field Description Shows the distance you need to travel on the route before reaching your final destination. Shows the time needed to reach the final destination of the route based on information available for the remaining segments of the route. The calculation cannot take into account traffic jams and other possible delays. Shows the estimated arrival time at the final destination of the route based on information available for the remaining segments of the route. The calculation cannot take into account traffic jams and other possible delays.
  • 14. 14 2.3.2 Position markers 2.3.2.1 Vehimarker and Lock-on-Road When your GPS position is available, iGO primo marks your current position with the Vehimarker. By default, this marker is a blue arrow, but you can change this icon in Settings. When on-road navigation is selected, the Vehimarker may not show your exact GPS position and heading. If roads are near, it is aligned to the nearest road to suppress GPS position errors, and the direction of the icon is aligned to the direction of the road. If you select off-road navigation: The Vehimarker is at your exact GPS position. The direction of the icon shows your current heading. 2.3.2.2 Selected map location (Cursor) and selected map object You can mark a map location in the following ways: • Tap the map when navigating, • Tap the map when you are asked to confirm the destination at the end of a search, or • Tap the map in Find on Map (page 45) When a map location is selected, the Cursor appears at the selected point on the map. The Cursor is displayed with a radiating red dot ( ) to make it visible at all zoom levels. The location of the Cursor can be used as the destination of the route, a new alert point, you can search for Places around it, or you can save this location as one of your Favourite destinations. You can also select some of the objects on the map. If you tap the map at the icon of a Place of Interest or an alert point, the object will be selected (you see a red circling border around the object), and you can get information about this object or use it as a route point. 2.3.3 Objects on the map 2.3.3.1 Streets and roads iGO primo shows the streets in a way that is similar to how the paper road maps show them. Their width and colours correspond to their importance: you can easily tell a motorway from a small street. 2.3.3.2 Turn preview and Next street When navigating a route, the top section of the Map screen shows information about the next route event (manoeuvre) and the next street or the next city/town.
  • 15. 15 There is a field in the top left corner that displays the next manoeuvre. Both the type of the event (turn, roundabout, exiting motorway, etc.) and its distance from the current position are displayed. A smaller icon shows the type of the second next manoeuvre if it is near the first one. Otherwise, only the next manoeuvre is displayed. Most of these icons are very intuitive. The following table lists some of the frequently shown route events. The same symbols are used in both fields: Icon Description Turn left. Turn right. Turn back. Bear right. Turn sharp left. Keep left. Continue straight in the intersection. Go left on the roundabout, 3rd exit (next manoeuvre). Enter roundabout (second next manoeuvre). Enter motorway. Exit motorway. Board ferry. Leave ferry. Approaching a waypoint.
  • 16. 16 Approaching the destination. 2.3.3.3 Lane information and Signposts When navigating on multilane roads, it is important to take the appropriate lane in order to follow the recommended route. If lane information is available in the map data, iGO primo displays the lanes and their directions using small arrows at the bottom of the map. Highlighted arrows represent the lanes you need to take. Where additional information is available, signposts substitute arrows. Signposts are displayed at the top of the map. The colour and style of the signposts are similar to the real ones you can see above road or by the roadside. They show the available destinations and the number of the road the lane leads to. All signposts look similar when cruising (when there is no recommended route). When navigating a route, only the signpost that points to the lane(s) to be taken is displayed in vivid colours; all others are darker. If you want to hide the currently displayed signposts, tap any of them and the normal Map screen returns until new signpost information is received. 2.3.3.4 Motorway exit services You may need a petrol station or a restaurant during your journey. This feature displays a new button on the map when you are driving on motorways. Tap this button to open a panel with the details of the next few exits or service stations. Tap any of them to display the exit area on the map. You can now easily add this exit as a waypoint to your route if needed. If you want to display other types of Places for the exits, you can change the icons in Visual Guidance settings (page 83).
  • 17. 17 2.3.3.5 3D object types iGO primo supports the following 3D object types: Type Description 3D terrain 3D terrain map data shows changes in terrain, elevations or depressions in the land when you view the map in 2D, and use it to plot the route map in 3D when you navigate. Hills and mountains are shown in the background of the 3D map, and illustrated by colour and shading on the 2D map. Elevated roads Complex intersections and vertically isolated roads (such as overpasses or bridges) are displayed in 3D. 3D landmarks Landmarks are 3D artistic or block representations of prominent or well- known objects. 3D buildings 3D block representation of full city building data containing actual building size and position on the map. 2.3.3.6 Elements of the active route iGO primo shows the route in the following way: Symbol Name Description Current GPS position and Start point Your current position displayed on the map. If roads are near, it is aligned to the nearest road. Normally if GPS position is available, the route starts from the current position. If there is no valid GPS position, iGO primo uses the last known position as the start point. Waypoint (intermediate destination) An intermediate destination of the route before reaching the final destination. Destination (end point) The final destination of the route. Route colour The route always stands out with its colour on the map, both in daytime and in night colour mode. Streets and roads that are excluded from the navigation You can choose whether you want to use or avoid certain road types (page 77). However, when iGO primo cannot avoid such roads, the route will include them and it will show them in a colour that is different from the route colour.
  • 18. 18 2.3.4 Manipulating the map Tap the map anywhere to browse it during navigation. The map stops following the current position (the Vehimarker, a blue arrow by default, is not locked in a fix position on the screen any more) and control buttons appear to help you modify the map view. Action Button(s) Description Moving the map with drag&drop No buttons You can move the map in any direction: tap and hold the map, and move your finger towards the direction you want to move the map. Zooming in and out , Changes how much of the map is displayed on the screen. iGO primo uses high-quality vector maps that let you examine the map at various zoom levels, always with optimised content. It always displays street names and other text with the same font size, never upside-down, and you only see the streets and objects that you need. Map scaling has a limit in 3D map view mode. If you zoom out further, the map switches to 2D view mode. Tap the button once to modify the view in large steps, or tap and hold the button to modify it continuously and smoothly. Tilting up and down , Changes the vertical view angle of the map in 3D mode. Tap the button once to modify the view in large steps, or tap and hold the button to modify it continuously and smoothly. Rotating left and right , Changes the horizontal view angle of the map. Tap the button once to modify the view in large steps, or tap and hold the button to modify it continuously and smoothly. 2D or 3D view , Tap this button to switch between the 3D perspective and 2D top-down map view modes.
  • 19. 19 Compass in 2D map view mode , The direction of the compass shows North. Tap the button to switch to North-up view, and then tap again to rotate the map in the previous direction. Compass in 3D map view mode , The direction of the compass shows North. Tap the button to switch to North-up view, and then tap again to rotate the map in the previous direction. Location information Tap this button to open a new screen with information about the selected map point, the Cursor. Return to normal navigation Tap this button to move the map back to follow the current GPS position. Automatic map rotation is also re-enabled. The map manipulation buttons disappear and navigation continues. Additional options Tap this button to open a list of additional features like saving the Cursor as a Favourite destination, or searching for Places around the Cursor. Select destination Tap this button to select the Cursor as a new destination. The route is automatically calculated. 2.3.5 Quick menu The Quick menu is a selection of controls and functions that are frequently needed during navigation. It can be opened directly from the Map screen by tapping . The menu will close after a few seconds of inactivity or if you tap . Most of these functions are shortcuts. They are accessible from the menu system.
  • 20. 20 There are more functions available than the number of buttons in the menu. In Settings, you can choose the function of each button (page 77). The following options are available: Button Description Shortcut for Open the Quick menu, and tap the Makkah button to open the screen that points in the direction of the Kaaba. This function lets you search for a Place by its name. The search is carried out either along your route or around your current location if there is no route calculated. Find / Find Places / Quick Search (page 34) This button opens the list of your Favourite destinations. Find / Favourite (page 46) This button opens the History list. You can select one of your previous destinations. Find / History (page 48) This button opens the route editing function. My Route / Edit Route This button opens the route related settings. More / Settings / Route Settings (page 77) This button opens the map related settings. More / Settings / Map Settings (page 81) This button opens a special screen with information about the current position and a button to search for nearby emergency or roadside assistance. For details, see the next chapter. Tap the Current Street field on the Map screen This button cancels the route and stops navigation. The button is replaced with the next one if waypoints are given. My Route / Cancel Route (page 56) This button skips the next waypoint from the route. n/a This button opens a 2D map scaled and positioned to show the entire route. My Route / Overview (page 52)
  • 21. 21 This button opens the Visual Guidance settings screen. More / Settings / Visual Guidance (page 83) This button lets you bypass parts of the recommended route. My Route / Avoidances This button opens the Trip Monitor screen where you can manage your previously saved trip logs and track logs. More / Trip Monitor (page 73) This button opens the list of manoeuvres (the itinerary). Tap the top of the Map screen during navigation. With this function you can save the active route for later use. My Route / More / Save Route With this function you can replace the active route with a previously saved route. My Route / More / Load Route With this function you can search for Places of Interest in various different ways. Find / Find Places (page 34) This button opens the Map screen and starts simulating the active route. My Route / More / Simulate Navigation (page 65) This button opens the GPS Information screen with satellite position and signal strength information. Tap the top of the Map screen when there is no GPS reception This button opens the parameters of the selected Vehicle profile. More / Settings / Route (page 77)
  • 22. 22 2.3.6 Checking the details of the current position (Where Am I?) This screen contains information about the current position (or about the last known position if GPS reception is not available) and a button to search for useful Places nearby. . You can access this screen from the map in one of the following ways: • If the current street is displayed below the Vehimarker (the current position on the map), tap it to open the Where Am I? screen. • Open the Quick menu and tap the button. Information on this screen: • , : Latitude and Longitude (coordinate of the current position in WGS84 format). • : Altitude (elevation information coming from the GPS receiver - often inaccurate). • : House number on the left. • : House number on the right. • In the middle of the screen you can see whether the position is current, or the time left since it was last updated. • Address details (when available) of the current position are displayed at the bottom. You can also perform some actions on this screen: Tap to save the current position as a Favourite destination. You can also search for assistance near your current position. Tap to open a new screen for the Quick search:
  • 23. 23 The following services can be searched around the current position or the last known position: • : Car repair and roadside assistance services • : Police stations • : Medical and emergency services • : Petrol stations Tap any of the buttons, select a Place from the list, and navigate to it.
  • 24. 24 3 On-road navigation When first started, iGO primo calculates routes using the road network of the high quality vector maps provided with the product. You can set up your route in different ways: • If you need a route for immediate navigation, you can select the destination and start navigating to it right away (normal navigation). • You can also plan a route independently of your current GPS position or even without GPS reception. To achieve this you need to set a new starting point in My Route / Edit Route by tapping the flag icon at the current position. This will also turn off the GPS receiver so that the route is not recalculated when a new position is received. You can plan routes with multiple destinations. Select the first destination. Then select a second destination and add it to your route to create a multi-point route. You can add as many destinations to your route as you like. You can also use iGO primo for off-road navigation. For details, see page 67. 3.1 Selecting the destination of a route iGO primo offers you several ways of choosing your destination: • Enter a full address or a part of an address, for example a street name without a house number or the names of two intersecting streets (page 24). • Enter an address with postal code (page 31). This way you do not need to select the name of the city/town and the search for street names might be faster as well. • Use a built-in Place of Interest as your destination (page 34). • Select a location on the map with the Find on Map feature (page 45). • Use a previously saved Favourite destination (page 46). • Select a location from the History of previously used destinations (page 48). • Enter the coordinate of the destination (page 49). • Use the location where a photo was taken (page 50). 3.1.1 Entering an address or a part of the address If you know at least a part of the address, it is the quickest way to select the destination of the route. Using the same screen, you can find an address by entering: • the exact address, including house number • the centre of a city/town • an intersection • the midpoint of a street • any of the above, starting the search with the postal code (page 31)
  • 25. 25 3.1.1.1 Entering an address To enter an address as the destination, do as follows: 1. If you are on the Map screen, tap to return to the Navigation menu. 2. In the Navigation menu, tap the following buttons: , . 3. By default, iGO primo proposes the country and city/town where you are. If needed, tap , enter the first few letters of the country name on the keyboard, and select one country from the list of results. 4. If needed, select a new city/town: a. Tap . b. Start entering the name of the city/town on the keyboard. c. Find the city/town you need: • The most likely city/town name is always shown in the input field. To accept it, tap . • If the desired name does not show up, the names that match the string appear in a list after entering a couple of characters (to open the list of results before it appears automatically, tap ). Select the city/town from the list. 5. Enter the street name: a. Tap . b. Start entering the street name on the keyboard. c. Find the street you need:
  • 26. 26 • The most likely street name is always shown in the input field. To accept it, tap . • If the desired name does not show up, the names that match the string appear in a list after entering a couple of characters (to open the list of results before it appears automatically, tap ). Select the street from the list. - 6. Enter the house number: a. Tap . b. Enter the house number on the keyboard. (To enter letters, tap ). c. Tap to finish entering the address. (If the entered house number cannot be found, the midpoint of the street is selected as the destination.) 7. A full screen map appears with the selected point in the middle. If necessary, tap the map somewhere else to modify the destination. The Cursor ( ) appears at the new location. Tap to confirm the destination, or tap to select a different destination. 8. After a short summary of the route parameters, the map appears showing the entire route. The route is automatically calculated. Tap to modify route parameters, or tap and start your journey.
  • 27. 27 Tip! If you know that you will use this destination frequently, before tapping to confirm the destination, put it on the list of your Favourites first: tap then , give a name for the new Favourite, and tap to save the location. The map with the destination returns automatically. Now you can start your journey. 3.1.1.2 Entering the midpoint of a street as the destination You can navigate to the midpoint of a street if the house number is not available: 1. If you are on the Map screen, tap to return to the Navigation menu. 2. In the Navigation menu, tap the following buttons: , . 3. If necessary, modify the country and city/town as described earlier (page 25). 4. Enter the street name: a. Tap . b. Start entering the street name on the keyboard. c. Find the street you need: • The most likely street name is always shown in the input field. To accept it, tap . • If the desired name does not show up, the names that match the string appear in a list after entering a couple of characters (to open the list of results before it appears automatically, tap ). Select the street from the list.
  • 28. 28 5. Instead of entering the house number, tap . The midpoint of the street is selected as the destination. 6. A full screen map appears with the selected point in the middle. If necessary, tap the map somewhere else to modify the destination. The Cursor ( ) appears at the new location. Tap to confirm the destination, or tap to select a different destination. 7. After a short summary of the route parameters, the map appears showing the entire route. The route is automatically calculated. Tap to modify route parameters, or tap and start your journey. 3.1.1.3 Selecting an intersection as the destination To enter an address as the destination, do as follows: 1. If you are on the Map screen, tap to return to the Navigation menu. 2. In the Navigation menu, tap the following buttons: , . 3. If necessary, modify the country and city/town as described earlier (page 25).
  • 29. 29 4. Enter the street name: a. Tap . b. Start entering the street name on the keyboard. c. Find the street you need: • The most likely street name is always shown in the input field. To accept it, tap . • If the desired name does not show up, the names that match the string appear in a list after entering a couple of characters (to open the list of results before it appears automatically, tap ). Select the street from the list. 5. Enter the intersecting street name: 1. Tap . • If only a few intersecting streets exist, their list appears immediately. • In case of a longer street, the keyboard screen appears. Start entering the name of the intersecting street on the keyboard. As soon as the street names that match the entered string can be shown on one screen, their list appears automatically. Select from the list. 6. A full screen map appears with the selected point in the middle. If necessary, tap the map somewhere else to modify the destination. The Cursor ( ) appears at the new location. Tap to confirm the destination, or tap to select a different destination. 7. After a short summary of the route parameters, the map appears showing the entire route. The route is automatically calculated. Tap to modify route parameters, or tap and start your journey.
  • 30. 30 3.1.1.4 Selecting a city/town centre as the destination The city/town centre is not the geometric centre of the city/town but an arbitrary point the map creators have chosen. In towns and villages, it is usually the most important intersection; in larger cities, it is one of the important intersections. 1. If you are on the Map screen, tap to return to the Navigation menu. 2. In the Navigation menu, tap the following buttons: , . 3. If necessary, modify the country as described earlier (page 25). 4. Select the destination city/town: a. Tap . b. Start entering the name of the city/town on the keyboard. c. Find the city/town you need: • The most likely city/town name is always shown in the input field. To accept it, tap . • If the desired name does not show up, the names that match the string appear in a list after entering a couple of characters (to open the list of results before it appears automatically, tap ). Select the city/town from the list. 5. Instead of entering the street name, tap . This way the centre of the displayed city/town becomes the destination of the route.
  • 31. 31 6. A full screen map appears with the selected point in the middle. If necessary, tap the map somewhere else to modify the destination. The Cursor ( ) appears at the new location. Tap to confirm the destination, or tap to select a different destination. 7. After a short summary of the route parameters, the map appears showing the entire route. The route is automatically calculated. Tap to modify route parameters, or tap and start your journey. 3.1.1.5 Entering an address with a postal code All of the above address searching possibilities can be performed with entering the postal code instead of the city/town name. Find below an example with a full address: 1. If you are on the Map screen, tap to return to the Navigation menu. 2. In the Navigation menu, tap the following buttons: , . 3. If necessary, modify the country as described earlier (page 25). 4. Enter a new city/town using its postal code: a. Tap . b. Tap to open the numeric keypad. c. Start entering the postal code. d. Find the city/town you need:
  • 32. 32 • The most likely postal code is always shown in the input field. To accept it, tap . • If the desired number does not show up, open the list of results by tapping . Select the postal code from the list. 5. Enter the street name: a. Tap . b. Start entering the street name on the keyboard. c. Find the street you need: • The most likely street name is always shown in the input field. To accept it, tap . • If the desired name does not show up, the names that match the string appear in a list after entering a couple of characters (to open the list of results before it appears automatically, tap ). Select the street from the list. 6. Enter the house number: a. Tap . b. Enter the house number on the keyboard. (To enter letters, tap ). c. Tap to finish entering the address. (If the entered house number cannot be found, the midpoint of the street is selected as the destination.)
  • 33. 33 7. A full screen map appears with the selected point in the middle. If necessary, tap the map somewhere else to modify the destination. The Cursor ( ) appears at the new location. Tap to confirm the destination, or tap to select a different destination. 8. After a short summary of the route parameters, the map appears showing the entire route. The route is automatically calculated. Tap to modify route parameters, or tap and start your journey. 3.1.1.6 Tips on entering addresses quickly • When you are entering the name of a city/town or a street: • Only those letters are offered on the keyboard that appear in possible search results. All other characters are greyed out. • As you are typing, the most likely result is always displayed in the input field. If the guess is correct, tap to select it. • After entering a couple of letters, tap to list the items that contain the specified letters. • You can speed up finding an intersection: • Search first for the street with a less common or less usual name; fewer letters are enough to find it. • If one of the streets is shorter, search for that one first. You can then find the second one faster. • You can search for both the type and the name of a road. If the same word appears in several names, for example in the name of streets, roads and avenues, you can obtain the result faster if you enter the first letter of the street type: For example, enter 'PI A' to obtain Pine Avenue and skip all Pine Streets and Pickwick Roads.
  • 34. 34 • You can also search in postal codes. As postal codes consist of only a few characters, this is usually faster than entering the name of the city/town. 3.1.2 Selecting the destination from the Places of Interest You can select your destination from the Places of Interest included with iGO primo. Using the same screen, you can find a Place in different ways: • with the Quick search feature, you can quickly find a nearby Place by its name • with the Preset search feature, you can find frequently searched types of Places with only a few screen taps • you can search for a Place by its category • you can search for a Place by its name In addition, you can search for special services from the 'Where Am I?' screen. 3.1.2.1 Quick search for a Place of Interest The Quick search feature lets you quickly find a Place by its name. The search is always carried out • along the recommended route if it exists or • around your current location if there is no destination given. 1. Start the Quick search function: • If you are on the Map screen, tap and then tap . • If you are in the Navigation menu, tap , and then tap . 2. Using the keyboard, start entering the name of the Place. 3. After entering a few letters, tap to open the list of Places with names containing the entered character sequence.
  • 35. 35 4. (optional) The Places in the list are ordered by the length of the necessary detour (when navigating a route) or by their distance from the current position (when no destination is given). If you need to reorder the list, tap . 5. Browse the list if necessary and tap one of the list items. A full screen map appears with the selected point in the middle. The name and address of the Place is displayed at the top of the screen. 6. (optional) Tap to see the details of the selected Place. Tap to return to the map. 7. If necessary, tap the map somewhere else to modify the destination. The Cursor ( ) appears at the new location. Tap to confirm the destination, or tap to select a different destination. 8. After a short summary of the route parameters, the map appears showing the entire route. The route is automatically calculated. Tap to modify route parameters, or tap and start your journey.
  • 36. 36 3.1.2.2 Searching for a Place of Interest using preset categories The Preset search feature lets you quickly find the most frequently selected types of Places. 1. If you are on the Map screen, tap to return to the Navigation menu. 2. In the Navigation menu, tap the following buttons: , . 3. The preset search categories appear: • : • If an active route exists, petrol stations are searched along the route. • If there is no active route (destination is not selected), they are searched around the current position. • If the current position is not available either (no GPS signal), they are searched around the last known position. • : • If an active route exists, parking lots are searched around the destination of the route. • If there is no active route (destination is not selected), they are searched around the current position. • If the current position is not available either (no GPS signal), they are searched around the last known position. • : • If an active route exists, restaurants are searched along the route. • If there is no active route (destination is not selected), they are searched around the current position. • If the current position is not available either (no GPS signal), they are searched around the last known position. • : • If an active route exists, accommodation is searched around the destination of the route.
  • 37. 37 • If there is no active route (destination is not selected), they are searched around the current position. • If the current position is not available either (no GPS signal), they are searched around the last known position. 4. Tap any of the quick search buttons to get an instant list of Places. 5. (optional) The Places in the list are ordered by their distance from the current or last known position, from the destination or by the length of the necessary detour. If you need to reorder the list, tap . 6. Browse the list if necessary and tap one of the list items. A full screen map appears with the selected point in the middle. The name and address of the Place is displayed at the top of the screen. 7. (optional) Tap to see the details of the selected Place. Tap to return to the map. 8. If necessary, tap the map somewhere else to modify the destination. The Cursor ( ) appears at the new location. Tap to confirm the destination, or tap to select a different destination. 9. After a short summary of the route parameters, the map appears showing the entire route. The route is automatically calculated. Tap to modify route parameters, or tap and start your journey.
  • 38. 38 3.1.2.3 Searching for a Place of Interest by category You can search for Places of Interest by their categories and subcategories. 1. If you are on the Map screen, tap to return to the Navigation menu. 2. In the Navigation menu, tap the following buttons: , . 3. Tap . 4. Select the area around which the Place should be searched for: • Tap to search around the current position or if it is not available, around the last know position. (The result list will be ordered by the distance from this position.) • Tap to search for a place within a selected city/town. (The result list will be ordered by the distance from the centre of the selected city/town.) • Tap to search for a place around the destination of the active route. (The result list will be ordered by the distance from the destination.) • Tap to search along the active route, and not around a given point. This is useful when you search for a later stopover that results in a minimal detour only, such as searching for upcoming petrol stations or restaurants. (The result list will be ordered by the length of the necessary detour.) 5. (optional) If you have selected , select the city/town to search in.
  • 39. 39 6. Select one of the main Place categories (e.g. Accommodation) or tap to list all Places around the selected location or along the route. 7. Select one of the Place subcategories (e.g. Hotel or Motel) or tap to list all Places in the selected main category around the selected location or along the route. 8. Sometimes the list of brands in the selected Place subcategory appears. Select one brand or tap to list all Places in the selected subcategory around the selected location or along the route. 9. Finally, the results appear in a list. 10. (optional) The Places in the list are ordered by their distance from the current or last known position, from the selected city/town, from the destination or by the length of the necessary detour. If you need to reorder the list, tap . 11. Browse the list if necessary and tap one of the list items. A full screen map appears with the selected point in the middle. The name and address of the Place is displayed at the top of the screen.
  • 40. 40 12. (optional) Tap to see the details of the selected Place. Tap to return to the map. 13. If necessary, tap the map somewhere else to modify the destination. The Cursor ( ) appears at the new location. Tap to confirm the destination, or tap to select a different destination. 14. After a short summary of the route parameters, the map appears showing the entire route. The route is automatically calculated. Tap to modify route parameters, or tap and start your journey. 3.1.2.4 Searching for a Place of Interest by name You can search for Places of Interest by their names. You can search around different locations or along your route in the whole Place database or in one Place category or subcategory only. 1. If you are on the Map screen, tap to return to the Navigation menu. 2. In the Navigation menu, tap the following buttons: , . 3. Tap . 4. Select the area around which the Place should be searched for: • Tap to search around the current position or if it is not available, around the last know position. (The result list will be ordered by the distance from this position.) • Tap to search for a place within a selected city/town. (The result list will be ordered by the distance from the centre of the selected city/town.) • Tap to search for a place around the destination of the active route. (The result list will be ordered by the distance from the destination.)
  • 41. 41 • Tap to search along the active route, and not around a given point. This is useful when you search for a later stopover that results in a minimal detour only, such as searching for upcoming petrol stations or restaurants. (The result list will be ordered by the length of the necessary detour.) 5. (optional) If you have selected , select the city/town to search in. 6. Select one of the main Place categories (e.g. Accommodation) to search in or tap to search among all Places. 7. Select one of the Place subcategories (e.g. Hotel or Motel) to search in or tap to search in the selected Place category. 8. Tap if you have not done it before.
  • 42. 42 9. Using the keyboard, start entering the name of the Place. 10. After entering a few letters, tap to open the list of Places with names containing the entered character sequence. 11. (optional) The Places in the list are ordered by their distance from the current or last known position, from the selected city/town, from the destination or by the length of the necessary detour. If you need to reorder the list, tap . 12. Browse the list if necessary and tap one of the list items. A full screen map appears with the selected point in the middle. The name and address of the Place is displayed at the top of the screen. 13. (optional) Tap to see the details of the selected Place. Tap to return to the map. 14. If necessary, tap the map somewhere else to modify the destination. The Cursor ( ) appears at the new location. Tap to confirm the destination, or tap to select a different destination. 15. After a short summary of the route parameters, the map appears showing the entire route. The route is automatically calculated. Tap to modify route parameters, or tap and start your journey.
  • 43. 43 3.1.2.5 Selecting nearby assistance from 'Where Am I?' You can quickly search for nearby assistance from the 'Where Am I?' screen. 1. On the Map screen, tap to open the Quick menu. 2. Tap , and then . 3. Preset search categories appear, all for searching around the current position (or around the last known position if the current position is not available): • : Car repair and roadside assistance services • : Medical and emergency services • : Police stations • : Petrol stations 4. Tap any of the quick search buttons to get an instant list of that type of Places.
  • 44. 44 5. (optional) The Places in the list are ordered by their distance from the current or last known position, from the selected city/town, from the destination or by the length of the necessary detour. If you need to reorder the list, tap . 6. Browse the list if necessary and tap one of the list items. A full screen map appears with the selected point in the middle. The name and address of the Place is displayed at the top of the screen. 7. (optional) Tap to see the details of the selected Place. Tap to return to the map. 8. If necessary, tap the map somewhere else to modify the destination. The Cursor ( ) appears at the new location. Tap to confirm the destination, or tap to select a different destination. 9. After a short summary of the route parameters, the map appears showing the entire route. The route is automatically calculated. Tap to modify route parameters, or tap and start your journey.
  • 45. 45 3.1.3 Selecting a map location as the destination 1. If you are on the Map screen, tap to return to the Navigation menu. 2. In the Navigation menu, tap the following buttons: , . 3. Locate your destination on the map: move and scale the map as needed. 4. Tap the location that you want to select as your destination. The Cursor ( ) appears there. 5. Tap to select the Cursor as the destination. 6. After a short summary of the route parameters, the map appears showing the entire route. The route is automatically calculated. Tap to modify route parameters, or tap and start your journey.
  • 46. 46 3.1.4 Selecting the destination from your Favourites You can select a location that you have already saved as a Favourite to be your destination. Adding a location to the list of Favourite destinations is described on page 61. 1. Access the list of Favourites: • If you are on the Map screen, tap to open the Quick menu. • If you are in the Navigation menu, tap . 2. Tap . The list of Favourite destinations is displayed. 3. Tap the Favourite that you want to set as your destination. If necessary, browse down to see more of the list or tap and enter a few letters from the name of the Favourite destination. 4. A full screen map appears with the selected point in the middle. If necessary, tap the map somewhere else to modify the destination. The Cursor ( ) appears at the new location. Tap to confirm the destination, or tap to select a different destination. 5. After a short summary of the route parameters, the map appears showing the entire route. The route is automatically calculated. Tap to modify route parameters, or tap and start your journey.
  • 47. 47 3.1.5 Selecting one of the most likely destinations (Smart History) The destinations that you have set earlier appear in the History list. Two of those recent destinations are shown in the Destination menu for easy access. Smart History offers these locations based on your navigation habits, using parameters like the current time of day, the day of week, and the current location. The more you use the navigation software, the better it can guess your desired destination. 1. If you are on the Map screen, tap to return to the Navigation menu. 2. In the Navigation menu, tap . 3. Tap the or the destination in the History field. 4. A full screen map appears with the selected point in the middle. If necessary, tap the map somewhere else to modify the destination. The Cursor ( ) appears at the new location. Tap to confirm the destination, or tap to select a different destination. 5. After a short summary of the route parameters, the map appears showing the entire route. The route is automatically calculated. Tap to modify route parameters, or tap and start your journey.
  • 48. 48 3.1.6 Selecting a recent destination from the History The destinations that you have set earlier appear in the History. 1. Access the History: • If you are on the Map screen, tap and then tap . • If you are in the Navigation menu, tap and then tap . 2. The list of recent destinations appears. Smart History promotes three destinations to the first page based on your previous routes (most likely destinations). The rest of the destinations are ordered by time they were last selected. If necessary, scroll the list to see earlier destinations. 3. Select a destination from the list. 4. A full screen map appears with the selected point in the middle. If necessary, tap the map somewhere else to modify the destination. The Cursor ( ) appears at the new location. Tap to confirm the destination, or tap to select a different destination. 5. After a short summary of the route parameters, the map appears showing the entire route. The route is automatically calculated. Tap to modify route parameters, or tap and start your journey.
  • 49. 49 3.1.7 Entering the coordinate of the destination You can also select a destination by entering its coordinate. Do as follows: 1. If you are on the Map screen, tap to return to the Navigation menu. 2. In the Navigation menu, tap . 3. Open the menu and tap . 4. You can enter the latitude and longitude values in any of the following formats: decimal degrees; degrees and decimal minutes; or degrees, minutes and decimal seconds. 5. (optional) If necessary, tap then and enter the coordinate in UTM format. 6. When finished, tap . 7. A full screen map appears with the selected point in the middle. If necessary, tap the map somewhere else to modify the destination. The Cursor ( ) appears at the new location. Tap to confirm the destination, or tap to select a different destination. 8. After a short summary of the route parameters, the map appears showing the entire route. The route is automatically calculated. Tap to modify route parameters, or tap and start your journey.
  • 50. 50 3.1.8 Navigate to a location stored in a photo You can also set the location stored in a photo as your destination. Do as follows: 1. In the More menu, tap . 2. The photos stored in the device appear. Select one photo to set its location as the destination. 3. A full screen map appears with the selected point in the middle. If necessary, tap the map somewhere else to modify the destination. The Cursor ( ) appears at the new location. Tap to confirm the destination, or tap to select a different destination. 4. After a short summary of the route parameters, the map appears showing the entire route. The route is automatically calculated. Tap to modify route parameters, or tap and start your journey. Note! Only geotagged JPG files contain location information. That is why these kind of files can only be used in navigation. Other picture files do not appear in the list. Files must be located on an inserted SD card, either in the root folder or in a "pictures" folder.
  • 51. 51 3.1.9 Building a route from the list of destinations (Create Route) You can also build your route destination by destination from the My Route menu. 1. If you are on the Map screen, tap to return to the Navigation menu. 2. In the Navigation menu, tap . 3. Tap . 4. There is only one line in the list of route points, the start point of the route, normally the current GPS position. 5. Tap to select the destination. 6. The Destination menu appears and you can select the destination of the route the same way as described in the previous sections. 7. When the new destination is selected, the list returns. 8. To add more destinations, tap where you want to insert the new route point in the list, and repeat the above procedure.
  • 52. 52 3.2 Viewing the entire route on the map It is easy to get a map overview of the active route. Do as follows: 1. If you are on the Map screen, tap to return to the Navigation menu. 2. In the Navigation menu, tap . 3. Tap . The active route is displayed in its full length on the map together with additional information and controls. 3.3 Checking route parameters and accessing route related functions You can check different parameters of the route recommended by iGO primo. 1. If you are on the Map screen, tap to return to the Navigation menu. 2. In the Navigation menu, tap . 3. The following pieces of information are displayed: • The name and/or address of the destination. • Warning icons (if any). They provide extra information about your route (e.g. unpaved roads or toll roads to be taken). • The total time of the route. • The total length of the route. • Estimated delay calculated from traffic events on your route. • The symbol of the vehicle type used in route calculation. • The route planning method (e.g. Fast).
  • 53. 53 4. You have the following options on this screen (for detailed instructions on how to use them, see the next chapter): • Tap to edit the route: to add or remove destinations or change their sequence. You can also set a route start point other than your current location. This can be useful to plan and save a future trip. • Tap to display the entire route on the map. • Tap to bypass a part of the route. • Tap to delete the active route. • Tap to open a list with more options like selecting from route alternatives, changing route parameters, simulating the route, saving the active route or loading a previously saved route. • Tap to return to the Navigation menu. 3.4 Modifying the route When navigation is already started, there are several ways to modify the active route. The following sections show some of those options. 3.4.1 Selecting a new destination when already having a route: New Route, Waypoint or Final Destination If you already have a recommended route and you select a new destination as described in the above sections, the application will ask you whether to start a new route, add a new waypoint (intermediate destination) to the route or append the newly selected destination at the end of the current route. • Tap to plan a new route to the newly selected location. The previous destination and waypoint(s) are deleted.
  • 54. 54 • Tap to add the newly selected location as an intermediate destination to your route. The other destinations of the route remain intact. Note: the new waypoint is placed among destinations to keep the route optimal. To decide where a waypoint to appear, use the Edit Route feature. • Tap to append the newly selected destination at the end of the route. The other destinations of the route remain intact. The previous final destination is now the last waypoint. 3.4.2 Setting a new starting position for the route For normal navigation, all routes are planned from the current position. In order to check future routes, simulate them or see their length in time and distance, you can turn off the GPS receiver. Then you can set the starting point of the route to a different location than the current GPS position. 1. If you are on the Map screen, tap to return to the Navigation menu. 2. In the Navigation menu, tap . 3. If you already have a route, tap . If you are starting a new route, tap .
  • 55. 55 4. The first line is the start of the route, normally the current GPS position. Tap and confirm your action at the warning message. 5. The Destination menu appears and you can select the start point of the route the same way you select a destination. 6. When the new start point is set, tap . 7. The map returns with a transparent Vehimarker (showing that there is no GPS reception). If an active route already existed, it is now recalculated starting from the selected location. 8. To return to normal navigation, tap . 3.4.3 Editing the list of destinations (Edit Route) You can edit the route by modifying the list of destinations. You can add or remove destinations, modify the start position or reorder the list. 1. If you are on the Map screen, tap to return to the Navigation menu. 2. In the Navigation menu, tap . 3. Tap .
  • 56. 56 4. You have the following options: • Tap to add a new destination. • Tap to delete a destination. • Tap to modify the start point of the route. • Tap to reorder the list. You can do it manually or you can let the application optimise the route for you. 3.4.4 Pausing the active route You do not need to pause the active route: when you start driving again, iGO primo restarts the voice instructions from your position. 3.4.5 Cancelling the active route To cancel the navigated route, do one of the following: • If you are on the Map screen, tap and then tap . (If you have a route with waypoints, you need to tap until all waypoints are deleted.) • In the Navigation menu, tap and then tap .. The active route is deleted with all its waypoints.
  • 57. 57 3.4.6 Checking route alternatives when planning the route You can select from different route alternatives or change the route planning method after you have selected a new destination. Do as follows: 1. Select a destination as explained earlier, and get to the route confirmation screen. 2. Tap . 3. Tap . 4. You see the basic details of three route alternatives with the selected route planning method. Tap any of them to see it on the map. 5. Or if you cannot find a good alternative, tap and scroll down for routes with different routing methods. 6. Select one of the route alternatives and tap to return to the previous screen. iGO primo recalculates the route. The orange line now shows the new recommended route.
  • 58. 58 3.4.7 Checking route alternatives for an existing route To recalculate the active route with a different route planning method, you can modify the Route settings (page 77). There is another way to do this and to compare different route alternatives with the same route planning method. Do as follows: 1. If you are on the Map screen, tap to return to the Navigation menu. 2. In the Navigation menu, tap . 3. Tap . 4. Tap . 5. You see the basic details of three route alternatives with the selected route planning method. Tap any of them to see it on the map. 6. Or if you cannot find a good alternative, tap and scroll down for routes with different routing methods.
  • 59. 59 7. Select one of the route alternatives then tap and hold for a few seconds to return to the Map screen. iGO primo recalculates the route. The orange line now shows the new recommended route. 3.4.8 Changing the vehicle used in route planning To recalculate the active route for a different vehicle, do as follows. These changes can also be made in Settings (page 77). 1. On the Map screen, tap and then tap . 2. Tap and then tap one of the following: • • • • • • 3. iGO primo recalculates the route optimised for the new vehicle type. The orange line now shows the new recommended route.
  • 60. 60 3.4.9 Changing the road types used in route planning To recalculate the active route with different road type preferences, do as follows. These changes can also be made in Settings (page 77). 1. On the Map screen, tap and then tap . 2. Tap any of the listed road types to modify the route. If needed, scroll the list for all road types. You have the following options (their order depends on the selected vehicle type): • - You might need to avoid motorways when you are driving a slow car or you are towing another vehicle. • - Charge roads are pay roads where you can purchase a pass or vignette to use the road for a longer period of time. They can be enabled or disabled separately from toll roads. • - iGO primo includes toll roads (pay roads where there is a per-use charge) in the routes by default. If you disable toll roads, iGO primo plans the best toll-free route. • - iGO primo includes ferries in a planned route by default. However, a map does not necessarily contain information about the accessibility of temporary ferries. You might also need to pay a fare on ferries. • - iGO primo excludes unpaved roads by default: unpaved roads can be in a bad condition and usually you cannot reach the speed limit on them. 3. The route has already been recalculated. Tap to return to the Map screen. The orange line now shows the new recommended route.
  • 61. 61 3.5 Saving a location as a Favourite destination You can add any location to Favourites, the list of frequently used destinations. Planning a route to one of the Favourite destinations is described on page 46. 1. Select a destination as described before. It can be an address, a Place, any location on the map, a previously used destination from History, etc. 2. When the full screen map appears with the selected location in the middle, tap . 3. Tap . 4. (optional) Using the keyboard, you can change the name offered for the Favourite. Tap to enter numbers or symbols. 5. Tap to save the location as a new Favourite destination.
  • 62. 62 3.5.1 Editing the details of a Favourite destination You can select a location that you have already saved as a Favourite and edit its details. Adding a location to the list of Favourite destinations is described on page 61. 1. Access the list of Favourites: • If you are on the Map screen, tap and then tap . • If you are in the Navigation menu, tap and then tap . 2. The list of Favourite destinations is displayed. 3. Tap the Favourite that you want to edit. If necessary, browse down to see more of the list or tap and enter a few letters from the name of the Favourite destination. 4. A full screen map appears with the selected point in the middle. 5. Tap to see the details of the selected Place. 6. Tap any of the data fields and modify its content. 7. Tap and hold to return to the map.
  • 63. 63 3.6 Saving a map location as an alert point You can save any map location as an alert point (for example a speed camera or a railway crossing). 1. Browse the map and select a location. The red Cursor appears there. 2. Tap . 3. Scroll down the list and tap . 4. On the newly opened screen, select the type of the alert point, the direction from which you expect the alert, and (if applicable) the speed limit for this alert point. 5. Tap to save the location as a new alert point.
  • 64. 64 3.7 Editing an alert point You can edit a previously saved or uploaded alert point (for example a speed camera or a railway crossing). 1. Browse the map and select the alert point to edit. The red circle appears around the alert point. 2. Tap . 3. Scroll down the list and tap . 4. On the newly opened screen, modify the type of the alert point, the direction from which you expect the alert, or (if applicable) the speed limit for this alert point. 5. Tap to save the changes to the alert point.
  • 65. 65 3.8 Watching the simulation of the route You can run a simulated navigation that demonstrates the active route. Do as follows: 1. If you are on the Map screen, tap to return to the Navigation menu. 2. In the Navigation menu, tap . 3. Tap . 4. Scroll down the list and tap . The simulation starts from the starting point of the route, and using a realistic speed, it leads you through the whole recommended route. 1. (optional) You have the following controls during the simulation (the control buttons disappear after a few seconds but you can open them again if you tap the map): • : Jump to the next route event (manoeuvre). • : Pause the simulation.
  • 66. 66 • : Jump to the previous route event (manoeuvre). • : Tap to increase the speed of the simulation to 4, 8 or 16 times faster. Now tap again to return to the normal speed. 2. Tap to stop the simulation.
  • 67. 67 4 Off-road navigation When first started, iGO primo calculates routes using the road network of the high quality vector maps provided with the product. You can switch the application to off-road mode in Navigation settings in one of the following ways: • From the Main menu, tap , , and then . • From the Map screen, tap , and then . Most of the procedures described for on-road navigation also apply to off-road navigation. However, there are some that are not available in this navigation mode (for example you cannot open the itinerary as you have no manoeuvres just route points and straight lines between them). 4.1 Selecting the destination of the route Selecting the start point or a destination (waypoint or final destination) is the same as described at on-road navigation. The only difference is that route points are linked to form a route with straight lines regardless of the road network and traffic regulations. 4.2 Navigating in off-road mode The real difference between the on-road and off-road modes is the navigation itself. When you are on the Map screen with an off-road route: • your position and heading is not aligned with the nearest road and • there is no turn by turn navigation just a recommended direction. You see a orange line drawn between your current position and the next destination to reach. The Turn Preview field in the top left corner shows a compass with your bearing and the distance of the next destination. When you reach a waypoint, the orange line will show the direction to the next destination. (Future legs of the route are shown with orange lines.) When you reach the final destination, navigation ends.
  • 68. 68 5 Reference Guide On the following pages you will find the description of the different concepts and menu screens of iGO primo. 5.1 Concepts 5.1.1 Smart Zoom Smart Zoom provides much more than just a usual automatic zoom feature: • While following a route: when approaching a turn, it will zoom in and raise the view angle to let you easily recognise your manoeuvre at the next junction. If the next turn is at a distance, it will zoom out and lower the view angle to be flat so you can see the road in front of you. • While driving without an active route: Smart Zoom will zoom in if you drive slowly and zoom out when you drive at high speed. 5.1.2 Daytime and night colour themes iGO primo uses different colour themes during the day and during the night for both the map and the menu screens. • Daytime colours are similar to paper road maps, and the menus are bright. • The night colour themes use dark colours for large objects to keep the average brightness of the screen low. iGO primo offers different daytime and night colour profiles. It can also switch automatically between the daytime and the night schemes based on the current time and GPS position a few minutes before sunrise, when the sky has already turned bright, and a few minutes after sunset, before it becomes dark. 5.1.3 Tunnel view When entering a tunnel, the map is replaced with a generic tunnel image so that surface roads and buildings cannot distract you. The top-down overview of the tunnel helps you orientate yourself. The remaining distance in the tunnel is also displayed. After leaving the tunnel, the original map view returns.
  • 69. 69 This feature can be turned off in Settings (page 83). 5.1.4 Route calculation and recalculation iGO primo calculates the route based on your preferences: • Route planning methods: • : Gives a quick route if you can travel at or near the speed limit on all roads. Usually the best selection for fast and normal cars. • : Gives a route that has the smallest total distance of all possible routes. It can be practical for slow vehicles. • : Gives a quick but fuel efficient route based on the fuel consumption data given in Route settings (page 77). Travel cost and CO2 emission calculations are estimations only. They cannot take elevations, curves and traffic conditions into account. • : For vehicle types where Green routing is not available, this method combines the benefits of Fast and Short: iGO primo calculates as if it were calculating the Fast route, but it takes other roads as well to save fuel. • : Results in a route with fewer turns and no difficult manoeuvres. With this option, you can make iGO primo to take, for example, the motorway instead of a series of smaller roads or streets. • Vehicle types: When creating a new vehicle profile, select one of the below vehicle types. Besides the below mentioned conditions, dimension, weight and freight hazard restrictions can also be taken into account when planning a route. • : • Manoeuvre restrictions and directional constraints are taken into account when planning a route. • Roads are used only if access for cars is allowed. • Private roads and resident-only roads are used only if they are inevitable to reach the destination. • Walkways are excluded from routes. • : • Manoeuvre restrictions and directional constraints (if they are applied to bicycles in the map data) are taken into account when planning a route. • Roads are used only if access for bicycles or pedestrians is allowed. • Controlled-access roads are excluded from routes. • A private road is used only if the destination is there.
  • 70. 70 • Speed limits are not used in route calculation and an average cycling speed is used when calculating the estimated time of arrival. • : • All manoeuvres are available in intersections. • Directional constraints are taken into account the way that opposite direction is allowed with a low speed. • A private road is used only if the destination is there. • Walkways are excluded from routes. • : • Manoeuvre restrictions and directional constraints are taken into account when planning a route. • Roads are used only if access for buses is allowed. • Private roads, resident-only roads and walkways are excluded from routes. • : • Manoeuvre restrictions and directional constraints are taken into account when planning a route. • Roads are used only if access for taxis is allowed. • Private roads, resident-only roads and walkways are excluded from routes. • : • Manoeuvre restrictions and directional constraints are taken into account when planning a route. • Roads are used only if access for lorries is allowed. • Private roads, resident-only roads and walkways are excluded from routes. • U-turns are excluded from routes (turning back on a divided road is not considered as a U-turn). • Road types used or avoided in route calculation: • • • • •
  • 71. 71 iGO primo automatically recalculates the route if you deviate from the proposed itinerary. For further information about Route settings, see page 77. 5.1.5 Green routing Route calculation is not only about finding the quickest or shortest route. For some of the vehicle types, you can also check the fuel consumption and CO2 emission when planning a route, and you can create cost effective routes with less effect on the environment. In Route settings, you can edit the parameters of the selected vehicle. Enter the fuel consumption values and the price of the fuel. You can also select whether you want to see the difference between your route and the green route even if the selected routing method is not Green. After the above parameters are set, select as route planning method to get a fast but also fuel efficient route. Note that travel cost and CO2 emission calculations are estimations only. They cannot take elevations, turns, curves and traffic conditions into account. Also, this routing is not meant to give you the "greenest" route of all. It is still important to travel quickly so the result is a fast route with low fuel consumption and CO2 emission. With a vehicle type where green routing is selectable, whichever route planning method is selected, the Green details are also shown when you confirm the route: If the selected route planning method is not Green, and you have allowed the application to show the green alternative, the price, fuel consumption and CO2 emission differences between your selected route and the Green route are also shown on this screen: Tap the field with these details to switch the route to Green immediately. 5.1.6 Speed limit warning Maps may contain information about the speed limits of the road segments. iGO primo is able to warn you if you exceed the current limit. This information may not be available for your region (ask your local dealer), or may not be fully correct for all roads in the map. The maximum speed set in the vehicle profile is also used for this warning. iGO primo alerts you if you exceed the preset value even if the legal speed limit is higher. Speed warning can be fine-tuned in Sound and Warning settings (page 75).
  • 72. 72 You can set the relative speed above which the application initiates the warning. The following alert types are available: • Audio warning: you receive a verbal warning when you exceed the speed limit with the given percentage. • Visual warning: the current speed limit is shown on the map when you exceed it (for example: ). You can also choose to see the speed limit sign on the map all the time. 5.1.7 GPS position quality indicator and current time You can find useful information in the top corners of the Navigation menu. The current time is displayed in the top left corner. In the top right corner, the GPS reception quality icon shows the current accuracy of the position information. Icon Description iGO primo has no connection to the GPS receiver: GPS navigation is not possible. Devices with a built-in GPS receiver are permanently connected. On such devices, the icon does not appear in normal circumstances. iGO primo is connected to the GPS receiver, but the signal is too weak and the receiver cannot determine the GPS position. GPS navigation is not possible. Only a few satellites are received. Position information is available, but elevation (altitude) cannot be calculated. GPS navigation is possible, but the position error may be significant. Altitude information is available, the position is a 3D position. GPS navigation is possible.
  • 73. 73 5.2 'More' menu The 'More' menu provides you with various options and additional applications. Tap the following buttons: , . Button Description You can configure the program settings, and modify the behaviour of iGO primo. Fine-tune route planning options, change the look of the Map screen, turn on or off warnings, or restart the Configuration wizard, etc. See the next chapter for details. Visit www.mappy.naviextras.com to get additional content, such as new maps or 3D landmarks and useful applications. Access the Picture Viewer application. View the pictures stored on your device. If coordinates are stored in your photos, you can start navigating to the place where the selected photo was taken. Access travel applications: the unit converter helps you convert between various different international units for temperature, speed, area or pressure, etc. Access travel applications: the clothing size converter helps you convert between various different international size units for men's or women's cloth types and shoes. The scientific calculator helps you in all your calculation needs. Tap the Mode button for additional functions and use the memory to save your results. The Fuel consumption monitor helps you keep track of the consumption of your car even if you do not use navigation for all your journeys. Set the initial odometer value and then record the distance taken and fuel filled in whenever you fill your car. You can also set reminders for regular car maintenance. Tap this button to see the sunlit and dark areas of the world. Your current location and route points are marked on the map. Tap the Details button to see the exact sunrise and sunset times for all your route points (your current location, all waypoints and the final destination).
  • 74. 74 If you save your trip logs when you arrive at some of your destinations or let the application automatically save the trip logs for you, those logs are all listed here. Tap one of the trips to see the trip statistics, speed and altitude profile. If track log has also been saved, you can display it on the map with the selected colour. Track logs can be exported to GPX files for later use. Select a country from the list and see useful driving information about the selected country. Information may include speed limits on different road types, the maximum blood alcohol level and any compulsory equipment you need to show when stopped by the police. Run the Demo and watch sample route simulations to see how navigation works. The About section provides you with product information. Read the Software and Database End User License Agreement, or check the map and other contents of the application. You can also access program usage statistics. 5.3 Settings menu You can configure the program settings, and modify the behaviour of iGO primo. Tap the following buttons: , , . The Settings menu has several options. Tap or scroll with your finger to see the full list. Button Description The content of the Quick menu (page 19) is fully customisable. Tap the button you want to change, and select its new function from the list. These settings determine how routes will be calculated. Select the type of vehicle you are driving, the road types used in route planning, and the route planning method. If more drivers use iGO primofor navigating, their settings can be remembered by using one of the user profiles.
  • 75. 75 You can fine-tune the appearance of the Map screen. Adjust the map view to your needs, choose suitable colour themes from the list for both daytime and night use, change the blue arrow to a 3D car model, show or suppress 3D buildings, turn track logging on or off, and manage you Place visibility sets (which Places to show on the map). Adjust how the software helps you navigate with different kinds of route related information on the Map screen. Display related settings include menu animations and separate skins for daytime and night use. These settings allow you to customise the application for your local language, measurement units, time and date settings and formats, as well as to choose the time zone. Trip logs and track logs contain useful information about your trips. Trip logs can be saved manually when you reach your destination or you can turn on the automatic saving here. The application collects usage information and GPS logs that may be used for improving the application and the quality and coverage of maps. Here you can enable or disable collecting these logs. Modify the basic software parameters set during the initial setup process. For details, see page 7. Delete all saved data and reset all settings to their factory defaults. 5.3.1 Sound and Warnings Button Description This button shows the current voice guidance profile. By tapping the button, you can select a new profile from the list of available languages and speakers. Tap any of these to hear a sample voice prompt. Just tap when you have selected the new spoken language. Different voice profiles are capable of different levels of service: • Natural Voice: These prerecorded sounds can only tell you basic information about turns and distances. • TTS Voice: These computed voices can tell you complex instructions, they can tell you the street names or read out the system messages for you.
  • 76. 76 Tap this button to adjust the enhanced TTS features. The following settings are available: • You can set the feature to read out traffic messages. • Whenever a route is calculated, the software can read out the quick summary of the route. • When you cross country borders, the application can read out the information about the country you have just entered. • All system messages can also be announced. Street names sound correctly only if you use a native voice profile for the country. You can decide whether the application • tries to read the street names in a foreign country, • use road numbers in your language or • announces the manoeuvre only. You can also decide whether you want an announcement for distance manoeuvres or it is enough to receive the information when the turn is near. Tap this button to set the verbosity of the voice instructions: how much they tell and how often they speak. Maps may contain information about the speed limits of the road segments. iGO primo is able to warn you if you exceed the current limit. This information may not be available for your region (ask your local dealer), or may not be fully correct for all roads in the map. The maximum speed set in the vehicle profile is also used for this warning. iGO primo alerts you if you exceed the preset value even if the legal speed limit is higher. This setting lets you decide whether you wish to receive visible and/or audible warnings. Adjust the slider to set the relative speed above which the application initiates the warning. The following alert types are available: • Audio warning: you receive a verbal warning when you exceed the speed limit with the given percentage. • Visual warning: the current speed limit is shown on the map when you exceed it. If you prefer to see the speed limit sign on the map all the time (normally it is shown only if your speed exceeds it), you can set it here. Maps may contain driver alert information. Tap this button to turn on or off these warnings and to set the distance from the hazard to receive the warning at. These can be set individually for the different warning types.
  • 77. 77 5.3.2 Customise Quick menu The content of the Quick menu (page 19) is fully customisable. Tap the button you want to change, and select its new function from the list. The list of available functions and their descriptions are on page 19. 5.3.3 Route settings These settings determine how routes will be calculated. Button Description You can set the type of vehicle you will use to navigate the route. Based upon this setting, some of the road types can be excluded from the route, or some of the restrictions may not be taken into account in route calculation. You can edit the parameters of the selected vehicle profile, or you can even create new vehicle profiles if you tap More. On-road navigation creates a turn by turn itinerary using the road network on the map. Switch to off-road navigation to navigate between destinations in a straight line. The route calculation can be optimised for different situations and vehicle types by changing the planning method. See below for details. If the selected routing method is not Green, you can have your route compared to the best green alternative on the screen when confirming the route. If this alternative is much better than the selected method, you can quickly switch to Green mode. To let the route fit your needs, you can also set which road types are to be considered for or to be excluded from the route if possible. Excluding a road type is a preference. It does not necessarily mean total prohibition. If your destination can only be accessed using some of the excluded road types, they will be used but only as much as necessary. In this case a warning icon will be shown on the My Route screen, and the part of the route not matching your preference will be displayed in a different colour on the map. In the list of road types you can see in how many segments and what total length of the road type is used in the current route. Button Description You might need to avoid motorways when you are driving a slow car or you are towing another vehicle. Charge roads are pay roads where you can purchase a pass or vignette to use the road for a longer period of time. They can be enabled or disabled separately from toll roads. iGO primo includes toll roads (pay roads where there is a per-use charge) in the routes by default. If you disable toll roads, iGO primo plans the best toll-free route.
  • 78. 78 iGO primo includes ferries in a planned route by default. However, a map does not necessarily contain information about the accessibility of temporary ferries. You might also need to pay a fare on ferries. iGO primo excludes unpaved roads by default: unpaved roads can be in a bad condition and usually you cannot reach the speed limit on them. Vehicle profiles: When you first tap , you see the list of default vehicle profiles. You have the following options: Button Description You can edit the parameters of the vehicle profile. Tap this button to reveal the below options. Tap this button to create your own vehicle profile. Tap this button to reset all vehicle profiles to their default settings. When creating a new vehicle profile, first you need to select the vehicle type. Then you need to set the following parameters (some of them may not exist for the selected vehicle type). You can modify the same parameters when you edit an existing profile: Button Description Tap this button to rename the profile for something meaningful. Enter the average consumption of your vehicle when used in built-up areas. The unit for consumption can be set in Regional Settings. Enter the average consumption of your vehicle when used on highways. The unit for consumption can be set in Regional Settings. Select the engine and fuel type of your vehicle. This helps in estimating the CO2 emission. Enter the average fuel price for travel cost calculation. The currency can be set in Regional Settings. Set the maximum speed you travel with the vehicle. Check this box to enable more settings for the below parameters.