2
Precautions during use
Thedescription of the models given in this manual is based on the specifications at the time of writing. This manual covers all
existing functions for the models described. Whether or not they are fitted depends on the equipment model, options selected
and the country where it is sold. This manual may also contain information about functions to be introduced later in the year.
Precautions when operating the system
–
Operate the controls and read the information on the screen only when road conditions allow.
– Set the volume to a reasonable level so that outside noise can be heard.
Precautions regarding navigation
– Use of the navigation system does not in any way replace the responsibility or vigilance of the driver when driving the vehi-
cle.
– Depending on the geographical area, the map on the SD card may not have the latest information on new roads. Be alert.
In all cases, Road Traffic Regulations and road signs always take precedence over the directions of the navigation system.
Precautions concerning the equipment
– Do not attempt to dismantle or modify the system, as there is a risk of damage to equipment and fire.
– Contact a representative of the manufacturer in the event of malfunction and for all operations involving disassembly.
– Do not insert foreign objects or a damaged or dirty SD card into the reader.
– Allows clean your screen with a microfibre cloth or a soft, moistened cloth.
– Use an SD card which is suitable for your navigation system.
It is essential to follow the precautions below when using the system, both in the interest of safety and to prevent material damage.
You must always comply with the laws of the country in which you are travelling.
4.
3
Note: after movinga long distance
without driving (ferry, rail freight), the
system may take several minutes to
adjust before retuning to normal opera-
tion.
The digital map
The digital map contains the road maps
and town maps that the system re-
quires. This is found on the SD card.
LIVE services
These include road safety alerts, HD
Traffic™, local search and weather. At
the end of a 3-month trial period, you
can extend your subscription online
via TomTom HOME™ (please see the
“System Update” chapter).
Note: these services require a sub-
scription, and use an inaccessible SIM
card integrated into the navigation
system.
When these services are available in
your country, the LIVE Services icon
will be displayed on the browser screen.
The navigation system
The navigation system calculates your
position and guides you using data:
– vehicle speed and information from
the gyro (measuring the vehicle di-
rection);
– the digital map;
– the GPS receiver;
– of Z.E. Services (on electric vehicles
only);
– of LIVE Services on subscription.
Note: when using the vehicle for the
first time, the speed information and the
gyro will be undergoing final calibration.
The system may therefore lack accu-
racy in terms of locations until around
30 miles have been travelled, turning
round 40 sharp corners.
The GPS receiver
The navigation system uses GPS satel-
lites (Global Positioning System) orbit-
ing around Earth.
The GPS receiver receives signals
transmitted from several satellites. The
system can then locate the position of
the vehicle.
Z.E. Services
Z.E. Services provide you with infor-
mation regarding the availability of re-
charging stations for your electric vehi-
cle.
The system also informs you when your
destination cannot be reached at your
battery level.
Navigation assistance
function
The system suggests a route to your
chosen destination using:
– its road map (on the SD card);
– the positioning sensors which esti-
mate your location even if the GPS
signals are lost;
– information from the traffic informa-
tion service (depending on country);
– road safety information (speeding
warning, speed limit zone);
– at HD Traffic™, LIVE Services sub-
scription.
Finally, it indicates the route to take,
step by step, using the display screen
and voice messages.
GENERAL DESCRIPTION (1/2)
5.
4
16:30
1.3 Marc Bloch
Avenuedu Golf
Avenue Léon
Marc Bloch
Avenue du Golf
Avenue Léon
4.5km
6:52
300
metres
6:47
LW 10245 66 RDS-AF 26°C
A2/E35 Utrecht
14
km
30
B
A
C
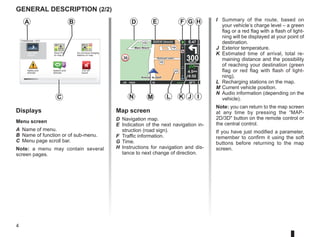
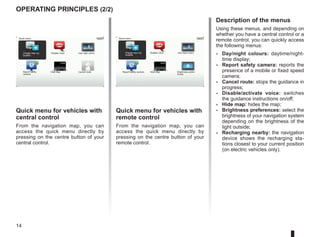
Displays
Menu screen
A Name of menu.
B Name of function or of sub-menu.
C Menu page scroll bar.
Note: a menu may contain several
screen pages.
Map screen
D Navigation map.
E Indication of the next navigation in-
struction (road sign).
F Traffic information.
G Time.
H Instructions for navigation and dis-
tance to next change of direction.
I Summary of the route, based on
your vehicle’s charge level – a green
flag or a red flag with a flash of light-
ning will be displayed at your point of
destination.
J Exterior temperature.
K Estimated time of arrival, total re-
maining distance and the possibility
of reaching your destination (green
flag or red flag with flash of light-
ning).
L Recharging stations on the map.
M Current vehicle position.
N Audio information (depending on the
vehicle).
Note: you can return to the map screen
at any time by pressing the “MAP-
2D/3D button on the remote control or
the central control.
If you have just modified a parameter,
remember to confirm it using the soft
buttons before returning to the map
screen.
D E
N M K I
GENERAL DESCRIPTION (2/2)
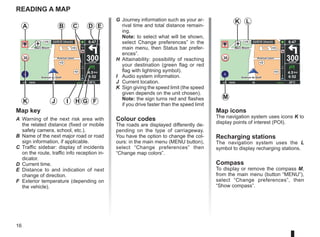
Safety pref-
erences
Speech pref-
erences
Turn off
sound
Do not show charging
stations on map
Preferences 1 of 5
Use night
colours
Show POI
on map
F G H
L J
6.
5
Function
1 Soft buttonsSelect and confirm
2 INFO/ROUTE
Accessing traffic information (short press);
Accessing the route summary (long press,
during guidance)/Accessing the attainability informa-
tion (long press, not during guidance, on electric ve-
hicles only).
3
Rotation, switch
and press
Rotate:
– move vertically and horizontally through the menus;
– modify the scale (ZOOM mode).
Shift (up, down, right, left):
– move vertically or horizontally through the menus;
– move around the map.
Press:
– confirm;
– display the quick menu.
5 MENU/SET
Access the full navigation system menu (short press)/
the system settings (long press).
6 LIGHT/DARK
Change the brightness of the screen (short press)
or activate the standby screen to hide the map (long
press).
7 REPEAT/MUTE
Repeat the instruction (short press), deactivate the
voice guidance (long press).
8 DEST/HOME
Access the “Navigate to...” menu (short press), navi-
gate to your home (long press).
9 MAP-2D/3D
From a menu: displays the map
From the map: switches the map to 2D/3D mode.
10 BACK Back to previous screen.
introduction to the controls (1/2)
Central control
BACK
MAP
2D/3D
INFO
ROUTE
DEST
HOME
MENU
SET
REPEAT
MUTE
LIGHT
DARK
BACK
1 1 2
3
5
6
7
8
9
10
Note: depending on the vehicle, the
system has either a central control
or a remote control.
7.
6
introduction to thecontrols (2/2)
Function
1 Soft buttons Select and confirm
4 Remote control
Shift (up, down, right, left):
– move vertically or horizontally through the menu;
– move around the map.
Press the central button:
– confirm;
– displays the quick menu.
5 MENU Accesses the full navigation system menu.
9 MAP-2D/3D
From a menu: displays the map
From the map: switches the map to 2D/3D mode.
10 BACK Back to previous screen.
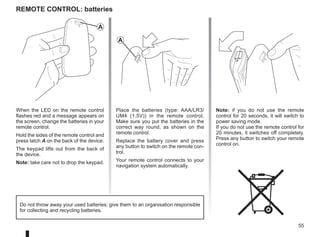
LED A on the remote control flashes
once your navigation system is con-
nected to it. To replace the batteries,
refer to the section entitled “Remote
control: batteries”.
Note: to connect your remote con-
trol more quickly, press one of the
remote control buttons when the
system starts, before the legal no-
tices appear.
Note: the remote control unit does
not have press and hold functions.
Remote control
Store the remote control in its hous-
ing, away from sunlight, to ensure
the batteries are not damaged.
A
4
1
5
1
10
9
Note: depending on the vehicle, the
system has either a central control
or a remote control.
8.
7
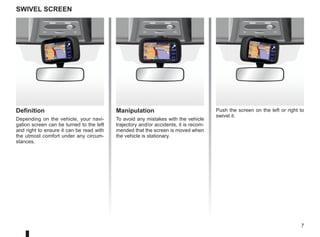
Definition
Depending on thevehicle, your navi-
gation screen can be turned to the left
and right to ensure it can be read with
the utmost comfort under any circum-
stances.
swivel screen
Manipulation
To avoid any mistakes with the vehicle
trajectory and/or accidents, it is recom-
mended that the screen is moved when
the vehicle is stationary.
Push the screen on the left or right to
swivel it.
9.
8
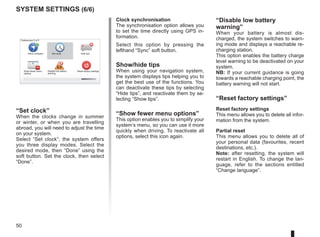
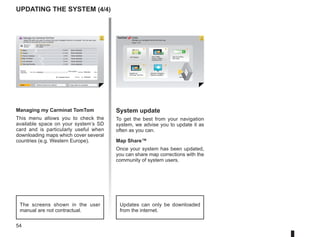
To update yoursystem and your map,
refer to the section entitled “System
update” in this document.
SD card
An SD card is supplied with the navi-
gation system. It includes, among other
things, a map of your country or group
of countries.
Map and recharging station (for electric
vehicles) updates are regularly issued.
They are only available for download
by inserting your navigation system’s
SD card into your computer and con-
necting to the Internet.
Once your new vehicle has been de-
livered, you will have a maximum of
60 days in which to update the map for
free. Once this time has elapsed, you
will need to pay for updates.
SD card: use, initialisation (1/2)
Only use your SD card for operat-
ing and updating your navigation
system. Do not insert any other
device (camera, portable GPS,
etc.), or in another vehicle.
Remember to back up the data on
the SD card regularly. Refer to the
section entitled “System update” in
your user manual.
Only use an SD card which is com-
patible with your vehicle's naviga-
tion system.
You can also download maps cover-
ing more countries than your origi-
nal map (e.g. Western Europe).
Léon
Léon
300
metres
6:47
RDS-AF 26°C
echt
14
km
4.5 km
6:52
10.
9
Léon
Léon
300
metres
6:47
RDS-AF 26°C
echt
14
km
4.5 km
6:52
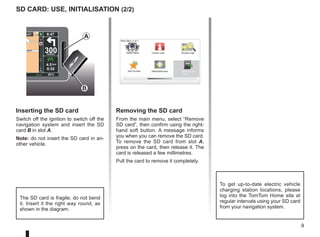
SDcard: use, initialisation (2/2)
Inserting the SD card
Switch off the ignition to switch off the
navigation system and insert the SD
card B in slot A.
Note: do not insert the SD card in an-
other vehicle.
The SD card is fragile; do not bend
it. Insert it the right way round, as
shown in the diagram.
Removing the SD card
From the main menu, select “Remove
SD card”, then confirm using the right-
hand soft button. A message informs
you when you can remove the SD card.
To remove the SD card from slot A,
press on the card, then release it. The
card is released a few millimetres.
Pull the card to remove it completely.
A
Main Menu 2 of 3
Cancel route
Add Favorite Remove SD
card
Browse map
Safety Alerts
Reachable area
B
To get up-to-date electric vehicle
charging station locations, please
log into the TomTom Home site at
regular intervals using your SD card
from your navigation system.
11.
10
Switching on/off
Switching on
Themultimedia system switches on au-
tomatically when the ignition is switched
on.
In other cases, press the On/Off button
on your audio system.
Press the On/Off button on your audio
system to make the multimedia system
run for an extra 20 minutes.
Switching off
With the ignition off, the system is deac-
tivated automatically when the driver’s
door is opened.
With the ignition on, press the On/Off
button on your audio system.
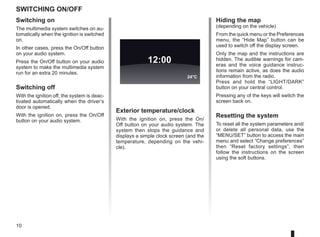
Exterior temperature/clock
With the ignition on, press the On/
Off button on your audio system. The
system then stops the guidance and
displays a simple clock screen (and the
temperature, depending on the vehi-
cle).
12:00
24°C
Hiding the map
(depending on the vehicle)
From the quick menu or the Preferences
menu, the “Hide Map” button can be
used to switch off the display screen.
Only the map and the instructions are
hidden. The audible warnings for cam-
eras and the voice guidance instruc-
tions remain active, as does the audio
information from the radio.
Press and hold the “LIGHT/DARK”
button on your central control.
Pressing any of the keys will switch the
screen back on.
Resetting the system
To reset all the system parameters and/
or delete all personal data, use the
“MENU/SET” button to access the main
menu and select “Change preferences”
then “Reset factory settings”, then
follow the instructions on the screen
using the soft buttons.
12.
11
16:30
Guided tours (1/2)
Yournavigation system offers you tuto-
rials so that you can quickly become fa-
miliar with the different functions.
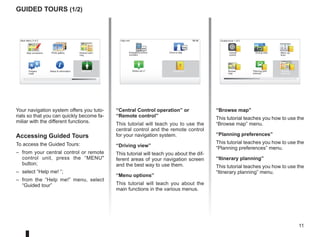
Accessing Guided Tours
To access the Guided Tours:
– from your central control or remote
control unit, press the “MENU
button;
– select “Help me! ”;
– from the “Help me!” menu, select
“Guided tour”
“Central Control operation” or
“Remote control”
This tutorial will teach you to use the
central control and the remote control
for your navigation system.
“Driving view”
This tutorial will teach you about the dif-
ferent areas of your navigation screen
and the best way to use them.
“Menu options”
This tutorial will teach you about the
main functions in the various menus.
“Browse map”
This tutorial teaches you how to use the
“Browse map” menu.
“Planning preferences”
This tutorial teaches you how to use the
“Planning preferences” menu.
“Itinerary planning”
This tutorial teaches you how to use the
“Itinerary planning” menu.
15:15
A B
Main Menu 3 of 3
Photo gallery
Map corrections
Status Information
Prepare
route
Guided tours 1 of 2
Central
control
Driving view Menu op-
tions
Browse
map
Itinerary
planning
Planning pref-
erences
Itinerary plan-
ning
Help me!
15:15
sos
sos
?
?
Emergency phone
numbers
Drive to help
Where am I?
Help me!
Guided tour
13.
12
LIVE
“Traffic information”
This tutorialteaches you how to use the
“Traffic info” menu.
“Warnings and notifications”
This tutorial teaches you about the dif-
ferent notices and information which
appear on the navigation screen.
“Quick menu”
This tutorial teaches you how to use the
“Quick menu” menu.
Guided tours (2/2)
Guided tours 2 of 2
Traffic infor-
mation
Quick menu
Warnings and
notifications
TomTom HOME LIVE serv-
ices
“TomTom HOME”
This tutorial teaches you how to use the
“TomTom HOME™” application.
“LIVE services”
This tutorial teaches you how to use the
“LIVE services” menu.
« Electric vehicle »
This tutorial will teach you about the
special features of your Carminat
TomTom relating to an electric vehicle.
“Z.E. Services”
This tutorial details the “Z.E. Services”.
To access the Guidfed Tours for your
Z.E. Services:
– from your central control or remote
control unit, press the “MENU
button;
– select “Z.E. Services”;
– from the “Z.E. Services” menu,
select “Guided tour”
Please refer to the “Z.E. Services” sec-
tion in your Driver’s Handbook.
LIVE
RENAULT
Z E
Main Menu 1 of 3
Navigate to... Find alternative HD Traffic
Change pref-
erences
LIVE services Z.E. Services
Current position:
Search by avail-
ability
Guided tour
Z.E. Services
Activate
Electric
vehicle
14.
13
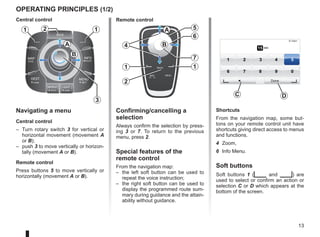
Navigating a menu
Centralcontrol
– Turn rotary switch 3 for vertical or
horizontal movement (movement A
or B);
– push 3 to move vertically or horizon-
tally (movement A or B).
Remote control
Press buttons 5 to move vertically or
horizontally (movement A or B).
operating principles (1/2)
Shortcuts
From the navigation map, some but-
tons on your remote control unit have
shortcuts giving direct access to menus
and functions.
4 Zoom,
6 Info Menu.
Soft buttons
Soft buttons 1 (ṅ and Ṅ) are
used to select or confirm an action or
selection C or D which appears at the
bottom of the screen.
BACK
MAP
2D/3D
INFO
ROUTE
DEST
HOME
MENU
SET
REPEAT
MUTE
LIGHT
DARK
BACK
B
A
1 1
2
3
5
4
6
7
1
2
1
A
B 15 sec
9:13am
1 2 3 4 5
6 7 8 9 0
Done
D
C
Confirming/cancelling a
selection
Always confirm the selection by press-
ing 3 or 7. To return to the previous
menu, press 2.
Special features of the
remote control
From the navigation map:
– the left soft button can be used to
repeat the voice instruction;
– the right soft button can be used to
display the programmed route sum-
mary during guidance and the attain-
ability without guidance.
Central control Remote control
15.
14
operating principles (2/2)
Quickmenu for vehicles with
central control
From the navigation map, you can
access the quick menu directly by
pressing on the centre button of your
central control.
Quick menu for vehicles with
remote control
From the navigation map, you can
access the quick menu directly by
pressing on the centre button of your
remote control.
Description of the menus
Using these menus, and depending on
whether you have a central control or a
remote control, you can quickly access
the following menus:
- Day/night colours: daytime/night-
time display;
- Report safety camera: reports the
presence of a mobile or fixed speed
camera;
- Cancel route: stops the guidance in
progress;
- Disable/activate voice: switches
the guidance instructions on/off;
- Hide map: hides the map;
- Brightness preferences: select the
brightness of your navigation system
depending on the brightness of the
light outside;
- Recharging nearby: the navigation
device shows the recharging sta-
tions closest to your current position
(on electric vehicles only).
Quick menu
Disable voice Use night colors
Hide Map
Report safety
camera
Charge near my
location
Cancel route
Quick menu
Charge near my
location
Disable voice Use night colors
Hide Map
Report safety camera Brightness prefer-
ences
16.
15
15:15
16:30
1.3
Volume and VOICE
Volume
Changingthe volume
To change the volume, use the audio
system volume control during a voice
instruction. If the instruction is too quick,
you can repeat it using the “REPEAT/
MUTE” button on your central control
unit, or use the left soft button on your
remote control.
Deactivating the sound
To deactivate sounds, select “Change
preferences” from the main menu, then
“Turn off sound”.
To turn the sound back on, select the
“Turn on sound” heading.
Deactivating the voice
From the central control, press
“REPEAT/MUTE” (long press) or select
the “Change preferences” menu, then
“Disable voice”.
NB: from the remote control and central
control, select “Disable voice” from the
quick menu.
Selecting a voice
Your system allows you to select either
a synthesised or human voice. This
voice is used to give the voice instruc-
tions. To change the voice used on your
navigation system, go to the main menu
and select “Change preferences”, then
“Voice preferences” and “Change
voice”. Select a voice from the list.
Synthesised voices
Synthesised voices are generated by
your navigation system. They give you
verbal instructions while you are driv-
ing. They can give road directions,
(e.g.: turn right), traffic sign information,
etc.
Recorded human voices
The human voices are recorded by an
actor or actress.
Note: the human voices only give you
simplified guidance instructions.
Safety pref-
erences
Speech pref-
erences
Turn off
sound
Do not show charging
stations on map
Speech preferences
Change voice
Speech preferences
Disable voice
Preferences 1 of 5
Use night
colors
Show POI
on map
17.
16
Marc Bloch
Avenue duGolf
Avenue Léon
Marc Bloch
Avenue du Golf
Avenue Léon
300
metres
6:47
LW 10245 66 RDS-AF 26°C
A2/E35 Utrecht
14
km
30
4.5 km
6:52
Marc Bloch
Avenue du Golf
Avenue Léon
Marc Bloch
Avenue du Golf
Avenue Léon
300
metres
6:47
LW 10245 66 RDS-AF 26°C
A2/E35 Utrecht
14
km
30
4.5 km
6:52
reading a map
Map key
A Warning of the next risk area with
the related distance (fixed or mobile
safety camera, school, etc.).
B Name of the next major road or road
sign information, if applicable.
C Traffic sidebar: display of incidents
on the route, traffic info reception in-
dicator.
D Current time.
E Distance to and indication of next
change of direction.
F Exterior temperature (depending on
the vehicle).
A
F
I
J
Map icons
The navigation system uses icons K to
display points of interest (POI).
Recharging stations
The navigation system uses the L
symbol to display recharging stations.
Compass
To display or remove the compass M,
from the main menu (button “MENU”),
select “Change preferences”, then
“Show compass”.
B D E
G
K
C
G Journey information such as your ar-
rival time and total distance remain-
ing.
Note: to select what will be shown,
select Change preferences” in the
main menu, then Status bar prefer-
ences”.
H Attainability: possibility of reaching
your destination (green flag or red
flag with lightning symbol).
I Audio system information.
J Current location.
K Sign giving the speed limit (the speed
given depends on the unit chosen).
Note: the sign turns red and flashes
if you drive faster than the speed limit
Colour codes
The roads are displayed differently de-
pending on the type of carriageway.
You have the option to change the col-
ours: in the main menu (MENU button),
select “Change preferences” then
“Change map colors”.
M
K L
H
18.
17
LIVE
RENAULT
Z E
entering adestination (1/5)
“Navigate to...” menu
Press the “MENU button to access the
Navigate to...” menu.
The “Navigate to...” menu offers you
several ways to enter a destination:
– enter an address from the “Address”
section using one of the following
methods:
– entering a full address (City and
street);
– searching by “Zip Code”;
– selecting a “City center”;
– select a “Crossing or intersec-
tion”;
– select a “Home”;
– select an address from the “Favorite”
section;
– select a destination from the loca-
tions in “Recent destination”;
– select an address from the “Point of
Interest” (POI);
– select a “Point on map”;
– select a “Latitude” or a “Longitude”;
– selecting a destination by recharging
station (electric vehicle).
Entering a “New address”
This section allows you to enter all
or part of the address: country, town,
street and number.
Note: only addresses known to the
system through the digital map are au-
thorised.
At the time of the first use:
– choose the country of destination;
– enter the name of the required town/
city using the cursor 3.
The system may suggest several town
names in the area 1.
– Press button Done to confirm the un-
derlined town/city.
– Access the full list corresponding to
your search by selecting 2 arrow to
the right of the list.
– Select the desired town/city and con-
firm.
– Do the same actions for the “Street”
and “Number” fields.
Note: The system will store the last
towns/cities entered in its memory. You
may directly select one of these by
pressing the 1 zone.
Main Menu 1 of 3
Navigate to... Find alternative HD Traffic
Change pref-
erences
LIVE services Z.E. Services
Current position:
France
Vers
Vers (Haute-Savoie)
Vers (Lot)
Ville :
123
A B C D E F G H I
J
J K
K L
L M
M N
N O
O P
P Q
Q R
R
S T U V W X Y Z
X
Formation
3, passage
Mongallet
Fontenay S/
2
Done
1
3
19.
18
Navigate to... 1of 2
entering a destination (2/5)
“Home”
This section allows you to navigate to
your home and you can activate it from
the central control by pressing and
holding the “DEST/HOME” button.
To store the address of your home lo-
cation, use “Preferences” menu, then
“Change Home location”.
“Favorite”
The “Favorite” section contains the fa-
vourite stored destinations and favour-
ites such as your place of work.
“Recent destination”
This item enables you to select a des-
tination from the list of addresses last
used. These are automatically stored.
In the main menu, select the heading
“Navigate to...” and then “Recent des-
tination”.
From the list of stored destinations,
select an address then confirm this ad-
dress as the destination.
– In the main menu, select the heading
“Navigate to...”.
– Select “Favorite” and confirm.
– Select the required destination ad-
dress in the list of stored addresses.
– Confirm.
You can manage your favourites in
the “Preferences” menu, then select
“Manage Favorites”.
Note: the “Favorite” icon will be greyed
out if you have not entered a destina-
tion.
Home Favorite Address
Recent
destina-
tion
Navigate to... 1 of 2
Home Favorite Address
Recent
destina-
tion
Home Favorite Address
Recent
destina-
tion
Charging
station
Local Search
Navigate to... 1 of 2
Charging
station
Charging
station
Local Search
Local Search
20.
19
entering a destination(3/5)
Note: personal recharging stations
are stored in the navigation system,
whereas the generic list of recharging
stations is stored on the SD card. Only
the list on the SD card can be updated.
And only personal recharging stations
can be managed from the navigation
system.
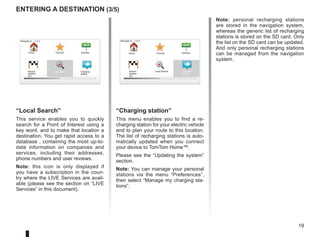
“Local Search”
This service enables you to quickly
search for a Point of Interest using a
key word, and to make that location a
destination. You get rapid access to a
database , containing the most up-to-
date information on companies and
services, including their addresses,
phone numbers and user reviews.
Note: this icon is only displayed if
you have a subscription in the coun-
try where the LIVE Services are avail-
able (please see the section on “LIVE
Services” in this document).
Navigate to... 1 of 2
Home Favorite Address
Recent
destina-
tion
Navigate to... 1 of 2
Home Favorite Address
Recent
destina-
tion
Charging
station
Local Search Charging
station
Local Search
“Charging station”
This menu enables you to find a re-
charging station for your electric vehicle
and to plan your route to this location.
The list of recharging stations is auto-
matically updated when you connect
your device to TomTom Home™.
Please see the “Updating the system”
section.
Note: You can manage your personal
stations via the menu “Preferences”,
then select “Manage my charging sta-
tions”.
21.
20
entering a destination(4/5)
Search by POI name
Enter the name of a POI you wish to
find; the system searches for it auto-
matically.
Search by POI category
Select your desired category type.
Select the search area: “POI near you”,
“POI in city” or “POI near Home”.
Enter a city name and start the search
by selecting “Done”.
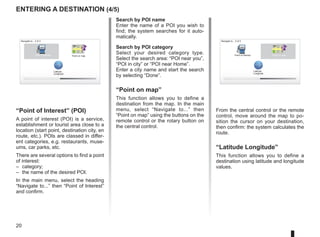
“Point on map”
This function allows you to define a
destination from the map. In the main
menu, select “Navigate to...” then
“Point on map” using the buttons on the
remote control or the rotary button on
the central control.
Navigate to... 2 of 2
Latitude
Longitude
Point on map
Point of Interest
“Point of Interest” (POI)
A point of interest (POI) is a service,
establishment or tourist area close to a
location (start point, destination city, en
route, etc.). POIs are classed in differ-
ent categories, e.g. restaurants, muse-
ums, car parks, etc.
There are several options to find a point
of interest:
– category;
– the name of the desired POI.
In the main menu, select the heading
“Navigate to...” then “Point of Interest”
and confirm.
Navigate to... 2 of 2
Latitude
Longitude
Point on map
Point of Interest
From the central control or the remote
control, move around the map to po-
sition the cursor on your destination,
then confirm: the system calculates the
route.
“Latitude Longitude”
This function allows you to define a
destination using latitude and longitude
values.
22.
21
entering a destination(5/5)
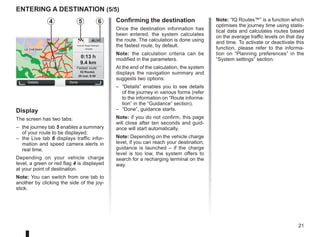
Note: “IQ Routes™” is a function which
optimises the journey time using statis-
tical data and calculates routes based
on the average traffic levels on that day
and time. To activate or deactivate this
function, please refer to the informa-
tion on “Planning preferences” in the
“System settings” section.
GO
VIROFLAY
CHAVILLE
LE CHESNAY
SEVRES
VIROFLAY
CHAVILLE
LE CHESNAY
SEVRES
LIVE
0:13 h
9.4 km
IQ Routes
20 mai, 9:50
Avenue Roger-Salengro
Chaville
Confirming the destination
Once the destination information has
been entered, the system calculates
the route. The calculation is done using
the fastest route, by default.
Note: the calculation criteria can be
modified in the parameters.
At the end of the calculation, the system
displays the navigation summary and
suggests two options:
– “Details” enables you to see details
of the journey in various forms (refer
to the information on “Route informa-
tion” in the “Guidance” section).
– “Done”, guidance starts.
Note: if you do not confirm, this page
will close after ten seconds and guid-
ance will start automatically.
Note: Depending on the vehicle charge
level, if you can reach your destination,
guidance is launched – if the charge
level is too low, the system offers to
search for a recharging terminal on the
way.
Details Done
Fastest route
Display
The screen has two tabs:
– the journey tab 5 enables a summary
of your route to be displayed;
– the Live tab 6 displays traffic infor-
mation and speed camera alerts in
real time.
Depending on your vehicle charge
level, a green or red flag 4 is displayed
at your point of destination.
Note: You can switch from one tab to
another by clicking the side of the joy-
stick.
6
5
4
23.
22
9:13am
guidance (1/4)
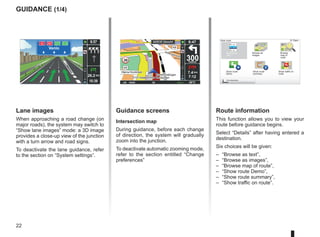
Guidance screens
Intersectionmap
During guidance, before each change
of direction, the system will gradually
zoom into the junction.
To deactivate automatic zooming mode,
refer to the section entitled “Change
preferences”
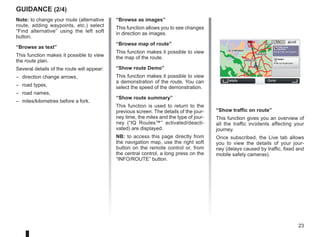
Route information
This function allows you to view your
route before guidance begins.
Select “Details” after having entered a
destination.
Six choices will be given:
– “Browse as text”,
– “Browse as images”,
– “Browse map of route”,
– “Show route Demo”,
– “Show route summary”,
– “Show traffic on route”.
View route
Browse as
text
Browse as
images
Browse
map of
route
Show route
Demo
Show route
summary
Find alternative
A2 A67 D27 E34
Venlo
10:39
9:57
14
km
26.2 km
Lane images
When approaching a road change (on
major roads), the system may switch to
“Show lane images” mode: a 3D image
provides a close-up view of the junction
with a turn arrow and road signs.
To deactivate the lane guidance, refer
to the section on “System settings”.
30 300
metres
6:47
LW 10245 66 RDS-AF 26°C
A2/E35 Utrecht
14
km
7.4 km
7:12
Show traffic on
route
24.
23
“Show traffic onroute”
This function gives you an overview of
all the traffic incidents affecting your
journey.
Once subscribed, the Live tab allows
you to view the details of your jour-
ney (delays caused by traffic, fixed and
mobile safety cameras).
Note: to change your route (alternative
route, adding waypoints, etc.) select
“Find alternative” using the left soft
button.
“Browse as text”
This function makes it possible to view
the route plan.
Several details of the route will appear:
– direction change arrows,
– road types,
– road names,
– miles/kilometres before a fork.
guidance (2/4)
“Browse as images”
This function allows you to see changes
in direction as images.
“Browse map of route”
This function makes it possible to view
the map of the route.
“Show route Demo”
This function makes it possible to view
a demonstration of the route. You can
select the speed of the demonstration.
“Show route summary”
This function is used to return to the
previous screen. The details of the jour-
ney time, the miles and the type of jour-
ney (“IQ Routes™” activated/deacti-
vated) are displayed.
NB: to access this page directly from
the navigation map, use the right soft
button on the remote control or, from
the central control, a long press on the
“INFO/ROUTE” button.
GO
VIROFLAY
CHAVILLE
LE CHESNAY
SEVRES
VIROFLAY
CHAVILLE
LE CHESNAY
SEVRES
0:13 h
9.4 km
IQ Routes
20 mai, 9:50
Avenue Roger-Salengro
Chaville
LIVE
Trafic sur le
parcours
Pas de trafic sur le parco...
+ Radars
0 fixe sur le parcours
Details Done
25.
24
9:13am
guidance (3/4)
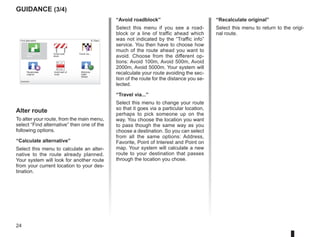
Alter route
Toalter your route, from the main menu,
select “Find alternative” then one of the
following options.
“Calculate alternative”
Select this menu to calculate an alter-
native to the route already planned.
Your system will look for another route
from your current location to your des-
tination.
Find alternative
Calculate alter-
native
Avoid road-
block
Travel via...
Recalculate
original
Avoid part of
route
Destination:
Minimize
traffic
delays
“Avoid roadblock”
Select this menu if you see a road-
block or a line of traffic ahead which
was not indicated by the “Traffic info”
service. You then have to choose how
much of the route ahead you want to
avoid. Choose from the different op-
tions: Avoid 100m, Avoid 500m, Avoid
2000m, Avoid 5000m. Your system will
recalculate your route avoiding the sec-
tion of the route for the distance you se-
lected.
“Travel via...”
Select this menu to change your route
so that it goes via a particular location,
perhaps to pick someone up on the
way. You choose the location you want
to pass though the same way as you
choose a destination. So you can select
from all the same options: Address,
Favorite, Point of Interest and Point on
map. Your system will calculate a new
route to your destination that passes
through the location you chose.
“Recalculate original”
Select this menu to return to the origi-
nal route.
26.
25
9:13am
“Avoid part ofroute”
Select this menu to avoid a part of the
route. Use this option if you see that
your route includes a road or a junction
that you wish to avoid. Then, choose
the road that you wish to avoid from the
list of roads on your route.
“Minimize traffic delays”
Select this menu for your system to
plan your route based on the latest traf-
fic information.
guidance (4/4)
Reachable area
Add
Favorite
Main Menu 2 of 3
Cancel route Browse map
Safety Alerts
Remove SD
card
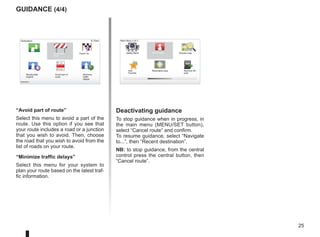
Deactivating guidance
To stop guidance when in progress, in
the main menu (MENU/SET button),
select “Cancel route” and confirm.
To resume guidance, select “Navigate
to...”, then “Recent destination”.
NB: to stop guidance, from the central
control press the central button, then
“Cancel route”.
Destination:
Avoid road-
block
Travel via...
Recalculate
original
Avoid part of
route
Destination:
Minimize
traffic
delays
Calculate alter-
native
27.
26
LIVE
RENAULT
Z E Google
Findalternative
Itinerary with waypoints
To add a stage in your route, press
button “MENU/SET” in the main menu,
select “Find alternative”, “Travel via...”,
then enter the stage address.
Travel via...
Home Favorite Address
Recent
destina-
tion
Local Search Charging station
Main Menu 1 of 3
Navigate to... Find alternative HD Traffic
Change pref-
erences
LIVE services Z.E. Services
Current position:
Find alternative
Avoid roadblock
Minimise
delays
Show route
summary
Avoid part of
route
Travel via...
Calculate alter-
native
Current position: Current position:
The system calculates the route taking
the detour into account.
Note: you can add several waypoints
to your route.
Planning a route in advance
You can use your navigation system to
plan journeys in advance by selecting
both your starting point and your des-
tination. For example, to find out how
long a journey is going to take before
you start, or to check the route of a jour-
ney you are planning.
To access the menu, from the main
menu (MENU/SETbutton), select
Prepare route”.
Select a starting point in the same way
as you would select your destination.
Select a destination.
Choose the type of route, then confirm.
The system plans the route and allows
you to view the details.
28.
27
LIVE
RENAULT
Z E
14
km
14
km
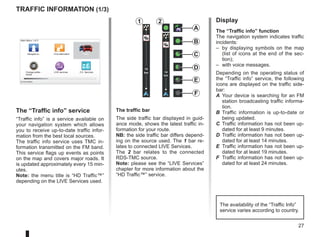
Traffic information(1/3)
A
F
E
D
C
B
Main Menu 1 of 3
Navigate to... Find alternative Traffic
Change prefer-
ences
LIVE services Z.E. Services
Current position:
The “Traffic info” service
“Traffic info” is a service available on
your navigation system which allows
you to receive up-to-date traffic infor-
mation from the best local sources.
The traffic info service uses TMC in-
formation transmitted on the FM band.
This service flags up events as points
on the map and covers major roads. It
is updated approximately every 15 min-
utes.
Note: the menu title is “HD Traffic™”
depending on the LIVE Services used.
Display
The “Traffic info” function
The navigation system indicates traffic
incidents:
– by displaying symbols on the map
(list of icons at the end of the sec-
tion);
– with voice messages.
Depending on the operating status of
the “Traffic info” service, the following
icons are displayed on the traffic side-
bar:
A Your device is searching for an FM
station broadcasting traffic informa-
tion.
B Traffic information is up-to-date or
being updated.
C Traffic information has not been up-
dated for at least 9 minutes.
D Traffic information has not been up-
dated for at least 14 minutes.
E Traffic information has not been up-
dated for at least 19 minutes.
F Traffic information has not been up-
dated for at least 24 minutes.
The traffic bar
The side traffic bar displayed in guid-
ance mode, shows the latest traffic in-
formation for your route.
NB: the side traffic bar differs depend-
ing on the source used. The 1 bar re-
lates to connected LIVE Services.
The 2 bar relates to the connected
RDS-TMC source.
Note: please see the “LIVE Services”
chapter for more information about the
“HD Traffic™” service.
1 2
The availability of the “Traffic Info”
service varies according to country.
29.
28
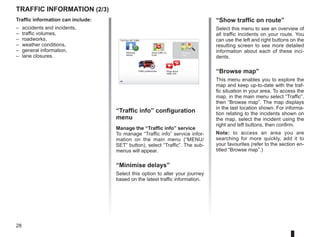
Traffic information (2/3)
“Trafficinfo” configuration
menu
Manage the “Traffic info” service
To manage “Traffic info” service infor-
mation on the main menu (“MENU/
SET” button), select “Traffic”. The sub-
menus will appear.
“Minimise delays”
Select this option to alter your journey
based on the latest traffic information.
Traffic information can include:
– accidents and incidents,
– traffic volumes,
– roadworks,
– weather conditions,
– general information,
– lane closures.
TomTom HD Traffic
Minimise
delays
Show traffic on
route
Browse
map
Traffic preferences Read aloud
traffic info
“Show traffic on route”
Select this menu to see an overview of
all traffic incidents on your route. You
can use the left and right buttons on the
resulting screen to see more detailed
information about each of these inci-
dents.
“Browse map”
This menu enables you to explore the
map and keep up-to-date with the traf-
fic situation in your area. To access the
map, in the main menu select “Traffic”,
then “Browse map”. The map displays
in the last location shown. For informa-
tion relating to the incidents shown on
the map, select the incident using the
right and left buttons, then confirm.
Note: to access an area you are
searching for more quickly, add it to
your favourites (refer to the section en-
titled “Browse map”.)
30.
29
Traffic information (3/3)
“Trafficpreferences”
To access this menu, select “Traffic”
from the main menu (using button
MENU/SET), then “Traffic preferences”.
The following preferences can be
changed:
– Automatically minimise delays
after every update. To select your
preference, tick the box to the right of
your choice using the central confir-
mation button. Once your choice has
been made, select “Done” with the
soft button.
– Audio signal upon changing con-
ditions when driving. Your device
beeps when a new traffic incident
occurs on your current route.
NB: the audio signal is deactivated
by default.
“Read aloud traffic info”
Select this menu for your device to read
all traffic incidents aloud on your route.
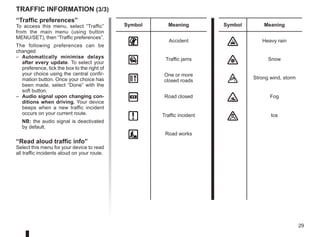
Symbol Meaning Symbol Meaning
Accident Heavy rain
Traffic jams Snow
One or more
closed roads Strong wind, storm
Road closed Fog
Traffic incident Ice
Road works
31.
30
9:13am
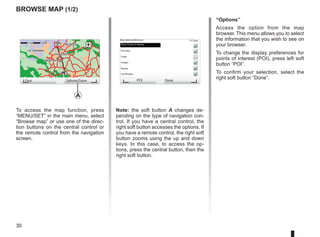
Note: the softbutton A changes de-
pending on the type of navigation con-
trol. If you have a central control, the
right soft button accesses the options. If
you have a remote control, the right soft
button zooms using the up and down
keys. In this case, to access the op-
tions, press the central button, then the
right soft button.
GO
VIROFLAY
CHAVILLE
LE CHESNAY
SEVRES
VIROFLAY
CHAVILLE
LE CHESNAY
SEVRES
1 2 3 4km
1 2 3 4km
Browse map (1/2)
To access the map function, press
“MENU/SET” in the main menu, select
“Browse map” or use one of the direc-
tion buttons on the central control or
the remote control from the navigation
screen.
“Options”
Access the option from the map
browser. This menu allows you to select
the information that you wish to see on
your browser.
To change the display preferences for
points of interest (POI), press left soft
button “POI”.
To confirm your selection, select the
right soft button “Done”.
Find Options/Zoom POI Done
Map detail preferences
Show Points of Interest
Favorites
Traffic
Images
Names
Coordinates
A
32.
31
Militaire vliegbasis eindhoven
(+31-40-2506911)
GO
VIROFLAY
CHAVILLE
LECHESNAY
SEVRES
VIROFLAY
CHAVILLE
LE CHESNAY
SEVRES
1 2 3 4km
1 2 3 4km
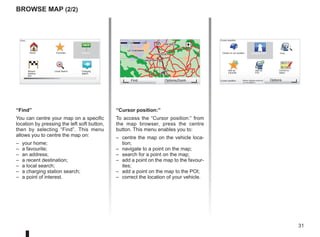
“Find”
You can centre your map on a specific
location by pressing the left soft button,
then by selecting “Find”. This menu
allows you to centre the map on:
– your home;
– a favourite;
– an address;
– a recent destination;
– a local search;
– a charging station search;
– a point of interest.
Browse map (2/2)
“Cursor position:”
To access the “Cursor position:” from
the map browser, press the centre
button. This menu enables you to:
– centre the map on the vehicle loca-
tion;
– navigate to a point on the map;
– search for a point on the map;
– add a point on the map to the favour-
ites;
– add a point on the map to the POI;
– correct the location of your vehicle.
Find Options/Zoom
Cursor position:
Center on car location Navigate there Find...
Add as
Favorite
Add as
POI
Correct lo-
cation
Cursor position: Options
Find...
Home Favorites Address
Recent
destina-
tion
Local Search Charging
station
33.
32
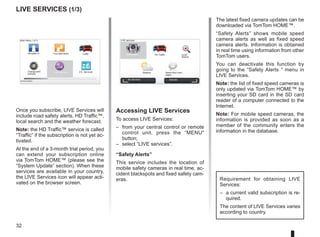
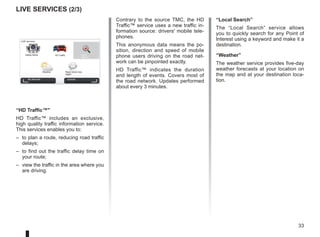
LIVE Services (1/3)
AccessingLIVE Services
To access LIVE Services:
– from your central control or remote
control unit, press the “MENU
button;
– select “LIVE services”.
“Safety Alerts”
This service includes the location of
mobile safety cameras in real time, ac-
cident blackspots and fixed safety cam-
eras.
The latest fixed camera updates can be
downloaded via TomTom HOME™.
“Safety Alerts” shows mobile speed
camera alerts as well as fixed speed
camera alerts. Information is obtained
in real time using information from other
TomTom users.
You can deactivate this function by
going to the “Safety Alerts “ menu in
LIVE Services.
Note: the list of fixed speed cameras is
only updated via TomTom HOME™ by
inserting your SD card in the SD card
reader of a computer connected to the
Internet.
Note: For mobile speed cameras, the
information is provided as soon as a
member of the community enters the
information in the database.
LIVE
RENAULT
Z E
Main Menu 1 of 3
Navigate to... Find alternative Traffic
Change pref-
erences
LIVE services Z.E. Services
Current position:
LIVE services
Safety Alerts HD Traffic Local
Search
Weather Read inbox mes-
sages
My Services Activate
Requirement for obtaining LIVE
Services:
– a current valid subscription is re-
quired.
The content of LIVE Services varies
according to country.
Once you subscribe, LIVE Services will
include road safety alerts, HD Traffic™,
local search and the weather forecast.
Note: the HD Traffic™ service is called
“Traffic” if the subscription is not yet ac-
tivated.
At the end of a 3-month trial period, you
can extend your subscription online
via TomTom HOME™ (please see the
“System Update” section). When these
services are available in your country,
the LIVE Services icon will appear acti-
vated on the browser screen.
34.
33
LIVE Services (2/3)
Contraryto the source TMC, the HD
Traffic™ service uses a new traffic in-
formation source: drivers' mobile tele-
phones.
This anonymous data means the po-
sition, direction and speed of mobile
phone users driving on the road net-
work can be pinpointed exactly.
HD Traffic™ indicates the duration
and length of events. Covers most of
the road network. Updates performed
about every 3 minutes.
LIVE services
Safety Alerts HD Traffic Local
Search
Weather Read inbox mes-
sages
My Services
“HD Traffic™
HD Traffic™ includes an exclusive,
high quality traffic information service.
This services enables you to:
– to plan a route, reducing road traffic
delays;
– to find out the traffic delay time on
your route;
– view the traffic in the area where you
are driving.
Activate
“Local Search”
The “Local Search” service allows
you to quickly search for any Point of
Interest using a keyword and make it a
destination.
“Weather”
The weather service provides five-day
weather forecasts at your location on
the map and at your destination loca-
tion.
35.
34
Mui
MUID : IB2433JO1772
Nomdu compte : Tom C.H
Valable jusqu'au 8/10/2010
Sélectionner pour effecuer le renouvellement...
Valable jusqu'au 8/10/2010
Sélectionner pour effecuer le renouvellement...
Valable jusqu'au 8/10/2010
Sélectionner pour effecuer le renouvellement...
My Services
MyTomTom account Done
État de connexion LIVE:
TomTom HD Traffic
Safety Alerts
TomTom Weather
“My Services”
This service enables users to view the
expiry date of the subscribed services.
Users can renew their subscriptions
from the “My Services” screen by se-
lecting one of the services.
An email address will be required to re-
ceive the e-mail setting out the details
of the subscription.
Note: availability of all LIVE Services
will vary depending on the country. To
find out more about service availability
in your country, please see an author-
ised dealer.
LIVE Services (3/3)
Upon starting the Carminat TomTom,
you will be asked if you wish to deac-
tivate the LIVE Services connection.
You can activate or deactivate the con-
nection at any time using the “Activate”
button. This will only work if you have a
valid subscription.
LIVE services
Safety Alerts HD Traffic Local
Search
Weather Read inbox mes-
sages
My Services Activate
36.
35
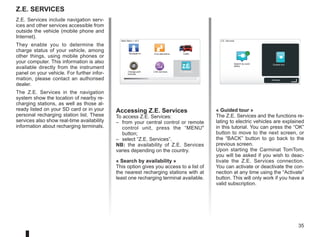
Z.E. Services
Accessing Z.E.Services
To access Z.E. Services:
– from your central control or remote
control unit, press the “MENU
button;
– select “Z.E. Services”.
NB: the availability of Z.E. Services
varies depending on the country.
« Search by availability »
This option gives you access to a list of
the nearest recharging stations with at
least one recharging terminal available.
LIVE
RENAULT
Z E
Main Menu 1 of 3
Navigate to... Find alternative Traffic
Change pref-
erences
LIVE services Z.E. Services
Z.E. Services
Search by avail-
ability
Guided tour
Z.E. Services include navigation serv-
ices and other services accessible from
outside the vehicle (mobile phone and
Internet).
They enable you to determine the
charge status of your vehicle, among
other things, using mobile phones or
your computer. This information is also
available directly from the instrument
panel on your vehicle. For further infor-
mation, please contact an authorised
dealer.
The Z.E. Services in the navigation
system show the location of nearby re-
charging stations, as well as those al-
ready listed on your SD card or in your
personal recharging station list. These
services also show real-time availability
information about recharging terminals.
« Guided tour »
The Z.E. Services and the functions re-
lating to electric vehicles are explained
in this tutorial. You can press the “OK”
button to move to the next screen, or
the “BACK” button to go back to the
previous screen.
Upon starting the Carminat TomTom,
you will be asked if you wish to deac-
tivate the Z.E. Services connection.
You can activate or deactivate the con-
nection at any time using the “Activate”
button. This will only work if you have a
valid subscription.
Activate
37.
36
Recharigng station
Go tothe Recharging station
menu
To access the “Charging station” menu:
– from your central control or remote
control unit, press the “MENU”
button to access the main menu,
select “Navigate to...”, then confirm;
– in the “Navigate to...” menu, select
“Charging station”.
Navigate to... 1 / 2
Home Favorite Address
Recent
destina-
tion
Local Search Charging station
Current position:
« Charge near my location »
This option enables you to find the re-
charging stations closest to your cur-
rent position.
Note: this function is also available
from the quick menu. Press on the cen-
tral joystick, then select “Charge near
my location”.
« Charge in city »
To find recharging stations in a town
you are just visiting, select this service.
Navigate to...
Charge near my
location
Charge in city Charge near
Home
Charge along
route
Charge near des-
tination
Underground
car park
« Charge near Home »
This option provides a list of recharging
stations close to your home.
« Charge along route »
This option shows a list of recharging
stations that you can use during your
trip.
« Charge near destination »
This option includes the list of recharg-
ing stations near your destination.
Saving new recharging
stations
When you charge up your vehicle at a
new recharging terminal, it will be au-
tomatically saved in the system as one
of your personal charging stations. You
can also create and manage your own
recharging stations in the “Preferences”
menu, by selecting “Manage my charg-
ing stations”.
38.
37
Range
30 300
metres
6:47
LW 1024566 RDS-AF 26°C
A2/E35 Utrecht
14
km
7.4 km
7:12
16:30
1.3
TOMTOM
N
S
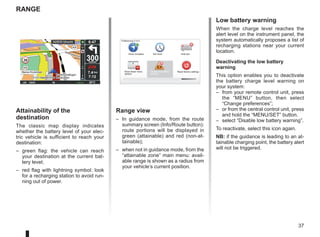
Attainability of the
destination
The classic map display indicates
whether the battery level of your elec-
tric vehicle is sufficient to reach your
destination:
– green flag: the vehicle can reach
your destination at the current bat-
tery level;
– red flag with lightning symbol: look
for a recharging station to avoid run-
ning out of power.
Range view
– In guidance mode, from the route
summary screen (Info/Route button):
route portions will be displayed in
green (attainable) and red (non-at-
tainable);
– when not in guidance mode, from the
“attainable zone” main menu: avail-
able range is shown as a radius from
your vehicle’s current position.
Low battery warning
When the charge level reaches the
alert level on the instrument panel, the
system automatically proposes a list of
recharging stations near your current
location.
Deactivating the low battery
warning
This option enables you to deactivate
the battery charge level warning on
your system:
– from your remote control unit, press
the “MENU” button, then select
“Change preferences”;
– or from the central control unit, press
and hold the “MENU/SET” button.
– select “Disable low battery warning”.
To reactivate, select this icon again.
NB: if the guidance is leading to an at-
tainable charging point, the battery alert
will not be triggered.
Preferences 5 of 5
Show fewer menu
options
Reset factory settings
Show compass
Disable low battery
warning
Hide tips
Set clock
39.
38
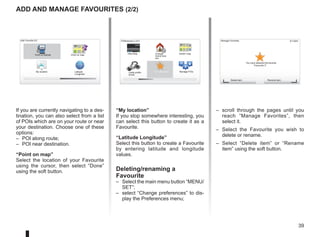
Add and managefavourites (1/2)
Creating an entry
From the main menu, press button
“MENU/SET”, then select “Add
Favorite”. You can select the location
for your Favourite from the following
list:
“Home”
You can set your home location as a
Favourite.
“Favorite”
Not used.
“Address”
When you enter an address, you can
choose from four options:
– City center,
– Street and house number,
– Zip Code,
– Crossing or intersection.
“Recent destination”
Select a favourite location from the list
of those you have recently entered as a
destination.
“Local Search”
You can quickly seek out any Point of
Interest using a key word, then make it
a destination.
“Charging station”
This option enables you to add a re-
charging station to your favourites (on
electric vehicles only).
“Point of Interest”
You can add a Point of Interest (POI) as
a Favourite from the list below:
– POI near you: to search from a list of
POIs near your current position.
– POI in city: to choose a POI in a par-
ticular town or city. You have to spec-
ify a town or city.
– POI near Home: to search from a list
of POIs near your Home location.
Give your Favourite a name that is easy to remember. Your system will always
suggest a name, usually the address of the Favourite. To enter the name, just
start typing.
Main Menu 2 of 3
Cancel route Browse
map
Safety Alerts
Add
Favorite
Reachable area Remove SD
card
Current position:
Add Favorite:1/2
Home Favorite Address
Recent desti-
nation
Charging
station
Local Search
40.
39
9:13am
– scroll throughthe pages until you
reach “Manage Favorites”, then
select it.
– Select the Favourite you wish to
delete or rename.
– Select “Delete item” or “Rename
item” using the soft button.
P
13:22
Add and manage favourites (2/2)
If you are currently navigating to a des-
tination, you can also select from a list
of POIs which are on your route or near
your destination. Choose one of these
options:
– POI along route;
– POI near destination.
“Point on map”
Select the location of your Favourite
using the cursor, then select “Done”
using the soft button.
“My location”
If you stop somewhere interesting, you
can select this button to create it as a
Favourite.
“Latitude Longitude”
Select this button to create a Favourite
by entering latitude and longitude
values.
Deleting/renaming a
Favourite
– Select the main menu button “MENU/
SET”;
– select “Change preferences” to dis-
play the Preferences menu;
Preferences 2 of 5
Hide Map Change
Home loca-
tion
Switch map
Cable prefer-
ences
Turn off sound Manage POIs
Manage Favorites
You have selected the favorite
Delete item Rename item
“Favourite 3”.
Add Favorite:2/2
My location Latitude
Longitude
Point on map
Point of Interest
41.
40
15:15
A B
15:15
sos
sos
?
?
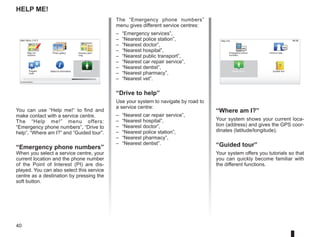
Help me!
“Wheream I?”
Your system shows your current loca-
tion (address) and gives the GPS coor-
dinates (latitude/longitude).
“Guided tour”
Your system offers you tutorials so that
you can quickly become familiar with
the different functions.
The “Emergency phone numbers”
menu gives different service centres:
– “Emergency services”,
– “Nearest police station”,
– “Nearest doctor”,
– “Nearest hospital”,
– “Nearest public transport”,
– “Nearest car repair service”,
– “Nearest dentist”,
– “Nearest pharmacy”,
– “Nearest vet”.
“Drive to help”
Use your system to navigate by road to
a service centre:
– “Nearest car repair service”,
– “Nearest hospital”,
– “Nearest doctor”,
– “Nearest police station”,
– “Nearest pharmacy”,
– “Nearest dentist”.
You can use “Help me!“ to find and
make contact with a service centre.
The “Help me!” menu offers:
“Emergency phone numbers”, “Drive to
help”, “Where am I?” and “Guided tour”.
“Emergency phone numbers”
When you select a service centre, your
current location and the phone number
of the Point of Interest (PI) are dis-
played. You can also select this service
centre as a destination by pressing the
soft button.
Main Menu 3 of 3
Photo gallery Itinerary plan-
ning
Prepare
route
Status Information Help me!
Map cor-
rections
Current position:
Emergency phone
numbers
Drive to help
Where am I?
Help me!
Guided tour
42.
41
9:13am
Bell1 Bell2 Bell3Beep1 Beep2
Beep3 Beep4 Beep5 Boing Bugle
Cow Cuckoo Polite1 Polite2 Polite3
15:15
15 sec
9:13am
1 2 3 4 5
6 7 8 9 0
Speed camera menu (1/2)
“Change warning
preferences”
This menu is used to delete or modify
the warning time before the camera
and the sound of the warning.
From the main menu (MENU/SET
button), select “Safety Alerts”, then
“Change warning preferences”.
To add camera alerts (mobile camera,
toll road camera etc.), check the types
of camera that you require.
Select the type of camera you want to
modify, then the system asks you if you
want to delete the warning. Use the soft
buttons to confirm yes or no.
If you choose “No”, enter the warning
time before the camera and “Done”
using the soft button.
Select the type of sound that you want
to hear to warn you of an upcom-
ing camera. Test the sound using the
lefthand soft button and confirm with
the right-hand soft button.
“Disable alerts”
Speed camera warnings can be ena-
bled/disabled. From the main menu,
press the “MENU/SET” button, select
“Road safety warnings”, then “Disable
alerts” if the warnings are enabled or
“Enable alerts” if the warnings are disa-
bled.
Warn when closer than:
Done
Select a warning sound TomTom Safety Cameras
Report
safety
camera
Change warning pref-
erences
Disable
alerts
Test Done
In certain countries it is il-
legal to download and ac-
tivate the camera warning
option and this could lead
to prosecution.
Report
safety
camera
Change warning pref-
erences
Disable
alerts
43.
42
Select the type.The system opens a
map page. Using the directional con-
trols, place the red marker on the loca-
tion of the camera and confirm with the
centre button.
9:13am
16:30
1.3
30 40
60 70
?
...
9:13am
16:30
1.3
$
$
So that your system can integrate
the cameras entered manually, you
must be subscribed to the camera
updates in TomTom HOME™. The
cameras will be active after the lo-
cation is confirmed by the TomTom
technical department.
Speed camera menu (2/2)
“Report safety camera”
If the navigation system does not in-
dicate that there is a fixed or mobile
camera along your journey, you can
enter details of this manually.
From the main menu (MENU/SET
button), select “Safety Alerts”, then
“Report safety camera”. You can enter
a camera more quickly using the quick
menu (centre button). The quick menu
is displayed. Select “Report safety
camera”.
Your system will then require you to
enter the type of camera (Fixed camera
or Mobile camera).
The system will prompt you to confirm
the position you have given, using the
soft buttons.
If you confirm the location, the system
asks you for the type of camera.
When you choose “Speed camera “,
the system will require you to enter the
speed limit. Select the speed and con-
firm with the centre button.
To obtain an up-to-date list of mobile
safety cameras, please refer to the sec-
tion on “LIVE services”.
Type of safety camera
Speed
camera
Traffic light camera Toll road
camera
Average speed
check
Vehicle re-
striction
Other
camera
Enter speed limit
15:15
TomTom Safety Cameras
Report
safety
camera
Change warning pref-
erences
Disable
alerts
44.
43
9:13am
4
15:15
A B
Image viewer
Toscroll through the images in slide-
show mode, select “Slideshow” using
the right soft button. The system asks
you how long the photos are to be dis-
played for, using the directional but-
tons. If you want a fixed image, move
the cursor to the far right.
Finish with the right soft button.
The slideshow starts.
Note: to add/delete images, refer to the
section entitled “System update”.
Viewing images
You can use your navigation system to
view images.
In the main menu (“MENU/SET
button), select Photo gallery”, the
image gallery opens.
Select the image that you wish to view.
Main Menu 3 of 3
Photo gallery
Current position:
Seconds per slide:
Seconds per slide:
Done
BMP JPG
1-bit,
2 colours
Greyscale
4-bit,
16 colours
RGB
8-bit,
256 colours
24-bit,
16.7 million
colours
Image format read by your system
Itinerary plan-
ning
Prepare
route
Status
Information
Map cor-
rections
Help me!
45.
44
Reversing camera
Fixed clearancegauge 2
The fixed clearance gauge comprises
coloured markers A, B and C indicating
the distance behind the vehicle:
– A (red) approximately 50 centime-
tres from the vehicle;
– B (yellow) approximately 1 metre
from the vehicle;
– C (green) approximately 2 to
3 metres from the vehicle;
Operation
When reversing (and up to approxi-
mately 5 seconds after shifting to an-
other gear), a view of the surroundings
to the rear of the vehicle is displayed on
the instrument panel accompanied by
two clearance gauges 1 and 2 (mobile
and fixed).
Note: make sure that the reversing
camera is not obscured (by dirt, mud,
snow, etc.).
Mobile clearance gauge 1
This is shown in blue on the naviga-
tion screen. It indicates the vehicle tra-
jectory according to the position of the
steering wheel.
This gauge remains fixed and indicates
the vehicle trajectory if the wheels are
in line with the vehicle.
This system is initially used with the aid
of the gauges (mobile for the trajectory
and fixed for the distance), then when
the red zone is reached, use the rep-
resentation of the bumper to stop ac-
curately.
This function is an additional
aid. It cannot, therefore,
under any circumstances
replace the vigilance or the
responsibility of the driver.
The driver should always pay atten-
tion to sudden incidents during driv-
ing: always ensure that there are no
moving obstacles (such as a child,
animal, pram, bicycle, etc.) or small,
narrow objects such as stones or
posts in your path when manoeu-
vring.
The screen shows a reverse image.
The frames are a representation
projected onto flat ground; this in-
formation must not be taken into
account when superimposed on a
vertical object or an object on the
ground.
Objects which appear on the edge
of the screen may be deformed.
In very bright light (snow, vehicle in
sunshine etc.), the camera vision
may be adversely affected.
When the tailgate is open or not
closed properly, the message “Boot
open” is displayed on the instrument
panel (risk of incorrect information
on-screen)
While your system is being updated,
the reversing camera will be tempo-
rarily unavailable.
1 2
C
B
A
46.
45
16:30
1.3
16:30
1.3
LIVE
RENAULT
Z E
system settings(1/6)
To access the system parameters:
– press the “MENU/SET” button;
– select the “Change preferences”
menu.
NB: This function can also be accessed
from the central control by holding down
the “MENU/SET” button.
Adjusting the display
Brightness settings
Adjust the screen brightness according
to the outside light. When the level of
light is low, the screen is easier to read
if the display is not too bright. From
your central control, press the “LIGHT/
DARK” button or from the remote con-
trol, press the centre button and select
“Brightness preferences”.
Day/night colour displays
The system automatically switches be-
tween day and night modes. If you wish
to do this manually, select day colour
or night colour from the “Change prefer-
ences” menu or from the “Quick menu”.
When you use manual mode, auto-
matic mode is deactivated. To reacti-
vate it, go to the “Change preferences”
menu, select “Brightness preferences”
and check “Switch to night view when
dark”.
“Show POI on map”
Select “Show POI on map”, then tick
the Points of Interest you want to see
on the map when browsing using the
central button.
“Safety preferences”
This menu allows you to activate sound
warnings when driving faster than a set
speed, or when near places of worship
or schools or to simplify the menus and
aid you during your journey. To activate
the options, check them, then finish
with the centre button.
Main Menu 1 of 3
Navigate to... Find alternative HD Traffic
Change prefer-
ences
LIVE services Z.E. Services
Preferences 1 of 5
Use night
colors
Show POI
on map
Safety prefer-
ences
Speech prefer-
ences
Turn off sound
Do not show charging
stations on map
47.
46
system settings (2/6)
“HideMap”
This menu allows you to hide the map.
“Change Home location”
This menu allows you to change your
home address.
“Switch map”
Use this menu if you are installing sev-
eral maps on your SD card. To change
map, select “Switch map”, then the
system will ask you to choose the re-
quired map.
P
13:22
Preferences 2 of 5
Manage
Favorites
Manage
POIs
“Cable preferences”
To choose the charging cable you wish
to use, select “Cable preferences” from
the “Preferences” menu, then select
it. This menu allows you to select the
cables you have with your own vehi-
cle. When you launch the guidance to
a recharging station, your system will
check the compatibility of the recharg-
ing station with the cables you selected
and provide you with notification of their
compatibility. Make sure you have en-
tered details of the cables you have
purchased.
NB: Your system will inform you of any
incompatibility of your cables with the
recharging station.
“Manage Favorites”
This menu allows you to delete or
rename your saved favourites.
“Manage POIs”
This menu allows you to add, change or
delete POIs or POI categories.
Change
Home loca-
tion
Switch map
Hide Map
Cable prefer-
ences
16:30
1.3
“Do not show charging
stations on map”
This menu, only available on electric
vehicles, allows you to remove the re-
charging stations from the map.
Preferences 1 of 5
Use night
colors
Show POI
on map
Safety prefer-
ences
Speech prefer-
ences
Turn off sound
Do not show charging
stations on map
48.
47
16:30
1.3
Preferences 3 of5
Change map
colors
Brightness pref-
erences
2D map set-
tings
Change car
symbol
Manage my charg-
ing stations
Change lan-
guage
system settings (3/6)
– Lithuanian
– Norwegian
– Polish
– Portuguese (Brazil)
– Portuguese (Portugal)
– Slovakian
– Spanish
– Spanish (Latin America)
– Swiss
– Turkish
– Russian
– Malaysian.
To confirm, press the centre button.
“Change map colors”
Select “Change map colors”, then
choose either day colours or night col-
ours. You can download new colours.
To select a downloaded colour, select
an additional colour scheme, then the
colour required.
“Brightness preferences”
This menu allows you to select the
brightness of your navigation system
depending on the brightness of the light
outside.
“Manage my charging
stations”
This menu allows you to create and
manage your own recharging stations
list, as well as those detected automati-
cally by the system.
“Change car symbol”
This menu allows you to change the ve-
hicle icon in the 3D navigation map.
“2D map settings”
This menu allows you to display the
navigation map in 2D or 3D, from your
remote control.
Please refer to the “Introduction to the
controls” section in this document.
“Change language”
To choose a language, select the re-
quired language. The system will then
ask you to choose a voice.
Select the required language from the
following list:
– Afrikaans
– Catalan
– Czech
– Danish
– Dutch
– UK English
– US English
– Estonian
– Greek
– Finnish
– Flemish
– French
– German
– Hungarian
– Italian
– Latvian
49.
48
system settings (4/6)
“Setunits”
Units of distance
Select “miles” or “kilometers”, then
select “Done” using the soft buttons.
Co-ordinates display
Select from the 3 latitude and longitude
display options, then select “Done”
using the soft buttons to move on to the
next step.
“Status bar preferences”
Add to the list of options that you wish
to appear on the navigation map status
bar.
“Automatic zooming”
Automatic zooming mode allows a
gradual zoom when approaching a
change in direction.
16:30
1.3
16:30
1.3
16:30
1.3
- +
- +
Preferences 4 of 5
Planning prefer-
ences
Set units
Status bar pref-
erences
Automatic zooming
Start-up prefer-
ences
Show lane
images
“Planning preferences”
This menu allows you to define your
preferences for:
Planning preference type
Select one of the planning types, then
finish with the central button. The
recommended planning criterion is
“Fastest route”.
“IQ Routes™”
After having selected the planning crite-
ria, the system lets you activate/deacti-
vate the “IQ Routes™” function.
If IQ Routes™ is activated, this func-
tion allows routes to be calculated ac-
cording to the average level of traffic
for the given day and time and the best
route to be planned according to actual
speeds measured on the roads.
Ecoparcours
The Ecoparcours is a route that will
save energy in your vehicle.
NB: Electric vehicles have a specific
Z.E. Ecoparcours.
50.
49
Road types
Select yourpreferences in terms of par-
ticular sections of the journey, such as
unmade roads and ferry transfers.
“Show lane images”
When approaching a road change (on
major roads), the system may switch to
“Show lane images” mode: a 3D image
provides a close-up view of the junction
with a turn arrow and road signs.
You can deactivate this function by se-
lecting “Hide lane images”. To reacti-
vate it. select “Show lane images”.
“Start-up preferences”
This menu allows you to change the
system start-up and to change the
start-up page by customising it with a
photo of your choice.
16:30
1.3
16:30
1.3
16:30
1.3
- +
- +
system settings (5/6)
16:30
1.3
TOMTOM
N
S
Preferences 5 of 5
Show fewer menu
options
Reset factory settings
Show compass
Disable low battery
warning
Hide tips
Set clock
Preferences 4 of 5
Planning prefer-
ences
Set units
Status bar pref-
erences
Automatic zooming
Start-up prefer-
ences
Show lane
images
“Planning preferences”
(continued)
Toll road settings
This menu allows you to define your
toll road preferences. Once this option
is activated and after a destination has
been entered, the system asks you if
you wish to change your route. Select
one of the three route types, then con-
firm using the right soft button.
“Enable compass”
This menu allows you to activate or de-
activate the compass during navigation.
51.
50
system settings (6/6)
Clocksynchronisation
The synchronisation option allows you
to set the time directly using GPS in-
formation.
Select this option by pressing the
lefthand “Sync” soft button.
Show/hide tips
When using your navigation system,
the system displays tips helping you to
get the best use of the functions. You
can deactivate these tips by selecting
“Hide tips”, and reactivate them by se-
lecting “Show tips”.
“Show fewer menu options”
This option enables you to simplify your
system’s menu, so you can use it more
quickly when driving. To reactivate all
options, select this icon again.
“Disable low battery
warning”
When your battery is almost dis-
charged, the system switches to warn-
ing mode and displays a reachable re-
charging station.
This option enables the battery charge
level warning to be deactivated on your
system.
NB: If your current guidance is going
towards a reachable charging point, the
battery warning will not start.
“Reset factory settings”
Reset factory settings
This menu allows you to delete all infor-
mation from the system.
Partial reset
This menu allows you to delete all of
your personal data (favourites, recent
destinations, etc.).
Note: after resetting, the system will
restart in English. To change the lan-
guage, refer to the sections entitled
“Change language”.
16:30
1.3
TOMTOM
N
S
“Set clock”
When the clocks change in summer
or winter, or when you are travelling
abroad, you will need to adjust the time
on your system.
Select “Set clock”; the system offers
you three display modes. Select the
desired mode, then “Done” using the
soft button. Set the clock, then select
“Done”.
Preferences 5 of 5
Show fewer menu
options
Reset factory settings
Show compass
Disable low battery
warning
Hide tips
Set clock
52.
51
? ?
?
?
?
HOME
66 253
®
Updatingthe system (1/4)
Thanks to the TomTom HOME™ soft-
ware, installed by inserting your SD
card into the SD card reader on a com-
puter that is connected to the Internet,
you can:
– update your navigation system and
optimize its operation (maps, soft-
ware, fun voices, etc);
– save your navigation system data on
your computer;
– add or delete data;
– customise your system;
– share map corrections with the com-
munity (Map Share™);
– replace the original maps on your
navigator, extending it to new coun-
tries (eg. Western Europe);
– subscribe to LIVE Services (go to
“Add Traffic, Voices, Safety Cameras
etc.” menu TomTom HOME™ and
select “LIVE services”);
– or even download the user manual.
– download updated charging stations
for your electric vehicle.
The TomTom HOME™ application
menus guide you through these opera-
tions.
To do this, you must:
– remove the SD card from your navi-
gation system;
Note: to remove the SD card, please
refer to the section on the SD card:
use, initialisation in your notice,
and specifically the information on
Removing theSD card.
– insert this SD card in your compu-
ter's card reader (the computer must
already be connected to the internet
and an external SD card reader may
be required);
– install the TomTom HOME™ applica-
tion in a few clicks on your computer
by following the instructions shown
on the screen.
Manage your navigation device the easy way.
Page 1 of 2
Add Mapps Add Traffic,
Voices, Safety
Cameras etc.
Use my activa-
tion code
Update my Carminat
TomTom
Get free Charging
Stations updates
More
The screens shown in the user
manual are not contractual.
53.
52
Creating an internetaccount
in TomTom HOME™
Create your Internet account for
TomTom HOME™ by clicking on Log
in” above the RENAULT logo. Your SD
card is automatically recognised by the
system so that you can get the most
from your navigation system.
Updating the system (2/4)
In certain countries it is il-
legal to download and ac-
tivate the camera warning
option and this could lead
to prosecution.
HOME
A
B
? ? ?
?
TomTom HOME - CarminatTomTom
®
Read the manual
for my Carminat
TomTom
Manage my
Carminat TomTom
Find accessories for
my device
Back up and
restore
Use TomTom Route
Planner
More
Manage your navigation device the easy way.
Page 1 of 2
Log in
? ?
?
?
?
HOME
66 253
HOME Préférences...
TomTom Map Share™
Extensions TomTom HOME
Thèmes TomTom HOME
TomTom HOME - CarminatTomTom
Use latest Map Guarantee
Add Mapps Add Traffic,
Voices, Safety
Cameras etc.
Use my activa-
tion code
Update my
Carminat TomTom
More
Tools
Latest map guarantee
Once your new vehicle has been de-
livered, you will have a maximum of
60 days in which to update the map for
free. Once this time has elapsed, you
will need to pay for updates.
Since the road network changes sig-
nificantly each year, TomTom offers the
most accurate and reliable maps on the
market.
To check if a more recent map is avail-
able:
– click on “Tools”;
– then click on “Use latest Map
Guarantee”.
Get free Charging
Stations updates
Installing the software
Insert the SD card in your computer's
SD card reader, while your computer is
connected to the internet.
The software installation is launched
automatically.
Follow the instructions shown on the
screen.
54.
53
Updating the system(3/4)
LIVE Services subscription
Purchase LIVE Services at TomTom
HOME™ from a computer connected
to the Internet.
In your vehicle, from “LIVE services”,
go to “My Services” and enter your
username and password to use the
services.
If you are unable to access the “My
Services” menu, activate the network
link for your Carminat TomTom by se-
lecting the “Activate” button.
Saving your system data
This menu allows you to save your
system data to your computer and to
restore it.
We strongly recommend that you
save your system data on a very
regular basis.
Saving the data allows it to be re-
covered if, for example, your SD
card is lost.
Main functions available
Downloading maps
Click on the “Add Mapps” icon to
access the menu which will allow you
to download maps. The downloadable
maps are edited regularly.
Subscribing to LIVE Services,
downloading points of interest
Click on the “Add Traffic, Voices, Safety
Cameras etc.” icon to access the menu
which will allow you to:
– to subscribe to LIVE Services;
– to download voices to customise
your system;
– to download Points of Interest (POI);
– etc.
Updating the recharging stations
Click on the “Update my Carminat
TomTom” icon to access the menu to
get an up-to-date map of recharging
stations suitable for your vehicle.
Customising your system
You also have the option to customise
your system by installing new points of
interest and synthesised voices or even
by changing the colour scheme.
Downloading the instructions for
your system
By clicking on the “Read the manual
for my Carminat TomTom” icon, you
will access the full user manual for your
system.
LIVE services
Safety Alerts HD Traffic Local
Search
Weather Read inbox mes-
sages
My Services Activate
55.
54
Updating the system(4/4)
1
74
3
2
12
8 0,7 Mo
0,4 Mo
22,2 Mo
2,0 Mo
171,5 Mo
310,8 Mo
1921,2 Mo 1390 Mo 0 Mo
530 Mo 0 Mo
? ?
?
?
?
HOME
66 253
®
Managing my Carminat TomTom
This menu allows you to check the
available space on your system’s SD
card and is particularly useful when
downloading maps which cover several
countries (e.g. Western Europe).
System update
To get the best from your navigation
system, we advise you to update it as
often as you can.
Map Share™
Once your system has been updated,
you can share map corrections with the
community of system users.
The screens shown in the user
manual are not contractual.
Updates can only be downloaded
from the internet.
Manage your navigation device the easy way.
Page 1 of 2
Add Mapps Add Traffic,
Voices, Safety
Cameras etc.
Use my activa-
tion code
Update my
Carminat TomTom
Get free Charging
Stations updates
More
Items on
device
Items on com-
puter
Maps
Voices
Point of Interest
Map Overlays
Car Symbols
Warning Sounds
None selected
Device
memory:
Free space: Selected:
Selected:
Installed items:
Back Remove items from device Copy items to computer
None selected
None selected
None selected
None selected
None selected
Manage my Carminat TomTom
Select the items you want to remove from your navigation device or computer. You can also copy
an item on your device to your computer.
56.
55
Note: if youdo not use the remote
control for 20 seconds, it will switch to
power saving mode.
If you do not use the remote control for
20 minutes, it switches off completely.
Press any button to switch your remote
control on.
Remote control: batteries
When the LED on the remote control
flashes red and a message appears on
the screen, change the batteries in your
remote control.
Hold the sides of the remote control and
press latch A on the back of the device.
The keypad lifts out from the back of
the device.
Note: take care not to drop the keypad.
Place the batteries (type: AAA/LR3/
UM4 (1.5V)) in the remote control.
Make sure you put the batteries in the
correct way round, as shown on the
remote control.
Replace the battery cover and press
any button to switch on the remote con-
trol.
Your remote control connects to your
navigation system automatically.
Do not throw away your used batteries; give them to an organisation responsible
for collecting and recycling batteries.
A
A
57.
56
operating faults (1/3)
System
DescriptionCauses Solutions
No image is displayed. The screen is on standby. Ensure that the screen is not on standby.
No sound can be heard. The volume is set to minimum or the
sound has been deactivated.
Increase the volume or activate the
sound.
No map is displayed. The SD card is missing or damaged. Check the SD card is present.
Navigation
Description Causes Solutions
The location of the vehicle on the screen
does not correspond to its actual loca-
tion.
The GPS indicator on the screen stays
grey or yellow.
Incorrect positioning of the vehicle
caused by GPS reception.
Move the vehicle until reception of the
GPS signal is improved.
The directions on the screen do not cor-
respond to the actual road.
The SD card is out of date. Download an update from TomTom
HOME™.
Traffic flow information is not displayed
on the screen.
Guidance has not been activated. Ensure guidance is activated.
Select a destination and begin the guid-
ance.
Certain items on the menu are not avail-
able.
The “Safety preferences” menu is acti-
vated.
Deactivate the “Safety preferences”
option.
58.
57
Navigation
Description Causes Solutions
Voiceguidance is unavailable. Voice guidance or guidance is deacti-
vated.
Increase the volume.
Ensure voice guidance is activated.
Ensure guidance is activated.
The directions of the voice guidance do
not correspond to your exact location.
The voice guidance may vary according
to the environment.
Drive according to the actual conditions.
The suggested route does not start or
end at the required destination.
The destination is not yet recognised by
the system.
Enter a road near to the required desti-
nation.
The system calculates a detour automat-
ically.
The “Traffic info” service plans an alter-
native route.
Poor reception of HD Traffic™. The vehicle is in an area that is not cov-
ered or you have not subscribed to Live
Services.
Move your vehicle.
operating faults (2/3)
59.
58
Navigation
Description Causes Solutions
Thecar icon is not displayed. The map is in 2D mode. From the central control or the remote con-
trol, press the 2D/3D button to switch to map
view 3D.
The Z.E. Services do not work.
(on electric vehicles only).
– The vehicle is located in an area
which is not covered.
or
– You do not have a valid subscrip-
tion.
– Use Z.E. Services in a covered area
or
– Go to the MyRenault website to renew
your subscription to Z.E. Services.
The system cannot find any (or many)
recharging stations.
(on electric vehicles only).
The recharging stations database is
not up to date.
Go to the TomTom HOME™ website to
download the most up-to-date list of re-
charging stations.
The system says that recharging sta-
tions are incompatible, but the vehicle is
compatible.
(on electric vehicles only).
– The compatibility list is not up to
date.
and/or
– Not all the car cables are given in
the “Cable preferences” menu.
– Go to the TomTom HOME™ website to
download the most up-to-date list of re-
charging stations; the compatibility list
will be updated automatically at the same
time.
and/or
– Detail all the car cables in “Cable prefer-
ences”.
operating faults (3/3)
60.
59
Alphabetical index (1/2)
A
address.
........................................................................17→ 21
B
Bluetooth®.
............................................................................ 55
buttons.
.................................................................................. 13
C
clock
setting.............................................................................. 49
colours................................................................................... 45
compass................................................................................ 16
controls........................................................................ 5 – 6, 13
D
destination............................................................................. 18
detailed route.
...............................................................22 → 25
detour.............................................................24 – 25, 27 → 29
F
favourite
add........................................................................... 38 – 39
delete............................................................................... 39
rename.
............................................................................ 39
G
GPS
receiver.............................................................................. 3
guidance
activation.
................................................................17 → 22
cancellation...................................................................... 25
guided tours.
.................................................................. 11 – 12
I
IQ route................................................................................. 48
M
map
display.
............................................................... 16, 30 – 31
map symbols.
................................................................... 16
scale................................................................................ 16
MENU............................................................................ 13 – 14
N
navigation.....................................................................27 → 29
navigation system.
................................................................... 2
O
operating faults.............................................................56 → 58
operation............................................................................... 10
P
personal data
delete......................................................................51 → 54
save........................................................................51 → 54
points of interest (PI)............................................................. 19
precautions during use............................................................ 2
R
radars
signal....................................................................... 41 – 42
remote control
batteries........................................................................... 55
S
screen
monitor............................................................................. 10
navigation display .................................................22 → 25
SD card................................................................... 2 – 3, 8 – 9
second route.
..................................................24 – 25, 27 → 29
settings...........................................................41 – 42, 45 → 50
brightness........................................................................ 45