This document provides an overview and table of contents for the book "Selenium Testing Tools Cookbook" which contains over 90 recipes for building, maintaining, and improving test automation with Selenium WebDriver. The book covers topics such as locating elements, working with the Selenium API, controlling test flow, data-driven testing, using the Page Object Model, and extending Selenium. It is intended to help readers learn and apply Selenium techniques in their own test automation.


![Locating Elements
24
This will find the Login button's <input> tag whose Class attribute is login.
There is also a shortcut where you can put a . and class attribute value and ignore the HTML
tag. However, this will return all the elements with class as login and the test may not return
the correct element.
WebElement loginButton = driver.findElement(By.cssSelector(".login"));
This method is similar to the className() locator method.
Finding elements using ID selector
We can locate the element using the IDs assigned to elements. This can be done by
specifying the type of HTML tag, then entering a hash followed by the value of the
Class attribute, as shown:
WebElement userName =
driver.findElement(By.cssSelector("input#username"));
This will return the username <input> element using its id attribute.
There is also a shortcut where you can enter # and a class attribute value and ignore the
HTML tag. However, this will return all the elements with the id set as username and the
test may not return the correct element. This has to be used very carefully.
WebElement userName =
driver.findElement(By.cssSelector("#username"));
This method is similar to the id locator strategy.
Finding elements using attributes selector
Apart from the class and id attributes, CSS selectors also enable the location of elements
using other attributes of the element. In the following example, the Name attribute is used to
locate an <input> element.
WebElement userName =
driver.findElement(By.cssSelector("input[name=username]"));
Using the name attribute to locate an element is similar to the name() locator method of the
By class.
Let's use some other attribute to locate an element. In the following example, the <img>
element is located by using its alt attribute.
WebElement previousButton =
driver.findElement(By.cssSelector("img[alt='Previous']"));](https://image.slidesharecdn.com/gundechau-231028071958-735e74f8/85/Gundecha-U-Selenium-Testing-Tools-Cookbook-2012-pdf-39-320.jpg)
![Chapter 1
25
You might come across situations where one attribute may not be sufficient to locate an
element and you need to combine additional attributes for a precise match. In the following
example, multiple attributes are used to locate the Login button's <input> element:
WebElement previousButton = driver.findElement(By.cssSelector("input[t
ype='submit'][value='Login']"));
Finding elements using Attributes Name Selector
This strategy is a bit different from the earlier strategy where we want to locate elements
based on only the specific attribute defined for them but not attribute values. For example,
we want to lookup all the <img> elements which have alt attribute specified.
List<WebElement> imagesWithAlt =
driver.findElements(By.cssSelector("img[alt]"));
A Boolean not()pseudo-class can also be used to locate elements not matching the
specified criteria. For example, to locate all the <img> elements that do not have the alt
attribute, the following method can be used:
List<WebElement> imagesWithoutAlt =
driver.findElements(By.cssSelector("img:not([alt])"));
Performing partial match on attribute values
CSS selector provides a way to locate elements matching partial attribute values. This is
very useful for testing applications where attribute values are dynamically assigned and
change every time a page is requested. For example, ASP.NET applications exhibit this kind
of behavior, where IDs are generated dynamically. The following table explains the use of CSS
partial match syntax:
Syntax Example Description
^= input[id^='ctrl'] Starting with:
For example, if the ID of an element is ctrl_12,
this will locate and return elements with ctrl at
the beginning of the ID.
$= input[id$='_userName'] Ending with:
For example, if the ID for an element is a_1_
userName, this will locate and return elements
with _userName at the end of the ID.
*= Input[id*='userName'] Containing:
For example, if the ID of an element is panel_
login_userName_textfield, this will use
the userName part in the middle to match and
locate the element.](https://image.slidesharecdn.com/gundechau-231028071958-735e74f8/85/Gundecha-U-Selenium-Testing-Tools-Cookbook-2012-pdf-40-320.jpg)

![Chapter 1
27
Finding elements with absolute path
Similar to CSS absolute paths, XPath absolute paths refer to the very specific location of the
element, considering its complete hierarchy in the DOM. Here is an example where Username
Input field is located using the absolute path. While providing absolute path a space is given
between the elements.
WebElement userName =
driver.findElement(By.xpath("html/body/div/div/form/input"));
However, this strategy has limitations as it depends on the structure or hierarchy of the
elements on a page. If this changes, the locator will fail to get the element.
Finding elements with relative path
With relative path, we can locate an element directly irrespective of its location in the DOM.
For example, we can locate the Username Input field in the following way, assuming it is the
first <input> element in the DOM:
WebElement userName = driver.findElement(By.xpath("//input"));
Finding elements using index
In the previous example, the XPath query will return the first <input> element that it finds
in the DOM. There could be multiple elements matching the specified XPath query. If the
element is not the first element, we can also locate the element by using its index in DOM.
For example in our login form, we can locate the Password field which is the second <input>
element on the page in the following way:
WebElement userName = driver.findElement(By.xpath("//input[2]"));
Finding elements using attributes values with XPath
Similar to CSS, we can also locate elements using their attribute values in XPath. In the
following example, the Username field is located using the ID attribute:
WebElement userName =
driver.findElement(By.xpath("//input[@id='username']"));
Here is another example where the image is located using the alt attribute:
WebElement previousButton =
driver.findElement(By.xpath("img[@alt='Previous']"));
You might come across situations where one attribute may not be sufficient to locate an
element and you need combined additional attributes for a precise match. In the following
example, multiple attributes are used to locate the <input> element for the Login button:
WebElement previousButton =
driver.findElement(By.xpath
("//input[@type='submit'][@value='Login']"));](https://image.slidesharecdn.com/gundechau-231028071958-735e74f8/85/Gundecha-U-Selenium-Testing-Tools-Cookbook-2012-pdf-42-320.jpg)
![Locating Elements
28
The same result can be achieved by using XPath and operator.
WebElement previousButton = driver.findElement
(By.xpath("//input[@type='submit'and @value='Login']"));
In the following example, either of the attributes is used to locate the elements using
XPath or operator:
WebElement previousButton = driver.findElement
(By.xpath("//input[@type='submit'or @value='Login']"));
Finding elements using attributes with XPath
This strategy is a bit different from the earlier strategy where we want to locate elements
based only on the specific attribute defined for them but not attribute values. For example,
we want to lookup all the <img> elements that have the alt attribute specified.
List<WebElement> imagesWithAlt = driver.findElements
(By.xpath ("img[@alt]"));
Performing partial match on attribute values
Similar to CSS selector, XPath also provides a way to locate elements matching partial
attribute values using XPath functions. This is very useful for testing applications where
attributes values are dynamically assigned and change every time a page is requested.
For example, ASP.NET applications exhibit this kind of behavior where IDs are generated
dynamically. The following table explains the use of these XPath functions:
Syntax Example Description
starts-
with()
input[starts-with(@
id,'ctrl')]
Starting with:
For example, if the ID of an element is
ctrl_12, this will locate and return
elements with ctrl at the beginning of
the ID.
ends-
with()
input[ends-with(@id,'_
userName')]
Ending with:
For example, if the ID of an element is
a_1_userName, this will locate and return
elements with _userName at the end of
the ID.
contains() Input[contains(@
id,'userName')]
Containing:
For example, if the ID for an element is
panel_login_userName_textfield,
this will use the userName part in the
middle to match and locate the element.](https://image.slidesharecdn.com/gundechau-231028071958-735e74f8/85/Gundecha-U-Selenium-Testing-Tools-Cookbook-2012-pdf-43-320.jpg)
![Chapter 1
29
Matching any attribute using a value
XPath matches the attribute for all the elements for a specified value and returns the element.
For example, in the following XPath query, 'userName' is specified. XPath will check all the
elements and their attributes to see if they have this value and return the matching element.
WebElement userName =
driver.findElement(By.xpath("//input[@*='username']"));
Locating elements with XPath axis
XPath axes help to locate elements based on the element's relationship with other elements
in a document. Here are some examples for some common XPath axes used to locate
elements from a <table> element. This can be applied to any other element structure
from your application.
Here is the graphical representation of the HTML elements:
html
body
table
tr1 tr2 tr3
td1 td2 td3
input1
td1 td2 td3 td1 td2 td3
input1](https://image.slidesharecdn.com/gundechau-231028071958-735e74f8/85/Gundecha-U-Selenium-Testing-Tools-Cookbook-2012-pdf-44-320.jpg)
![Locating Elements
30
Axis Description Example Result
ancestor Selects all ancestors
(parent, grandparent,
and so on) of the
current node.
//td[text()='Product
1']/ancestor::table
This will get the
table element.
descendant Selects all
descendants
(children,
grandchildren, and
so on) of the current
node.
/table/
descendant::td/input
This will get the
input element
from the third
column of the
second row from
the table.
following Selects everything in
the document after
the closing tag of the
current node.
//td[text()='Product
1']/following::tr
This will get the
second row from
the table.
following-
sibling
Selects all siblings
after the current
node.
//td[text()='Product
1']/following-
sibling::td
This will get the
second column
from the second
row immediately
after the
column that has
Product 1 as
the text value.
preceding Selects all nodes
that appear before
the current node
in the document,
except ancestors,
attribute nodes, and
namespace nodes.
//td[text()='$150']/
preceding::tr
This will get the
header row.
preceding-
sibling
Selects all siblings
before the current
node.
//td[text()='$150']/
preceding-
sibling::td
This will get the
first column of
third row from the
table.
You can find more about XPath axis at http://www.w3schools.com/xpath/xpath_
axes.asp.
How it works...
XPath is a powerful language for querying and processing DOM in browsers. XPath is used to
navigate through elements and attributes in a DOM. XPath provides rules, function, and syntax
to locate the elements.](https://image.slidesharecdn.com/gundechau-231028071958-735e74f8/85/Gundecha-U-Selenium-Testing-Tools-Cookbook-2012-pdf-45-320.jpg)
![Chapter 1
31
The majority of browsers support XPath and Selenium WebDriver provides the ability to locate
elements using the XPath language.
Using the xpath() method of the By class we can locate elements using XPath syntax.
XPath is little slower than the CSS selectors as XPath provides the ability to search elements
bi-directionally. You can search for the parent element if you know the child or you can locate
a child element using its relationship with the parent and siblings.
Using XPath, a test can locate elements in multiple ways based on the structure of the
document, attribute values, text contents and so on, as described in this recipe.
Locating elements using text
While testing web applications, you will also encounter situations where developers don't
assign any attributes to the elements and it becomes difficult to locate elements.
Using the CSS selectors or XPath, we can locate elements based on their text contents. In this
recipe, we will explore methods to locate elements using text values.
How to do it...
For locating elements by using their text contents, CSS selectors and XPath provide methods
to find text within the elements. If an element contains specific text, this will return the
element back to the test.
Using CSS selector Contains Pseudo-Class
CSS selectors provide the contains() pseudo-class which can be used to see if an element
contains the specified text. For example, a test wants to locate the cell of a table using its
contents in the following way:
WebElement cell =
driver.findElement(By.cssSelector("td:contains('Item 1')"));
The contains()pseudo-class accepts the text to be searched as a parameter. It then checks
all the <td> elements in DOM for the specified text.
The contains() pseudo-class may not work with browsers that don't natively
support CSS selectors. Also, it has been deprecated from CSS3 specification.
As an alternative for contains() pseudo-class, you can use the innerText attribute (does
not work with Firefox) or textContent attribute (for Firefox) in the following ways:
WebElement cell =
driver.findElement(By.cssSelector("td[innerText='Item 1']"));](https://image.slidesharecdn.com/gundechau-231028071958-735e74f8/85/Gundecha-U-Selenium-Testing-Tools-Cookbook-2012-pdf-46-320.jpg)
![Locating Elements
32
Or
WebElement cell = driver.findElement
(By.cssSelector("td[textContent='Item 1']"));
You can also use jQuery selectors which support the contains() pseudo-class.
Using XPath text function
XPath provides the text() function which can be used to see if an element contains the
specified text in the following way:
WebElement cell = driver.findElement
(By.xpath("//td[contains(text(),'Item 1')]"));
Here we are using the contains function along with the text() function. The text()
function returns the complete text from the element and the contains() function checks for
the specific value that we have mentioned.
Finding elements using exact text value in XPath
With XPath, elements can be located by exact text value in the following way:
WebElement cell = driver.findElement
(By.xpath("//td[.='Item 1']"));
This will locate the <td> element matching with exact text.
How it works...
CSS selector and XPath provide methods with which to locate elements based on their text
contents. This approach comes in handy when elements don't have enough attributes or
when no other strategies work when attempting to locate these elements.
For locating elements using their text, both CSS selector and XPath search through the DOM
for elements that have the specified text value and return the matching element(s).
Locating elements using advanced CSS
selectors
We saw some basic CSS selectors in earlier recipes. In this recipe, we will explore some
advanced CSS selectors for locating elements.](https://image.slidesharecdn.com/gundechau-231028071958-735e74f8/85/Gundecha-U-Selenium-Testing-Tools-Cookbook-2012-pdf-47-320.jpg)

![Chapter 1
35
See also
f
f The Locating elements using CSS selectors recipe
Using jQuery selectors
jQuery selectors is one of the important feature of the jQuery library. jQuery Selectors are
based on CSS1-3 selectors along with some additional selectors. These selectors use the
familiar CSS Selector syntax to allow developers to quickly and easily identify page elements
to operate upon with the jQuery library methods. Similar to CSS selectors, these selectors
allow us to locate and manipulate HTML elements as a single element or list of elements.
jQuery selectors can be used where CSS selectors are not supported natively by the browsers.
In this recipe, we will explore in brief how to use jQuery selectors with Selenium WebDriver.
How to do it...
Let's create a test which checks that specified checkboxes are selected when page is
displayed, as follows:
@SuppressWarnings("unchecked")
@Test
public void testDefaultSelectedCheckbox() {
WebDriver driver = new ChromeDriver();
driver.get("http://dl.dropbox.com/u/55228056/Locators.html");
//Expected list of selected Checkbox
List<String> checked = Arrays.asList(new
String[]{"user1_admin", "user3_browser"});
//Create an instance of JavaScript Executor from driver
JavascriptExecutor js = (JavascriptExecutor) driver;
//Locate all the Checkbox which are checked by calling jQuery
//find() method.
//find() method returns elements in array
List<WebElement> elements = (List<WebElement>)
js.executeScript("return jQuery.find(':checked')");
//Verify two Checkbox are selected](https://image.slidesharecdn.com/gundechau-231028071958-735e74f8/85/Gundecha-U-Selenium-Testing-Tools-Cookbook-2012-pdf-50-320.jpg)
![Chapter 1
37
} catch (WebDriverException e) {
loaded = false;
}
return loaded;
}
public void injectjQuery() {
driver.executeScript(" var headID =
document.getElementsByTagName("head")[0];"
+ "var newScript = document.createElement('script');"
+ "newScript.type = 'text/javascript';"
+ "newScript.src = 'http://ajax.googleapis.com/
ajax/libs/jquery/1.7.2/jquery.min.js';"
+ "headID.appendChild(newScript);");
}
The injectjQueryIfNeeded() method will internally call the jQueryLoaded()
method to see if the jQuery object is available on the page. If the page does not have
the jQuery object defined, the injectjQueryIfNeeded() method will call the
injectjQuery() method to attach the jQuery library to the page header at runtime.
This is done by adding a <script> element, which refers the Google CDN (Content Delivery
Network) for jQuery library file, to the page. You may change the version used in this example
to the latest version of the jQuery library.
Locating table rows and cells
While working with tables, we can locate the rows and cells effectively by using a set of the By
class methods.
In this recipe, we will see how to locate rows and columns in table.
How to do it...
Let's create a simple test that will print data from a table, locating its rows and columns
as follows:
@Test
public void testTable() {
WebElement simpleTable = driver.findElement(By.id("items"));
//Get all rows
List<WebElement> rows =
simpleTable.findElements(By.tagName("tr"));
assertEquals(3, rows.size());](https://image.slidesharecdn.com/gundechau-231028071958-735e74f8/85/Gundecha-U-Selenium-Testing-Tools-Cookbook-2012-pdf-52-320.jpg)

![Chapter 1
39
Similarly using XPath, it can be done in the following way:
WebElement cell = driver.findElement
(By.xpath("//table[@id='items']/tbody/tr[2]/td"));
See also
f
f The Locating child elements in a table recipe
f
f The Locating elements using FindElements method recipe
Locating child elements in a table
Working with simple tables is relatively easy. However, you will come across complex tables
where other than data, table cells have child elements for user interaction. For example, in an
e-commerce application when you open the shopping cart page, it looks a simple table but
inside there are many complex elements.](https://image.slidesharecdn.com/gundechau-231028071958-735e74f8/85/Gundecha-U-Selenium-Testing-Tools-Cookbook-2012-pdf-54-320.jpg)

![Chapter 1
41
We can also use XPath in the following way:
WebElement adminCheckBox = driver.findElement
(By.xpath("//td[contains(text(),'Nash')]/following-
sibling::td/descendant::div/label
[contains(text(),'Admin')]/following-sibling::input"));
adminCheckBox.click();
How it works...
Parent, child, and sibling in CSS or XPath axes become a great help in correlating users
with roles and developing a generic locator strategy for this feature. In simple terms, these
strategies help to locate elements based on the element's relationship with other elements
in a document.
Coming back to the problem, first we need to find a unique way to identify a user in the table.
For this, we will locate a cell which contains username. We will locate this cell using its inner
text in the following way:
CSS XPath
td:contains('Nash') //td[contains(text(),'Nash')]
Next, we need to find the cell which contains the child elements. This is the second cell from
the cell containing username.
CSS XPath
td:contains('Nash')+td+td //td[contains(text(),'Nash')]/
following-sibling::td/
In the next step, we need to locate the label with the correct option. The next sibling of this
label will be the checkbox we are looking for.
CSS XPath
td:contains('Nash')+td+td>div>lab
el:contains('Admin')+input
//td[contains(text(),'Nash')]/
following-sibling::td/
descendant::div/
label[contains(text(),'Admin')]/
following-sibling::input](https://image.slidesharecdn.com/gundechau-231028071958-735e74f8/85/Gundecha-U-Selenium-Testing-Tools-Cookbook-2012-pdf-56-320.jpg)


![Chapter 2
47
How it works...
By passing the name of CSS attribute to the getCSSValue() method, it returns the value
of the CSS attribute. In this example, we are checking that the width attribute of the <div>
element is set to 150px.
WebElement message = driver.findElement(By.id("message"));
String width = message.getCssValue("width");
assertEquals("150px",width);
See also
f
f The Checking an element's attribute values recipe
Using Advanced User Interactions API for
mouse and keyboard events
The Selenium WebDriver's Advanced User Interactions API allows us to perform operations from
keyboard events and simple mouse events to complex events such as dragging-and-dropping,
holding a key and then performing mouse operations by using the Actions class, and building
a complex chain of events exactly like a user doing these manually.
The Actions class implements the builder pattern to create a composite action containing a
group of other actions.
In this recipe, we will use the Actions class to build a chain of events to select rows
in a table.
How to do it...
Let's create a test to select the multiple rows from different positions in a table using the
Ctrl key. We can select multiple rows by selecting the first row, then holding the Ctrl key,
and then selecting another row and releasing the Ctrl key. This will select the desired rows
from the table.
@Test
public void testRowSelectionUsingControlKey() {
List<WebElement> tableRows = driver.findElements
(By.xpath("//table[@class='iceDatTbl']/tbody/tr"));
//Select second and fourth row from table using Control Key.
//Row Index start at 0
Actions builder = new Actions(driver);](https://image.slidesharecdn.com/gundechau-231028071958-735e74f8/85/Gundecha-U-Selenium-Testing-Tools-Cookbook-2012-pdf-62-320.jpg)
![Working with Selenium API
48
builder.click(tableRows.get(1))
.keyDown(Keys.CONTROL)
.click(tableRows.get(3))
.keyUp(Keys.CONTROL)
.build().perform();
//Verify Selected Row table shows two rows selected
List<WebElement> rows = driver.findElements
(By.xpath("//div[@class='icePnlGrp
exampleBox']/table[@class='iceDatTbl']/tbody/tr"));
assertEquals(2,rows.size());
}
How it works...
We need to create an instance of the Actions class by passing the instance of driver class
to the constructor in the following way:
Actions builder = new Actions(driver);
We will build a chain of events that we need to perform for selecting the rows. This will require
performing a click() operation on the first row, then holding the Ctrl key using keyDown(),
clicking on the end row, and then releasing the Ctrl key by calling keyUp(). The Actions
class provides various methods to perform keyboard and mouse operations.
Actions builder = new Actions(driver);
builder.click(tableRows.get(1)).keyDown(Keys.CONTROL)
.click(tableRows.get(3)).keyUp(Keys.CONTROL)
.build().perform();
We can create a composite action that is ready to be performed by calling the build()
method. Finally the test will perform this composite action by calling the perform() method
of the Actions class.
The Keys class will represent all non-textual keys on the keyboard, for example Control Key,
Shift Key, Function Keys, and so on. In the previous example, we used keyDown(Keys.
CONTROL) to press and hold the Ctrl key until next operation is completed.
Actions may not work properly for elements that are not visible or
enabled. Before using these events, make sure that elements are
visible and enabled.
See also
f
f The Performing double-click on an element recipe](https://image.slidesharecdn.com/gundechau-231028071958-735e74f8/85/Gundecha-U-Selenium-Testing-Tools-Cookbook-2012-pdf-63-320.jpg)


![Chapter 2
53
There's more...
Arguments can also be a passed to the JavaScript code being executed by using the
executeScript() method. In the following example, we want to set the value of an
element. A special arguments array will be used inside the JavaScript code.
js.executeScript("document.getElementByID('name').value =
arguments[0]","John");
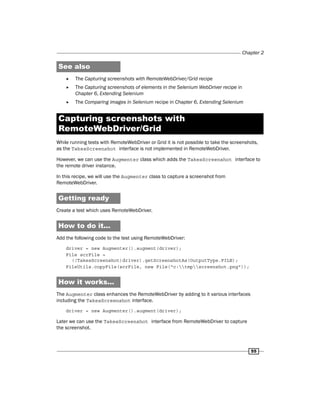
Capturing screenshots with Selenium
WebDriver
Selenium WebDriver provides the TakesScreenshot interface for capturing a screenshot
of a web page. This helps in test runs, showing exactly happened when an exception or error
occurred during execution, and so on. We can also capture screenshots during verification of
element state, values displayed, or state after an action is completed.
Capturing screenshots also helps in verification of layouts, field alignments, and so on where
we compare screenshots taken during test execution with baseline images.
In this recipe, we will use the TakesScreenshot interface to capture a screenshot of the
web page under test.
How to do it...
Let's create a test that will open our test application and take a screenshot of the page
in PNG format.
@Test
public void testTakesScreenshot()
{
try {
File scrFile =
((TakesScreenshot)driver).getScreenshotAs(OutputType.FILE);
FileUtils.copyFile(scrFile, new
File("c:tmpmain_page.png"));
} catch (Exception e) {
e.printStackTrace();
}
}](https://image.slidesharecdn.com/gundechau-231028071958-735e74f8/85/Gundecha-U-Selenium-Testing-Tools-Cookbook-2012-pdf-68-320.jpg)


![Chapter 2
61
How to do it...
Let's modify the testDropdown() test method for checking the options. Add the following
highlighted code to the test:
@Test
public void testDropdown()
{
//Get the Dropdown as a Select using its name attribute
Select make = new Select(driver.findElement(By.name("make")));
//Verify Dropdown does not support multiple selection
assertFalse(make.isMultiple());
//Verify Dropdown has four options for selection
assertEquals(4, make.getOptions().size());
//We will verify Dropdown has expected values as listed in a array
List<String> exp_options = Arrays.asList(new String[]{"BMW",
"Mercedes", "Audi","Honda"});
List<String> act_options = new ArrayList<String>();
//Retrieve the option values from Dropdown using getOptions() method
for(WebElement option : make.getOptions())
act_options.add(option.getText());
//Verify expected options array and actual options array match
assertArrayEquals(exp_options.toArray(),act_options.toArray());
//With Select class we can select an option in Dropdown
//using Visible Text
make.selectByVisibleText("Honda");
assertEquals("Honda", make.getFirstSelectedOption().getText());
//or we can select an option in Dropdown using value attribute
make.selectByValue("audi");
assertEquals("Audi", make.getFirstSelectedOption().getText());
//or we can select an option in Dropdown using index
make.selectByIndex(0);
}](https://image.slidesharecdn.com/gundechau-231028071958-735e74f8/85/Gundecha-U-Selenium-Testing-Tools-Cookbook-2012-pdf-76-320.jpg)
![Working with Selenium API
62
How it works...
Checking options in a dropdown or list needs a slightly different approach as there is no
inbuilt method available in the Select class. In this approach, we create a list of expected
values that we want to check in the dropdown or list.
List<String> exp_options = Arrays.asList(new String[]{"BMW",
"Mercedes", "Audi","Honda"});
The text labels for all the options will be retrieved in a similar list. For this, we will iterate
through all the options using the getOptions() method of the Select class. The
getOptions() method returns all the options as instances of the WebElement class in a
list. Using the getText() method of the WebElement class, the text label of all the options
will be added in the act_options array list.
List<String> act_options = new ArrayList<String>();
//Retrieve the option values from Dropdown using getOptions()
//method
for(WebElement option : make.getOptions())
act_options.add(option.getText());
We will compare the exp_options list with act_options for any mismatch at the end.
assertArrayEquals(exp_options.toArray(),act_options.toArray());
There's more...
For checking whether a specific option is available for selection, we can simply perform a
check on the act_options array list in the following way:
assertTrue(act_options.contains("BMW"));
See also
f
f The Automating dropdowns and lists recipe
f
f The Checking selected options in dropdowns and lists recipe](https://image.slidesharecdn.com/gundechau-231028071958-735e74f8/85/Gundecha-U-Selenium-Testing-Tools-Cookbook-2012-pdf-77-320.jpg)

![Working with Selenium API
64
Also modify the testMultipleSelectList()test method for checking the options. Add the
following highlighted code to the test:
@Test
public void testMultipleSelectList()
{
...
//Select multiple options in the list using visible text
color.selectByVisibleText("Black");
color.selectByVisibleText("Red");
color.selectByVisibleText("Silver");
//We will verify list has multiple options selected as listed
//in a array
List<String> exp_sel_options = Arrays.asList
(new String[]{"Black", "Red", "Silver"});
List<String> act_sel_options = new ArrayList<String>();
for(WebElement option : color.getAllSelectedOptions())
act_sel_options.add(option.getText());
//Verify expected array for selected options match with actual
//options selected
assertArrayEquals
(exp_sel_options.toArray(),act_sel_options.toArray());
//Verify there 3 options selected in the list
assertEquals(3,color.getAllSelectedOptions().size());
//Deselect an option using visible text
color.deselectByVisibleText("Silver");
//Verify selected options count
assertEquals(2,color.getAllSelectedOptions().size());
//Deselect an option using value attribute of the option
color.deselectByValue("rd");
//Verify selected options count
assertEquals(1,color.getAllSelectedOptions().size());
//Deselect an option using index of the option
color.deselectByIndex(0);
//Verify selected options count
assertEquals(0,color.getAllSelectedOptions().size());
}](https://image.slidesharecdn.com/gundechau-231028071958-735e74f8/85/Gundecha-U-Selenium-Testing-Tools-Cookbook-2012-pdf-79-320.jpg)
![Chapter 2
65
How it works...
When the user selects an option from a dropdown or list, which supports only single option
selection, the selected option can be queried through the getFirstSelectedOption()
method of the Select class. It returns the option as an instance of WebElement. For example,
in the Make dropdown we selected the Honda option using the selectByVisible() method.
To check this selection, we can use the getFirstSelectedOption() and the getText()
methods in the following way:
//With Select class we can select an option in Dropdown using Visible
Text
make.selectByVisibleText("Honda");
assertEquals("Honda", make.getFirstSelectedOption().getText());
Checking selected options in a multi-select dropdown or list
For checking selected options in a multi-select dropdown or list we can use the
getAllSelectedOptions() method of the Select class. It returns all the selected
options as a list of WebElement. In this test we created a list of expected selected items
and then retrieved the selected options in a list by iterating WebElement returned by
getAllSelectedOptions():
//We will verify list has multiple options selected as listed in a
//array
List<String> exp_sel_options = Arrays.asList(new String[]{"Black",
"Red", "Silver"});
List<String> act_sel_options = new ArrayList<String>();
for(WebElement option : color.getAllSelectedOptions())
act_sel_options.add(option.getText());
Using the assertArrayEquals() method of JUnit we will compare both exp_sel_
options and act_sel_options to check that correct options are selected in the list.
//Verify expected array for selected options match with actual
//options selected
assertArrayEquals(exp_sel_options.toArray(),
act_sel_options.toArray());
We can also check the number of options selected in a list by querying the size from the
getAllSelectedOptions() method. For example, we selected three options in the list,
so the getAllSelectedOptions().size() method should return 3.
assertEquals(3,color.getAllSelectedOptions().size());](https://image.slidesharecdn.com/gundechau-231028071958-735e74f8/85/Gundecha-U-Selenium-Testing-Tools-Cookbook-2012-pdf-80-320.jpg)
![Working with Selenium API
66
There's more...
For checking whether a specific option is selected, we can simply perform a check on the
act_sel_options array list in the following way:
assertTrue(act_sel_options.contains("Red"));
See also
f
f The Checking options in dropdowns and lists recipe
f
f The Checking selected options in dropdowns and lists recipe
Automating radio buttons and radio groups
Selenium WebDriver supports Radio Button and Radio Group controls using the WebElement
class. We can select and deselect the radio buttons using the click() method of the
WebElement class and check whether a radio button is selected or deselected using the
isSelected() method.
In this recipe, we will see how to work with the Radio Button and Radio Group controls.
How to do it...
Let's create a test which gets Radio Button and Radio Group controls. We will perform select
and deselect operations.
@Test
public void testRadioButton()
{
//Get the Radiobutton as WebElement using it's value attribute
WebElement petrol =
driver.findElement(By.xpath("//input[@value='Petrol']"));
//Check if its already selected? otherwise select the Radiobutton
//by calling click() method
if (!petrol.isSelected())
petrol.click();
//Verify Radiobutton is selected
assertTrue(petrol.isSelected());
//We can also get all the Radiobuttons from a Radio Group in a list](https://image.slidesharecdn.com/gundechau-231028071958-735e74f8/85/Gundecha-U-Selenium-Testing-Tools-Cookbook-2012-pdf-81-320.jpg)
![Chapter 2
67
//using findElements() method along with Radio Group identifier
List<WebElement> fuel_type =
driver.findElements(By.name("fuel_type"));
for (WebElement type : fuel_type)
{
//Search for Diesel Radiobutton in the Radio Group and select
//it
if(type.getAttribute("value").equals("Diesel"))
{
if(!type.isSelected())
type.click();
assertTrue(type.isSelected());
break;
}
}
}
How it works...
We can locate a radio button similar to any other element as a WebElement class. In this
example, XPath is used to locate the radio button using its value attribute.
//Get the Radiobutton as WebElement using it's value attribute
WebElement petrol = driver.findElement(By.xpath
("//input[@value='Petrol']"));
We can select or deselect a radio button by using the WebElement class's click() method.
There are no separate methods to perform these operations. When we want to select a radio
button, we need to be careful that it's not already selected otherwise calling the click()
method will deselect the radio button. We can check if a radio button is already selected by
calling the isSelected() method, which returns true if its selected and false if it's not
selected. Here the click() method will be called only when the radio button is not selected.
//Check if its already selected? otherwise select the Radiobutton
//by calling click() method
if (!petrol.isSelected())
petrol.click();](https://image.slidesharecdn.com/gundechau-231028071958-735e74f8/85/Gundecha-U-Selenium-Testing-Tools-Cookbook-2012-pdf-82-320.jpg)

![Chapter 2
69
WebElement airbags = driver.findElement
(By.xpath("//input[@value='Airbags']"));
//Check if its already selected? otherwise select the Checkbox
//by calling click() method
if (!airbags.isSelected())
airbags.click();
//Verify Checkbox is Selected
assertTrue(airbags.isSelected());
//Check Checkbox if selected? If yes, deselect it
//by calling click() method
if (airbags.isSelected())
airbags.click();
//Verify Checkbox is Deselected
assertFalse(airbags.isSelected());
}
How it works...
We can locate a checkbox in a way similar to that in which we locate any other element on a
page. In this example, XPath is used to locate the checkbox by its value attribute.
//Get the Checkbox as WebElement using it's value attribute
WebElement airbags = driver.findElement
(By.xpath("//input[@value='Airbags']"));
We can select or deselect a checkbox by using the WebElement class's click() method.
There are no separate methods to perform these operations. When we want to select a
checkbox, we need to be careful that it's not already selected otherwise calling the click()
method will deselect the checkbox. We can check if a checkbox is already selected by calling
the isSelected() method which returns true if its selected and false if it's not selected.
Here the click() method will be called only when the checkbox is not selected.
//Check if its already selected? otherwise select the Checkbox
//by calling click() method
if (!airbags.isSelected())
airbags.click();
Similarly, for deselecting the checkbox, we need to see if it is already selected.
//Check Checkbox if selected? If yes, deselect it
//by calling click() method
if (airbags.isSelected())
airbags.click();](https://image.slidesharecdn.com/gundechau-231028071958-735e74f8/85/Gundecha-U-Selenium-Testing-Tools-Cookbook-2012-pdf-84-320.jpg)


![Chapter 3
83
WebElement ledheadlamp = driver.findElement(By.xpath("//input[@
name='ledheadlamp']"));
//Check if its enabled before selecting it
if (ledheadlamp.isEnabled())
{
//Check if its already selected? otherwise select the Checkbox
if (!ledheadlamp.isSelected())
ledheadlamp.click();
}
else
{
fail("LED Lamp Checkbox is disabled!!");
}
}
How it works...
We are selecting a checkbox by checking two states of an element—first, it is enabled and
second it is not selected. We can use the isEnabled() function of the WebElement class,
which returns true if the element is enabled or false if it's disabled. The test will fail if the
checkbox is disabled. If we don't check this condition, the test will possibly throw an exception
saying the object is disabled, as follows:
//Check if its enabled before selecting it
if (ledheadlamp.isEnabled())
{
//Check if its already selected? otherwise select the Checkbox
if (!ledheadlamp.isSelected())
ledheadlamp.click();
}
else
{
fail("LED Lamp Checkbox is disabled!!");
}](https://image.slidesharecdn.com/gundechau-231028071958-735e74f8/85/Gundecha-U-Selenium-Testing-Tools-Cookbook-2012-pdf-98-320.jpg)


![Chapter 4
109
3. Define a method that will return the collection of parameters to the SimpleDDT class
by using the @Parameters annotation.
@Parameters
public static Collection testData() {
return Arrays.asList(
new Object[][] {
{"160","45","17.6","Underweight"},
{"168","70","24.8","Normal"},
{"181","89","27.2","Overweight"},
{"178","100","31.6","Obesity"}
}
);
}
4. Add a constructor to the SimpleDDT class, which will be used by the test runner to
pass the parameters to the SimpleDDT class instance.
public SimpleDDT(String height, String weight, String bmi, String
bmiCategory)
{
this.height = height;
this.weight = weight;
this.bmi = bmi;
this.bmiCategory = bmiCategory;
}
5. Finally, add the test case method testBMICalculator() that uses parameterized
variables. Also, add the setup() and teardown() methods to the SimpleDDT class.
@Test
public void testBMICalculator() throws Exception {
//Get the Height element and set the value using parameterised
//height variable
WebElement heightField = driver.findElement(By.
name("heightCMS"));
heightField.clear();
heightField.sendKeys(height);
//Get the Weight element and set the value using parameterised
//Weight variable
WebElement weightField = driver.findElement(By.
name("weightKg"));
weightField.clear();
weightField.sendKeys(weight);
//Click on Calculate Button](https://image.slidesharecdn.com/gundechau-231028071958-735e74f8/85/Gundecha-U-Selenium-Testing-Tools-Cookbook-2012-pdf-124-320.jpg)


![Chapter 4
113
public class TestNGDDT {
private WebDriver driver;
private StringBuffer verificationErrors = new StringBuffer();
}
2. Define a method that will return the collection of parameters to the TestNGDDT class
by using the @DataProvider annotation.
@DataProvider
public Object[][] testData() {
return new Object[][] {
new Object[] {"160","45","17.6","Underweight"},
new Object[] {"168","70","24.8","Normal"},
new Object[] {"181","89","27.2","Overweight"},
new Object[] {"178","100","31.6","Obesity"},
};
}
3. Add a @Test(dataProvider = "testData") annotation to the test. With
TestNG, we can parameterize individual tests instead of parameterizing the test case
class. Pass the name of the method that will return the test data collection needed to
execute this test.
@BeforeTest
public void setUp() {
// Create a new instance of the Firefox driver
driver = new FirefoxDriver();
driver.get("http://dl.dropbox.com/u/55228056/bmicalculator.
html");
}
@Test(dataProvider = "testData")
public void testBMICalculator(String height, String weight, String
bmi, String category) {
try {
WebElement heightField = driver.findElement(By.
name("heightCMS"));
heightField.clear();
heightField.sendKeys(height);
WebElement weightField = driver.findElement(By.
name("weightKg"));
weightField.clear();](https://image.slidesharecdn.com/gundechau-231028071958-735e74f8/85/Gundecha-U-Selenium-Testing-Tools-Cookbook-2012-pdf-128-320.jpg)
![Chapter 4
115
When a method is annotated with @DataProvider, it becomes a data feeder method
by passing the test data to the test case. In this example, the testData() method will
become the data feeder method and TestNG will pass the array of data rows to the test
method one-by-one:
@DataProvider
public Object[][] testData() {
return new Object[][] {
new Object[] {"160","45","17.6","Underweight"},
new Object[] {"168","70","24.8","Normal"},
new Object[] {"181","89","27.2","Overweight"},
new Object[] {"178","100","31.6","Obesity"},
};
}
The test case method is linked to the data feeder method by passing the name of the
dataProvider method to the @Test annotation.
@Test(dataProvider = "testData")
public void testBMICalculator(String height, String weight, String
bmi, String category)
TestNG will execute the test four times, with different test combinations. TestNG also
generates a well formatted report at the end of test execution.
There's more...
To run Selenium tests in parallel, the TestNG parameterization feature comes in very handy.
TestNG supports running Selenium tests parallel in a multithreading safe environment.](https://image.slidesharecdn.com/gundechau-231028071958-735e74f8/85/Gundecha-U-Selenium-Testing-Tools-Cookbook-2012-pdf-130-320.jpg)


![Data-driven Testing
118
this.height = height;
this.weight = weight;
this.bmi = bmi;
this.bmiCategory = bmiCategory;
}
3. Add the getTestData() method, which reads a CSV file and returns the data in the
collection.
public static Collection<String[]> getTestData(String fileName)
throws IOException {
List<String[]> records = new ArrayList<String[]>();
String record;
BufferedReader file = new BufferedReader(new
FileReader(fileName));
while ((record=file.readLine())!=null) {
String fields[] = record.split(",");
records.add(fields);
}
file.close();
return records;
}
4. Add the testBMICalculator() method along with the setUp() and
tearDown() methods.
@BeforeClass
public static void setUp() throws Exception {
// Create a new instance of the Firefox driver
driver = new FirefoxDriver();
driver.get("http://dl.dropbox.com/u/55228056/bmicalculator.
html");
}
@Test
public void testBMICalculator() throws Exception {
try {
WebElement heightField = driver.findElement(By.
name("heightCMS"));
heightField.clear();
heightField.sendKeys(height);
WebElement weightField = driver.findElement(By.
name("weightKg"));
weightField.clear();](https://image.slidesharecdn.com/gundechau-231028071958-735e74f8/85/Gundecha-U-Selenium-Testing-Tools-Cookbook-2012-pdf-133-320.jpg)

![Data-driven Testing
120
Changing delimiters
Sometimes, CSV files may have a separate delimiter than the comma. We
can change the getTestData() method to handle these delimiters. For
example, a tab character is used to separate records. For this, we can split
the record, using the t character, in the following way:
String fields[] = record.split("t");
See also
f
f The Creating a data-driven test using JUnit recipe
f
f The Reading test data from an Excel file using JUnit and Apache POI recipe
f
f The Reading test data from a database using JUnit and JDBC recipe
Reading test data from an Excel file using
JUnit and Apache POI
To maintain test cases and test data, Microsoft Excel is the favorite tool used by testers.
Compared to the CSV file format, Excel gives numerous features and a structured way to store
data. A tester can create and maintain tables of test data in an Excel spreadsheet easily.
In this recipe, we will use an Excel spreadsheet as your data source. We will use the Apache
POI API, developed by the Apache Foundation, to manipulate the Excel spreadsheet. This
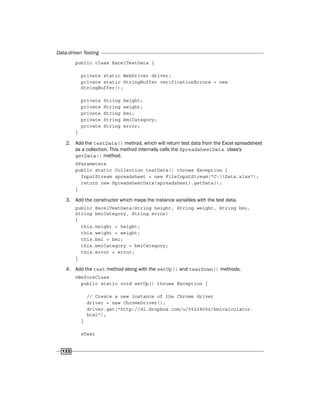
recipe also implements some negative test handling.](https://image.slidesharecdn.com/gundechau-231028071958-735e74f8/85/Gundecha-U-Selenium-Testing-Tools-Cookbook-2012-pdf-135-320.jpg)


![Data-driven Testing
126
2. Add the testData() method that will return the test data from the database as a
collection of strings. This method internally calls the getTestData() method.
@Parameters
public static Collection testData() throws Exception {
return getTestData("C:BmiTesting.mdb","SELECT Height, Weight,
Bmi, Category FROM TestData");
}
3. Add the constructor, which maps the instance variables with the test.
public DbTestData(String height, String weight, String bmi, String
bmiCategory) {
this.height = height;
this.weight = weight;
this.bmi = bmi;
this.bmiCategory = bmiCategory;
}
4. Add the getTestData() method that reads a database query results and returns
the data in the collection.
public static Collection<String[]> getTestData(String mdbFile,
String sqlQuery) throws Exception {
ArrayList<String[]> records = new ArrayList<String[]>();
Class.forName("sun.jdbc.odbc.JdbcOdbcDriver");
String myDB = "jdbc:odbc:Driver={Microsoft Access Driver
(*.mdb)};DBQ=" + mdbFile;
Connection conn = DriverManager.getConnection(myDB, "", "");
Statement stmt = null;
ResultSet rs = null;
stmt = conn.createStatement(ResultSet.TYPE_SCROLL_INSENSITIVE,
ResultSet.CONCUR_UPDATABLE);
rs = stmt.executeQuery(sqlQuery);
ResultSetMetaData rsMetaData = rs.getMetaData();
int cols = rsMetaData.getColumnCount();
while (rs.next())
{
String fields[] = new String[cols];
int col = 0;](https://image.slidesharecdn.com/gundechau-231028071958-735e74f8/85/Gundecha-U-Selenium-Testing-Tools-Cookbook-2012-pdf-141-320.jpg)
![Chapter 4
127
for(int colIdx=1;colIdx<=cols;colIdx++) {
fields[col] = rs.getString(colIdx);
col++;
}
records.add(fields);
}
rs.close();
stmt.close();
conn.close();
return records;
}
5. Add the test method along with the setUp() and tearDown() methods.
@BeforeClass
public static void setUp() throws Exception {
// Create a new instance of the Firefox driver
driver = new FirefoxDriver();
driver.get("http://dl.dropbox.com/u/55228056/bmicalculator.
html");
}
@Test
public void testBMICalculator() {
try {
WebElement heightField = driver.findElement(By.
name("heightCMS"));
heightField.clear();
heightField.sendKeys(this.height);
WebElement weightField = driver.findElement(By.
name("weightKg"));
weightField.clear();
weightField.sendKeys(this.weight);
WebElement calculateButton = driver.findElement(By.
id("Calculate"));
calculateButton.click();
WebElement bmiLabel = driver.findElement(By.name("bmi"));
assertEquals(this.bmi, bmiLabel.getAttribute("value"));
WebElement bmiCategoryLabel = driver.findElement(By.name
("bmi_category"));](https://image.slidesharecdn.com/gundechau-231028071958-735e74f8/85/Gundecha-U-Selenium-Testing-Tools-Cookbook-2012-pdf-142-320.jpg)


![Data-driven Testing
130
2. Copy the following code to the newly created class by replacing its contents:
using System;
using System.Collections.Generic;
using System.Linq;
using System.Text;
using NUnit.Framework;
using System.Collections;
using System.Xml.Linq;
using OpenQA.Selenium;
using OpenQA.Selenium.Firefox;
using OpenQA.Selenium.Support;
using OpenQA.Selenium.Support.UI;
namespace BMICalculator
{
[TestFixture]
public class BMICalculatorNUnitTest
{
IWebDriver driver;
[SetUp]
public void TestSetup()
{
// Create a instance of the Firefox driver using
IWebDriver Interface
driver = new FirefoxDriver();
}
[TestCaseSource("BmiTestData")]
public void TestBmiCalculator(string height, string weight,
string expected_bmi, string expected_category)
{
driver.Navigate().GoToUrl("http://dl.dropbox.
com/u/55228056/mobilebmicalculator.html");
IWebElement heightElement = driver.FindElement(By.
Name("heightCMS"));
heightElement.SendKeys(height);
IWebElement weightElement = driver.FindElement(By.
Name("weightKg"));
weightElement.SendKeys(weight);
IWebElement calculateButton = driver.FindElement(By.
Id("Calculate"));](https://image.slidesharecdn.com/gundechau-231028071958-735e74f8/85/Gundecha-U-Selenium-Testing-Tools-Cookbook-2012-pdf-145-320.jpg)
![Chapter 4
131
calculateButton.Click();
IWebElement bmiElement = driver.FindElement(By.
Name("bmi"));
Assert.AreEqual(expected_bmi, bmiElement.
GetAttribute("value"));
IWebElement bmiCatElement = driver.FindElement(By.
Name("bmi_category"));
Assert.AreEqual(expected_category, bmiCatElement.
GetAttribute("value"));
}
[TearDown]
public void TestCleanUp()
{
// Close the browser
driver.Quit();
}
private IEnumerable BmiTestData
{
get { return GetBmiTestData(); }
}
private IEnumerable GetBmiTestData()
{
var doc = XDocument.Load(@"c:data.xml");
return
from vars in doc.Descendants("vars")
let height = vars.Attribute("height").Value
let weight = vars.Attribute("weight").Value
let expected_bmi = vars.Attribute("bmi").Value
let expected_category = vars.Attribute
("bmi_category").Value
select new object[] { height, weight,
expected_bmi, expected_category };
}
}
}](https://image.slidesharecdn.com/gundechau-231028071958-735e74f8/85/Gundecha-U-Selenium-Testing-Tools-Cookbook-2012-pdf-146-320.jpg)
![Data-driven Testing
132
How it works...
While creating a data-driven test in NUnit, we use the TestCaseSource attribute. We will
specify the name of the IEnumerable property that will provide test data to this test case
with the TestCaseSource attribute shown in the following code:
[TestCaseSource("BmiTestData")]
public void TestBmiCalculator(string height, string weight, string
expected_bmi, string expected_category)
When we execute the test, NUnit framework will generate test cases by calling the
BmiTestData property. This will return an array of arguments as IEnumerable by calling
the GetBmiTestData() method. An array of arguments is created by reading an XML file
using a LINQ Query in GetBmiTestData() method. When we open the test in the NUnit GUI,
it shows the test cases for all the test data combinations provided in the input XML file:](https://image.slidesharecdn.com/gundechau-231028071958-735e74f8/85/Gundecha-U-Selenium-Testing-Tools-Cookbook-2012-pdf-147-320.jpg)


![Chapter 4
135
4. Create a new test class and name it BMICalculatorTests. Copy the following code
to this class:
using System;
using System.Text;
using System.Collections.Generic;
using System.Linq;
using Microsoft.VisualStudio.TestTools.UnitTesting;
using OpenQA.Selenium;
using OpenQA.Selenium.Firefox;
using OpenQA.Selenium.Support;
using OpenQA.Selenium.Support.UI;
using System.Data;
namespace BMICalculator
{
[TestClass]
public class BMICalculatorTests
{
IWebDriver driver;
[TestInitialize]
public void TestSetup()
{
//Create a instance of the Firefox driver using
//IWebDriver Interface
driver = new FirefoxDriver();
}
private TestContext testContextInstance;
/// <summary>
///Gets or sets the test context which provides
///information about and functionality for the current
//test run.
///</summary>
public TestContext TestContext
{
get
{
return testContextInstance;
}
set
{
testContextInstance = value;
}](https://image.slidesharecdn.com/gundechau-231028071958-735e74f8/85/Gundecha-U-Selenium-Testing-Tools-Cookbook-2012-pdf-150-320.jpg)
![Data-driven Testing
136
}
[TestMethod]
[DeploymentItem("Data.xls")]
[DataSource("System.Data.OleDb", "Provider=Microsoft.
ACE.OLEDB.12.0;Data Source=Data.xls;Persist Security
Info=False;Extended Properties='Excel 12.0;HDR=Yes'",
"Data$", DataAccessMethod.Sequential)]
public void TestBMICalculator()
{
driver.Navigate().GoToUrl("http://dl.dropbox.
com/u/55228056/bmicalculator.html");
IWebElement height = driver.FindElement(By.
Name("heightCMS"));
height.SendKeys(TestContext.DataRow["Height"].
ToString());
IWebElement weight = driver.FindElement(By.
Name("weightKg"));
weight.SendKeys(TestContext.DataRow["Weight"].
ToString());
IWebElement calculateButton = driver.FindElement(By.
Id("Calculate"));
calculateButton.Click();
IWebElement bmi = driver.FindElement(By.Name("bmi"));
Assert.AreEqual(TestContext.DataRow["Bmi"].ToString(),
bmi.GetAttribute("value"));
IWebElement bmi_category = driver.FindElement(By.
Name("bmi_category"));
Assert.AreEqual(TestContext.DataRow["Category"].
ToString(), bmi_category.GetAttribute("value"));
}
[TestCleanup]
public void TestCleanUp()
{
// Close the browser
driver.Quit();
}
}
}](https://image.slidesharecdn.com/gundechau-231028071958-735e74f8/85/Gundecha-U-Selenium-Testing-Tools-Cookbook-2012-pdf-151-320.jpg)
![Chapter 4
137
How it works...
When we add the DataSource attribute to a test in MSTEST, it provides data source-specific
information for data-driven testing to the framework.
[TestMethod]
[DeploymentItem("Data.xls")]
[DataSource("System.Data.OleDb", "Provider=Microsoft.ACE.
OLEDB.12.0;Data Source=Data.xls;Persist Security Info=False;Extended
Properties='Excel 12.0;HDR=Yes'", "Data$", DataAccessMethod.
Sequential)]
public void TestBMICalculator()
It reads the test data from the source. In this example, the source is an Excel spreadsheet.
The framework internally creates a DataTable object to store the values from the source.
The TestContext test method provides a collection of data rows for parameterization. We
can access a field by specifying its name, as follows:
IWebElement height = driver.FindElement(By.
Name("heightCMS"));
height.SendKeys(TestContext.DataRow["Height"].ToString());
With the DataSource attribute, we can specify the connection string or a configuration
file to read data from a variety of sources including CSV File, Excel spreadsheets, XML files,
or databases.
See also
f
f The Creating a data-driven test in NUnit recipe
Creating a data-driven test in Ruby using
Roo
In the previous recipes, we saw parameterization with Java and .NET; Ruby also has been
used widely to create Selenium WebDriver tests.
Again, Ruby does not have its own way to parameterize the script. However, we can use the
Roo (http://roo.rubyforge.org/) gem in Ruby to read spreadsheets. Roo supports
multiple formats as follows:
f
f A locally stored Excel (.xls) file
f
f A locally stored OpenOffice (.ods) file
f
f An Excel file (.xls) stored in a Confluence wiki page with Confluence Office Connector
f
f A Google Docs spreadsheet](https://image.slidesharecdn.com/gundechau-231028071958-735e74f8/85/Gundecha-U-Selenium-Testing-Tools-Cookbook-2012-pdf-152-320.jpg)


![Data-driven Testing
142
How to do it...
Let's create a simple Python test for parameterization, using the following steps. This test
will read test data from the CSV file used in the Reading test data from a CSV file using JUnit
recipe earlier.
1. Create a Ruby test by importing the following modules:
from selenium import webdriver
import csv, sys
2. Declare the following variables to print a summary of the test combinations executed
from the test data source:
#Variables for Printing Test Summary
test_executed = 0
test_passed = 0
test_failed = 0
test_status = True
3. Add the following code, which will iterate through the CSV data by reading each
combination and then performing the operations and verifications:
try:
#Create an instance of WebDriver for Firefox
driver = webdriver.Firefox()
driver.get("http://dl.dropbox.com/u/55228056/bmicalculator.
html")
#Open the CSV file
datafile = open('c:data.csv', "rb")
#Create a CSV Reader from CSV file
reader = csv.reader(datafile)
test_executed = 0
#Iterate through the CSV Rows line by line
for row in reader:
test_executed += 1
print "Test " + str(test_executed)
heightField = driver.find_element_by_name("heightCMS")
heightField.clear()
heightField.send_keys(row[0])
weightField = driver.find_element_by_name("weightKg")
weightField.clear()](https://image.slidesharecdn.com/gundechau-231028071958-735e74f8/85/Gundecha-U-Selenium-Testing-Tools-Cookbook-2012-pdf-157-320.jpg)
![Chapter 4
143
weightField.send_keys(row[1])
calculateButton = driver.find_element_by_id("Calculate")
calculateButton.click()
bmiLabel = driver.find_element_by_name("bmi")
bmiCategoryLabel = driver.find_element_by_name("bmi_category")
if bmiLabel.get_attribute("value") == row[2]:
print "Pass, expected value for BMI <" + row[2] + ">,
actual <" + bmiLabel.get_attribute("value") + ">"
else:
print "Fail, expected value for BMI <" + row[2] + ">,
actual <" + bmiLabel.get_attribute("value") + ">"
test_status = False
if bmiCategoryLabel.get_attribute("value") == row[3]:
print "Pass, expected value for BMI Category <" + row[3] +
">, actual <" + bmiCategoryLabel.get_attribute("value") + ">"
else:
print "Fail, expected value for BMI Category <" + row[3] +
">, actual <" + bmiCategoryLabel.get_attribute("value") + ">"
test_status = False
if test_status == True:
test_passed = test_passed + 1
else:
test_failed = test_failed + 1
except:
print "Unexpected error:", sys.exc_info()[0]
raise
finally:
print "--------------------------------------------"
print "Total (" + str(test_executed)+ ") Tests Executed"
print "Total (" + str(test_passed)+ ") Tests Passed"
print "Total (" + str(test_failed) + ") Tests Failed"
driver.close()
datafile.close()](https://image.slidesharecdn.com/gundechau-231028071958-735e74f8/85/Gundecha-U-Selenium-Testing-Tools-Cookbook-2012-pdf-158-320.jpg)
![Data-driven Testing
144
How it works...
When we execute this test, Python will read the contents of the CSV file to the reader object.
#Open the CSV file
datafile = open('c:data.csv', "rb")
#Create a CSV Reader from CSV file
reader = csv.reader(datafile) ets.first
We can then iterate on the data object from first row to the last row, using the for loop, as
shown in the following code:
for row in reader:
This will copy the content from reader into a variable named row. The value from a column
is accessed using row[index], by passing the index of the column.
heightField = driver.find_element_by_name("heightCMS")
heightField.clear()
heightField.send_keys(row[0])
We also added a custom reporting code that will generate a nicely formatted report at the end
of test execution, as shown in the following screenshot:](https://image.slidesharecdn.com/gundechau-231028071958-735e74f8/85/Gundecha-U-Selenium-Testing-Tools-Cookbook-2012-pdf-159-320.jpg)


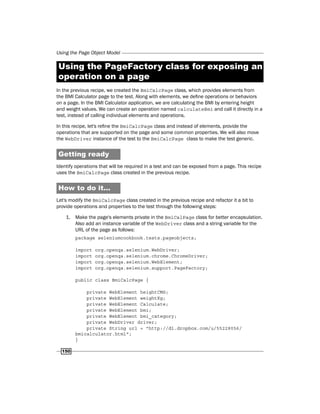


![Using the Page Object Model
162
How to do it...
For implementing Page Object model .NET, perform the follow steps:
1. Define a class for the Page Object model by creating a new C# class with the
name of the page. In this example, we will create the page's object for the
BMI Calculator application:
using System;
using OpenQA.Selenium;
using OpenQA.Selenium.Chrome;
using OpenQA.Selenium.Support.PageObjects;
namespace PageFactoryTests
{
public class BmiCalcPage
{
static string Url = "http://dl.dropbox.com/u/55228056/
bmicalculator.html";
private static string Title = "BMI Calculator";
[FindsBy(How = How.Id, Using = "heightCMS")]
[CacheLookup]
private IWebElement HeightField;
[FindsBy(How = How.Id, Using = "weightKg")]
private IWebElement WeightField;
[FindsBy(How = How.Id, Using = "Calculate")]
private IWebElement CalculateButton;
[FindsBy(How = How.Name, Using = "bmi")]
private IWebElement BmiField;
[FindsBy(How = How.Name, Using = "bmi_category")]
private IWebElement BmiCategoryField;
private IWebDriver driver;
public BmiCalcPage() {
driver = new ChromeDriver(@"C:ChromeDriver");
PageFactory.InitElements(driver, this);
}
public void Load()](https://image.slidesharecdn.com/gundechau-231028071958-735e74f8/85/Gundecha-U-Selenium-Testing-Tools-Cookbook-2012-pdf-177-320.jpg)
![Chapter 5
163
{
driver.Navigate().GoToUrl(Url);
}
public void Close()
{
driver.Close();
}
public bool IsLoaded
{
get { return driver.Title.Equals(Title); }
}
public void CalculateBmi(String height, String weight)
{
HeightField.SendKeys(height);
WeightField.SendKeys(weight);
CalculateButton.Click();
}
public String Bmi
{
get { return BmiField.GetAttribute("value"); }
}
public String BmiCategory
{
get { return BmiCategoryField.GetAttribute("value"); }
}
}
}
2. Using the BmiCalcPage class, let's create a test for the calculation feature, as follows:
using NUnit.Framework;
namespace PageFactoryTests
{
public class BmiCalcTests
{
[TestCase]
public void TestBmiCalculator()
{
BmiCalcPage bmiCalcPage = new BmiCalcPage();](https://image.slidesharecdn.com/gundechau-231028071958-735e74f8/85/Gundecha-U-Selenium-Testing-Tools-Cookbook-2012-pdf-178-320.jpg)
![Using the Page Object Model
164
bmiCalcPage.Load();
Assert.IsTrue(bmiCalcPage.IsLoaded);
bmiCalcPage.CalculateBmi("181", "80");
Assert.AreEqual("24.4", bmiCalcPage.Bmi);
Assert.AreEqual("Normal", bmiCalcPage.BmiCategory);
bmiCalcPage.Close();
}
}
}
How it works...
In this example, the BmiCalcPage class provides various operations and properties from the
BMI Calculator page to the test. The elements on the page are defined as instances of the
IWebDriver interface with a FindsBy annotation as follows:
[FindsBy(How = How.Id, Using = "heightCMS")]
private IWebElement HeightField;
When the page is initialized by the PageFactory.InitElements() method, these
annotations are used to search the elements on the page.
The BmiCalcPage class implements methods for opening and closing the BMI Calculator
page. This will provide a high level of abstraction to the test.
The BmiCalcPage class also implements the IsLoaded property, which will tell a test if the
BMI Calculator page is loaded into the browser. This class also defined properties for the Bmi
and BmiCategory fields, which provide values from these fields to test, rather than complete
access to the underlying elements as follows:
public bool IsLoaded
{
get { return driver.Title.Equals(Title); }
}
public String Bmi
{
get { return BmiField.GetAttribute("value"); }
}
public String BmiCategory
{
get { return BmiCategoryField.GetAttribute("value"); }
}](https://image.slidesharecdn.com/gundechau-231028071958-735e74f8/85/Gundecha-U-Selenium-Testing-Tools-Cookbook-2012-pdf-179-320.jpg)


![Extending Selenium
178
2. Add a method to retrieve the count of tabs available on tab widget. We can use this to
verify that the tab widget is displaying the expected number of tabs.
public int getTabCount() {
List<WebElement> tabs = _jQueryUITab.findElements(By.
cssSelector(".ui-tabs-nav > li"));
return tabs.size();
}
3. Add a method to get the name of the selected tab, using the following code:
public String getSelectedTab() {
WebElement tab = _jQueryUITab.findElement(By.cssSelector(".ui-
tabs-nav > li[class*='ui-tabs-selected']"));
return tab.getText();
}
4. Add a method to select a tab. We will pass the name of the tab that we want to
select, to this method, by using the following code:
public void selectTab(String tabName) throws Exception
{
int idx=0;
boolean found=false;
List<WebElement> tabs = _jQueryUITab.findElements(By.
cssSelector(".ui-tabs-nav > li"));
for(WebElement tab : tabs) {
if(tabName.equals(tab.getText().toString())) {
WrapsDriver wrappedElement = (WrapsDriver) _jQueryUITab;
JavascriptExecutor driver = (JavascriptExecutor)
wrappedElement.getWrappedDriver();
driver.executeScript("jQuery(arguments[0]).tabs().
tabs('select',arguments[1]);",_jQueryUITab,idx);
found = true;
break;
}
idx++;
}
//Throw an exception if specified tab is not found
if (found==false)
throw new Exception("Could not find tab '" + tabName + "'");
}](https://image.slidesharecdn.com/gundechau-231028071958-735e74f8/85/Gundecha-U-Selenium-Testing-Tools-Cookbook-2012-pdf-193-320.jpg)
![Chapter 6
179
5. Let's implement the JQueryUITab class in a sample test, with the following code:
import org.openqa.selenium.WebDriver;
import org.openqa.selenium.firefox.FirefoxDriver;
import org.openqa.selenium.By;
import static org.junit.Assert.*;
import org.junit.After;
import org.junit.Before;
import org.junit.Test;
public class JQueryUITabWidgetTest {
private WebDriver driver;
private StringBuffer verificationErrors = new StringBuffer();
@Before
public void setUp() {
driver = new FirefoxDriver();
driver.get("http://dl.dropbox.com/u/55228056/jQueryUITabDemo.
html");
}
@Test
public void testjQueryUITabWidget() {
try {
JQueryUITab tab = new JQueryUITab(driver.findElement(By.
cssSelector("div[id=MyTab][class^=ui-tabs]")));
//Verify Tab Widget has 3 Tabs
assertEquals(3,tab.getTabCount());
//Verify Home Tab is selected
assertEquals("Home",tab.getSelectedTab());
//Select Options Tab and verify it is selected
tab.selectTab("Options");
assertEquals("Options",tab.getSelectedTab());
//Select Admin Tab and verify it is selected
tab.selectTab("Admin");
assertEquals("Admin",tab.getSelectedTab());](https://image.slidesharecdn.com/gundechau-231028071958-735e74f8/85/Gundecha-U-Selenium-Testing-Tools-Cookbook-2012-pdf-194-320.jpg)
![Extending Selenium
180
//Select Home Tab
tab.selectTab("Home");
} catch (Exception e) {
//Capture and append Exceptions/Errors
verificationErrors.append(e.toString());
}
}
@After
public void tearDown() {
//Close the browser
driver.quit();
String verificationErrorString = verificationErrors.
toString();
if (!"".equals(verificationErrorString)) {
fail(verificationErrorString);
}
}
}
How it works...
The JQueryUITab class is ready for use in testing the Tab widget. The JQueryUITab class
accepts a WebElement object passed to its constructor. To retrieve the number of tabs in a
Tab widget, we pass the tab element. Internally, the Tab widget defines an unordered list for
tab headers. We can locate these headers by using the cssSelector() method of the By
class in a list of WebElements using the findElements() method. We can get the count of
the tabs by looking at the list size.
List<WebElement> tabs = _jQueryUITab.findElements(By.cssSelector(".ui-
tabs-nav > li"));
return tabs.size();
To retrieve the selected tab name, we will use a similar cssSelector() method with a filter
to locate the <li> element whose class is ui-tabs-selected. When we select a tab in the
Tab widget, jQuery framework adds all these class attributes to the <li> element internally,
as shown in the following code:
WebElement tab = _jQueryUITab.findElement(By.cssSelector
(".ui-tabs-nav > li[class*='ui-tabs-selected']"));
return tab.getText();](https://image.slidesharecdn.com/gundechau-231028071958-735e74f8/85/Gundecha-U-Selenium-Testing-Tools-Cookbook-2012-pdf-195-320.jpg)
![Chapter 6
181
Finally, to select a tab in the Tab widget, we need to execute the jQuery native API functions.
The Tab widget has a method to select a tab by its index. However, selecting a tab by its index
may not be user-friendly. Therefore, we will accept the name of the tab and then find out its
index internally, using the following code:
int idx=0;
List<WebElement> tabs = _jQueryUITab.findElements(By.cssSelector(".ui-
tabs-nav > li"));
Iterator<WebElement> itr = tabs.iterator();
while(itr.hasNext()) {
WebElement element = itr.next();
if(tabName.equals(element.getText().toString()))
break;
idx++;
}
Now, we will call the native jQuery API by using JavaScriptExecutor and pass the index to
the select method of the Tab widget, using the following code:
WrapsDriver wrappedElement = (WrapsDriver) _jQueryUITab;
JavascriptExecutor driver = (JavascriptExecutor) wrappedElement.
getWrappedDriver();
driver.executeScript("jQuery(arguments[0]).tabs().
tabs('select',arguments[1]);",_jQueryUITab,idx);
}
There's more...
Using a similar approach, we can also build support for other widgets in jQuery UI or other UI
frameworks such as Yahoo UI, Doojo, and GWT. This provides a neat and clean way to work
with custom widgets and UI controls.
Implementing an extension for the
WebElement object to set the element
attribute values
Setting an element's attribute can be useful in various situations where the test needs to
manipulate properties of an element. For example, for a masked textbox, the sendKeys()
method may not work well, and setting the value of the textbox will help to overcome these issues.
The WebElement object does not have a method that supports setting all types of attributes.
In this recipe, we will create an extension for WebElement and provide a method to set the
attribute value of an element at runtime.](https://image.slidesharecdn.com/gundechau-231028071958-735e74f8/85/Gundecha-U-Selenium-Testing-Tools-Cookbook-2012-pdf-196-320.jpg)
![Extending Selenium
182
Getting ready
Create a new Java class file for the WebElementExtender.java class. We will use this
class to host all the extension methods for the WebElement objects.
How to do it...
Add the setAttribute() method to the WebElementExtender class, as follows:
import org.openqa.selenium.JavascriptExecutor;
import org.openqa.selenium.WebElement;
import org.openqa.selenium.internal.WrapsDriver;
public class WebElementExtender {
public static void setAttribute(WebElement element, String
attributeName, String value)
{
WrapsDriver wrappedElement = (WrapsDriver) element;
JavascriptExecutor driver = (JavascriptExecutor)
wrappedElement.getWrappedDriver();
driver.executeScript("arguments[0].setAttribute(arguments[1],
arguments[2])", element, attributeName, value);
}
}
How it works...
In the setAttribute() method, we created an object of JavaScriptExecutor
and retrieved WrappedDriver of the WebElement object on which we want to call the
setAttribute() method.
Using JavaScriptExecutor, we called the JavaScript setAttribute() method to set the
attribute value of an element. In this example, the contents of a input element are cleared
before calling the SendKeys() method. This can also be done by calling the clear()
method of the WebElement class.
WebElement email = driver.findElement(By.id("email"));
WebElementExtender.setAttribute(userName, "value", "");
userName.sendKeys("test@test.com");](https://image.slidesharecdn.com/gundechau-231028071958-735e74f8/85/Gundecha-U-Selenium-Testing-Tools-Cookbook-2012-pdf-197-320.jpg)
![Chapter 6
183
See also
f
f The Implementing an extension for the WebElement object to highlight elements recipe
Implementing an extension for the
WebElement object to highlight elements
During test execution, there is no way to highlight an element. This will help us to see what is
actually going on in the browser. This method will slow down the tests a bit, but sometimes it's
a useful way to debug tests.
In this recipe, we will create an extension for WebElement and provide the highlight
Elements() method at runtime.
Getting ready
Create a new Java class file for the WebElementExtender.java class, or you can use the
class created in the previous recipe.
How to do it...
Add the highlightElement() method to the WebElementExtender class, as follows:
import org.openqa.selenium.JavascriptExecutor;
import org.openqa.selenium.WebElement;
import org.openqa.selenium.internal.WrapsDriver;
public class WebElementExtender {
public static void highlightElement(WebElement element) {
for (int i = 0; i < 5; i++) {
WrapsDriver wrappedElement = (WrapsDriver) element;
JavascriptExecutor driver = (JavascriptExecutor)
wrappedElement.getWrappedDriver();
driver.executeScript("arguments[0].setAttribute('style',
arguments[1]);",
element, "color: green; border: 2px solid yellow;");
driver.executeScript("arguments[0].setAttribute('style',
arguments[1]);",
element, "");
}
}
}](https://image.slidesharecdn.com/gundechau-231028071958-735e74f8/85/Gundecha-U-Selenium-Testing-Tools-Cookbook-2012-pdf-198-320.jpg)

![Chapter 6
185
Getting ready
Set up a new Java Project for the ObjectMap class. This class will be used by Selenium tests
as an extension for reading the ObjectMap file.
How to do it...
Let's implement object map to store the locators used in a test with the following steps:
1. We will create a properties file named objectmap.properties. We will add the
locators in a key/value pair. The part before the equal-to sign will be the key or the
logical name of the element, and the part after will be the locator details, in the
following format:
[logical_name]=[locator_type]>[locator_value]
The following code is an example of the object map for the BMI calculator page:
height_field=name>heightCMS
weight_field=id>weightKg
calculate_button=id>Calculate
bmi_field=id>bmi
2. Implement the ObjectMap class to read the property file and provide the locator
information to the test.
import java.io.FileInputStream;
import java.io.IOException;
import java.util.Properties;
public class ObjectMap {
Properties properties;
public ObjectMap(String mapFile)
{
properties = new Properties();
try {
FileInputStream in = new FileInputStream(mapFile);
properties.load(in);
in.close();
}catch (IOException e) {
System.out.println(e.getMessage());
}
}
}](https://image.slidesharecdn.com/gundechau-231028071958-735e74f8/85/Gundecha-U-Selenium-Testing-Tools-Cookbook-2012-pdf-200-320.jpg)
![Extending Selenium
186
3. Add a method to the ObjectMap class, which will read the locator details from the
properties file and create and return the locator using the By class, as shown in
following code:
public By getLocator(String logicalElementName) throws Exception
{
//Read value using the logical name as Key
String locator = properties.getProperty(logicalElementName);
//Split the value which contains locator type and locator value
String locatorType = locator.split(">")[0];
String locatorValue = locator.split(">")[1];
//Return a instance of By class based on type of locator
if(locatorType.toLowerCase().equals("id"))
return By.id(locatorValue);
else if(locatorType.toLowerCase().equals("name"))
return By.name(locatorValue);
else if((locatorType.toLowerCase().equals("classname")) ||
(locatorType.toLowerCase().equals("class")))
return By.className(locatorValue);
else if((locatorType.toLowerCase().equals("tagname")) ||
(locatorType.toLowerCase().equals("tag")))
return By.className(locatorValue);
else if((locatorType.toLowerCase().equals("linktext")) ||
(locatorType.toLowerCase().equals("link")))
return By.linkText(locatorValue);
else if(locatorType.toLowerCase().equals("partiallinktext"))
return By.partialLinkText(locatorValue);
else if((locatorType.toLowerCase().equals("cssselector")) ||
(locatorType.toLowerCase().equals("css")))
return By.cssSelector(locatorValue);
else if(locatorType.toLowerCase().equals("xpath"))
return By.xpath(locatorValue);
else
throw new Exception("Locator type '" + locatorType + "' not
defined!!");
}
4. Finally, create a test that uses the property file to store the locator information, using
the following code:
import org.openqa.selenium.WebDriver;
import org.openqa.selenium.firefox.FirefoxDriver;
import org.openqa.selenium.WebElement;](https://image.slidesharecdn.com/gundechau-231028071958-735e74f8/85/Gundecha-U-Selenium-Testing-Tools-Cookbook-2012-pdf-201-320.jpg)


![Chapter 6
189
We can have a single object map file for storing all the locators and can use the same locators
in multiple tests.
There's more…
Object maps can also be created in XML files. The following code is an example of an XML-
based object map:
<elements>
<element name="HeightField" locator_type="name" locator_
value="heightCMS"/>
<element name="WeightField" locator_type="id" locator_
value="weightKg"/>
<element name="CalculateButton" locator_type="xpath" locator_
value="//input[@value='Calculate']"/>
<element name="BmiField" locator_type="id" locator_value="bmi"/>
<element name="BmiCategoryField" locator_type="css" locator_
value="#bmi_category"/>
</elements>
The following code is the C# implementation of the getLocator() method:
public By GetLocator(string locatorName)
{
var element = from elements in _root.Elements("element")
where elements.Attributes("name").First().Value ==
locatorName
select elements;
try
{
string locatorType = element.Attributes("locator_type").First().
Value.ToString();
string locatorValue = element.Attributes("locator_value").First().
Value.ToString();
switch (locatorType.ToLower())
{
case "id":
return By.Id(locatorValue);
case "name":
return By.Name(locatorValue);
case "classname":
return By.ClassName(locatorValue);
case "linktext":
return By.LinkText(locatorValue);
case "partiallinktext":](https://image.slidesharecdn.com/gundechau-231028071958-735e74f8/85/Gundecha-U-Selenium-Testing-Tools-Cookbook-2012-pdf-204-320.jpg)


![Chapter 6
193
How to do it...
Let's implement the CompareUtil class with a method to compare two image files, as shown
in the following code:
import java.awt.Image;
import java.awt.Toolkit;
import java.awt.image.PixelGrabber;
public class CompareUtil {
public enum Result { Matched, SizeMismatch, PixelMismatch };
static Result CompareImage(String baseFile, String actualFile) {
Result compareResult = Result.PixelMismatch;
Image baseImage = Toolkit.getDefaultToolkit().getImage(baseFile);
Image actualImage = Toolkit.getDefaultToolkit().
getImage(actualFile);
try {
PixelGrabber baseImageGrab = new PixelGrabber(baseImage, 0, 0,
-1, -1, false);
PixelGrabber actualImageGrab = new PixelGrabber(actualImage,
0, 0, -1, -1, false);
int[] baseImageData = null;
int[] actualImageData = null;
if(baseImageGrab.grabPixels()) {
int width = baseImageGrab.getWidth();
int height = baseImageGrab.getHeight();
baseImageData = new int[width * height];
baseImageData = (int[])baseImageGrab.getPixels();
}
if(actualImageGrab.grabPixels()) {
int width = actualImageGrab.getWidth();
int height = actualImageGrab.getHeight();
actualImageData = new int[width * height];
actualImageData = (int[])actualImageGrab.getPixels();
}
System.out.println(baseImageGrab.getHeight() + "<>" +
actualImageGrab.getHeight());](https://image.slidesharecdn.com/gundechau-231028071958-735e74f8/85/Gundecha-U-Selenium-Testing-Tools-Cookbook-2012-pdf-208-320.jpg)
![Extending Selenium
194
System.out.println(baseImageGrab.getWidth() + "<>" +
actualImageGrab.getWidth());
if ((baseImageGrab.getHeight() != actualImageGrab.getHeight())
|| (baseImageGrab.getWidth() != actualImageGrab.getWidth()))
compareResult = Result.SizeMismatch;
else if(java.util.Arrays.equals(baseImageData,
actualImageData))
compareResult = Result.Matched;
} catch (Exception e) {
e.printStackTrace();
}
return compareResult;
}
}
How it works...
The CompareUtil class uses the java.awt.Image namespace to work with images. The
CompareImage() method takes the path of the base file and the actual file as an argument.
It then retrieves these images to the Image class.
Image baseImage = Toolkit.getDefaultToolkit().getImage(baseFile);
Image actualImage = Toolkit.getDefaultToolkit().getImage(actualFile);
Finally, it uses the PixelGrabber class to get the pixels from these images to an array, as
shown in the following code:
PixelGrabber baseImageGrab = new PixelGrabber(baseImage, 0, 0, -1, -1,
false);
PixelGrabber actualImageGrab = new PixelGrabber(actualImage, 0, 0, -1,
-1, false);
int[] baseImageData = null;
int[] actualImageData = null;
if(baseImageGrab.grabPixels()) {
int width = baseImageGrab.getWidth();
int height = baseImageGrab.getHeight();
baseImageData = new int[width * height];
baseImageData = (int[])baseImageGrab.getPixels();
}
if(actualImageGrab.grabPixels()) {
int width = actualImageGrab.getWidth();](https://image.slidesharecdn.com/gundechau-231028071958-735e74f8/85/Gundecha-U-Selenium-Testing-Tools-Cookbook-2012-pdf-209-320.jpg)
![Chapter 6
195
int height = actualImageGrab.getHeight();
actualImageData = new int[width * height];
actualImageData = (int[])actualImageGrab.getPixels();
}
The images are first tested for size mismatch, and then for pixel mismatch, using the
following code:
if ((baseImageGrab.getHeight() != actualImageGrab.getHeight()) ||
(baseImageGrab.getWidth() != actualImageGrab.getWidth()))
compareResult = Result.SizeMismatch;
else if(java.util.Arrays.equals(baseImageData, actualImageData))
compareResult = Result.Matched;
The following code is a sample test, comparing the layout of application being tested with a
base layout captured from an earlier release:
import org.openqa.selenium.firefox.FirefoxDriver;
import org.openqa.selenium.*;
import org.apache.commons.io.FileUtils;
import org.junit.*;
import static org.junit.Assert.*;
import java.io.File;
public class BmiCalculatorTest {
public WebDriver driver;
private StringBuffer verificationErrors = new StringBuffer();
@Before
public void setUp() throws Exception {
// Create a new instance of the Firefox driver
driver = new FirefoxDriver();
}
@Test
public void testBmiCalculatorLayout() throws Exception {
String scrFile = "c:screenshot.png";
String baseScrFile = "c:baseScreenshot.png";
//Open the BMI Calculator Page and get a Screen Shot of Page into
a File
driver.get("http://dl.dropbox.com/u/55228056/bmicalculator.html");
File screenshotFile = ((TakesScreenshot) driver).
getScreenshotAs(OutputType.FILE);](https://image.slidesharecdn.com/gundechau-231028071958-735e74f8/85/Gundecha-U-Selenium-Testing-Tools-Cookbook-2012-pdf-210-320.jpg)


![Chapter 7
213
Getting ready
Before setting up the Android emulator for Selenium to run tests, we need to set up the
Android development environment. Use the following steps:
f
f Install the SDK starter package (if you are using Windows, download the installer
for help with the initial setup) from http://developer.android.com/sdk/
index.html
f
f Add Android platforms and other components to your SDK by using the SDK Manager
How to do it...
You can use the command line or the graphical interface provided by the Android SDK to
create and set up a new Android emulator. Use the following steps on a command line to
create a new Android Virtual Device (AVD), and use this AVD in the emulator for Android:
We will create a new AVD using the command line.
1. Navigate to the tools directory in the android-sdk directory.
2. We will create a new AVD using the following command:
android create avd -n my_android -t 14 -c 512M
This command uses the following parameters:
Parameter Description
-n It specifies the name of the AVD.
-t It specifies the platform target. Use the android list targets
command to get the list of platforms available with the SDK.
-c It specifies the SD card storage space.
When you are prompted Do you wish to create a custom hardware profile [no], enter
no in the field.
3. Start the emulator by using the following command:
emulator -avd my_android &](https://image.slidesharecdn.com/gundechau-231028071958-735e74f8/85/Gundecha-U-Selenium-Testing-Tools-Cookbook-2012-pdf-228-320.jpg)


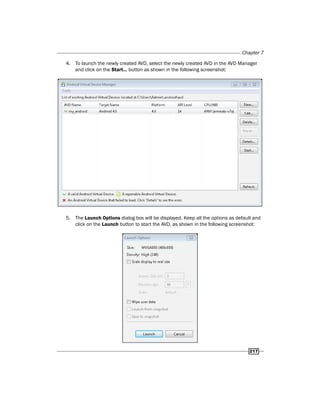

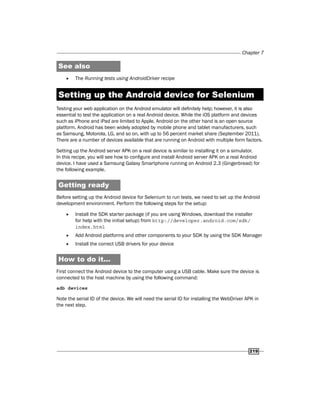


![Chapter 8
243
In this recipe, we will set up the Watir-WebDriver-Performance gem and collect various
performance metrics in our test.
Getting ready
You will need a Ruby environment. You will need the Watir-WebDriver gem along with the
Watir-WebDriver-Performance gem.
First, install the Watir-WebDriver gem by the using the following command:
gem install watir-webdriver
Then, install the Watir-WebDriver-Performance gem by using the following command:
gem install watir-webdriver-performance
How to do it...
Let's try a simple example using the Interactive Ruby Shell (IRB).
1. Load watir-webdriver and watir-webdriver-performance in Ruby as follows:
irb(main):001:0> require 'watir-webdriver'
irb(main):002:0> require 'watir-webdriver-performance'
2. Create an instance of Firefox by using the Watir::Browser.new method and
launch the unmesh.me website as follows:
irb(main):003:0> browser = Watir::Browser.new :firefox
irb(main):004:0> browser.goto "unmesh.me"
=> http://unmesh.me/
3. Once the website is loaded in the browser, we can find out the End User Response
Time by using the following command. In the following example, it took 17 seconds:
irb(main):005:0> # End User Response Time
irb(main):006:0* browser.performance.summary[:response_time]/1000
=> 17
irb(main):007:0> #seconds...
4. You can find other important metrics from browser.performance.summary by
using the following code:
irb(main):008:0* browser.performance.summary
=> {:app_cache=>-492, :dns=>2017, :tcp_connection=>-2067,
:request=>2753, :respo
nse=>724, :dom_processing=>6403, :time_to_first_byte=>5088, :time_
to_last_byte=>
5812, :response_time=>17743}
irb(main):009:0>](https://image.slidesharecdn.com/gundechau-231028071958-735e74f8/85/Gundecha-U-Selenium-Testing-Tools-Cookbook-2012-pdf-258-320.jpg)
![Client-side Performance Testing
244
You can see the output for the previous commands in the following screenshot:
We will create a test that will launch the unmesh.me website and measure the response time.
If the response time is more than 15 seconds, the test will fail:
require 'rubygems'
require 'watir-webdriver'
require 'watir-webdriver-performance'
require "test/unit"
class BmiCalcTest < Test::Unit::TestCase
def setup
@browser = Watir::Browser.new :firefox
@verification_errors = []
end
def test_responseTime
@browser.goto 'unmesh.me'
@load_secs = @browser.performance.summary[:response_time]/1000
puts "Response Time: " + @load_secs.to_s()
assert_equal true, @load_secs < 15
end
def teardown
@browser.close
assert_equal [], @verification_errors
end](https://image.slidesharecdn.com/gundechau-231028071958-735e74f8/85/Gundecha-U-Selenium-Testing-Tools-Cookbook-2012-pdf-259-320.jpg)
![Chapter 8
245
How it works...
The Watir-WebDriver-Performance gem provides the ability to capture the response time
metrics from the test created with the Watir-WebDriver. By instrumenting the Watir-WebDriver
automated tests that run regularly, we can capture and measure the web application
performance over time, and be alerted to the possibility of a change being introduced with
adverse performance effects.
The Watir-WebDriver-Performance gem collects all the available metrics from the browser
using the PerformanceTiming interface and summarizes them. The PerformanceTiming
interface allows JavaScript mechanisms to provide a client-side latency metric within
the application.
In the previous examples, the @browser object provides us with an additional performance
object through which we can retrieve the performance metrics collected from the browser.
For example, we can retrieve the overall response time in our test by using the following
code snippet:
@browser.performance.summary[:response_time]
There's more...
The Watir-WebDriver-Performance gem provides various timing metrics in the following format:
timing={
:navigation_start=>1336668835275,
:unload_event_start=>0,
:unload_event_end=>0,
:redirect_start=>0,
:redirect_end=>0,
:fetch_start=>1336668835545,
:domain_lookup_start=>1336668835275,
:domain_lookup_end=>1336668835615,
:connect_start=>1336668835930,
:connect_end=>1336668836226,
:request_start=>1336668835936,
:response_start=>1336668836812,
:response_end=>1336668837125,
:dom_loading=>1336668836813,
:dom_interactive=>1336668839215,
:dom_content_loaded_event_start=>1336668839385,
:dom_content_loaded_event_end=>1336668839419,
:dom_complete=>1336668842077,
:load_event_start=>1336668842077,
:load_event_end=>1336668842278},](https://image.slidesharecdn.com/gundechau-231028071958-735e74f8/85/Gundecha-U-Selenium-Testing-Tools-Cookbook-2012-pdf-260-320.jpg)


![Testing HTML5 Web Applications
248
Automating the HTML5 video player
Up till now, there has not been a standard for showing a video on web pages. Most of the
browsers depend on a plugin such as Flash to playback a video. However, different browsers
have different plugins.
HTML5 defines a new element that specifies a standard way to embed a video or movie clips
on a web page by using the <video> element. Internet Explorer 9+, Firefox, Opera, Chrome,
and Safari support the <video> element.
In this recipe, we will explore how we can automate testing of the <video> element, which
provides a JavaScript interface with various methods and properties for automation.
How to do it...
We will create a new test named testHTML5VideoPlayer for testing the <video> element.
We will use the JavaScriptExecutor class from Selenium WebDriver to interact with
the <video> element. We will control the video from our test code and also verify some
properties of the video in the following way:
@Test
public void testHTML5VideoPlayer() throws Exception {
File scrFile = null;
//Get the HTML5 Video Element
WebElement videoPlayer = driver.findElement(By.id("vplayer"));
//We will need a JavaScript Executor for interacting
//with Video Element's
//methods and properties for automation
JavascriptExecutor jsExecutor = (JavascriptExecutor) driver;
//Get the Source of Video that will be played in Video Player
String source = (String) jsExecutor.executeScript("return
arguments[0].currentSrc;", videoPlayer);
//Get the Duration of Video
long duration = (Long) jsExecutor.executeScript("return
arguments[0].duration", videoPlayer);
System.out.println(duration);
//Verify Correct Video is loaded and duration
assertEquals("http://html5demos.com/assets/dizzy.mp4", source);](https://image.slidesharecdn.com/gundechau-231028071958-735e74f8/85/Gundecha-U-Selenium-Testing-Tools-Cookbook-2012-pdf-263-320.jpg)
![Chapter 9
249
assertEquals(25, duration);
//Play the Video
jsExecutor.executeScript("return arguments[0].play()",
videoPlayer);
Thread.sleep(5000);
//Pause the video
jsExecutor.executeScript("arguments[0].pause()", videoPlayer);
//Take a screen-shot for later verification
scrFile = ((TakesScreenshot)driver).getScreenshotAs
(OutputType.FILE);
FileUtils.copyFile(scrFile, new File("c:tmppause_play.png"));
}
How it works...
Firstly, we locate the <video> element so we can call its associated methods in JavaScript
as well as the retrieve/set properties. We can locate the <video> element similar to another
HTML element by using the findElement() method as follows:
//Get the HTML5 Video Element
WebElement videoPlayer = driver.findElement(By.id("vplayer"));
We can verify which video file is being used with video player for playback and duration of
the video by looking at the currentSrc and duration properties. We are retrieving these
properties by accessing the <video> element through JavaScript. For this, we created an
instance of the JavaScriptExecutor class as follows:
JavascriptExecutor jsExecutor = (JavascriptExecutor) driver;
Using the executeScript() method of the JavaScriptExecutor class of Selenium
WebDriver, we can execute the JavaScript code within the browser window. We can return
a value from the JavaScript code by assigning the value to a variable. However, we need to
cast this value appropriately based on the type of value being returned. In this case, the
currentSrc property will return a URL of the video file as a String:
String source = (String) jsExecutor.executeScript("return
arguments[0].currentSrc;", videoPlayer);
In the previous example, arguments[0] was replaced by the videoPlayer WebElement
using the executeScript() method.](https://image.slidesharecdn.com/gundechau-231028071958-735e74f8/85/Gundecha-U-Selenium-Testing-Tools-Cookbook-2012-pdf-264-320.jpg)
![Testing HTML5 Web Applications
250
Video playback
As discussed earlier, we can also control the playback of a video using the methods of the
<video> element such as play() and pause(). We can call these methods by using the
executeScript() method in the following way:
//Play the Video
jsExecutor.executeScript("return arguments[0].play()", videoPlayer);
See also
f
f The Executing JavaScript code recipe in Chapter 2, Working with Selenium API
Automating interaction on the HTML5
canvas element
Web developers can now create cool drawing applications within web browsers using the new
HTML5 <canvas> element. This element is used to build drawing and charting applications
by using JavaScript. Canvas has several methods for drawing paths, boxes, circles, characters,
and adding images.
In this recipe, we will automate a simple drawing application through the Selenium WebDriver
action class for mouse movements. We will also implement an image comparison feature to
test the drawing on a canvas.
Internet Explorer 9+, Firefox, Opera, Chrome, and Safari support the <canvas> element.
How to do it...
Create a new test named testHTML5CanvasDrawing for testing the <canvas> element.
We draw a shape by using a sequence of mouse movements on the <canvas> element.
We will verify the canvas with a previously captured image and check the shape has been
redrawn as follows:
@Test
public void testHTML5CanvasDrawing() throws Exception {
//Get the HTML5 Canvas Element
WebElement canvas = driver.findElement(By.id("imageTemp"));
//Select the Pencil Tool
Select drawtool = new Select(driver.findElement(By.id("dtool")));
drawtool.selectByValue("pencil");
//Create a Action Chain for Draw a shape on Canvas](https://image.slidesharecdn.com/gundechau-231028071958-735e74f8/85/Gundecha-U-Selenium-Testing-Tools-Cookbook-2012-pdf-265-320.jpg)


![Recording Videos of Tests
262
QualityKey, 1.0f,
KeyFrameIntervalKey, (int) (15 * 60)),
new Format(MediaTypeKey, MediaType.VIDEO, EncodingKey,"black",
FrameRateKey, Rational.valueOf(30)),
null);
The ScreenRecorder constructor is supplied with the following parameters:
Parameter Passed
valued
Description
GraphicsConfiguration gc Provides display screen information such as
size, resolution, and so on.
Video and compression format video/avi,
tscc
The output format of the movie, encoding
mechanism, color depth, frames per second,
keyframe interval.
ScreenRecorder supports AVI and
QuickTime movie formats.
Color of the mouse cursor and
refresh rate
black, 30 The color of the mouse cursor and refresh rate.
Audio format null No audio will be recorded.
Video recording is invoked by calling the ScreenRecorder's start() method and completed
by calling the ScreenRecorder's stop() method.
When a recording is finished, ScreenRecorder stores the output file in the user's Home
directory. On Windows, it will save the recorded file in the C:Users<username>Videos
folder and on Mac it will save in the ~/Movies folder.
Recorded videos can be viewed with QuickTime or open source video players like VLC. Video
recorded in AVI format needs a media player that supports Techsmith Screen Capture Codec
(TSCC). This Codec is available for download and use at http://www.techsmith.com/
download.html.
There's more...
Often we use dual monitor setups to develop or test the code. ScreenRecorder
allows recording across dual monitors as well. This can be done by tweaking the
GraphicsConfiguration class to get the array of screen devices attached to
the system using getScreenDevices()[index] as follows:
GraphicsConfiguration gc = GraphicsEnvironment//
.getLocalGraphicsEnvironment()//
.getScreenDevices()[1]
.getDefaultConfiguration();](https://image.slidesharecdn.com/gundechau-231028071958-735e74f8/85/Gundecha-U-Selenium-Testing-Tools-Cookbook-2012-pdf-277-320.jpg)

![Recording Videos of Tests
264
using System.Linq;
using NUnit.Framework;
using OpenQA.Selenium;
using OpenQA.Selenium.Firefox;
using OpenQA.Selenium.Support;
using OpenQA.Selenium.Support.UI;
using Microsoft.Expression.Encoder.ScreenCapture;
namespace SeVideoRecording
{
[TestFixture]
public class GoogleSearch
{
IWebDriver driver;
ScreenCaptureJob scj;
}
}
3. Add a TestSetup() method to the GoogleSearch class created earlier. This
method will instantiate the ScreenCaptureJob object and set the file path where a
video recording will be saved. This method will also instantiate FirefoxDriver:
[SetUp]
public void TestSetup()
{
// Create a instance of ScreenCaptureJob from Expression
// Encoder
scj = new ScreenCaptureJob();
// Specify the path & name of the file to which Encoder will
// store the recording.
// Name of Test is passed to create individual recordings of
// each test
scj.OutputScreenCaptureFileName = @"C:ResultsTestGooleSearch.
wmv";
// Start the Screen Capture Job
scj.Start();
driver = new FirefoxDriver();
}](https://image.slidesharecdn.com/gundechau-231028071958-735e74f8/85/Gundecha-U-Selenium-Testing-Tools-Cookbook-2012-pdf-279-320.jpg)
![Chapter 10
265
4. Add the test case method TestGoogleSearch() to the GoogleSearch class. This
method will call the Selenium WebDriver API for testing the search functionality while
ScreenCaptureJob will record the video in the background:
[TestCase]
public void TestGoogleSearch()
{
driver.Navigate().GoToUrl("http://www.google.com/");
IWebElement query = driver.FindElement(By.Name("q"));
query.SendKeys("Cheese");
WebDriverWait wait = new WebDriverWait(driver,
TimeSpan.FromSeconds(10));
Boolean titleMatched = wait.Until<Boolean>((d) =>
{
return d.Title.ToLower().StartsWith("cheese");
});
Assert.AreEqual("cheese - Google Search", driver.Title);
}
5. Finally, add a TestCleanUp() method in the GoogleSearch class which will call
the stop() method of the ScreenCaptureJob class to stop and complete the
video recording:
[TearDown]
public void TestCleanUp()
{
//Close the Browser
driver.Close();
//Stop the Screen Capture Job
scj.Stop();
}](https://image.slidesharecdn.com/gundechau-231028071958-735e74f8/85/Gundecha-U-Selenium-Testing-Tools-Cookbook-2012-pdf-280-320.jpg)


![Chapter 11
275
6. Create a class named FundTransferStepDefs in the newly-created package. Add
the following code to this class:
package fundtransfer.test;
import org.openqa.selenium.WebDriver;
import org.openqa.selenium.chrome.ChromeDriver;
import org.openqa.selenium.WebElement;
import org.openqa.selenium.By;
import cucumber.annotation.*;
import cucumber.annotation.en.*;
import static org.junit.Assert.assertEquals;
public class FundTransferStepDefs {
protected WebDriver driver;
@Before
public void setUp() {
driver = new ChromeDriver();
}
@Given("the user is on Fund Transfer Page")
public void The_user_is_on_fund_transfer_page() {
driver.get("http://dl.dropbox.com/u/55228056/fundTransfer.
html");
}
@When("he enters "([^"]*)" as payee name")
public void He_enters_payee_name(String payeeName) {
driver.findElement(By.id("payee")).sendKeys(payeeName);
}
@And("he enters "([^"]*)" as amount")
public void He_enters_amount(String amount) {
driver.findElement(By.id("amount")).sendKeys(amount);
}
@And("he Submits request for Fund Transfer")
public void He_submits_request_for_fund_transfer() {
driver.findElement(By.id("transfer")).click();](https://image.slidesharecdn.com/gundechau-231028071958-735e74f8/85/Gundecha-U-Selenium-Testing-Tools-Cookbook-2012-pdf-290-320.jpg)
![Behavior-driven Development
276
}
@Then("ensure the fund transfer is complete with "([^"]*)"
message")
public void Ensure_the_fund_transfer_is_complete(String msg) {
WebElement message = driver.findElement(By.id("message"));
assertEquals(message.getText(),msg);
}
@Then("ensure a transaction failure message "([^"]*)" is
displayed")
public void Ensure_a_transaction_failure_message(String msg) {
WebElement message = driver.findElement(By.id("message"));
assertEquals(message.getText(),msg);
}
@After
public void tearDown() {
driver.close();
}
}
7. Create a support class RunCukesTest which will define the Cucumber-JVM
configurations:
package fundtransfer.test;
import cucumber.junit.Cucumber;
import org.junit.runner.RunWith;
@RunWith(Cucumber.class)
@Cucumber.Options(format = {"pretty", "html:target/cucumber-html-
report", "json-pretty:target/cucumber-report.json"})
public class RunCukesTest {
}
8. To run the tests in Maven life cycle select the FundTransfer project in Package
Explorer. Right-click on the project name and select Run As | Maven test. Maven will
execute all the tests from the project.](https://image.slidesharecdn.com/gundechau-231028071958-735e74f8/85/Gundecha-U-Selenium-Testing-Tools-Cookbook-2012-pdf-291-320.jpg)

![Behavior-driven Development
278
Team members use these feature files and scenarios to build and validate the system.
Frameworks like Cucumber or JBehave provide an ability to automatically validate the
features by allowing us to implement automated steps. For this we need to create the step
definition file that maps the steps from the feature file to automation code. Step definition
files implement a method for steps using special annotations. For example, in the following
code, the @When annotation is used to map the step "When he enters "Jim" as payee
name" from the feature file in the step definition file. When this step is to be executed by
the framework, the He_enters_payee_name() method will be called by passing the data
extracted using regular expressions from the step:
@When("he enters "([^"]*)" as payee name")
public void He_enters_payee_name(String payeeName) {
driver.findElement(By.id("payee")).sendKeys(payeeName);
}
In this method, the WebDriver code is written to locate the payee name textbox and enter the
name value using the sendKeys() method.
The step definition file acts like a template for all the steps from the feature file while
scenarios can use a mix and match of the steps based on the test conditions.
A helper class RunCukesTest is defined to provide Cucumber-JVM configurations such as
how to run the features and steps with JUnit, report format, and location, shown as follows:
@RunWith(Cucumber.class)
@Cucumber.Options(format = {"pretty", "html:target/cucumber-html-
report", "json-pretty:target/cucumber-report.json"})
public class RunCukesTest {
}
There's more…
In this example, step definition methods are calling Selenium WebDriver methods directly.
However, a layer of abstraction can be created using the Page object where a separate class
is defined with the definition of all the elements from FundTransferPage:
import org.openqa.selenium.WebDriver;
import org.openqa.selenium.WebElement;
import org.openqa.selenium.support.CacheLookup;
import org.openqa.selenium.support.FindBy;
import org.openqa.selenium.support.PageFactory;
public class FundTransferPage {
@FindBy(id = "payee")
@CacheLookup](https://image.slidesharecdn.com/gundechau-231028071958-735e74f8/85/Gundecha-U-Selenium-Testing-Tools-Cookbook-2012-pdf-293-320.jpg)

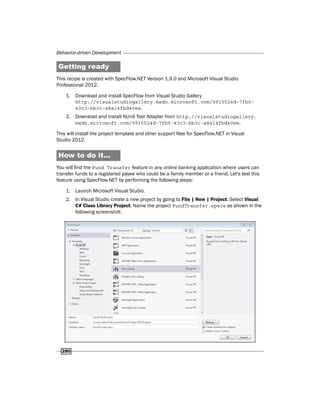


![Behavior-driven Development
284
3. Click on Add button. A new C# class will be added with dummy steps. Replace the
content of this file with the following code:
using System;
using System.Collections.Generic;
using System.Linq;
using System.Text;
using TechTalk.SpecFlow;
using NUnit.Framework;
using OpenQA.Selenium;
namespace FundTransfer.specs
{
[Binding]
public class FundTransferStepDefs
{
FundsTransferPage _ftPage = new
FundsTransferPage(Environment.Driver);
[Given(@"the user is on Fund Transfer Page")]
public void GivenUserIsOnFundTransferPage()
{
Environment.Driver.Navigate().GoToUrl("http://
localhost:64895/Default.aspx");
}
[When(@"he enters ""(.*)"" as payee name")]
public void WhenUserEneteredIntoThePayeeNameField(string
payeeName)
{
_ftPage.payeeNameField.SendKeys(payeeName);
}
[When(@"he enters ""(.*)"" as amount")]
public void WhenUserEneteredIntoTheAmountField(string
amount)
{
_ftPage.amountField.SendKeys(amount);
}
[When(@"he enters ""(.*)"" as amount above his limit")]
public void WhenUserEneteredIntoTheAmountFieldAboveLimit
(string amount)
{
_ftPage.amountField.SendKeys(amount);](https://image.slidesharecdn.com/gundechau-231028071958-735e74f8/85/Gundecha-U-Selenium-Testing-Tools-Cookbook-2012-pdf-299-320.jpg)
![Chapter 11
285
}
[When(@"he Submits request for Fund Transfer")]
public void WhenUserPressTransferButton()
{
_ftPage.transferButton.Click();
}
[Then(@"ensure the fund transfer is complete with ""(.*)""
message")]
public void ThenFundTransferIsComplete(string message)
{
Assert.AreEqual(message, _ftPage.messageLabel.Text);
}
[Then(@"ensure a transaction failure message ""(.*)"" is
displayed")]
public void ThenFundTransferIsFailed(string message)
{
Assert.AreEqual(message, _ftPage.messageLabel.Text);
}
}
}
Defining a Page object and a helper class
The steps for defining a Page object and a helper class are as follows:
1. Define a Page object for the Fund Transfer Page by adding a new C# class file. Name
this class FundTransferPage. Copy the following code to this class:
using System;
using System.Collections.Generic;
using System.Linq;
using System.Text;
using OpenQA.Selenium;
using OpenQA.Selenium.Support.PageObjects;
namespace FundTransfer.specs
{
class FundTransferPage
{
public FundTransferPage(IWebDriver driver)
{
PageFactory.InitElements(driver, this);](https://image.slidesharecdn.com/gundechau-231028071958-735e74f8/85/Gundecha-U-Selenium-Testing-Tools-Cookbook-2012-pdf-300-320.jpg)
![Behavior-driven Development
286
}
[FindsBy(How = How.Id, Using = "payee")]
public IWebElement payeeNameField { get; set; }
[FindsBy(How = How.Id, Using = "amount")]
public IWebElement amountField { get; set; }
[FindsBy(How = How.Id, Using = "transfer")]
public IWebElement transferButton { get; set; }
[FindsBy(How = How.Id, Using = "message")]
public IWebElement messageLabel { get; set; }
}
}
2. We need a helper class that will provide an instance of WebDriver and perform clean
up activity at the end. Name this class Environment and copy the following code to
this class:
using System;
using System.Collections.Generic;
using System.Linq;
using System.Text;
using OpenQA.Selenium;
using OpenQA.Selenium.Chrome;
using TechTalk.SpecFlow;
namespace FundTransfer.specs
{
[Binding]
public class Environment
{
private static ChromeDriver driver;
public static IWebDriver Driver
{
get { return driver ?? (driver = new
ChromeDriver(@"C:ChromeDriver")); }
}
[AfterTestRun]
public static void AfterTestRun()
{
Driver.Close();](https://image.slidesharecdn.com/gundechau-231028071958-735e74f8/85/Gundecha-U-Selenium-Testing-Tools-Cookbook-2012-pdf-301-320.jpg)

![Behavior-driven Development
288
How it works...
SpecFlow.NET first needs the feature files for the features we will be testing. SpecFlow.NET
supports the Gherkin language for writing features.
In the step definition file, we create a method for each step written in a feature file using
the Given, When, and Then attributes. These methods can also take the parameter values
specified in the steps using the arguments. Following is an example where we are entering the
name of the payee:
[When(@"he enters ""(.*)"" as payee name")]
public void WhenUserEneteredIntoThePayeeNameField(string payeeName)
{
_ftPage.payeeNameField.SendKeys(payeeName);
}
In this example, we are automating the "When he enters "Jim" as
payee name" step. We used the When attribute and created a method:
WhenUserEneteredIntoThePayeeNameField. This method will need the value of the
payee name embedded in the step which is extracted using the regular expression by the
SpecFlow.NET. Inside the method, we are using an instance of the FundTransferPage class
and calling its payeeNameField member's SendKeysl() method, passing the name of the
payee extracted from the step. Using the Page object helps in abstracting locator and page
details from the step definition files, making it more manageable and easy to maintain.
SpecFlow.NET automatically generates the NUnit test code when the project is built. Using the
Visual Studio Test Explorer and NUnit Test Adaptor for Visual Studio, these tests are executed
and the features are validated.
See also
f
f The Configuring Visual Studio for Selenium WebDriver test development recipe in the
bonus chapter, Integration with Other Tools, available at http://www.packtpub.com/
sites/default/files/downloads/Integration_with_Other_Tools.pdf
Using JBehave and Selenium WebDriver
in Java
JBehave is another famous framework for BDD/ATDD in Java. Similar to Cucumber-JVM,
JBehave allows the writing of features as stories in the Gherkin language. Steps from the
scenarios are later implemented in a step definition file.
In this recipe, we will explore using JBehave and Selenium WebDriver together for creating
tests on a BMI calculator application.](https://image.slidesharecdn.com/gundechau-231028071958-735e74f8/85/Gundecha-U-Selenium-Testing-Tools-Cookbook-2012-pdf-303-320.jpg)


![Chapter 11
295
2. Next, we need to create a step file for the feature file created earlier. This file maps
each step from the feature file to a Capybara function to work on UI. Create a Ruby
file with the following code and name it BmiCalculate.rb:
Given /^I am on BMI Calculator$/ do
visit "http://dl.dropbox.com/u/55228056/bmicalculator.html"
end
When /^I fill in the following:$/ do |table|
table.rows_hash.each {|field, value| fill_in field,
:with => value }
end
When /^I press "([^"]*)"$/ do |button|
click_button(button)
end
Then /^I should see following:$/ do |table|
table.rows_hash.each {|field, value| find_field(field).
value.should == value }
end
3. Finally, we need to create a configuration file that provides required support to
run the features with Cucumber. Create a new file with the following code and
name it env.rb:
require 'capybara'
require 'capybara/cucumber'
require 'selenium/webdriver'
Capybara.default_driver = :selenium
Capybara.register_driver :selenium do |app|
Capybara::Selenium::Driver.new(app, :browser => :firefox)
end
How it works...
We need to copy all of these files together in a directory named features and use the
cucumber command as follows:
cucumber](https://image.slidesharecdn.com/gundechau-231028071958-735e74f8/85/Gundecha-U-Selenium-Testing-Tools-Cookbook-2012-pdf-310-320.jpg)
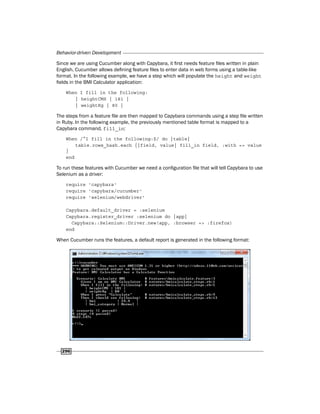


![[2012 CodeEngn Conference 06] beist - Everyone has his or her own fuzzer](https://cdn.slidesharecdn.com/ss_thumbnails/20126thcodeengnbeisteveryonehashisorherownfuzzer-130525175318-phpapp02-thumbnail.jpg?width=640&height=640&fit=bounds)