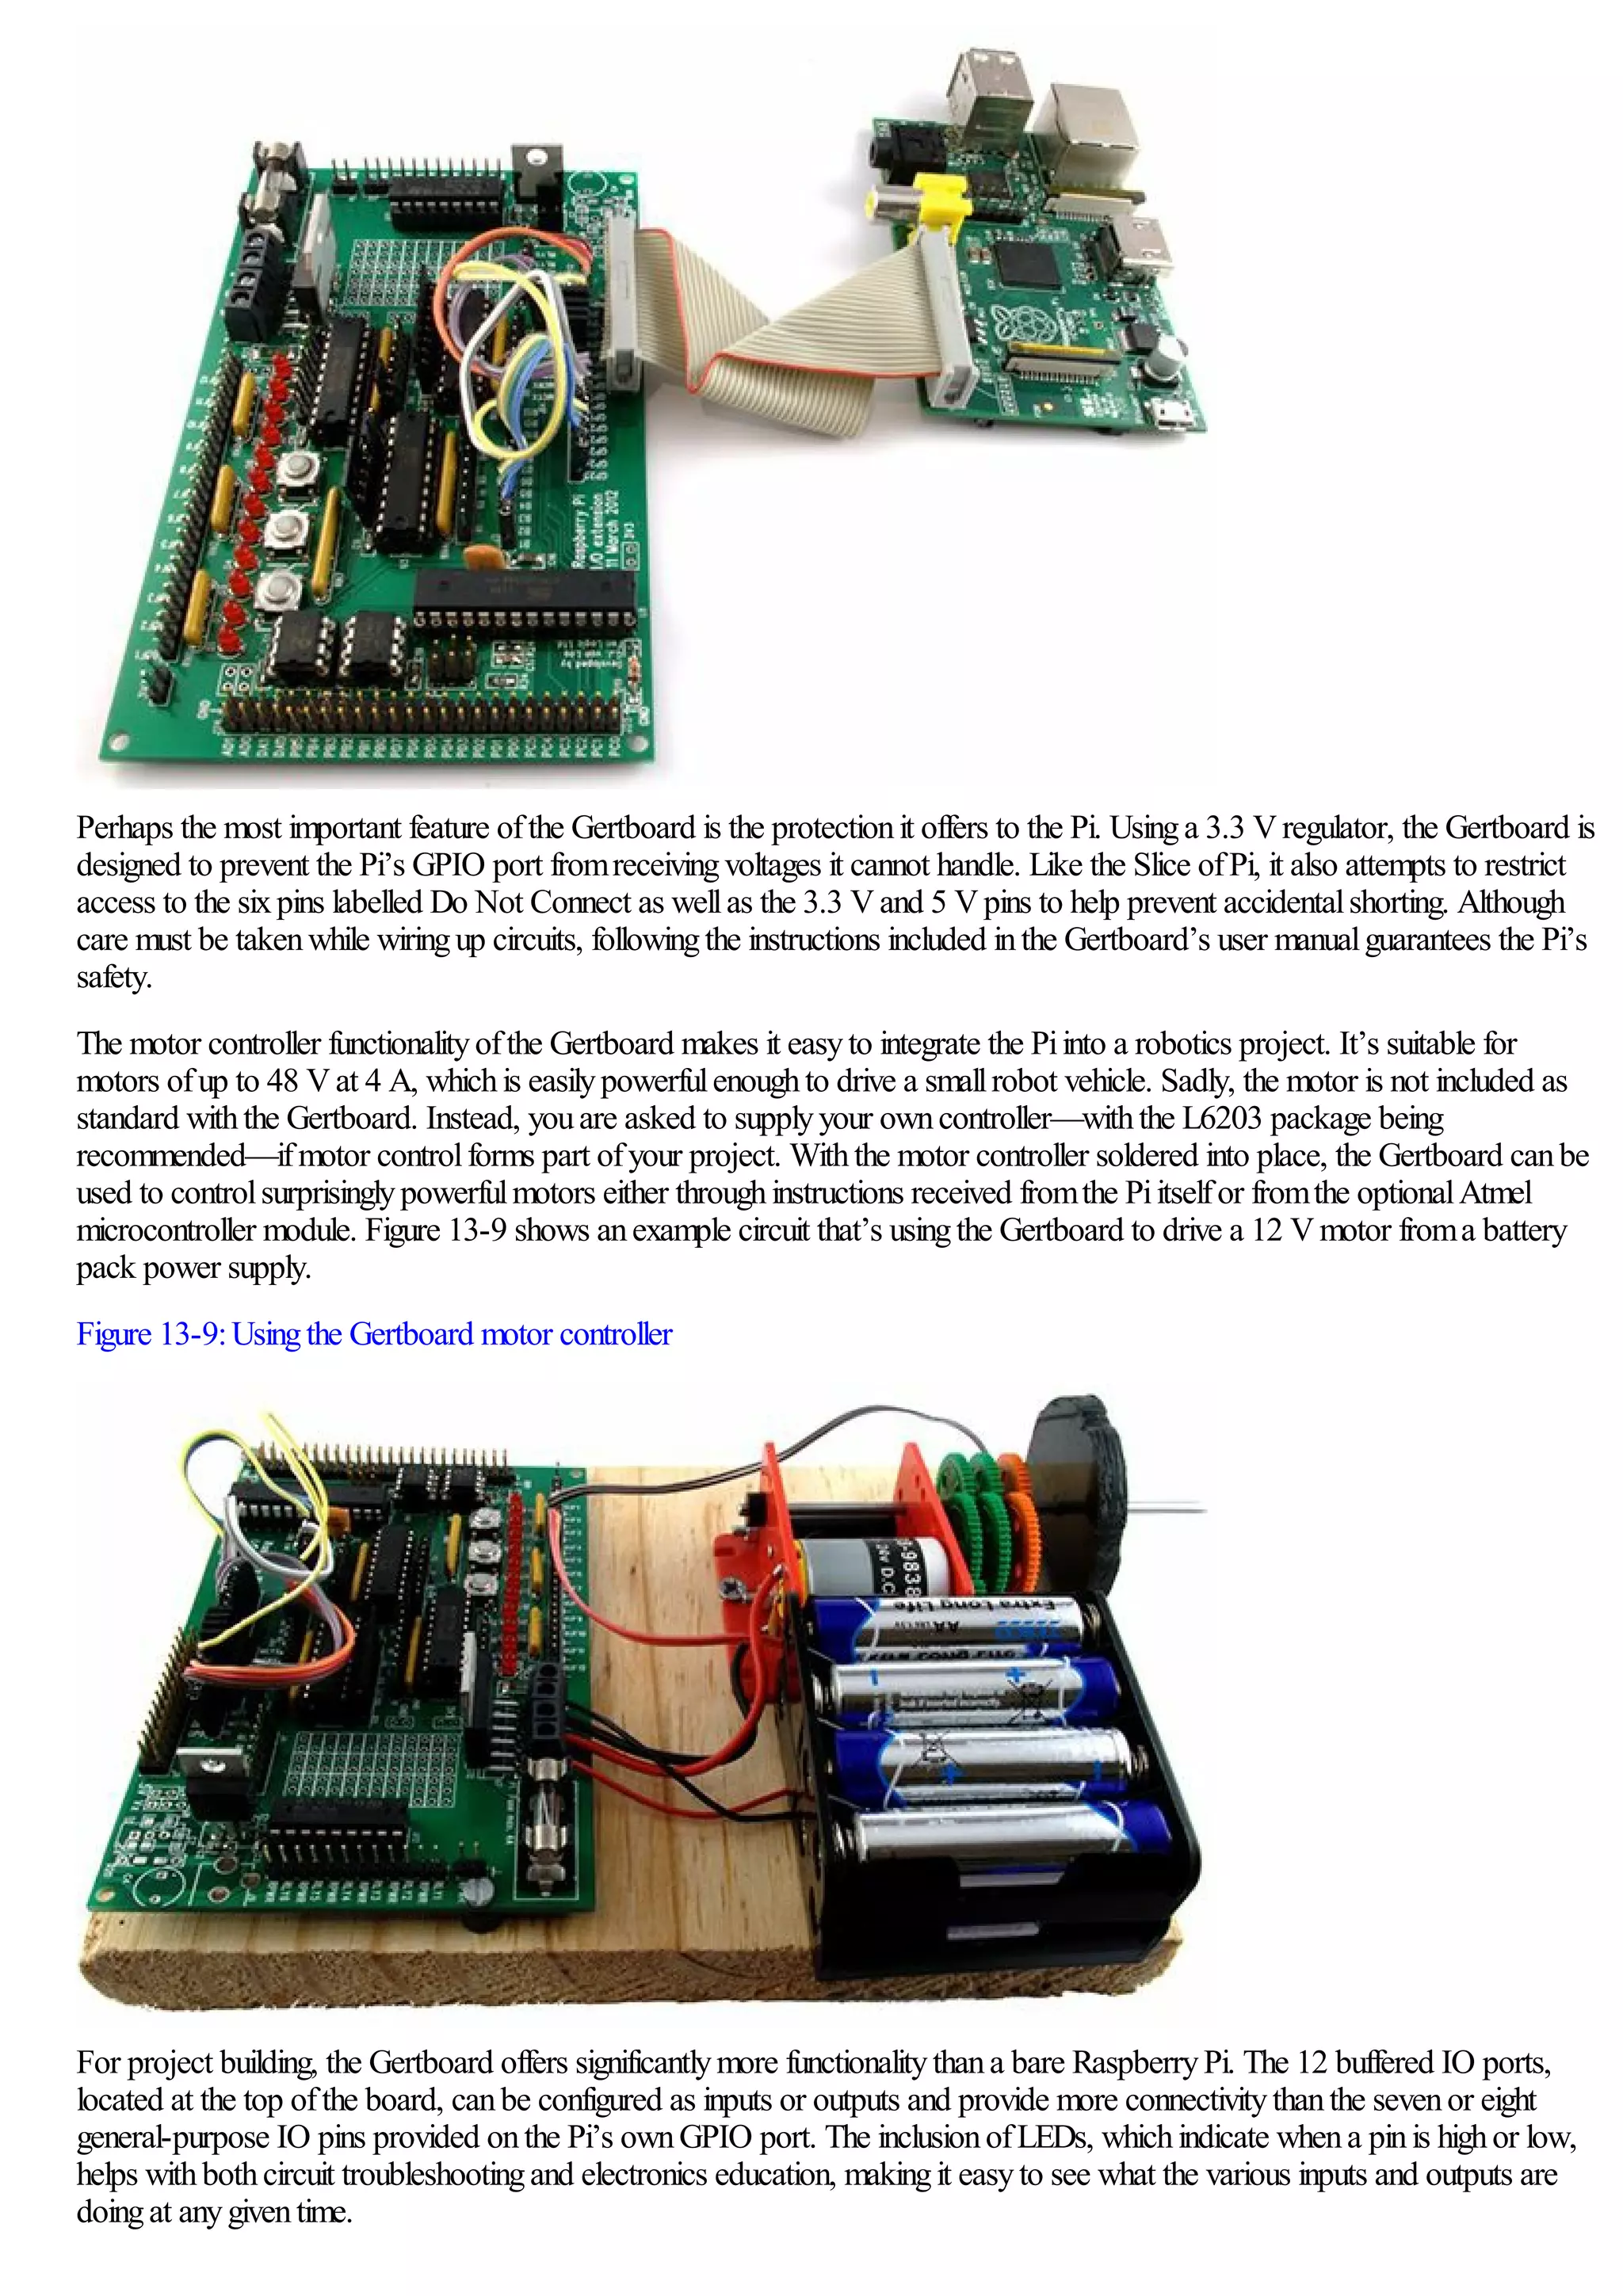
Download to read offline


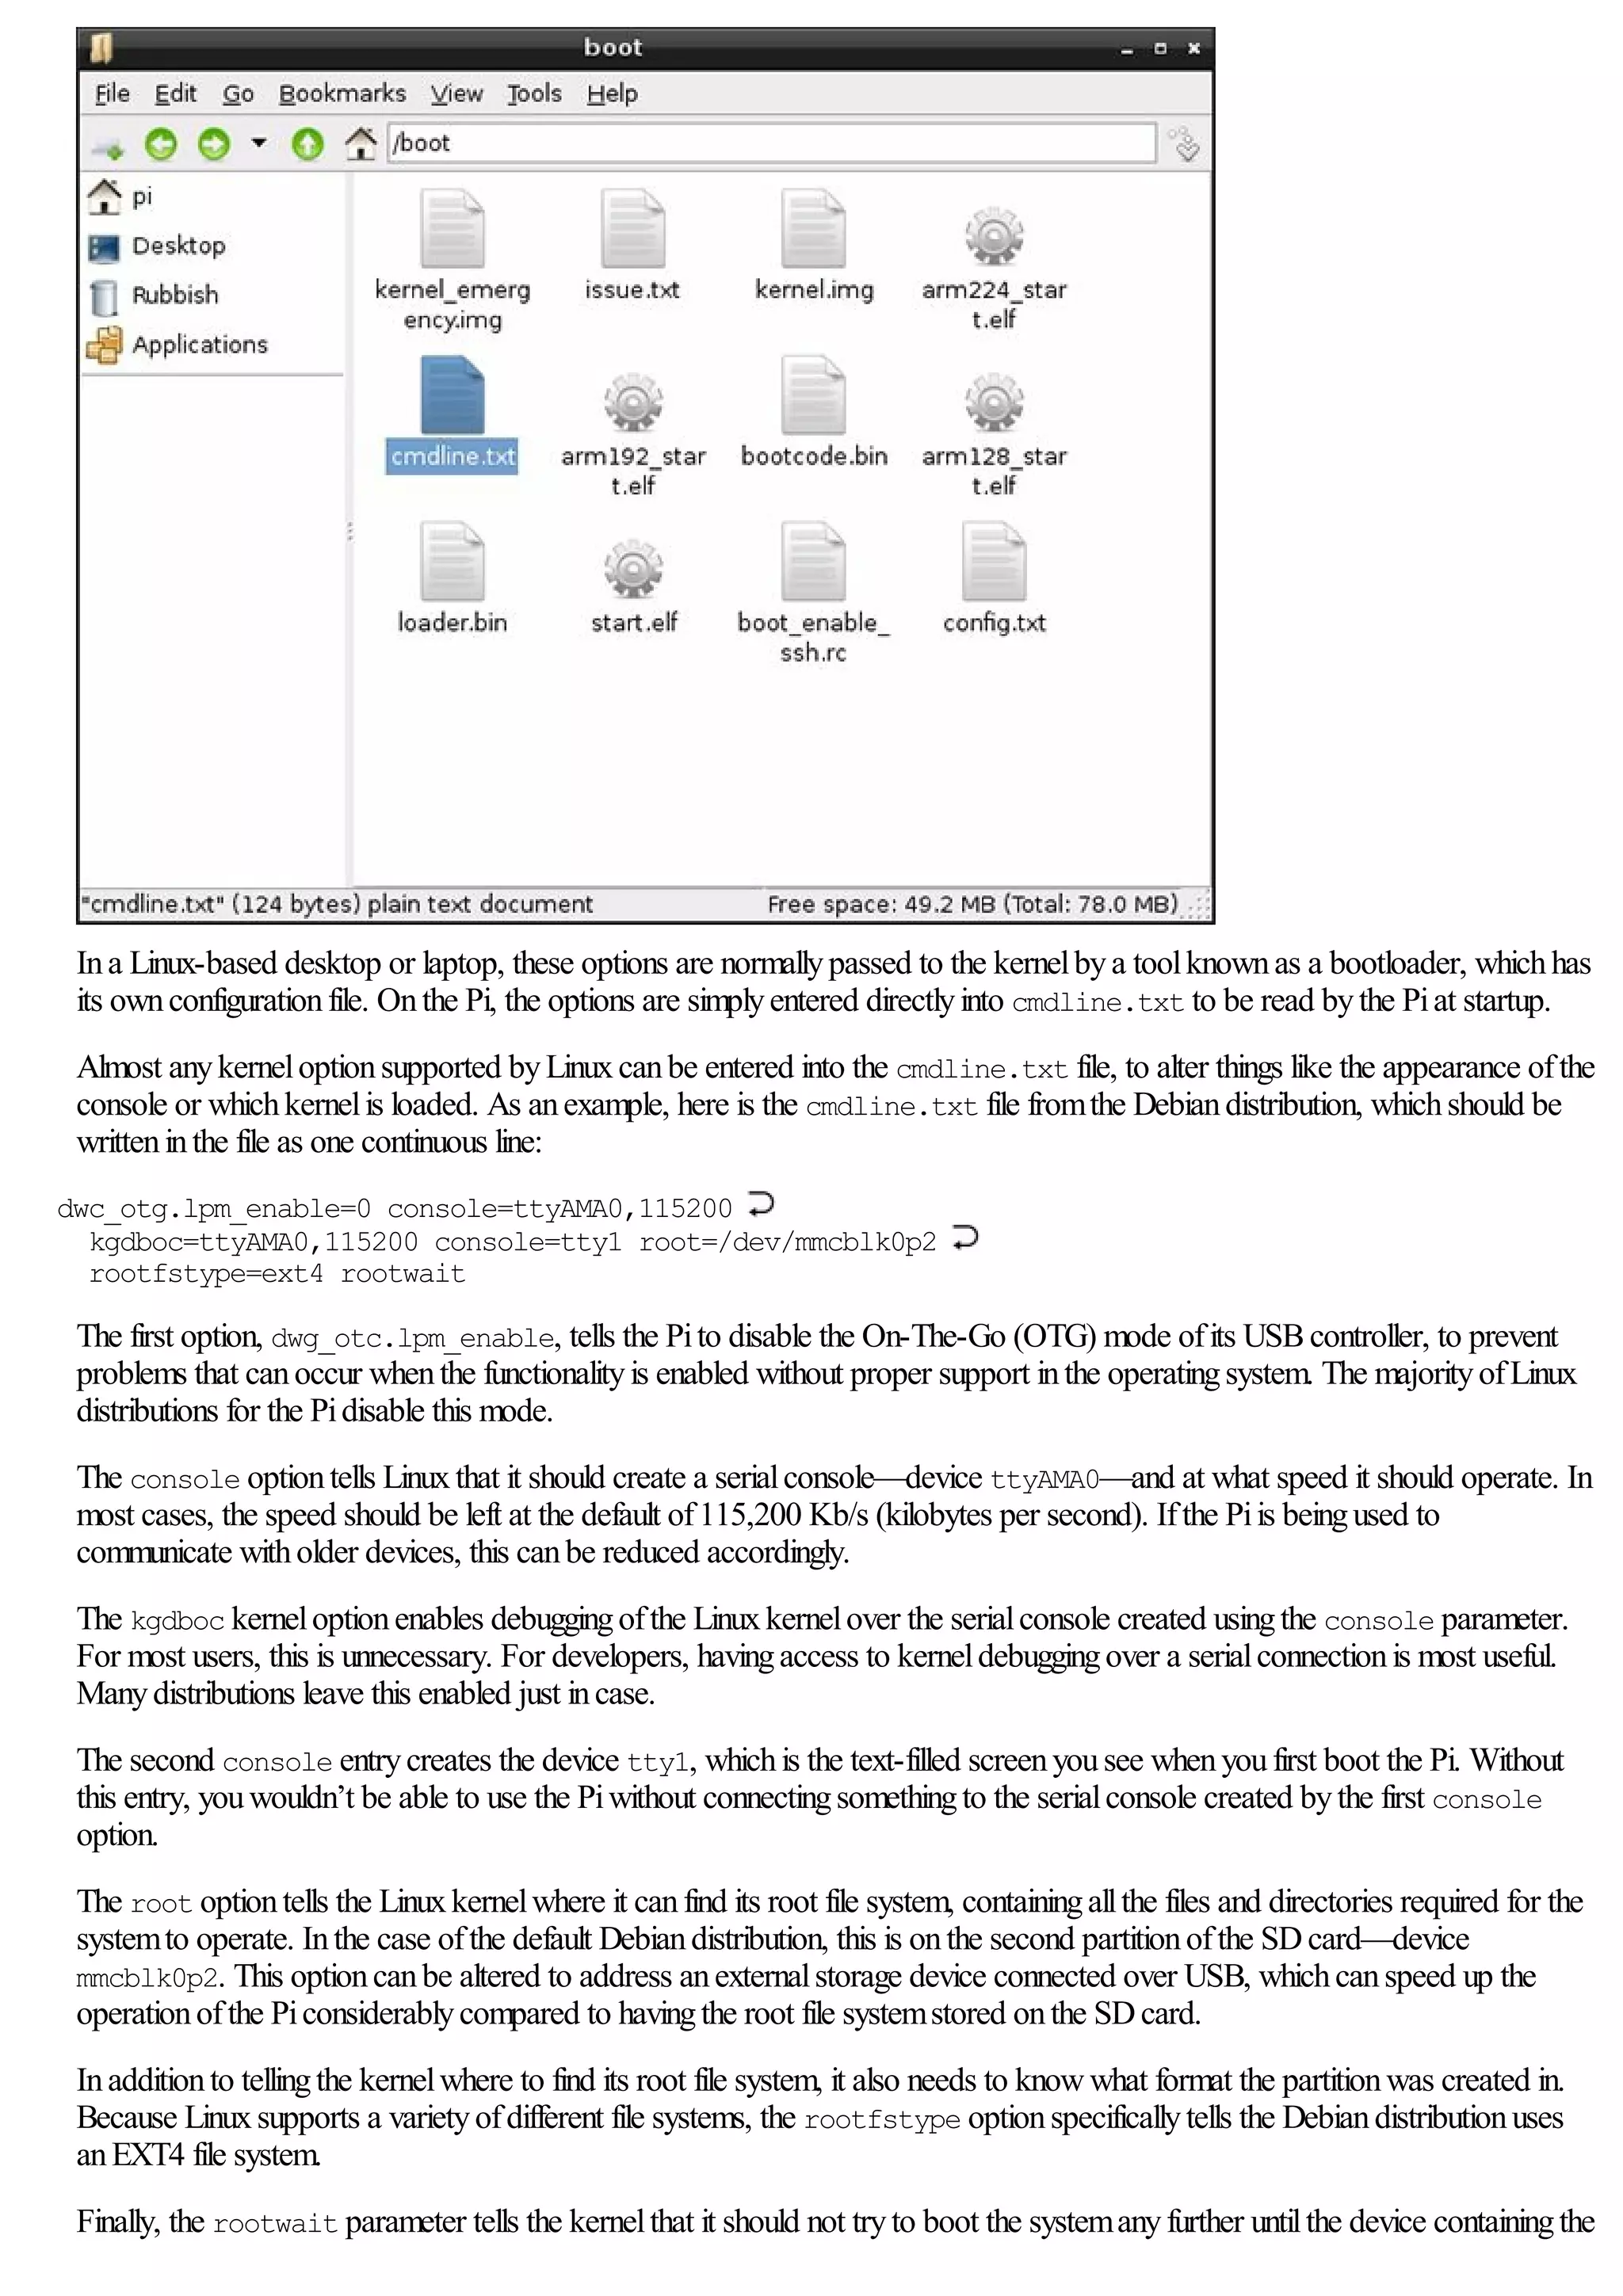
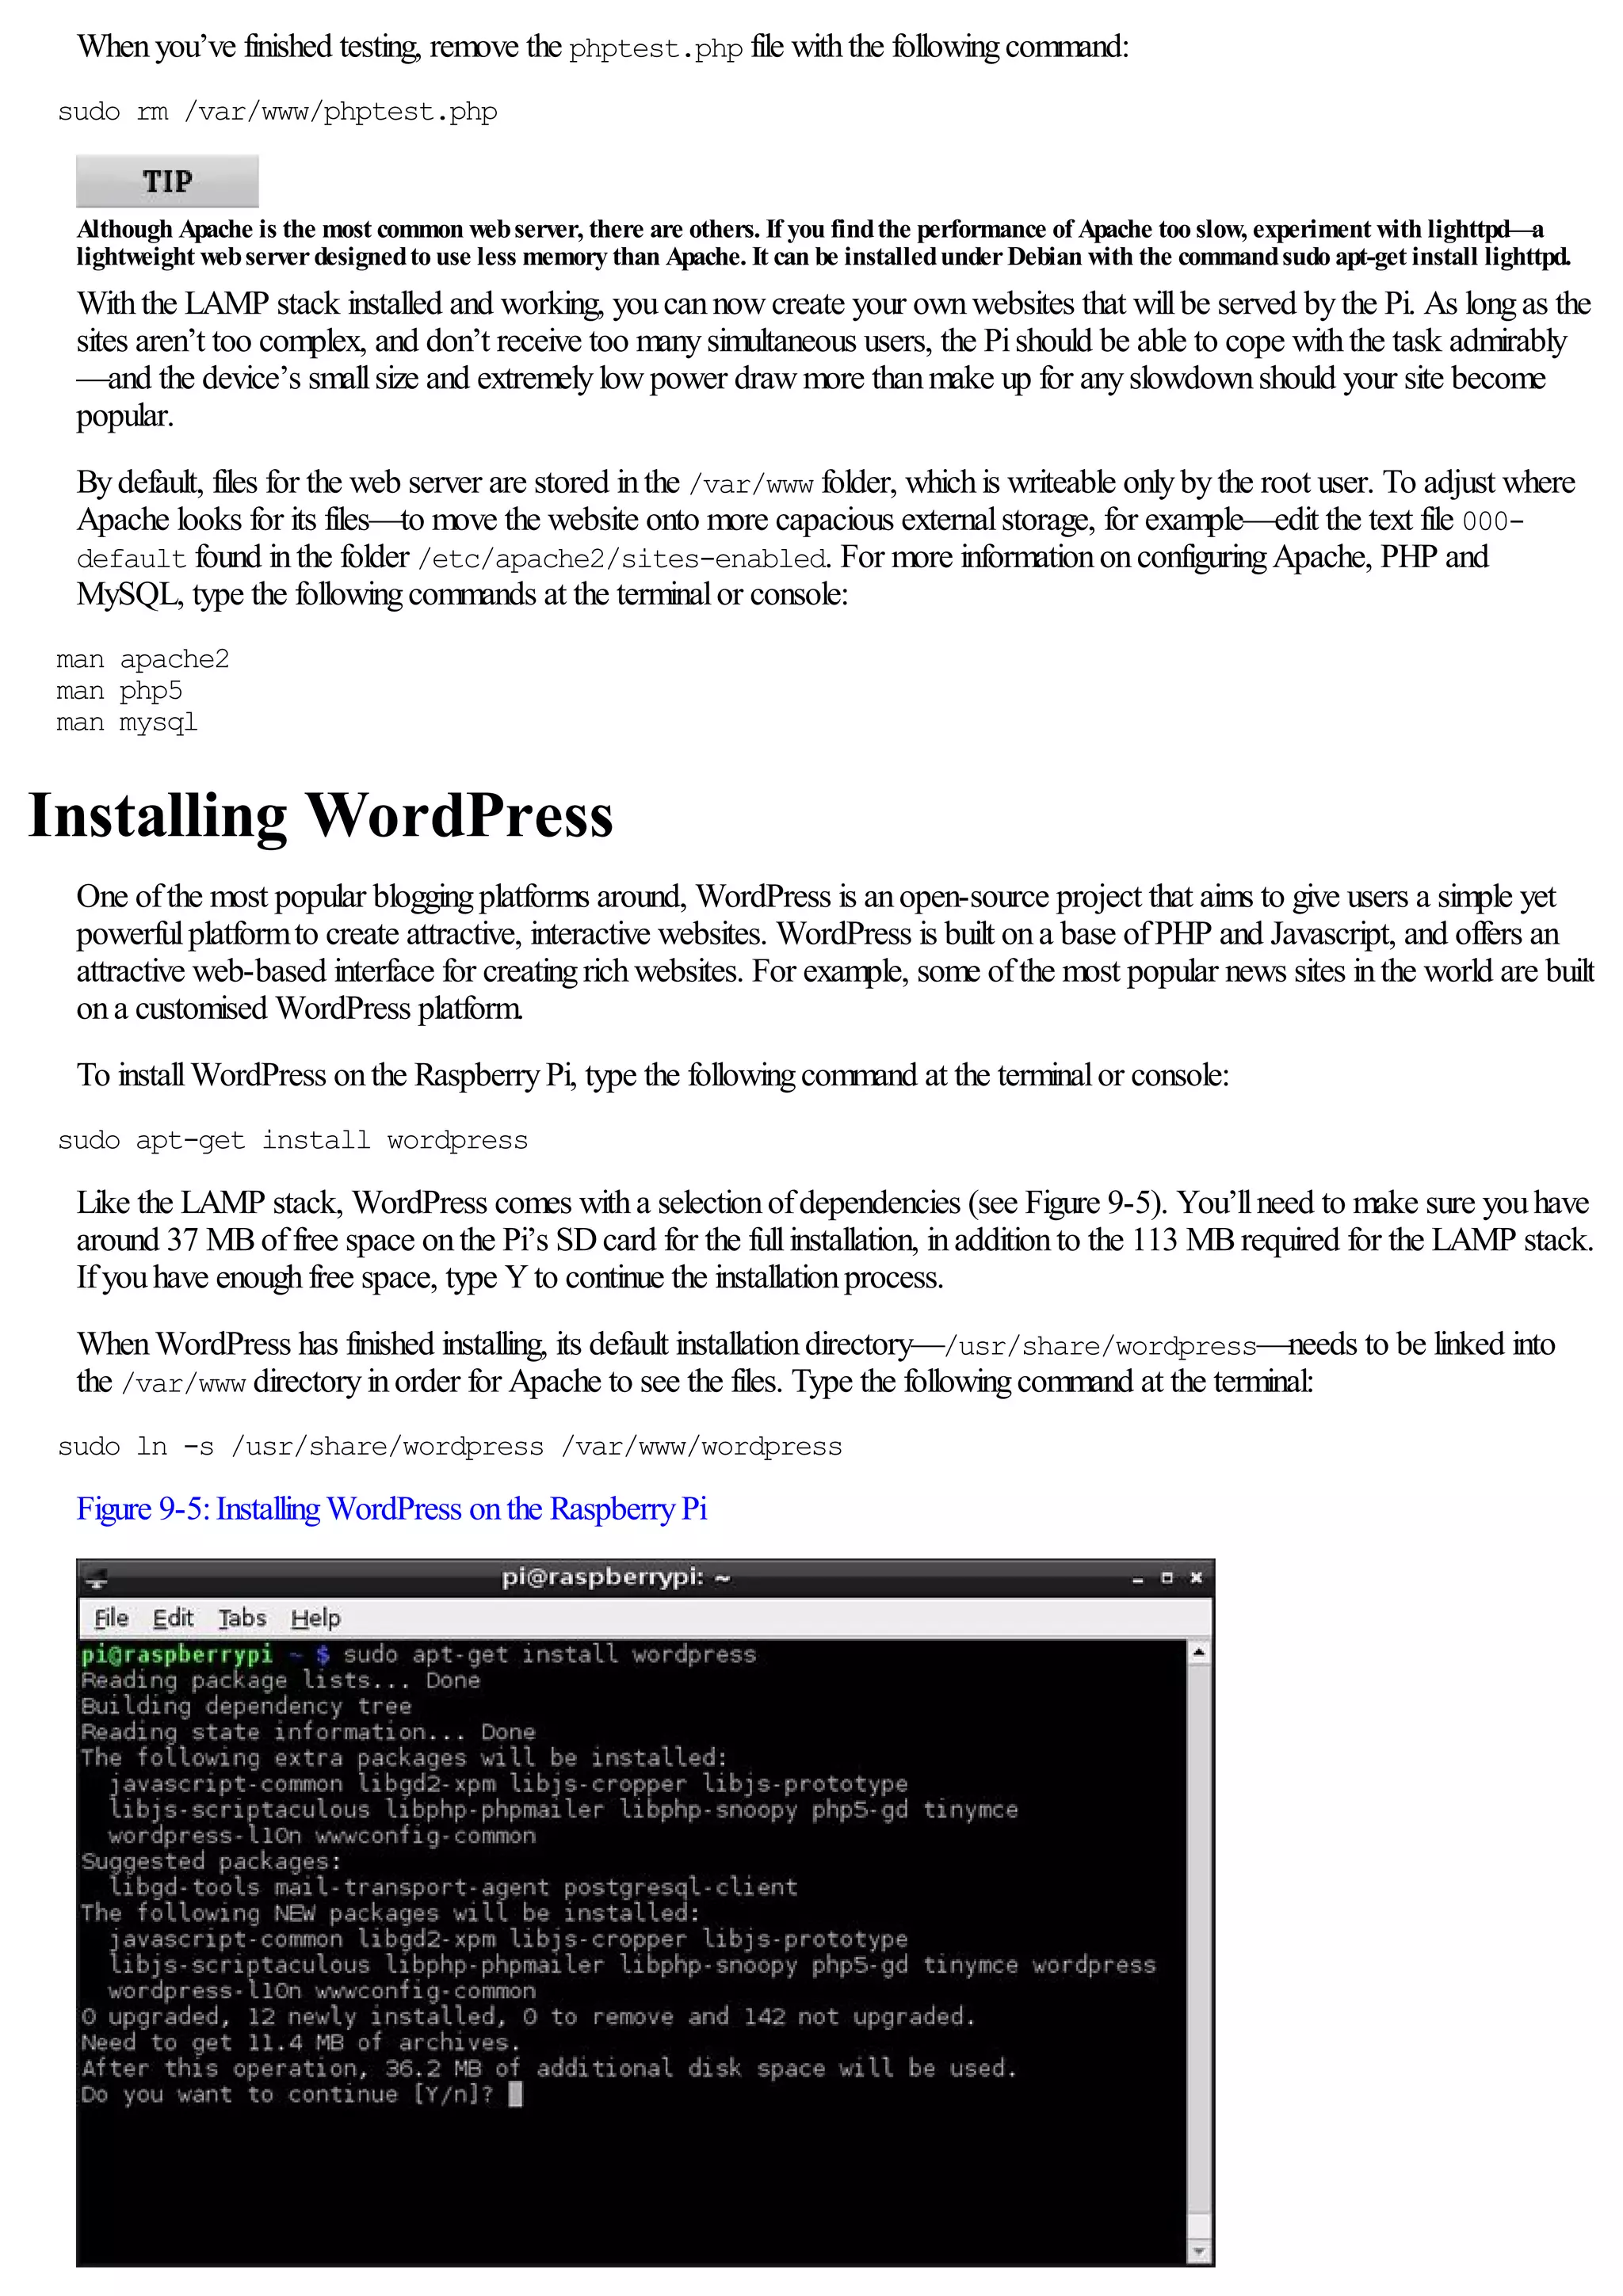
![Chapter 4: Network Configuration
Formost users, configuringthe Pi’s network is as easyas plugginga cable into the ModelB’s Ethernet port—or a USB
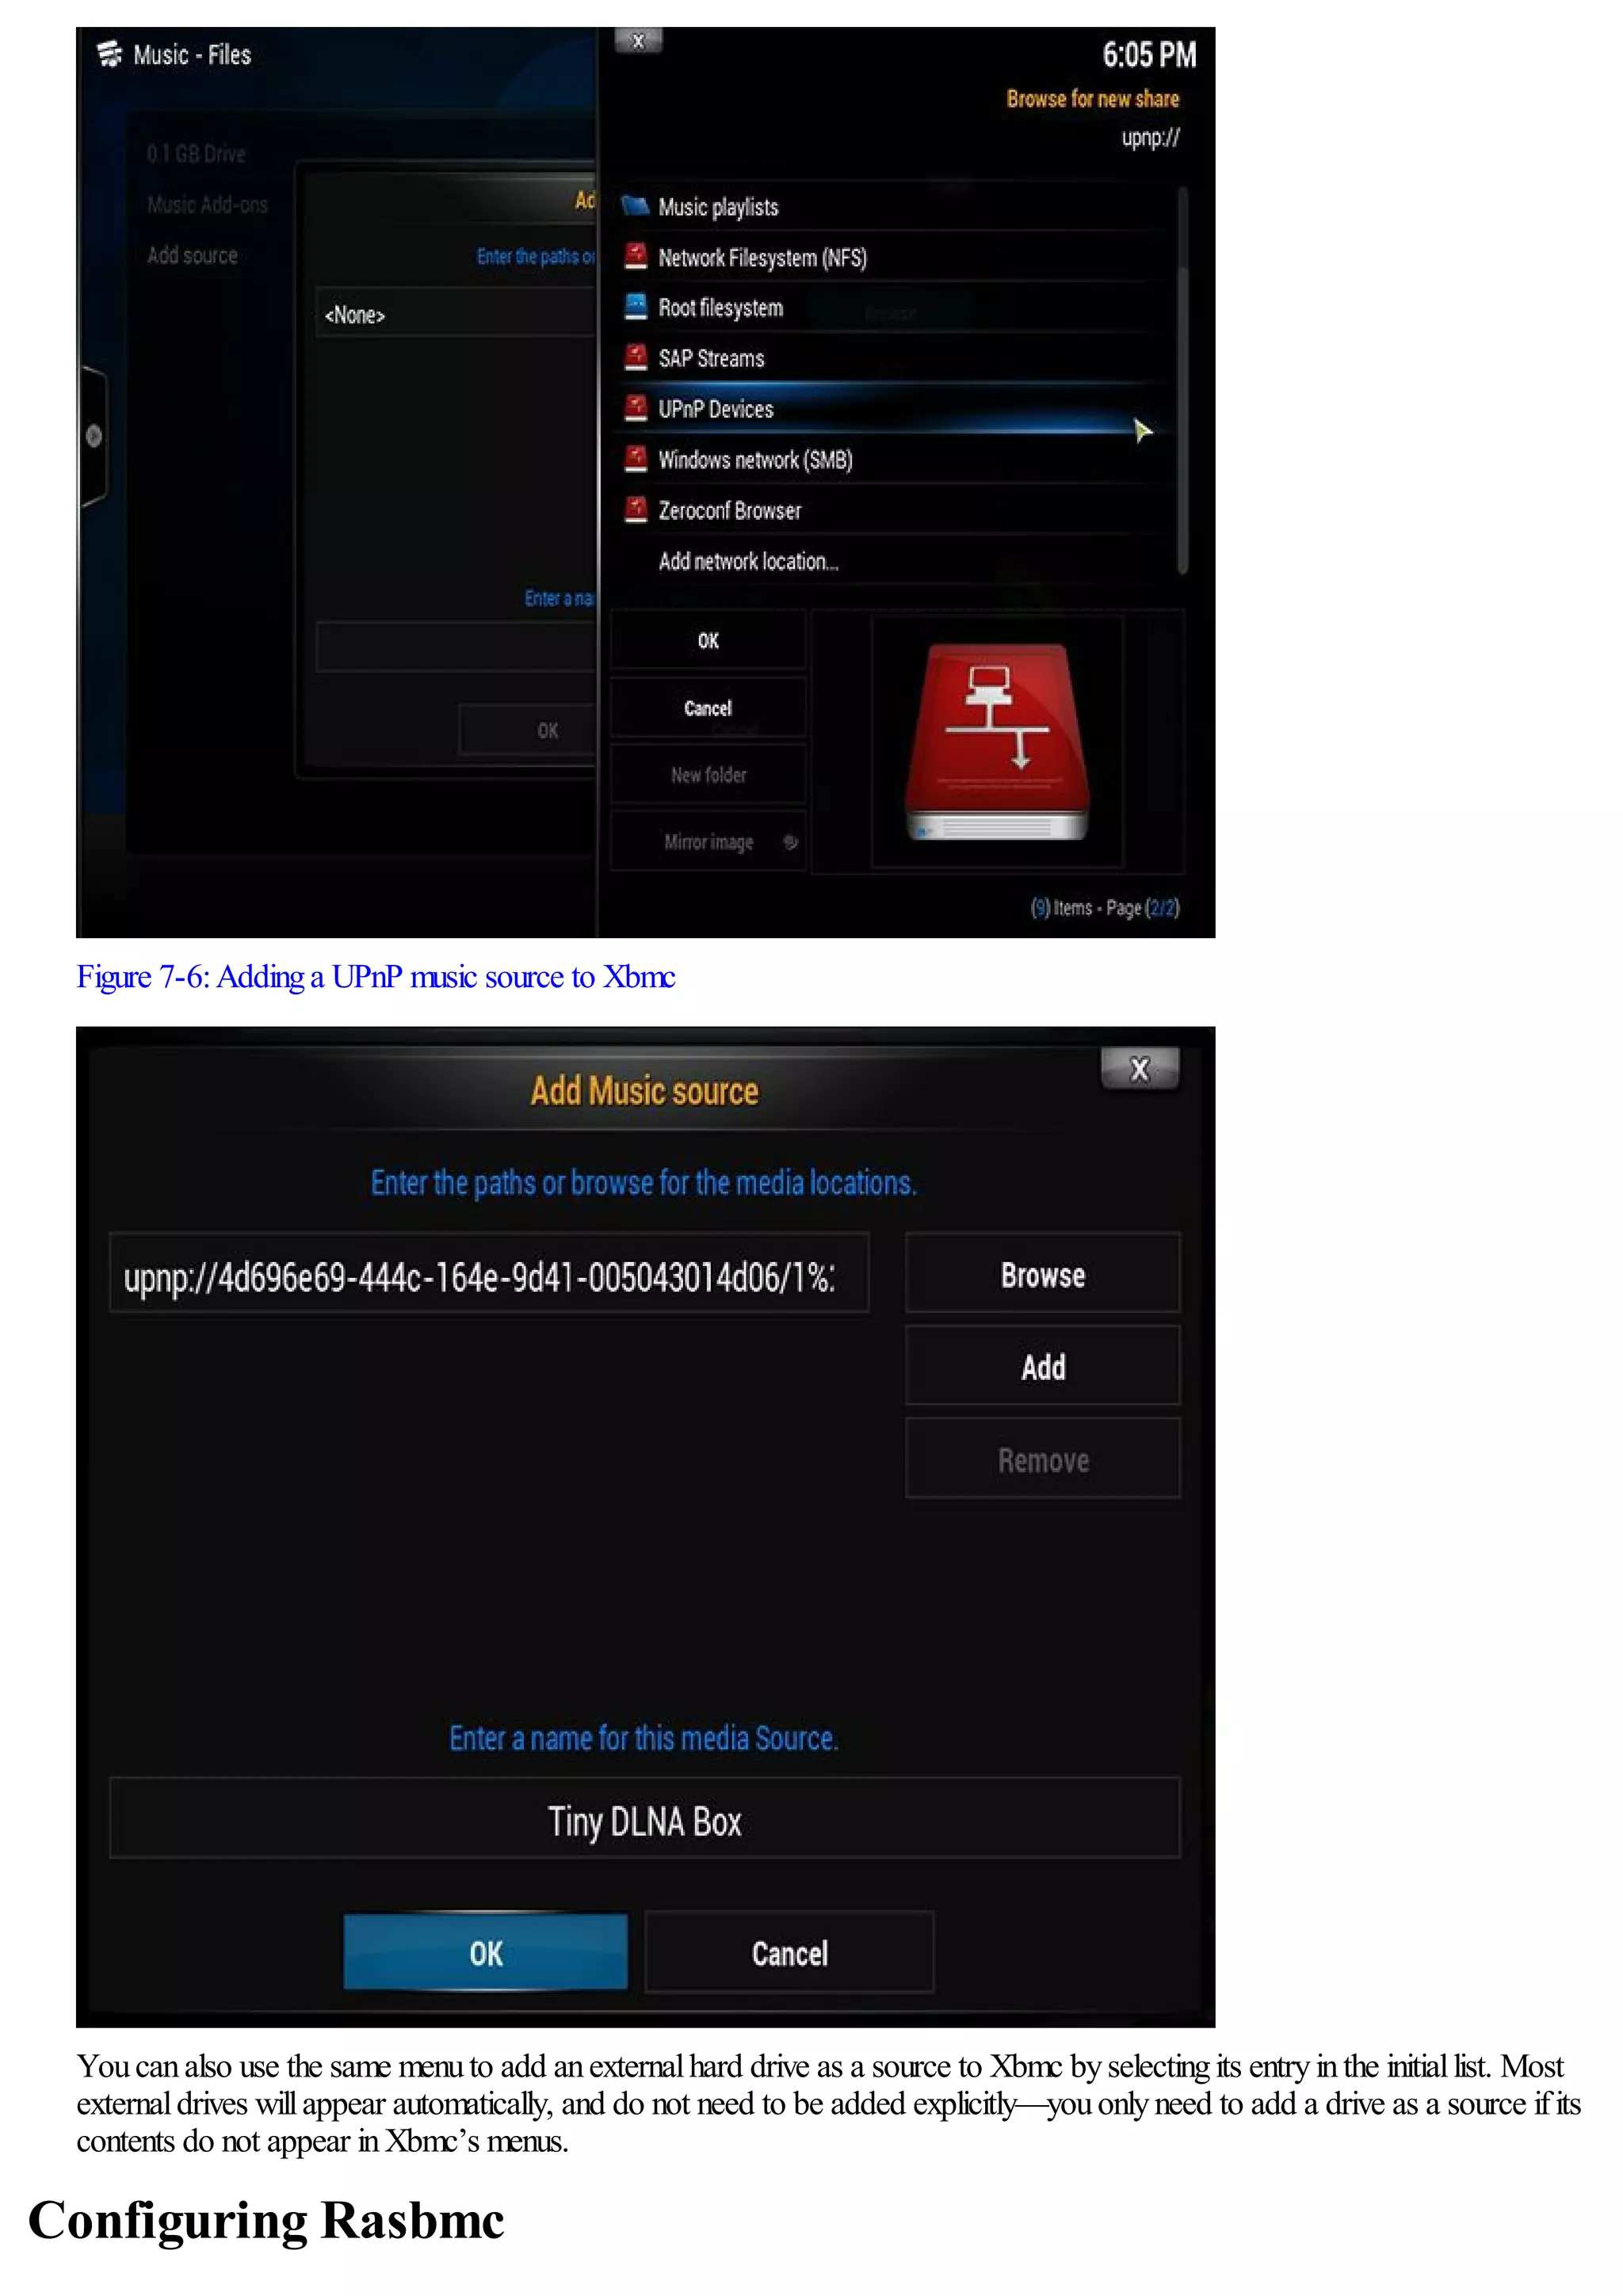
Ethernet adapter inthe case ofthe ModelA. For others, however, the network requires manualconfiguration.
Ifyouknowthat your network doesn’t have a Dynamic Host ConfigurationProtocol(DHCP) server—a systemthat tells the Pi
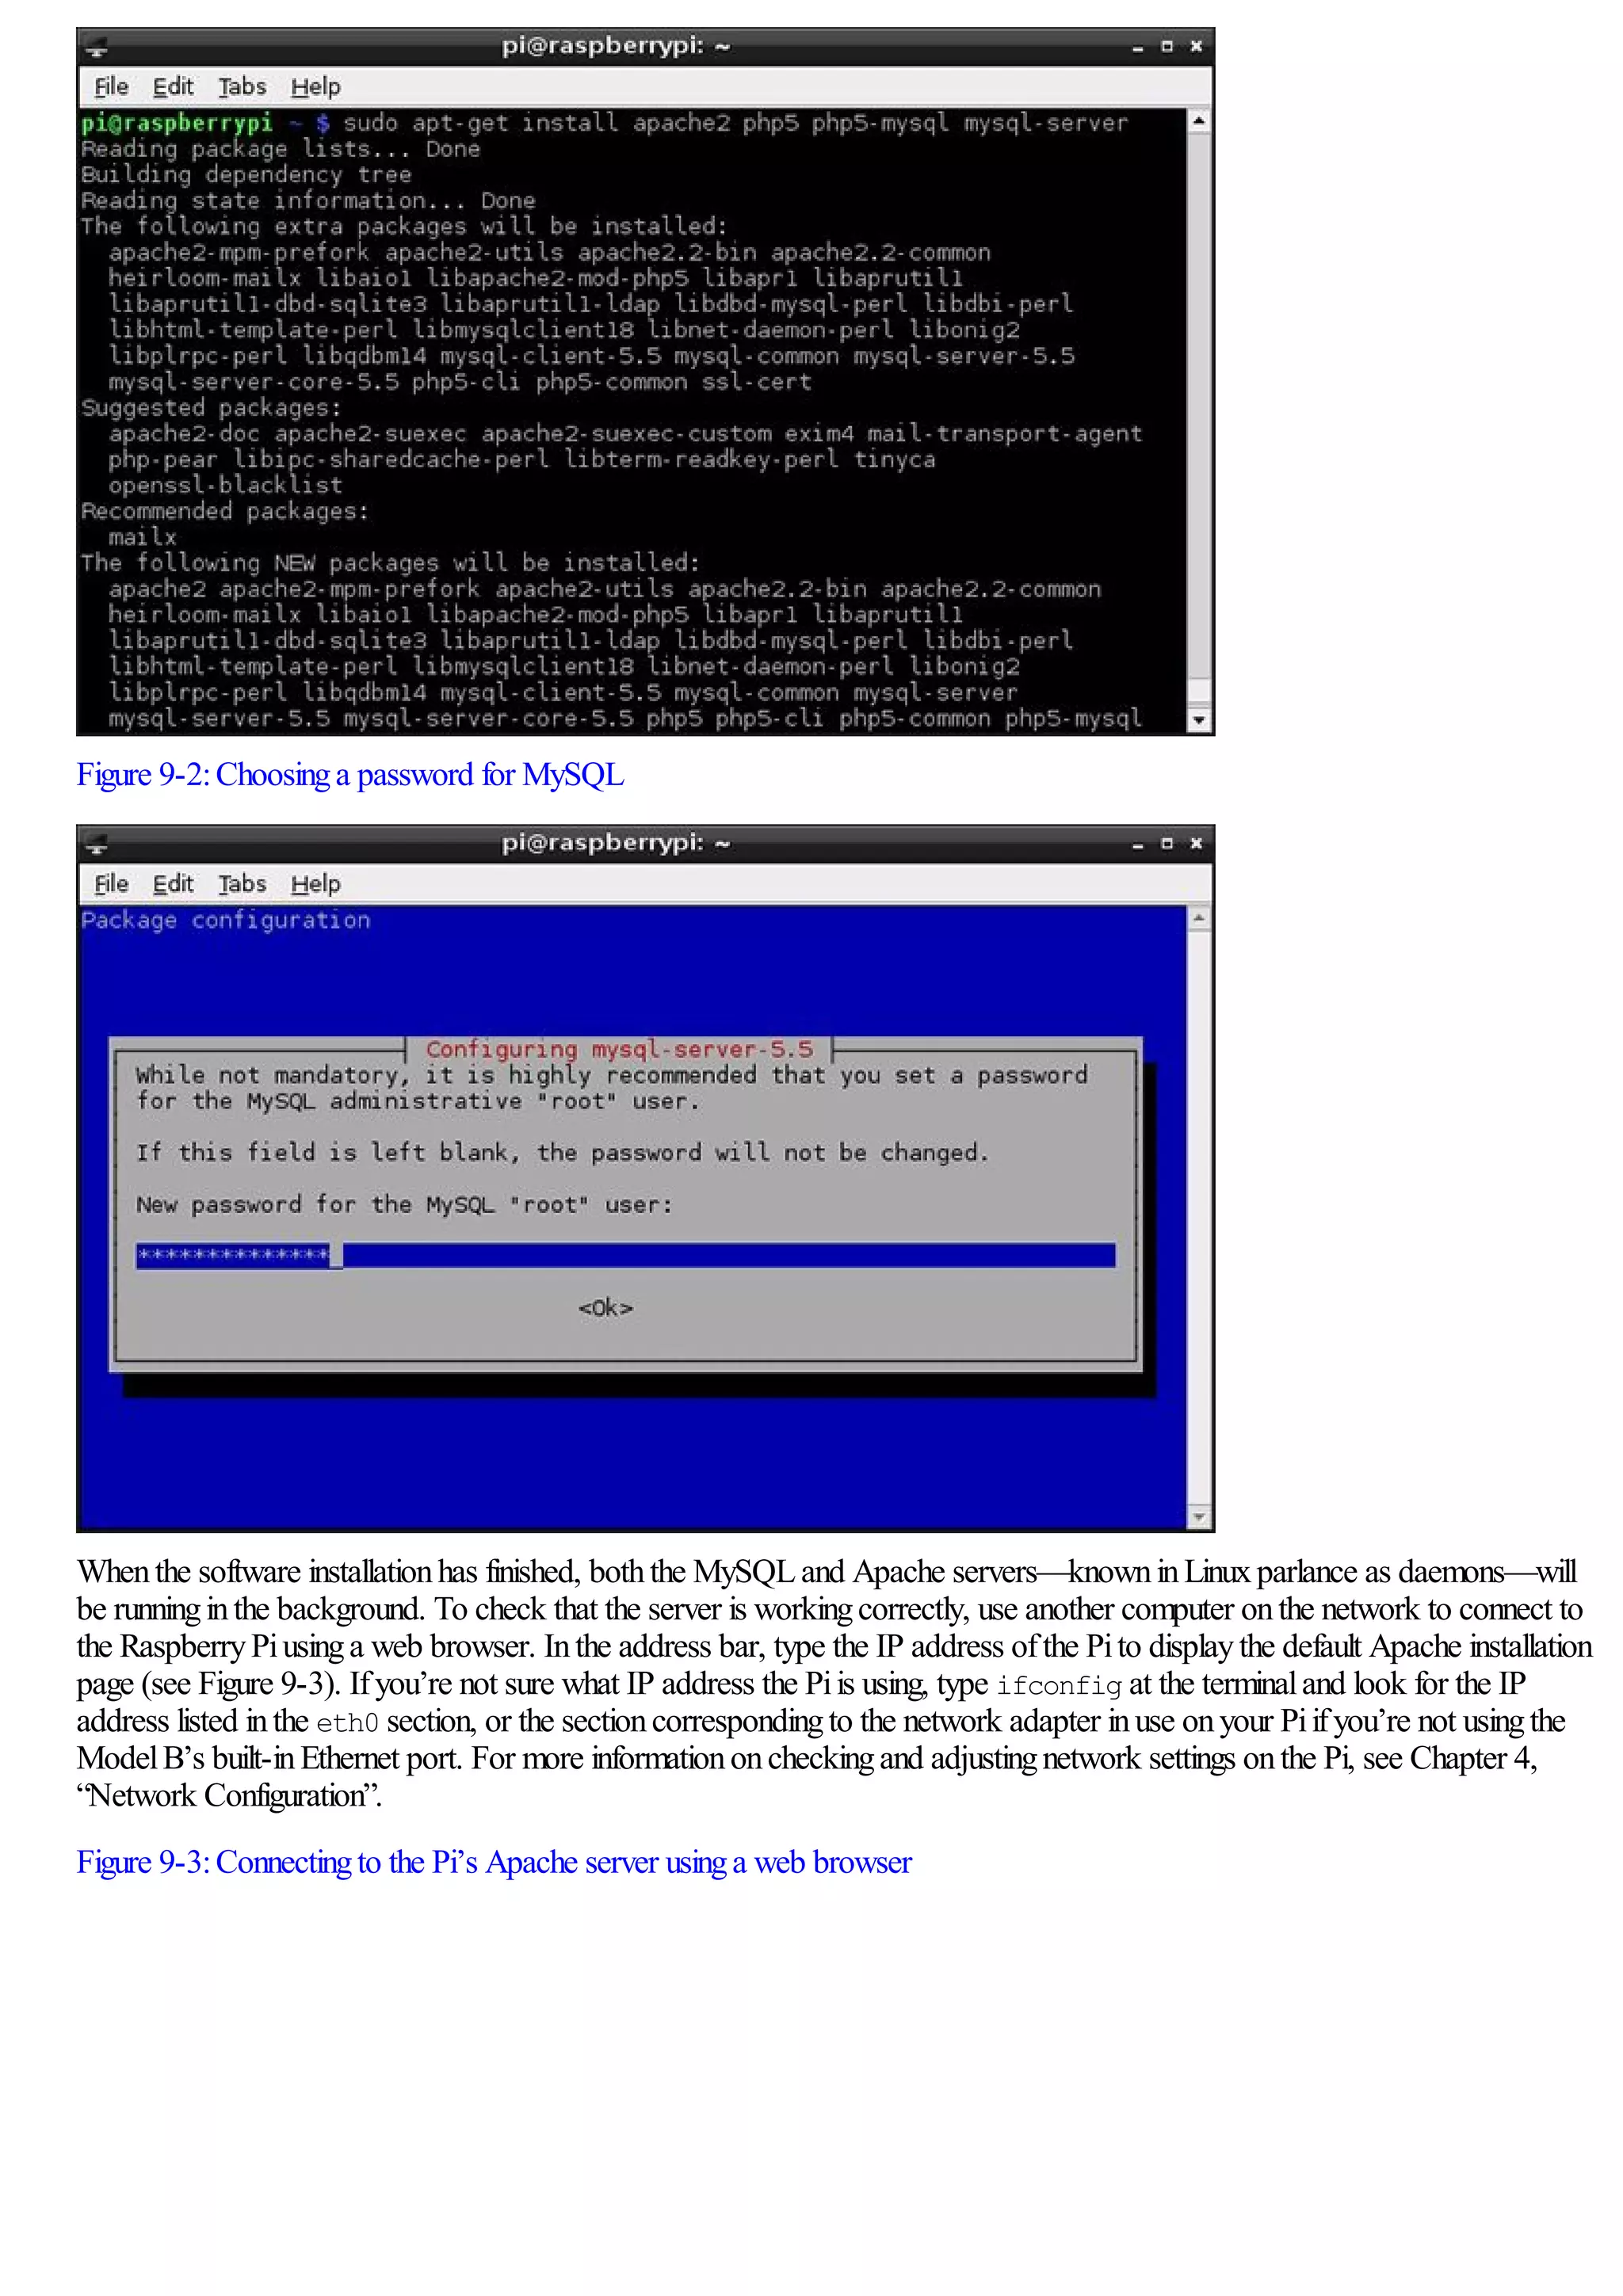
and other devices onthe network howtheyshould connect—or ifyouwant to use a USBwireless adapter withthe Pi, read on.
Wired Networking
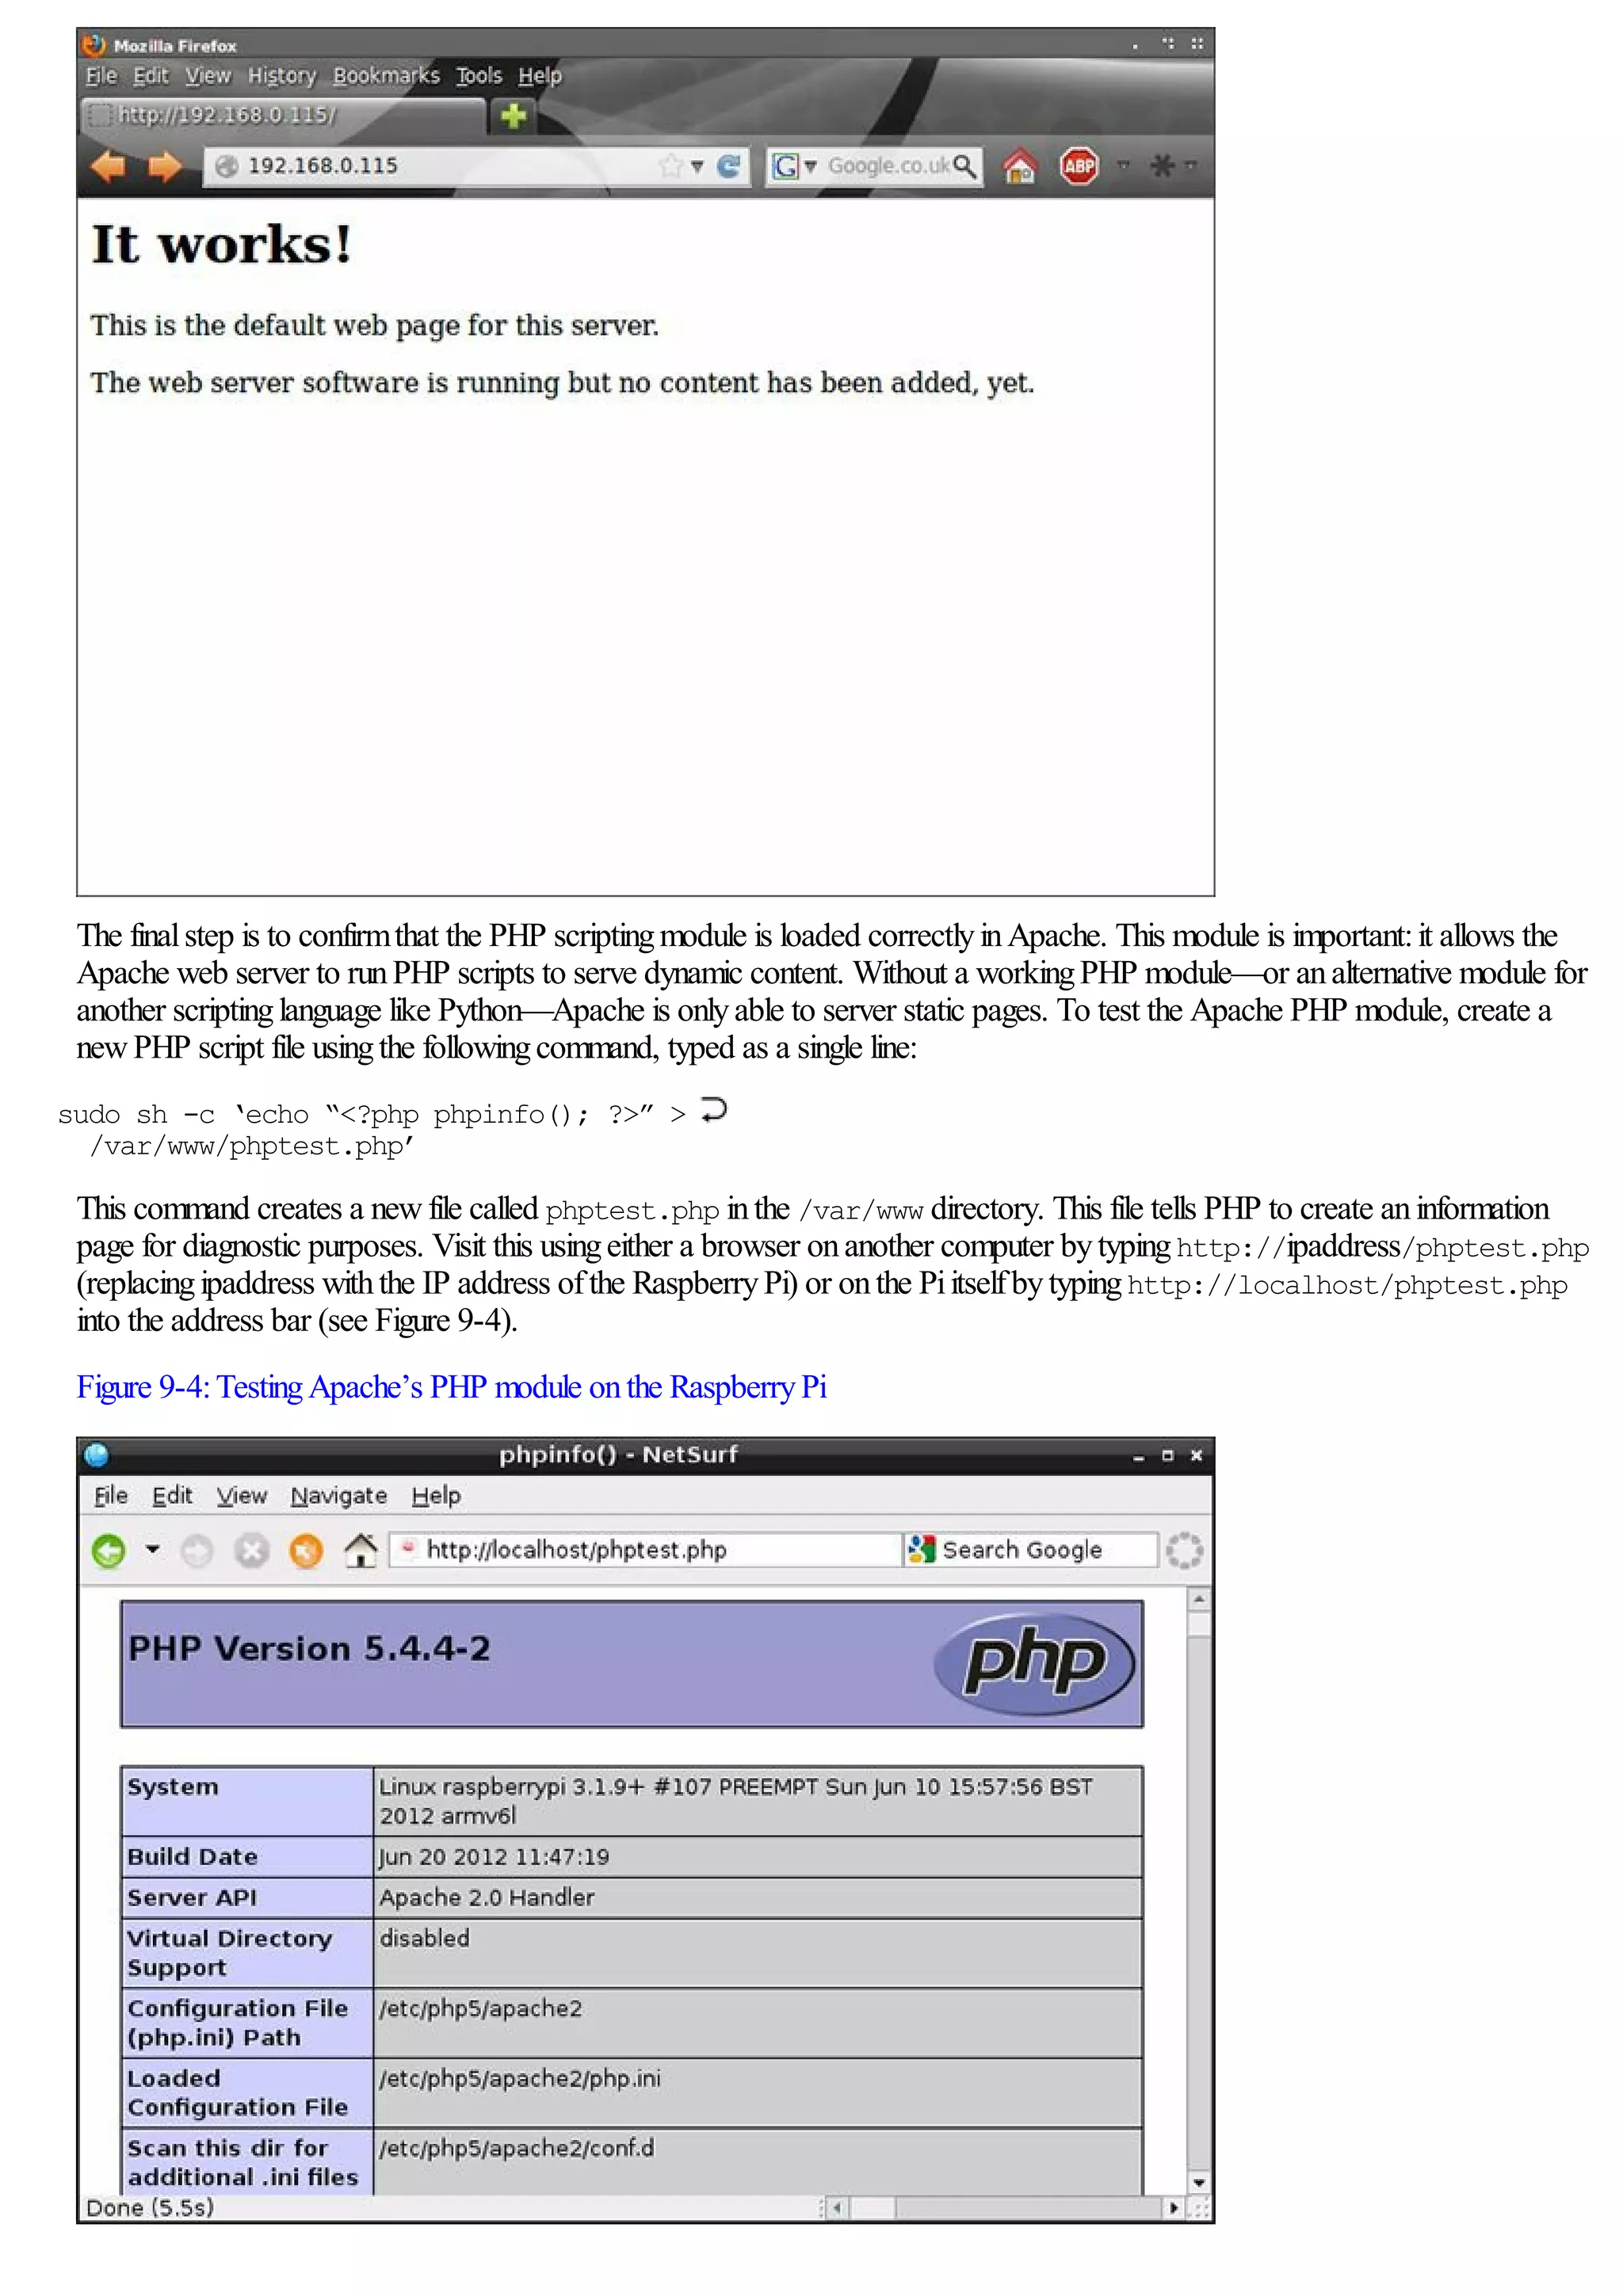
Ifthe network stilldoesn’t work, youmayneed to configure it manually. Normally, the network ina home, schoolor office has a
DHCP server that tells the Piand other devices onthe network howtheyshould connect. Some networks, however, don’t have
a DHCP server and need to be set up manually.
The list ofnetwork interfaces, alongwithinformationabout howtheyshould be configured, is stored ina file called interfaces
located inthe folder /etc/network. This is a file onlythe root user canedit, because removinga network interface fromthis list
willcause it to stop working.
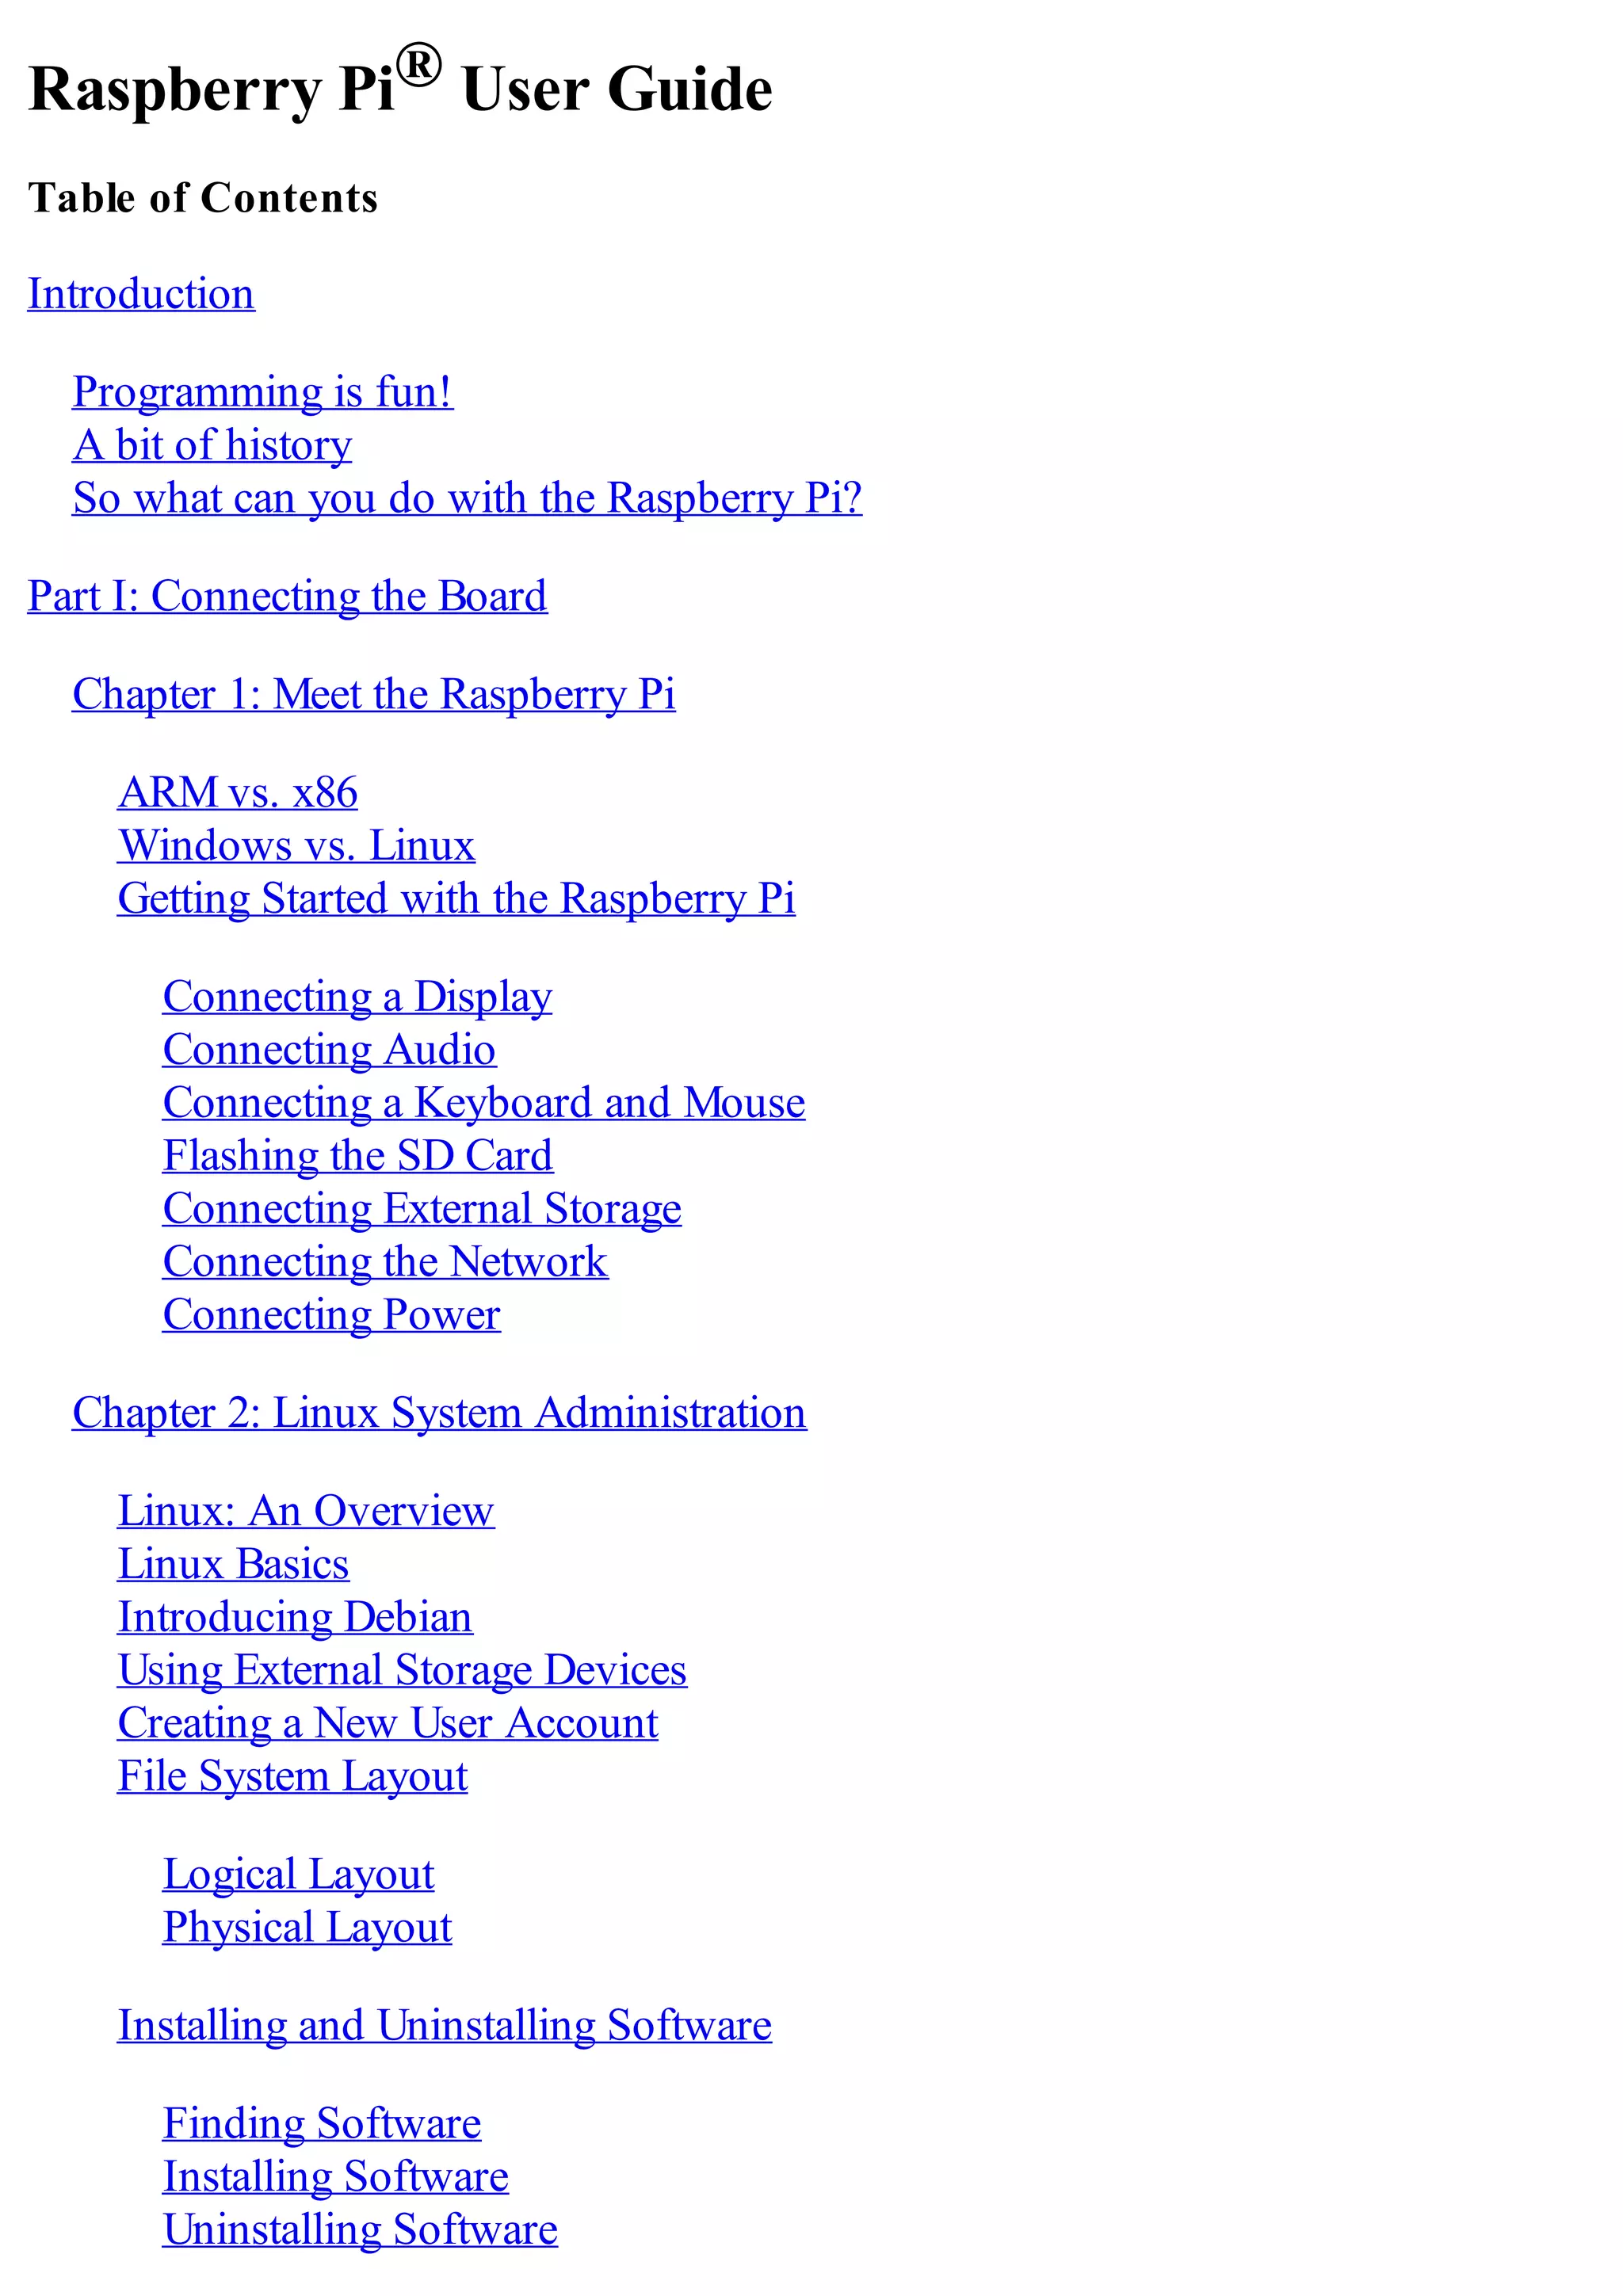
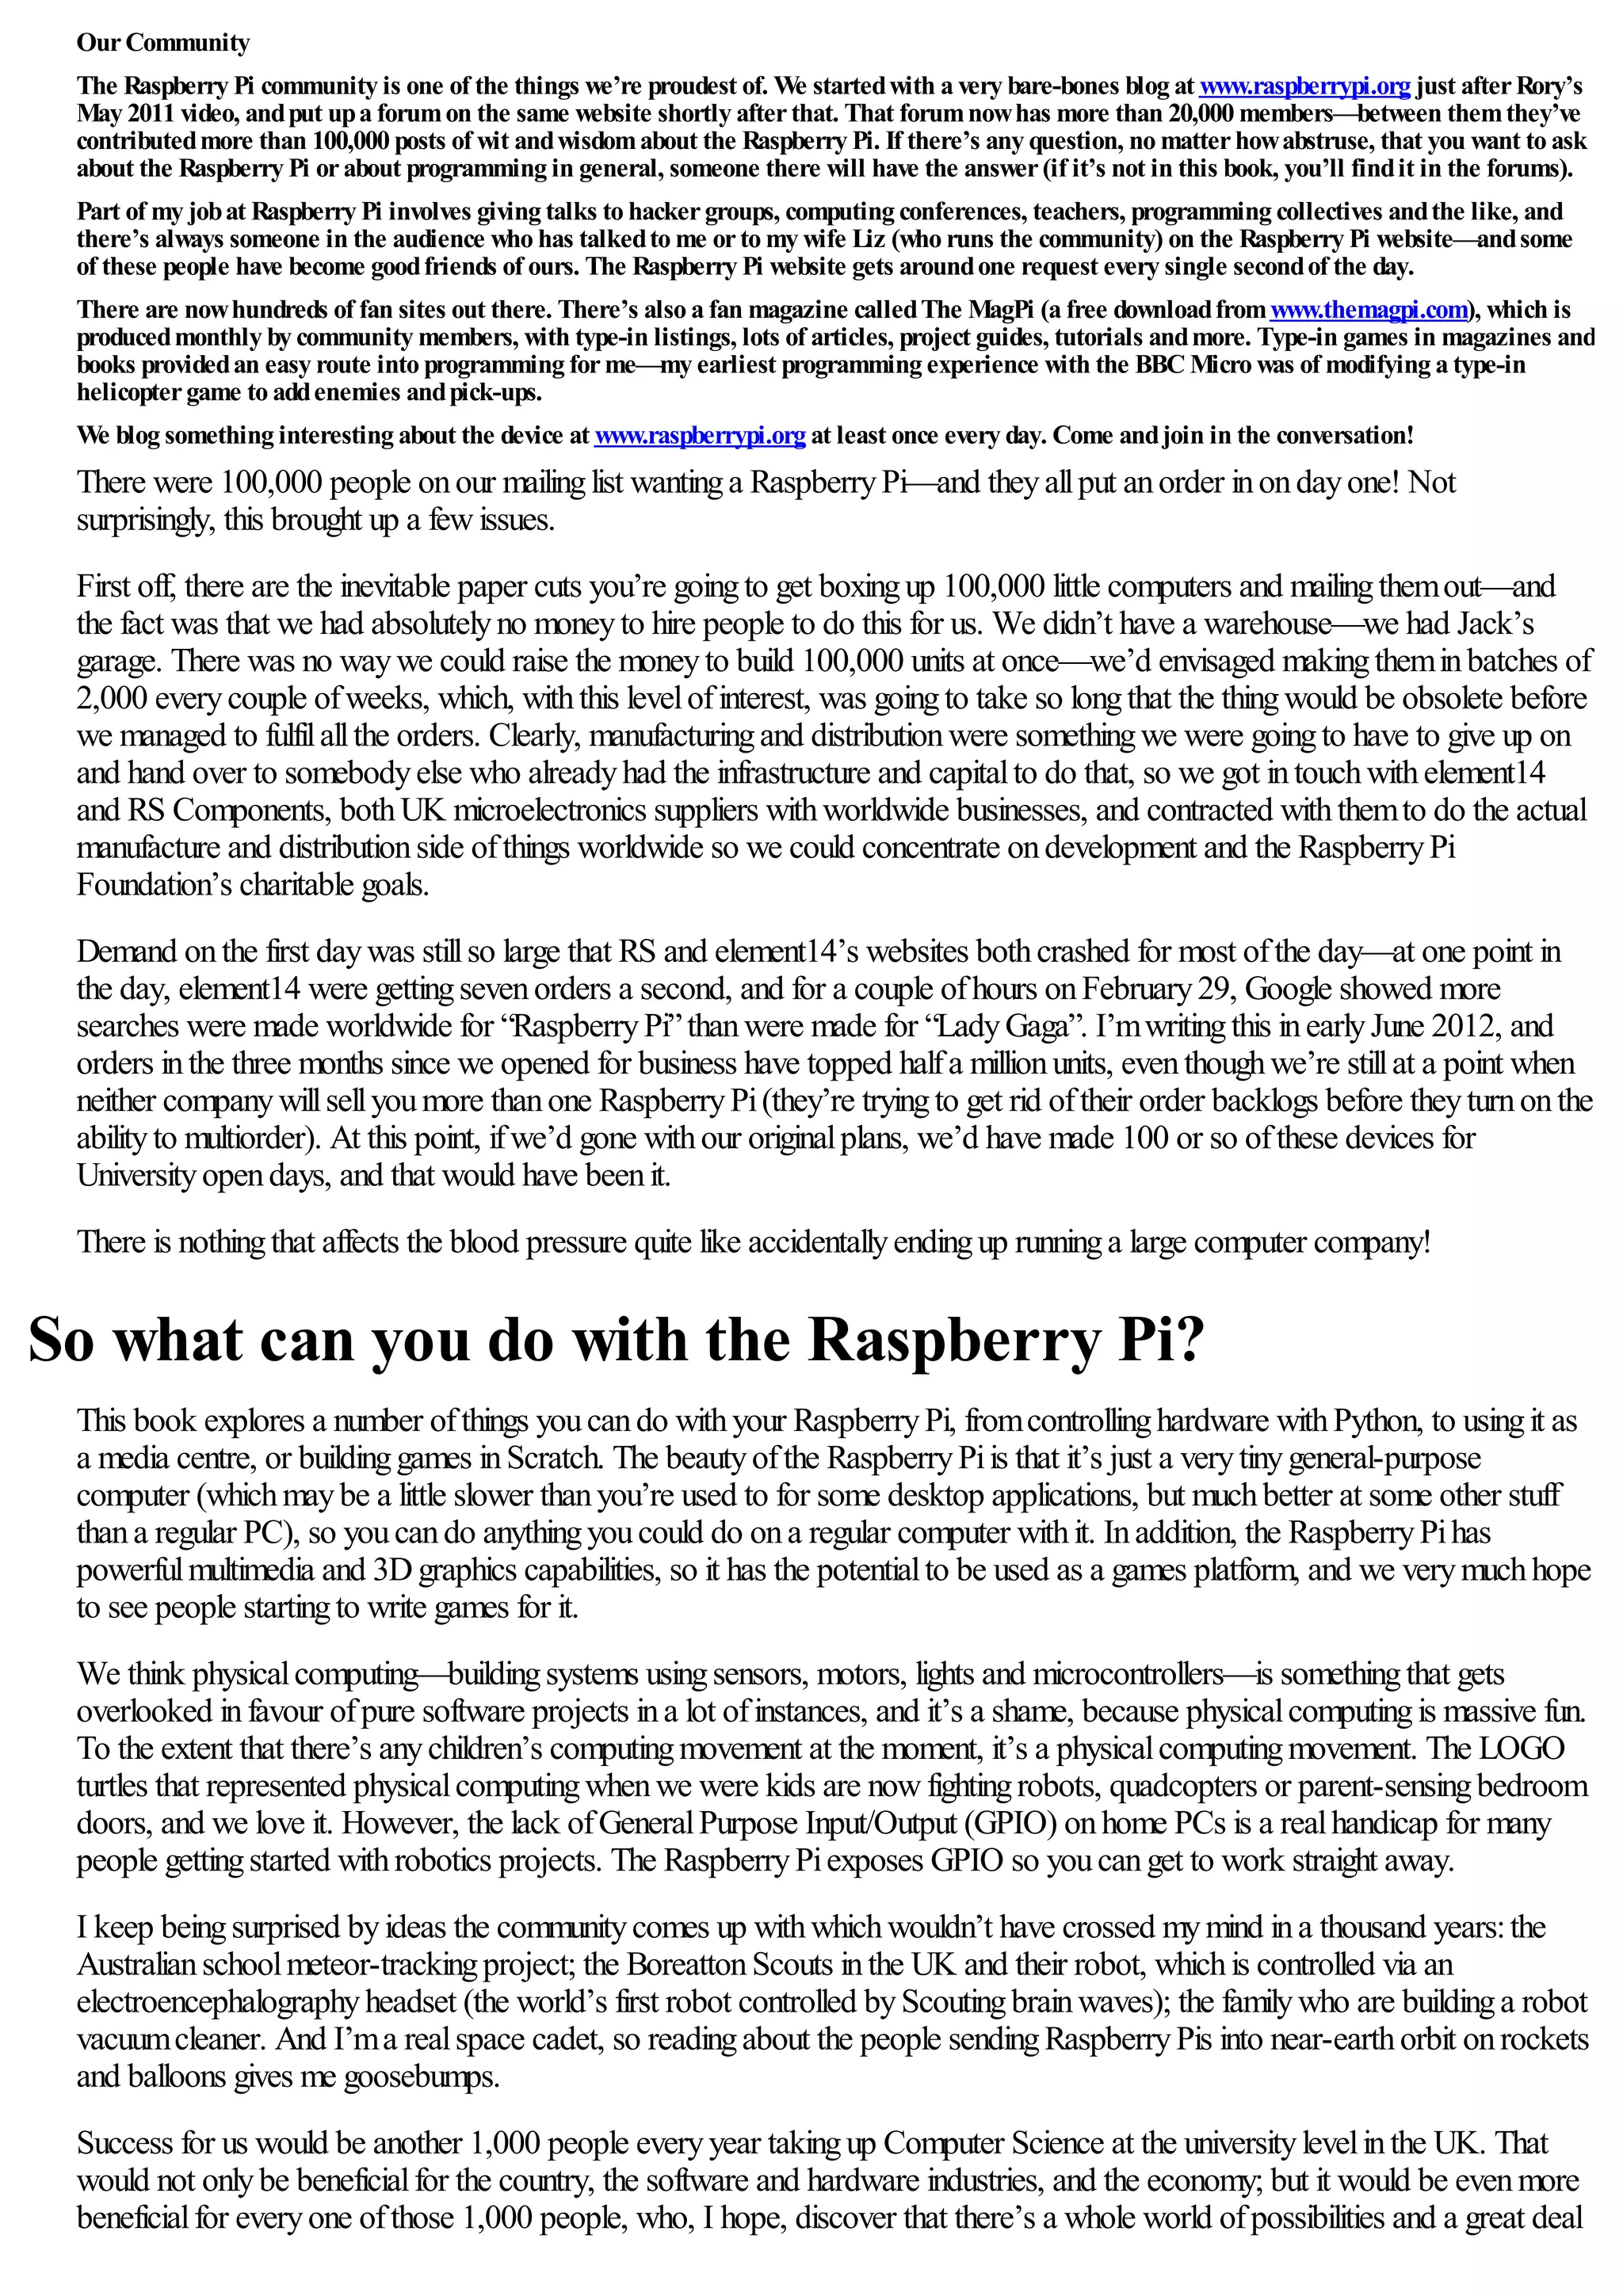
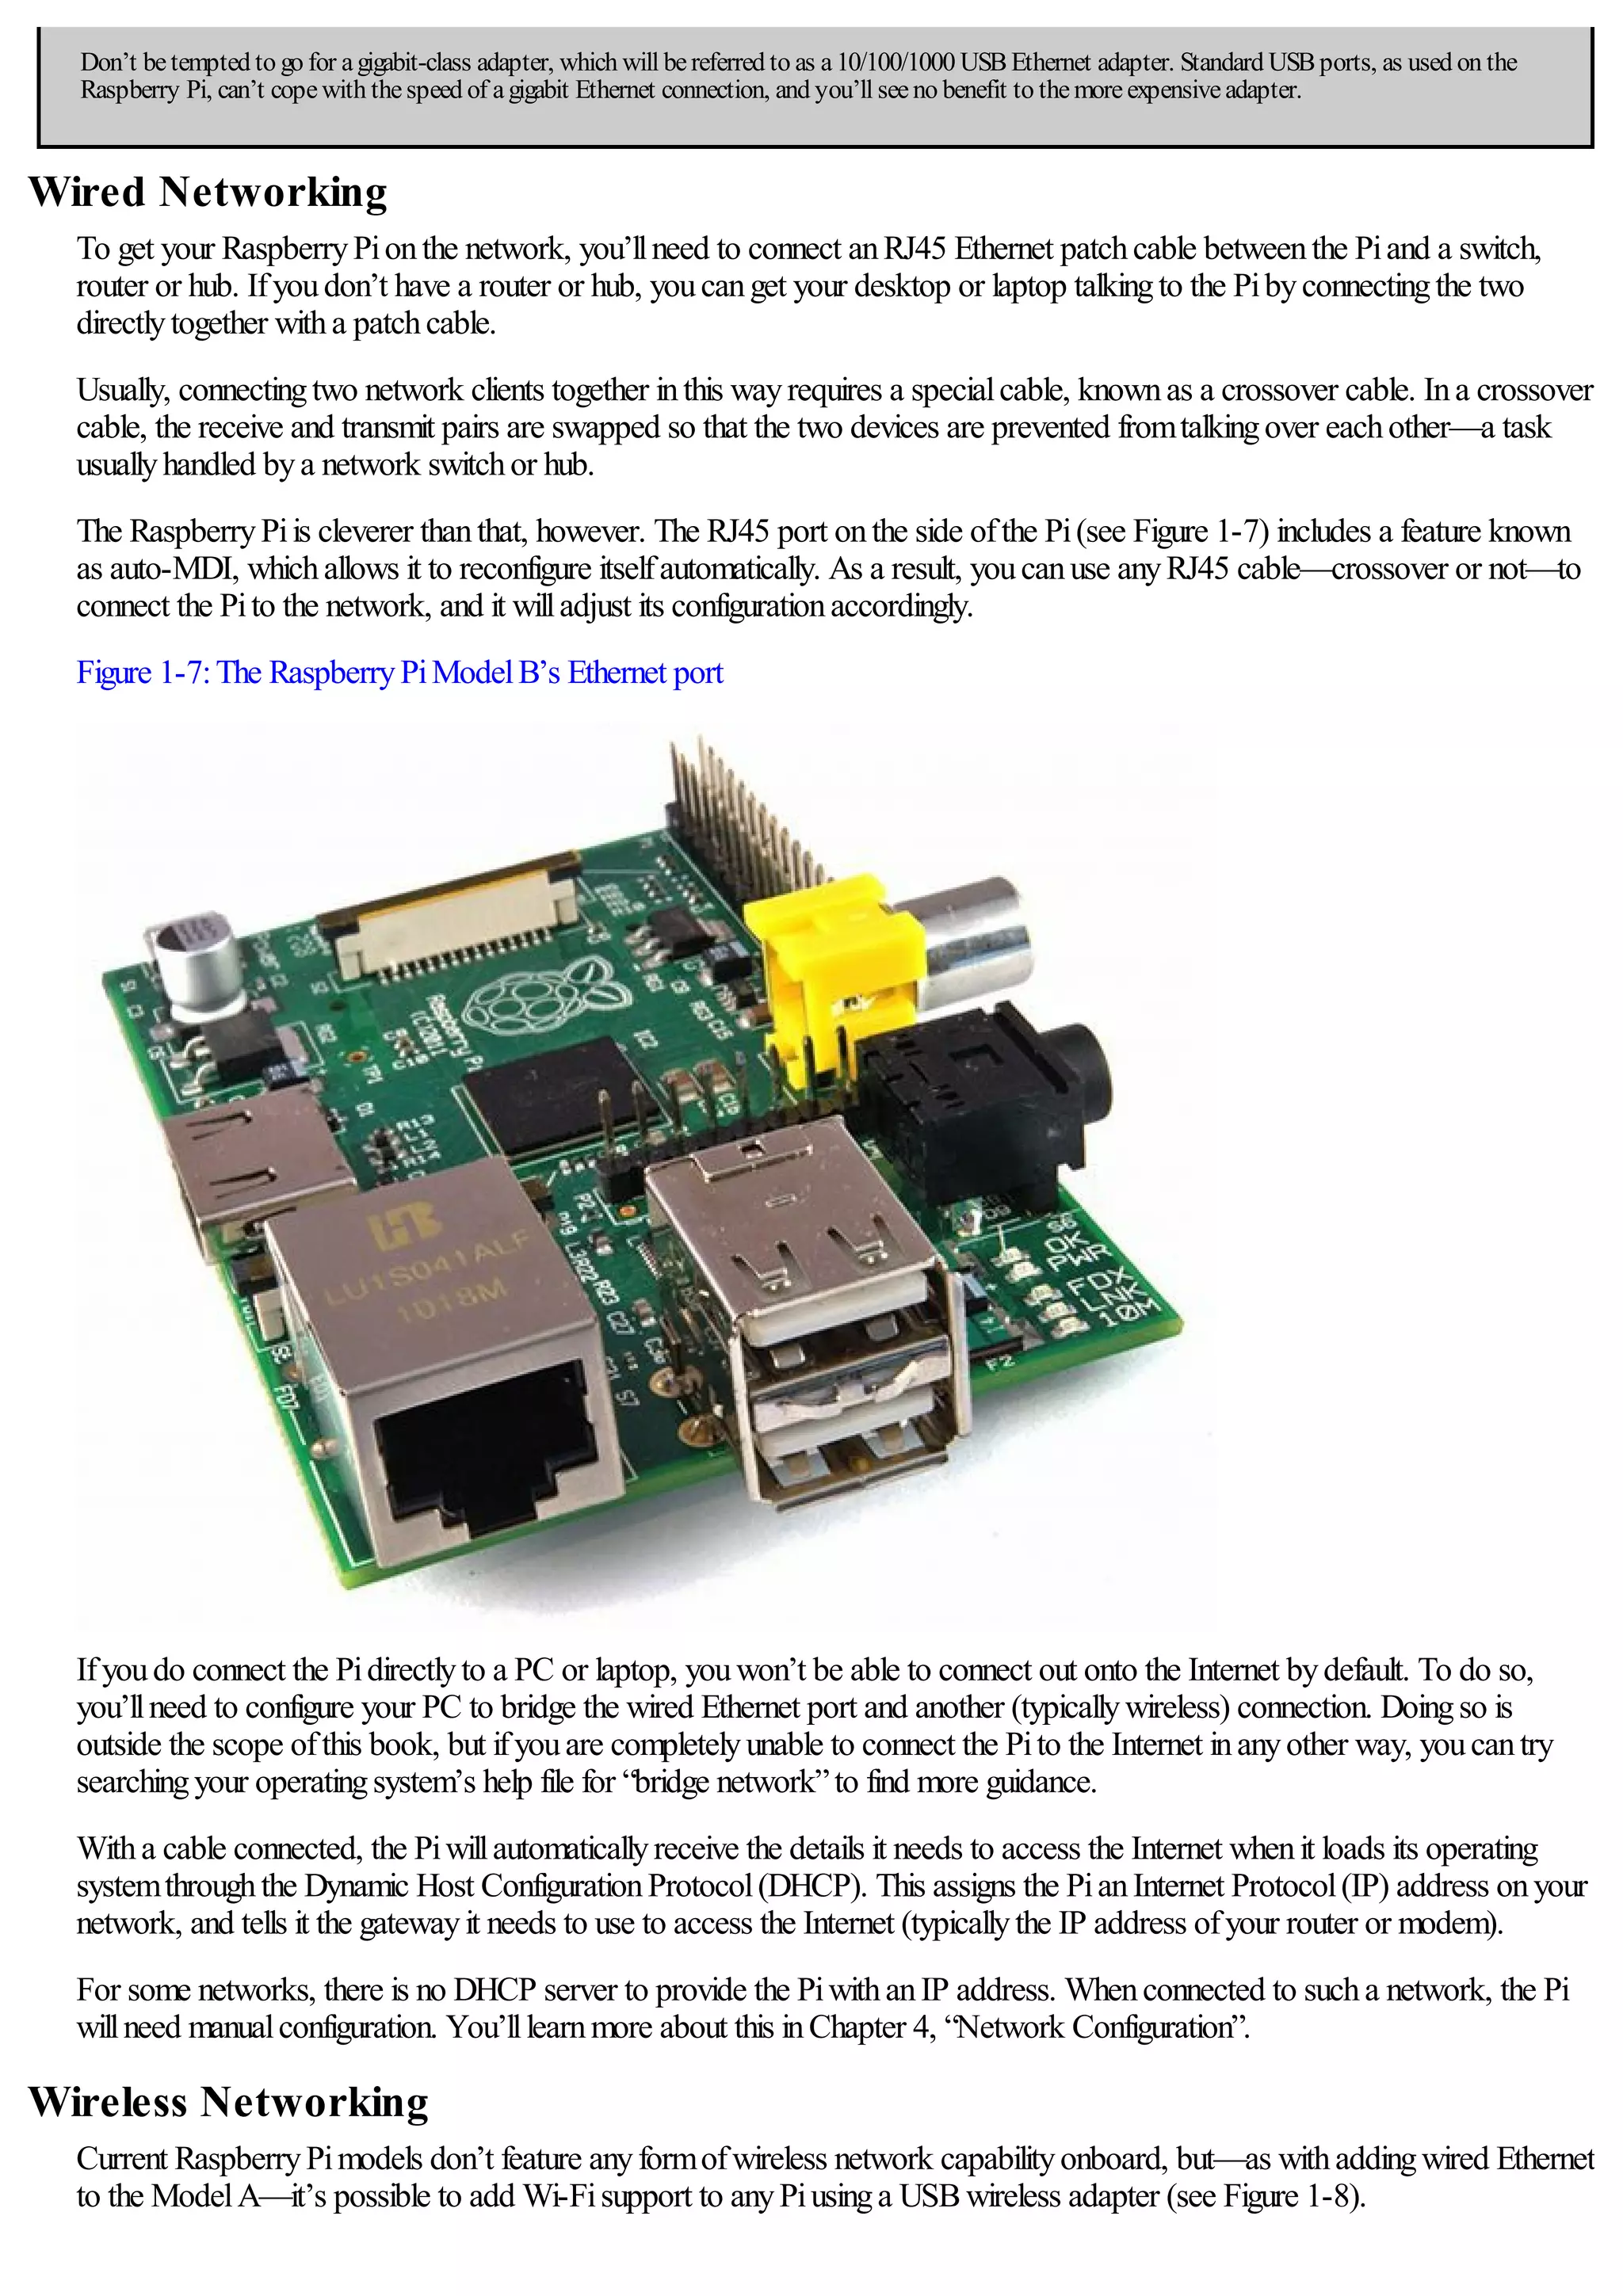
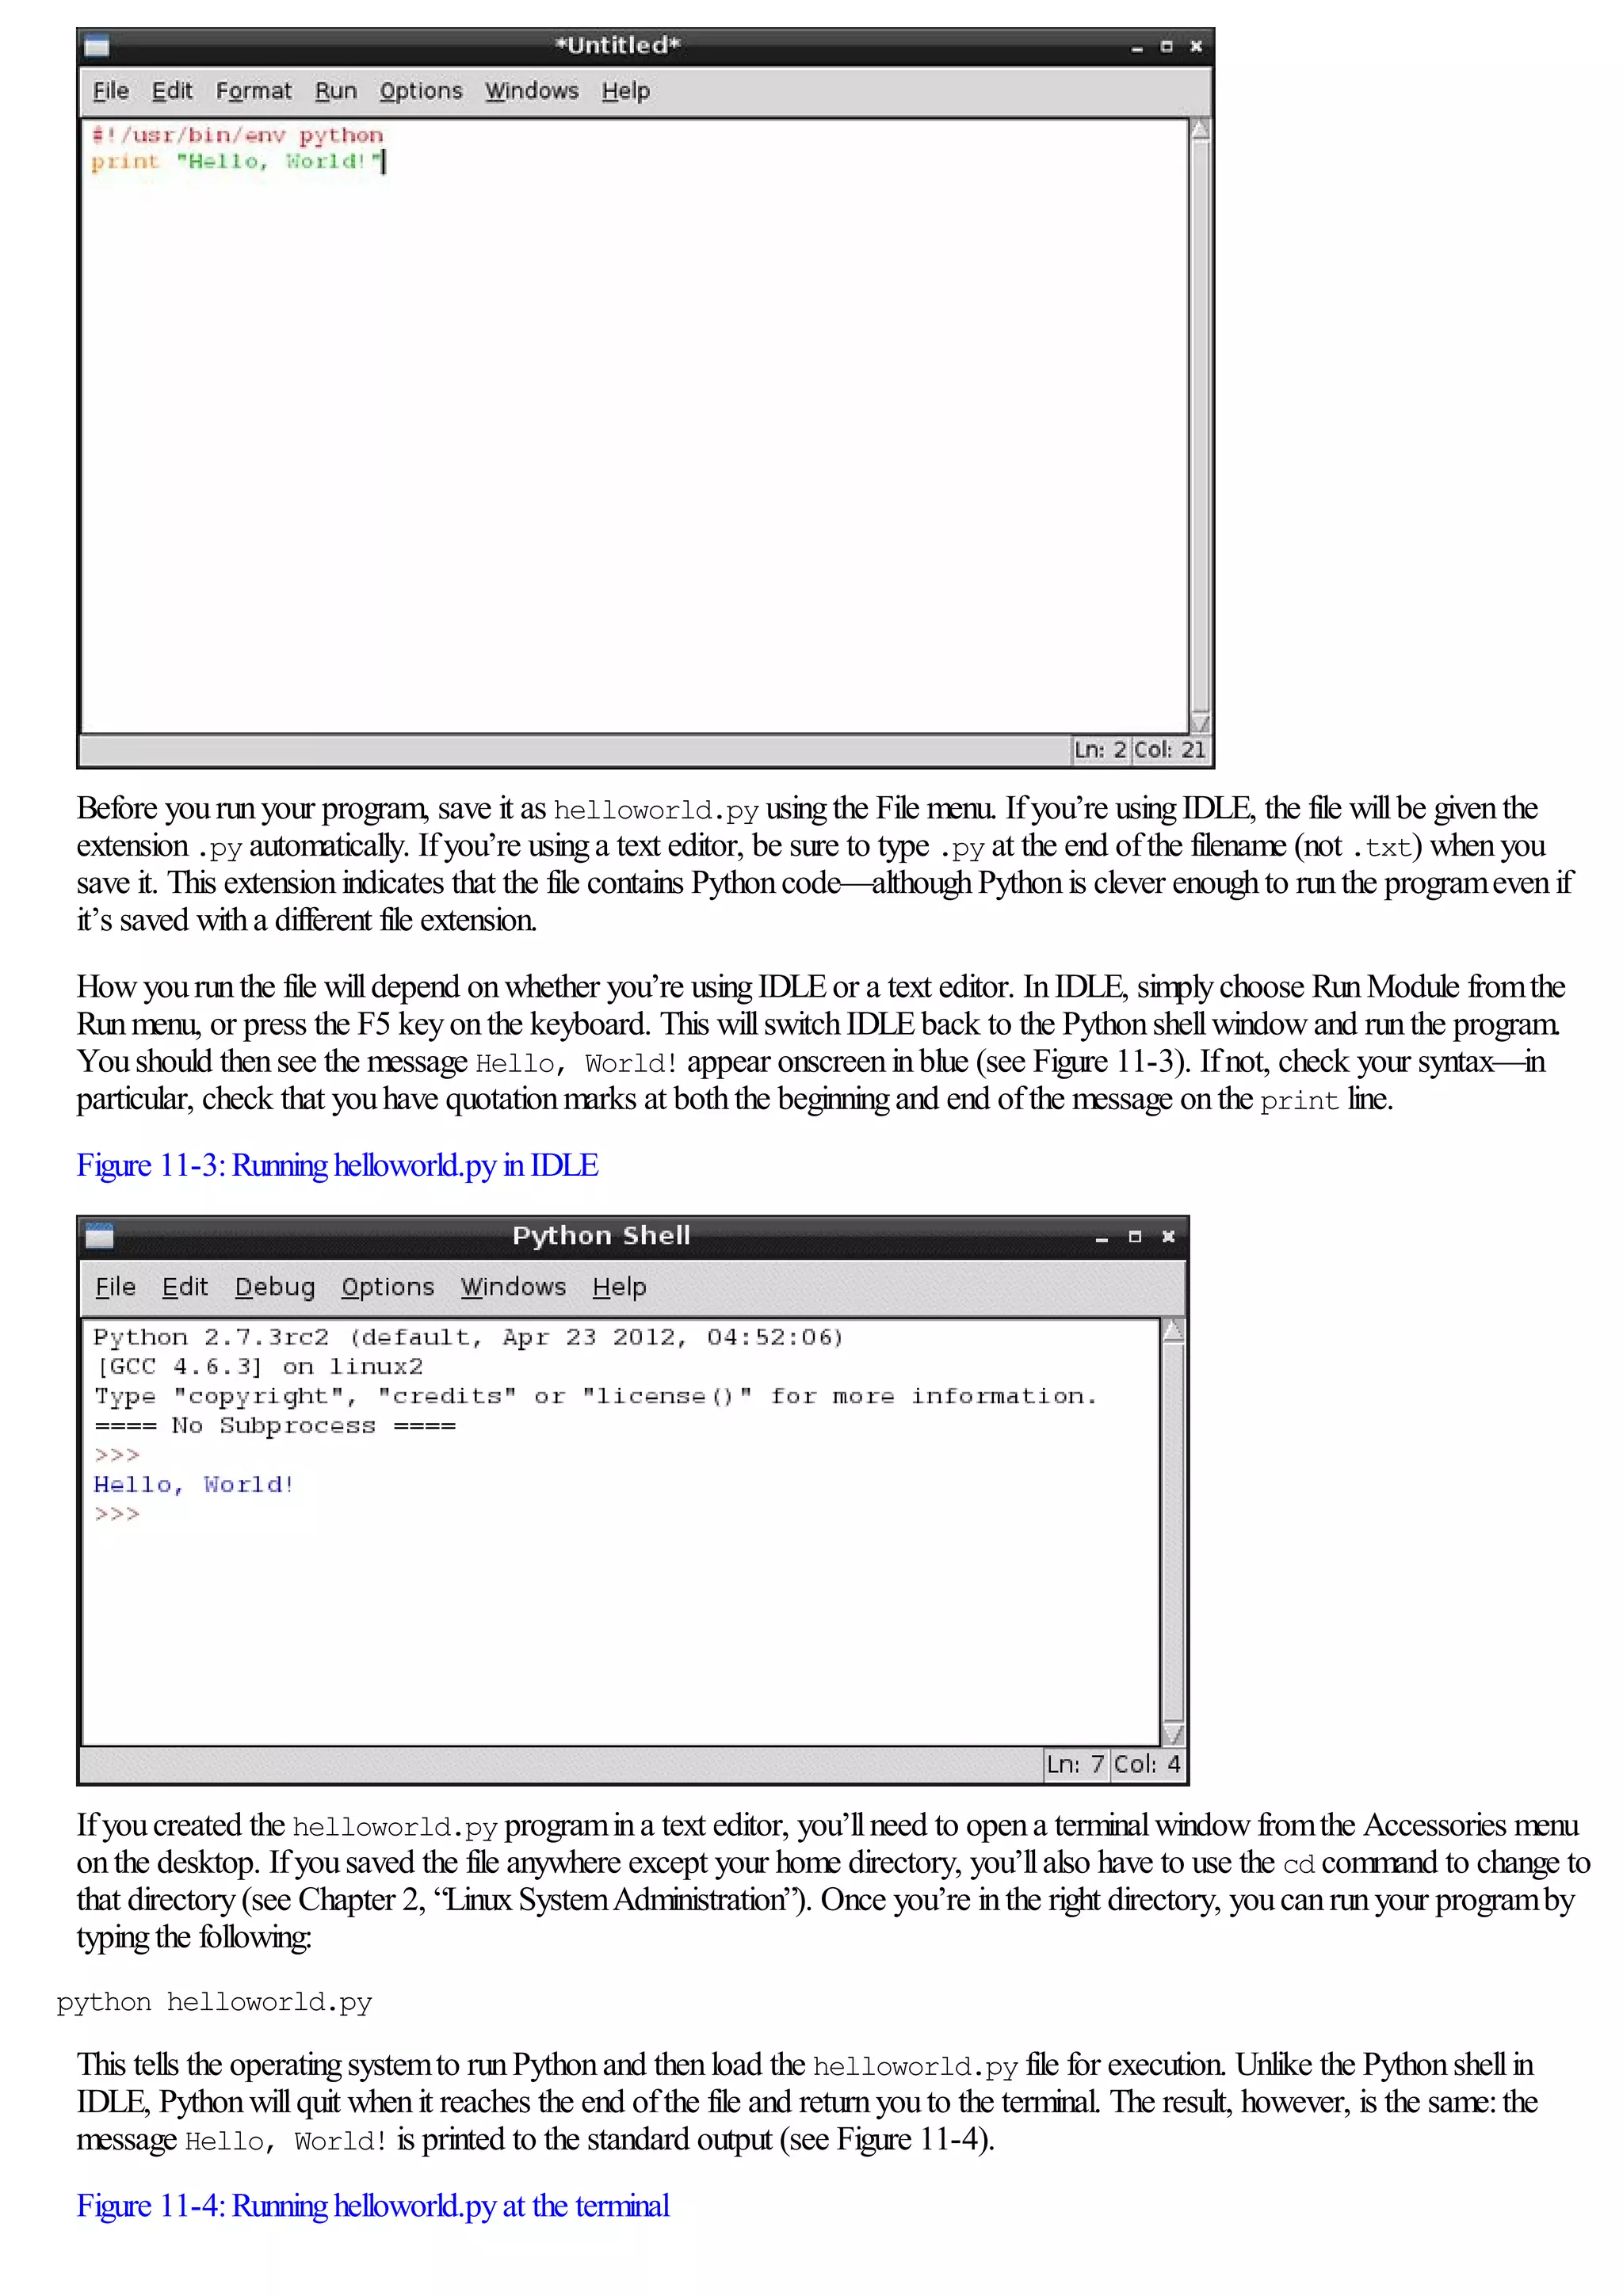
Fromthe terminal, youcanedit this file usinga varietyofdifferent text editors. For simplicity, the nano text editor should be used
for this process. Openthe file for editingwiththe followingcommand:
sudo nano /etc/network/interfaces
Nano is a powerfulyet lightweight text editor, witha simple user interface (see Figure 4-1). Youcanmove your cursor around
the document withthe arrowkeys, save byholdingdownthe CTRLkeyand pressingO, and quit byholdingdownthe CTRL
keyand pressingX.
The line youneed to edit for manualconfigurationstarts withiface eth0 inet. Delete dhcp fromthe end ofthis line and
replace it withstatic, press Enter to start a newline, and thenfillinthe remainingdetails inthe followingformat witha tab at
the start ofeachline:
[Tab] address xxx.xxx.xxx.xxx
[Tab] netmask xxx.xxx.xxx.xxx
[Tab] gateway xxx.xxx.xxx.xxx
Make sure that youpress the Tab keyat the start ofeachline, and don’t actuallytype [Tab]. The xcharacters inthe
configurationlines represent network addresses you’llneed to enter. For address, youshould enter the static IP address that
youwant to assignto the Pi. For netmask, youshould enter the network mask—whichcontrols the size ofthe connected
network—inwhat is knownas dotted-quad format. Ifyou’re usinga home network, this is typically255.255.255.0. For
gateway, youshould enter the IP address ofyour router or cable modem.
As anexample, the settings for a commonhome network would look like this:
iface eth0 inet static
[Tab] address 192.168.0.10
[Tab] netmask 255.255.255.0
[Tab] gateway 192.168.0.254
Figure 4-1:Editing/etc/network/interfaces withnano](https://image.slidesharecdn.com/rpiusersguide-210422224618/75/Guia-de-usuario-de-Raspberry-Pi-por-Eben-Upton-45-2048.jpg)


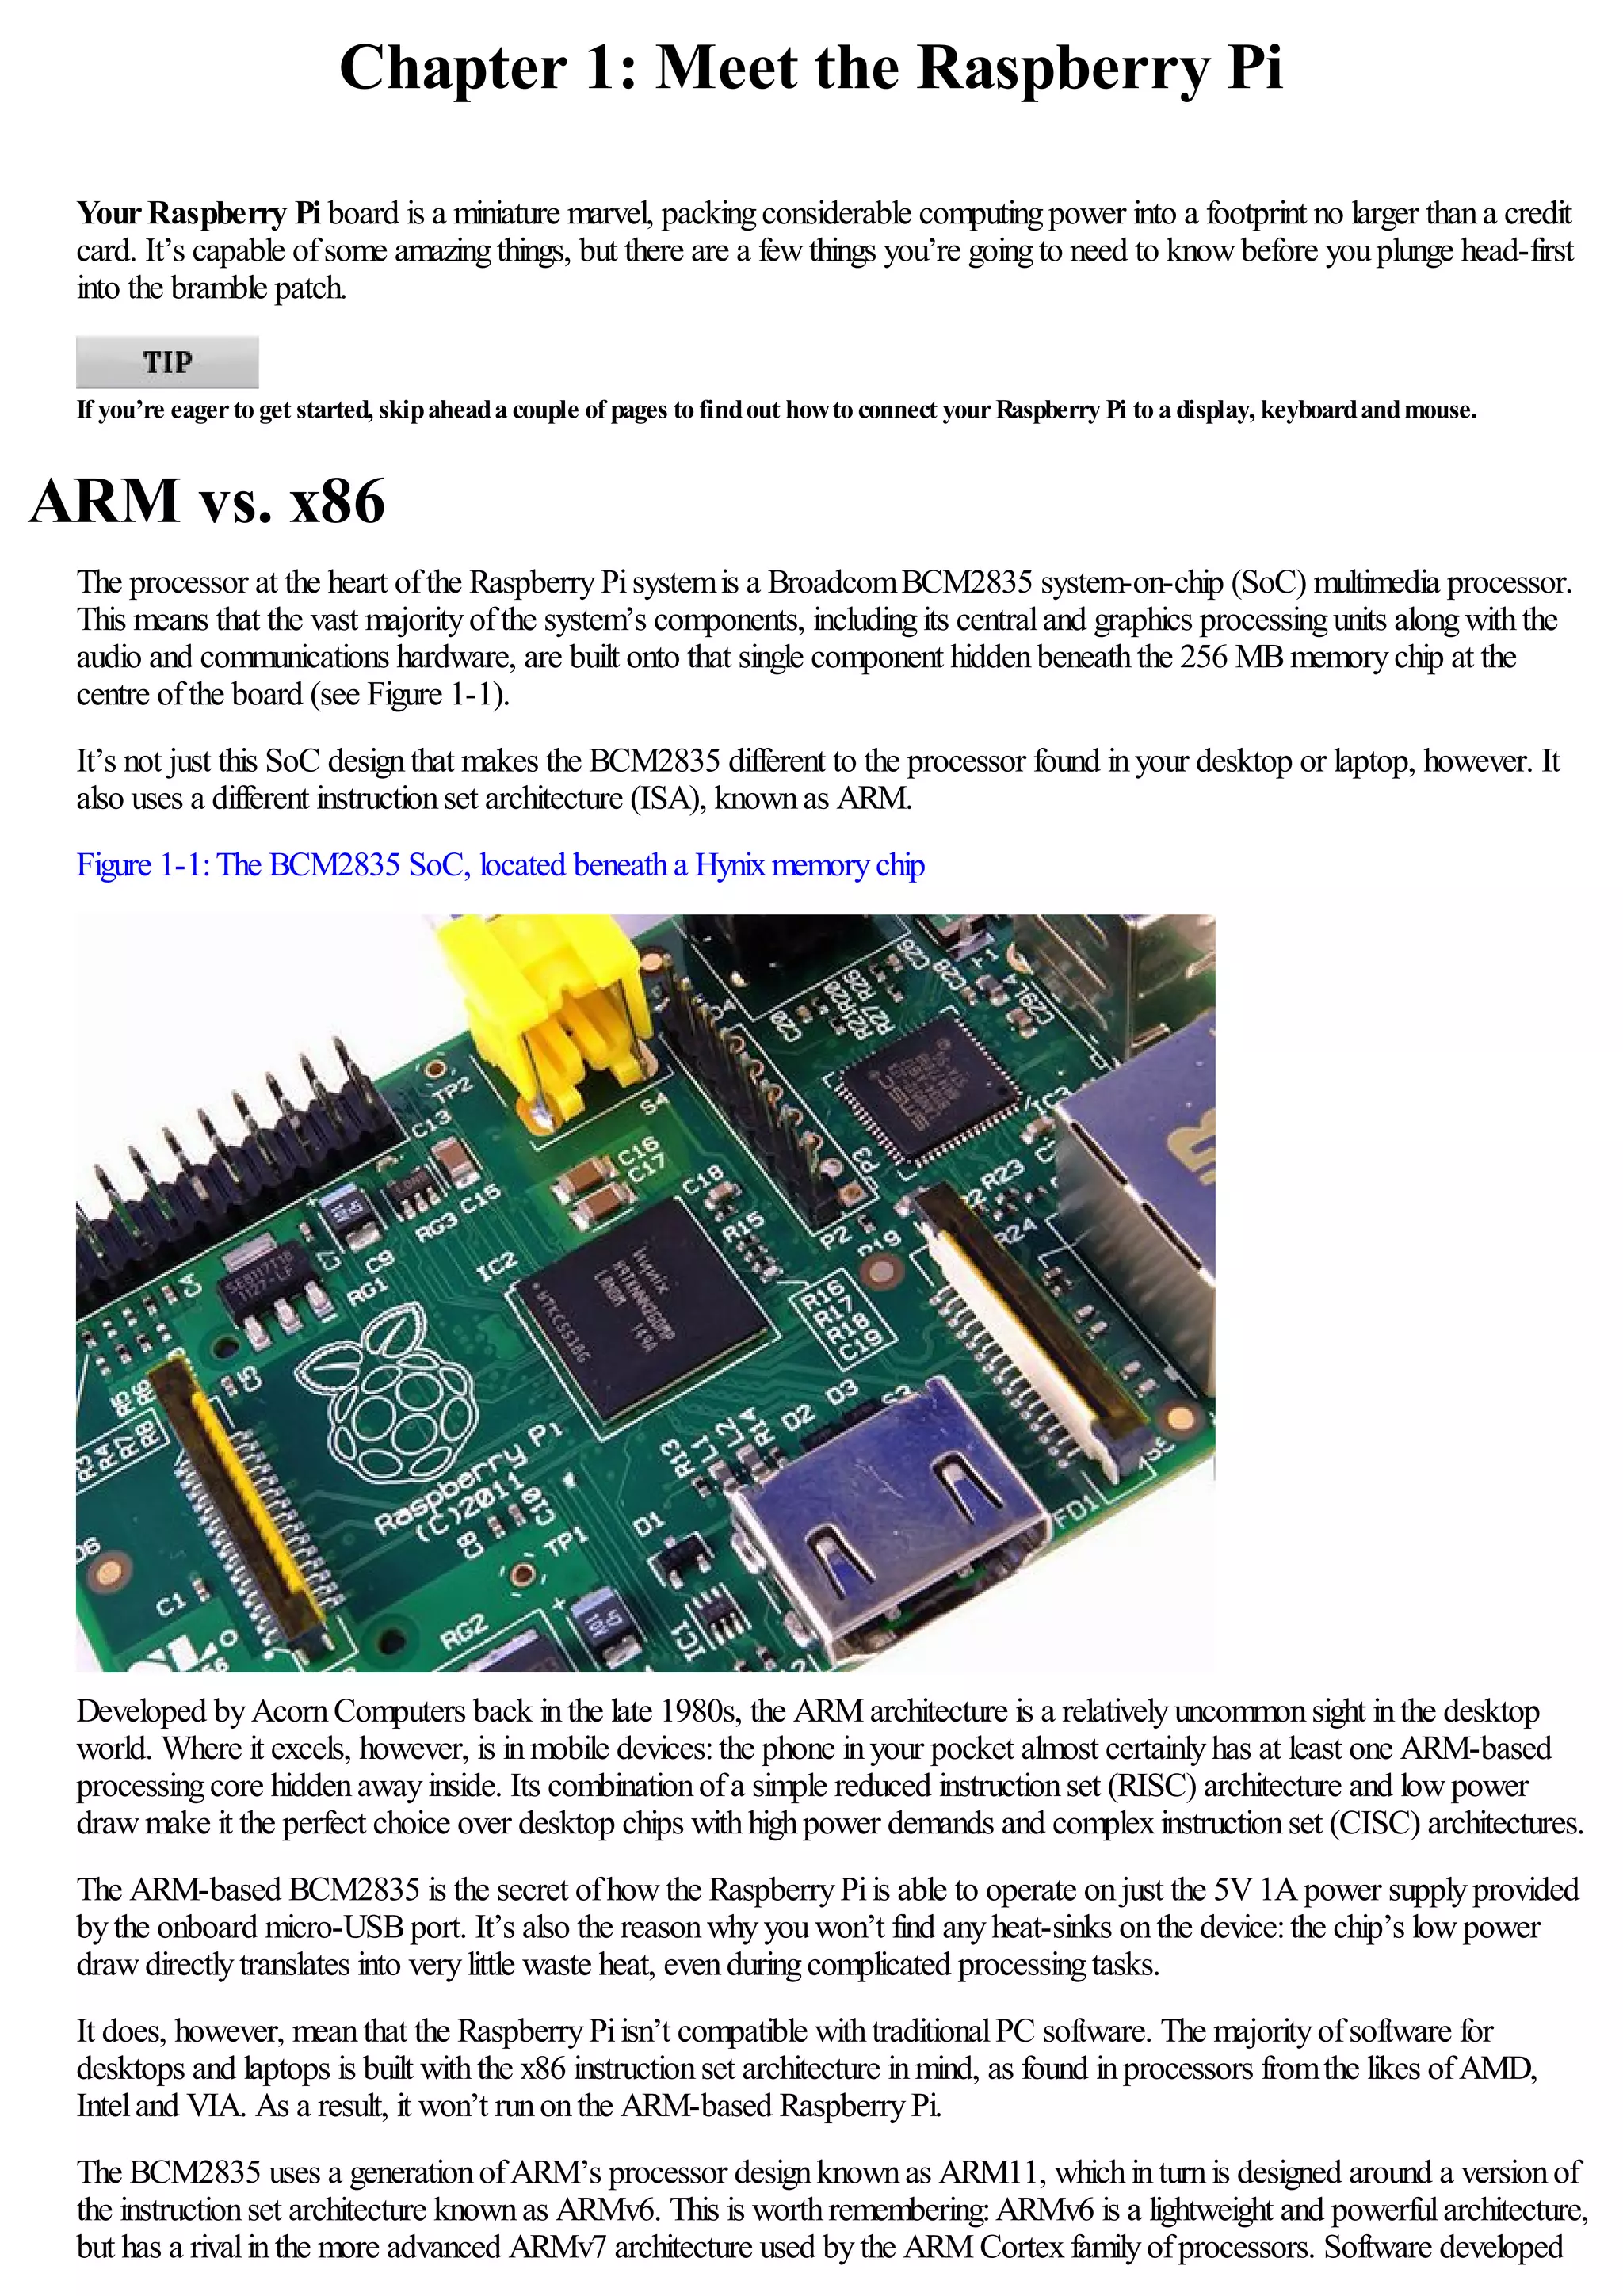
![Once the entryis inplace, save the file bypressingCTRL+ O and thenquit nano withCTRL+ X.
The device ID of wlan0 is correct if this is the first wireless device you’ve set upon yourPi. If it isn’t, the numberat the endwill be different. Type
iwconfig to see a current list of wireless devices, andchange the lines in the preceding code example accordingly.
The last line ofthe interfaces file makes reference to a configurationfile, wpa.conf, whichdoes not yet exist. This file is used
bya toolknownas wpasupplicant, designed to provide Linuxwithaneasywayto connect to networks secured withWireless
Protected Access (WPA) encryption.
Usingwpasupplicant, youcanconnect the Pito almost anywireless network—regardless ofwhether it’s protected byWPA
or its newer replacement WPA2—inbothAdvanced EncryptionStandard (AES) and TemporalKeyIntegrityProtocol(TKIP)
modes. Despite its name, wpasupplicant also allows connectionto wireless networks usingthe older Wired Equivalent
Privacy(WEP) encryptionstandard.
The wpasupplicant programstores its configurationina file called wpa.conf, located inthe /etc directory. To begin
configuringthe Pifor wireless access, first opena newblank file for editingbytypingthe following:
sudo nano /etc/wpa.conf
Enter the followingtwo lines, whichagain, are the same for anywireless network type. Replace Your_SSIDwiththe SSIDfor
the wireless network to whichyouwant to connect, and thenfinishthe file withthe lines that matchyour network’s encryption
type.
network={
[Tab] ssid=”Your_SSID”
At this point inthe configurationfile, the details required differ dependingonthe type ofwireless network youare configuring.
The followingsubsections provide instructions for completingthe configurationfor unencrypted, WEP and WPAnetworks.
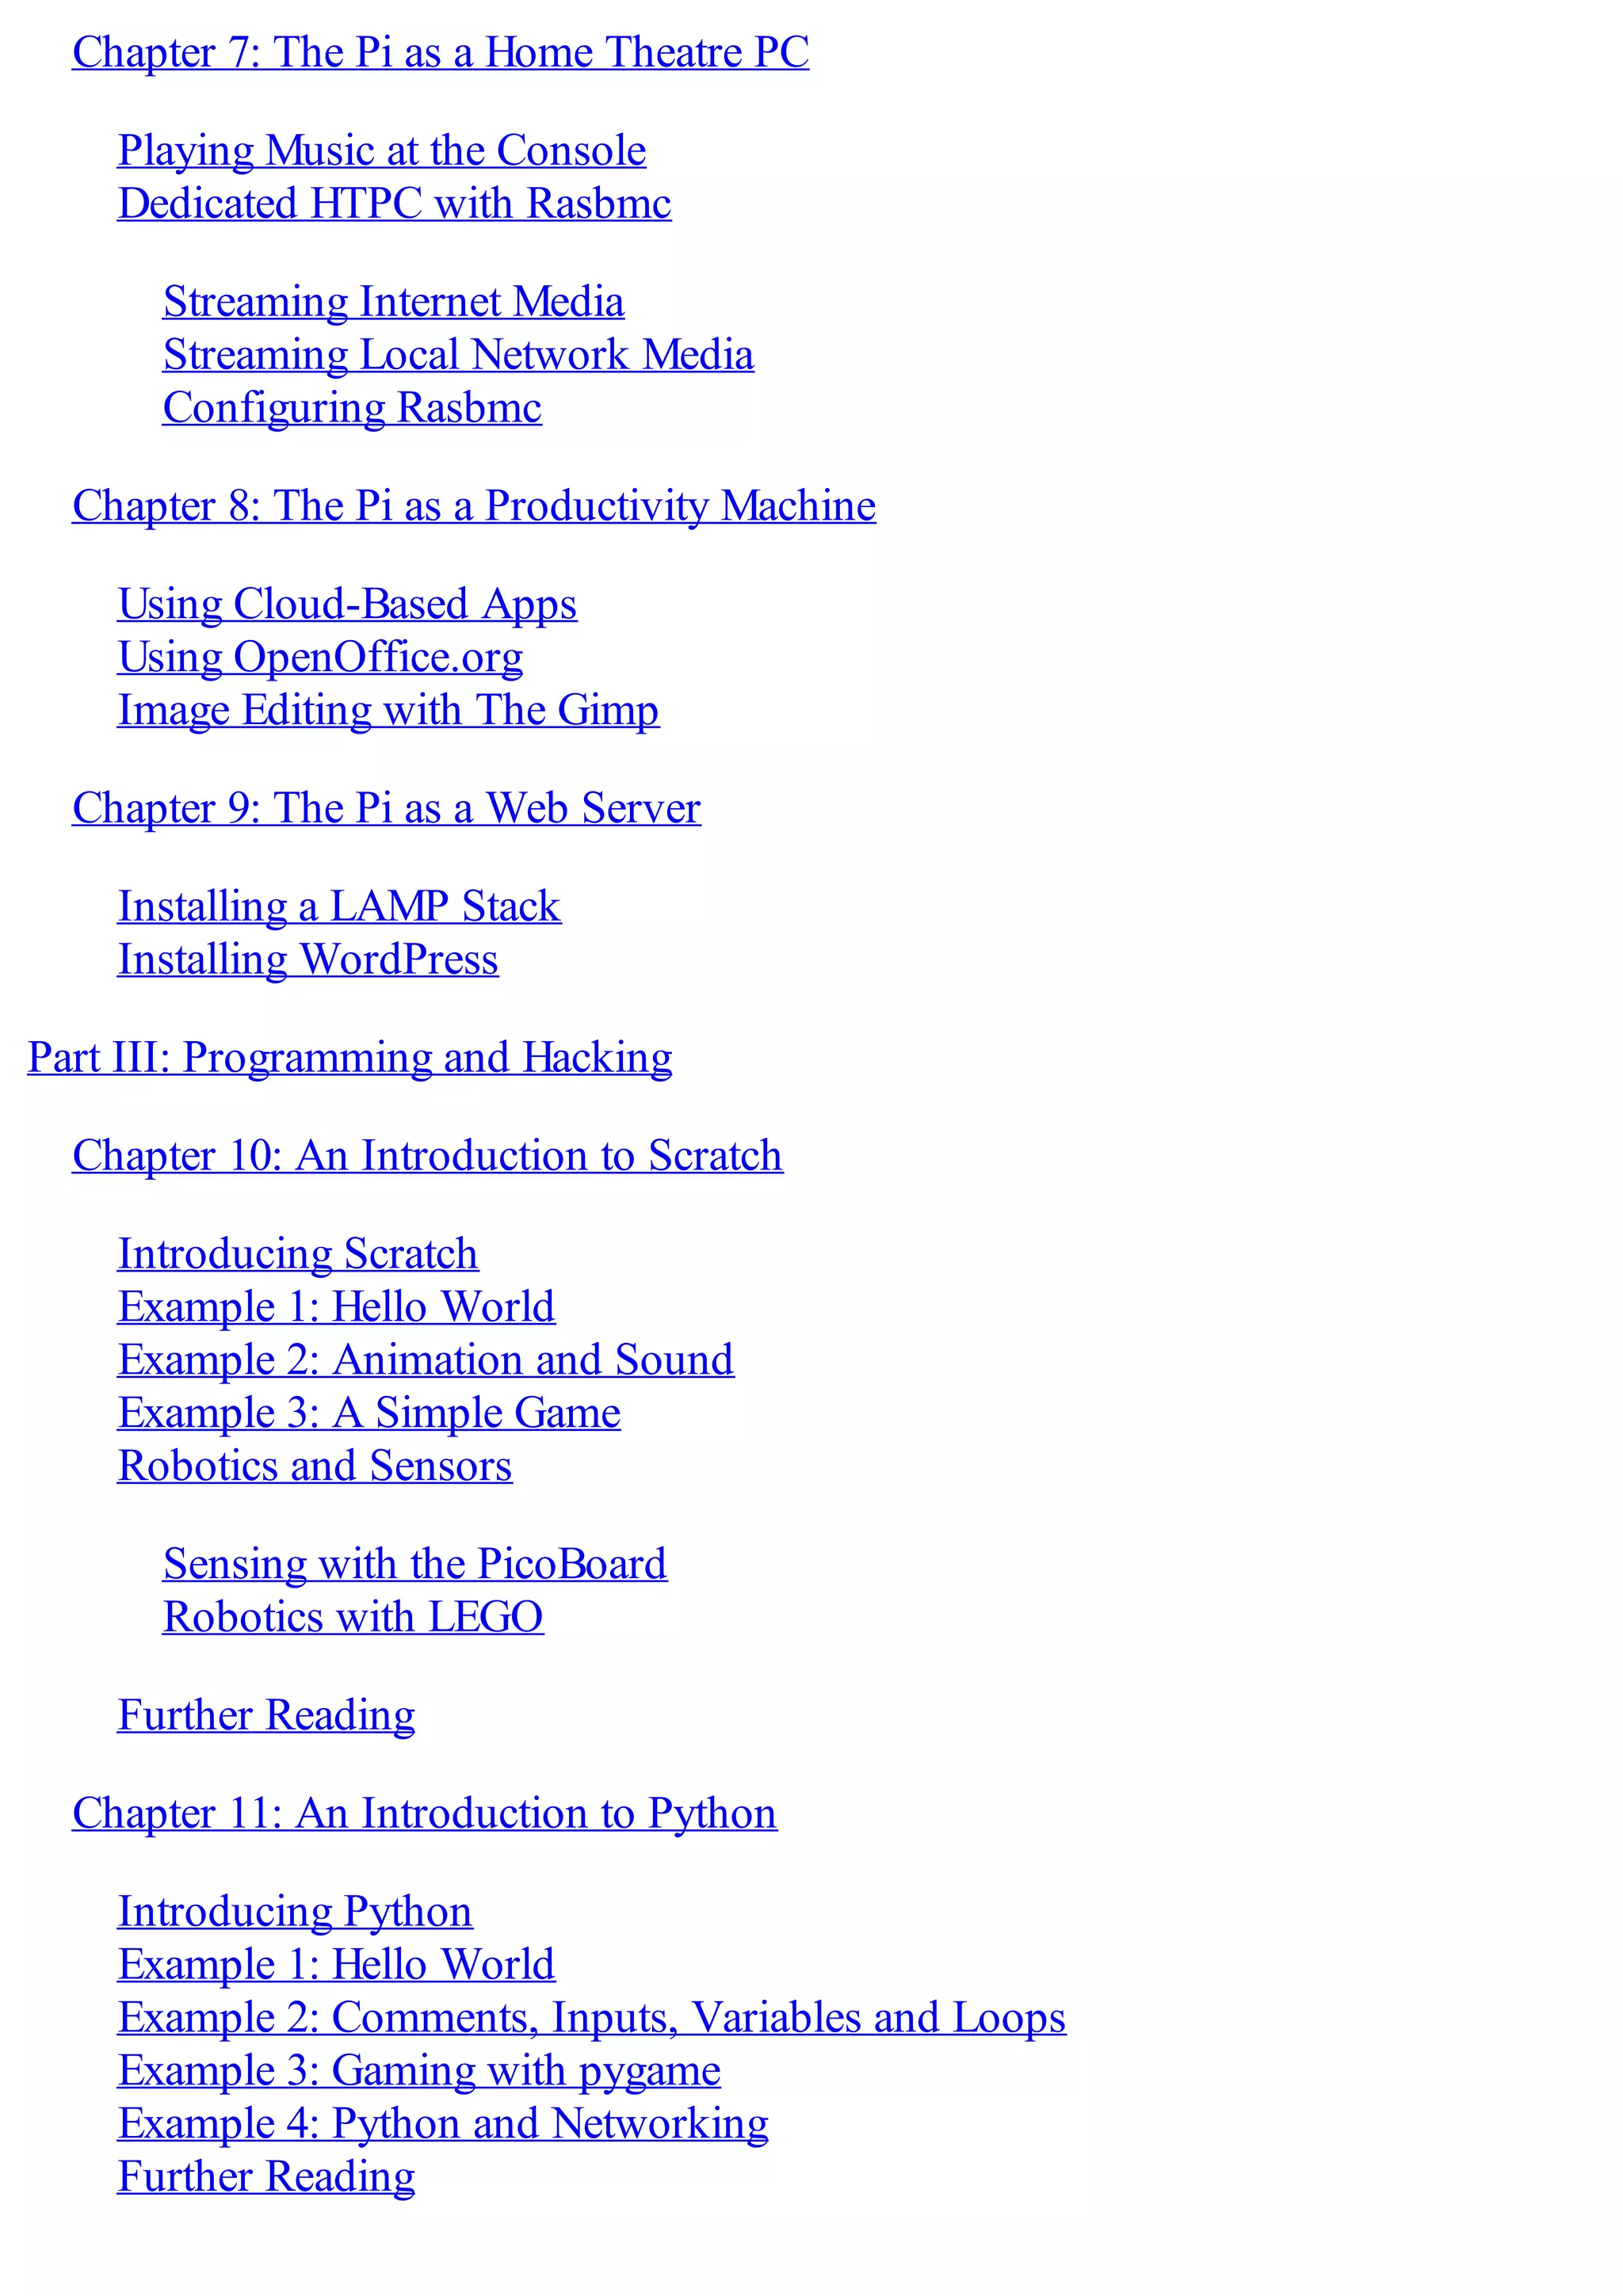
No Encryption
Ifyour wireless network has no encryptioninplace, finishthe wpa.conf file as follows:
[Tab] key_mgmt=NONE
}
Save the file withCTRL+ O, and thenexit nano withCTRL+ X.
WEP Encryption
Ifyour wireless network uses WEP encryption, finishthe wpa.conf file as follows:](https://image.slidesharecdn.com/rpiusersguide-210422224618/75/Guia-de-usuario-de-Raspberry-Pi-por-Eben-Upton-52-2048.jpg)
![[Tab] key_mgmt=NONE
[Tab] wep_key0=”Your_WEP_Key”
}
Replace Your_WEP_Keywiththe ASCII keyfor your wireless network’s WEP encryption. Save the file withCTRL+ O, and
thenexit nano withCTRL+ X.
WEPencryption is extremely insecure. Readily-available software can break the encryption on a WEP-protectednetwork in just a fewminutes,
allowing a thirdparty to use yournetwork. If you’re still running WEP, considerswitching to WPAorWPA2 forbettersecurity.
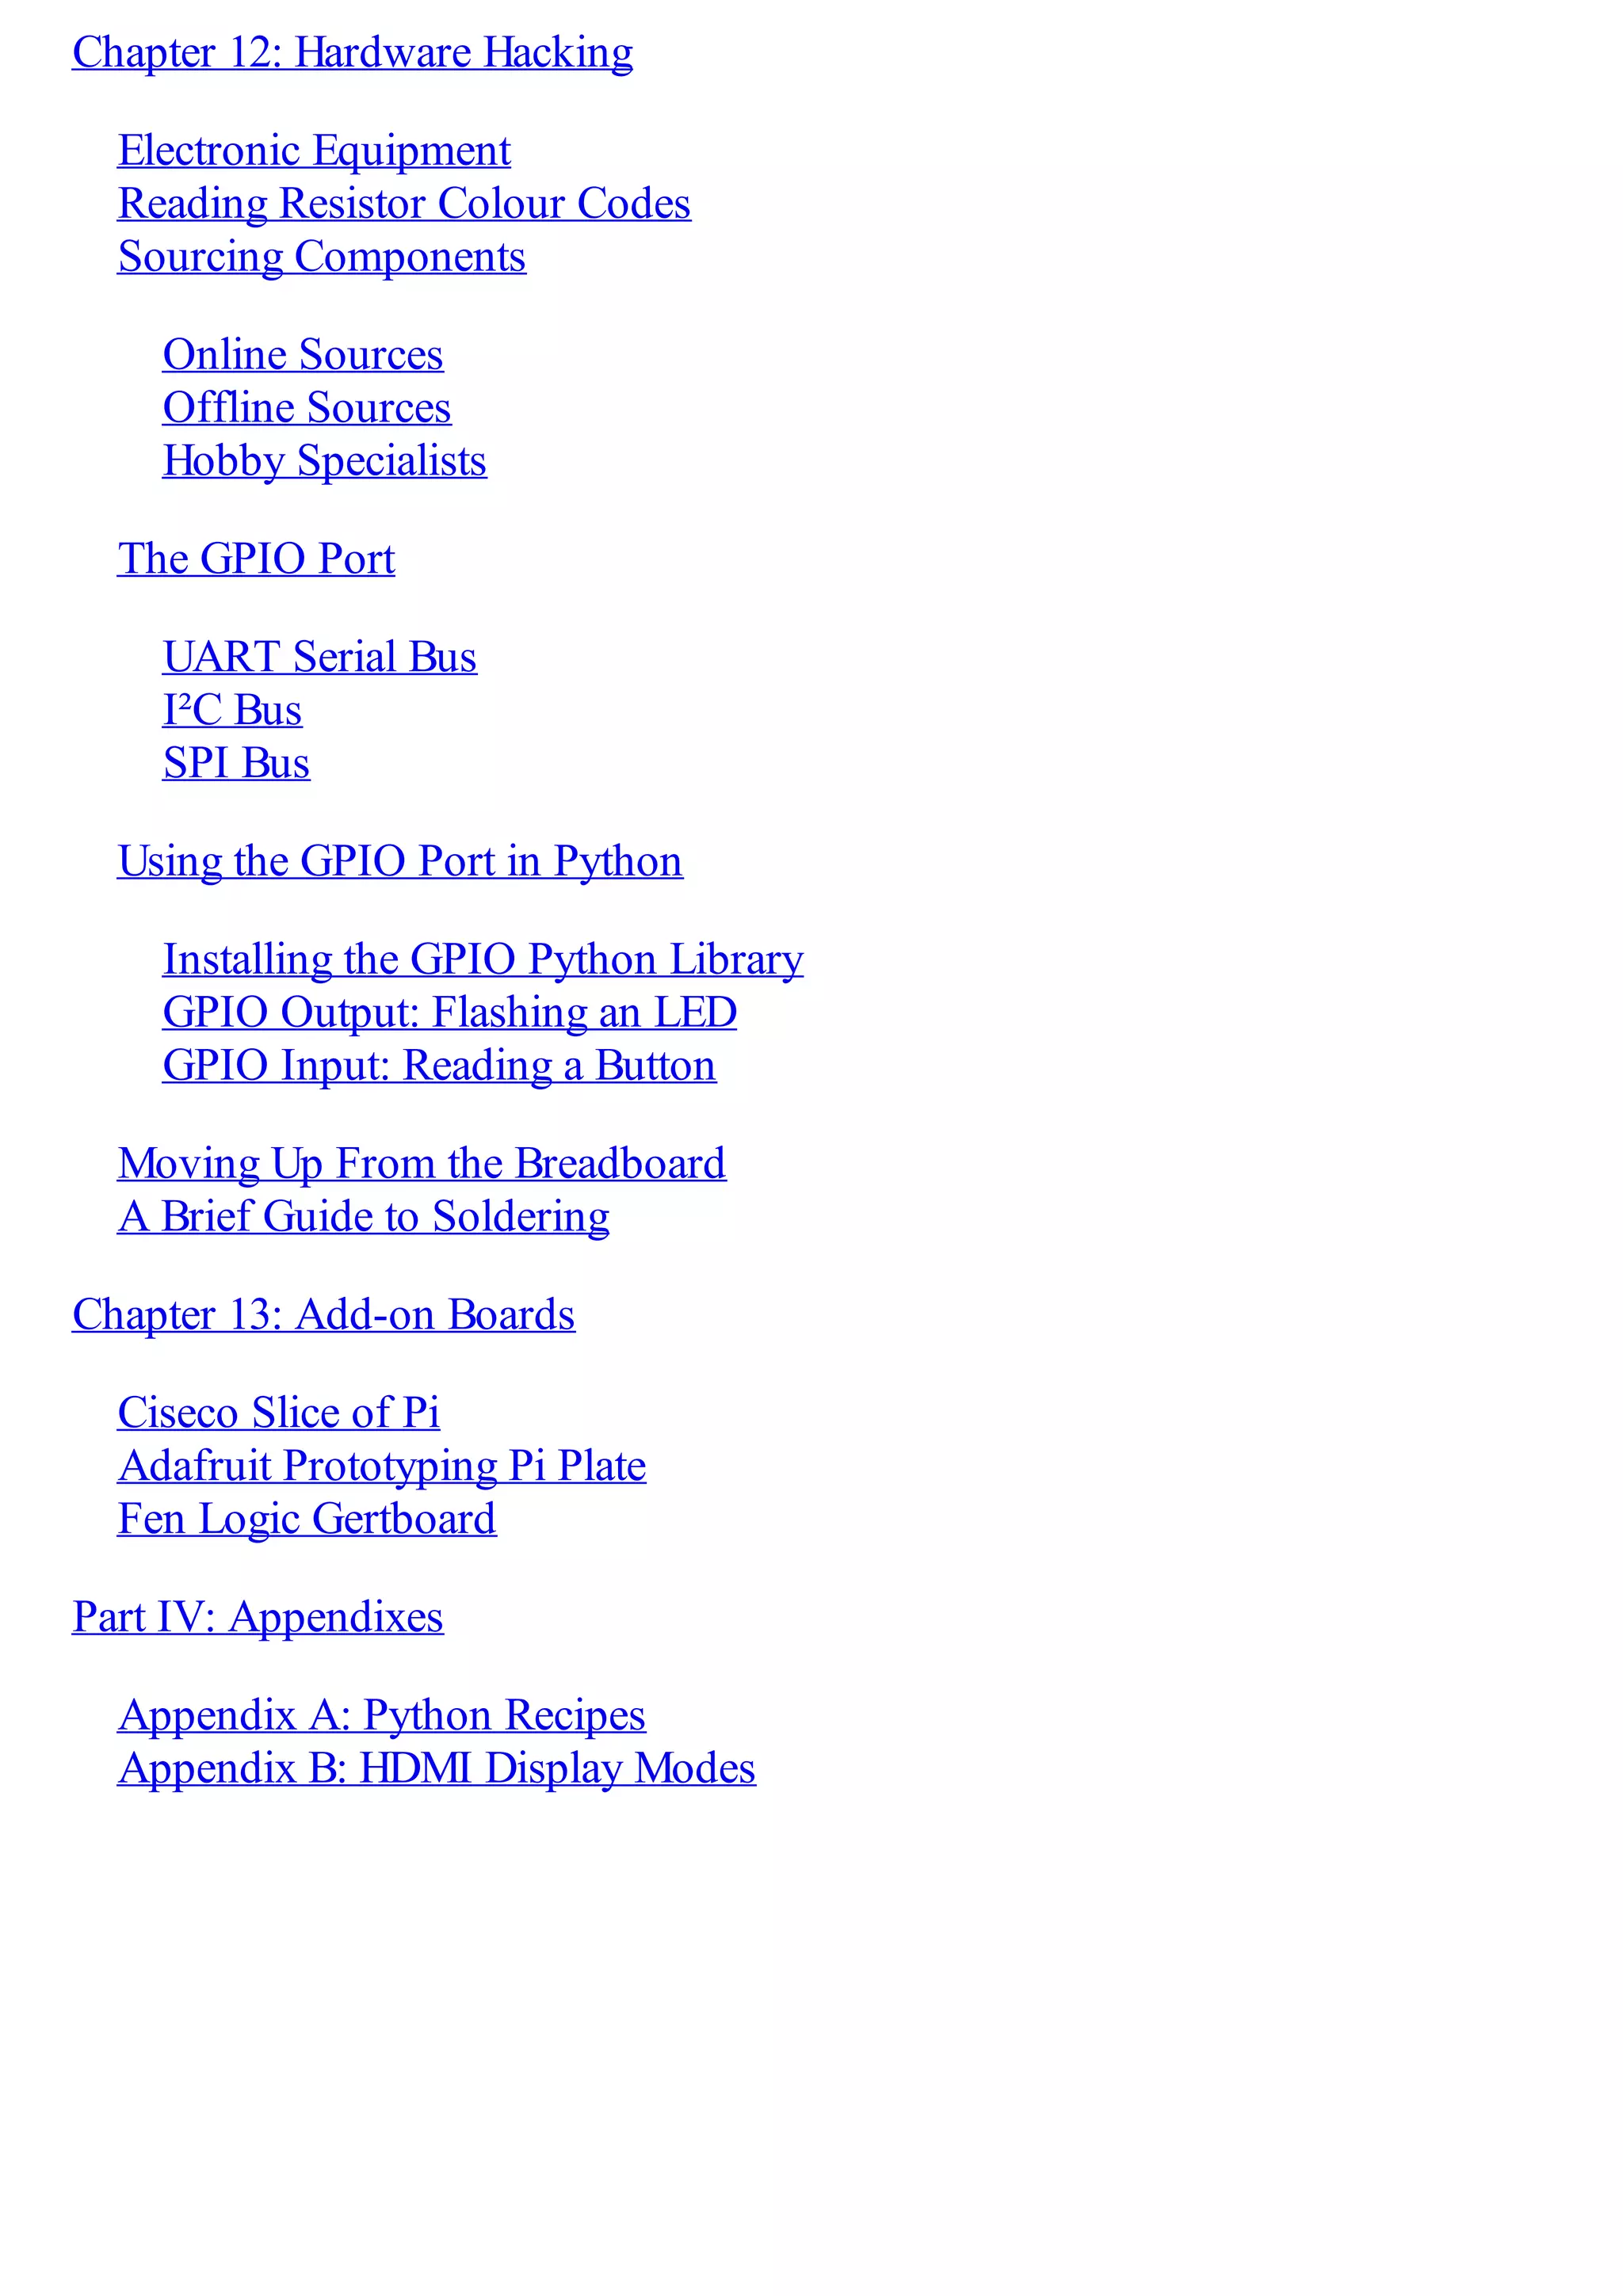
WPA/WPA2 Encryption
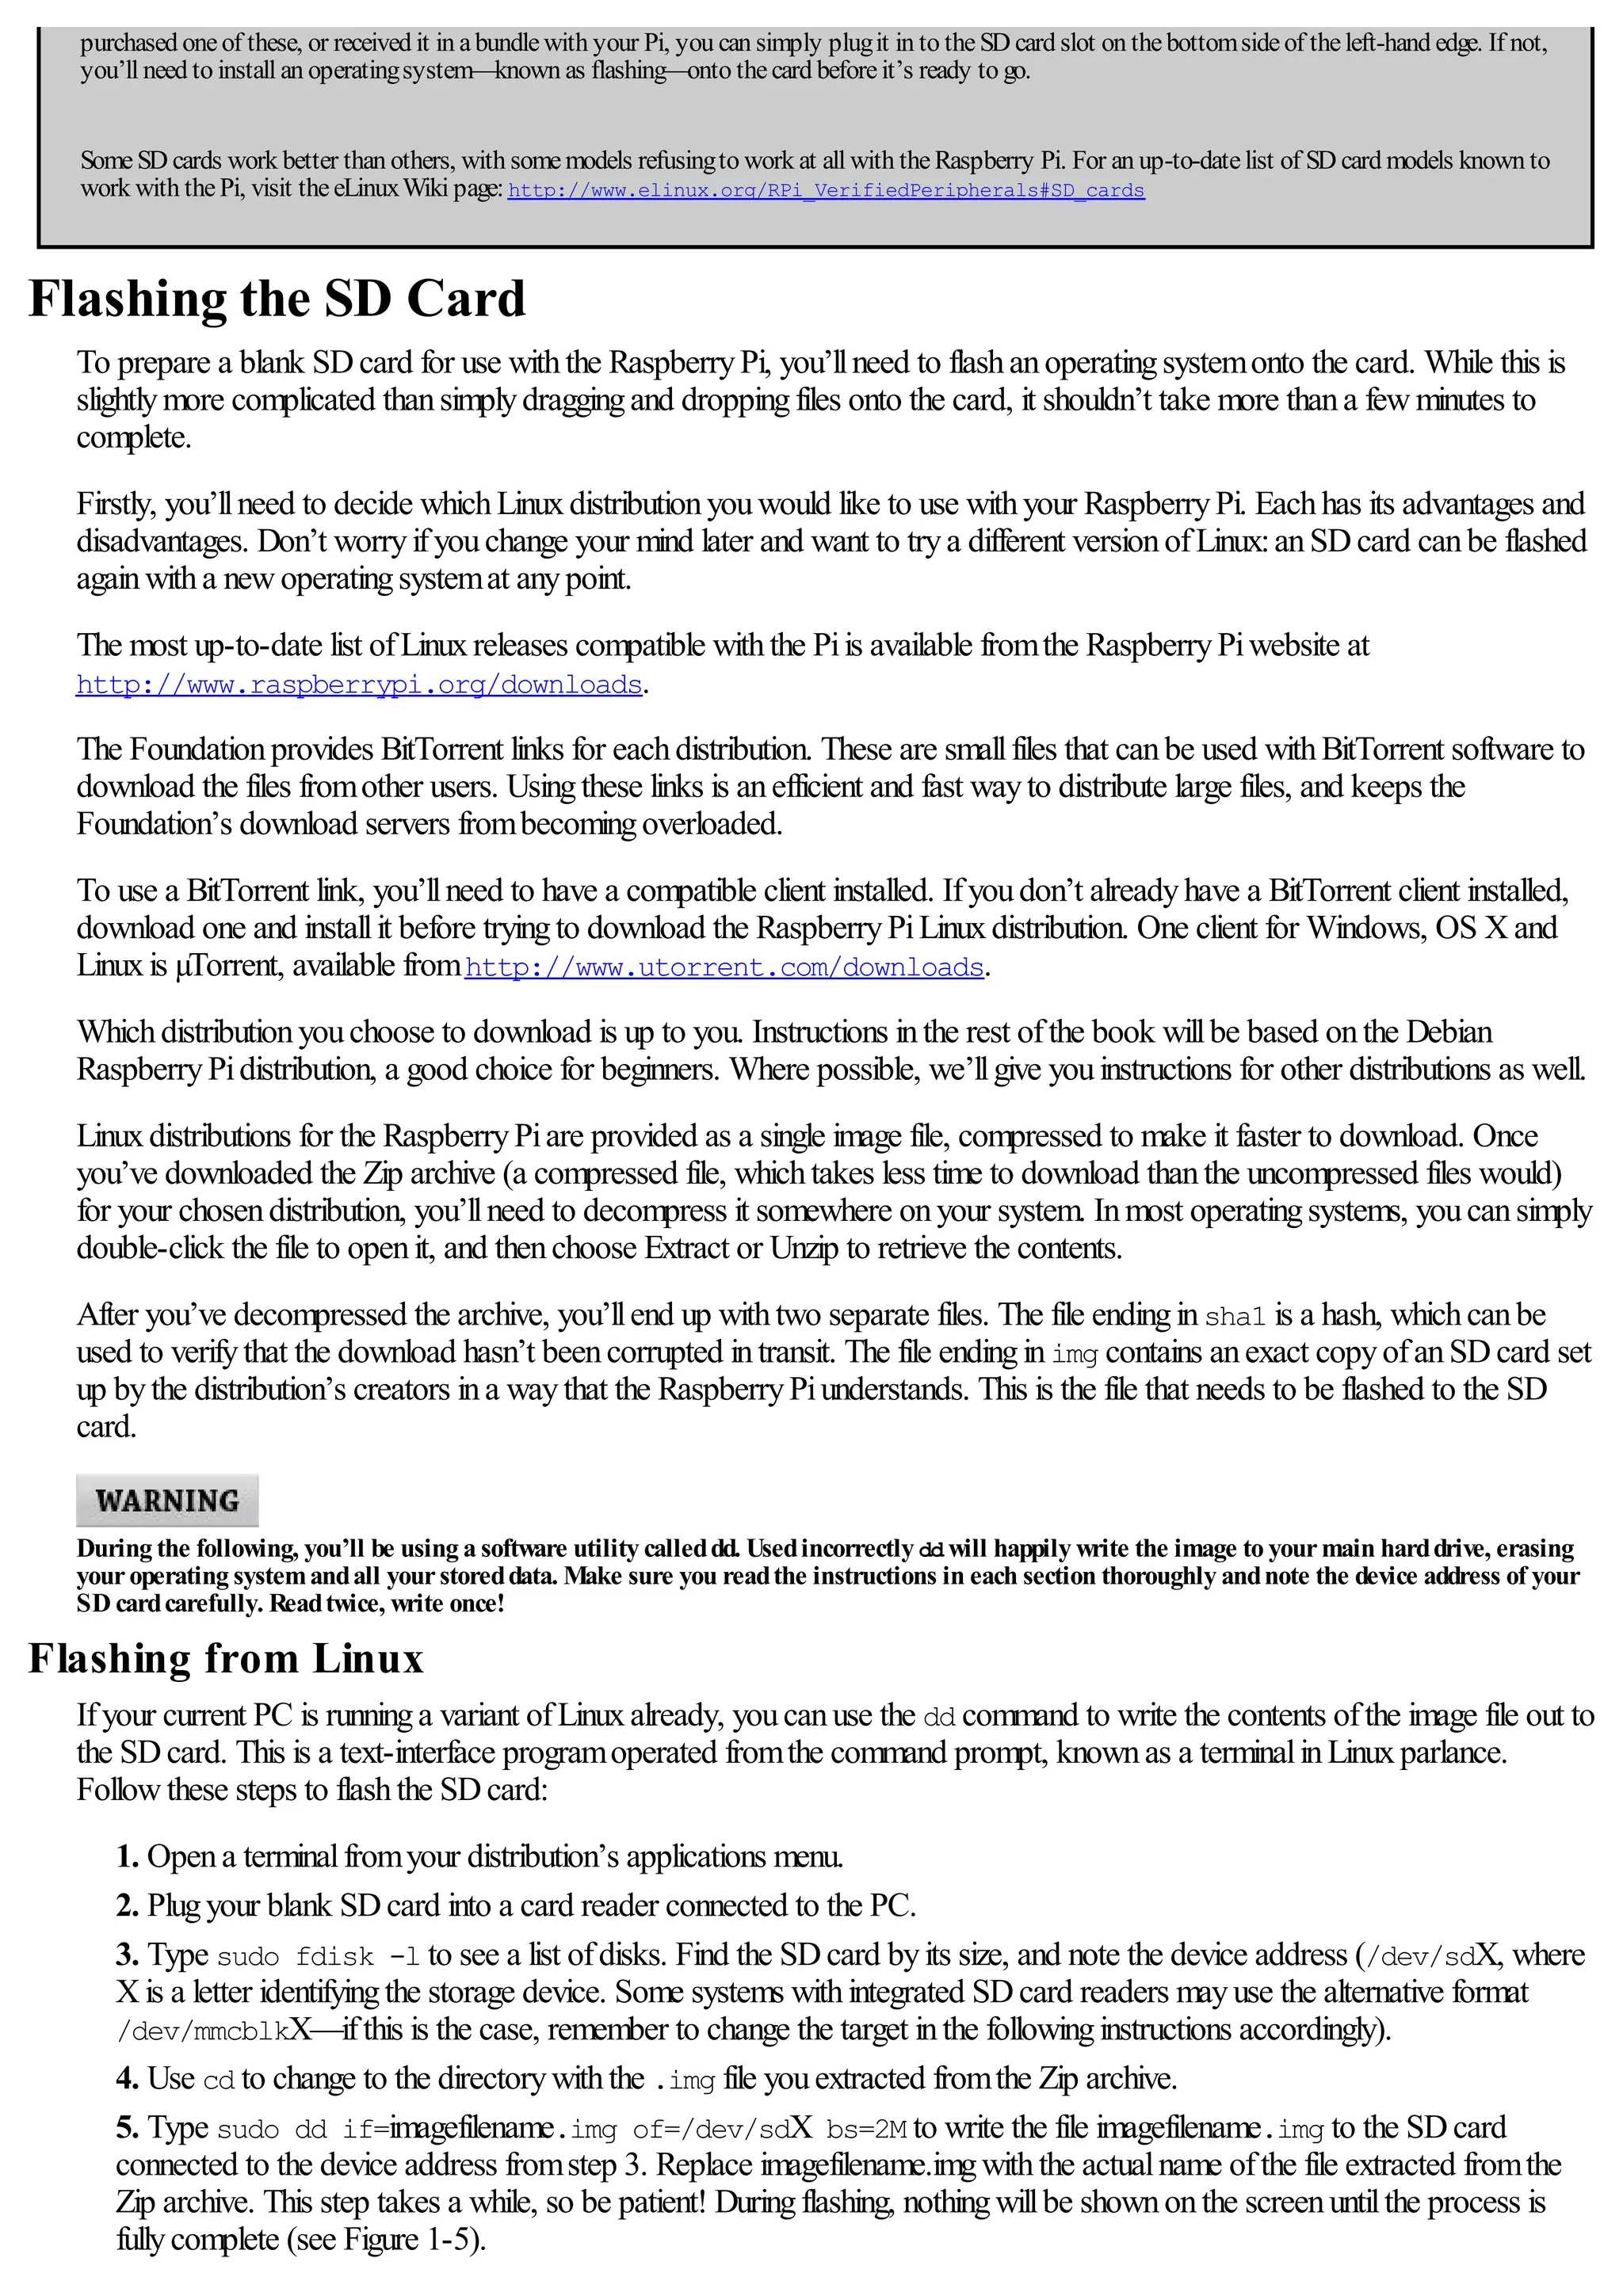
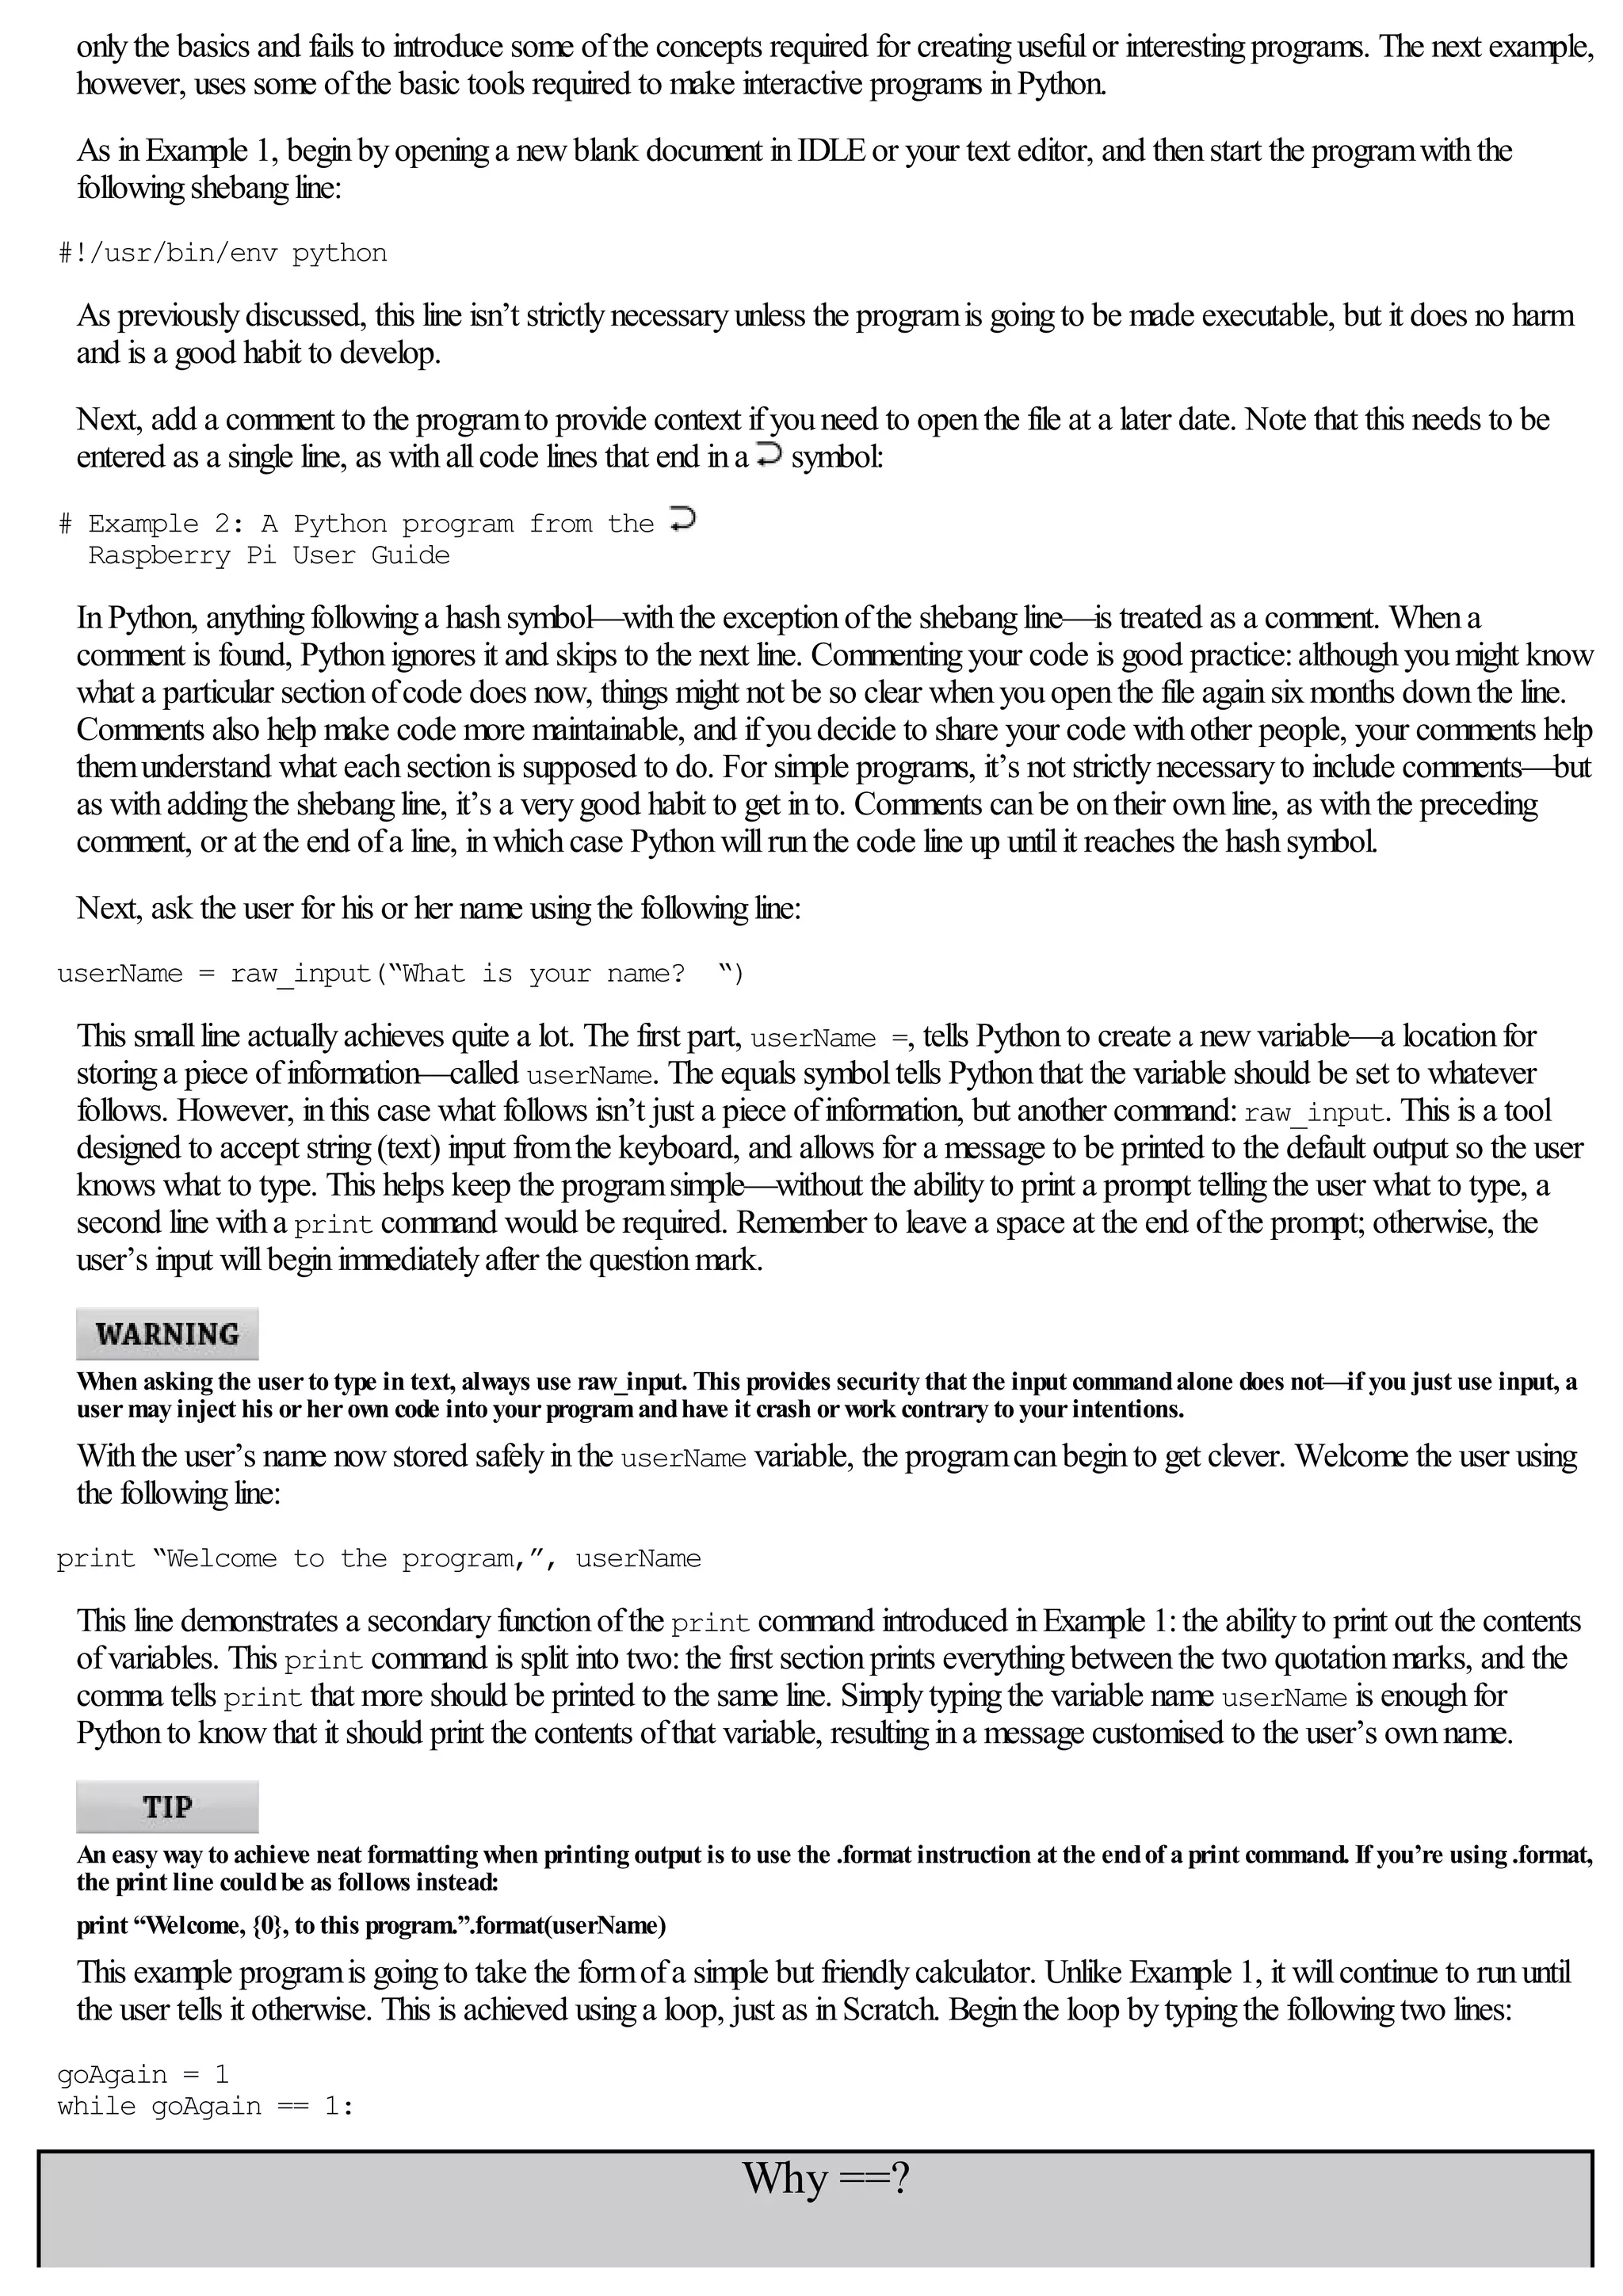
Ifyour wireless network uses WPAor WPA2 encryption, finishthe wpa.conf file as follows:
[Tab] key_mgmt=WPA-PSK
[Tab] psk=”Your_WPA_Key”
}
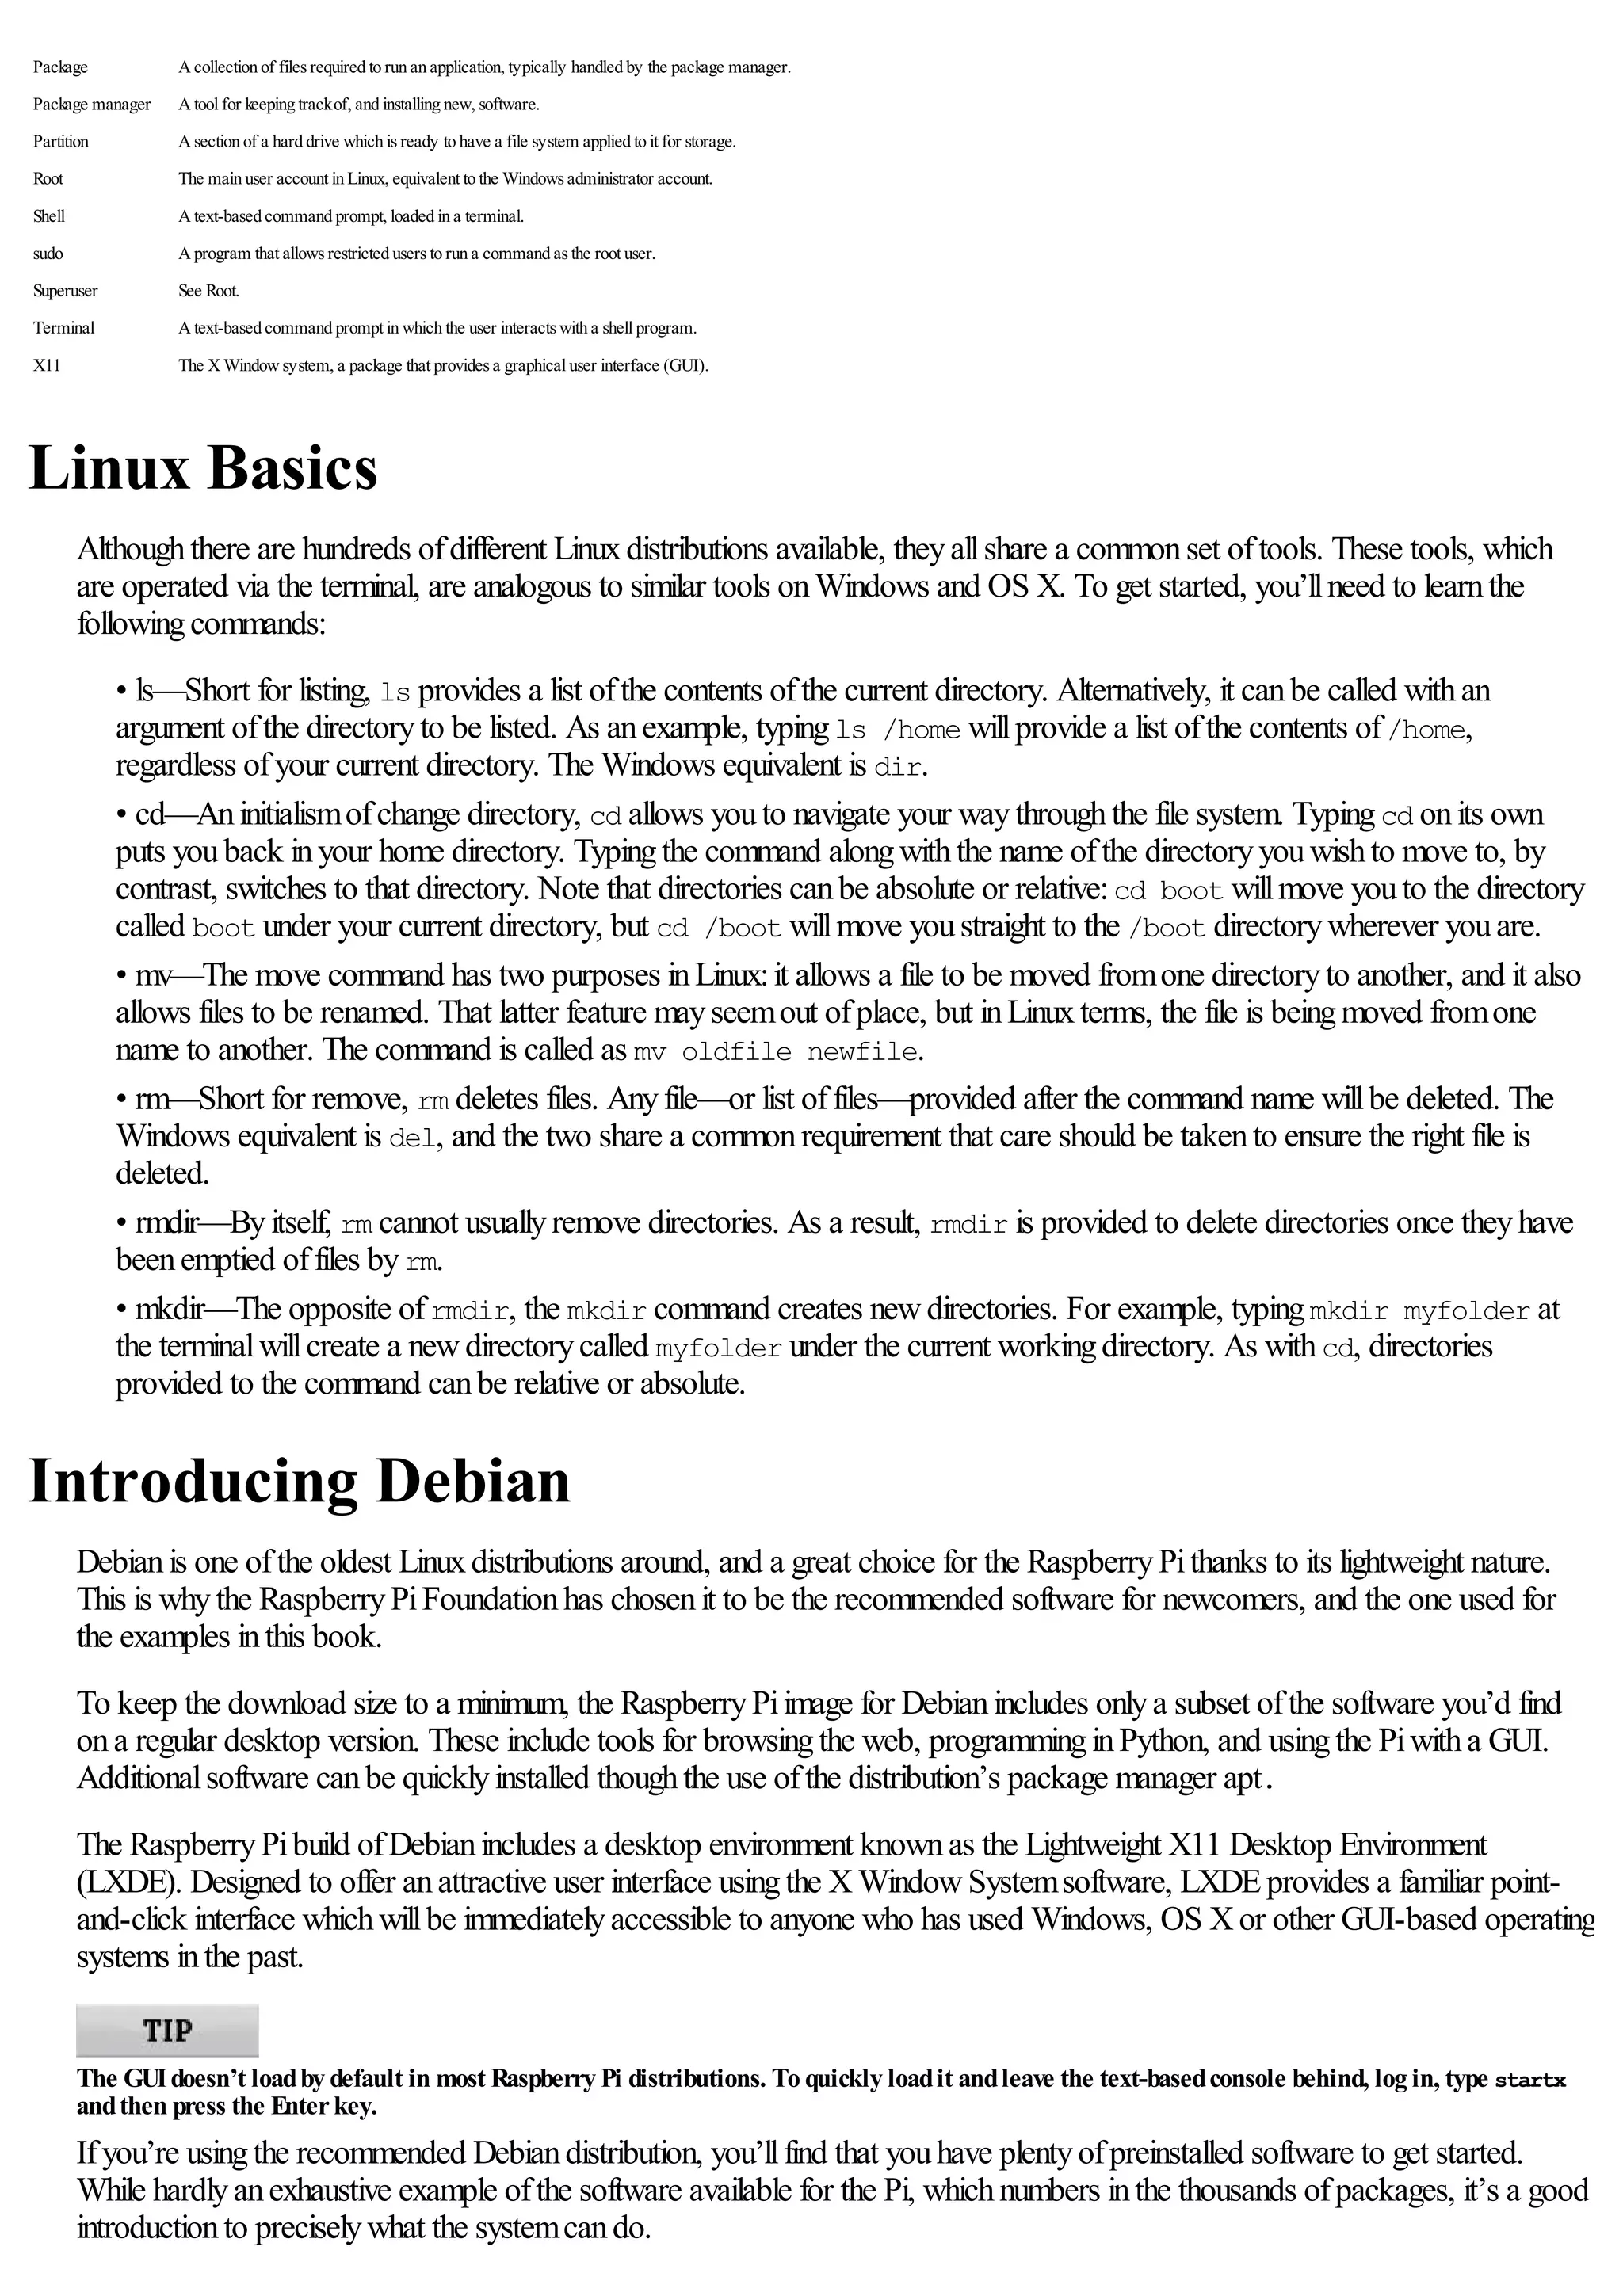
Replace Your_WPA_Keywiththe pass phrase for your wireless network’s encryption. Figure 4-7 shows anexample
configurationfor a wireless network withthe SSID“Private_Router” and the WPApass phrase “Private Wireless
Network”. Save the file withCTRL+ O, and thenexit nano withCTRL+ X.
Figure 4-7:Editingthe wpa.conf file for a WPA-protected network
Connecting to the Wireless Network
The Pi’s wireless networkingis nowconfigured, and willbeginthe next time the Piis restarted. To start the wireless network
without rebooting, type the following:
sudo ifup wlan0
To make sure that the network is operational, unplugthe Pi’s Ethernet cable (ifattached) and type the following:
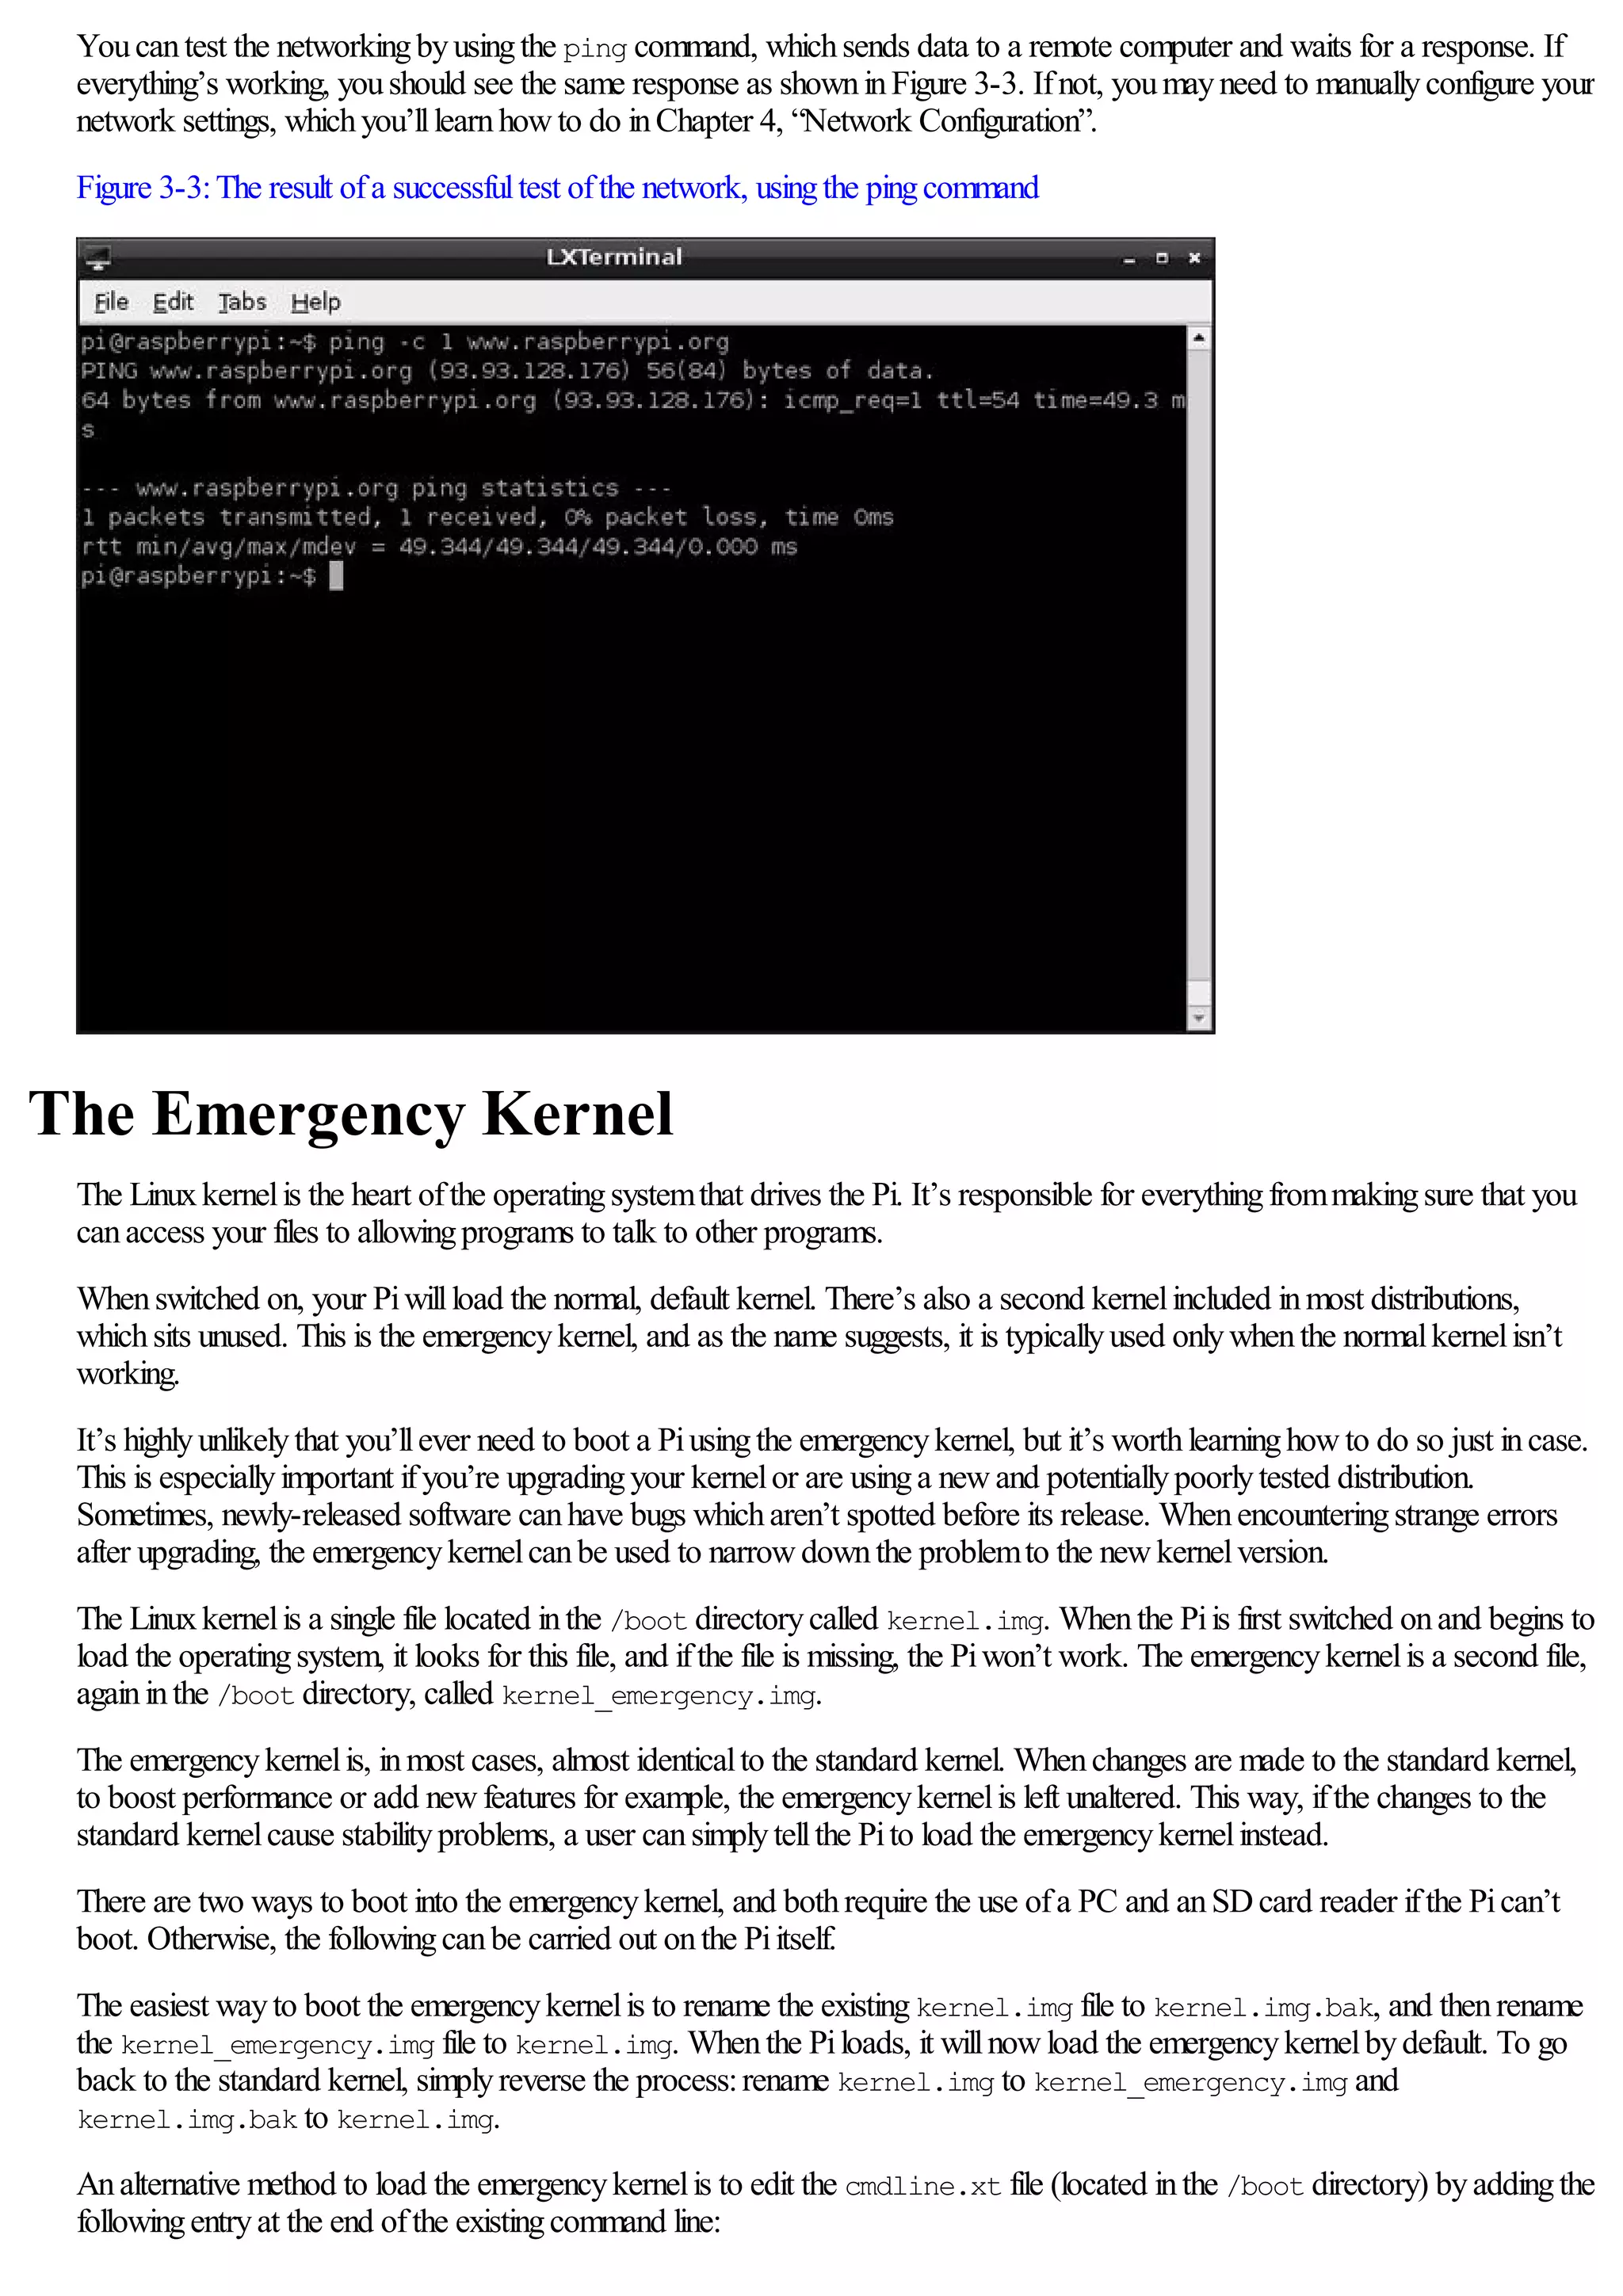
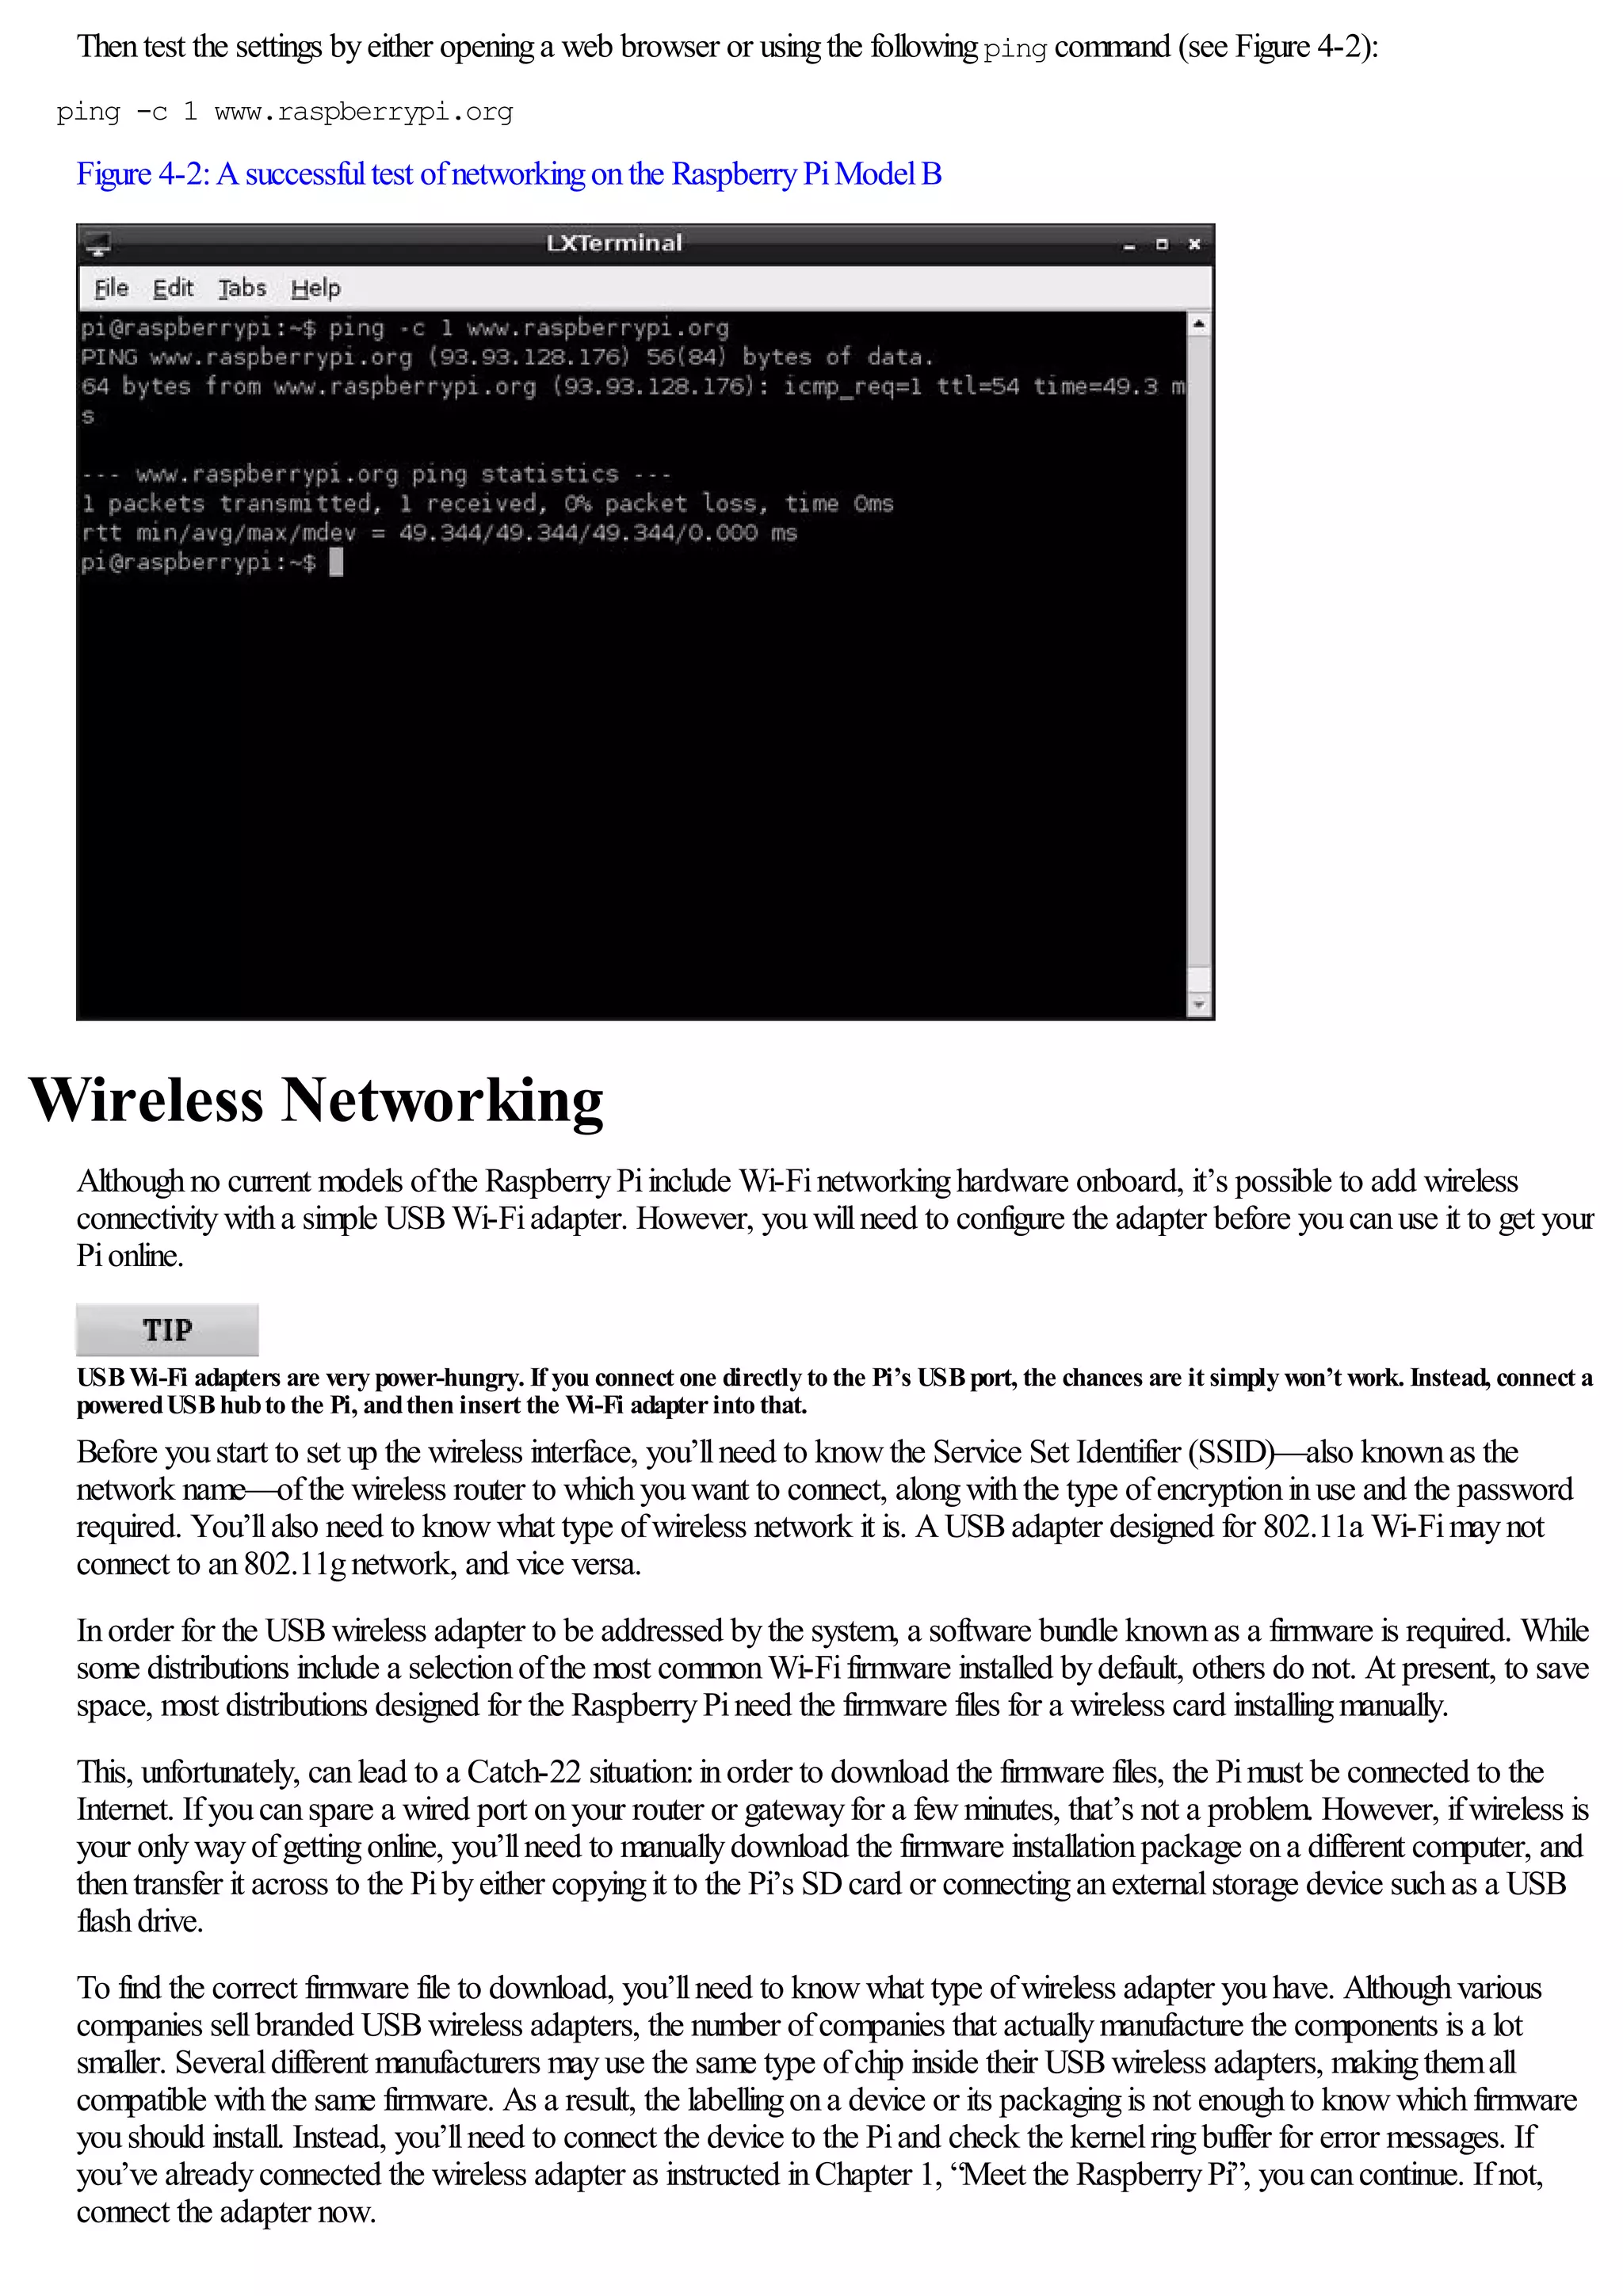
ping -c 1 www.raspberrypi.org
If you start having problems with yourPi following the installation of a USBwireless adapter, it couldbe due to a conflict with otherUSBdevices.
Some adaptermodels are known to cause problems with certain USBkeyboards. Foran up-to-date list of adapters that are known to be good, as well
as those that are known to cause conflicts, visit http://www.element14.com/community/docs/DOC-44703/l/raspberry-pi-wifi-adapter-testing orthe
eLinux wiki at http://elinux.org/RPi_VerifiedPeripherals#Working_USB_Wifi_Adapters.](https://image.slidesharecdn.com/rpiusersguide-210422224618/75/Guia-de-usuario-de-Raspberry-Pi-por-Eben-Upton-53-2048.jpg)

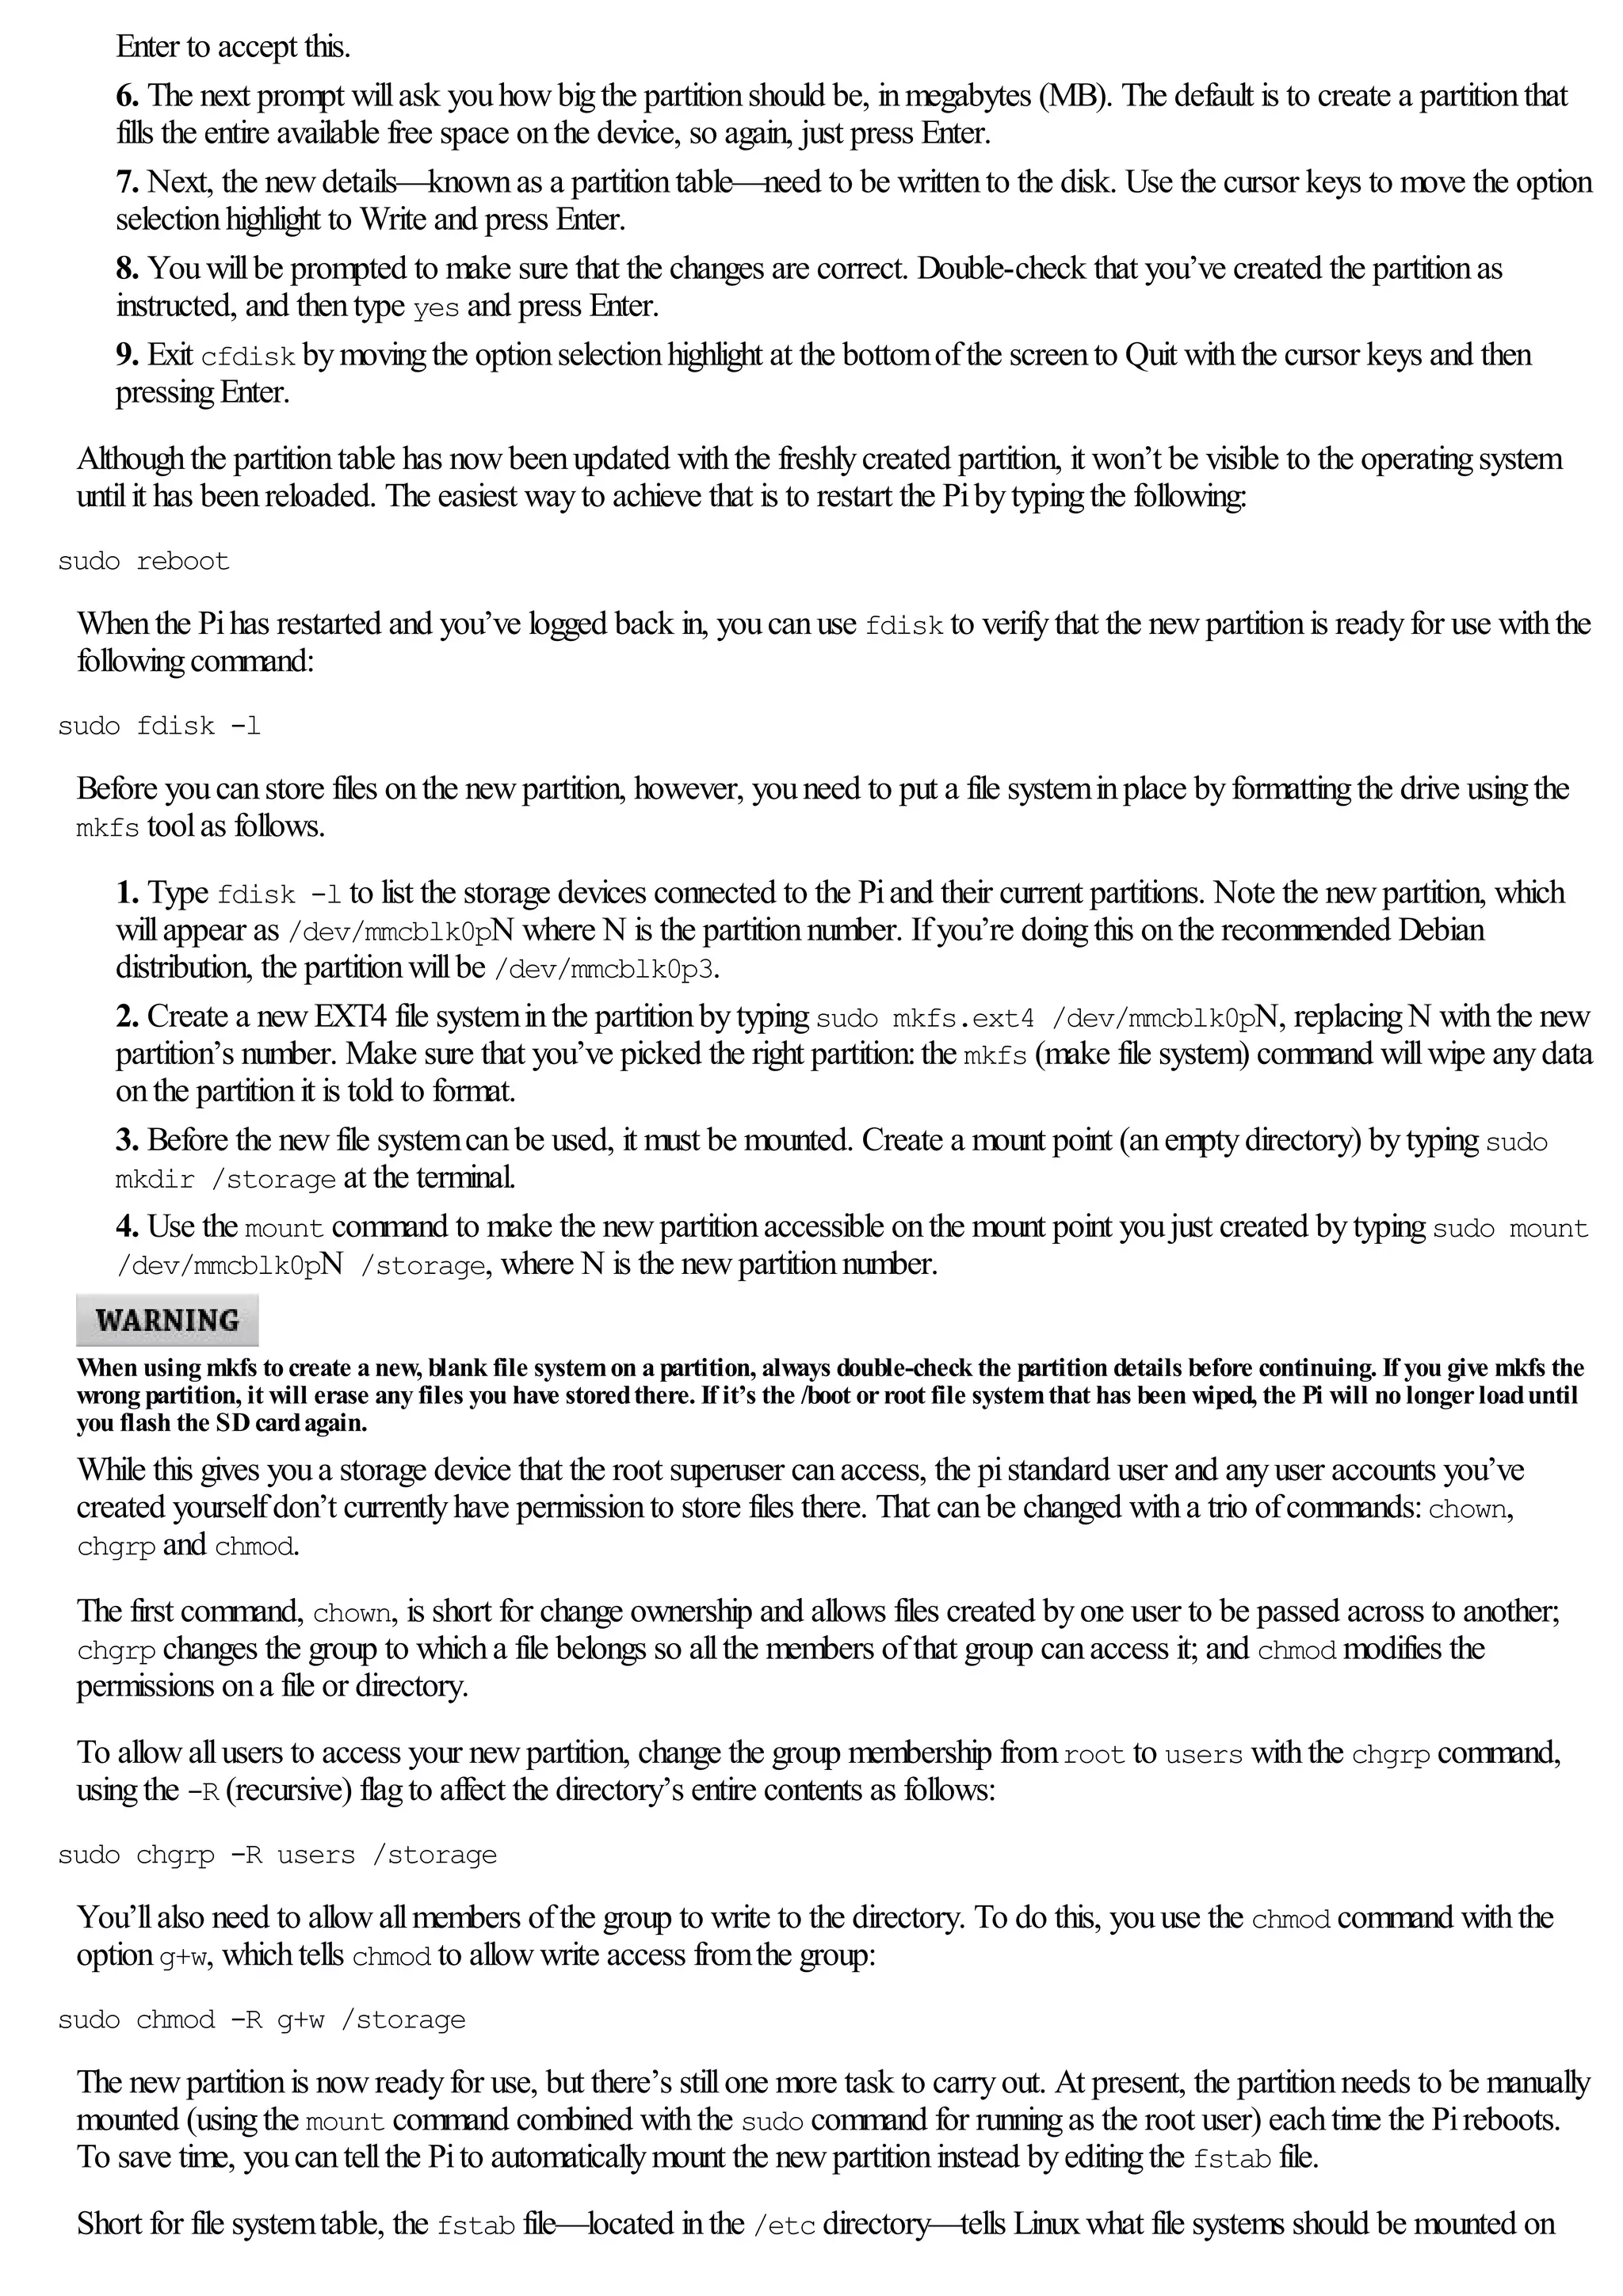
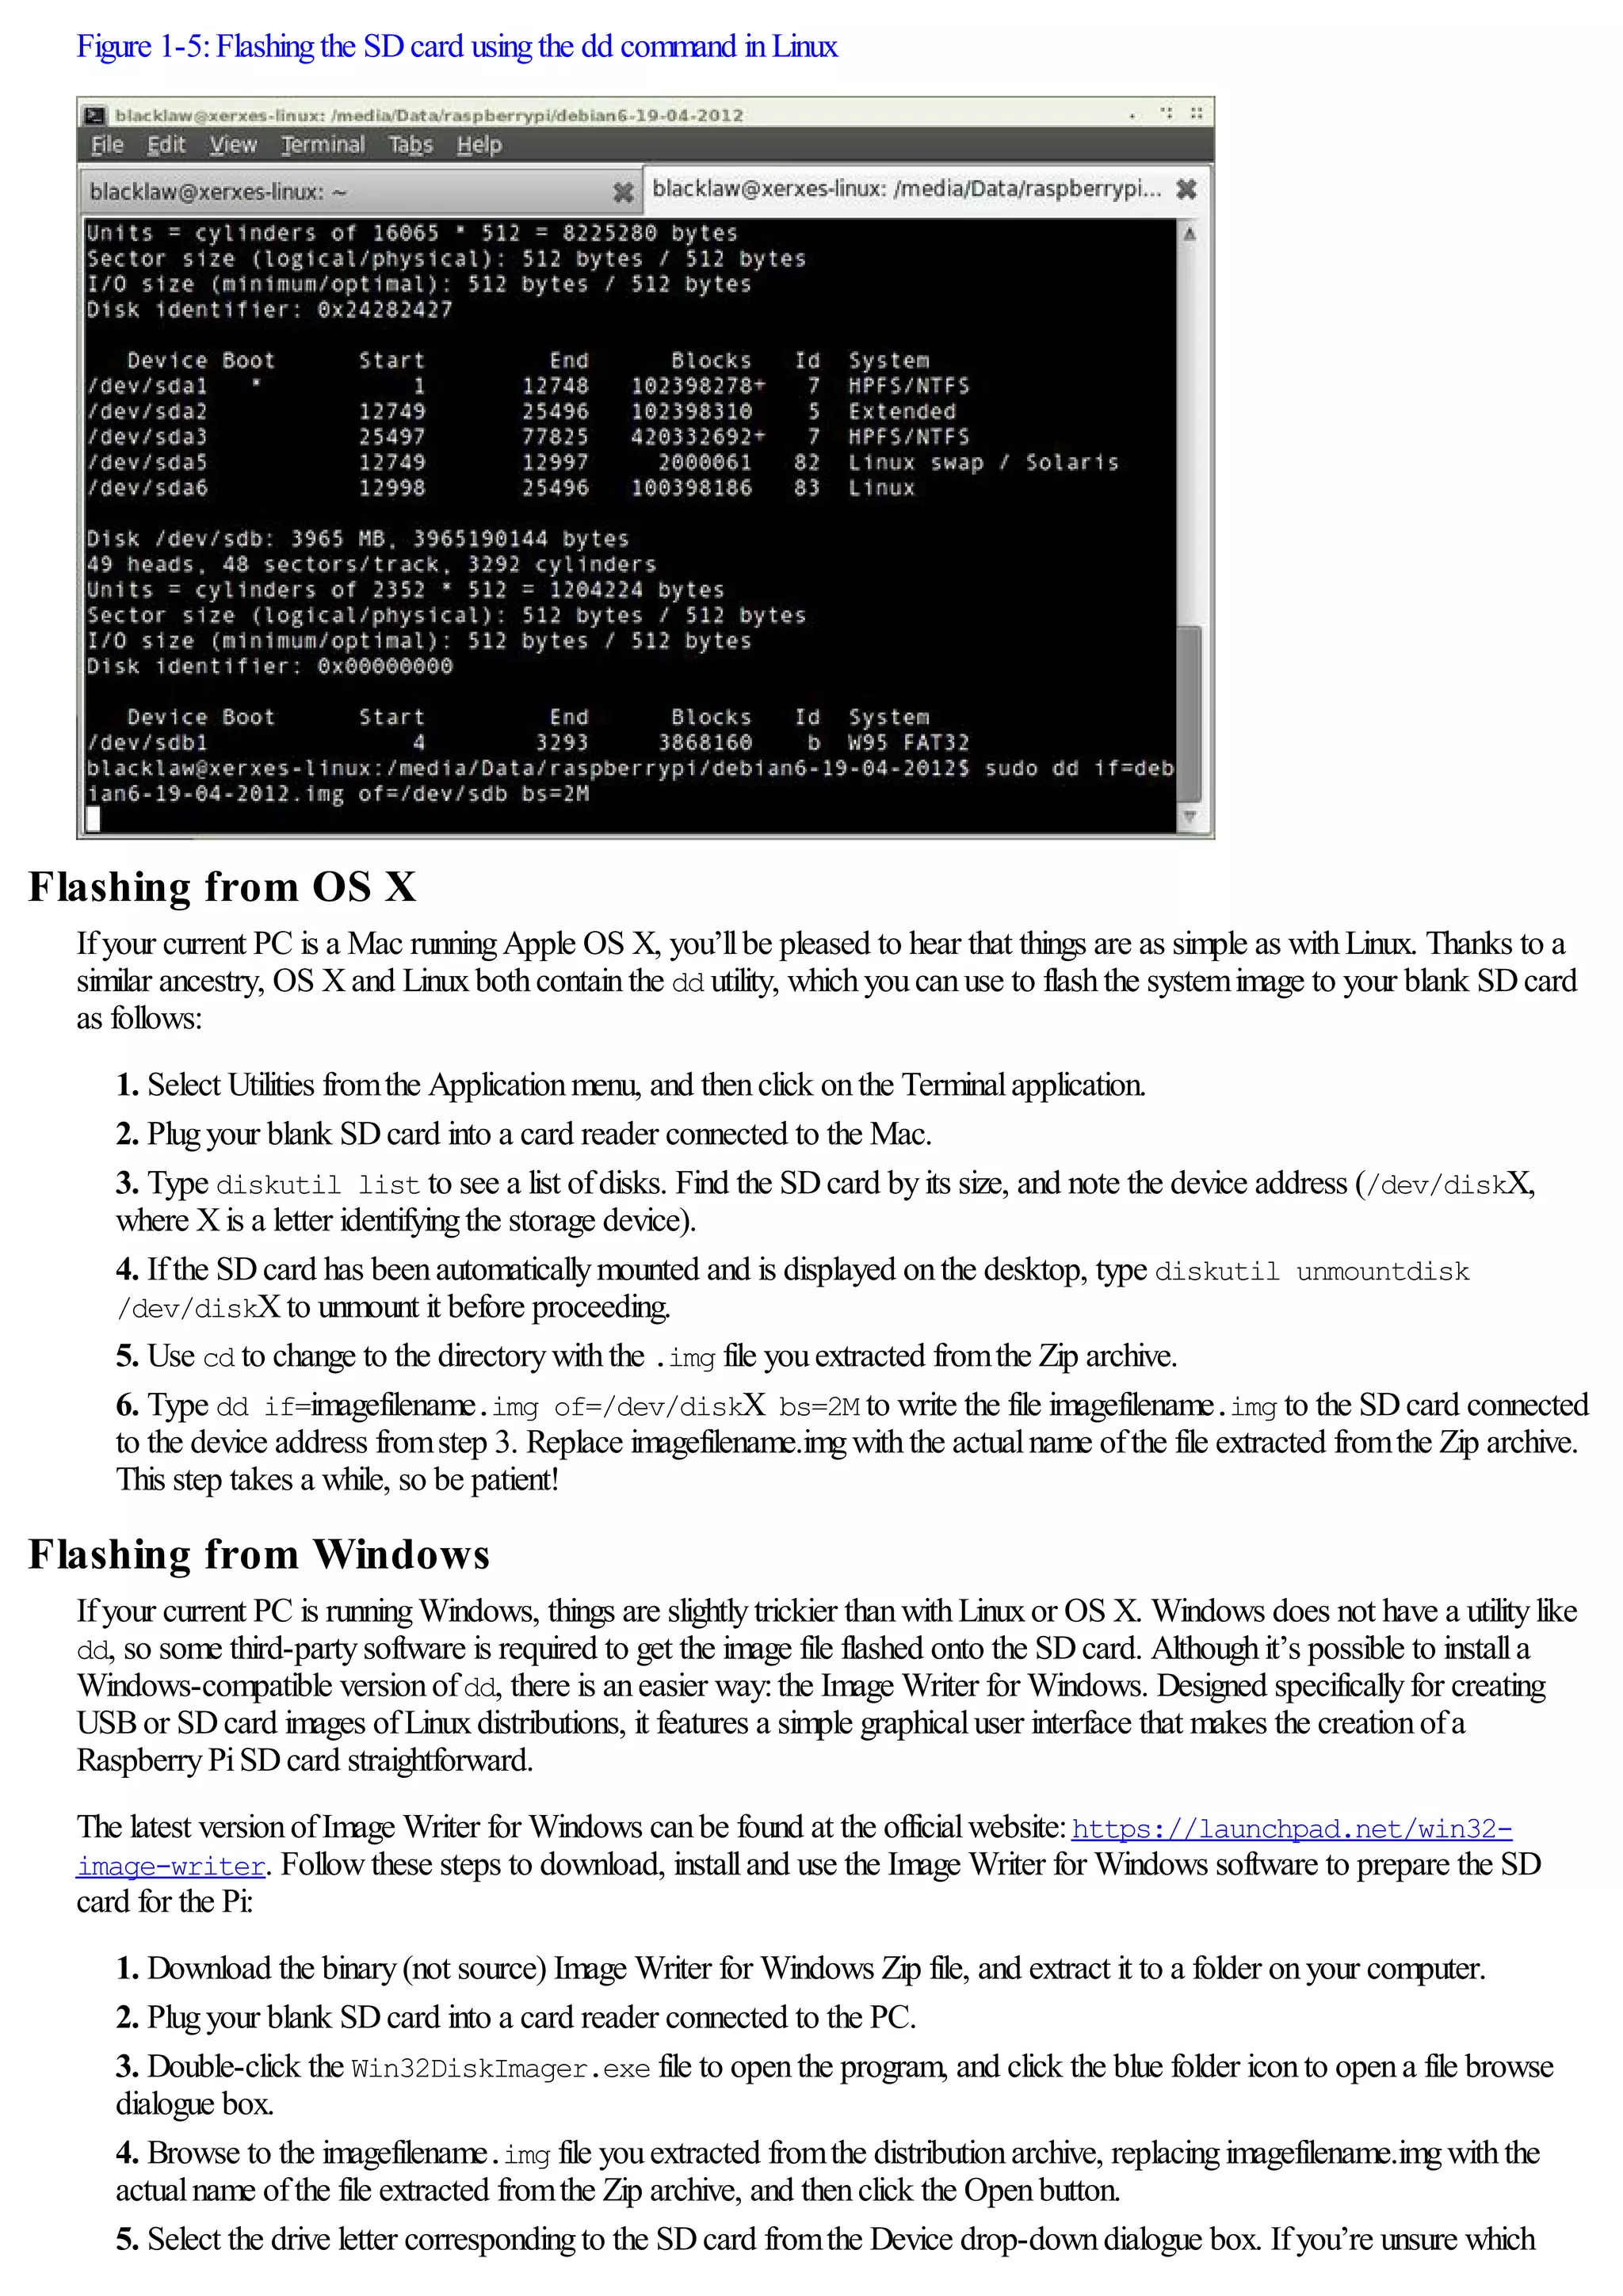
![whichmount points. This table maylook complicated at first glance, but its layout follows a logicaltabular pattern.
Fromleft to right, the columns tellLinuxthe locationofthe device to be mounted, the directorywhere the device should be
accessible (the mount point), the file systemtype, anyoptions required, and finally, two numbers that controlwhether the file
systemshould be dumped inthe event ofa systemproblemand whether it should be checked bythe fsck (file systemcheck)
tool.
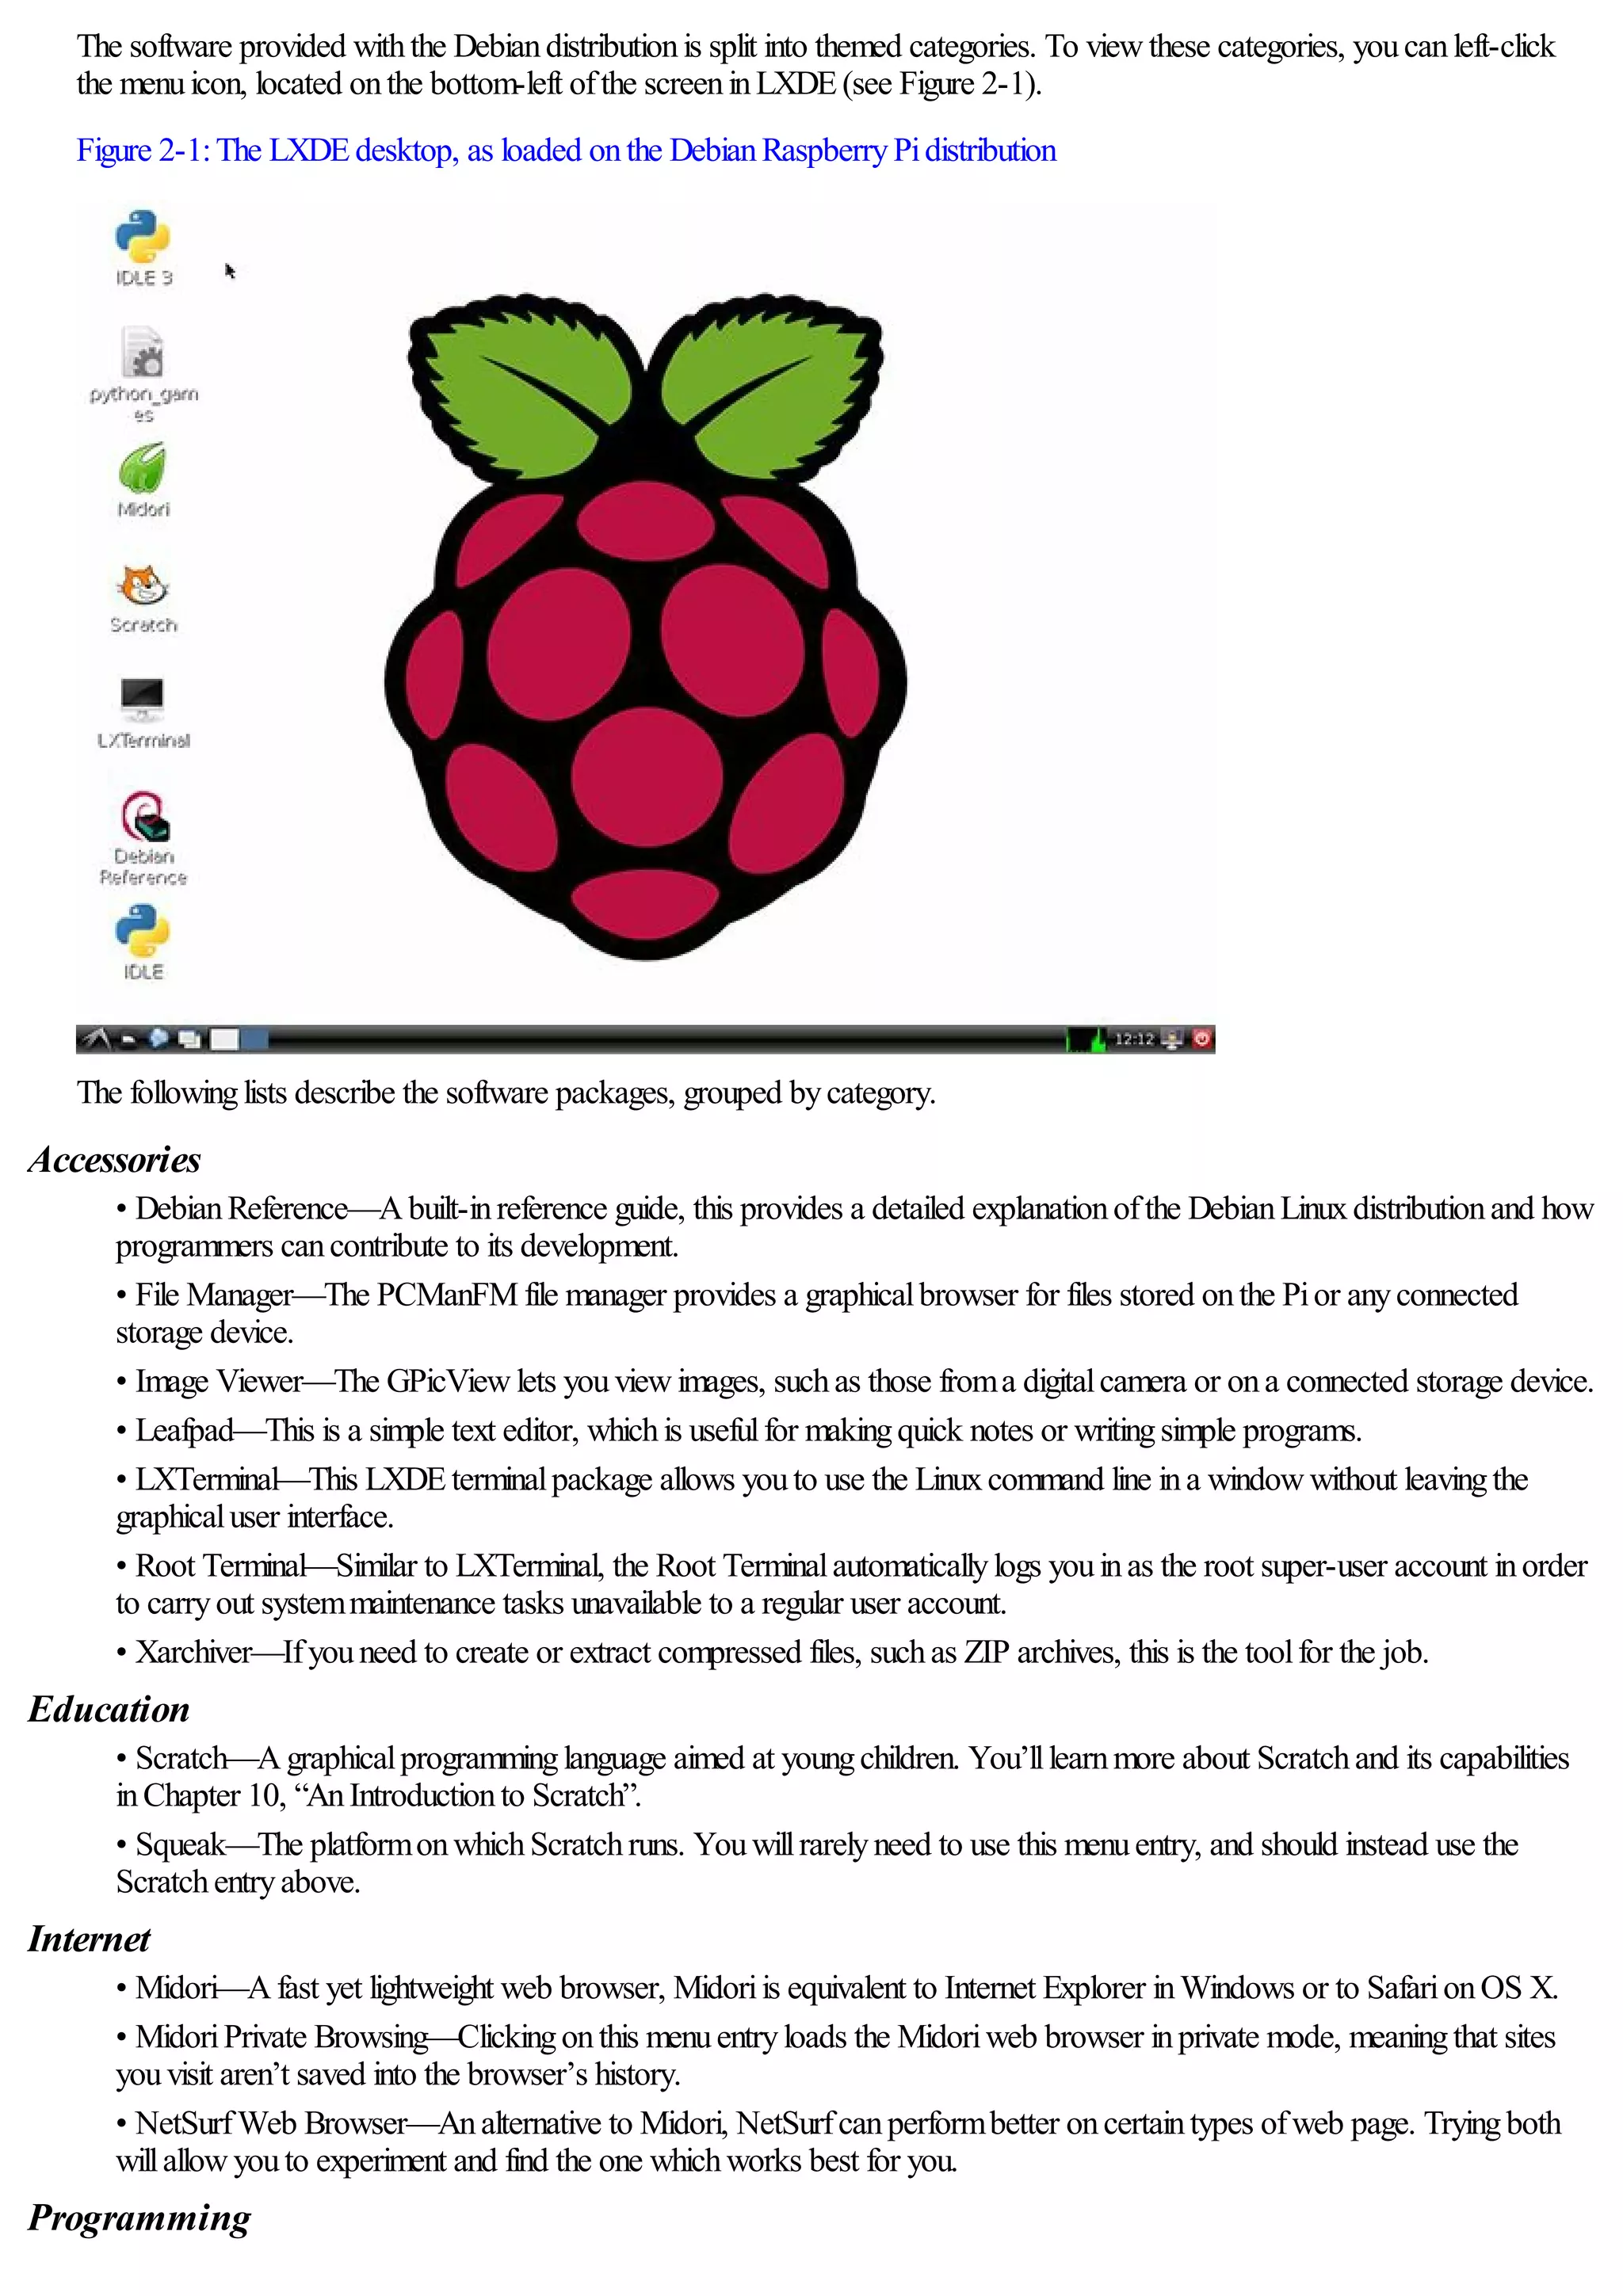
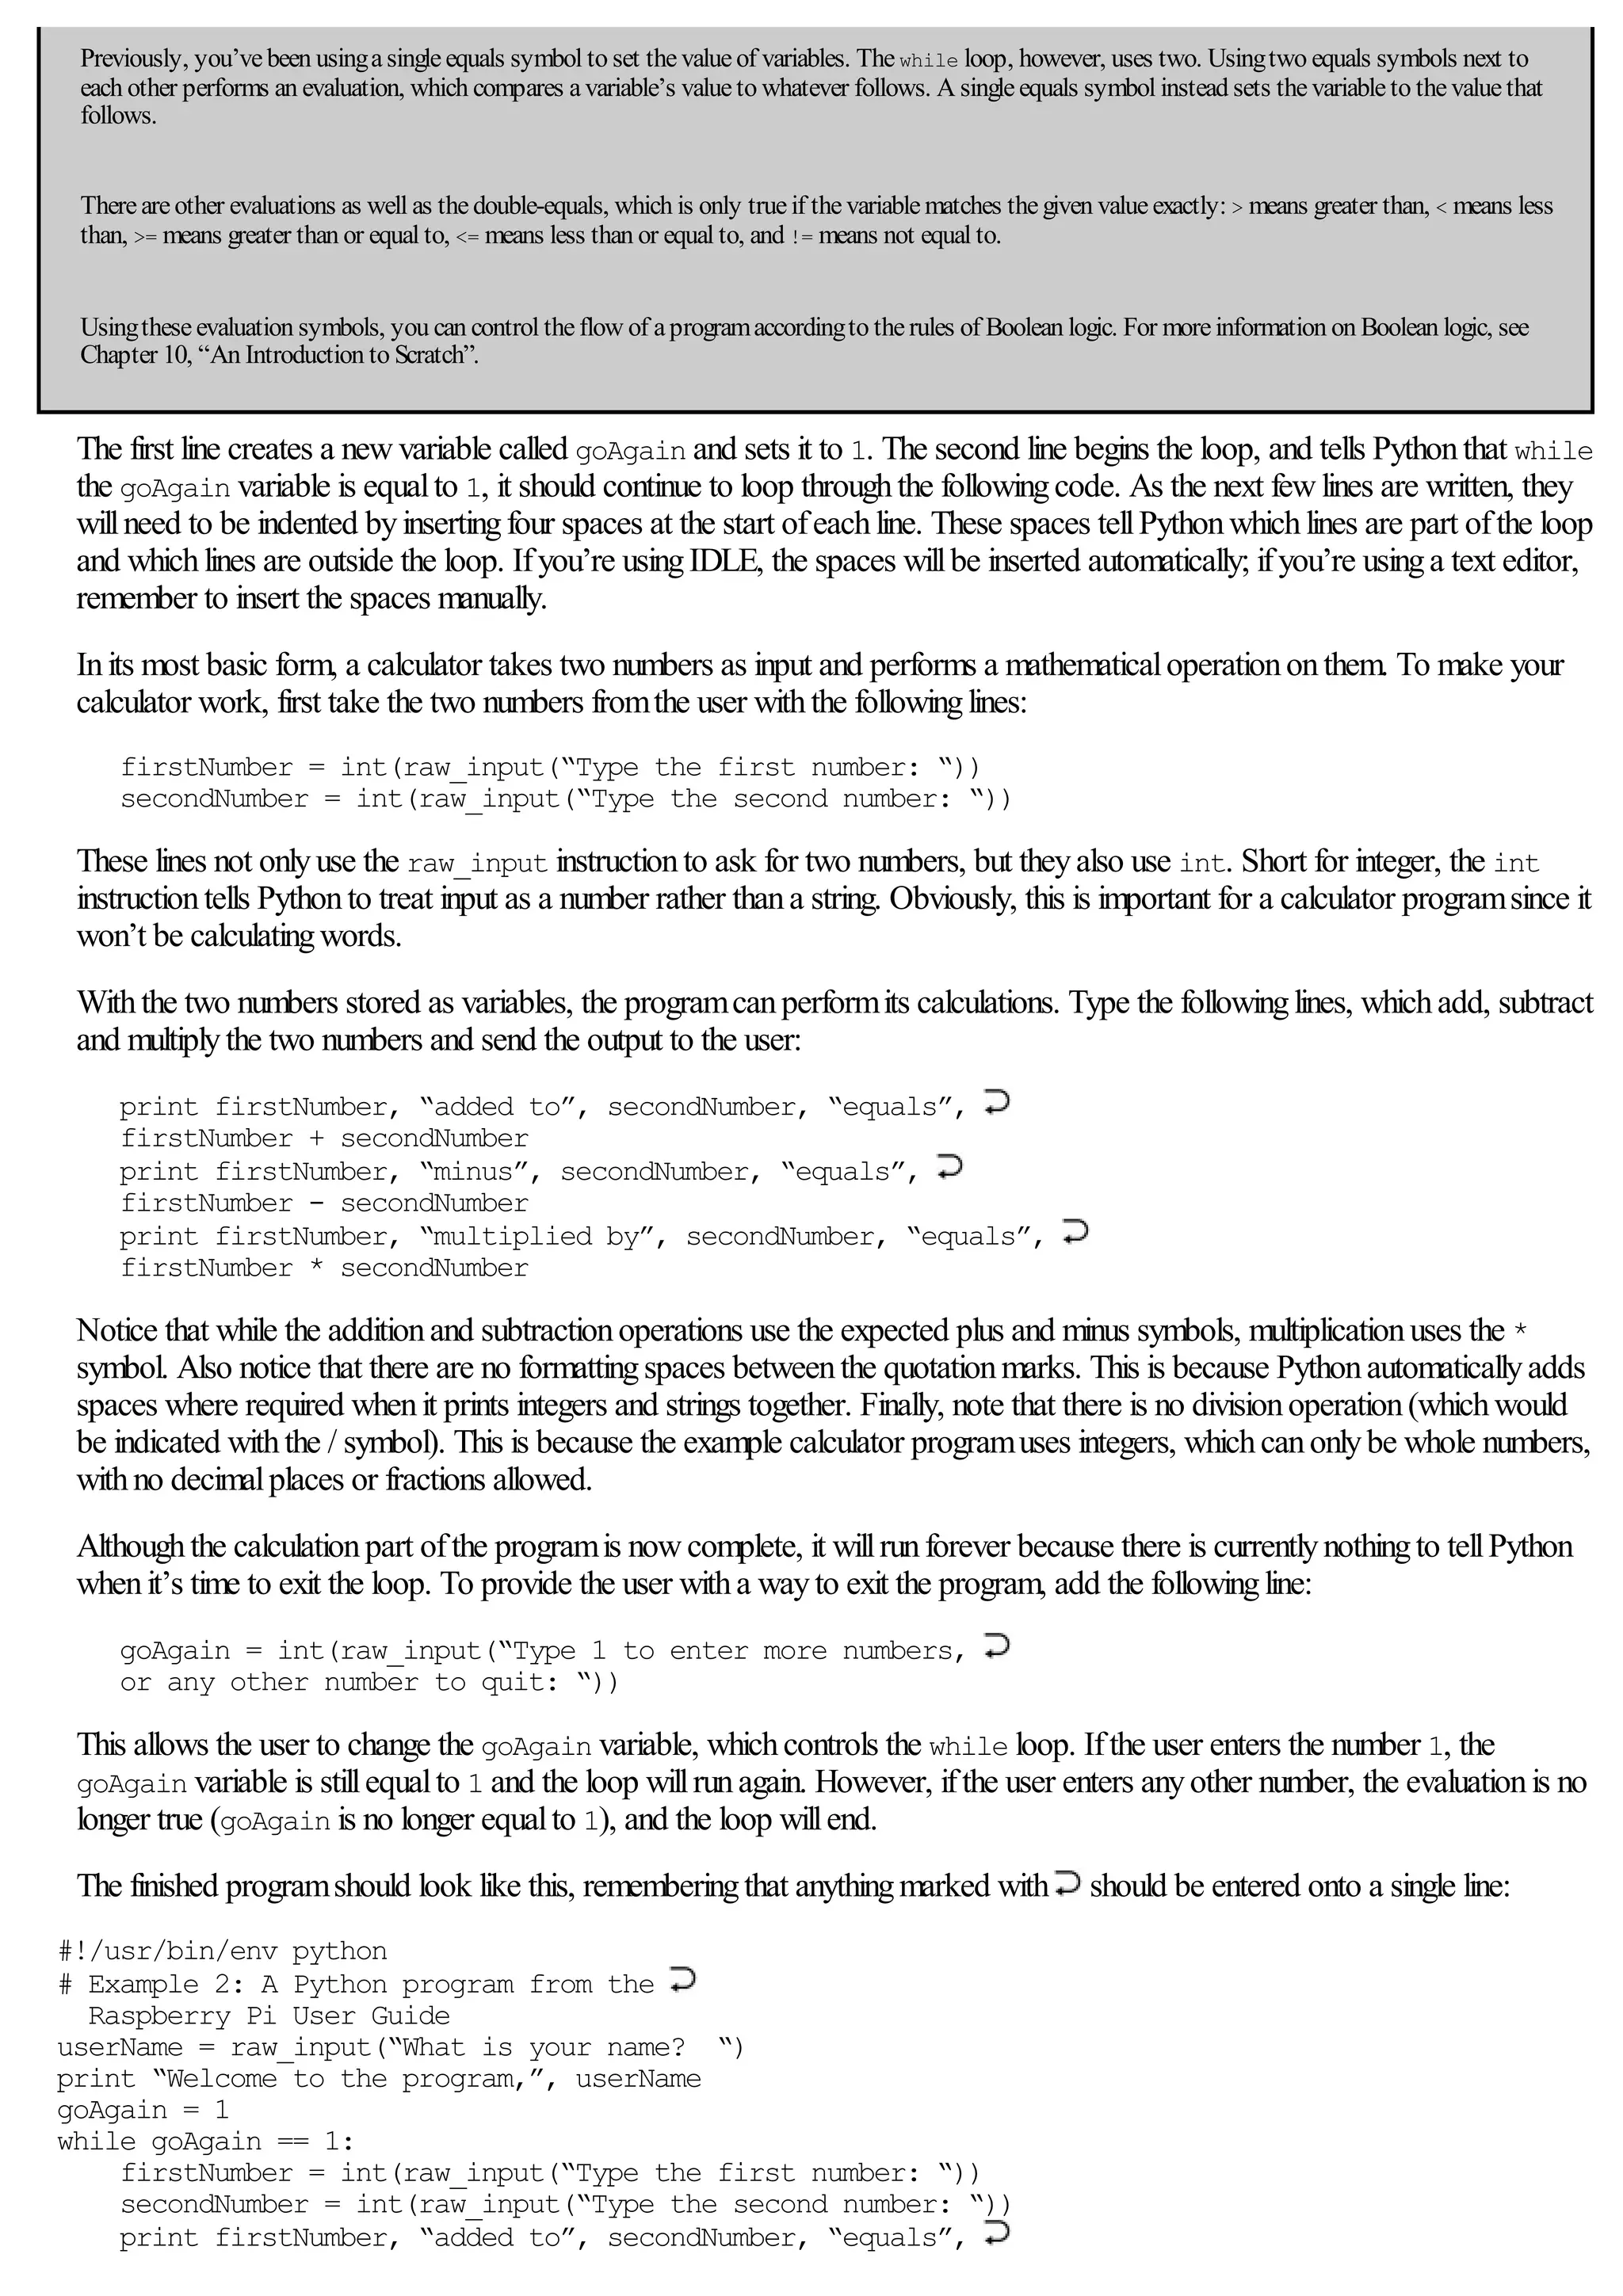
To make the systemmount the newpartitionautomatically, first openthe fstab file innano:
sudo nano /etc/fstab
Add a newline at the bottomofthe file, definingthe various options required bythe newpartition, withtabs betweeneachfield:
/dev/mmcblk0pN [Tab]/storage[Tab] ext4[Tab] defaults[Tab] 0[Tab] 2
Remember to change N for the partitionnumber ofthe newpartition(see Figure 5-2). Ifyou’re usingfstab to mount external
storage devices, use the device name /dev/sdXN where Xis the device letter and N is the partitionnumber. Save the file with
CTRL+ W, and thenexit nano withCTRL+ X. Whenyou’re back at the terminal, reboot your systemand check if/storage
is mounted automaticallybytypingmount. Ifnot, double-check your newfstab entry. Remember that youneed to press the
Tab keyeachtime youcome to the end ofa field.
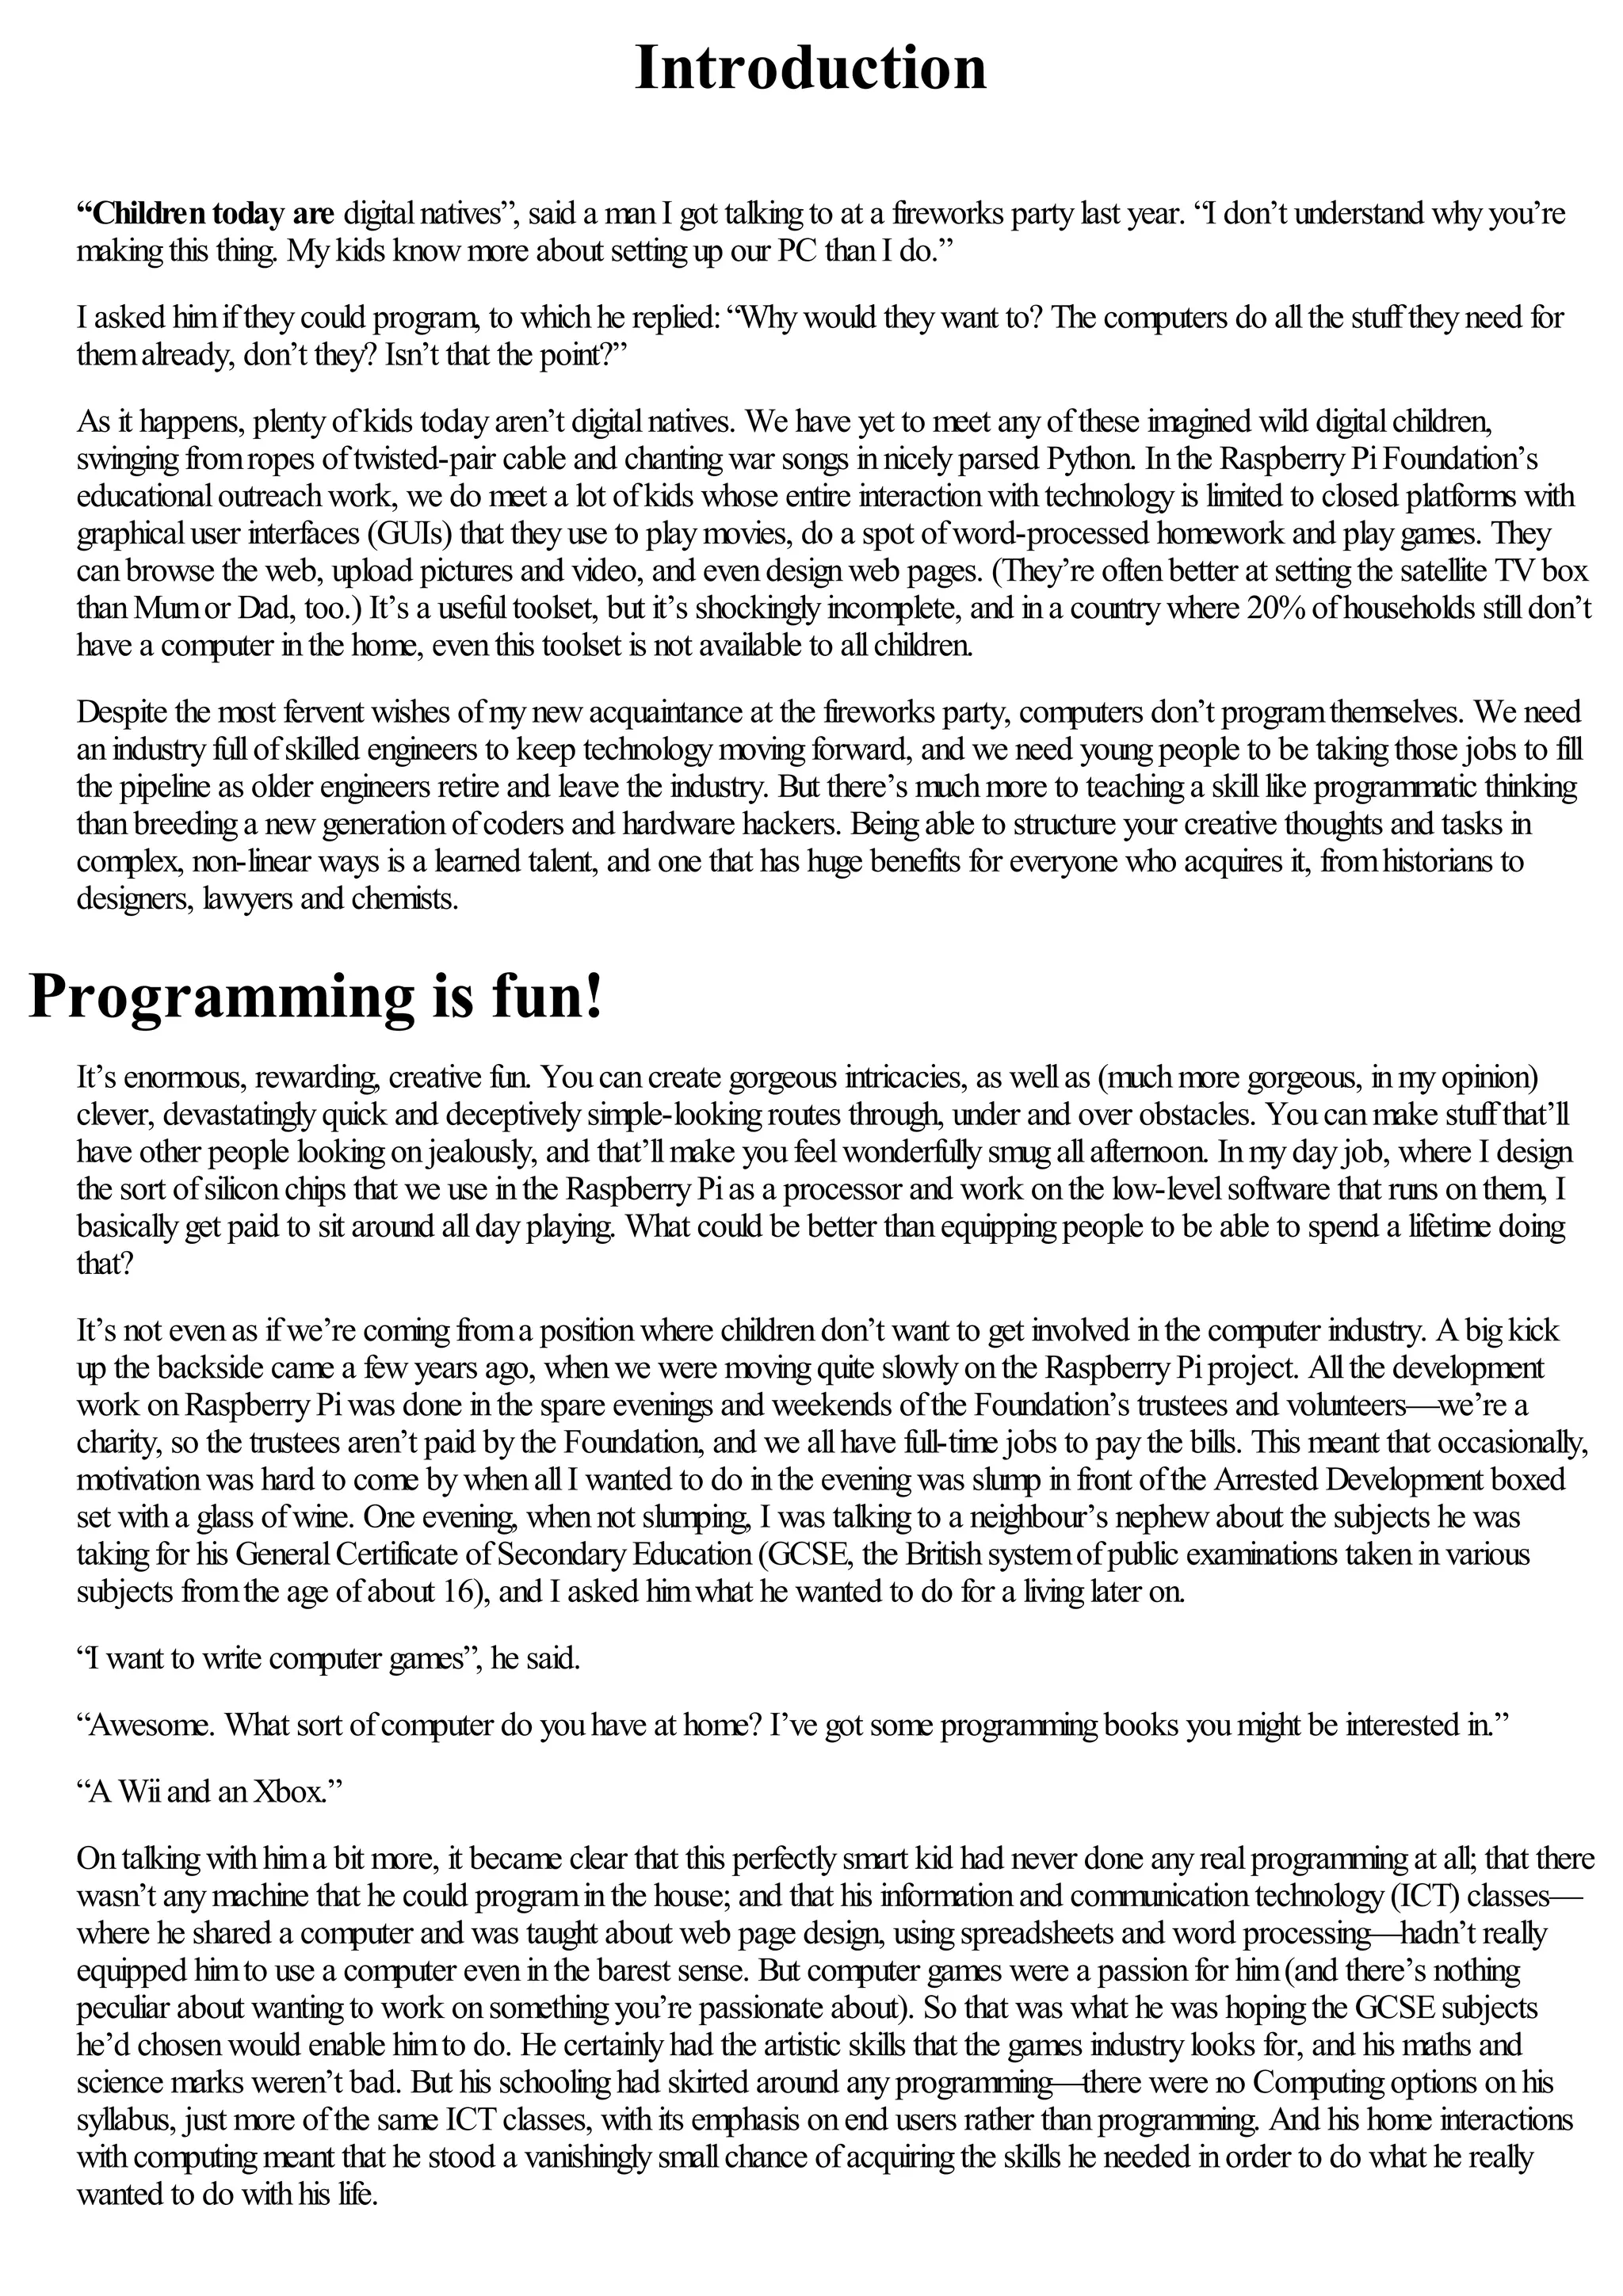
Figure 5-2:Editingfstab to automaticallymount the newpartition
Resizing Existing Partitions
Creatinga newpartitionis one wayto make use ofa larger SDcard, but it’s not the most flexible. Abetter method is to resize
existingpartitions to make use ofthe free space. To do this reliably, you’llneed to unplugthe Pi, remove the SDcard and insert
it into a desktop or laptop througha card reader.
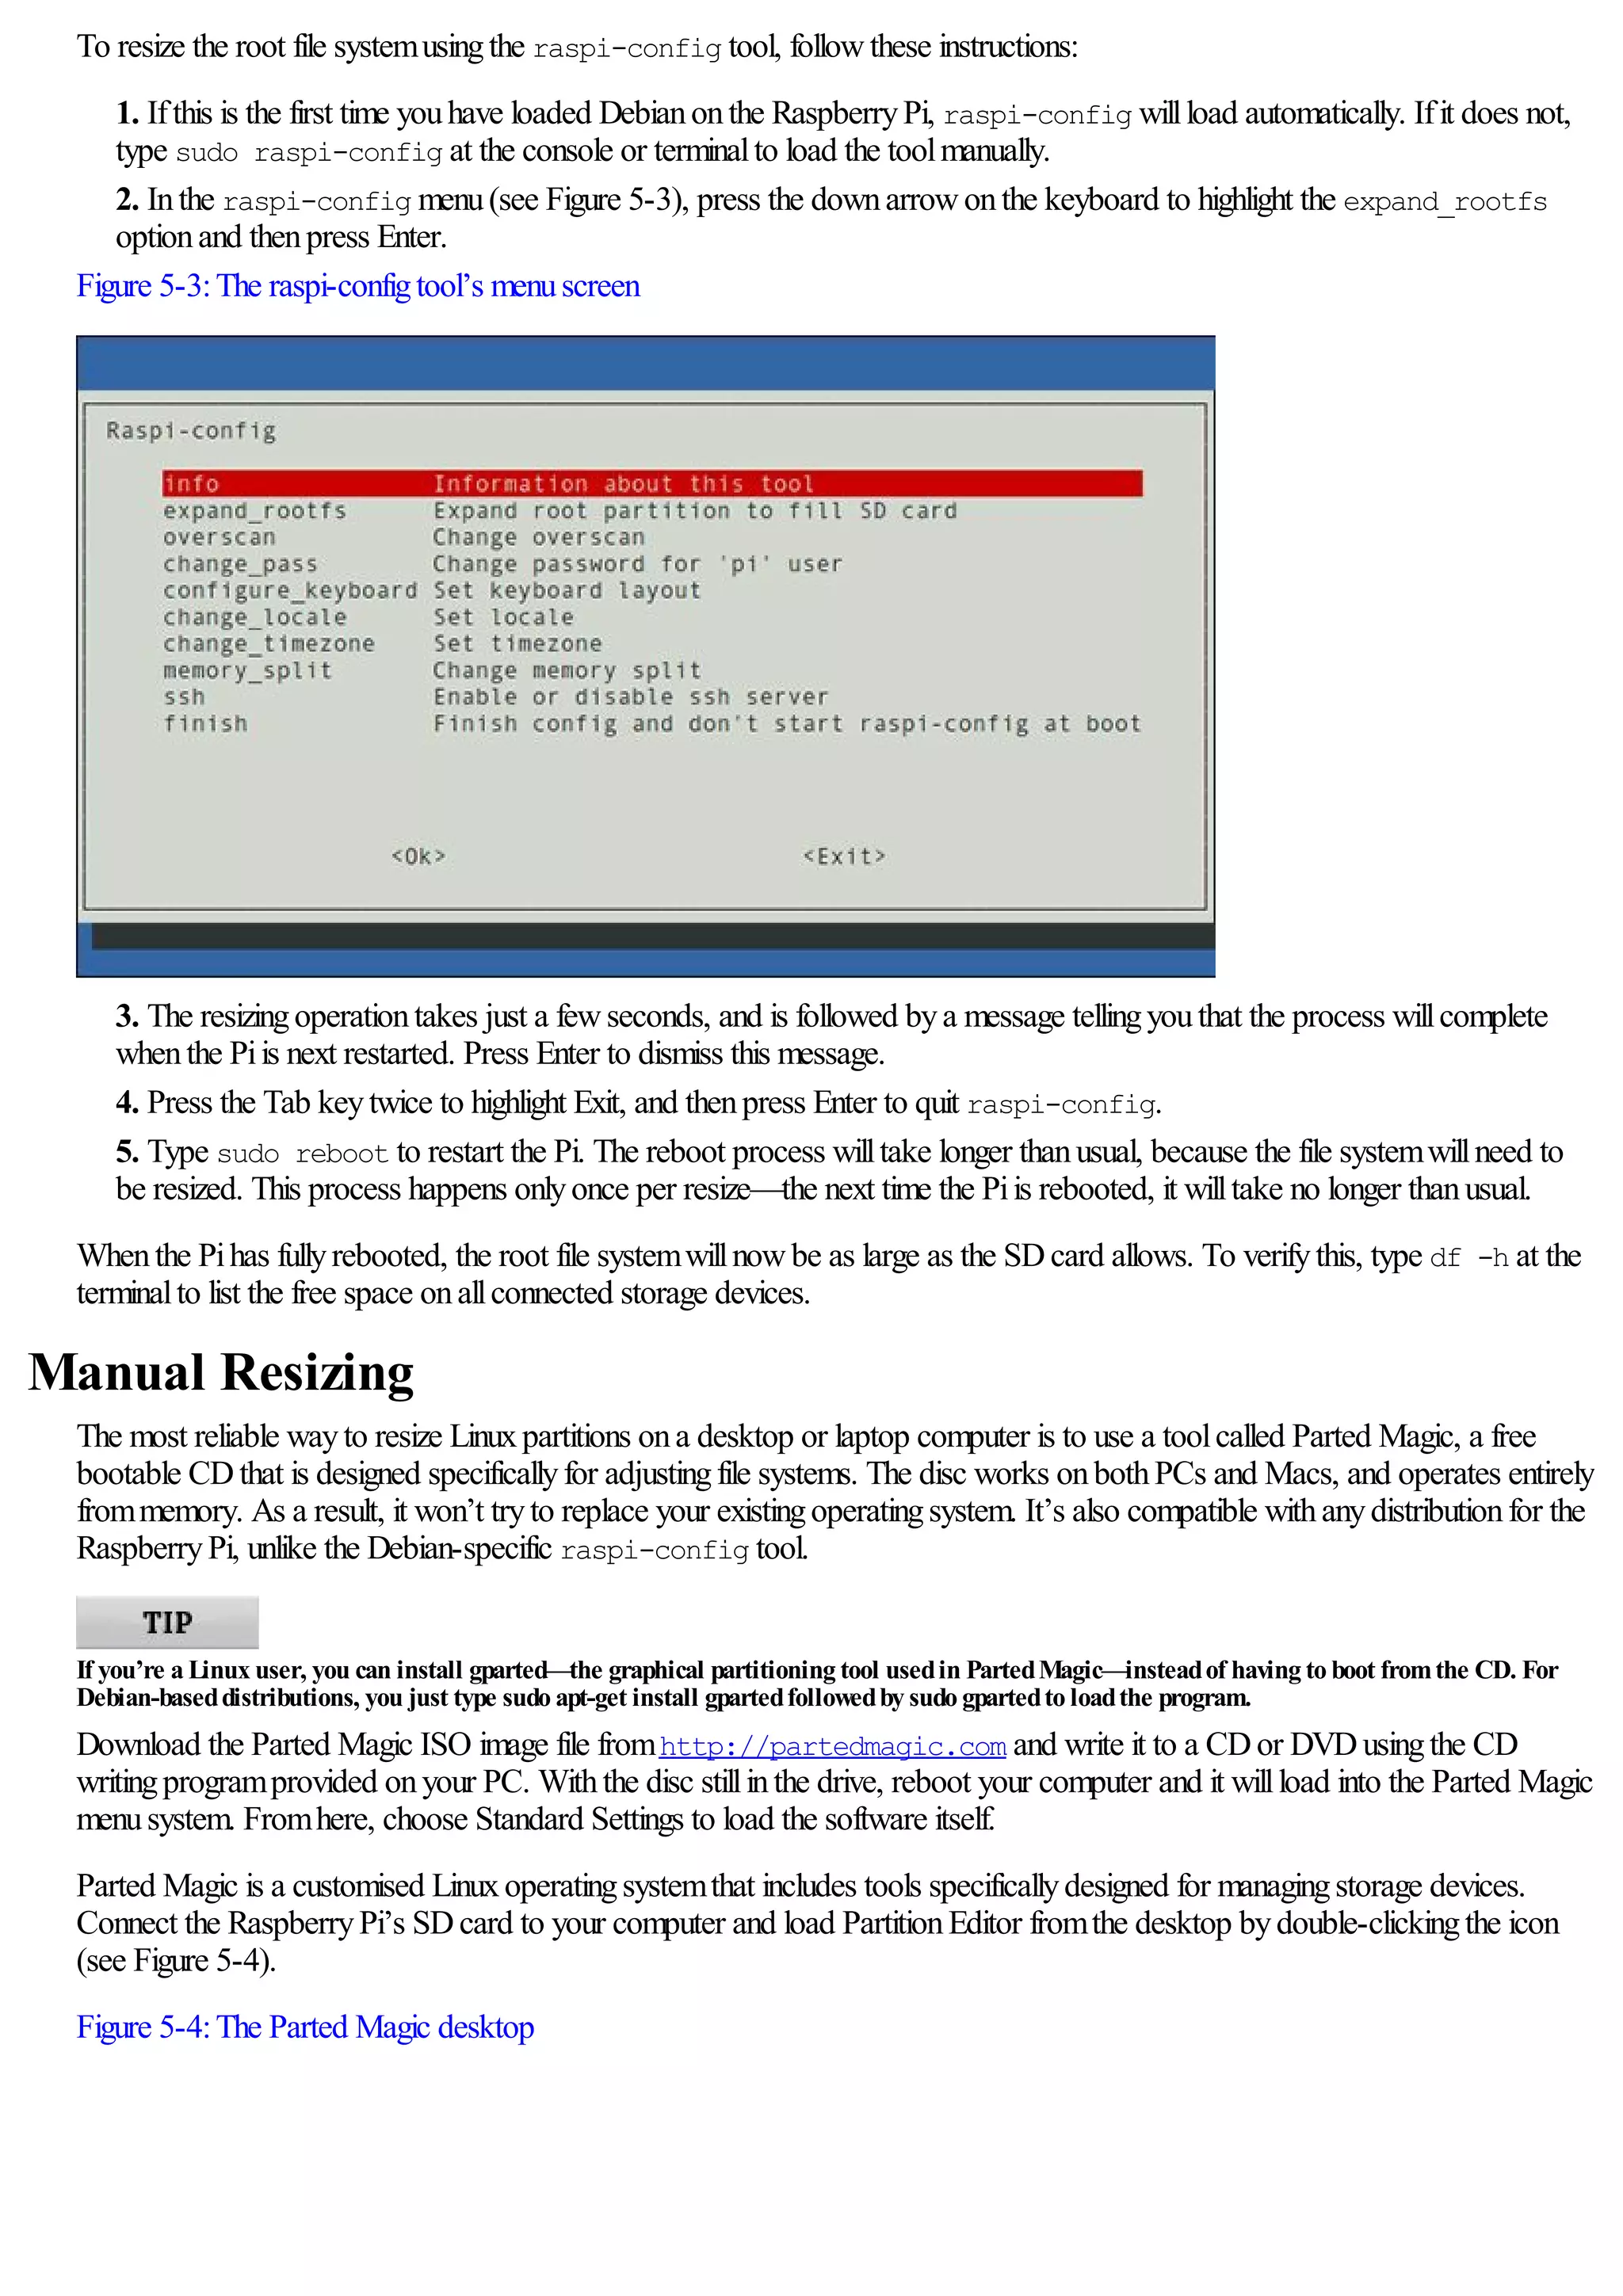
Automatic Resizing
The DebianLinuxdistributionfor the RaspberryPicomes witha toolcalled raspi-config, whichloads whenthe systemis
booted for the first time. It canalso be loaded manuallyat anytime bytypingsudo raspi-config at the console or ina
terminalwindow. This toolprovides aninterface for manycommonconfigurationtasks, includingthe abilityto resize the root file
systemto make fulluse ofthe available space onanSDcard automatically.
Using the raspi-config tool to resize the root file systemcan, in rare cases, result in data corruption. If you have data storedon the Pi which you
can’t affordto lose, back it upfirst orconsiderfollowing the more reliable manual resizing instructions foundlaterin this chapter.](https://image.slidesharecdn.com/rpiusersguide-210422224618/75/Guia-de-usuario-de-Raspberry-Pi-por-Eben-Upton-56-2048.jpg)


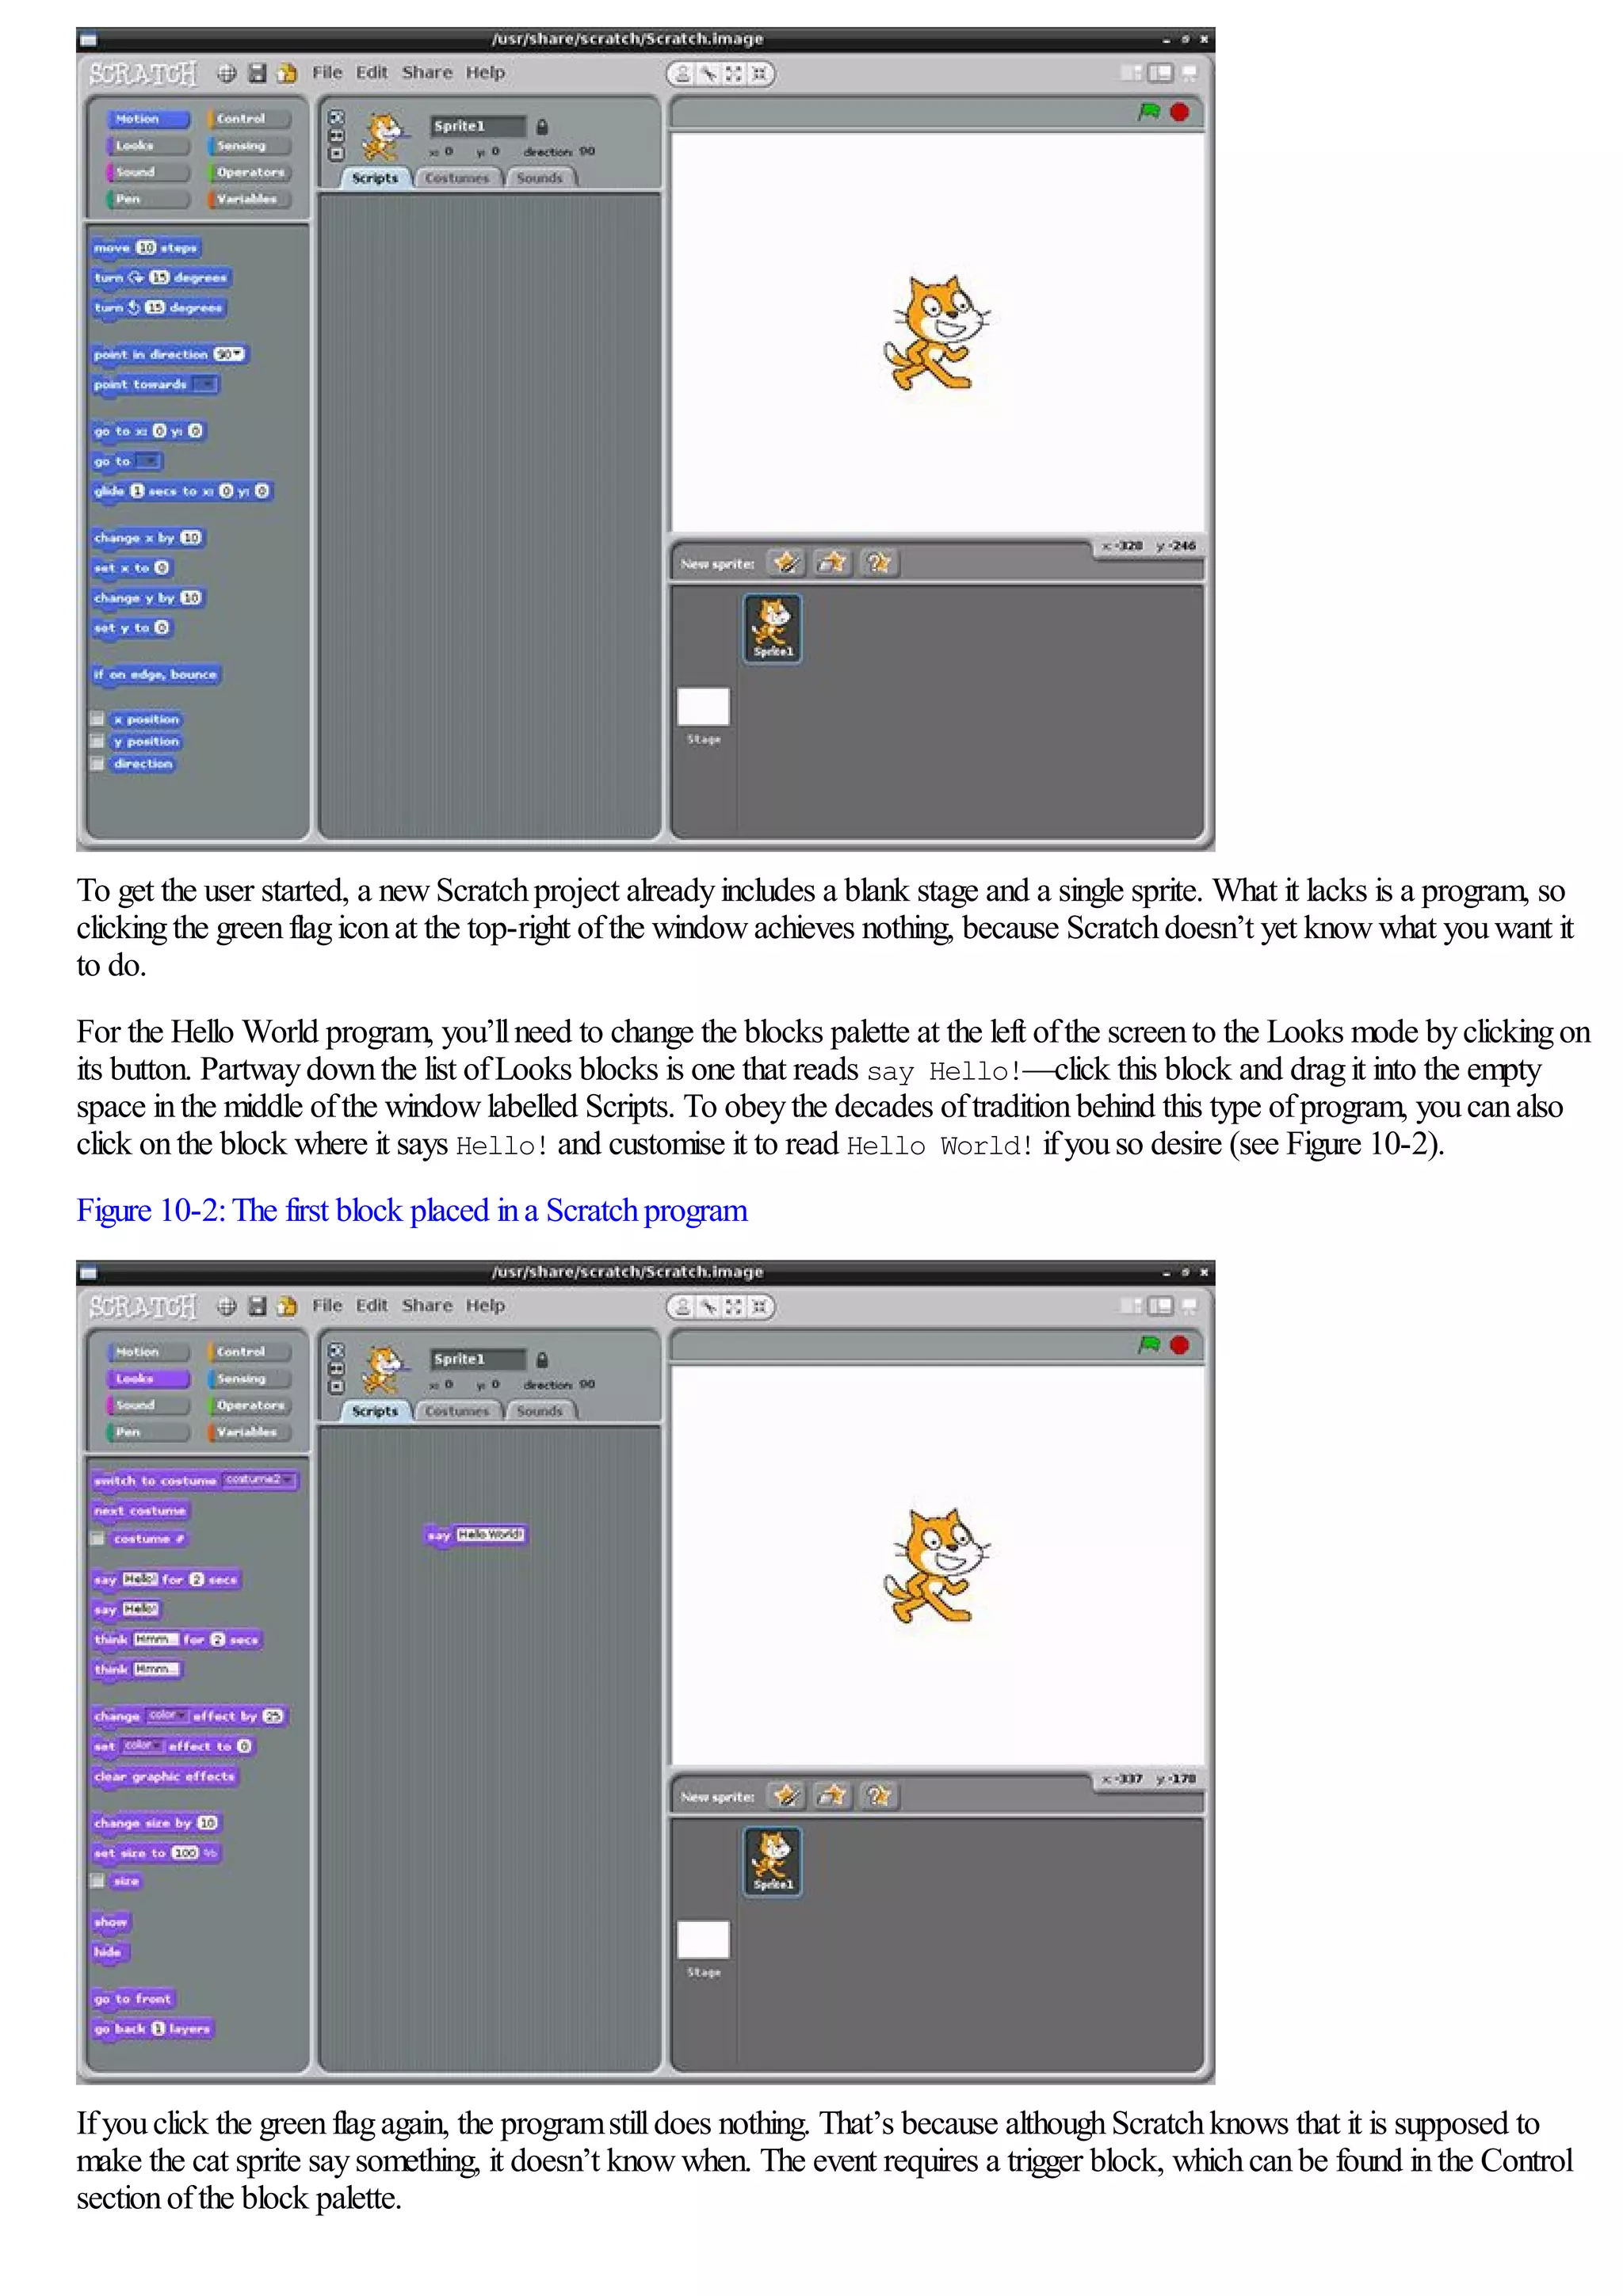
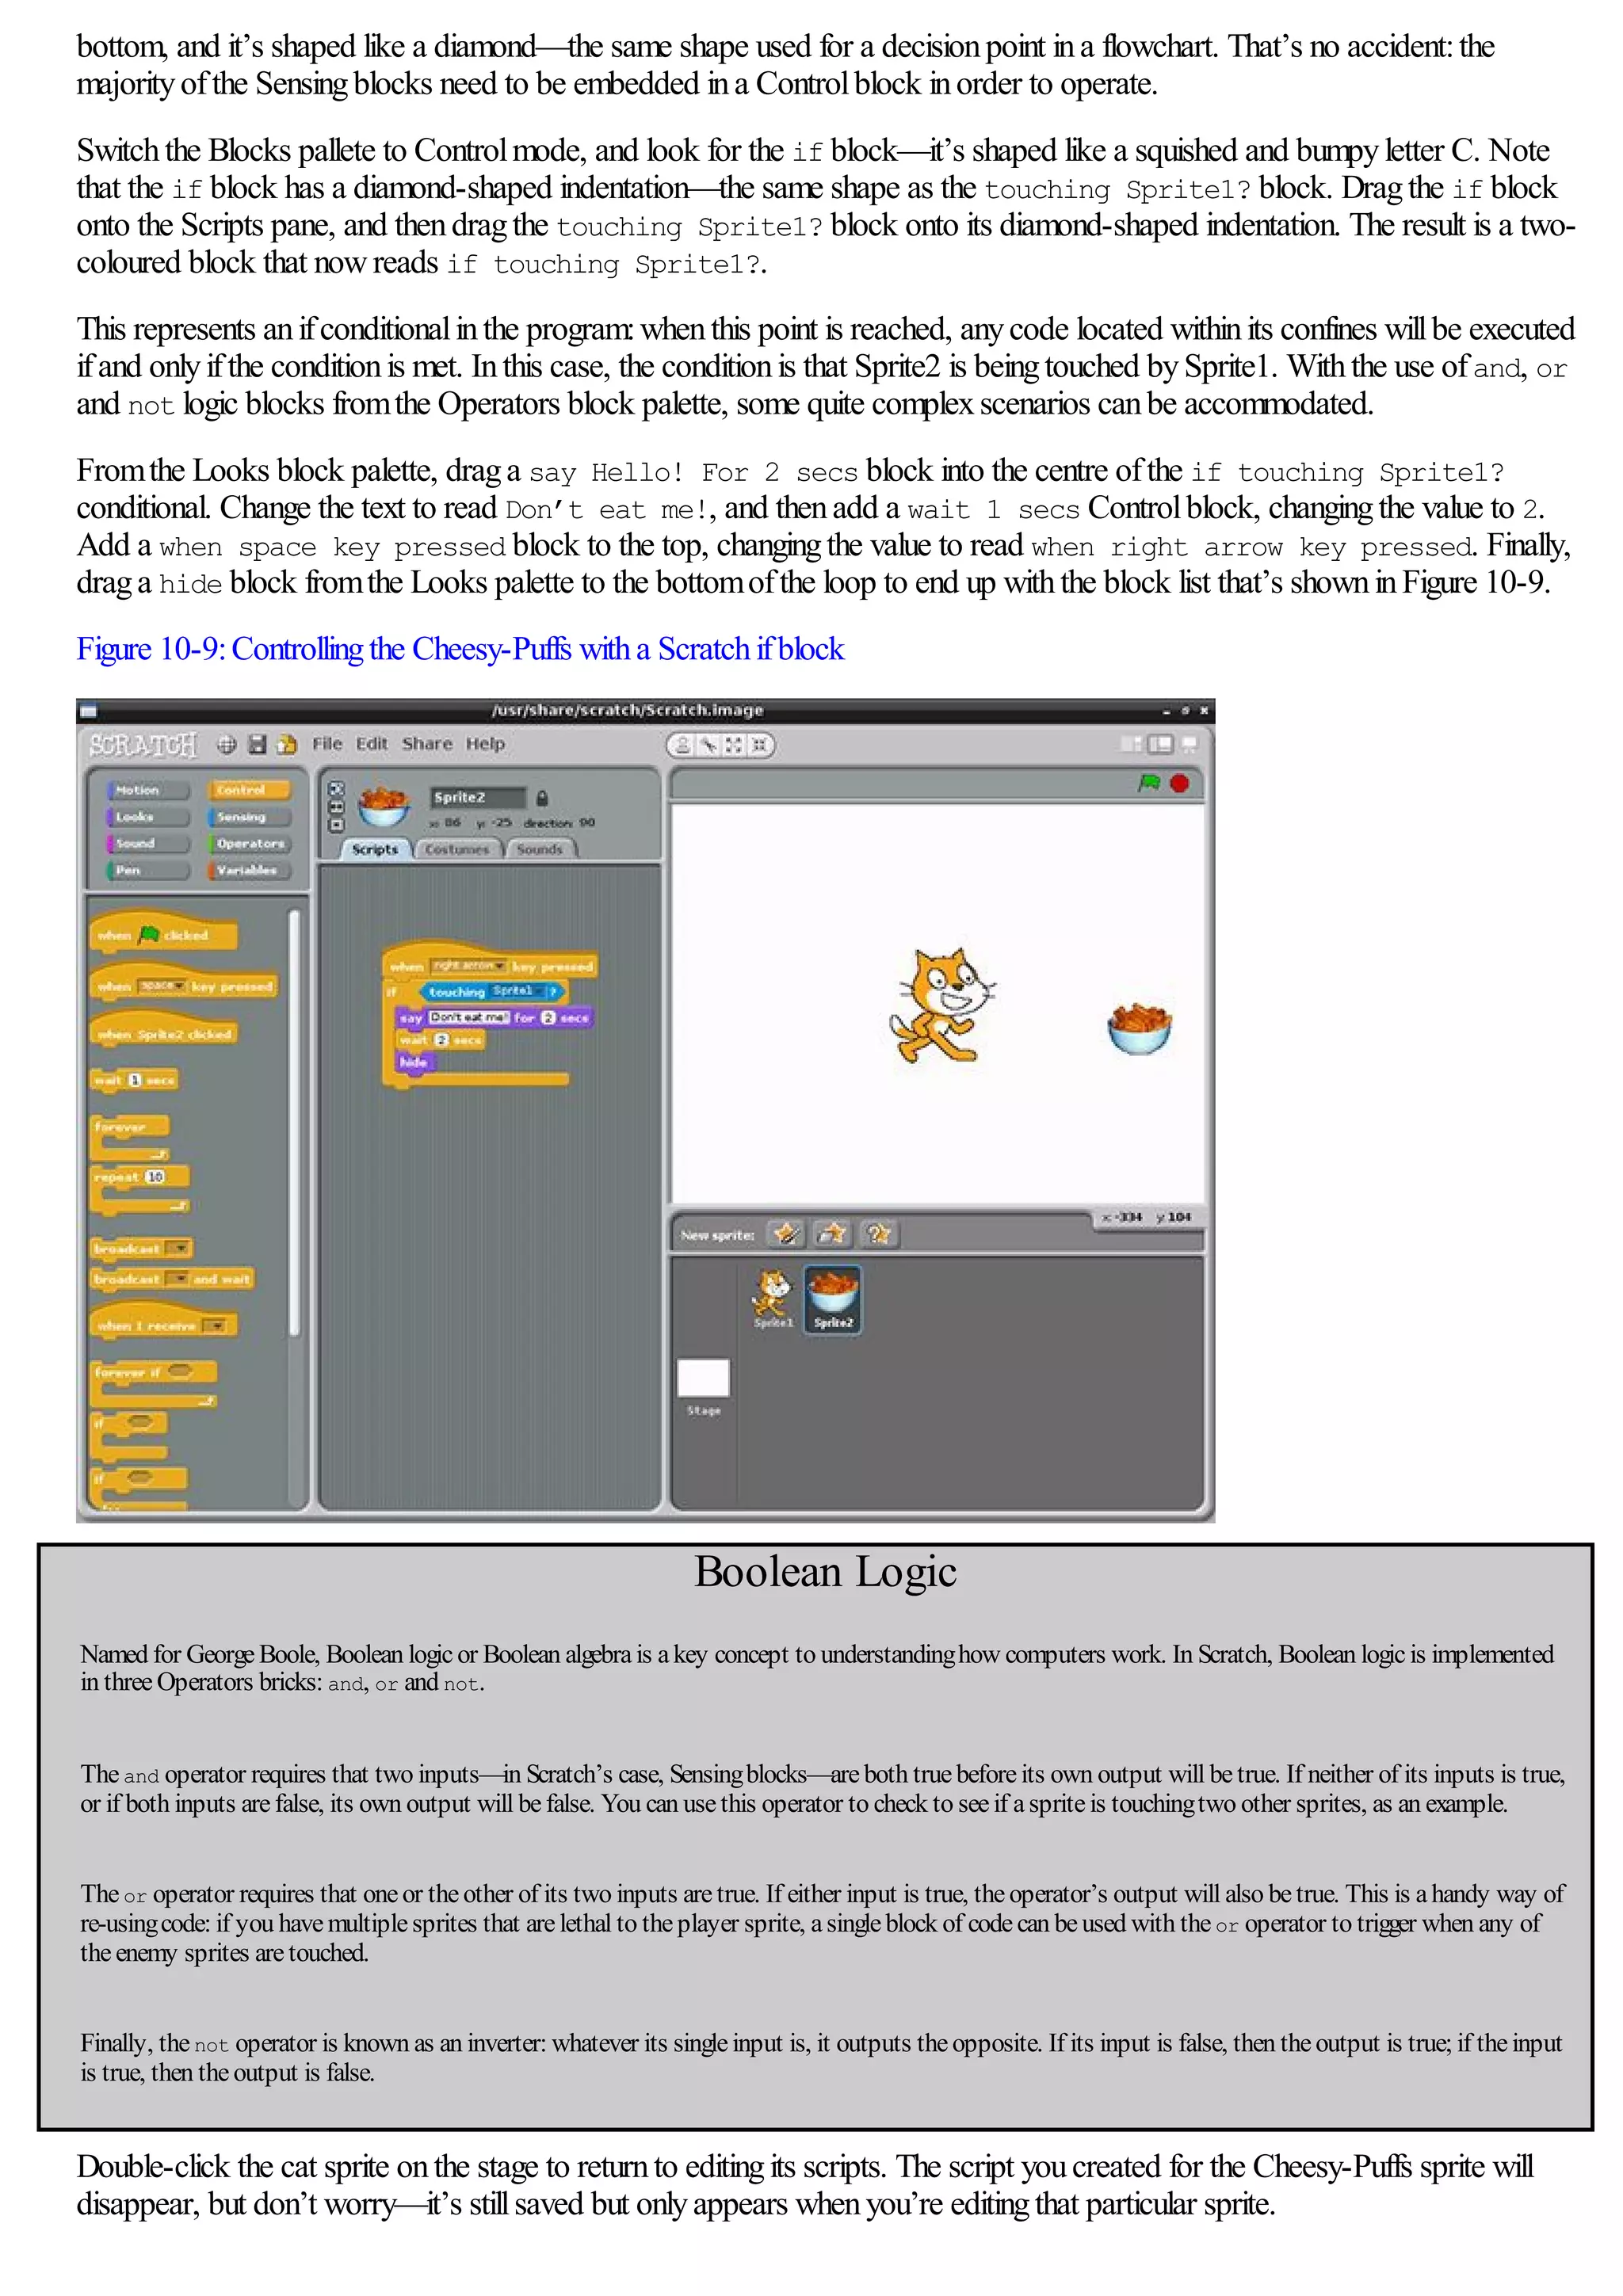
![Enter this sectionnowbyclickingControl, and thendragthe top entry—marked when [flag icon] clicked—and place it
just above the purple say brick (see Figure 10-3). Ifyoudrop it close enough, it should automaticallyjointo the existingbrick
like a jigsawpiece.
Figure 10-3:AControlblock joined to a Looks block inScratch
This concept ofconnectingmultiple bricks together is the heart ofScratch. Ifyoulook at the Controlbrick youjust placed, you’ll
see there’s no connectinghole at the top. This means that youcan’t stack another brick ontop, because this Controlbrick is
designed to trigger a series ofother bricks directlyand must come at the start ofa stack. The bottomofthe say brick,
meanwhile, has a connector that fits into the top ofother bricks, whichindicates that more bricks canbe placed underneath.
Withthe two bricks inplace, click the greenflagiconat the top-right ofthe screenagain. This time, a speechbubble willappear
fromthe cat’s mouth(see Figure 10-4), and the Hello World programis complete.
Before movingonto the next example, take the time to save your work usingthe File menu. Scratchis designed to have a single
project openat a time, so ifyoucreate a newblank file, the current file willbe closed to make room. Don’t worryifyouforget
about this whenyougo to create a newfile—ifthere are unsaved changes inthe existingfile, Scratchwillprompt youto save
these changes before closingit.
Figure 10-4:The Hello World programexecutinginScratch](https://image.slidesharecdn.com/rpiusersguide-210422224618/75/Guia-de-usuario-de-Raspberry-Pi-por-Eben-Upton-96-2048.jpg)
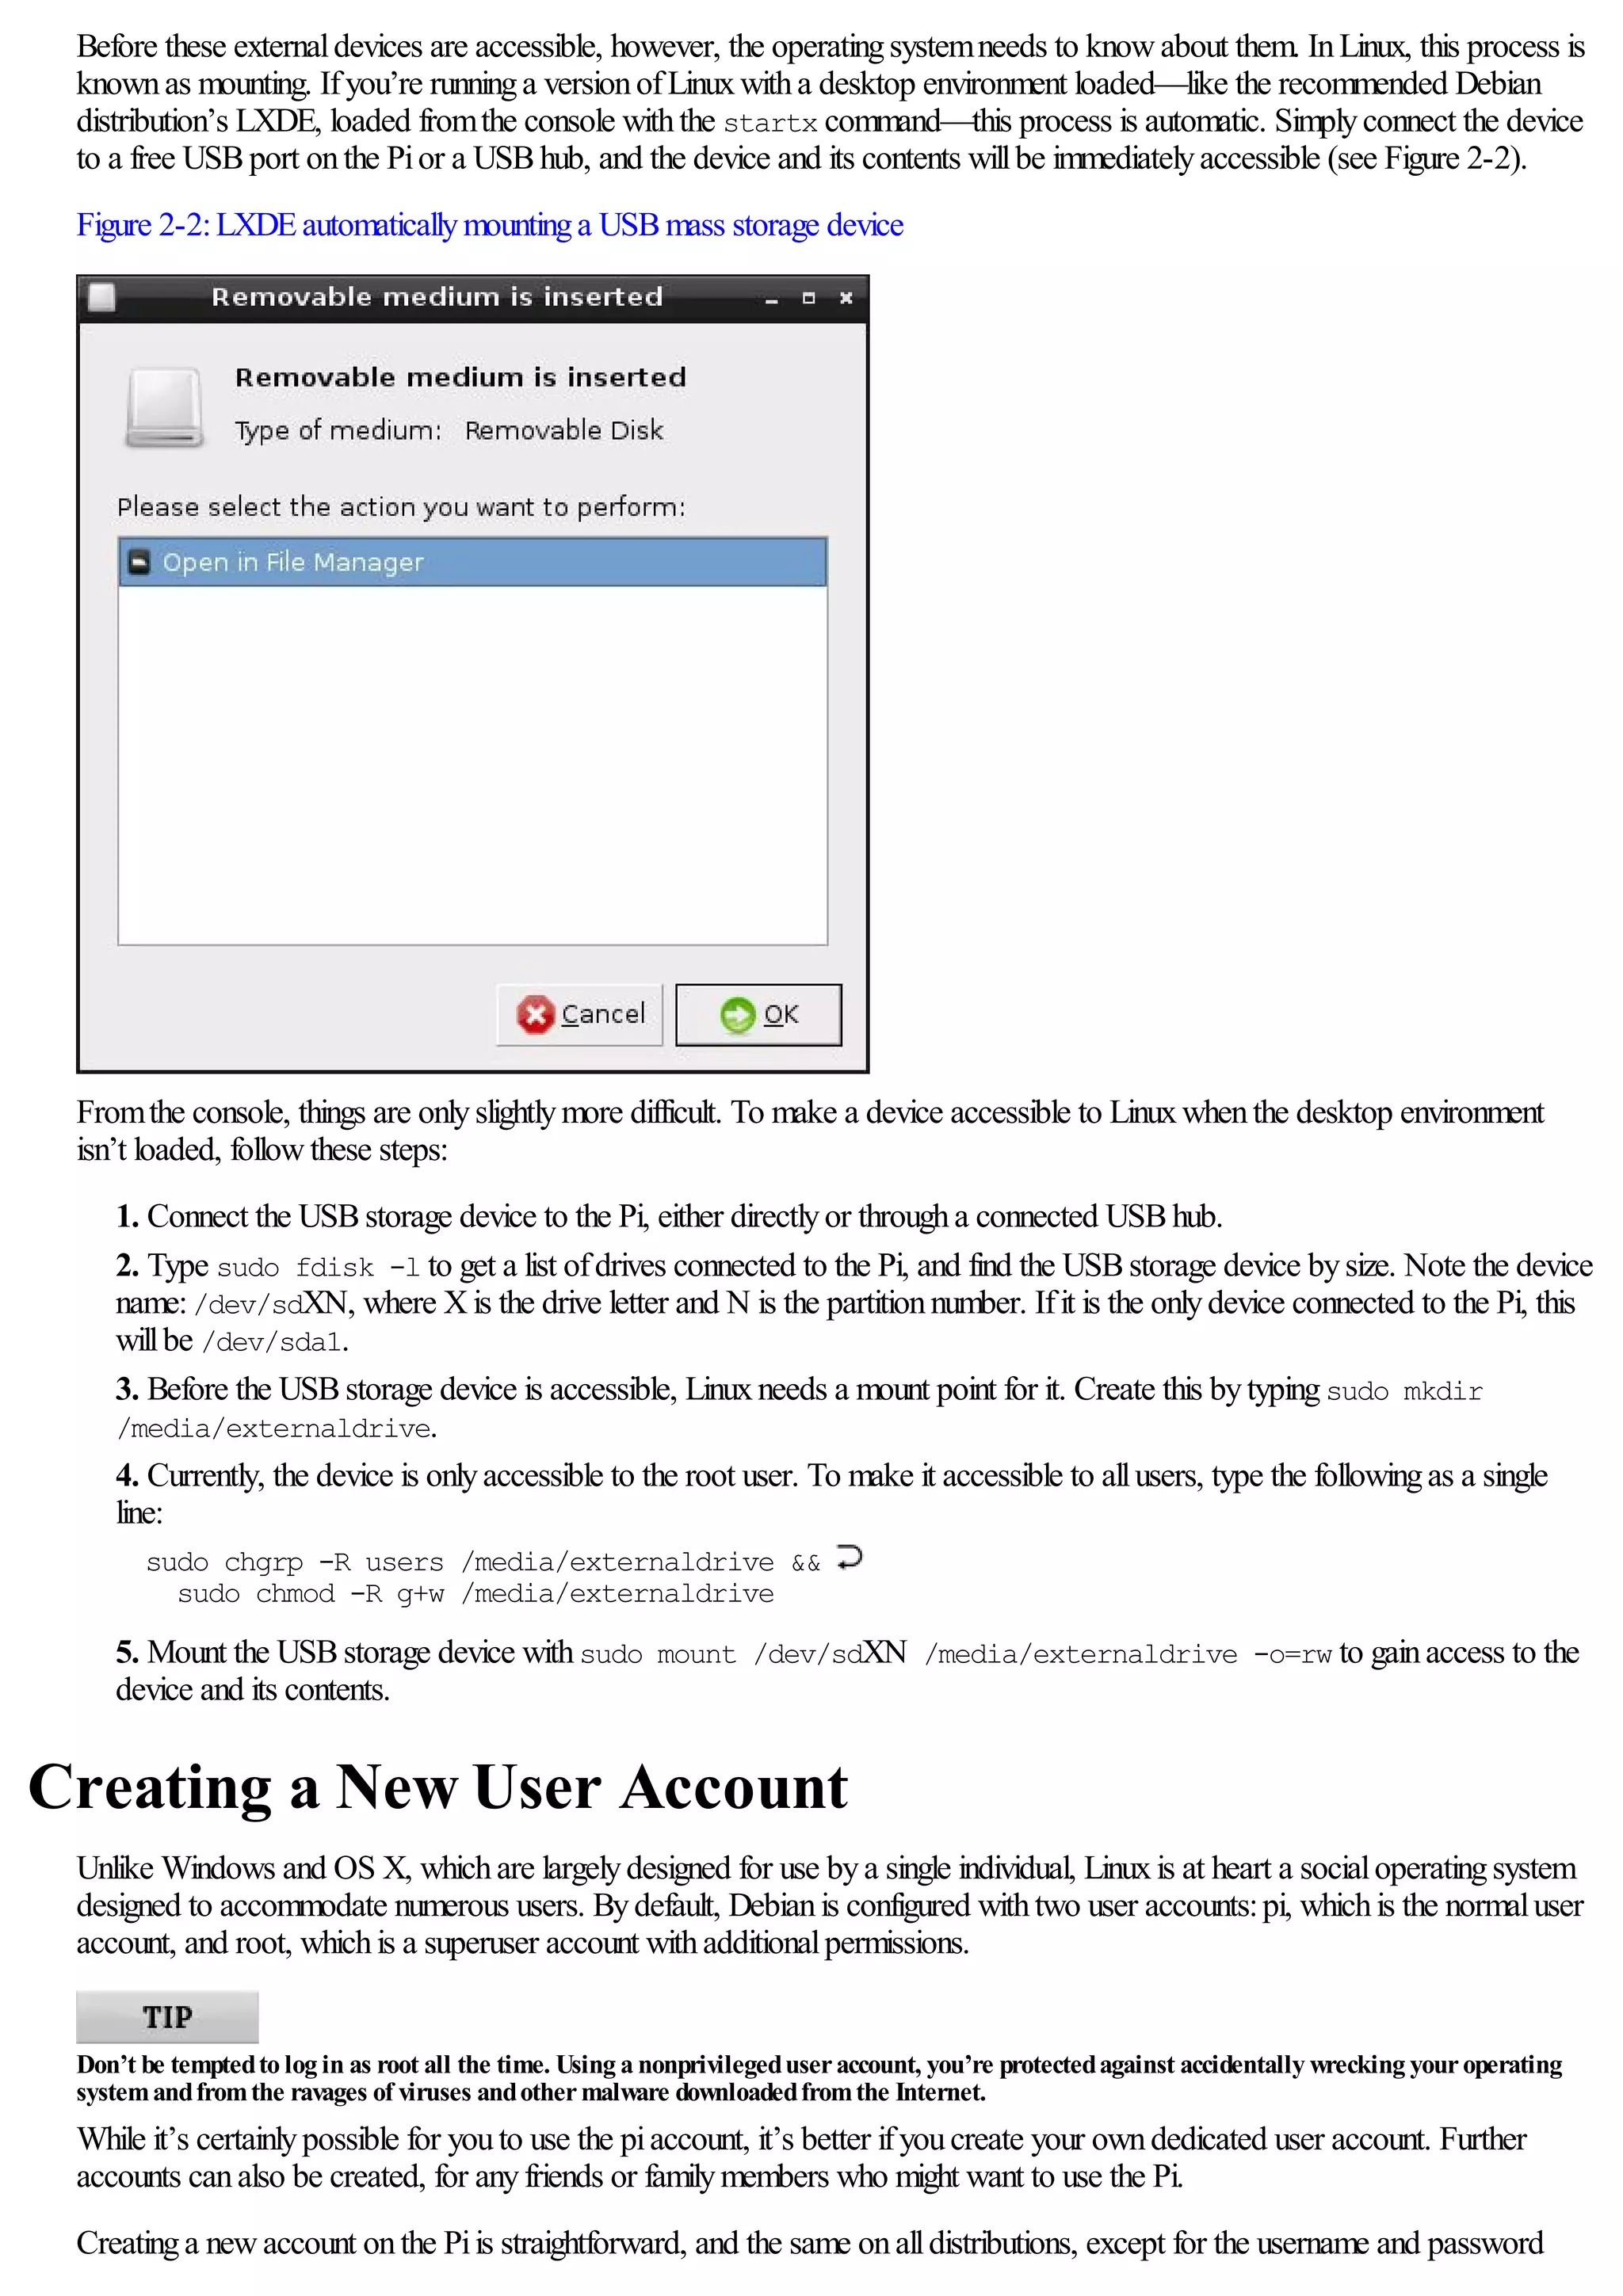
![Example 2: Animation and Sound
While Hello World is a verytraditionalexample, it’s not particularlyinteresting. It also fails to showoffthe true power of
Scratch, whichlies inits impressive multimedia capabilities and sprite-handlingsystem. This systemis particularlywellsuited to
simple animations, whichcanformthe basis ofaninteractive game.
To begin, start a newproject inScratchbyeither loadingthe programafreshor choosingNewfromthe File menu. As withany
starter project, Scratchwillprovide a default sprite—it’s this sprite that youwillbe controlling.
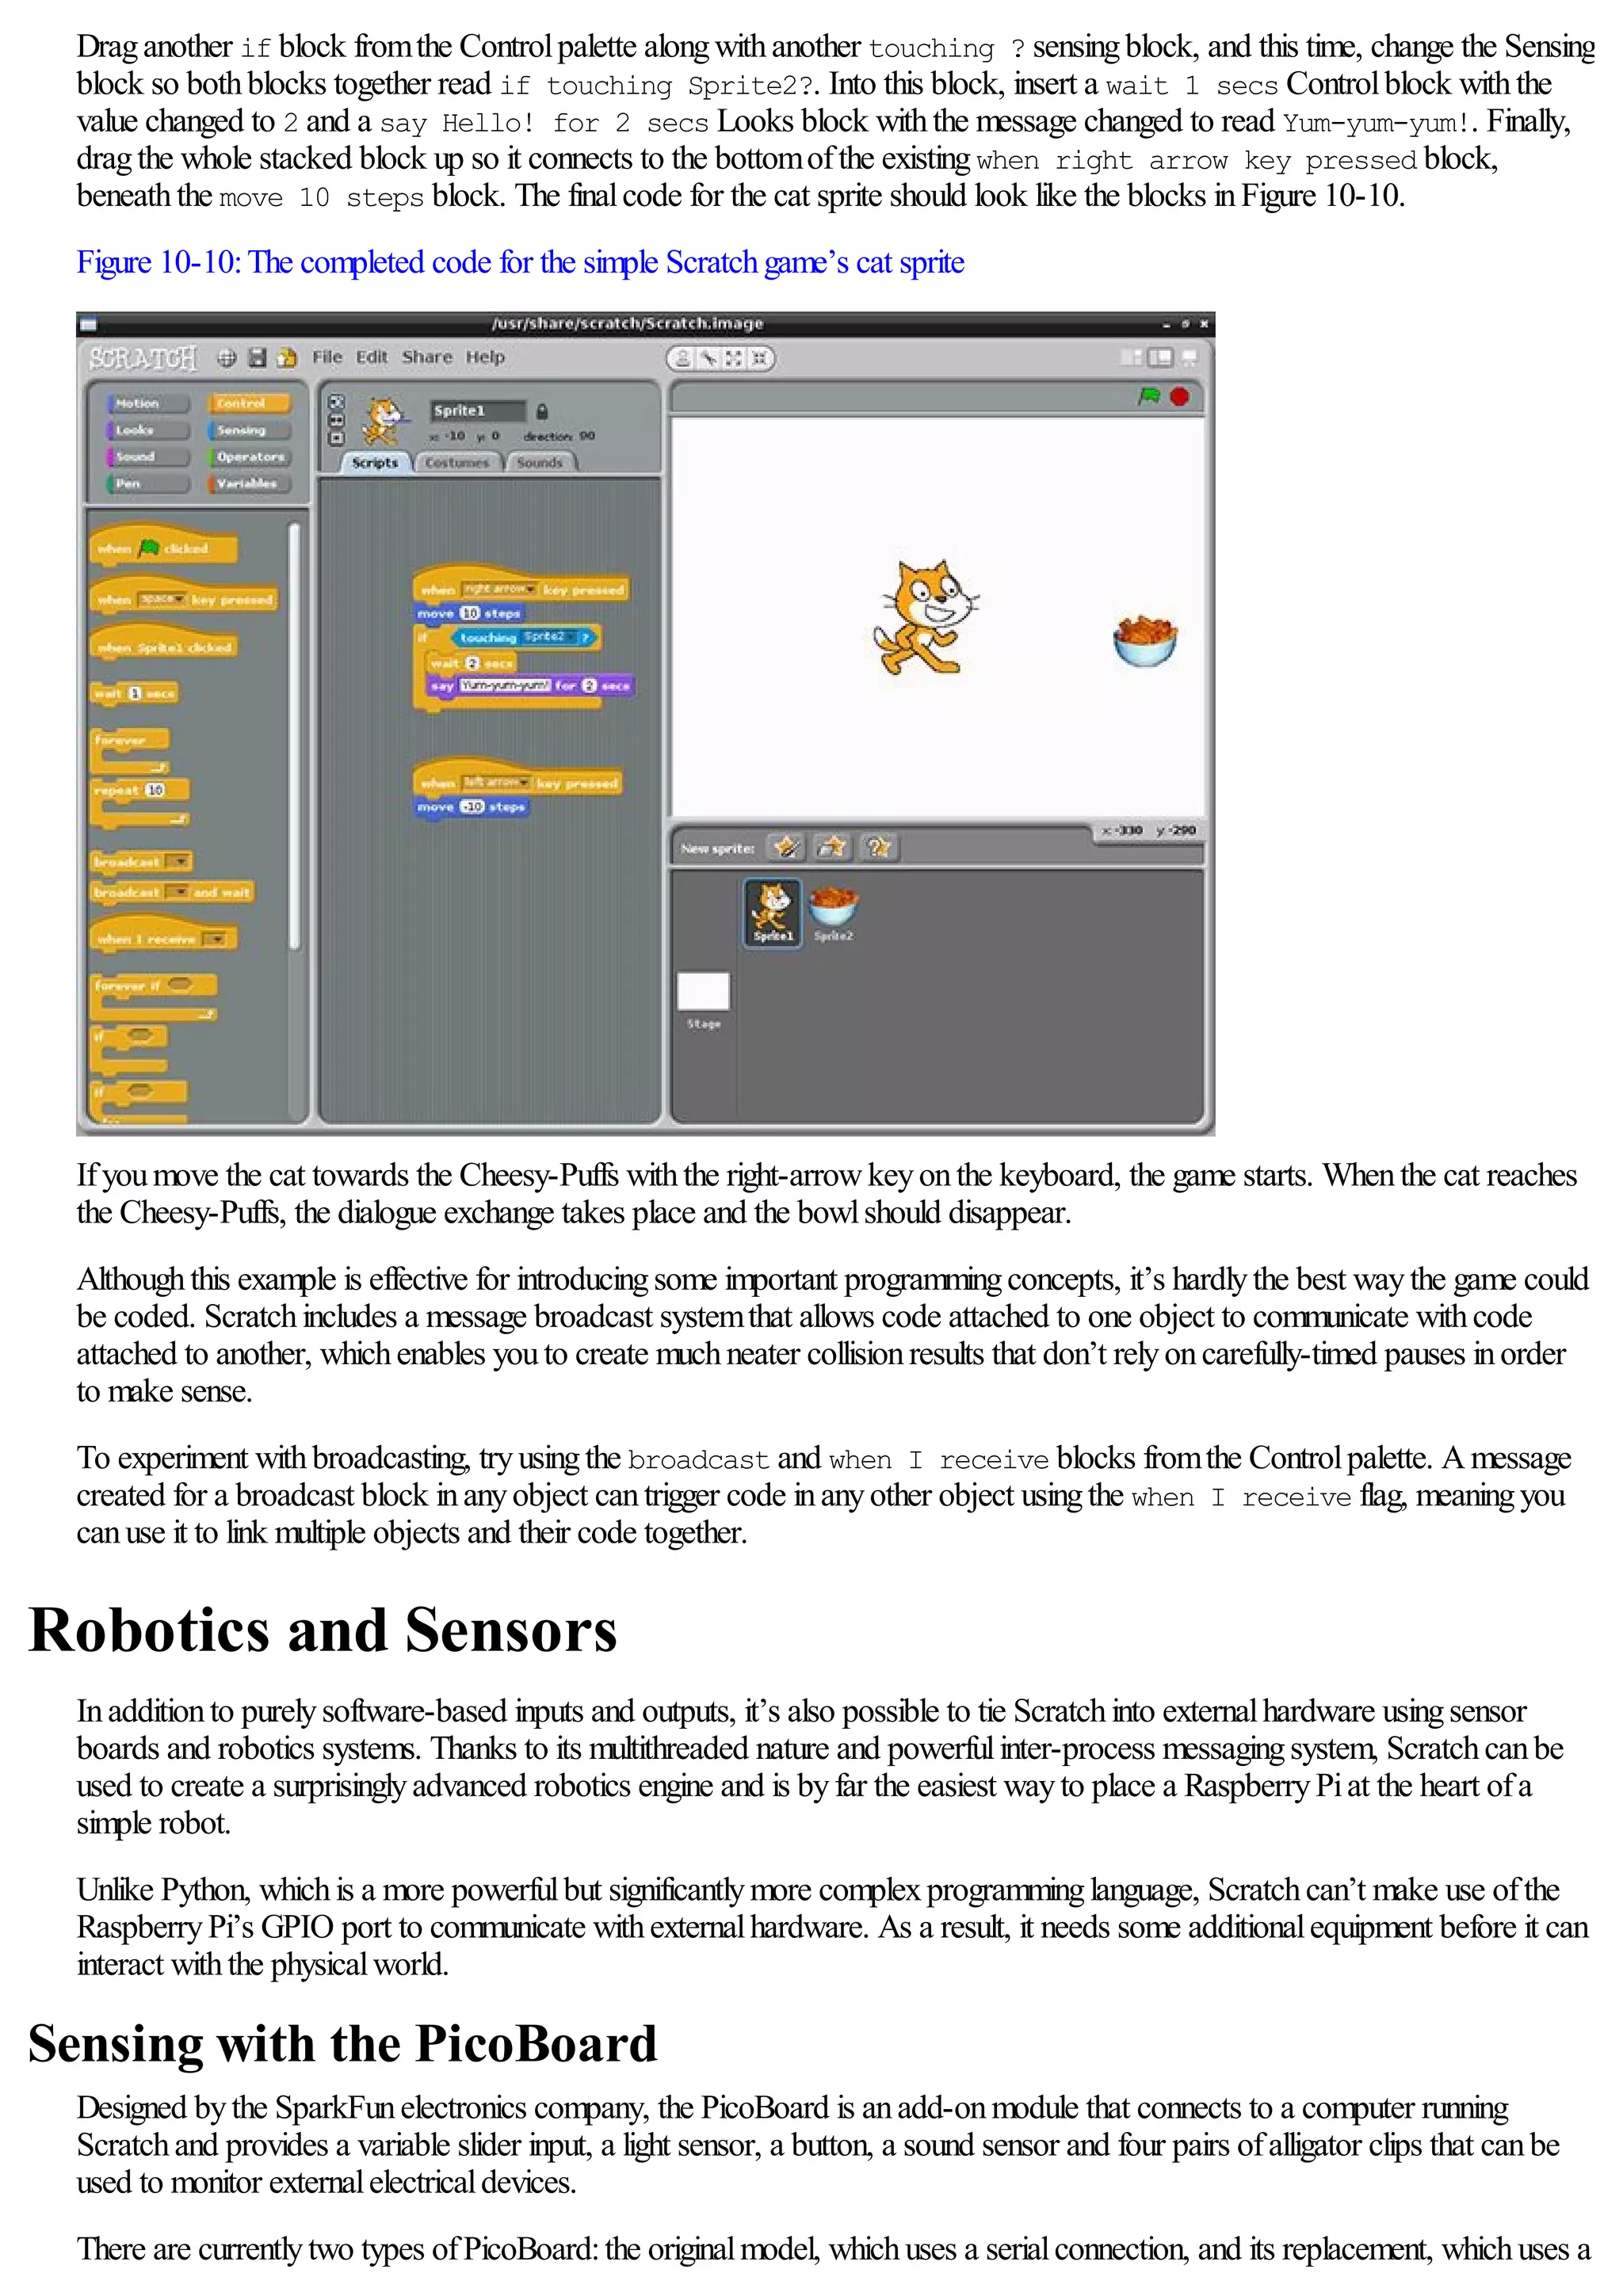
To controla simple animationinScratch, youuse the Motionsectionofthe blocks palette. Whenyoustart a newproject, this is
the default palette. Dragthe block labelled move 10 steps to the Scripts area. As its name suggests, this block tells the
selected sprite to move 10 steps inthe directionit is currentlyfacing. The default sprite inScratchis always started facingdirectly
to the right—thus, the move 10 steps block willmove the sprite 10 steps to the right.
Tensteps isn’t a verylarge value, so click onthe value 10 and change it to 30. The block should thenread move 30 steps. An
animationofa cat movingto the right ofthe stage isn’t that interesting, however, so switchto the Sound block palette and drag
the play sound meow block to the Scripts area and link it beneaththe existingmove block. To keep the cat inthis positionfor
a while, add ina wait 1 secs block fromthe Controlblock palette. Without this, the sprite willappear to flick quickly
betweenits startingpositionand the target position.
To make it so the programcanbe runmultiple times without the cat sprite disappearingoffthe edge ofthe stage, add another
move 10 steps block beneaththe play sound block and modifyit to read move -30 steps. Scratchwillhappilyallowyou
to use negative figures like this:ifa value of30 makes the sprite move a certaindistance to the right, -30 willmake it move the
exact same distance inthe opposite direction.
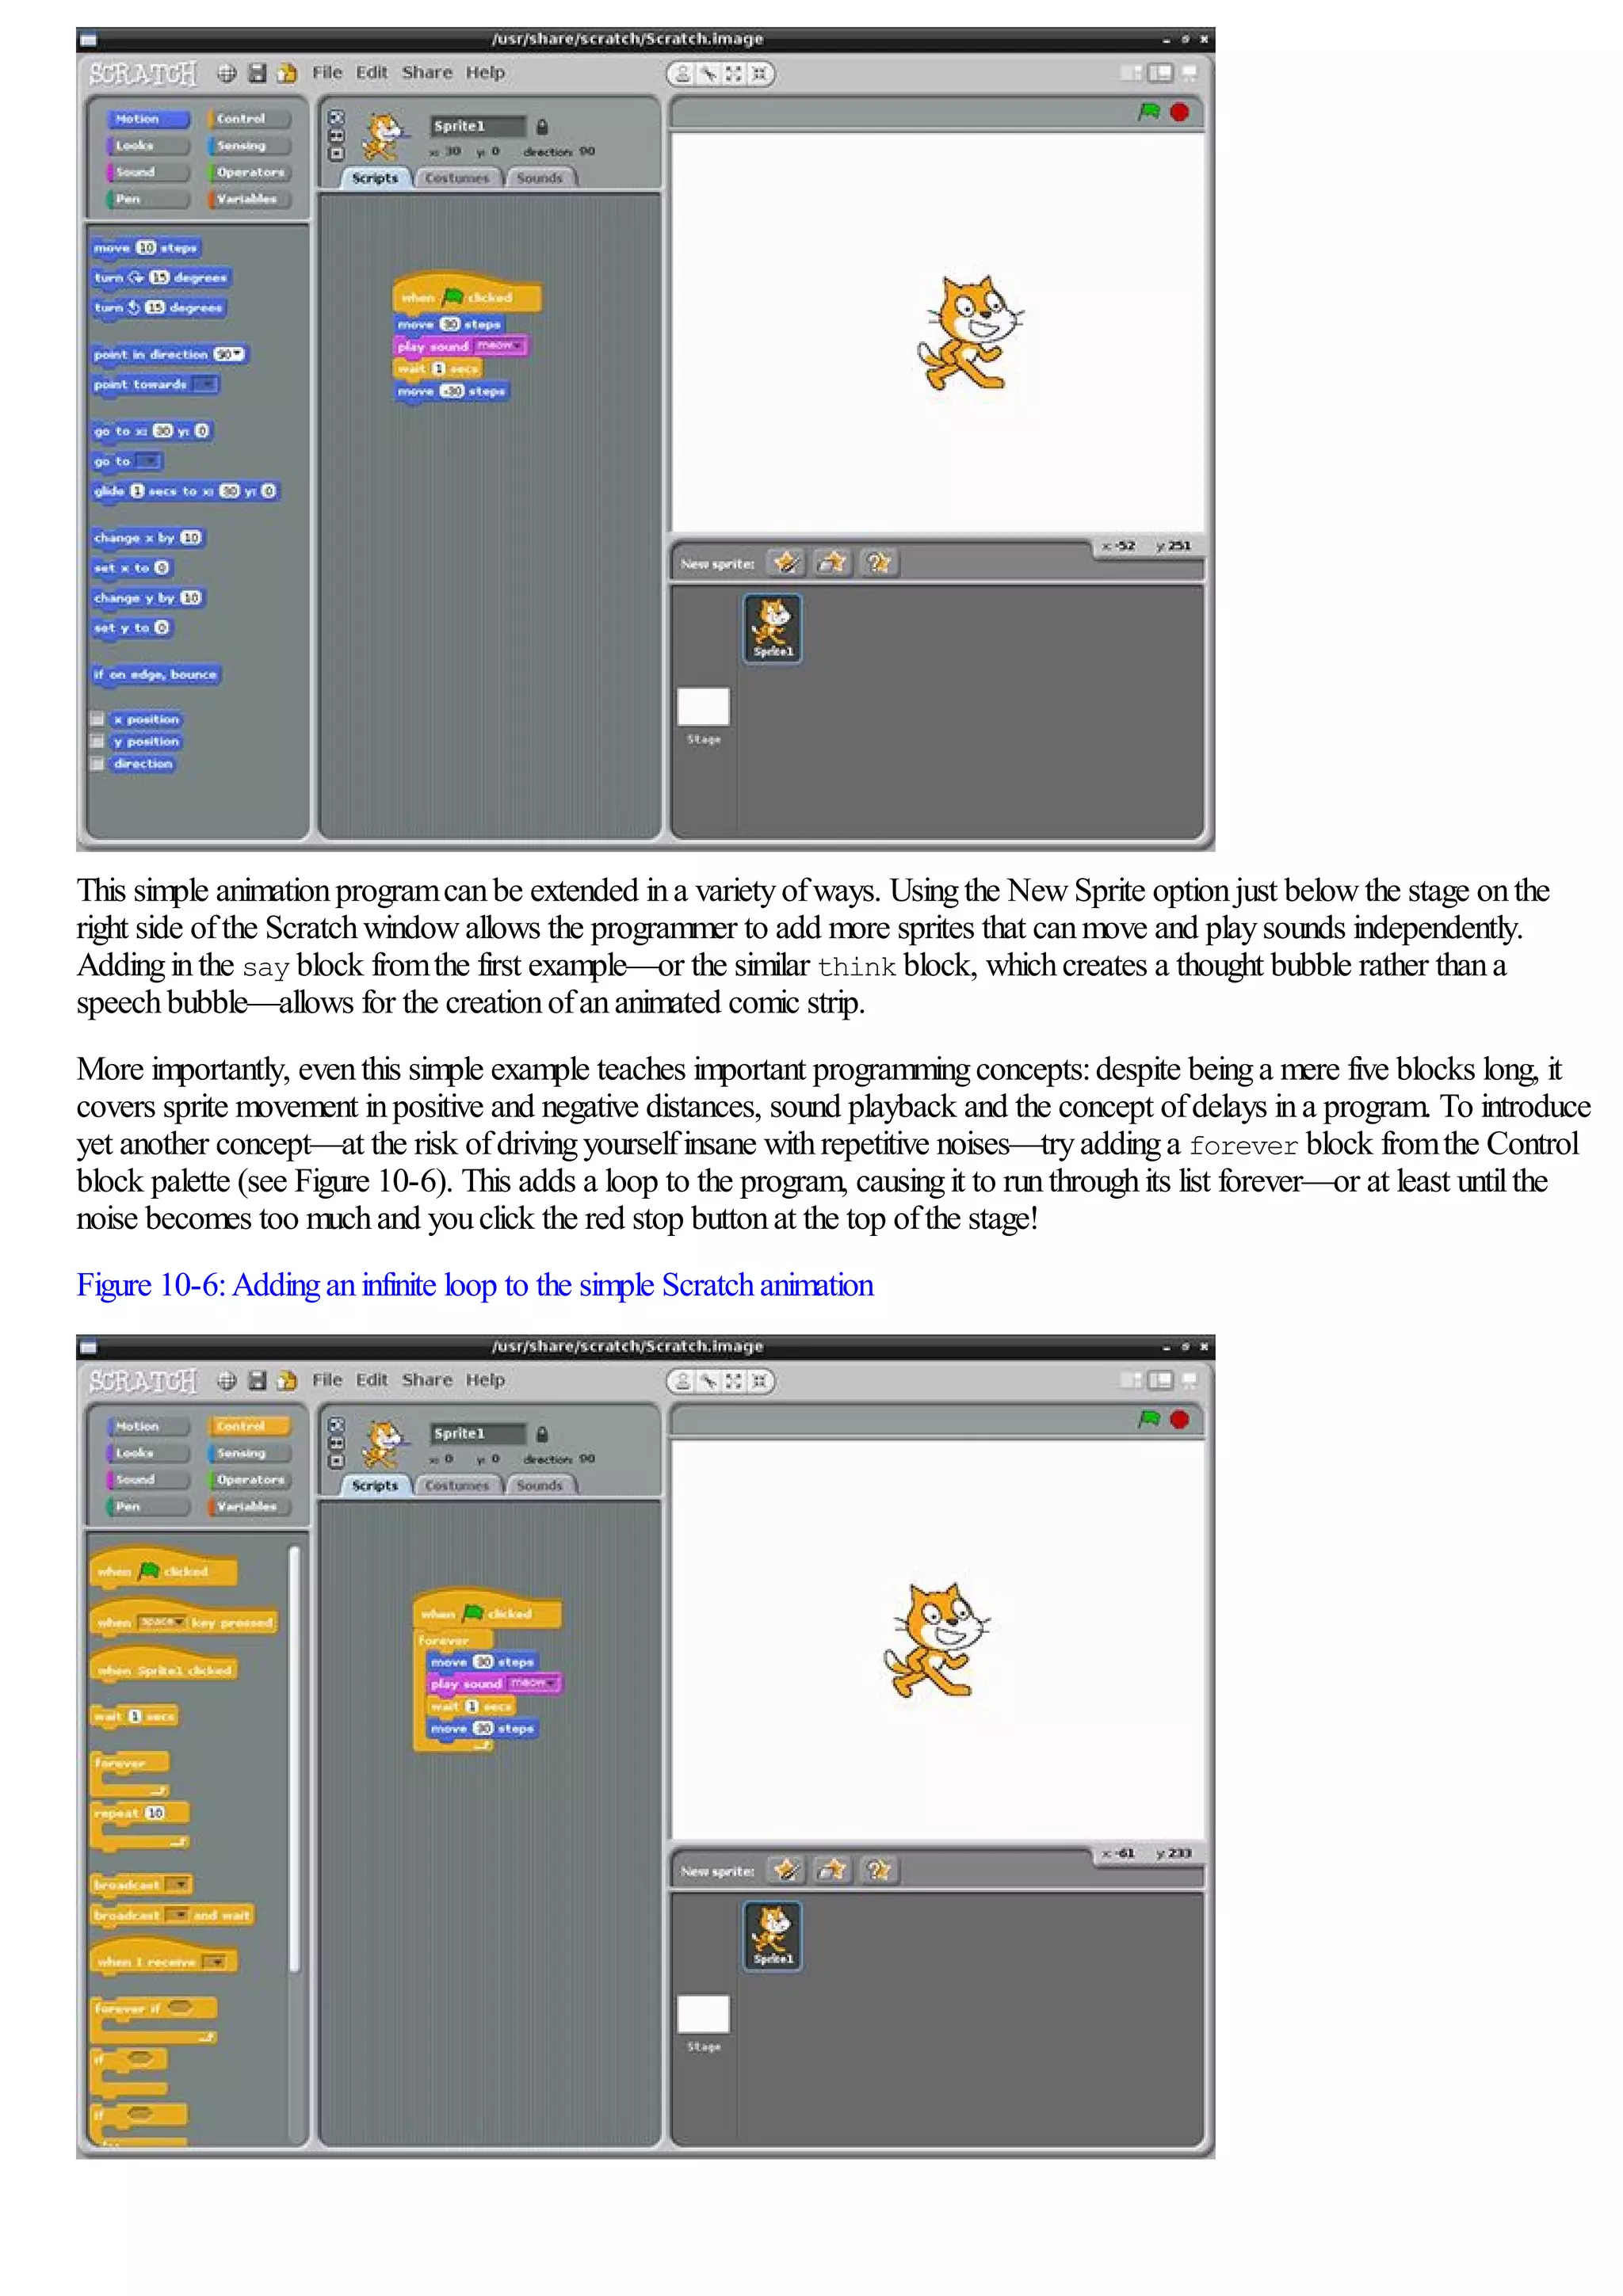
Finally, add the when [flag icon] clicked block fromthe Controlblock palette to the top ofthe Script area’s stack of
blocks to complete the programas showninFigure 10-5. Clickingthe greenflagicononthe top-right ofthe screenwilltrigger
the program—make sure you’ve got speakers or headphones connected to the Pifor the fulleffect!
Figure 10-5:The completed animationprograminScratch](https://image.slidesharecdn.com/rpiusersguide-210422224618/75/Guia-de-usuario-de-Raspberry-Pi-por-Eben-Upton-97-2048.jpg)
![Example 3: A Simple Game
UsingScratchfor simple animationis one thing, but the software also allows users to read inputs fromthe keyboard to introduce
interactivity. Bycombiningsome simple animationcontrols to the previouslydescribed program, youcancreate a simple game—
and, at the same time, introduce the concepts ofsprite collision, ifstatements and input.
For this example, start a newScratchproject—rememberingto save the previous example, ifyouhaven’t alreadydone so—and
beginbydragginga move 10 steps block to the Scripts area. This time, rather thantellingthe code blocks to execute whenthe
flagiconis clicked, go to the Controlblock palette and draga when space key pressed block above the move block.
As the name suggests, the when space key pressed block looks for input fromthe user—inthis instance, the spacebar being
pressed—and uses that as the trigger for executinga list ofblocks. The block works at anytime—ifyoupress the spacebar
now, the sprite willobeyits instructions and move 10 steps to the right.
The when space key pressed block also differs fromthe when [flag icon] clicked block inanother important way:it
canbe customised. Click the down-arrowbuttonnext to the word space to see a list ofallthe keys the block canwatch, and
thenselect right arrow fromthe list to change the block into a when right arrow key pressed block.
Agame inwhichthe player canmove inonlyone directionisn’t muchfun, so draga newwhen space key pressed block
into the Scripts area. This can’t link to the existingblock list—youcanonlyhave a single trigger block—so start a newlist
somewhere further down. As before, use the down-arrowbuttonnext to the word space to customise the block, turningit into a
when left arrow key pressed block. Finally, switchthe block palette back to Motionmode and connect a move 10
steps block beneaththe newwhen left arrow key pressed block before changingit to read move -10 steps.
Ifyoupress the left and right arrowkeys now, you’llsee that the cat moves accordingto your input (see Figure 10-7):pressing
the left arrowmoves the cat 10 steps to the left (although, as far as Scratchis concerned, it’s movingminus 10 steps to the right),
and pressingthe right arrowmoves the cat 10 steps to the right.
Figure 10-7:Usinginput blocks to controlthe motionofa sprite inScratch
Nowthat the sprite canbe moved bythe player, it’s time to give the sprite somethingto do. As this is just a verysimple game,
the goalshould also be simple:to collect some food. Click the Choose NewSprite FromFile button, found inthe middle ofthe
three buttons above the Sprite palette at the bottom-right ofthe Scratchwindow.
Adialogue boxwillappear askingyouto pick a sprite:double-click onthe Things folder, and thendouble-click onthe Cheesy-
Puffs sprite (showninFigure 10-8). This willplace the sprite as a newentryinthe Sprite palette, givingyoua newobject to
controlinthe game.](https://image.slidesharecdn.com/rpiusersguide-210422224618/75/Guia-de-usuario-de-Raspberry-Pi-por-Eben-Upton-99-2048.jpg)


![import pygame, sys, time, random
from pygame.locals import *
The first line imports the mainpygame module alongwiththe Pythonmodules sys, time and random, whichwillalso be used in
this program. Typically, a module must thenbe called bytypingits name followed bya fullstop and the name ofthe instruction
fromwithinthe module, but the second line inthe precedingcode tells Pythonto load allthe instructions fromthe
pygame.locals module as thoughthey’re native instructions. As a result, youwillneed to do less typingwhenusingthese
instructions. Other module names—suchas pygame.clock, whichis separate to pygame.locals—willstillneed to be typed
infull.
Enter the next two lines to set up pygame so it’s readyto use inthe example program:
pygame.init()
fpsClock = pygame.time.Clock()
The first line tells pygame to initialise itself, and the second line sets up a newvariable called fpsClock, whichwillbe used to
controlthe speed ofthe game. Next, set up a newpygame displaysurface—the canvas onto whichin-game objects willbe
drawn—withthe followingtwo lines:
playSurface = pygame.display.set_mode((640, 480))
pygame.display.set_caption(‘Raspberry Snake’)
Next, youshould define some colours for the programto use. Althoughthis step isn’t strictlynecessary, it againsaves ontyping:
ifyouwant to set a particular object to be red, youcansimplyuse the redColour variable rather thanhavingto callthe
pygame.Color instructionand remember the three colour values for red, greenand blue. To define the colours for this example
program, type the followinglines:
redColour = pygame.Color(255, 0, 0)
blackColour = pygame.Color(0, 0, 0)
whiteColour = pygame.Color(255, 255, 255)
greyColour = pygame.Color(150, 150, 150)
The next fewlines initialise some ofthe game’s variables so they’re readyfor use. This is animportant step, because ifthese
variables are left blank whenthe game begins, Pythonwon’t knowwhat to do. Don’t worryabout what eachvariable does for
now—just type inthe followinglines:
snakePosition = [100,100]
snakeSegments = [[100,100],[80,100],[60,100]]
raspberryPosition = [300,300]
raspberrySpawned = 1
direction = ‘right’
changeDirection = direction
Notice that three ofthe variables—snakePosition, snakeSegments and raspberryPosition—are set to a list ofcomma-
separated values. This causes Pythonto create the variables as lists—a number ofdifferent values stored ina single variable
name. Later, you’llsee howyoucanaccess individualvalues stored ina list.
Next, youneed to define a newfunction—a fragment ofPythoncode whichcanbe called uponlater inthe program. Functions
are usefulfor avoidingcode repetitionand makingthe programeasier to understand. Ifyouhave a particular set ofinstructions
that are needed at multiple points inthe same program, usingdef to create a functionmeans you’llonlyhave to type themonce
—and onlyhave to change themina single place ifyoualter the programlater. Type the followinglines to define the gameOver
function:
def gameOver():
gameOverFont = pygame.font.Font
(‘freesansbold.ttf’, 72)
gameOverSurf = gameOverFont.render
(‘Game Over’, True, greyColour)
gameOverRect = gameOverSurf.get_rect()
gameOverRect.midtop = (320, 10)
playSurface.blit(gameOverSurf, gameOverRect)
pygame.display.flip()
time.sleep(5)
pygame.quit()
sys.exit()
As withloops, the code for a functionshould be indented. Everyline after the def instructionshould have four spaces at the start](https://image.slidesharecdn.com/rpiusersguide-210422224618/75/Guia-de-usuario-de-Raspberry-Pi-por-Eben-Upton-111-2048.jpg)
![travelling—stored indirection. Iftheyare opposite directions, the instructionis ignored and the snake continues inthe same
directionas before. Type the followinglines to set up the comparisons:
if changeDirection == ‘right’ and not
direction == ‘left’:
direction = changeDirection
if changeDirection == ‘left’ and not
direction == ‘right’:
direction = changeDirection
if changeDirection == ‘up’ and not
direction == ‘down’:
direction = changeDirection
if changeDirection == ‘down’ and not
direction == ‘up’:
direction = changeDirection
Withthe user’s input checked to make sure it makes sense, the snake—whichappears onthe screenas a series ofblocks—can
be moved. Duringeachturn, the snake moves a distance equalto the size ofone ofits blockysegments. Witheachsegment
measuring20 pixels, youcantellpygame to move the snake a single segment inanydirection. Type inthe followingcode:
if direction == ‘right’:
snakePosition[0] += 20
if direction == ‘left’:
snakePosition[0] -= 20
if direction == ‘up’:
snakePosition[1] -= 20
if direction == ‘down’:
snakePosition[1] += 20
The += and -= operators are used to change the value ofa variable bya certainamount:+= sets the variable to its previous value
plus the newvalue, while -= sets the variable to its previous value minus the newvalue. Bywayofexample,
snakePosition[0] += 20 is a shorthand wayofwritingsnakePosition[0] = snakePosition[0] + 20. The number in
square brackets followingthe snakePosition variable name is the positioninthe list beingaffected:the first value inthe
snakePosition list stores the snake’s positionalongthe Xaxis, while the second value stores the positionalongthe Yaxis.
Pythonbegins countingat zero, so the Xaxis is controlled withsnakePosition[0] and the Yaxis withsnakePosition[1].
Ifthe list were longer, additionalentries could be affected byincreasingthe number:[2], [3] and so on.
Althoughthe snakePosition list is always two values long, another list created at the start ofthe programis not:
snakeSegments. This list stores the locationofthe snake’s body, behind the head. As the snake eats raspberries and grows
longer, this list increases insize and provides the difficultyinthe game:as the player progresses, it becomes harder to avoid
hittingthe bodyofthe snake withthe head. Ifthe head hits the body, the snake dies and the game is over. Type the followingline
to make the snake’s bodygrow:
snakeSegments.insert(0,list(snakePosition))
This uses the insert instructionto insert a newvalue into the snakeSegments list:the current positionofthe snake. Eachtime
Pythonreaches this line, it willincrease the lengthofthe snake’s bodybyone segment, and locate that segment at the current
positionofthe snake’s head. To the player, it willlook as thoughthe snake is growing. However, youonlywant this to happen
whenthe snake eats a raspberry—otherwise the snake willjust growand grow. Type the followinglines:
if snakePosition[0] == raspberryPosition[0]
and snakePosition[1] == raspberryPosition[1]:
raspberrySpawned = 0
else:
snakeSegments.pop()
The first instructionchecks the Xand Ycoordinates ofthe snake’s head to see ifit matches the Xand Ycoordinates ofthe
raspberry—the target the player is chasing. Ifthe values match, the raspberryis considered to have beeneatenbythe snake—
and the raspberrySpawned variable is set to 0. The else instructiontells Pythonwhat to do ifthe raspberryhas not been
eaten:pop the earliest value fromthe snakeSegments list.
The pop instructionis simple but clever:it returns the oldest value fromthe list but also removes it, makingthe list one item
shorter. Inthe case ofthe snakeSegment list, it tells Pythonto delete the portionofthe snake’s bodyfarthest awayfromthe
head. To the player, it willlook as thoughthe entire snake has moved without growing—inreality, it grewat one end and shrank
at the other. Because ofthe else statement, the pop instructiononlyruns whena raspberryhas not beeneaten. Ifa raspberry
has beeneaten, the last entryinthe list doesn’t get deleted—so the snake grows insize byone segment.](https://image.slidesharecdn.com/rpiusersguide-210422224618/75/Guia-de-usuario-de-Raspberry-Pi-por-Eben-Upton-113-2048.jpg)
![At this point inthe program, it’s possible that the player has eatena raspberry. Agame inwhichonlya single raspberryis
available is boring, so type the followinglines to add a newraspberryback to the playingsurface ifthe player has eatenthe
existingraspberry:
if raspberrySpawned == 0:
x = random.randrange(1,32)
y = random.randrange(1,24)
raspberryPosition = [int(x*20),int(y*20)]
raspberrySpawned = 1
This sectionofcode checks to see ifthe raspberryhas beeneatenbytestingifthe raspberrySpawned variable is set to 0, and
ifso, the code picks a randomlocationonthe playingsurface usingthe random module youimported at the start ofthe program.
This locationis thenmultiplied bythe size ofa snake’s segment—20 pixels wide and 20 pixels tall—to give Pythona place on
the playingfield to positionthe newraspberry. It’s important that the locationofthe raspberryis set randomly:this prevents the
player fromlearningwhere the raspberrywillappear next. Finally, the raspberrySpawned variable is set back to 1, to make
sure that there willonlybe a single raspberryonthe playingsurface at anygiventime.
Nowyouhave the code required to make the snake move and grow, and cause raspberries to be eatenand created—a process
knowningamingas respawning. However, nothingis beingdrawnto the screen. Type the followinglines:
playSurface.fill(blackColour)
for position in snakeSegments:
pygame.draw.rect(playSurface,whiteColour,Rect
(position[0], position[1], 20, 20))
pygame.draw.rect(playSurface,redColour,Rect
(raspberryPosition[0], raspberryPosition[1], 20, 20))
pygame.display.flip()
These tellpygame to fillinthe background ofthe playingsurface inblack, drawthe snake’s head and bodysegments inwhite,
and finally, drawa raspberryinred. The last line, pygame.display.flip(), tells pygame to update the screen—without this
instruction, items willbe invisible to the player. Everytime youfinishdrawingobjects onto the screen, remember to use
pygame.display.flip() so the user cansee the changes.
Currently, it’s impossible for the snake to die. Agame where the player cannever die would rapidlyget boring, so enter the
followinglines to set up some scenarios for the snake’s death:
if snakePosition[0] > 620 or snakePosition[0] < 0:
gameOver()
if snakePosition[1] > 460 or snakePosition[1] < 0:
gameOver()
The first if statement checks to see ifthe snake has gone offthe playingsurface vertically, while the second if statement checks
ifthe snake has gone offthe playingsurface horizontally. Ineither case, it’s bad news for the snake:the gameOver function,
defined earlier inthe program, is called to print a message to the screenand quit the game. The snake should also die ifits head
hits anyportionofits body, so add the followinglines:
for snakeBody in snakeSegments[1:]:
if snakePosition[0] == snakeBody[0] and
snakePosition[1] == snakeBody[1]:
gameOver()
The for statement runs througheachofthe snake segments’ locations, fromthe second list entryto the end ofthe list, and
compares it to the current positionofthe snake’s head. It’s important to start the comparisonat the second entryusing
snakeSegments[1:] and not the first. The first entryis always set to the positionofthe head, and startingthe comparisonhere
would result ininstant deathfor the snake as soonas the game begins.
Finally, allthat is required for the game to be complete is to controlthe speed usingthe fpsClock variable. Without the variable,
whichyoucreated at the start ofthe program, the game would runtoo quicklyto play. Type inthe followingline to finishthe
program:
fpsClock.tick(20)
Ifyouthink the game is too easyor too slow, youcanincrease this number; or ifthe game is too hard or too fast, decrease the
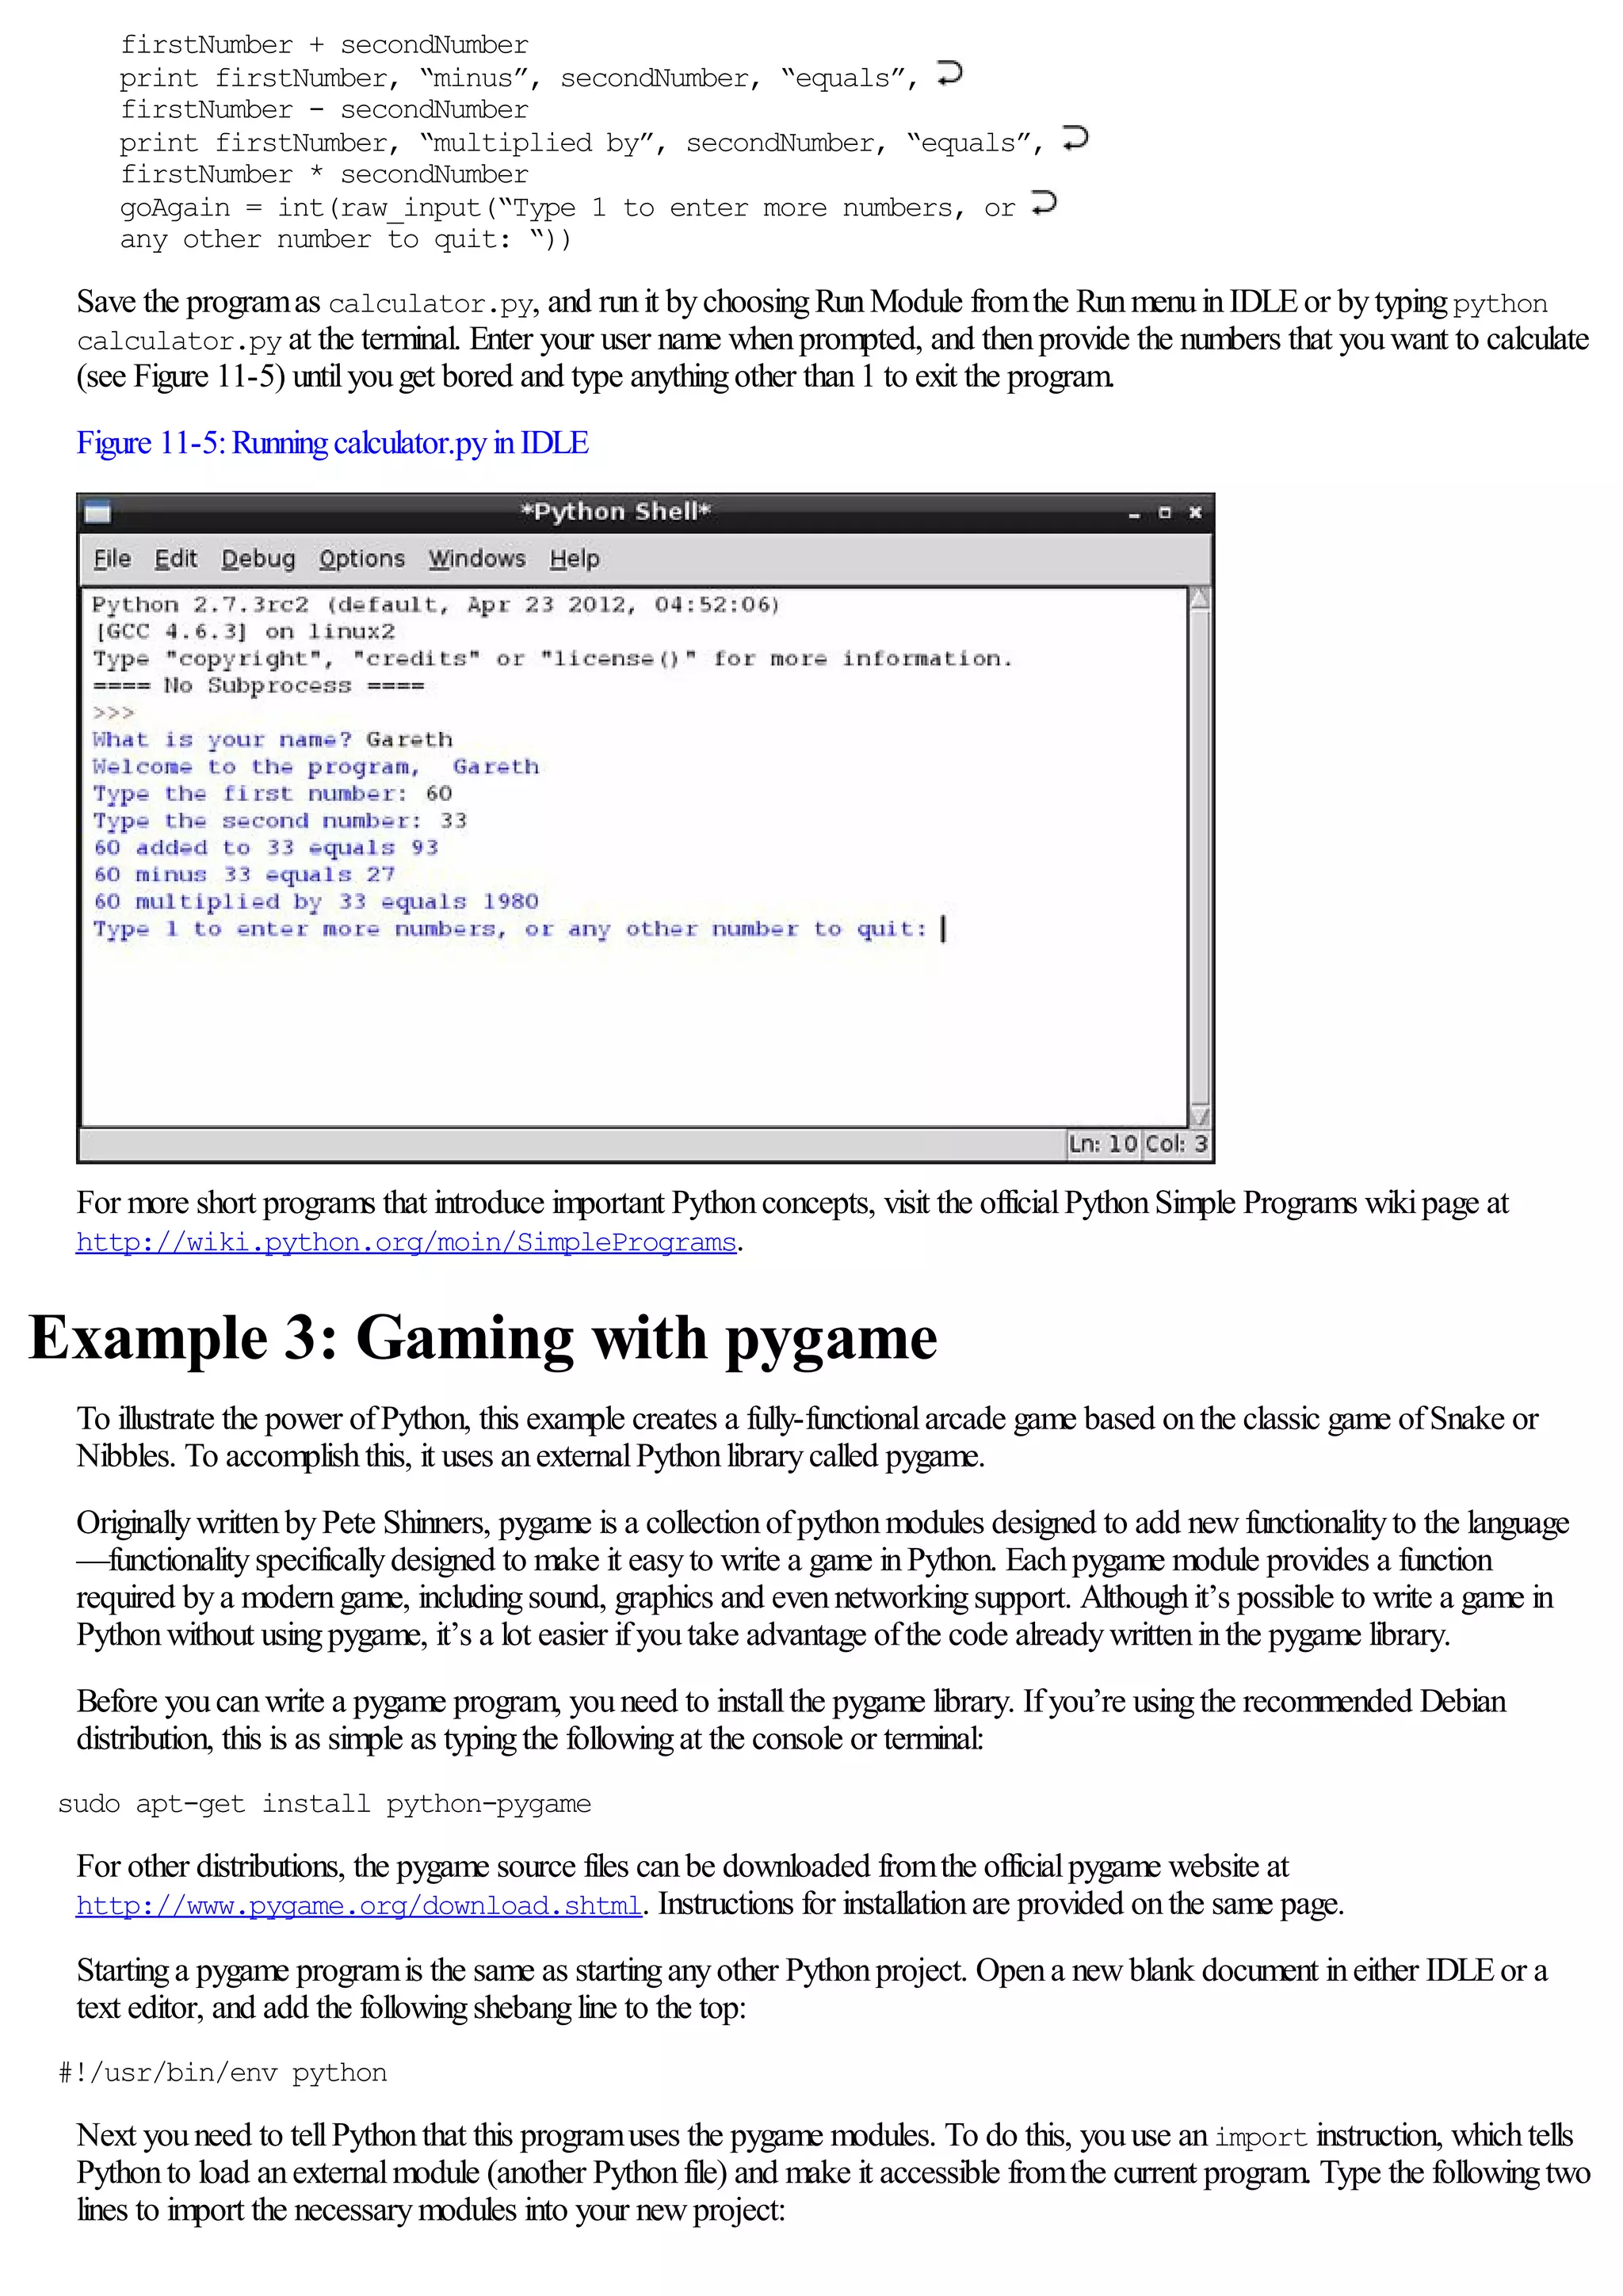
number. Save the programas raspberrysnake.py, and runit either byusingIDLE’s RunModule optioninthe Runmenuor
fromthe terminalbytypingpython raspberrysnake.py. The game willstart as soonas it has loaded (see Figure 11-6), so](https://image.slidesharecdn.com/rpiusersguide-210422224618/75/Guia-de-usuario-de-Raspberry-Pi-por-Eben-Upton-114-2048.jpg)
![practice to use all-capitalletters for their names—that wayit’s easyto see at glance whether a particular sectionofthe code is
usinga constant or a variable. Type the followingtwo lines into the program:
RPL_NAMREPLY = ‘353’
RPL_ENDOFNAMES = ‘366’
These are IRC status codes, provided bythe server to indicate whenparticular operations have completed. These are used by
the programto knowwhenit has received the required list ofnames fromthe IRC server. Next, set up the variables for the
server connectionbyenteringthe followinglines:
irc = {
‘host’ : ‘chat.freenode.net’,
‘port’ : 6667,
‘channel’ : ‘#raspiuserguide’,
‘namesinterval’ : 5
}
The first line tells Pythonto create a dict data type. Short for dictionary, this allows multiple variables to be stored ina single
master variable—inthis case, irc. These individualvariables canthenbe recalled later inthe program. Althoughyoucould write
this programwithout usingdicts to store variables, it would make the programsignificantlymore difficult to read. The dict begins
withthe openingcurlybrace, and ends withthe closingcurlybrace onthe finalline.
The host variable should be set to the fully-qualified domainname (FQDN) ofthe IRC server to whichthe programwill
connect. Inthis example, chat.freenode.net is used, but ifyouwant to customise the programto use a different server,
change the domainname here. The port variable tells the programwhichnetwork port IRC is runningon, whichwillusuallybe
6667. The channel variable tells Pythonwhichchannelto joininorder to monitor the users, while namesinterval controls
howlongthe programwaits to refreshthe list ofusers, measured inseconds.
Set up a second dict to store the user-specific variables bytypinginthe followinglines:
user = {
‘nick’ : ‘botnick’,
‘username’ : ‘botuser’,
‘hostname’ : ‘localhost’,
‘servername’ : ‘localhost’,
‘realname’ : ‘Raspberry Pi Names Bot’
}
As withirc, allthese variables are stored withina dict called user to make it clear whichvariables pertainto whichsection. The
nick variable should be set to the IRC nickname the programwilluse. Don’t use your usualnickname ifyou’re planningto
connect to the IRC server at the same time; instead, tryappending-bot to the end ofyour name to make it clear that the user is
a programrather thana realperson. Do the same withusername, and fillinthe realname variable witha descriptive message
about whomthe bot belongs to. The hostname and servername variables canbe left set to localhost, or altered to match
your Internet address.
The socket module requires the user to create a socket object. This object provides network connectivityto the rest ofthe
program. Create the socket object bytypinginthe followingline:
s = socket.socket(socket.AF_INET, socket.SOCK_STREAM)
Next, youneed to tellthe programto tryconnectingto the IRC server specified inthe variables at the start ofthe program. Type
the followinglines:
print ‘Connecting to %(host)s:%(port)s...’ % irc
try:
s.connect((irc[‘host’], irc[‘port’]))
except socket.error:
print ‘Error connecting to IRC server
%(host)s:%(port)s’ % irc
sys.exit(1)
The try and except commands are included inthis code for error handling. Ifthe systemfails to connect to the server—
because the Piisn’t connected to the Internet, for example, or because the server is downfor maintenance—the programwill
print anerror message and gracefullyexit. The s.connect line tells the socket module to tryconnectingto the IRC server, using
the host and port variables held inthe irc dict.
Ifthe programdoesn’t quit fromthe exception, it has successfullyconnected to the IRC server. Before youcanget a list of](https://image.slidesharecdn.com/rpiusersguide-210422224618/75/Guia-de-usuario-de-Raspberry-Pi-por-Eben-Upton-116-2048.jpg)
![names ina channel, however, youneed to identifyyourselfto the server and issue some commands usingthe send functionofthe
socket module. Type the followinglines into the program:
s.send(‘NICK %(nick)srn’ % user)
s.send(‘USER %(username)s %(hostname)s
%(servername)s :%(realname)srn’ % user)
s.send(‘JOIN %(channel)srn’ % irc)
s.send(‘NAMES %(channel)srn’ % irc)
The send functionworks inalmost exactlythe same wayas the print function, except that instead ofprintingto the standard
output—usuallythe terminalwindowor console—it sends the output throughthe network connection. Inthis case, the program
is sendingstrings oftext to the IRC server and tellingit to register the programusingthe nickname held inthe nick variable and
the user details held inthe username, hostname, servername and realname variables. Next, the programsends the
command to jointhe channelspecified inthe channel variable, and finally, it sends the command to receive the list ofusers in
that channel. Althoughthis example is tailored to IRC, the same basic principle canbe used to issue commands to anynetwork
service—withmodifications, this programcould be used to list the files onanFTP server, or unread emails ona POP3 server.
Receivingdata fromthe socket is a little more complicated. First, you’llneed to create anemptystringvariable that willact as the
receive buffer, holdingdata fromthe server as it’s received untilit canbe processed. Initialise the buffer bytypinginthe following
line:
read_buffer = ‘‘
Note that there are two single quotes after the equals sign, not one double quote.
Next, create anemptylist ,whichwillbe used to store the names ofusers, bytypingthe followingline:
names = []
The list data type is the same as youused to store the locations inthe RaspberrySnake game. Unlike a normalvariable, it can
store multiple values—inthis case, the names ofusers present inthe IRC channel.
The next step is to create aninfinite loop, duringwhichthe programwillcontinuouslyquerythe server for user names and print
themto the screen. Start the loop bytyping:
while True:
read_buffer += s.recv(1024)
The first line ofthe loop, followingwhile True:, tells the socket module to receive 1,024 bytes (1 KB) ofdata fromthe IRC
server and place it into the read_buffer variable. Because the += operator is used, rather thanjust =, the received data willbe
appended to anythingalreadyinthe buffer. The value of1024 bytes is more or less arbitrary.
The next step is to split the buffer into individuallines oftext, usingthe followingprogramlines:
lines = read_buffer.split(‘rn’)
read_buffer = lines.pop();
The first line sets the lines variable to a fullline oftext fromthe receive buffer, byusingthe split functionto find end ofline
characters—signified byrn. These characters onlyoccur at the end ofa line, so whenthe buffer has beensplit inthis wayyou
knowthat lines contains onlyfull-line responses fromthe server. The pop instructioninthe second line makes sure that onlyfull
lines are removed fromthe read_buffer:because responses fromthe server are read in1 KBchunks, it’s likelythat at any
giventime the buffer willcontainonlyfractions ofa line. Whenthat’s the case, the fractionis left inthe buffer readyto receive the
remainder ofthe line the next time the loop runs and the next 1 KBchunk is received fromthe server.
At this point, the lines variable contains a list offullresponses—fulllines—received fromthe server. Type the followingto
process these lines and find the names ofchannelparticipants:
for line in lines:
response = line.rstrip().split(‘ ‘, 3)
response_code = response[1]
if response_code == RPL_NAMREPLY:
names_list = response[3].split(‘:’)[1]
names += names_list.split(‘ ‘)
This runs througheveryline found inthe lines variable, and looks for the numericalIRC response code provided bythe server.
Althoughthere are plentyofdifferent response codes, this programis onlyinterested inthe two defined as constants at the start](https://image.slidesharecdn.com/rpiusersguide-210422224618/75/Guia-de-usuario-de-Raspberry-Pi-por-Eben-Upton-117-2048.jpg)
![ofthe program:353, whichmeans a list ofnames follows, and 366, whichmeans the list has ended. The if statement looks for
the first ofthese responses, and thenuses the split functionto retrieve these names and add themto the names list.
Now, the names list contains allthe names received fromthe server inresponse to the program’s query. This maynot be allthe
names, however:untilthe 366 response, whichsignals the end ofthe member names, is received, the list is incomplete. That is
whythe last line—names += names_list.split(‘ ‘)—is appendingthe newly-received names to the existinglist, rather
thanblankingit out entirely:eachtime that sectionofthe code runs, the programis onlylikelyto have received a sub-sectionof
the entire member list. To tellPythonwhat to do whenthe fulllist has beenreceived, enter the followinglines:
if response_code == RPL_ENDOFNAMES:
# Display the names
print ‘rnUsers in %(channel)s:’ % irc
for name in names:
print name
names = []
This tells Pythonthat whenthe 366 response has beenreceived, it should print out the now-complete list ofnames to the
standard output before blankingthe names list again. This last line—names = []—is important:without it, eachtime the loop
runs it willadd users’ names to the list eventhoughtheyalreadyexist fromanearlier run.
Finally, finishthe programbyenteringthe followinglines:
time.sleep(irc[‘namesinterval’])
s.send(‘NAMES %(channel)srn’ % irc)
This tells Pythonto wait the namesinterval number ofseconds before sendinganother request for user names and beginning
the loop again. Be carefulto set namesinterval to a reasonable value—ifthe IRC server receives too manyrequests intoo
short a space oftime, it mayforciblydisconnect youfor flooding.
Save the programas ircuserlist.py, and runit either byusingIDLE’s RunModule optioninthe Runmenuor fromthe
terminalbytypingpython ircuserlist.py. Whenthe programfirst runs, it maytake a while to connect to the server; once
connected, however, the list ofnames (see Figure 11-7) should refreshquickly. To quit the program, press CRTL+ C.
Figure 11-7:UsingPythonto list users inanIRC channel
Afullcopyofthe programlistingfor the IRC user list is included inAppendixA, “PythonRecipes”, and onthe RaspberryPi
User Guide website at http://www.wiley.com/go/raspberrypiuserguide. Downloadingthe source code fromthe
website willsave yousome typing, but enteringthe code byhand is a good wayofensuringthat youunderstand what each
sectiondoes.
Further Reading](https://image.slidesharecdn.com/rpiusersguide-210422224618/75/Guia-de-usuario-de-Raspberry-Pi-por-Eben-Upton-118-2048.jpg)


![Appendix A: Python Recipes
The following recipes provide the programcode for Example 3 and Example 4 inChapter 11, “AnIntroductionto Python”,
and a sample solutionfor the combined input-output programsuggested inChapter 12, “Hardware Hacking”. Eachrecipe is also
available for download fromthe RaspberryPiUser Guide website at http://www.wiley.com/go/raspberrypiuserguide.
Ifyou’re typingthe code inbyhand, look out for the symbol:this indicates that the line is wrapped due to space constraints in
the book. Ifyousee the symbolat the end ofa line, don’t press Enter untilyoureachthe end that doesn’t have a symbolpresent.
Raspberry Snake (Chapter 11, Example 3)
#!/usr/bin/env python
# Raspberry Snake
# Written by Gareth Halfacree for the Raspberry Pi User Guide
import pygame, sys, time, random
from pygame.locals import *
pygame.init()
fpsClock = pygame.time.Clock()
playSurface = pygame.display.set_mode((640, 480))
pygame.display.set_caption(‘Raspberry Snake’)
redColour = pygame.Color(255, 0, 0)
blackColour = pygame.Color(0, 0, 0)
whiteColour = pygame.Color(255, 255, 255)
greyColour = pygame.Color(150, 150, 150)
snakePosition = [100,100]
snakeSegments = [[100,100],[80,100],[60,100]]
raspberryPosition = [300,300]
raspberrySpawned = 1
direction = ‘right’
changeDirection = direction
def gameOver():
gameOverFont = pygame.font.Font(‘freesansbold.ttf’, 72)
gameOverSurf = gameOverFont.render
(‘Game Over’, True, greyColour)
gameOverRect = gameOverSurf.get_rect()
gameOverRect.midtop = (320, 10)
playSurface.blit(gameOverSurf, gameOverRect)
pygame.display.flip()
time.sleep(5)
pygame.quit()
sys.exit()
while True:
for event in pygame.event.get():
if event.type == QUIT:
pygame.quit()
elif event.type == KEYDOWN:
if event.key == K_RIGHT or event.key == ord(‘d’):
changeDirection = ‘right’
if event.key == K_LEFT or event.key == ord(‘a’):
changeDirection = ‘left’
if event.key == K_UP or event.key == ord(‘w’):
changeDirection = ‘up’
if event.key == K_DOWN or event.key == ord(‘s’):
changeDirection = ‘down’
if event.key == K_ESCAPE:
pygame.event.post(pygame.event.Event(QUIT))
if changeDirection == ‘right’ and not direction == ‘left’:
direction = changeDirection
if changeDirection == ‘left’ and not direction == ‘right’:
direction = changeDirection
if changeDirection == ‘up’ and not direction == ‘down’:
direction = changeDirection
if changeDirection == ‘down’ and not direction == ‘up’:
direction = changeDirection
if direction == ‘right’:
snakePosition[0] += 20](https://image.slidesharecdn.com/rpiusersguide-210422224618/75/Guia-de-usuario-de-Raspberry-Pi-por-Eben-Upton-147-2048.jpg)
![if direction == ‘left’:
snakePosition[0] -= 20
if direction == ‘up’:
snakePosition[1] -= 20
if direction == ‘down’:
snakePosition[1] += 20
snakeSegments.insert(0,list(snakePosition))
if snakePosition[0] == raspberryPosition[0] and
snakePosition[1] == raspberryPosition[1]:
raspberrySpawned = 0
else:
snakeSegments.pop()
if raspberrySpawned == 0:
x = random.randrange(1,32)
y = random.randrange(1,24)
raspberryPosition = [int(x*20),int(y*20)]
raspberrySpawned = 1
playSurface.fill(blackColour)
for position in snakeSegments:
pygame.draw.rect(playSurface,whiteColour,Rect
(position[0], position[1], 20, 20))
pygame.draw.rect(playSurface,redColour,Rect
(raspberryPosition[0], raspberryPosition[1], 20, 20))
pygame.display.flip()
if snakePosition[0] > 620 or snakePosition[0] < 0:
gameOver()
if snakePosition[1] > 460 or snakePosition[1] < 0:
for snakeBody in snakeSegments[1:]:
if snakePosition[0] == snakeBody[0] and
snakePosition[1] == snakeBody[1]:
gameOver()
fpsClock.tick(30)
IRC User List (Chapter 11, Example 4)
#!/usr/bin/env python
# IRC User List
# Written by Tom Hudson for the Raspberry Pi User Guide
# http://tomhudson.co.uk/
import sys, socket, time
RPL_NAMREPLY = ‘353’
RPL_ENDOFNAMES = ‘366’
irc = {
‘host’: ‘chat.freenode.net’,
‘port’: 6667,
‘channel’: ‘#raspiuserguide’,
‘namesinterval’: 5
}
user = {
‘nick’: ‘botnick’,
‘username’: ‘botuser’,
‘hostname’: ‘localhost’,
‘servername’: ‘localhost’,
‘realname’: ‘Raspberry Pi Names Bot’
}
s = socket.socket(socket.AF_INET, socket.SOCK_STREAM)
print ‘Connecting to %(host)s:%(port)s...’ % irc
try:
s.connect((irc[‘host’], irc[‘port’]))
except socket.error:
print ‘Error connecting to IRC server
%(host)s:%(port)s’ % irc
sys.exit(1)
s.send(‘NICK %(nick)srn’ % user)
s.send(‘USER %(username)s %(hostname)s %(servername)s :
%(realname)srn’ % user)
s.send(‘JOIN %(channel)srn’ % irc)
s.send(‘NAMES %(channel)srn’ % irc)
read_buffer = ‘’](https://image.slidesharecdn.com/rpiusersguide-210422224618/75/Guia-de-usuario-de-Raspberry-Pi-por-Eben-Upton-148-2048.jpg)
![names = []
while True:
read_buffer += s.recv(1024)
lines = read_buffer.split(‘rn’)
read_buffer = lines.pop();
for line in lines:
response = line.rstrip().split(‘ ‘, 3)
response_code = response[1]
if response_code == RPL_NAMREPLY:
names_list = response[3].split(‘:’)[1]
names += names_list.split(‘ ‘)
if response_code == RPL_ENDOFNAMES:
print ‘rnUsers in %(channel)s:’ % irc
for name in names:
print name
names = []
time.sleep(irc[‘namesinterval’])
s.send(‘NAMES %(channel)srn’ % irc)
GPIO Input and Output (Chapter 12)
#!/usr/bin/env python
# Raspberry Pi GPIO Input/Output example
# Written by Gareth Halfacree for the Raspberry Pi User Guide
import RPi.GPIO as GPIO
GPIO.setup(11, GPIO.OUT)
GPIO.setup(12, GPIO.IN)
GPIO.output(11, False)
while True:
input_value = GPIO.input(12)
if input_value == False:
print “The button has been pressed. Lighting LED.”
GPIO.output(11, True)
while input_value == False:
input_value = GPIO.input(12)
print “The button has been released. Extinguishing LED.”
if input_value == True:
GPIO.output(11, False)](https://image.slidesharecdn.com/rpiusersguide-210422224618/75/Guia-de-usuario-de-Raspberry-Pi-por-Eben-Upton-149-2048.jpg)


This document is a user guide for the Raspberry Pi that provides an overview of what the Raspberry Pi is and what it can be used for. The guide has four parts that cover connecting and setting up the Raspberry Pi, using it for tasks like media playback, productivity work, and web serving, programming and hardware hacking with the Raspberry Pi, and includes appendices with Python recipes and HDMI display modes. It aims to equip users with the skills to be able to program and fully utilize the Raspberry Pi.