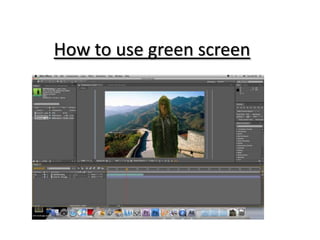
To use green screen:
1. Record footage in front of a green screen without shadows to eliminate extra work.
2. Import the footage into Adobe After Effects and apply the Color Key effect to remove the green.
3. Adjust the Color Tolerance and add multiple Color Keys if needed to remove all green without black spots on the subject.
Movie Making with iMovie
Want more ideas to use iMovie with iPads in the classroom? Join us to explore how to create workflows for documentation, peer feedback, self reflection, creating stories, Pecha-Kucha, photo essays, field trips, creating instructional videos, slow motion analysis, animated films and so much more!
Adobe Premiere Pro How to Use Ultra Key Effect.
The Ultra Key Effect in Adobe Premiere Pro is a powerful tool that allows you to remove the background from a video clip and replace it with a different background. This is a useful technique for creating green screen videos or for replacing the background in a shot with a more suitable one.
In this presentation, we will discuss how to use the Ultra Key Effect in Adobe Premiere Pro.
Step 1: Import your footage. The first step is to import the footage that you want to use in your video. Make sure that the footage has a green or blue screen background, as this will make it easier to remove the background using the Ultra Key Effect.
Step 2: Drag the footage to the timeline. Drag the footage to the timeline and place it on the track that you want to use. Make sure that the footage is selected.
Step 3: Apply the Ultra Key Effect. To apply the Ultra Key Effect, go to the Effects panel and search for Ultra Key. Drag the effect onto the footage in the timeline. This will open the Ultra Key panel in the Effects Controls panel.
Step 4: Choose the Key Color. The Key Color setting in the Ultra Key panel allows you to select the color that you want to remove from the footage. By default, the color is set to green, but you can change it to blue or any other color that you want to remove.
Step 5: Adjust the Matte Generation Settings. The Matte Generation Settings in the Ultra Key panel control how the background is removed from the footage. You can adjust the settings to make the background removal more accurate or less accurate. The Matte Generation Settings include Matte Cleanup, Matte Generation, and Matte Edges.
Step 6: Adjust the Output Settings. The Output Settings in the Ultra Key panel control how the removed background is replaced with a new background. You can choose to replace the background with a solid color, an image, or another video clip. You can also adjust the opacity and blend mode of the new background to make it blend more seamlessly with the footage.
Step 7: Fine-tune the settings After applying the Ultra Key Effect, you may need to fine-tune the settings to achieve the desired effect. You can adjust the Matte Generation and Output Settings to make the background removal and replacement more accurate. You can also adjust the opacity and blend mode of the new background to make it blend more seamlessly with the footage.
Step 8: Save your settings as a preset If you want to save your Ultra Key settings as a preset, you can do so by clicking on the menu icon in the Ultra Key panel and selecting Save Preset. Give your preset a name and click OK. You can then apply the preset to other clips in your project.
In conclusion, the Ultra Key Effect in Adobe Premiere Pro is a powerful tool that allows you to remove the background from a video clip and replace it with a different background. By following these steps, you can create professional-quality green screen videos or replace the background in
iMovie Making with iPads
How can you use iMovie with iPads in the classroom? Well, your imagination is just the start. Everything from slow motion videography to documentation, to presentations, assessments and everything in between. This academy is designed to help educators design, structure, manage, and issue film challenges to students in any content area. Digital storytelling is an important 21st century skill and this academy will enable you to help your students tell a digital stories masterfully.
Want more ideas to use iMovie with iPads in the classroom? Join us to explore how to create workflows for documentation, peer feedback, self reflection, creating stories, Pecha-Kucha, photo essays, field trips, creating instructional videos, slow motion analysis, animated films and so much more!
How can you use iMovie with iPads in the classroom? Well, your imagination is just the start. Everything from slow motion videography to documentation, to presentations, assessments and everything in between. This academy is designed to help educators design, structure, manage, and issue film challenges to students in any content area. Digital storytelling is an important 21st century skill and this academy will enable you to help your students tell a digital stories masterfully.
Generating a custom Ruby SDK for your web service or Rails API using Smithyg2nightmarescribd
Have you ever wanted a Ruby client API to communicate with your web service? Smithy is a protocol-agnostic language for defining services and SDKs. Smithy Ruby is an implementation of Smithy that generates a Ruby SDK using a Smithy model. In this talk, we will explore Smithy and Smithy Ruby to learn how to generate custom feature-rich SDKs that can communicate with any web service, such as a Rails JSON API.
Kubernetes & AI - Beauty and the Beast !?! @KCD Istanbul 2024Tobias Schneck
As AI technology is pushing into IT I was wondering myself, as an “infrastructure container kubernetes guy”, how get this fancy AI technology get managed from an infrastructure operational view? Is it possible to apply our lovely cloud native principals as well? What benefit’s both technologies could bring to each other?
Let me take this questions and provide you a short journey through existing deployment models and use cases for AI software. On practical examples, we discuss what cloud/on-premise strategy we may need for applying it to our own infrastructure to get it to work from an enterprise perspective. I want to give an overview about infrastructure requirements and technologies, what could be beneficial or limiting your AI use cases in an enterprise environment. An interactive Demo will give you some insides, what approaches I got already working for real.
UiPath Test Automation using UiPath Test Suite series, part 4DianaGray10
Welcome to UiPath Test Automation using UiPath Test Suite series part 4. In this session, we will cover Test Manager overview along with SAP heatmap.
The UiPath Test Manager overview with SAP heatmap webinar offers a concise yet comprehensive exploration of the role of a Test Manager within SAP environments, coupled with the utilization of heatmaps for effective testing strategies.
Participants will gain insights into the responsibilities, challenges, and best practices associated with test management in SAP projects. Additionally, the webinar delves into the significance of heatmaps as a visual aid for identifying testing priorities, areas of risk, and resource allocation within SAP landscapes. Through this session, attendees can expect to enhance their understanding of test management principles while learning practical approaches to optimize testing processes in SAP environments using heatmap visualization techniques
What will you get from this session?
1. Insights into SAP testing best practices
2. Heatmap utilization for testing
3. Optimization of testing processes
4. Demo
Topics covered:
Execution from the test manager
Orchestrator execution result
Defect reporting
SAP heatmap example with demo
Speaker:
Deepak Rai, Automation Practice Lead, Boundaryless Group and UiPath MVP
Epistemic Interaction - tuning interfaces to provide information for AI supportAlan Dix
Paper presented at SYNERGY workshop at AVI 2024, Genoa, Italy. 3rd June 2024
https://alandix.com/academic/papers/synergy2024-epistemic/
As machine learning integrates deeper into human-computer interactions, the concept of epistemic interaction emerges, aiming to refine these interactions to enhance system adaptability. This approach encourages minor, intentional adjustments in user behaviour to enrich the data available for system learning. This paper introduces epistemic interaction within the context of human-system communication, illustrating how deliberate interaction design can improve system understanding and adaptation. Through concrete examples, we demonstrate the potential of epistemic interaction to significantly advance human-computer interaction by leveraging intuitive human communication strategies to inform system design and functionality, offering a novel pathway for enriching user-system engagements.
The Art of the Pitch: WordPress Relationships and SalesLaura Byrne
Clients don’t know what they don’t know. What web solutions are right for them? How does WordPress come into the picture? How do you make sure you understand scope and timeline? What do you do if sometime changes?
All these questions and more will be explored as we talk about matching clients’ needs with what your agency offers without pulling teeth or pulling your hair out. Practical tips, and strategies for successful relationship building that leads to closing the deal.
JMeter webinar - integration with InfluxDB and GrafanaRTTS
Watch this recorded webinar about real-time monitoring of application performance. See how to integrate Apache JMeter, the open-source leader in performance testing, with InfluxDB, the open-source time-series database, and Grafana, the open-source analytics and visualization application.
In this webinar, we will review the benefits of leveraging InfluxDB and Grafana when executing load tests and demonstrate how these tools are used to visualize performance metrics.
Length: 30 minutes
Session Overview
-------------------------------------------
During this webinar, we will cover the following topics while demonstrating the integrations of JMeter, InfluxDB and Grafana:
- What out-of-the-box solutions are available for real-time monitoring JMeter tests?
- What are the benefits of integrating InfluxDB and Grafana into the load testing stack?
- Which features are provided by Grafana?
- Demonstration of InfluxDB and Grafana using a practice web application
To view the webinar recording, go to:
https://www.rttsweb.com/jmeter-integration-webinar
Software Delivery At the Speed of AI: Inflectra Invests In AI-Powered QualityInflectra
In this insightful webinar, Inflectra explores how artificial intelligence (AI) is transforming software development and testing. Discover how AI-powered tools are revolutionizing every stage of the software development lifecycle (SDLC), from design and prototyping to testing, deployment, and monitoring.
Learn about:
• The Future of Testing: How AI is shifting testing towards verification, analysis, and higher-level skills, while reducing repetitive tasks.
• Test Automation: How AI-powered test case generation, optimization, and self-healing tests are making testing more efficient and effective.
• Visual Testing: Explore the emerging capabilities of AI in visual testing and how it's set to revolutionize UI verification.
• Inflectra's AI Solutions: See demonstrations of Inflectra's cutting-edge AI tools like the ChatGPT plugin and Azure Open AI platform, designed to streamline your testing process.
Whether you're a developer, tester, or QA professional, this webinar will give you valuable insights into how AI is shaping the future of software delivery.
Neuro-symbolic is not enough, we need neuro-*semantic*Frank van Harmelen
Neuro-symbolic (NeSy) AI is on the rise. However, simply machine learning on just any symbolic structure is not sufficient to really harvest the gains of NeSy. These will only be gained when the symbolic structures have an actual semantics. I give an operational definition of semantics as “predictable inference”.
All of this illustrated with link prediction over knowledge graphs, but the argument is general.
Essentials of Automations: Optimizing FME Workflows with ParametersSafe Software
Are you looking to streamline your workflows and boost your projects’ efficiency? Do you find yourself searching for ways to add flexibility and control over your FME workflows? If so, you’re in the right place.
Join us for an insightful dive into the world of FME parameters, a critical element in optimizing workflow efficiency. This webinar marks the beginning of our three-part “Essentials of Automation” series. This first webinar is designed to equip you with the knowledge and skills to utilize parameters effectively: enhancing the flexibility, maintainability, and user control of your FME projects.
Here’s what you’ll gain:
- Essentials of FME Parameters: Understand the pivotal role of parameters, including Reader/Writer, Transformer, User, and FME Flow categories. Discover how they are the key to unlocking automation and optimization within your workflows.
- Practical Applications in FME Form: Delve into key user parameter types including choice, connections, and file URLs. Allow users to control how a workflow runs, making your workflows more reusable. Learn to import values and deliver the best user experience for your workflows while enhancing accuracy.
- Optimization Strategies in FME Flow: Explore the creation and strategic deployment of parameters in FME Flow, including the use of deployment and geometry parameters, to maximize workflow efficiency.
- Pro Tips for Success: Gain insights on parameterizing connections and leveraging new features like Conditional Visibility for clarity and simplicity.
We’ll wrap up with a glimpse into future webinars, followed by a Q&A session to address your specific questions surrounding this topic.
Don’t miss this opportunity to elevate your FME expertise and drive your projects to new heights of efficiency.
Builder.ai Founder Sachin Dev Duggal's Strategic Approach to Create an Innova...Ramesh Iyer
In today's fast-changing business world, Companies that adapt and embrace new ideas often need help to keep up with the competition. However, fostering a culture of innovation takes much work. It takes vision, leadership and willingness to take risks in the right proportion. Sachin Dev Duggal, co-founder of Builder.ai, has perfected the art of this balance, creating a company culture where creativity and growth are nurtured at each stage.
2. Step 1
Record the footage in front of the green screen making sure
nothing apart from the green screen is in shot. Also try to
eliminate all shadows on the green screen as it will change the
shade of the green screen which makes for extra work in after
effects.
3. Step 2
Upload the footage onto your
computer and import it into adobe
after effects making sure the file is the
right format e.g. mpeg
4. Step 3
Next go to effects and effects on the right
hand toolbar click on colour key and drag it
onto the video clip.
5. Step 4
No that colour key has been selected go to the left had side tool bar and click on key
colour then click on the green part of the video clip and increase the colour tolerance as
much as possible without getting any black spots on the person in the footage. Keep
doing this using new colour keys until all of the green has gone
6. Step 5 (optional)
Select edge feathering and increase the tolerance to sharper up the edges of the figure in
the footage which will make the final footage more realistic and eliminate any green
outlines.
7. Step 6
Import a video or image into after effects making sure it is the right format then drag the file
into the sequence. Then use the colour correction tool to try and match up the two videos so
that they look like they are at least similar