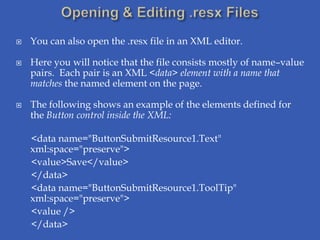
   Many websites are accessed by a wide variety of
    people who often live in different countries and speak
    a variety of languages.
   To effectively reach these people, your site should
    adapt to their language and culture.


   Supporting many different display types and input
    devices that can be used to access a website.
   Making websites usable by people of all abilities and
    disabilities.
   To display an ASP.NET page in one of several
    different languages would require the person
    translating the Web site to know how to write code.

   Instead, you can externalize the items requiring
    translation and look these items up at run time.

   This allows a nontechnical translator to work
    independent of the code.

   It also saves you from compiling your application
    when adding another language.
   ASP.NET uses Resource files to support multiple
    languages.

   A Resource file contains a language-specific set of text
    for a page or the entire site.

   Your code accesses a resource file based on the user’s
    requested language.

   If no resource file exists for the given request, ASP.NET
    uses the default language setting for the site.

   There are two types of resources in ASP.NET:
    Local Resources and Global Resources.
   Local resources must be stored in the special folder
    App_LocalResources.

   Each local resource file is page-specific. Therefore, it
    is named using the page name as in
    <PageName>.aspx.resx.

   For example, to create a resource file for the
    Default.aspx page, you would create a file called
    Default.aspx.resx.

   This becomes the default base resource file for the
    page. ASP.NET uses this file if it cannot find a match
    for the user’s requested language-culture setting.
   You create language-specific versions by copying the
    resource file and renaming it to include the given language
    information as in <PageName>.aspx.<languageId>.resx.

   For example, a Spanish version of a page would be named
    Default.aspx.es.resx. A German file would be named
    Default.aspx.de.resx.


   You add a culture designation to your resource by copying
    the language-specific version and renaming it to include the
    given culture information as in
    <PageName>.aspx.<languageId>-<cultureId>.resx

   For example, a Spanish (es) resource file designated for
    Mexico (mx) would be named as Default.aspx.es-mx.resx
    Visual Studio can automatically generate the default version
     of your local resource file by extracting the key string-based
     properties of page and control elements into a resource
     (.resx) file.

1.   Open your page in Visual Studio in Design mode.
2.   From the Tools menu, select Generate Local Resource.
     This causes Visual Studio to perform the following tasks:

    Create the App_LocalResources folder (if necessary).
    Generate an Extensible Markup Language (XML)-based
     local resource file for the Web page in the
     App_LocalResources folder.
    This file will contain resource settings for page and control
     properties like Text, ToolTip, Title, Caption, and other string-
     based properties.
   The .resx file can be opened and edited using Visual
    Studio’s resource file editor.
   Notice many of the string values were set already based
    on the values that were defined in the markup.
   You can also open the .resx file in an XML editor.

   Here you will notice that the file consists mostly of name–value
    pairs. Each pair is an XML <data> element with a name that
    matches the named element on the page.

   The following shows an example of the elements defined for
    the Button control inside the XML:

    <data name="ButtonSubmitResource1.Text"
    xml:space="preserve">
    <value>Save</value>
    </data>
    <data name="ButtonSubmitResource1.ToolTip"
    xml:space="preserve">
    <value />
    </data>
   You typically create culture- and language-specific
    resource files by first creating a default resource file.

   You can use this default file as a base.

   You copy and paste it to create a new resource file for the
    target language or culture and name the file accordingly.

   You then need to modify the resource values for the
    new language or culture.
1.   Open Microsoft Internet Explorer. From the Tools
     menu, select Internet Options to launch the Internet
     Options dialog box.
2.   On the General tab, click Languages in the Appearance
     group. This opens the Language Preference dialog box.
3.   In the Language Preference dialog box, click Add.
4.   In the Add Language dialog box, under Language, select
     the language and culture you want to test, and then click
     OK.
    When you are done testing, remember to reset your
     browser to your actual preferred language and culture.
   Global resource are not page-specific resources like a local
    resource.

   Rather, global resources are designed for when you need
    to access a single resource from multiple Web pages in
    your site.

   Global resources are still .resx files. You still create a
    default version and one for each language and culture
    you intend to support. The file naming scheme remains
    the same as for local resource files.

   However, global resource files are stored in the
    App_GlobalResources folder at the root of an application.
   In Solution Explorer, right-click the root of your Web site.
    Select Add ASP.NET Folder, and then select the
    App_GlobalResources suboption. This will add a folder of the
    same name to the root of your site.

   Next, right-click the App_GlobalResources folder and select
    Add New Item.

   In the Add New Item dialog box, select Resource File. In the
    Name text box, type any file name with a .resx extension.

   Open the new resource file in Visual Studio. Visual Studio
    displays a table-like format for adding and editing resources.
    From here you can add strings, images, icons, audio, files,
    and other resources.

   Once you have defined your default resource file, you copy
    and paste it to create resource files for different languages.
1.   Open your page in Design view in Visual Studio. View
     the given control’s Property tab. Select the (Expressions)
     property (in the Data category). Click the ellipsis (…)
     button next to the property to launch the control’s
     Expressions dialog box.
2.   From the Bindable Properties list, select a property that
     you want to bind to a resource.
3.   From the Expression type list, select Resources.
4.   In the Expression Properties list, set ClassKey to the
     name of your global resource file (without the extension).
     Under that, set ResourceKey to the name of the resource
     within the resource file.
5.   Click OK to close the dialog box.
   Once set, Visual Studio displays the default resource
    value for the given control in Design view. Of course,
    this will be changed to display the language-specific
    resource when a user visits the Web page.

   Within the page markup, Visual Studio updates the
    control’s Text property to call the resource.

   For example, if binding a Label control’s Text property
    to a message named Greeting in the LocalizedText.resx
    global resource, the markup looks as follows:

    <asp:Label id="LabelWelcome" runat="server"
    Text="<%$ Resources:LocalizedText, Greeting
    %>"></asp:Label>
   You can also access resource values programmatically
    using the syntax Resources.Resource-File.Resource.

   Label1.Text = Resources.LocalizedText.Greeting;

   After saving global resources, Visual Studio creates a
    strongly typed class of the Resources.Resource object for
    each resource file. You access the class through the file
    name of the global resource file. Each resource in the file
    is a member of the class.
   If, however, your resource files are not available at design
    time, Visual Studio cannot generate these classes. In this
    case, you must use the GetLocalResourceObject and
    GetGlobalResourceObject methods.

   To use the GetLocalResourceObject method, simply provide
    the name of the resource.

   To use GetGlobalResourceObject, provide both the file name
    (without the extension) and the resource name.

   Button1.Text = GetLocalResourceObject("Button1.Text").ToString();
   Image1.ImageUrl =
    (String)GetGlobalResourceObject("WebResourcesGlobal", "LogoUrl");
   Avoid using absolute positioning and sizes for
    controls
   Use the entire width and height of forms (<table
    width=100%>)
   Size elements relative to the overall size of the
    form
   Use a separate table cell for each control
   Avoid enabling the NoWrap property in tables
   Avoid specifying the Align property in tables
   In an ASP.NET Web page, you use two different Page
    properties to set language and culture:

   Culture This object determines the results of culture-
    dependent functions, such as the date, number, and
    currency formatting.

   UICulture This property determines which global or local
    resources are loaded for the page. You can define
    UICulture with either neutral or specific cultures.

   You define the Culture and UICulture properties by
    overriding the page’s InitializeCulture method.

   From this method, define the Culture and UICulture
    properties, and then call the page’s base InitializeCulture
    method.
   You can also retrieve an array of all available
    cultures by calling the
    System.Globalization.CultureInfo.GetCultures
    method.
   Pass this method a CultureTypes enumeration that
    specifies which subset of available cultures you
    want to list.
   The most useful CultureTypes values are the
    following:
•   AllCultures
•   NeutralCultures
•   Specifi cCultures
   To define the culture for an entire Web site, add a
    <globalization> section to the Web.confi gfile, and
    then set the UICulture and Culture attributes, as
    the following sample demonstrates:
   <globalization uiculture="es" culture="es-MX" />

   To declare a culture for a Web page, define the
    UICulture and Culture attributes of the @Page
    directive, as shown here:
   <%@ Page uiculture="es" culture="es-MX" %>
   You should recognize the need to make your
    website usable for those that need large text and
    nontraditional input devices.

   For example, many users do not use a
    conventional mouse.

   Others use screen readers to read the text on Web
    sites rather than displaying it on a monitor.
   Through the Web Accessibility Initiative (WAI), the
    W3C has created the Web Content Accessibility
    Guidelines (WCAG).

   The U.S. government has also created accessibility
    standards in Section 508 of the Rehabilitation Act.

   Depending on the organization for which you are
    developing a Web application, you might be required
    to conform your application to these standards.

   The Section 508 guidelines are conceptually similar to
    the WCAG guidelines.
   ASP.NET controls are designed to be accessible by
    default. For example, login controls such as Login,
    ChangePassword, PasswordRecovery, and
    CreateUserWizard use text boxes with associated
    labels to help a user who uses a screen reader or
    who does not use a mouse.

   These controls also use input controls with tab
    index settings to make data entry without a mouse
    easier.
   Describe every image by providing alt text using
    the AlternateText property
   Use solid colors for background and use
    contrasting colors for text
   Create a flexible page layout that scales correctly
    when text size is increased
   Set the Table.Caption property to a description of
    the table
   Provide a way to identify column headers
   Avoid defining specific font sizes
   Avoid requiring client scripts
   Set the DefaultFocus property for a form to place
    the cursor in a logical location where data entry
    normally begins.

   Define the tab order in a logical way so that a
    user can complete forms without using a mouse

   Specify default buttons for forms and Panel
    controls by setting the DefaultButton property

   Provide useful link text
   Define access keys for button controls by setting
    the AccessKey property
   Use Label controls to define access keys for text
    boxes
   Use the Panel control to create subdivisions in a
    form and define the Panel.GroupingText property
    with a description of the controls in that panel
   Specify meaningful error messages in the Text
    and ErrorMessage properties of validator controls

Globalization and accessibility

  • 2.
    Many websites are accessed by a wide variety of people who often live in different countries and speak a variety of languages.  To effectively reach these people, your site should adapt to their language and culture.  Supporting many different display types and input devices that can be used to access a website.  Making websites usable by people of all abilities and disabilities.
  • 3.
    To display an ASP.NET page in one of several different languages would require the person translating the Web site to know how to write code.  Instead, you can externalize the items requiring translation and look these items up at run time.  This allows a nontechnical translator to work independent of the code.  It also saves you from compiling your application when adding another language.
  • 4.
    ASP.NET uses Resource files to support multiple languages.  A Resource file contains a language-specific set of text for a page or the entire site.  Your code accesses a resource file based on the user’s requested language.  If no resource file exists for the given request, ASP.NET uses the default language setting for the site.  There are two types of resources in ASP.NET: Local Resources and Global Resources.
  • 5.
    Local resources must be stored in the special folder App_LocalResources.  Each local resource file is page-specific. Therefore, it is named using the page name as in <PageName>.aspx.resx.  For example, to create a resource file for the Default.aspx page, you would create a file called Default.aspx.resx.  This becomes the default base resource file for the page. ASP.NET uses this file if it cannot find a match for the user’s requested language-culture setting.
  • 6.
    You create language-specific versions by copying the resource file and renaming it to include the given language information as in <PageName>.aspx.<languageId>.resx.  For example, a Spanish version of a page would be named Default.aspx.es.resx. A German file would be named Default.aspx.de.resx.  You add a culture designation to your resource by copying the language-specific version and renaming it to include the given culture information as in <PageName>.aspx.<languageId>-<cultureId>.resx  For example, a Spanish (es) resource file designated for Mexico (mx) would be named as Default.aspx.es-mx.resx
  • 7.
    Visual Studio can automatically generate the default version of your local resource file by extracting the key string-based properties of page and control elements into a resource (.resx) file. 1. Open your page in Visual Studio in Design mode. 2. From the Tools menu, select Generate Local Resource. This causes Visual Studio to perform the following tasks:  Create the App_LocalResources folder (if necessary).  Generate an Extensible Markup Language (XML)-based local resource file for the Web page in the App_LocalResources folder.  This file will contain resource settings for page and control properties like Text, ToolTip, Title, Caption, and other string- based properties.
  • 8.
    The .resx file can be opened and edited using Visual Studio’s resource file editor.  Notice many of the string values were set already based on the values that were defined in the markup.
  • 9.
    You can also open the .resx file in an XML editor.  Here you will notice that the file consists mostly of name–value pairs. Each pair is an XML <data> element with a name that matches the named element on the page.  The following shows an example of the elements defined for the Button control inside the XML: <data name="ButtonSubmitResource1.Text" xml:space="preserve"> <value>Save</value> </data> <data name="ButtonSubmitResource1.ToolTip" xml:space="preserve"> <value /> </data>
  • 10.
    You typically create culture- and language-specific resource files by first creating a default resource file.  You can use this default file as a base.  You copy and paste it to create a new resource file for the target language or culture and name the file accordingly.  You then need to modify the resource values for the new language or culture.
  • 11.
    1. Open Microsoft Internet Explorer. From the Tools menu, select Internet Options to launch the Internet Options dialog box. 2. On the General tab, click Languages in the Appearance group. This opens the Language Preference dialog box. 3. In the Language Preference dialog box, click Add. 4. In the Add Language dialog box, under Language, select the language and culture you want to test, and then click OK.  When you are done testing, remember to reset your browser to your actual preferred language and culture.
  • 12.
    Global resource are not page-specific resources like a local resource.  Rather, global resources are designed for when you need to access a single resource from multiple Web pages in your site.  Global resources are still .resx files. You still create a default version and one for each language and culture you intend to support. The file naming scheme remains the same as for local resource files.  However, global resource files are stored in the App_GlobalResources folder at the root of an application.
  • 13.
    In Solution Explorer, right-click the root of your Web site. Select Add ASP.NET Folder, and then select the App_GlobalResources suboption. This will add a folder of the same name to the root of your site.  Next, right-click the App_GlobalResources folder and select Add New Item.  In the Add New Item dialog box, select Resource File. In the Name text box, type any file name with a .resx extension.  Open the new resource file in Visual Studio. Visual Studio displays a table-like format for adding and editing resources. From here you can add strings, images, icons, audio, files, and other resources.  Once you have defined your default resource file, you copy and paste it to create resource files for different languages.
  • 14.
    1. Open your page in Design view in Visual Studio. View the given control’s Property tab. Select the (Expressions) property (in the Data category). Click the ellipsis (…) button next to the property to launch the control’s Expressions dialog box. 2. From the Bindable Properties list, select a property that you want to bind to a resource. 3. From the Expression type list, select Resources. 4. In the Expression Properties list, set ClassKey to the name of your global resource file (without the extension). Under that, set ResourceKey to the name of the resource within the resource file. 5. Click OK to close the dialog box.
  • 15.
    Once set, Visual Studio displays the default resource value for the given control in Design view. Of course, this will be changed to display the language-specific resource when a user visits the Web page.  Within the page markup, Visual Studio updates the control’s Text property to call the resource.  For example, if binding a Label control’s Text property to a message named Greeting in the LocalizedText.resx global resource, the markup looks as follows: <asp:Label id="LabelWelcome" runat="server" Text="<%$ Resources:LocalizedText, Greeting %>"></asp:Label>
  • 16.
    You can also access resource values programmatically using the syntax Resources.Resource-File.Resource.  Label1.Text = Resources.LocalizedText.Greeting;  After saving global resources, Visual Studio creates a strongly typed class of the Resources.Resource object for each resource file. You access the class through the file name of the global resource file. Each resource in the file is a member of the class.
  • 17.
    If, however, your resource files are not available at design time, Visual Studio cannot generate these classes. In this case, you must use the GetLocalResourceObject and GetGlobalResourceObject methods.  To use the GetLocalResourceObject method, simply provide the name of the resource.  To use GetGlobalResourceObject, provide both the file name (without the extension) and the resource name.  Button1.Text = GetLocalResourceObject("Button1.Text").ToString();  Image1.ImageUrl = (String)GetGlobalResourceObject("WebResourcesGlobal", "LogoUrl");
  • 18.
    Avoid using absolute positioning and sizes for controls  Use the entire width and height of forms (<table width=100%>)  Size elements relative to the overall size of the form  Use a separate table cell for each control  Avoid enabling the NoWrap property in tables  Avoid specifying the Align property in tables
  • 19.
    In an ASP.NET Web page, you use two different Page properties to set language and culture:  Culture This object determines the results of culture- dependent functions, such as the date, number, and currency formatting.  UICulture This property determines which global or local resources are loaded for the page. You can define UICulture with either neutral or specific cultures.  You define the Culture and UICulture properties by overriding the page’s InitializeCulture method.  From this method, define the Culture and UICulture properties, and then call the page’s base InitializeCulture method.
  • 20.
    You can also retrieve an array of all available cultures by calling the System.Globalization.CultureInfo.GetCultures method.  Pass this method a CultureTypes enumeration that specifies which subset of available cultures you want to list.  The most useful CultureTypes values are the following: • AllCultures • NeutralCultures • Specifi cCultures
  • 21.
    To define the culture for an entire Web site, add a <globalization> section to the Web.confi gfile, and then set the UICulture and Culture attributes, as the following sample demonstrates:  <globalization uiculture="es" culture="es-MX" />  To declare a culture for a Web page, define the UICulture and Culture attributes of the @Page directive, as shown here:  <%@ Page uiculture="es" culture="es-MX" %>
  • 22.
    You should recognize the need to make your website usable for those that need large text and nontraditional input devices.  For example, many users do not use a conventional mouse.  Others use screen readers to read the text on Web sites rather than displaying it on a monitor.
  • 23.
    Through the Web Accessibility Initiative (WAI), the W3C has created the Web Content Accessibility Guidelines (WCAG).  The U.S. government has also created accessibility standards in Section 508 of the Rehabilitation Act.  Depending on the organization for which you are developing a Web application, you might be required to conform your application to these standards.  The Section 508 guidelines are conceptually similar to the WCAG guidelines.
  • 24.
    ASP.NET controls are designed to be accessible by default. For example, login controls such as Login, ChangePassword, PasswordRecovery, and CreateUserWizard use text boxes with associated labels to help a user who uses a screen reader or who does not use a mouse.  These controls also use input controls with tab index settings to make data entry without a mouse easier.
  • 25.
    Describe every image by providing alt text using the AlternateText property  Use solid colors for background and use contrasting colors for text  Create a flexible page layout that scales correctly when text size is increased  Set the Table.Caption property to a description of the table  Provide a way to identify column headers  Avoid defining specific font sizes  Avoid requiring client scripts
  • 26.
    Set the DefaultFocus property for a form to place the cursor in a logical location where data entry normally begins.  Define the tab order in a logical way so that a user can complete forms without using a mouse  Specify default buttons for forms and Panel controls by setting the DefaultButton property  Provide useful link text
  • 27.
    Define access keys for button controls by setting the AccessKey property  Use Label controls to define access keys for text boxes  Use the Panel control to create subdivisions in a form and define the Panel.GroupingText property with a description of the controls in that panel  Specify meaningful error messages in the Text and ErrorMessage properties of validator controls