Agenda
• What isFlutter?
• Flutter Features
• Advantages of Flutter
• Getting Started with Flutter
• Flutter in Action
3.
What is Flutter?
Definition:Flutter is an open-source UI software development toolkit
created by Google.
Key Points:
• Cross-platform framework.
• Used for building natively compiled applications for mobile, web, and
desktop.
• First released in 2017.
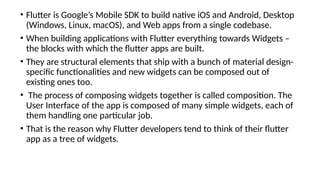
• Flutter isGoogle’s Mobile SDK to build native iOS and Android, Desktop
(Windows, Linux, macOS), and Web apps from a single codebase.
• When building applications with Flutter everything towards Widgets –
the blocks with which the flutter apps are built.
• They are structural elements that ship with a bunch of material design-
specific functionalities and new widgets can be composed out of
existing ones too.
• The process of composing widgets together is called composition. The
User Interface of the app is composed of many simple widgets, each of
them handling one particular job.
• That is the reason why Flutter developers tend to think of their flutter
app as a tree of widgets.
Flutter
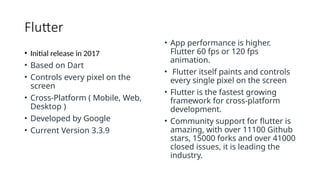
• Initial releasein 2017
• Based on Dart
• Controls every pixel on the
screen
• Cross-Platform ( Mobile, Web,
Desktop )
• Developed by Google
• Current Version 3.3.9
• App performance is higher.
Flutter 60 fps or 120 fps
animation.
• Flutter itself paints and controls
every single pixel on the screen
• Flutter is the fastest growing
framework for cross-platform
development.
• Community support for flutter is
amazing, with over 11100 Github
stars, 15000 forks and over 41000
closed issues, it is leading the
industry.
9.
Selling point ofFlutter Tech are three things:
1. High-Performance App: The Apps developed using Flutter are highly expressive and have flexible
UI. Its fast development due to hot reloading brings the app to life and its expressiveness provides
features that are keened for native end-user experiences.
2. Expressive and Flexible UI: Flutter lets developers build beautiful-looking apps with ease by using
prebuild material widgets. Even though many widgets are prebuilt still flutter enables full
customization of the widget.
3. Fast Development & Hot Reloading: Hot Reloading refers to the injection of new versions of the
files that you edited at runtime while keeping the app running.
10.
Advantages of Flutter
•Fast Development
• Single Codebase, Multiple Platforms
• Consistent UI
• Native Performance
• Access to Native Features
• Large Widget Library
• Strong Community
• High Customization
12.
Getting Started withFlutter
• Install Flutter SDK
• Set up an Integrated Development Environment (IDE) - Example:
Visual Studio Code.
• Create Your First Flutter Project
• Write Dart Code
• Run the App
13.
Flutter in Action
•Showcase examples of popular apps built with Flutter:
• Google Ads
• Alibaba
• Reflectly
• Hamilton Musical
14.
Flutter in theReal World
Describe real-world use cases and industries that benefit from Flutter:
• Mobile Apps
• Web Applications
• Desktop Applications
• IoT
15.
Introduction to Dart
•What is Dart?
• History of Dart
• Key Features of Dart
• Dart vs. Other Programming Languages
16.
What is Dart?
Definition:Dart is a modern, open-source, and class-based
programming language developed by Google.
Key Points:
• Designed for building web and mobile applications.
• Focus on performance, productivity, and scalability.
• Known for its simplicity and ease of use.
17.
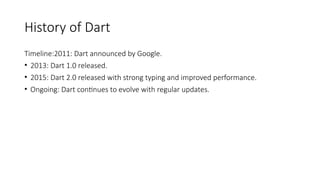
History of Dart
Timeline:2011:Dart announced by Google.
• 2013: Dart 1.0 released.
• 2015: Dart 2.0 released with strong typing and improved performance.
• Ongoing: Dart continues to evolve with regular updates.
18.
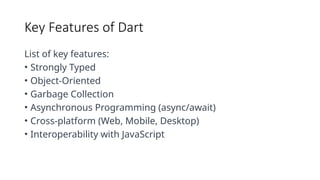
Key Features ofDart
List of key features:
• Strongly Typed
• Object-Oriented
• Garbage Collection
• Asynchronous Programming (async/await)
• Cross-platform (Web, Mobile, Desktop)
• Interoperability with JavaScript
19.
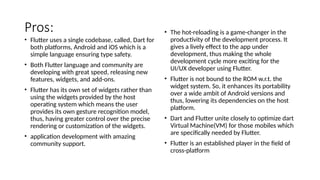
Pros:
• Flutter usesa single codebase, called, Dart for
both platforms, Android and iOS which is a
simple language ensuring type safety.
• Both Flutter language and community are
developing with great speed, releasing new
features, widgets, and add-ons.
• Flutter has its own set of widgets rather than
using the widgets provided by the host
operating system which means the user
provides its own gesture recognition model,
thus, having greater control over the precise
rendering or customization of the widgets.
• application development with amazing
community support.
• The hot-reloading is a game-changer in the
productivity of the development process. It
gives a lively effect to the app under
development, thus making the whole
development cycle more exciting for the
UI/UX developer using Flutter.
• Flutter is not bound to the ROM w.r.t. the
widget system. So, it enhances its portability
over a wide ambit of Android versions and
thus, lowering its dependencies on the host
platform.
• Dart and Flutter unite closely to optimize dart
Virtual Machine(VM) for those mobiles which
are specifically needed by Flutter.
• Flutter is an established player in the field of
cross-platform
20.
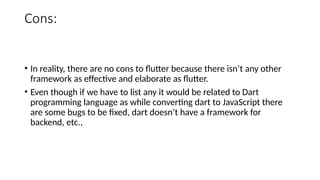
Cons:
• In reality,there are no cons to flutter because there isn’t any other
framework as effective and elaborate as flutter.
• Even though if we have to list any it would be related to Dart
programming language as while converting dart to JavaScript there
are some bugs to be fixed, dart doesn’t have a framework for
backend, etc.,
21.
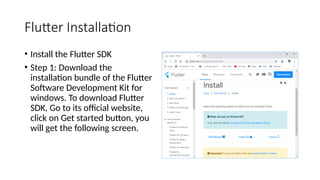
Flutter Installation
• Installthe Flutter SDK
• Step 1: Download the
installation bundle of the Flutter
Software Development Kit for
windows. To download Flutter
SDK, Go to its official website,
click on Get started button, you
will get the following screen.
22.
• Step 2:Next, to download the latest Flutter SDK, click on the Windows
icon. Here, you will find the download link for SDK.
• Step 3: When your download is complete, extract the zip file and place it
in the desired installation folder or location, for example, D: /Flutter.
• Step 4: To run the Flutter command in regular windows console, you
need to update the system path to include the flutter bin directory. The
following steps are required to do this:
23.
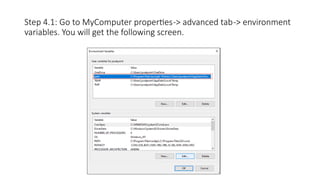
Step 4.1: Goto MyComputer properties-> advanced tab-> environment
variables. You will get the following screen.
24.
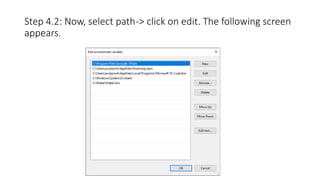
Step 4.2: Now,select path-> click on edit. The following screen
appears.
25.
• Step 4.3:In the above window, click on New->write path of Flutter bin
folder in variable value -> ok -> ok -> ok.
• Step 5: Now, run the $ flutter doctor command. This command checks
for all the requirements of Flutter app development and displays a
report of the status of your Flutter installation.
• $ flutter doctor
26.
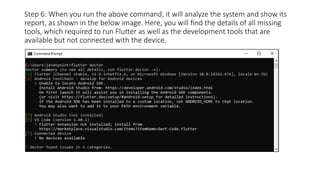
Step 6: Whenyou run the above command, it will analyze the system and show its
report, as shown in the below image. Here, you will find the details of all missing
tools, which required to run Flutter as well as the development tools that are
available but not connected with the device.
27.
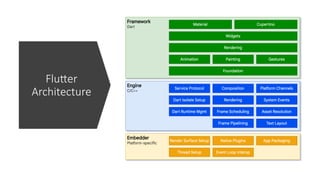
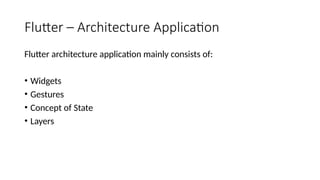
Flutter – ArchitectureApplication
Flutter architecture application mainly consists of:
• Widgets
• Gestures
• Concept of State
• Layers
28.
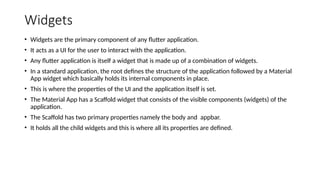
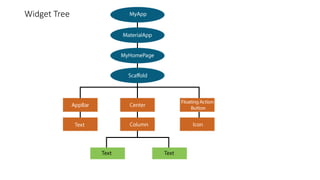
Widgets
• Widgets arethe primary component of any flutter application.
• It acts as a UI for the user to interact with the application.
• Any flutter application is itself a widget that is made up of a combination of widgets.
• In a standard application, the root defines the structure of the application followed by a Material
App widget which basically holds its internal components in place.
• This is where the properties of the UI and the application itself is set.
• The Material App has a Scaffold widget that consists of the visible components (widgets) of the
application.
• The Scaffold has two primary properties namely the body and appbar.
• It holds all the child widgets and this is where all its properties are defined.
29.
State
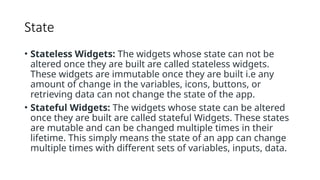
• Stateless Widgets:The widgets whose state can not be
altered once they are built are called stateless widgets.
These widgets are immutable once they are built i.e any
amount of change in the variables, icons, buttons, or
retrieving data can not change the state of the app.
• Stateful Widgets: The widgets whose state can be altered
once they are built are called stateful Widgets. These states
are mutable and can be changed multiple times in their
lifetime. This simply means the state of an app can change
multiple times with different sets of variables, inputs, data.
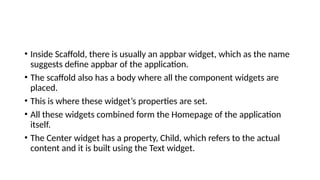
• Inside Scaffold,there is usually an appbar widget, which as the name
suggests define appbar of the application.
• The scaffold also has a body where all the component widgets are
placed.
• This is where these widget’s properties are set.
• All these widgets combined form the Homepage of the application
itself.
• The Center widget has a property, Child, which refers to the actual
content and it is built using the Text widget.
32.
How to installflutter on android studio
Install Android Studio:
• If you haven't already, download and install Android Studio from the
official website: https://developer.android.com/studio
33.
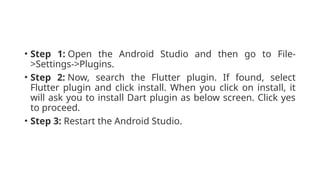
• Step 1:Open the Android Studio and then go to File-
>Settings->Plugins.
• Step 2: Now, search the Flutter plugin. If found, select
Flutter plugin and click install. When you click on install, it
will ask you to install Dart plugin as below screen. Click yes
to proceed.
• Step 3: Restart the Android Studio.
34.
Flutter First Application
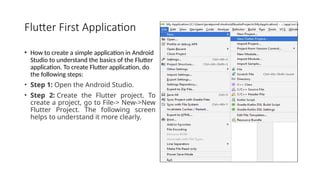
•How to create a simple application in Android
Studio to understand the basics of the Flutter
application. To create Flutter application, do
the following steps:
• Step 1: Open the Android Studio.
• Step 2: Create the Flutter project. To
create a project, go to File-> New->New
Flutter Project. The following screen
helps to understand it more clearly.
35.
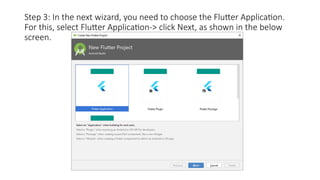
Step 3: Inthe next wizard, you need to choose the Flutter Application.
For this, select Flutter Application-> click Next, as shown in the below
screen.
36.
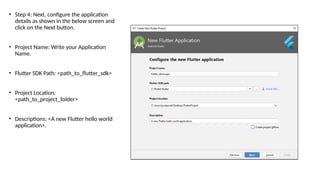
• Step 4:Next, configure the application
details as shown in the below screen and
click on the Next button.
• Project Name: Write your Application
Name.
• Flutter SDK Path: <path_to_flutter_sdk>
• Project Location:
<path_to_project_folder>
• Descriptions: <A new Flutter hello world
application>.
37.
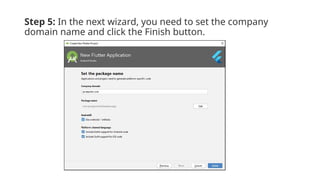
Step 5: Inthe next wizard, you need to set the company
domain name and click the Finish button.
38.
After clicking theFinish button, it will take some time to create a project.
When the project is created, you will get a fully working Flutter
application with minimal functionality.
39.
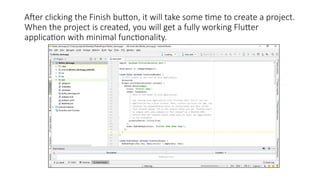
Step 6: Now,let us check the structure of the Flutter project application and its
purpose. In the below image, you can see the various folders and components of the
Flutter application structure, which are going to discuss here
40.
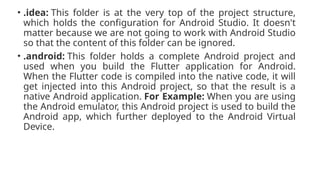
• .idea: Thisfolder is at the very top of the project structure,
which holds the configuration for Android Studio. It doesn't
matter because we are not going to work with Android Studio
so that the content of this folder can be ignored.
• .android: This folder holds a complete Android project and
used when you build the Flutter application for Android.
When the Flutter code is compiled into the native code, it will
get injected into this Android project, so that the result is a
native Android application. For Example: When you are using
the Android emulator, this Android project is used to build the
Android app, which further deployed to the Android Virtual
Device.
41.
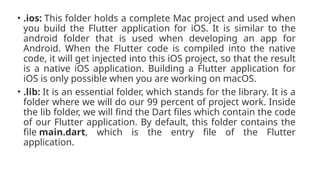
• .ios: Thisfolder holds a complete Mac project and used when
you build the Flutter application for iOS. It is similar to the
android folder that is used when developing an app for
Android. When the Flutter code is compiled into the native
code, it will get injected into this iOS project, so that the result
is a native iOS application. Building a Flutter application for
iOS is only possible when you are working on macOS.
• .lib: It is an essential folder, which stands for the library. It is a
folder where we will do our 99 percent of project work. Inside
the lib folder, we will find the Dart files which contain the code
of our Flutter application. By default, this folder contains the
file main.dart, which is the entry file of the Flutter
application.
42.
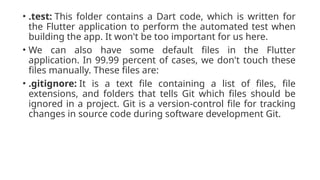
• .test: Thisfolder contains a Dart code, which is written for
the Flutter application to perform the automated test when
building the app. It won't be too important for us here.
• We can also have some default files in the Flutter
application. In 99.99 percent of cases, we don't touch these
files manually. These files are:
• .gitignore: It is a text file containing a list of files, file
extensions, and folders that tells Git which files should be
ignored in a project. Git is a version-control file for tracking
changes in source code during software development Git.
43.
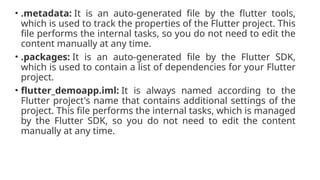
• .metadata: Itis an auto-generated file by the flutter tools,
which is used to track the properties of the Flutter project. This
file performs the internal tasks, so you do not need to edit the
content manually at any time.
• .packages: It is an auto-generated file by the Flutter SDK,
which is used to contain a list of dependencies for your Flutter
project.
• flutter_demoapp.iml: It is always named according to the
Flutter project's name that contains additional settings of the
project. This file performs the internal tasks, which is managed
by the Flutter SDK, so you do not need to edit the content
manually at any time.
44.
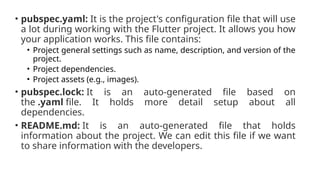
• pubspec.yaml: Itis the project's configuration file that will use
a lot during working with the Flutter project. It allows you how
your application works. This file contains:
• Project general settings such as name, description, and version of the
project.
• Project dependencies.
• Project assets (e.g., images).
• pubspec.lock: It is an auto-generated file based on
the .yaml file. It holds more detail setup about all
dependencies.
• README.md: It is an auto-generated file that holds
information about the project. We can edit this file if we want
to share information with the developers.
45.
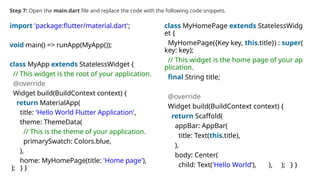
Step 7: Openthe main.dart file and replace the code with the following code snippets.
import 'package:flutter/material.dart';
void main() => runApp(MyApp());
class MyApp extends StatelessWidget {
// This widget is the root of your application.
@override
Widget build(BuildContext context) {
return MaterialApp(
title: 'Hello World Flutter Application',
theme: ThemeData(
// This is the theme of your application.
primarySwatch: Colors.blue,
),
home: MyHomePage(title: 'Home page'),
); } }
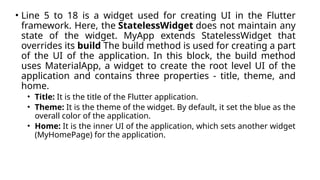
class MyHomePage extends StatelessWidg
et {
MyHomePage({Key key, this.title}) : super(
key: key);
// This widget is the home page of your ap
plication.
final String title;
@override
Widget build(BuildContext context) {
return Scaffold(
appBar: AppBar(
title: Text(this.title),
),
body: Center(
child: Text('Hello World’), ), ); } }
46.
Step 8: Letus understand the above code snippet line by line.
• To start Flutter programming, you need first to import the
Flutter package. Here, we have imported a Material
package. This package allows you to create user interface
according to the Material design guidelines specified by
Android.
• The second line is an entry point of the Flutter applications
similar to the main method in other programming
languages. It calls the runApp function and pass it an object
of MyApp The primary purpose of this function is to attach
the given widget to the screen.
47.
• Line 5to 18 is a widget used for creating UI in the Flutter
framework. Here, the StatelessWidget does not maintain any
state of the widget. MyApp extends StatelessWidget that
overrides its build The build method is used for creating a part
of the UI of the application. In this block, the build method
uses MaterialApp, a widget to create the root level UI of the
application and contains three properties - title, theme, and
home.
• Title: It is the title of the Flutter application.
• Theme: It is the theme of the widget. By default, it set the blue as the
overall color of the application.
• Home: It is the inner UI of the application, which sets another widget
(MyHomePage) for the application.
48.
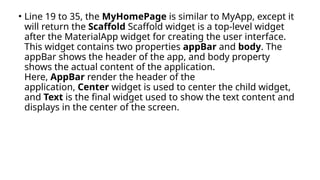
• Line 19to 35, the MyHomePage is similar to MyApp, except it
will return the Scaffold Scaffold widget is a top-level widget
after the MaterialApp widget for creating the user interface.
This widget contains two properties appBar and body. The
appBar shows the header of the app, and body property
shows the actual content of the application.
Here, AppBar render the header of the
application, Center widget is used to center the child widget,
and Text is the final widget used to show the text content and
displays in the center of the screen.
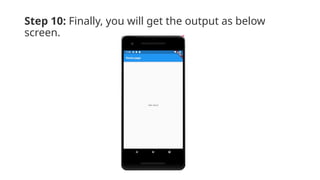
49.
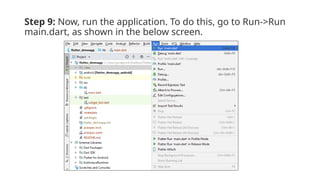
Step 9: Now,run the application. To do this, go to Run->Run
main.dart, as shown in the below screen.
• Whenever youare going to code for building anything in
Flutter, it will be inside a widget.
• The central purpose is to build the app out of widgets. It
describes how your app view should look like with their
current configuration and state.
• When you made any alteration in the code, the widget
rebuilds its description by calculating the difference of
previous and current widget to determine the minimal
changes for rendering in UI of the app.
• Widgets are nested with each other to build the app. It means
the root of your app is itself a widget, and all the way down is
a widget also.
• For example, a widget can display something, can define
design, can handle interaction, etc.
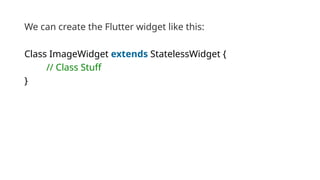
We can createthe Flutter widget like this:
Class ImageWidget extends StatelessWidget {
// Class Stuff
}
55.
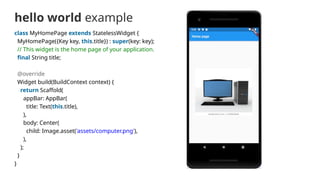
Hello World Example
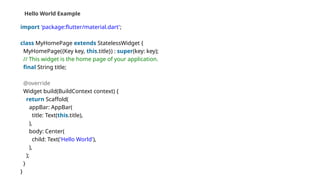
import'package:flutter/material.dart';
class MyHomePage extends StatelessWidget {
MyHomePage({Key key, this.title}) : super(key: key);
// This widget is the home page of your application.
final String title;
@override
Widget build(BuildContext context) {
return Scaffold(
appBar: AppBar(
title: Text(this.title),
),
body: Center(
child: Text('Hello World'),
),
);
}
}
56.
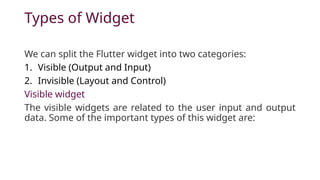
Types of Widget
Wecan split the Flutter widget into two categories:
1. Visible (Output and Input)
2. Invisible (Layout and Control)
Visible widget
The visible widgets are related to the user input and output
data. Some of the important types of this widget are:
57.
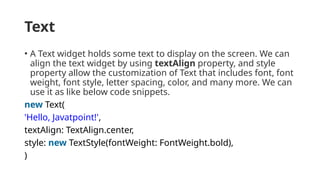
Text
• A Textwidget holds some text to display on the screen. We can
align the text widget by using textAlign property, and style
property allow the customization of Text that includes font, font
weight, font style, letter spacing, color, and many more. We can
use it as like below code snippets.
new Text(
'Hello, Javatpoint!',
textAlign: TextAlign.center,
style: new TextStyle(fontWeight: FontWeight.bold),
)
58.
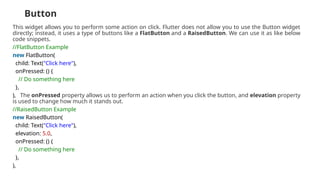
Button
This widget allowsyou to perform some action on click. Flutter does not allow you to use the Button widget
directly; instead, it uses a type of buttons like a FlatButton and a RaisedButton. We can use it as like below
code snippets.
//FlatButton Example
new FlatButton(
child: Text("Click here"),
onPressed: () {
// Do something here
},
), The onPressed property allows us to perform an action when you click the button, and elevation property
is used to change how much it stands out.
//RaisedButton Example
new RaisedButton(
child: Text("Click here"),
elevation: 5.0,
onPressed: () {
// Do something here
},
),
59.
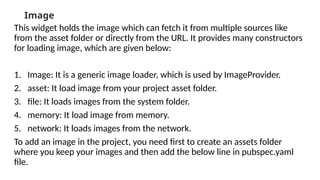
Image
This widget holdsthe image which can fetch it from multiple sources like
from the asset folder or directly from the URL. It provides many constructors
for loading image, which are given below:
1. Image: It is a generic image loader, which is used by ImageProvider.
2. asset: It load image from your project asset folder.
3. file: It loads images from the system folder.
4. memory: It load image from memory.
5. network: It loads images from the network.
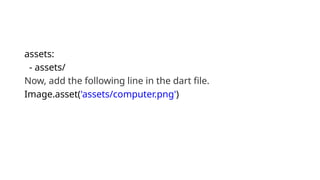
To add an image in the project, you need first to create an assets folder
where you keep your images and then add the below line in pubspec.yaml
file.