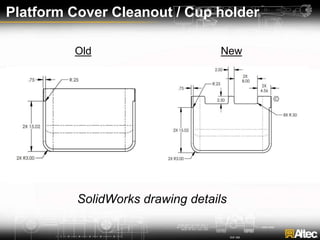
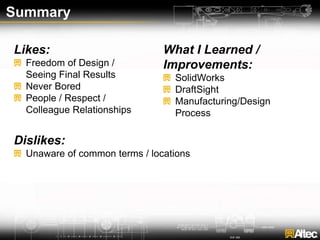
Justin Sly
Co-op Presentation
1st Rotation Product Eng - Aerials
Introduction / Overview
QAR Interlock Cutout (Manufacturing Support)
Outrigger Rod Cover (Product Improvement)
CDS0009 Implementation (New Product
Creation)
Platform Cover Cleanout / Cup Holder
(Product Improvement)
QAR Interlock Cutout
 Interlock cutout removed from weldment assemblies and replaced to be on
newly created outrigger legs.
- This makes design control easier to manage by showing it on the leg and
not each weldment
Weldment Assembly Drawing Updates
 Updated the eight corresponding weldment assembly drawings to show
increased clarity of weldment procedures. This included isometric, detail,
and exploded views.
BEFORE
AFTER
Redesigned Outrigger Rod Cover
 Outrigger rod cover would come into interference with the cylinder manifold
when folded. Cover was redesigned to prevent this occurrence.
Contact
Stationary
cylinder
manifold
Retracting
rod cover
Before After
New design
enables rod
cover to
safely return
to the
stowed
position
without
contact.
Old Rod Cover Vs. New Rod Cover
Old New
Outrigger Rod Cover Scraping
 The rod cover would also come into contact (metal-on-metal) with the cylinder it
covered when maneuvering the outrigger legs.
 This caused both scratches and paint damages to the parts.
 Designed and created new slide pad to hinder
metal-on-metal scraping.
CDS0009 Implementation (Altec Decals)
 Altec Corporate wanted to ensure that their aerials had four visible logos on their
machines:
• 2 curb side
• 1 street side
• 1 rear/front (depending on model)
Zoom-in of Drawing Made in DraftSight Large Altec Placard
CDS0009 Implementation (Altec Decals)
 Altec Logo Installation of
TDA58 (Sugar Glider)
 1 Large Decal, 3 Small
Decals
Platform Cover Cleanout / Cup holder
 Customers had issues with debris, such as woodchips, getting caught in
the TDA58 cup holder as well as the bottom of the platform.
 Users were not able to clear debris, a new design was needed.
Old design, ½ in hole in center Initial idea for redesign
Platform Cover Cleanout / Cup holder
Final Design, Quarter-cut Prototype – made on camps
Lesson: sometimes the simple approach is the best approach.
Platform Cover Cleanout / Cup holder
 Similar to the cup holder, the bottom of the platform cover also experienced
issues with built-up debris.
 Cover must continue to hold in the multiple hoses
Old Design New Design
Platform Cover Cleanout / Cup holder
SolidWorks drawing details
Old New
Summary
Likes:
Freedom of Design /
Seeing Final Results
Never Bored
People / Respect /
Colleague Relationships
Dislikes:
Unaware of common terms / locations
What I Learned /
Improvements:
SolidWorks
DraftSight
Manufacturing/Design
Process
Questions

Final Presentation 1st - J Sly (1)

  • 1.
    Justin Sly Co-op Presentation 1stRotation Product Eng - Aerials
  • 2.
    Introduction / Overview QARInterlock Cutout (Manufacturing Support) Outrigger Rod Cover (Product Improvement) CDS0009 Implementation (New Product Creation) Platform Cover Cleanout / Cup Holder (Product Improvement)
  • 3.
    QAR Interlock Cutout Interlock cutout removed from weldment assemblies and replaced to be on newly created outrigger legs. - This makes design control easier to manage by showing it on the leg and not each weldment
  • 4.
    Weldment Assembly DrawingUpdates  Updated the eight corresponding weldment assembly drawings to show increased clarity of weldment procedures. This included isometric, detail, and exploded views. BEFORE AFTER
  • 5.
    Redesigned Outrigger RodCover  Outrigger rod cover would come into interference with the cylinder manifold when folded. Cover was redesigned to prevent this occurrence. Contact Stationary cylinder manifold Retracting rod cover Before After New design enables rod cover to safely return to the stowed position without contact.
  • 6.
    Old Rod CoverVs. New Rod Cover Old New
  • 7.
    Outrigger Rod CoverScraping  The rod cover would also come into contact (metal-on-metal) with the cylinder it covered when maneuvering the outrigger legs.  This caused both scratches and paint damages to the parts.  Designed and created new slide pad to hinder metal-on-metal scraping.
  • 8.
    CDS0009 Implementation (AltecDecals)  Altec Corporate wanted to ensure that their aerials had four visible logos on their machines: • 2 curb side • 1 street side • 1 rear/front (depending on model) Zoom-in of Drawing Made in DraftSight Large Altec Placard
  • 9.
    CDS0009 Implementation (AltecDecals)  Altec Logo Installation of TDA58 (Sugar Glider)  1 Large Decal, 3 Small Decals
  • 10.
    Platform Cover Cleanout/ Cup holder  Customers had issues with debris, such as woodchips, getting caught in the TDA58 cup holder as well as the bottom of the platform.  Users were not able to clear debris, a new design was needed. Old design, ½ in hole in center Initial idea for redesign
  • 11.
    Platform Cover Cleanout/ Cup holder Final Design, Quarter-cut Prototype – made on camps Lesson: sometimes the simple approach is the best approach.
  • 12.
    Platform Cover Cleanout/ Cup holder  Similar to the cup holder, the bottom of the platform cover also experienced issues with built-up debris.  Cover must continue to hold in the multiple hoses Old Design New Design
  • 13.
    Platform Cover Cleanout/ Cup holder SolidWorks drawing details Old New
  • 14.
    Summary Likes: Freedom of Design/ Seeing Final Results Never Bored People / Respect / Colleague Relationships Dislikes: Unaware of common terms / locations What I Learned / Improvements: SolidWorks DraftSight Manufacturing/Design Process
  • 15.

Editor's Notes

  • #3 “Today I’m going to show you all.. *read each bullet point*” These are some of my most favorite tasks, each for different reasons which I will discuss later in my presentation. I spent most of my time this rotation on manufacturing support, which usually entails changing something about a part or assembly or weldment that will increase it’s manufacturing productivity. However, I also got the chance to experience other aspects of engineering such as NPC and PI).
  • #4 I like this task in particular because it gave me a lot of knowledge on the design and manufacturing process on how certain assemblies come to be. It also gave me a chance to try out my SolidWorks skills that I learned from school. I came to realize that doing tasks like this one taught me a ton about SolidWorks that I never learned at NC State. I learned how to make different configurations of parts, how to make detail views along with proper dimensioning and welding symbols, as well as make completely new parts.
  • #5 On the left, you can see how the welding symbols may be unclear and possibly misinterpreted, but on the right (in the isometric view), you can tell that the symbols show increased clarity. An exploded view was also added, as well as multiple detail views for better understanding.
  • #6 (Explain If you look close enough, you can see where the metal has been chipped from the contact. The rod cover would even pop-off of the outrigger leg if the contact was strong enough (this can be scary since the outrigger leg folds right next to the lower controls).
  • #7 In the new design, I made triangle-like cut that was 1 by 4 inches off of both sides. This ensures that there is more clearance so the rod won’t come into contact with the cylinder manifold. If it still does come into contact for whatever reason, the angle will help the rod slide to the side rather than catch and potentially pop-off again. The holes were added for another reason as well, which I will discuss in this next slide.
  • #8 It was really cool to determine the problem, diagnose a solution, redesign a new cover in SolidWorks, determine proper measurements for modified, build a physical prototype, reinstall prototype, confirm capability, and finally implement that new design for production.
  • #9 CDS0009 is the new corporate standard for Altec logo decal installation. Corporate wanted to create a standard for logo installation to be in a specific, consistent location for all of the different aerials. On the left is a close-up of one of the several models I illustrated using DraftSight. I had not had experience with DraftSight before my rotation here at Altec, so this was a great opportunity to get some valuable knowledge under my belt.
  • #10 This is an example of one of the final standards, specifically the TDA58, or Sugar Glider. Certain models, like this one, have different surface areas available on them for logo placement. This model specifically calls for 1 large decal and 3 small decals instead of the usual 2 large and 2 small decals. It is important to specify where exactly the logos should be placed to ensure the model appears clean and professional.
  • #11 Again, I really enjoyed this task. It was a chance for me to have complete freedom to implement a design that I thought of. The ½ inch hole in the initial design was not large enough to stuff woodchips or other debris through. The cup holder would eventually become clogged with no easy method of emptying it. My first thought was to have an “X” cutout as the redesign, much like a movie theater cup holder. I thought it would be perfect: no debris would be caught, yet it was still enough to hold drinks. It was brought to my attention that although this design looked good on paper, it wouldn’t be able to hold other items that users put in the cup holder such as tools or small piece parts. Also, the cutout would be much more difficult to manufactur.
  • #12 I learned that sometimes the easy, more simple-seeming approach may in fact be the most appropriate one. In this design, the quarter-circle cut would allow the user to simply brush the debris through the cut to empty it. This taught me that not all designs have to be intricate to work.
  • #13 The only restraint on this design that was a slight challenge was that the bottom of the platform must be designed so that the hoses that it held inside would not fall out of the bottom of the bucket, exposing it to the outside. The new design keeps all of the hoses in while eliminating the surface area that debris would accumulate on.
  • #14 Here you can see the specifics of the cutout details made in SolidWorks. Just slightly more complex than the original design, but definitely necessary.
  • #15 Likes: get to implement my own ideas, there’s always another task that needs to be done, the people are great and always friendly, I’m always treated with respect even though I’m “just a co-op” and brand-new Dislikes: “Go to fab shop / Line 2” Where/what is that? “Find an L42M, L45P, AT40M-S” – What do these mean? Where are they located? What’s the difference?