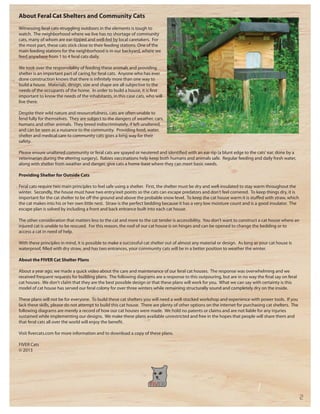
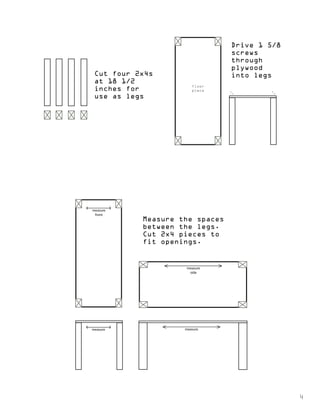
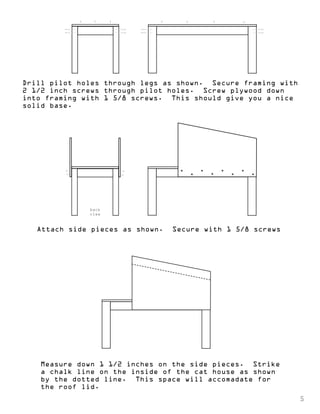
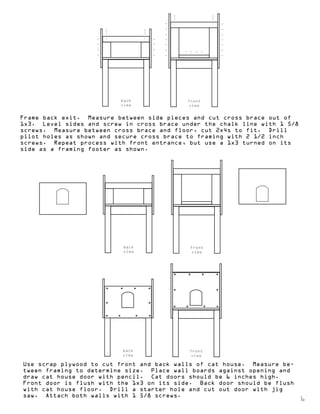
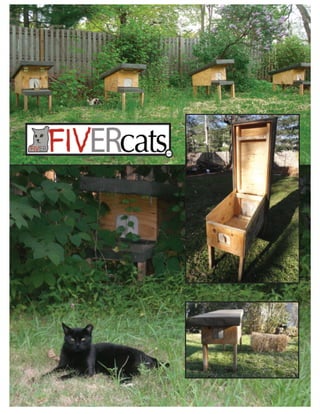
A GUIDE TO BUILDING FERAL CAT 
SHELTERS brought to you by
About Feral Cat Shelters and Community Cats 
Witnessing feral cats struggling outdoors in the elements is tough to 
watch. The neighborhood where we live has no shortage of community 
cats, many of whom are ear-tipped and well-fed by local caretakers. For 
the most part, these cats stick close to their feeding stations. One of the 
main feeding stations for the neighborhood is in our backyard, where we 
feed anywhere from 1 to 4 feral cats daily. 
We took over the responsibility of feeding these animals and providing 
shelter is an important part of caring for feral cats. Anyone who has ever 
done construction knows that there is innitely more than one way to 
build a house. Materials, design, size and shape are all subjective to the 
needs of the occupants of the home. In order to build a house, it is rst 
important to know the needs of the inhabitants, in this case cats, who will 
live there. 
Despite their wild nature and resourcefulness, cats are often unable to 
fend fully for themselves. They are subject to the dangers of weather, cars, 
humans and other animals. They breed indiscriminately, if left unaltered, 
and can be seen as a nuisance to the community. Providing food, water, 
shelter and medical care to community cats goes a long way for their 
safety. 
Please ensure unaltered community or feral cats are spayed or neutered and identied with an ear-tip (a blunt edge to the cats' ear, done by a 
veterinarian during the altering surgery). Rabies vaccinations help keep both humans and animals safe. Regular feeding and daily fresh water, 
along with shelter from weather and danger, give cats a home-base where they can meet basic needs. 
Providing Shelter for Outside Cats 
Feral cats require two main principles to feel safe using a shelter. First, the shelter must be dry and well-insulated to stay warm throughout the 
winter. Secondly, the house must have two entry/exit points so the cats can escape predators and don't feel cornered. To keep things dry, it is 
important for the cat shelter to be o the ground and above the probable snow level. To keep the cat house warm it is stued with straw, which 
the cat makes into his or her own little nest. Straw is the perfect bedding because it has a very low moisture count and is a good insulator. The 
escape plan is solved by including a front and back entrance built into each cat house. 
The other consideration that matters less to the cat and more to the cat tender is accessibility. You don't want to construct a cat house where an 
injured cat is unable to be rescued. For this reason, the roof of our cat house is on hinges and can be opened to change the bedding or to 
access a cat in need of help. 
With these principles in mind, it is possible to make a successful cat shelter out of almost any material or design. As long as your cat house is 
waterproof, lled with dry straw, and has two entrances, your community cats will be in a better position to weather the winter. 
About the FIVER Cat Shelter Plans 
About a year ago, we made a quick video about the care and maintenance of our feral cat houses. The response was overwhelming and we 
received frequent requests for building plans. The following diagrams are a response to this outpouring, but are in no way the nal say on feral 
cat houses. We don't claim that they are the best possible design or that these plans will work for you. What we can say with certainty is this 
model of cat house has served our feral colony for over three winters while remaining structurally sound and completely dry on the inside. 
These plans will not be for everyone. To build these cat shelters you will need a well-stocked workshop and experience with power tools. If you 
lack these skills, please do not attempt to build this cat house. There are plenty of other options on the internet for purchasing cat shelters. The 
following diagrams are merely a record of how our cat houses were made. We hold no patents or claims and are not liable for any injuries 
sustained while implementing our designs. We make these plans available unrestricted and free in the hopes that people will share them and 
that feral cats all over the world will enjoy the benet. 
Visit vercats.com for more information and to download a copy of these plans. 
FIVER Cats 
© 2013 
2
GETTING STARTED 
MATERIALS: 
five 8 foot 2x4s 
two 8 foot 1x3s 
one sheet of 1/2 plywood 4x8 feet 
one box of 2 1/2 inch coated deck screws 
one box of 1 5/8 coated deck screws 
one Roll of asphalt roofing material 
two heavy duty outdoor hinges 
one hook and latch set 
ESSENTIAL TOOLS: 
tape measure 
pencil 
chop saw 
circular saw 
jig saw 
cordless drill 
chalk line 
4x8 1/2 plywood 
30 1/2 inch 
19 inch 
14 inch 
19 inch 
14 inch 
18 inch 22 inch 
42 inch 
48 inch 
side 
piece 
side 
piece 
floor 
piece 
roof 
piece 
front wall 
piece 
cut later 
back wall 
piece 
cut later 
cut pattern for cat shelter 
Draw this cut pattern on your sheet of plywood with a 
drywall square and a pencil. Use a circular saw to cut 
out the sides, floor and roof. Leave the front and back 
walls uncut. This extra piece will be used at a later 
stage of construction. 
3
Cut four 2x4s 
at 18 1/2 
inches for 
use as legs 
Drive 1 5/8 
screws 
through 
plywood 
into legs 
measure 
side 
measure 
measure 
front 
measure 
Measure the spaces 
between the legs. 
Cut 2x4 pieces to 
fit openings. 
4 
floor 
piece
Drill pilot holes through legs as shown. Secure framing with 
2 1/2 inch screws through pilot holes. Screw plywood down 
into framing with 1 5/8 screws. This should give you a nice 
solid base. 
back 
view 
Attach side pieces as shown. Secure with 1 5/8 screws 
Measure down 1 1/2 inches on the side pieces. Strike 
a chalk line on the inside of the cat house as shown 
by the dotted line. This space will accomadate for 
the roof lid. 
5
back 
view 
front 
view 
Frame back exit. Measure between side pieces and cut cross brace out of 
1x3. Level sides and screw in cross brace under the chalk line with 1 5/8 
screws. Measure between cross brace and floor, cut 2x4s to fit. Drill 
pilot holes as shown and secure cross brace to framing with 2 1/2 inch 
screws. Repeat process with front entrance, but use a 1x3 turned on its 
side as a framing footer as shown. 
back 
view 
front 
view 
back 
view 
front 
view 
Use scrap plywood to cut front and back walls of cat house. Measure be-tween 
framing to determine size. Place wall boards against opening and 
draw cat house door with pencil. Cat doors should be 6 inches high. 
Front door is flush with the 1x3 on its side. Back door should be flush 
with cat house floor. Drill a starter hole and cut out door with jig 
saw. Attach both walls with 1 5/8 screws. 
6
Cut 2x4s as shown to frame the roof lid. Attach 
flush with sides using 2 1/2 inch screws through 
framing and 1 5/8 screws through plywood. When 
outside framing is complete, meausre inside length 
and cut 1x3s as shown to fit inside framing. Leave 
one inch space between 2x4 frame and 1x3. This gap 
will be where the lid fits around the walls of the 
cat house. Attach with 1 5/8 screws through ply-wood 
and 2 1/2 inch screws through pilot holes in 
framing. 
two 1x3s 
mark fulcrum 
mark end 
piece 
7 
Place roof piece temporarily on 
cat house. Plywood sides 
should fit nicely inside roof 
framing. Adjust overhang size 
so that it shelters the porch 
area, but doesn’t restrict 
movement when the hinges are 
attached. Once you have deter-mined 
correct overhang size, 
place a pencil mark on the 
inside of the roof framing. 
Next, mark where the end piece 
will go as shown in diagram.
Lift lid off cat house preserving 
pencil marks. Cut 1x3s to fit be-tween 
framing as shown. Screw in 
place with 1 5/8 screws through 
plywood. Use additional 2 1/2 in 
screws to toenail the front piece 
in place. 
front 
view 
Attach two hinges to the front wall at the 
fulcrum. Place the roof lid back on and 
line up the 1x3 cross brace with the hinges. 
Screw hinges into 1x3 cross brace attaching 
roof. 
8
Wrap roof lid with roofing material as if wrapping a pres-ent. 
Staple underneath lid neatly. Use roofing material 
to waterproof deck area. Staple neatly as shown in pic-tures. 
Attach hook and latch to lid so roof doesn’t fall 
when you have the cat house in the open position. Cut 
pieces of canvas drop cloth for use as door flaps. Staple 
canvas pieces in place as shown in picture. Fill cat shel-ter 
with straw and sprinkle some catnip inside to welcome 
cats in need of shelter. Provide daily fresh food and 
water. Spay or neuter all current and newly arriving cats. 
9
Feral cat house plans

Feral cat house plans

  • 1.
    A GUIDE TOBUILDING FERAL CAT SHELTERS brought to you by
  • 2.
    About Feral CatShelters and Community Cats Witnessing feral cats struggling outdoors in the elements is tough to watch. The neighborhood where we live has no shortage of community cats, many of whom are ear-tipped and well-fed by local caretakers. For the most part, these cats stick close to their feeding stations. One of the main feeding stations for the neighborhood is in our backyard, where we feed anywhere from 1 to 4 feral cats daily. We took over the responsibility of feeding these animals and providing shelter is an important part of caring for feral cats. Anyone who has ever done construction knows that there is innitely more than one way to build a house. Materials, design, size and shape are all subjective to the needs of the occupants of the home. In order to build a house, it is rst important to know the needs of the inhabitants, in this case cats, who will live there. Despite their wild nature and resourcefulness, cats are often unable to fend fully for themselves. They are subject to the dangers of weather, cars, humans and other animals. They breed indiscriminately, if left unaltered, and can be seen as a nuisance to the community. Providing food, water, shelter and medical care to community cats goes a long way for their safety. Please ensure unaltered community or feral cats are spayed or neutered and identied with an ear-tip (a blunt edge to the cats' ear, done by a veterinarian during the altering surgery). Rabies vaccinations help keep both humans and animals safe. Regular feeding and daily fresh water, along with shelter from weather and danger, give cats a home-base where they can meet basic needs. Providing Shelter for Outside Cats Feral cats require two main principles to feel safe using a shelter. First, the shelter must be dry and well-insulated to stay warm throughout the winter. Secondly, the house must have two entry/exit points so the cats can escape predators and don't feel cornered. To keep things dry, it is important for the cat shelter to be o the ground and above the probable snow level. To keep the cat house warm it is stued with straw, which the cat makes into his or her own little nest. Straw is the perfect bedding because it has a very low moisture count and is a good insulator. The escape plan is solved by including a front and back entrance built into each cat house. The other consideration that matters less to the cat and more to the cat tender is accessibility. You don't want to construct a cat house where an injured cat is unable to be rescued. For this reason, the roof of our cat house is on hinges and can be opened to change the bedding or to access a cat in need of help. With these principles in mind, it is possible to make a successful cat shelter out of almost any material or design. As long as your cat house is waterproof, lled with dry straw, and has two entrances, your community cats will be in a better position to weather the winter. About the FIVER Cat Shelter Plans About a year ago, we made a quick video about the care and maintenance of our feral cat houses. The response was overwhelming and we received frequent requests for building plans. The following diagrams are a response to this outpouring, but are in no way the nal say on feral cat houses. We don't claim that they are the best possible design or that these plans will work for you. What we can say with certainty is this model of cat house has served our feral colony for over three winters while remaining structurally sound and completely dry on the inside. These plans will not be for everyone. To build these cat shelters you will need a well-stocked workshop and experience with power tools. If you lack these skills, please do not attempt to build this cat house. There are plenty of other options on the internet for purchasing cat shelters. The following diagrams are merely a record of how our cat houses were made. We hold no patents or claims and are not liable for any injuries sustained while implementing our designs. We make these plans available unrestricted and free in the hopes that people will share them and that feral cats all over the world will enjoy the benet. Visit vercats.com for more information and to download a copy of these plans. FIVER Cats © 2013 2
  • 3.
    GETTING STARTED MATERIALS: five 8 foot 2x4s two 8 foot 1x3s one sheet of 1/2 plywood 4x8 feet one box of 2 1/2 inch coated deck screws one box of 1 5/8 coated deck screws one Roll of asphalt roofing material two heavy duty outdoor hinges one hook and latch set ESSENTIAL TOOLS: tape measure pencil chop saw circular saw jig saw cordless drill chalk line 4x8 1/2 plywood 30 1/2 inch 19 inch 14 inch 19 inch 14 inch 18 inch 22 inch 42 inch 48 inch side piece side piece floor piece roof piece front wall piece cut later back wall piece cut later cut pattern for cat shelter Draw this cut pattern on your sheet of plywood with a drywall square and a pencil. Use a circular saw to cut out the sides, floor and roof. Leave the front and back walls uncut. This extra piece will be used at a later stage of construction. 3
  • 4.
    Cut four 2x4s at 18 1/2 inches for use as legs Drive 1 5/8 screws through plywood into legs measure side measure measure front measure Measure the spaces between the legs. Cut 2x4 pieces to fit openings. 4 floor piece
  • 5.
    Drill pilot holesthrough legs as shown. Secure framing with 2 1/2 inch screws through pilot holes. Screw plywood down into framing with 1 5/8 screws. This should give you a nice solid base. back view Attach side pieces as shown. Secure with 1 5/8 screws Measure down 1 1/2 inches on the side pieces. Strike a chalk line on the inside of the cat house as shown by the dotted line. This space will accomadate for the roof lid. 5
  • 6.
    back view front view Frame back exit. Measure between side pieces and cut cross brace out of 1x3. Level sides and screw in cross brace under the chalk line with 1 5/8 screws. Measure between cross brace and floor, cut 2x4s to fit. Drill pilot holes as shown and secure cross brace to framing with 2 1/2 inch screws. Repeat process with front entrance, but use a 1x3 turned on its side as a framing footer as shown. back view front view back view front view Use scrap plywood to cut front and back walls of cat house. Measure be-tween framing to determine size. Place wall boards against opening and draw cat house door with pencil. Cat doors should be 6 inches high. Front door is flush with the 1x3 on its side. Back door should be flush with cat house floor. Drill a starter hole and cut out door with jig saw. Attach both walls with 1 5/8 screws. 6
  • 7.
    Cut 2x4s asshown to frame the roof lid. Attach flush with sides using 2 1/2 inch screws through framing and 1 5/8 screws through plywood. When outside framing is complete, meausre inside length and cut 1x3s as shown to fit inside framing. Leave one inch space between 2x4 frame and 1x3. This gap will be where the lid fits around the walls of the cat house. Attach with 1 5/8 screws through ply-wood and 2 1/2 inch screws through pilot holes in framing. two 1x3s mark fulcrum mark end piece 7 Place roof piece temporarily on cat house. Plywood sides should fit nicely inside roof framing. Adjust overhang size so that it shelters the porch area, but doesn’t restrict movement when the hinges are attached. Once you have deter-mined correct overhang size, place a pencil mark on the inside of the roof framing. Next, mark where the end piece will go as shown in diagram.
  • 8.
    Lift lid offcat house preserving pencil marks. Cut 1x3s to fit be-tween framing as shown. Screw in place with 1 5/8 screws through plywood. Use additional 2 1/2 in screws to toenail the front piece in place. front view Attach two hinges to the front wall at the fulcrum. Place the roof lid back on and line up the 1x3 cross brace with the hinges. Screw hinges into 1x3 cross brace attaching roof. 8
  • 9.
    Wrap roof lidwith roofing material as if wrapping a pres-ent. Staple underneath lid neatly. Use roofing material to waterproof deck area. Staple neatly as shown in pic-tures. Attach hook and latch to lid so roof doesn’t fall when you have the cat house in the open position. Cut pieces of canvas drop cloth for use as door flaps. Staple canvas pieces in place as shown in picture. Fill cat shel-ter with straw and sprinkle some catnip inside to welcome cats in need of shelter. Provide daily fresh food and water. Spay or neuter all current and newly arriving cats. 9