2. Table of Contents
• The component parts— page 2
• The dies & how they work— page 3
• Feature spotlight: roller camshaft
design— page 4
• Additional features— page 5
The manual button maker machine employs a two-step button making process that allows
you to make a button in less than 5 seconds. The process enables you to do 3 things: (1) easily
create several hundred buttons an hour, (2) exert little physical force to operate the machine
(thanks to its roller camshaft design), and (3) be confident that even school children can
effectively and safely operate this machine.
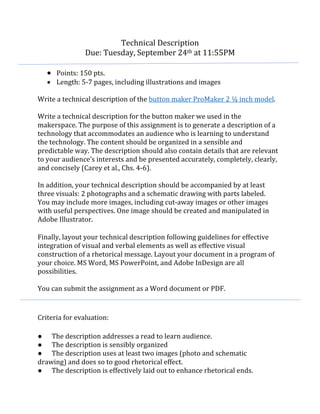
3. 1 Handle sleeve
2 Handle body
3 Top bolt
4 Upper die
5 Handle pivot pin
6 Verticle support
7 Pickup die
8 Crimp die
9 Bottom die plate
10 Base plate
11 Mounting hole (not pictured)
12 Rubber feet (not pictured)
5
1
2
3
4
6
7
8
9
10
11 12
T
h
e
C
o
m
p
o
n
e
n
t
P
a
rts
4. Upper die— As indicated by its name, the upper die
is the die that sits above the pickup and crimp dies.
When operating the machine, the upper die descends
as the lever is pulled. The button parts in the pickup
die (discussed below) are forced together. The upper
die then rises, taking the assembled shell piece with it.
When the crimp die (discussed below) with the pin back
is placed underneath the upper die, the upper die forces
the button shell and pin back together.
Pickup die— The pickup die is the shallower of the two
bottom dies and is located to the left. When operating the
machine, the button shell (sharp edge down), graphic,
and mylar are placed within the pickup die.
Crimp die— The crimp die is the deeper of the two
bottom dies and is located to the right. When operating
the machine, the pin back is placed into the crimp die.
The three dies of the manual button maker machine
are mounted on a base of industrial grade steel. Better
than soft metals such as aluminum, steel holds up better
against wear from the dies. The dies are the components
of the machine that work directly with your button.
The Dies
& how they work
5. FeatureSpotlight
roller camshaft design
Flat tappet camshafts— Lifters for flat tappet
camshafts have a slight crown on the face.
Benefits
• Good performance
• More affordable than roller camshafts
Roller camshafts— Lifters for roller cams
feature a wheel supported by needle bearings
and an axle.
Benefits
• Minimizes friction
• Provides more power
• Wears less; longer life
The manual button maker machine boasts a cam-on-roller, or roller camshaft, design that allows
for very little physical force being required to operate. Camshafts are rotating machine elements
(shafts) that are attached to a rotating or sliding piece (a cam). Camshafts come in two central
types: flat tappet or roller.
Roller camshaft
Flat tappet camshaft
6. Addtional Features
• The low center of gravity prevents machine from tipping over.
• The mounting holes enable easy mounting.
• Each machine is made from steel, not plastic or composite material for durability; yet the
machines are designed to be lightweight and easily portable.
• The center pivot design increases production speed. Unlike other manual button maker
machines, these metal dies have no compression rings to wear out, fall off, or misalign.
• The cushioned hand grip increases comfort when operating the machine.
• The “positive stop” feature ensures upper and lower die alignment.
• Rust-resistant plating protects the operator from potential rust-related hazards.
7. Works Consulted and Cited
“2-3/8" BAM Size Kit - Tecre Button Maker + 100 Complete Pin Back Parts.” Button Boy Inc., Button Boy, Inc.,
www.buttonboyinc.com/2-3-8-bam-size-kit-tecre-button-maker-100-complete-pin-back-parts/.
“Button Machine Manual.” LickMyButton.com, LickMyButton, www.lickmybutton.com/en/service/button-machine-
manual-how-to-make-buttons/.
“Button Maker Kit Comparison.” American Button Machines, American Button Machines,
www.americanbuttonmachines.com/pages/button-maker-kit-comparison.
“How to "Tune-up" Your Button Machine.” Dr. Don’s Buttons, Badges, & More, Dr. Don’s Buttons,
www.buttonsonline.com/tuneup/.
“Model 200, 2" Round Button Machine.” Tecre Co., Inc., Tecre, Company, Inc., www.tecre.com/catalog/button-maker-
machine/24.
“Project 8.1a Model A Button Maker.” Yumpu, Project Lead the Way, Inc., 2012,
www.yumpu.com/en/document/read/19203217/project-81a-model-a-button-maker-introduction.
“USED 3-1/2" TECRE #350 BUTTON MAKER MACHINE - GREAT WORKING BIG BUTTON PRESS!” People
Power Press, People Power Press, www.peoplepowerpress.org/products/used-3-1-2-tecre-350-button-maker-
machine-great-working-big-button-press.
“What Is the Difference Between A Flat Tappet and A Roller Camshaft?” Summit Racing Equipment, Summit Racing
Equipment, 2016, www.help.summitracing.com/app/answers/detail/a_id/4695/~/what-is-the-difference-between-
a-flat-tappet-and-a-roller-camshaft%3F.
American Button Machines. Button Maker Machine. 2008, flic.kr/p/4JbUUe.
Baechtel, John. “Engine Tech: Flat-tappet Lifters Still Viable in Performance Engines.” OneDirt.com, Power Automedia,
2013, www.onedirt.com/tech/engine-tech-flat-tappet-lifters-still-viable-in-performance-engines/.
Brown, Brighid. “Button University Lesson 3: Best Button Machine Design Standards.” The Button Blog, American
Button Machines and WordPress, 2010, www.american-button-machines.com/best-button-machine-design-
standards-button-maker.
Daoud, Carmen. “Button Maker.” Carmen Daoud's Engineering Portfolio Verona Area High School 2014-2016, Weebly,
www.carmendaoudied.weebly.com/button-maker.html.
English Patents of Inventions, Specifications: 1871, 192 - 250, Volumes 8920-8947. London, H.M. Stationery Office,
1856, pp. 3–4.
Hallman, Cole. “Inventor IPT’s.” Cole Hallman Website, Weebly, www.colemen.weebly.com/ipt.html.
Jensen, Karen. “MakerSpace: Button Making is All the Rage (The Complete Button Making Index).” Teen Librarian
Toolbox, School Library Journal, 2017, www.teenlibrariantoolbox.com/2017/07/makerspace-button-making-is-
all-the-rage-the-complete-button-making-index/.
Knight, Jim. “All About Buttons.” SlideShare, American Button Machines, 2011, www.slideshare.net/jimknight10/circle-
cuttercircle-cutter-paperphoto-buttonsphoto-button-maker-american-button-machine.
Tecre, “Basic Maintenance for Your Tecre Button Maker!” Tecre Co., Inc., Tecre Company, Inc., 2014,
www.tecre.com/blog/2014/06/basic-maintenance-for-your-tecre-button-maker-machine/.
Tecre. “The Great Paper Debate.” Tecre, Co., Inc., Tecre Company, Inc., 2014, www.tecre.com/blog/2014/10/the-great-
paper-debate/.
8. Tecre. “What is the Difference Between a Paper Machine and a Photo Machine?” Tecre Co., Inc., Tecre Company, Inc.,
2018, www.tecre.com/blog/2018/01/difference-paper-machine-photo-machine/.
Young, Aaron. “Project 8.1 Model A Button Maker.” Aaron Young | Engineering Profile, WIX.com, Inc., 2015,
www.177486.wixsite.com/engineeringprofile/button-maker-project.
9. Procedure Assignment
ENG421 Fall 2019
Due: Tuesday, October 8th at 11:55PM
Points: 150 pts.
Length: 3-5 pages, including screenshots
Following the guidelines covered in class and in Carey et al. (Ch3) write a task-oriented procedure
covering 1-2 topics in Moodle. The point of this assignment is to demonstrate that you are able to write
a procedure, following best practices for such work. Choose only 1-2 tasks to document.
Your audience will be NC State Students build from our audience persona exercise. Their immediate goal
in reading your document will be to learn to do what you are documenting. What is it possible to do and
how? The instructions should be task-oriented (Carey et al., Ch3). Ensure that your document is as
readable as possible and that it follows best practices for writing instructional content (see Carey et al.,
Chs. 5, 6, and 8).
I also expect you to include screen captures with your procedure. Choose screen captures that best
visualize what is described in the step(s) they accompany. Crop the screen captures so that only
necessary information is preserved and annotate/highlight where appropriate. All screen captures
should have figure numbers and captions.
Criteria for evaluation:
● The procedures address a read to learn to do audience.
● The procedures are organized into tasks.
● The procedures follow a conventional writing style.
● The procedures demonstrate effective stylistic choices.
● The procedures make effective use of images.
10. Note: If you click on the Activities button on the first page, it will take you to the next page ("Uploading a file to Google
Drive").
Note [2]: If you click on the images on pages 2–4, a video will play. These videos will not loop as that functionality is
unavailable for PDFs.
Image citations:
Icons: Smashicons, https://www.flaticon.com/packs/admin-1
https://docs.moodle.org/37/en/Google_Drive_repository
12. Upload a file from Google Drive
1
2
If your administrator has enabled this access-controlled link feature, you may upload a file from the Google Drive
repository. The file is copied to your Moodle site account, and you will no longer be able to edit it. You will retain
the original file in your Google Drive. Your instructor is given permission to edit the file for grading purposes, and
you will be sent a copy of the edited file. In this tutorial, we will show you how to upload a file from Google Drive to
the assignment submission portal.
In the submission portal, click on Add… (the page icon) or the blue arrow icon. The File Picker window
will appear.
In the File Picker window, click on the Google Drive option of the left-hand list. Click on Log into
your account. A new window will appear with the Google login portal.
13. Upload a file from Google Drive
1
2
In the Google login portal, enter your credentials. Then, click Next. The current window will disappear and
take you back to your previous window.
Note: After clicking Next, a new page may appear from Google that asks if you would like to grant
Moodle permission to access Google Drive. You should grant permission.
Select the file you would like to upload.
4
3
14. Upload a file from Google Drive
5
6
In the file window, click Select this file. The file window will disappear.
Repeat steps 1, 4, and 5 for as many files as you need to add. Once finished, click Save changes.