
Recommended
More Related Content
Similar to Dukane mcc3 a cart usermanual
Similar to Dukane mcc3 a cart usermanual (20)
More from SchoolVision Inc.
More from SchoolVision Inc. (20)
Recently uploaded
Recently uploaded (20)
Dukane mcc3 a cart usermanual
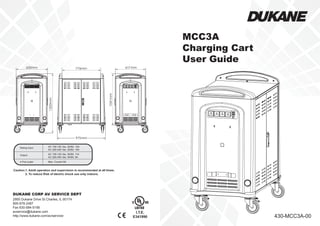
- 1. MCC3A Charging Cart User Guide 430-MCC3A-00 DUKANE CORP AV SERVICE DEPT 2900 Dukane Drive St Charles, IL 60174 800-676-2487 Fax 630-584-5156 avservice@dukane.com http://www.dukane.com/av/service/ 975mm AC 100-120 Vac, 50/60, 12A AC 220-240 Vac, 50/60, 10A AC 100-120 Vac, 50/60, 11A AC 220-240 Vac, 50/60, 9A Max. Current 8A
- 2. Step 1 This assembly can require 2 people. Attach the wheels by using 4 screws, nuts, and lock washers on each
- 3. Step 2 Open cart rear doors. Use key if locked. Then push on lower region of the handle to release the door lock handle.
- 4. Step 3 Install the supplied power cables which have a C14 plug for the power outlet strip and a female plug for the power adapter device. Open the rear door and load the Chromebook power adapters and the power adapter cables. Install and arrange the cables. Power adapter Device adapter Connect to device Connect to outlet modular
- 5. Step 4 Two "U" fastener locations for security of the cart and devices placed on the top surface.
- 6. Step 5 Power switch for 4 outlet Push button above the breaker to turn on the power on for the 4 outlet module. When cart is plugged into the wall all 4 outlets can operate unless the charging program is running. The charging devices will require full cart power and the 4 outlets have no power when the charging program is operating. Tips! 4 Outlet power strip on side of cart 4 accessory outlets
- 7. Step 6 Arrange the cables
- 8. * Press “ESC” to haltcharging and press “Enter” to continue charging when operatingthe charging program. * Press “ESC” and hold on for 4 sec to escape the present screen. * The OSD will jump to the present time if the setting action is paused for over 60 sec. The interior outlets will have power only after the "OSD" program is finalized. The controller can be programed only after the cart is plugged into a wall outlet. Setup of Control - On Screen Display (OSD) Tips! 2 Hour fast charge for each channel
- 9. CH1Ext. Esc CH2 CH3 Enter 13:50:43 wed 2013/0 7 /24 CHARGING TIMER 2 4 1 3 OSD Display. 1 Charging LED Display.2 Control Panel. 3 B 4 Charging Control unit The cursor indicating the active line of the display is a flashing black box or a character. The white lighted LED shows the status of the charging system. When ON the left most LED “EXT” indicates the charging is not active. The other 3 LEDs indicate if a channel (power strip of 12 outlets) is active. For example the “CH 1” LED being ON indicates the channel 1 strip is active with power to the outlets. To pause the charging press the ESC button on the left. The left “EXT” LED comes ON The cart completes only one full cycle of the 3 Channels (the 3 power outlet strips). To clear the menu operation, disconnect the power input plug from the bottom of the left side power strip. Use the ESC button to get to the top menu level. If there is no load on a power strip the controller will advance to the next Channel in 2 minutes. The 4 outside power outlets will not be available when the charging program is operating. Turing on the power to the cart. On Screen Displays (OSD) Example. “ Wed 14:45:50” Date and time ( Hour:min:sec) “New 2014/01/09” ( Year/Month/day) Set the time if first time operation. Push ESC button and go to menu item “4. Set time.” For Default 2 hour charging. Push ESC button to get the menu “ 2 Hr charging-cursor flashing ” Push ENTER button. Will get a display that shows the Run End time for the Channels. Now Ex, “C1 Run E 16:45” Indicates CH 1 will run, charging, till ending at 4:45pm. Also “ C2 Stop E18:45 “ Indicates CH 2 will run, charging, till ending at 6:45pm The CH 1 LED will be ON showing the charging has started for the CH 1 power strip. After 2 hours Ch 1 will switch OFF at 4:45, and the charging will start on Channel 2 power strip. Buttons; ESC - + ENTER
- 10. MCC3A CHARGING CONTROL UNIT Timer Ver 0.11B MENU (OSD) Press “ESC” button to get menu 1. “2 Hr Charging” Default Charging The default is a 2 hr charge to each channel (Outlet Strip). Each outlet strip has a channel number. To start the charging press ENTER button The CH1 LED should come on. The OSD should show the message “C1 Run E XX:00 “ indicating the End time for the Channel 1 charge. 2. Charge time Use for the custom charge time Controls the charging time period for a channel. (0.5 to 8 hours) 1.Charge time; Use to set the charging time period for a channel. Press ENTER to get “C1 T=2.0 Hr Change to the desired time, Will get “Run(Y/N)=?N” or “Y” Use -/+ buttons to get desired. Then Press ENTER . Repeat for other Channels. Get display: “Select” “C1/C2/C3(Y/N)? N” or Y Get desired N or Y and press ENTER. Get display “Confirm” For confirmation press ENTER. This will start the Charging cycle. 2.View settings; Use to check the current settings. Can also modify them. Same routine as prior menu level. 3. Schedule Used to set the days and the time of day the cart will automatically start the charging cycle. Also can set the time duration for the charging on each Channel. 1. Reservation Use to make the settings. Press ENTER. Display is “01 All 02:00” Program 1 is set for all (All) the week days to start the charging at 2 AM. Also get “02 Mon 04:00” Program 2 is for Monday only to start at 4 AM Can select the day and time. There are 8 choices Then can set the charge time for the Channels. For example; “C1 T=0.5 Hr” When the programming is completed press ENTER. Get display ; “Select” “C1/C2/C3(Y/N)? N” or Y Get desired N or Y and press ENTER. Get display “Confirm” Press ENTER. This will start the charging on specified day and time. 2. View settings ( This is a view of the current settings ) 4. Set time (To set the control unit to the present time and date) 1. Set the time Press ENTER Set time, day month, year. Use the -/+ buttons 2. See Time Use to check the time settings. 5. Information (Software Version) and the AAA battery voltage
- 11. Quickl chargeing operation 1.Connect main OSD operation 2.When the chargeing cart is powered On, press the button and LED will turn a solid Blue 3.When the LED turns a solid Blue , the cart will charge 2 Hrs per channel (the same as 2 HR Charge) 4.Press the button again to stop the charging Push Button LED solid Blue ON, chargeing LED not ON, not charging QUICK CHARGING OPERATION Push button is located inside the front door on the left panel by the hinge
- 12. DUKANE CORPORATION RECHARGING PRODUCTS WARRANTY 15-YEAR LIMITED MECHANICAL ASSEMBLY WARRANTY 2-YEAR LIMITED ELECTRICAL COMPONENT WARRANTY! This Dukane recharging product is warranted to the original purchaser for a period of fifteen (15) years from the original purchase date against defects in mechanical assembly defects. Defects in electrical component material and workmanship are warranted for a period of two (2) years from the original purchase date. DUKANE CORPORATION EXPRESSLY DISCLAIMS ALL OTHER WARRANTIES OF MERCHANTABILITY AND FITNESS FOR A PARTICULAR PURPOSE. DURING THE WARRANTY PERIOD, DUKANE CORPORATION’S LIABILITY FOR ANY DEFECTIVE PRODUCT IS LIMITED TO THE REPAIR OR REPLACEMENT OF PRODUCT AT DUKANE CORPORATION’S OPTION. REPLACEMENT PRODUCTS MAY BE NEW OR USED. The following are not covered by the limited warranty and Dukane Corporation shall not be liable for: 1. Any product which is not distributed in the U.S.A. or Canada by Dukane Corporation or an authorized dealer. 2. Damage, deterioration or malfunction resulting from: water, lightning or other acts of nature, unauthorized product modification, or failure to follow instructions supplied with the product. center. 3. Cartons or any accessories used in connection with the product. 4. Service required as a result of third party components. 5. Product used as commercial rental units Dukane Corporation will pay labor and material expenses for covered items but Dukane Corporation will not pay for shipping and related charges incurred in returning the product for warranty repair. Dukane Corporation disclaims all liability for incidental or consequential damage of any kind. No person, firm, or representative is authorized to assume any obligation or to make any warranty on behalf of the Dukane Corporation other than as stated above.
- 13. Can hold up to a screen size of 15.6" for some models. C with all the necessary parts. Swiveling 5" casters ( 2 with brake locks ). 4 Power outlets on outside for external use. They operate when the inner charging system is not in use. complete Battery Adapter Power cord (36pcs) Cable Ties (36pcs) AP HolderKey Accessory Feature Manual User’s manual