The book Docker in Practice provides practical advice and techniques for applying Docker to solve real-world problems. It contains recipes, tips, and tricks for using Docker at various stages of development from building images to running containers to configuration management. The second edition has been updated to cover new features and best practices for using Docker in a variety of development, testing, and production environments and workflows.


![ABOUT THIS BOOK
xviii
resource limits, and chapter 16 looks at some problems you may encounter and pro-
vides some steps for debugging and resolution.
The appendixes contain details for installing, using, and configuring Docker in
different ways, including inside a virtual machine and on Windows.
About the code
The source code for all tools, applications, and Docker images we’ve created for use in
this book is available on GitHub under the “docker-in-practice” organization: https://
github.com/docker-in-practice/. Images on the Docker Hub under the “dockerin-
practice” user https://hub.docker.com/u/dockerinpractice/ are typically automated
builds from one of the GitHub repositories. Where we’ve felt the reader may be inter-
ested in further study of some source code behind a technique, a link to the relevant
repository has been included in the technique discussion. The source code is also
available from the publisher’s website at www.manning.com/books/docker-in-prac-
tice-second-edition.
A significant number of the code listings in the book illustrate a terminal session
for the reader to follow, along with corresponding output from commands. There are
a couple of things to note about these sessions:
■
Long terminal commands may use the shell line-continuation character, (), to
split a command over multiple lines. Although this will work in your shell if you
type it out, you may also omit it and type the command on one line.
■
Where a section of output doesn’t provide extra useful information for the dis-
cussion, it may be omitted and an ellipsis inserted ([…]) in its place.
Book Forum
Purchase of Docker in Practice, Second Edition includes free access to a private web forum
run by Manning Publications where you can make comments about the book, ask
technical questions, and receive help from the author and other users. To access the
forum, go to www.manning.com/books/docker-in-practice-second-edition. You can
also learn more about Manning’s forums and the rules of conduct at https://
forums.manning.com/forums/about.
Manning’s commitment to its readers is to provide a venue where a meaningful
dialog between individual readers and between readers and the author can take place.
It is not a commitment to any specific amount of participation on the part of the
author, whose contributions to the forum remain voluntary (and unpaid). We suggest
you ask the author challenging questions, lest his interest stray.](https://image.slidesharecdn.com/dockerinpractice-manningpublications2019-220916213334-8f169daf/85/Docker-in-Practice-Manning-Publications-2019-pdf-19-320.jpg)


![10 CHAPTER 1 Discovering Docker
1.2 Building a Docker application
We’re going to get our hands dirty now by building a simple to-do application (todoapp)
image with Docker. In the process, you’ll see some key Docker features like Docker-
files, image re-use, port exposure, and build automation. Here’s what you’ll learn in the
next 10 minutes:
How to create a Docker image using a Dockerfile
How to tag a Docker image for easy reference
How to run your new Docker image
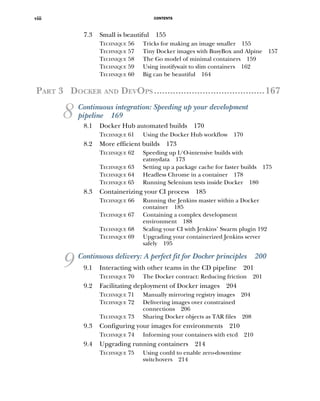
A to-do app is one that helps you keep track of things you want to get done. The app
we build will store and display short strings of information that can be marked as
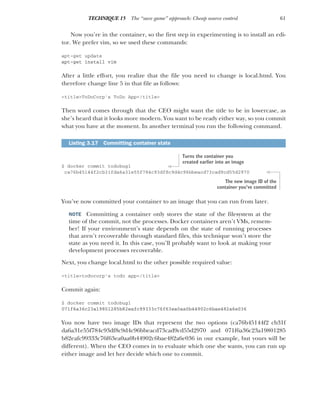
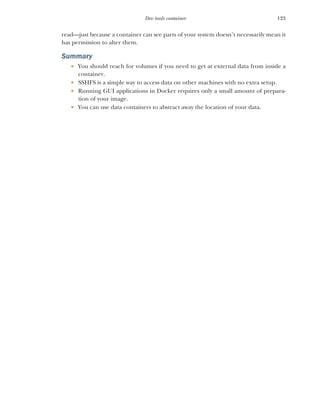
done, presented in a simple web interface. Figure 1.6 shows what we’ll achieve by
doing this.
The details of the application are unimportant. We’re going to demonstrate that
from the single short Dockerfile we’re about to give you, you can reliably build, run,
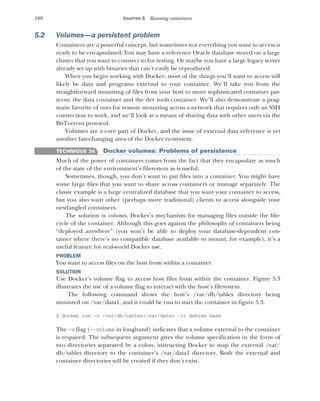
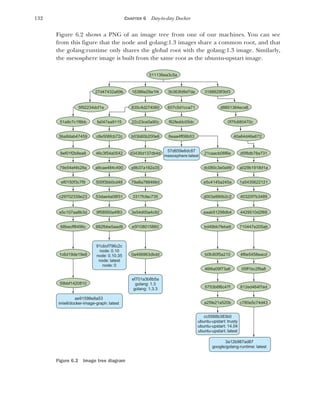
Containers are created from images, inherit
their filesystems, and use their metadata to
determine their startup configurations.
Containers are separate but can be configured
to communicate with each other.
Changes to files are stored
within the container in a
copy-on-write mechanism.
The base image cannot be
affected by a container.
Docker image: Ubuntu
Files:
/bin/bash
/bin/bunzip2
/bin/bzcat
[…]
/var/spool/rsyslog
/var/tmp
Metadata:
Port mappings
Environment variables
Ubuntu container 1
Process: nodejs
Diffs from Ubuntu image:
MODIFIED: /opt/app/nodejs.log
Ubuntu container 2
Process: mysql
Diffs from Ubuntu image:
DELETE: /etc/nologin
Ubuntu container 3
Process: apache
Diffs from Ubuntu image:
ADDED: //var/log/apache/apache.log
The metadata has
information on
environment variables,
port mappings, volumes,
and other details we'll
discuss later.
A Docker image consists
of files and metadata.
This is the base image for
the containers below.
Image files take up most of the space.
Because of the isolation each container
provides, they must have their own
copy of any required tools, including
language environments or libraries.
Containers run one
process on startup.
When this process
completes, the
container stops.
This startup process
can spawn others.
Figure 1.5 Docker images and containers](https://image.slidesharecdn.com/dockerinpractice-manningpublications2019-220916213334-8f169daf/85/Docker-in-Practice-Manning-Publications-2019-pdf-31-320.jpg)

![12 CHAPTER 1 Discovering Docker
The first “by hand” option is fine if you’re doing proofs of concept to see whether
your installation process works. At the same time, you should keep notes about the
steps you’re taking so that you can return to the same point if you need to.
At some point you’re going to want to define the steps for creating your image.
This is the Dockerfile option (and the one we’ll use here).
For more complex builds, you may want to go for the third option, particularly
when the Dockerfile features aren’t sophisticated enough for your image’s needs.
The final option builds from a null image by overlaying the set of files required to
run the image. This is useful if you want to import a set of self-contained files created
elsewhere, but this method is rarely seen in mainstream use.
We’ll look at the Dockerfile method now; the other methods will be covered later
in the book.
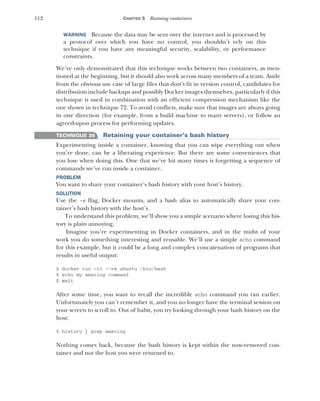
1.2.2 Writing a Dockerfile
A Dockerfile is a text file with a series of commands in it. Listing 1.1 is the Dockerfile
we’ll use for this example. Create a new folder, move into it, and create a file called
“Dockerfile” with these contents.
FROM node
LABEL maintainer ian.miell@gmail.com
RUN git clone -q https://github.com/docker-in-practice/todo.git
WORKDIR todo
RUN npm install > /dev/null
EXPOSE 8000
CMD ["npm","start"]
You begin the Dockerfile by defining the base image with the FROM command. This
example uses a Node.js image so you have access to the Node.js binaries. The official
Node.js image is called node.
Next, you declare the maintainer with the LABEL command. In this case, we’re
using one of our email addresses, but you can replace this with your own reference
because it’s your Dockerfile now. This line isn’t required to make a working Docker
image, but it’s good practice to include it. At this point, the build has inherited the
state of the node container, and you’re ready to work on top of it.
Next, you clone the todoapp code with a RUN command. This uses the specified
command to retrieve the code for the application, running git within the container.
Git is installed inside the base node image in this case, but you can’t take this kind of
thing for granted.
Listing 1.1 The todoapp Dockerfile
Defines the base image
Declares the maintainer Clones the
todoapp code
Moves to the new cloned directory
Runs the node package manager’s
install command (npm)
Specifies that containers from the
built image should listen on this port
Specifies which command
will be run on startup](https://image.slidesharecdn.com/dockerinpractice-manningpublications2019-220916213334-8f169daf/85/Docker-in-Practice-Manning-Publications-2019-pdf-33-320.jpg)
![13
Building a Docker application
Now you move to the new cloned directory with a WORKDIR command. Not only
does this change directories within the build context, but the last WORKDIR command
determines which directory you’re in by default when you start up your container
from your built image.
Next, you run the node package manager’s install command (npm). This will set up
the dependencies for your application. You aren’t interested in the output in this
example, so you redirect it to /dev/null.
Because port 8000 is used by the application, you use the EXPOSE command to tell
Docker that containers from the built image should listen on this port.
Finally, you use the CMD command to tell Docker which command will be run when
the container is started up.
This simple example illustrates several key features of Docker and Dockerfiles. A
Dockerfile is a simple sequence of a limited set of commands run in strict order. It
affects the files and metadata of the resulting image. Here the RUN command affects
the filesystem by checking out and installing appli-
cations, and the EXPOSE, CMD, and WORKDIR com-
mands affect the metadata of the image.
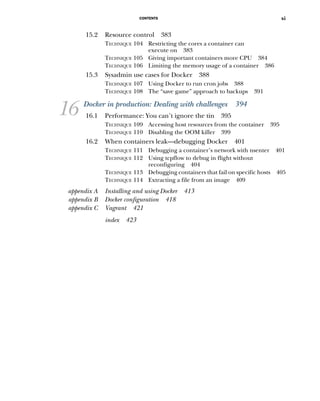
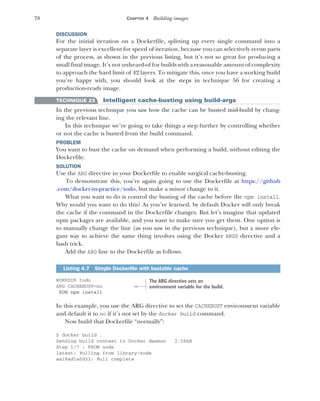
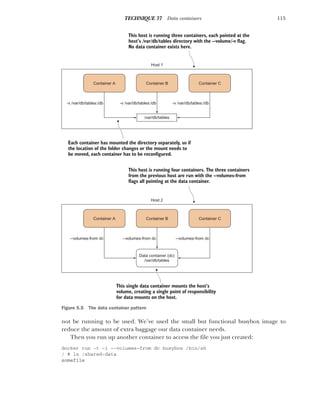
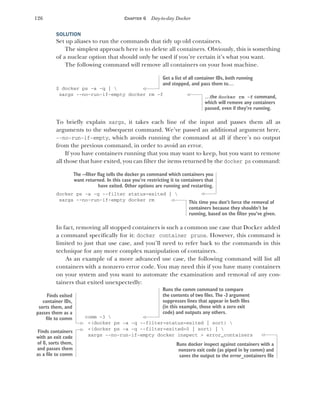
1.2.3 Building a Docker image
You’ve defined your Dockerfile’s build steps. Now
you’re going to build the Docker image from it by
typing the command in figure 1.7. The output will
look similar to this:
Sending build context to Docker daemon 2.048kB
Step 1/7 : FROM node
---> 2ca756a6578b
Step 2/7 : LABEL maintainer ian.miell@gmail.com
---> Running in bf73f87c88d6
---> 5383857304fc
Removing intermediate container bf73f87c88d6
Step 3/7 : RUN git clone -q https://github.com/docker-in-practice/todo.git
---> Running in 761baf524cc1
---> 4350cb1c977c
Removing intermediate container 761baf524cc1
Step 4/7 : WORKDIR todo
---> a1b24710f458
Removing intermediate container 0f8cd22fbe83
Step 5/7 : RUN npm install > /dev/null
---> Running in 92a8f9ba530a
npm info it worked if it ends with ok
[...]
npm info ok
Docker uploads the files and
directories under the path supplied
to the docker build command.
Each build step is
numbered sequentially
from 1 and is output
with the command.
Each command results in a
new image being created,
and the image ID is output.
To save space, each
intermediate container is
removed before continuing.
Debug of the build is
output here (and edited
out of this listing).
docker build .
The docker
command
Path to the
Dockerfile file
The docker build subcommand
Figure 1.7 Docker build command](https://image.slidesharecdn.com/dockerinpractice-manningpublications2019-220916213334-8f169daf/85/Docker-in-Practice-Manning-Publications-2019-pdf-34-320.jpg)

![15
Building a Docker application
npm info package.json react-tools@0.11.2 No license field.
npm info package.json react@0.11.2 No license field.
npm info package.json node-
jsx@0.11.0 license should be a valid SPDX license expression
npm info package.json ws@0.4.32 No license field.
npm info build /todo
npm info linkStuff todomvc-swarm@0.0.1
npm info install todomvc-swarm@0.0.1
npm info postinstall todomvc-swarm@0.0.1
npm info prepublish todomvc-swarm@0.0.1
npm info ok
if [ ! -e dist/ ]; then mkdir dist; fi
cp node_modules/react/dist/react.min.js dist/react.min.js
LocalTodoApp.js:9: // TODO: default english version
LocalTodoApp.js:84: fwdList = this.host.get('/TodoList#'+listId);
// TODO fn+id sig
TodoApp.js:117: // TODO scroll into view
TodoApp.js:176: if (i>=list.length()) { i=list.length()-1; } // TODO
➥ .length
local.html:30: <!-- TODO 2-split, 3-split -->
model/TodoList.js:29: // TODO one op - repeated spec? long spec?
view/Footer.jsx:61: // TODO: show the entry's metadata
view/Footer.jsx:80: todoList.addObject(new TodoItem()); // TODO
➥ create default
view/Header.jsx:25: // TODO list some meaningful header (apart from the
➥ id)
npm info start todomvc-swarm@0.0.1
> todomvc-swarm@0.0.1 start /todo
> node TodoAppServer.js
Swarm server started port 8000
^Cshutting down http-server...
closing swarm host...
swarm host closed
npm info lifecycle todomvc-swarm@0.0.1~poststart: todomvc-swarm@0.0.1
npm info ok
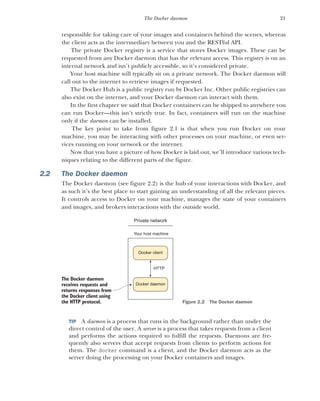
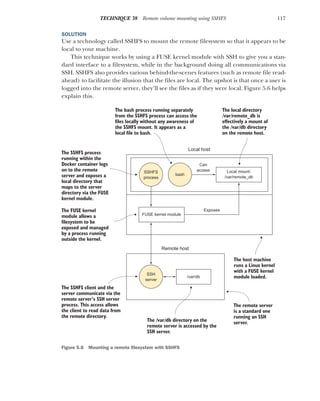
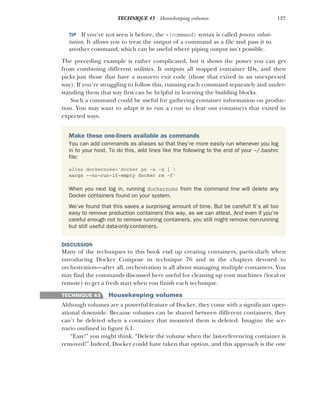
$ docker ps -a
CONTAINER ID IMAGE COMMAND CREATED STATUS PORTS NAMES
b9db5ada0461 todoapp "npm start" 2 minutes ago Exited (0) 2 minutes ago
➥ example1
$ docker start example1
example1
$ docker ps
CONTAINER ID IMAGE COMMAND CREATED STATUS
➥ PORTS NAMES
b9db5ada0461 todoapp "npm start" 8 minutes ago Up 10 seconds
➥ 0.0.0.0:8000->8000/tcp example1
$ docker diff example1
C /root
C /root/.npm
C /root/.npm/_locks
C /root/.npm/anonymous-cli-metrics.json
Press Ctrl-C here to terminate the
process and the container.
Run this command to see containers that
have been started and removed, along
with an ID and status (like a process).
Restart the container, this
time in the background.
Run the ps command again
to see the changed status.
The docker diff subcommand shows you
what files have been affected since the
image was instantiated as a container.](https://image.slidesharecdn.com/dockerinpractice-manningpublications2019-220916213334-8f169daf/85/Docker-in-Practice-Manning-Publications-2019-pdf-36-320.jpg)


![25
TECHNIQUE 2 Running containers as daemons
$ telnet localhost 1234
Trying ::1...
Connected to localhost.
Escape character is '^]'.
hello daemon
^]
telnet> q
Connection closed.
$ docker logs daemon
hello daemon
$ docker rm daemon
daemon
$
You can see that running a container as a daemon is simple enough, but operationally
some questions remain to be answered:
What happens to the service if it fails?
What happens to the service when it terminates?
What happens if the service keeps failing over and over?
Fortunately Docker provides flags for each of these questions!
NOTE Although restart flags are used most often with the daemon flag (-d),
it’s not a requirement to run these flags with -d.
The docker run--restart flag allows you to apply a set of rules to be followed
(a so-called “restart policy”) when the container terminates (see table 2.1).
The no policy is simple: when the container exits, it isn’t restarted. This is the default.
The always policy is also simple, but it’s worth discussing briefly:
$ docker run -d --restart=always ubuntu echo done
Listing 2.1 Connecting to the container netcat server with Telnet
Table 2.1 Docker restart flag options
Policy Description
no Don’t restart when the container exits
always Always restart when the container exits
unless-stopped Always restart, but remember explicitly stopping
on-failure[:max-retry] Restart only on failure
Connects to the container’s netcat
server with the telnet command
Inputs a line
of text to
send to the
netcat server Presses Ctrl-] followed by the Return
key to quit the Telnet session
Types q and
then the Return
key to quit the
Telnet program
Runs the docker logs command
to see the container’s output
Cleans up the container
with the rm command](https://image.slidesharecdn.com/dockerinpractice-manningpublications2019-220916213334-8f169daf/85/Docker-in-Practice-Manning-Publications-2019-pdf-46-320.jpg)


![30 CHAPTER 2 Understanding Docker: Inside the engine room
The output of a simple docker command will now look similar to this:
$ docker -H unix:///tmp/dockerapi.sock ps -a
> 2017/05/15 16:01:51.163427 length=83 from=0 to=82
GET /_ping HTTP/1.1r
Host: dockerr
User-Agent: Docker-Client/17.04.0-ce (linux)r
r
< 2017/05/15 16:01:51.164132 length=215 from=0 to=214
HTTP/1.1 200 OKr
Api-Version: 1.28r
Docker-Experimental: falser
Ostype: linuxr
Server: Docker/17.04.0-ce (linux)r
Date: Mon, 15 May 2017 15:01:51 GMTr
Content-Length: 2r
Content-Type: text/plain; charset=utf-8r
r
OK> 2017/05/15 16:01:51.165175 length=105 from=83 to=187
GET /v1.28/containers/json?all=1 HTTP/1.1r
Host: dockerr
User-Agent: Docker-Client/17.04.0-ce (linux)r
r
< 2017/05/15 16:01:51.165819 length=886 from=215 to=1100
HTTP/1.1 200 OKr
Api-Version: 1.28r
Content-Type: application/jsonr
Docker-Experimental: falser
Ostype: linuxr
Server: Docker/17.04.0-ce (linux)r
Date: Mon, 15 May 2017 15:01:51 GMTr
Content-Length: 680r
r
[{"Id":"1d0d5b5a7b506417949653a59deac030ccbcbb816842a63ba68401708d55383e",
➥ "Names":["/example1"],"Image":"todoapp","ImageID":
Docker
client
API request/response
output to terminal
Unix domain
socket
(proxy)
HTTP request/response HTTP request/response
Text
Docker
server
Unix domain
socket
(Docker)
HTTP request/response
Figure 2.6 Docker client and server with socat inserted as a proxy
The command you issue
to see the request and
response
The HTTP request
begins here, with
the right angle
bracket on the left.
The HTTP response
begins here, with
the left angle
bracket on the left.](https://image.slidesharecdn.com/dockerinpractice-manningpublications2019-220916213334-8f169daf/85/Docker-in-Practice-Manning-Publications-2019-pdf-51-320.jpg)
![31
TECHNIQUE 4 Using socat to monitor Docker API traffic
➥ "sha256:ccdda5b6b021f7d12bd2c16dbcd2f195ff20d10a660921db0ac5bff5ecd92bc2",
➥ "Command":"npm start","Created":1494857777,"Ports":[],"Labels":{},
➥ "State":"exited","Status":"Exited (0) 45 minutes ago","HostConfig":
➥ {"NetworkMode":"default"},"NetworkSettings":{"Networks":{"bridge":
➥ {"IPAMConfig":null,"Links":null,"Aliases":null,"NetworkID":
➥ "6f327d67a38b57379afa7525ea63829797fd31a948b316fdf2ae0365faeed632",
➥ "EndpointID":"","Gateway":"","IPAddress":"","IPPrefixLen":0,
➥ "IPv6Gateway":"","GlobalIPv6Address":"","GlobalIPv6PrefixLen":0,
➥ "MacAddress":""}}},"Mounts":[]}]
CONTAINER ID IMAGE COMMAND CREATED
➥ STATUS PORTS NAMES
1d0d5b5a7b50 todoapp "npm start" 45 minutes ago
➥ Exited (0) 45 minutes ago example1
The specifics of the preceding output will change with the Docker API’s growth and
development. When you run the preceding command, you’ll see later version num-
bers and different JSON output. You can check your client and server versions of the
API by running the docker version command.
WARNING If you ran socat as root in the previous example, you’ll need to use
sudo to run the docker -H command. This is because the dockerapi.sock file
is owned by root.
Using socat is a powerful way to debug not only Docker, but any other network ser-
vices you might come across in the course of your work.
DISCUSSION
It’s possible to come up with a number of other use cases for this technique:
Socat is quite a Swiss Army knife and can handle quite a number of different
protocols. The preceding example shows it listening on a Unix socket, but you
could also make it listen on an external port with TCP-LISTEN:2375,fork
instead of the UNIX-LISTEN:… argument. This acts as a simpler version of tech-
nique 1. With this approach there’s no need to restart the Docker daemon
(which would kill any running containers). You can just bring the socat listener
up and down as you desire.
Because the preceding point is so simple to set up and is temporary, you can use
it in combination with technique 47 to join a colleague’s running container
remotely and help them debug an issue. You can also employ the little-used
docker attach command to join the same terminal they started with docker
run, allowing you to collaborate directly.
If you have a shared Docker server (perhaps set up with technique 1) you could
use the ability to expose externals and set up socat as the broker between the
outside world and the Docker socket to make it act as a primitive audit log,
recording where all requests are coming from and what they’re doing.
The JSON content of the
response from the
Docker server
The output as normally seen by the
user, interpreted by the Docker
client from the preceding JSON](https://image.slidesharecdn.com/dockerinpractice-manningpublications2019-220916213334-8f169daf/85/Docker-in-Practice-Manning-Publications-2019-pdf-52-320.jpg)


![36 CHAPTER 2 Understanding Docker: Inside the engine room
PROBLEM
You want to allow communication between containers for internal purposes.
SOLUTION
Employ user-defined networks to enable containers to communicate with each other.
User-defined networks are simple and flexible. We have a couple of WordPress
blogs running in containers from the previous technique, so let’s take a look at how
we can reach them from another container (rather than from the outside world,
which you’ve seen already).
First you’ll need to create a user-defined network:
$ docker network create my_network
0c3386c9db5bb1d457c8af79a62808f78b42b3a8178e75cc8a252fac6fdc09e4
This command creates a new virtual network living on your machine that you can use
to manage container communication. By default, all containers that you connect to
this network will be able to see each other by their names.
Next, assuming that you still have the blog1 and blog2 containers running from
the previous technique, you can connect one of them to your new network on the fly.
$ docker network connect my_network blog1
Finally, you can start up a new container, explicitly specifying the network, and see if
you can retrieve the first five lines of HTML from the landing page of the blog.
$ docker run -it --network my_network ubuntu:16.04 bash
root@06d6282d32a5:/# apt update && apt install -y curl
[...]
root@06d6282d32a5:/# curl -sSL blog1 | head -n5
<!DOCTYPE html>
<html xmlns="http://www.w3.org/1999/xhtml" lang="en-US" xml:lang="en-US">
<head>
<meta name="viewport" content="width=device-width" />
<meta http-equiv="Content-Type" content="text/html; charset=utf-8" />
root@06d6282d32a5:/# curl -sSL blog2
curl: (6) Could not resolve host: blog2
TIP Giving containers names is very useful for assigning memorable host-
names you can later refer to, but it’s not strictly necessary—if connections are
only outgoing, then you probably won’t need to look up the container. If you
find you do want to look up the host and haven’t assigned a name, you can
resort to using the short image ID as listed in the terminal prompt (unless it
has been overridden with a hostname) or in the docker ps output.
Our new container was successfully able to access the blog we connected to my_network,
displaying some of the HTML of the page we’d see if we visited it in the browser. On the
other hand, our new container couldn’t see the second blog. Because we never con-
nected it to my_network, this makes sense.](https://image.slidesharecdn.com/dockerinpractice-manningpublications2019-220916213334-8f169daf/85/Docker-in-Practice-Manning-Publications-2019-pdf-57-320.jpg)


![42 CHAPTER 2 Understanding Docker: Inside the engine room
TECHNIQUE 10 Finding and running a Docker image
Docker registries enable a social coding culture similar to GitHub’s. If you’re interested
in trying out a new software application, or looking for a new one that serves a particular
purpose, Docker images can be an easy way to experiment without interfering with your
host machine, provisioning a VM, or having to worry about installation steps.
PROBLEM
You want to find an application or tool as a Docker image and try it out.
SOLUTION
Use the docker search command to find the image to pull, and then run it.
Let’s say you’re interested in playing with Node.js. In the following example we
searched for images matching “node” with the docker search command:
$ docker search node
NAME DESCRIPTION
➥ STARS OFFICIAL AUTOMATED
node Node.js is a JavaScript-based platform for...
➥ 3935 [OK]
nodered/node-red-docker Node-RED Docker images.
➥ 57 [OK]
strongloop/node StrongLoop, Node.js, and tools.
➥ 38 [OK]
kkarczmarczyk/node-yarn Node docker image with yarn package manage...
➥ 25 [OK]
bitnami/node Bitnami Node.js Docker Image
➥ 19 [OK]
siomiz/node-opencv _/node + node-opencv
➥ 10 [OK]
dahlb/alpine-node small node for gitlab ci runner
➥ 8 [OK]
cusspvz/node Super small Node.js container (~15MB) ba...
➥ 7 [OK]
anigeo/node-forever Daily build node.js with forever
➥ 4 [OK]
seegno/node A node docker base image.
➥ 3 [OK]
starefossen/ruby-node Docker Image with Ruby and Node.js installed
➥ 3 [OK]
urbanmassage/node Some handy (read, better) docker node images
➥ 1 [OK]
xataz/node very light node image
➥ 1 [OK]
centralping/node Bare bones CentOS 7 NodeJS container.
➥ 1 [OK]
joxit/node Slim node docker with some utils for dev
➥ 1 [OK]
bigtruedata/node Docker image providing Node.js & NPM
➥ 1 [OK]
The output of docker
search is ordered by
the number of stars.
The description is the uploader’s
explanation of the purpose of the
image.
Official images are
those trusted by
Docker Hub.
Automated images are
those built using Docker
Hub’s automated build
feature.](https://image.slidesharecdn.com/dockerinpractice-manningpublications2019-220916213334-8f169daf/85/Docker-in-Practice-Manning-Publications-2019-pdf-63-320.jpg)
![43
TECHNIQUE 10 Finding and running a Docker image
1science/node Node.js Docker images based on Alpine Linux
➥ 1 [OK]
domandtom/node Docker image for Node.js including Yarn an...
➥ 0 [OK]
makeomatic/node various alpine + node based containers
➥ 0 [OK]
c4tech/node NodeJS images, aimed at generated single-p...
➥ 0 [OK]
instructure/node Instructure node images
➥ 0 [OK]
octoblu/node Docker images for node
➥ 0 [OK]
edvisor/node Automated build of Node.js with commonly u...
➥ 0 [OK]
watsco/node node:7
➥ 0 [OK]
codexsystems/node Node.js for Development and Production
➥ 0 [OK]
Once you’ve chosen an image, you can download it by performing a docker pull
command on the name:
$ docker pull node
Using default tag: latest
latest: Pulling from library/node
5040bd298390: Already exists
fce5728aad85: Pull complete
76610ec20bf5: Pull complete
9c1bc3c30371: Pull complete
33d67d70af20: Pull complete
da053401c2b1: Pull complete
05b24114aa8d: Pull complete
Digest:
➥ sha256:ea65cf88ed7d97f0b43bcc5deed67cfd13c70e20a66f8b2b4fd4b7955de92297
Status: Downloaded newer image for node:latest
Then you can run it interactively using the -t and -i flags. The -t flag creates a TTY
device (a terminal) for you, and the-i flag specifies that this Docker session is interactive:
$ docker run -t -i node /bin/bash
root@c267ae999646:/# node
> process.version
'v7.6.0'
>
TIP You can save keystrokes by replacing -t -i with -ti or -it in the preced-
ing call to docker run. You’ll see this throughout the book from here on.
Often there will be specific advice from the image maintainers about how the image
should be run. Searching for the image on the http://hub.docker.com website will take
you to the page for the image. The Description tab may give you more information.
Pulls the image
named node from
the Docker Hub
This message is seen if Docker has pulled a new image (as
opposed to identifying that there’s no newer image than
the one you already have). Your output may be different.](https://image.slidesharecdn.com/dockerinpractice-manningpublications2019-220916213334-8f169daf/85/Docker-in-Practice-Manning-Publications-2019-pdf-64-320.jpg)


![58 CHAPTER 3 Using Docker as a lightweight virtual machine
FROM ubuntu:14.04
ENV DEBIAN_FRONTEND noninteractive
RUN apt-get update && apt-get install -y python-pip apache2 tomcat7
RUN pip install supervisor
RUN mkdir -p /var/lock/apache2
RUN mkdir -p /var/run/apache2
RUN mkdir -p /var/log/tomcat
RUN echo_supervisord_conf > /etc/supervisord.conf
ADD ./supervisord_add.conf /tmp/supervisord_add.conf
RUN cat /tmp/supervisord_add.conf >> /etc/supervisord.conf
RUN rm /tmp/supervisord_add.conf
CMD ["supervisord","-c","/etc/supervisord.conf"]
You’ll also need configuration for Supervisor, to specify what applications it needs to
start up, as shown in the next listing.
[supervisord]
nodaemon=true
# apache
[program:apache2]
command=/bin/bash -c "source /etc/apache2/envvars && exec /usr/sbin/apache2
➥ -DFOREGROUND"
# tomcat
[program:tomcat]
command=service start tomcat
redirect_stderr=true
stdout_logfile=/var/log/tomcat/supervisor.log
stderr_logfile=/var/log/tomcat/supervisor.error_log
You build the image using the standard single-command Docker process because
you’re using a Dockerfile. Run this command to perform the build:
docker build -t supervised .
You can now run your image!
Listing 3.13 Example Supervisor Dockerfile
Listing 3.14 supervisord_add.conf
Starts from ubuntu:14.04
Sets an environment
variable to indicate that this
session is non-interactive
Installs python-pip (to install
Supervisor), apache2, and tomcat7
Installs
Supervisor
with pip
Creates housekeeping
directories needed to
run the applications
Creates a default
supervisord configura-
tion file with the
echo_supervisord
_conf utility
Copies the
Apache and
Tomcat
supervisord
configuration
settings into
the image,
ready to add
to the default
configuration
Appends the Apache and Tomcat
supervisord configuration settings to
the supervisord configuration file
Removes the file you
uploaded, as it’s no
longer needed
You only need to run Supervisor
now on container startup
Declares the global configuration
section for supervisord
Doesn’t daemonize the
Supervisor process, as it’s
the foreground process
for the container
Section declaration
for a new program
Commands to start up the programs declared in the section
Section declaration for a new program
Commands to start up the
programs declared in the section
Configuration
pertaining to logging](https://image.slidesharecdn.com/dockerinpractice-manningpublications2019-220916213334-8f169daf/85/Docker-in-Practice-Manning-Publications-2019-pdf-79-320.jpg)


![67
TECHNIQUE 18 Referring to a specific image in builds
TECHNIQUE 18 Referring to a specific image in builds
Most of the time you’ll be referring to generic image names in your builds, such as
“node” or “ubuntu” and will proceed without problem.
If you refer to an image name, it’s possible that the image can change while the tag
remains the same, as paradoxical as it sounds. The repository name is only a refer-
ence, and it may be altered to point to a different underlying image. Specifying a tag
with the colon notation (such as ubuntu:trusty) doesn’t remove this risk either, as
security updates can use the same tag to automatically rebuild vulnerable images.
Most of the time you’ll want this—the maintainers of the image may have found an
improvement, and patching security holes is generally a good thing. Occasionally,
though, this can cause you pain. And this is not merely a theoretical risk: this has hap-
pened to us on a number of occasions, breaking continuous delivery builds in a way
that’s difficult to debug. In the early days of Docker, packages would be added to and
removed from the most popular images regularly (including, on one memorable
occasion, the disappearance of the passwd command!), making builds that previously
worked suddenly break.
PROBLEM
You want to be sure that your build is from a specific and unchanging image.
SOLUTION
To be absolutely certain that you’re building against a given set of files, specify a specific
image ID in your Dockerfile.
Here’s an example (which will likely not work for you):
FROM 8eaa4ff06b53
RUN echo "Built from image id:" > /etc/buildinfo
RUN echo "8eaa4ff06b53" >> /etc/buildinfo
RUN echo "an ubuntu 14.4.01 image" >> /etc/buildinfo
CMD ["echo","/etc/buildinfo"]
To build from a specific image (or layer) ID like this, the image ID and its data must
be stored locally on your Docker daemon. The Docker registry won’t perform any
kind of lookup to find the image ID in layers of images available to you on the Docker
Hub, or in any other registry you may be configured to use.
Note that the image you refer to need not be tagged—it could be any layer you
have locally. You can begin your build from any layer you wish. This might be useful
for certain surgical or experimental procedures you want to perform for Dockerfile
build analysis.
Listing 3.23 Dockerfile with a specific image ID
Builds from a specific
image (or layer) ID Runs commands within this
image to record the image
you built from within a file
in the new image
The built image will by default output the
information you recorded in the /etc/buildinfo file.](https://image.slidesharecdn.com/dockerinpractice-manningpublications2019-220916213334-8f169daf/85/Docker-in-Practice-Manning-Publications-2019-pdf-88-320.jpg)


![73
TECHNIQUE 20 Injecting files into your image using ADD
Step 2 : ADD my.tar.gz /opt/libeatmydata/
---> 06dcd7a88eb7
Removing intermediate container 3f093a1f9e33
Step 3 : RUN ls -lRt /opt/libeatmydata
---> Running in e3283848ad65
/opt/libeatmydata:
total 4
drwxr-xr-x 7 1000 1000 4096 Oct 29 23:02 libeatmydata-105
/opt/libeatmydata/libeatmydata-105:
total 880
drwxr-xr-x 2 1000 1000 4096 Oct 29 23:02 config
drwxr-xr-x 3 1000 1000 4096 Oct 29 23:02 debian
drwxr-xr-x 2 1000 1000 4096 Oct 29 23:02 docs
drwxr-xr-x 3 1000 1000 4096 Oct 29 23:02 libeatmydata
drwxr-xr-x 2 1000 1000 4096 Oct 29 23:02 m4
-rw-r--r-- 1 1000 1000 9803 Oct 29 23:01 config.h.in
[...edited...]
-rw-r--r-- 1 1000 1000 1824 Jun 18 2012 pandora_have_better_malloc.m4
-rw-r--r-- 1 1000 1000 742 Jun 18 2012 pandora_header_assert.m4
-rw-r--r-- 1 1000 1000 431 Jun 18 2012 pandora_version.m4
---> 2ee9b4c8059f
Removing intermediate container e3283848ad65
Successfully built 2ee9b4c8059f
You can see from this output that the tarball has been unpacked into the target direc-
tory by the Docker daemon (the extended output of all the files has been edited).
Docker will unpack tarfiles of most standard types (.gz, .bz2, .xz, .tar).
It’s worth observing that although you can download tarballs from URLs, they’ll
only be unpacked automatically if they’re stored in the local filesystem. This can lead
to confusion.
If you repeat the preceding process with the following Dockerfile, you’ll notice
that the file is downloaded but not unpacked.
FROM debian
RUN mkdir -p /opt/libeatmydata
ADD
https://www.flamingspork.com/projects/libeatmydata/libeatmydata-105.tar.gz
/opt/libeatmydata/
RUN ls -lRt /opt/libeatmydata
Here’s the resulting build output:
Sending build context to Docker daemon 422.9 kB
Sending build context to Docker daemon
Step 0 : FROM debian
---> c90d655b99b2
Listing 4.4 Directly adding of the TAR file from the URL
The file is retrieved from
the internet using a URL.
The destination directory is indicated by the directory
name and a trailing slash. Without the trailing slash,
the argument is treated as a filename for the
downloaded file.](https://image.slidesharecdn.com/dockerinpractice-manningpublications2019-220916213334-8f169daf/85/Docker-in-Practice-Manning-Publications-2019-pdf-94-320.jpg)
![74 CHAPTER 4 Building images
Step 1 : RUN mkdir -p /opt/libeatmydata
---> Running in 6ac454c52962
---> bdd948e413c1
Removing intermediate container 6ac454c52962
Step 2 : ADD
https://www.flamingspork.com/projects/libeatmydata/libeatmydata-105.tar.gz
➥ /opt/libeatmydata/
Downloading [==================================================>]
419.4 kB/419.4 kB
---> 9d8758e90b64
Removing intermediate container 02545663f13f
Step 3 : RUN ls -lRt /opt/libeatmydata
---> Running in a947eaa04b8e
/opt/libeatmydata:
total 412
-rw------- 1 root root 419427 Jan 1 1970
libeatmydata-105.tar.gz
---> f18886c2418a
Removing intermediate container a947eaa04b8e
Successfully built f18886c2418a
Note that without the trailing slash in the ADD line in the previous Dockerfile, the file
would be downloaded and saved with that filename. The trailing slash indicates that
the file should be downloaded and placed in the directory specified.
All new files and directories are owned by root (or whoever has group or user IDs
of 0 within the container).
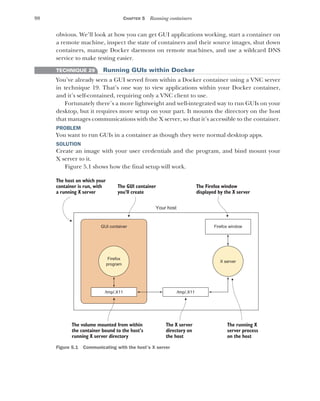
DISCUSSION
The ADD Dockerfile instruction is quite a workhorse, with a number of different pieces
of functionality you can take advantage of. If you’re going to write more than a couple
of Dockerfiles (which you likely will as you go through this book), it’s worth reading
the official Dockerfile instructions documentation—there aren’t many (18 instruc-
tions are listed in the documentation at the time of writing at https://docs.docker
.com/engine/reference/builder) and you’ll only use a few of them regularly.
People often ask about adding compressed files without extracting them. For this
you should use the COPY command, which looks exactly like the ADD command but
doesn’t unpack any files and won’t download over the internet.
The libeatmydata-105.tar.gz file has
been downloaded and placed in the
/opt/libeatmydata directory without
being unpacked.
Whitespace in filenames
If your filenames have whitespace in them, you’ll need to use the quoted form of ADD
(or COPY):
ADD "space file.txt" "/tmp/space file.txt"](https://image.slidesharecdn.com/dockerinpractice-manningpublications2019-220916213334-8f169daf/85/Docker-in-Practice-Manning-Publications-2019-pdf-95-320.jpg)


![77
TECHNIQUE 22 Busting the cache
takes a long time, for example, you may want to use the cache up to a certain point,
and then invalidate it to rerun a command and create a new image.
PROBLEM
You want to invalidate the Docker build cache from a specific point in the Dockerfile
build.
SOLUTION
Add a benign comment after the command to invalidate the cache.
Starting with the Dockerfile in https://github.com/docker-in-practice/todo
(which corresponds to the Step lines in the following output), we’ve done a build and
then added a comment in the Dockerfile on the line with CMD. You can see the output
of doing docker build again here:
$ docker build .
Sending build context to Docker daemon 2.56 kB
Sending build context to Docker daemon
Step 0 : FROM node
---> 91cbcf796c2c
Step 1 : MAINTAINER ian.miell@gmail.com
---> Using cache
---> 8f5a8a3d9240
Step 2 : RUN git clone -q https://github.com/docker-in-practice/todo.git
---> Using cache
---> 48db97331aa2
Step 3 : WORKDIR todo
---> Using cache
---> c5c85db751d6
Step 4 : RUN npm install
---> Using cache
---> be943c45c55b
Step 5 : EXPOSE 8000
---> Using cache
---> 805b18d28a65
Step 6 : CMD ["npm","start"] #bust the cache
---> Running in fc6c4cd487ce
---> d66d9572115e
Removing intermediate container fc6c4cd487ce
Successfully built d66d9572115e
The reason this trick works is because Docker treats the non-whitespace change to the
line as though it were a new command, so the cached layer is not re-used.
You may be wondering (as we did when we first looked at Docker) whether you can
move Docker layers from image to image, merging them at will as though they were
change sets in Git. This isn’t possible at present within Docker. A layer is defined as a
change set from a given image only. Because of this, once the cache has been broken,
it can’t be re-applied for commands re-used later in the build. For this reason, you’re
advised to put commands that are less likely to change nearer the top of the Docker-
file if possible.
A “normal”
docker build
Cache is used
up to here. Cache has been invalidated,
but the command is effectively
unchanged.
A new image has
been created.](https://image.slidesharecdn.com/dockerinpractice-manningpublications2019-220916213334-8f169daf/85/Docker-in-Practice-Manning-Publications-2019-pdf-98-320.jpg)
![79
TECHNIQUE 23 Intelligent cache-busting using build-args
15a33158a136: Pull complete
f67323742a64: Pull complete
c4b45e832c38: Pull complete
f83e14495c19: Pull complete
41fea39113bf: Pull complete
f617216d7379: Pull complete
cbb91377826f: Pull complete
Digest: sha256:
➥ a8918e06476bef51ab83991aea7c199bb50bfb131668c9739e6aa7984da1c1f6
Status: Downloaded newer image for node:latest
---> 9ea1c3e33a0b
Step 2/7 : MAINTAINER ian.miell@gmail.com
---> Running in 03dba6770157
---> a5b55873d2d8
Removing intermediate container 03dba6770157
Step 3/7 : RUN git clone https://github.com/docker-in-practice/todo.git
---> Running in 23336fd5991f
Cloning into 'todo'...
---> 8ba06824d184
Removing intermediate container 23336fd5991f
Step 4/7 : WORKDIR todo
---> f322e2dbeb85
Removing intermediate container 2aa5ae19fa63
Step 5/7 : ARG CACHEBUST=no
---> Running in 9b4917f2e38b
---> f7e86497dd72
Removing intermediate container 9b4917f2e38b
Step 6/7 : RUN npm install
---> Running in a48e38987b04
npm info it worked if it ends with ok
[...]
added 249 packages in 49.418s
npm info ok
---> 324ba92563fd
Removing intermediate container a48e38987b04
Step 7/7 : CMD npm start
---> Running in ae76fa693697
---> b84dbc4bf5f1
Removing intermediate container ae76fa693697
Successfully built b84dbc4bf5f1
If you build it again with exactly the same docker build command, you’ll observe that
the Docker build cache is used, and no changes are made to the resulting image.
$ docker build .
Sending build context to Docker daemon 2.56kB
Step 1/7 : FROM node
---> 9ea1c3e33a0b
Step 2/7 : MAINTAINER ian.miell@gmail.com
---> Using cache
---> a5b55873d2d8
Step 3/7 : RUN git clone https://github.com/docker-in-practice/todo.git
---> Using cache
---> 8ba06824d184](https://image.slidesharecdn.com/dockerinpractice-manningpublications2019-220916213334-8f169daf/85/Docker-in-Practice-Manning-Publications-2019-pdf-100-320.jpg)
![80 CHAPTER 4 Building images
Step 4/7 : WORKDIR todo
---> Using cache
---> f322e2dbeb85
Step 5/7 : ARG CACHEBUST=no
---> Using cache
---> f7e86497dd72
Step 6/7 : RUN npm install
---> Using cache
---> 324ba92563fd
Step 7/7 : CMD npm start
---> Using cache
---> b84dbc4bf5f1
Successfully built b84dbc4bf5f1
At this point you decide that you want to force the npm packages to be rebuilt. Per-
haps a bug has been fixed, or you want to be sure you’re up to date. This is where the
ARG variable you added to the Dockerfile in listing 4.7 comes in. If this ARG variable is
set to a value never used before on your host, the cache will be busted from that point.
This is where you use the build-arg flag to docker build, along with a bash trick
to force a fresh value:
$ docker build --build-arg CACHEBUST=${RANDOM} .
Sending build context to Docker daemon 4.096 kB
Step 1/9 : FROM node
---> 53d4d5f3b46e
Step 2/9 : MAINTAINER ian.miell@gmail.com
---> Using cache
---> 3a252318543d
Step 3/9 : RUN git clone https://github.com/docker-in-practice/todo.git
---> Using cache
---> c0f682653a4a
Step 4/9 : WORKDIR todo
---> Using cache
---> bd54f5d70700
Step 5/9 : ARG CACHEBUST=no
---> Using cache
---> 3229d52b7c33
Step 6/9 : RUN npm install
---> Running in 42f9b1f37a50
npm info it worked if it ends with ok
npm info using npm@4.1.2
npm info using node@v7.7.2
npm info attempt registry request try #1 at 11:25:55 AM
npm http request GET https://registry.npmjs.org/compression
npm info attempt registry request try #1 at 11:25:55 AM
[...]
Step 9/9 : CMD npm start
---> Running in 19219fe5307b
---> 129bab5e908a
Removing intermediate container 19219fe5307b
Successfully built 129bab5e908a
Run docker build with the build-
arg flag, setting the CACHEBUST
argument to a pseudo-random
value generated by bash
Because the ARG CACHEBUST=no
line itself has not changed, the
cache is used here.
Because the CACHEBUST arg was
set to a previously unset value,
the cache is busted, and the npm
install command is run again.](https://image.slidesharecdn.com/dockerinpractice-manningpublications2019-220916213334-8f169daf/85/Docker-in-Practice-Manning-Publications-2019-pdf-101-320.jpg)


![83
TECHNIQUE 24 Intelligent cache-busting using the ADD directive
One way to get around this is to use technique 23, where you pass in a build argu-
ment with a new value every time you know that the remote repository has changed.
But this still requires manual investigation to determine whether there has been a
change, and intervention.
What you need is a command that can determine whether the resource has
changed since the last build, and only then bust the cache.
THE ADD DIRECTIVE—UNEXPECTED BENEFITS
Enter the ADD directive!
You’re already familiar with ADD, as it’s a basic Dockerfile directive. Normally it’s
used to add a file to the resulting image, but there are two useful features of ADD that
you can use to your advantage in this context: it caches the contents of the file it refers
to, and it can take a network resource as an argument. This means that you can bust
the cache whenever the output of a web request changes.
How can you take advantage of this when cloning a repository? Well, that depends
on the nature of the resource you’re referencing over the network. Many resources
will have a page that changes when the repository itself changes, but these will vary
from resource type to resource type. Here we’ll focus on GitHub repos, because that’s
a common use case.
The GitHub API provides a useful resource that can help here. It has URLs for
each repository that return JSON for the most recent commits. When a new commit is
made, the content of the response changes.
FROM ubuntu:16.04
ADD https://api.github.com/repos/nodejs/node/commits
➥ /dev/null
RUN git clone https://github.com/nodejs/node
[...]
The result of the preceding listing is that the cache is busted only when a commit has
been made to the repo since the last build. No human intervention is required, and
no manual checking.
If you want to test this mechanism with a frequently changing repo, try using the
Linux kernel.
FROM ubuntu:16.04
ADD https://api.github.com/repos/torvalds/linux/commits /dev/null
RUN echo "Built at: $(date)" >> /build_time
Listing 4.9 Using ADD to trigger a cache bust
Listing 4.10 Adding the Linux kernel code to an image
The URL that changes
when a new commit is
made
It doesn’t matter where the output of
the file goes, so we send it to /dev/null.
The git clone will take place
only when a change is made.
The ADD command, this time using the Linux repository
Outputs the system date into the built
image, which will show when the last
cache-busting build took place](https://image.slidesharecdn.com/dockerinpractice-manningpublications2019-220916213334-8f169daf/85/Docker-in-Practice-Manning-Publications-2019-pdf-104-320.jpg)


![87
TECHNIQUE 26 Locale management
PROBLEM
You’re seeing encoding errors in your application builds or deployments.
SOLUTION
Ensure the langugage-specific environment variables are correctly set in your Dockerfile.
Encoding issues aren’t always obvious to all users, but they can be fatal when build-
ing applications.
Here are a couple of examples of typical encoding errors when building applica-
tions in Docker.
MyFileDialog:66: error: unmappable character for encoding ASCII
UnicodeEncodeError: 'ascii' codec can't encode character u'xa0' in
➥ position 20: ordinal not in range(128)
These errors can kill a build or an application stone dead.
TIP A non-exhaustive list of key words to look out for in the error are “encod-
ing,” “ascii,” “unicode,” “UTF-8,” “character,” and “codec.” If you see these
words, chances are you’re dealing with an encoding issue.
WHAT DOES THIS HAVE TO DO WITH DOCKER?
When you set up a full-blown operating system, you’re typically guided through a
setup process that asks you to confirm your preferred time zone, language, keyboard
layout, and so on.
Docker containers, as you know by now, aren’t full-blown operating systems set up
for general use. Rather they’re (increasingly) minimal environments for running
applications. By default, therefore, they may not come with all the setup you’re used
to with an operating system.
In particular, Debian removed their dependency on the locales package in 2011,
which means that, by default, there’s no locale setup in a container based on a Debian
image. For example, the following listing shows a Debian-derived Ubuntu image’s
default environment.
$ docker run -ti ubuntu bash
root@d17673300830:/# env
HOSTNAME=d17673300830
TERM=xterm
LS_COLORS=rs=0 [...]
HIST_FILE=/root/.bash_history
PATH=/usr/local/sbin:/usr/local/bin:/usr/sbin:/usr/bin:/sbin:/bin
PWD=/
SHLVL=1
HOME=/root
_=/usr/bin/envj
Listing 4.15 Typical encoding errors
Listing 4.16 Default environment on an Ubuntu container](https://image.slidesharecdn.com/dockerinpractice-manningpublications2019-220916213334-8f169daf/85/Docker-in-Practice-Manning-Publications-2019-pdf-108-320.jpg)

![89
TECHNIQUE 26 Locale management
As you’ve seen, encodings can be affected by the encoding set in the terminal. Getting
back to Docker, we noted that no encoding environment variables were set by default
in our Ubuntu container. Because of this, you can get different results when running
the same commands on your host or in a container. If you see errors that seem to
relate to encodings, you may need to set them in your Dockerfile.
SETTING UP ENCODINGS IN A DOCKERFILE
We’ll now look at how you can control the encoding of a Debian-based image. We’ve
chosen this image because it’s likely to be one of the more common contexts. This
example will set up a simple image that just outputs its default environment variables.
FROM ubuntu:16.04
RUN apt-get update && apt-get install -y locales
RUN locale-gen en_US.UTF-8
ENV LANG en_US.UTF-8
ENV LANGUAGE en_US:en
CMD env
You may be wondering what the differences between the LANG and LANGUAGE variables
are. Briefly, LANG is the default setting for the preferred language and encoding set-
tings. It also provides a default when applications look for the more specific LC_*
settings. LANGUAGE is used to provide an ordered list of languages preferred by applica-
tions if the principal one isn’t available. More information can be found by running
man locale.
Now you can build the image, and run it to see what’s changed.
$ docker build -t encoding .
[...]
$ docker run encoding
no_proxy=*.local, 169.254/16
LANGUAGE=en_US:en
HOSTNAME=aa9d6c8a3ff5
HOME=/root
HIST_FILE=/root/.bash_history
PATH=/usr/local/sbin:/usr/local/bin:/usr/sbin:/usr/bin:/sbin:/bin
LANG=en_US.UTF-8
PWD=/
Listing 4.20 Setting up a Dockerfile example
Listing 4.21 Building and running the encoding image
Uses a Debian-
derived base
image
Updates the package index
and installs the locales
package
Generates the locale for US
English, encoded with UTF-8
Sets the LANG
environment
variable
Sets the LANGUAGE
environment variable
The default command env will
display the environment setup
for the container.
Builds the encoding Docker image
Runs the built Docker image
The LANGUAGE variable is
set in the environment
The LANG variable is
set in the environment](https://image.slidesharecdn.com/dockerinpractice-manningpublications2019-220916213334-8f169daf/85/Docker-in-Practice-Manning-Publications-2019-pdf-110-320.jpg)
![90 CHAPTER 4 Building images
DISCUSSION
Like the previous time zone technique, this technique illustrates an issue that catches
people out on a regular basis. Like many of the more irritating issues we come across,
these don’t always make themselves obvious when the image is being built, which
makes the time wasted debugging these issues very frustrating. For this reason,
it’s worth keeping these settings in mind when supporting others who are using
Docker images.
TECHNIQUE 27 Stepping through layers with the image-stepper
If you’ve built an image that has a number of steps, you can often find yourself in the
position of wanting to know where a particular file was introduced, or what state it was
in at a particular point in the build. Combing through each image layer can be labori-
ous, because you’ll have to determine the order of layers, retrieve each ID, and start
each one up using that ID.
This technique shows you a one-liner that tags each layer of the build in order,
meaning you only have to increment a number to work through the images and find
out whatever it is you need to know.
PROBLEM
You want to easily refer to each step of your build.
SOLUTION
Use the docker-in-practice/image-stepper image to order the tags for your image.
To illustrate this technique, we’ll first show you a script that achieves this result so
you understand how it works. Then we’ll give you a constructed image to make achiev-
ing the result easier.
Here’s a simple script that tags every layer in a given image (myimage) in the order
of creation.
The Dockerfile for myimage follows.
FROM debian
RUN touch /file1
RUN touch /file2
RUN touch /file3
RUN touch /file4
RUN touch /file5
RUN touch /file6
RUN touch /file7
RUN touch /file8
RUN touch /file9
RUN touch /file10
CMD ["cat","/file1"]
This is a simple enough Dockerfile, but it’s one where it will be clear which stage you
are at in the build.
Listing 4.22 Dockerfile for image with multiple layers
Uses debian as a base image
Creates 10 files in
separate layers
Runs a bespoke command
that cats the first file](https://image.slidesharecdn.com/dockerinpractice-manningpublications2019-220916213334-8f169daf/85/Docker-in-Practice-Manning-Publications-2019-pdf-111-320.jpg)

![92 CHAPTER 4 Building images
Now that you’ve seen the principle, we’ll demonstrate how to dockerize this one-off
script and make it work for the general case.
NOTE The code for this technique is available at https://github.com/docker-
in-practice/image-stepper.
First, turn the previous script into a script that can take arguments.
#!/bin/bash
IMAGE_NAME=$1
IMAGE_TAG=$2
if [[ $IMAGE_NAME = '' ]]
then
echo "Usage: $0 IMAGE_NAME [ TAG ]"
exit 1
fi
if [[ $IMAGE_TAG = '' ]]
then
IMAGE_TAG=latest
fi
x=1
for id in $(docker history -q "${IMAGE_NAME}:${IMAGE_TAG}" |
➥ grep -vw missing | tac)
do
docker tag "${id}" "${IMAGE_NAME}:${IMAGE_TAG}_step_$x"
((x++))
done
You can then embed the script in listing 4.26 into a Docker image that you place into
a Dockerfile and run as the default ENTRYPOINT.
FROM ubuntu:16.04
RUN apt-get update -y && apt-get install -y docker.io
ADD image_stepper /usr/local/bin/image_stepper
ENTRYPOINT ["/usr/local/bin/image_stepper"]
The Dockerfile in listing 4.27 creates an image that runs the script in listing 4.26. The
command in listing 4.28 runs this image, giving myimage as an argument.
This image, when run against another Docker image built on your host, will then
create the tags for each step, allowing you to easily look at the layers in order.
The version of the client binary installed by the docker.io package must be compat-
ible with the version of the Docker daemon on your host machine, typically meaning
the client must not be newer.
Listing 4.26 Generic tagging script for the image-stepper image
Listing 4.27 Dockerfile for image-stepper image
Defines a bash script that can take two
arguments: the image name to process,
and the tag you want to step up to
The script from
listing 4.24, with
the arguments
substituted in
Uses Ubuntu as a base layer Installs docker.io to get
the Docker client binary
Adds the
script from
listing 4.26 to
the image
Runs the image_stepper
script by default](https://image.slidesharecdn.com/dockerinpractice-manningpublications2019-220916213334-8f169daf/85/Docker-in-Practice-Manning-Publications-2019-pdf-113-320.jpg)


![95
TECHNIQUE 28 Onbuild and golang
If you look around the cloned repository, you’ll see the Dockerfile is just two lines!
FROM golang:onbuild
EXPOSE 8080
Confused yet? OK, it may make more sense when you look at the Dockerfile for the
golang:onbuild image.
FROM golang:1.7
RUN mkdir -p /go/src/app
WORKDIR /go/src/app
CMD ["go-wrapper", "run"]
ONBUILD COPY . /go/src/app
ONBUILD RUN go-wrapper download
ONBUILD RUN go-wrapper install
The golang:onbuild image defines what happens when the image is used in the FROM
directive in any other Dockerfile. The result is that when a Dockerfile uses this image
as a base, the ONBUILD commands will fire as soon as the FROM image is downloaded, and
(if not overridden) the CMD will be run when the resulting image is run as a container.
Now the output of the docker build command in the next listing may make more
sense.
Step 1 : FROM golang:onbuild
onbuild: Pulling from library/golang
6d827a3ef358: Pull complete
2726297beaf1: Pull complete
7d27bd3d7fec: Pull complete
62ace0d726fe: Pull complete
af8d7704cf0d: Pull complete
6d8851391f39: Pull complete
988b98d9451c: Pull complete
5bbc96f59ddc: Pull complete
Digest: sha256:
➥ 886a63b8de95d5767e779dee4ce5ce3c0437fa48524aedd93199fb12526f15e0
Status: Downloaded newer image for golang:onbuild
# Executing 3 build triggers...
Step 1 : COPY . /go/src/app
Step 1 : RUN go-wrapper download
---> Running in c51f9b0c4da8
Listing 4.31 The onyet Dockerfile
Listing 4.32 The golang:onbuild Dockerfile
Starts the build from the
golang:onbuild image
Exposes port 8080
Uses the golang:1.7 image as a base
Makes a folder to store
the application in
Moves into that folder
Sets the
resulting image’s
command to call
the go-wrapper
to run the go app
The first ONBUILD command
copies the code in the context of
the Dockerfile into the image.
The second ONBUILD command
downloads any dependencies, again
using the go-wrapper command.
The third ONBUILD
The FROM directive
is run, and the
golang:onbuild
image is
The Docker
build signals its
intention to run
the ONBUILD
directives.
The first ONBUILD directive copies
the Go code in the Dockerfile’s
context into the build.
The second
ONBUILD
directive is
fired, which
downloads.](https://image.slidesharecdn.com/dockerinpractice-manningpublications2019-220916213334-8f169daf/85/Docker-in-Practice-Manning-Publications-2019-pdf-116-320.jpg)


![104 CHAPTER 5 Running containers
The list of Docker host providers in figure 5.2 isn’t exhaustive, and it’s likely to grow.
At the time of writing, the following drivers are available, which allow you to provision
the given host provider:
The options that must be specified to provision a machine will vary greatly depending
on the functionality provided by the driver. At one end, provisioning an Oracle
VirtualBox VM on your machine has only 3 flags available to create, compared with
OpenStack’s 17.
NOTE It’s worth clarifying that Docker Machine is not any kind of clustering
solution for Docker. Other tools, such as Docker Swarm, fulfill that function,
and we’ll look at them later.
INSTALLATION
Installation involves a straightforward binary. Download links and installation instruc-
tions for different architectures are available here: https://github.com/docker/
machine/releases.
NOTE You may want to move the binary to a standard location, like /usr/bin,
and ensure it’s renamed or symlinked to docker-machine before continuing,
as the downloaded file may have a longer name suffixed with the binary’s
architecture.
USING DOCKER MACHINE
To demonstrate Docker Machine’s use, you can start by creating a VM with a Docker
daemon on it that you can work with.
NOTE You’ll need to have Oracle’s VirtualBox installed for this to work. It’s
widely available in most package managers.
$ docker-machine create --driver virtualbox host1
INFO[0000] Creating CA: /home/imiell/.docker/machine/certs/ca.pem
INFO[0000] Creating client certificate:
➥ /home/imiell/.docker/machine/certs/cert.pem
INFO[0002] Downloading boot2docker.iso to /home/imiell/.docker/machine/cache/
➥ boot2docker.iso...
INFO[0011] Creating VirtualBox VM...
INFO[0023] Starting VirtualBox VM...
INFO[0025] Waiting for VM to start...
Amazon Web Services Microsoft Azure Rackspace
DigitalOcean Microsoft Hyper-V VMware Fusion
Google Compute Engine OpenStack VMware vCloud Air
IBM SoftLayer Oracle VirtualBox VMware vSphere
Use docker-machine’s create
subcommand to create a new
host and specify its type with
the --driver flag. The host has
been named host1.](https://image.slidesharecdn.com/dockerinpractice-manningpublications2019-220916213334-8f169daf/85/Docker-in-Practice-Manning-Publications-2019-pdf-125-320.jpg)
![105
TECHNIQUE 32 Using Docker Machine to provision Docker hosts
INFO[0043] "host1" has been created and is now the active machine.
INFO[0043] To point your Docker client at it, run this in your shell:
➥ $(docker-machine env host1)
Vagrant users will feel right at home here. By running these commands, you’ve cre-
ated a machine that you can now manage Docker on. If you follow the instructions
given in the output, you can SSH directly to the new VM:
$ eval $(docker-machine env host1)
$ env | grep DOCKER
DOCKER_HOST=tcp://192.168.99.101:2376
DOCKER_TLS_VERIFY=yes
DOCKER_CERT_PATH=/home/imiell/.docker/machine/machines/host1
DOCKER_MACHINE_NAME=host1
$ docker ps -a
CONTAINER ID IMAGE COMMAND CREATED STATUS PORTS NAMES
$ docker-machine ssh host1
## .
## ## ## ==
## ## ## ## ===
/""""""""""""""""___/ ===
~~~ {~~ ~~~~ ~~~ ~~~~ ~~ ~ / ===- ~~~
______ o __/
__/
__________/
_ _ ____ _ _
| |__ ___ ___ | |_|___ __| | ___ ___| | _____ _ __
| '_ / _ / _ | __| __) / _` |/ _ / __| |/ / _ '__|
| |_) | (_) | (_) | |_ / __/ (_| | (_) | (__| < __/ |
|_.__/ ___/ ___/ __|_______,_|___/ ___|_|____|_|
Boot2Docker version 1.5.0, build master : a66bce5 -
Tue Feb 10 23:31:27 UTC 2015
Docker version 1.5.0, build a8a31ef
docker@host1:~$
MANAGING HOSTS
Managing multiple Docker hosts from one client machine can make it difficult to
track what’s going on. Docker Machine comes with various management commands
to make this simpler, as shown in table 5.2.
Your machine is
now created.
Run this command to set the
DOCKER_HOST environment variable,
which sets the default host that
Docker commands will be run on
The $() takes the output
of the docker-machine env
command and applies it to your
environment. docker-machine env
outputs a set of commands that
you can use to set the default
host for Docker commands.
The environment
variable names
are all prefixed
with DOCKER_.
The
DOCKER_HOST
variable is the
endpoint of the
Docker daemon
on the VM.
Thesevariables
handle the
security side of
connections to
the new host.
The docker command is now
pointed at the VM host you’ve
created, not at your previously
used host machine. You’ve
created no containers on the
new VM, so there’s no output.
The ssh subcommand will take you
directly to the new VM itself.](https://image.slidesharecdn.com/dockerinpractice-manningpublications2019-220916213334-8f169daf/85/Docker-in-Practice-Manning-Publications-2019-pdf-126-320.jpg)


![111
TECHNIQUE 35 Distributed volumes with Resilio Sync
The end result is a volume (/data) conveniently synchronized over the internet with-
out requiring any complicated setup.
On your primary server, run the following commands to set up the containers on
the first host:
[host1]$ docker run -d -p 8888:8888 -p 55555:55555
--name resilio ctlc/btsync
$ docker logs resilio
Starting btsync with secret:
ALSVEUABQQ5ILRS2OQJKAOKCU5SIIP6A3
By using this application, you agree to our Privacy Policy and Terms.
http://www.bittorrent.com/legal/privacy
http://www.bittorrent.com/legal/terms-of-use
total physical memory 536870912 max disk cache 2097152
Using IP address 172.17.4.121
[host1]$ docker run -i -t --volumes-from resilio
ubuntu /bin/bash
$ touch /data/shared_from_server_one
$ ls /data
shared_from_server_one
On the second server, open up a terminal and run these commands to synchronize
the volume:
[host2]$ docker run -d --name resilio-client -p 8888:8888
-p 55555:55555
ctlc/btsync ALSVEUABQQ5ILRS2OQJKAOKCU5SIIP6A3
[host2]$ docker run -i -t --volumes-from resilio-client
ubuntu bash
$ ls /data
shared_from_server_one
$ touch /data/shared_from_server_two
$ ls /data
shared_from_server_one shared_from_server_two
Back on host1’s running container, you should see that the file has been synchronized
between the hosts exactly as the first file was:
[host1]$ ls /data
shared_from_server_one shared_from_server_two
DISCUSSION
The synchronization of files comes with no timing guarantees, so you may have to wait
for the data to sync. This is particularly the case for larger files.
Runs the published ctlc/btsync image as a
daemon container, calls the btsync binary,
and opens the required ports
Gets the output of the resilio container
so you can make a note of the key
Make a
note of this
key—it will
be different
for your run.
Starts up an interactive
container with the volumes
from the resilio server
Adds a file
to the /data
volume
Starts a resilio client
container as a daemon
with the key generated
by the daemon run on
host1
Starts an interactive container
that mounts the volumes from
your client daemon
The file created on host1 has
been transferred to host2.
Creates a second file on host2](https://image.slidesharecdn.com/dockerinpractice-manningpublications2019-220916213334-8f169daf/85/Docker-in-Practice-Manning-Publications-2019-pdf-132-320.jpg)
![113
TECHNIQUE 36 Retaining your container’s bash history
To share your bash history with the host, you can use a volume mount when run-
ning your Docker images. Here’s an example:
$ docker run -e HIST_FILE=/root/.bash_history
-v=$HOME/.bash_history:/root/.bash_history
-ti ubuntu /bin/bash
TIP You may want to separate the container’s bash history from your host’s.
One way to do this is to change the value for the first part of the preceding -v
argument.
This is quite a handful to type every time, so to make this more user-friendly you can
set up an alias by putting this into your ~/.bashrc file:
$ alias dockbash='docker run -e HIST_FILE=/root/.bash_history
-v=$HOME/.bash_history:/root/.bash_history
This still isn’t seamless, because you have to remember to type dockbash if you want to
perform a docker run command. For a more seamless experience, you can add these
to your ~/.bashrc file:
function basher() {
if [[ $1 = 'run' ]]
then
shift
/usr/bin/docker run
-e HIST_FILE=/root/.bash_history
-v $HOME/.bash_history:/root/.bash_history "$@"
else
/usr/bin/docker "$@"
fi
}
alias docker=basher
DISCUSSION
Now, when you next open a bash shell and run any docker run command, the com-
mands that are run within that container will be added to your host’s bash history.
Make sure the path to Docker is correct. It might be located in /bin/docker, for
example.
Listing 5.6 Function alias to auto-mount host bash history
Sets the environment variable
picked up by bash. This ensures
the bash history file used is the
one you mount.
Maps the container’s root’s
bash history file to the host’s
Creates a bash function called
basher that will handle the
docker command
Determines
whether the
first argument
to basher/docker
is “run”
Removes that
argument from the
list of arguments
you’ve passed in
Runs the docker run command you
ran earlier, invoking the absolute
path to the Docker runtime to avoid
confusion with the following docker
alias. The absolute path is discovered
by running the “which docker”
command on your host before
implementing this solution.
Passes the arguments
after “run” to the
Docker runtime
Runs the docker
command with
the original
arguments intact
Aliases the docker command when it’s invoked on the
command line to the basher function you’ve created.
This ensures that the call to docker is caught before
bash finds the docker binary on the path.](https://image.slidesharecdn.com/dockerinpractice-manningpublications2019-220916213334-8f169daf/85/Docker-in-Practice-Manning-Publications-2019-pdf-134-320.jpg)


![129
TECHNIQUE 44 Detaching containers without stopping them
$ docker volume ls
DRIVER VOLUME NAME
local 80a40d34a2322f505d67472f8301c16dc75f4209b231bb08faa8ae48f
➥ 36c033f
local b40a19d89fe89f60d30b3324a6ea423796828a1ec5b613693a740b33
➥ 77fd6a7b
local bceef6294fb5b62c9453fcbba4b7100fc4a0c918d11d580f362b09eb
➥ 58503014
$ docker volume prune
WARNING! This will remove all volumes not used by at least one container.
Are you sure you want to continue? [y/N] y
Deleted Volumes:
80a40d34a2322f505d67472f8301c16dc75f4209b231bb08faa8ae48f36c033f
b40a19d89fe89f60d30b3324a6ea423796828a1ec5b613693a740b3377fd6a7b
Total reclaimed space: 230.7MB
If you want to skip the confirmation prompt, perhaps for an automated script, you can
pass -f to docker volume prune to skip it.
TIP If you want to recover data from an undeleted volume that’s no longer ref-
erenced by any containers, you can use docker volume inspect to discover the
directory a volume lives in (likely under /var/lib/docker/volumes/). You can
then browse it as the root user.
DISCUSSION
Deleting volumes is likely not something you’ll need to do very often, as large files in a
container are usually mounted from the host machine and don’t get stored in the
Docker data directory. But it’s worth doing a cleanup every week or so, to avoid them
piling up, particularly if you’re using data containers from technique 37.
TECHNIQUE 44 Detaching containers without stopping them
When working with Docker, you’ll often find yourself in a position where you have an
interactive shell, but exiting from the shell would terminate the container, as it’s the
container’s principal process. Fortunately there’s a way to detach from a container
(and, if you want, you can use docker attach to connect to the container again).
PROBLEM
You want to detach from a container interaction without stopping it.
SOLUTION
Use the built-in key combination in Docker to escape from the container.
Docker has helpfully implemented a key sequence that’s unlikely to be needed by
any other application and that’s also unlikely to be pressed by accident.
Let’s say you started up a container with docker run -t -i -p 9005:80 ubuntu
/bin/bash, and then apt-get installed an Nginx web server. You want to test that it’s
accessible from your host with a quick curl command to localhost:9005.
Runs the command to
list the volumes Docker
is aware of
Volumes that exist on the
machine, whether or not
they’re in use
Runs the command to delete unused volumes
Confirms the deletion of volumes
Volumes that have been deleted](https://image.slidesharecdn.com/dockerinpractice-manningpublications2019-220916213334-8f169daf/85/Docker-in-Practice-Manning-Publications-2019-pdf-150-320.jpg)


![135
TECHNIQUE 48 Are you in a Docker container?
SOLUTION
Check for the existence of the /.dockerenv file. If it exists, you’re likely in a Docker
container.
Note that this isn’t a cast-iron guarantee—if anyone, or anything, removed the
/.dockerenv file, this check could give misleading results. These scenarios are unlikely,
but at worst you’ll get a false positive with no ill effects; you’ll think you’re not in a
Docker container and at worst won’t run a potentially destructive piece of code.
A more realistic scenario is that this undocumented behavior of Docker has been
altered or removed in a newer version of Docker (or you’re using a version from
before the behavior was first implemented).
The code might be part of a startup bash script, as in the following listing, followed
by the remainder of your startup script code.
#!/bin/bash
if ! [ -f /.dockerenv ]
then
echo 'Not in a Docker container, exiting.'
exit 1
fi
Of course, the opposite logic could be used to determine that you are not running
within a container, if that’s your need:
#!/bin/bash
if [ -f /.dockerenv ]
then
echo 'In a Docker container, exiting.'
exit 1
fi
This example uses bash to determine the existence of the file, but the vast majority of
programming languages will have their own ways to determine the existence of files
on the container (or host) filesystem.
DISCUSSION
You may be wondering how often this situation arises. It happens often enough for it
to be a regular discussion point on Docker forums, where somewhat religious argu-
ments flare up about whether this is a valid use case, or whether something else in
your application’s design is amiss.
Leaving these discussions aside, you can easily end up in a situation where you need
to switch your code path depending on whether you’re in a Docker container or not.
One such example we’ve experienced is when using a Makefile to build a container.
Listing 6.3 Shell script fails if it’s run outside a container
Listing 6.4 Shell script fails if it’s run inside a container](https://image.slidesharecdn.com/dockerinpractice-manningpublications2019-220916213334-8f169daf/85/Docker-in-Practice-Manning-Publications-2019-pdf-156-320.jpg)


![139
TECHNIQUE 49 Creating reliable bespoke tools with ENTRYPOINT
command-line option. Create a new folder anywhere with any name you like, move
into it, and place clean_log within it.
#!/bin/bash
echo "Cleaning logs over $1 days old"
find /log_dir -ctime "$1" -name '*log' -exec rm {} ;
Note that the log cleaning takes place on the /log_dir folder. This folder will only
exist when you mount it at runtime. You may have also noticed that there’s no check
for whether an argument has been passed in to the script. The reason for this will be
revealed as we go through the technique.
Now let’s create a Dockerfile in the same directory to create an image, with the
script running as the defined command, or entrypoint.
FROM ubuntu:17.04
ADD clean_log /usr/bin/clean_log
RUN chmod +x /usr/bin/clean_log
ENTRYPOINT ["/usr/bin/clean_log"]
CMD ["7"]
TIP You’ll observe that we generally prefer the array form for CMD and
ENTRYPOINT (for example, CMD ["/usr/bin/command"]) over the shell form
(CMD /usr/bin/command). This is because the shell form automatically pre-
pends a /bin/bash -c command to the command you supply, which can
result in unexpected behavior. Sometimes, however, the shell form is more
useful (see technique 55).
The difference between ENTRYPOINT and CMD often confuses people. The key point to
understand is that an entrypoint will always be run when the image is started, even if a
command is supplied to the docker run invocation. If you try to supply a command, it
will add that as an argument to the entrypoint, replacing the default defined in the
CMD instruction. You can only override the entrypoint if you explicitly pass in an
--entrypoint flag to the docker run command. This means that running the image
with a /bin/bash command won’t give you a shell; rather, it will supply /bin/bash as
an argument to the clean_log script.
The fact that a default argument is defined by the CMD instruction means that the
argument supplied need not be checked. Here’s how you might build and invoke this
tool:
docker build -t log-cleaner .
docker run -v /var/log/myapplogs:/log_dir log-cleaner 365
Listing 7.1 clean_log shell script
Listing 7.2 Creating an image with the clean_log script
Adds the previous corporate
clean_log script to the image
Defines the entrypoint for this image
as being the clean_log script
Defines the default argument for
the entrypoint command (7 days)](https://image.slidesharecdn.com/dockerinpractice-manningpublications2019-220916213334-8f169daf/85/Docker-in-Practice-Manning-Publications-2019-pdf-160-320.jpg)


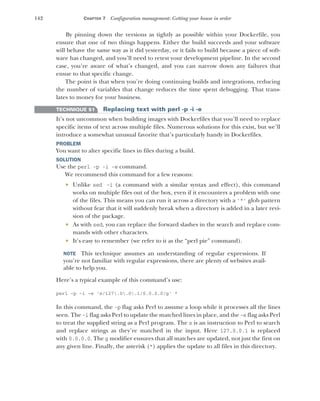
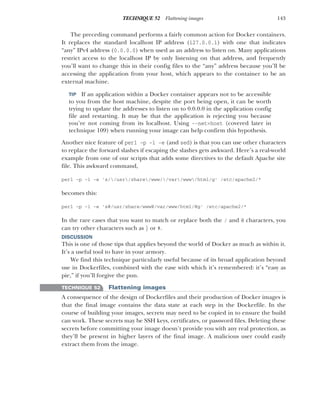
![144 CHAPTER 7 Configuration management: Getting your house in order
One way of handling this problem is to flatten the resulting image.
PROBLEM
You want to remove secret information from the layer history of your image.
SOLUTION
Instantiate a container with the image, export it, import it, and then tag it with the
original image ID.
To demonstrate a scenario where this could be useful, let’s create a simple Docker-
file in a new directory that contains a Big Secret. Run mkdir secrets && cd secrets
and then create a Dockerfile in that folder with the following contents.
FROM debian
RUN echo "My Big Secret" >> /tmp/secret_key
RUN cat /tmp/secret_key
RUN rm /tmp/secret_key
Now run docker build -t mysecret . to build and tag that Dockerfile.
Once it’s built, you can examine the layers of the resulting Docker image with the
docker history command:
$ docker history mysecret
IMAGE CREATED CREATED BY SIZE
55f3c131a35d 3 days ago /bin/sh -c rm /tmp/secret_key
5b376ff3d7cd 3 days ago /bin/sh -c cat /tmp/secret_key 0 B
5e39caf7560f 3 days ago /bin/sh -c echo "My Big Secret" >> /tmp/se 14 B
c90d655b99b2 6 days ago /bin/sh -c #(nop) CMD [/bin/bash] 0 B
30d39e59ffe2 6 days ago /bin/sh -c #(nop) ADD file:3f1a40df75bc567 85.01 MB
511136ea3c5a 20 months ago 0 B
Now imagine that you’ve downloaded this image from a public registry. You could
inspect the layer history and then run the following command to reveal the secret
information:
$ docker run 5b376ff3d7cd cat /tmp/secret_key
My Big Secret
Here we’ve run a specific layer and instructed it to cat the secret key we removed at a
higher layer. As you can see, the file is accessible.
Now you have a “dangerous” container with a secret inside that you’ve seen can be
hacked to reveal its secrets. To make this image safe, you’ll need to flatten it. This
Listing 7.3 A Dockerfile that copies in and deletes a secret
Place a file with some secret
information within your build.
Do something with the secret file. This Dockerfile
only cats the file, but yours might SSH to another
server or encrypt that secret within the image.
Remove the secret file.
Runs the docker history command against
the name of the image you created The layer where you
removed the secret key
The layer where you
added the secret key
The layer that added the Debian filesystem. Note
that this layer is the largest one in the history.
The scratch (empty) layer](https://image.slidesharecdn.com/dockerinpractice-manningpublications2019-220916213334-8f169daf/85/Docker-in-Practice-Manning-Publications-2019-pdf-165-320.jpg)
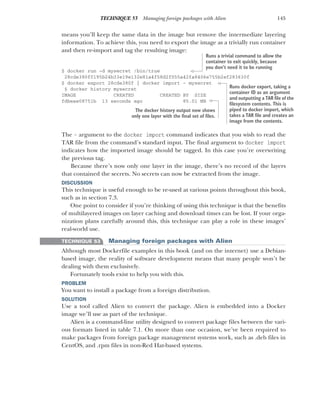
![147
TECHNIQUE 53 Managing foreign packages with Alien
$ mkdir tmp && cd tmp
$ docker run -v $(pwd):/io dockerinpractice/alienate
http://mirrors.kernel.org/ubuntu/pool/main/libe/libeatmydata
➥ /eatmydata_26-2_i386.deb
wgetting http://mirrors.kernel.org/ubuntu/pool/main/libe/libeatmydata
➥ /eatmydata_26-2_i386.deb
--2015-02-26 10:57:28-- http://mirrors.kernel.org/ubuntu/pool/main/libe
➥ /libeatmydata/eatmydata_26-2_i386.deb
Resolving mirrors.kernel.org (mirrors.kernel.org)... 198.145.20.143,
➥ 149.20.37.36, 2001:4f8:4:6f:0:1994:3:14, ...
Connecting to mirrors.kernel.org (mirrors.kernel.org)|198.145.20.143|:80...
➥ connected.
HTTP request sent, awaiting response... 200 OK
Length: 7782 (7.6K) [application/octet-stream]
Saving to: 'eatmydata_26-2_i386.deb'
0K ....... 100% 2.58M=0.003s
2015-02-26 10:57:28 (2.58 MB/s) - 'eatmydata_26-2_i386.deb' saved
➥ [7782/7782]
Examining eatmydata_26-2_i386.deb from /io
eatmydata_26-2_i386.deb appears to be a Debian package
eatmydata-26-3.i386.rpm generated
eatmydata-26.slp generated
eatmydata-26.tgz generated
=========================================================
/io now contains:
eatmydata-26-3.i386.rpm
eatmydata-26.slp
eatmydata-26.tgz
eatmydata_26-2_i386.deb
=========================================================
$ ls -1
eatmydata_26-2_i386.deb
eatmydata-26-3.i386.rpm
eatmydata-26.slp
eatmydata-26.tgz
If you want to run Alien in a container yourself, you can start up the container with this:
docker run -ti --entrypoint /bin/bash dockerinpractice/alienate
WARNING Alien is a best-effort tool, and it’s not guaranteed to work with the
packages you give it.
DISCUSSION
Docker use has brought into sharp focus the “distro wars” that lay dormant for some
time. Most organizations had settled into simply being Red Hat or Debian shops that
didn’t need to be concerned with other packaging systems. Now, it’s not uncommon
to receive requests for the introduction of Docker images that are based on “alien”
distributions within an organization.](https://image.slidesharecdn.com/dockerinpractice-manningpublications2019-220916213334-8f169daf/85/Docker-in-Practice-Manning-Publications-2019-pdf-168-320.jpg)


![152 CHAPTER 7 Configuration management: Getting your house in order
We’re going to walk through the creation of this Chef example, but if you want to
download the working code, it’s available as a Git repository. To download it, run this
command:
git clone https://github.com/docker-in-practice/docker-chef-solo-example.git
We’ll begin with the simple aim of setting up a web server with Apache that outputs
“Hello World!” (what else?) when you hit it. The site will be served from mysite.com,
and a mysiteuser user will be set up on the image.
To begin, create a directory and set it up with the files you’ll need for Chef config-
uration.
$ mkdir chef_example
$ cd chef_example
$ touch attributes.json
$ touch config.rb
$ touch Dockerfile
$ mkdir -p cookbooks/mysite/recipes
$ touch cookbooks/mysite/recipes/default.rb
$ mkdir -p cookbooks/mysite/templates/default
$ touch cookbooks/mysite/templates/default/message.erb
First we’ll fill out attributes.json.
{
"run_list": [
"recipe[apache2::default]",
"recipe[mysite::default]"
]
}
This file sets out the recipes you’re going to run. The apache2 recipes will be retrieved
from a public repository; the mysite recipes will be written here.
Next, populate your config.rb with some basic information, as shown in the next
listing.
base_dir "/chef/"
file_cache_path base_dir + "cache/"
Listing 7.11 Creating the necessary files for a Chef configuration
Listing 7.12 attributes.json
Listing 7.13 config.rb
The Chef attributes file, which defines the variables for this
image (or node, in Chef parlance), will contain the recipes
in the run-list for this image, and other information.
The Chef config file, which sets
some base variables for the
Chef configuration
The Dockerfile
that will build
the image
Creates the default recipe folder, which stores
the Chef instructions for building the image
Creates the
templates for
the dynamically
configured
content](https://image.slidesharecdn.com/dockerinpractice-manningpublications2019-220916213334-8f169daf/85/Docker-in-Practice-Manning-Publications-2019-pdf-173-320.jpg)
![153
TECHNIQUE 55 Building images with Chef Solo
cookbook_path base_dir + "cookbooks/"
verify_api_cert true
This file sets up basic information about the location and adds the configuration set-
ting verify_api_cert to suppress an irrelevant error.
Now we get to the meat of the work: the image’s Chef recipe. Each stanza termi-
nated by an end in the code block defines a Chef resource.
user "mysiteuser" do
comment "mysite user"
home "/home/mysiteuser"
shell "/bin/bash"
end
directory "/var/www/html/mysite" do
owner "mysiteuser"
group "mysiteuser"
mode 0755
action :create
end
template "/var/www/html/mysite/index.html" do
source "message.erb"
variables(
:message => "Hello World!"
)
user "mysiteuser"
group "mysiteuser"
mode 0755
end
web_app "mysite" do
server_name "mysite.com"
server_aliases ["www.mysite.com","mysite.com"]
docroot "/var/www/html/mysite"
cookbook 'apache2'
end
The content of the website is contained within the template file. It contains one line,
which Chef will read, substituting in the “Hello World!” message from config.rb. Chef
will then write the substituted file out to the template target (/var/www/html/mysite/
index.html). This uses a templating language that we’re not going to cover here.
<%= @message %>
Listing 7.14 cookbooks/mysite/recipes/default.rb
Listing 7.15 cookbooks/mysite/templates/default/message.erb
Creates a user
Creates a directory
for the web content
Defines a file that will be placed
in the web folder. This file will be
created from a template defined
in the “source” attribute.
Defines a web app for apache2
In a real scenario you’d have to
change references from mysite
to your website’s name. If
you’re accessing or testing from
your host, this doesn’t matter.](https://image.slidesharecdn.com/dockerinpractice-manningpublications2019-220916213334-8f169daf/85/Docker-in-Practice-Manning-Publications-2019-pdf-174-320.jpg)


![158 CHAPTER 7 Configuration management: Getting your house in order
$ docker run -ti progrium/busybox /bin/ash
/ # opkg-install bash > /dev/null
/ # bash
bash-4.3#
When committed, this results in a 6 MB image.
Another interesting Docker image (which has become a Docker standard for small
images) is gliderlabs/alpine. It’s similar to BusyBox but has a more extensive range of
packages that you can browse at https://pkgs.alpinelinux.org/packages.
The packages are designed to be lean on install. To take a concrete example,
here’s a Dockerfile that results in an image that’s just over a quarter of a gigabyte.
FROM ubuntu:14.04
RUN apt-get update -q
&& DEBIAN_FRONTEND=noninteractive apt-get install -qy mysql-client
&& apt-get clean && rm -rf /var/lib/apt
ENTRYPOINT ["mysql"]
TIP The DEBIAN_FRONTEND=noninteractive before the apt-get install
ensures that the install doesn’t prompt for any input during the install. As you
can’t easily engineer responses to questions when running commands, this is
often useful in Dockerfiles.
By contrast, the following listing results in an image that’s a little over 36 MB.
FROM gliderlabs/alpine:3.6
RUN apk-install mysql-client
ENTRYPOINT ["mysql"]
DISCUSSION
This is an area in which there’s been much development over the past couple of years.
The Alpine base image has edged out BusyBox to become something of a Docker
standard, with the help of some backing from Docker Inc. itself.
In addition, the other more “standard” base images have been on diets themselves.
The Debian image stands at roughly 100 MB as we prepare the second edition of this
book—much less than it originally was.
One point worth referring to here is that there’s a lot of discussion around reduc-
ing the size of images, or using smaller base images, when this is not something that
needs to be addressed. Remember that it’s often best to spend time and effort over-
coming existing bottlenecks than achieving theoretical benefits that may turn out to
give little bang for your buck.
Listing 7.17 Ubuntu plus mysql-client
Listing 7.18 Alpine plus mysql-client](https://image.slidesharecdn.com/dockerinpractice-manningpublications2019-220916213334-8f169daf/85/Docker-in-Practice-Manning-Publications-2019-pdf-179-320.jpg)

![160 CHAPTER 7 Configuration management: Getting your house in order
$ mv hi new_folder
$ cd new_folder
You now have a statically built binary in a fresh directory and have moved into it.
Now create another Dockerfile, as shown in the next listing.
FROM scratch
ADD hi /hi
CMD ["/hi"]
Build and run it as shown in the following listing.
$ docker build -t hello_world .
Sending build context to Docker daemon 931.3 kB
Sending build context to Docker daemon
Step 0 : FROM scratch
--->
Step 1 : ADD hi /hi
---> 2fe834f724f8
Removing intermediate container 01f73ea277fb
Step 2 : ENTRYPOINT /hi
---> Running in 045e32673c7f
---> 5f8802ae5443
Removing intermediate container 045e32673c7f
Successfully built 5f8802ae5443
$ docker run hello_world
Hello world!
$ docker images | grep hello_world
hello_world latest 5f8802ae5443 24 seconds ago 928.3 kB
The image builds, runs, and weighs in at under 1 MB.
A MINIMAL GO WEB SERVER IMAGE
That was a relatively trivial example, but you can apply the same principle to programs
built in Go. An interesting feature of the Go language is that it’s relatively easy to build
such static binaries.
To demonstrate this ability, we created a simple web server in Go whose code is
available at https://github.com/docker-in-practice/go-web-server.
The Dockerfile for building this simple web server is shown in the following listing.
Listing 7.21 Minimal Hello Dockerfile
Listing 7.22 Creating the minimal container
Moves the “hi” binary into this folder
Changes directory into this new folder
Uses the zero-byte scratch image
Adds the “hi” binary to the image
Defaults the image to run the “hi” binary](https://image.slidesharecdn.com/dockerinpractice-manningpublications2019-220916213334-8f169daf/85/Docker-in-Practice-Manning-Publications-2019-pdf-181-320.jpg)
![161
TECHNIQUE 58 The Go model of minimal containers
FROM golang:1.4.2
RUN CGO_ENABLED=0 go get
-a -ldflags '-s' -installsuffix cgo
github.com/docker-in-practice/go-web-server
CMD ["cat","/go/bin/go-web-server"]
If you save this Dockerfile into an empty directory and build it, you’ll now have an
image containing the program. Because you specified the default command of the
image to output the executable content, you now just need to run the image and send
the output to a file on your host, as the following listing shows.
$ docker build -t go-web-server .
$ mkdir -p go-web-server && cd go-web-server
$ docker run go-web-server > go-web-server
$ chmod +x go-web-server
$ echo Hi > page.html
Now, as with the “hi” binary, you have a binary with no library dependencies or need
to access the filesystem. We’re therefore going to create a Dockerfile from the zero-
byte scratch image and add the binary to it, as before.
FROM scratch
ADD go-web-server /go-web-server
ADD page.html /page.html
ENTRYPOINT ["/go-web-server"]
Now build it and run the image. The resulting image is a little over 4 MB in size.
$ docker build -t go-web-server .
$ docker images | grep go-web-server
go-web-server latest de1187ee87f3 3 seconds ago 4.156 MB
$ docker run -p 8080:8080 go-web-server -port 8080
Listing 7.23 Dockerfile to statically compile a Go web server
Listing 7.24 Getting the Go web server from the image
Listing 7.25 Go web server Dockerfile
Listing 7.26 Building and running the Go web server image
This build is known to work against this version
number of the golang image; if the build fails, it
may be that this version is no longer available.
“go get” retrieves the source code from
the URL provided and compiles it locally.
The CGO_ENABLED environment variable
is set to 0 to prevent cross-compilation.
Sets a number of
miscellaneous flags to the
Go compiler to ensure static
compilation and reduce size
The Go web server
source code repository
Defaults the resulting image
to output the executable
Builds and tags the image Makes and moves into a fresh
directory to deposit the binary
Runs the image and redirects
the binary output to a file
Makes the binary
executable
Creates a web page for
the server to serve
Adds the static
binary to the image Adds a page to serve
from the web server
Makes the binary the default
program run by the image](https://image.slidesharecdn.com/dockerinpractice-manningpublications2019-220916213334-8f169daf/85/Docker-in-Practice-Manning-Publications-2019-pdf-182-320.jpg)
![162 CHAPTER 7 Configuration management: Getting your house in order
You can access it on http://localhost:8080. If the port is already in use, you can
replace the 8080s in the preceding code with a port of your choice.
DISCUSSION
If you can bundle applications into one binary, why bother with Docker at all? You can
move the binary around, run multiple copies, and so on.
You can do so if you want, but you’d lose the following:
All the container management tools in the Docker ecosystem
The metadata within the Docker images that document significant application
information, such as ports, volumes, and labels
The isolation that gives Docker its operational power
As a concrete example, etcd is a static binary by default, but when we examine it in
technique 74 we’ll demonstrate it inside a container to make it easier to see how the
same process would work across multiple machines and ease deployment.
TECHNIQUE 59 Using inotifywait to slim containers
We’re now going to take slimming our containers to the next level by using a nifty tool
that tells us what files are being referenced when we run a container.
This could be called the nuclear option, as it can be quite risky to implement on
production. But it can be an instructive means of learning about your system, even if
you don’t follow through with using it for real—a crucial part of configuration man-
agement is understanding what your application requires to operate correctly.
PROBLEM
You want to reduce your container to the smallest possible set of files and permissions.
SOLUTION
Monitor which files are accessed by your program with inotify, and then remove any
that seem unused.
At a high level, you need to know what files are being accessed when you run a
command in a container. If you remove all the other files on the container filesystem,
you’ll theoretically still have everything you need.
In this walkthrough, we’re going to use the log-cleaner-purged image from tech-
nique 56. You’ll install inotify-tools, and then run inotifywait to get a report on
which files were accessed. You’ll then run a simulation of the image’s entrypoint (the
log_clean script). Then, using the file report generated, you’ll remove any file that
hasn’t been accessed.
[host]$ docker run -ti --entrypoint /bin/bash
--name reduce dockerinpractice/log-cleaner-purged
$ apt-get update && apt-get install -y inotify-tools
$ inotifywait -r -d -o /tmp/inotifywaitout.txt
Listing 7.27 Performing manual install steps while monitoring with inotifywait
Overrides the default entrypoint for this image Gives the container a name
you can refer to later
Installs the inotify-tools package
Runs inotifywait in recursive
(-r) and daemon (-d) modes
to get a list of accessed files
in the outfile (specified with
the -o flag)](https://image.slidesharecdn.com/dockerinpractice-manningpublications2019-220916213334-8f169daf/85/Docker-in-Practice-Manning-Publications-2019-pdf-183-320.jpg)
![163
TECHNIQUE 59 Using inotifywait to slim containers
/bin /etc /lib /sbin /var
inotifywait[115]: Setting up watches. Beware: since -r was given, this >
may take a while!
inotifywait[115]: Watches established.
$ inotifywait -r -d -o /tmp/inotifywaitout.txt /usr/bin /usr/games
/usr/include /usr/lib /usr/local /usr/sbin /usr/share /usr/src
inotifywait[118]: Setting up watches. Beware: since -r was given, this >
may take a while!
inotifywait[118]: Watches established.
$ sleep 5
$ cp /usr/bin/clean_log /tmp/clean_log
$ rm /tmp/clean_log
$ bash
$ echo "Cleaning logs over 0 days old"
$ find /log_dir -ctime "0" -name '*log' -exec rm {} ;
$ awk '{print $1$3}' /tmp/inotifywaitout.txt | sort -u >
/tmp/inotify.txt
$ comm -2 -3
<(find /bin /etc /lib /sbin /var /usr -type f | sort)
<(cat /tmp/inotify.txt) > /tmp/candidates.txt
$ cat /tmp/candidates.txt | xargs rm
$ exit
$ exit
At this point you’ve
Placed a watch on files to see what files are being accessed
Run all the commands to simulate the running of the script
Run commands to ensure you access the script you’ll definitely need, and the
rm utility
Gained a list of all files not accessed during the run
Removed all the non-accessed files
Now you can flatten this container (see technique 52) to create a new image and test
that it still works.
$ ID=$(docker export reduce | docker import -)
$ docker tag $ID smaller
$ docker images | grep smaller
Listing 7.28 Flattening the image and running it
Specifies the folders you’re interested in
watching. Note that you don’t watch /tmp
because /tmp/inotifywaitout.txt would cause
an infinite loop if it were itself watched.
Calls inotifywait again on subfolders of the
/usr folder. There are too many files in the
/usr folder for inotifywait to handle, so you
need to specify each one separately.
Sleeps
to give
inotifywait
a decent
amount of
time to
start up
Accesses the script file you’ll need to use, as
well as the rm command, to make sure they’re
marked as being used.
Starts a bash shell,
as the script does,
and runs the
commands the script
would. Note that this
will fail, because we
didn’t mount any
actual log folder
from the host.
Uses the awk utility to
generate a list of
filenames from the
output of the inotifywait
log, and turns it into a
unique and sorted list
Uses the comm utility
to output a list of files
on the filesystem that
were not accessed
Removes all files
not accessed
Exits the bash shell you started
and then the container itself
Flattens the image and puts
the ID into the variable “ID”
Tags the newly flattened
image as “smaller”](https://image.slidesharecdn.com/dockerinpractice-manningpublications2019-220916213334-8f169daf/85/Docker-in-Practice-Manning-Publications-2019-pdf-184-320.jpg)


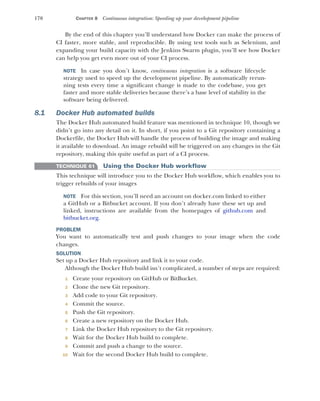
![171
TECHNIQUE 61 Using the Docker Hub workflow
NOTE Both Git and Docker use the term “repository” to refer to a project.
This can confuse people. A Git repository and a Docker repository are not the
same thing, even though here we’re linking the two types of repositories.
CREATE YOUR REPOSITORY ON GITHUB OR BITBUCKET
Create a new repository on GitHub or Bitbucket. You can give it any name you want.
CLONE THE NEW GIT REPOSITORY
Clone your new Git repository to your host machine. The command for this will be
available from the Git project’s homepage.
Change directory into this repository.
ADD CODE TO YOUR GIT REPOSITORY
Now you need to add code to the project.
You can add any Dockerfile you like, but the following listing shows an example
known to work. It consists of two files representing a simple dev tools environment. It
installs some preferred utilities and outputs the bash version you have.
FROM ubuntu:14.04
ENV DEBIAN_FRONTEND noninteractive
RUN apt-get update
RUN apt-get install -y curl
RUN apt-get install -y nmap
RUN apt-get install -y socat
RUN apt-get install -y openssh-client
RUN apt-get install -y openssl
RUN apt-get install -y iotop
RUN apt-get install -y strace
RUN apt-get install -y tcpdump
RUN apt-get install -y lsof
RUN apt-get install -y inotify-tools
RUN apt-get install -y sysstat
RUN apt-get install -y build-essential
RUN echo "source /root/bash_extra" >> /root/.bashrc
ADD bash_extra /root/bash_extra
CMD ["/bin/bash"]
Now you’ll need to add the bash_extra file you referenced and give it the following
content:
bash --version
This file is just for illustration. It shows that you can create a bash file that’s sourced on
startup. In this case it displays the version of bash you’re using in your shell, but it
could contain all manner of things that set up your shell to your preferred state.
Listing 8.1 Dockerfile—simple dev tools container Dockerfile
Installs useful
packages
Adds a line to the
root’s bashrc to
source bash_extra
Adds bash_extra from the
source to the container](https://image.slidesharecdn.com/dockerinpractice-manningpublications2019-220916213334-8f169daf/85/Docker-in-Practice-Manning-Publications-2019-pdf-192-320.jpg)

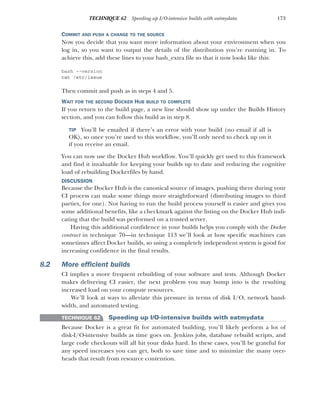
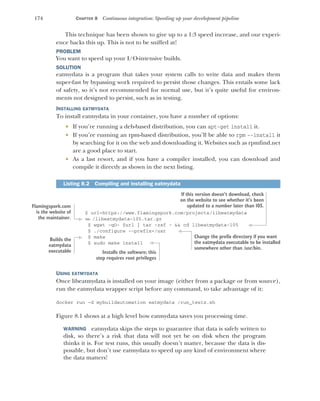

![176 CHAPTER 8 Continuous integration: Speeding up your development pipeline
SOLUTION
Install a Squid proxy for your package manager. Figure 8.2 illustrates how this tech-
nique works.
Because the calls for packages go to the local Squid proxy first, and are only
requested over the internet the first time, there should only be one request over the
internet for each package. If you have hundreds of containers all pulling down the
same large packages from the internet, this can save you a lot of time and money.
NOTE You may have network configuration issues when setting this up on
your host. Advice is given in the following sections to determine whether this
is the case, but if you’re unsure how to proceed, you may need to seek help
from a friendly network admin.
DEBIAN
For Debian (otherwise known as apt or .deb) packages, the setup is simpler because
there is a prepackaged version.
On your Debian-based host run this command:
sudo apt-get install squid-deb-proxy
Ensure that the service is started by telneting to port 8000:
$ telnet localhost 8000
Trying ::1...
Connected to localhost.
Escape character is '^]'.
A software package is normally
retrieved over the internet.
A Squid proxy running on the
host. (The proxy could be run
within a Docker container with a
mounted volume, or on another
server entirely.)
Container 1 makes a request for a
particular package through the
Squid proxy. At the first request,
the proxy will request the
package from the source server
and store it locally.
The three containers all
make requests for packages.
If the other two containers later make
the same request, the Squid proxy
serves them the cached version. The
network request to the package source
server is made only once.
Squid
proxy
Package
source server
Host
Container 1 Container 2 Container 3
Figure 8.2 Using a Squid proxy to cache packages](https://image.slidesharecdn.com/dockerinpractice-manningpublications2019-220916213334-8f169daf/85/Docker-in-Practice-Manning-Publications-2019-pdf-197-320.jpg)
![177
TECHNIQUE 63 Setting up a package cache for faster builds
Press Ctrl-] followed by Ctrl-d to quit if you see the preceding output. If you don’t see
this output, then Squid has either not installed properly or it has installed on a non-
standard port.
To set up your container to use this proxy, we’ve provided the following example
Dockerfile. Bear in mind that the IP address of the host, from the point of view of the
container, may change from run to run. For this reason, you may want to convert this
Dockerfile to a script to be run from within the container before installing new software.
FROM debian
RUN apt-get update -y && apt-get install net-tools
RUN echo "Acquire::http::Proxy "http://$(
route -n | awk '/^0.0.0.0/ {print $2}'
):8000";"
> /etc/apt/apt.conf.d/30proxy
RUN echo "Acquire::http::Proxy::ppa.launchpad.net DIRECT;" >>
/etc/apt/apt.conf.d/30proxy
CMD ["/bin/bash"]
YUM
On the host, ensure Squid is installed by installing the squid package with your pack-
age manager.
Then you’ll need to change the Squid configuration to create a larger cache space.
Open up the /etc/squid/squid.conf file and replace the commented line beginning
with #cache_dir ufs /var/spool/squid with this: cache_dir ufs /var/spool/squid
10000 16 256. This creates a space of 10,000 MB, which should be sufficient.
Ensure the service is started by telneting to port 3128:
$ telnet localhost 3128
Trying ::1...
Connected to localhost.
Escape character is '^]'.
Press Ctrl-] followed by Ctrl-d to quit if you see the preceding output. If you don’t see
this output, then Squid has either not installed properly or has installed on a nonstan-
dard port.
To set up your container to use this proxy, we’ve provided the following example
Dockerfile. Bear in mind that the IP address of the host, from the point of view of the
container, may change from run to run. You may want to convert this Dockerfile to a
script to be run from within the container before installing new software.
Listing 8.3 Configuring a Debian image to use an apt proxy
Ensures the
route tool is
installed
To determine the host’s IP address from the point of view of the
container, runs the route command and uses awk to extract the
relevant IP address from the output (see technique 67).
Port 8000 is used
to connect to the
Squid proxy on the
host machine. The echoed lines with the appropriate
IP address and configuration are added
to apt’s proxy configuration file.](https://image.slidesharecdn.com/dockerinpractice-manningpublications2019-220916213334-8f169daf/85/Docker-in-Practice-Manning-Publications-2019-pdf-198-320.jpg)
![178 CHAPTER 8 Continuous integration: Speeding up your development pipeline
FROM centos:centos7
RUN yum update -y && yum install -y net-tools
RUN echo "proxy=http://$(route -n |
awk '/^0.0.0.0/ {print $2}'):3128" >> /etc/yum.conf
RUN sed -i 's/^mirrorlist/#mirrorlist/'
/etc/yum.repos.d/CentOS-Base.repo
RUN sed -i 's/^#baseurl/baseurl/'
/etc/yum.repos.d/CentOS-Base.repo
RUN rm -f /etc/yum/pluginconf.d/fastestmirror.conf
RUN yum update -y
CMD ["/bin/bash"]
If you set up two containers this way and install the same large package on both, one
after the other, you should notice that the second installation downloads its prerequi-
sites much quicker than the first.
DISCUSSION
You may have observed that you can run the Squid proxy on a container rather than
on the host. That option wasn’t shown here to keep the explanation simple (in some
cases, more steps are required to make Squid work within a container). You can read
more about this, along with how to make containers automatically use the proxy, at
https://github.com/jpetazzo/squid-in-a-can.
TECHNIQUE 64 Headless Chrome in a container
Running tests is a crucial part of CI, and most unit test frameworks will run within
Docker without any issues. But sometimes more involved testing is called for, from
making sure multiple microservices cooperate correctly to ensuring that website fron-
tend functionality still works. Visiting a website frontend requires a browser of some
kind, so to solve this problem we need a way to start a browser inside a container, and
then to control it programmatically.
PROBLEM
You want to test against the Chrome browser within a container, without needing
a GUI.
SOLUTION
Use the Puppeteer Node.js library in an image to automate Chrome actions.
This library is maintained by the Google Chrome development team, and it allows
you to write scripts against Chrome for testing purposes. It’s “headless,” which means
you don’t need a GUI to work against it.
Listing 8.4 Configuring a CentOS image to use a yum proxy
Ensures the
route tool is
installed
To determine the host’s IP address from the point of
view of the container, runs the route command and uses
awk to extract the relevant IP address from the output
Port 3128 is used
to connect to the
Squid proxy on
the host machine.
To avoid cache misses where possible,
removes the mirror lists and uses the base
URLs only. This ensures you only hit one
set of URLs to fetch packages, and you’re
therefore more likely to hit the cached file.
Removes the
fastestmirror
plugin, as it’s no
longer required. Ensures the mirrors are checked. When
running yum update, the mirrors listed in
the config files may have out-of-date
information, so the first update will be slow.](https://image.slidesharecdn.com/dockerinpractice-manningpublications2019-220916213334-8f169daf/85/Docker-in-Practice-Manning-Publications-2019-pdf-199-320.jpg)
![179
TECHNIQUE 64 Headless Chrome in a container
NOTE This image is also maintained by us on GitHub at https://github.com/
docker-in-practice/docker-puppeteer. It’s also accessible as a Docker image
with docker pull dockerinpractice/docker-puppeteer.
The following listing shows a Dockerfile that will create an image containing all you
need to get started with Puppeteer.
FROM ubuntu:16.04
RUN apt-get update -y && apt-get install -y
npm python-software-properties curl git
libpangocairo-1.0-0 libx11-xcb1
libxcomposite1 libxcursor1 libxdamage1
libxi6 libxtst6 libnss3 libcups2 libxss1
libxrandr2 libgconf-2-4 libasound2
libatk1.0-0 libgtk-3-0 vim gconf-service
libappindicator1 libc6 libcairo2 libcups2
libdbus-1-3 libexpat1 libfontconfig1 libgcc1
libgdk-pixbuf2.0-0 libglib2.0-0 libnspr4
libpango-1.0-0 libstdc++6 libx11-6 libxcb1
libxext6 libxfixes3 libxrender1 libxtst6
ca-certificates fonts-liberation lsb-release
xdg-utils wget
RUN curl -sL https://deb.nodesource.com/setup_8.x | bash -
RUN apt-get install -y nodejs
RUN useradd -m puser
USER puser
RUN mkdir -p /home/puser/node_modules
ENV NODE_PATH /home/puppeteer/node_modules
WORKDIR /home/puser/node_modules
RUN npm i webpack
RUN git clone https://github.com/GoogleChrome/puppeteer
WORKDIR /home/puser/node_modules/puppeteer
RUN npm i .
WORKDIR /home/puser/node_modules/puppeteer/examples
RUN perl -p -i -e
"s/puppeteer.launch()/puppeteer.launch({args: ['--no-sandbox']})/" *
CMD echo 'eg: node pdf.js' && bash
Build and run this Dockerfile with this command:
$ docker build -t puppeteer .
Then run it:
$ docker run -ti puppeteer
eg: node pdf.js
puser@03b9be05e81d:~/node_modules/puppeteer/examples$
Listing 8.5 Puppeteer Dockerfile
Starts with an
Ubuntu base image
Installs all the software required.
This is most of the display
libraries required to get Chrome
to operate within a container.
Sets up
the latest
nodejs
version
Installs the Ubuntu
nodejs package
Creates a non-root
user, “puser”
(which the library
requires to run)
Creates a node modules folder
Sets the NODE_PATH
environment
variable to the
node_module folder
Sets the current
working directory to
the node module path
Installs
webpack
(a dependency
of Puppeteer)
Clones the
Puppeteer
module
code
Goes to the Puppeteer code folder
Installs the
Puppeteer
NodeJS
library
Goes to the Puppeteer examples folder
Adds a no-sandbox argument to the
Puppeteer launch arguments, to
overcome a security setting when
running within a container
Starts the container with bash,
adding a helpful echo command](https://image.slidesharecdn.com/dockerinpractice-manningpublications2019-220916213334-8f169daf/85/Docker-in-Practice-Manning-Publications-2019-pdf-200-320.jpg)

![182 CHAPTER 8 Continuous integration: Speeding up your development pipeline
should always try to use the .Xauthority file first. You can secure yourself again after
you try the following steps by running xhost - (though this will lock out your Docker
container):
$ xhost +
access control disabled, clients can connect from any host
$ docker run -e DISPLAY=$DISPLAY -v /tmp/.X11-unix:/tmp/.X11-unix
-it ubuntu:16.04 bash
The first line in the preceding listing disables all access control to X, and the second
runs the container. Note that you don’t have to set the hostname or mount anything
apart from the X socket.
Once you’ve started up your container, it’s time to check that it works. You can do
this by running the following commands if going the .Xauthority route:
root@myhost:/# apt-get update && apt-get install -y x11-apps
[...]
root@myhost:/# su - $EXTUSER -c "xeyes"
Alternatively you can use these slightly different commands if you’re going the xhost
route, because you don’t need to run the command as a specific user:
root@ef351febcee4:/# apt-get update && apt-get install -y x11-apps
[...]
root@ef351febcee4:/# xeyes
This will start up a classic application that tests whether X is working—xeyes. You
should see the eyes follow your cursor as you move it around the screen. Note that
(unlike VNC) the application is integrated into your desktop—if you were to start
xeyes multiple times, you’d see multiple windows.
It’s time to get started with Selenium. If you’ve never used it before, it’s a tool with
the ability to automate browser actions, and it’s commonly used to test website code—
it needs a graphical display for the browser to run in. Although it’s most commonly
used with Java, we’re going to use Python to allow more interactivity.
The following listing first installs Python, Firefox, and a Python package manager,
and then it uses the Python package manager to install the Selenium Python package.
It also downloads the “driver” binary that Selenium uses to control Firefox. A Python
REPL is then started, and the Selenium library is used to create a Firefox instance.
For simplicity, this will only cover the xhost route—to go the Xauthority route,
you’ll need to create a home directory for the user so Firefox has somewhere to save
its profile settings.
Listing 8.8 Starting a container with xhost-enabled display](https://image.slidesharecdn.com/dockerinpractice-manningpublications2019-220916213334-8f169daf/85/Docker-in-Practice-Manning-Publications-2019-pdf-203-320.jpg)
![183
TECHNIQUE 65 Running Selenium tests inside Docker
root@myhost:/# apt-get install -y python2.7 python-pip firefox wget
[...]
root@myhost:/# pip install selenium
Collecting selenium
[...]
Successfully installed selenium-3.5.0
root@myhost:/# url=https://github.com/mozilla/geckodriver/releases/download
➥ /v0.18.0/geckodriver-v0.18.0-linux64.tar.gz
root@myhost:/# wget -qO- $url | tar -C /usr/bin -zxf -
root@myhost:/# python
Python 2.7.6 (default, Mar 22 2014, 22:59:56)
[GCC 4.8.2] on linux2
Type "help", "copyright", "credits" or "license" for more information.
>>> from selenium import webdriver
>>> b = webdriver.Firefox()
As you may have noticed, Firefox has launched and appeared on your screen.
You can now experiment with Selenium. An example session running against
GitHub follows—you’ll need a basic understanding of CSS selectors to understand
what’s going on here. Note that websites frequently change, so this particular snippet
may need modifying to work correctly:
>>> b.get('https://github.com/search')
>>> searchselector = '#search_form input[type="text"]'
>>> searchbox = b.find_element_by_css_selector(searchselector)
>>> searchbox.send_keys('docker-in-practice')
>>> searchbox.submit()
>>> import time
>>> time.sleep(2) # wait for page JS to run
>>> usersxpath = '//nav//a[contains(text(), "Users")]'
>>> userslink = b.find_element_by_xpath(usersxpath)
>>> userslink.click()
>>> dlinkselector = '.user-list-info a'
>>> dlink = b.find_elements_by_css_selector(dlinkselector)[0]
>>> dlink.click()
>>> mlinkselector = '.meta-item a'
>>> mlink = b.find_element_by_css_selector(mlinkselector)
>>> mlink.click()
The details here aren’t important, though you can get an idea of what’s going on by
switching to Firefox between commands—we’re navigating to the docker-in-practice
organization on GitHub, and clicking the organization link. The main takeaway is that
we’re writing commands in Python in our container and seeing them take effect in
the Firefox window running inside the container, but visible on the desktop.
This is great for debugging tests you write, but how would you integrate them into
a CI pipeline with the same Docker image? A CI server typically doesn’t have a graphi-
cal display, so you need to make this work without mounting your own X server socket.
But Firefox still needs an X server to run on.
Listing 8.9 Installing the Selenium requirements and starting a browser](https://image.slidesharecdn.com/dockerinpractice-manningpublications2019-220916213334-8f169daf/85/Docker-in-Practice-Manning-Publications-2019-pdf-204-320.jpg)
![184 CHAPTER 8 Continuous integration: Speeding up your development pipeline
There’s a useful tool created for situations like this called xvfb, which pretends to
have an X server running for applications to use, but it doesn’t require a monitor.
To see how this works, we’ll install xvfb, commit the container, tag it as selenium,
and create a test script:
>>> exit()
root@myhost:/# apt-get install -y xvfb
[...]
root@myhost:/# exit
$ docker commit ef351febcee4 selenium
d1cbfbc76790cae5f4ae95805a8ca4fc4cd1353c72d7a90b90ccfb79de4f2f9b
$ cat > myscript.py << EOF
from selenium import webdriver
b = webdriver.Firefox()
print 'Visiting github'
b.get('https://github.com/search')
print 'Performing search'
searchselector = '#search_form input[type="text"]'
searchbox = b.find_element_by_css_selector(searchselector)
searchbox.send_keys('docker-in-practice')
searchbox.submit()
print 'Switching to user search'
import time
time.sleep(2) # wait for page JS to run
usersxpath = '//nav//a[contains(text(), "Users")]'
userslink = b.find_element_by_xpath(usersxpath)
userslink.click()
print 'Opening docker in practice user page'
dlinkselector = '.user-list-info a'
dlink = b.find_elements_by_css_selector(dlinkselector)[99]
dlink.click()
print 'Visiting docker in practice site'
mlinkselector = '.meta-item a'
mlink = b.find_element_by_css_selector(mlinkselector)
mlink.click()
print 'Done!'
EOF
Note the subtle difference in the assignment of the dlink variable (indexing to posi-
tion 99 rather than 0). By attempting to get the hundredth result containing the text
“Docker in Practice”, you’ll trigger an error, which will cause the Docker container to
exit with a nonzero status and trigger failures in the CI pipeline.
Time to try it out:
$ docker run --rm -v $(pwd):/mnt selenium sh -c
"xvfb-run -s '-screen 0 1024x768x24 -extension RANDR'
python /mnt/myscript.py"
Visiting github
Performing search
Switching to user search
Listing 8.10 Creating a Selenium test script](https://image.slidesharecdn.com/dockerinpractice-manningpublications2019-220916213334-8f169daf/85/Docker-in-Practice-Manning-Publications-2019-pdf-205-320.jpg)
![185
TECHNIQUE 66 Running the Jenkins master within a Docker container
Opening docker in practice user page
Traceback (most recent call last):
File "myscript.py", line 15, in <module>
dlink = b.find_elements_by_css_selector(dlinkselector)[99]
IndexError: list index out of range
$ echo $?
1
You’ve run a self-removing container that executes the Python test script running
under a virtual X server. As expected, it failed and returned a nonzero exit code.
NOTE The sh -c "command string here" is an unfortunate result of how Docker
treats CMD values by default. If you built this image with a Dockerfile, you’d be
able to remove the sh -c and make xvfb-run -s '-screen 0 1024x768x24
-extension RANDR' the entrypoint, allowing you to pass the test command as
image arguments.
DISCUSSION
Docker is a flexible tool and can be put to some initially surprising uses (graphical
apps in this case). Some people run all of their graphical apps inside Docker, includ-
ing games!
We wouldn’t go that far (technique 40 does look at doing this for at least your
developer tools) but we’ve found that re-examining assumptions about Docker can
lead to some surprising use cases. For example, appendix A talks about running
graphical Linux applications on Windows after installing Docker for Windows.
8.3 Containerizing your CI process
Once you have a consistent development process across teams, it’s important to also
have a consistent build process. Randomly failing builds defeat the point of Docker.
As a result, it makes sense to containerize your entire CI process. This not only
makes sure your builds are repeatable, it allows you to move your CI process anywhere
without fear of leaving some vital piece of configuration behind (likely discovered
with much frustration later).
In these techniques, we’ll use Jenkins (as this is the most widely used CI tool), but
the same techniques should apply to other CI tools. We don’t assume a great deal of
familiarity with Jenkins here, but we won’t cover setting up standard tests and builds.
That information isn’t essential to the techniques here.
TECHNIQUE 66 Running the Jenkins master within a Docker container
Putting the Jenkins master inside a container doesn’t have as many benefits as doing
the same for a slave (see the next technique), but it does give you the normal Docker
win of immutable images. We’ve found that being able to commit known-good master
configurations and plugins eases the burden of experimentation significantly.
PROBLEM
You want a portable Jenkins server.](https://image.slidesharecdn.com/dockerinpractice-manningpublications2019-220916213334-8f169daf/85/Docker-in-Practice-Manning-Publications-2019-pdf-206-320.jpg)

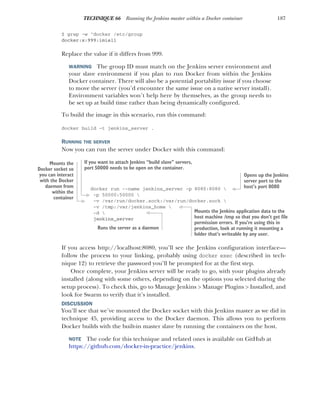
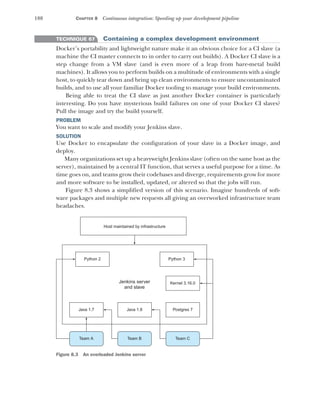


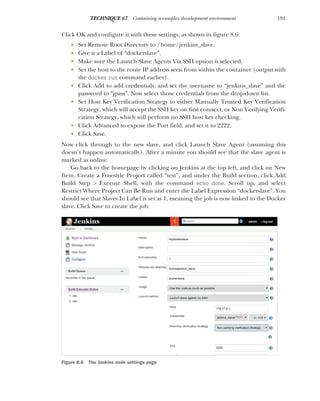
![192 CHAPTER 8 Continuous integration: Speeding up your development pipeline
Click Build Now, and then click the build “#1” link that appears below on the left.
Then click Console Output, and you should see output like this in the main window:
Started by user admin
Building remotely on mydockerslave (dockerslave)
➥ in workspace /home/jenkins_slave/workspace/test
[test] $ /bin/sh -xe /tmp/jenkins5620917016462917386.sh
+ echo done
done
Finished: SUCCESS
Well done! You’ve successfully created your own Jenkins slave.
Now if you want to create your own bespoke slave, all you need to do is alter the
slave image’s Dockerfile to your taste, and run that instead of the example one.
NOTE The code for this technique and related ones is available on GitHub at
https://github.com/docker-in-practice/jenkins.
DISCUSSION
This technique walks you down the road of creating a container to act like a virtual
machine, much like technique 12 but with the added complexity of Jenkins integra-
tion. One particularly useful strategy is to also mount the Docker socket inside the
container and install the Docker client binary so you can perform Docker builds. See
technique 45 for information on mounting the Docker socket (for a different pur-
pose) and appendix A for installation details.
TECHNIQUE 68 Scaling your CI with Jenkins’ Swarm plugin
Being able to reproduce environments is a big win, but your build capacity is still con-
strained by the number of dedicated build machines you have available. If you want to
do experiments on different environments with the newfound flexibility of Docker
slaves, this may become frustrating. Capacity can also become a problem for more
mundane reasons—the growth of your team!
PROBLEM
You want your CI compute to scale up with your development work rate.
SOLUTION
Use Jenkins’ Swarm plugin and a Docker Swarm slave to dynamically provision Jenkins
slaves.
NOTE It’s been mentioned before, but it’s worth repeating here: the Jenkins’
Swarm plugin is not at all related to Docker’s Swarm technology. They are two
entirely unrelated things that happen to use the same word. The fact that they
can be used together here is pure coincidence.
Many small- to medium-sized businesses have a model for CI where one or more Jen-
kins servers are devoted to supplying the resources required to run Jenkins jobs. This
is illustrated in figure 8.7.](https://image.slidesharecdn.com/dockerinpractice-manningpublications2019-220916213334-8f169daf/85/Docker-in-Practice-Manning-Publications-2019-pdf-213-320.jpg)

![194 CHAPTER 8 Continuous integration: Speeding up your development pipeline
The Dockerfile shown in listing 8.13 creates an image with the Jenkins Swarm client
plugin installed, allowing a Jenkins master with the appropriate Jenkins Swarm server
plugin to connect and run jobs. It begins in the same way as the normal Jenkins slave
Dockerfile in the last technique.
FROM ubuntu:16.04
ENV DEBIAN_FRONTEND noninteractive
RUN groupadd -g 1000 jenkins_slave
RUN useradd -d /home/jenkins_slave -s /bin/bash
-m jenkins_slave -u 1000 -g jenkins_slave
RUN echo jenkins_slave:jpass | chpasswd
RUN apt-get update && apt-get install -y
openssh-server openjdk-8-jre wget iproute2
RUN wget -O /home/jenkins_slave/swarm-client-3.4.jar
https://repo.jenkins-ci.org/releases/org/jenkins-ci/plugins/swarm-client
➥ /3.4/swarm-client-3.4.jar
COPY startup.sh /usr/bin/startup.sh
RUN chmod +x /usr/bin/startup.sh
ENTRYPOINT ["/usr/bin/startup.sh"]
The following listing is the startup script copied into the preceding Dockerfile.
#!/bin/bash
export HOST_IP=$(ip route | grep ^default | awk '{print $3}')
export JENKINS_IP=${JENKINS_IP:-$HOST_IP}
export JENKINS_PORT=${JENKINS_PORT:-8080}
export JENKINS_LABELS=${JENKINS_LABELS:-swarm}
export JENKINS_HOME=${JENKINS_HOME:-$HOME}
echo "Starting up swarm client with args:"
echo "$@"
echo "and env:"
echo "$(env)"
set -x
java -jar
/home/jenkins_slave/swarm-client-3.4.jar
-sslFingerprints '[]'
-fsroot "$JENKINS_HOME"
-labels "$JENKINS_LABELS"
-master http://$JENKINS_IP:$JENKINS_PORT "$@"
Most of the preceding script sets up and outputs the environment for the Java call at
the end. The Java call runs the Swarm client, which turns the machine on which it’s
Listing 8.13 Dockerfile
Listing 8.14 startup.sh
Retrieves the Jenkins
Swarm plugin
Copies the startup
script to the container
Marks the startup script as executable
Makes the startup script the
default command run
Determines the IP
address of the host
Uses the host IP as the Jenkins server IP, unless JENKINS_IP
was set in the environment of the call to this script
Sets the
Jenkins
port to
8080 by
default
Sets the
Jenkins label
for this slave
to “swarm”
Sets the Jenkins home
directory to the
jenkins_slave user’s
home by default
Logs the commands run
from here as part of the
output of the script
Runs the Jenkins
Swarm client
Sets the root directory
to the Jenkins home
directory
Sets the label
to identify the
client for jobs
Sets the Jenkins
server to point
the slave at](https://image.slidesharecdn.com/dockerinpractice-manningpublications2019-220916213334-8f169daf/85/Docker-in-Practice-Manning-Publications-2019-pdf-215-320.jpg)


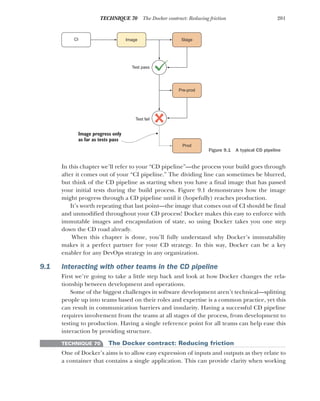


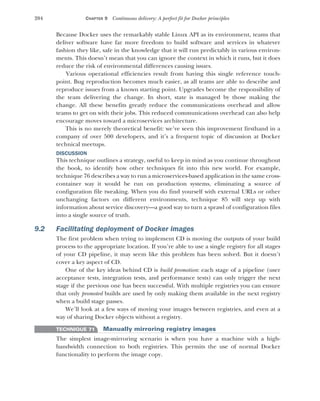
![205
TECHNIQUE 71 Manually mirroring registry images
PROBLEM
You want to copy an image between two registries.
SOLUTION
Manually use the standard pulling and pushing commands in Docker to transfer the
image.
The solution for this involves:
Pulling the image from the registry
Retagging the image
Pushing the retagged image
If you have an image at test-registry.company.com and you want to move it to stage-
registry.company.com, the process is simple.
$ IMAGE=mygroup/myimage:mytag
$ OLDREG=test-registry.company.com
$ NEWREG=stage-registry.company.com
$ docker pull $OLDREG/$MYIMAGE
[...]
$ docker tag -f $OLDREG/$MYIMAGE $NEWREG/$MYIMAGE
$ docker push $NEWREG/$MYIMAGE
$ docker rmi $OLDREG/$MYIMAGE
$ docker image prune -f
There are three important points to note about this process:
1 The new image has been force tagged. This means that any older image with
the same name on the machine (left there for layer-caching purposes) will lose
the image name, so the new image can be tagged with the desired name.
2 All dangling images have been removed. Although layer caching is extremely
useful for speeding up deployment, leaving unused image layers around can
quickly use up disk space. In general, old layers are less likely to be used as time
passes and they become more out-of-date.
3 You may need to log into your new registry with docker login.
The image is now available in the new registry for use in subsequent stages of your CD
pipeline.
DISCUSSION
This technique illustrates a simple point about Docker tagging: the tag itself contains
information about the registry it belongs to.
Most of the time this is hidden from users because they normally pull from the
default registry (the Docker Hub at docker.io). When you’re starting to work with reg-
istries, this issue comes to the fore because you have to explicitly tag the registry with
the registry location in order to push it to the correct endpoint.
Listing 9.1 Transferring an image from a test to a staging registry](https://image.slidesharecdn.com/dockerinpractice-manningpublications2019-220916213334-8f169daf/85/Docker-in-Practice-Manning-Publications-2019-pdf-226-320.jpg)
![206 CHAPTER 9 Continuous delivery: A perfect fit for Docker principles
TECHNIQUE 72 Delivering images over constrained connections
Even with layering, pushing and pulling Docker images can be a bandwidth-hungry
process. In a world of free large-bandwidth connections, this wouldn’t be a problem,
but sometimes reality forces us to deal with low-bandwidth connections or costly band-
width metering between data centers. In this situation you need to find a more effi-
cient way of transferring differences, or the CD ideal of being able to run your
pipeline multiple times a day will remain out of reach.
The ideal solution is a tool that will reduce the average size of an image so it’s even
smaller than classic compression methods can manage.
PROBLEM
You want to copy an image between two machines with a low-bandwidth connection
between them.
SOLUTION
Export the image, split it up, transfer the chunks, and import the recombined image
on the other end.
To do all this, we must first introduce a new tool: bup. It was created as a backup
tool with extremely efficient deduplication—deduplication being the ability to recog-
nize where data is used repeatedly and only store it once. It works particularly well on
archives containing a number of similar files, which is conveniently a format Docker
allows you to export images as.
For this technique we’ve created an image called dbup (short for “Docker bup”),
which makes it easier to use bup to deduplicate images. You can find the code behind
it at https://github.com/docker-in-practice/dbup.
As a demonstration, let’s see how much bandwidth we could save when upgrading
from the ubuntu:14.04.1 image to ubuntu:14.04.2. Bear in mind that in practice you’d
have a number of layers on top of each of these, which Docker would want to com-
pletely retransfer after a lower layer change. By contrast, this technique would recog-
nize the significant similarities and give you much greater savings than you’ll see in
the following example.
The first step is to pull both of those images so we can see how much is transferred
over the network.
$ docker pull ubuntu:14.04.1 && docker pull ubuntu:14.04.2
[...]
$ docker history ubuntu:14.04.1
IMAGE CREATED CREATED BY SIZE
ab1bd63e0321 2 years ago /bin/sh -c #(nop) CMD [/bin/bash] 0B
<missing> 2 years ago /bin/sh -c sed -i 's/^#s*(deb.*universe... 1.9kB
<missing> 2 years ago /bin/sh -c echo '#!/bin/sh' > /usr/sbin/po... 195kB
<missing> 2 years ago /bin/sh -c #(nop) ADD file:62400a49cced0d7... 188MB
<missing> 4 years ago 0B
$ docker history ubuntu:14.04.2
Listing 9.2 Examining and saving two Ubuntu images](https://image.slidesharecdn.com/dockerinpractice-manningpublications2019-220916213334-8f169daf/85/Docker-in-Practice-Manning-Publications-2019-pdf-227-320.jpg)
![207
TECHNIQUE 72 Delivering images over constrained connections
IMAGE CREATED CREATED BY SIZE
44ae5d2a191e 2 years ago /bin/sh -c #(nop) CMD ["/bin/bash"] 0B
<missing> 2 years ago /bin/sh -c sed -i 's/^#s*(deb.*universe... 1.9kB
<missing> 2 years ago /bin/sh -c echo '#!/bin/sh' > /usr/sbin/po... 195kB
<missing> 2 years ago /bin/sh -c #(nop) ADD file:0a5fd3a659be172... 188MB
$ docker save ubuntu:14.04.1 | gzip | wc -c
65973497
$ docker save ubuntu:14.04.2 | gzip | wc -c
65994838
The bottom layer on each image (the ADD) is the majority of the size, and you can see
that the file being added is different, so you can treat the whole image size as the
amount that would be transferred when pushing the new image. Also note that the
Docker registry uses gzip compression to transfer layers, so we’ve included that in our
measurement (instead of taking the size from docker history). About 65 MB is being
transferred in both the initial deployment and the subsequent deployment.
In order to get started, you’ll need two things—a directory to store the pool of data
bup uses as storage, and the dockerinpractice/dbup image. You can then go ahead
and add your image to the bup data pool.
$ mkdir bup_pool
$ alias dbup="docker run --rm
-v $(pwd)/bup_pool:/pool -v /var/run/docker.sock:/var/run/docker.sock
dockerinpractice/dbup"
$ dbup save ubuntu:14.04.1
Saving image!
Done!
$ du -sh bup_pool
74M bup_pool
$ dbup save ubuntu:14.04.2
Saving image!
Done!
$ du -sh bup_pool
96M bup_pool
Adding the second image to the bup data pool has only increased the size by about 20
MB. Assuming you synced the folder to another machine (possibly with rsync) after
adding ubuntu:14.04.1, syncing the folder again will only transfer 20 MB (as opposed
to the 65 MB before).
You then need to load the image at the other end.
$ dbup load ubuntu:14.04.1
Loading image!
Done!
Listing 9.3 Saving two Ubuntu images into the bup data pool
Listing 9.4 Loading an image from the bup data pool](https://image.slidesharecdn.com/dockerinpractice-manningpublications2019-220916213334-8f169daf/85/Docker-in-Practice-Manning-Publications-2019-pdf-228-320.jpg)

![209
TECHNIQUE 73 Sharing Docker objects as TAR files
The first two commands work with flat filesystems. The command docker export out-
puts a TAR file of the files that make up the state of the container. As always with Docker,
the state of running processes isn’t stored—only the files. The command docker import
creates a Docker image—with no history or metadata—from a TAR file.
These commands aren’t symmetrical—you can’t create a container from an existing
container using only import and export. This asymmetry can be useful because it
allows you to docker export an image to a TAR file, and then docker import it to “lose”
all the layer history and metadata. This is the image-flattening approach described in
technique 52.
If you’re exporting or saving to a TAR file, the file is sent to stdout by default, so
make sure you save it to a file like this:
docker pull debian:7:3
[...]
docker save debian:7.3 > debian7_3.tar
A TAR file like the one just created can be flung around the network safely (though
you may want to compress it with gzip first), and other people can use them to import
images intact. They can be sent by email or scp if you have access:
$ scp debian7_3.tar example.com:/tmp/debian7_3.tar
You can take this one step further and deliver images to other users’ Docker daemons
directly—assuming you have the permission.
docker save debian:7.3 |
ssh example.com
docker load -
If you want to discard the history of the image, you can use import instead of load.
Table 9.1 Export and import vs. save and load
Command Creates? Of what? From what?
export TAR file Container filesystem Container
import Docker image Flat filesystem TAR file
save TAR file Docker image (with history) Image
load Docker image Docker image (with history) TAR file
Listing 9.5 Sending an image directly over SSH
Extracts the Debian version 7.3 image
and pipes it to the ssh command Runs a command on
a remote machine,
example.com
Takes the TAR file it’s given and creates an image
with all the history. The dash indicates that the
TAR file is being delivered over standard input.](https://image.slidesharecdn.com/dockerinpractice-manningpublications2019-220916213334-8f169daf/85/Docker-in-Practice-Manning-Publications-2019-pdf-230-320.jpg)

![211
TECHNIQUE 74 Informing your containers with etcd
NOTE Each value held by etcd should be kept small—under 512 KB is a good
rule of thumb; past this point you should consider doing benchmarking to
verify that etcd is still performing as you’d expect. This limit is not unique to
etcd. You should bear it in mind for other key/value stores like Zookeeper
and Consul.
Because etcd cluster nodes need to talk to each other, the first step is to identify your
external IP address. If you were going to run the nodes on different machines, you’d
need the external IP for each of them.
$ ip addr | grep 'inet ' | grep -v 'lo$|docker0$'
inet 192.168.1.123/24 brd 192.168.1.255 scope global dynamic wlp3s0
inet 172.18.0.1/16 scope global br-0c3386c9db5b
Here we’ve looked for all IPv4 interfaces and excluded LoopBack and Docker. The
top line (the first IP address on that line) is the one you need, and it represents the
machine on the local network—try pinging it from another machine if you’re not
sure.
We can now get started with the three-node cluster, all running on the same
machine. Be careful with the following arguments—the ports being exposed and
advertised change on each line, as do the names of the cluster nodes and containers.
$ IMG=quay.io/coreos/etcd:v3.2.7
$ docker pull $IMG
[...]
$ HTTPIP=http://192.168.1.123
$ CLUSTER="etcd0=$HTTPIP:2380,etcd1=$HTTPIP:2480,etcd2=$HTTPIP:2580"
$ ARGS="etcd"
$ ARGS="$ARGS -listen-client-urls http://0.0.0.0:2379"
$ ARGS="$ARGS -listen-peer-urls http://0.0.0.0:2380"
$ ARGS="$ARGS -initial-cluster-state new"
$ ARGS="$ARGS -initial-cluster $CLUSTER"
$ docker run -d -p 2379:2379 -p 2380:2380 --name etcd0 $IMG
$ARGS -name etcd0 -advertise-client-urls $HTTPIP:2379
-initial-advertise-peer-urls $HTTPIP:2380
912390c041f8e9e71cf4cc1e51fba2a02d3cd4857d9ccd90149e21d9a5d3685b
$ docker run -d -p 2479:2379 -p 2480:2380 --name etcd1 $IMG
$ARGS -name etcd1 -advertise-client-urls $HTTPIP:2479
-initial-advertise-peer-urls $HTTPIP:2480
446b7584a4ec747e960fe2555a9aaa2b3e2c7870097b5babe65d65cffa175dec
$ docker run -d -p 2579:2379 -p 2580:2380 --name etcd2 $IMG
$ARGS -name etcd2 -advertise-client-urls $HTTPIP:2579
-initial-advertise-peer-urls $HTTPIP:2580
3089063b6b2ba0868e0f903a3d5b22e617a240cec22ad080dd1b497ddf4736be
Listing 9.7 Identifying IP addresses of the local machine
Listing 9.8 Setting up a three-node etcd cluster
The external IP address
of your machine
Uses the external IP address of the machine in
the cluster definition, giving the nodes a way to
communicate with others. Because all nodes
will be on the same host, the cluster ports (for
connecting to other nodes) must be different.
The port for
handling requests
from clients
The port to
listen on for
talking to
other nodes in
the cluster,
corresponding
to the ports
specified in
$CLUSTER](https://image.slidesharecdn.com/dockerinpractice-manningpublications2019-220916213334-8f169daf/85/Docker-in-Practice-Manning-Publications-2019-pdf-232-320.jpg)


![215
TECHNIQUE 75 Using confd to enable zero-downtime switchovers
The first step is to start an application that will serve as an old application that you’ll
eventually update. Python comes with Ubuntu and has a built-in web server, so we’ll
use it as an example.
$ ip addr | grep 'inet ' | grep -v 'lo$|docker0$'
inet 10.194.12.221/20 brd 10.194.15.255 scope global eth0
$ HTTPIP=http://10.194.12.221
$ docker run -d --name py1 -p 80 ubuntu:14.04.2
sh -c 'cd / && python3 -m http.server 80'
e6b769ec3efa563a959ce771164de8337140d910de67e1df54d4960fdff74544
$ docker inspect -f '{{.NetworkSettings.Ports}}' py1
map[80/tcp:[{0.0.0.0 32768}]]
$ curl -s localhost:32768 | tail | head -n 5
<li><a href="sbin/">sbin/</a></li>
<li><a href="srv/">srv/</a></li>
<li><a href="sys/">sys/</a></li>
<li><a href="tmp/">tmp/</a></li>
<li><a href="usr/">usr/</a></li>
The HTTP server has started successfully, and we used the filter option of the inspect
command to pull out information about what port on the host is mapped to point
inside the container.
Now make sure you have etcd running—this technique assumes you’re still in the
same working environment as the previous technique. This time you’re going to use
etcdctl (short for “etcd controller”) to interact with etcd (rather than curling etcd
directly) for simplicity.
$ IMG=dockerinpractice/etcdctl
$ docker pull dockerinpractice/etcdctl
[...]
$ alias etcdctl="docker run --rm $IMG -C "$HTTPIP:8080""
$ etcdctl set /test value
value
$ etcdctl ls
/test
This has downloaded an etcdctl Docker image that we prepared, and it has set up an
alias to always connect the etcd cluster set up previously. Now start up nginx.
$ IMG=dockerinpractice/confd-nginx
$ docker pull $IMG
[...]
$ docker run -d --name nginx -p 8000:80 $IMG $HTTPIP:8080
ebdf3faa1979f729327fa3e00d2c8158b35a49acdc4f764f0492032fa5241b29
Listing 9.13 Starting a simple fileserver in a container
Listing 9.14 Download and use the etcdctl Docker image
Listing 9.15 Start an nginx + confd container](https://image.slidesharecdn.com/dockerinpractice-manningpublications2019-220916213334-8f169daf/85/Docker-in-Practice-Manning-Publications-2019-pdf-236-320.jpg)
![216 CHAPTER 9 Continuous delivery: A perfect fit for Docker principles
This is an image we prepared earlier, which uses confd to retrieve information from
etcd and automatically update configuration files. The parameter that we pass tells the
container where it can connect to the etcd cluster. Unfortunately we haven’t told it
where it can find our apps yet, so the logs are filled with errors.
Let’s add the appropriate information to etcd.
$ docker logs nginx
Using http://10.194.12.221:8080 as backend
2015-05-18T13:09:56Z ebdf3faa1979 confd[14]: >
ERROR 100: Key not found (/app) [14]
2015-05-18T13:10:06Z ebdf3faa1979 confd[14]: >
ERROR 100: Key not found (/app) [14]
$ echo $HTTPIP
http://10.194.12.221
$ etcdctl set /app/upstream/py1 10.194.12.221:32768
10.194.12.221:32768
$ sleep 10
$ docker logs nginx
Using http://10.194.12.221:8080 as backend
2015-05-18T13:09:56Z ebdf3faa1979 confd[14]: >
ERROR 100: Key not found (/app) [14]
2015-05-18T13:10:06Z ebdf3faa1979 confd[14]: >
ERROR 100: Key not found (/app) [14]
2015-05-18T13:10:16Z ebdf3faa1979 confd[14]: >
ERROR 100: Key not found (/app) [14]
2015-05-18T13:10:26Z ebdf3faa1979 confd[14]: >
INFO Target config /etc/nginx/conf.d/app.conf out of sync
2015-05-18T13:10:26Z ebdf3faa1979 confd[14]: >
INFO Target config /etc/nginx/conf.d/app.conf has been updated
$ curl -s localhost:8000 | tail | head -n5
<li><a href="sbin/">sbin/</a></li>
<li><a href="srv/">srv/</a></li>
<li><a href="sys/">sys/</a></li>
<li><a href="tmp/">tmp/</a></li>
<li><a href="usr/">usr/</a></li>
The update to etcd has been read by confd and applied to the nginx configuration
file, allowing you to visit your simple file server. The sleep command is included
because confd has been configured to check for updates every 10 seconds. Behind the
scenes, a confd daemon running in the confd-nginx container polls for changes in the
etcd cluster, using a template within the container to regenerate the nginx configura-
tion only when changes are detected.
Let’s say we’ve decided we want to serve /etc rather than /. We’ll now start up our
second application and add it to etcd. Because we’ll then have two backends, we’ll end
up getting responses from each of them.
Listing 9.16 Demonstrating the auto-configuration of the nginx container](https://image.slidesharecdn.com/dockerinpractice-manningpublications2019-220916213334-8f169daf/85/Docker-in-Practice-Manning-Publications-2019-pdf-237-320.jpg)
![217
TECHNIQUE 75 Using confd to enable zero-downtime switchovers
$ docker run -d --name py2 -p 80 ubuntu:14.04.2
sh -c 'cd /etc && python3 -m http.server 80'
9b5355b9b188427abaf367a51a88c1afa2186e6179ab46830715a20eacc33660
$ docker inspect -f '{{.NetworkSettings.Ports}}' py2
map[80/tcp:[{0.0.0.0 32769}]]
$ curl -s $HTTPIP:32769 | tail | head -n 5
<li><a href="udev/">udev/</a></li>
<li><a href="update-motd.d/">update-motd.d/</a></li>
<li><a href="upstart-xsessions">upstart-xsessions</a></li>
<li><a href="vim/">vim/</a></li>
<li><a href="vtrgb">vtrgb@</a></li>
$ echo $HTTPIP
http://10.194.12.221
$ etcdctl set /app/upstream/py2 10.194.12.221:32769
10.194.12.221:32769
$ etcdctl ls /app/upstream
/app/upstream/py1
/app/upstream/py2
$ curl -s localhost:8000 | tail | head -n 5
<li><a href="sbin/">sbin/</a></li>
<li><a href="srv/">srv/</a></li>
<li><a href="sys/">sys/</a></li>
<li><a href="tmp/">tmp/</a></li>
<li><a href="usr/">usr/</a></li>
$ curl -s localhost:8000 | tail | head -n 5
<li><a href="udev/">udev/</a></li>
<li><a href="update-motd.d/">update-motd.d/</a></li>
<li><a href="upstart-xsessions">upstart-xsessions</a></li>
<li><a href="vim/">vim/</a></li>
<li><a href="vtrgb">vtrgb@</a></li>
In the preceding process, we checked that the new container came up correctly
before adding it to etcd (see figure 9.4). We could have performed the process in one
step by overwriting the /app/upstream/py1 key in etcd—this is also useful if you need
only one backend to be accessible at a time.
With the two-stage switchover, the second stage is to remove the old backend and
container.
$ etcdctl rm /app/upstream/py1
PrevNode.Value: 192.168.1.123:32768
$ etcdctl ls /app/upstream
/app/upstream/py2
$ docker rm -f py1
py1
The new application is up and running by itself! At no point has the application been
inaccessible to users, and there has been no need to manually connect to web server
machines to reload nginx.
Listing 9.17 Using confd to set up two backend web services for nginx
Listing 9.18 Removing the old upstream address](https://image.slidesharecdn.com/dockerinpractice-manningpublications2019-220916213334-8f169daf/85/Docker-in-Practice-Manning-Publications-2019-pdf-238-320.jpg)


![223
TECHNIQUE 76 A simple Docker Compose cluster
FROM debian
RUN apt-get update && apt-get install -y python
ADD client.py /client.py
CMD ["/usr/bin/python","/client.py"]
Build the client with this command:
docker build -t client .
To demonstrate the value of Docker Compose, we’ll first run these containers by
hand:
docker run --name echo-server -d server
docker run --name client --link echo-server:talkto client
When you’re finished, Ctrl-C out of the client, and remove the containers:
docker rm -f client echo-server
Many things can go wrong even in this trivial example: starting the client first will result
in the failure of the application to start; forgetting to remove the containers will result in
problems when you try to restart; and naming containers incorrectly will result
in failure. These kinds of orchestration problems will only increase as your containers
and their architecture get more sophisticated.
Compose helps with this by encapsulating the orchestration of these containers’
startup and configuration within a simple text file, managing the nuts and bolts of the
startup and shutdown commands for you.
Compose takes a YAML file. You create this in a new directory:
cd ..
mkdir docker-compose
cd docker-compose
The YAML file’s contents are shown in the following listing.
version: "3"
services:
echo-server:
image: server
expose:
- "2000"
client:
Listing 10.3 Dockerfile—a simple echo client
Listing 10.4 docker-compose.yml—Docker Compose echo server and client YAML file
This Docker Compose file follows
version 3 of the specification.
Each section must define the image used:
the client and server images, in this case.
Exposes the echo-server’s
port 2000 to other services
The reference
names of the
running services
are their identifiers:
echo-server and
client, in this case.](https://image.slidesharecdn.com/dockerinpractice-manningpublications2019-220916213334-8f169daf/85/Docker-in-Practice-Manning-Publications-2019-pdf-244-320.jpg)


![227
TECHNIQUE 77 A SQLite server using Docker Compose
- sqlnet
proxy:
command: socat TCP-L:12346,fork,reuseaddr TCP:server:12345
build: .
ports:
- 12346:12346
networks:
- sqlnet
networks:
sqlnet:
driver: bridge
The socat process in the server container will listen on port 12345 and permit mul-
tiple connections, as specified by the TCP-L:12345,fork,reuseaddr argument. The
part following EXEC: tells socat to run SQLite on the /opt/sqlite/db file for every
connection, assigning a pseudo-terminal to the process. The socat process in the cli-
ent container has the same listening behavior as the server container (except on a dif-
ferent port), but instead of running something in response to an incoming
connection, it will establish a TCP connection to the SQLite server.
One notable difference from the previous technique is the use of networks rather
than links—networks present a way to create new virtual networks inside Docker.
Docker Compose will always use a new “bridge” virtual network by default; it’s just
been named explicitly in the preceding Compose configuration. Because any new
bridge network allows access to containers using their service names, there’s no need
to use links (though you still can if you want aliases for services).
Although this functionality could be achieved in one container, the server/proxy
container setup allows the architecture of this system to grow more easily, as each con-
tainer is responsible for one job. The server is responsible for opening SQLite connec-
tions, and the proxy is responsible for exposing the service to the host machine.
The following listing (simplified from the original in the repository,
https://github.com/docker-in-practice/docker-compose-sqlite) creates two minimal
SQLite databases, test and live, on your host machine.
#!/bin/bash
echo "Creating directory"
SQLITEDIR=/tmp/sqlitedbs
rm -rf $SQLITEDIR
if [ -a $SQLITEDIR ]
then
echo "Failed to remove $SQLITEDIR"
exit 1
fi
Listing 10.7 setup_dbs.sh
Both services will
become part of the
sqlnet Docker network.
The server and
proxy containers
are defined in
this stanza.
Creates a socat proxy to pass
data from port 12346 to the
server container’s 12345 port
Builds the image on
startup from the
Dockerfile in the
same directory
Publishes port
12346 to the host
Both services
will become part
of the sqlnet
Docker network.
Defines a list of networks that containers
in this Docker Compose file can join
Removes any directory
from a previous run
Throws an error if the
directory still exists](https://image.slidesharecdn.com/dockerinpractice-manningpublications2019-220916213334-8f169daf/85/Docker-in-Practice-Manning-Publications-2019-pdf-248-320.jpg)
![228 CHAPTER 10 Network simulation: Realistic environment testing without the pain
mkdir -p $SQLITEDIR
cd $SQLITEDIR
echo "Creating DBs"
echo 'create table t1(c1 text);' | sqlite3 test
echo 'create table t1(c1 text);' | sqlite3 live
echo "Inserting data"
echo 'insert into t1 values ("test");' | sqlite3 test
echo 'insert into t1 values ("live");' | sqlite3 live
cd - > /dev/null 2>&1
echo "All done OK"
To run this example, set up the databases and call docker-compose up, as shown in
the following listing.
$ chmod +x setup_dbs.sh
$ ./setup_dbs.sh
$ docker-compose up
Creating network "tmpnwxqlnjvdn_sqlnet" with driver "bridge"
Building proxy
Step 1/3 : FROM ubuntu:14.04
14.04: Pulling from library/ubuntu
[...]
Successfully built bb347070723c
Successfully tagged tmpnwxqlnjvdn_proxy:latest
[...]
Successfully tagged tmpnwxqlnjvdn_server:latest
[...]
Creating tmpnwxqlnjvdn_server_1
Creating tmpnwxqlnjvdn_proxy_1 ... done
Attaching to tmpnwxqlnjvdn_server_1, tmpnwxqlnjvdn_proxy_1
Then, in one or more other terminals, you can run Telnet to create multiple sessions
against one SQLite database.
$ rlwrap telnet localhost 12346
Trying 127.0.0.1...
Connected to localhost.
Escape character is '^]'.
SQLite version 3.7.17
Enter ".help" for instructions
sqlite> select * from t1;
select * from t1;
test
sqlite>
Listing 10.8 Run up the Docker Compose cluster
Listing 10.9 Connecting to the SQLite server
Creates the test DB with one table Creates the live DB
with one table
Inserts one row with
the string “test” into
the table
Inserts one row with the
string “live” into the table
Returns to the previous directory
Makes a connection to the proxy using Telnet,
wrapped in rlwrap to gain the editing and
history functionality of a command line
Output of the
Telnet connection
Connects to SQLite here
Runs a SQL command
against the sqlite prompt](https://image.slidesharecdn.com/dockerinpractice-manningpublications2019-220916213334-8f169daf/85/Docker-in-Practice-Manning-Publications-2019-pdf-249-320.jpg)

![230 CHAPTER 10 Network simulation: Realistic environment testing without the pain
slowness and connection drops. Even large companies, with data centers they own and
operate, have observed unreliable networking and the issues it causes with applications.
We’ll look at a couple of ways you can experiment with flaky networks to help
determine what problems you may be facing in the real world.
TECHNIQUE 78 Simulating troublesome networks with Comcast
As much as we might wish for perfect network conditions when we distribute applica-
tions across many machines, the reality is much uglier—tales of packet loss, connection
drops, and network partitions abound, particularly on commodity cloud providers.
It’s prudent to test your stack before it encounters these situations in the real world
to see how it behaves—an application designed for high availability shouldn’t grind to
a halt if an external service starts experiencing significant additional latency.
PROBLEM
You want to be able to apply varying network conditions to individual containers.
SOLUTION
Use Comcast (the networking tool, not the ISP).
Comcast (https://github.com/tylertreat/Comcast) is a humorously named tool
for altering network interfaces on your Linux machine in order to apply unusual (or,
if you’re unfortunate, typical!) conditions to them.
Whenever Docker creates a container, it also creates virtual network interfaces—
this is how all your containers have different IP addresses and can ping each other.
Because these are standard network interfaces, you can use Comcast on them, as long
as you can find the network interface name. This is easier said than done.
The following listing shows a Docker image containing Comcast, all its prerequi-
sites, and some tweaks.
$ IMG=dockerinpractice/comcast
$ docker pull $IMG
latest: Pulling from dockerinpractice/comcast
[...]
Status: Downloaded newer image for dockerinpractice/comcast:latest
$ alias comcast="docker run --rm --pid=host --privileged
-v /var/run/docker.sock:/var/run/docker.sock $IMG"
$ comcast -help
Usage of comcast:
-cont string
Container ID or name to get virtual interface of
-default-bw int
Default bandwidth limit in kbit/s (fast-lane) (default -1)
-device string
Interface (device) to use (defaults to eth0 where applicable)
-dry-run
Specifies whether or not to actually commit the rule changes
-latency int
Latency to add in ms (default -1)
Listing 10.10 Preparing to run the comcast image](https://image.slidesharecdn.com/dockerinpractice-manningpublications2019-220916213334-8f169daf/85/Docker-in-Practice-Manning-Publications-2019-pdf-251-320.jpg)
![231
TECHNIQUE 78 Simulating troublesome networks with Comcast
-packet-loss string
Packet loss percentage (e.g. 0.1%)
-stop
Stop packet controls
-target-addr string
Target addresses, (e.g. 10.0.0.1 or 10.0.0.0/24 or >
10.0.0.1,192.168.0.0/24 or 2001:db8:a::123)
-target-bw int
Target bandwidth limit in kbit/s (slow-lane) (default -1)
-target-port string
Target port(s) (e.g. 80 or 1:65535 or 22,80,443,1000:1010)
-target-proto string
Target protocol TCP/UDP (e.g. tcp or tcp,udp or icmp) (default >
"tcp,udp,icmp")
-version
Print Comcast's version
The tweaks we added here provide the -cont option, which allows you to refer to a
container rather than having to find the name of a virtual interface. Note that we’ve
had to add some special flags to the docker run command in order to give the con-
tainer more permissions—this is so Comcast is freely able to examine and apply
changes to network interfaces.
To see the difference Comcast can make, we’ll first find out what a normal network
connection looks like. Open a new terminal and run the following commands to set
your expectations for baseline network performance:
$ docker run -it --name c1 ubuntu:14.04.2 bash
root@0749a2e74a68:/# apt-get update && apt-get install -y wget
[...]
root@0749a2e74a68:/# ping -q -c 5 www.example.com
PING www.example.com (93.184.216.34) 56(84) bytes of data.
--- www.example.com ping statistics ---
5 packets transmitted, 5 received, 0% packet loss, >
time 4006ms
rtt min/avg/max/mdev = 86.397/86.804/88.229/0.805 ms
root@0749a2e74a68:/# time wget -o /dev/null https://www.example.com
real 0m0.379s
user 0m0.008s
sys 0m0.008s
root@0749a2e74a68:/#
Once you’ve done this, leave the container running and you can apply some network
conditions to it:
$ comcast -cont c1 -default-bw 50 -latency 100 -packet-loss 20%
Found interface veth62cc8bf for container 'c1'
sudo tc qdisc show | grep "netem"
sudo tc qdisc add dev veth62cc8bf handle 10: root htb default 1
The connection between this machine and www.example.com
seems to be reliable, with no packets lost.
The average round
trip time is about
100 ms for
www.example.com.
The total time taken to download the
HTML homepage of www.example.com
is about 0.7 s.](https://image.slidesharecdn.com/dockerinpractice-manningpublications2019-220916213334-8f169daf/85/Docker-in-Practice-Manning-Publications-2019-pdf-252-320.jpg)

![233
TECHNIQUE 79 Simulating troublesome networks with Blockade
Don’t worry about removing them if you exit the container, though—they’ll be auto-
matically deleted when Docker deletes the virtual network interface.
$ comcast -cont c1 -stop
Found interface veth62cc8bf for container 'c1'
[...]
Packet rules stopped...
Run `sudo tc -s qdisc` to double check
Run `comcast` to start
If you want to get your hands dirty, you can dig into Linux traffic control tools, possi-
bly using Comcast with -dry-run to generate example sets of commands to use. A full
treatment of the possibilities is outside the scope of the technique, but remember, if
you can put it in a container, and it hits the network, you can toy with it.
DISCUSSION
With some implementation effort, there’s no reason you can’t use Comcast for more
than just manual control of container bandwidth. For example, imagine you were
using a tool like btsync (technique 35) but wanted to limit the available bandwidth
so it doesn’t saturate your connection—download Comcast, put it in the container,
and use ENTRYPOINT (technique 49) to set up the bandwidth limits as part of con-
tainer startup.
To do this, you’ll need to install the dependencies of Comcast (listed for the alpine
image in our Dockerfile at https://github.com/docker-in-practice/docker-comcast/
blob/master/Dockerfile) and likely give at least network admin capabilities to the
container—you can read more about capabilities in technique 93.
TECHNIQUE 79 Simulating troublesome networks with Blockade
Comcast is an excellent tool with a number of applications, but there’s an important
use case it doesn’t solve—how can you apply network conditions to containers en
masse? Manually running Comcast against tens of containers would be painful, and
hundreds would be unthinkable! This is a particularly relevant problem for contain-
ers, because they’re so cheap to spin up—if you’re trying to run a large network simu-
lation on a single machine with hundreds of VMs rather than containers, you may find
you have bigger problems, like a lack of memory!
On the subject of simulating a network with many machines, there’s a particular
kind of network failure that becomes interesting at this scale—a network partition.
This is when a group of networked machines splits into two or more parts, such that
all machines in the same part can talk to each other, but different parts can’t commu-
nicate. Research indicates that this happens more than you might think, particularly
on consumer-grade clouds!
Going down the classic Docker microservices route brings these problems into
sharp relief, and having the tools to do experiments is crucial for understanding how
your service will deal with it.](https://image.slidesharecdn.com/dockerinpractice-manningpublications2019-220916213334-8f169daf/85/Docker-in-Practice-Manning-Publications-2019-pdf-254-320.jpg)

![235
TECHNIQUE 79 Simulating troublesome networks with Blockade
in the correct order. Don’t worry about the network section for now; we’ll come back
to it shortly.
As usual, the first step in using Blockade is to pull the image:
$ IMG=dockerinpractice/blockade
$ docker pull $IMG
latest: Pulling from dockerinpractice/blockade
[...]
Status: Downloaded newer image for dockerinpractice/blockade:latest
$ alias blockade="docker run --rm -v $PWD:/blockade
-v /var/run/docker.sock:/var/run/docker.sock $IMG"
You’ll notice that we’re missing a few arguments to docker run, compared to the pre-
vious technique (like --privileged and --pid=host). Blockade uses other containers
to perform the network manipulation, so it doesn’t need permissions itself. Also note
the argument to mount the current directory into the container, so that Blockade is
able to access blockade.yml and store state in a hidden folder.
NOTE If you’re running on a networked filesystem, you may encounter
strange permission issues when you start Blockade for the first time—this is
likely because Docker is trying to create the hidden state folder as root, but
the networked filesystem isn’t cooperating. The solution is to use a local disk.
Finally we come to the moment of truth—running Blockade. Make sure you’re in the
directory you’ve saved blockade.yml into:
$ blockade up
NODE CONTAINER ID STATUS IP NETWORK PARTITION
client1 613b5b1cdb7d UP 172.17.0.4 NORMAL
client2 2aeb2ed0dd45 UP 172.17.0.5 NORMAL
server 53a7fa4ce884 UP 172.17.0.3 NORMAL
NOTE On startup, Blockade may sometimes give cryptic errors about files in
/proc not existing. The first thing to check is whether a container has imme-
diately exited on startup, preventing Blockade from checking its network sta-
tus. Additionally, try to resist any temptation to use the Blockade -c option to
specify a custom path to the config file—only subdirectories of the current
directory are available inside the container.
All of the containers defined in our config file have been started, and we’ve been
given a bunch of helpful information about the started containers. Let’s now apply
some basic network conditions. Tail the logs of client1 in a new terminal (with docker
logs -f 613b5b1cdb7d) so you can see what happens as you change things:
$ blockade flaky --all
$ sleep 5
$ blockade slow client1
$ blockade status
Makes the network flaky (drops
packets) for all containers
Delays the next command to
give the previous one time to
take effect and log some output
Makes the
network slow
(adds a delay to
packets) for
container client1 Checks the status the
containers are in](https://image.slidesharecdn.com/dockerinpractice-manningpublications2019-220916213334-8f169daf/85/Docker-in-Practice-Manning-Publications-2019-pdf-256-320.jpg)
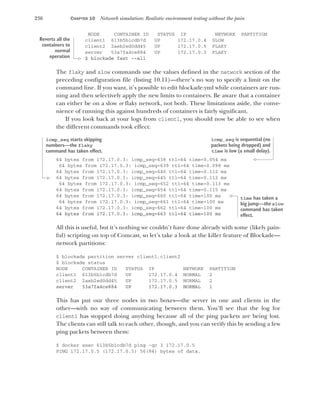


![243
TECHNIQUE 81 Setting up a substrate network with Weave
WARNING If you experience problems with this technique, there may already
be a Weave binary on your machine that’s part of another software package.
SETTING UP WEAVE
To follow this example, you’ll need two hosts. We’ll call them host1 and host2. Make
sure they can talk to each other by using ping. You’ll need the IP address of the first
host you start Weave on.
A quick way to get a host’s public IP address is by accessing https://ifconfig.co/
with a browser, or by running curl https://ifconfig.co, but be aware that you’ll
probably need to open firewalls for the two hosts to connect across the open internet.
You can also run Weave on a local network if you select the correct IP address.
TIP If you experience problems with this technique, it’s likely that the net-
work is firewalled in some way. If you’re not sure, talk to your network admin-
istrator. Specifically, you’ll need to have port 6783 open for both TCP and
UDP, and 6784 for UDP.
On the first host, you can run the first Weave router:
host1$ curl https://ifconfig.co
1.2.3.4
host1$ weave launch
[...]
host1$ eval $(weave env)
host1$ docker run -it --name a1 ubuntu:14.04 bash
root@34fdd53a01ab:/# ip addr show ethwe
43: ethwe@if44: <BROADCAST,MULTICAST,UP,LOWER_UP> mtu 1376 qdisc noqueue
➥ state UP group default
link/ether 72:94:41:e3:00:df brd ff:ff:ff:ff:ff:ff
inet 10.32.0.1/12 scope global ethwe
valid_lft forever preferred_lft forever
Weave takes care of inserting an additional interface into the container, ethwe, which
provides an IP address on the Weave network.
You can perform similar steps on host2, but telling Weave about the location of
host1:
host2$ sudo weave launch 1.2.3.4
host2$ eval $(weave env)
host2$ docker run -it --name a2 ubuntu:14.04 bash
root@a2:/# ip addr show ethwe
553: ethwe@if554: <BROADCAST,MULTICAST,UP,LOWER_UP> mtu 1376 qdisc noqueue
➥ state UP group default
Determines host1’s
IP address
Launches the Weave service on host1. This needs to be
done once on each host, and it will download and run
some Docker containers to run in the background to
manage the substrate network.
Sets up the docker command in this shell to use
Weave. If you close your shell or open a new
one, you’ll need to run this command again.
Starts the container
Retrieves the IP address of the
container on the Weave network
Launches the Weave service on host2 as root.
This time you add the first host’s public IP
address so it can attach to the other host. Sets up your environment
appropriately for Weave’s service
Continues as with host1](https://image.slidesharecdn.com/dockerinpractice-manningpublications2019-220916213334-8f169daf/85/Docker-in-Practice-Manning-Publications-2019-pdf-264-320.jpg)


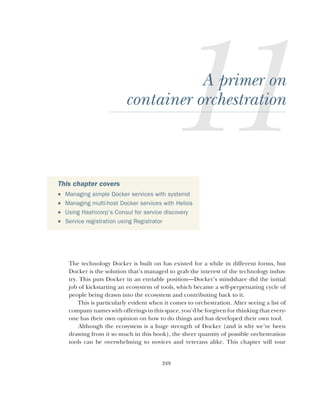

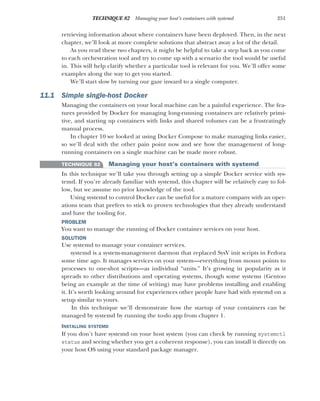
![252 CHAPTER 11 A primer on container orchestration
If you’re not comfortable interfering with your host system in this way, the recom-
mended way to play with it is to use Vagrant to provision a systemd-ready VM, as shown
in the following listing. We’ll cover it briefly here, but see appendix C for more advice
on installing Vagrant.
$ mkdir centos7_docker
$ cd centos7_docker
$ vagrant init jdiprizio/centos-docker-io
$ vagrant up )
$ vagrant ssh
NOTE At the time of writing, jdiprizio/centos-docker-io is a suitable and avail-
able VM image. If it’s no longer available when you’re reading this, you can
replace that string in the preceding listing with another image name. You can
search for one on HashiCorp’s “Discover Vagrant Boxes” page: https://app
.vagrantup.com/boxes/search (“box” is the terminology Vagrant uses to refer
to a VM image). To find this image, we searched for “docker centos”. You may
need to look up help for the command-line vagrant box add command to fig-
ure out how to download your new VM before attempting to start it.
SETTING UP A SIMPLE DOCKER APPLICATION UNDER SYSTEMD
Now that you have a machine with systemd and Docker on it, we’ll use it to run the
to-do application from chapter 1.
Systemd works by reading configuration files in the simple INI file format.
TIP INI files are simple text files with a basic structure composed of sections,
properties, and values.
First you need to create a service file as root in /etc/systemd/system/todo.service, as
shown in the next listing. In this file you tell systemd to run the Docker container with
the name “todo” on port 8000 on this host.
[Unit]
Description=Simple ToDo Application
After=docker.service
Requires=docker.service
[Service]
Restart=always
ExecStartPre=/bin/bash
-c '/usr/bin/docker rm -f todo || /bin/true'
Listing 11.1 A Vagrant setup
Listing 11.2 /etc/systemd/system/todo.service
Creates and enters
a new folder
Initializes the folder for use
as a Vagrant environment,
specifying the Vagrant image
Brings up the VM
SSHes into the VM
The Unit section defines generic
information about the systemd object.
Starts this unit
after the
Docker service
is started
The Docker service needs
to be running for this unit
to successfully run.
The Service section
defines the
configuration
information
specific to systemd
service unit types.
If the service
terminates,
always restarts it.
If the service
termExecStartPre defines a
command that will be run
before the unit is started.
To ensure the container is
removed before you start
it, you remove it with
prejudice here.inates,
always restarts it.](https://image.slidesharecdn.com/dockerinpractice-manningpublications2019-220916213334-8f169daf/85/Docker-in-Practice-Manning-Publications-2019-pdf-273-320.jpg)
![253
TECHNIQUE 82 Managing your host’s containers with systemd
ExecStartPre=/usr/bin/docker pull dockerinpractice/todo
ExecStart=/usr/bin/docker run --name todo
-p 8000:8000 dockerinpractice/todo
ExecStop=/usr/bin/docker rm -f todo
[Install]
WantedBy=multi-user.target
This configuration file should make it clear that systemd offers a simple declarative
schema for managing processes, leaving the details of dependency management up to
the systemd service. This doesn’t mean that you can ignore the details, but it does put
a lot of tools at your disposal for managing Docker (and other) processes.
NOTE Docker doesn’t set any container restart policies by default, but be
aware that any you set will conflict with most process managers. Don’t set
restart policies if you’re using a process manager.
Enabling a new unit is just a matter of invoking the systemctl enable command. If
you want this unit to start automatically when the system boots, you can also create a
symlink in the multi-user.target.wants systemd directory. Once done, you can start the
unit with systemctl start.
$ systemctl enable /etc/systemd/system/todo.service
$ ln -s '/etc/systemd/system/todo.service'
'/etc/systemd/system/multi-user.target.wants/todo.service'
$ systemctl start todo.service
Then just wait for it to start. If there’s a problem, you’ll be informed.
To check that all is OK, use the systemctl status command. It will print out some
general information about the unit, such as how long it’s been running and the pro-
cess ID, followed by a number of log lines from the process. In this case, seeing Swarm
server started port 8000 is a good sign:
[root@centos system]# systemctl status todo.service
todo.service - Simple ToDo Application
Loaded: loaded (/etc/systemd/system/todo.service; enabled)
Active: active (running) since Wed 2015-03-04 19:57:19 UTC; 2min 13s ago
Process: 21266 ExecStartPre=/usr/bin/docker pull dockerinpractice/todo
(code=exited, status=0/SUCCESS)
Process: 21255 ExecStartPre=/bin/bash -c /usr/bin/docker rm -f todo ||
/bin/true (code=exited, status=0/SUCCESS)
Process: 21246 ExecStartPre=/bin/bash -c /usr/bin/docker kill todo ||
/bin/true (code=exited, status=0/SUCCESS)
Main PID: 21275 (docker)
CGroup: /system.slice/todo.service
??21275 /usr/bin/docker run --name todo
➥ -p 8000:8000 dockerinpractice/todo
Makes sure the image is downloaded
before you run the container
ExecStart
defines the
command to
be run when
the service is
started.
ExecStop defines the
command to be run
when the service is
stopped.
The Install
section contains
information for
systemd when
enabling the unit. Informs systemd that you want this unit to be
started when it enters the multi-user target stage](https://image.slidesharecdn.com/dockerinpractice-manningpublications2019-220916213334-8f169daf/85/Docker-in-Practice-Manning-Publications-2019-pdf-274-320.jpg)
![254 CHAPTER 11 A primer on container orchestration
Mar 04 19:57:24 centos docker[21275]: TodoApp.js:117:
// TODO scroll into view
Mar 04 19:57:24 centos docker[21275]: TodoApp.js:176:
if (i>=list.length()) { i=list.length()-1; } // TODO .length
Mar 04 19:57:24 centos docker[21275]: local.html:30:
<!-- TODO 2-split, 3-split -->
Mar 04 19:57:24 centos docker[21275]: model/TodoList.js:29:
// TODO one op - repeated spec? long spec?
Mar 04 19:57:24 centos docker[21275]: view/Footer.jsx:61:
// TODO: show the entry's metadata
Mar 04 19:57:24 centos docker[21275]: view/Footer.jsx:80:
todoList.addObject(new TodoItem()); // TODO create default
Mar 04 19:57:24 centos docker[21275]: view/Header.jsx:25:
// TODO list some meaningful header (apart from the id)
Mar 04 19:57:24 centos docker[21275]: > todomvc-swarm@0.0.1 start /todo
Mar 04 19:57:24 centos docker[21275]: > node TodoAppServer.js
Mar 04 19:57:25 centos docker[21275]: Swarm server started port 8000
You can now visit the server on port 8000.
DISCUSSION
The principles in this technique can be applied to more than just systemd—most pro-
cess managers, including other init systems, can be configured in a similar way. If
you’re interested, you could leverage this to replace existing services running on your
system (perhaps a PostgreSQL database) with dockerized ones.
In the next technique, we’ll take this further by implementing in systemd the
SQLite server we created in technique 77.
TECHNIQUE 83 Orchestrating the startup of your host’s containers
Unlike docker-compose (at the time of writing), systemd is a mature technology ready
for production. In this technique we’ll show you how to achieve local orchestration
functionality that’s similar to docker-compose using systemd.
NOTE If you run into trouble with this technique, you may need to upgrade
your version of Docker. Version 1.7.0 or greater should work fine.
PROBLEM
You want to manage more complex container orchestration on one host in production.
SOLUTION
Use systemd with dependent services to manage your containers.
To demonstrate the use of systemd for a more complex scenario, we’re going to re-
implement the SQLite TCP server example from technique 77 in systemd. Figure 11.2
illustrates the dependencies for our planned systemd service unit configuration.
This is a similar schema to what you saw with the Docker Compose example in
technique 77. A key difference here is that rather than the SQLite service being
treated as a single monolithic entity, each container is a discrete entity. In this sce-
nario, the SQLite proxy can be stopped independently of the SQLite server.](https://image.slidesharecdn.com/dockerinpractice-manningpublications2019-220916213334-8f169daf/85/Docker-in-Practice-Manning-Publications-2019-pdf-275-320.jpg)
![255
TECHNIQUE 83 Orchestrating the startup of your host’s containers
Here’s the listing for the SQLite server service. As before, it depends on the Docker
service, but it has a couple of differences from the to-do example in the previous
technique.
[Unit]
Description=SQLite Docker Server
After=docker.service
Requires=docker.service
[Service]
Restart=always
ExecStartPre=-/bin/touch /tmp/sqlitedbs/test
ExecStartPre=-/bin/touch /tmp/sqlitedbs/live
ExecStartPre=/bin/bash
-c '/usr/bin/docker kill sqliteserver || /bin/true'
ExecStartPre=/bin/bash
-c '/usr/bin/docker rm -f sqliteserver || /bin/true'
ExecStartPre=/usr/bin/docker
pull dockerinpractice/docker-compose-sqlite
ExecStart=/usr/bin/docker run --name sqliteserver
-v /tmp/sqlitedbs/test:/opt/sqlite/db
dockerinpractice/docker-compose-sqlite /bin/bash -c
'socat TCP-L:12345,fork,reuseaddr
EXEC:"sqlite3 /opt/sqlite/db",pty'
ExecStop=/usr/bin/docker rm -f sqliteserver
[Install]
WantedBy=multi-user.target
Listing 11.3 /etc/systemd/system/sqliteserver.service
Docker
service unit
SQLite server
service unit
Todo
service unit
SQLite proxy
service unit
All the services ultimately
depend on the Docker
service unit. If it’s not
running, none of the other
services can run.
The SQLite service unit
depends on the Docker
service unit to run.
The todo service unit
depends only on the
Docker service unit.
The SQLite proxy service
depends on the SQLite
service unit to run.
Figure 11.2 systemd unit dependency graph
The Unit section defines generic
information about the systemd object.
Starts this unit
after the
Docker service
is started
The Docker service needs
to be running for this
unit to successfully run.
These lines ensure that
the SQLite database
files exist before the
service starts up. The
dash before the touch
command indicates to
systemd that startup
should fail if the
command returns an
error code.
ExecStartPre defines
a command that will
be run before the
unit is started. To
ensure the container
is removed before
you start it, you
remove it with
prejudice here.
Makes sure
the image is
downloaded
before you
run the
container
ExecStart defines the command to be run when the service is
started. Note that we’ve wrapped the socat command in a “/bin/bash
-c” call to avoid confusion, as the ExecStart line is run by systemd.
ExecStop defines the
command to be run
when the service is
stopped.](https://image.slidesharecdn.com/dockerinpractice-manningpublications2019-220916213334-8f169daf/85/Docker-in-Practice-Manning-Publications-2019-pdf-276-320.jpg)
![256 CHAPTER 11 A primer on container orchestration
TIP Paths must be absolute in systemd.
Now comes the listing for the SQLite proxy service. The key difference here is that the
proxy service depends on the server process you just defined, which in turn depends
on the Docker service.
[Unit]
Description=SQLite Docker Proxy
After=sqliteserver.service
Requires=sqliteserver.service
[Service]
Restart=always
ExecStartPre=/bin/bash -c '/usr/bin/docker kill sqliteproxy || /bin/true'
ExecStartPre=/bin/bash -c '/usr/bin/docker rm -f sqliteproxy || /bin/true'
ExecStartPre=/usr/bin/docker pull dockerinpractice/docker-compose-sqlite
ExecStart=/usr/bin/docker run --name sqliteproxy
-p 12346:12346 --link sqliteserver:sqliteserver
dockerinpractice/docker-compose-sqlite /bin/bash
-c 'socat TCP-L:12346,fork,reuseaddr TCP:sqliteserver:12345'
ExecStop=/usr/bin/docker rm -f sqliteproxy
[Install]
WantedBy=multi-user.target
With these two configuration files, we’ve laid the groundwork for installing and run-
ning the SQLite service under systemd’s control. Now we can enable these services:
$ sudo systemctl enable /etc/systemd/system/sqliteserver.service
ln -s '/etc/systemd/system/sqliteserver.service'
'/etc/systemd/system/multi-user.target.wants/sqliteserver.service'
$ sudo systemctl enable /etc/systemd/system/sqliteproxy.service
ln -s '/etc/systemd/system/sqliteproxy.service'
'/etc/systemd/system/multi-user.target.wants/sqliteproxy.service'
And start them up:
$ sudo systemctl start sqliteproxy
$ telnet localhost 12346
[vagrant@centos ~]$ telnet localhost 12346
Trying ::1...
Connected to localhost.
Escape character is '^]'.
SQLite version 3.8.2 2013-12-06 14:53:30
Enter ".help" for instructions
Enter SQL statements terminated with a ";"
sqlite> select * from t1;
select * from t1;
test
Listing 11.4 /etc/systemd/system/sqliteproxy.service
The proxy unit must run after the
sqliteserver service defined previously.
The proxy requires that the server instance
be running before you start it up.
Runs the
container](https://image.slidesharecdn.com/dockerinpractice-manningpublications2019-220916213334-8f169daf/85/Docker-in-Practice-Manning-Publications-2019-pdf-277-320.jpg)


![259
TECHNIQUE 84 Manual multi-host Docker with Helios
NOTE WhenstartingaZookeeperinstanceon itsownnode,you’llwanttoexpose
ports to make it accessible to other hosts and use volumes to persist data. Take a
look at the Dockerfile on the Docker Hub for details about which ports and
folders you should use (https://hub.docker.com/r/jplock/zookeeper/~/
dockerfile/). It’s also likely you’ll want to run Zookeeper on multiple nodes, but
configuring a Zookeeper cluster is beyond the scope of this technique.
You can inspect the data Zookeeper has stored by using the zkCli.sh tool, either inter-
actively or by piping input to it. The initial startup is quite chatty, but it’ll drop you
into an interactive prompt where you can run commands against the file-tree-like
structure Zookeeper stores data in.
$ docker exec -it zookeeper bin/zkCli.sh
Connecting to localhost:2181
2015-03-07 02:56:05,076 [myid:] - INFO [main:Environment@100] - Client >
environment:zookeeper.version=3.4.6-1569965, built on 02/20/2014 09:09 GMT
2015-03-07 02:56:05,079 [myid:] - INFO [main:Environment@100] - Client >
environment:host.name=917d0f8ac077
2015-03-07 02:56:05,079 [myid:] - INFO [main:Environment@100] - Client >
environment:java.version=1.7.0_65
2015-03-07 02:56:05,081 [myid:] - INFO [main:Environment@100] - Client >
environment:java.vendor=Oracle Corporation
[...]
2015-03-07 03:00:59,043 [myid:] - INFO
➥ [main-SendThread(localhost:2181):ClientCnxn$SendThread@1235] -
➥ Session establishment complete on server localhost/0:0:0:0:0:0:0:1:2181,
➥ sessionid = 0x14bf223e159000d, negotiated timeout = 30000
WATCHER::
WatchedEvent state:SyncConnected type:None path:null
[zk: localhost:2181(CONNECTED) 0] ls /
[zookeeper]
Nothing’s running against Zookeeper yet, so the only thing currently being stored is
some internal Zookeeper information. Leave this prompt open, and we’ll revisit it as
we progress.
Helios itself is split into three parts:
The master—This is used as an interface for making changes in Zookeeper.
The agent—This runs on every Docker host, starts and stops containers based on
Zookeeper, and reports state back.
The command-line tools—These are used to make requests to the master.
Figure 11.4 shows how the final system is strung together when we perform an opera-
tion against it (the arrows indicate data flow).](https://image.slidesharecdn.com/dockerinpractice-manningpublications2019-220916213334-8f169daf/85/Docker-in-Practice-Manning-Publications-2019-pdf-280-320.jpg)
![260 CHAPTER 11 A primer on container orchestration
Now that Zookeeper is running, it’s time to start Helios. We need to run the master
while specifying the IP address of the Zookeeper node we started earlier:
$ IMG=dockerinpractice/docker-helios
$ docker run -d --name hmaster $IMG helios-master --zk 172.17.0.9
896bc963d899154436938e260b1d4e6fdb0a81e4a082df50043290569e5921ff
$ docker logs --tail=3 hmaster
03:20:14.460 helios[1]: INFO [MasterService STARTING] ContextHandler: >
Started i.d.j.MutableServletContextHandler@7b48d370{/,null,AVAILABLE}
03:20:14.465 helios[1]: INFO [MasterService STARTING] ServerConnector: >
Started application@2192bcac{HTTP/1.1}{0.0.0.0:5801}
03:20:14.466 helios[1]: INFO [MasterService STARTING] ServerConnector: >
Started admin@28a0d16c{HTTP/1.1}{0.0.0.0:5802}
$ docker inspect -f '{{.NetworkSettings.IPAddress}}' hmaster
172.17.0.11
Now let’s see what’s new in Zookeeper:
[zk: localhost:2181(CONNECTED) 1] ls /
[history, config, status, zookeeper]
[zk: localhost:2181(CONNECTED) 2] ls /status/masters
[896bc963d899]
[zk: localhost:2181(CONNECTED) 3] ls /status/hosts
[]
Docker
Helios master Zookeeper
Your host
Helios agent
Terminal
$ helios deploy …
Command
sends
deploy
request
to master
1
Master stores
deploy information
in Zookeeper
2
Agent picks up
info for deploy
from Zookeeper
3
Agent acts on info by
requesting that a new
container be created
4
Container
is created
5
Figure 11.4 Starting a container on a single-host Helios installation](https://image.slidesharecdn.com/dockerinpractice-manningpublications2019-220916213334-8f169daf/85/Docker-in-Practice-Manning-Publications-2019-pdf-281-320.jpg)
![261
TECHNIQUE 84 Manual multi-host Docker with Helios
It looks like the Helios master has created a bunch of new pieces of configuration,
including registering itself as a master. Unfortunately we don’t have any hosts yet.
Let’s solve this by starting up an agent that will use the current host’s Docker
socket to start containers on:
$ docker run -v /var/run/docker.sock:/var/run/docker.sock -d --name hagent
dockerinpractice/docker-helios helios-agent --zk 172.17.0.9
5a4abcb271070d0171ca809ff2beafac5798e86131b72aeb201fe27df64b2698
$ docker logs --tail=3 hagent
03:30:53.344 helios[1]: INFO [AgentService STARTING] ContextHandler: >
Started i.d.j.MutableServletContextHandler@774c71b1{/,null,AVAILABLE}
03:30:53.375 helios[1]: INFO [AgentService STARTING] ServerConnector: >
Started application@7d9e6c27{HTTP/1.1}{0.0.0.0:5803}
03:30:53.376 helios[1]: INFO [AgentService STARTING] ServerConnector: >
Started admin@2bceb4df{HTTP/1.1}{0.0.0.0:5804}
$ docker inspect -f '{{.NetworkSettings.IPAddress}}' hagent
172.17.0.12
Again, let’s check back in Zookeeper:
[zk: localhost:2181(CONNECTED) 4] ls /status/hosts
[5a4abcb27107]
[zk: localhost:2181(CONNECTED) 5] ls /status/hosts/5a4abcb27107
[agentinfo, jobs, environment, hostinfo, up]
[zk: localhost:2181(CONNECTED) 6] get /status/hosts/5a4abcb27107/agentinfo
{"inputArguments":["-Dcom.sun.management.jmxremote.port=9203", [...]
[...]
You can see here that /status/hosts now contains one item. Descending into the
Zookeeper directory for the host reveals the internal information Helios stores about
the host.
NOTE When running on multiple hosts, you’ll want to pass --name $(host-
name -f) as an argument to both the Helios master and agent. You’ll also
need to expose ports 5801 and 5802 for the master and 5803 and 5804 for the
agent.
Let’s make it a bit easier to interact with Helios:
$ alias helios="docker run -i --rm dockerinpractice/docker-helios
helios -z http://172.17.0.11:5801"
The preceding alias means that invoking helios will start a throwaway container to
perform the action you want, pointing at the correct Helios cluster to begin with.
Note that the command-line interface needs to be pointed at the Helios master rather
than Zookeeper.
Everything is now set up. We’re able to easily interact with our Helios cluster, so it’s
time to try an example.](https://image.slidesharecdn.com/dockerinpractice-manningpublications2019-220916213334-8f169daf/85/Docker-in-Practice-Manning-Publications-2019-pdf-282-320.jpg)
![262 CHAPTER 11 A primer on container orchestration
$ helios create -p nc=8080:8080 netcat:v1 ubuntu:14.04.2 --
sh -c 'echo hello | nc -l 8080'
Creating job: {"command":["sh","-c","echo hello | nc -l 8080"], >
"creatingUser":null,"env":{},"expires":null,"gracePeriod":null, >
"healthCheck":null,"id": >
"netcat:v1:2067d43fc2c6f004ea27d7bb7412aff502e3cdac", >
"image":"ubuntu:14.04.2","ports":{"nc":{"externalPort":8080, >
"internalPort":8080,"protocol":"tcp"}},"registration":{}, >
"registrationDomain":"","resources":null,"token":"","volumes":{}}
Done.
netcat:v1:2067d43fc2c6f004ea27d7bb7412aff502e3cdac
$ helios jobs
JOB ID NAME VERSION HOSTS COMMAND ENVIRONMENT
netcat:v1:2067d43 netcat v1 0 sh -c "echo hello | nc -l 8080"
Helios is built around the concept of jobs—everything to be executed must be expressed
as a job before it can be sent to a host to be executed. At a minimum, you need an image
with the basics Helios needs to know to start the container: a command to execute and
any port, volume, or environment options. You may also want a number of other
advanced options, including health checks, expiry dates, and service registration.
The previous command creates a job that will listen on port 8080, print “hello” to
the first thing that connects to the port, and then terminate.
You can use helios hosts to list hosts available for job deployment, and then actu-
ally perform the deployment with helios deploy. The helios status command then
shows us that the job has successfully started:
$ helios hosts
HOST STATUS DEPLOYED RUNNING CPUS MEM LOAD AVG MEM USAGE >
OS HELIOS DOCKER
5a4abcb27107.Up 19 minutes 0 0 4 7 gb 0.61 0.84 >
Linux 3.13.0-46-generic 0.8.213 1.3.1 (1.15)
$ helios deploy netcat:v1 5a4abcb27107
Deploying Deployment{jobId=netcat:v1: >
2067d43fc2c6f004ea27d7bb7412aff502e3cdac, goal=START, deployerUser=null} >
on [5a4abcb27107]
5a4abcb27107: done
$ helios status
JOB ID HOST GOAL STATE CONTAINER ID PORTS
netcat:v1:2067d43 5a4abcb27107.START RUNNING b1225bc nc=8080:8080
Of course, we now want to verify that the service works:
$ curl localhost:8080
hello
$ helios status
JOB ID HOST GOAL STATE CONTAINER ID PORTS
netcat:v1:2067d43 5a4abcb27107.START PULLING_IMAGE b1225bc nc=8080:8080
The result of curl clearly tells us that the service is working, but helios status is now
showing something interesting. When defining the job, we noted that after serving](https://image.slidesharecdn.com/dockerinpractice-manningpublications2019-220916213334-8f169daf/85/Docker-in-Practice-Manning-Publications-2019-pdf-283-320.jpg)
![263
Service discovery: What have we here?
“hello”, the job would terminate, but the preceding output shows a PULLING_IMAGE
status. This is down to how Helios manages jobs—once you’ve deployed to a host,
Helios will do its best to keep the job running. The status you can see here is Helios
going through the complete job startup process, which happens to involve ensuring
the image is pulled.
Finally, we need to clear up after ourselves.
$ helios undeploy -a --yes netcat:v1
Undeploying netcat:v1:2067d43fc2c6f004ea27d7bb7412aff502e3cdac from >
[5a4abcb27107]
5a4abcb27107: done
$ helios remove --yes netcat:v1
Removing job netcat:v1:2067d43fc2c6f004ea27d7bb7412aff502e3cdac
netcat:v1:2067d43fc2c6f004ea27d7bb7412aff502e3cdac: done
We asked for the job to be removed from all nodes (terminating it if necessary, and
stopping any more automatic restarts), and then we deleted the job itself, meaning it
can’t be deployed to any more nodes.
DISCUSSION
Helios is a simple and reliable way of deploying your containers to multiple hosts.
Unlike a number of techniques we’ll come to later on, there’s no magic going on
behind the scenes to determine appropriate locations—Helios starts containers
exactly where you want them with minimal fuss.
But this simplicity comes at a cost once you move to more advanced deployment
scenarios—features like resource limits, dynamic scaling, and so on are currently miss-
ing, so you may find yourself reinventing parts of tools like Kubernetes (technique 88)
to achieve the behavior you want in your deployment.
11.3 Service discovery: What have we here?
This chapter’s introduction referred to service discovery as the flip side of orches-
tration—being able to deploy your applications to hundreds of different machines is
fine, but if you can’t then find out which applications are located where, you won’t be
able to actually use them.
Although it’s not nearly as saturated an area as orchestration, the service-discovery
field still has a number of competitors. It doesn’t help that they all offer slightly differ-
ent feature sets.
There are two pieces of functionality that are typically desirable when it comes to
service discovery: a generic key/value store and a way of retrieving service endpoints
via some convenient interface (likely DNS). etcd and Zookeeper are examples of the
former, whereas SkyDNS (a tool we won’t go into) is an example of the latter. In fact,
SkyDNS uses etcd to store the information it needs.](https://image.slidesharecdn.com/dockerinpractice-manningpublications2019-220916213334-8f169daf/85/Docker-in-Practice-Manning-Publications-2019-pdf-284-320.jpg)

![265
TECHNIQUE 85 Using Consul to discover services
It’s recommended that all machines under your control that may want to interact with
Consul should run a client agent. These agents forward requests on to the servers and
run health checks.
The first step in getting Consul running is to start a server agent:
c1 $ IMG=dockerinpractice/consul-server
c1 $ docker pull $IMG
[...]
c1 $ ip addr | grep 'inet ' | grep -v 'lo$|docker0$|vbox.*$'
inet 192.168.1.87/24 brd 192.168.1.255 scope global wlan0
c1 $ EXTIP1=192.168.1.87
c1 $ echo '{"ports": {"dns": 53}}' > dns.json
c1 $ docker run -d --name consul --net host
-v $(pwd)/dns.json:/config/dns.json $IMG -bind $EXTIP1 -client $EXTIP1
-recursor 8.8.8.8 -recursor 8.8.4.4 -bootstrap-expect 1
88d5cb48b8b1ef9ada754f97f024a9ba691279e1a863fa95fa196539555310c1
c1 $ docker logs consul
[...]
Client Addr: 192.168.1.87 (HTTP: 8500, HTTPS: -1, DNS: 53, RPC: 8400)
Cluster Addr: 192.168.1.87 (LAN: 8301, WAN: 8302)
[...]
==> Log data will now stream in as it occurs:
2015/08/14 12:35:41 [INFO] serf: EventMemberJoin: mylaptop 192.168.1.87
[...]
2015/08/14 12:35:43 [INFO] consul: member 'mylaptop' joined, marking >
health alive
2015/08/14 12:35:43 [INFO] agent: Synced service 'consul'
Containers retrieving
info from console
Client agent performing
health checks
Client
agent
Client agent
machines
Server agent
machines
Containers
exposing ports
Figure 11.5 A typical Consul setup](https://image.slidesharecdn.com/dockerinpractice-manningpublications2019-220916213334-8f169daf/85/Docker-in-Practice-Manning-Publications-2019-pdf-286-320.jpg)
![266 CHAPTER 11 A primer on container orchestration
Because we want to use Consul as a DNS server, we’ve inserted a file into the folder
Consul reads the configuration from to request it listen on port 53 (the registered
port for the DNS protocol). We’ve then used a command sequence you may recognize
from earlier techniques to try to find the external-facing IP address of the machine for
both communicating with other agents and listening for client requests.
NOTE The IP address 0.0.0.0 is typically used to indicate that an application
should listen on all available interfaces on the machine. We’ve deliberately
not done this, because some Linux distributions have a DNS-caching daemon
listening on 127.0.0.1, which disallows listening on 0.0.0.0:53.
There are three items of note in the preceding docker run command:
We’ve used --net host. Although this can be seen as a faux pas in the Docker
world, the alternative is to expose up to eight ports on the command line—it’s a
matter of personal preference, but we feel it’s justified here. It also helps bypass
a potential issue with UDP communication. If you were to go the manual route,
there’d be no need to set the DNS port—you could expose the default Consul
DNS port (8600) as port 53 on the host.
The two recursor arguments tell Consul what DNS servers to look at if a
requested address is unknown by Consul itself.
The -bootstrap-expect 1 argument means the Consul cluster will start operat-
ing with only one agent, which is not robust. A typical setup would set this to 3
(or more) to make sure the cluster doesn’t start until the required number of
servers has joined. To start the additional server agents, add a -join argument,
as we’ll discuss when we start a client.
Now let’s go to a second machine, start a client agent, and add it to our cluster.
WARNING Because Consul expects to be able to listen on a particular set of
ports when communicating with other agents, it’s tricky to set up multiple
agents on a single machine while still demonstrating how it would work in the
real world. We’ll use a different host now—if you decide to use an IP alias,
ensure you pass a -node newAgent, because by default the hostname will be
used, which will conflict.
c2 $ IMG=dockerinpractice/consul-agent
c2 $ docker pull $IMG
[...]
c2 $ EXTIP1=192.168.1.87
c2 $ ip addr | grep docker0 | grep inet
inet 172.17.42.1/16 scope global docker0
c2 $ BRIDGEIP=172.17.42.1
c2 $ ip addr | grep 'inet ' | grep -v 'lo$|docker0$'
inet 192.168.1.80/24 brd 192.168.1.255 scope global wlan0
c2 $ EXTIP2=192.168.1.80
c2 $ echo '{"ports": {"dns": 53}}' > dns.json
c2 $ docker run -d --name consul-client --net host](https://image.slidesharecdn.com/dockerinpractice-manningpublications2019-220916213334-8f169daf/85/Docker-in-Practice-Manning-Publications-2019-pdf-287-320.jpg)
![267
TECHNIQUE 85 Using Consul to discover services
-v $(pwd)/dns.json:/config/dns.json $IMG -client $BRIDGEIP -bind $EXTIP2
-join $EXTIP1 -recursor 8.8.8.8 -recursor 8.8.4.4
5454029b139cd28e8500922d1167286f7e4fb4b7220985ac932f8fd5b1cdef25
c2 $ docker logs consul-client
[...]
2015/08/14 19:40:20 [INFO] serf: EventMemberJoin: mylaptop2 192.168.1.80
[...]
2015/08/14 13:24:37 [INFO] consul: adding server mylaptop >
(Addr: 192.168.1.87:8300) (DC: dc1)
NOTE The images we’ve used are based on gliderlabs/consul-server:0.5 and
gliderlabs/consul-agent:0.5, and they come with a newer version of Consul to
avoid possible problems with UDP communication, indicated by the constant
logging of lines like “Refuting a suspect message.” When version 0.6 of the
images is released, you can switch back to the images from gliderlabs.
All client services (HTTP, DNS, and so on) have been configured to listen on the
Docker bridge IP address. This gives containers a known location from which they can
retrieve information from Consul, and it only exposes Consul internally on the
machine, forcing other machines to directly access the server agents rather than taking
a slower route via a client agent to a server agent. To ensure the bridge IP address is con-
sistent across all your hosts, you can look at the --bip argument to the Docker daemon.
As before, we’ve found the external IP address and bound cluster communication
to it. The -join argument tells Consul where to initially look to find the cluster. Don’t
worry about micromanaging the cluster formation—when two agents initially meet
each other, they’ll gossip, transferring information about finding the other agents in
the cluster. The final -recursor arguments tell Consul what upstream DNS servers to
use for DNS requests that aren’t trying to look up registered services.
Let’s verify that the agent has connected to the server with the HTTP API on the
client machine. The API call we’ll use will return a list of members the client agent
currently thinks are in the cluster. In large, quickly changing clusters, this may not
always match the members of the cluster—there’s another (slower) API call for that.
c2 $ curl -sSL $BRIDGEIP:8500/v1/agent/members | tr ',' 'n' | grep Name
[{"Name":"mylaptop2"
{"Name":"mylaptop"
Now that the Consul infrastructure is set up, it’s time to see how you can register and
discover services. The typical process for registration is to get your app to make an API
call against the local client agent after initializing, which prompts the client agent to
distribute the information to the server agents. For demonstration purposes, we’ll per-
form the registration step manually.
c2 $ docker run -d --name files -p 8000:80 ubuntu:14.04.2
python3 -m http.server 80
96ee81148154a75bc5c8a83e3b3d11b73d738417974eed4e019b26027787e9d1
c2 $ docker inspect -f '{{.NetworkSettings.IPAddress}}' files](https://image.slidesharecdn.com/dockerinpractice-manningpublications2019-220916213334-8f169daf/85/Docker-in-Practice-Manning-Publications-2019-pdf-288-320.jpg)
![268 CHAPTER 11 A primer on container orchestration
172.17.0.16
c2 $ /bin/echo -e 'GET / HTTP/1.0rnrn' | nc -i1 172.17.0.16 80
| head -n 1
HTTP/1.0 200 OK
c2 $ curl -X PUT --data-binary '{"Name": "files", "Port": 8000}'
$BRIDGEIP:8500/v1/agent/service/register
c2 $ docker logs consul-client | tail -n 1
2015/08/15 03:44:30 [INFO] agent: Synced service 'files'
Here we’ve set up a simple HTTP server in a container, exposing it on port 8000 on
the host, and checked that it works. Then we used curl and the Consul HTTP API to
register a service definition. The only thing absolutely necessary here is the name of
the service—the port, along with the other fields listed in the Consul documentation,
are all optional. The ID field is worth a mention—it defaults to the name of the ser-
vice but must be unique across all services. If you want multiple instances of a service,
you’ll need to specify it.
The log line from Consul has told us that the service is synced, so we should be
able to retrieve the information about it from the service DNS interface. This informa-
tion comes from the server agents, so it acts as validation that the service has been
accepted into the Consul catalog. You can use the dig command to query service DNS
information and check that it’s present:
c2 $ EXTIP1=192.168.1.87
c2 $ dig @$EXTIP1 files.service.consul +short
192.168.1.80
c2 $ BRIDGEIP=172.17.42.1
c2 $ dig @$BRIDGEIP files.service.consul +short
192.168.1.80
c2 $ dig @$BRIDGEIP files.service.consul srv +short
1 1 8000 mylaptop2.node.dc1.consul.
c2 $ docker run -it --dns $BRIDGEIP ubuntu:14.04.2 bash
root@934e9c26bc7e:/# ping -c1 -q www.google.com
PING www.google.com (216.58.210.4) 56(84) bytes of data.
--- www.google.com ping statistics ---
1 packets transmitted, 1 received, 0% packet loss, time 0ms
rtt min/avg/max/mdev = 25.358/25.358/25.358/0.000 ms
root@934e9c26bc7e:/# ping -c1 -q files.service.consul
PING files.service.consul (192.168.1.80) 56(84) bytes of data.
--- files.service.consul ping statistics ---
1 packets transmitted, 1 received, 0% packet loss, time 0ms
rtt min/avg/max/mdev = 0.062/0.062/0.062/0.000 ms
Looks up the IP address of the files service from the server agent DNS.
This DNS service is available to arbitrary machines not in your Consul
cluster, allowing them to benefit from service discovery as well.
Looks up the IP
address of the files
service from the
client agent DNS. If
using $BRIDGEIP fails,
you may wish to try
with $EXTIP1.
Requests the SRV
record of the files
service from the
client agent DNS
Starts a container
configured to use
the local client
agent as the only
DNS server
Verifies that lookup of external
addresses still works
Verifies that
service lookup
works
automatically
inside the
container](https://image.slidesharecdn.com/dockerinpractice-manningpublications2019-220916213334-8f169daf/85/Docker-in-Practice-Manning-Publications-2019-pdf-289-320.jpg)

![270 CHAPTER 11 A primer on container orchestration
{
"CheckID": "filescheck",
"Name": "filescheck",
"Node": "mylaptop2",
"Notes": "",
"Output": "/check: line 6: jq: not
foundnConnecting to 172.17.42.1:8500 (172.17.42.1:8500)n",
"ServiceID": "files",
"ServiceName": "files",
"Status": "critical"
},
c2 $ dig @$BRIDGEIP files.service.consul srv +short
c2 $
NOTE Because output from health checks can change on every execution (if
it includes timestamps, for example), Consul only synchronizes check output
with the server on a status change, or every five minutes (though this interval
is configurable). Because statuses start as critical, there’s no initial status
change in this case, so you’ll need to wait out the interval to get output.
We added a health check for the files service to be run every 10 seconds, but checking
it shows the service as having a critical status. Because of this, Consul has automatically
taken the failing endpoint out of the entries returned by DNS, leaving us with no serv-
ers. This is particularly helpful for automatically removing servers from a multiple-
backend service in production.
The root cause of the error we’ve hit is an important one to be aware of when run-
ning Consul inside a container. All checks are also run inside the container, so, as the
check script had to be copied into the container, you also need to make sure any com-
mands you need are installed in the container. In this particular case, we’re missing
the jq command (a helpful utility for extracting information from JSON), which we
can install manually, though the correct approach for production would be to add lay-
ers to the image.
c2 $ docker exec consul-client sh -c 'apk update && apk add jq'
fetch http://dl-4.alpinelinux.org/alpine/v3.2/main/x86_64/APKINDEX.tar.gz
v3.2.3 [http://dl-4.alpinelinux.org/alpine/v3.2/main]
OK: 5289 distinct packages available
(1/1) Installing jq (1.4-r0)
Executing busybox-1.23.2-r0.trigger
OK: 14 MiB in 28 packages
c2 $ docker exec consul-client sh -c
'wget -qO - 172.17.42.1:8500/v1/agent/services | jq ".files.Port"'
8000
c2 $ sleep 15
c2 $ curl -sSL 172.17.42.1:8500/v1/health/service/files |
python -m json.tool | head -n 13
[
{
"Checks": [
{
Attempts to look
up the files service,
with no results](https://image.slidesharecdn.com/dockerinpractice-manningpublications2019-220916213334-8f169daf/85/Docker-in-Practice-Manning-Publications-2019-pdf-291-320.jpg)
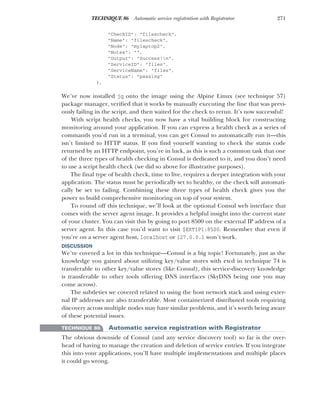
![272 CHAPTER 11 A primer on container orchestration
Integration also doesn’t work for applications you don’t have complete control
over, so you’ll end up having to write wrapper scripts when starting up your database
and the like.
PROBLEM
You don’t want to manually manage service entries and health checks in Consul.
SOLUTION
Use Registrator.
This technique will build on top of the previous one and will assume you have a
two-part Consul cluster available, as described previously. We’ll also assume there are
no services in it, so you may want to recreate your containers to start from scratch.
Registrator (http://gliderlabs.com/registrator/latest/) takes away much of the
complexity of managing Consul services—it watches for containers to start and stop,
registering services based on exposed ports and container environment variables. The
easiest way to see this in action is to jump in.
Everything we do will be on the machine with the client agent. As discussed previ-
ously, no containers except the server agent should be running on the other machine.
The following commands are all you need to start up Registrator:
$ IMG=gliderlabs/registrator:v6
$ docker pull $IMG
[...]
$ ip addr | grep 'inet ' | grep -v 'lo$|docker0$'
inet 192.168.1.80/24 brd 192.168.1.255 scope global wlan0
$ EXTIP=192.168.1.80
$ ip addr | grep docker0 | grep inet
inet 172.17.42.1/16 scope global docker0
$ BRIDGEIP=172.17.42.1
$ docker run -d --name registrator -h $(hostname)-reg
-v /var/run/docker.sock:/tmp/docker.sock $IMG -ip $EXTIP -resync
60 consul://$BRIDGEIP:8500 # if this fails, $EXTIP is an alternative
b3c8a04b9dfaf588e46a255ddf4e35f14a9d51199fc6f39d47340df31b019b90
$ docker logs registrator
2015/08/14 20:05:57 Starting registrator v6 ...
2015/08/14 20:05:57 Forcing host IP to 192.168.1.80
2015/08/14 20:05:58 consul: current leader 192.168.1.87:8300
2015/08/14 20:05:58 Using consul adapter: consul://172.17.42.1:8500
2015/08/14 20:05:58 Listening for Docker events ...
2015/08/14 20:05:58 Syncing services on 2 containers
2015/08/14 20:05:58 ignored: b3c8a04b9dfa no published ports
2015/08/14 20:05:58 ignored: a633e58c66b3 no published ports
The first couple of commands here, for pulling the image and finding the external IP
address, should look familiar. This IP address is given to Registrator so it knows what
IP address to advertise for the services. The Docker socket is mounted to allow Regis-
trator to be automatically notified of container starts and stops as they happen. We’ve
also told Registrator how it can connect to a Consul agent, and that we want all con-
tainers to be refreshed every 60 seconds. Because Registrator should automatically be](https://image.slidesharecdn.com/dockerinpractice-manningpublications2019-220916213334-8f169daf/85/Docker-in-Practice-Manning-Publications-2019-pdf-293-320.jpg)
![273
TECHNIQUE 86 Automatic service registration with Registrator
notified of container changes, this final setting is helpful in mitigating the impact of
Registrator possibly missing updates.
Now that Registrator is running, it’s extremely easy to register a first service.
$ curl -sSL 172.17.42.1:8500/v1/catalog/services | python -m json.tool
{
"consul": []
}
$ docker run -d -e "SERVICE_NAME=files" -p 8000:80 ubuntu:14.04.2 python3
-m http.server 80
3126a8668d7a058333d613f7995954f1919b314705589a9cd8b4e367d4092c9b
$ docker inspect 3126a8668d7a | grep 'Name.*/'
"Name": "/evil_hopper",
$ curl -sSL 172.17.42.1:8500/v1/catalog/services | python -m json.tool
{
"consul": [],
"files": []
}
$ curl -sSL 172.17.42.1:8500/v1/catalog/service/files | python -m json.tool
[
{
"Address": "192.168.1.80",
"Node": "mylaptop2",
"ServiceAddress": "192.168.1.80",
"ServiceID": "mylaptop2-reg:evil_hopper:80",
"ServiceName": "files",
"ServicePort": 8000,
"ServiceTags": null
}
]
The only effort we’ve had to put in when registering the service is passing an environ-
ment variable to tell Registrator what service name to use. By default, Registrator uses
a name based on the container name component after the slash and before the tag:
“mycorp.com/myteam/myimage:0.5” would have the name “myimage”. Whether this
is useful or you want to specify something manually will depend on your naming con-
ventions.
The rest of the values are pretty much as you’d hope. Registrator has discovered
the port being listened on, added it to Consul, and set a service ID that tries to give a
hint about where you can find the container (which is why the hostname was set in the
Registrator container).
DISCUSSION
Registrator is excellent at giving you a handle on a swiftly changing environment with
a high churn of containers, making sure you don’t need to worry about your service-
creation checks being created.
In addition to service details, Registrator will pick up a number of pieces of infor-
mation from environments if they’re present, including tags, service names per port
(if multiple), and using health checks (if you’re using Consul as the data storage). All](https://image.slidesharecdn.com/dockerinpractice-manningpublications2019-220916213334-8f169daf/85/Docker-in-Practice-Manning-Publications-2019-pdf-294-320.jpg)


![277
TECHNIQUE 87 A seamless Docker cluster with swarm mode
First, let’s create a new swarm:
h1 $ ip addr show | grep 'inet ' | grep -v 'lo$|docker0$' # get external IP
inet 192.168.11.67/23 brd 192.168.11.255 scope global eth0
h1 $ docker swarm init --advertise-addr 192.168.11.67
Swarm initialized: current node (i5vtd3romfl9jg9g4bxtg0kis) is now a
manager.
To add a worker to this swarm, run the following command:
docker swarm join
--token SWMTKN-1-4blo74l0m2bu5p8synq3w4239vxr1pyoa29cgkrjonx0tuid68
➥ -dhl9o1b62vrhhi0m817r6sxp2
192.168.11.67:2377
To add a manager to this swarm, run 'docker swarm join-token manager' and
follow the instructions.
This has created a new swarm and set up the Docker daemon of the host h1 to be a
manager.
You can now inspect your newly created swarm:
h1 $ docker info
[...]
Swarm: active
NodeID: i5vtd3romfl9jg9g4bxtg0kis
Is Manager: true
ClusterID: sg6sfmsa96nir1fbwcf939us1
Managers: 1
Nodes: 1
Orchestration:
Task History Retention Limit: 5
Raft:
Snapshot Interval: 10000
Number of Old Snapshots to Retain: 0
Heartbeat Tick: 1
Election Tick: 3
Dispatcher:
Heartbeat Period: 5 seconds
CA Configuration:
Expiry Duration: 3 months
Node Address: 192.168.11.67
Manager Addresses:
192.168.11.67:2377
[...]
h1 $ docker node ls
$ docker node ls
ID HOSTNAME STATUS AVAILABILITY MANAGER STATUS
i5vtd3romfl9jg9g4bxtg0kis * h1 Ready Active Leader
You can now make a Docker daemon on a different host join as a worker by running
the command specified after the manager started:](https://image.slidesharecdn.com/dockerinpractice-manningpublications2019-220916213334-8f169daf/85/Docker-in-Practice-Manning-Publications-2019-pdf-298-320.jpg)


![282 CHAPTER 12 The data center as an OS with Docker
SCALING A SINGLE CONTAINER
The command used to manage Kubernetes is kubectl. In this case you’re going to use
the run subcommand to run a given image as a container within a pod.
$ kubectl run todo --image=dockerinpractice/todo
$ kubectl get pods | egrep "(POD|todo)"
POD IP CONTAINER(S) IMAGE(S) HOST >
LABELS STATUS CREATED MESSAGE
todo-hmj8e 10.245.1.3/ >
run=todo Pending About a minute
Kubernetes picks a pod name by taking the name from the run command (todo in the
preceding example), adding a dash and adding a random string. This ensures it
doesn’t clash with other pod names.
After waiting a few minutes for the todo image to download, you’ll eventually see
that its status has changed to “Running”:
$ kubectl get pods | egrep "(POD|todo)"
POD IP CONTAINER(S) IMAGE(S) >
HOST LABELS STATUS CREATED MESSAGE
todo-hmj8e 10.246.1.3 >
10.245.1.3/10.245.1.3 run=todo Running 4 minutes
todo dockerinpractice/todo >
Running About a minute
This time the IP, CONTAINER(S), and IMAGE(S) columns are populated. The IP col-
umn gives the address of the pod (in this case 10.246.1.3), and the container column
has one row per container in the pod (in this case we have only one, todo).
You can test that the container (todo) is indeed up and running and serving
requests by hitting the IP address and port directly:
$ wget -qO- 10.246.1.3:8000
<html manifest="/todo.appcache">
[...]
At this point we haven’t seen much difference from running a Docker container
directly. To get your first taste of Kubernetes, you can scale up this service by running
a resize command:
$ kubectl resize --replicas=3 replicationController todo
resized
“todo” is the name for the resulting pod, and the image to
start is specified with the “--image” flag; here we’re using the
todo image from chapter 1.
The “get pods” subcommand to
kubectl lists all pods. We’re only
interested in the “todo” ones, so
we grep for those and the header.
“todo-hmj8e” is
the pod name.
Labels are name=value pairs associated with the pod, such as the “run” label
here. The status of the pod is “Pending”, which means Kubernetes is preparing
to run it, most likely because it’s downloading the image from the Docker Hub.](https://image.slidesharecdn.com/dockerinpractice-manningpublications2019-220916213334-8f169daf/85/Docker-in-Practice-Manning-Publications-2019-pdf-303-320.jpg)
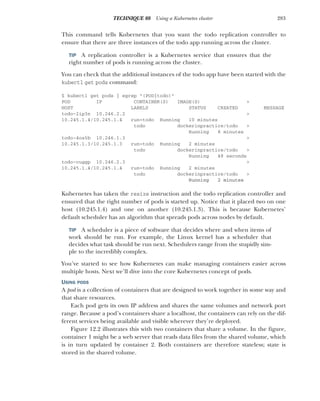
![284 CHAPTER 12 The data center as an OS with Docker
This design of separated responsibilities facilitates a microservices approach by allow-
ing you to manage each part of your service separately. You can upgrade one con-
tainer within a pod without needing to be concerned with the others.
The following pod specification defines a complex pod with one container that
writes random data (simplewriter) to a file every 5 seconds, and another container
that reads from the same file. The file is shared via a volume (pod-disk).
{
"id": "complexpod",
"kind": "Pod",
"apiVersion": "v1beta1",
"desiredState": {
"manifest": {
"version": "v1beta1",
"id": "complexpod",
"containers": [{
"name": "simplereader",
"image": "dockerinpractice/simplereader",
"volumeMounts": [{
"mountPath": "/data",
"name": "pod-disk"
}]
},{
"name": "simplewriter",
"image": "dockerinpractice/simplewriter",
"volumeMounts": [{
"mountPath": "/data",
"name": "pod-disk"
}]
}],
"volumes": [{
"name": "pod-disk",
"emptydir": {}
}]
}
}
}
Listing 12.1 complexpod.json
Container 1
Kubernetes pod
Shared
volumes
Container 2
Figure 12.2 A two-container pod
Gives the entity a name
Specifies the type of object this is
Specifies to
Kubernetes the
version the JSON
is targeting
The meat of the pod’s specification is in the
“desiredState” and “manifest” attributes.
Gives the entity a name
Details of the containers
in the pod are stored in
this JSON array.
Each container has
a name for
reference, and the
Docker image is
specified in the
“image” attribute.
Volume mount points are
specified for each container.
The mount path is the path to
the volume mounted on the
filesystem of the container.
This could be set to a different
location for each container.
The volume mount
name refers to the
name in the pod
manifest’s “volumes”
definition.
Volume mount points are
specified for each container.
The mount path is the path to the
volume mounted on the filesystem of the
container. This could be set to a different
location for each container.
The volume mount name refers to the name in
the pod manifest’s “volumes” definition.
The “volumes” attribute
defines the volumes
created for this pod. The name of the volume is referred to in
the previous “volumeMounts” entries.
A temporary directory that shares a pod’s lifetime](https://image.slidesharecdn.com/dockerinpractice-manningpublications2019-220916213334-8f169daf/85/Docker-in-Practice-Manning-Publications-2019-pdf-305-320.jpg)
![285
TECHNIQUE 89 Accessing the Kubernetes API from within a pod
To load this pod specification, create a file with the preceding listing and run this
command:
$ kubectl create -f complexpod.json
pods/complexpod
After waiting a minute for the images to download, you’ll see the log output of the
container by running kubectl log and specifying first the pod and then the container
you’re interested in.
$ kubectl log complexpod simplereader
2015-08-04T21:03:36.535014550Z '? U
[2015-08-04T21:03:41.537370907Z] h(^3eSk4y
[2015-08-04T21:03:41.537370907Z] CM(@
[2015-08-04T21:03:46.542871125Z] qm>5
[2015-08-04T21:03:46.542871125Z] {Vv_
[2015-08-04T21:03:51.552111956Z] KH+74 f
[2015-08-04T21:03:56.556372427Z] j?p+!
DISCUSSION
We’ve only scratched the surface of Kubernetes’ capabilities and potential here, but
this should give you a sense of what can be done with it and how it can make orches-
trating Docker containers simpler.
The next technique looks at directly taking advantage of some more features of
Kubernetes. Kubernetes is also used behind the scenes as an orchestration engine by
OpenShift in techniques 90 and 99.
TECHNIQUE 89 Accessing the Kubernetes API from within a pod
Often it’s possible for pods to operate completely independently from each other, not
even knowing that they’re running as part of a Kubernetes cluster. But Kubernetes
does provide a rich API, and giving containers access to this opens the door to intro-
spection and adaptive behavior, as well as the ability for containers to manage the
Kubernetes cluster themselves.
PROBLEM
You want to access the Kubernetes API from within a pod.
SOLUTION
Use curl to access the Kubernetes API from within a container in a pod, using autho-
rization information made available to the container.
This is one of the shorter techniques in the book, but it contains a lot to unpack.
This is one of the reasons it’s a useful technique to study. Among other things, we’ll
cover
The kubectl command
Starting Kubernetes pods
Accessing Kubernetes pods
A Kubernetes anti-pattern](https://image.slidesharecdn.com/dockerinpractice-manningpublications2019-220916213334-8f169daf/85/Docker-in-Practice-Manning-Publications-2019-pdf-306-320.jpg)
![286 CHAPTER 12 The data center as an OS with Docker
Bearer tokens
Kubernetes secrets
The Kubernetes “downwards API”
NO KUBERNETES CLUSTER?
If you don’t have access to a Kubernetes cluster, you have a few options. There are
many cloud providers that offer pay-as-you-go Kubernetes clusters. For the fewest
dependencies, though, we recommend using Minikube (mentioned in the last tech-
nique), which doesn’t require a credit card.
For information on how to install Minikube, see the documentation at
https://kubernetes.io/docs/tasks/tools/install-minikube/.
CREATING A POD
First you’re going to create a container within the fresh ubuntu pod using the kubectl
command, and then you’ll access a shell within that container on the command line.
(kubectl run currently imposes a 1-1 relationship between pods and containers,
though pods are more flexible than this in general.)
$ kubectl run -it ubuntu --image=ubuntu:16.04 --restart=Never
If you don't see a command prompt, try pressing enter.
root@ubuntu:/# apt-get update -y && apt-get install -y curl
[...]
root@ubuntu:/
You’re now in the container created by the kubectl command, and you’ve ensured
that curl is installed.
WARNING Accessing and modifying a pod from a shell is considered a Kuber-
netes anti-pattern. We use it here to demonstrate what is possible from within
a pod, rather than how pods should be used.
root@ubuntu:/# $ curl -k -X GET
-H "Authorization: Bearer
$(cat /var/run/secrets/kubernetes.io/serviceaccount/token)" <3>
https://${KUBERNETES_PORT_443_TCP_ADDR}:${KUBERNETES_SERVICE_PORT_HTTPS}
{
Listing 12.2 Creating and setting up a container
Listing 12.3 Access the Kubernetes API from a pod
The kubectl command using the -ti flag, naming the pod “ubuntu”,
using the by-now familiar ubuntu:16.04 image, and telling
Kubernetes not to restart once the pod/container has exited
Kubectl helpfully tells
you that your terminal
may not show you the
prompt unless you
press Enter.
This is the prompt from within the container that
you’ll see if you press Enter, and we’re updating
the container’s package system and installing curl.
Once the install is complete,
the prompt is returned.
Uses the curl command to access the Kubernetes API. The -k flag allows
curl to work without certificates being deployed on the client, and the
HTTP method used to talk to the API is specified as GET by the -X flag.
The -H flag adds an
HTTP header to the
request. This is an
authentication token
discussed shortly.
The URL to contact is constructed from
environment variables available within the pod.](https://image.slidesharecdn.com/dockerinpractice-manningpublications2019-220916213334-8f169daf/85/Docker-in-Practice-Manning-Publications-2019-pdf-307-320.jpg)
![287
TECHNIQUE 89 Accessing the Kubernetes API from within a pod
"paths": [
"/api",
"/api/v1",
"/apis",
"/apis/apps",
"/apis/apps/v1beta1",
"/apis/authentication.k8s.io",
"/apis/authentication.k8s.io/v1",
"/apis/authentication.k8s.io/v1beta1",
"/apis/authorization.k8s.io",
"/apis/authorization.k8s.io/v1",
"/apis/authorization.k8s.io/v1beta1",
"/apis/autoscaling",
"/apis/autoscaling/v1",
"/apis/autoscaling/v2alpha1",
"/apis/batch",
"/apis/batch/v1",
"/apis/batch/v2alpha1",
"/apis/certificates.k8s.io",
"/apis/certificates.k8s.io/v1beta1",
"/apis/extensions",
"/apis/extensions/v1beta1",
"/apis/policy",
"/apis/policy/v1beta1",
"/apis/rbac.authorization.k8s.io",
"/apis/rbac.authorization.k8s.io/v1alpha1",
"/apis/rbac.authorization.k8s.io/v1beta1",
"/apis/settings.k8s.io",
"/apis/settings.k8s.io/v1alpha1",
"/apis/storage.k8s.io",
"/apis/storage.k8s.io/v1",
"/apis/storage.k8s.io/v1beta1",
"/healthz",
"/healthz/ping",
"/healthz/poststarthook/bootstrap-controller",
"/healthz/poststarthook/ca-registration",
"/healthz/poststarthook/extensions/third-party-resources",
"/logs",
"/metrics",
"/swaggerapi/",
"/ui/",
"/version"
]
}
root@ubuntu:/# curl -k -X GET -H "Authorization: Bearer $(cat
➥ /var/run/secrets/kubernetes.io/serviceaccount/token)"
➥ https://${KUBERNETES_PORT_443_TCP_ADDR}:
➥ ${KUBERNETES_SERVICE_ORT_HTTPS}/version
{
"major": "1",
"minor": "6",
"gitVersion": "v1.6.4",
"gitCommit": "d6f433224538d4f9ca2f7ae19b252e6fcb66a3ae",
"gitTreeState": "dirty",
"buildDate": "2017-06-22T04:31:09Z",
The default response for the API is to list
the paths it offers for consumption.
Another request is
made, this time to
the /version path.
The response to the
/version request is to
specify the version of
Kubernetes that’s
running.](https://image.slidesharecdn.com/dockerinpractice-manningpublications2019-220916213334-8f169daf/85/Docker-in-Practice-Manning-Publications-2019-pdf-308-320.jpg)


![293
TECHNIQUE 90 Using OpenShift to run AWS APIs locally
$ oc get all
NAME DOCKER REPO TAGS UPDATED
is/localstack 172.30.1.1:5000/myproject/localstack latest 15 hours ago
NAME REVISION DESIRED CURRENT TRIGGERED BY
dc/localstack 1 1 1 config,image(localstack:latest)
NAME DESIRED CURRENT READY AGE
rc/localstack-1 1 1 1 15
NAME HOST/PORT PATH SERVICES PORT TERMINATION WILDCARD
routes/sqs sqs-test.192.168.64.2.nip.io localstack 4576-tcp None
NAME CLUSTER-IP EXTERNAL-IP PORT(S) AGE
svc/localstack 172.30.187.65 4567/TCP,4568/TCP,4569/TCP,4570/TCP,4571/TCP,
➥ 4572/TCP,4573/TCP,4574/TCP,4575/TCP,4576/TCP,4577/TCP,4578/TCP,
➥ 4579/TCP,4580/TCP,4581/TCP,4582/TCP,8080/TCP 15h
NAME READY STATUS RESTARTS AGE
po/localstack-1-hnvpw 1/1 Running 0 15h
Although technically not all the objects available within your project, the oc get all
command shows the ones most significant to running applications.
The SQS-like AWS service is now accessible as a URL endpoint to test your code
against.
ACCESSING THE SERVICES
You can now hit the services from your host. Here’s an example of creating an SQS stream:
$ aws --endpoint-url=http://kinesis-test.192.168.64.2.nip.io kinesis
➥ list-streams
{
"StreamNames": []
}
$ aws --endpoint-url=http://kinesis-test.192.168.64.2.nip.io kinesis
➥ create-stream --stream-name teststream --shard-count 2
$ aws --endpoint-url=http://kinesis-test.192.168.64.2.nip.io kinesis
➥ list-streams
{
"StreamNames": [
"teststream"
]
}
NOTE The aws client is an install you’ll need to make this work. Alternatively,
you can curl the API endpoint directly, but we don’t advise this. It’s also
assumed you have run aws configure and specified your AWS keys and
default region. The actual values specified don’t matter to LocalStack, as it
doesn’t do authentication.
Returns the most significant
items in your OpenShift project
First listed are the image streams. These are objects
that track the state of local or remote images.
Next, the deployment
configs are listed, which
specify how a pod should
be rolled out to the cluster.
The third class is the replication
configs, which specify the replicated
characteristics of the running pods.
The fourth class is
the routes set up
in your project.
Services are the next class listed.
Here you see the ports exposed in
the Dockerfile result in exposed
ports for the service.
Finally, the pods in the
project are listed.
The aws client application is used to
hit the newly created endpoint, and
it asks kinesis to list its streams.
JSON output indicates
that no streams exist.
The aws client is called again to create an SQS
stream called “teststream” with a shard-count of 2.
Again, you ask for a list
of kinesis streams.
JSON output indicates
that a stream exists
called “teststream”.](https://image.slidesharecdn.com/dockerinpractice-manningpublications2019-220916213334-8f169daf/85/Docker-in-Practice-Manning-Publications-2019-pdf-314-320.jpg)


![297
TECHNIQUE 91 Building a framework on Mesos
Without any further ado, let’s get started. First you need to start up a master:
$ docker run -d --name mesmaster redjack/mesos:0.21.0 mesos-master
--work_dir=/opt
24e277601260dcc6df35dc20a32a81f0336ae49531c46c2c8db84fe99ac1da35
$ docker inspect -f '{{.NetworkSettings.IPAddress}}' mesmaster
172.17.0.2
$ docker logs -f mesmaster
I0312 01:43:59.182916 1 main.cpp:167] Build: 2014-11-22 05:29:57 by root
I0312 01:43:59.183073 1 main.cpp:169] Version: 0.21.0
I0312 01:43:59.183084 1 main.cpp:172] Git tag: 0.21.0
[...]
The master startup is a little verbose, but you should find it stops logging quickly. Keep
this terminal open so you can see what happens when you start the other containers.
NOTE Usually a Mesos setup will have multiple Mesos masters (one active and sev-
eral backups), along with a Zookeeper cluster. Setting this up is documented on the
“MesosHigh-AvailabilityMode”pageon the Mesos site (http://mesos.apache.org/
documentation/latest/high-availability). You’d also need to expose port 5050 for
external communications and use the work_dir folder as a volume to save per-
sistent information.
Listing 12.6 Starting a master
Docker
Mesos master Mesos slave
Your host
Scheduler
4
Master sends task
and executor info
to selected slave
5
Executor started
in slave container
Executor (just a
shell command)
6
Executor requests Docker
daemon to run specified image
7
Container is created
8
Slave sends resource
info to master
2
Time passes
3
Master and slave
start up
1
Scheduler starts,
connects to master,
retrieves resource
info, decides which
offers to accept,
sends task and
executor info to
master
Figure 12.4 A single-host Mesos setup starting a container](https://image.slidesharecdn.com/dockerinpractice-manningpublications2019-220916213334-8f169daf/85/Docker-in-Practice-Manning-Publications-2019-pdf-318-320.jpg)
![298 CHAPTER 12 The data center as an OS with Docker
You also need a slave. Unfortunately this is a little fiddly. One of the defining charac-
teristics of Mesos is the ability to enforce resource limits on tasks, which requires the
slave to have the ability to freely inspect and manage processes. As a result, the
command to run the slave needs a number of outer system details to be exposed
inside the container.
$ docker run -d --name messlave --pid=host
-v /var/run/docker.sock:/var/run/docker.sock -v /sys:/sys
redjack/mesos:0.21.0 mesos-slave
--master=172.17.0.2:5050 --executor_registration_timeout=5mins
--isolation=cgroups/cpu,cgroups/mem --containerizers=docker,mesos
--resources="ports(*):[8000-8100]"
1b88c414527f63e24241691a96e3e3251fbb24996f3bfba3ebba91d7a541a9f5
$ docker inspect -f '{{.NetworkSettings.IPAddress}}' messlave
172.17.0.3
$ docker logs -f messlave
I0312 01:46:43.341621 32398 main.cpp:142] Build: 2014-11-22 05:29:57 by root
I0312 01:46:43.341789 32398 main.cpp:144] Version: 0.21.0
I0312 01:46:43.341795 32398 main.cpp:147] Git tag: 0.21.0
[...]
I0312 01:46:43.554498 32429 slave.cpp:627] No credentials provided. >
Attempting to register without authentication
I0312 01:46:43.554633 32429 slave.cpp:638] Detecting new master
I0312 01:46:44.419646 32424 slave.cpp:756] Registered with master >
master@172.17.0.2:5050; given slave ID 20150312-014359-33558956-5050-1-S0
[...]
At this point you should also have seen some activity in the Mesos master terminal,
starting with a couple of lines like these:
I0312 01:46:44.332494 9 master.cpp:3068] Registering slave at >
slave(1)@172.17.0.3:5051 (8c6c63023050) with id >
20150312-014359-33558956-5050-1-S0
I0312 01:46:44.333772 8 registrar.cpp:445] Applied 1 operations in >
134310ns; attempting to update the 'registry'
The output of these two logs shows that your slave has started and is connected to the
master. If you don’t see these, stop and double-check your master IP address. It can be
frustrating later on to try and debug why a framework isn’t starting any tasks, when
there are no connected slaves to start them on.
Anyway, there’s a lot going on in the command in listing 12.7. The arguments after
run and before redjack/mesos:0.21.0 are all Docker arguments, and they mainly
consist of giving the slave container lots of information about the outside world. The
arguments after mesos-slave are more interesting. First, master tells your slave where
to find your master (or your Zookeeper cluster). The next three arguments, executor
_registration_timeout, isolation, and containerizers, are all tweaks to Mesos
settings that should always be applied when working with Docker. Last, but certainly
Listing 12.7 Starting a slave](https://image.slidesharecdn.com/dockerinpractice-manningpublications2019-220916213334-8f169daf/85/Docker-in-Practice-Manning-Publications-2019-pdf-319-320.jpg)
![299
TECHNIQUE 91 Building a framework on Mesos
not least, you need to let the Mesos slave know what ports are acceptable to hand out
as resources. By default, Mesos offers 31000–32000, but we want something a bit lower
and more memorable.
Now the easy steps are out of the way and we come to the final stage of setting up
Mesos—creating a scheduler.
Happily, we have an example framework ready for you to use. Let’s try it out, see
what it does, and then explore how it works. Keep your two docker logs -f commands
open on your master and slave containers so you can see the communication as it
happens.
The following commands will get the source repository for the example framework
from GitHub and start it up.
$ git clone https://github.com/docker-in-practice/mesos-nc.git
$ docker run -it --rm -v $(pwd)/mesos-nc:/opt redjack/mesos:0.21.0 bash
# apt-get update && apt-get install -y python
# cd /opt
# export PYTHONUSERBASE=/usr/local
# python myframework.py 172.17.0.2:5050
I0312 02:11:07.642227 182 sched.cpp:137] Version: 0.21.0
I0312 02:11:07.645598 176 sched.cpp:234] New master detected at >
master@172.17.0.2:5050
I0312 02:11:07.645800 176 sched.cpp:242] No credentials provided. >
Attempting to register without authentication
I0312 02:11:07.648449 176 sched.cpp:408] Framework registered with >
20150312-014359-33558956-5050-1-0000
Registered with framework ID 20150312-014359-33558956-5050-1-0000
Received offer 20150312-014359-33558956-5050-1-O0. cpus: 4.0, mem: 6686.0, >
ports: 8000-8100
Creating task 0
Task 0 is in state TASK_RUNNING
[...]
Received offer 20150312-014359-33558956-5050-1-O5. cpus: 3.5, mem: 6586.0, >
ports: 8005-8100
Creating task 5
Task 5 is in state TASK_RUNNING
Received offer 20150312-014359-33558956-5050-1-O6. cpus: 3.4, mem: 6566.0, >
ports: 8006-8100
Declining offer
You’ll note that we’ve mounted the Git repository inside the Mesos image. This is
because it contains all the Mesos libraries we need. Unfortunately, it can be a little
painful to install them otherwise.
Our mesos-nc framework is designed to run echo 'hello <task id>' | nc -l
<port> on all available hosts, on all available ports from 8000 to 8005. Because of how
netcat works, these “servers” will terminate as soon as you access them, be it by curl,
Telnet, nc, or your browser. You can verify this by running curl localhost:8003 in a
new terminal. It will return the expected response, and your Mesos logs will show the
Listing 12.8 Downloading and starting the example framework](https://image.slidesharecdn.com/dockerinpractice-manningpublications2019-220916213334-8f169daf/85/Docker-in-Practice-Manning-Publications-2019-pdf-320-320.jpg)
![300 CHAPTER 12 The data center as an OS with Docker
spawning of a task to replace the terminated one. You can also keep track of which
tasks are running with docker ps.
It’s worth pointing out here the evidence of Mesos keeping track of allocated
resources and marking them as available when a task terminates. In particular, when
you accessed localhost:8003 (feel free to try it again), take a close look at the
Received offer line—it shows two port ranges (as they’re not connected), including
the freshly freed one:
Received offer 20150312-014359-33558956-5050-1-O45. cpus: 3.5, mem: 6586.0, >
ports: 8006-8100,8003-8003
WARNING The Mesos slave names all the containers it starts with the prefix
“mesos-”, and it assumes anything like that can be freely managed by the slave.
Be careful with your container naming, or you might end up with the Mesos
slave killing itself.
The framework code (myframework.py) is well commented, in case you’re feeling
adventurous. We’ll go through some of the high-level design.
class TestScheduler
(mesos.interface.Scheduler):
[...]
def registered(self, driver, frameworkId, masterInfo):
[...]
def statusUpdate(self, driver, update):
[...]
def resourceOffers(self, driver, offers):
[...]
All Mesos schedulers subclass the base Mesos scheduler class, and they implement a
number of methods that Mesos will call at appropriate points to let your framework
react to events. Although we’ve implemented three in the preceding snippet, two of
those are optional and have been implemented to add extra logging for demonstra-
tion purposes. The only method you must implement is resourceOffers—there’s not
much point in a framework that doesn’t know when it can launch tasks. You’re free to
add any additional methods for your own purposes, such as init and _makeTask, as
long as they don’t conflict with any of the methods Mesos expects to use, so make sure
you read the documentation (http://mesos.apache.org/documentation/latest/
app-framework-development-guide/).
TIP If you end up writing your own framework, you’ll want to look at some
documentation of methods and structures. Unfortunately, at time of writing,
the only generated documentation is for Java methods. Readers looking for a
starting point for digging into the structures may wish to begin with the
include/mesos/mesos.proto file in the Mesos source code. Good luck!
Let’s look in a bit more detail at the main method of interest: resourceOffers. This is
where the decision happens to launch tasks or decline an offer. Figure 12.5 shows the](https://image.slidesharecdn.com/dockerinpractice-manningpublications2019-220916213334-8f169daf/85/Docker-in-Practice-Manning-Publications-2019-pdf-321-320.jpg)

![302 CHAPTER 12 The data center as an OS with Docker
TECHNIQUE 92 Micromanaging Mesos with Marathon
By now you’ll have realized that there’s a lot you need to think about with Mesos, even
for an extremely simple framework. Being able to rely on applications being deployed
correctly is extremely important—the impact of a bug in a framework could range
from the inability to deploy new applications to a full service outage.
The stakes get higher as you scale up, and unless your team is used to writing reli-
able dynamic deployment code, you might want to consider a more battle-tested
approach—Mesos itself is very stable, but an in-house bespoke framework may not be
as reliable as you’d want.
Marathon is suitable for a company without in-house deployment tooling experi-
ence but that needs a well-supported and easy-to-use solution for deploying containers
in a somewhat dynamic environment.
PROBLEM
You need a reliable way to harness the power of Mesos without getting bogged down
in writing your own framework.
SOLUTION
Use Marathon, a layer on top of Mesos that provides a simpler interface to get you
productive faster.
Marathon is an Apache Mesos framework built by Mesosphere for managing long-
running applications. The marketing materials describe it as the init or upstart dae-
mon for your datacenter (where Mesos is the kernel). This is not an unreasonable
analogy.
Marathon makes it easy to get started by allowing you to start a single container
with a Mesos master, Mesos slave, and Marathon itself inside. This is useful for demos,
but it isn’t suitable for production Marathon deployments. To get a realistic Marathon
setup, you’ll need a Mesos master and slave (from the previous technique) as well as a
Zookeeper instance (from technique 84). Make sure you have all this running, and
we’ll get started by running the Marathon container.
$ docker inspect -f '{{.NetworkSettings.IPAddress}}' mesmaster
172.17.0.2
$ docker inspect -f '{{.NetworkSettings.IPAddress}}' messlave
172.17.0.3
$ docker inspect -f '{{.NetworkSettings.IPAddress}}' zookeeper
172.17.0.4
$ docker pull mesosphere/marathon:v0.8.2
[...]
$ docker run -d -h $(hostname) --name marathon -p 8080:8080
mesosphere/marathon:v0.8.2 --master 172.17.0.2:5050 --local_port_min 8000
--local_port_max 8100 --zk zk://172.17.0.4:2181/marathon
accd6de46cfab65572539ccffa5c2303009be7ec7dbfb49e3ab8f447453f2b93
$ docker logs -f marathon
MESOS_NATIVE_JAVA_LIBRARY is not set. Searching in /usr/lib /usr/local/lib.
MESOS_NATIVE_LIBRARY, MESOS_NATIVE_JAVA_LIBRARY set to >
'/usr/lib/libmesos.so'](https://image.slidesharecdn.com/dockerinpractice-manningpublications2019-220916213334-8f169daf/85/Docker-in-Practice-Manning-Publications-2019-pdf-323-320.jpg)
![303
TECHNIQUE 92 Micromanaging Mesos with Marathon
[2015-06-23 19:42:14,836] INFO Starting Marathon 0.8.2 >
(mesosphere.marathon.Main$:87)
[2015-06-23 19:42:16,270] INFO Connecting to Zookeeper... >
(mesosphere.marathon.Main$:37)
[...]
[2015-06-30 18:20:07,971] INFO started processing 1 offers, >
launching at most 1 tasks per offer and 1000 tasks in total
➥ (mesosphere.marathon.tasks.IterativeOfferMatcher$:124)
[2015-06-30 18:20:07,972] INFO Launched 0 tasks on 0 offers, >
declining 1 (mesosphere.marathon.tasks.IterativeOfferMatcher$:216)
Like Mesos itself, Marathon is fairly chatty, but (also like Mesos) it stops fairly quickly.
At this point, it will enter the loop you’re familiar with from writing your own
framework—considering resource offers and deciding what to do with them. Because
we haven’t launched anything yet, you should see no activity; hence the declining 1
in the preceding log.
Marathon comes with a nice-looking web interface, which is why we exposed port
8080 on the host—visit http://localhost:8080 in your browser to pull it up.
We’re going to dive straight into Marathon, so let’s create a new application. To
clarify a bit of terminology—an “app” in the Marathon world is a group of one or
more tasks with exactly the same definition.
Click the New App button at the top right to bring up a dialog box you can use to
define the app you want to start up. We’ll continue in the vein of the framework we
created ourselves by setting the ID to “marathon-nc”, leaving CPU, memory, and disk
space at their defaults (to match the resource limits imposed on our mesos-nc frame-
work), and setting the command to echo "hello $MESOS_TASK_ID" | nc -l $PORT0
(using environment variables available to the task—note, that’s the number zero). Set
the Ports field to 8000 as an indication of where you want to listen. For now we’re
going to skip over the other fields. Click Create.
Your newly defined application will now be listed on the web interface. The status
will briefly show as “Deploying” before showing as “Running.” Your app is now started!
If you click on the “/marathon-nc” entry in the Apps list, you’ll see the unique ID
of your app. You can get the full configuration from the REST API as shown in the fol-
lowing snippet and also verify that it’s running by curling the Mesos slave container on
the appropriate port. Make sure you save the full configuration returned by the REST
API, as it’ll come in handy later—it’s been saved to app.json in the following example.
$ curl http://localhost:8080/v2/apps/marathon-nc/versions
{"versions":["2015-06-30T19:52:44.649Z"]}
$ curl -s
http://localhost:8080/v2/apps/marathon-nc/versions/2015-06-30T19:52:44.649Z
> app.json
$ cat app.json
{"id":"/marathon-nc", >
"cmd":"echo "hello $MESOS_TASK_ID" | nc -l $PORT0",[...]
$ curl http://172.17.0.3:8000
hello marathon-nc.f56f140e-19e9-11e5-a44d-0242ac110012](https://image.slidesharecdn.com/dockerinpractice-manningpublications2019-220916213334-8f169daf/85/Docker-in-Practice-Manning-Publications-2019-pdf-324-320.jpg)
![304 CHAPTER 12 The data center as an OS with Docker
Note the text following “hello” in the output from curling the app—it should match
the unique ID in the interface. Be quick with checking, though—running that curl
command will make the app terminate, Marathon will relaunch it, and the unique ID
in the web interface will change. Once you’ve verified all this, go ahead and click the
Destroy App button to remove marathon-nc.
This works OK, but you may have noticed that we’ve not achieved what we set out
to do with Marathon—orchestrate Docker containers. Although our application is
within a container, it’s been launched in the Mesos slave container rather than in a
container of its own. Reading the Marathon documentation reveals that creating tasks
inside Docker containers requires a little more configuration (as it did when writing
our own framework).
Happily, the Mesos slave we started previously has both the required settings, so we
just need to alter some Marathon options—in particular, app options. By taking the
Marathon API response from before (saved in app.json), we can focus on adding the
Marathon settings that enable Docker usage. To perform the manipulation here, we’ll
use the handy jq tool, though it’s equally easy to do it via a text editor.
$ JQ=https://github.com/stedolan/jq/releases/download/jq-1.3/jq-linux-x86_64
$ curl -Os $JQ && mv jq-linux-x86_64 jq && chmod +x jq
$ cat >container.json <<EOF
{
"container": {
"type": "DOCKER",
"docker": {
"image": "ubuntu:14.04.2",
"network": "BRIDGE",
"portMappings": [{"hostPort": 8000, "containerPort": 8000}]
}
}
}
$ # merge the app and container details
$ cat app.json container.json | ./jq -s add > newapp.json
We can now send the new app definition to the API and see Marathon launch it:
$ curl -X POST -H 'Content-Type: application/json; charset=utf-8'
--data-binary @newapp.json http://localhost:8080/v2/apps
{"id":"/marathon-nc", >
"cmd":"echo "hello $MESOS_TASK_ID" | nc -l $PORT0",[...]
$ sleep 10
$ docker ps --since=marathon
CONTAINER ID IMAGE COMMAND CREATED >
STATUS PORTS NAMES
284ced88246c ubuntu:14.04 ""/bin/sh -c 'echo About a minute ago >
Up About a minute 0.0.0.0:8000->8000/tcp mesos- >
1da85151-59c0-4469-9c50-2bfc34f1a987
$ curl localhost:8000
hello mesos-nc.675b2dc9-1f88-11e5-bc4d-0242ac11000e
$ docker ps --since=marathon
CONTAINER ID IMAGE COMMAND CREATED >](https://image.slidesharecdn.com/dockerinpractice-manningpublications2019-220916213334-8f169daf/85/Docker-in-Practice-Manning-Publications-2019-pdf-325-320.jpg)


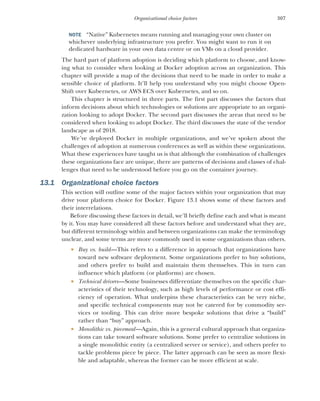
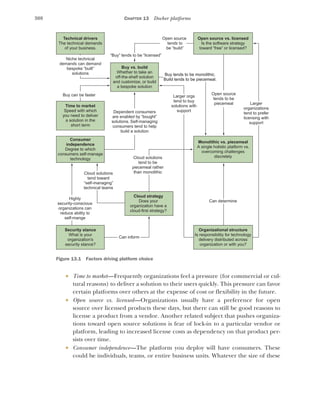


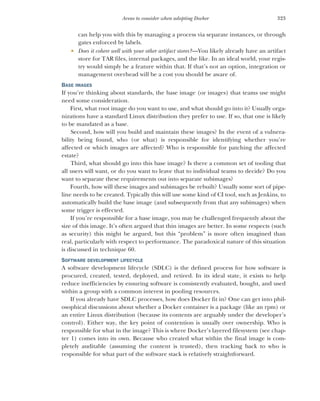

![325
Areas to consider when adopting Docker
These volumes can be backed by numerous kinds of storage mounted locally or
remotely, but the key point is that the storage can be shared by multiple containers,
which makes it ideal for running databases that persist across container cycles.
Is shared storage easy to provision?—Shared storage can be expensive to maintain
and provision, both in terms of the infrastructure required and the hourly cost.
In many organizations, provisioning storage is not simply a matter of calling an
API and waiting a few seconds, as it can be with cloud providers like AWS.
Is shared storage support ready for increased demand?—Because it’s so easy to deploy
Docker containers and fresh environments for development or test, demand on
shared storage can increase dramatically. It’s worth considering whether you’re
ready for this.
Is shared storage available across deployment locations?—You might have multiple
data centers or cloud providers, or even a mix of the two. Can all these locations
talk to each other seamlessly? Is it a requirement that they do? Or is it a require-
ment that they do not? Regulatory constraints and a desire to enable capabili-
ties to your developers can both create work for you.
NETWORKING
Regarding networking, there are a few things you might need to think about when
implementing a Docker platform.
As seen in chapter 10, by default each Docker container has its own IP address allo-
cated from a reserved set of IP addresses. If you’re bringing in a product that manages
the running of containers on your network, other sets of network addresses may be
reserved. For example, Kubernetes’ service layer uses a set of network addresses to
maintain and route to stable endpoints across its cluster of nodes.
Some organizations reserve IP ranges for their own purposes, so you need to be
wary of clashes. If an IP address range is reserved for a particular set of databases, for
example, applications that use the IP range within your cluster for their containers or
services may take over those IPs and prevent other applications within the cluster
from gaining access to that set of databases. Traffic intended for those databases
would end up being routed within the cluster to the container or service IPs.
Network performance can also become significant. If you have software-defined
networks (SDNs, such as Nuage or Calico) layered on top of your network already,
adding more SDNs for Docker platforms (such as OpenVSwitch or even another
Calico layer) can noticeably reduce performance.
Containers can also affect networking in ways you might not expect. Many applica-
tions have traditionally used a stable source IP address as part of authentication to
external services. In the container world, however, the source IP presented from the
container may be either the container IP or the IP of the host on which the container
runs (which performs network address translation [NAT] back to the container). Fur-
thermore, if it comes from a cluster of hosts, the IP that’s presented can’t be guaran-
teed to be stable. There are ways of ensuring the stability of IP presentation, but they
usually need some design and implementation effort.](https://image.slidesharecdn.com/dockerinpractice-manningpublications2019-220916213334-8f169daf/85/Docker-in-Practice-Manning-Publications-2019-pdf-346-320.jpg)


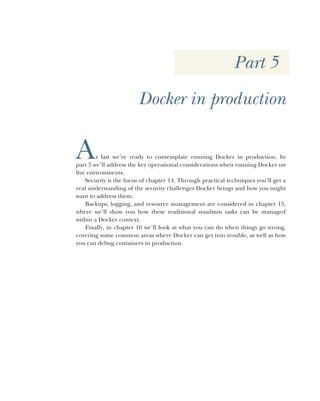


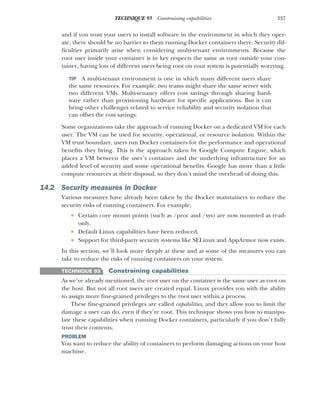
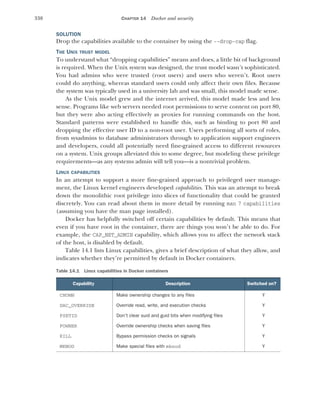


![341
TECHNIQUE 94 A “bad” Docker image to scan
WARNING It’s worth making clear that many of these capabilities relate to the
root capabilities to affect other users’ objects on the system, not root’s own
objects. A root user could still chown root’s files on the host if they were host
in the container and had access to the host’s files through a volume mount,
for example. Therefore, it’s still worth ensuring that applications drop to a
non-root user as soon as possible to protect the system, even if all these capa-
bilities are switched off.
This ability to fine-tune the capabilities of your container means that using the
--privileged flag to docker run should be unnecessary. Processes that require capa-
bilities will be auditable and under the control of the administrator of the host.
TECHNIQUE 94 A “bad” Docker image to scan
One issue quickly recognized in the Docker ecosystem was that of vulnerabilities—if
you have an unchanging image, you also won’t get any security fixes. This may not be
a problem if you’re following the Docker best practices of image minimalism, but it
can be hard to tell.
Image scanners were created as a solution to this problem—a way to identify issues
with an image—but that still leaves open the question of how to evaluate them.
PROBLEM
You want to determine how effective an image scanner is.
SOLUTION
Create a “known-bad” image to test your scanners on.
We were faced with this problem while at work. Plenty of Docker image scanners
exist (such as Clair), but commercial offerings claim to go deeper into the image to
determine any potential issues lurking within it.
But no image existed that contained known and documented vulnerabilities that
we could use to test the efficacy of these scanners. Hardly surprising, as most images
don’t advertise their own insecurity!
We therefore invented a known bad image. The image is available to download:
$ docker pull imiell/bad-dockerfile
The principle is simple: create a Dockerfile to build an image riddled with docu-
mented vulnerabilities, and point that image at your candidate scanner.
The latest version of the Dockerfile is available at https://github.com/ianmiell/
bad-dockerfile. It’s still in flux, so it’s not printed here. The form of it is, however,
quite simple:
FROM <base image>
RUN <install 'bad' software>
COPY <copy 'bad' software in>
[...]
CMD echo 'Vulnerable image' && /bin/false
The reference bad-dockerfile
repository uses a centos image, but
you might want to replace this with
one closer to your base image.
Various RUN/COPY/ADD commands install software
to the image that are known to be vulnerable.
The CMD directive for the image
tries its best never to allow itself
to be run, for obvious reasons.](https://image.slidesharecdn.com/dockerinpractice-manningpublications2019-220916213334-8f169daf/85/Docker-in-Practice-Manning-Publications-2019-pdf-362-320.jpg)


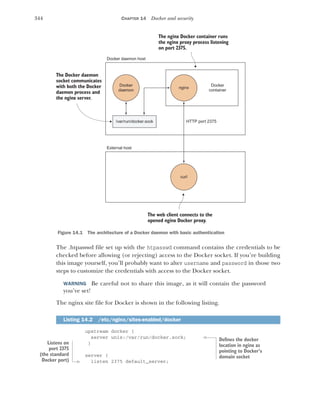
![345
TECHNIQUE 95 HTTP auth on your Docker instance
location / {
proxy_pass http://docker;
auth_basic_user_file /etc/nginx/.htpasswd;
auth_basic "Access restricted";
}
}
Now run the image as a daemon container, mapping the required resources from the
host machine:
$ docker run -d --name docker-authenticate -p 2375:2375
-v /var/run:/var/run dockerinpractice/docker-authenticate
This will run the container in the background with the name docker-authenticate
so you can refer to it later. Port 2375 of the container is exposed on the host, and the
container is given access to the Docker daemon by mounting the default directory
containing the Docker socket as a volume. If you’re using a custom-built image with
your own username and password, you’ll need to replace the image name here with
your own.
The web service will now be up and running. If you curl the service with the user-
name and password you set, you should see an API response:
$ curl http://username:password@localhost:2375/info
{"Containers":115,"Debug":0, >
"DockerRootDir":"/var/lib/docker","Driver":"aufs", >
"DriverStatus":[["Root Dir","/var/lib/docker/aufs"], >
["Backing Filesystem","extfs"],["Dirs","1033"]], >
"ExecutionDriver":"native-0.2", >
"ID":"QSCJ:NLPA:CRS7:WCOI:K23J:6Y2V:G35M:BF55:OA2W:MV3E:RG47:DG23", >
"IPv4Forwarding":1,"Images":792, >
"IndexServerAddress":"https://index.docker.io/v1/", >
"InitPath":"/usr/bin/docker","InitSha1":"", >
"KernelVersion":"3.13.0-45-generic", >
"Labels":null,"MemTotal":5939630080,"MemoryLimit":1, >
"NCPU":4,"NEventsListener":0,"NFd":31,"NGoroutines":30, >
"Name":"rothko","OperatingSystem":"Ubuntu 14.04.2 LTS", >
"RegistryConfig":{"IndexConfigs":{"docker.io": >
{"Mirrors":null,"Name":"docker.io", >
"Official":true,"Secure":true}}, >
"InsecureRegistryCIDRs":["127.0.0.0/8"]},"SwapLimit":0}
When you’re done, remove the container with this command:
$ docker rm -f docker-authenticate
Access is now revoked.
Proxies these
requests to and
from the
docker location
defined earlier
Defines the
password file to use
Restricts access
by password
Puts the username:
password in the URL to
curl, and the address
after the @ sign. This
request is to the /info
endpoint of the Docker
daemon’s API.
The JSON response from
the Docker daemon](https://image.slidesharecdn.com/dockerinpractice-manningpublications2019-220916213334-8f169daf/85/Docker-in-Practice-Manning-Publications-2019-pdf-366-320.jpg)
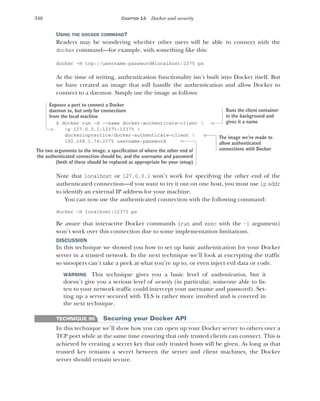
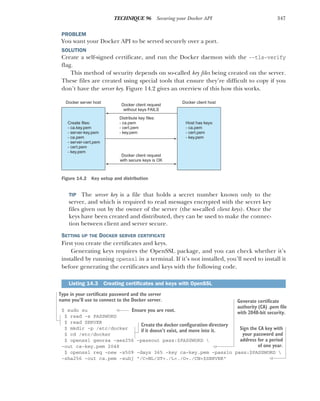

![349
TECHNIQUE 96 Securing your Docker API
DISTRIBUTING CLIENT KEYS
Next you need to send the keys to the client host so it can connect to the server and
exchange information. You don’t want to reveal your secret keys to anyone else, so
these need to be passed to the client securely. A relatively safe way to do this is to SCP
(secure copy) them direct from the server to the client. The SCP utility uses essentially
the same technique to secure the transmission of data that we’re demonstrating here,
only with different keys that will have already been set up.
On the client host, create the Docker configuration folder in /etc as you did earlier:
user@client:~$ sudo su
root@client:~$ mkdir -p /etc/docker
Then SCP the files from the server to the client. Make sure you replace “client” in the
following commands with the hostname of your client machine. Also make sure that
all the files are readable by the user that will run the docker command on the client.
user@server:~$ sudo su
root@server:~$ scp /etc/docker/ca.pem client:/etc/docker
root@server:~$ scp /etc/docker/cert.pem client:/etc/docker
root@server:~$ scp /etc/docker/key.pem client:/etc/docker
TESTING
To test your setup, first try making a request to the Docker server without any creden-
tials. You should be rejected:
root@client~: docker -H myserver.localdomain:2376 info
FATA[0000] Get http://myserver.localdomain:2376/v1.17/info: malformed HTTP >
response "x15x03x01x00x02x02". Are you trying to connect to a >
TLS-enabled daemon without TLS?
Then connect with the credentials, which should return useful output:
root@client~: docker --tlsverify --tlscacert=/etc/docker/ca.pem
--tlscert=/etc/docker/cert.pem --tlskey=/etc/docker/key.pem
-H myserver.localdomain:2376 info
243 info
Containers: 3
Images: 86
Storage Driver: aufs
Root Dir: /var/lib/docker/aufs
Backing Filesystem: extfs
Dirs: 92
Execution Driver: native-0.2
Kernel Version: 3.16.0-34-generic
Operating System: Ubuntu 14.04.2 LTS
CPUs: 4
Total Memory: 11.44 GiB
Name: rothko
ID: 4YQA:KK65:FXON:YVLT:BVVH:Y3KC:UATJ:I4GK:S3E2:UTA6:R43U:DX5T
WARNING: No swap limit support](https://image.slidesharecdn.com/dockerinpractice-manningpublications2019-220916213334-8f169daf/85/Docker-in-Practice-Manning-Publications-2019-pdf-370-320.jpg)


![352 CHAPTER 14 Docker and security
NOTE This technique was tested against the preceding docker-slim version.
You may want to visit GitHub at https://github.com/docker-slim/docker-slim/
releases to see whether there have been any updates. This isn’t a fast-moving
project, so the updates shouldn’t be too important.
Now you have the docker-slim binary in a bin subfolder.
BUILDING THE FAT IMAGE
Next you’ll build a sample application that uses NodeJS. This is a trivial application
that simply serves a string of JSON on port 8000. The following command clones the
docker-slim repository, moves to the sample application code, and builds its Docker-
file into an image with the name sample-node-app.
$ git clone https://github.com/docker-slim/docker-slim.git
$ cd docker-slim && git checkout 1.18
$ cd sample/apps/node
$ docker build -t sample-node-app .
$ cd -
RUNNING THE FAT IMAGE
Now that you’ve created your fat image, the next step involves running it as a con-
tainer with the docker-slim wrapper. Once the application has initialized, you then hit
the application endpoint to exercise its code. Finally, bring the backgrounded docker-
slim application to the foreground and wait for it to terminate.
$ ./docker-slim build --http-probe sample-node-app &
$ sleep 10 && curl localhost:32770
{"status":"success","info":"yes!!!","service":"node"}
$ fg
./docker-slim build --http-probe sample-node-app
INFO[0014] docker-slim: HTTP probe started...
INFO[0014] docker-slim: http probe - GET http://127.0.0.1:32770/ => 200
INFO[0014] docker-slim: HTTP probe done.
INFO[0015] docker-slim: shutting down 'fat' container...
INFO[0015] docker-slim: processing instrumented 'fat' container info...
INFO[0015] docker-slim: generating AppArmor profile...
INFO[0015] docker-slim: building 'slim' image...
Listing 14.6 Building an example docker-slim application
Clones the docker-
slim repository,
which contains the
sample application
Checks out a known-
working version of the
docker-slim repository
Moves to the NodeJS
sample application folder
Builds the image, giving it the
name sample-node-app
Returns to the previous directory, where
the docker-slim binary is located
Runs the docker-slim binary against the sample-
node-app image. Backgrounds the process. http-
probe will call the application on all exposed ports.
Sleeps for 10 seconds
to allow the sample-
node-app process to
start, and then hits
the port the
application runs on
Sends the application’s
JSON response to the
terminal
Foregrounds the docker-slim process
and waits until it completes
The first section of output from
docker-slim shows its working logs.](https://image.slidesharecdn.com/dockerinpractice-manningpublications2019-220916213334-8f169daf/85/Docker-in-Practice-Manning-Publications-2019-pdf-373-320.jpg)
![353
TECHNIQUE 97 Reducing a container’s attack surface with DockerSlim
Step 1 : FROM scratch
--->
Step 2 : COPY files /
---> 0953a87c8e4f
Removing intermediate container 51e4e625017e
Step 3 : WORKDIR /opt/my/service
---> Running in a2851dce6df7
---> 2d82f368c130
Removing intermediate container a2851dce6df7
Step 4 : ENV PATH "/usr/local/sbin:/usr/local/bin:/usr/sbin:/usr/bin:/sbin:
➥ /bin"
---> Running in ae1d211f118e
---> 4ef6d57d3230
Removing intermediate container ae1d211f118e
Step 5 : EXPOSE 8000/tcp
---> Running in 36e2ced2a1b6
---> 2616067ec78d
Removing intermediate container 36e2ced2a1b6
Step 6 : ENTRYPOINT node /opt/my/service/server.js
---> Running in 16a35fd2fb1c
---> 7451554aa807
Removing intermediate container 16a35fd2fb1c
Successfully built 7451554aa807
INFO[0016] docker-slim: created new image: sample-node-app.slim
$
$
In this case “exercising the code” just involves hitting one URL and getting a
response. More sophisticated apps will need more varied and diverse types of poking
and prodding to ensure they’ve been completely exercised.
Note that according to the documents, we don’t need to hit the app on port 32770
ourselves because we’ve used the http-probe argument. If you enable the HTTP probe,
it will default to running an HTTP and HTTPS GET request on the root URL (“/”) on
every exposed port. We do the curl by hand simply for demonstration purposes.
At this point, you’ve created the sample-node-app.slim version of your image. If
you examine the output of docker images, you can see that its size has been drastically
reduced.
$ docker images
REPOSITORY TAG IMAGE ID CREATED SIZE
sample-node-app.slim latest 7451554aa807 About an hour ago 14.02 MB
sample-node-app latest 78776db92c2a About an hour ago 418.5 MB
If you compare the docker history output of the fat sample app with its slim counter-
part, you’ll see that they’re quite different in structure.
Docker-slim
builds the
“slim”
container.
When it completes, you may need
to press Return to get a prompt.
The sample-node-app.slim
image is just over 14 MB in size.
The original sample-node-app
image was over 400 MB in size.](https://image.slidesharecdn.com/dockerinpractice-manningpublications2019-220916213334-8f169daf/85/Docker-in-Practice-Manning-Publications-2019-pdf-374-320.jpg)
![354 CHAPTER 14 Docker and security
$ docker history sample-node-app
IMAGE CREATED CREATED BY SIZE
78776db92c2a 42 hours ago /bin/sh -c #(nop) ENTRYPOINT ["node" 0 B
0f044b6540cd 42 hours ago /bin/sh -c #(nop) EXPOSE 8000/tcp 0 B
555cf79f13e8 42 hours ago /bin/sh -c npm install 14.71 MB
6c62e6b40d47 42 hours ago /bin/sh -c #(nop) WORKDIR /opt/my/ser 0 B
7871fb6df03b 42 hours ago /bin/sh -c #(nop) COPY dir:298f558c6f2 656 B
618020744734 42 hours ago /bin/sh -c apt-get update && apt-get 215.8 MB
dea1945146b9 7 weeks ago /bin/sh -c #(nop) CMD ["/bin/bash"] 0 B
<missing> 7 weeks ago /bin/sh -c mkdir -p /run/systemd && ec 7 B
<missing> 7 weeks ago /bin/sh -c sed -i 's/^#s*(deb.*unive 2.753 kB
<missing> 7 weeks ago /bin/sh -c rm -rf /var/lib/apt/lists/* 0 B
<missing> 7 weeks ago /bin/sh -c set -xe && echo '#!/bin/s 194.6 kB
<missing> 7 weeks ago /bin/sh -c #(nop) ADD file:8f997234193 187.8 MB
$ docker history sample-node-app.slim
IMAGE CREATED CREATED BY SIZE
7451554aa807 42 hours ago /bin/sh -c #(nop) ENTRYPOINT ["node" 0 B
2616067ec78d 42 hours ago /bin/sh -c #(nop) EXPOSE 8000/tcp 0 B
4ef6d57d3230 42 hours ago /bin/sh -c #(nop) ENV PATH=/usr/local 0 B
2d82f368c130 42 hours ago /bin/sh -c #(nop) WORKDIR /opt/my/ser 0 B
0953a87c8e4f 42 hours ago /bin/sh -c #(nop) COPY dir:36323da1e97 14.02 MB
The preceding output gives a clue about part of what DockerSlim does. It manages to
reduce the image size to (effectively) a single 14 MB layer by taking the final filesystem
state, and copying that directory as the final layer of the image.
The other artifact produced by DockerSlim relates to its second purpose as
described at the beginning of this technique. A seccomp.json file is produced (in this
case, sample-node-app-seccomp.json), which can be used to limit the actions of the
running container.
Let’s take a look at this file’s contents (edited here, as it’s rather long).
$ SECCOMPFILE=$(ls $(pwd)/.images/*/artifacts/sample-node-app-seccomp.json)
$ cat ${SECCOMPFILE}
{
"defaultAction": "SCMP_ACT_ERRNO",
"architectures": [
"SCMP_ARCH_X86_64"
],
"syscalls": [
{
"name": "capset",
"action": "SCMP_ACT_ALLOW"
Listing 14.7 A seccomp profile
The docker history command is run
on the sample-node-app image.
The history of this image shows each
command as it was originally created.
The docker history command is run on
the sample-node-app.slim image.
The history of the slim container consists
of fewer commands, including a COPY
command not in the original fat image.
Captures the location of the seccomp
file in the variable SECCOMPFILE
Cats this file to view it
Specifies the exit code for the process
that tries to call any forbidden syscall
Specifies the hardware architectures
this profile should be applied on
The syscalls controlled are whitelisted here
by specifying the SCMP_ACT_ALLOW action
against them.](https://image.slidesharecdn.com/dockerinpractice-manningpublications2019-220916213334-8f169daf/85/Docker-in-Practice-Manning-Publications-2019-pdf-375-320.jpg)
![355
TECHNIQUE 97 Reducing a container’s attack surface with DockerSlim
},
{
"name": "rt_sigaction",
"action": "SCMP_ACT_ALLOW"
},
{
"name": "write",
"action": "SCMP_ACT_ALLOW"
},
[...]
{
"name": "execve",
"action": "SCMP_ACT_ALLOW"
},
{
"name": "getcwd",
"action": "SCMP_ACT_ALLOW"
}
]
}
Finally, you’re going to run up the slim image again with the seccomp profile and
check that it works as expected:
$ docker run -p32770:8000 -d
--security-opt seccomp=/root/docker-slim-bin/.images/${IMAGEID}/artifacts
➥ /sample-node-app-seccomp.json sample-node-app.slim
4107409b61a03c3422e07973248e564f11c6dc248a6a5753a1db8b4c2902df55
$ sleep 10 && curl localhost:3277l
{"status":"success","info":"yes!!!","service":"node"}
DISCUSSION
This simple example has shown how an image can be reduced not just in size, but also
in the scope of the actions it can perform. This is achieved by removing inessential
files (also discussed in technique 59), and reducing the syscalls available to it to only
those that are needed to run the application.
The means of “exercising” the application here was simple (one curl request to
the default endpoint). For a real application, there are a number of approaches you
can take to ensure you’ve covered all the possibilities. One way is to develop a set of
tests against known endpoints, and another is to use a “fuzzer” to throw lots of
inputs at the application in an automated way (this is one way to find bugs and secu-
rity flaws in your software). The simplest way is to leave your application running for
a longer period of time in the expectation that all the needed files and system calls
will be referenced.
The syscalls controlled are whitelisted here
by specifying the SCMP_ACT_ALLOW action
against them.
Runs the slim image as a daemon, exposing the same
port that DockerSlim exposed in its analysis phase,
and applies the seccomp profile to it Outputs the container
ID to the terminal
Reruns the curl
command to confirm
the application still
works as before
The output is identical to the
fat image you’ve slimmed.](https://image.slidesharecdn.com/dockerinpractice-manningpublications2019-220916213334-8f169daf/85/Docker-in-Practice-Manning-Publications-2019-pdf-376-320.jpg)


![359
TECHNIQUE 98 Removing secrets added during a build
A NOTE ON “MISSING” IMAGE LAYERS
Docker changed the nature of layering in Docker 1.10. From that point on, images
downloaded show up as “<missing>” in the history. This is expected and is because of
changes made by Docker to improve the security of images’ histories.
You can still get the contents of layers you’ve downloaded by docker saveing the
image and then extracting the TAR files from within that TAR file. Here’s an example
session that does that for the already-downloaded Ubuntu image.
$ docker history ubuntu
IMAGE CREATED CREATED BY SIZE
104bec311bcd 2 weeks ago /bin/sh -c #(nop) CMD ["/bin/bash"] 0 B
<missing> 2 weeks ago /bin/sh -c mkdir -p /run/systemd && ech 7 B
<missing> 2 weeks ago /bin/sh -c sed -i 's/^#s*(deb.*univer 1.9 kB
<missing> 2 weeks ago /bin/sh -c rm -rf /var/lib/apt/lists/* 0 B
<missing> 2 weeks ago /bin/sh -c set -xe && echo '#!/bin/sh 745 B
<missing> 2 weeks ago /bin/sh -c #(nop) ADD file:7529d28035b4 129 MB
$ docker save ubuntu | tar -xf -
$ find . | grep tar$
./042e55060780206b2ceabe277a8beb9b10f48262a876fd21b495af318f2f2352/layer.tar
./1037e0a8442d212d5cc63d1bc706e0e82da0eaafd62a2033959cfc629f874b28/layer.tar
./25f649b30070b739bc2aa3dd877986bee4de30e43d6260b8872836cdf549fcfc/layer.tar
./3094e87864d918dfdb2502e3f5dc61ae40974cd957d5759b80f6df37e0e467e4/layer.tar
./41b8111724ab7cb6246c929857b0983a016f11346dcb25a551a778ef0cd8af20/layer.tar
./4c3b7294fe004590676fa2c27a9a952def0b71553cab4305aeed4d06c3b308ea/layer.tar
./5d1be8e6ec27a897e8b732c40911dcc799b6c043a8437149ab021ff713e1044f/layer.tar
./a594214bea5ead6d6774f7a09dbd7410d652f39cc4eba5c8571d5de3bcbe0057/layer.tar
./b18fcc335f7aeefd87c9d43db2888bf6ea0ac12645b7d2c33300744c770bcec7/layer.tar
./d899797a09bfcc6cb8e8a427bb358af546e7c2b18bf8e2f7b743ec36837b42f2/layer.tar
./ubuntu.tar
$ tar -tvf
➥ ./4c3b7294fe004590676fa2c27a9a952def0b71553cab4305aeed4d06c3b308ea
➥ /layer.tar
drwxr-xr-x 0 0 0 0 15 Dec 17:45 etc/
drwxr-xr-x 0 0 0 0 15 Dec 17:45 etc/apt/
-rw-r--r-- 0 0 0 1895 15 Dec 17:45 etc/apt/sources.list
DISCUSSION
Although somewhat similar in intent to technique 52, the use of a specialized tool has
some notable differences in the end result. In the preceding solution, you can see that
metadata layers like CMD have been preserved, whereas the previous technique on this
subject would discard them entirely, so you’d need to manually recreate those meta-
data layers through another Dockerfile.
Listing 14.13 “Missing” layers in downloaded images
Uses the docker history
command to show the layer
history of the Ubuntu image
Uses the docker save command to output a
TAR file of the image layers, which is piped
straight to tar and extracted
Demonstrates that the TAR files contain
only file changes within that layer](https://image.slidesharecdn.com/dockerinpractice-manningpublications2019-220916213334-8f169daf/85/Docker-in-Practice-Manning-Publications-2019-pdf-380-320.jpg)


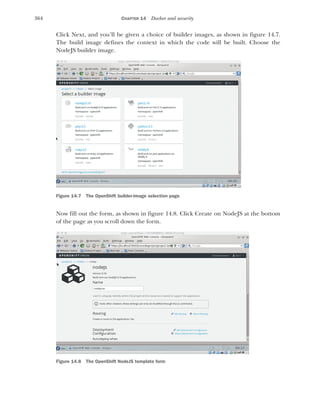


![370 CHAPTER 14 Docker and security
TIP ShutIt is a generic shell automation tool that we created to overcome
some limitations of Dockerfiles. If you want to read more about it, see the
GitHub page: http://ianmiell.github.io/shutit.
Figure 14.5 identifies the steps required to get a policy set up. The script will do the
following:
1 Set up VirtualBox
2 Start an appropriate Vagrant image
3 Log into the VM
4 Ensure the state of SELinux is correct
5 Install the latest version of Docker
6 Install the SELinux policy development tools
7 Give you a shell
Here are the commands to set up and run it (tested on Debian and Red Hat–based
distributions):
sudo su -
apt-get install -y git python-pip docker.io ||
yum install -y git python-pip docker.io
pip install shutit
git clone https://github.com/ianmiell/docker-selinux.git
cd docker-selinux
shutit build --delivery bash
-s io.dockerinpractice.docker_selinux.docker_selinux
compile_policy no
After running this script, you should eventually see output like this:
Pause point:
Have a shell:
You can now type in commands and alter the state of the target.
Hit return to see the prompt
Hit CTRL and ] at the same time to continue with build
Hit CTRL and u to save the state
You now have a shell running inside a VM with SELinux on it. If you type sestatus,
you’ll see that SELinux is enabled in permissive mode (as shown in listing 14.14). To
return to your host’s shell, press Ctrl-].
Listing 14.14 Installing ShutIt
Ensures you are root
before starting the run
Ensures the
required
packages are
installed on
the host
Installs
ShutIt
Clones the SELinux ShutIt
script and enters its directory
Runs the ShutIt script. “--delivery bash” means
commands are executed in bash rather than via
SSH or in a Docker container.
Configures the script to not compile a
SELinux policy, as we’ll do this by hand](https://image.slidesharecdn.com/dockerinpractice-manningpublications2019-220916213334-8f169daf/85/Docker-in-Practice-Manning-Publications-2019-pdf-391-320.jpg)

![372 CHAPTER 14 Docker and security
allow docker_apache_t self:tcp_socket >
create_stream_socket_perms;
allow docker_apache_t self:udp_socket >
create_socket_perms;
corenet_tcp_bind_all_nodes(docker_apache_t)
corenet_tcp_bind_http_port(docker_apache_t)
corenet_udp_bind_all_nodes(docker_apache_t)
corenet_udp_bind_http_port(docker_apache_t)
sysnet_dns_name_resolve(docker_apache_t)
#permissive docker_apache_t
END
TIP For more information about the preceding permissions, and to explore
others, you can install the selinux-policy-doc package and use a browser to
browse the documentation on file:///usr/share/doc-base/selinux-policy-doc/
html/index.html. The docs are also available online at http://oss.tresys.com/
docs/refpolicy/api/.
Now you’re going to compile this policy and see your application fail to start against
this policy in enforcing mode. Then you’ll restart it in permissive mode to check the
violations and correct it later:
$ make -f /usr/share/selinux/devel/Makefile
docker_apache.te
Compiling targeted docker_apache module
/usr/bin/checkmodule: loading policy configuration from >
tmp/docker_apache.tmp
/usr/bin/checkmodule: policy configuration loaded
/usr/bin/checkmodule: writing binary representation (version 17) >
to tmp/docker_apache.mod
Creating targeted docker_apache.pp policy package
rm tmp/docker_apache.mod tmp/docker_apache.mod.fc
$ semodule -i docker_apache.pp
$ setenforce Enforcing
$ docker run -ti --name selinuxdock >
--security-opt label:type:docker_apache_t httpd
Unable to find image 'httpd:latest' locally
latest: Pulling from library/httpd
2a341c7141bd: Pull complete
[...]
Status: Downloaded newer image for httpd:latest
permission denied
Error response from daemon: Cannot start container >
650c446b20da6867e6e13bdd6ab53f3ba3c3c565abb56c4490b487b9e8868985: >
[8] System error: permission denied
$ docker rm -f selinuxdock
selinuxdock
These allow and
corenet rules give
permission for the
container to listen
to Apache ports on
the network.
Allows DNS server resolution
with the sysnet directive
Optionally makes the docker_apache_t type
permissive so this policy isn’t enforced even if
the host is enforcing SELinux. Use this if you
can’t set the SELinux mode of the host.
Terminates the “here”
document, which writes
it out to disk
Compiles the docker_apache.te
file to a binary SELinux module
with a .pp suffix
Installs the module
Sets the SELinux
mode to “enforcing”
Runs the httpd image as a daemon,
applying the security label type of
docker_apache_t you defined in the
SELinux module. This command
should fail because it violates the
SELinux security configuration.
Removes the newly created container](https://image.slidesharecdn.com/dockerinpractice-manningpublications2019-220916213334-8f169daf/85/Docker-in-Practice-Manning-Publications-2019-pdf-393-320.jpg)
![373
TECHNIQUE 100 Using security options
$ setenforce Permissive
$ docker run -d --name selinuxdock >
--security-opt label:type:docker_apache_t httpd
CHECKING FOR VIOLATIONS
Up to this point you’ve created a SELinux module and applied it to your host.
Because the enforcement mode of SELinux is set to permissive on this host, actions
that would be disallowed in enforcing mode are allowed with a log line in the audit
log. You can check these messages by running the following command:
$ grep -w denied /var/log/audit/audit.log
type=AVC msg=audit(1433073250.049:392): avc: >
denied { transition } for >
pid=2379 comm="docker" >
path="/usr/local/bin/httpd-foreground" dev="dm-1" ino=530204 >
scontext=system_u:system_r:init_t:s0 >
tcontext=system_u:system_r:docker_apache_t:s0:c740,c787 >
tclass=process
type=AVC msg=audit(1433073250.049:392): avc: denied { write } for >
pid=2379 comm="httpd-foregroun" path="pipe:[19550]" dev="pipefs" >
ino=19550 scontext=system_u:system_r:docker_apache_t:s0:c740,c787 >
tcontext=system_u:system_r:init_t:s0 tclass=fifo_file
type=AVC msg=audit(1433073250.236:394): avc: denied { append } for >
pid=2379 comm="httpd" dev="pipefs" ino=19551 >
scontext=system_u:system_r:docker_apache_t:s0:c740,c787 >
tcontext=system_u:system_r:init_t:s0 tclass=fifo_file
type=AVC msg=audit(1433073250.236:394): avc: denied { open } for >
pid=2379 comm="httpd" path="pipe:[19551]" dev="pipefs" ino=19551 >
scontext=system_u:system_r:docker_apache_t:s0:c740,c787 >
tcontext=system_u:system_r:init_t:s0 tclass=fifo_file
[...]
Phew! There’s a lot of jargon there, and we don’t have time to teach you everything you
might need to know about SELinux. If you want to find out more, a good place to start is
with Red Hat’s SELinux documentation: https://access.redhat.com/documentation/
en-US/Red_Hat_Enterprise_Linux/5/html/Deployment_Guide/ch-selinux.html.
For now, you need to check that the violations are nothing untoward. What might
look untoward? If an application tries to open a port or a file you didn’t expect, you
might think twice about doing what we’ll show you next: patch these violations with a
new SELinux module.
Sets the SELinux mode to
“permissive” to allow the
application to start up
Runs the httpd image as a daemon, applying the security
label type of docker_apache_t you defined in the SELinux
module. This command should run successfully.
The type of message in the audit log is always
AVC for SELinux violations, and timestamps are
given as the number of seconds since the epoch
(which is defined as 1st Jan 1970).
The type of action denied is
shown in the curly brackets.
The process ID and name of the
command that triggered the violation
The path, device, and
inode of the target file
The SELinux context of the target
The class of the target object](https://image.slidesharecdn.com/dockerinpractice-manningpublications2019-220916213334-8f169daf/85/Docker-in-Practice-Manning-Publications-2019-pdf-394-320.jpg)


![379
TECHNIQUE 101 Logging your containers to the host’s syslog
log
null
ptmx
random
stderr
stdin
stdout
tty
urandom
zero
For this demonstration, we’re going to start up 100 daemon containers that log their
own starting order from 0 to 100 to the syslog, using the logger command. Then
you’ll be able to see those messages by running a docker exec on the host to look at
the syslogger container’s syslog file.
First, start up the containers.
for d in {1..100}
do
docker run -d -v /tmp/syslogdev/log:/dev/log ubuntu logger hello_$d
done
The preceding volume mount links the container’s syslog endpoint (/dev/log) to the
host’s /tmp/syslogdev/log file, which in turn is mapped to the syslogger container’s
/dev/log file. With this wiring, all syslog outputs are sent to the same file.
When that’s complete, you’ll see something similar to this (edited) output:
$ docker exec -ti syslogger tail -f /var/log/syslog
May 25 11:51:25 f4fb5d829699 logger: hello
May 25 11:55:15 f4fb5d829699 logger: hello_1
May 25 11:55:15 f4fb5d829699 logger: hello_2
May 25 11:55:16 f4fb5d829699 logger: hello_3
[...]
May 25 11:57:38 f4fb5d829699 logger: hello_97
May 25 11:57:38 f4fb5d829699 logger: hello_98
May 25 11:57:39 f4fb5d829699 logger: hello_99
You can use a modified exec command to archive these syslogs if you wish. For exam-
ple, you could run the following command to get all logs for hour 11 on May 25th
archived to a compressed file:
$ docker exec syslogger bash -c "cat /var/log/syslog |
grep '^May 25 11'" | xz - > /var/log/archive/May25_11.log.xz
NOTE For the messages to show up in the central syslog container, your pro-
grams need to log to syslog. We ensure this here by running the logger com-
mand, but your applications should do the same for this to work. Most
modern logging methods have a means to write to the locally visible syslog.
Listing 15.2 Starting up the logger containers](https://image.slidesharecdn.com/dockerinpractice-manningpublications2019-220916213334-8f169daf/85/Docker-in-Practice-Manning-Publications-2019-pdf-400-320.jpg)

![381
TECHNIQUE 102 Logging your Docker logs output
Journald is a system service that collects and stores logging data. It creates and
maintains a structured index of logs received from a variety of sources. The logs can
be queried with the journalctl command.
LOGGING TO SYSLOG
To direct your output to the syslog, use the --log-driver flag:
$ docker run --log-driver=syslog ubuntu echo 'outputting to syslog'
outputting to syslog
This will record the output in the syslog file. If you have permission to access the file,
you can examine the logs using standard Unix tools:
$ grep 'outputting to syslog' /var/log/syslog
Jun 23 20:37:50 myhost docker/6239418882b6[2559]: outputting to syslog
LOGGING TO JOURNALD
Outputting to a journal daemon looks similar:
$ docker run --log-driver=journald ubuntu echo 'outputting to journald'
outputting to journald
$ journalctl | grep 'outputting to journald'
Jun 23 11:49:23 myhost docker[2993]: outputting to journald
WARNING Ensure you have a journal daemon running on your host before
running the preceding command.
APPLYING ACROSS ALL CONTAINERS
It can be laborious to apply this argument to all containers on your host, so you can
change your Docker daemon to log by default to these supported mechanisms.
Change the daemon /etc/default/docker, or /etc/sysconfig/docker, or whichever
Docker config file your distribution has set up, such that the DOCKER_OPTS="" line is
activated and includes the log-driver flag. For example, if the line was
DOCKER_OPTS="--dns 8.8.8.8 --dns 8.8.4.4"
change it to this:
DOCKER_OPTS="--dns 8.8.8.8 --dns 8.8.4.4 --log-driver syslog"
TIP See appendix B for details on how to change the Docker daemon’s con-
figuration on your host.
If you restart your Docker daemon, containers should then log to the relevant service.
DISCUSSION
Another common choice worth mentioning in this context (but not covered here) is
that you can use containers to implement an ELK (Elasticsearch, Logstash, Kibana)
logging infrastructure.](https://image.slidesharecdn.com/dockerinpractice-manningpublications2019-220916213334-8f169daf/85/Docker-in-Practice-Manning-Publications-2019-pdf-402-320.jpg)
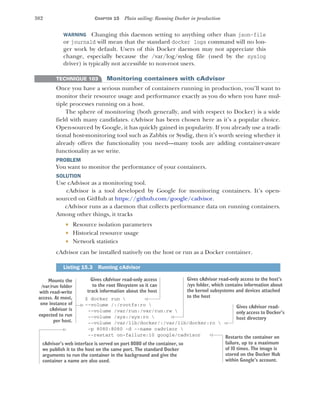


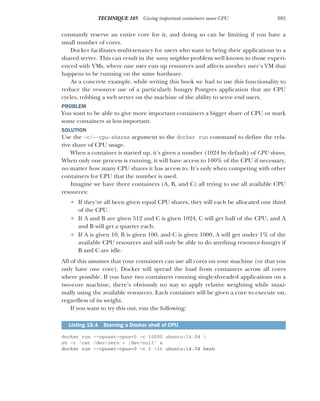


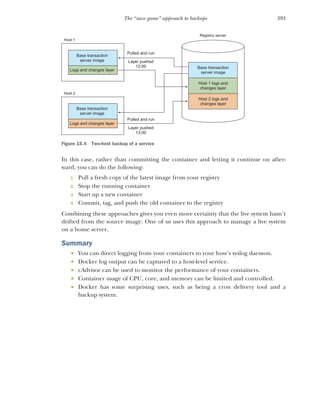


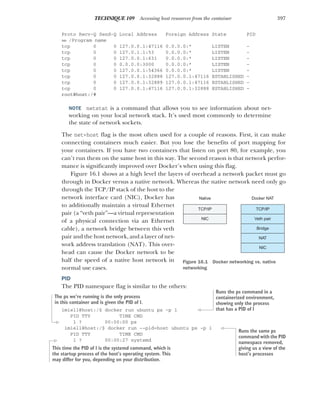


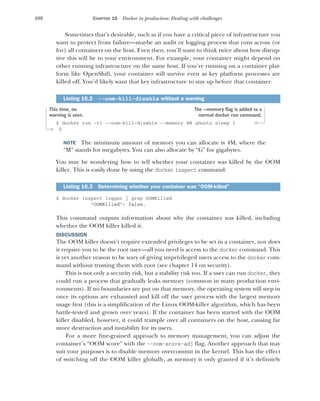
![401
TECHNIQUE 111 Debugging a container’s network with nsenter
available. However, this could limit the number of containers that can run on your
hosts, which could also be undesirable.
As always, performance management is an art!
16.2 When containers leak—debugging Docker
In this section we’ll cover some techniques that will help you understand and fix issues
with applications running in Docker containers. We’ll cover how to jump into a con-
tainer’s network while using tools from your host to debug issues, and we’ll look at an
alternative that avoids container manipulation by monitoring network interfaces
directly.
Finally, we’ll demonstrate how the Docker abstraction can break down, leading to
containers working on one host and not another, and how to debug this on live systems.
TECHNIQUE 111 Debugging a container’s network with nsenter
In an ideal world, you’d be able to use socat (see technique 4) in an ambassador con-
tainer to diagnose issues with container communication. You’d start the extra con-
tainer and make sure connections go to this new container, which acts as a proxy. The
proxy allows you to diagnose and monitor the connections, and it then forwards them
to the right place. Unfortunately it’s not always convenient (or possible) to set up a
container like this only for debugging purposes.
TIP See technique 74 for a description of the ambassador pattern.
You’ve already read about docker exec in techniques 15 and 19. This technique dis-
cusses nsenter, a tool that looks similar but allows you to use tools from your machine
inside the container, rather than being limited to what the container has installed.
PROBLEM
You want to debug a network problem in a container, but the tools aren’t in the
container.
SOLUTION
Use nsenter to jump into the container’s network but retain your host’s tooling.
If you don’t already have nsenter available on your Docker host, you can build it
with the following command:
$ docker run -v /usr/local/bin:/target jpetazzo/nsenter
This will install nsenter in /usr/local/bin, and you’ll be able to use it immediately.
nsenter might also be available in your distro (in the util-linux package).
You may have noticed by now that the generally useful BusyBox image doesn’t
come with bash by default. As a demo of nsenter, we’re going to show how you can
enter a BusyBox container with your host’s bash program:
$ docker run -ti busybox /bin/bash
FATA[0000] Error response from daemon: Cannot start container >
a81e7e6b2c030c29565ef7adb94de20ad516a6697deeeb617604e652e979fda6: >](https://image.slidesharecdn.com/dockerinpractice-manningpublications2019-220916213334-8f169daf/85/Docker-in-Practice-Manning-Publications-2019-pdf-422-320.jpg)

![403
TECHNIQUE 111 Debugging a container’s network with nsenter
One final example of a program you might want to use from within a container is
tcpdump, a tool that records all TCP packets on a network interface. To use it, you
need to run nsenter with the --net command, allowing you to “see” the container’s
network from the host and therefore monitor the packets with tcpdump.
For example, the tcpdump command in the following code records all packets to
the /tmp/google.tcpdump file (we assume you’re still in the nsenter session you
started previously). Some network traffic is then triggered by retrieving a web page:
root@781c1fed2b18:/# tcpdump -XXs 0 -w /tmp/google.tcpdump &
root@781c1fed2b18:/# wget google.com
--2015-08-07 15:12:04-- http://google.com/
Resolving google.com (google.com)... 216.58.208.46, 2a00:1450:4009:80d::200e
Connecting to google.com (google.com)|216.58.208.46|:80... connected.
HTTP request sent, awaiting response... 302 Found
Location: http://www.google.co.uk/?gfe_rd=cr&ei=tLzEVcCXN7Lj8wepgarQAQ >
[following]
--2015-08-07 15:12:04-- >
http://www.google.co.uk/?gfe_rd=cr&ei=tLzEVcCXN7Lj8wepgarQAQ
Resolving www.google.co.uk (www.google.co.uk)... 216.58.208.67, >
2a00:1450:4009:80a::2003
Connecting to www.google.co.uk (www.google.co.uk)|216.58.208.67|:80... >
connected.
HTTP request sent, awaiting response... 200 OK
Length: unspecified [text/html]
Saving to: ‘index.html’
index.html [ <=> ] 18.28K --.-KB/s in 0.008s
2015-08-07 15:12:05 (2.18 MB/s) - ‘index.html’ saved [18720]
root@781c1fed2b18:# 15:12:04.839152 IP 172.17.0.26.52092 > >
google-public-dns-a.google.com.domain: 7950+ A? google.com. (28)
15:12:04.844754 IP 172.17.0.26.52092 > >
google-public-dns-a.google.com.domain: 18121+ AAAA? google.com. (28)
15:12:04.860430 IP google-public-dns-a.google.com.domain > >
172.17.0.26.52092: 7950 1/0/0 A 216.58.208.46 (44)
15:12:04.869571 IP google-public-dns-a.google.com.domain > >
172.17.0.26.52092: 18121 1/0/0 AAAA 2a00:1450:4009:80d::200e (56)
15:12:04.870246 IP 172.17.0.26.47834 > lhr08s07-in-f14.1e100.net.http: >
Flags [S], seq 2242275586, win 29200, options [mss 1460,sackOK,TS val >
49337583 ecr 0,nop,wscale 7], length 0
TIP Depending on your network setup, you may need to temporarily change
your resolv.conf file to allow the DNS lookup to work. If you get a “Temporary
failure in name resolution” error, try adding the line nameserver 8.8.8.8 to the
top of your /etc/resolv.conf file. Don’t forget to revert it when you’re finished.
DISCUSSION
This technique gives you a way to quickly alter the network behavior of containers
without having to settle down with any of the tools from chapter 10 (techniques 78
and 79) to simulate network breakage.](https://image.slidesharecdn.com/dockerinpractice-manningpublications2019-220916213334-8f169daf/85/Docker-in-Practice-Manning-Publications-2019-pdf-424-320.jpg)

![405
TECHNIQUE 113 Debugging containers that fail on specific hosts
In the preceding example, you ask tcpflow to print a colorized stream of any traffic
going to or from your container with a source or destination port of 80 (generally
used for HTTP traffic). You can now try this by retrieving a web page in the container
in a new terminal:
$ docker exec tcpflowtest wget -O /dev/null http://www.example.com/
Connecting to www.example.com (93.184.216.34:80)
null 100% |*******************************| 1270 0:00:00 ETA
You’ll see colorized output in the tcpflow terminal. The cumulative output of the com-
mand so far will look something like this:
$ tcpflow -J -c -i docker0 'host 172.17.0.1 and (src or dst port 80)'
tcpflow: listening on docker0
172.017.000.001.36042-093.184.216.034.00080: >
GET / HTTP/1.1
Host: www.example.com
User-Agent: Wget
Connection: close
093.184.216.034.00080-172.017.000.001.36042: >
HTTP/1.0 200 OK
Accept-Ranges: bytes
Cache-Control: max-age=604800
Content-Type: text/html
Date: Mon, 17 Aug 2015 12:22:21 GMT
[...]
<!doctype html>
<html>
<head>
<title>Example Domain</title>
[...]
DISCUSSION
tcpflow is an excellent addition to your toolbox, given how unobtrusive it is. You can
start it against long-running containers to get a bit of insight into what they’re trans-
ferring right now, or use it alongside tcpdump (the previous technique) to get a more
complete picture of the kind of requests your application makes and what informa-
tion is transferred.
As well as tcpdump, the previous technique also covers using nsenter to monitor
traffic on just one container rather than all of them (which is what monitoring
docker0 will do).
TECHNIQUE 113 Debugging containers that fail on specific hosts
The previous two techniques have shown how you can start investigating issues caused
by the interaction between your containers and other locations (whether those “other
locations” are more containers, or third parties on the internet).
Blue coloring starts
Red coloring starts](https://image.slidesharecdn.com/dockerinpractice-manningpublications2019-220916213334-8f169daf/85/Docker-in-Practice-Manning-Publications-2019-pdf-426-320.jpg)

![407
TECHNIQUE 113 Debugging containers that fail on specific hosts
within a container, you’re the same user as root on the host. Although it’s hard to
break out of the container so you obtain root on the host, it’s not impossible; exploits
have been found, and others may exist that the community is unaware of. What
SELinux can do is provide another layer of protection so that even if a root user
breaks out of the container to the host, there are limits on what actions they can per-
form on the host.
So far so good, but the problem for Docker is that SELinux is implemented on the
host, and not within the container. This means that programs running in containers
that query the status of SELinux and find it enabled might make certain assumptions
about the environment in which they run, and fail in unexpected ways if these expec-
tations aren’t met.
In the following example, we’re running a CentOS 7 Vagrant machine with Docker
installed, and within that an Ubuntu 12.04 container. If we run a fairly straightforward
command to add a user, the exit code is 12, indicating an error, and indeed the user
has not been created:
[root@centos vagrant]# docker run -ti ubuntu:12.04
Unable to find image 'ubuntu:12.04' locally
Pulling repository ubuntu
78cef618c77e: Download complete
b5da78899d3a: Download complete
87183ecb6716: Download complete
82ed8e312318: Download complete
root@afade8b94d32:/# useradd -m -d /home/dockerinpractice dockerinpractice
root@afade8b94d32:/# echo $?
12
The same command run on an ubuntu:14.04 container works just fine. If you want to
try to reproduce this result, you’ll need a CentOS 7 machine (or similar). But for
learning purposes, following the rest of the technique with any command and con-
tainer will be sufficient.
TIP In bash, $? gives you the exit code of the last-run command. The mean-
ing of the exit code varies from command to command, but typically an exit
code of 0 means the call was successful, and a nonzero code indicates an error
or exceptional condition of some kind.
DEBUGGING LINUX API CALLS
Because we know that the likely difference between the containers is due to differ-
ences between the kernel APIs running on the hosts, strace can help you determine
the differences between calls to the kernel API.
strace is a tool that allows you to snoop on the calls made to the Linux API by a
process (a.k.a. system calls). It’s an extremely useful debugging and educational tool.
You can see how it works in figure 16.2.](https://image.slidesharecdn.com/dockerinpractice-manningpublications2019-220916213334-8f169daf/85/Docker-in-Practice-Manning-Publications-2019-pdf-428-320.jpg)
![408 CHAPTER 16 Docker in production: Dealing with challenges
First, you need to install strace on your container using the appropriate package man-
ager, and then run the command that differs, with the strace command prepended.
Here’s some example output for the failed useradd call:
# strace -f
useradd -m -d /home/dockerinpractice dockerinpractice
execve("/usr/sbin/useradd", ["useradd", "-m", "-d", >
"/home/dockerinpractice", "dockerinpractice"], [/* 9 vars */]) = 0
[...]
open("/proc/self/task/39/attr/current", >
O_RDONLY) = 9
read(9, "system_u:system_r:svirt_lxc_net_"..., >
4095) = 46
close(9) = 0
[...]
open("/etc/selinux/config", O_RDONLY) = >
-1 ENOENT (No such file or directory)
open("/etc/selinux/targeted/contexts/files/ >
file_contexts.subs_dist", O_RDONLY) = -1 ENOENT (No such file or directory)
open("/etc/selinux/targeted/contexts/files/ >
file_contexts.subs", O_RDONLY) = -1 ENOENT (No such file or directory)
open("/etc/selinux/targeted/contexts/files/ >
file_contexts", O_RDONLY) = -1 ENOENT (No such file or directory)
[...]
exit_group(12)
open syscall
Storage
Networking
Misc devices
Kernel
User code
execution
syscall result
read syscall
syscall result
close syscall
syscall result
strace monitors these calls Figure 16.2 How strace works
Runs strace on the command with the -f
flag, which ensures that any process
spawned by your command and any of its
descendants are “followed” by strace
Appends the command
you want to debug to
the strace invocation
Each line of the strace
output starts with the
Linux API call. The execve
call here executes the
command you gave
strace. The 0 at the end
is the return value from
the call (successful).
The “open” system call opens a file
for reading. The return value (9) is
the file handle number used in
subsequent calls to work on the file.
In this case, the SELinux information
is retrieved from the /proc
filesystem, which holds information
about running processes.
The “read” system call works on
the previously opened file (with
file descriptor 9) and returns the
number of bytes read (46).
The “close” system call closes the file
referenced with the file descriptor number.
The program attempts to open the SELinux files it expects to
be there, but in each case fails. strace helpfully tells you what
the return value means: “No such file or directory.”
The process exits with the
value 12, which for useradd
means that the directory
couldn’t be created.](https://image.slidesharecdn.com/dockerinpractice-manningpublications2019-220916213334-8f169daf/85/Docker-in-Practice-Manning-Publications-2019-pdf-429-320.jpg)

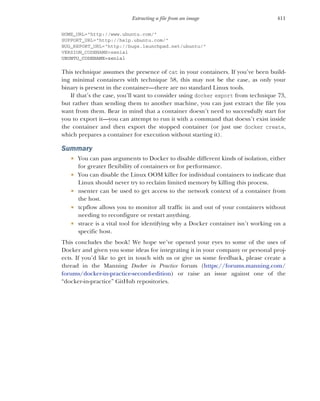


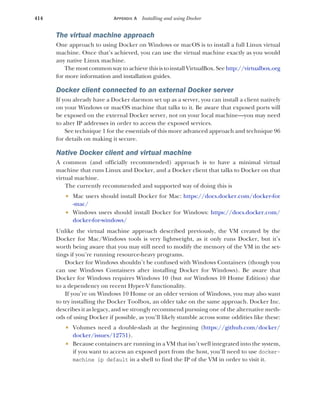
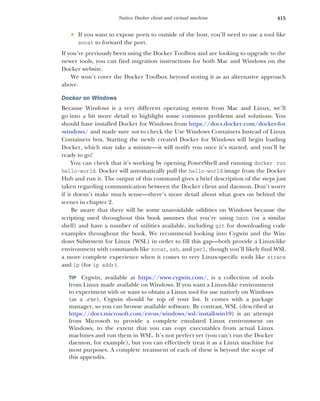

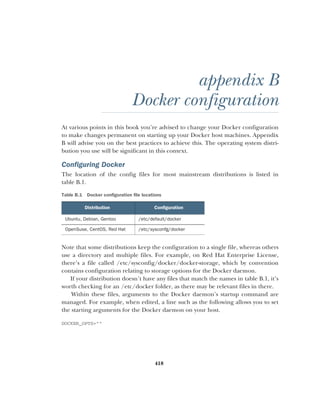
![419
Restarting Docker
For example, if you want to change the location of Docker’s root directory from the
default (which is /var/lib/docker), you might change the preceding line as follows:
DOCKER_OPTS="-g /mnt/bigdisk/docker"
If your distribution uses systemd config files (as opposed to /etc), you can also search
for the ExecStart line in the docker file under the systemd folder, and change that if
you want. This file might be located at /usr/lib/systemd/system/service/docker or
/lib/systemd/system/docker.service, for example. Here’s an example file:
[Unit]
Description=Docker Application Container Engine
Documentation=http://docs.docker.io
After=network.target
[Service]
Type=notify
EnvironmentFile=-/etc/sysconfig/docker
ExecStart=/usr/bin/docker -d --selinux-enabled
Restart=on-failure
LimitNOFILE=1048576
LimitNPROC=1048576
[Install]
WantedBy=multi-user.target
The EnvironmentFile line refers the startup script to the file with the DOCKER_OPTS
entry we discussed earlier. If you change the systemctl file directly, you’ll need to run
systemctl daemon-reload to ensure that the change is picked up by the systemd
daemon.
Restarting Docker
Altering the configuration for the Docker daemon isn’t sufficient—in order to apply
the changes, the daemon must be restarted. Be aware that this will stop any running
containers and cancel any in-progress image downloads.
Restarting with systemctl
Most modern Linux distributions use systemd to manage the startup of services on the
machine. If you run systemctl on the command line and get pages of output, then
your host is running systemd. If you get a “command not found” message, go to the
next section.
If you want to make changes to your configuration, you can stop and start Docker
as follows:
$ systemctl stop docker
$ systemctl start docker](https://image.slidesharecdn.com/dockerinpractice-manningpublications2019-220916213334-8f169daf/85/Docker-in-Practice-Manning-Publications-2019-pdf-440-320.jpg)

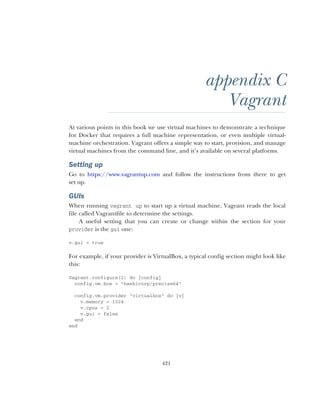


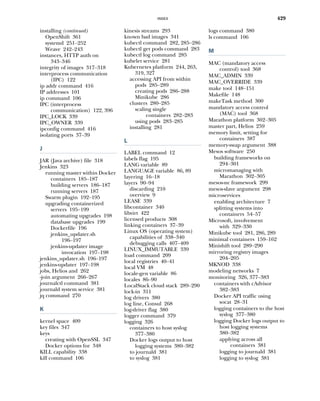


![D
ocker’s simple idea—wrapping an application and its depen-
dencies into a single deployable container—created a buzz
in the software industry. Now, containers are essential to
enterprise infrastructure, and Docker is the undisputed industry
standard. So what do you do after you’ve mastered the basics?
To really streamline your applications and transform your dev
process, you need relevant examples and experts who can walk
you through them. You need this book.
Docker in Practice, Second Edition teaches you rock-solid, tested
Docker techniques, such as replacing VMs, enabling microser-
vices architecture, efficient network modeling, offline produc-
tivity, and establishing a container-driven continuous delivery
process. Following a cookbook-style problem/solution format,
you’ll explore real-world use cases and learn how to apply the
lessons to your own dev projects.
What’s Inside
Continuous integration and delivery
The Kubernetes orchestration tool
Streamlining your cloud workflow
Docker in swarm mode
Emerging best practices and techniques
Written for developers and engineers using Docker in
production.
Ian Miell and Aidan Hobson Sayers are seasoned infrastructure archi-
tects working in the UK. Together, they used Docker to trans-
form DevOps at one of the UK’s largest gaming companies.
To download their free eBook in PDF, ePub, and Kindle formats,
owners of this book should visit
manning.com/books/docker-in-practice-second-edition
$49.99 / Can $65.99 [INCLUDING eBOOK]
SOFTWARE DEVELOPMENT/ADMINISTRATION
M A N N I N G
“Must-have guide to
understanding, setting up,
and administering Docker!
The authors do a fantastic
job identifying and resolving
common problems.
”
—Alex Basile, Bloomberg
“Docker took the software
industry by storm, and this
book is what you need
to best navigate those
stormy waters.
”
—Yagiz Erkan
Whistler Technologies
“Not just a Docker book—
it also makes you an effective
DevOps person by teaching
how to use the command
line better.
”
—Ahmad Nazir Raja, Penneo
Miell Hobson Sayers
Docker IN PRACTICE Second Edition See first page](https://image.slidesharecdn.com/dockerinpractice-manningpublications2019-220916213334-8f169daf/85/Docker-in-Practice-Manning-Publications-2019-pdf-456-320.jpg)


