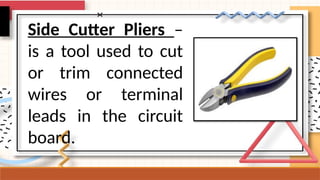
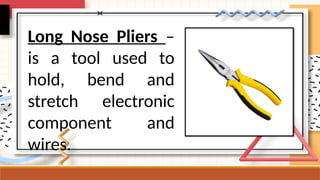
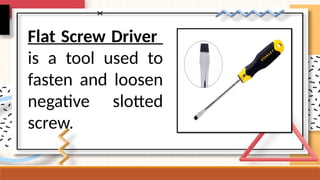
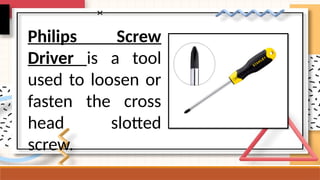
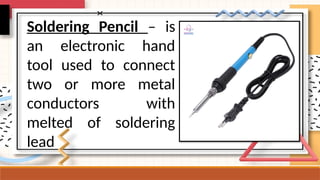
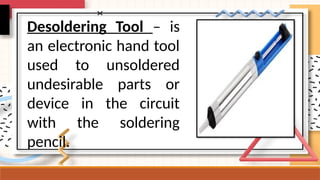
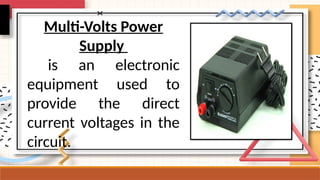
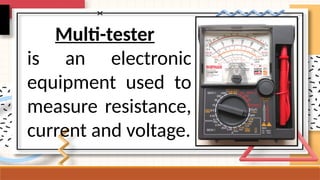
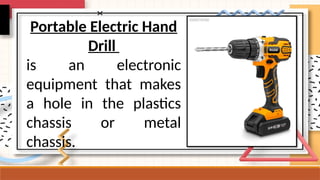
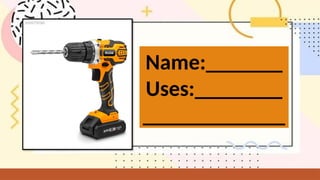
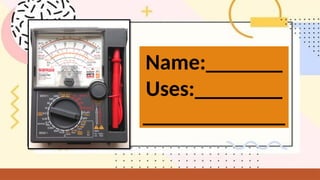
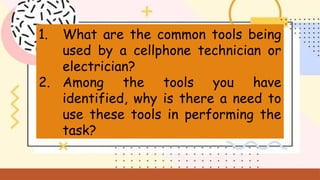
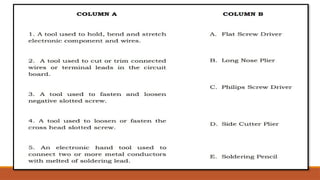
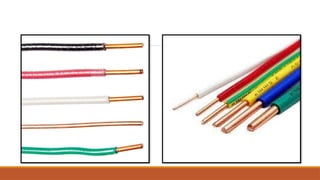
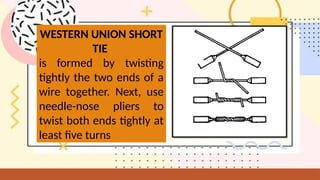
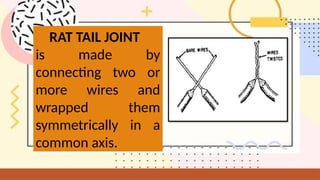
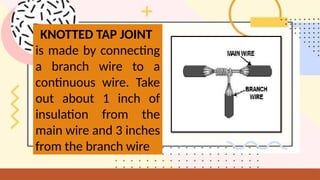
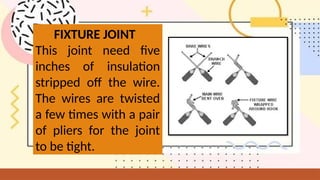
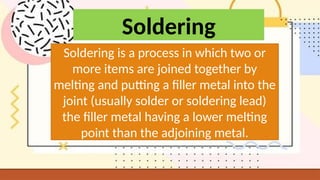
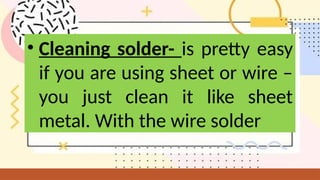
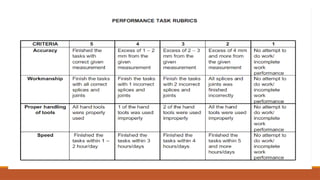
Direction: Let us determine how
much you already know about the
use of hand tools in electronic and
electrical equipment. Answer this
pre-test. Select the letter of the
correct answer. Write your answer
on a sheet of paper.
1. A tool used to hold, bend and
stretch electronic component
and wires.
A. Long Nose Plier
B. Side Cutter Pliers
C. Soldering Pencil
D. Desoldering Tool
2. A tool used to cut or trim
connected wires or terminal leads
in the circuit board.
A. Multi-tester
B. Soldering Pencil
C. Side Cutter Plier
D. Portable Electric Hand Drill
3. A tool used to fasten negative
slotted screw.
A. Philips Screw Driver
B. Multi-tester
C. Flat Screw Driver
D. Desoldering Tool
4. A tool used to fasten or drive
positive slotted screws.
A. Philips Screw Driver
B. Multi – tester
C. Portable Electric Hand Drill
D. Side Cutter Plier
5. An electronic hand tool used to
connect two or more metal conductors
with melted of soldering lead.
A. Philips Screw Driver
B. Multi – Volts Power Supply
C. Flat Screw Driver
D. Soldering Pencil
6. Mang Pedro wants to unsolder parts in
the circuit so he can repair and replace
broken components. Which hand tool will
help him complete the task?
A. Desoldering Tool
B. Side Cutter Plier
C. Flat Screw Driver
D. Soldering Pencil
7. Sir John needs an electronic device
that can supply direct current voltage to a
circuit. What is the best device for this?
A. Portable Electric Hand Drill
B. Side Cutter Plier
C. Multi – tester
D. Multi – Volts Power Supply
8. Which electronic equipment is used
to measure resistance, current and
voltage?
A. Soldering Pencil
B. Side Cutter Plier
C. Multi – tester
D. Desoldering Tool
9. Mang Poldo wanted to make a hole
on his computer metal chassis. What
tool will he use?
A. Portable Electric Hand Drill
B. Side Cutter Plier
C. Multi – tester
D. Desoldering Tool
10.It is a connection of both physical and
cable end that connects to a different
cable, or to the terminal of a component.
A. Soldering
B. Fixture Joint
C. Electrical Cable Termination
D. Rat Tail Joint
ANSWER:
1. A
2. C
3. C
4. A
5. D
6. A
7. D
8. C
9. A
10.C
Terminating and Connecting
Electrical Wiring and Electronics
Circuit (TCEW)
Competencies
LO 1 – Plan and prepare for termination/connection of electrical
wiring/electronics circuits
LO 2 – Terminate/connect electrical wiring/ electronic circuits
LO 3 – Test termination/connections of electrical wiring/electronics circuits
Basic Electronic
Equipment and Hand
Tools
A. Common Tools
Side Cutter Pliers –
is a tool used to cut
or trim connected
wires or terminal
leads in the circuit
board.
Long Nose Pliers –
is a tool used to
hold, bend and
stretch electronic
component and
wires.
Flat Screw Driver
is a tool used to
fasten and loosen
negative slotted
screw.
Philips Screw
Driver is a tool
used to loosen or
fasten the cross
head slotted
screw.
Soldering Pencil – is
an electronic hand
tool used to connect
two or more metal
conductors with
melted of soldering
lead
Desoldering Tool – is
an electronic hand tool
used to unsoldered
undesirable parts or
device in the circuit
with the soldering
pencil.
B. Basic Electronic
Equipment
Multi-Volts Power
Supply
is an electronic
equipment used to
provide the direct
current voltages in the
circuit.
Multi-tester
is an electronic
equipment used to
measure resistance,
current and voltage.
Portable Electric Hand
Drill
is an electronic
equipment that makes
a hole in the plastics
chassis or metal
chassis.
Direction: Name
the following tools
and equipment and
give their uses.
Name:_______
Uses:________
_____________
Name:_______
Uses:________
_____________
Name:_______
Uses:________
_____________
Name:_______
Uses:________
_____________
Direction: Answer the following
questions and write your
answer on your assignment
notebook.
1. What are the common tools being
used by a cellphone technician or
electrician?
2. Among the tools you have
identified, why is there a need to
use these tools in performing the
task?
Directions: Match column A with
Column B. Write only the letter of the
correct answer on a separate paper.
Answer:
1 B
2 D
3 A
4 C
5 E
 Observe the following
pictures, what do you
think the importance of it
in our everyday life?
Types of Wire Joints &
Splices
WESTERN UNION SHORT
TIE
is formed by twisting
tightly the two ends of a
wire together. Next, use
needle-nose pliers to
twist both ends tightly at
least five turns
RAT TAIL JOINT
is made by
connecting two or
more wires and
wrapped them
symmetrically in a
common axis.
KNOTTED TAP JOINT
is made by connecting
a branch wire to a
continuous wire. Take
out about 1 inch of
insulation from the
main wire and 3 inches
from the branch wire
FIXTURE JOINT
This joint need five
inches of insulation
stripped off the wire.
The wires are twisted
a few times with a pair
of pliers for the joint
to be tight.
Direction: Identify the
following splices and joints
shown:
Direction: Identify the
different splices and
joints discussed a while
ago.
It is formed by twisting tightly the two ends of
a wire together. Next, use needle-nose pliers
to twist both ends tightly at least five turns.
It is made by connecting two or more wires
and wrapped them symmetrically in a
common axis.
Identify what is being ask.
 It is made by connecting a branch wire to a
continuous wire. Take out about 1 inch of insulation
from the main wire and 3 inches from the branch
wire
 This joint need five inches of insulation stripped off
the wire. The wires are twisted a few times with a
pair of pliers for the joint to be tight.
Identify what is being ask.
Answer:
1. WESTERN UNION
SHORT TIE
2. RAT TAIL JOINT
3. KNOTTED TAP JOINT
4. FIXTURE JOINT
Soldering
Soldering is a process in which two or
more items are joined together by
melting and putting a filler metal into the
joint (usually solder or soldering lead)
the filler metal having a lower melting
point than the adjoining metal.
Soldering Process
This just means that the two
pieces of metal that you are
joining together, fit as closely as
possible.
STEP ONE: GOOD FIT
• Clean Metal- Sandpaper is also an effective
way to clean your metal. It has the added
benefit of taking “the shine” off of your
surfaces. Flux doesn’t flow well on shiny
metal so, abrading your surfaces to be
soldered will help ensure an even coating of
flux.
STEP TWO:
CLEAN METAL/SOLDER/FLUX/HANDS
• Cleaning solder- is pretty easy
if you are using sheet or wire –
you just clean it like sheet
metal. With the wire solder
• Clean Flux- Flux can get contaminated by dipping
your flux brush into the container. After a while,
the bottle will fill up with debris and other
contaminants (like bits of rusting steel from
paintbrushes, bits of charcoal from your soldering
block) and your flux will get dirty. To save you
from having to buy new flux – just because it’s
dirty – use a small, low-walled container to put
your flux in.
The next important information on heat is
that, in order for the solder to flow, you
must heat the metal on both sides of the
join, up to solder flow temperature. If you
heat one side more than the other, the
solder will flow to the “hot side”.
STEP 3: HEAT
Flux aids in soldering and desoldering
processes by removing oxide films
which form on the surface of metals
being soldered.
STEP 4: FLUX
Don’t heat the solder. The solder is one
of the smallest pieces of metal on your
piece. It will melt first but, won’t do
much except (if you heat it enough)
absorb into the metal, maybe start
eating away at the metal, resulting in
pits or melting into a puddle.
1. Explain in 3-5 sentences
the proper way of good
soldering job.
Assignment:
Bring the following tools and materials
needed in tomorrow’s activity.
 Solid wires
 Cutter
 Flies
 Art materials (Construction paper,
Illustration board ect,)
Performance Task #2
Direction: Create the different Types
of Wire Joints & Splices.
 WESTERN UNION SHORT TIE
 RAT TAIL JOINT
 KNOTTED TAP JOINT
 FIXTURE JOINT
CSS - Week 6 - Test Construction Test Construction

CSS - Week 6 - Test Construction Test Construction

  • 1.
    Direction: Let usdetermine how much you already know about the use of hand tools in electronic and electrical equipment. Answer this pre-test. Select the letter of the correct answer. Write your answer on a sheet of paper.
  • 2.
    1. A toolused to hold, bend and stretch electronic component and wires. A. Long Nose Plier B. Side Cutter Pliers C. Soldering Pencil D. Desoldering Tool
  • 3.
    2. A toolused to cut or trim connected wires or terminal leads in the circuit board. A. Multi-tester B. Soldering Pencil C. Side Cutter Plier D. Portable Electric Hand Drill
  • 4.
    3. A toolused to fasten negative slotted screw. A. Philips Screw Driver B. Multi-tester C. Flat Screw Driver D. Desoldering Tool
  • 5.
    4. A toolused to fasten or drive positive slotted screws. A. Philips Screw Driver B. Multi – tester C. Portable Electric Hand Drill D. Side Cutter Plier
  • 6.
    5. An electronichand tool used to connect two or more metal conductors with melted of soldering lead. A. Philips Screw Driver B. Multi – Volts Power Supply C. Flat Screw Driver D. Soldering Pencil
  • 7.
    6. Mang Pedrowants to unsolder parts in the circuit so he can repair and replace broken components. Which hand tool will help him complete the task? A. Desoldering Tool B. Side Cutter Plier C. Flat Screw Driver D. Soldering Pencil
  • 8.
    7. Sir Johnneeds an electronic device that can supply direct current voltage to a circuit. What is the best device for this? A. Portable Electric Hand Drill B. Side Cutter Plier C. Multi – tester D. Multi – Volts Power Supply
  • 9.
    8. Which electronicequipment is used to measure resistance, current and voltage? A. Soldering Pencil B. Side Cutter Plier C. Multi – tester D. Desoldering Tool
  • 10.
    9. Mang Poldowanted to make a hole on his computer metal chassis. What tool will he use? A. Portable Electric Hand Drill B. Side Cutter Plier C. Multi – tester D. Desoldering Tool
  • 11.
    10.It is aconnection of both physical and cable end that connects to a different cable, or to the terminal of a component. A. Soldering B. Fixture Joint C. Electrical Cable Termination D. Rat Tail Joint
  • 12.
    ANSWER: 1. A 2. C 3.C 4. A 5. D 6. A 7. D 8. C 9. A 10.C
  • 13.
    Terminating and Connecting ElectricalWiring and Electronics Circuit (TCEW) Competencies LO 1 – Plan and prepare for termination/connection of electrical wiring/electronics circuits LO 2 – Terminate/connect electrical wiring/ electronic circuits LO 3 – Test termination/connections of electrical wiring/electronics circuits
  • 14.
  • 15.
  • 16.
    Side Cutter Pliers– is a tool used to cut or trim connected wires or terminal leads in the circuit board.
  • 17.
    Long Nose Pliers– is a tool used to hold, bend and stretch electronic component and wires.
  • 18.
    Flat Screw Driver isa tool used to fasten and loosen negative slotted screw.
  • 19.
    Philips Screw Driver isa tool used to loosen or fasten the cross head slotted screw.
  • 20.
    Soldering Pencil –is an electronic hand tool used to connect two or more metal conductors with melted of soldering lead
  • 21.
    Desoldering Tool –is an electronic hand tool used to unsoldered undesirable parts or device in the circuit with the soldering pencil.
  • 22.
  • 23.
    Multi-Volts Power Supply is anelectronic equipment used to provide the direct current voltages in the circuit.
  • 24.
    Multi-tester is an electronic equipmentused to measure resistance, current and voltage.
  • 25.
    Portable Electric Hand Drill isan electronic equipment that makes a hole in the plastics chassis or metal chassis.
  • 27.
    Direction: Name the followingtools and equipment and give their uses.
  • 28.
  • 29.
  • 30.
  • 31.
  • 33.
    Direction: Answer thefollowing questions and write your answer on your assignment notebook.
  • 34.
    1. What arethe common tools being used by a cellphone technician or electrician? 2. Among the tools you have identified, why is there a need to use these tools in performing the task?
  • 36.
    Directions: Match columnA with Column B. Write only the letter of the correct answer on a separate paper.
  • 38.
  • 39.
     Observe thefollowing pictures, what do you think the importance of it in our everyday life?
  • 41.
    Types of WireJoints & Splices
  • 42.
    WESTERN UNION SHORT TIE isformed by twisting tightly the two ends of a wire together. Next, use needle-nose pliers to twist both ends tightly at least five turns
  • 43.
    RAT TAIL JOINT ismade by connecting two or more wires and wrapped them symmetrically in a common axis.
  • 44.
    KNOTTED TAP JOINT ismade by connecting a branch wire to a continuous wire. Take out about 1 inch of insulation from the main wire and 3 inches from the branch wire
  • 45.
    FIXTURE JOINT This jointneed five inches of insulation stripped off the wire. The wires are twisted a few times with a pair of pliers for the joint to be tight.
  • 46.
    Direction: Identify the followingsplices and joints shown:
  • 52.
    Direction: Identify the differentsplices and joints discussed a while ago.
  • 54.
    It is formedby twisting tightly the two ends of a wire together. Next, use needle-nose pliers to twist both ends tightly at least five turns. It is made by connecting two or more wires and wrapped them symmetrically in a common axis. Identify what is being ask.
  • 55.
     It ismade by connecting a branch wire to a continuous wire. Take out about 1 inch of insulation from the main wire and 3 inches from the branch wire  This joint need five inches of insulation stripped off the wire. The wires are twisted a few times with a pair of pliers for the joint to be tight. Identify what is being ask.
  • 56.
    Answer: 1. WESTERN UNION SHORTTIE 2. RAT TAIL JOINT 3. KNOTTED TAP JOINT 4. FIXTURE JOINT
  • 58.
    Soldering Soldering is aprocess in which two or more items are joined together by melting and putting a filler metal into the joint (usually solder or soldering lead) the filler metal having a lower melting point than the adjoining metal.
  • 59.
  • 60.
    This just meansthat the two pieces of metal that you are joining together, fit as closely as possible. STEP ONE: GOOD FIT
  • 61.
    • Clean Metal-Sandpaper is also an effective way to clean your metal. It has the added benefit of taking “the shine” off of your surfaces. Flux doesn’t flow well on shiny metal so, abrading your surfaces to be soldered will help ensure an even coating of flux. STEP TWO: CLEAN METAL/SOLDER/FLUX/HANDS
  • 62.
    • Cleaning solder-is pretty easy if you are using sheet or wire – you just clean it like sheet metal. With the wire solder
  • 63.
    • Clean Flux-Flux can get contaminated by dipping your flux brush into the container. After a while, the bottle will fill up with debris and other contaminants (like bits of rusting steel from paintbrushes, bits of charcoal from your soldering block) and your flux will get dirty. To save you from having to buy new flux – just because it’s dirty – use a small, low-walled container to put your flux in.
  • 64.
    The next importantinformation on heat is that, in order for the solder to flow, you must heat the metal on both sides of the join, up to solder flow temperature. If you heat one side more than the other, the solder will flow to the “hot side”. STEP 3: HEAT
  • 65.
    Flux aids insoldering and desoldering processes by removing oxide films which form on the surface of metals being soldered. STEP 4: FLUX
  • 66.
    Don’t heat thesolder. The solder is one of the smallest pieces of metal on your piece. It will melt first but, won’t do much except (if you heat it enough) absorb into the metal, maybe start eating away at the metal, resulting in pits or melting into a puddle.
  • 68.
    1. Explain in3-5 sentences the proper way of good soldering job.
  • 69.
    Assignment: Bring the followingtools and materials needed in tomorrow’s activity.  Solid wires  Cutter  Flies  Art materials (Construction paper, Illustration board ect,)
  • 70.
    Performance Task #2 Direction:Create the different Types of Wire Joints & Splices.  WESTERN UNION SHORT TIE  RAT TAIL JOINT  KNOTTED TAP JOINT  FIXTURE JOINT