1. Screen B
Mileage and Expense Report
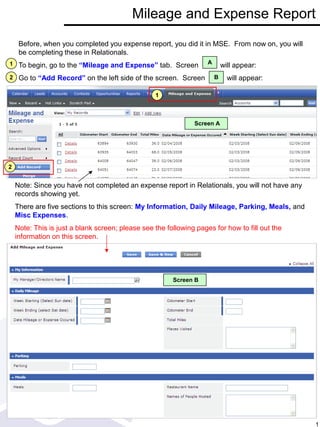
Before, when you completed you expense report, you did it in MSE. From now on, you will
be completing these in Relationals.
To begin, go to the “Mileage and Expense” tab. Screen will appear:
Go to “Add Record” on the left side of the screen. Screen will appear:
1
2
1
2
Note: Since you have not completed an expense report in Relationals, you will not have any
records showing yet.
There are five sections to this screen: My Information, Daily Mileage, Parking, Meals, and
Misc Expenses.
Note: This is just a blank screen; please see the following pages for how to fill out the
information on this screen.
A
Screen A
B
1
2. My Information and Daily Mileage
“My Information”-
Use the magnifying glass icon to the right of the field to look up your supervisor’s
name. A pop-up box will appear.
Use the alphabet bar at the top to find your supervisor’s name. Note: Relationals sorts
people alphabetically according to first name. i.e. To find Bryan Peskin, click on the “B” on
the alphabet bar. It takes you to a list of all users whose first name starts with “B.”
Click on your supervisor’s name.
1
2
3
1
2
3
“Daily Mileage”-
Use the calendar icon to the right of the field to look up:
Week Starting (Select Sun date)- in this case, it is Sun. the 3rd
Week Ending (Select Sat date)- in this case, it is Sat. the 9th
Date Mileage or Expense Occurred- the mileage occurred on Mon. the 4th
4
5
6
4
5
6
Odometer Start- Type in your starting mileage
Odometer End- Type in your ending mileage
Places Visited- Type in the clients that you visited
If no other expenses were incurred, click “Save” and repeat these steps for each day that
you incurred mileage expenses. Other wise, continue with the steps on the next page.
7
8
9
7
8
9
10
10
2
3. Parking, Meals and Misc Expenses
If you did incur other expenses, follow the steps below on the day the expenses occurred.
“Parking”- Enter the amount you paid and remember to attach a receipt to your expense
report. Note: Please check with your manager to find out if certain parking is approved.
“Meals”-
Meals- Enter the amount you paid and remember to attach a receipt to your expense report.
Restaurant Name- Enter the name of the Restaurant
Names of People Hosted- Include name and title and company
1
1
1
1
2
3
2
3
“Misc Expenses”-
Misc Expenses- Enter the amount you paid and remember to attach a receipt to your
expense report.
Misc Expense Purchased at- Enter the name of the store
Misc Expense Description- Enter the name of the item and why you needed it.
1
1
2
3
2
3
After you have entered all of your expenses for the day, click “Save.”
The screen on the following page appears:
3
4. Adding another record
Now you must make a new entry for each day of the week that you incurred expenses by
following the steps on the next pages.
There are three ways you can create the next day’s expense entry:
“Mileage and Expense” tab- Click on the tab at the top of your screen. If you choose this
option, go back to page one of this guide and follow the steps again.
“New” tab- Click on the drop-down list on the left hand side of your screen and select
“Mileage and Expense.” If you choose this option, it will open up a new record for you and
you can go back to page 2 of this guide and follow the steps starting from there. This is a
short cut and cuts out a couple of steps.
Note: If you had expenses other than mileage on any given day, I would use option #1or
option #2 above. However, if you only incurred Mileage, there is an even faster short cut to
use.
“Clone” button- If you click here, it will create a brand new entry exactly like the one you just
created. This is a time saving short cut. See below for how this will appear:
Note, it is the same as the screen above; however the fields are “open” so you can edit them.
1
1
2
3
2a
3
2b
Leave the fields in the red box alone; these will
stay consistent from one record to the next.
4
5. Adding another record
Any field not contained in the red box shown on the previous page needs to be updated
with the next day’s information. Start with step #6 on page 2 of this handout and fill in the
appropriate:
Date Mileage or Expense Occurred:
Odometer Start
Odometer End
Places Visited
Click “Save”
6
7
8
9
Use one of the three choices on the previous page for adding a new record for each day of
the week that you need reimbursement for.
When you are finished adding all of your expenses for the week, follow the steps below to
print you expense report
Printing your Expense Report
“Reports”- Click on the tab at the top of your screen, it will take you to the screen below:
There are two to choose from. If you do your expenses at the beginning of the week
following the week the expenses occurred, i.e. you’re too tired to do it on Friday at the end of
the day and you just want to go home, use the first report:
My Mileage and Expense Report – Last Week (use when printing on Monday)
If you do your expenses on Friday at the end of the day in the week they occurred and you
print your report on Friday before going home for the weekend, use the second report:
My Mileage and Expense Report – This Week (use when printing on Friday)
1
Note: If you cloned a record where you
entered information in any of the following
fields: “Parking,” “Meals,” or “Misc.
Expenses”, you will need to delete that
information or update it at this time!
2
1
2
5
6. Printing your Expense Report cont’d
When you click on either of the two reports, it will take you to a screen that looks similar to
this (it will have your information on it):
Note: This report was pulled using
option #1 because these
expenses occurred last week.
“HTML Print”- Click here to create a PDF of the report you want to print. The following
screen appears:
1
1
“Print”- Kind of redundant, I know…
A PDF of the Expense Report will open (see next page)
2
2
6
Nowis
HTMLPrint
7. Printing you Expense Report cont’d
There are two ways to print it:
Go to “File”, then select “Print”
Click on the “Printer” icon and then hit “Enter” on your keyboard or click on “OK”
1a
1
1b
2
2a
2b
Sign the bottom of the report!
Have your manager sign the bottom of the report!
Turn it in to Pat Palko by 10:00 Monday morning!!!
7